Introduction, Philosophy, and Tips
Welcome!
Before we dive into the material, there are some important housekeeping items to mention first.
- Unlike our other courses, the current version of this course is pretty hands off. That’ll change in future versions. For now, enjoy the video, text, and quiz - then you’ll be able to start applying the topic in the code you work on.
- Unlike our other courses, the current version of this course doesn’t have any curriculum. That will also change in future versions.
- You can take this course regardless of if you’re on Mac, Linux, or Windows. If you’re wondering, I’m running Node v13.12.0 and NPM v6.14.4.
- If you haven’t already, request to join our official private Facebook Group for subscribers. It’s where other members of the team and I will be hanging out answering support questions. Again, if your code isn’t working after following a video, very carefully compare it to the specific commit for that video before asking a question in the facebook group.
Good luck!
Guide to Execution Contexts, Hoisting, Scopes, and Closures
It may seem surprising, but in my opinion the most important and fundamental concept to understanding the JavaScript language is understanding Execution Context. By properly learning it, you’ll be positioned nicely to learn more advanced topics like hoisting, scope chains, and closures. With that in mind, what exactly is an “Execution Context”? To better understand it, let’s first take a look at how we write software.
One strategy for writing software is to break our code up into separate pieces. Though these “pieces” have many different names (functions, modules, packages, etc), they all exist for a single purpose - to break apart and manage the complexity in our applications. Now instead of thinking like someone authoring code, think in terms of the JavaScript engine whose job is to interpret code. Can we use that same strategy, separating code into pieces, to manage the complexity of interpreting code just like we did in order to write it? Turns out we can and these “pieces” are called Execution Contexts. Just like functions/modules/packages allow you to manage the complexity of writing code, Execution Contexts allow the JavaScript engine to manage the complexity of interpreting and running your code. So now that we know the purpose of Execution Contexts, the next questions we need to answer are how do they get created and what do they consist of?
The first Execution Context that gets created when the JavaScript engine runs your code is called the “Global Execution Context”. Initially this Execution Context will consist of two things - a global object and a variable called this . this will reference the global object which will be window if you’re running JavaScript in the browser or global if you’re running it in a Node environment.
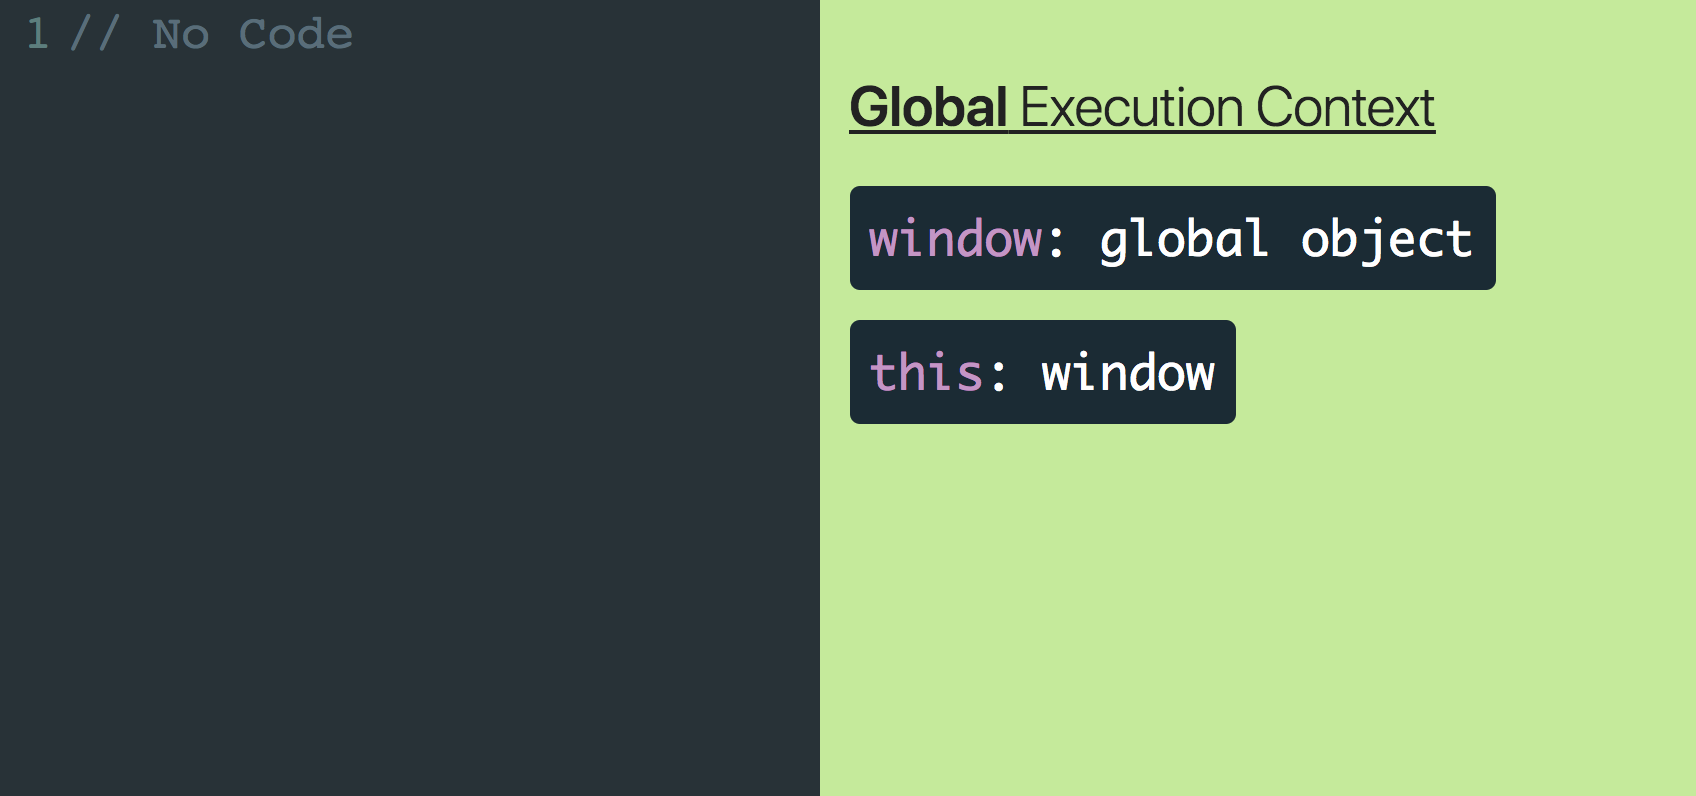
Above we can see that even without any code, the Global Execution Context will still consist of two things - window and this . This is the Global Execution Context in its most basic form.
Let’s step things up and see what happens when we start actually adding code to our program. Let’s start with adding a few variables.

Can you spot the differences between those two image above? The key take away is that each Execution Context has two separate phases, a Creation phase and an Execution phase and each phase has its own unique responsibilities.
In the Global Creation phase, the JavaScript engine will
- Create a global object.
- Create an object called “this”.
- Set up memory space for variables and functions.
- Assign variable declarations a default value of “undefined” while placing any function declarations in memory.
It’s not until the Execution phase where the JavaScript engine starts running your code line by line and executing it.
We can see this flow from Creation phase to Execution phase in the GIF below.
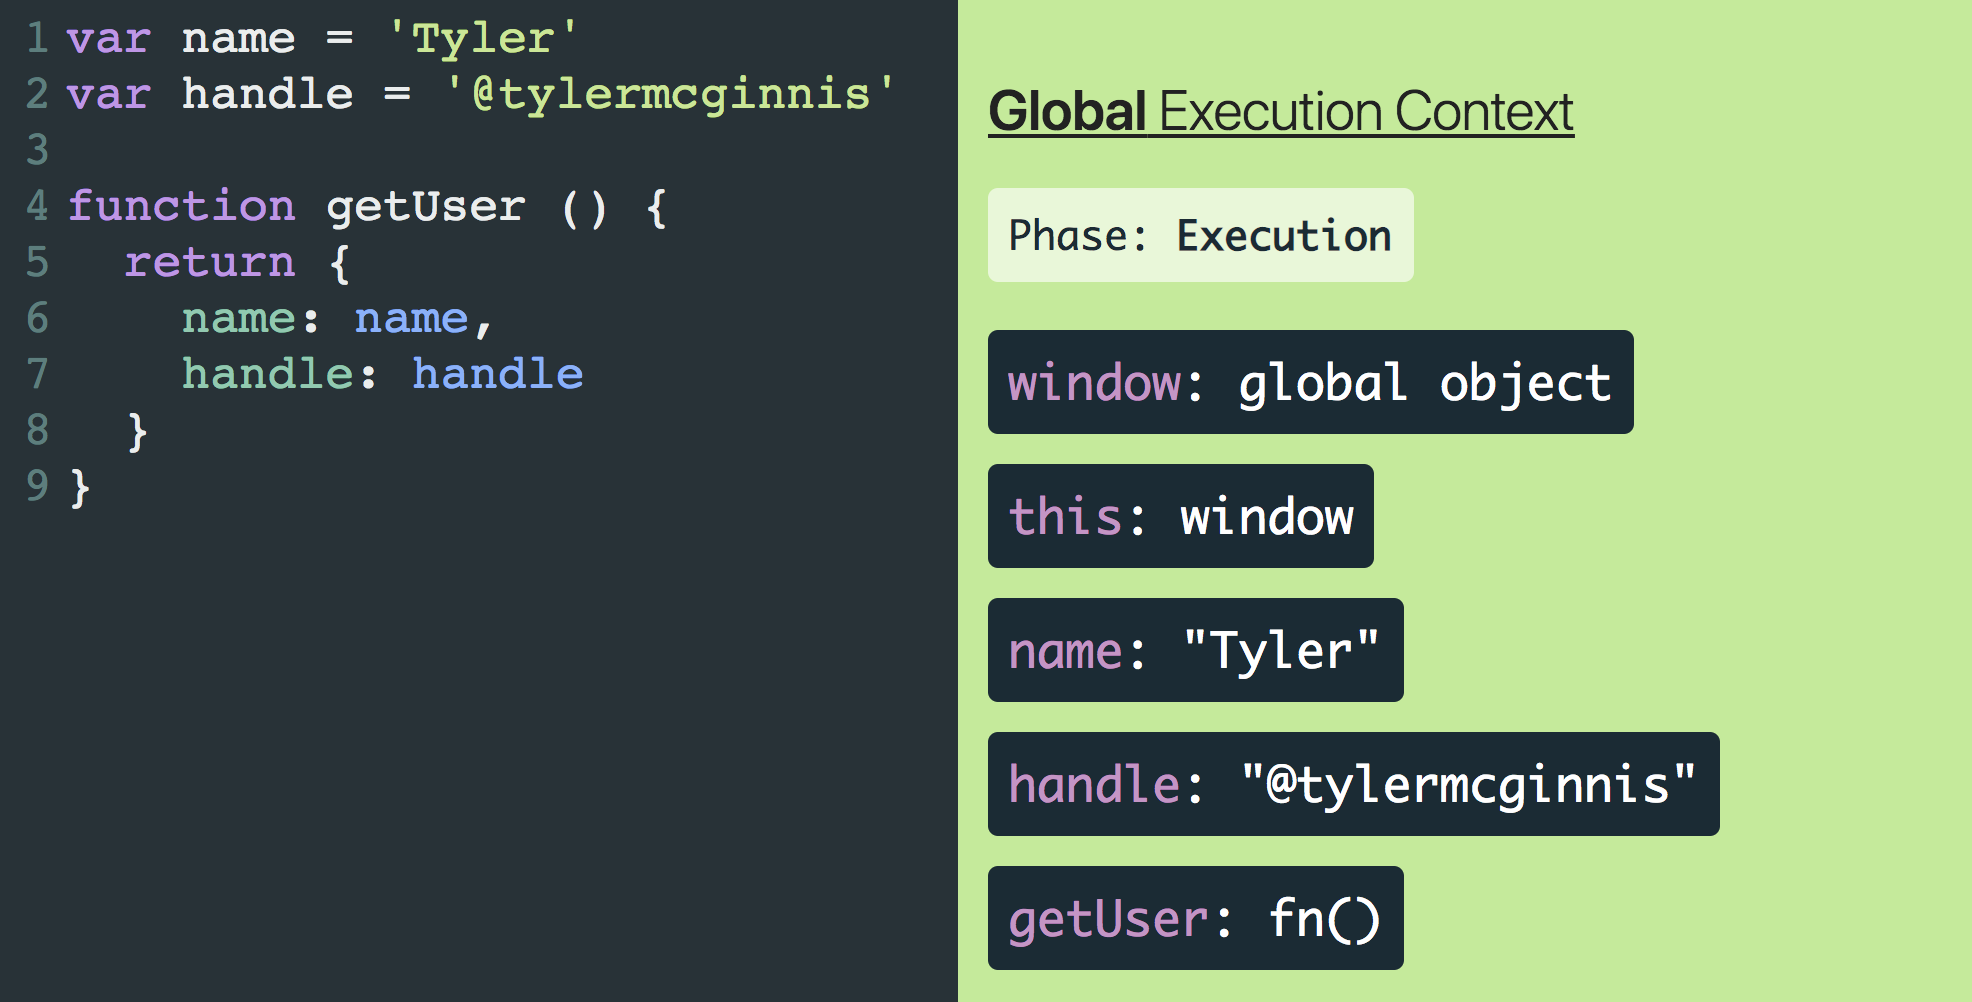
During the Creation phase, window and this are created, variable declarations ( name and handle ) are assigned a default value of undefined , and any function declarations ( getUser ) are placed entirely into memory. Then once we enter the Execution phase, the JavaScript engine starts executing the code line by line and assigns the real values to the variables already living in memory.
GIFs are cool, but not as cool as stepping through the code and seeing the process for yourself. Because you deserve it, I created JavaScript Visualizer just for you. If you want to walk through the exact code above, use THIS LINK.
To really cement this idea of Creation phase vs Execution phase, let’s log some values after the Creation phase and before the Execution phase.
console.log('name: ', name)
console.log('handle: ', handle)
console.log('getUser :', getUser)

var name = 'Tyler'
var handle = '@tylermcginnis'

function getUser () {
  return {
    name: name,
    handle: handle
  }
}
In the code above, what do you expect to be logged to the console? By the time the JavaScript engine starts executing our code line by line and invoking our console.logs, the Creation phase has already happened. What that means is that, as we saw earlier, the variable declarations should have been assigned a value of undefined while the function declaration should be fully in memory already. So just as we should expect, name and handle are undefined and getUser is a reference to the function in memory.
console.log('name: ', name) // name: undefined
console.log('handle: ', handle) // handle: undefined
console.log('getUser :', getUser) // getUser: ƒ getUser () {}

var name = 'Tyler'
var handle = '@tylermcginnis'

function getUser () {
  return {
    name: name,
    handle: handle
  }
}
This process of assigning variable declarations a default value of
undefinedduring the creation phase is called Hoisting .
Hopefully you just had an 'Aha!" moment. You may have had “hoisting” explained to you previously without much success. The thing that’s confusing about “hoisting” is that nothing is actually “hoisted” or moved around. Now that you understand Execution Contexts and that variable declarations are assigned a default value of undefined during the Creation phase, you understanding “hoisting” because that’s literally all it is.
At this point you should be fairly comfortable with the Global Execution Context and its two phases, Creation and Execution . The good news is there’s only one other Execution Context you need to learn and its almost exactly identical to the Global Execution Context. It’s called the Function Execution Context and it’s created whenever a function is invoked .
This is key. The only time an Execution Context is created is when the JavaScript engine first starts interpreting your code (Global Execution Context) and whenever a function is invoked.
Now the main question we need to answer is what’s the difference between the Global Execution Context and a Function Execution Context. If you remember from earlier, we said that in the Global Creation phase, the JavaScript engine will
- Create a global object.
- Create an object called “this”.
- Set up memory space for variables and functions.
- Assign variable declarations a default value of “undefined” while placing any function declarations in memory.
Which of those steps doesn’t make sense when we’re talking about a Function Execution Context? It’s step #1. We should only ever have one global object that’s created during the Creation phase of the Global Execution Context, not every time a function is invoked and the JavaScript engine creates a Function Execution Context. Instead of creating a global object, one thing a Function Execution Context needs to worry about that the Global Execution Context doesn’t are arguments. With that in mind, we can adapt our list from earlier. Whenever a Function Execution Context is created, the JavaScript engine will
1. ~~Create a global object.~~
- Create an arguments object.
- Create an object called this.
- Set up memory space for variables and functions.
- Assign variable declarations a default value of “undefined” while placing any function declarations in memory.
To see this in action, let’s go back to the code we had earlier, but this time instead of just defining getUser , let’s see what happens when we invoke it.
Just as we talked about, when we invoke getUser a new Execution Context is created. During the Creation phase of getUsers Execution Context, the JavaScript engine creates a this object as well as an arguments object. Because getUser doesn’t have any variables, the JavaScript engine doesn’t need to set up any memory space or “hoist” any variable declarations.
You may have also noticed that when the getUser function is finished executing, it’s removed from the visualization. In reality, the JavaScript engine creates what’s called an “Execution Stack” (also known as the “Call Stack”). Anytime a function is invoked, a new Execution Context is created and added to the Execution Stack. Whenever a function is finished running through both the Creation and Execution phase, it gets popped off the Execution Stack. Because JavaScript is single threaded (meaning only one task can be executed at a time), this is easy to visualize. With “JavaScript Visualizer” the Execution Stack is shown in a nested fashion with each nested item being a new Execution Context on the Execution Stack.
At this point we’ve seen how function invocations create their own Execution Context which get placed on the Execution Stack. What we haven’t seen yet is how local variables play into that. Let’s change up our code so our functions have local variables.
There are few important details to notice here. First is that any argument you pass in will be added as a local variable in that function’s Execution Context. In the example handle exists both as a variable in the Global Execution Context (since that’s where it was defined) as well as the getURL Execution Context because we passed it in as an argument. Next is that variables declared inside of a function live inside that function’s Execution Context. So when we created twitterURL , it lived inside of the getURL Execution Context since that’s where it was defined, not the Global Execution Context. That may seem obvious, but it’s fundamental to our next topic, Scopes.
In the past you probably heard a definition of “Scope” along the lines of “where variables are accessible”. Regardless of whether or not that made sense at the time, with your newfound knowledge of Execution Contexts and the JavaScript Visualizer tool, Scopes will be more clear than they’ve ever been. In fact, MDN defines “Scope” as “The current context of execution.” Sound familiar? We can think of “Scope” or “where variables are accessible” in a very similar way to how we’ve been thinking about execution contexts.
Here’s a test for you. What will bar be when it’s logged in the code below?
function foo () {
  var bar = 'Declared in foo'
}

foo()

console.log(bar)
Let’s check it out in JavaScript Visualizer.
When foo is invoked we create a new Execution Context on the Execution Stack. The Creation phase creates this , arguments , and sets bar to undefined . Then the Execution phase happens and assigns the string Declared in foo to bar . After that the Execution phase ends and the foo Execution Context is popped off the stack. Once foo is removed from the Execution Stack, we try to log bar to the console. At that moment, according to JavaScript Visualizer, it’s as if bar never even existed so we get ReferenceError: bar is not defined . What this shows us is that variables created inside of a function are locally scoped. That means (for the most part, we’ll see an exception later) they can’t be accessed once the function’s Execution Context has been popped off the Execution Stack.
Here’s another. What will be logged to the console after the code is finished executing?
function first () {
  var name = 'Jordyn'

  console.log(name)
}

function second () {
  var name = 'Jake'

  console.log(name)
}

console.log(name)
var name = 'Tyler'
first()
second()
console.log(name)
Again, let’s take a look at JavaScript Visualizer.
We get undefined , Jordyn , Jake , then Tyler . What this shows us is that you can think of each new Execution Context as having its own unique variable environment. Even though there are other Execution Contexts that contain the variable name , the JavaScript engine will first look to the current Execution Context for that variable.
This brings up the question, what if the variable doesn’t exist in the current Execution Context? Will the JavaScript engine just stop trying to look for that variable? Let’s see an example that will answer this question. In the code below, what’s going to be logged?
var name = 'Tyler'

function logName () {
  console.log(name)
}

logName()
Your intuition might be that it’s going to log undefined since the logName Execution Context doesn’t have a name variable in its scope. That’s fair but it’s wrong. What happens is if the JavaScript engine can’t find a variable local to the function’s Execution Context, it’ll look to to nearest parent Execution Context for that variable. This lookup chain will continue all the way until the engine reaches the Global Execution Context. In that case, if the Global Execution Context doesn’t have the variable, it’ll throw a Reference Error.
This process of the JavaScript engine going one by one and checking each individual parent Execution Context if a variable doesn’t exist in the local Execution Context is called the
Scope Chain. JavaScript Visualizer shows the Scope Chain by having each new Execution Context indented and with a unique colored background. Visually you can see that any child Execution Context can reference any variables located in any of its parent Execution Contexts, but not vice versa.
Earlier we learned that variables created inside of a function are locally scoped and they can’t be ( for the most part ) accessed once the function’s Execution Context has been popped off the Execution Stack. It’s time to dive into that “ for the most part ”. The one scenario where this isn’t true is if you have a function nested inside of another function. In this case, the child function will still have access to the outer function’s scope, even after the parent function’s Execution Context has been removed from the Execution Stack. That was a lot of words. As always, JavaScript Visualizer can help us out here.
Notice that after the makeAdder Execution Context has been popped off the Execution Stack, JavaScript Visualizer creates what’s called a Closure Scope . Inside of that Closure Scope is the same variable environment that existed in the makeAdder Execution Context. The reason this happened is because that we have a function nested inside of another function. In our example, the inner function is nested inside of the makeAdder function, so inner creates a Closure over the makeAdder variable environment. Even after the makeAdder Execution Environment has been popped off the Execution Stack, because that Closure Scope was created, inner has access to the x variable (via the Scope Chain).
As you probably guessed, this concept of a child function “closing” over the variable environment of its parent function is called Closures .
Bonus Section
Here are a few more related topics that I know if I don’t mention someone will call me out on it  .
.
Global Variables
In the browser, anytime you create a variable in the Global Execution Context (outside of any function), that variable will be added as a property on the window object.
In both the browser and in Node, if you create a variable without a declaration (ie without var , let , or const ), that variable will also be added as a property on the global object.
// In the browser
var name = 'Tyler'

function foo () {
  bar = 'Created in foo without declaration'
}

foo()

console.log(window.name) // Tyler
console.log(window.bar) // Created in foo without declaration
let and const
let and const behave a little different than var. Check out “var vs let vs const in JavaScript” for more info.
the this keyword
In this article we learned that in the Creation phase of every Execution Context the JavaScript engine creates an object called this . If you want to learn more about why that’s important and how to determine what the this keyword is, I’d suggest reading WTF is this - Understanding the this keyword, call, apply, and bind in JavaScript
Understanding the this keyword, call, apply, and bind
Before diving into the specifics of the this keyword in JavaScript, it’s important to take a step back and first look at why the this keyword exists in the first place. The this keyword allows you to reuse functions with different contexts. Said differently, the “this” keyword allows you to decide which object should be focal when invoking a function or a method. Everything we talk about after this will build upon that idea. We want to be able to reuse functions or methods in different contexts or with different objects.
The first thing we’ll look at is how to tell what the this keyword is referencing. The first and most important question you need to ask yourself when you’re trying to answer this question is “ Where is this function being invoked? ”. The only way you can tell what the this keyword is referencing is by looking at where the function using the this keyword was invoked.
To demonstrate this with an example you’re already familiar with, say we had a greet function that took in a name an alerted a welcome message.
function greet (name) {
  alert(`Hello, my name is ${name}`)
}
If I were to ask you exactly what greet was going to alert, what would your answer be? Given only the function definition, it’s impossible to know. In order to know what name is, you’d have to look at the function invocation of greet .
greet('Tyler')
It’s the exact same idea with figuring out what the this keyword is referencing. You can even think about the this keyword as you would a normal argument to a function - it’s going to change based on how the function is invoked.
Now that you know the first step to figuring out what the this keyword is referencing is to look at where the function is being invoked, what’s next? To help us with the next step, we’re going to establish 5 rules or guidelines.
- Implicit Binding
- Explicit Binding
- new Binding
- Lexical Binding
- window Binding
Implicit Binding
Remember, the goal here is to be able to look at a function definition using the this keyword and tell what this is referencing. The first and most common rule for doing that is called the Implicit Binding . I’d say it’ll tell you what the this keyword is referencing about 80% of the time.
Let’s say we had an object that looked like this
const user = {
  name: 'Tyler',
  age: 27,
  greet() {
    alert(`Hello, my name is ${this.name}`)
  }
}
Now, if you were to invoke the greet method on the user object, you’d do so be using dot notation.
user.greet()
This brings us to the main key point of the implicit binding rule. In order to figure out what the this keyword is referencing, first, look to the left of the dot when the function is invoked . If there is a “dot”, look to the left of that dot to find the object that the this keyword is referencing.
In the example above, user is to “the left of the dot” which means the this keyword is referencing the user object. So, it’s as if , inside the greet method, the JavaScript interpreter changes this to user .
greet() {
  // alert(`Hello, my name is ${this.name}`)
  alert(`Hello, my name is ${user.name}`) // Tyler
}
Let’s take a look at a similar, but a slightly more advanced example. Now, instead of just having a name , age , and greet property, let’s also give our user object a mother property which also has a name and greet property.
const user = {
  name: 'Tyler',
  age: 27,
  greet() {
    alert(`Hello, my name is ${this.name}`)
  },
  mother: {
    name: 'Stacey',
    greet() {
      alert(`Hello, my name is ${this.name}`)
    }
  }
}
Now the question becomes, what is each invocation below going to alert?
user.greet()
user.mother.greet()
Whenever we’re trying to figure out what the this keyword is referencing we need to look to the invocation and see what’s to the “left of the dot”. In the first invocation, user is to the left of the dot which means this is going to reference user . In the second invocation, mother is to the left of the dot which means this is going to reference mother .
user.greet() // Tyler
user.mother.greet() // Stacey
As mentioned earlier, about 80% of the time there will be an object to the “left of the dot”. That’s why the first step you should take when figuring out what the this keyword is referencing is to “look to the left of the dot”. But, what if there is no dot? This brings us to our next rule -
Explicit Binding
Now, what if instead of our greet function being a method on the user object, it was just its own standalone function.
function greet () {
  alert(`Hello, my name is ${this.name}`)
}

const user = {
  name: 'Tyler',
  age: 27,
}
We know that in order to tell what the this keyword is referencing we first have to look at where the function is being invoked. Now, this brings up the question, how can we invoke greet but have it be invoked with the this keyword referencing the user object. We can’t just do user.greet() like we did before because user doesn’t have a greet method. In JavaScript, every function contains a method which allows you to do exactly this and that method is named call .
“call” is a method on every function that allows you to invoke the function specifying in what context the function will be invoked.
With that in mind, we can invoke greet in the context of user with the following code -
greet.call(user)
Again, call is a property on every function and the first argument you pass to it will be the context (or the focal object) in which the function is invoked. In other words, the first argument you pass to call will be what the this keyword inside that function is referencing.
This is the foundation of rule #2 (Explicit Binding) because we’re explicitly (using .call ), specifying what the this keyword is referencing.
Now let’s modify our greet function just a little bit. What if we also wanted to pass in some arguments? Say along with their name, we also wanted to alert what languages they know. Something like this
function greet (l1, l2, l3) {
  alert(
    `Hello, my name is ${this.name} and I know ${l1}, ${l2}, and ${l3}`
  )
}
Now to pass arguments to a function being invoked with .call , you pass them in one by one after you specify the first argument which is the context.
function greet (l1, l2, l3) {
  alert(
    `Hello, my name is ${this.name} and I know ${l1}, ${l2}, and ${l3}`
  )
}

const user = {
  name: 'Tyler',
  age: 27,
}

const languages = ['JavaScript', 'Ruby', 'Python']

greet.call(user, languages[0], languages[1], languages[2])
This works and it shows how you can pass arguments to a function being invoked with .call . However, as you may have noticed, it’s a tad annoying to have to pass in the arguments one by one from our languages array. It would be nice if we could just pass in the whole array as the second argument and JavaScript would spread those out for us. Well good news for us, this is exactly what .apply does. .apply is the exact same thing as .call , but instead of passing in arguments one by one, you can pass in a single array and it will spread each element in the array out for you as arguments to the function.
So now using .apply , our code can change into this (below) with everything else staying the same.
const languages = ['JavaScript', 'Ruby', 'Python']

// greet.call(user, languages[0], languages[1], languages[2])
greet.apply(user, languages)
So far under our “Explicit Binding” rule we’ve learned about .call as well as .apply which both allow you to invoke a function, specifying what the this keyword is going to be referencing inside of that function. The last part of this rule is .bind . .bind is the exact same as .call but instead of immediately invoking the function, it’ll return a new function that you can invoke at a later time. So if we look at our code from earlier, using .bind , it’ll look like this
function greet (l1, l2, l3) {
  alert(
    `Hello, my name is ${this.name} and I know ${l1}, ${l2}, and ${l3}`
  )
}

const user = {
  name: 'Tyler',
  age: 27,
}

const languages = ['JavaScript', 'Ruby', 'Python']

const newFn = greet.bind(user, languages[0], languages[1], languages[2])
newFn() // alerts "Hello, my name is Tyler and I know JavaScript, Ruby, and Python"
new Binding
The third rule for figuring out what the this keyword is referencing is called the new binding. If you’re unfamiliar with the new keyword in JavaScript, whenever you invoke a function with the new keyword, under the hood, the JavaScript interpreter will create a brand new object for you and call it this . So, naturally, if a function was called with new , the this keyword is referencing that new object that the interpreter created.
function User (name, age) {
  /*
    Under the hood, JavaScript creates a new object
    called `this` which delegates to the User's prototype
    on failed lookups. If a function is called with the
    new keyword, then it's this new object that interpreter
    created that the this keyword is referencing.
  */

  this.name = name
  this.age = age
}

const me = new User('Tyler', 27)
Lexical Binding
At this point, we’re on our 4th rule and you may be feeling a bit overwhelmed. That’s fair. The this keyword in JavaScript is arguably more complex than it should be. Here’s the good news, this next rule is the most intuitive.
Odds are you’ve heard of and used an arrow function before. They’re new as of ES6. They allow you to write functions in a more concise format.
friends.map((friend) => friend.name)
Even more than conciseness, arrow functions have a much more intuitive approach when it comes to this keyword. Unlike normal functions, arrow functions don’t have their own this . Instead, this is determined lexically . That’s a fancy way of saying this is determined how you’d expect, following the normal variable lookup rules. Let’s continue with the example we used earlier. Now, instead of having languages and greet as separate from the object, let’s combine them.
const user = {
  name: 'Tyler',
  age: 27,
  languages: ['JavaScript', 'Ruby', 'Python'],
  greet() {}
}
Earlier we assumed that the languages array would always have a length of 3. By doing so we were able to use hardcoded variables like l1 , l2 , and l3 . Let’s make greet a little more intelligent now and assume that languages can be of any length. To do this, we’ll use .reduce in order to create our string.
const user = {
  name: 'Tyler',
  age: 27,
  languages: ['JavaScript', 'Ruby', 'Python'],
  greet() {
    const hello = `Hello, my name is ${this.name} and I know`

    const langs = this.languages.reduce(function (str, lang, i) {
      if (i === this.languages.length - 1) {
        return `${str} and ${lang}.`
      }

      return `${str} ${lang},`
    }, "")

    alert(hello + langs)
  }
}
That’s a lot more code but the end result should be the same. When we invoke user.greet() , we expect to see Hello, my name is Tyler and I know JavaScript, Ruby, and Python. . Sadly, there’s an error. Can you spot it? Grab the code above and run it in your console. You’ll notice it’s throwing the error Uncaught TypeError: Cannot read property 'length' of undefined . Gross. The only place we’re using .length is on line 9, so we know our error is there.
if (i === this.languages.length - 1) {}
According to our error, this.languages is undefined. Let’s walk through our steps to figure out what that this keyword is referencing cause clearly, it’s not referencing user as it should be. First, we need to look at where the function is being invoked. Wait? Where is the function being invoked? The function is being passed to .reduce so we have no idea. We never actually see the invocation of our anonymous function since JavaScript does that itself in the implementation of .reduce . That’s the problem. We need to specify that we want the anonymous function we pass to .reduce to be invoked in the context of user . That way this.languages will reference user.languages . As we learned above, we can use .bind .
const user = {
  name: 'Tyler',
  age: 27,
  languages: ['JavaScript', 'Ruby', 'Python'],
  greet() {
    const hello = `Hello, my name is ${this.name} and I know`

    const langs = this.languages.reduce(function (str, lang, i) {
      if (i === this.languages.length - 1) {
        return `${str} and ${lang}.`
      }

      return `${str} ${lang},`
    }.bind(this), "")

    alert(hello + langs)
  }
}
So we’ve seen how .bind solves the issue, but what does this have to do with arrow functions. Earlier I said that with arrow functions " this is determined lexically . That’s a fancy way of saying this is determined how you’d expect, following the normal variable lookup rules."
In the code above, following just your natural intuition, what would the this keyword reference inside of the anonymous function? For me, it should reference user . There’s no reason to create a new context just because I had to pass a new function to .reduce . And with that intuition comes the often overlooked value of arrow functions. If we re-write the code above and do nothing but use an anonymous arrow function instead of an anonymous function declaration, everything “just works”.
const user = {
  name: 'Tyler',
  age: 27,
  languages: ['JavaScript', 'Ruby', 'Python'],
  greet() {
    const hello = `Hello, my name is ${this.name} and I know`

    const langs = this.languages.reduce((str, lang, i) => {
      if (i === this.languages.length - 1) {
        return `${str} and ${lang}.`
      }

      return `${str} ${lang},`
    }, "")

    alert(hello + langs)
  }
}
Again the reason for this because with arrow functions, this is determined “lexically”. Arrow functions don’t have their own this . Instead, just like with variable lookups, the JavaScript interpreter will look to the enclosing (parent) scope to determine what this is referencing.
window Binding
Finally is the “catch-all” case - the window binding. Let’s say we had the following code
function sayAge () {
  console.log(`My age is ${this.age}`)
}

const user = {
  name: 'Tyler',
  age: 27
}
As we covered earlier, if you wanted to invoke sayAge in the context of user , you could use .call , .apply , or .bind . What would happen if we didn’t use any of those and instead just invoked sayAge as you normally would
sayAge() // My age is undefined
What you’d get is, unsurprisingly, My age is undefined because this.age would be undefined. Here’s where things get a little weird. What’s really happening here is because there’s nothing to the left of the dot, we’re not using .call , .apply , .bind , or the new keyword, JavaScript is defaulting this to reference the window object. What that means is if we add an age property to the window object, then when we invoke our sayAge function again, this.age will no longer be undefined but instead, it’ll be whatever the age property is on the window object. Don’t believe me? Run this code,
window.age = 27

function sayAge () {
  console.log(`My age is ${this.age}`)
}
Pretty gnarly, right? That’s why the 5th rule is the window Binding . If none of the other rules are met, then JavaScript will default the this keyword to reference the window object.
As of ES5, if you have “strict mode” enabled, JavaScript will do the right thing and instead of defaulting to the window object will just keep “this” as undefined.
'use strict'

window.age = 27

function sayAge () {
  console.log(`My age is ${this.age}`)
}

sayAge() // TypeError: Cannot read property 'age' of undefined
So putting all of our rules into practice, whenever I see the this keyword inside of a function, these are the steps I take in order to figure out what it’s referencing.
- Look to where the function was invoked.
- Is there an object to the left of the dot? If so, that’s what the “this” keyword is referencing. If not, continue to #3.
- Was the function invoked with “call”, “apply”, or “bind”? If so, it’ll explicitly state what the “this” keyword is referencing. If not, continue to #4.
- Was the function invoked using the “new” keyword? If so, the “this” keyword is referencing the newly created object that was made by the JavaScript interpreter. If not, continue to #5.
- Is “this” inside of an arrow function? If so, its reference may be found lexically in the enclosing (parent) scope. If not, continue to #6.
- Are you in “strict mode”? If yes, the “this” keyword is undefined. If not, continue to #7.
- JavaScript is weird. “this” is referencing the “window” object.
The JavaScript Event Loop - A Simple Guide
I want to tell you a story about my friend Bruce. You see, Bruce was a simple man. Nice family, nice job, nice home in Springville, Utah. He enjoyed fly fishing, Solitaire, and watching Wheel of Fortune. One Saturday morning as Bruce was watching his son’s Soccer match, he got a phone call from a Woman named Christy. Christy claimed to be from Bassi Law, a law firm in San Francisco specializing in “Estate Planning and Probate law”. According to Christy, Bruce was a recipient of a large sum of inheritance money left to him by his late Grandpa Archie. Although Bruce and Archie didn’t talk much, they did take a yearly Fly Fishing trip down at Patagonia River Ranch in Argentina. A long story and lots of taxes later, Bruce was no longer a simple man. As the late poet Christopher Wallace said, “Mo Money Mo Problems”. Bruce quickly adjusted to the lavish life. Attending Silicon Valley “sex parties” and investing in Utah cryptocurrency companies with no product became his new norm. In order to keep up with his newly formed lifestyle, Bruce decided to hire a butler named Wadsworth to take care of his old “common folk” tasks.
This is where the story gets interesting. - Dwight Shrute
You see, this isn’t a story about Bruce’s moral decay. We’re not that type of website. However, this is a story about one butler, Wadsworth, and his learnings in systemizing all his tasks for increased productivity. When Wadsworth became Bruce’s butler, it’s as if he had to take over Bruce’s entire (before he became lavish) life. Laundry, cleaning, picking up the kids, all of it became Wadsworth’s responsibility. Initially, Wadsworth wasn’t worried - he’d just work harder.
On the first day, Wadsworth had the following todo list.
Get the Dry Cleaning done
Clean the Garage
Get the Car Detailed
Pick up the Kids
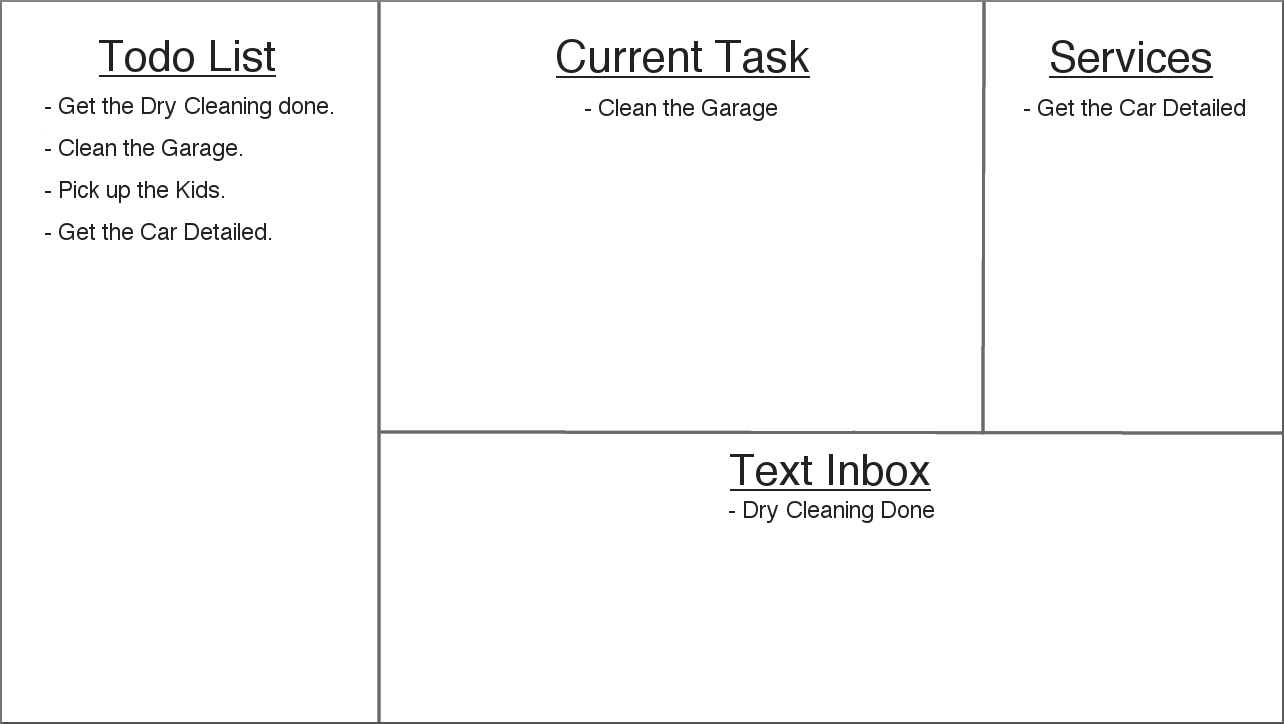
In order to keep the family informed on what he was working on at any given moment, Wadsworth also created a “Current Task” list.
Here’s how his Todo list and Current Task list changed throughout the first day.
10AM -
Current Task
Get the Dry Cleaning done
Todo List
Get the Dry Cleaning done
Clean the Garage
Get the Car Detailed
Pick up the Kids
Noon -
Current Task
Clean the Garage
Todo List
Get the Dry Cleaning done
Clean the Garage
Get the Car Detailed
Pick up the Kids
2PM -
Current Task
Get the Car Detailed
Todo List
Get the Dry Cleaning done
Clean the Garage
Get the Car Detailed
Pick up the Kids
5PM -
Current Task
Pick up the Kids
Todo List
Get the Dry Cleaning done
Clean the Garage
Get the Car Detailed
Pick up the Kids
5:30PM -
Current Task
NA
Todo List
Get the Dry Cleaning done
Clean the Garage
Get the Car Detailed
Pick up the Kids
Not a great look for our friend Wadsworth’s first day. He got all his tasks done, but the kids got out of school at 3PM and weren’t picked up until 5PM. Combine this with the fact that they all still miss their Dad; it made for a rough day.
Three weeks later and Wadsworth was given the original todo list again. He knew this time the smart thing to do was to prioritize picking up the kids, so that’s what he did.
10AM -
Current Task
Get the Dry Cleaning done
Todo List
Get the Dry Cleaning done
Clean the Garage
Get the Car Detailed
Pick up the Kids
1PM -
Current Task
Clean the Garage
Todo List
Get the Dry Cleaning done
Clean the Garage
Get the Car Detailed
Pick up the Kids
3PM -
Current Task
Pick up the Kids
Todo List
Get the Dry Cleaning done
Clean the Garage
Get the Car Detailed
Pick up the Kids
4PM -
Current Task
Get the Car Detailed
Todo List
Get the Dry Cleaning done
Clean the Garage
Get the Car Detailed
Pick up the Kids
7:00PM -
Current Task
NA
Todo List
Get the Dry Cleaning done
Clean the Garage
Get the Car Detailed
Pick up the Kids
Much better. Wadsworth got all his tasks done. Sadly, he didn’t get to go home until 7 PM this time. You don’t have to be a rocket surgeon to know there are some optimizations Wadsworth can make to his schedule to both get his tasks done and get home at a reasonable hour. Right now, he’s doing everything synchronously. Goes to the dry cleaner, waits until it’s done before he leaves. Goes to get the car detailed, waits until the car’s done before he leaves. He’s wasting a bunch of time sitting around when he could be working on other items on his to-do list.
Three weeks later Wadsworth is given the same todo list again. Instead of repeating the same thing this time, he’s come up with a plan. Instead of waiting around at the Dry Cleaners and Car Detailer, he tells them to text him when they’re done. There are two obvious benefits here. First is that while the dry cleaning is being done or the car is being detailed, he has the freedom to work on any of his other tasks (or relax if he wants). Second is that he’s free to decide when he should pick up the clothes and the car.
To keep things simple, he decides to check off the tasks that involve leveraging someone else (dry cleaning and car detailing) when he first drops off the clothes/car instead of when he picks them up. This allows him to better visualize what he still has remaining on his todo list.
10AM -
Current Task
Get the Dry Cleaning done
Todo List
Get the Dry Cleaning done
Clean the Garage
Get the Car Detailed
Pick up the Kids
10:15 -
Current Task
Get the Car Detailed
Todo List
Get the Dry Cleaning done
Clean the Garage
Get the Car Detailed
Pick up the Kids
10:30 -
Current Task
Clean the Garage
Todo List
Get the Dry Cleaning done
Clean the Garage
Get the Car Detailed
Pick up the Kids
12:30PM -
Received a text that the clothes are done.
Decides to wait until the car is finished too.
Current Task
NA
Todo List
Get the Dry Cleaning done
Clean the Garage
Get the Car Detailed
Pick up the Kids
1:15PM -
Received a text the car is finished.
UBERed to pick up the car.
Current Task
NA
Todo List
Get the Dry Cleaning done
Clean the Garage
Get the Car Detailed
Pick up the Kids
3PM -
Current Task
Pick up the Kids
Todo List
Get the Dry Cleaning done
Clean the Garage
Get the Car Detailed
Pick up the Kids
3:30PM -
Current Task
NA
Todo List
Get the Dry Cleaning done
Clean the Garage
Get the Car Detailed
Pick up the Kids
With his new strategy, Wadsworth is able to prioritize picking up the kids on time, finishes all his tasks earlier, and has more time throughout the day to relax at the house while he waits to pick up the kids. You can visualize his new process like this.
Cool story, Tyler… but I’m here to learn about the JavaScript event loop. - you, probably.
Turns out, our story of a morally corrupt father and an overwhelmed butler isn’t too far from the architecture of the actual JavaScript event loop. Let me explain.
Let’s start with the original todo list. You can think of this as a list of functions that eventually need to get executed (or invoked). If the original todo list is the list of functions, then the “Current Task” list is what’s called the “call stack”. JavaScript is single threaded. What that means is that only one task can be executed at a time. You call a function, a new “frame” is added to the call stack and doesn’t get popped off until that function is finished executing.
If that function calls another function, another frame is added to the call stack.
Let’s say we had some code that looked like this
function first () {
    return second()
}

function second () {
    return third()
}

function third () {
    return fourth()
}

function fourth () {
    return fifth()
}

function fifth () {
    return "🥞"
}

first()
If we were to slow down the call stack for the code above in order to visualize the process, it would look like this.

Going back to our story, if each item on the original list is a function, and the “Current Task” list is the call stack, that makes Wadsworth the JavaScript Engine. Wadsworth is the one responsible for executing each of the items and placing them on the “Current task” list (i.e. the call stack). Like the JavaScript Engine, Wadsworth can only work on one task at a time, synchronously. If we were to visualize his initial process as a call stack, it would look something like this where each task is completed one after the other.
As Wadsworth discovered, working on tasks synchronously, one after the other, wasn’t the most effective approach. For Wadsworth, it meant wasted time and being late to pick up the kids. For the browser, it means an unresponsive UI and a terrible UX. You’ve probably experienced it before. As a user you trigger some event from the UI, then the whole app freezes. You click once, nothing happens. You click 85 more times, nothing happens. Then, just as you’re about to exit the app, all your click events register and the app goes crazy. The reason this happens is because JavaScript is synchronous. There was a single frame on the call stack which was blocking everything else.
As Wadsworth eventually figured out, sometimes it makes sense to do things asynchronously if you can. In the case of Wadsworth, it was the dry cleaning and car detailing. In the case of JavaScript, it’s things like Ajax requests or timers. There were two important aspects that allowed Wadsworth to accomplish these async tasks. The first was that there was some external service he was able to leverage. He didn’t have to do the dry cleaning or detail the car himself. In the browser, these “external services” are called Web APIs. In Node, they’re C++ APIs. The second was that those services agreed to text Wadsworth when they were finished with the task. That gave him the freedom to work on other tasks while those tasks were being completed and just as important, it gave him the option to decide when to pick up the clothes and car. Similar, when a Web or C++ API finishes their task, the way they notify the JavaScript engine is by pushing the callback function that was given to them into what’s called a “Task Queue”. Just as Wadsworth’s text inbox was a collection of completed async tasks ready for him to pick up, so to is the Task Queue a collection of completed async tasks whose callback functions are ready to be executed and pushed onto the call stack.
| Wadsworth | JavaScript |
|---|---|
| Todo List | Functions |
| Current Task List | Call Stack |
| Async Todo Items | Web or C++ APIs |
| Text Inbox | Task Queue |
There’s only one more piece to this process we need to figure out before we dive into some code. That piece is how a function gets from the Task Queue onto the Call Stack. Looking at Wadsworth one last time as our example - he didn’t decide to pick up the car or clothes until the previous task he was working on (cleaning the garage) was finished. It’s similar with JavaScript. When the call stack is empty, the JavaScript engine will look to the Task Queue to see if there are any functions that need to be executed and pushed onto the call stack. This is important to conceptualize. Only when the call stack is empty will the JavaScript engine look to see if there’s anything in the Task Queue. What that means is that if there’s a frame on the call stack that’s taking forever, nothing on the Task Queue will get processed. This whole process is called the “Event Loop”.
Sometimes looking at code makes things clearer, here’s how you can think about the Event Loop.
let callStack = []
let taskQueue = []

while (true) {
  if (callStack.length === 0 && taskQueue.length > 0) {
    callStack.push(taskQueue.shift())
  }
}
Alright, enough high-level stuff. Let’s look at some code to solidify our metaphor.
The easiest way to see how async JavaScript works is with setTimeout . setTimeout allows you to delay execution of a particular function for a specified number of milliseconds.
If you’ve never used it before,
setTimeout(function () {
  console.log('This logs at least two seconds later.')
}, 2000)
The reason we’re going to use setTimeout to demonstrate async JavaScript is because setTimeout is non blocking. Remember, JavaScript is single threaded (only one task can be executed at a time). Since setTimeout is non-blocking, that means it won’t sit on the call stack waiting for the milliseconds to pass. If it did, the entire app would be blocked from doing anything else other than waiting. Instead what setTimeout does is it kicks off the whole event loop process we learned about earlier.
It’s important to note here that “setTimeout” isn’t part of the JavaScript language. Instead, it comes with the environment JavaScript runs in (typically the Browser or Node). From earlier, we’d call “setTimeout” a Web or C++ API.
In what order will the logs show up in the console for the code below?
console.log('First')

setTimeout(function () {
    console.log('Second')
}, 1000)

console.log('Third')
As you probably guessed, the order is going to be First , Third , then Second . What’s more interesting here is what’s happening behind the scenes with the event loop. Let’s take a look.
We’re going to use a tool called Loupe which allows you to visualize the JavaScript run time, at run time. That’s a fancy way of saying that it’s going to slow down processing our code for us so we can see how JavaScript treats the call stack and any async code we have.
You can play with this code yourself, here.
This flow should look familiar. It’s the exact same concept that Wadsworth used earlier for figuring out how to most effectively manage his day, but instead of “Current Task”, “Services”, and “Text Inbox” we have the “Call Stack”, “Web APIs”, and “Task Queue”.
Watch the GIF a few times so you can see what’s going on. First log is invoked. That’s a synchronous task so JavaScript doesn’t need to do anything fancy. It just pushes log onto the call stack then it’s popped off once it’s executed. Next setTimeout is invoked. This one is async so JavaScript needs to put on its big boy pants. It first pushes setTimeout onto the call stack. From there, the anonymous function that is given to setTimeout is added to the Web APIs section. It’s this section which is responsible for counting to 1000 milliseconds. From there setTimeout is popped off the call stack and JavaScript continues to evaluate the code line by line. Next another synchronous console.log invocation is made so it’s added to the call stack and executed. At some point during the execution of the second console.log , the Web API saw that 1000 milliseconds had passed so it pushed the anonymous function into the Task Queue section. As we discussed earlier, whenever the call stack is empty the Event Loop checks the Task Queue and pushes the first item in there onto the call stack.
That was a big wall of text. Here’s the thing. If you’re with me still, you’re good. The complexity of the examples from here increases, but fundamentally everything will be the same as the example above. Even if the code becomes more complex, the process is still the exact same.
Same question. What order will the logs show up in the console with the code below?
console.log('First')

setTimeout(function () {
  console.log('Second')
}, 0)

console.log('Third')
Everything is the exact same as before but instead of waiting 1000 milliseconds to push the anonymous function to the Task Queue, the Web APIs section is going to wait 0 milliseconds.
Your intuition might be First , Second , Third . Unfortunately, that’s not right. Think about what you know about the Event Loop. The key here is that the Task Queue only gets cleared out once the Call Stack is clear.
By the time the anonymous function is pushed into the Task Queue, the second console.log is already on the call stack. That means that the Event Loop waits until the call stack is clear before it moves the anonymous function from the Task Queue onto the call stack, therefore logging First , Third , and Second .
Loupe doesn’t currently support simulating the visual for Ajax or HTTP requests but the process is the exact same. Instead of the Web API being setTimeout, it’s XMLHttpRequest.
You may be familiar with native Promises that were introduced into JavaScript as of ES6. To accommodate that addition, there was a change to the Event Loop as well called the “Job Queue”. The way I like to think of it is it’s similar to the Task Queue except items in the Job Queue have a higher priority than items in the Task Queue. That means the Event Loop will clear out the Job Queue before it starts clearing out the Task Queue. The code below demonstrates this.
console.log('First')

setTimeout(function () {
  console.log('Second')
}, 0)

new Promise(function (res) {
  res('Third')
}).then(console.log)

console.log('Fourth')
First
Fourth
Third
Second
Even though the setTimeout was before the Promise.then , because Promise jobs are put in the Job Queue which has a higher priority than the Task Queue, Third is logged to the console before Second .