WORKING ON PROJECTS
Have you ever tried learning a new language or technology simply by reading or completing exercises? It seems to be working … until you forget it all in a month or so.
The problem is you’re only scratching the surface by working on trivial problems. You need to bang your head on the keyboard, let your brain melt a little, push your limits and improve to wrap your head around new things. The best way to do that is to get your hands dirty and work on side-projects.
SIDE-PROJECTS
Side-projects are projects your work on part time, on the side, for fun. You can have several ones. Some on hold, some active. It doesn’t matter if you complete them or not. What mater is that they help you discover new approaches, technics or technologies. They can serve several purposes:
- If you’re looking to get a better or first programming job. You can use the projects on your portfolio.
- If you’ve lost your passion for coding because of your day job. Then projects can give you something fun to work on the side.
- If you’re now in a management position but still want to stay in the game.
- If you just want to learn new technologies and languages. Projects are perfect for this! It gives you a chance to learn while doing.
- If you’re looking to get into open source and create a popular project. Creating a bunch of projects is a good way to achieve this, you’ll probably end up with something cool someday.
Personally, I’ve experienced all of these throughout my career and having a project on the side was always what made me happy and helped me progress. As an example, my project Thin got me many job offers, made me travel the world, meet incredible people and helped me build a business.
MORE CREATING, LESS CONSUMING
Creating your first few side-projects is hard. Why so? Because you’re used to using. Consuming libraries, frameworks, resources, tutorials, finding pre-made solution on StackOverflow. Jumping to the other side, by producing, creating from scratch, is hard. It’s normal to feel lost at first and even feel that your projects are pointless.
But creation is never pointless. It can teach you a few lessons at worst. And improve the life of many at best.
Creating a side-project is art. You’re expressing yourself. You want to communicate to the world: this is how I see it working.
Some of your projects might gain traction and stay around for a little while. They might get a life of their own. Inspire others to create other things.
By creating projects, you’re making your dent in the universe.
What do you say? Ready to make a dent in the universe?
LETS GET STARTED
The goal of this club is to help you get start on your own side-projects journey. You’ll have plenty of ideas and videos to help you get started.
But first, the next few modules will go over the basics you need to dive into the club’s projects.
Feel free to skip any if you’re already familiar with the subject matter.
INTRODUCTION TO JAVASCRIPT
The language I’ll use to present projects is JavaScript. It is one of the most popular and, well… it’s everwhere! However, I highly encourage you to use the club’s projects to discover new languages. Try porting a project to a new language. It’s the best way to learn a new programming language.
Here’s an overview of some important JavaScript features we’ll use.
This lesson assumes you already know how to use a programming language such a Ruby, Python, C, C#, Java, Objective-C or the like.
VARIABLES
var name = 'value', second = 1
Local variables are declared using the var keyword.
If you use a variable without declaring it first using var , that variable will be global. It will be accessible from everywhere and its value will be shared by all. For that reason, it is highly recommended to always declare your variables using var .
CONDITIONALS
Several values are considered false or true when used as conditions.
-
undefinedis consideredfalse -
nullis consideredfalse -
falseis consideredfalse -
0,''andNaNare also consideredfalse - any other object is considered
true
EQUALITY
1 == '1'
// => true

1 === '1'
// => false
== converts the value on the right to the type on the left. Always use === , which doesn’t do conversions.
OBJECTS
var object = {
  age: 333
}

object.name = 'Marc'
Objects can be used as hashmaps / hashtable / dictionnaries.
object['name'] = 'Marc'
ARRAYS
var array = [1, 2, 3]
array.push(4)
array.slice(1)
array.forEach(function(item) { })
array.splice(2, 1)
“YOU FORGOT TO USE SEMICOLONS!”
You’ll notice that I do no use semicolons in most the JavaScript I write for this club.
Semicolons are optional in JavaScript, so it’s up to you to decide if you want to use them or not. Many people will tell you that you should use semicolons or else JavaScript will automatically insert them for you. That would be a bad thing. You don’t want JavaScript to mess with your code before executing it.
However, that way of thinking is wrong. JavaScript doesn’t automatically insert semicolons. Instead, it has parsing rules which define the semicolon as optional. If you’ve never heard of a parser before, no worries, there’s a project for that. Once again, semicolons are optional and not automatically inserted.
Since I’m an extremely lazy busy man, I prefer to save the trillions of extra keystrokes required to type those optional semicolons for something else. Honestly, I enjoy writing code most without the semicolons.
That being said, I encourage you to experiment and find your own style while working on the club’s projects. The club is all about experimenting, and finding your own style. Note that if you’re collaborating to an existing project, always follow the established style guides .
USING FUNCTIONS
JavaScript functions are very flexible. They can be used for many things. Here are a few important ways to use functions.
FUNCTIONS DECLARATIONS
function myFunction(arg1, arg2) {
  // ...
}
Function declarations are hoisted to the top.
FUNCTIONS EXPRESSIONS
object.method = function(arg1, arg2) {
  // ...
}
Used for storing a function in a variable or property.
USING “THIS”
object.getName = function() {
  return this.name
}
What controls the value of this is how you call the function .
Calling as a method, this is set to the object.
object.getName() // => object.name
Calling as a function, this is set to the global object ( window in the browser and root in Node).
var getName = object.getName
getName() // => undefined
CONTROLLING THE VALUE OF “THIS”
You can control the value of this when calling a function using the following two methods:
myFunction.call(object, arg1, arg2)
myFunction.apply(object, [arg1, arg2])
BINDING “THIS”
The main problem with this is that its value will change when used inside callbacks. Always freeze the value of this in a local variable when using it inside a callback.
object.method = function() {
  var self = this

  doSomethingWithCallback(function () {
    self.name // use self, NOT this
  })
}
OBJECT-ORIENTED PROGRAMMING
JavaScript is an object-oriented programming language much like Java, Ruby, Python and C#. Which means you can create objects and most things are object.
As you would expect, you can create your own type (class) of objects in JavaScript. The first step to do so is to define a constructor.
OBJECT CONSTRUCTORS
Like we’ve seen in the previous module, functions are very versatile. They can be used as functions of course, but also as object constructors.
function User(name) {
  // This is the constructor.
  // `this` is the new object.
  this.name = name
  // No need to return anything
}

var user = new User('Marc')
user.name === 'Marc' // Initialized in the constructor!
The usual convention is to use CapitalCase for constructor function names.
USING PROTOTYPES
Now to add methods onto our new type of object, we have to use its prototype.
JavaScript is a prototype-based language. Unlike Java, Ruby, Python and C#, which are class-based languages. In a class-based language, methods are stored in classes. In a prototype-based language, like JavaScript, methods are stored in prototypes.
You can add properties and methods shared by all instances of a class (constructor) via the magical prototype property of the constructor.
User.prototype.save = function() {
  PotatoDB.pretendToSaveWithNoSQL(this)
  PotatoDB.corruptDataTwice()
}

// All instances of User will now have the save method.
user.save()
INHERITANCE
Inheritance allows a class of objects to inherit the prototype properties of another class.
Lets say for example we want to have a Parent and Child classes. We want the Child class to inherit from Parent .
function Parent() {}

// Every Parent instances has a name property
Parent.prototype.name = 'Parent'

function Child() {
  Parent.call(this) // We have to explicitly call the super class constructor.
  // ...
}

// First we make the Child prototype a copy of the Parent prototype
Child.prototype = Object.create(Parent.prototype)

// Next, we make sure to reset the constructor, since this was overridden when
// we copied the prototype from the Parent.
Child.prototype.constructor = Child

// All instances of Child will now inherit from the prototype properties of Parent.
var child = new Child()
child.name === 'Parent' // The name property has been inherited from Parent.

// We can override the property.
Child.prototype.name = 'Child'
child.name === 'Child'
OVERRIDING METHODS
There is no built-in way to override methods in JavaScript.
We must retrieve the method from the parent’s prototype and call it.
Child.prototype.save = function(arg1) {
  Parent.prototype.save.call(this, arg1)
  // ...
}
JAVASCRIPT IN THE BROWSER
JavaScript is the language of the web! Here’s how to use it in the browser.
INCLUDING FILES ON A PAGE
To include JavaScript on a web page, use the <script> tag.
<script src="file.js"></script>
<script>
  var a = 'hello'
</script>
THE GLOBAL WINDOW OBJECT
Variables you define at the root of your JavaScript files or <script> tags are made global and added to the root object ( window ).
// Declaring `a` at the root of you script
var a = 'hello'

// `a` is accessible everywhere, but also from `window`, the global object.
window.a === 'hello'
USING THE JAVASCRIPT CONSOLE
To open the JavaScript console:
Chrome
- on Mac: ⌥ + ⌘ + J
- on Windows or Linux: ⇧ + Ctrl + J
Firefox
- on Mac: ⇧ + ⌘ + K
- on Windows or Linux: ⇧ + Ctrl + K
Try it now!
NODE.JS
Node is a powerful JavaScript interpreter that allows you to run JavaScript on servers or any machine. Node specializes in creating highly scalable network programs. It is the perfect system for building servers and backends that must handle multiple connections at once.
Here’s how to use Node for creating JavaScript projects.
INSTALLING NODE
See Node’s download page for instructions to download and install Node.
You can also use a package manager to install Node.
On Mac OS, use Homebrew:
$ brew install node
Once you’re done, check that it’s installed
$ node -v
RUNNING FILES WITH NODE
To execute a JavaScript file with Node, simply pass it as an argument:
$ node file.js
If your directory contains an index.js file you can pass the directory name, it will default to executing the index.js file.
$ node lib
# Same as
$ node lib/index.js
You can also start a interactive Node interpreter (REPL) by calling node
$ node
>
PACKAGE.JSON
The package.json file stores the projects properties: its name, version and dependencies.
To create a new one, run the following command:
$ npm init
USING MODULES
npm is the Node package manager command. You can use it to install node modules.
$ npm install underscore
This command will install underscore in your project (under node_nodules ). However, if you want to have others using your projects install those modules too, you need to declare that module as a dependency of your project in the prackage.json . Do to so, run the following command:
$ npm install underscore --save
This will modify your package.json file to add the new dependency.
You can search for Node packaged modules on npmjs.org.
REQUIRING MODULES
To require a module you’ve installed:
var underscore = require('underscore')
To require a .js file you’ve created, from the current directory:
var something = require('./something')
In the something.js file of the current directory, export properties you want the module to expose:
exports.cool = true
When requiring your module:
var something = require('./something')

something.cool === true
WORKING WITH GIT
When working on projects, it’s very important to keep a good history of your work. The better you feel about your code being in a safe place, the more inclined you’ll be to experiment, start over and code.
Here is a brief introduction to using Git. If you’re already familiar with the basics of Git, skip this module.
If you need any more help installing or using Git, head over to GitHub Help.
CLONING A REPOSITORY
$ git clone https://github.com/greatcodeclub/intro.git
# Or for your personal repos
$ git clone git@github.com:greatcodeclub/intro.git
This will create a new directory with the same name as the repository.
COMMITTING YOUR WORK
To save your work, commit it:
$ git add .  # Add files you've created/modified
$ git commit -m "Explain what you did"
This only saves your changes locally. You now need to push your changes to the server.
$ git push
WORKING WITH BRANCHES
Branches are easy to create in Git. You can create branches to work on features, bug fixes and anything that you want to work on that might require more than one commit.
$ git checkout -b myfeature
This will create a branch called myfeature based on the current branch and switch to it.
To push your newly created branch to GitHub:
$ git push origin myfeature
Once this is done, all future pushes can be done with a quick git push .
BUILDING A 2D GAME
GAME BASICS
The first video is a lecture about game basics. I go over four important concepts to understand before diving into game development:
- FPS (frame per second): the speed at which your game runs
- The game loop: the heart of any game
- Game entities
- Collision detection
If you’re not familiar with those, watch the video. Then, continue on to the next module.
KEY TAKEAWAYS:
- The game loop will, at interval, update and draw each entity.
- The interval is obtained with: 1000 / FPS (to get the milliseconds per frame).
- A game entity has a position (x, y), dimensions (width, height) and velocity (speed + direction).
- Collision detection determines when two objects intersect (eg.: ball hits a paddle).
SETUP YOUR ENVIRONMENT
To get the code:
$ git clone https://github.com/greatcodeclub/pong.git # or your fork
$ cd pong
After you’ve cloned the repo, follow these instructions to get started with the project.
-
Install Ruby (I recommend RVM)Check if it’s already install first with:
$ ruby -v - Install required Ruby gems (a web server and live reloading server):
$ gem install guard-livereload
- Install one of these browser extensions to enable live reloading: for Safari, for Chrome or for Firefox.
- Start the web server
# (in pong)
$ ruby -run -ehttpd . -p3000
Open your browser at http://localhost:3000/game.html
5. In a new terminal, start the LiveReload server:
$ guard
- Enable the LiveReload browser extension. Should look like this:

EXERCISE: ANIMATING THE BALL
To get started, I recommend you re-code the first part of the previous Pong screencast. Make the ball rebound up and down, exactly like in the video.
You can setup the code for this by checking out the start branch:
$ git checkout start
Here’s some of the code to get you started.
// A black background
function Background() {}
Background.prototype.draw = function(context) {
  context.fillStyle = '#000'
  context.fillRect(0, 0, game.width, game.height)
}

function Ball() {
  Entity.call(this)

  this.width = 20
  this.height = 20

  // TODO init the ball position and velocity
}
Ball.prototype = Object.create(Entity.prototype)
Ball.prototype.constructor = Ball

Ball.prototype.update = function() {
  Entity.prototype.update.apply(this, arguments)

  // TODO check if the ball hit a wall and rebound (inverse velocity)
}

// Initialize and start the game
var game = new Game($('canvas')[0])

// Load the game entities
game.entities = [
  new Background(),
  new Ball(),
]

game.start()
$('canvas')[0].focus()
Once you’re done, you can continue re-coding the game following the screencast or continue to the next module.
EXERCISE: PORTING PONG
The best way to learn a new language is to use it on a real project. We already got a real project! Now to chose a language …
To port our game to another language, I recommend you use a language that compiles to JavaScript. Porting will be easier.
If you’re feeling more adventurous and want to port the game to run outside of the browser, in Java, C or Objective-C for example, read this article about implementing game loops outside of JavaScript or use a game engine.
A FEW GAME ENGINES
- Many, many JavaScript game engines!
- Gosu - a Ruby and C++ game engine
- PyGame - Python game engine
- LOVE - game engine for Lua
- Cocos2D - a game engine for iOS
IMPLEMENT YOUR OWN GAME
You’re ready to implement a game on your own?
I suggest you go with Breakout. It is very similar to Pong. Here’s an online demo.
You can use those amazing game assets if you do so:
Whatever you end up doing, please share! I’d love to take a look and I’m sure everyone in here would to.
RESOURCES
REFERENCES
OTHER GAMES TO LEARN FROM
- A simple racing game in CoffeeScript I made
- A small platform game re-implemented in several languages
GAME ENGINES
- So many JavaScript game engines!
- Gosu - a Ruby and C++ game engine
- PyGame - Python game engine
- LOVE - game engine for Lua
- Cocos2D - a game engine for iOS
WHERE TO FIND ASSETS (IMAGES) FOR YOUR GAMES
ARTICLES ABOUT GAME LOOPS AND MORE
- Other collision detection algorithms
- Game Programming Patterns - Game loop
- Article about JavaScript game loops
- More about fixed time steps game loops
BUILDING A TRANSPILER
RESOURCES
GRAMMAR FILES DOCUMENTATION
- See the Flex documentation for details about the lexer’s grammar.
- See the Bison’s documentation for reference on the parser’s grammar rules.
- See the Jison’s documentation for Jison specific features and additional examples.
INTRODUCTION
I think the most fascinating projects are the ones you can use to create other things. When you can’t guess all possibilities. The ones for which people show you what they created with your project, and it blows your mind!
Any project involving a parser is like that. Because parsing is so powerful, it’s hard to imagine all the possibilities.
The project we’ll build is a CSS preprocessor, aka transpiler or compiler. It will parse our own custom language and compile it to CSS.
We’ll first parse plain CSS and then extend it to parse our own custom language, SSS. Which stands for Super Style Sheets!
Here’s what our language will look like.
body#home {
  background-color: #fff;

  // Variables
  @pad: 10px;

  .nestedRule {
    padding: @pad;
  }
}
It’s CSS with nested rules and variables support. Just like Less and similar to Sass.
The biggest piece of the project is the parser. Learning how a to create a parser is like learning a new language. It takes some time and can look daunting at first. But hopefully the following videos and code will help.
PARSING WITH JISON
The first video is a lecture about parsing with Jison.
I go over:
- What is parsing and why it’s important.
- Jison’s origins.
- What is a lexer and how it works.
- What is a parser and how to define its rules.
A few more notes:
- We define tokens in a .jisonlex file.
- The grammar (.jison file) defines the syntax of our language.
- Those two are then compiled to form the actual executable parser (a .js file).
- We use recursion to parse sequences (you can only use it on the left-side).
Although, we talk about Jison, any Bison/Yacc compatible tool will follow the same structure and concepts.
A SIMPLE PARSER
Before diving into the project, I recommend you play with this very simple parser first to understand how it works.
$ git clone https://github.com/greatcodeclub/simple_parser.git
$ cd simple_parser
$ npm install
$ make watch
Here are a few things you can do to play with the code:
- Look at the
grammar.jison. - Modify
test.jsto parse new expressions. - Add a new type of token in
tokens.jisonlex(false, null, etc.) - Integrate that token in the
grammar.jison.
GET THE CODE
The name of our project is SSS, for Super Style Sheets! To get the code:
$ git clone https://github.com/greatcodeclub/sss.git # or your fork
$ cd sss
To install and compile the project, you will need Node and make .
$ npm install
$ make
Each time your switch branch, make sure to run make again.
PART 1: PARSING CSS
Now that you know a little bit about parsing. Watch the following video in which I create a grammar for parsing a subset of CSS. And then recompile it back to CSS.
That piece of code is useless on its own. But it is the foundation for what we’re about to do: add our own features to CSS!
To get the code from the video, check out the part1 branch.
$ git checkout part1
$ make
PART 2: NESTED RULES SUPPORT
The next video shows how to modify the code to support nested CSS rules.
body {
  .nestedRule { ... }
}
Which will compile to the following CSS:
body .nestedRule { ... }
Before watching this video, make sure you’ve understood the previous one and explored the code.
Here’s a recap of what we did to implement this feature:
- Modify the grammar to define how nested rules look (the syntax)
- Define a
Contextof compilation, to track selectors from inside nested rules. - Compile rules, followed by their nested rules to CSS.
To get the code from the video, check out the part2 branch.
$ git checkout part2
$ make
PART 3: VARIABLES SUPPORT
In the last video, we add support for variables.
@accentColor: #66f;
body {
  color: @accentColor
}
Here’s a recap of what we did to implement this feature:
- Define a new type of token to catch:
@varName - Define the syntax of variable declarations (
@var: value) and variable lookup (property: @var). - Store the variables in the
Context. - Compile variable declarations/assigments (
Assign) and lookup (Variable) to CSS.
To get the code from the video, check out the part3 branch.
$ git checkout part3
$ make
EXERCISE: RE-CODE SSS WITH ME
If you were a bit lost during the screencasts, I recommend you re-watch it slowly while re-coding the project with me and pause as needed.
You can setup the code for this by checking out the start branch for the part you want to re-code:
PART 1: PARSING CSS
$ git checkout -b part1 origin/start-part1
PART 2: NESTED RULES
$ git checkout -b part2 origin/start-part2
PART 3: VARIABLES
$ git checkout -b part3 origin/start-part3
EXERCISE: PORTING SSS
The best way to learn a new language is to use it on a real project. We already got a real project! Now to chose a language …
To port the grammar, you will need a Bison/Yacc compatible parser generator for that language. Here are a few ones:
For other languages, try to find a port of Yacc or an LALR or LR(1) type of parser generator.
XERCISE: EXTENDING SSS
Want to extend the language with your own features?
Here are a few ideas:
- Add options to output compressed or indented CSS.
- Implement full CSS selector support:
h1 p,h1, h2,h1 > p,[attribute=...], etc. - Add
@importsupport. Loading .sss files from inside a .sss file. - Add support for functions. Eg.:
background-color: saturate(#8ef, 20%). - Make ‘;’ optional.
If you do add a feature, send me a pull request!
IMPLEMENT YOUR OWN TRANSPILER
Once you know how to implement a parser, the possibilities are endless! You can implement a template engine, language preprocessor or mini-language.
Here’s a simple template engine I implemented that renders HTML: github.com/greatcodeclub/template_engine.
And another one, more advanced, in which I show how to parse Markdown: github.com/greatcodeclub/markdown_parser.
RESOURCES
GRAMMAR FILES DOCUMENTATION
- See the Flex documentation for details about the lexer’s grammar.
- See the Bison’s documentation for reference on the parser’s grammar rules.
- See the Jison’s documentation for Jison specific features and additional examples.
BACK-END WEB FRAMEWORK
INTRODUCTION
If you’re a web developer, you use a web framework each and every day. Understanding how it works is crucial. You could rely on tutorials and others to use it. But the day you’ll bang your head on a bug no one has encountered before, you’ll be glad you understand how it work inside.
The goal of this project is not only to understand how a web framework work inside, but to inspire you to make your own. Everyone who has worked with a framework for some time has a few ideas on how to make it better.
Now’s your chance!
Before we get started building our own framework, lets review some of Express features. Since the framework we’ll build is heavily based on Express.
EXPRESS
Express is a very popular JavaScript framework for Node. It is simple, elegant, yet very powerful.
If you’re already familiar with Express, you can skip this module. If not, here’s a brief intro. I go over the features we’ll re-implement in our own framework.
DEFINING ROUTES
To define a route that will respond to GET / , the root of your site:
app.get('/', function(req, res) {
  req.url         // get info about the request
  res.send('Hi!') // send back a response
})
You can also use app.post , app.put , app.delete . There’s one for each request method.
RENDERING VIEWS
// You first need to set some settings
app.set('views', __dirname + '/views') // Where to find the views
app.set('view engine', 'jade')         // Engine to use

// In your routes
res.render('index', { title: 'My App' }) // Will render views/index.jade
We used a Jade template:
doctype html
html
  head
    title= title
    link(rel="stylesheet" href="style.css")
  body
    h1= title
    p Welcome to #{title}
You can read more about Jade here.
USING MIDDLEWARES
Most features of Express are implemented via middlewares. Here’s the list of supported middlewares.
// To serve static files from the /public directory
app.use(serveStatic(__dirname + '/public'))
You can implement your own middleware like so:
app.use(function(req, res, next) {
  // Log the request to the console
  console.log(req.method, req.url)
  // Call the next middleware.
  // You have to call this if you do not send a response.
  next()
})
GET THE CODE
You can browse the code on GitHub or clone it:
$ git clone https://github.com/greatcodeclub/express_app.git
$ cd express_app
$ npm install
$ make watch
NODE’S HTTP SERVER
To create a web server in Node, you have to use the http module.
The http.createServer(callback) method will call your callback each time a request comes in. Every Node web framework is based on this method.
A SIMPLE NODE WEB SERVER
var http = require('http')

var server = http.createServer(function (req, res) {
  // A new request came in ...

  // You can get info about the request via `req`
  var body = 'You requested ' + req.method + ' ' + req.url

  // You send the response status and headers using `writeHead`.
  res.writeHead(200, {
    'Content-Length': body.length,
    'Content-Type': 'text/html'
  })

  // ... and the response body using `end`
  res.end(body)
})

server.listen(3000)
If you’ve never created a Node web server before. Paste this code in a server.js file and run it with node server.js . Open your browser to http://localhost:3000/.
All a framework truely is, is sugar on top of this!
REQ & RES
In Express and in our own framework, we’ll be using the req and res objects from Node’s HTTP server. Whenever you see those two, keep in mind they came from the callback of http.createServer .
MEET INSTANT
The name of our framework is Instant!
It will look exactly like Express:
var instant = require('instant'),
    serveStatic = require('serve-static')

var app = instant()

app.set('views', __dirname + '/views')
app.set('view engine', 'jade')

app.use(serveStatic(__dirname + '/public'))

app.get('/', function(req, res) {
  res.render('index', { title: 'Instant' })
})

app.listen(3000)
But, it will not do more than that.
GET THE CODE
$ git clone https://github.com/greatcodeclub/instant.git # or your fork
$ cd instant
To install and compile the project, you will need Node.
$ npm install
WHAT’S NEXT?
In the next three modules, we’ll implement the following features in our framework:
- A routing system
- View rendering
- Middleware support
We’ll use a test driven approach, running a test first and implementing code to pass the test second. However, to speed up the process, I prepared the tests before recording the screencasts. But, most of framework code will be written live in the videos.
PART 1: ROUTING
The routing system, is the central part of any web framework. It controls which piece of your application code is executed depending on the request coming in.
WHAT WE’LL IMPLEMENT
We’ll use the same API as in Express to define routes in our framework:
app.get('/', function(req, res) {
  // ...
})
We’ll also need to provide a way to create and start the app:
var app = instant()   // Create the app
app.listen(3000)      // Start it
Lets get started!
RECAP
- We implement a
Routerclass with aroute(method, url, callback(req, res))method for defining routes. - The router routes the requests via its
handle(req, res)method. - If a route is not found, an error is raised.
- We wrap the router in an
Appto expose a nicer API. - We make
res, the response object, inherit from our ownResponseclass.This allow us to add our own methods tores. Likeres.send([status,] body). - We wrap the
Appcreation in a niceinstant()function.
GET THE CODE
To get the code:
git checkout part1
If you want to re-code this part on your own, use the start-part1 branch:
git checkout start-part1
EXERCISE: IMPLEMENT APP.ALL
Here’s an exercise to get your hands dirty and play with our framework.
Implement app.all to define routes that respond to any the HTTP methods: GET, POST, DELETE, etc.
app.all('/', function(req, res) {
  res.send("I don't care about no method.")
})
GET THE CODE
To get the test for this exercise, check out the part1-exercise branch.
git checkout part1-exercise
make watch
SOLUTION
To get the solution, check out the part1-solution branch.
git checkout part1-solution
PART 2: VIEWS
Implementing view rendering can be trivial. All you have to do is call the template engine properly, et voila !
RENDERING ALL THE VIEWS!
However, we want to support ALL the possible template engines in our framework! Well… at least the same same as in Express. By chance, we can use consolidate, which makes all the template engines share the same API. Here’s how to use it.
var cons = require('consolidate')

var path = __dirname + "path/to/index.jade"
    locals = { title: 'Demo' }

cons.jade(path, locals, function(err, html) {
  if (err) throw err
  console.log(html)
})
WHAT WE’LL IMPLEMENT
We’ll need to add a way to tell the framework which view engine to use and where to find the view.
app.set('views', __dirname + '/views')
app.set('view engine', 'jade')
And finally, the render method will take care of rendering the view.
res.render('index', { title: 'Instant' })
With that in mind, lets add support for views in our framework!
RECAP
- We add support for
app.set(name, value)to set settings. - We implement
app.render(template, locals, callback(html))to render a template. - We implement
res.render(template, locals), which callsapp.renderand sends the resulting HTML to the browser.
GET THE CODE
To get the code:
git checkout part2
If you want to re-code this part on your own, use the start-part2 branch:
git checkout start-part2
EXERCISE: ADD LAYOUT SUPPORT
Here’s an exercise to get your hands dirty once again.
Add support for view layouts.
Lets say we have this view:
html
  body
    != content
We want to use it as a layout. The content will be replaced with the enclosing view.
Calling render will look like this:
res.render('index', { layout: 'layout' })
This will render index.jade first, store the resulting HTML in content and render layout.jade .
GET THE CODE
To get the test for this exercise, check out the part2-exercise branch.
git checkout part2-exercise
make watch
SOLUTION
To get the solution, check out the part2-solution branch.
git checkout part2-solution
PART 3: MIDDLEWARES
Middlewares are very powerful. They can handle all the features that our framework wont. This allows our framework to be very flexible and at the same time, keep the code to a minimum.
We don’t have to re-implement serving static files in our framework, we can use a existing middle for that.
Here’s a list of middlewares you can use in Express, and soon, in our framework!
THE MIDDLEWARE API
Middlewares are simple JavaScript functions. The best way to think of them is as a series of filters that are applied to your request before it reaches your app. Each one is called in turn each time a request comes in.
The API of a middleware is similar as the one of a route:
app.use(function(req, res, next) {
  // Do something ...
  next() // Calls the next middleware or the router.
})
You’ll notice the extra next argument. next is a function that you need to call in the middleware to continue the execution, either to the next middleware or to the router. You could also choose not to call next() if you want to prevent the application from processing this request.
For example, we could implement an authentication system like so:
app.use(function(req, res, next) {
  if (isValidUser(req)) {
    next() // Authorized! Keep going.
  } else {
    res.send(401, 'Unauthorized')
    // Don't call next(), we don't want the app to handle this anymore.
  }
})
WHAT WE’LL IMPLEMENT
We’ll need to make the App keep track of middlewares defined via the app.use method:
app.use(serveStatic(__dirname + '/public'))
And modify app.handle(req, res) to call the middlewares.
Lets do this!
RECAP
- We implement
app.use(middleware)to install middlewares in an app. - We modify the
app.handle(req, res)to call the middlewares. - We make the
next()function call the next middleware, or the router, if there are no more middlewares to be called.
GET THE CODE
To get the code:
git checkout part3
If you want to re-code this part on your own, use the start-part3 branch:
git checkout start-part3
EXERCISE: TURN THE ROUTER INTO A MIDDLEWARE
Here’s one final, and trickier exercise.
The problem with our middleware system now is that we can’t add middleware after the router. We can’t have middlewares do some work after the router, like catch errors, change the response or do some cleanup.
Do allow this, we need to turn the router into a middleware. So that we can control where we install it. For example:
app.use(app.router)
app.use(function(req, res, next) {
  // Do some cleanup after the router
})
Our custom middleware will be called after the router, because the app.router middleware is installed before.
Do implement this you will need to change app.router to return a middleware function. You can also simplify the app.handle code, since now, everything is a middleware. However, make sure the app.router middleware is always present! Or else you’ll run into some troubles.
GET THE CODE
To get the test for this exercise, check out the part3-exercise branch.
git checkout part3-exercise
make watch
SOLUTION
To get the solution, check out the part3-solution branch.
git checkout part3-solution
EXTENDING INSTANT
Here are a few ideas to extend Instant on your own.
If you want to work on any of these, make sure to click the Work on this project button in the top right corner of this page.
IMPLEMENT ERROR-HANDLING MIDDLEWARES
To be fully compliant with Express middlewares, you’ll need to add support for error-handling middlewares:
app.use(function(err, req, res, next) {
  console.error(err.stack)
  res.send(500, 'Something broke!')
})
To will allow the app to catch errors thrown by other middlewares or the router. Make sure to start from the part3-solution branch to turn the router into a middleware.
Another tip: you can check the number of arguments a function accepts using its length property. 4 means it’s an error-handling middleware.
PARSE ROUTING PARAMS
In Express you can have named params in routes:
app.get('/users/:id', function(req, res) {
  req.params.id // the value of :id
})
To implement this feature, you’ll need to keep track of the param names in the router and convert them to proper regular expressions.
MOUNT MIDDLEWARES UNDER A PATH
Add support for mounting middlewares only under certain URL paths:
app.use('/admin', function(req, res, next) {
  // This will be called for every request under /admin/*
})
CHANGE EVERYTHING!
Try changing the way routes are defined. Maybe introduce controllers like in Rails? If you’ve used a web framework before, I’m sure you have some ideas on how to make things better.
BUILD YOUR OWN FRAMEWORK
How you design the API of your framework is the most interesting and creative part. Some framework, like Express, focus on a simple and minimal API. Others, like Rails, have a place for everything and lots of conventions.
If you’re serious about building your own framework, I suggest you start of with a real application, a real problem to solve. Try to avoid hypothetical situations and add too much features. Starts with an app and refactor it to use your own ideal framework.
If you plan on working on your own framework, make sure to click the Work on this project button in the top right corner of this page.
NO ORM?
We haven’t touched on the subject of databases or ORM. We’ve only built the web part of our framework. But building a web framework tightly integrated with an ORM can be a very good idea. Think of Rails and Django.
PORTING INSTANT TO ANOTHER LANGUAGE
If want to implement your own framework in another language than JavaScript. Porting Instant to that language first can be a good starting point. See the Resources for a few links to help you with that.
RESOURCES
Here are a fews resources to help you build your own framework.
JAVASCRIPT
- Express
- Connect : The middleware part of Express
- Template engines
RUBY
-
Rack : the interface between web servers and your framework
- Rack Contrib: Other Rack middlewares
- Tilt : Like Consolidate, for Ruby
PYTHON
- WSGI: the interface between web servers and your framework
UILDING A SERVER
INTRODUCTION
For most programmers, building something a lot of people will use is the ultimate accomplishment. We love creating things! But knowing your creation is used by millions is the validation that you created something useful, helped others and made your dent in the universe.
In this era of clouds and thin clients, a server is the most useful piece of code you could write. Everything you do online is interacting with servers.
You might think by now most servers have been implemented and that there’s no need for yet another server. Don’t be so sure! There are many ways to implement a server and every approach has its own benefits.
I’ve personally built Thin, a Ruby web server that was known for its performance and stability at a time when Ruby servers where crashing on a daily basis. That server is now used by millions and helped me built a career I could have only dreamed of.
Now’s your chance to create your own server!
THE FOUR COMPONENTS OF A SERVER
- Request parser: validating and understand incoming data
- Scheduler: how you’ll handle concurrency
- Protocol: how to reply to requests
- Response encoder: sending back data to clients
Those are the four parts of any server. However, with Node, the scheduler is already taken care of.
Before diving into the code, lets review some of the basics of network programming.
NETWORK PROGRAMMING
Network programming allows programs to communicate with each other across a network.
One side is the server, listening for incoming connections. The other is the client, connection to the server.
Any communication done between a server and client is done over a socket.
SOCKETS
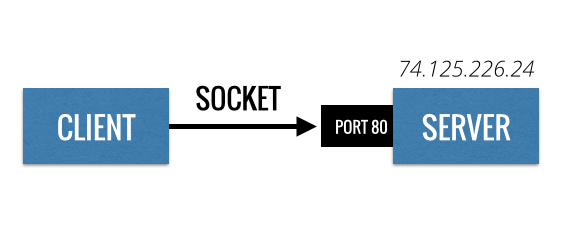
Using a socket, a client connects to an address and a port of a given computer. Think of the computer as a large building. A building can be located using its address, and the port is like a door into the building.
Like buildings, computers have many doors, but one door can only be used by one person at a time.
Similarly, computers have an address and many ports available. But only one server can use a given port at once.
UNDER THE HOOD OF A WEB REQUEST
Lets use a concrete example.
Whenever you’re requesting a web page, lets say http://google.com/ , several things happen under the hood of your web browser.
- The domain name is turned into an IP address, using a Domain Name Server (DNS).
google.comis turned into74.125.226.24 - The browser creates a socket and connects it to the port
80(the port for web traffic) at address74.125.226.24(Google’s address). - The browser writes an HTTP request to the socket to request the page:
GET / HTTP/1.1
Host: google.com
Accept: */*
- Google’s server replies with an HTTP response containing the HTML you’ll see in your browser.
HTTP/1.1 200 OK
Location: http://www.google.com/
Content-Type: text/html; charset=UTF-8
Content-Length: 219

<HTML>...</HTML>
- The HTML is rendered in your browser.
Those steps repeat each time you browse to another page, or even, each time an image, stylesheet or file is downloaded from a web server.
Although those steps are specific to an HTTP server, most servers share the same foundation.
The next modules goes into the details of creating a Node server.
A SIMPLE NODE SERVER
Node was made specifically for creating servers that can handle large number of concurrent connections. Consequently, creating a server in Node is straightforward using the net module.
var net = require('net')

var server = net.createServer(function(connection) {
  console.log('A new client connected')

  connection.on('data', function(data) {
    // We received data sent by the client

    // Send back some data
    connection.write('You sent: ' + data.toString())

    // Close the connection
    connection.end()
  })
})

// Start the server on port 3000 and loopback address (localhost).
server.listen(3000)
TESTING A SERVER
To test a server, use netcat, which is already installed on most UNIX-like systems.
Start netcat using nc <host> <port> :
$ nc localhost 3000
Will connect to server running locally on port 3000.
Everything you type in the console will be sent to the server when you hit enter . Everything sent by the server will be outputted in your console.
It’s a great way to quickly test a server and inspect the raw data that is sent from the server.
You can also create a server using netcat’s -l option:
$ nc -l localhost 3000
Will listen for connections on port 3000.
SAMPLE SERVERS IN VARIOUS LANGUAGES
Check out greatcodeclub/simple_servers for a list of simple servers implemented in various languages.
$ git clone https://github.com/greatcodeclub/simple_servers.git
$ cd simple_servers
$ node node/server.js
In another console, test it using netcat:
$ nc localhost 3000
Hi
TRY IT OUT!
Try re-implementing a simple Noder server on your own.
Once you’re comfortable with the this, jump to the next module to learn about the real server we’ll build together.
IRCD: OUR OWN IRC SERVER
The server we’ll build is a chat server based on the IRC protocol. Users will be able to connect to the server, join channels and send messages.
It will not implement the entire IRC protocol, but just enough to be able to use it with most IRC clients out there.
GET THE CODE
$ git clone https://github.com/greatcodeclub/ircd.git # or your fork
$ cd ircd
To install and compile the project, you will need Node.
$ npm install
IRC CLIENTS
To connect to an IRC server, you’ll need an IRC client.
-
ircII : A command-line based IRC client. Install with
apt-get install irciiorbrew install ircii. - Colloquy : An IRC client for Mac OS X.
- mIRC : An IRC client for Windows.
- Freenode web client: An online web client to the popular freenode IRC network.
I’ll use ircII in the videos to develop the server since it’s easier and faster to control from the command line.
IRC COMMANDS
IRC clients connect to a server on port 6667 and send commands in the following format:
COMMAND argument1 argument2 ...
Here are all the commands we’ll implement in our server.
-
NICK: allows users to set their nick name on the server. -
USER: allows users to set their real name on other info on the server. -
JOIN: allows users to join channels -
PRIVMSG: is used for sending messages to channel.
IRC REPLIES
The server replies to those commands using mainly two formats:
:server_name.com <REPLY_CODE> nickname_of_user argument1 argument2 :Last argument
The last argument of a reply can contain spaces if it is prefixed with a : .
A server can also broadcast command back to users:
:from_nickname!~from_username@from_hostname.com COMMAND argument1 argument2 ...
The first chunk of information is the user who originally issued that command to the server.
LET’S GET CODING!
That’s all we need to build a fully working IRC server.
We’ll proceed in three parts:
- Make our server accept incoming connections.
- Make our server reply to users.
- Finally, add support for channels and sending messages.
Jump to the next module to build the first part of our server.
PART 1: ACCEPTING CONNECTIONS
The first thing a server does is accept incoming connections. Each time a client connects to our server, he’ll need to pass along its information such as his nickname.
WHAT WE’LL IMPLEMENT
We’ll set the foundation of our IRC server. It’ll accept connections, parse incoming requests, and allow users to set their nickname using the following command:
NICK nickname
RECAP
- We create a server using
net.createServer(callback). - We connect an IRC client to our server and inspect the IRC commands sent on connection.
- Using
nc irc.freenode.net 6667, we connect to a real IRC server and see how it behaves. - A parser, converts incoming requests into JavaScript objects (
message). - We forward commands to the functions defined in
protocol.js. - We implement the
Userclass to represent a user connection in our server. -
NICKis the first command we implement. Setting the nick name of the user.
GET THE CODE
To get the code:
git checkout part1
If you want to re-code this part on your own, use the start-part1 branch:
git checkout start-part1
EXERCISE: THE QUIT COMMAND
Here’s an exercise to get started diving into the code.
According to the IRC protocol:
A client session is ended with a quit message. The server must close the connection to a client which sends a
QUITmessage. - Source
Here’s what the client will send:
QUIT
The server should then close the connection.
You can close a connection in Node using connection.end() .
Add support for that new command in protocol.js
GET THE CODE
To get the test for this exercise, check out the part1-exercise branch.
git checkout part1-exercise
make watch
You should get one failing test: handles QUIT .
SOLUTION
To get the solution, check out the part1-solution branch.
git checkout part1-solution
git diff part1-exercise
PART 2: SENDING REPLIES
At some point the server has to talk back to the client. This is done by writing to the connection’s socket.
THE USER COMMAND
The next command we’ll implement in our server will allow users to set their information on the server.
USER username hostname.com servername.com :Real Name
The server will reply with the following:
:server.net 001 nickname :Welcome
:server.net 002 nickname :Your host is userhost.com, running version ircd-1.0
:server.net 376 nickname :End of /MOTD command.
This will finally allow IRC clients to fully connect and sign-in to our server.
RECAP
- We add the
USERfunction inprotocol.js. - We set the user name, hostname and real name of the user.
- We implement
User.prototype.sendReply(code, text)to send back replies to users. - Replies are sent to the clients by writing to the connection’s (
connection.write(data)) - We use that method to reply to the
USERcommand. - The IRC client can now connect to our server and is ready to join a channel.
GET THE CODE
To get the code:
git checkout part2
If you want to re-code this part on your own, use the start-part2 branch:
git checkout start-part2
EXERCISE: PINGING CLIENTS
It is difficult for servers to know whether a client is still connected or not. The only accurate way to know is to ask the client to send some data. This is what the PING command does.
If a client has been inactive for a while, an IRC server will send PING :server.name to test if the client is still there.
IMPLEMENTING PING
If a client is inactive (didn’t sent any data) for more than 30 seconds. We send him the following command:
PING :server.com
If the client doesn’t reply within another 30 seconds, we close the connection.
Complete the pingLater method in lib/user.js to send a ping after 30 seconds.
GET THE CODE
To get the test for this exercise, check out the part2-exercise branch.
git checkout part2-exercise
make watch
You should get one failing test: ping later .
SOLUTION
To get the solution, check out the part2-solution branch.
git checkout part2-solution
git diff part2-exercise
PART 3: CHANNELS
Now that IRC clients can connect to our server, lets add supports for channels and sending messages.
JOINING A CHANNEL
Joining a channel is done with the following command:
JOIN #channel
If the channel doesn’t exist yet, it is created.
The server first broadcast the join to others in the channel:
:from-nick!~from-username@from-hostname JOIN #channel
Then replies to the user with the names of those already in the channel.
:server.net 353 nickname @ #channel :nickname
:server.net 366 nickname #channel :End of /NAMES list.
SENDING A MESSAGE
Sending a message to a channel is done with the following command:
PRIVMSG #channel :Hi there
The server broadcast the message to others in the channel:
:nickname!~login@userhost.com PRIVMSG #channel :Hi there
RECAP
- We add support for the
JOINcommand inprotocol.js. - We implement
server.getChannel(name)to get or create channels. - We define a new
Channelclass. - We implement a
User.prototype.sendCommandto send commands to users. - Using that method, we broadcast command to channels in
Channel.prototype.sendCommand. - We send back the names of users already in the channels.
- We add support for the
PRIVMSGcommand inprototype.jsto send messages to channels. - IRC clients can now connect, join channels and send messages using our server!
GET THE CODE
To get the code:
git checkout part3
If you want to re-code this part on your own, use the start-part3 branch:
git checkout start-part3
EXERCISE: BROADCASTING QUITS
When a user quits a channels, we need to tell others in the channels that someone quit.
We already implemented the QUIT command in the first exercise. The only missing piece is broadcasting the quit to others in the channel.
To do that, the server should send the following command reply to others in the channel:
:fromUser!~fromUserLogin@fromUserhost.com QUIT :Client quit
Use channel.sendCommand(...) on each channel the user was in. If the user was in #javascript and #ruby . Quitting will broadcast the command to both channels.
Note that the QUIT command accepts an optional message , stored in message.message by our parser. Use that to customize the quit message when broadcasting the command: QUIT :<Quit message> .
GET THE CODE
To get the test for this exercise, check out the part3-exercise branch.
git checkout part3-exercise
make watch
You should get one failing test: handles QUIT .
SOLUTION
To get the solution, check out the part3-solution branch.
git checkout part3-solution
git diff part3-exercise
EXTENDING OUR IRC SERVER
Our IRC server is far from complete. It is missing some very important commands like PART to leave channel, setting topic on channels, etc.
Here is a list of all the IRC commands. You do not need to implement them all to create a complete IRC server.
HOW TO ADD SUPPORT FOR NEW COMMANDS
To add support for new commands, add a new parsing rule in the parser.jison and make sure to recompile the parser using make .
Then, define how to handle the command in protocol.js .
See the master branch of the ircd project for a full suite of tests.
BUILD YOUR OWN SERVER
Building your own server requires the same four components we’ve seen in the intro:
- Request parser: validating and understand incoming data
- Scheduler: how you’ll handle concurrency
- Protocol: how to reply to requests
- Response encoder: sending back data to clients
WHAT TO DO?
Lets say you want to build a web (HTTP) server, here’s what you need to do.
- Either build of find an existing HTTP request parser.
- Decide how you’ll handle concurrency: threads? event loop? processes? coroutines? magic?
- Find documentation about the HTTP protocol.
Not all protocols are equal, some are complex, some are simple.
GOOD LUCK!
Creating a server is great experience if you’re interested in performance and optimization, but also a great way to learn about network programming.
I hope you’ll have fun creating your own server!
Click the Work on your project button in the top right corner when you’re ready.
RESOURCES
ARTICLES
- Rebuilding a Ruby web server: A free online class I did.
- Beej’s Guide to Network Programming
- IRC Over Telnet
- IRC Hacks: A book about IRC
- POP3 Protocol using Telnet
SOURCES
- Nginx: Source code to the famous web server (in C)
- ircd.js: another IRC Node server
- Thin: The Ruby web server I created.
- Unicorn: Another Ruby web server built around processes.
- greatcodeclub/simple_servers: A list of simple servers implemented in various languages.