BUILDING A VM
INTRODUCTION
In this project, we’ll recreate a CPU in code!
Sounds crazy? Well, that’s what virtual machines (VMs) are: virtual CPUs. Mimicking hardware (CPU) with software (code).
Not only will this project help you learn how to build a NES or GameBoy emulator or how programming languages work deep inside, but also how the real silicon chip on your computer works. The real thing!
There is no lower level. Once you understand how this works, you’ll understand how the brain of any computer works.
It’s a powerful thing!
BIT, BYTES AND BITWISE OPERATIONS
CPUs and VMs are optimized for speed and memory efficiency. They must pack as much information as possible in as little space as possible.
This is why VMs will use bytes to identify instructions and sometimes, even single bits for other information. Readability is not a priority here. So before going further, lets review some of those.
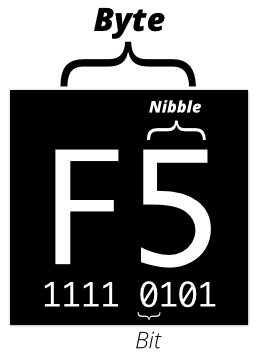
BIT
Memory is all zeros and ones. A bit is one of those 0 , or 1 .
BYTE
Eight consecutive bits form a byte. A byte can store a number from 0 to 255.
NIBBLE
We call half a byte, four bits, a nibble. It can store a number from 0 to 15.
HEXADECIMAL NUMBERS
Usually, when playing with binary data, bytes are presented in their hexadecimal form (base 16).
1 to 9 do no change, but 10 is A , 11 is B up to 15 which is F .
// Convert a number to hexadecimal
(15).toString(16) // => 'f'

// You can also write numbers in hexadecimal directly in your JavaScript code
0xF // => 15
BINARY NUMBERS
The computer sees the numbers is as a series of bits. Any number can be written with zeros and ones:
// Number   Binary
   1     ==    1
   2     ==   10
   3     ==   11
   4     ==  100
   5     ==  101
// To inspect the bits representing a number:
0xF.toString(2)  // => '1111'
(15).toString(2) // => '1111'
BITWISE OPERATIONS
Machine code makes use of all the available bits in each instruction. Before diving into the code, it’s important to understand how to inspect the value of various bits in a given instruction.
The bitwise operators allow us to play with the bits of a number. The most important ones are: & , | , << and >> .
It’s easier to understand how they work if we convert the numbers to binary first.
& and | work like their boolean friends ( && , || ) but at the bit level. 0 being equivalent to false .
3 & 10 == 2

// In binary
  0011  // 3
& 1010  // 10
= 0010  // 2
3 | 10 == 11

// In binary
  0011  // 3
| 1010  // 10
= 1011  // 11
<< , >> are the bit shift operators. Use to shift the bits, left or right.
0001 << 0 == 0001
0001 << 1 == 0010
0001 << 2 == 0100
0001 << 3 == 1000

1000 >> 0 == 1000
1000 >> 1 == 0100
1000 >> 2 == 0010
1000 >> 3 == 0001
CONCRETE EXAMPLES
Here are a few ways we’ll use bitwise operations to manipulate instructions in our VM.
To inspect only the first nibble on the left of an instruction:
0x1234 & 0xF000 // => 0x1000
To extract the first byte on the right:
0x1234 & 0x00FF // => 0x34
To extract the second nibble of an instruction:
(0x1234 & 0x0F00) >> 8 // => 2
To concatenate two bytes:
(0x12 << 8) + 0x34 // => 0x1234
Take a few minutes to try those in a JavaScript console. Remember to use .toString(16) to display a number is hexadecimal.
CONFUSED?
No worries if it’s still a little blurry. There’s no need to memorize those. If you ever get confused, pop a JavaScript console open and use the .toString(2 or 16) trick shown above to clear things up.
CHIP-8
The project we’ll build together is a CHIP-8 emulator running in the browser and using an HTML5 canvas as its display.
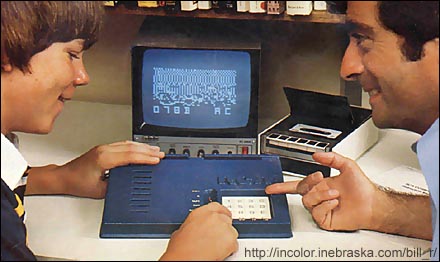
An old COSMAC VIP running a CHIP-8 program. (Image source)
CHIP-8 is not a real CPU. It was initially created to ease development of game on primitive computers. However, it is structured much like a real CPU, only simpler.
It’s one of the simplest VMs there is and can run games such as Pong and Pacman.
We’ll implement a subset of the CHIP-8 VM, enough to run some simple demo programs, but not enough to run games.
A CHIP-8 INSTRUCTION

CHIP-8 instructions are stored in two consecutive bytes. The type of the instruction (opcode) will often, but not always, be determined by the first nibble.
We’ll implement the following instructions:
-
00E0- Clear the display. -
00EE- Return from a subroutine. -
1nnn- Jump to locationnnn. -
2nnn- Call subroutine atnnn. -
3xkk- Skip next instruction ifVx = kk. -
4xkk- Skip next instruction ifVx != kk. -
6xkk- SetVx = kk. -
7xkk- SetVx = Vx + kk. -
Annn- SetI = nnn. -
Cxkk- SetVx = random byte AND kk. -
Dxyn- Display n-byte sprite starting at memory locationIat(Vx, Vy), setVF = collision. -
Fx1E- SetI = I + Vx.
The lowercase letters represents the operands of the instruction. Other nibbles are the opcode.
DEMO
Here’s a demo of the first part of our project running a simple program along with a debugger we’ll use to ease development.
You can play with the completed project online over here: http://greatcodeclub.github.io/chip8/.
GET THE CODE
$ git clone https://github.com/greatcodeclub/chip8.git # or your fork
$ cd chip8
PART 1: INSTRUCTION AND REGISTERS
In this first part we’ll create a VM capable of loading programs in memory and executing a few instructions using registers.
RECAP
- We load a program (
roms/MAZE) in the memory of the VM. - We set a
pcto track our position in the memory. - Two bytes are read from memory and concatenated to form an instruction.
- We create
VxandIregisters to pass values around instructions. - A few instructions are implementing in a big
switch ... case. Onecaseper opcode:
-
1nnn- Jump to location nnn. -
3xkk- Skip next instruction if Vx = kk. -
6xkk- Set Vx = kk. -
7xkk- Set Vx = Vx + kk. -
Annn- Set I = nnn. -
Cxkk- Set Vx = random byte AND kk. -
Dxyn- Display n-byte sprite starting at memory location I at (Vx, Vy), set VF = collision.
- We create a timer to run the CPU at 100 Hz.
GET THE CODE
To get the code:
git checkout part1
If you want to re-code this part on your own, use the start-part1 branch:
git checkout start-part1
PART 2: THE CALL STACK
The call stack is an important part of any CPU or VM. It keeps track of returning addresses when calling subroutines.
RECAP
- We load a new program (
roms/LOGO) that draws the CHIP-8 logo. - We implement the
2nnninstruction to call a subroutine. - We implement the
00EEinstruction to return from a subroutine.
GET THE CODE
To get the code:
git checkout part2
If you want to re-code this part on your own, use the start-part2 branch:
git checkout start-part2
EXERCISE: MORE INSTRUCTIONS
The code we’ve written in the previous part is not enough to run the LOGO rom.
You’ll need to add support for the following instructions:
-
00E0- Clear the display. (Usethis.display.clear()) -
4xkk- Skip next instruction ifVx != kk. -
Fx1E- SetI = I + Vx.
This should be enough to run the LOGO rom.
GET SETUP
Get the code for this exercise, check out the exercise branch.
git checkout exercise
Start a server:
python -m SimpleHTTPServer 3000
And browse to http://localhost:3000/
You’ll need to modify VM.prototype.step to support the three new instructions.
SOLUTION
To get the solution, check out the solution branch.
git checkout solution
git diff exercise
EXTENDING THE VM
If you wish to continue working on our CHIP-8 implementation, see the roms/ directory of the project for other programs to run in the VM.
However, to run those programs, you’ll need to implement more instructions.
At this point, 12 out of the 34 required CHIP-8 opcodes are supported. The following instructions are missing to make a complete CHIP-8 emulator:
-
5xy0- Skip next instruction ifVx = Vy. -
8xy0- SetVx = Vy. -
8xy1- SetVx = Vx | Vy. -
8xy2- SetVx = Vx & Vy. -
8xy3- SetVx = Vx ^ Vy. -
8xy4- SetVx = Vx + Vy, setVF = carry. -
8xy5- SetVx = Vx - Vy, setVF = NOT borrow. -
8xy6- SetVx = Vx SHR 1. -
8xy7- SetVx = Vy - Vx, set VF = NOT borrow. -
8xyE- SetVx = Vx SHL 1. -
9xy0- Skip next instruction ifVx != Vy. -
Bnnn- Jump to locationnnn + V0. -
Ex9E- Skip next instruction if key with the value ofVxis pressed. -
ExA1- Skip next instruction if key with the value ofVxis not pressed. -
Fx07- SetVx= delay timer value. -
Fx0A- Wait for a key press, store the value of the key inVx. -
Fx15- Set delay timer =Vx. -
Fx18- Set sound timer =Vx. -
Fx29- SetI= location of sprite for digitVx. -
Fx33- Store BCD representation ofVxin memory locationsI,I+1, andI+2. -
Fx55- Store registersV0throughVxin memory starting at locationI. -
Fx65- Read registersV0throughVxfrom memory starting at locationI.
See Cowgod’s Chip-8 Technical Reference for the complete documentation.
To run games and more advanced demos, you’ll need to add support for timers and keyboard input.
Even a fraction of those instructions can get you pretty far in running most ROMs. To discover what instructions are missing, load a program and use the VM debugger.
CREATING YOUR OWN VM
You can emulate any machine. All you need is a reference for all the instructions it supports.
It’s usually easy to find those online using the keywords: instruction set or opcodes .
Happy coding!
RESOURCES
CHIP-8
Here are a few links to help you complete our CHIP-8 implementation.
- OChip8: A complete CHIP-8 emulator in the browser with games.
- Cowgod’s Chip-8 Technical Reference: The best instructions reference .
- Mastering CHIP-8: An introductory blog post.
- JavaScript Chip-8 Emulator: A tutorial on emulating CHIP-8 in JavaScript.
- Jose Donizetti’s Ruby implementation
OTHER EMULATORS
- GameBoy-Online: A GameBoy emulator in JavaScript
- jsGB: Another GameBoy emulator in JavaScript
- The Software Emulation of the NES Console
MACHINE CODE AND PROCESSORS
- Easy 6502: An online ebook to write assembly language for the 6502 processor.
- X86 Opcode and Instruction Reference
PROGRAMMING LANGUAGE VMS
The Lua programming language uses a VM to speed up its execution and consume less memory. It is a register-based VM like CHIP-8 and features only 35 types of instructions, which is quite a feat for a full blown programming language.
It’s a good starting point into the world of programming language VMs. The following papers go into great details about the implementation.
Other popular languages VMs:
- YARV: The Ruby VM
- Java bytecode instruction listings
RAY CASTING
INTRODUCTION
Ray casting is a technique used to render 3D scenes. It’s the easiest to implement and understand. Nevertheless, it can be very efficient and run on 10 years old computers.
Games such as Wolfenstein, Doom and Duke Nukem used this technique to create the first widely popular 3D games.
Ray casting feels like magic at first. It’s a truly beautiful algorithm that is worth implementing on your own at least once. Lets cast some rays!
It works in three steps:
- Cast (trace) a ray from the eye of the player to a wall.
- Draw a column of screen pixels. The height of the column is determined by the length of the ray.
- Shade the column based on distance (length of the ray).
We repeat those three steps for each column of screen pixels.
TRIGONOMETRIC FUNCTIONS
The only math required to build a ray caster are the three trigonometric functions.
Whenever we got an angle and length in a right triangle (90° angle) we can use a trigo function to find the length of other sides.

These functions are available in JavaScript via the Math object.
Math.cos(angle)
Math.sin(angle)
Math.tan(angle)
However, note that these functions accept an angle in radian. If your angle is in degrees, you need to convert it.
DEGREE TO RADIAN
Since 1° equals π/180 radian:
var DEG = Math.PI / 180 // 1 deg == pi/180 radian

var angleInRadian = angleInDegree * DEG

Math.cos(angleInRadian)
CARTESIAN COORDINATES
Trigonometric functions are commonly used to convert a vector (angle and distance) into Cartesian coordinates (x, y).
var x = Math.cos(angle) * distance
var y = Math.sin(angle) * distance
Phew! That’s it. That’s all the math you need to build a ray caster. Now, lets code…
SETUP YOUR ENVIRONMENT
To get the code:
$ git clone https://github.com/greatcodeclub/raycaster.git # or your fork
$ cd raycaster
After you’ve cloned the repo, start the web server:
# (in raycaster)
# If you have Python installed
$ python -m SimpleHTTPServer 3000

# Or, if you have Ruby installed
$ ruby -run -ehttpd . -p3000
(See this list for other ways to start a static web server.)
Then browse to http://localhost:3000/.
Reload the page each time you change something, or see the following instructions to setup automatic reloading on file change.
AUTOMATIC RELOADING
-
Install Ruby (I recommend RVM)Check if it’s already install first with:
$ ruby -v - Install required Ruby gems (a web server and live reloading server):
$ gem install guard-livereload
- Install one of these browser extensions to enable live reloading: for Safari, for Chrome or for Firefox.
- In a new terminal, start the LiveReload server:
$ guard
- Enable the LiveReload browser extension. Should look like this:

PART 1: CASTING RAYS
In this first part we’ll cast the rays and draw the wall slices on an HTML5 canvas.
Here’s a demo of the completed project: http://greatcodeclub.github.io/raycaster/
RECAP
- We create a method to project the map on the canvas (
Camera.prototype.project). - We cast rays for each screen column (
x). - We use the ray length to determine the height of the wall slice.
- The wall slice is drawn, centered vertically.
- The slice is shaded based on distance.
- Boom! We got ourselves are ray caster.
PERFORMANCE ISSUES
We’ve implemented a simplified version of the algorithm. Without most of the usual optimizations. A real ray caster will be smarter when incrementing the length of rays being caster ( for loop in Camera.prototype.castRay ). Instead of incrementing by 1px it will make bigger jumps following the size of the map grid. See this tutorial for more details.
If you run into some performance issues, reduce the width of canvas (in index.html ) so that less rays have to be casted.
GET THE CODE
To get the code:
git checkout part1
If you want to re-code this part on your own, use the start-part1 branch:
git checkout start-part1
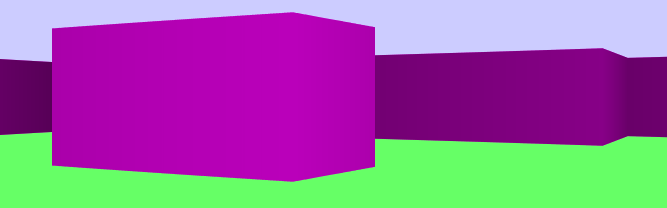
PART 2: DISTORTION & MOVEMENTS
Our ray caster renders a fish eye vision of our 3D scene. We fix that and allow the camera to move using keyboard arrow keys at the same time.
RECAP
- We fix the fish eye distortion by making all rays the same length.
- We introduce a game loop to constantly redraw the scene (
game.onFrame). - The camera position and angle are modified by the arrow keys.
- Tada! We can now move around freely in the map.
GET THE CODE
To get the code:
git checkout part2
If you want to re-code this part on your own, use the start-part2 branch:
git checkout start-part2
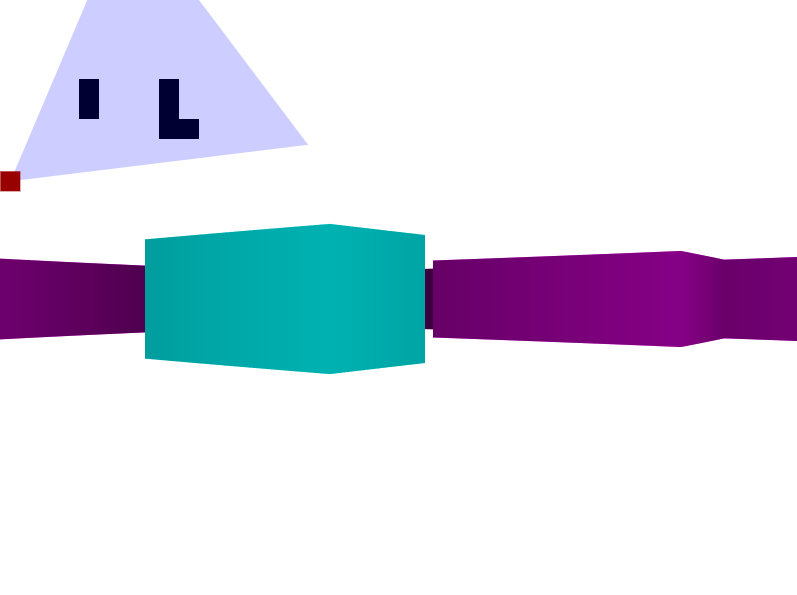
EXERCISE: USING DIFFERENT COLORS
So far we’ve only used 0 and 1 in the map. But we can use the map to store more information.
For example, we could draw walls identified by 2 in a different color.
// in map.js
this.grid = [
  0, 0, 0, 0, 0, 0, 0, 0, 0, 0,
  0, 0, 0, 0, 0, 0, 0, 0, 0, 0,
  0, 0, 0, 0, 0, 0, 0, 0, 0, 0,
  0, 0, 0, 0, 0, 0, 0, 0, 0, 0,
  0, 0, 0, 0, 2, 0, 0, 0, 1, 0,
  0, 0, 0, 0, 2, 0, 0, 0, 1, 0,
  0, 0, 0, 0, 0, 0, 0, 0, 1, 1,
  0, 0, 0, 0, 0, 0, 0, 0, 0, 0,
  0, 0, 0, 0, 0, 0, 0, 0, 0, 0,
  0, 0, 0, 0, 0, 0, 0, 0, 0, 0
]
GET SETUP
Follow the instructions to setup your environment.
Then, get the code for the exercise by checking out the exercise branch.
git checkout exercise
You’ll need to modify camera.js to draw wall marked as 2 in map.js in cyan ( #0ff ).
SOLUTION
To get the solution, check out the solution branch.
git checkout solution
git diff exercise
You can also view the diff on GitHub.
EXTENDING
Here are a few ideas to extend our ray caster.
OPTIMIZING
Several parts of our ray caster can be optimized. The main one being Camera.prototype.castRay . Instead of incrementing the length by 1, jump by map grid blocks (~100px). This will drastically speed up the process.
See this tutorial for instructions.
TEXTURE
Using solid colors is pretty bland. Real games use textures (images) to dress the walls.
Instead of using colored rectangle when drawing wall slices, we’ll use slices from a texture image. The challenge is keeping track of the offset in the image.
This tutorial offers many pointers for using textures.
FLOOR & CEILING
The simple solution is to keep your floor and ceiling of solid colors. Draw the top half of the screen the color of the ceiling and the bottom half the floor color. You can use gradient from black to shade it.
However if you intend to use textures on the floor, this tutorial explain the basics of floor-casting.
WALL COLLISION DETECTION
Our current implementation allows the player (camera) to go through walls. In a real game you’ll need to stop the player when it hits a wall. We already know that. The ray length will be zero.
Prevent movements in the direction (angle) where the rays are of zero length.
OBJECTS
To build complete game you’ll need to draw a player and enemies. You can use simple 2D images to do so. Simply draw the image on top of the 3D scene. That’s what game such as DOOM did.
The player can be drawn using a static image at the bottom of the screen.
RESOURCES
RAY CASTING
- Permadi’s excellent ray casting tutorial
- A first-person engine in 265 lines
- Opera’s guide to ray casting
- Lode’s ray casting tutorial
SOURCE CODE
BUILDING A DB
INTRODUCTION
We won’t implement a full database. We won’t write anything to disk either. But we’ll focus on one of the most important features of modern databases: indexes.
Indexes allow for speedy querying and can be implemented in a relatively simple way.
But the most surprising thing about indexes is that all the main engines use the same data structure to store the indexes. B-trees!
In this project we’ll go from building an API to query our DB down to implementing our own B-tree data structure from scratch.
TREE DATA STRUCTURES
From Wikipedia:
A tree data structure can be defined recursively (locally) as a collection of nodes (starting at a root node), where each node is a data structure consisting of a value, together with a list of references to nodes (the “children”), with the constraints that no reference is duplicated, and none points to the root.
TERMINOLOGY
- Node : A place to store values in the tree.
- Branch : A connection between two nodes.
- Root : The top level node.
- Child : A node under a parent.
- Leaf : A node without any children, at the bottom of the tree.
- Depth : The number of connections up to the root node.
- Height : The number of connections on the longest path down to a leaf.
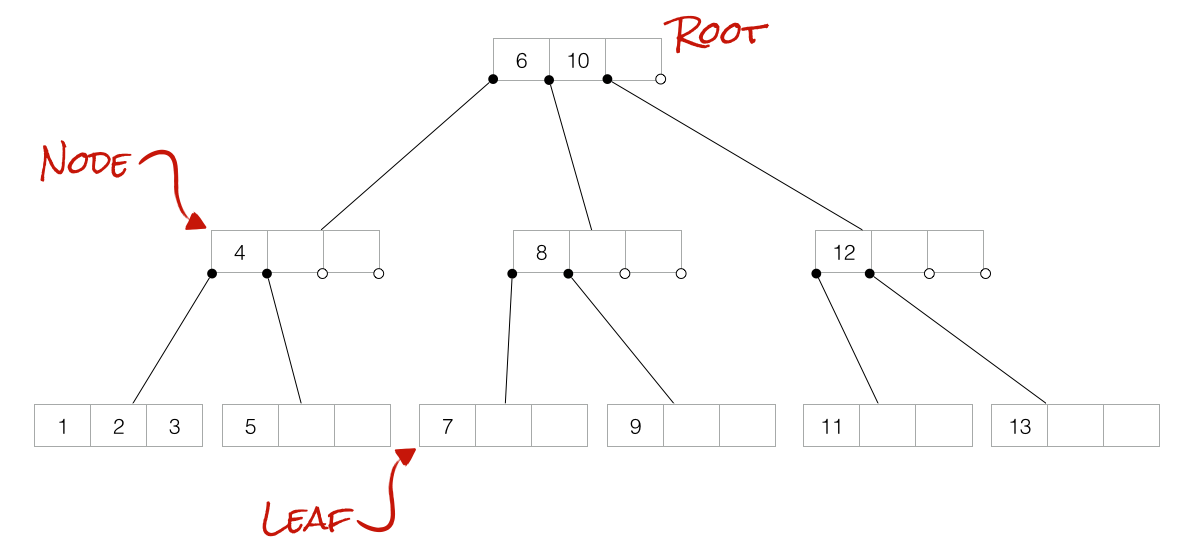
B-TREE
A B-tree is a specialized type of tree which stores many items, sorted, in a single node. Each node has several children, one more than the number of items. Each leaf also need to have the same depth, forming a perfect triangle.
It is a data structure perfectly designed to be stored on disk. Node can contain a very large number of items and can be loaded all at once from a page or memory. Thus reducing the number of I/O operations.
That is why most databases choose to use a B-tree for their indexes. Large indexes can be stored on disk without impacting performance.
SETUP YOUR ENVIRONMENT
To get the code:
$ git clone https://github.com/greatcodeclub/deebee.git # or your fork
$ cd deebee
PLAYING WITH THE CODE (OPTIONAL)
You can modify the demo.js file to play with our database engine on your own.
$ node demo.js
RUNNING THE TESTS (OPTIONAL)
You can run the B-tree tests using the mocha command.
$ npm install -g mocha
$ mocha
PART 1: USING INDEXES
In this first part we’ll implement a simple in-memory database that supports indexes.
Records in our database will have a sequencial auto-incrementing id starting at 1.
RECAP
- We create a
Tableclass that holds the records. - We implement an
insertmethod to add new records. - We implement a
findByIdmethod to retrieve a record by its id. - We implement a
findBy(attribute, value)method to retrieve a record any attribute value. - Index support is added to speed up search. Indexes are plain JavaScript hashes.
GET THE CODE
To get the code:
$ git checkout -b part1 origin/part1
If you want to re-code this part on your own, use the start-part1 branch:
$ git checkout -b my-part1 origin/start-part1
PART 2: B-TREE
In this last part we’ll implement a B-tree from scratch.
RECAP
- We implement searching by key in the tree (
Node.prototype.search(key)). - We implement inserting new items in the tree (
Node.prototype.insert(key, value)). - We split child nodes that are full when inserting (
Node.prototype.split(i)). - We split the root node when full (
BTree.prototype.insert(key, value)). - Finally, the B-tree is used in our own index implementation from part 1.
NOTE ON THE DEGREE
Usually, a database will use a much larger degree (maximum number of items in a node). A child will be read from disk when needed and removed from memory when no longer needed. This will reduce the number of I/O operations.
GET THE CODE
To get the code:
$ git checkout -b part2 origin/part2
If you want to re-code this part on your own, use the start-part2 branch:
$ git checkout -b my-part2 origin/start-part2
EXERCISE: RE-CODING THE B-TREE
The best way to understand a complex piece of code is to recode it. I recommend you re-watch the last video slowly while re-coding the B-tree with me and pause as needed.
This article also describe the algorithm in pseudo-code.
If at any given time, you want to inspect the content of the tree, use btree.inspect() to dump its internal structure.
GET SETUP
Follow the instructions to setup your environment.
And prepare the branch you’ll work on:
$ git checkout -b recoding origin/start-part2
$ edit lib/btree.js
OTHER DATA STRUCTURES
Here are a few other similar and interesting data structures.
BINARY SEARCH TREE

Image licensed under Public domain via Wikimedia Commons
Unlike B-trees, binary search tree are not balanced and each node can only contain one item and two children. However branches share the same attributes. Left-side branch will be lower, right-side greater than the item in the node.
B±TREE

Image by Grundprinzip. Licensed under Creative Commons Attribution 3.0 via Wikimedia Commons
A B±tree copies the keys in the leaf nodes and keep a pointer to the next node to speed up sequencial access.
B*-TREE
A B*-tree keeps nodes more densely packed. Instead of splitting full nodes, keys are transfered to the a node next to it.
RED–BLACK TREE

Image by Cburnett. Licensed under Creative Commons Attribution-Share Alike 3.0 via Wikimedia Commons
Red-black trees work by painting nodes either black or red. Every red node must have two black child nodes. And every path from a given node to any of its descendant leaves contains the same number of black nodes.
A red-black tree is similar to a B-tree of degree 2. Such as the one we’ll build.
RESOURCES
BOOKS
ALGORITHMS
ARTICLES ON B-TREES
- Analysis of Algorithms - B-Trees
- B-tree Wikipedia article
- The Power of B-trees (in CouchDB)
- MySQL comparison of B-Tree and Hash Indexes
- Postgres Index Types
SOURCE CODE
REAL-TIME WEB
INTRODUCTION
Originally, the web was designed around the request, response cycle. You click a link, a request is sent to the server, who replies with a response. Then we got AJAX, which allowed us to request data from the server without reloading.
But what if we want the server to notify us of something? Let us know about a new message, notification, or event. And get notified as soon as it happens. That’s what real-time on the web is all about.
In this project, we’ll build our own real-time web engine. Similar to Socket.io. It will support two types of transports: long polling and WebSocket.
This will help you understand the magic behind real-time updates in the browser.
TRANSPORTS
The transport is the technic used to publish and subscribe over HTTP. Here are the three ones I presented.
- Polling
- Long polling
- WebSocket
In this project, we’ll focus on the last two since they are still widely in use today.
REAL-TIME WEB BASICS
Most real-time web librairies work in the same way.
They have a client, running in the browser, that communicates with a server.

Socket.io is one of the most popular real-time engine at the moment, so we’ll use that as an example. But keep in mind, at their core, all real-time engines work in the same way. Only their API changes.
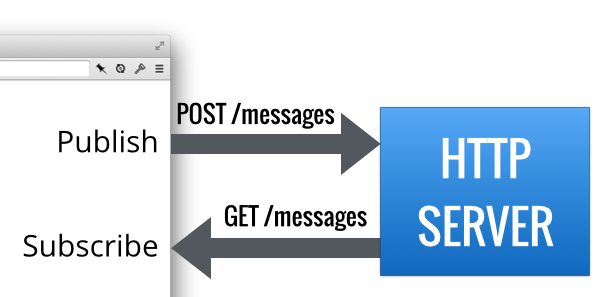
CLIENT-SIDE (IN THE BROWSER)
The client can publish messages to the server. Usually with a method called publish , send or emit .
client.publish('hello')

// In Socket.io 1.0
client.emit('message', 'hello')

// In older Socket.io versions
client.send('hello')
To receive messages from the server, the client needs to subscribe and provide a callback. The callback function will be called whenever a message is received from the server.
client.subscribe(function(data) {
  console.log('Got a message from the server', data)
})

// In Socket.io
client.on('message', function(data) {
  console.log('Got a message from the server', data)
})
SERVER-SIDE
A similar API need to exist on the server too.
With Socket.io:
io.on('connection', function(socket) {

  socket.on('message', function(msg) {
    console.log('message: ' + msg)
  })

})
See this tutorial on building chat app with Socket.io for an overview of this in action.
BUILDING OUR OWN REAL-TIME ENGINE
In the next two videos, we’ll implement our own custom real-time engine.
It will have a client, running the browser, that can publish messages and subscribe to incoming messages on the server.
We’ll use Express to build the server-side portion of our engine.
SETUP YOUR ENVIRONMENT
Get the code:
$ git clone https://github.com/greatcodeclub/realtime.git # or your fork
$ cd realtime
$ npm install
STARTING THE SERVER
Use the following command to start the web server with automatic reloading on file change.
$ npm start
Browse to http://localhost:3000/.
Try opening two tabs at that same URL. Type a message in input box and hit enter.
BAM! Real-time.
PART 1: LONG POLLING
In real-time web speak, a transport is the technology used to transport messages from the client to the server and back.
Long polling is supported by all browsers and is relatively simple to implement. So we’ll start with that one.
It consists of an AJAX request that waits for an event to happen on the server. By keeping an active connection opened with the server, we get real-time updates.
However, the downside of long polling is that we have to make a new AJAX request after each message we get. Because, the server sends back a message using an HTTP response and then closes the connection.
Lets start building our own real-time engine and implement long polling!
RECAP
- We start by implementing a
Clientthat canpublishandsubscribeto messages on the server. - We use an AJAX POST request to send messages to the server.
- On the server, we use Node’s
EventEmitterto create a message bus. - In the client, we subscribe to messages from the server using an AJAX GET request that will stay opened until a message arrives.
- The server handles the GET request by subscribing to the message bus.
GET THE CODE
To get the code:
$ git checkout -b part1 origin/part1
If you want to re-code this part on your own, use the start-part1 branch:
$ git checkout -b my-part1 origin/start-part1
PART 2: WEBSOCKET
WebSockets are now supported by most browsers. They feel like real sockets and offer two way communication. Plus, they don’t have the overhead of long polling.
In this second part, we’ll extend our Client to support WebSocket and fallback to long polling.
We’ll use the ws Node.js library to implement the backend on the server.
RECAP
- We setup
ws's WebSocket server into our existing server. - We hook
ws's server with the message bus. - We refactor the client to support multiple transports.
-
Client.WebSocketnow has the methods to handle WebSocket on the client-side. - We detect if WebSockets are available. (
window.WebSocketis defined?) and pick the transport accordingly. - We got ourselves a real-time web engine!
GET THE CODE
To get the code:
$ git checkout -b part2 origin/part2
If you want to re-code this part on your own, use the start-part2 branch:
$ git checkout -b my-part2 origin/start-part2
EXERCISE: RE-CODING THE ENGINE
The best way to understand a complex piece of code is to recode it. I recommend re-watching the last videos slowly while re-coding the part you’re interested in.
GET SETUP
Follow the instructions to setup your environment.
And prepare the branch you’ll work on:
$ git checkout -b recoding origin/start-part1 # or part2
USING A DIFFERENT LANGUAGE
If you’re thinking of re-implementing this project using another platform on the server-side, be careful.
Real-time requires keeping a large collection of connections opened at once. The concurrency mechanism used by the server is very important. Most web servers were built for fast request-response cycles. Meaning the response is sent right away. The connection is not kept opened.
Non-blocking I/O is the best way to support a large number of concurrent connections. Node is the platform of choice for this type of problem, since it only supports non-blocking I/O.
Take a look at these libraries if you’re interesting in implementing the project in different language:
- Ruby: EventMachine
- Python: Tornado
- C: libev
Take note that most servers use threads to handle concurrency. Which will work fine, but might use more resources.