FRONT-END WEB FRAMEWORK
INTRODUCTION
Front-end web frameworks can help you create really fast web applications. You click a link and BAM ! It’s already there. How do they do this?
The trick is they don’t wait for a response from the server. Everything is done in the browser. From changing the URL in the address bar to updating content on the page.
In this project, we’ll uncover the methods used to build single page applications, and the frameworks that support them.
You will understand how the routing system of Backbone, Ember and Angular work inside.
Ready? Let’s do this!
TOOLS WE’LL USE
Here are three important tools and APIs we’ll use to build our own front-end framework.
THE HISTORY OBJECT
HTML5 introduced the pushState method to push a new entry into the history of your browser and update the URL in the address bar.
// To change the URL in the address bar.
history.pushState({}, "", "/some/path")

// To know when the user hits back (or forward).
$(window).on('popstate', function() {
  console.log('URL changed to ' + location.pathname)
})
HANDLEBARS
Handlebars is a popular JavaScript template engine. We’ll use it to render templates from inside the browser.
Dynamic portions of the template are wrapped in {{ ... }} . The rest is plain HTML.
var source = "<p>{{ name }}</p>"

// Handlebars compiles the template to a function.
var template = Handlebars.compile(source)

// Call the function to render the template passing the data to use.
var html = template({ name: 'Marc' })
A trick often used to embed templates in an HTML page is to put them in <script> tags.
<script type="text/x-handlebars-template">
  <p>{{ name }}</p>
</script>
FUNCTION.APPLY
At some point in our framework, we’ll need to pass an array as a list of arguments to a function. apply to the rescue!
// Take this callback function as an example
function callback(a, b, c) {
  return [this, a, b, c]
}

// We want to pass these as the a, b, c arguments.
var args = [1, 2, 3]

callback.apply(null, args) // => [window, 1, 2, 3]
// Same result as calling:
callback(1, 2, 3)

// The first argument controls the value of `this`.
var object = {}
callback.apply(object, args)
// Same result as:
object.callback = callback
object.callback(1, 2, 3)
SETUP YOUR ENVIRONMENT
Get the code:
$ git clone https://github.com/greatcodeclub/front.git # or your fork
$ cd front
STARTING THE SERVER
After you’ve cloned the repo, start the web server:
# (in front)
# If you have Python installed
$ python -m SimpleHTTPServer 3000

# Or, if you have Ruby installed
$ ruby -run -ehttpd . -p3000
(See this list for other ways to start a static web server.)
Then browse to http://localhost:3000/ and marvel at my wonderful and snappy blog.
READY?
Ready to build a simple front-end web framework to run a single page app? Jump to the next module and lets do this!
PART 1: ROUTING
In this first part, we’ll implement a routing system in the browser using history.pushState .
At the end of this video, we’ll end up with the following API for our framework:
Front.route('/', function() {
  // ...
})

Front.route('/:permalink', function(permalink) {
  // ...
})
RECAP
- We use Handlebars to render the index template.
- We implement
Front.navigate(url)usingpushState. -
Front.load()is then called to load a page. And hooked to thepopstateevent. - In the app code, we capture all link clicks and forward them to
Front.navigate. - We define routes using
Front.route(path, callback). - The proper route is found and called in
Front.load. - Finally, we add support for named parameters in routes (
:permalink).
GET THE CODE
To get the code:
$ git checkout -b part1 origin/part1
If you want to re-code this part on your own, use the start-part1 branch:
$ git checkout -b my-part1 origin/start-part1
EXERCISE: FALLBACK TO USING HASH
As mentioned in the introduction, pushState is not supported by all browsers. That’s why front-end frameworks fallback back to a second, and more widely supported approach. Using location.hash and onhashchange event.
GET SETUP
Follow the instructions to setup your environment.
Then, get the code for the exercise by checking out the exercise branch.
$ git checkout -b exercise origin/exercise
Here are the changes you’ll need to make:
- Use
location.hash = '#' + pathinstead ofpushState. - Bind to the
hashchangeevent instead ofpopstate. - Use
location.hashinstead oflocation.pathnameto determine the current URL.
Gotcha: Before setting location.hash , you’ll need to make the URL relative, use the following regular expression: path.replace(/(\/\/|[^\/])*/, "")
SOLUTION
To get the solution, check out the solution branch.
$ git diff origin/solution
You can also view the diff on GitHub.
PART 2: A NICER API
The fun part of creating a framework is giving it the shape you want.
In this video, I’ll show you how I turn the previous code into:
new Front.Router({
  '/': function() {
    this.render('index', { posts: posts })
  },

  '/:permalink': function(permalink) {
    var post = _.findWhere(posts, { permalink: permalink })
    this.render('post', post)
  }
})
RECAP
- We define the
Front.Routerconstructor function. - We define a
rendermethod on theRouterclass. - Tada! Our own custom front-end framework.
GET THE CODE
To get the code:
$ git checkout -b part2 origin/part2
If you want to re-code this part on your own, use the start-part2 branch:
$ git checkout -b my-part2 origin/start-part2
EXERCISE: EXTEND THE FRAMEWORK
I’m sure you’ve got some crazy ideas to make the ideal front-end framework. Here’s your chance to create your own! Use the code from this project to get started.
Some frameworks like Backbone are more flexible and some others like Ember impose more conventions. Each one has their own set of pros and cons.
The limits are endless. But keep in mind, it’s all about designing an API that look nice, will be easy to use and understand. Here are a few ideas to get you started.
INSPIRED BY RAILS
Front.routes(function(map) {
  map('/', 'posts#index')
  // Send to PostsController.prototypte.index defined bellow

  map('/:permalink', 'posts#show')
})

PostsController = Front.Controller.extend({
  'index': function() { ... },
  'show': function(permalink) { ... }
})
CHAINING GALORE
Front.route('/').
      renders('index')

Front.route('/:permalink').
      renders('post').
      with(function(permalink) {
        return _.findWhere(posts, { permalink: permalink })
      })
Good luck!
GET SETUP
Click the WORK ON YOUR PROJECT button in the top right to get started working on your own framework.
Follow the instructions to setup your environment.
Once you’re ready, implement your own Router API like I did in the second part.
RESOURCES
WEB API REFERENCES
POPULAR FRONT-END WEB FRAMEWORKS
MORE ABOUT PUSHSTATE
REAL IMPLEMENTATIONS
NEURAL NETWORK
INTRODUCTION
Can you make a computer think? Have a brain? Well… that’s not really possible (yet …). But we can get pretty close with artificial intelligence and Neural Networks.
Neural Networks, technically Artificial Neural Networks, are inspired by the way our brain works. They can be used to estimate outputs that depend on a large number of inputs. For example, recognizing hand-written characters in images.
In this project we’ll implement a Neural Network from scratch and use it to recognize numbers drawn with pixels:

In this first video, we’ll see the concepts and algorithms powering Neural Networks.
FEEDFORWARD NEURAL NETWORKS
Neurons are simple processing units. Inputs in, one output out. That’s it. But their full power comes when they work together. The output of a neuron will be the input of another neuron and on like so until we reach the end of the network.
In the Neural Network we’ll build, neurons are arranged in layers. Each neuron of a layer feeds its output to all the neurons of the following layer. Which is why we call it a Feedforward Neural Network.
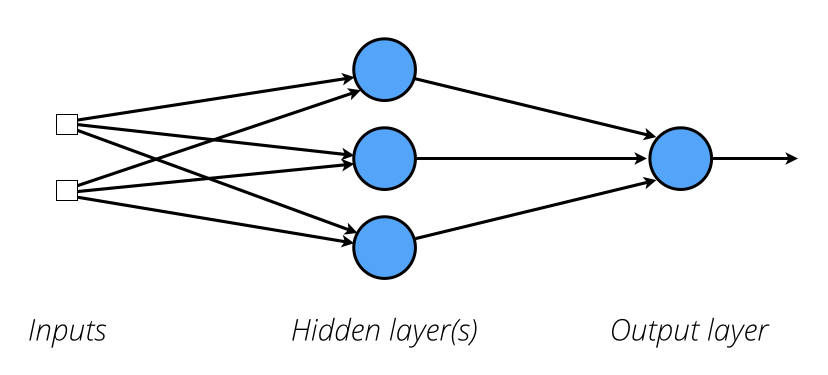
IMPORTANT PROPERTIES ON A FEEDFORWARD NEURAL NETWORK
- A neuron can have multiple inputs, but only one output.
- All inputs and outputs are numbers between 0 and 1.
- A neuron is connected to all the neurons of the next layer, and vice versa.
- By consequence, all neurons of a layer have the same number of inputs.
- The number of inputs in the first layer is the number of inputs that we to feed to the Neural Network.
- The number of neurons in the last layer (the output layer), sets the number of outputs produced by the Neural Network.
Wooh! That’s a lot of stuff. We’ll cover each one of those points, one at a time, in the upcoming videos.
ALGORITHMS
Here is a summary of the algorithms we’ll use when building our Neural Network.
The origin of these algorithms is described in great details in the book Artificial Intelligence: A Modern Approach by Stuart Russell and Peter Norvig. You can also jump to the Resource page if you’d like to learn more.
PROCESSING INPUTS IN A NEURON
The output of a neuron is the sum of all its inputs multiplied by the weight of the branch they came from. To normalize the output to a number between 0 and 1, we feed it to the Sigmoid function ( S ).

The bias is the trigger of our function. If the sum of all inputs times their weights is greater than the bias, then the neuron activates. Consider the bias like a weight of a branch that always receives the input 1 .
TRAINING A NEURON
Training is done by feeding the network with inputs for which we know the final output(s). We then compute the error (difference between the expected and actual output) for each neuron.
Once we have the error, we know how much to adjust the weights and bias to reduce future errors.
To compute the error of the neurons in the output layer:
Error = Target - Output
Target being the expected output, and Output the actual output.
For the neurons in the hidden layers:
Error = Delta of neuron #1 in next layer * Weight of the branch to that neuron +
        Delta of neuron #2 in next layer * Weight of the branch to that neuron +
        ...
Once we have the error, we can compute the delta.
Delta = Output * (1 - Output) * Error
Notice that for the hidden layers, we needed the deltas of the next layer to compute the error. Thus, we’ll need to compute the error starting from the last layer (output layer) and move backward from there.
Finally, using the delta, we update the weights and bias of the neuron.
Weight += Learning rate * Input * Delta
Bias += Learning rate * Delta
The Learning rate is a percentage that ensures the neurons don’t learn too fast and focus too much on one output.
ETUP YOUR ENVIRONMENT
Get the code:
$ git clone https://github.com/greatcodeclub/neural.git # or your fork
$ cd neural
RUNNING THE CODE
Make sure you have Node installed.
To run a demo:
# (in neural)
$ node demos/character_recognition.js
READY?
Ready to build our Neural Network? Jump to the next module and lets do this!
PART 1: PROCESSING
In this project, we’ll use our Neural Network to recognize numbers from 0 to 3 drawn in pixels (in a 4x5 matrix). Here’s the layout of our network: 20 inputs, one hidden layer containing 10 neurons, and two neurons in the output layer.
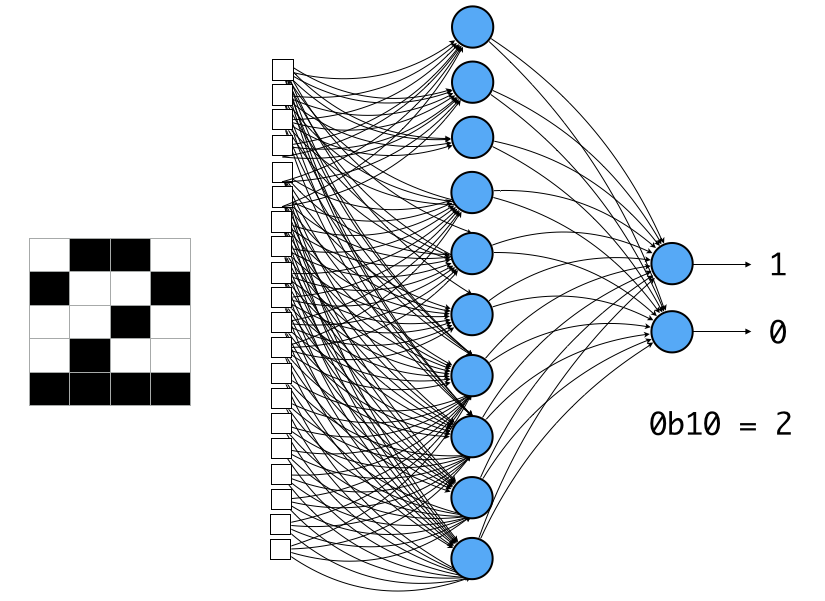
Each input correspond to a pixel. 1 being a pixel, and 0 blank, in the character image. The outputs will be the recognized number in binary format.
RECAP
- We create the
Neuronclass, holding the weights and bias. - We implement the
Neuron.prototype.processmethod to process the inputs and return the output. - The
Layerclass groups the neurons together and make them all process the same inputs and collect their outputs. - The
Networkclass make each layer process the inputs, and feeds their outputs to the next layer.
GET THE CODE
To get the code:
$ git checkout -b part1 origin/part1
If you want to re-code this part on your own, use the start-part1 branch:
$ git checkout -b my-part1 origin/start-part1
PART 2: TRAINING
At this point, our network is dumb. It has all the neurons and layers it needs, but the weights and bias have been set randomly. When you run the demo you might get the correct answer sometimes, but that’s just plain luck.
To make our network smarter, we must train it. We’ll train it by feeding it examples of good answers.
Refer back to the Algorithms page for the list of equations we’ll use.
RECAP
- We feed a few training examples to our network.
- We create a
Network.prototype.trainmethod to train the network using those examples. - For each examples we get the
inputsand the expected outputs (targets). - We process the inputs through the network to get the actual outputs (
outputs). - We compute the errors and deltas of the neurons in the output layer.
- We continue computing the errors and deltas backward to the previous layers.
- We update the weights and bias of the neurons, using the deltas we just computed.
- Finally, we do this whole process many times until we reach a low enough error (
errorThreshold) or have done a fixed number of iterations.
GET THE CODE
To get the code:
$ git checkout -b part2 origin/part2
If you want to re-code this part on your own, use the start-part2 branch:
$ git checkout -b my-part2 origin/start-part2
USE CASES & APPLICATIONS
Neural Networks can be used to solve many kinds of problems. You’ll find another demo, in the master branch of the project repository, in which we use the network to estimate XOR. Although this is useless a application, it shows how a Neural Network can be used to estimate any kind of equation.
You’ll find another great demo online, using the brain JavaScript library, in which you train a network to recognize color contrast.
GET SETUP
Click the WORK ON YOUR PROJECT button in the top right to get started using our Neural Network.
Follow the instructions to setup your environment.
Once you’re ready, setup your own network and make that magic happen!
RESOURCES
BOOKS
- Artificial Intelligence: A Modern Approach by Stuart Russell and Peter Norvig
- Neural Networks and Deep Learning
ARTICLES
- Basic Concepts for Neural Networks
- Neural Networks in Plain English
- Artificial Neural Networks - Introduction
- Principles of training multi-layer neural network using backpropagation