A Tested and Proven Methodology
The iOS Lead Essentials has been battle-tested and is a proven methodology to achieve technical excellence and, as a consequence, be ready for better projects and job opportunities.
For years, it has been working for us, our friends, mentors, and mentees.
It’s important to understand you can accomplish it too . Knowing it’s possible—for anyone to achieve an enriching and fulfilling career—is a powerful source of motivation.
Does it mean it’s easy? No.
If it were easy, everyone would have an enriching and fulfilling career already.
Does it mean everyone can achieve it? Yes, absolutely.
We’ve seen fantastic career transformations for all kinds of experience levels, backgrounds, and locations.
Does it mean those results are typical? No.
They are not typical, but they are 100% possible.
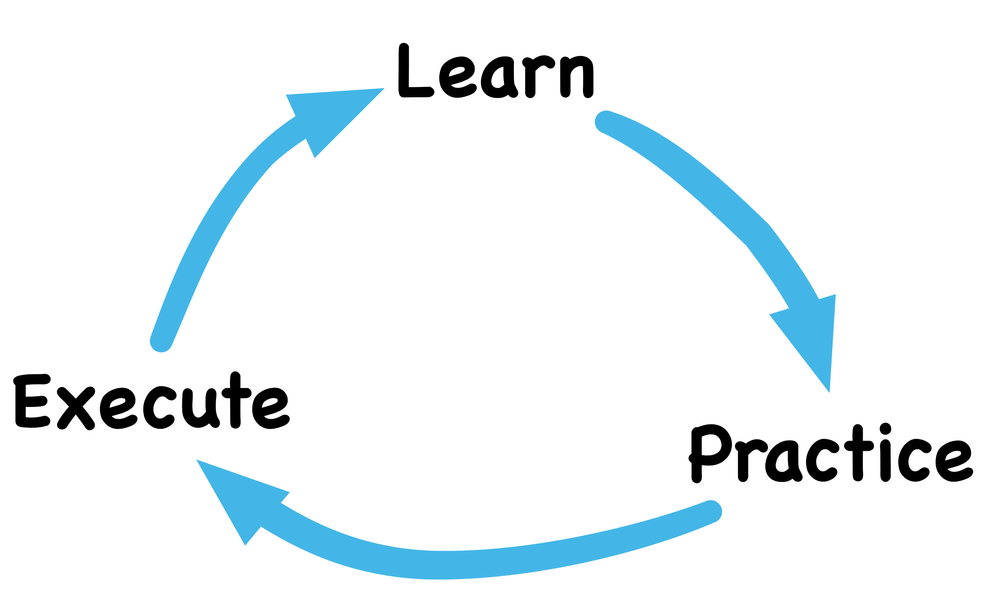
To get there, you’ll need to follow a three-step timeless formula: learn , practice, and execute .
Your results will depend on your ability to start and endure. It’ll depend on how much energy you put not just into learning, but also practice and execution.
So follow the program, practice, execute, and the results will come.
Consistency is the key. The good news is: You’ve just joined a community that is eager to help you thrive and stay on the right path.
The iOS Lead Essentials Structure
Many of you are super excited to start learning. Others may be feeling overwhelmed thinking: “Will I be able to do it?” or “Will it work for me?”
The important thing is: whatever you’re experiencing at this point is normal. Be assured many devs feel just like you.
To get the most out of the iOS Lead Essentials course, it’s important to understand the structure of the course before you dive into the lectures.
There are 5 modules.
1. Planning, Initial System Design and Requirements Analysis module
In the first module, you will learn the fundamentals of modular design and diagrams, and how they link with the overall business needs, planning, and requirement analysis.
The knowledge within this module is the foundation of everything to come. Being able not just to create good design, but—literally—visualize and communicate your intent with diagrams, stories, use cases, and clear requirements is essential to achieve technical excellence and collaborate well with others .
You’ll also learn how to identify the common pitfalls of many iOS apps (e.g., Singletons and Spaghetti design) and learn the keys to short- and long-term growth, harmonious collaboration, and professional fulfillment (e.g., excellent communication, flexible design, positive mindset, leadership, career growth…).
The goal is for you to start off on the right foot, forming a solid foundation for you to stack the upcoming knowledge.
Throughout the lectures, we’ll be exercising the iOS Lead Essentials methodology, combining:
- Leadership as a Software Developer
- Requirement Analysis and Refinement
- Stories, Scenarios and Use Cases
- Effective Version Control with Git
- Modular Design and Clean iOS Architecture
- Design Principles applied in Swift (SOLID, CQS, Functional Core…)
- Design Patterns applied in Swift (Strategy, Delegate, Singleton Factories…)
- Unit, Integration, and End-to-End Testing Strategies
- XP, TDD, BDD and DDD practices
- Continuous Integration, Build and Deployment
- Economics of iOS app development (trade-offs, cost analysis, ROI…)
- Codebase Health Analysis
2. Networking module
In the Networking module, you’ll start exercising the iOS Lead Essentials methodology hands-on. We’ll cover Stories, Scenarios, Use Cases, Modular Design, SOLID principles, XP, TDD, BDD and DDD practices, URLSession, URLProtocol, Decodable, Unit, Integration and End-to-End testing, decoupling networking frameworks from business logic, setting up a Continuous Integration pipeline, how to work effectively with backend teams, and much more!
You’ll keep learning the fundamentals with active practice and execution . You’ll learn networking best practices and how to tackle the most common challenges when it comes to developing, maintaining, and test-driving a clean networking layer in your iOS applications.
3. Persistence module
In the Persistence module, we dive deep into complex Stories, Scenarios, and Use Cases, Modular Design, SOLID principles, XP, TDD, BDD and DDD practices, decoupling database frameworks from business logic, Unit and Integration testing, URLCache, CoreData, FileManager, Codable, and much more.
You’ll keep mastering the fundamentals with continuous practice and execution . You’ll learn persistence best practices and how to tackle the most common challenges when it comes to developing, maintaining, and test-driving a clean persistence layer in your iOS applications.
4. UI+Presentation module
In the UI section, you’ll learn about prototyping techniques, localization, pixel-perfect design specs, UX, UI, MVC, and how to work effectively with designers.
In the following Presentation section, you’ll learn about MVVM and MVP as we go the extra mile to decouple UI from core business logic, creating reusable UI elements.
You’ll learn UI, UX, and Presentation best practices and how to tackle the most common challenges when it comes to developing, maintaining, and test-driving a clean UI and Presentation layer in your iOS applications.
5. Main module
In the Main module, you’ll learn how to compose all modules to form a fully functional app, validate high-level acceptance criteria with automated tests at every level (Unit, Integration, Snapshot, and UI tests), and how to set up a continuous delivery pipeline.
You’ll learn app composition best practices, including how to use the Combine framework and how to tackle the most common challenges when it comes to developing, maintaining, and test-driving a clean Composition layer in your iOS applications.
Extras
Throughout the course, you’ll find a lot of supplementary material. The extra content is there for people who want to achieve extra ordinary results.
For example, every video lecture comes with an accompanying article. Also, you’ll find references, book titles, external links, recaps, mentoring sessions, and other bonus material.
Can I achieve my goals without the extra material?
Yes, you can. The extra material is not mandatory. But it vastly increases your chances of achieving results faster.
So, we strongly recommend you to take this extra content seriously .
Learn , practice , and execute . Be consistent, and the results will come.
Once you learn, you can’t unlearn it. The positive results of your good education will pay off forever.
The Decisive Factors of Your Training
Many students want to know the decisive factors to become a remarkable iOS dev and experience an enriching and fulfilling career.
In our experience, it’s like learning how to swim vs. becoming an elite swimmer.
You can watch professionals swim all your life, but if you don’t practice, you won’t ever achieve their level. You may not even learn how to swim.
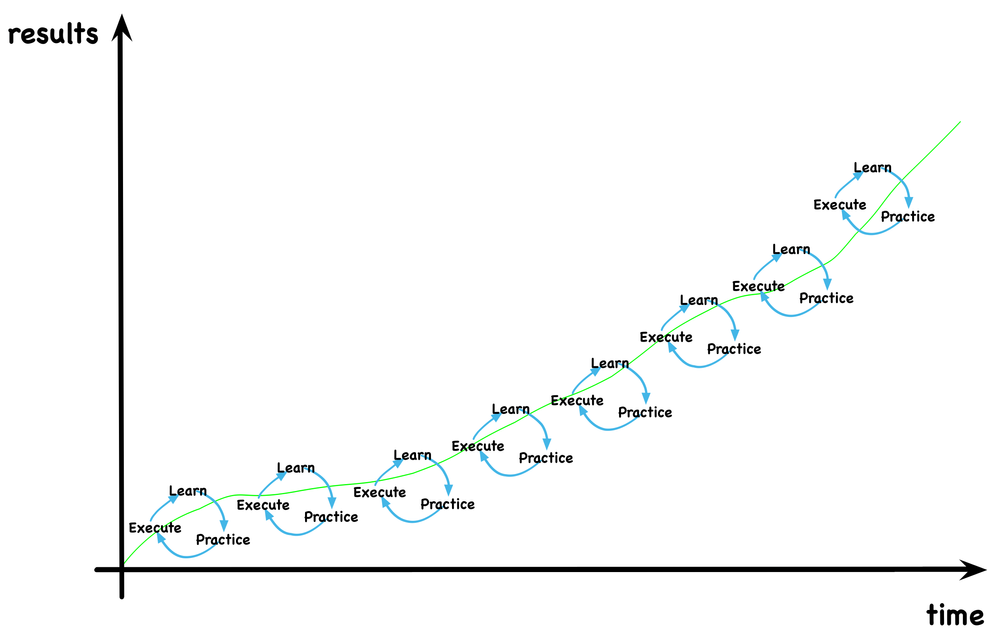
To achieve a high level of excellence, in any industry, you need to learn, practice, and execute. The more you follow these three steps, the more results you’ll get.
Your career progression is a result of how much effort you put in the right direction . The results you will achieve through this training are directly correlated to the amount and quality of your practice and execution .
The key to becoming a success story in the iOS Lead Essentials program is to learn a little bit with each lecture, and practice a little bit what you learned. Then, execute in your day-to-day work. Make a habit out of repeating this process over and over again.
One step at a time, in the right direction .
If you don’t practice and execute what you learn in the lectures, chances are you won’t achieve your goals.
If you don’t fully get what’s in the lecture, don’t get discouraged. Open Xcode and practice what you saw. Even if you only copy and paste.
Build the project. Run the tests and watch them pass (or fail).
Feel the bits moving and get some of that feedback on the screen— that’s progress!
Done is better than perfect.
Some feedback is better than no feedback.
Any feedback is better than no feedback!
Don’t wait until you feel confident you’ve mastered it, because it’s very unlikely you’ll learn how to execute just by watching.
The active practice is what will make you confident . Active practice will make you a master at your craft.
Don’t wait for the perfect time (it will never come).
Practicing under imperfect conditions is what will help you evolve faster and achieve your most ambitious career and life goals.
Watch a lecture, learn, and practice a little bit. Then watch it again . And practice a little bit more.
Now… If we had to choose just one goal for you in the iOS Lead Essentials , it would be to execute .
You are learning so you can execute it.
You’re in the right direction if the following steps are part of your daily workflow:
- Learn
- Practice
- Execute
- Evaluate your results
- Ask questions
- Help others
- Repeat
Small steps, in the right direction .
Keep this in mind:
- Your career is not a quick sprint (finite). It’s a continuous journey (infinite) .
- Your career is not about speed. It’s about being o n the right path .
- Done is better than perfect.
Learn a little bit and practice a little bit. Execute. Repeat.
The iOS Lead Essentials High-Performance Mindset
What got you to your current career level, isn’t necessarily what will get you to the next level. It may even get in the way.
That’s a hard realization for many iOS developers.
Many times in your life and career, you’ll have to let go of the past to open space for what’s next.
We know it can be hard to let go, but when you accept and embrace change and try new things, it’s liberating.
If you think about it… Embracing change and trying new things is what got you in iOS development in the first place.
However, the same steps that got you to your current career level can only get you so far. Repeating them will most probably generate the same results.
If you want to achieve the next level, you need a new path. A new set of steps. You need a force to generate motion— in the right direction .
Being open-minded will immensely boost your career progression.
But learning new ways is not enough. You need practice and execution!
To be effective, don’t focus only on the final destination (an enriching and fulfilling iOS career through technical excellence).
Chances are you’ve heard the proverb stating that a journey of a thousand miles starts with a single step . Well, that’s pretty accurate.
What the proverb doesn’t state is that you need to stay on the path and keep walking.
You can’t reach mile 1000 without walking 999 miles first. One step at a time.
So…
Your primary focus should be continuous improvement . Every time you learn and practice, you become better. And better… Step by step.
Learn, practice, and execute. Over and over. Focus on continuous evolution, and the improvements will compound.
In this process, we recommend you to evaluate yourself, ask questions, and help others continually. But we don’t recommend you to compare yourself to other developers.
Only compare yourself to who you were yesterday.
Ask the following:
“Am I better than I was yesterday?” Aim for a yes, every day .
Aim for 1% improvement every day .
One effective way our high-performance students adopted the iOS Lead Essentials methodology, was by watching and rewatching the lectures, going through the extra material, practicing, executing, asking questions, and helping others thrive. Over and over again .
It’s like when you’re learning a new language, let’s say Portuguese . The more you hear it, not only you will understand it better, but also be able to use it better.
The more the iOS Lead Essentials practices become part of your daily dev routine, the easier it’ll be to understand, apply and, of course, execute it and achieve your ambitious goals.
Remember: just watching is not enough.
You need to dedicate time for your career transformation. To reach the next level.
45 minutes a day is more than enough if you don’t have a lot of time.
Watch a lecture. Take notes. Apply.
And don’t hesitate to ask for help and to help others in the community. We’re here to help you progress in the right direction.
Learn, practice, and execute.
Behavioral Profiles
After working with and mentoring many iOS Developers, we observed and mapped common traits in the following three main behavioral profiles:
1. The Learner
The Learner , of course, loves to learn. Thus, the more they learn, the more they realize they have more to learn, creating a vicious circle.
For them, practice and execution are not that important, and they love to discuss the theory behind everything and how to develop high-quality solutions (for the long-term).
They avoid networking or pairing because they don’t like to code before they understand the problem thoroughly and have a solution mapped in their head. They often justify working alone by saying “ I need time to think about the problem on my own .”
Learners are usually great teachers. When pairing with a learner , be open and ready to learn a lot (bring your notepad and write down notes and any book references or wisdom they might throw at you!).
2. The Networker
The Networker does not care much about learning, practicing, and executing. Instead, they focus more on establishing strong relationships with other developers.
Networkers go to a lot of events, they reach out to people, meet and make friends in the community. They often don’t care about the short- or long-term; instead, they care about now !
They love helping others, networking, and pairing. But most often will avoid taking the lead (they run from the keyboard!). They prefer to observe the process and contribute by exercising their connections and high-level ideas.
Do you know that problem you’ve been avoiding because you have to call support or collaborate with external teams? Networkers can solve these challenges in no time!
When pairing with a networker , they may not have the answers, but they know someone who does (be ready to meet and greet many people, help others, and increase your status in the company!).
3. The Doer
The Doer doesn’t care much about how things actually work, they are more interested in executing and seeing results (often short-term). So they learn a little bit and spend A LOT of time executing. Even if the execution is not well-thought-out.
They are eager enough to start before they’re ready! They often justify working alone by saying “ people slow me down .” If they have the keyboard, it’s hard to take it back from them.
When pairing with a doer , you’ll learn how to get things done quick (be ready to try to follow their fast pace—they may not be able to explain well what they’re doing!).
Finding out your profile
Of course, these types won’t ever describe you perfectly. However, it’s important to understand which profile you identify the most (it may change over time!), so you can leverage your strong qualities, but also identify your potential weak points:
-
Learners may never get remarkable results if they just study the theory and avoid pairing with people that know how to execute. They need to reinforce the importance of execution and networking .
-
Networkers may never get remarkable results if they just observe and rarely take the lead . They need to reinforce the importance of learning, practicing, and executing .
-
Doers may never get remarkable results if they lack the theoretical foundation and avoid pairing with people that “ slow them down ” (they probably do need to slow down and build up the patience to progress faster in the long run). They need to reinforce the importance of learning and networking .
Conclusion
All three types can achieve extraordinary results if they learn, practice, and execute .
However, Doers tend to achieve better (and faster) career transformations because they execute more!
Remember, you are learning to execute .
It doesn’t matter what you know. It matters what you do with what you know.
Execution is the end goal. But execution alone does not guarantee extraordinary results …
For example, if just driving a car made you a better driver, every seasoned taxi driver would be an extraordinary driver . Unfortunately, that’s clearly not the case.
Extraordinary results require deliberate learning, practice, and execution.
So above all, execute . But don’t forget to learn and practice as well!
Thriving Through Adversity
In your journey of continuous improvement, you will inevitably face adversity, struggles, setbacks, hurdles, unexpected events, and enemy forces that will try to prevent you from achieving a remarkable career. We all face them.
The solution is to prepare yourself to overcome and thrive through all of them!
So…
We have compiled a list of the most common types of “progress enemies” and how to defeat them.
Overcoming these enemy forces will keep you on the right path to achieve all of your ambitious life goals.
1. Pursuit of Perfect
The pursuit of perfection is that voice telling you:
- You’re not ready yet to practice or execute it.
- Learn a little bit more.
- Don’t ship it yet. Improve the code a little bit more.
- Your code is not clean enough.
- Don’t apply for a better job yet. Study a little more…
This enemy masks itself as a good endeavor: to deliver perfect outcomes . In reality, it’s just a natural fear of failure (insecurity) we all have. The pursuit of perfection is a place to hide from the uncomfortable.
“I’m not ready (perfect) yet” often means “I won’t fail if I never try.”
Don’t let the Pursuit of Perfect win. Own your work!
Perfection is something we should all aspire to achieve; however, we should accept nothing is ever perfect .
Regardless of how excellent our skills are, there’s always room for improvement .
Our work can always be a little bit better.
But remember…
Done is better than perfect.
Improving one requirement is better than zero improved requirements.
Automating one task is better than zero automated tasks.
Decoupling one module is better than zero decoupled modules.
Writing one test is better than zero tests.
Applying for a better job is better than zero applications.
This doesn’t mean you shouldn’t aim for improving all requirements, automating the most tasks you can, decoupling most modules, testing all of your code, and getting ready for a better role.
Yes, you should aim high , but focus on continuous improvement to get there .
Small steps, in the right direction.
If you’re feeling like your results are not good enough, we can assure you that every successful software developer you admire went through this exact phase where you are now. All of them.
Results won’t be remarkable at first.
For example, the first iPhone is much worse than the latest one. If Apple waited to release the perfect phone, they would never have released the iPhone in the first place. It can always be a little better—and in fact, it is getting better over time!
Although Apple aims to produce the perfect smartphone, they understand that done is better than perfect .
One imperfect execution today is better than a perfect execution a year from now. That’s because the “perfect execution a year from now” depends on “ the imperfect execution today.”
So… learn, practice, execute, and improve continuously!
2. Time Eater
The time-eater is that voice telling you:
- What’s happening on Facebook, Twitter, and Instagram?
- Maybe you should watch another episode of [insert latest Netflix hit]…
- Instead of studying as planned, let’s eat something. You’re hungry…
This voice will do everything it can to keep you occupied instead of contributing to your progression.
At the end of the day, you may feel like you did a lot of things. But almost nothing that gets you closer to your life goals. To where you aspire to be.
You may even feel bad because you didn’t follow through with your plans.
So, every time you’re fighting with the Time Eater voice, remind yourself: “I want better results in my life! And results depend on execution!”
Then go ahead and ask yourself: “What will get me closer to where I aspire to be?”
- Occupying myself more with Netflix, social media, and other time eaters.
Or
- Going through the lectures and extra material, practicing, executing, asking questions, and helping others thrive in the community?
Nothing wrong with entertaining yourself (we all need it!). However, you need to find time to improve too.
Small steps, in the right direction.
Plant seeds, create good habits, and be ready to harvest the rewards later.
3. Confusion
When you’re confused, it’s natural to stop and do nothing.
The voice will say: This is too much! I don’t understand anything!
Confusion is natural. In fact, it’s the first step in learning.
But it shouldn’t become an excuse for stopping.
When feeling confused, the first thing you need to understand is what is confusing you?
Is it a word you never heard before (e.g., polymorphism)?
Is it the application of a principle (e.g., dependency inversion)?
Is it a tool issue (e.g., running tests in Xcode)?
…
Then, write down a very specific question and send it to the community.
By asking questions, you can get unstuck and learn faster.
The more philosophical your question is, the more philosophical the answer will be. For example, “When should I use protocols?”
That’s a very broad question. It’s not precise. Thus, you probably won’t get a precise answer to help you out.
The more specific your question is, the more specific the answer will be. For example, " At 10:32, you say that to decouple high-level business logic from low-level details, we need to use Dependency Inversion. And that we can do it with protocols. How can I use protocols to achieve Dependency Inversion to separate my Login validation rules (high-level) from the Login UI (low-level)? "
Aim for specific.
4. Information Overloader
The Information Overloader is that voice telling you: “Oh no! There’s so much to learn! I can’t ever do it!”
Think about it this way…
Learning is like climbing a very tall mountain.
If you stare only at the top, it may look impossible to get there. Thus, the voice will tell you to give up before even starting. Instead, you should focus on the path right in front of you. The steps you can take now.
But the voice will try everything to prevent you from taking the most important steps: the first ones.
If you feel paralyzed at any point in the course because of the Information Overloader , remind yourself that everyone — EVERYONE — goes through the same challenges you’re facing now.
And how do they win against the voice? By taking one step at a time, in the right direction.
The speed is not as important as the direction you’re going .
Remember: You are in the exact same conditions as others (who got to where you aspire to be) were at some point.
Stay on the right path and ask for help when you feel overloaded with information.
5. Blame Outsourcer
The Blame Outsourcer is the voice blaming everything around you for your lack of results.
Usually, this voice wants to tell you that your environment and circumstances overpower you:
- I don’t have time to study/practice because of X, Y, Z
- My boss doesn’t let me write tests
- My peers don’t care about modular design
- You don’t understand, if you knew the company I work for you’d know it’s impossible to do X, Y, Z
- Xcode is too slow/hard to configure
And so on.
That annoying voice will tell you to outsource the blame to others .
The problem is: although the voice can make you feel better for a minute, it also makes you feel helpless. “Since my boss doesn’t allow me to write automated tests, there’s nothing I can do to learn and practice it…”
But… You can win the argument against the Blame Outsourcer !
For example, Caio once had a client that didn’t want him spending time writing tests because they thought it would take longer and it would cost them more.
Caio negotiated with his client to still write the tests, and if it took him longer, he would not charge them for any of the extra time.
They ended up delivering the project on time, and the automated tests were a great addition to the product development. Caio took responsibility for the outcomes, increased his skills and influence in the process, over-delivered to expectations, and acquired a client for life!
Take responsibility and outsmart the Blame Outsourcer !
Once you accept responsibility, you might feel bad when you don’t get the desired outcomes, but the good news is that—since you’re responsible—you can still find a way to thrive!
The best opportunities come from taking responsibility when no one else will.
So every time something gets in the way of your goals, stop and think: “What can I do to achieve my goals regardless of the current situation?”
Regardless of your current level, the Blame Outsourcer will always be there whispering in your ears.
So… be ready to win the argument:
I’m a responsible person who achieves exceptional results, regardless of the situation.
The choice is yours.
6. Speed Comparator
In the iOS Lead Essentials, there are developers from all backgrounds and levels of experience.
And many developers tend to start comparing themselves to others.
They want to know who achieves more results, who earns the best salary, who finishes the course first, who asks the most questions, what is the level of the questions they ask, etc.
Comparing yourself to others can give you the drive to pursue better and faster outcomes, but can also demotivate you.
Because some people will get results faster than others…
The important thing is: speed doesn’t matter.
Regardless of how good you are, there will always be people with better/higher/faster results.
When the voice tells you that " You won’t ever be as good as that other developer—don’t even try ." IGNORE IT.
Be ready to tell this voice that you should only compare yourself with who you were yesterday.
Focus on continuous improvement. Tomorrow you should be better than you’re today.
Aim for (at least) a 1% improvement every day.
- One more lecture
- One more practice
- One more execution
- One more question asked
- One more dev helped
Otherwise…
If you compare yourself to others, you’ll always find a way to lose.
Remember: You’re here to achieve your goals.
You joined the iOS Lead Essentials program to become better than you already are.
Your transformation process is unique to you. Only you have control over how much energy you’ll put into it.
One step at a time, in the right direction.
Exercise
If you’re not achieving your goals with your training, chances are it’s because of one of these enemy voices in your head.
The first step to getting back on track is to identify which enemy voice is talking to you. Then, come back to this section, read the enemy description and how to overcome it.
You most probably know the enemies that often stop you from progressing in your endeavors.
As an exercise, be proactive and list the enemies you believe will most likely talk to you, and be ready to stop them!
-
Which enemies have already made an appearance in your life, preventing you from progressing in your career?
-
Which actions will you take to stop them?
Building a Remarkable Reputation
Many developers switch jobs via the typical path: a résumé. Odds are they get typical (average) results.
The critical problem is: your CV is likely to land on the desk of someone with no interest whatsoever in you or your work. If that’s the only path you take, you’re missing enormous opportunities.
“Millions of resumes, all in a pile, all waiting for someone to find them. If you’re in that pile, it’s not a good place to be. Before you start looking for a job, consider what you could do today so you never have to worry about that” —Purple Cow by Seth Godin
On the path to an exceptional career, you need to stand out from the crowd . Otherwise, sooner or later, you’ll hit a cap.
What we’ve learned from networking with remarkable developers—with remarkable careers—is that they switch jobs fairly easy.
They often don’t even have a CV. They don’t look for jobs. The jobs come to them through recommendations and their strong reputation.
You don’t need to get better at interviews and job-seeking. If you want always to get out-of-the-curve offers, your references should be your CV.
The secret to building such a reputation is what you do when you’re not looking for a job: over-deliver exceptional work with every opportunity . And make sure to make it known—share it ! So you increase the chances of getting an even better project next time.
Promote your work
Start a blog, podcast, daily advice, and/or YouTube channel if you don’t have one already. Aim for one publication a week and increase as you can (the more, the better!).
“…you can be the best programmer in the world, but if you are sitting alone in your basement and no one knows it but you, it doesn’t really matter. You aren’t going to have much of an impact.”—Sonmez, John. The Complete Software Developer’s Career Guide
If you need inspiration, produce content about what you’re learning in the iOS Lead Essentials course. For example, create content about how your unique skills, your technical excellence, and leadership are positively affecting your outcomes, your peers, and companies you work for.
Sharing and teaching others is a great way to promote yourself, increase your visibility in the market, and help the dev community. Additionally, it will help you revisit and understand better what you’ve been learning throughout the course.
Add an easy way for people to find and contact you on your pages. If you produce good content consistently, you should eventually start receiving out-of-the-curve offers directly to your inbox.
These offers often can’t be found in public listings, and are much higher than average.
Moreover, if you’re up to the challenge, writing a book and giving talks is a fantastic way to highlight yourself in the industry.
Find a niche for your content
Everyone has a unique combination of skills. Make a list of ten ways your unique skill set can make you remarkable and appeal to businesses.
Focus on actual results you identify as unique in the work you do. The things that differentiate you from your peers. That’s your initial niche and what you’ll focus on for creating content.
For example, Mike combines finance, behavioral economics, and business expertise with technical excellence. Don’t go for typical, as typical has been taken already. You have to go where the competition has not. The further, the better!
Don’t be afraid of also sharing your struggles and mistakes as it can help others avoid them while giving you credibility. It shows you’ve tried things and can learn when they don’t work.
Remarkable people don’t fail: they either succeed or learn.
Build your GitHub portfolio
Along with the course, build your GitHub portfolio to help you highlight yourself in the industry.
Most companies will Google your name before inviting you for an interview.
That’s a fantastic chance to start with a great first impression (first impression matters!). Along with your amazing online content (articles, posts, positive social media presence), they should find an outstanding GitHub profile showing how much you care for code integrity and empathy towards other developers.
GitHub provides an excellent opportunity to showcase your portfolio in a centralized and easily discoverable place. There you can demonstrate and promote the processes you use, metadata such as commit consistency (message/size/quality), code quality, communication skills, and frequency of your contributions (especially if you are interested in open-source projects).
Use open-source GitHub repositories to communicate your expertise.
Spend some time curating your GitHub repositories. Try to put yourself in the position of someone interested in learning more about you, your projects, and your skills.
Provide any documentation, diagrams, or code samples to communicate your intent well. Make it look good.
Highlight the purpose and techniques used to develop the project. This is a great opportunity to showcase any niched/specialized skills you have—the skills that make you stand out. (e.g., UI/UX, systems architecture, security, low-level coding, etc.).
Above all, remember that software development is a social activity.
So…
Most of the value you can provide comes from excellent communication .
For example, imagine if you had a Tic-Tac-Toe or FizzBuzz implementation in your GitHub repositories.
Although these exercises are simple, you can make your solution stand out from thousands of other repositories :
- The way you segment your code into frequent commits with meaningful messages
- A delightful and entertaining README (documentation)
- An amazing user interface
- Clean and easy to understand your code
- A comprehensive test suite with clean and easy to understand tests
- Demonstrating possible abstractions that contribute to the extensibility of the application
And so on.
Over-deliver in every interaction! With every opportunity. Even in small personal projects, over-deliver! Be consistent.
Positively engage with others in the dev community
Engage in community discussions. Contribute. Help others thrive without expecting anything back. Go to events. Host your own events. Network.
Always be positive and find great things to say about other developers’ work.
Sure some of the work may be lousy, but only looking for the negative just reaffirms what you already know and is bound to face resistance.
When you’re positive and listen to others, you know twice as much (what you know and what they know) and can influence and contribute much more to the community. Thus, the community will be eager to give back to you as well.
It takes time
Remember the famous quote: “It may take years to become an overnight success.”
Well, it’s a famous quote because it’s true.
It takes time to build a reputation so, if you haven’t started yet, you better start now .
Of course, some people can build a reputation fast, but that’s not typical (and many times unsustainable). So… It’s important to be realistic and set up the right expectations. Then, work towards your goals.
To build a strong reputation, you need consistency, patience, perseverance, and conviction.
Regardless of your current level, start building your reputation as soon as possible.
Beginners often believe they don’t have anything to offer. Everyone has something to offer .
If you’re a beginner and you share your journey, your content will connect with other beginners facing the same challenges (that’s A LOT of people). Your steps will help others thrive and show they’re not alone. It’ll also show companies and interviewers how much you care about your craft, journey, and assisting others in succeeding—immensely increasing your chances of landing a fantastic job.
Don’t forget to find your niche/specialization and share your step-by-step evolution.
Don’t you think that documenting your journey to master TDD, for example, would help others learn it as well?
Be sure there will be days you’ll feel like giving up. Don’t give up .
If you give up too soon like the majority, you probably won’t go far from average.
Set the right incentives around you. Write down your ambitious goals and continuously refer back to them when you feel like slacking off the path.
Remind yourself why you started this journey in the first place.
Additionally, be around positive people. People that give you the incentive and motivation to stay on the right path.
Be consistent, and you’ll be able to achieve anything you aspire to.
Planning and Getting Things Done Effectively
Finding time to learn and practice is the key to achieve your goals, but it can be challenging when trying to manage family, work, fitness, relationships, and life in general.
There is a lot to juggle in a day, and everyone is bound to the same 24 hours constraint.
Why do some people find time to develop themselves, and others don’t?
Because…
“I don’t have time to do X” means “X is not a priority to me”
So… no excuses! If you want a better life and caree r , you need to make it a priority .
Then, work c onsistently and deliberately toward that goal.
If you want to make the most out of the iOS Lead Essentials and achieve a remarkable career, you need a plan to stay on the right path. You need to get things done!
There are plenty of planning strategies and tools you can choose from. If you’re already a productivity master, just stick with your working formula.
If you need some help planning your learning sessions, here are the essentials we use and recommend.
1. Plan
“Failing to plan is planning to fail "— Benjamin Franklin
“A bad plan is better than no plan,” but you know what’s even better? A good plan .
A good plan is precise , realistic , and effective . Most importantly, one you can stick to .
Planning to study 12h/day 7-days/week is precise but likely unrealistic . It may sound great because of how much time dedicated to improving yourself; however, you probably won’t be able to stick to it for long .
If your plan is unrealistic , it won’t be effective .
It may work for short-term goals, like passing an exam or certification. But remember… your career is not a quick sprint (finite). It’s a continuous journey (infinite).
If you can’t sustain a plan for long, you may not achieve your most ambitious goals.
Going to the other extreme, planning to study ‘when you have some time off’ is realistic, but imprecise and very ineffective.
You can always stick to such a vague and loose plan because you don’t need to do anything to be on track. “ Well, I didn’t study/practice today… because I didn’t have time. I’ll try again tomorrow…”
There’s no “try.” A plan is not a wish.
You need to allocate time for your training and do it . Otherwise, you may never find the time.
45 minutes a day is more than enough if you don’t have a lot of time.
Planning is an ongoing process that keeps you focused on completing tasks and helps achieve your goals.
It should become a ritual to complete your plan every day. Nothing should get in the way. You won’t allow it.
To create a good plan to study and practice, do it at least the night before. Do it before checking your email, social media, etc. Perhaps, do it before switching on your computer, to avoid distractions. (emails we get are often somebody else’s planning/checklist they are trying to get through—they can wait.)
We recommend you to plan your entire week on Sundays .
Be ready, so you don’t need to get ready.
The question to ask yourself should be “What would make this week a success?” Make a list with what you have come up with—those are your priorities. Time to make yourself more valuable (study and practice) is mandatory .
Look at the list and consider how much time you need to spend on each of them and break it into tasks. Check your calendar and add those tasks to your schedule. You may find that there is not enough time to schedule all your tasks. At this stage, reprioritize.
The secret to being productive is to have short—realistic—lists and finish all items. Every day .
Forcing yourself to have short and realistic daily lists gives you no choice but to prioritize .
Over time, the completed tasks compound, and you’ll have achieved—in the long run—much more than you could even imagine.
At times, you will need to break those tasks into smaller chunks, but as long as you complete them, you are doing well. Remember, your career is a continuous journey, not a quick sprint.
Ideally, the hardest and most demanding tasks should be completed first—there is great power in an optimal allocation of time. Take into account when during the day you are the most productive and your energy levels are high.
For example, some people prefer to study in the morning and workout in the afternoon. Others prefer to exercise in the morning, study during lunch break, and have the afternoon free. It’s up to you.
So, throughout the day, don’t keep yourself busy with small tasks that are not a priority.
These small (and probably irrelevant) tasks will give you a false sense of accomplishment and suck out your time and energy. Get the big stuff done, then complete smaller tasks, one by one.
After tackling the hard stuff, you will feel empowered and ready to do the rest. Own your day!
Decide on ‘When & How’
Make your plan complete with “when” and “how” for each of your tasks. Avoid vagueness.
If your goal is to finish reading a book and the plan is “Finish reading the book this week,” it will most likely be pushed to the bottom of the priority list as there is always something more urgent than reading, and after doing all the urgent stuff, you may just be too tired or out of time.
Imagine your plan is - “Read 25 min during the commute and 30 min at lunch.” That’s 55 min of reading in your day! (Did you realize you have that time?)
If your home is busy and noisy with family, kids, pets, or neighbors who take your focus away as soon as you walk through the door, find a cafe or a library where you can finish your tasks without interruptions. 1 hour of deep focus can give more results than 4 hours of starting and stopping.
So remember - If you want to get something done, decide when and where you’re going to do it. Otherwise, take it off your list . Unplanned tasks quickly become noise, making you think you are busier than you actually are. So plan time to do what really matters.
2. Getting things done
So it’s Monday morning, the plan is in place. You are excited to have a super productive week. You take on the first task—the hardest one of the week.
You have been at it for 1 hour, and your mind starts to wonder.
“Oh this is hard, I hardly made any progress… I’m hungry… There are three more things to do today… Maybe a coffee would help…”
And although you’re getting tired and unmotivated, you keep going. Constantly checking the clock and dreaming about lunchtime ( still 2 hours to go… ).
A plan alone is not enough. Now you need to be productive .
There are ways to increase our attention span and be more productive.
The most effective technique we know to tackle ‘dwindling attention’ is the Pomodoro technique.
Set up a timer and focus for 25 min on a task. Then, have a 5 minutes break (set a timer!). Repeat.
During the break, walk around, make a cup of tea, stretch, have some nuts, do 50 squats… anything you want. When the 5 min is up, go back to work .
You can use the Pomodoro technique to finish any task that requires focus. Work, study, practice, programming, etc.
For example, if you perform 10 Pomodoro sessions a day at work, you’ll have produced 4h of deeply-focused work. This small and simple change can make you at least twice as productive as other developers around you. And… It works great in a pairing session too (tip: take the short break to share a cup of coffee with your pair and strengthen the relationship).
If you perform 2 Pomodoro sessions a day reading The Lead Developer Essentials book, you can finish it in a week. If you are consistent, you can read 40+ books a year!
When you embrace this method with discipline, your brain will remain focused for the entire session, and you won’t need to fight it when you start to get distracted. This increase in focus helps with problem-solving and increases productivity. Plus, the break time keeps you fresh and less tired.
Some people perform well with 25 min focus time; others can focus for 40 min.
Experiment with focus time and find out what works best for you, but do take short breaks.
Short breaks are essential.
Our brains work on the problem even when we are not consciously trying to solve it. That’s why we often come up with solutions to hard problems in the shower or after we had some sleep.
When you are trying to learn or solve a problem, choose your break activity wisely. Don’t give your brain more problems to solve: playing RPG or reading a detective novel will give your mind more to work on.
A break is a break. Rest your mind.
3. Review
Done for the day! Time to review:
What did you learn?
What did you accomplish?
Where did you get distracted?
Pat yourself on the back for all the tasks you have completed. Enjoy the control you have taken over your day. Check your plan for tomorrow. Can you improve it based on today’s experience?
Remember that this is a tool to help you achieve your goals. It needs to work for you.
In the beginning, it is easy to write a schedule that is unrealistic to keep up with. That’s normal! But… you need to adjust it until you find a schedule that works for you .
Ticking off the checklist items is motivating and satisfying, but if you are unable to complete it, it has the opposite effect. It can leave you to feel overwhelmed and disheartened.
If this happens, rethink (adjust) your strategy and start fresh tomorrow.
You never lose when pursuing your dreams. You either win or you learn.
No plan survives the battlefield
So… Plan for the unexpected meeting, sickness, friend in need, etc. Keep reviewing your plan, and don’t be afraid to change it. If you set up your priorities right, smaller things should rarely get in the way.
But… emergencies can happen. When it does, always go back to the list of priorities and reschedule your tasks.
Don’t remove them, reschedule . Even better, allocate free time in your week for unexpected events.
Couldn’t keep your plan of reading 1h today? Read for 2h tomorrow.
Something unexpected for tomorrow? Do some of tomorrow’s tasks today.
Got some extra time today? Bring in more tasks (read more, study & practice more, workout more…).
Always be ahead of the game.
Rest
Finally, allow yourself to rest and recharge. Look after your health. Have some fun. Build meaningful relationships…
Planning and managing your time is a life skill. Do it well, and you’ll achieve anything you aspire to.
Learning Faster
Do you want to learn up to twice as fast —while doubling your attention ?
Our brains can process information much faster than we’re usually used to.
For example, if you gradually speed up a conversation, your brain would easily follow the new pace.
The video player in the lectures allows you to speed up the execution up to 2x. If you gradually speed it up, with time, you’ll get used to the fast pace.
But what about… doubling my attention ?
Think of it as driving a car. When you are moving at a slow traffic pace, you get easily distracted. You start talking to others, listening to your favorite jam, thinking about life, the universe, and everything.
Distraction is the biggest enemy of understanding.
Some people may get so distracted while driving that when they get to a familiar place like home, they are confused. “How did I get here?”
Well, the same wouldn’t happen if you drove at 200km/h (125mph).
You would (should) most probably pay a lot of attention to the road, and wouldn’t allow any distraction. You would turn down the music, ask people not to talk to you, and leave the universe problems for another time.
A fast pace requires a natural increase in focus.
The same happens with the video lectures. The faster you can watch it, the more focus you can give to it.
The more focus you have, the more you’ll understand the concepts.
We value your time, so we carefully edit the lectures to help you focus on what’s important.
Going the extra mile, we recommend you to try watching the videos at 1.25x, then 1.5x, 1.75x, and finally 2x. If you feel it’s going too fast, no problem. Slow it down!
Advanced video player controls
If the video is going too fast and you feel like you didn’t get a concept, you can easily rewind or fast-forward.
On iOS , you can watch the lectures with the native video player which has the jump back / forward controls.
On the desktop , if the video player is focused or fullscreen, you can use the following keyboard shortcuts while playing the video:
→ to forward a couple of seconds
← to rewind a couple of seconds
Hold → to fast forward
Hold ← to fast rewind
SHIFT + → to forward 15 secs
SHIFT + ← to rewind 15 secs
Conclusion
The primary goal of a fast pace is to increase your focus and understanding . Saving time is also important but secondary.
Don’t compromise focus and understanding to save up a couple of minutes. It can cost you much more in the long run.
Finally, to maximize your learning experience, remember to take notes during the lectures, go through the extra material, ask questions, explain what you learned to others, practice, and execute!
Instructions and Guidelines
It’s important that you follow these steps to get the most out of this program:
- Complete the lectures in sequence and take notes.
- Create a project and implement the same features as we go .
- Go through the extra/bonus material and challenges.
- Read the comments - you’ll find answers to most of your questions there.
- Ask questions when you don’t understand something or feel stuck. We’re here to help.
- Press ‘Complete’ to mark lectures as completed (we use this information for inviting you for mentoring sessions, for example).
Getting the most out of the program
The first time you’re going through the program, complete all lectures in order , and practice what you learn by implementing exactly the same features as we go.
When you finish the program, you can rewatch the lectures in any order and practice what you learned on a side-project (create one if needed - you can ask the community for ideas).
The aim is to build up your skills and apply what you learn to solve different problems in your real-life work.
Until you feel confident to apply your new skills at work, keep practicing on side-projects.
But don’t let it stop you. Applying at work is the ultimate goal! So, start doing it as soon as you can.
You can revisit specific lectures and ask questions when you get stuck.
Many students like to rewatch the whole program more than once - we highly recommend you do as well.
Asking questions
The official channel for asking questions about the lectures is the comment section at the bottom of every lecture page.
We encourage you to ask as many questions as you want about the lectures. It will help you and other students get the most out of this program.
So pay attention to the following guidelines for asking questions in the comment section:
- Only post questions related to the lectures.
- If you have questions unrelated to the lectures, please use the Slack community. And for private inquiries and support, contact us at contact@essentialdeveloper.com.
- Before asking a question, use the search box to find answers - most likely, someone has already asked the same question.
- Make sure to also read the comments before asking a question as you’ll find answers to most of your questions there.
- You must implement the code along with the lectures in a GitHub repo. So if you have questions or get stuck with a specific implementation, you can send us the link as a reference.
- Questions about implementation must include a link to your implementation in a GitHub repo (demonstrating the problem) because we can only help you with proper context.
- We’re here to help, but we can’t do the work for you. Remember that you learn by practicing, so make sure to only ask questions after you researched or tried implementing the code on your own.
IMPORTANT : Questions that violate the guidelines may be deleted.
We reply to questions within working hours (Mon-Fri 9am-5pm GMT). But feel free to ask questions at any time. We’ll reply as fast as we can.
How to follow the project’s progress
You can follow the project’s progress on the GitHub repo.
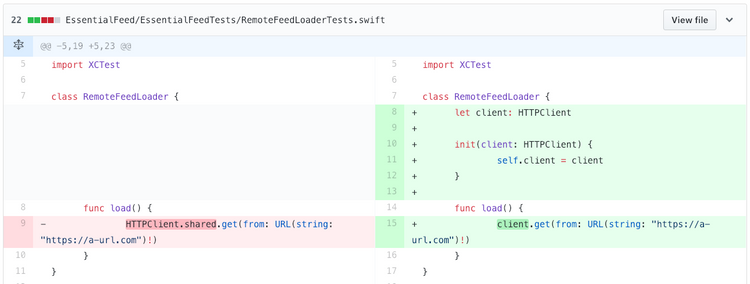
In every lecture where we produce code, you can find the git diff with all commits/changes. For example, the diff for the lecture “Singletons, Globals, or Dependency Injection?!” in the Networking module looks like:
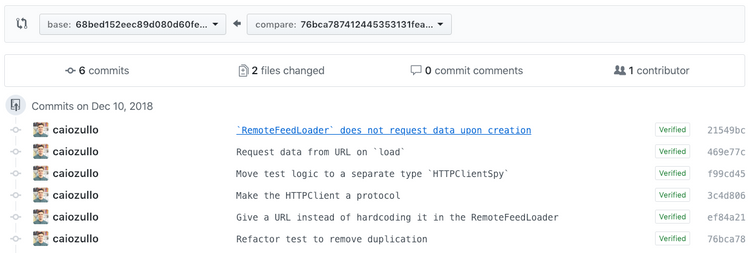
Where you can navigate commit by commit or see the overall changes performed in the whole episode:
Drawing diagrams
We use and recommend https://draw.io for drawing diagrams throughout the lectures. It’s online and it’s free. But you can use any other tool you prefer.
New Lectures Notifications
We’ll notify you via e-mail (from contact@essentialdeveloper.com) every time we publish a new lecture. Make sure to check your spam folder, as the e-mail may end up there sometimes (if you prefer, you can also add our address to your contacts to prevent it from happening).
Further reading
Along with the content produced in this course, we suggest you explore the books contained in our book suggestion page.
There you’ll find a collection of fundamental principles, mindsets, and practices from high-performance individuals. These ideas apply not only to software development but to everyday life as well.
Automated Testing Setup Guide
Ok, it’s time to start writing code!
So before you start the next lecture, we want to make sure that you understand how to configure your project to run automated tests.
Writing clean, fast, and reliable automated tests is an essential skill to build high-quality apps and thrive in the iOS industry.
The following guide shows how you can set up a test target to a new, or existing project. If you’ve never written tests before, getting the right setup is the first step.
1. Adding tests to a new project
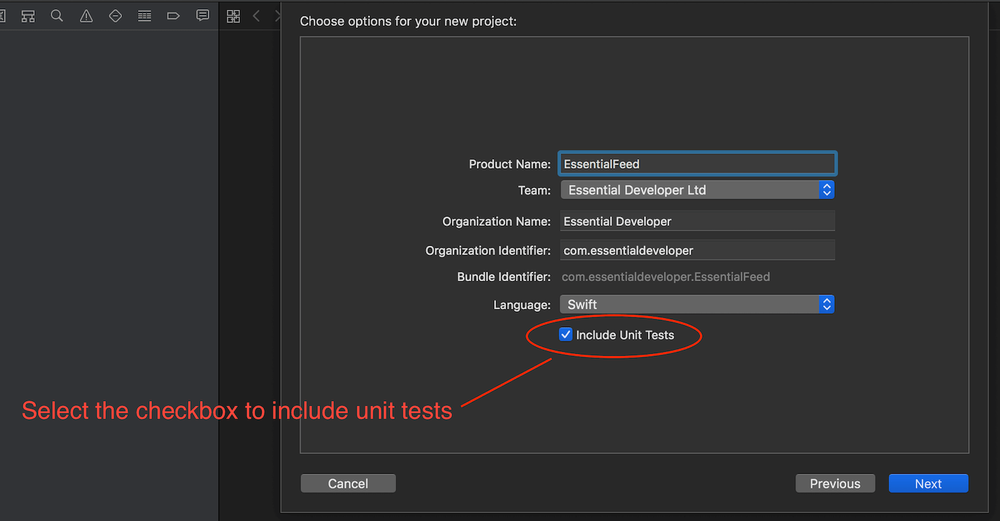
To create a test target when creating a New Project make sure to tick the “Include Unit Tests” checkbox (see image below) on the new project dialogue options. Xcode will automatically include and associate a test target and test folder for the given Product Name.
The test target and test folder will be named after the Product Name , suffixed by “Tests”. In this example, for the product name EssentialFeed Xcode will create a test target named EssentialFeedTests .
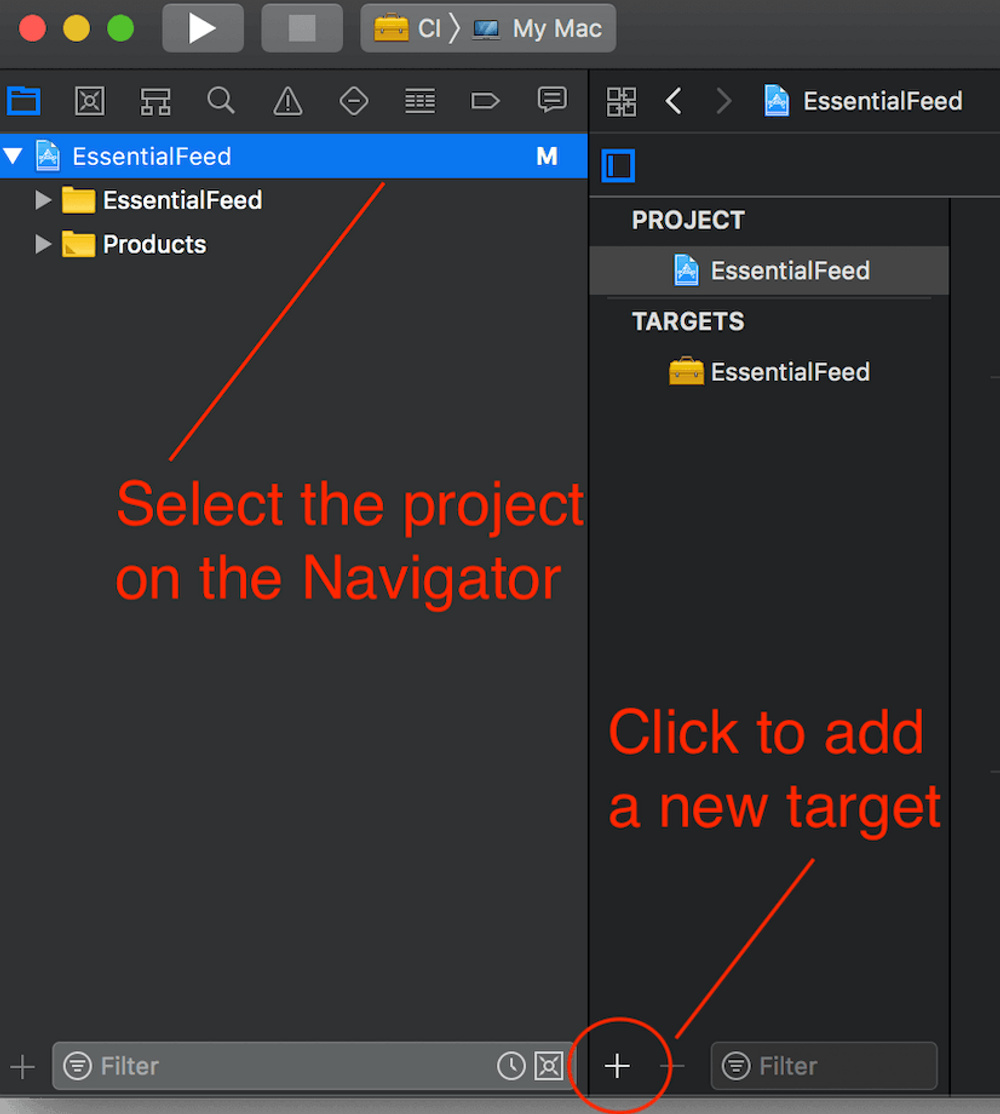
2. Adding a new test target to an existing project
To add a test target to an existing project you can navigate to to File -> New -> Target or select the project on the project Navigator and then click the + button on the target lists pane:
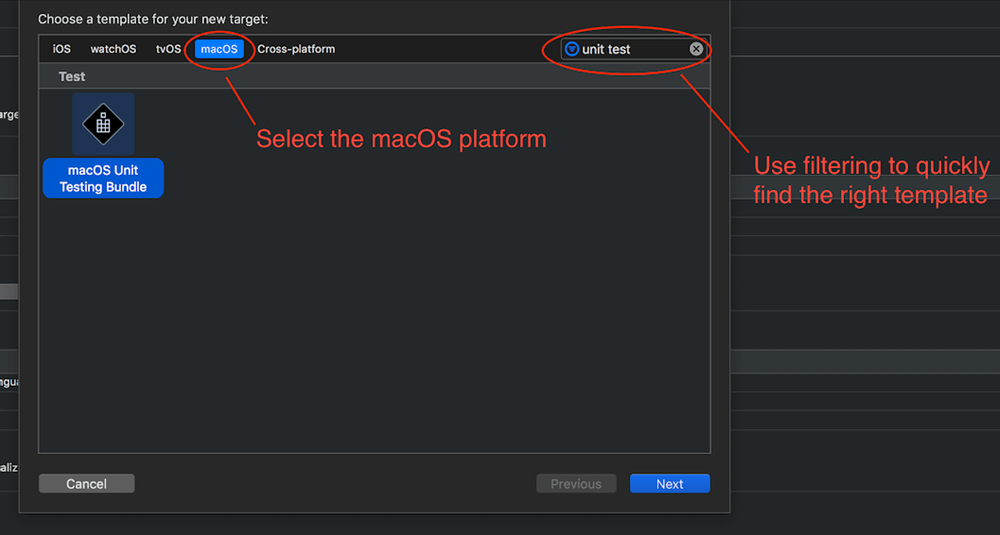
If you want to test an iOS target then select the iOS platform tab and choose the Unit Testing Bundle option.

You can follow the same steps for other platforms you support ( tvOS, macOS… ).
For example, for a macOS project you’d select the Unit Testing Bundle option under the macOS tab:
Next, specify the Product Name and select the Target to be Tested :
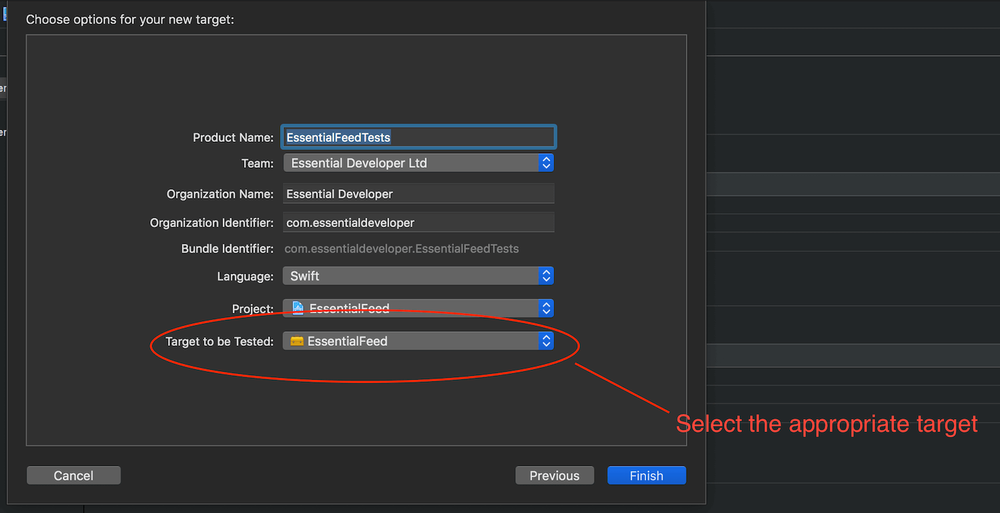
The naming convention is the Target to be Tested name ( EssentialFeed ) suffixed by “ Tests ”, e.g.: EssentialFeedTests . You can choose any name you want, but we recommend the convention so it’s easier for others to follow the project structure.
3. To run tests within Xcode you need a scheme
A scheme is a collection of settings that specify the targets to build for a project, the build configuration to use, and the executable environment to use when the product is launched.
You can think of schemes as instructions (recipe steps) for building, running, testing, profiling, analyzing and archiving your project.
When you open an existing project (or create a new one), Xcode automatically creates a scheme for each target.
The default scheme is named after your project and will already include your test target if you checked the Include Unit Test checkbox when creating your project. If you’re adding a test target to an existing project, you may need to configure your default scheme to run the tests.
Managing Schemes
You can manage the project’s schemes by clicking on the scheme drop-down list and clicking on Manage Schemes…


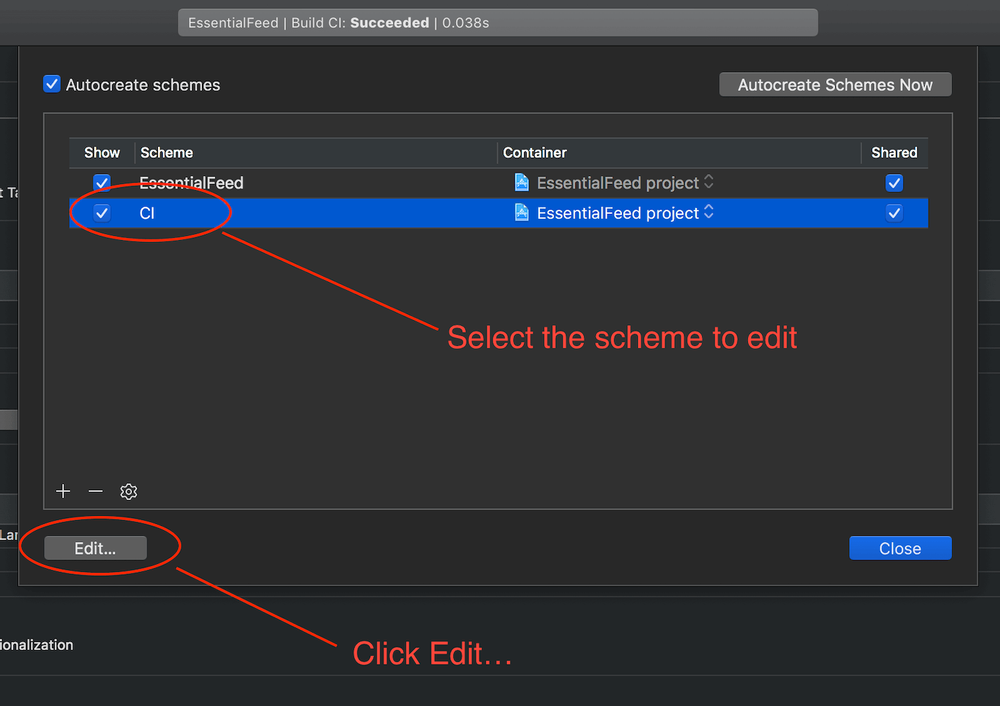
Add/Remove a test target to a scheme
While editing a scheme, you can add or remove a test target for that particular scheme by using the + and - buttons in the Test scheme action menu.
Mind that in case you’d like to remove a target from the Test scheme action, you will have to select the target first and then press the - button as shown in the image below.
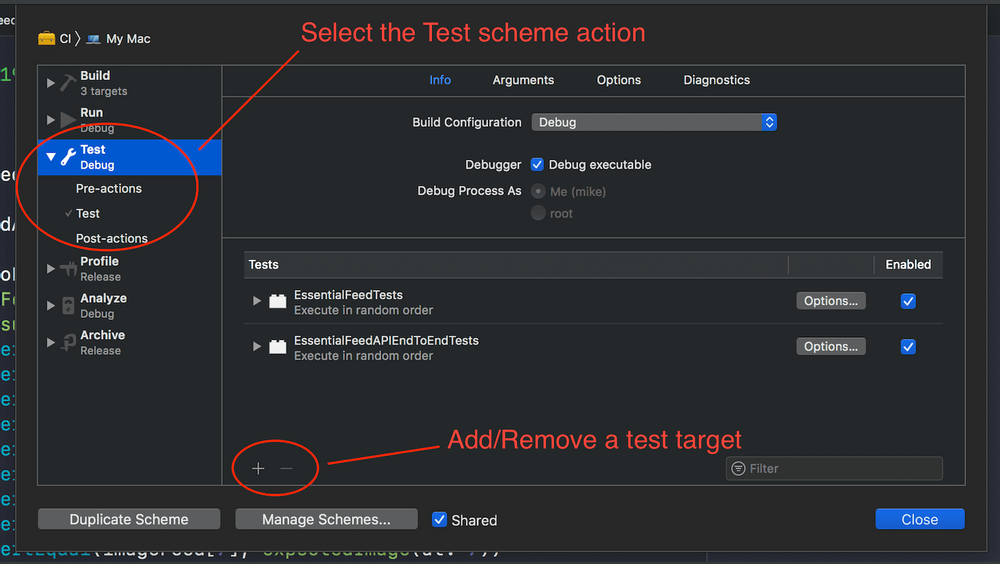
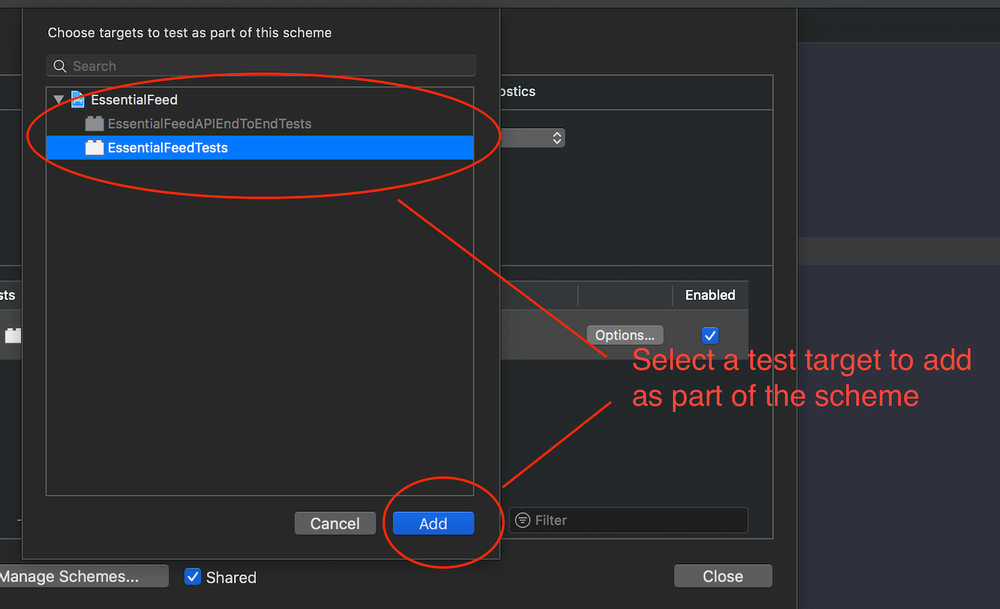
To add a test target to the scheme, press +, select the target(s) from the menu and press Add as shown below.
4. Running a single test
To run a single test, click on the gutter button next to the function declaration corresponding to the test you’d like to run.

5. Running all tests in a specific test case class
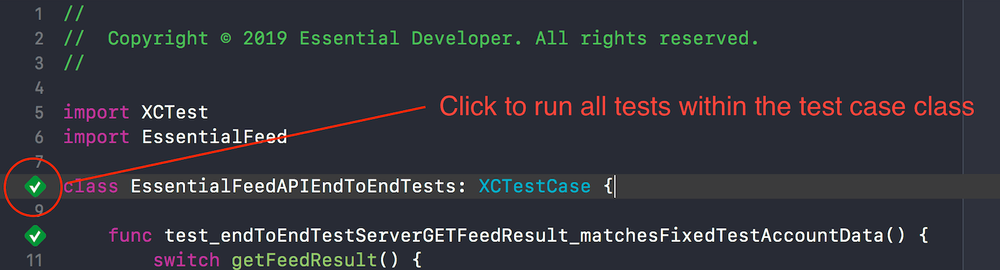
To run all tests in a test case class, click on the gutter button next to the test case class declaration.
6. Running all the tests
To run all the tests within the targets in the selected scheme, you can use the default keyboard shortcut set by Xcode: CMD+U .
Example of a successful test run
When the selected tests (regardless if the selection included all tests or just a single one) run successfully, Xcode will notify you by displaying a Test Succeeded HUD and turning the gutter buttons to a green checkmark.
Example of a failed test run
When one or more of the tests you selected to run fails then Xcode will notify you by displaying a Test Failed HUD and turning the gutter buttons to a red x.
Suggested workflow for running your tests
One of the benefits of automated testing is to check that the whole system behaves as specified, all the time. For this reason, we recommend you to continually run all the tests ( CMD+U ) throughout the development process (you’ll see how we run the tests several times per lecture!).
We can do so because a) we’ll be creating fast and reliable tests so the cost of running them is very small (close to zero) and b) we want to assert that the whole system behaves as expected in every revision.
You can find and set your own keyboard shortcuts by opening the Key Bindings options under
Preferences -> Key Bindings .

7. Running tests with xcodebuild (CLI)
You also have the option to run tests through the command line using the xcodebuild command, using the following format.
xcodebuild test -project [project name].xcodeproj -scheme “[scheme name]”
For example:
$ xcodebuild test -project EssentialFeed/EssentialFeed.xcodeproj -scheme "CI"
References
- Configure schemes https://help.apple.com/xcode/mac/10.2/#/dev0bee46f46
- Add a test target to a project https://help.apple.com/xcode/mac/10.2/#/dev2ea31ea57
What Many Apps Get Wrong About Reachability and How To Get It Right
In this lecture, we explore the idea of Network Reachability within Apple platforms.
Although we are creating an app with a cache fallback when the customer is offline, we don’t perform a “Reachability Check” before making the URL request. And there’s a good reason for that.
Because there’s no reliable way to check for connectivity without actually trying to perform the request!
From the Apple docs:
“Always attempt to make a connection. Do not attempt to guess whether network service is available, and do not cache that determination.”
It’s common to see iOS codebases using SCNetworkReachability , NWPathMonitor , or third-party reachability frameworks to make decisions about whether they should make a network request or not. Unfortunately, such a process is not reliable and can lead to bad customer experience.
Imagine the scenario where your device has an internet connection, but the app keeps telling you “No, it doesn’t!”
As advised by Apple, we can use the reachability status to diagnose the cause of the failure and perform actions after a failed request. For example, you can automatically retry a failed request on a reachability callback. You can also use the current reachability status to display hints to the user, such as “Looks like you’re offline.” But you shouldn’t stop attempting to make a request based on the current reachability status.
“ Important : The SCNetworkReachability API is not intended for use as a preflight mechanism for determining network connectivity. You determine network connectivity by attempting to connect. If the connection fails, consult the SCNetworkReachability API to help diagnose the cause of the failure.”
So what should we do?
Trying to determine the current reachability status has many race conditions.
So the right way to deal with reachability is to set request constraints, try to make the request, and handle the result.
For example, on iOS 11+, Apple made it easier to deal with connectivity challenges by adding the waitsForConnectivity flag to URLSessionConfiguration .
let configuration = URLSessionConfiguration.default if #available(iOS 11, *) { configuration.waitsForConnectivity = true } let session = URLSession(configuration: configuration)
waitsForConnectivity is set to false by default. If you set it to true , the session will do the logical thing: start the task when a connection becomes available again (it’s more complicated than it looks—there are complex rules running behind the scenes).
However, this property is relevant only during the establishment of a connection . If the network is available and then drops during a request, the request will fail (you’ll receive the regular connectivity error callback) and the session won’t automatically retry it (it’s up to you to decide what to do next–either ask the customer to retry or schedule an automatic retry).
It’s important to note that waitsForConnectivity is ignored by background sessions, which always wait for connectivity.
Also, waiting for the connection will eventually timeout. You can customize the timeout value to your needs (default value is 7 days):
configuration.timeoutIntervalForResource = 600 // 10 minutes (in seconds)
If you want to be notified when the session is waiting for connectivity, you can set a session delegate*:
let session = URLSession(configuration: configuration, delegate: delegate, delegateQueue: nil)
And implement the taskIsWaitingForConnectivity delegate method:
func urlSession(_ session: URLSession, taskIsWaitingForConnectivity task: URLSessionTask) { // For example, update the UI to notify the customer (with a cancel button) // or activate an interactive offline- or cellular-only-mode instead of blocking the UI }
-
URLSessionholds a strong reference to the delegate:
“The session object keeps a strong reference to the delegate until your app exits or explicitly invalidates the session. If you don’t invalidate the session, your app leaks memory until it exits.”
To invalidate the session and free the delegate, make sure to invoke invalidateAndCancel (you can’t use the session after invalidating it):
session.invalidateAndCancel()
Checking cellular connection
Another mistake is to use reachability flags to prevent making requests over a cellular connection. Again, from Apple’s docs:
“ Important : Checking the reachability flag does not guarantee that your traffic will never be sent over a cellular connection.”
For checking cellular connection, you can set the allowsCellularAccess boolean flag in the URLRequest:
var request = URLRequest(url: URL(string: “https://www.essentialdeveloper.com”)!) request.allowsCellularAccess = true // or false to prevent requests over cellular connection
Or in the URLSessionConfiguration (before creating the URLSession !):
let configuration = URLSessionConfiguration.default configuration.allowsCellularAccess = true // or false to prevent requests over cellular connection let session = URLSession(configuration: configuration)
waitsForConnectivity will respect the allowsCellularAccess set. So if cellular access is not allowed, the session will wait, for example, for Wi-Fi access before starting the request.
“It’s essential to set the configuration values (
waitsForConnectivity,timeoutIntervalForResource,allowsCellularAccess, etc.) before creating theURLSession. When you create aURLSessionwith a configuration, the session will copy all of the configuration values, so any later changes to the configuration instance will have no effect on the session.”
Expensive Network Access and Low Data Mode
On iOS 13+, Apple introduced two new configuration properties:
-
allowsExpensiveNetworkAccessto control whether connections may use a network interface that the system considers expensive. From Apple docs:
“iOS 13 considers most cellular networks and personal hotspots expensive. If there are no nonexpensive network interfaces available and the session’s allowsExpensiveNetworkAccess property is false, any task created from the session fails. In this case, the error provided when the task fails has a networkUnavailableReason property whose value is NSURLErrorNetworkUnavailableReason.expensive.”
-
allowsConstrainedNetworkAccessto control whether connections may use the network when the user has specified Low Data Mode. From Apple docs:
“In iOS 13 and later, users can set their device to use Low Data Mode as one of the Cellular Data Options in the Settings app. Users can turn on Low Data Mode to reduce your app’s network data usage. This property controls a URL session’s behavior when the user turns on Low Data Mode. If there are no nonconstrained network interfaces available and the session’s allowsConstrainedNetworkAccess property is false, any task created from the session fails. In this case, the error provided when the task fails has a networkUnavailableReason property whose value is NSURLErrorNetworkUnavailableReason.constrained.”
Again, you should avoid pre-flight checks about the current network status.
“Another message we’ve been giving you for many years is to avoid pre-flight checks. Using constraints such as allowsCellularAccess or allowsExpensiveNetworkAccess gives you much better control. It’s much easier to use. Once you start writing your apps this way, you’ll wonder why you ever did pre-flight checks. And besides, pre-flight checks can never work reliably because they always have race conditions.” — Stuart Cheshire, Advances in Networking, Part 2, WWDC 2019
So remember: don’t block requests based on pre-flight checks. Instead, set the appropriate constraints, try to make the request, and handle the result. If the connection fails, you can check the error status to determine the failure reason and react accordingly (e.g., retry automatically, try a less expensive request, notify the user…).
References
- Advances in Networking, Part 2 – WWDC 2019 https://developer.apple.com/videos/play/wwdc2019/713/
- Optimizing Your App for Today’s Internet – WWDC 2018 https://developer.apple.com/videos/play/wwdc2018/714
- Advances in Networking, Part 2 – WWDC 2017 https://developer.apple.com/videos/play/wwdc2017/709
-
waitsForConnectivitydocumentation – https://developer.apple.com/documentation/foundation/urlsessionconfiguration/2908812-waitsforconnectivity -
allowsCellularAccessdocumentation – https://developer.apple.com/documentation/foundation/urlsessionconfiguration/1409406-allowscellularaccess -
allowsExpensiveNetworkAccessdocumentation – https://developer.apple.com/documentation/foundation/urlsessionconfiguration/3235752-allowsexpensivenetworkaccess -
allowsConstrainedNetworkAccessdocumentation – https://developer.apple.com/documentation/foundation/urlsessionconfiguration/3235751-allowsconstrainednetworkaccess -
URLSessiondocumentation – https://developer.apple.com/documentation/foundation/urlsession -
NWPathMonitordocumentation – https://developer.apple.com/documentation/network/nwpathmonitor - Networking documentation – https://developer.apple.com/library/archive/documentation/NetworkingInternetWeb/Conceptual/NetworkingOverview/WhyNetworkingIsHard/WhyNetworkingIsHard.html
The FeedAPI Challenge
It’s time to put your skills to the test!
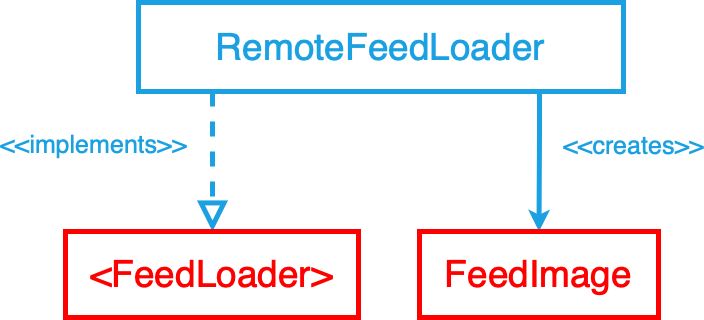
You are called to implement the RemoteFeedLoader to load a collection of images from a backend.
Your implementation must conform to the <FeedLoader> protocol creating an array of FeedImage :
Follow the instructions and guidelines in the challenge repository and use the comment section below to ask questions specific to the challenge.
Happy coding!
The FeedStore Challenge
Time to put your skills to the test!
You are called to build a new infrastructure component that conforms to the <FeedStore> protocol using Core Data to persist the feed.
As a minimum requirement to take this challenge, you must have seen all lectures of the Persistence module .
Follow the instructions and guidelines in the challenge repository and use the comment section below to ask questions specific to the challenge.
Happy coding!
The UI Design Patterns Challenge
It’s time to put your UI design patterns skills to the test!
You are called to implement a new UI feature: displaying localized error messages to the customers when the app fails to load the feed.
The goal is to implement this feature in both MVVM and MVP .
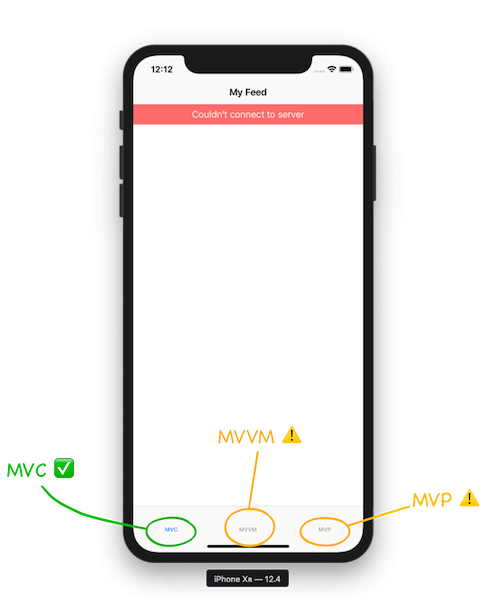
We’ve provided you with an MVC implementation using a reusable ErrorView as the UITableView.tableHeaderView .
You can study and use the MVC solution as a guide to help you implement the same feature using MVVM and MVP.
Follow the instructions and guidelines in the challenge repository and use the comment section below to ask questions specific to the challenge.
We advise you to invest time to produce a clean and well-presented solution. A project showcasing your skills in multiple UI design patterns is an ideal addition to your portfolio.
Happy coding!
Key Insights to Maximize Your Development Output
Main and the Composition Root
The Main module is where the app composition occurs. In iOS apps, that would be an iOS application target that composes other modules to start the application.
By centralizing the composition in the Main app module, you can keep other modules independent from each other. That’s key for a modular and flexible design.
For example, if you want to decouple the ‘Feed API’, ‘Feed Cache’, and ‘Feed UI’ modules, they should not reference each other. Only the Main module should know how to compose the concrete components of each module.
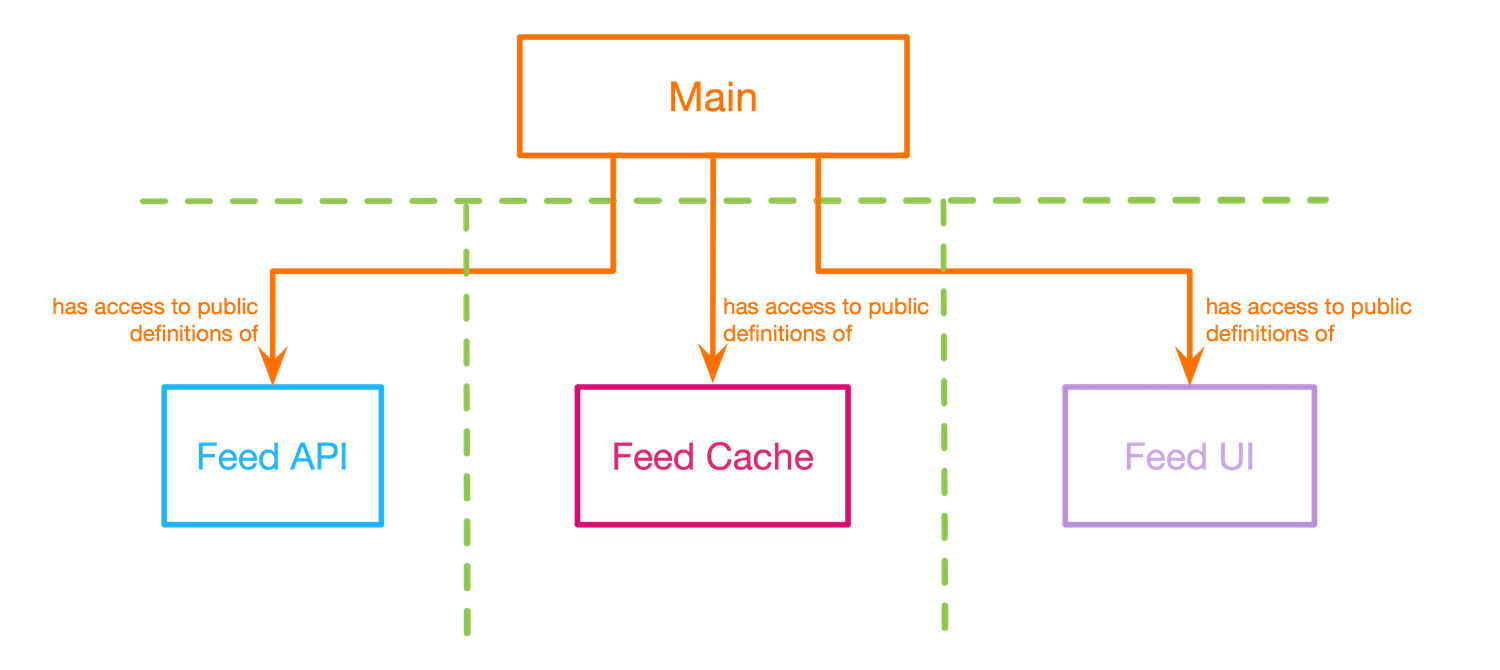
Centralizing your app’s instantiation and composition drastically simplifies the development and management of modules, components, and their dependencies.
If the API, Cache, and UI don’t know about each other, you can easily develop, test, maintain, extend, and deploy them in isolation. You can also easily replace or reuse those modules in different applications with different compositions.
Those are big wins in productivity and flexibility in app development. It’s how you can go fast without compromising quality.
But for the application to work, the API, Cache, and UI need to work together. So, the idea is to create a “Main module” responsible for instantiating and composing all independent modules in a centralized place, aka the “Composition Root.”
The Composition Root is the most concrete place in your app as it instantiates the concrete components for the app’s composition. The Composition Root is an application detail. Thus, only applications should have a Composition Root, not frameworks.
The Composition Root is supported by the SOLID principles and Dependency Injection patterns such as Initializer, Method, and Property Injection.
This way, you can design elegant and independent modules, where components communicate through clean abstractions. Moreover, components don’t need to be concerned about concrete dependency implementations or how to instantiate them. The dependencies can be easily injected and replaced without breaking existing code, promoting composability and extensibility (Open/Closed principle).
If the modules have unmatching interfaces or cross-cutting concerns, such as threading, analytics, and authentication, you can use Design Patterns (e.g., Decorator, Composite, Adapter) or Universal Abstractions (e.g., Combine’s map , catch , receive(on:) ) to compose the components without creating tight coupling between modules.
Testing the app as a whole
Automated testing is an essential practice to guarantee the correctness and quality of your apps and a productive development process. A trustworthy test suite and CI process can provide you and your team with the confidence to continue implementing the company’s vision. That’s how you can keep delivering great features at a fast and constant pace.
Remember that a good test suite is fast and reliable. So, you need a solid foundation of unit/isolated tests as your team’s primary testing strategy (the base of the testing strategy pyramid).
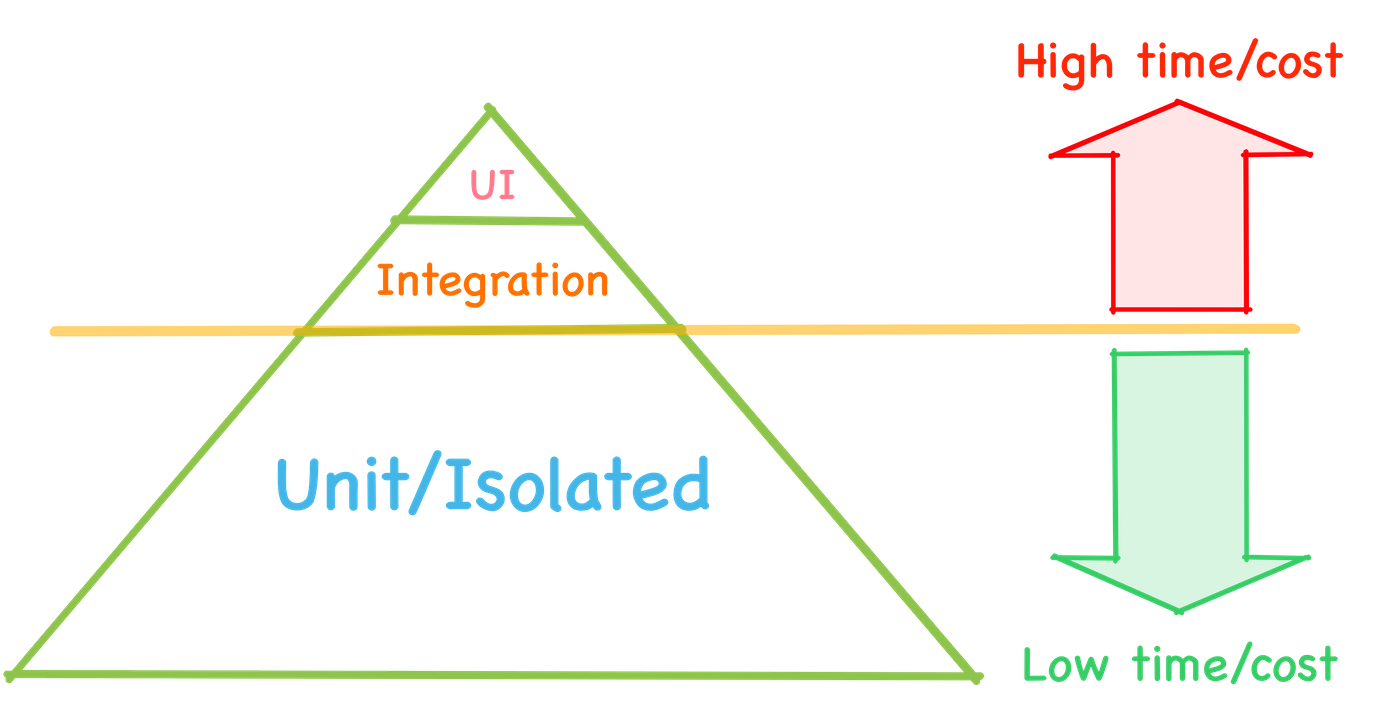
In the Main module, you learned three testing strategies that belong to the top of the testing pyramid:
1. UI Testing in Apple’s ecosystem
UI testing allows you to test your app as a “black-box.” You interact with and validate the UI elements of your app using the XCTest APIs that integrate with Accessibility controls.
In other words, UI tests are decoupled from production code. UI tests don’t have access to any concrete implementations of your app, as you would typically with unit/isolated or integration tests.
Thus, unlike unit/isolated and integration tests, UI tests require a running application to execute. Running the application and interacting with UI elements make UI testing a costly testing strategy as it often introduces flakiness in test results and can take a long time to run.
That’s why UI tests allocate a very small portion of the testing strategy pyramid (we want only very few UI tests—if any).
2. Acceptance Testing
Acceptance testing is the process of validating the system’s compliance with high-level acceptance criteria or business requirements.
In teams following BDD or similar processes, the acceptance criteria and tests are written by business folks (e.g., business analysts), and they are implemented by QA engineers or developers.
Acceptance tests can be expensive to run as they check real scenarios and the whole system running in integration, usually through the UI.
But you don’t need to run those tests through the UI.
When possible, write them as plain XCTests that can be faster and more reliable since you have more control over the infrastructure details (network, databases, UI…).
3. Snapshot Testing
Snapshot tests record a “snapshot” of parts of your system in order to compare them against previously recorded states.
A common use case for snapshot testing is validating the UI of an app. The idea is to automatically store snapshot images of the UI as “recorded states” in tests. Then, you can run those tests again to compare the “current” state matches the “recorded state”.
The tests will pass if the recorded state is the same as the received one, and they will fail if the two snapshots don’t match. So you can ensure the UI looks exactly the same after refactorings, for example.
But you’re not limited to only images. You can also use snapshot tests with other data representations like JSON, XML, and Data.
You should avoid using snapshot tests to validate the logic/behavior of your applications because they aren’t as precise as other testing strategies such as unit/integration testing. For example, when a snapshot test fails, it can be hard to figure out why. You’ll probably have to spend some time debugging. Snapshot tests are also much slower than unit tests since they rely on expensive operations such as rendering the UI and reading stored state from disk.
For example, the average duration of a snapshot test can be 34 times slower than a unit test. But it’s still much faster than UI tests.

The key insights you should take from the above graph is that a combination of unit, integration, and snapshot tests offer a reliable, faster, and more sustainable option than UI tests.
Thus, a good mix of unit, integration, and snapshot tests can eliminate the need for flaky and slow UI tests.
Continuously delivering value with a CD pipeline
Continuous Delivery is the practice of delivering working software in short cycles, usually several times a week or a day. “Working software” means reliable builds that can be released to customers at any time.
A Continuous Delivery workflow allows your team to continually deliver value to your stakeholders and customers as it eliminates long waiting periods.
In Continuous Delivery, the whole process of generating and uploading a build can also be automated. But approving the build and pushing it to production is done manually.
Once a build is approved by the business, it can be manually pushed to production. But pushing to production should be as simple as pressing a button because the build should always be ready to ship.
Going a step further, the team can achieve Continuous Deployment by eliminating the need for manual approvals.
Continuous Deployment is the practice of automatically approving and pushing builds to production as long as it passes all tests. The team needs to build a lot of confidence in the development process to eliminate the need for manual testing and approval, but it can be done by following practices you’ve been learning in this course such as excellent communication, clear requirements, Test-Driven Development, and supple software design.
Continuous Delivery and Deployment are key elements of technical excellence. Teams that achieve it can more rapidly deliver value to customers and adapt to market changes, which is a huge advantage against competitors.
Organizing the modules
In the Main module, we covered multiple ways you can break down and organize your projects into modules.
In the Essential Feed Case Study, we’ve been creating decoupled modules and features using Horizontal and Vertical slicing.
The main point is that the domain layer is at the center of the design and it doesn’t depend on any other layer.
On the red layer, we have independent service implementations that depend on the domain layer. On the blue layer, the infrastructure implementations and adapters to protect the inner layers from external frameworks such as URLSession, Firebase, UIKit, SwiftUI, CoreData, Realm, etc.
Moreover, the modules within the same layer can also be decoupled. For example, the ‘Feed API’ and ‘Feed Cache’ modules are within the same red layer, but they don’t know about each other.
New features don’t need to know about each other. So they can follow the same structure but in separate targets and/or projects.
The Image Comments Challenge
It’s time to put your development skills to the test!
You are called to add a new feature to the Feed App: displaying image comments when a user taps on an image in the feed.
The goal is to implement this feature using what you learned in the program.
You’ll develop the API, Presentation, and UI layers for this feature.
As a minimum requirement to take this challenge, you must have seen the live lectures #001 until #004 .
Follow the instructions and guidelines in the challenge repository and use the comment section below to ask questions specific to the challenge.
Happy coding!