Lesson 4: The New Resource Server Support - part 1
1. Goal
In this lesson, we’ll build a simple Resource Server using the new OAuth stack in Spring Security 5.
2. Lesson Notes
The relevant module you need to import when you’re starting with this lesson is: lsso-module2/resource-server-start.
If you want to have a look at the fully implemented lesson, as a reference, feel free to import: lsso-module2/resource-server-end.
2.1. Introduction
At the moment, Spring Security supports protecting endpoints using two forms of OAuth 2.0 Bearer Tokens:
- Opaque Tokens
- JWT
In the JWT form, the user information is included in the token. The Resource Server usually uses a public key to verify that the data hasn’t been tampered with.
Opaque Tokens, on the other hand, don’t have meaning by themselves. The Resource Server has to send them to the Authorization Server to be validated and optionally to retrieve user information.
Even though we’ll use JWTs in this lesson, we won’t go too deep into the topic, as the main focus of the lesson is to setup a Resource Server and analyze the features that it provides. We’ll look at both types of tokens in more detail in the next lessons.
2.2. Maven Dependencies
Let’s start by using Spring Boot features to easily configure the Resource Server with the help of application properties .
First, we need to add the following dependency to our pom.xml 
<dependency>
    <groupId>org.springframework.boot</groupId>
    <artifactId>spring-boot-starter-oauth2-resource-server</artifactId>
</dependency>
The spring-boot-starter-oauth2-resource-server artifact includes the spring-security-oauth2-resource-server one that, in its turn, contains the new Resource Server support.
This dependency also includes the core Spring Security libraries. Therefore, we can remove the base spring-boot-starter-security library from the dependencies.
2.3. Spring Boot Configuration
At this level, we have to define whether we’re going to use JWT or Opaque Tokens. In our case, we’ll set up the Resource Server to use JWTs.
We need to configure the Resource Server in such a way that it establishes the trust relation with the Authorization Server. This means that we need to make sure that the Resource Server can verify the JWTs signed by the Authorization Server .
In order to do that, it should be aware of the public key provided by the Authorization Server .
We can configure this in 2 different ways.
The first option is to simply specify the base Authorization Server URI by setting the issuer-uri property:
spring:
  security:
    oauth2:
      resourceserver:
        jwt:
          issuer-uri: http://localhost:8083/auth/realms/baeldung
In this configuration, we set the URI of the Authorization Server that issues the JWT. At a high-level, the Resource Server will attempt to determine the public key using the metadata that might be supplied by the Authorization Server.
A disadvantage of this method is that the Authorization Server needs to be running when the Resource Server starts up. Also, it needs to expose APIs that allow discovering the endpoint of the public keys.
The second option is to explicitly specify the endpoint containing the public keys ourselves using the property jwk-set-uri
spring:
  security:
    oauth2:
      resourceserver:
        jwt:
          jwk-set-uri: http://localhost:8083/auth/realms/baeldung/protocol/openid-connect/certs
Here, we’ll use both options because, even though we’re explicitly indicating the public key endpoint, it’s still a good practice to indicate the issuer URI as well. It’s used by the Spring Security framework as an extra security measure.
There is a third option that consists in specifying the location of a local file that contains the public key. We won’t cover this option because it’s neither a common nor convenient approach.
Lesson 4: The New Resource Server Support - part 2
2.4. Accessing Secured Resources
At this point, our application is completely functional so we can start it. By default, all the endpoints will be secured and we need to send an Access Token to access them.
Let’s obtain the token . In Postman, we have a couple of predefined requests to simulate the Authorization Code Flow that allow us to obtain an Access Token. This process is similar to the one we carry out in the Live Tests that you can find in the complete implementation of the lesson.
First of all, we should obtain the URL of the authorization endpoint from the login form , which we’ll then use to obtain an Authorization Code . We can do this by executing the request: GET - Extract Authorization Endpoint from the LSSO > The Basics of OAuth2 (New Stack) > The New Resource Server Support folder of our Postman collection.
Note that these requests are prepared in such a way that we actually don’t have to copy-paste anything because the values are automatically stored and used by Postman. Therefore, we can immediately execute the next request: POST - Request Authorization Code
In the request’s body, we’ll find the user’s credentials that are sent to the Authorization Server. Now we’re ready to obtain an Access Token by executing the request: POST - Request Access Token. If we inspect the request’s parameters, we’ll find the form parameters that we’ve received from the previous request.
Now that we have the Access Token, we can get the list of Projects that are stored on the Resource Server and hence should be secured.
To validate this, let’s first check whether we can succeed in retrieving this list without providing the token. Let’s execute the request GET - Request Projects. In the Authorization tab, we can see that the request contains no Bearer token. As a result, we get a response with the 401 Unauthorized error status.
Now, let’s add the Access Token to the request and execute it. We’ll see that the Resource Server now returns the list of Projects . So, we’ve just checked that the resource endpoint is in fact secured.
To sum up, we have a fully functional Resource Server by using just two application properties .
2.5. Java Configuration
We can also configure the Resource Server using Java configuration.
Let’s make the ResourceSecurityConfig class extend WebSecurityConfigurerAdapter and update the HttpSecurity configuration:
@Configuration
public class ResourceSecurityConfig extends WebSecurityConfigurerAdapter {

    @Override
    protected void configure(HttpSecurity http) throws Exception {
       http.authorizeRequests()
              .anyRequest()
                .authenticated()
            .and()
              .oauth2ResourceServer()
                .jwt();
    }
}
Since we’re overriding the default configuration here, we need to specify explicitly that we want this to behave as a Resource Server using the oauth2ResourceServer DSL .
We can use this to configure exactly how our Resource Server will behave. For example, we can indicate we’ll be using JWT-formatted Access Tokens by adding the jwt() method.
Since we’re not indicating which specific JWT configurations should be used, the service will still rely on the properties we defined previously.
In future lessons, we’ll analyze how we can use other directives to pull off more advanced configurations.
3. Resources
Lesson 5: JWT Support (text-only)
1. Goal
In this lesson, we’ll learn about the different Resource Servce Configurations that Spring Security offers to use JWT (JSON Web Tokens).
2. Lesson Notes
The relevant module you need to import when you’re working with this lesson is: lsso-module2/jwt-support
This lesson only needs a single reference codebase, so there is no end version of the project.
2.1. Maven Dependencies
We need the spring-boot-starter-oauth2-resource-server library in our Resource Server.
This starter includes, among other libraries, the spring-security-oauth2-jose library that contains the JWT signing and encryption functionality.
2.2. Exploring Basic JWT Properties
In the Resource Server project, we have some basic configuration defined in the application.yml file for setting up JWT support.
Let’s understand one of the properties here which is jwk-set-uri.
With JWTs all the information is contained within the Token. So all the Resource Server really needs is a way of verifying the token’s signature to make sure the data has not been modified.
The jwk-set-uri we’re configuring here contains the public key that the server can use to verify the integrity of the token. More exactly, according to the specification, this is called the JSON Web Key or JWK for short.
Another property configured here is issuer-uri. This is used as an additional security measure to verify that the iss (issuer) claim contained in the JWTs corresponds with this value.
2.3. Overriding the Spring Boot Autoconfiguration
Spring Boot defines two beans to configure our service as a Resource Server: a JwtDecoder and a WebSecurityConfigurerAdapter bean.
The WebSecurityConfigurerAdapter class actually belongs to Spring Security. Spring Boot provides an implementation to define a default Security configuration that configures the service as a Resource Server.
Naturally, Spring Boot is configured to intelligently back off and avoid declaring the bean if we provide our own as we’re doing here.
With this we get programmatic access to all the configuration of the Resource Server via oauth2ResourceServer().
Next, we can do JWT configuration with DSL - jwt() :
.jwt().decoder(decoder)
    .jwtAuthenticationConverter(jwtAuthenticationConverter);
Here, we’ve used 2 different objects: a JwtDecoder which is in charge of decoding String tokens into validated instances of the Jwt class, and a Converter that maps this Jwt instance to an Authentication object.
This is a really useful part of the functionality as this is the place where we have the option to map the JWT to the Spring Security principal.
Now, Spring Security supplies a default converter JwtGrantedAuthoritiesConverter that maps the scopes to authorities prefixed with SCOPE_ . So, normally, we don’t need to configure the converter, unless we have special requirements on how to extract the authorities from the JWTs.
Regarding the decoder, though Spring Security doesn’t provide a default implementation, but, it does search for a bean of type JwtDecoder bean in the context.
That’s why it’s possible to avoid providing the decoder and simply define a bean of this type:
@Bean
public JwtDecoder customDecoder() {
}
And that’s where Spring Boot comes into play again providing this JwtDecoder bean for us . As we’re indeed using Boot here we can just get rid of this bean.
Some of the features this Boot default instance provides are:
- defining a default token validator object that checks the iss claim - as we explained before - as well as the exp (expired) and the nbf (not before) claims to make sure the Token is valid in the corresponding time frame
- defining a mapper that converts claims into Java types
This default decoding and authentication converting behavior is probably all we need in most of the cases.
But, since the JWT can contain any custom information that we might need to use in different ways, it’s not uncommon that we may have to tune the default behavior to suit those needs.
The Spring Security documentation offers pretty clear examples for handling common JWT scenarios like customizing the validations we execute on the Token, modifying the claims mapping process and obtaining custom authorities out of JWT claims.
2.4. Exploring Other Properties
We can also setup more advanced JWT-related properties in our configuration.
One is the jws-algorithm , in case we need to validate tokens that have been signed with a different algorithm than the default one which is RS256.
And the other is the public-key-location which can be used to load the public key from a local file instead of taking it from the JWK Set endpoint.
3. Resources
- IETF ‘JSON Web Token (JWT)’ document
- Spring Security - OAuth 2.0 Resource Server customization
- JSON Web Key (JWK) specs
Lesson 1: Basic Authorization with OAuth2 (text-only)
1. Goal
In this lesson, we’ll learn about the basic mechanisms we have to control the access to our Resources when using OAuth2.
2. Lesson Notes
The relevant module you need to import when you’re starting with this lesson is: lsso-module3/basic-authorization-start
If you want have a look at the fully implemented lesson, as a reference, feel free to import: lsso-module3/basic-authorization-end
We’ll also need to import the Postman collection that contains all the REST calls that we need to run for this lesson.
2.1. Authorization in the Resource Server
Simply put, the Resource Server has to determine if the authorities granted by the Resource Owner to the Client are enough to access a particular resource.
The authorities are usually represented by the scopes granted by the Authorization Server.
This is, naturally, the approach taken by Spring and even though it can be customized, here we’ll stick to this basic behavior.
Let’s explain how this is handled under the hood by the Spring Security framework.
2.2. Authentication Object
Simply put, the security framework bases most of its functionality around the Authentication interface and its implementations.
As you might know, classes implementing this interface have to implement a method that retrieves a collection of authorities. In the case of OAuth then, the framework creates the Authentication object.
The Authentication object is created based on the Access Token , either from the token itself (in the case of JWT), or from the information provided by the introspection endpoint (for Opaque Tokens), creating the collection of authorities from the scopes.
2.3. Authorities
Authorities are usually represented as simple strings.
The framework adds the SCOPE_ prefix to these authorities by default , to differentiate them from other authorities that can be configured in the service.
The bottom line of all this is that we’ll end up with a regular Authentication object, just like the one we obtain when we use other more traditional authentication methods such as username/password authentication.
This means that the mechanisms we can use to control access are the same as the ones used on these other common scenarios, namely:
- Authorizing HTTP Requests ( HttpServletRequest s) with the FilterSecurityInterceptor; in practice, this usually means using the WebSecurityConfigurerAdapter to define access rules for the HttpSecurity configuration
- Using Expression-Based Access Control mainly in @Pre and @Post annotations like @PreAuthorize , @PreFilter , @PostAuthorize and @PostFilter
Let’s analyze some simple examples for these two approaches.
2.4. Authorizing HttpServletRequests
Let’s look at the security configuration for the Resource Server present in the class ResourceSecurityConfig
@Override
protected void configure(HttpSecurity http) throws Exception {
    http.authorizeRequests()
          .antMatchers(HttpMethod.GET, "/api/projects/**")
            .hasAuthority("SCOPE_read")
          .antMatchers(HttpMethod.POST, "/api/projects")
            .hasAuthority("SCOPE_write")
          .anyRequest()
            .authenticated()
        .and()
          .oauth2ResourceServer()
            .jwt();
}
We’ve set up the HttpSecurity configuration here by overriding the corresponding WebSecurityConfigurerAdapter method.
The authorizeRequests() method allows specifying the access rules for our endpoints.
So here, for example, we’re allowing access to the GET projects endpoint only if the Authentication instance contains the SCOPE_read authority.
This will be true if the Client was granted the read scope when requesting the Access Token.
2.5. Using Expression-Based Access Control
Now let’s have a look at how we can use expression-based access control.
In the same class ResourceSecurityConfig, we can see the service is already configured to process the @Pre and @Post annotations, as it contains the @EnableGlobalMethodSecurity annotation:
@EnableGlobalMethodSecurity(prePostEnabled = true)
@Configuration
public class ResourceSecurityConfig extends WebSecurityConfigurerAdapter {
    // ...
}
Next, let’s head to the ProjectController.
Here, we’ll use a common case example which is simply using the @PreAuthorize annotation to restrict access to a particular method.
For example, if we want to permit access to the findOne method here in the Controller only to Clients that have been granted the email scope, we can add the @PreAuthorize annotation, along with the hasAuthority rule with the expected scope, prefixed correspondingly:
@PreAuthorize("hasAuthority('SCOPE_email')")
@GetMapping(value = "/{id}")
public ProjectDto findOne(@PathVariable Long id) {
    // ...
}
It’s worth mentioning that here we’re using this annotation in the REST controller because, conceptually, it belongs to this layer.
But this can be used in any layer of our service; the request will be effectively executed until it invokes the annotated method and runs the proper validations.
Let’s see these configurations in action now; we’ll add a breakpoint in the BearerTokenAccessDeniedHandler#handle method and start the the Resource Server in debug mode.
We will also need the Authorization Server up and running, so let’s boot it as well.
2.6. Access Control in Action - No Scope
We will run the REST calls present in the Postman collection folder for this lesson.
We’ll first execute the necessary requests consecutively to obtain a new access token:
- Extract Authorization Endpoint - extracts the authorization endpoint with scope equals to none
- Request Authorization Code - gets the Authorization Code from the Authorization Server
- Request Access Token - exchanges the Authorization Code retrieved above to get an Access Token
Here, we’ve obtained an Access Token, without specifying any scope.
Next, let’s execute the call to get the Projects.
Since we’ve configured this endpoint to require the read scope, the execution will stop at the breakpoint we set.
What happened is that the framework threw an AccessDeniedException because the Authentication naturally didn’t comply with the access rules and therefore, this AccessDeniedHandler is invoked.
As we step further in the same method, we can see that the method adds an informative WWW-Authenticate header as indicated in the Bearer Token Usage specs:
// ...
String wwwAuthenticate = computeWWWAuthenticateHeaderValue(parameters);
response.addHeader(HttpHeaders.WWW_AUTHENTICATE, wwwAuthenticate);
and transforms the exception into the corresponding 403 - Forbidden response:
// ...
response.setStatus(HttpStatus.FORBIDDEN.value());
As we step out from this breakpoint and return to Postman, we can see that we got 403 Forbidden response and a helpful message in the WWW-Authenticate header indicating that this error response is due to insufficient scopes since the request requires higher privileges than the ones provided by the access token.
Next, let’s see the same flow in action when requesting an Access Token with read scope.
2.7. Access Control in Action - read Scope
Let’s repeat the process of obtaining an Access Token, but this time we’ll request one with read scope.
And let’s trigger the " Get All Projects" endpoint again.
This time, we’re able to successfully retrieve the list of Projects because we have requested the Access Token with read scope .
Next, let’s also try to access the “Project by Id” endpoint that is protected by the @PreAuthorize annotation requesting the email scope.
As we send this request, the breakpoint will be triggered again, as the framework throws an AccessDeniedException and the handler proceeds in the exact same way.
We resume back to the Postman and we can see that we have got the same 403 - Forbidden response with the corresponding WWW-Authenticate header.
2.8. Access Control in Action - email and read Scope
Next, let’s see the same flow again, but this time with requesting Access Token with both email and read scope.
With this token, we’ll execute the endpoint for Request Project by Id, and we can see that the request is invoked successfully now.
3. Resources
Lesson 2: Verify/Validate Claims from the JWT (Text-Only)
1. Goal
In this lesson, we’re going to look at JWT Claim validation in Spring.
2. Lesson Notes
The relevant module you need to import when you’re working with this lesson is: lsso-module3/verify-validate-claims-jwt.
This lesson only needs a single reference codebase, so there is no end version of the project.
2.1. Overview
In this lesson we’ll analyze and see in action the validators provided by Spring Security out of the box:
- the JwtTimestampValidator : checks that the token is not expired and that it can be used in the moment it’s received.
- the JwtIssuerValidator : validates that the token has been created and signed by the expected provider
It’s important to know that these validators are configured automatically by the framework when we set up JWT support.
2.2. Spring Security Validators - JwtTimestampValidator
Let’s start by analyzing what happens under the hood with the simple configuration we have in the Resource Server’s security config class:
@Override
protected void configure(HttpSecurity http) throws Exception {
  http.authorizeRequests()
      .antMatchers(HttpMethod.GET, "/api/projects/**")
        .hasAuthority("SCOPE_read")
      .antMatchers(HttpMethod.POST, "/api/projects")
        .hasAuthority("SCOPE_write")
      .anyRequest()
        .authenticated()
    .and()
      .oauth2ResourceServer()
        .jwt();
}
This is a simple config setting up our application as an OAuth Resource Server that uses JWT.
The framework will search the context for a bean implementing the JwtDecoder interface to transform the String tokens into Jwt objects.
Spring Security offers a useful implementation of this interface, the NimbusJwtDecoder class that contains a jwtValidator field:
public final class NimbusJwtDecoder implements JwtDecoder {

  // ...

  private OAuth2TokenValidator<Jwt> jwtValidator =  JwtValidators.createDefault();

  // ...

}
If we navigate into the JwtValidators.createDefault() method we’ll see the output of this createDefault method is clear:
public static OAuth2TokenValidator<Jwt> createDefault() {
	return new DelegatingOAuth2TokenValidator<>(Arrays.asList(new JwtTimestampValidator()));
}
It’s setting up a composite validator containing a single actual validator, the JwtTimestampValidator.
This validator is in charge of verifying that the token is used within the timeframe in which it’s valid.
This timeframe is determined by 2 claims contained in the JWT:
- nbf : the Not Valid Before claim determines the instant in which the token can start to be used
- exp : the Expiration Time claim indicates the time after which the JWT must not be accepted for processing
In the OAuth specification, these 2 claims are optional; thus they’ll only be validated if they’re included in the Token.
2.3. Spring Security Validators - JwtIssuerValidator
If we go back to the JwtValidators helper class implementation, we’ll see it offers one other function to create a JWT validator, the createDefaultWithIssuer method:
public static OAuth2TokenValidator<Jwt> createDefaultWithIssuer(String issuer) {
	List<OAuth2TokenValidator<Jwt>> validators = new ArrayList<>();
	validators.add(new JwtTimestampValidator());
	validators.add(new JwtIssuerValidator(issuer));
	return new DelegatingOAuth2TokenValidator<>(validators);
}
The implementation is fairly the same as the one we’ve just seen, with the difference that here there is one other validator getting configured, the JwtIssuerValidator.
Naturally, the framework will use this approach if we provide the issuer identifier, for example, as we’ve done in this application with the issuer-uri application property.
With this validator in place the decoder will check that the value corresponds with the iss (Issuer) claim, that is, who created and signed the token.
2.4. Testing the Spring Security Validators - Modifying the JWT
To see these validators in action, we can set up a breakpoint in the NimbusJwtDecoder#validateJwt method and launch the Resource Server application in debug mode.
Naturally, the best way to clearly see how this works is to force a failure in the validation of a JWT.
Normally, we wouldn’t be able to manipulate the content of JWTs because Authorization Servers only expose the public key to verify the signature of the token. But in this case, as it’s deployed locally, we do have access to the private key and we can use that to generate tokens with any data we want.
Follow these steps to create a new JWT from an existing one, with custom fields and values:
- Obtain an Access Token from the Authorization Server. You can use the Postman Collection (in the master branch) requests corresponding to this lesson to obtain a token
- Copy the JWT in the jwt.io tool to use as base to decode it
- Obtain the Authorization Server private key by searching the privateKey field in the Authorization Server’s baeldung-realm.json configuration file
- Copy the private key in jwt.io, in the last text box of the VERIFY SIGNATURE section
- Wrap the private key with an Encapsulation Boundary:
-----BEGIN RSA PRIVATE KEY-----
eyJhbGciOiJIUzI1NiIsInR5cCI6IkpXVCJ9.eyJzdWIiOiIxMj...
-----END RSA PRIVATE KEY-----
Now we can modify the fields in the JSON-formatted token payload, and we’ll see the encoded token is modified automatically. For example, in this case we’ll change the following claims:
- exp (Expiration Time) : we’ll set this to be the same as the iat (Issued At) instant, plus one
- iss (Issuer): we’ll simply remove a character from this string
2.5. Testing the Spring Security Validators - Debugging
We can now send this new token as a Bearer token in a request to the Resource Server using Postman.
For example, we can make the following request:
GET http://localhost:8081/lsso-resource-server/api/projects
Authorization: Bearer {newJWT}
Once we send this, Postman will be idle waiting for the response.
We can head to the IDE and continue with the execution step by step.
At this point we can confirm the jwtValidator is a composite validator as we mentioned before. If we now step into the execution of this validator, we can see that all this does is trigger the validation logic of the token validators it contains one by one.
We can see how the new entries appear in the errors variable after the validators get invoked.
We can resume the execution and have a look at the response we obtained in Postman.
We see we obtain a 401-Unauthorized response as expected.
A noteworthy aspect here is that if we inspect the response Headers we’ll see it contains a WWW-Authenticate header indicating one of the errors’ code and description we just saw.
Naturally, this is standard behavior as it’s part of the Bearer Token specification.
3. Resources
Lesson 3: Accessing JWT Bearer Token Authentication attributes (text-only)
1. Goal
In this lesson, we’ll learn how to access Token attributes in our Resource Server application.
2. Lesson Notes
The relevant module you need to import when you’re starting with this lesson is: lsso-module3/accessing-token-authentication-attributes-start
If you want have a look at the fully implemented lesson, as a reference, feel free to import: lsso-module3/accessing-token-authentication-attributes-end
We’ll also need to import the Postman collection that contains all the REST calls that we need to run for this lesson.
2.1. Introduction
We can use Access Token properties in our Resource Server application to modify business logic after the user is authorized, or to add additional security rules to guard routes or methods.
Usually, a Resource Server doesn’t care about the user requesting a resource; instead, it cares about the Authorities granted to that user.
However, if needed, it’s possible to obtain some information about the user that is making the request from the Access Token that was issued to the user.
Let’s see this with some examples.
2.2. Accessing the Token
In this example, we will access the Token in a controller method and inspect the accessible information, including attributes and claims.
We have added a UserInfoController in the start point of the lesson in the Resource Server and added an endpoint for /user/info
@RestController
public class UserInfoController {

    @GetMapping("/user/info")
    public Map<String, Object> getUserInfo() {

        return null;
    }
}
Our goal is to retrieve the token in the /user/info endpoint.
We’ll first add the Authentication object as a parameter in our controller method:
@GetMapping("/user/info")
public Map<String, Object> getUserInfo(Authentication authentication) {
    // ...
}
We can use this because after a Token is authorized, an instance of the Authentication is set in the Spring SecurityContext .
Since this Authentication holds an OAuth2 Authentication Principal, let’s access this in our method:
@GetMapping("/user/info")
public Map<String, Object> getUserInfo(Authentication authentication) {
    Jwt jwt = (Jwt) authentication.getPrincipal();

    return Collections.singletonMap("token", jwt);
}
Note that we had to cast this to the Jwt type. We’re doing this because our Resource Server is configured to use JWT Tokens, as a result this Principal is a Spring Security Jwt object.
If we were using Opaque Tokens, we could access the Authentication object in the same way but it would be of a different type.
Let’s add a breakpoint here and start the Resource Server in DEBUG mode so we can inspect the Authentication object. We will also need the Authorization Server up and running, so let’s boot it as well.
We’ll run the REST calls present in the Postman collection folder for this lesson.
We’ll first execute the necessary requests consecutively to obtain a new Access Token:
- Extract Authorization Endpoint - extracts the authorization endpoint
- Request Authorization Code - gets the Authorization Code from the Authorization Server
- Request Access Token - exchanges the Authorization Code retrieved above to get an Access Token
Next, let’s execute the request for the new endpoint:
GET - User Info
This will trigger the execution and it will pause on the breakpoint that we’ve added in the UserInfoController .
As we inspect the Authentication object here, we can see its type is JwtAuthenticationToken and it contains authorities for the scopes that were retrieved by the Authorization Server.
We can also notice that the principal field which is of type Jwt contains the information we want to access here in the claims Map . For example, one of the claims we can view is the preferred_username.
The response of this endpoint is the entire token with all its claims.
2.3. Obtaining User Information Directly
We can also obtain a reference to the Principal directly by using the @AuthenticationPrincipal annotation.
The annotation resolves the Authentication.getPrincipal() method on the authentication and stores the value in the annotated method argument. This will eliminate the casting we did in the previous method and make our code a bit cleaner.
In this new example we’ll implement a function to access the preferred_username claim.
First, let’s write a new endpoint to access the entire token using the @AuthenticationPrincipal annotation:
@GetMapping("/user/info/direct")
public Map<String, Object> getUserInfo(@AuthenticationPrincipal Jwt principal) {
    return Collections.singletonMap("principal", principal);
}
and obtain a new token.
We’ll again execute the requests to obtain a new Access Token and call the new endpoint we just created:
GET - Direct User Info
As we can see here, the output is the entire Authentication Principal returned in JSON format:
{
    "principal": {
        "tokenValue": "eyJhbGciOiJSUzI1NiIsInR5cCIgOiAiSldUIiwia2lkIiA6ICJlUktVWG10TFhKMHBBNkxBS29aWko1ZlU0VDhCdmxKdERCb3pXanFFdnhjIn0.eyJleHAiOjE1OTA0Mjc1MjUsImlhdCI6MTU5MDQyNzIyNSwiYXV0aF90aW1lIjoxNTkwNDI3MjIwLCJqdGkiOiJjNjMwZGVkMS1lMTc5LTQxMTMtOTYyNi02YzA3YTViZDQ2ZWYiLCJpc3MiOiJodHRwOi8vbG9jYWxob3N0OjgwODMvYXV0aC9yZWFsbXMvYmFlbGR1bmciLCJzdWIiOiJhNTQ2MTQ3MC0zM2ViLTRiMmQtODJkNC1iMDQ4NGU5NmFkN2YiLCJ0eXAiOiJCZWFyZXIiLCJhenAiOiJsc3NvQ2xpZW50Iiwic2Vzc2lvbl9zdGF0ZSI6IjRiNzQ4MjliLTIzMTYtNGFkOC1hMTYyLTM0ZjY1OTY4NzI2MCIsImFjciI6IjEiLCJzY29wZSI6InByb2ZpbGUgd3JpdGUiLCJwcmVmZXJyZWRfdXNlcm5hbWUiOiJqb2huQHRlc3QuY29tIn0.H2TCFuFx4OIaj2_rSs2jdvJYMNcLKqGcD3sEMlTK9TwwllI9f2uK2WW0iCyxmC4QkrEPCn3IsTcqhMpvS30oL_VeA201uikAzw4kHll1rs6IM3ve5qlmbnBfSblIlTMNv9tkU18prAa7IUJ8yolihb8fpPkzd86_YtXTY1ipu-Bkh7UGq8UL_SFae7cbcMfF8l2ufAN0hmiZ6ssy0FWca7oSKMl3b8mrkVQOA-NLGvtXKUwp3bk3r8TNjDMPhhgGDoGqt_DVyhn5R4Jt94E-5iJxbsAqGy8FwIgVTY-UwEzfQ66bbjBD8jbEcQ8XsLtK0fbsvn-BTHgL3l6r12nEuQ",
        "issuedAt": "2020-05-25T17:20:25Z",
        "expiresAt": "2020-05-25T17:25:25Z",
        "headers": {
            "kid": "eRKUXmtLXJ0pA6LAKoZZJ5fU4T8BvlJtDBozWjqEvxc",
            "typ": "JWT",
            "alg": "RS256"
        },
        "claims": {
            "sub": "a5461470-33eb-4b2d-82d4-b0484e96ad7f",
            "iss": "http://localhost:8083/auth/realms/baeldung",
            "typ": "Bearer",
            "preferred_username": "john@test.com",
            "acr": "1",
            "azp": "lssoClient",
            "auth_time": 1590427220,
            "scope": "profile write",
            "exp": "2020-05-25T17:25:25Z",
            "session_state": "4b74829b-2316-4ad8-a162-34f659687260",
            "iat": "2020-05-25T17:20:25Z",
            "jti": "c630ded1-e179-4113-9626-6c07a5bd46ef"
        },
        "id": "c630ded1-e179-4113-9626-6c07a5bd46ef",
        "subject": "a5461470-33eb-4b2d-82d4-b0484e96ad7f",
        "notBefore": null,
        "issuer": "http://localhost:8083/auth/realms/baeldung",
        "audience": null
    }
}
We can access any of these properties individually just like any other object.
Now, let’s try accessing the preferred_username claim; this is really easy since we already have the principal:
@GetMapping("/user/info/direct")
public Map<String, Object> getDirectUserInfo(@AuthenticationPrincipal Jwt principal) {
    String username = (String) principal.getClaims().get("preferred_username");

    return Collections.singletonMap("username", username);
}
Here, we’ve invoked the principal.getClaims() method; this returns a Map of the claims. Then, we extracted the desired claim preferred_username from this Map and returned it in our response.
The response will be a JSON containing username as the key and the preferred_username claim as the value.
Let’s test it out by obtaining a new Token, then calling the /user/info/direct endpoint again: GET - Direct User Info
As we can see, the response is the username:
{
    "username": "john@test.com"
}
3. Resources
Lesson 4: Accessing JWT Access Token Authentication Attributes Using SpEL(text-only)
1. Goal
In this lesson, we’ll learn how to access Token attributes in our Resource Server application using Spring Expression Language.
2. Lesson Notes
The relevant module you need to import when you’re starting with this lesson is: lsso-module3/accessing-token-authentication-attributes-spel-start
If you want have a look at the fully implemented lesson, as a reference, feel free to import: lsso-module3/accessing-token-authentication-attributes-spel-end
We’ll also need to import the Postman collection that contains all the REST calls that we need to run for this lesson.
2.1. Accessing Attributes via SpEL
We can use SpEL alongside the @AuthenticationPrincipal annotation to get properties from the Authentication principal. We do this by providing an expression to the annotation that Spring will resolve and return the required value.
In the next example, we’ll be accessing the preferred_username using SpEL.
We’ll add a new method getUserName(), and add the expression attribute to the annotation with the value “claims”:
@GetMapping("/user/info/spel1")
public Map<String, Object> getUserName(@AuthenticationPrincipal(expression = "claims") Map<String, Object> claims) {

    return Collections.singletonMap("username", claims.get("preferred_username"));
}
Under the hood, Spring checks the Authentication Principal for the claims property and invokes the getter if it exists.
Therefore, the expression returns a Map containing the claims. In our example, we’ve retrieved the username from that map.
Now, we can go to Postman and test this request.
We’ll execute the below requests consecutively to obtain a new access token:
- Extract Authorization Endpoint - extracts the authorization endpoint
- Request Authorization Code - gets the Authorization Code from the Authorization Server
- Request Access Token - exchanges the Authorization Code retrieved above to get an Access Token
Then call the new endpoint we just created: GET - SPEL-1
We can see the username is returned in the response:
{
    "username": "john@test.com"
}
2.2. Accessing Attributes via SpEL Using Method-Level Security
We’ve looked at accessing Token attributes via the Authentication interface, and the @AuthenticationPrincipal annotation.
Now, let’s look at another way we can use SpEL to access attributes.
We can access Token information using SpEL by taking advantage of method level security in Spring. This allows us apply guards to routes and methods in Spring, using SpEL.
To showcase this, we’ll implement a secure route that only users with the read scope can access.
First, we have to enable method level security in our Resource Server:
@Configuration
@EnableGlobalMethodSecurity(prePostEnabled = true)
public class ResourceSecurityConfig extends WebSecurityConfigurerAdapter {
    // ...
}
We’ve also set prePostEnabled to be true which allows us to use the @PreAuthorize and @PostAuthorize annotations on our methods.
We can now use the @PreAuthorize annotation in any method; in this case, we’ll use it on a Controller method.
We’ll add a new method in our UserInfoController, that uses an SpEL expression to check the scope claim:
@GetMapping("/user/info/spel2")
@PreAuthorize("principal?.claims['scope']?.contains('read')")
public Map<String, Object> getReadScopeResponse() {
    return Collections.singletonMap("response", "users with the read scope can see this");
}
This annotation will only allow the method to be invoked if the expression evaluates to true; in our case, if the scope claim contains read, then, we’re simply returning a String.
Let’s test this to see what happens.
We’ll obtain a new Token so we can set the scopes we want our Token to be granted.
We’ll execute the requests again to obtain a new Access Token. In the first request, GET - Extract Authorization Endpoint, we set the scope as read, so the Token should contain the read scope.
Once we have got the Token, we can confirm it has the read scope by using the user info endpoint we made earlier: GET - User Info
Now let’s execute our SpEL2 endpoint: GET - SPEL-2
The response will have the Http Status 200 :
{
    "response": "users with the read scope can see this"
}
Now, let’s see what happens if the Token is not granted the read scope.
We will need to obtain another Token, by changing the scope to write in the first request: GET - Extract Authorization Endpoint. We’ll then execute the 3 requests to get a new Token.
We can again confirm confirm it has the write scope using the user info endpoint we made earlier: GET - User Info
Now let’s execute our SpEL2 endpoint again and see what happens: GET - SPEL-2
As you can see we get no response and a 403 forbidden Http Status because our Token doesn’t contain the required read scope.
3. Resources
Lesson 1: New OAuth2 Social Login (text-only)
1. Goal
In this lesson, we’ll learn about authenticating our apps using a social login provider, the benefits of using social login providers and how to integrate with them.
2. Lesson Notes
The relevant module you need to import when you’re starting with this lesson is: lsso-module4/oauth2-social-login-start
If you want have a look at the fully implemented lesson, as a reference, feel free to import: lsso-module4/oauth2-social-login-end
2.1. Social Login and its Benefits
Social login means authenticating users for our app by delegating the authentication to social login providers such as Github, Google, Facebook etc.
Using social login providers for our app gives a lot of ease and flexibility to our users as they don’t have to create a new set of credentials to login to our app, and instead reuse the credentials already created at a trusted provider.
It also makes our job easier as it gives us an opportunity to delegate the authentication responsibility to the social login provider.
2.2. Spring Security Support for Social Login
The Spring Security OAuth2 framework provides very mature support for login with popular social login providers.
For Common OAuth2 providers such Google, Github, Facebook etc, it provides ready to use inbuilt configurations.
Furthermore, the framework is flexible and customizable if needed for a custom provider.
2.3. Authentication with GitHub
In our example, we’re going to authenticate our app using a popular social login provider - GitHub.
We’ll also try to access secured resources from GitHub for the authenticated user, namely the user’s profile and repository information.
Of course, the same functionality can be extended to any social login provider.
2.4. Configuring Security to Authenticate with OAuth2
In the Client module, we’ve included the spring-boot-starter-oauth2-client dependency . This brings in all the OAuth2 security and client libraries that we need.
Next, we need to configure security to enable OAuth2 authentication for our app.
Let’s open the class ClientSecurityConfig and make the required changes:
@Override
protected void configure(HttpSecurity http) throws Exception {
    http.authorizeRequests()
        .antMatchers("/").permitAll()
        .anyRequest().authenticated()
        .and()
        .oauth2Login()
        .and()
        .logout().logoutSuccessUrl("/");
}
Here, in the configure method, we’ve enabled OAuth2 login by using the DSL oauth2Login().
We’ve also configured the logout URL so that we can successfully log out from the app by using the logout() DSL.
These configurations will ensure that, for authentication, we’re redirected to the social login provider that we’ll register in our app in the next step.
But, before that, we have to understand the setup we need to do at the provider’s end.
2.5. Creating an OAuth App at the Provider’s Platform
To leverage any social provider to authenticate in our app using OAuth2, we first need to register an OAuth2 app at the provider’s platform.
For Github, this is done using the steps mentioned here: https://docs.github.com/en/free-pro-team@latest/developers/apps/creating-an-oauth-app
One important configuration that needs to be done at the provider’s end is configuring the correct callback URL.
A callback URL is the URL that the provider will redirect to after successful authentication.
This is defined and configured automatically by the framework.
Let’s see this for the app registered for our example:
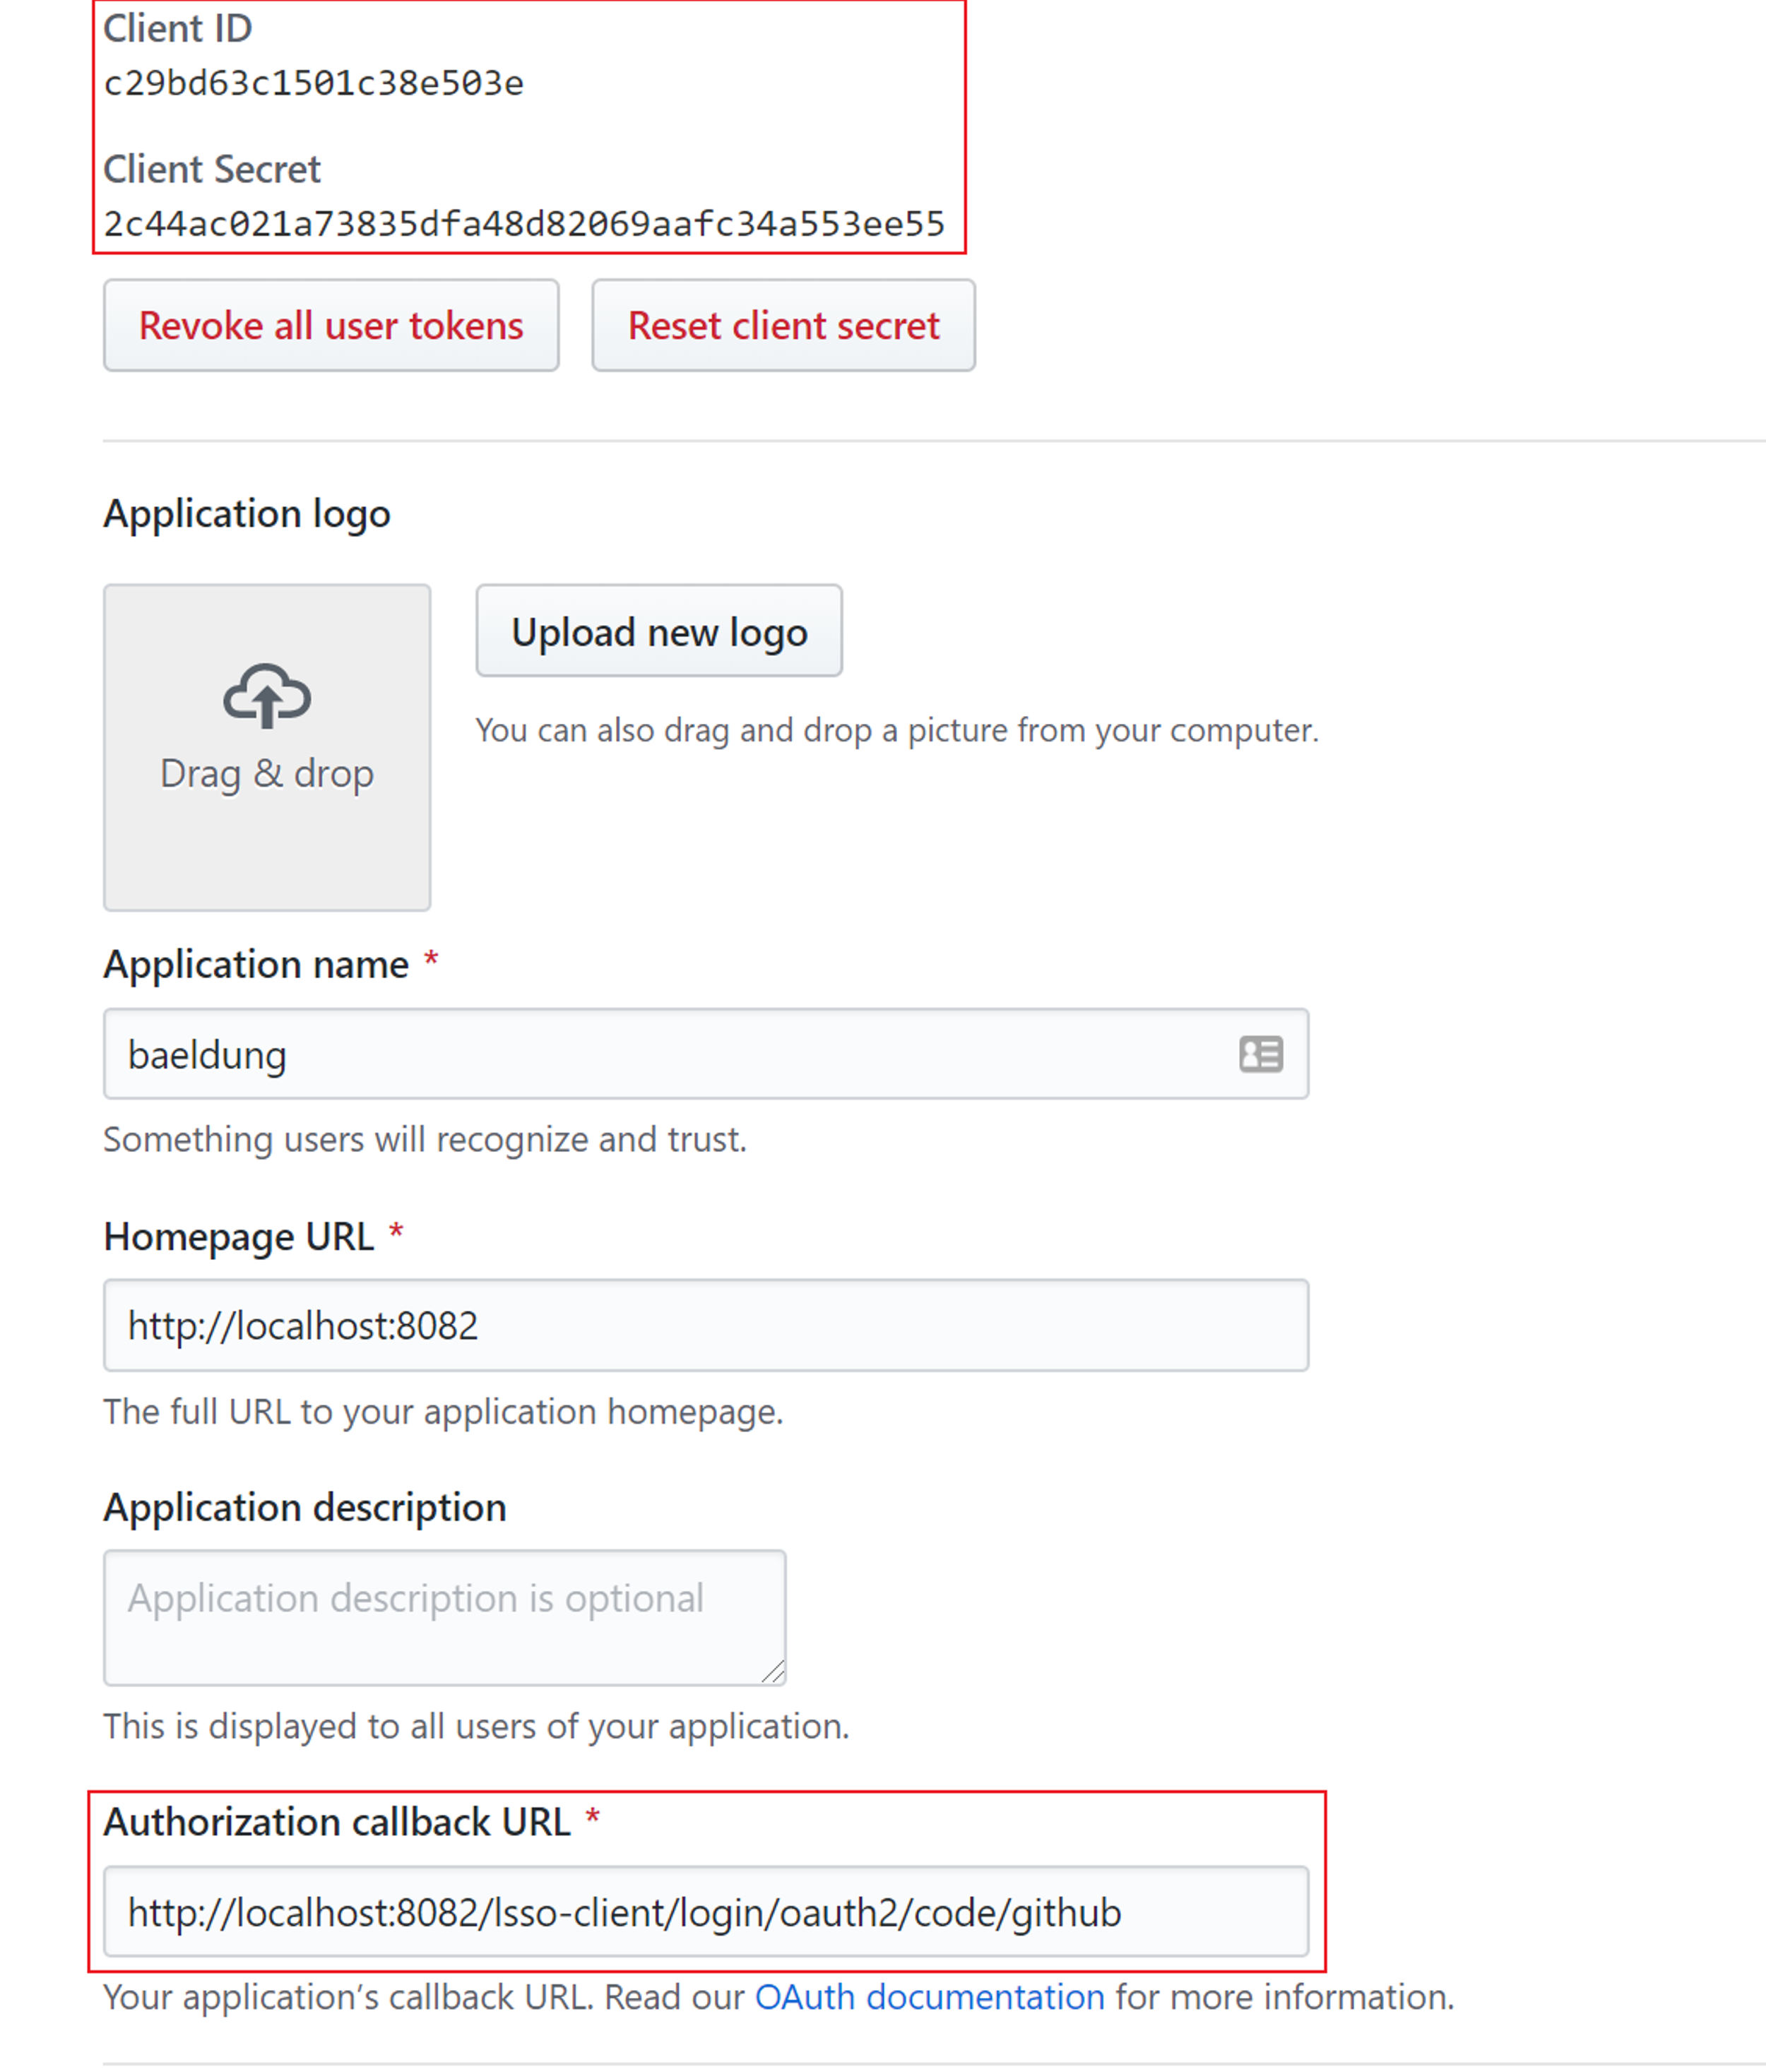
For our app the URL will be: http://localhost:8082/lsso-client/login/oauth2/code/github
Once an app is successfully registered with a provider, this creates a unique client-id and client-secret to identify the app. We can see these properties on the registered app as well.
2.6. Configuring the Registered OAuth2 app in our Client
Next, we need to add the client credentials we got from the provider in our Client module.
This configuration is similar to the one we would have for a local provider.
Let’s open the application.yml and add the details:
spring:
  security:
    oauth2:
      client:
        registration:
          github:
            client-id: c29bd63c1501c38e503e
            client-secret: 2c44ac021a73835dfa48d82069aafc34a553ee55
Here, we’ve registered with this provider using its name and the client-id and client-secret that we created at the providers’ end.
This completes our Client registration, though, it’s interesting to know here that due to Spring Security support for popular OAuth2 providers such as GitHub, we were able to register our Client by using only the client name and the above 2 properties.
All this is possible because the rest of the properties are already defined in the class CommonOAuth2Provider :
GITHUB {

	@Override
	public Builder getBuilder(String registrationId) {
		ClientRegistration.Builder builder = getBuilder(registrationId,
				ClientAuthenticationMethod.BASIC, DEFAULT_REDIRECT_URL);
		builder.scope("read:user");
		builder.authorizationUri("https://github.com/login/oauth/authorize");
		builder.tokenUri("https://github.com/login/oauth/access_token");
		builder.userInfoUri("https://api.github.com/user");
		builder.userNameAttributeName("id");
		builder.clientName("GitHub");
		return builder;
	}
}
For e.g. for Github, we already have the properties above defined.
To leverage these predefined configurations, it’s important that our client name registered in application.yml matches with the enumerations provided in this class.
Next, we need to add a Welcome Screen for the user and a controller that renders this screen.
2.7. Adding a New Welcome Screen
We’ve added a welcome page user.html in the start point of the lesson that contains the basic structure.
Let’s open user.html and add a simple welcome text:
<div class="container">
	<!-- Welcome Text -->
	<h1>Welcome!!</h1>
	<div class="row">
Our welcome screen is ready.
Next, let’s add a simple controller to render this:
@Controller
public class UserProfileController {

    @GetMapping("/user")
    public String user(Model model) {
        return "user";
    }

}
Next, let’s run the application and navigate to http://localhost:8082/lsso-client/. This should render the login screen.
If we click the login button, we can see it redirects us to the GitHub login form; this means that we’ve successfully integrated our app with the GitHub login.
After entering our correct GitHub credentials, we’re redirected to the Welcome screen.
Now we are able to authenticate using GitHub.
This functionality is even more powerful if we can access secured GitHub resources of the logged-in user such as his profile, basic information, repositories etc.
Let’s try this next.
2.8. Accessing Secured GitHub Resources
As soon as a user is authenticated, Spring Security wraps the basic user details provided by the social provider in an OAuth2User object.
This object is available as an authentication principal in all of our web requests.
Let’s leverage this principal object to access basic user details.
We’ll modify our existing user() method to use this principal object:
@Controller
public class UserProfileController {

    @GetMapping("/user")
    public String user(Model model, @AuthenticationPrincipal OAuth2User principal) {
        return "user";
    }

}
Next, we’ll extract a couple of details from the principal object and add them as model attributes to be displayed on the Welcome screen.
The attributes that we will extract are returned from GitHub for the authenticated user.
We can find the complete list of attributes in the GitHub documentation - https://docs.github.com/en/free-pro-team@latest/rest/reference/users#get-the-authenticated-user
@Controller
public class UserProfileController {

    @GetMapping("/user")
    public String user(Model model, @AuthenticationPrincipal OAuth2User principal) {
        model.addAttribute("name", principal.getAttribute("name"));
        model.addAttribute("id", principal.getAttribute("login"));
        model.addAttribute("img", principal.getAttribute("avatar_url"));
        return "user";
    }

}
Next, let’s render these details on the welcome screen:
<h1>Welcome!!</h1>
<div class="row">
    <div class="col-sm-2">
        <div>
            <!-- Profile Image -->
            <img th:src="@{${img}}" class="img-thumbnail" width="100" height="100"/>
        </div>
    </div>
    <div class="col">
    <!-- Basic Attributes -->
        <div th:text="${name}"/>
        <div th:text="${id}"/>
    </div>
</div>
In the user.html file above, we’ve displayed the user’s image in the img tag, and just next to the image we displayed the user’s basic details - name and uid.
Now, our basic profile page is ready; let’s reboot the application and test this feature.
As we login again we can see, we can access and display basic user details.
Until now, we’ve leveraged only the basic detail that we get in the auth response from GitHub.
The next step is to understand how we can access secured resources such as GitHub user repositories which are not included in the basic details response.
2.9. Accessing Secured API Endpoints from our App
To access APIs provided by GitHub, we’ll use the WebClient.
But we also need to ensure that the access token we’ve received from GitHub is sent with any secured API calls we make. For this, we need a WebClient bean.
Naturally, the configuration is the same as we would have when working with a local provider.
This bean is already present in the start point; let’s just enable it by uncommenting the @Bean annotation:
@Bean
WebClient webClient(ClientRegistrationRepository clientRegistrationRepository, OAuth2AuthorizedClientRepository authorizedClientRepository) {
    ServletOAuth2AuthorizedClientExchangeFilterFunction oauth2 = new ServletOAuth2AuthorizedClientExchangeFilterFunction(clientRegistrationRepository, authorizedClientRepository);
    oauth2.setDefaultOAuth2AuthorizedClient(true);
    return WebClient.builder()
        .apply(oauth2.oauth2Configuration())
        .build();
}
Next, in our UserProfileController we’ll inject the WebClient and use this to invoke the repositories URL. This URL is present in the principal itself.
The final state of our controller should look like this:
@Controller
public class UserProfileController {

    @Autowired
    private WebClient webClient;

    @GetMapping("/user")
    public String user(Model model, @AuthenticationPrincipal OAuth2User principal) {
        model.addAttribute("name", principal.getAttribute("name"));
        model.addAttribute("id", principal.getAttribute("login"));
        model.addAttribute("img", principal.getAttribute("avatar_url"));

        String repoUrl = principal.getAttribute("repos_url");

        List<Map<Object, Object>> repos = this.webClient.get()
            .uri(repoUrl)
            .retrieve()
            .bodyToMono(new ParameterizedTypeReference<List<Map<Object, Object>>>() {
            })
            .block();

        model.addAttribute("repos", repos);
        return "user";
    }

}
Next, we’ll display the information about repositories by iterating through all the repos to display the names:
<div>
<!-- Repos -->
    <h4>User Repos</h4>
    <div th:each="repo : ${repos}">
        <div th:text="${repo.name}"/>
    </div>
</div>
This brings us to the final state of our application.
As we login again, we can see all the user’s public repos are visible.
This means that:
- we were able to successfully login with GitHub
- we were able to access user’s personal details and further
- we were also able to access a secured resource - in this case, the user’s repository list
3. Resources
- Spring Security 5 – OAuth2 Login
- Spring Security Reference - OAuth 2.0 Client
- Next Generation OAuth Support with Spring Security 5.0
Lesson 2: Refreshing a Token (text-only)
1. Goal
In this lesson, we’ll learn about Refresh Tokens, how to work with them and what their benefits are.
2. Lesson Notes
The relevant module you need to import when you’re working with this lesson is: lsso-module4/refresh-token
This lesson only needs a single reference codebase, so there is no end version of the project.
We’ll also need to import the Postman collection that contains all the REST calls that we need to run for this lesson.
2.1. Refresh Tokens
Refresh Tokens are credentials used to obtain Access Tokens, either when the current Access Token expires or to obtain an Access Token with fewer scopes.
The main benefit of a Refresh Token is that the user can obtain a new Access Token without re-authenticating.
Refresh Tokens are often long-lived, but they can be invalidated by the Authorization Server.
Because of their long lifetime, Refresh Tokens must be stored securely to prevent being leaked.
2.2. Refreshing the Token Using Postman
Before diving into the code, we’ll carry out the refresh process manually using Postman.
First, we’ll need the Authorization Server and Resource Server to be running.
Then, we’ll execute the following requests consecutively to obtain a new access token:
- GET - Extract Authorization Endpoint - extracts the authorization endpoint
- POST - Request Authorization Code - gets the Authorization Code from the Authorization Server
- POST - Request Access Token - exchanges the Authorization Code retrieved above to get an Access Token
Note that the Access Token response that we get in the last call also includes a refresh_token value:
{
    "access_token": "eyJhbGciOiJSUzI1NiIsInR5cCIgOiAiSldUIiwia2lkIiA6ICJlUktVWG10TFhKMHBBNkxBS29aWko1ZlU0VDhCdmxKdERCb3pXanFFdnhjIn0.eyJqdGkiOiIyYzBhZDUwZi0xN2E2LTRkYTYtYmViMy05MGRlMmJkNjkyMzkiLCJleHAiOjE1ODY2MjU0NjcsIm5iZiI6MCwiaWF0IjoxNTg2NjI1MTY3LCJpc3MiOiJodHRwOi8vbG9jYWxob3N0OjgwODMvYXV0aC9yZWFsbXMvYmFlbGR1bmciLCJzdWIiOiJhNTQ2MTQ3MC0zM2ViLTRiMmQtODJkNC1iMDQ4NGU5NmFkN2YiLCJ0eXAiOiJCZWFyZXIiLCJhenAiOiJsc3NvQ2xpZW50IiwiYXV0aF90aW1lIjoxNTg2NjI1MTU0LCJzZXNzaW9uX3N0YXRlIjoiZGUyMzI1YjUtMDhmZS00ZDhjLTkwYzYtYTM2ZGI0ZTRlZGFlIiwiYWNyIjoiMSIsInNjb3BlIjoicHJvZmlsZSByZWFkIiwicHJlZmVycmVkX3VzZXJuYW1lIjoiam9obkB0ZXN0LmNvbSJ9.cx_IRFYhBgPfBg184-ZHMU3E8Xhq9ePBU8lZty90PM5I6PPbeS7eNyzDeHExeq8jCDFHu7A46UGHROAwhQToEBa9Ga_ZSlvJNYzy0DSsMfHMNvNLIBs-iwnY2YXhHPvHIq8jBe0SMQcZ7j7cWp3jNC0HMaN3j0yKicxLKf_bgXH7vLy_06CpTzB76Z_3yLsU5ngVmlwUbSuoo9weO11KB3IINgsWDBIpQ9TaehhvEEgWM9AY0BFl8SXFSTOwM8_EE-k8IUqQvWaH8PtFETggcnUUDs2bz2o6vNsb0Eqsr3fmhq6bBPcSIjXiiPI4hS7EdHubUqpdTxhisiIZdiO7ng",
    "expires_in": 300,
    "refresh_expires_in": 1800,
    "refresh_token": "eyJhbGciOiJIUzI1NiIsInR5cCIgOiAiSldUIiwia2lkIiA6ICIwZDkwY2JkNy03MTY0LTQyY2MtODhlMi1kMjE1ZTc5YWU4ZWEifQ.eyJqdGkiOiI0ZWI1YTg1MC1kZTZmLTQzYWUtYjMxNi1jYzg5MDE0OWM3M2UiLCJleHAiOjE1ODY2MjY5NjcsIm5iZiI6MCwiaWF0IjoxNTg2NjI1MTY3LCJpc3MiOiJodHRwOi8vbG9jYWxob3N0OjgwODMvYXV0aC9yZWFsbXMvYmFlbGR1bmciLCJhdWQiOiJodHRwOi8vbG9jYWxob3N0OjgwODMvYXV0aC9yZWFsbXMvYmFlbGR1bmciLCJzdWIiOiJhNTQ2MTQ3MC0zM2ViLTRiMmQtODJkNC1iMDQ4NGU5NmFkN2YiLCJ0eXAiOiJSZWZyZXNoIiwiYXpwIjoibHNzb0NsaWVudCIsImF1dGhfdGltZSI6MCwic2Vzc2lvbl9zdGF0ZSI6ImRlMjMyNWI1LTA4ZmUtNGQ4Yy05MGM2LWEzNmRiNGU0ZWRhZSIsInNjb3BlIjoicHJvZmlsZSByZWFkIn0.TvfG5uf0xGbnQLOnLdLbRn5ut0duANQQkSTIIXEWiqs",
    "token_type": "bearer",
    "not-before-policy": 0,
    "session_state": "de2325b5-08fe-4d8c-90c6-a36db4e4edae",
    "scope": "profile read"
}
The Refresh Token can also have a validity time after which it cannot be used anymore to obtain a new set of credentials from the Authorization Server. This validity time is typically longer than the Access Token lifetime.
Here, this is expressed in the response by the refresh_expires_in property. However, this property is not standardized and can have a different name or not be present at all for other Authorization Servers.
2.3. Retrieving a New Access Token Using the Refresh Token
After obtaining the Refresh Token, we’ll use it to receive a new set of credentials by calling the Token Endpoint.
In Postman, open the request:
POST - Refresh Token
We’ll set the grant_type to refresh_token and the refresh_token parameter to the refresh_token value we got in the previous request:
grant_type:refresh_token
client_id:lssoClient
client_secret:lssoSecret
refresh_token:eyJhbGciOiJIUzI1NiIsInR5cCIgOiAiSldUIiwia2lkIiA6ICIwZDkwY2JkNy03MTY0LTQyY2MtODhlMi1kMjE1ZTc5YWU4ZWEifQ.eyJqdGkiOiI0ZWI1YTg1MC1kZTZmLTQzYWUtYjMxNi1jYzg5MDE0OWM3M2UiLCJleHAiOjE1ODY2MjY5NjcsIm5iZiI6MCwiaWF0IjoxNTg2NjI1MTY3LCJpc3MiOiJodHRwOi8vbG9jYWxob3N0OjgwODMvYXV0aC9yZWFsbXMvYmFlbGR1bmciLCJhdWQiOiJodHRwOi8vbG9jYWxob3N0OjgwODMvYXV0aC9yZWFsbXMvYmFlbGR1bmciLCJzdWIiOiJhNTQ2MTQ3MC0zM2ViLTRiMmQtODJkNC1iMDQ4NGU5NmFkN2YiLCJ0eXAiOiJSZWZyZXNoIiwiYXpwIjoibHNzb0NsaWVudCIsImF1dGhfdGltZSI6MCwic2Vzc2lvbl9zdGF0ZSI6ImRlMjMyNWI1LTA4ZmUtNGQ4Yy05MGM2LWEzNmRiNGU0ZWRhZSIsInNjb3BlIjoicHJvZmlsZSByZWFkIn0.TvfG5uf0xGbnQLOnLdLbRn5ut0duANQQkSTIIXEWiqs
Executing this request we get a new Access Token and Refresh Token in the response:
{
    "access_token": "eyJhbGciOiJSUzI1NiIsInR5cCIgOiAiSldUIiwia2lkIiA6ICJlUktVWG10TFhKMHBBNkxBS29aWko1ZlU0VDhCdmxKdERCb3pXanFFdnhjIn0.eyJqdGkiOiI2Y2Y5YzdhMy1lMjg3LTRmZDEtYjhmMy0wNjgzZTRmNDMzYzMiLCJleHAiOjE1ODY2MjYyMjQsIm5iZiI6MCwiaWF0IjoxNTg2NjI1OTI0LCJpc3MiOiJodHRwOi8vbG9jYWxob3N0OjgwODMvYXV0aC9yZWFsbXMvYmFlbGR1bmciLCJzdWIiOiJhNTQ2MTQ3MC0zM2ViLTRiMmQtODJkNC1iMDQ4NGU5NmFkN2YiLCJ0eXAiOiJCZWFyZXIiLCJhenAiOiJsc3NvQ2xpZW50IiwiYXV0aF90aW1lIjoxNTg2NjI1MTU0LCJzZXNzaW9uX3N0YXRlIjoiZGUyMzI1YjUtMDhmZS00ZDhjLTkwYzYtYTM2ZGI0ZTRlZGFlIiwiYWNyIjoiMSIsInNjb3BlIjoicHJvZmlsZSByZWFkIiwicHJlZmVycmVkX3VzZXJuYW1lIjoiam9obkB0ZXN0LmNvbSJ9.G3_m9ZccEEf-MXmE7TfPkwQJ75j58oQ24fG8j5a1y8Y2kNnHQm2mBP8RgXocii2GvMxzJZp-tWbJN427Mq_fFqJIYwbFjiW2RB7DWE1X4itpPoNiUVkGnr7MaGo9ZeGzbdOIn-Q48FJrlHXXNjir7sji1tJpheVThAueJxW7JlAmWT3kW_-kf7npiosUO5ZtHDM1H5bKX8u1IzsOnfzlUteMM-aAw904fZQOIoVdrjLEeDVCYCyt3iueCgh_MCjFPITL3ewLu2PaBgf4le0PONmMExqtzWL3LHywKHCrg2Al4kh7fvuIGowM_Rrcq8-KPhhOLXcUM6Qbp5FIepNA5w",
    "expires_in": 300,
    "refresh_expires_in": 1800,
    "refresh_token": "eyJhbGciOiJIUzI1NiIsInR5cCIgOiAiSldUIiwia2lkIiA6ICIwZDkwY2JkNy03MTY0LTQyY2MtODhlMi1kMjE1ZTc5YWU4ZWEifQ.eyJqdGkiOiJkZDNkNDg5OC1lMjAzLTQyNWItYTBjMi02ZGVmMGE5NTFjY2EiLCJleHAiOjE1ODY2Mjc3MjQsIm5iZiI6MCwiaWF0IjoxNTg2NjI1OTI0LCJpc3MiOiJodHRwOi8vbG9jYWxob3N0OjgwODMvYXV0aC9yZWFsbXMvYmFlbGR1bmciLCJhdWQiOiJodHRwOi8vbG9jYWxob3N0OjgwODMvYXV0aC9yZWFsbXMvYmFlbGR1bmciLCJzdWIiOiJhNTQ2MTQ3MC0zM2ViLTRiMmQtODJkNC1iMDQ4NGU5NmFkN2YiLCJ0eXAiOiJSZWZyZXNoIiwiYXpwIjoibHNzb0NsaWVudCIsImF1dGhfdGltZSI6MCwic2Vzc2lvbl9zdGF0ZSI6ImRlMjMyNWI1LTA4ZmUtNGQ4Yy05MGM2LWEzNmRiNGU0ZWRhZSIsInNjb3BlIjoicHJvZmlsZSByZWFkIn0.dsFzvpUtawa3CEVeg-p2x3bgOBGIlPvWVKBR337KUZc",
    "token_type": "bearer",
    "not-before-policy": 0,
    "session_state": "de2325b5-08fe-4d8c-90c6-a36db4e4edae",
    "scope": "profile read"
}
Now that we’ve seen the sequence of calls let’s have a look at the code.
2.4. Client Configuration
Let’s move on to the Client app.
Here, we’re using the spring-boot-starter-oauth2-client library which includes the full Refresh Token support along with core Spring Security libraries.
OAuth 2.0 Client support integrates well with the new WebClient which will be replacing the classic RestTemplate.
Let’s have a deeper look at the WebClient support which can refresh tokens automatically.
In ClientSecurityConfig in the client module, we’ve implemented the WebClient bean:
@Bean
WebClient webClient(ClientRegistrationRepository clientRegistrationRepository, OAuth2AuthorizedClientRepository authorizedClientRepository) {
    ServletOAuth2AuthorizedClientExchangeFilterFunction oauth2 = new ServletOAuth2AuthorizedClientExchangeFilterFunction(clientRegistrationRepository, authorizedClientRepository);
    oauth2.setDefaultOAuth2AuthorizedClient(true);
    return WebClient.builder()
        .apply(oauth2.oauth2Configuration())
        .build();
}
As we’ve previously seen, OAuth 2.0 Client support integrates well with WebClient using the ExchangeFilterFunction. This function provides a simple mechanism for requesting protected resources by including the retrieved Access Token as a Bearer Token in the requests.
Also, the WebClient will automatically refresh the Access Token if it’s expired and a Refresh Token is available.
2.5. Debugging the WebClient
Let’s open RefreshTokenOAuth2AuthorizedClientProvider that contains the logic of refreshing the Access Token using a Refresh Token.
We’ll start by placing a breakpoint in the authorize() method where the re-authorization logic is found.
When sending requests with WebClient, the ExchangeFilterFunction will call this authorize() method which will check if the Refresh Token is available and whether the Access Token has expired.
Let’s run the Client app in debug mode, open http://localhost:8082/lsso-client/ and login with credentials: john@test.com/123
Upon successful login:
- we’re redirected to the /projects uri
- this triggers our getProjects() method in the ProjectClientController
- which further uses the WebClient to request a resource from the Resource Server
The debugger will stop at this code block:
OAuth2AuthorizedClient authorizedClient = context.getAuthorizedClient();
if (authorizedClient == null ||
		authorizedClient.getRefreshToken() == null ||
		!hasTokenExpired(authorizedClient.getAccessToken())) {
	return null;
}
As we step into the code block we can see that the refreshToken attribute is present and the Access Token hasn’t expired because we just obtained it.
As we proceed further we can see that the process returns null from this provider and the logic of refreshing the token will not be executed.
To see the Refresh Token in action we’ll have to wait for the Access Token to expire.
Let’s wait for 5 minutes for the Access Token to expire and then let’s reload the page to trigger the complete flow again.
The debugger will stop at the previous code block, but now since our Access Token has expired we can proceed to the next code block:
OAuth2RefreshTokenGrantRequest refreshTokenGrantRequest = new OAuth2RefreshTokenGrantRequest(
		authorizedClient.getClientRegistration(), authorizedClient.getAccessToken(),
		authorizedClient.getRefreshToken(), scopes);
OAuth2AccessTokenResponse tokenResponse =
		this.accessTokenResponseClient.getTokenResponse(refreshTokenGrantRequest);
Up until this point the execution obtains the scopes that were previously specified in the request and constructs the parameters needed for refreshing the token.
Primarily, it creates a refreshTokenGrantRequest - from the existing Access and Refresh Tokens, and finally fetches a new Access Token by executing this request.
The new Access Token should be present at tokenResponse > accessToken.
We can also compare it with the previous Access Token value which is present at authorizedClient > accessToken > tokenValue.
2.6. Authorization Server Configuration
As we’ve mentioned, Authorization Servers provide support for configuring Refresh Token properties.
This includes the validity time and how many times they can be used to obtain a new Access Token.
Since this property is not standardized, Spring doesn’t populate the expiresAt field with the value from the Authorization Server by default, so here it will be null.
Since we’re using Keycloak, let’s have a look at some options we have for configuring Refresh Tokens in the Keycloak Admin console.
Open - Realm Settings -> Tokens tab
The first property we’ll look at is the Revoke Refresh Token. If enabled, a Refresh Token can only be used up to Refresh Token Max Reuse and is revoked when a different token is used.
If disabled, Refresh Tokens are not revoked and can be used multiple times
We can also configure the SSO Session Idle which controls the Refresh Token lifetime.
3. Resources
- Understanding Refresh Tokens - Auth0