Lesson 4: Testing OAuth2 with REST-assured (text-only)
1. Goal
In this lesson we’ll focus on integration testing for our application using REST Assured.
We’ll be working with the Authorization Code flow connected to our Authorization Server and the refresh token process.
2. Lesson Notes
The relevant module you need to import when you’re starting with this lesson is: lsso-module5/testing-with-restassured-start
If you want to have a look at the fully implemented lesson, as a reference, feel free to import: lsso-module5/testing-with-restassured-end
2.1. Importance of Integration Testing
Testing is an important part of application development. Integration testing is usually more heavy-weight, but it allows us to check many levels of abstractions of the application.
It allows us to evaluate if components are interacting correctly, if everything is configured as expected, and hence to verify that the whole system works properly.
Last but not least, using integration tests we can easily find differences in APIs between applications, that is, if they have consistent data models.
2.2. REST Assured
Rest Assured is a Java library for t esting and validation of REST services. It gives us specific methods that allows us to create powerful and maintainable tests for RESTful APIs.
In this lesson, we’re going to use REST Assured to simulate the OAuth flow and obtain an Access Token.
2.3. Obtaining the Token
To start off, let’s check that the corresponding servers are running:
- Resource Server in port 8081
- Authorization in port 8083
Here REST Assured will be assuming the role of the OAuth Client.
In the TokenIntegrationTest class of the Resource Server, we’ve already defined some constants that are needed to connect to the Authorization Server and to the Resource Server being tested. These are the redirect, authorization endpoint, and the Token endpoint URLs, as well as the API endpoint that we’ll be finally requesting using the Access Token:
public class TokenIntegrationTest {
    private static final String AUTH_SERVICE_BASE_URL = "http://localhost:8083/auth/realms/baeldung";
    private static final String REDIRECT_URL = "http://localhost:8082/lsso-client/login/oauth2/code/custom";
    private static final String AUTH_SERVICE_AUTHORIZE_URL = AUTH_SERVICE_BASE_URL + "/protocol/openid-connect/auth?response_type=code&client_id=lssoClient&scope=read write&redirect_uri=" + REDIRECT_URL;
    private static final String CONNECT_TOKEN = AUTH_SERVICE_BASE_URL + "/protocol/openid-connect/token";
    private static final String SERVER_API_PROJECTS = "http://localhost:8081/lsso-resource-server/api/projects";

    /// ...
}
Step 1: The Authorization Endpoint
T he first step of the Authorization Code flow is to send a request to the Authorization Endpoint.
We can do this using REST Assured’s static get() method that makes an HTTP request of type GET and wraps the received response in an instance of the Response class. This contains convenience methods to have an easy access to response cookies, headers and body:
@Test
public void givenAuthorizationCodeGrant_whenUseToken_thenSuccess() {
    Response response = RestAssured.get(AUTH_SERVICE_AUTHORIZE_URL);
    // ...
}
Step 2: Authenticating the Resource Owner
The second s tep of the flow is to authenticate the Resource Owner by the Authorization Server and to establish the required grants in order to access the resources.
The OAuth specification doesn’t define this aspect, therefore each provider handles it in a slightly different way.
Here we’ll analyze the login process for our Keycloak server in order to understand what is happening when we click on the login button, and be able to replicate it using REST Assured calls.
Hopefully, this analysis will be helpful for you to figure out how you can reproduce different real-case interactions between services.
Let’s start the Client application and browse:
http://localhost:8082/lsso-client/
Our goal is to inspect the network requests that occur behind the scenes when the browser exchanges the information with the server.
In Chrome, for example, we may see the requests by opening the developer tool (press CTRL+SHIFT+I or F12 ) and selecting there the Network tab.
Now, let’s click the Login button and inspect the auth response. In its Cookies section we should find the AUTH_SESSION_ID key:
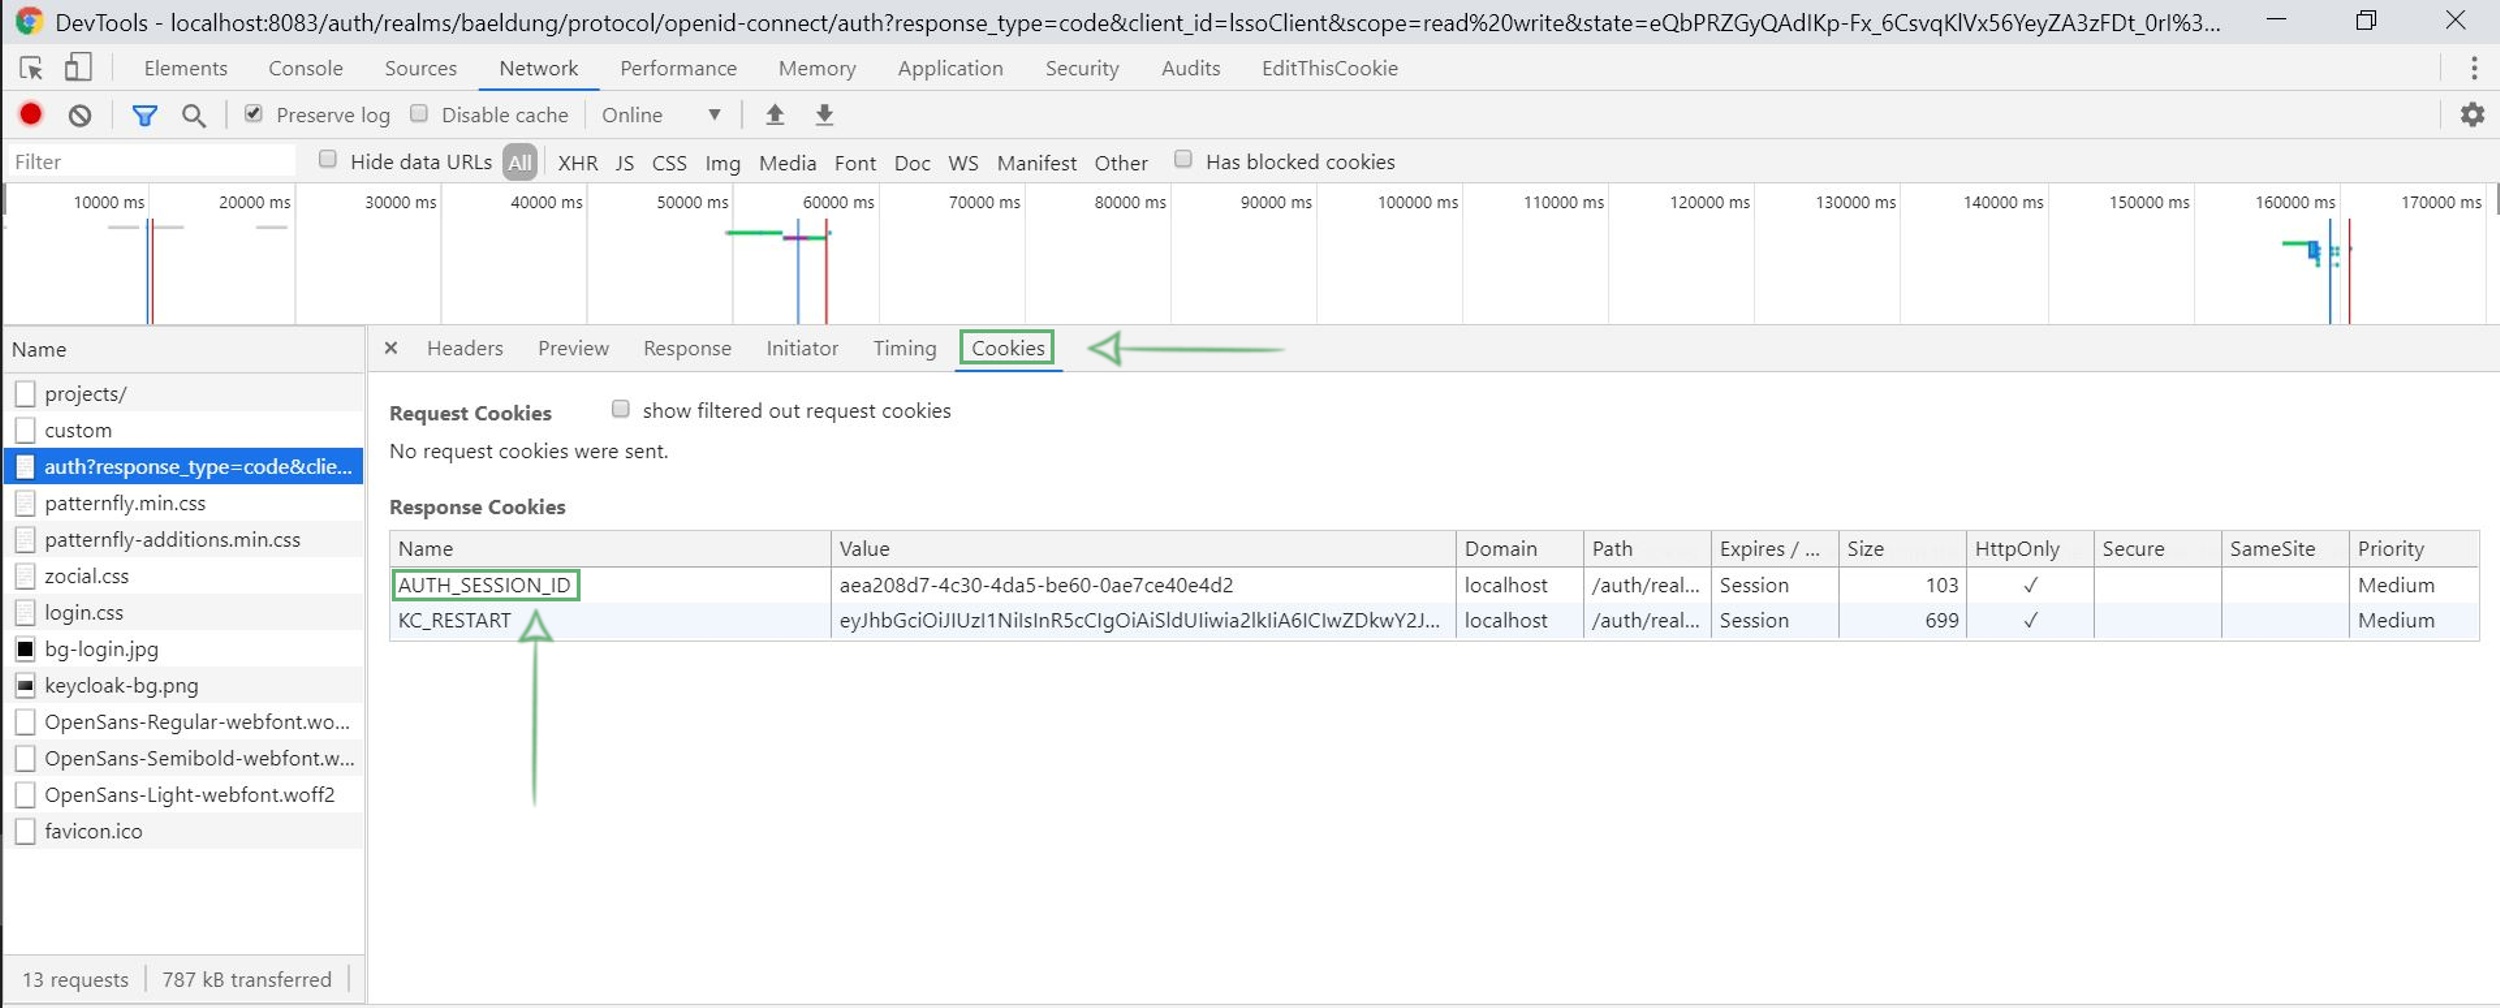
Of course, the browser stores this session ID to use it in the following calls. We have to mimic this behavior:
String authSessionId = response.getCookie("AUTH_SESSION_ID");
Now let’s get back to the browser to see the endpoint that the login form is going to hit when we click the submit button.
It can be easily found by searching the kc-form-login form in the source of the page (in Chrome, press CTRL+ U ). As we see, the endpoint contains some dynamic parameters and hence we can’t just hard-code it as a constant in the test:
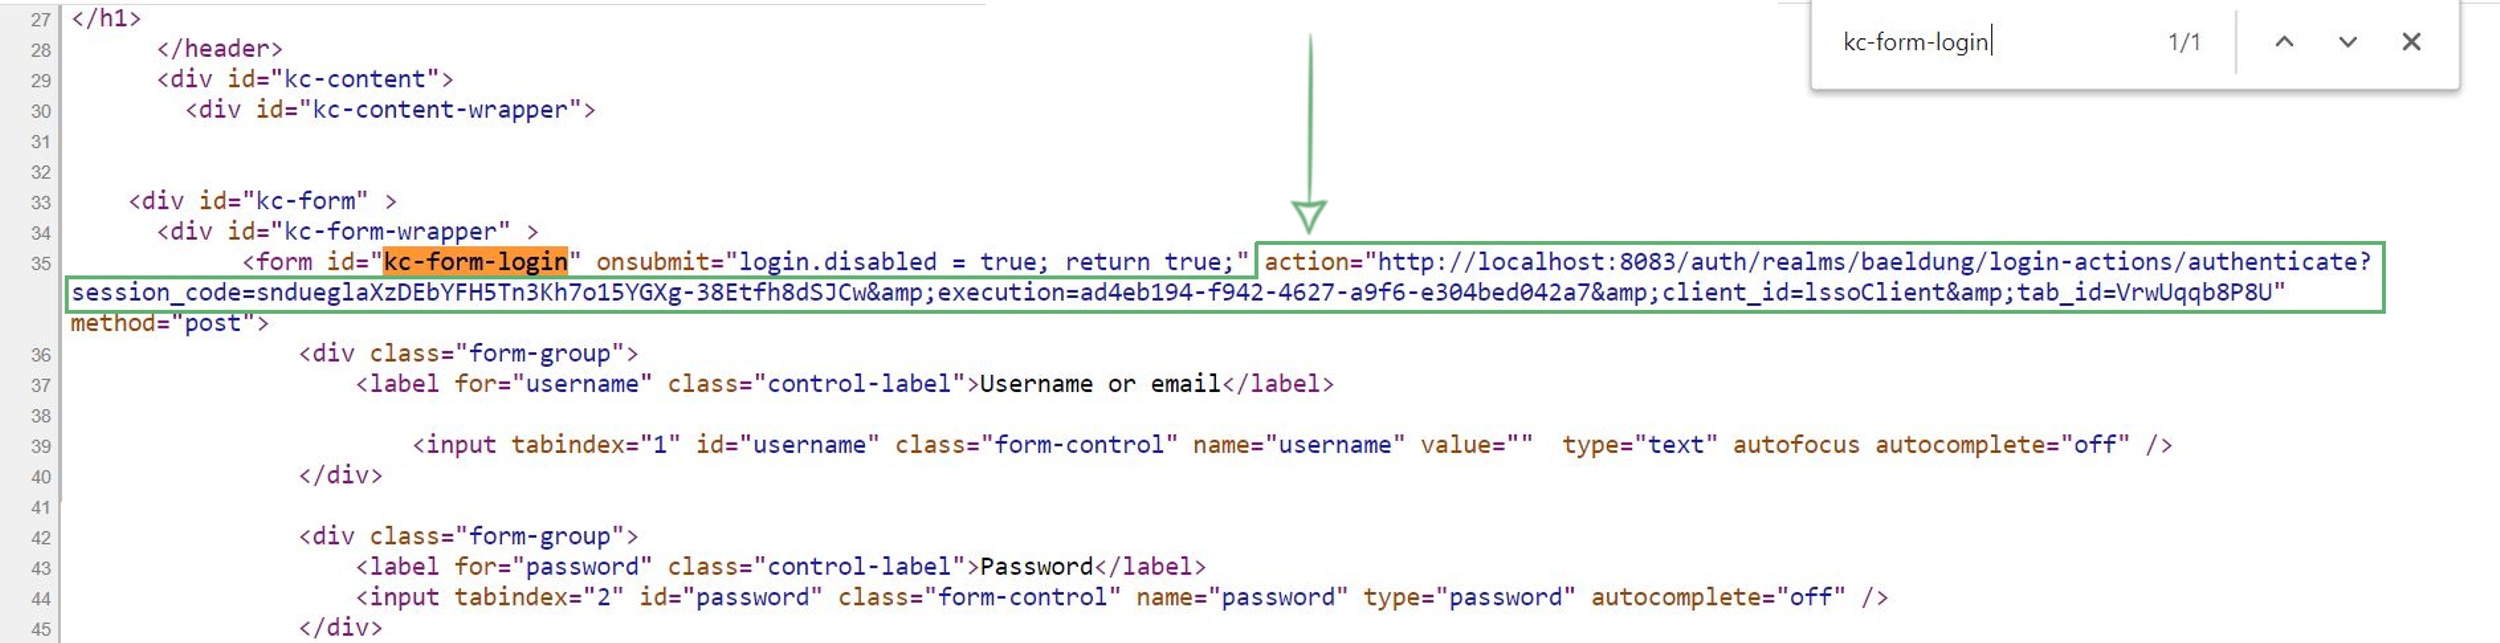
Then, we have to obtain the target endpoint from the Login form using the HTML body we obtained:
String kcPostAuthenticationUrl = response.asString()
  .split("action=\"")[1]
  .split("\"")[0]
  .replace("&", "&");
In HTML , the ampersand symbol ( & ) gets escaped, so we have to slightly modify the extracted String.
Now we have to simulate the user authenticating in the Authorization Server. Since the session is stored in cookies, we need to set it explicitly, along with the user parameters:
response = RestAssured.given()
  .cookie("AUTH_SESSION_ID", authSessionId)
  .formParams("username", "john@test.com", "password", "123")
  .post(kcPostAuthenticationUrl);
At this point, Keycloak will redirect us to the Client endpoint with the authorization code and state.
We’ll move all the process for this second step to a new private method in the class, to clearly separate these Authorization Server custom steps from the process defined by OAuth 2:
private Response authenticateInAuthorizationServer(Response response) {
  String authSessionId = response.getCookie("AUTH_SESSION_ID");
  String kcPostAuthenticationUrl = response.asString()
    .split("action=\"")[1]
    .split("\"")[0]
    .replace("&", "&");

  response = RestAssured.given()
    .cookie("AUTH_SESSION_ID", authSessionId)
    .formParams("username", "john@test.com", "password", "123")
    .post(kcPostAuthenticationUrl);

  return response;
}
Step 3: The Redirection URI
In the third step, the Authorization Server redirects the user-agent back to the client’s Redirection endpoint including the Authorization Code and a state parameter in the request:
response = authenticateInAuthorizationServer(response);

assertThat(HttpStatus.FOUND.value()).isEqualTo(response.getStatusCode());
At this point we can extract the redirect URL from the response’s location header using HttpHeaders.LOCATION:
String location = response.getHeader(HttpHeaders.LOCATION);
String code = location.split("code=")[1].split("&")[0];
Step 4: The Access Token Endpoint
Now we’re ready to get the Access Token.
To this end, we’ll create a POST request using the acquired code, the redirect URL, the client id and the secret which we’ll wrap in a Map structure.
We use these parameters in order to make a request to the Token endpoint:
Map<String, String> params = new HashMap<>();
params.put("grant_type", "authorization_code");
params.put("code", code);
params.put("client_id", "lssoClient");
params.put("redirect_uri", REDIRECT_URL);
params.put("client_secret", "lssoSecret");

response = RestAssured.given()
  .formParams(params)
  .post(CONNECT_TOKEN);
Step 5: The Access Token Response
And naturally, we can now retrieve the Access Token from the response:
String accessToken = response.jsonPath()
    .getString("access_token");

assertThat(accessToken).isNotBlank();
Note that we can use the jsonPath method if the response body is formatted as a JSON.
Step 6: Access the Protected Resource
Finally, we can access the Protected Resource using the token we’ve just obtained.
Since REST Assured 2.5.0 we can pass the Access Token using the oauth2() method so that it’ll end up in the Authorization header as a Bearer token:
response = RestAssured.given()
  .auth()
  .oauth2(accessToken)
  .get(SERVER_API_PROJECTS);

assertThat(HttpStatus.OK.value()).isEqualTo(response.getStatusCode());

List<ProjectDto> projects = response.getBody()
  .as(List.class);
assertThat(3).isEqualTo(projects.size());
In order to be sure that the resources are retrieved successfully, we’ve added an assertion of the size of the returned list of projects.
On a real-case scenario, we have to be careful when making such sort of assertions, as the tests will fail if data changes.
2.4. Refreshing the Token
Let’s now write a test that checks accessing the resources with an Access Token obtained using the Refresh Token specification.
In the TokenIntegrationTest class, we’re going to create a new test for this.
The first step is to retrieve an Access Token as we’ve just done, so let’s extract this operation into a separate method in order to be able to re-use it:
private Response getTokenInformation() {
    Response response = RestAssured.get(AUTH_SERVICE_AUTHORIZE_URL);

    response = authenticateInAuthorizationServer(response);

    String location = response.getHeader(HttpHeaders.LOCATION);
    String code = location.split("code=")[1].split("&")[0];

    Map<String, String> params = new HashMap<>();
    params.put("grant_type", "authorization_code");
    params.put("code", code);
    params.put("client_id", "lssoClient");
    params.put("redirect_uri", REDIRECT_URL);
    params.put("client_secret", "lssoSecret");

    response = RestAssured.given()
      .formParams(params)
      .post(CONNECT_TOKEN);
    return response;
}
Apart from the Access Token, the response object returned by this method will contain the Refresh Token, which we can easily extract using the same jsonPath directive:
@Test
public void givenAuthorizationCodeGrant_whenUseRefreshedToken_thenSuccess() {
    Response response = getTokenInformation();

    String refreshToken = response.jsonPath()
      .getString("refresh_token");
    assertThat(refreshToken).isNotBlank();
}
We can use this long-lived Refresh Token to obtain a new Access Token at any point.
The request will be similar to the one we used before when we exchanged the Authorization Code, but with the corresponding form parameters:
final Map<String, String> paramsRefresh = new HashMap<>();
paramsRefresh.put("grant_type", "refresh_token");
paramsRefresh.put("client_id", "lssoClient");
paramsRefresh.put("refresh_token", refreshToken);
paramsRefresh.put("client_secret", "lssoSecret");
Response refreshResponse = RestAssured.given()
  .formParams(paramsRefresh)
  .post(CONNECT_TOKEN);

String refreshedToken = refreshResponse.jsonPath()
  .getString("access_token");
assertThat(refreshedToken).isNotBlank();
And the new Token can be used to access the resources just as we’ve been doing before:
response = RestAssured.given()
  .auth()
  .oauth2(refreshedToken)
  .get(SERVER_API_PROJECTS);

assertThat(HttpStatus.OK.value()).isEqualTo(response.getStatusCode());

List<ProjectDto> projects = response.getBody()
  .as(List.class);
assertThat(3).isEqualTo(projects.size());
3. Resources
Lesson 5: OAuth2 and OpenID Connect (text-only)
1. Goal
In this lesson we’ll focus on another very important concept in the OAuth2 universe, the OpenID Connect protocol.
2. Lesson Notes
The relevant module you need to import when you’re starting with this lesson is: lsso-module5/oauth2-and-openid-connect-start
If you want to have a look at the fully implemented lesson, as a reference, feel free to import: lsso-module5/oauth2-and-openid-connect-end
2.1. OpenID Connect
OpenID Connect (OIDC) is an identity layer built on top of the OAuth2 authorization framework which allows the server to verify the identity of the users by providing mechanisms to retrieve the user’s profile details from the Authorization Server.
Due to this additional functionality, OpenID Connect becomes an Authentication protocol unlike OAuth2 which, as we explained, is an Authorization protocol.
OpenID Connect includes several optional capabilities but in this lesson we’ll be focusing only on its core feature, i.e. using OpenID Connect for Authentication.
Before diving into the implementation of this protocol, let’s introduce some key aspects.
ID Token
ID Token is a new type of Token. Basically, it is a strictly JWT-formatted Token defined by OpenID Connect specifications. It is returned to the Client by the Authorization Server along with the Access Token and it contains useful information and Claims representing the user.
Since the Token is technically a signed JWT, the Client has to verify the signature , usually by fetching the public keys from the Authorization Server.
User Info Endpoint
User Info Endpoint is hosted at the provider’s end. The Client can optionally hit this endpoint (usually during the Authentication flow) in order to get additional details about the user.
It is up to the provider to decide which user information to include into the ID Token and which in the User Info Endpoint. It can be the same, similar or completely different.
Spring Security Support
Spring Security has extensive support for OpenID Connect integration. It provides out-of-the-box support for Google and Okta - two of the most well-known OpenID Connect provider.
It also provides sufficient extension points to integrate with custom OpenID Connect providers.
2.2. Authorization Server Support
Let’s consider the basics of OpenID Connect using the Authorization Server we’ve been using locally.
Even though the current configuration already supports OpenID Connect, we’ve made some changes in the Keycloak configurations concerning the User settings in order to have a better experience in this lesson.
Namely, we’ve:
- added an email for the user (different from the username, which is also formatted as an email) and marked it as verified
- added a first name and last name for the user
- marked the email scope to be retrieved by default so that we don’t have to request it explicitly
And, we also indicated which claims will be retrieved in the ID Token and which in the User Info Endpoint:
- ID Token: email, email_verified, name (full name)
- User Info Endpoint: email, name, given_name, family_name
We’ll be able to visualize them in the forthcoming steps.
We include a link in the Resources section to the official Keycloak documentation with instructions on how to perform these configurations in case the already present settings do not fit our needs.
To get started, let’s run the Authorization Server and the Resource Server. With respect to OpenID Connect support, the Resource Server does not require any particular customization because this protocol is between the Client and the Authorization Server.
2.3. OpenID Connect: Client Configuration
OpenID Connect authentication is requested by the Client to the Authorization Server. This is done by adding the openid scope while making a Authorization Request to the Authorization Server.
In the application.yml file of the Client project, let’s add the openid value to the scope property and let’s set the jwk-set-uri property that contains the endpoint to the set of public keys that the Client needs in order to validate the ID Token:
spring:
  security:
    oauth2:
      client:
        registration:
          custom:
            // ..
            scope: read,write,openid
        provider:
          custom:
            // ..
            jwk-set-uri: http://localhost:8083/auth/realms/baeldung/protocol/openid-connect/certs
In fact, these are the only modifications that we should do in the Client configuration. Both the Authorization Server and the Spring framework in the Client will detect the openid scope, and proceed accordingly understanding the OpenID Connect protocol should be followed.
Let’s dive into more technical details how Spring handles this scenario.
2.4. Debugging the Request Flow - Obtaining the ID Token
For this section, we need the Client application to be started in debug mode.
Spring Security provides various implementations of the AuthenticationProvider interface that are used to authorize or authenticate users. There is, as well, a specific implementation for OIDC, namely the OidcAuthorizationCodeAuthenticationProvider .
Let’s open this class and add a breakpoint in its authenticate(Authentication authentication) method.
In order to hit this method, let’s open http://localhost:8082/lsso-client/ in the browser and log in with the john@test.com/123 credentials.
Once the login form is submitted, the execution of the code should pause at the breakpoint. Now we can explore the flow in detail:
// OidcAuthorizationCodeAuthenticationProvider.java
@Override
public Authentication authenticate(Authentication authentication) throws AuthenticationException {
  // ...

  accessTokenResponse = this.accessTokenResponseClient.getTokenResponse(
    new OAuth2AuthorizationCodeGrantRequest(
      authorizationCodeAuthentication.getClientRegistration(),
      authorizationCodeAuthentication.getAuthorizationExchange()));

  // ...

  OidcIdToken idToken = createOidcToken(clientRegistration, accessTokenResponse);

  // ...

  OidcUser oidcUser = this.userService.loadUser(new OidcUserRequest(
    clientRegistration, accessTokenResponse.getAccessToken(), idToken, additionalParameters));

  // ...
}
We can see that the framework receives the Access Token Endpoint response.
If we inspect this, we can find an ID Token is retrieved from the Authorization Server. This token has a structure of a JWT token, and it contains the following data:
- aud - recipients of the token (audience)
- iss - issuer of the token
- sub - token’s subject
- email, email_verified, name - the attributes that we’ve configured in the Authorization Server to be present in the ID Token.
In the converted OidcIdToken object, among these properties we can see the expiresAt , issuedAt and tokenValue attributes as well.
2.5. Debugging the Request Flow - Accessing the User Info Endpoint
The next step is to retrieve further user details from the User Info Endpoint.
If we step into the OidcUserService#loadUser() method we’ll notice that, differently from the plain OAuth2 Login process, this step is optional here; it is executed only if the endpoint has been decalred in the provider’s configuration:
// OidcUserService.java
@Override
public OidcUser loadUser(OidcUserRequest userRequest) throws OAuth2AuthenticationException {
  // ...

  if (this.shouldRetrieveUserInfo(userRequest)) {
    OAuth2User oauth2User = this.oauth2UserService.loadUser(userRequest);

  // ...
}

private boolean shouldRetrieveUserInfo(OidcUserRequest userRequest) {
  // Auto-disabled if UserInfo Endpoint URI is not provided
  if (StringUtils.isEmpty(userRequest.getClientRegistration().getProviderDetails()
    .getUserInfoEndpoint().getUri())) {
    return false;
  }

  // ...
}
We can navigate deeper into the DefaultOAuth2UserService#loadUser() method that gets called as part of this process to analyze the response retrieved by the Authorization Server, which contains:
- sub - subject identifier
- email, name, given_name, family_name - data that we’ve configured in the Authorization Server to be returned to User Info Endpoint
Next, as we step back to the OidcUserService we do further checks on the user information that we’ve just received:
// OidcUserService.java
@Override
public OidcUser loadUser(OidcUserRequest userRequest) throws OAuth2AuthenticationException {
  // ...
  if (this.shouldRetrieveUserInfo(userRequest)) {
    OAuth2User oauth2User = this.oauth2UserService.loadUser(userRequest);

    // ...

    if (userInfo.getSubject() == null) {
      OAuth2Error oauth2Error = new OAuth2Error(INVALID_USER_INFO_RESPONSE_ERROR_CODE);
      throw new OAuth2AuthenticationException(oauth2Error, oauth2Error.toString());
    }

    if (!userInfo.getSubject().equals(userRequest.getIdToken().getSubject())) {
      OAuth2Error oauth2Error = new OAuth2Error(INVALID_USER_INFO_RESPONSE_ERROR_CODE);
      throw new OAuth2AuthenticationException(oauth2Error, oauth2Error.toString());
    }
  }

  Set<GrantedAuthority> authorities = new LinkedHashSet<>();
  authorities.add(new OidcUserAuthority(userRequest.getIdToken(), userInfo));
  OAuth2AccessToken token = userRequest.getAccessToken();
  for (String authority : token.getScopes()) {
    authorities.add(new SimpleGrantedAuthority("SCOPE_" + authority));
  }

  // ...
}
Spring Security performs two further checks whether to authenticate the user:
- The first check is that the User Info should always have the subject claim . It is a locally unique and never reassigned identifier generated by the Authorization Server for the end user. Therefore, this is a critical identifier that is needed to verify the authenticity of the user.
- The second check is whether the subject exactly matches the subject claim present in the ID Token.
As soon as these checks succeed, the basic scopes are then converted into the authorities, as in the OAuth2 login process.
Finally, the authenticated user object obtained from merging the ID Token and the User Info information is returned.
This phase completes the Authentication flow.
3. Resources
Lesson 6: Client Credentials Flow (text-only)
1. Goal
In this lesson we’ll consider another core flow in OAuth, namely the so-called Client Credentials flow.
2. Lesson Notes
The relevant module you need to import when you’re starting with this lesson is: lsso-module5/client-credentials-flow-start
If you want to have a look at the fully implemented lesson, as a reference, feel free to import: lsso-module5/client-credentials-flow-end
2.1. The Flow
The Client Credentials flow is simple and straightforward: the application simply requests an Access Token using the Client Credentials and gets back an Access Token. It then uses the obtained token to access the API.
The main features of the flow:
- it’s enough to make a single request to obtain an Access Token
- it’s only suitable for Confidential Clients due to the fact that it operates with the Client’s id and secret
- it’s used in machine-to-machine communication since no end-user is involved into the process
2.2. Setup
Usually, we have to enable the Client Credentials flow explicitly in the Authorization Server.
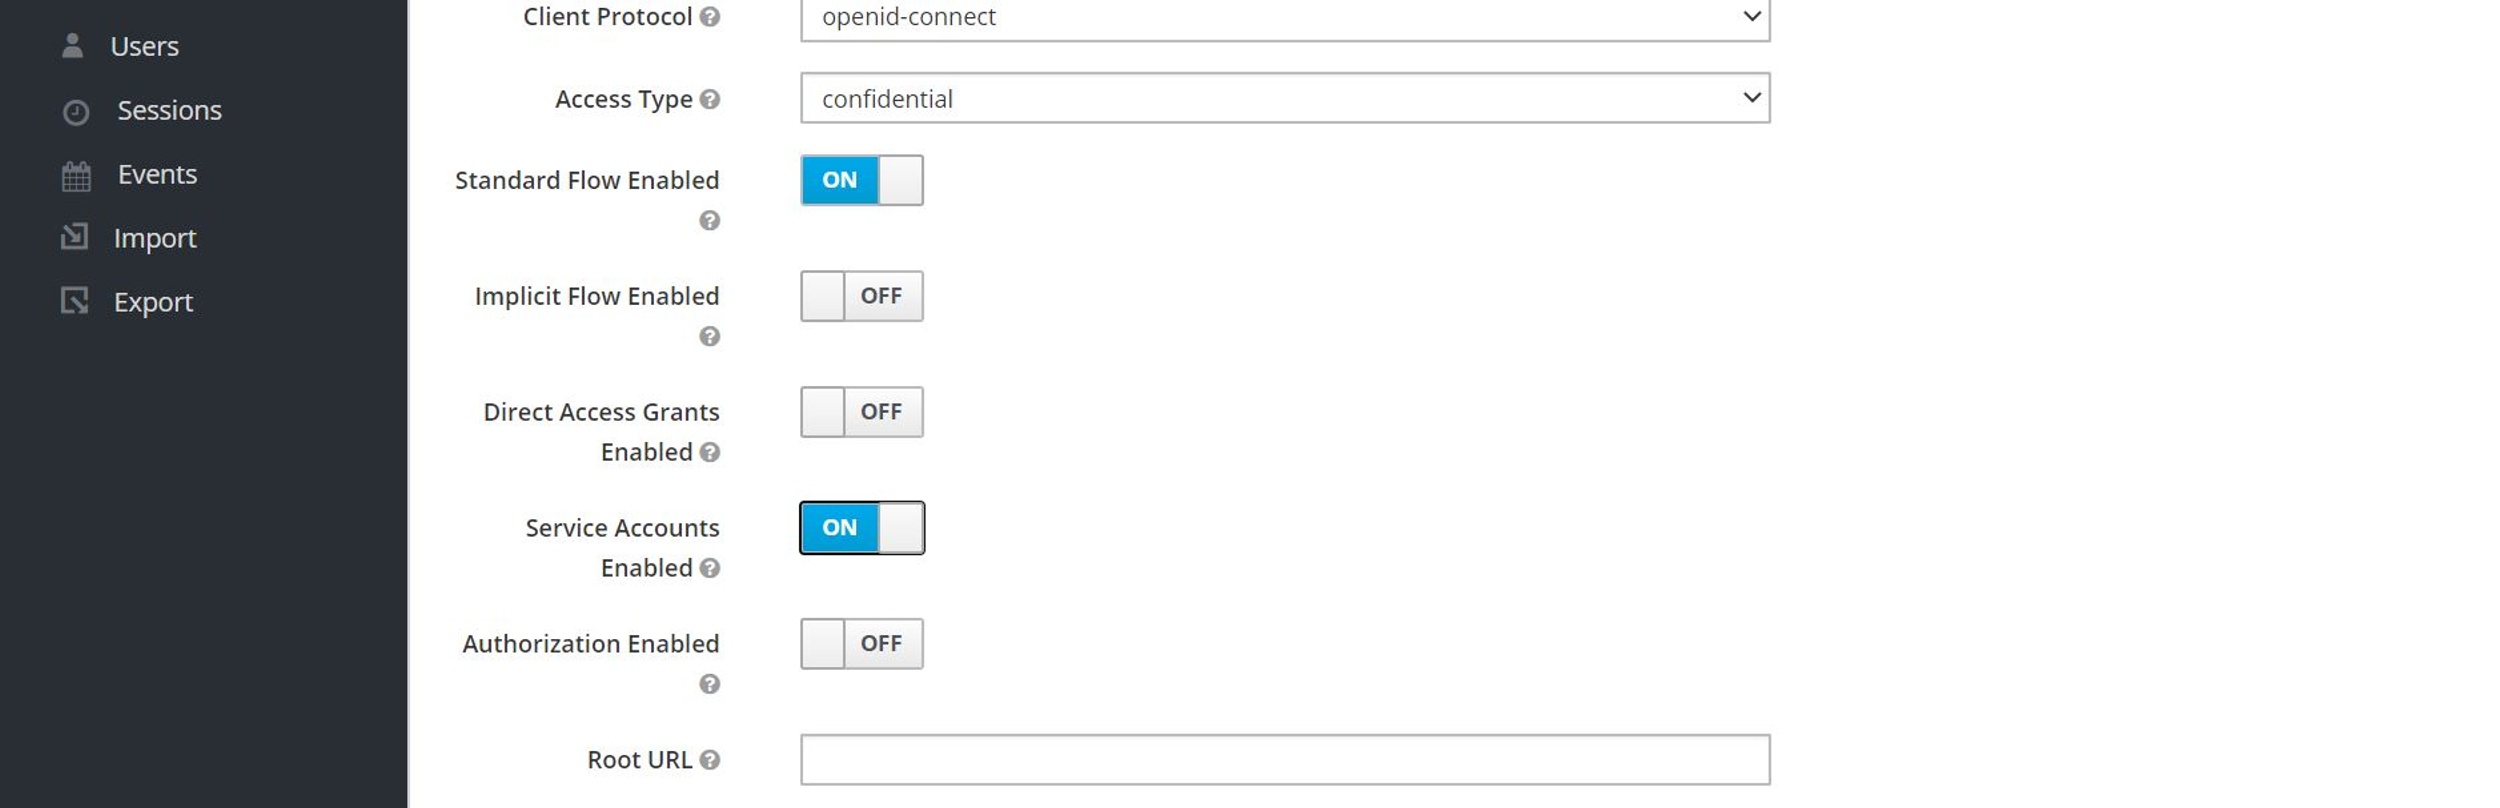
In order to enable this Grant Type in Keycloak we first have to browse the Admin Console:
http://localhost:8083/auth/admin/master/console/
Click in the Clients option in the left frame and select lssoClient from the list. Then, enable the Service Accounts Enabled option and save:
Now we’re ready to start the Authorization and the Resource Servers.
2.3. Executing the Client Credentials Flow Manually
In order to see how this flow is executed, we’ll first write a test method.
In the TokenLiveTest class of the Resource Server, we’ve defined some constants, namely the Token Endpoint and the Projects URLs.
Now, let’s create a test method:
public class TokenLiveTest {
  // ...
  @Test
  public void givenClientCredentialsGrant_whenUseToken_thenSuccess() {
    final Map<String, String> params = new HashMap<>();
    params.put("scope", "read write");
    params.put("grant_type", "client_credentials");
    params.put("client_id", "lssoClient");
    params.put("client_secret", "lssoSecret");

    Response response = RestAssured.given().formParams(params).post(CONNECT_TOKEN);

    String accessToken = response.jsonPath().getString("access_token");

    assertThat(accessToken).isNotBlank();

    response = RestAssured.given().auth().oauth2(accessToken).get(SERVER_API_PROJECTS);

    assertThat(HttpStatus.OK.value()).isEqualTo(response.getStatusCode());

    List<Project> projects = response.getBody().as(List.class);
    assertThat(3).isEqualTo(projects.size());
  }
}
First, we create the params map that contains parameters to be sent to the token endpoint by means of a POST request. The response of this request should be a JSON object and the access_token key should contain the acquired token.
As we’ve seen as one the features of the flow, it’s enough to make just one request to obtain an Access Token .
Secondly, we can now use this Token to connect to the Resource Server by means of the auth().oauth2(accessToken) directive of the REST Assured library.
Finally, we check that the response body contains a list with the correct number of Project instances.
Even though the flow is really simple, the framework offers support so that we don’t have to deal with this manually , and naturally, adding some useful features that makes it a better solution when dealing with a real-case scenario.
2.4. Setting up The Client
To configure the Client application, let’s declare a ClientRegistration entity in the application.yml file:
spring:
  security:
    oauth2:
      client:
        registration:
          customClientCredentials:
            authorization-grant-type: client_credentials
            client-id: lssoClient
            client-secret: lssoSecret
            scope: write, read
        provider:
          customClientCredentials:
            token-uri: http://localhost:8083/auth/realms/baeldung/protocol/openid-connect/token
As we can see, the only difference with the standard Authorization Code flow setup is the authorization-grant-type property value, which now is defined as client_credentials .
It’s also noteworthy that we need fewer provider configurations in place, namely just the Token Endpoint URL.
2.5. Configuring The WebClient
Let’s now configure the WebClient instance that the service we’ll be using to communicate with the Resource Server.
Normally, we could set up a basic WebClient bean by using the ClientRegistrationRepository and the OAuth2AuthorizedClientRepository defined by Spring Boot and delegating the creation of an Authorized Client manager to the exchange filter function.
However, this manager could only operate within an HttpServletRequest context which won’t be useful in our case.
Here, we’ll need to implement a new one that is capable of functioning in a scheduled/background thread. The filter constructor allows us to supply a custom OAuth2AuthorizedClientManager 
@Configuration
public class ClientSecurityConfig {
  // ...
  @Bean
  public WebClient webClient(OAuth2AuthorizedClientManager authorizedClientManager) {
    ServletOAuth2AuthorizedClientExchangeFilterFunction oauth2 = new ServletOAuth2AuthorizedClientExchangeFilterFunction(authorizedClientManager);
    oauth2.setDefaultClientRegistrationId("customClientCredentials");
    return WebClient.builder().apply(oauth2.oauth2Configuration()).build();
  }
}
Let’s now build the custom manager bean.
Spring Security provides the AuthorizedClientServiceOAuth2AuthorizedClientManager class in order to operate outside of the HttpServletRequest context. It’s constructor has two parameters which are defined in the Spring Boot context:
@Bean
public OAuth2AuthorizedClientManager authorizedClientManager(ClientRegistrationRepository clientRegistrationRepository, OAuth2AuthorizedClientService clientService) {
  OAuth2AuthorizedClientProvider authorizedClientProvider = OAuth2AuthorizedClientProviderBuilder.builder().clientCredentials().build();
  AuthorizedClientServiceOAuth2AuthorizedClientManager authorizedClientManager = new AuthorizedClientServiceOAuth2AuthorizedClientManager(clientRegistrationRepository, clientService);
  authorizedClientManager.setAuthorizedClientProvider(authorizedClientProvider);
  return authorizedClientManager;
}
Note that the Authorized Client manager is responsible for the overall management of OAuth2 Authorized Clients, but it relies on a OAuth2AuthorizedClientProvider instance which is the one in charge of implementing the strategy for authorizing the Clients.
Spring Security provides a builder class to easily set up an Authorized Client provider object. In our case, for example, we’ve configured it to use only the Client Credentials strategy.
Once the WebClient bean gets constructed and configured, we can use it to communicate with our Resource Server.
2.6. Using The WebClient
The Client we’re going to work on will access our resources from a cron job defined in our service. This is a common case where there is no user involved and therefore we have to rely on this particular flow.
Let’s start with a simple example. Suppose we should periodically log how many projects are in the Resource Server. Naturally, we need to access a secured resource as a part of an automatic task.
To this end, the Client application should be decorated with the @EnableScheduling annotation:
@SpringBootApplication
@EnableScheduling
public class LssoClientApplication {

    public static void main(String[] args) {
        // ...
    }
}
Now we need to create a class that will perform the scheduled task:
@Component
public class ProjectRetrieveScheduler {

  @Value("${resourceserver.api.project.url:http://localhost:8081/lsso-resource-server/api/projects/}")
  private String projectApiUrl;

  private static final Logger LOG = LoggerFactory.getLogger(ProjectRetrieveScheduler.class);

  private WebClient webClient;

  @Autowired
  public ProjectRetrieveScheduler(WebClient webClient) {
    this.webClient = webClient;
  }

  @Scheduled(fixedRate = 20000)
  public void scheduleResourceRetrieval() {
    List<ProjectModel> retrievedProjects = webClient.get()
      .uri(projectApiUrl)
      .retrieve()
      .bodyToMono(new ParameterizedTypeReference<List<ProjectModel>>() {})
      .block();

    LOG.info("Projects in the repository: " + retrievedProjects.size());
  }
}
The task consists in accessing the secured resource periodically and logging the retrieved number of projects.
In order to log the process of exchanging the credentials between the client and the server, let’s set the logging levels corresponding to the web client to DEBUG in the application.yml file:
logging:
  level:
    org.springframework.web.client: DEBUG
    org.springframework.web.reactive.function.client: DEBUG
After the application is started, in the corresponding log file we can see that:
- the application obtains an Access Token. Spring uses Basic Authentication for this
- the application uses the obtained token to access the resource and log it
- when requesting the resources for the next time, the application uses the same token without making a new request to the token endpoint.
3. Resources
Lesson 7: The Legacy Stack Authorization Server (text-only)
1. Goal
In this lesson, we’ll learn how to use the legacy Authorization Server and connect that with our new stack Client and Resource Server.
2. Lesson Notes
The relevant module you need to import when you’re starting with this lesson is: lsso-module5/legacy-stack-authorization-server-start
If you want to have a look at the fully implemented lesson, as a reference, feel free to import: lsso-module5/legacy-stack-authorization-server-end
2.1. What Is the Legacy Authorization Server?
The Legacy Authorization Server is part of the Spring Security OAuth project which is in maintenance mode as of now.
We may still need to use this project for cases where:
- We need to have a Spring solution across the board
- To maintain and support legacy projects which already use this feature
Let’s start by having a look at the dependencies we need to set up the Legacy Authorization Server. Basically, we need to add the Spring Security OAuth Autoconfiguration dependency that configures some sane defaults for us:
<dependency>
    <groupId>org.springframework.security.oauth.boot</groupId>
    <artifactId>spring-security-oauth2-autoconfigure</artifactId>
    <version>2.3.1.RELEASE</version>
</dependency>
Note that since this project is in maintenance mode only and no longer managed by Spring Boot we have to explicitly specify the dependency version here.
Next, let’s configure our Authorization Server.
2.2. Authorization Server - Basic Configuration
With this dependency in place, we can easily activate the Authorization Server features by simply adding the @EnableAuthorizationServer annotation in our application:
@SpringBootApplication
@EnableAuthorizationServer
public class LssoAuthorizationServerApp {
    // ...
}
By default, the Authorization Server configures a couple of endpoints – for example, the endpoints for issuing or validating tokens – and it will register a new Client when it launches based on the configuration.
Note: you’ll notice all the classes, interfaces and annotations belonging to this library have been marked as deprecated and therefore the IDE will be showing warnings for this.
We also need to enable web security. Let’s create a new config class for this and add the @EnableWebSecurity annotation:
@EnableWebSecurity
public class AuthorizationSecurityConfig extends WebSecurityConfigurerAdapter {
    // ...
}
Since we’ll be using JWT for authorization, let’s configure the Keystore related configuration:
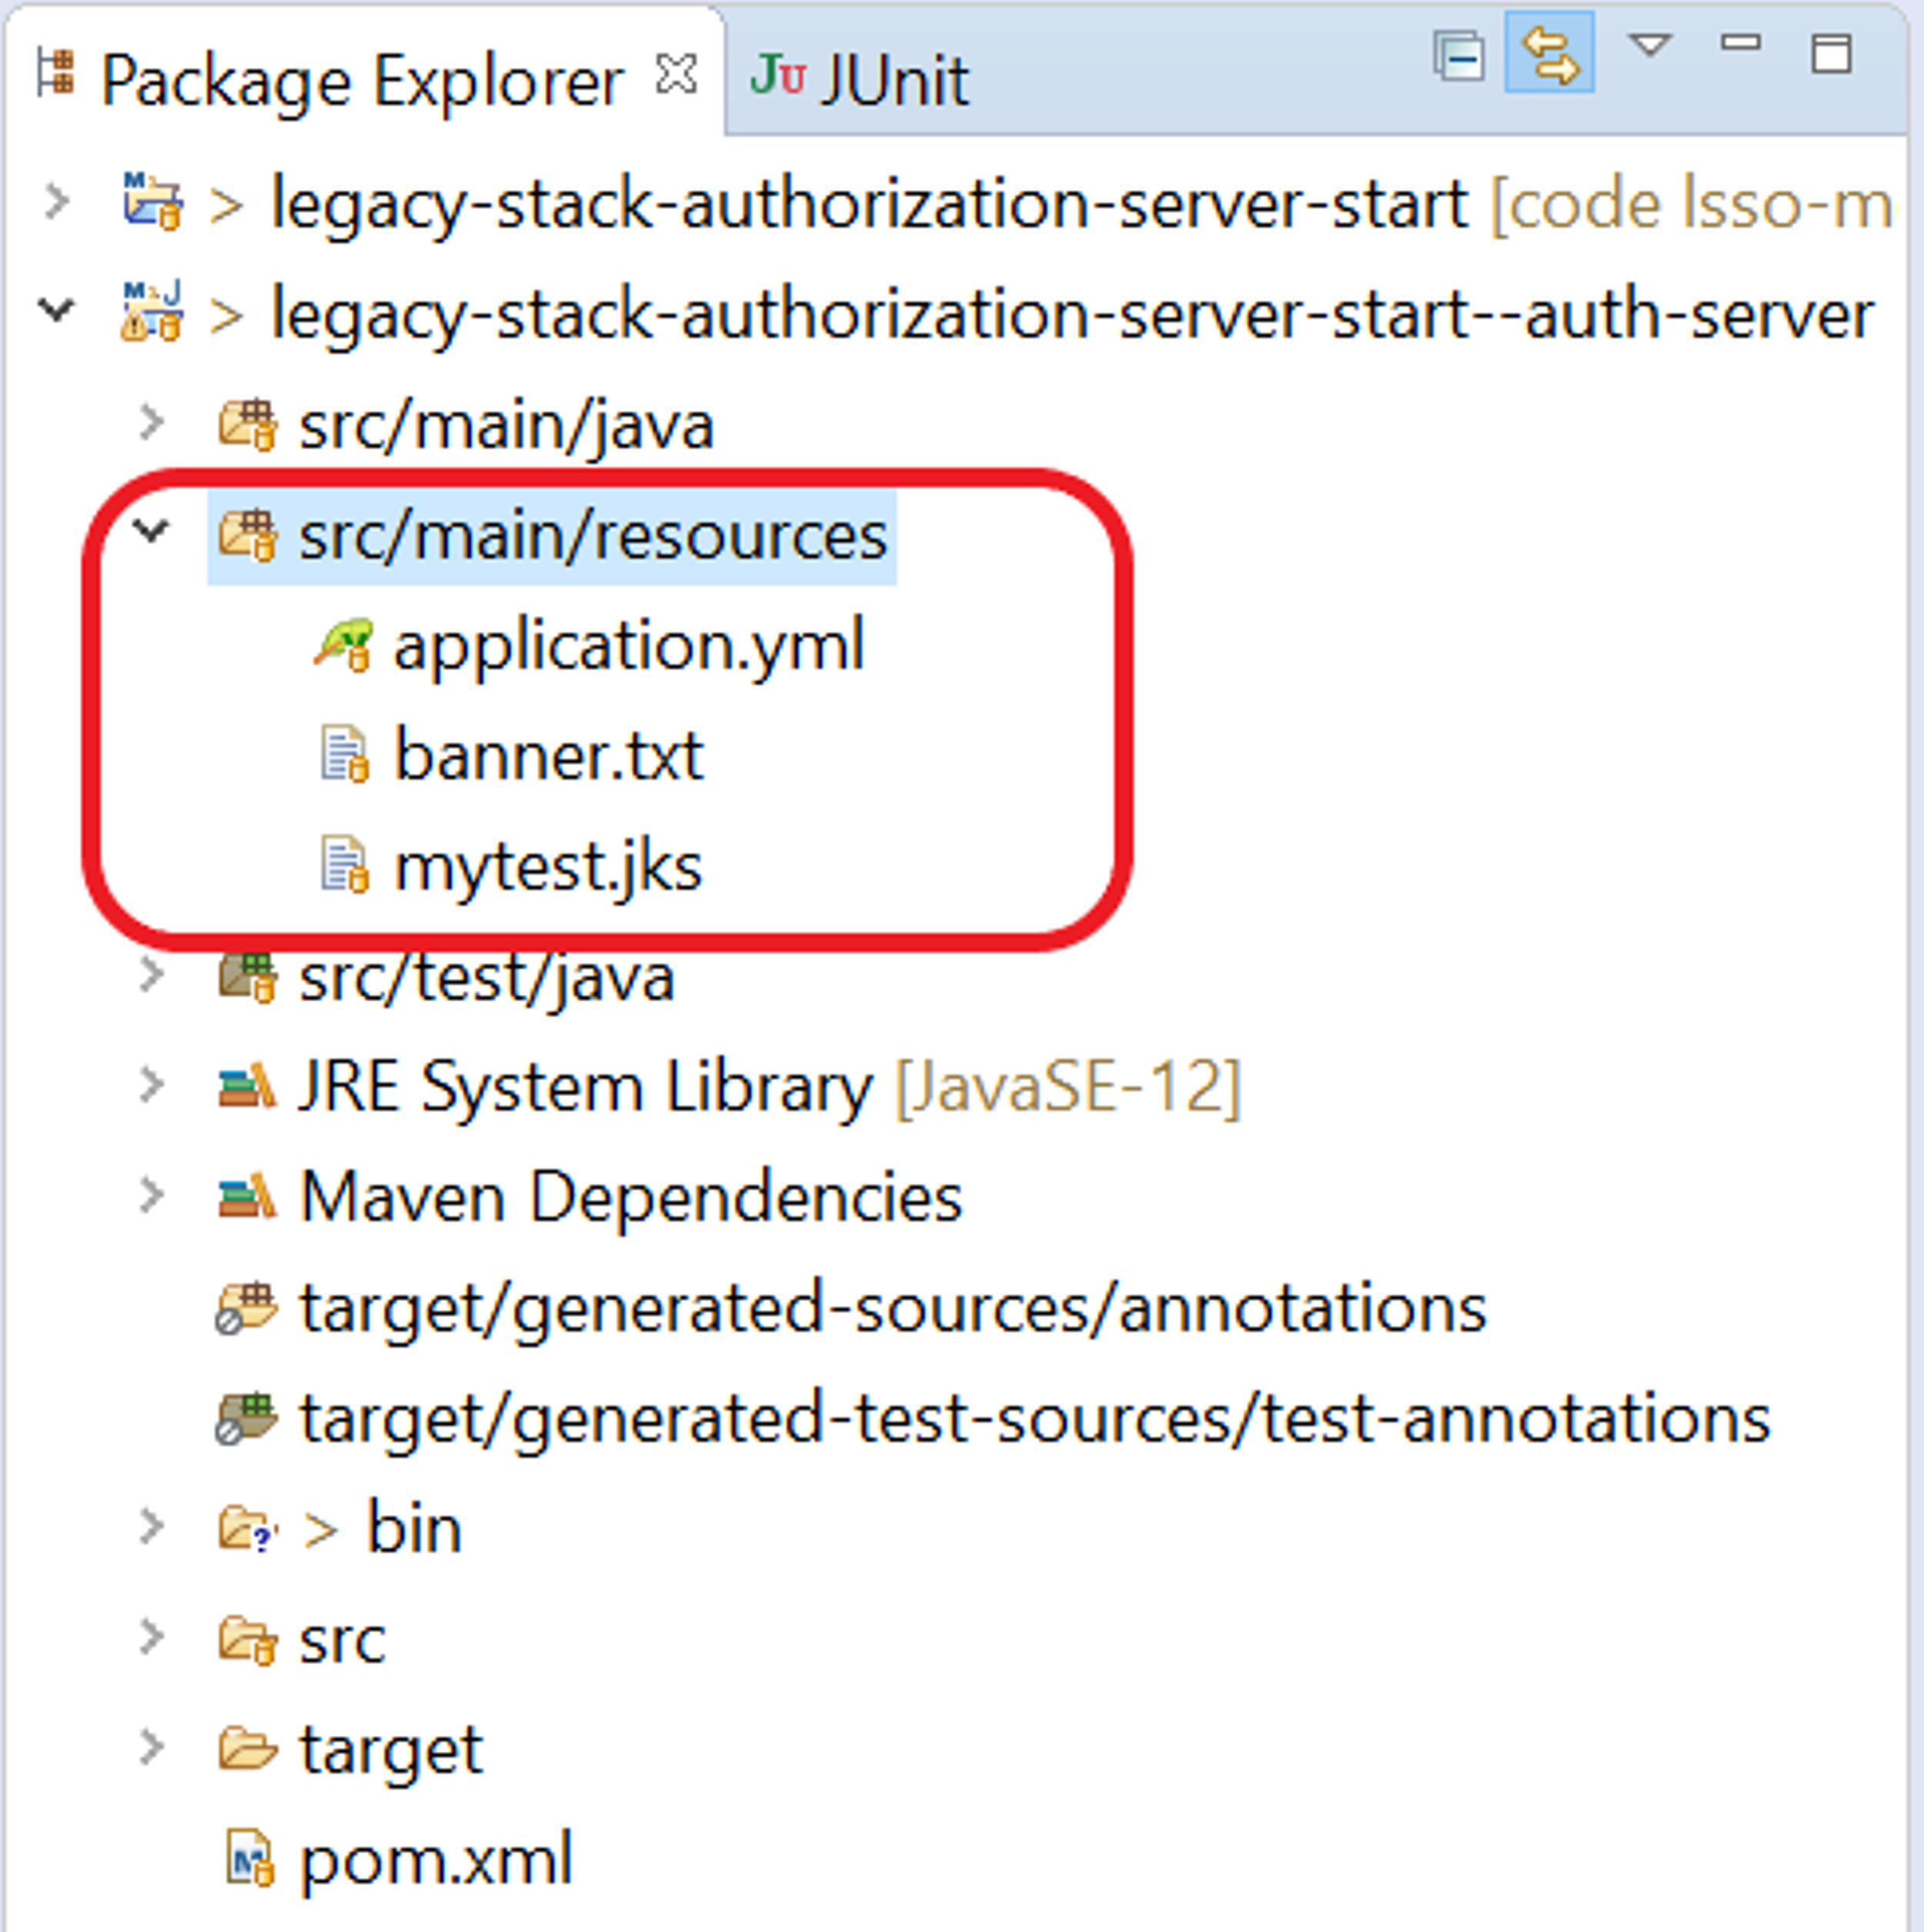
Here, we’ve configured a keystore file and added it to our project resources under src/main/resources . The mytest.jks file contains the private and public keys that we’ll use to sign and to verify JWTs.
Note: in the resources section, we have provided a link with information on how to create a keystore.
Next, let’s configure the keystore details i.e. alias, location and password in the application.yml file:
security:
  oauth2:
    authorization:
      jwt:
        key-alias: mytest
        key-store: classpath:/mytest.jks
        key-store-password: mypass
Now that we have enabled the Authorization Server and enabled web security, let’s register the client.
2.3. Authorization Server - Client Registration
We can easily register a new client using configurations in this same application.yml file:
security:
  oauth2:
    // ...
    client:
      client-id: lssoClient
      client-secret: lssoSecret
      scope:
      - read
      - write
      authorized-grant-types:
      - authorization_code
      registered-redirect-uri:
      - http://localhost:8082/lsso-client/login/oauth2/code/custom
      auto-approve-scopes:
      - read
      - write
Here, we’ve registered the basic id and secret, the supported scopes (which will be auto-approved for simplicity), a valid redirect uri, and finally indicated that we’ll be using the Authorization Code flow.
Next, we need to create an endpoint that will return JWK keys. This endpoint will be used by the Resource Server to validate the JWT token sent to it by the Client.
First, we need the spring-security-oauth2-jose dependency that we will use to handle JWT tokens in our application:
<dependency>
    <groupId>org.springframework.security</groupId>
    <artifactId>spring-security-oauth2-jose</artifactId>
</dependency>
Next, we can create our endpoint that will extract the public key from a KeyPair and then create a JWK key from this:
@FrameworkEndpoint
public class JwkSetEndpoint {

    @Autowired
    private KeyPair keyPair;

    @GetMapping("/endpoint/jwks.json")
    @ResponseBody
    public Map<String, Object> getKey(Principal principal) {
        RSAPublicKey publicKey = (RSAPublicKey) this.keyPair.getPublic();
        RSAKey key = new RSAKey.Builder(publicKey).build();
        return new JWKSet(key).toJSONObject();
    }
}
The @FrameworkEndpoint annotation is a synonym for @Controller , the only difference being that it’s used for endpoints provided by the framework and does not clash with the user’s endpoints.
Before configuring the KeyPair instance we’re using here, let’s allow this endpoint to be accessible without any restriction.
Open AuthorizationSecurityConfig and configure the security to allow access this endpoint and block the rest for proper authentication:
@Override
protected void configure(HttpSecurity http) throws Exception {
    http.authorizeRequests()
        .antMatchers("/endpoint/jwks.json")
        .permitAll()
        .anyRequest()
        .authenticated()
        .and()
        .formLogin();
}
Now, in this same configuration class, let’s configure the KeyPair bean:
@Bean
public KeyPair keypair() {
    KeyStoreKeyFactory keyStoreKeyFactory = new KeyStoreKeyFactory(
      new ClassPathResource("mytest.jks"),
      "mypass".toCharArray());
    return keyStoreKeyFactory.getKeyPair("mytest");
}
Here, we’ve created the KeyStoreKeyFactory from the configured Keystore file that will finally return our KeyPair .
Let’s also configure a PasswordEncoder instance here since we’ll be defining sensitive data later on, and this is always a good security practice:
@Bean
public PasswordEncoder encoder() {
  return new BCryptPasswordEncoder();
}
As the last step, let’s setup a user that we will use to login to the Authorization Server. We’ll add the user credentials in the application.yml
spring:
  security:
    user:
      # john@test.com / 123
      name: john@test.com
      password: $2a$10$yCl.WgsHZGpKeplZCVH1mea9IcCsbmLNXdbGJ511ws7AeyuLT6m9.
Alright, now our Authorization Server configuration is completed. Next, let’s connect our Resource Server to the Authorization Server.
2.4. Resource Server - Connecting to the Authorization Server
We need to connect our Resource Server to our Authorization Server so that it can fetch the keys and validate the authenticity when the Client calls it to retrieve user information.
Let’s open the application.yml and set:
spring:
  security:
    oauth2:
      resourceserver:
        jwt:
          jwk-set-uri: http://localhost:8083/endpoint/jwks.json
Next, let’s connect our Client application to our new Authorization Server.
2.5. Client - Connecting to the Authorization Server
As we can see in the Client module, we have already defined the configuration for the client itself but, the provider configurations are empty. Let’s fix that:
spring:
  security:
    oauth2:
      client:
        // ...
        provider:
          custom:
            authorization-uri: http://localhost:8083/oauth/authorize
            token-uri: http://localhost:8083/oauth/token
Now we can test our setup: start the Authorization Server, Resource Server and Client and browse http://localhost:8082/lsso-client/projects/
We can see that as soon as we hit the projects page url, we get redirected to our Authorization Server login screen. This means our Authorization code flow has been triggered.
As soon as we enter our credentials and login, we see the error missing_user_name_attribute and that makes sense since we’re using the oauth2Login feature here in our Client application and this require us to define a username attribute and a UserInfo URI.
Let’s quickly define this endpoint in our Authorization Server.
2.6. Authorization Server - UserInfo Endpoint Creation
We’ll setup a new controller for this:
@RestController
public class UserInfoController {

  @GetMapping("/users/userinfo")
  public Map<String, Object> getUserInfo(OAuth2Authentication authentication) {
    return Collections.singletonMap("preferred_username", authentication.getName());
  }

}
The implementation is straight-forward – we’ll just extract the user name from the principal and return it. Note we’re retrieving this using the preferred_username key.
Next, since we are using our Authorization Server to serve a resource i.e. User Information, we’ll have to configure our Authorization Server as a Resource Server too.
Let’s quickly create a new config class:
@Configuration
@EnableResourceServer
public class AuthorizationResourceServerConfig extends ResourceServerConfigurerAdapter {
    // ...
}
Here, we haved added ResourceServerConfigurerAdapter as a parent to this class to allow us specify the Resource Server specific configuration, and further, we added the @EnableResourceServer annotation so that we can authenticate requests using OAuth2 tokens.
Next, let’s override the configure method:
@Override
public void configure(HttpSecurity http) throws Exception {
    http.sessionManagement()
        .sessionCreationPolicy(SessionCreationPolicy.STATELESS)
      .and()
	      .requestMatchers()
	        .antMatchers("/users/userinfo")
      .and()
        .authorizeRequests()
          .antMatchers("/users/userinfo")
            .authenticated();
}
We specified that the application should be stateless, and we indicated that this setup should be applied only on our UserInfo endpoint, which should request for authentication before being accessed.
Our Authorization Server is now configured to serve the user information.
2.7. Client - User Info Endpoint Configuration
Let’s quickly configure our Client to use this endpoint. Open the client’s application.yml and set:
spring:
  security:
    oauth2:
      client:
        // ...
        provider:
          custom:
            // ...
            user-info-uri: http://localhost:8083/users/userinfo
            user-name-attribute: preferred_username
Let’s restart the Authorization Server, Client application and Resource Server to see all of this in action.
Start Authorization Server and Client and go to http://localhost:8082/lsso-client/projects/ and enter credentials john@test.com:123
As we can see the projects page is loaded now and we have been successfully able to connect the legacy Authorization Server with our new stack Client and Resource Server.
3. Resources
Lesson 1: OAuth Security Patterns in a Microservice Application
1. Goal
In this lesson, we’ll explore some OAuth Security patterns in a microservice application.
2. Lesson Notes
The relevant module you need to import when you’re starting with this lesson is: oauth-in-a-microservice-application-start
If you want have a look at the fully implemented lesson, as a reference, feel free to import: oauth-in-a-microservice-application-end
2.1. Securing Monolithic vs Microservices Applications
Microservice architecture is an architectural style where an application is composed of several loosely coupled services as opposed to a traditional monolithic architecture in which we have a single large system usually supported by a single codebase.
Naturally, security in the traditional architecture is simpler as we only have a single application to secure and, at a high level, one entry point to the system.
With microservices this becomes more complex because we now have to ensure all the different, loosely coupled microservices are secured using a common security mechanism.
2.2. The API Gateway Pattern
One common solution to deal with this, though certainly not the only one, is using the API Gateway Pattern.
This is one of the most popular architectural patterns used in microservices, in which we have a Gateway application that works as a single entry point to all our backend microservices.
The Gateway receives all the incoming requests, potentially proceeding from several different clients, and routes them to the corresponding service behind the Gateway.
Since in this pattern we have a single entry point, we can secure this Gateway and avoid exposing direct access to other services so that all our incoming requests are secured by a common security mechanism.
2.3. The New Project Structure For Microservices
First, let’s briefly recap the existing structure: this consists of an Authorization Server, a Client and a Resource Server .
To carry out their respective functions, the Client and the Resource Server interact with the Authorization Server with which they have a trust relationship and then the Client sends requests to the Resource Server directly to fetch its resources.
However, real-world scenarios are usually more complex than the one we’ve been working on.
For example, imagine that apart from handling Projects we also have to take care of Tasks. In a microservice architecture this will likely translate to a separate independent microservice for this purpose .
Also, we’re adding in a Gateway module to route the incoming requests to both services as the single entry point for our secured resources. Naturally, our Client will be now communicating with the Gateway module instead of to the services.
Our Resource Server won’t be performing any checks, so we should ensure it is accessible only via the Gateway by setting up our network security in that manner.
2.4. Spring Cloud Gateway
We talked about the Gateway and how we’re going to use it in our new structure.
For its implementation, we’ll use a Spring Boot application using the Spring Cloud Gateway framework.
That’s certainly not the only option but it’s a really good one especially within the Spring ecosystem.
The library provides easy routing mechanisms to route the incoming requests to different backend services.
It also helps us to effectively apply security which we’ll, of course, be doing in this lesson.
Let’s have a look at the Gateway module’s application.yml
spring:
  cloud:
    gateway:
      routes:
      - id: projects_route
        uri: http://localhost:8081
        predicates:
        - Path=/lsso-gateway/projects/**
        filters:
        - RewritePath=/lsso-gateway/(?<segment>.*), /lsso-project-resource-server/api/$\{segment}
      - id: tasks_route
        uri: http://localhost:8085
        predicates:
        - Path=/lsso-gateway/tasks/**
        filters:
        - RewritePath=/lsso-gateway/(?<segment>.*), /lsso-task-resource-server/api/$\{segment}
Basically, we’re routing all requests under the /projects/ path and under /tasks/ path to the corresponding services ( /lsso-project-resource-server/api and /lsso-task-resource-server/api, respectively).
Let’s now have a look at the Client’s ProjectClientController class:
public class ProjectClientController {

    @Value("${gateway.url:http://localhost:8084/lsso-gateway/}" + "projects/")
    private String projectApiUrl;

    // ...

}
We can see that our Client is now pointing to this Gateway module instead of to the services. All we have to do now is work on the security aspects of our solution.
2.5. Securing the Gateway Module
Let’s have a look at the gateway module pom.xml and look at the dependencies:
<dependencies>
    <!-- security -->

    <dependency>
        <groupId>org.springframework.cloud</groupId>
        <artifactId>spring-cloud-starter-gateway</artifactId>
    </dependency>
    <dependency>
        <groupId>org.springframework.cloud</groupId>
        <artifactId>spring-cloud-starter-security</artifactId>
    </dependency>

</dependencies>
We already have the core dependencies present in the start point of the lesson: spring-cloud-starter-gateway - which gets us started with Spring Cloud Gateway as well as spring-cloud-starter-security - which adds security features.
Now, as we’ve discussed, we want to move the responsibility of verifying the OAuth tokens from the individual Resource Servers to here, into the Gateway app.
This basically means that the Gateway needs to be configured to act as the Resource Server in terms of OAuth roles. Therefore, let’s add in the dependency:
<dependency>
    <groupId>org.springframework.boot</groupId>
    <artifactId>spring-boot-starter-oauth2-resource-server</artifactId>
</dependency>
Now that the necessary dependencies are in place, the next step is adding the Resource Server configurations to establish the trust relationship between our Gateway here and the Authorization Server.
We can simply copy this configuration from our existing Project Resource Server.
Open application.yml of Project Resource Server, copy the configuration below and add it into the gateway module:
spring:
  security:
    oauth2:
      resourceserver:
        jwt:
          issuer-uri: http://localhost:8083/auth/realms/baeldung
          jwk-set-uri: http://localhost:8083/auth/realms/baeldung/protocol/openid-connect/certs
Of course, removing this from the Resource Server will mean we need to do some work in that application as well, so let’s do that now.
2.6. Restructuring the Project Resource Server
As a first step, we’ll make our Project Resource Server unsecured in terms of OAuth validations, as this responsibility is already handled in the Gateway module now.
First, let’s remove the OAuth2 Resource Server dependency from the pom.xml - spring-boot-starter-oauth2-resource-server.
Next, let’s remove the Project Resource Security Config file entirely - ProjectResourceSecurityConfig.java
Note that - even though these individual Resource Servers are technically no longer Resource Servers as we’ve removed all OAuth configuration, we’ll still refer to them as “Individual Resource Servers” just for simplicity.
Also, another very important aspect to discuss is where these individual Resource Servers are, in our overall topology.
Simply put, it’s critical to deploy them behind a firewall with only the Gateway being able to communicate with them.
Of course, that’s an infrastructure issue that we won’t be covering in this lesson.
2.7. Demo
Let’s start all our applications and see them working.
Browse http://localhost:8082/lsso-client, and enter the credentials: john@test.com : 123
We can see that our Project list page is showing up - that means the client was able to retrieve the data via the Gateway.
We have some debug-level logging enabled in the Gateway module, so let’s have a quick look at the Gateway logs:
o.s.w.r.f.client.ExchangeFunctions       : [30488128] HTTP GET http://localhost:8083/auth/realms/baeldung/protocol/openid-connect/certs
o.s.w.r.f.client.ExchangeFunctions       : [30488128] Response 200 OK
We can see here that first, the Gateway communicates with the Authorization Server to obtain the JWT keys that will be used to validate the token received in subsequent requests, and next:
RoutePredicateHandlerMapping   : Route matched: projects_route
RoutePredicateHandlerMapping   : Mapping [Exchange: GET http://localhost:8084/lsso-gateway/projects/] to Route{id='projects_route', uri=http://localhost:8081, order=0, predicate=Paths: [/lsso-gateway/projects/**], match trailing slash: true, gatewayFilters=[[[RewritePath /lsso-gateway/(?<segment>.*) = '/lsso-project-resource-server/api/${segment}'], order = 1]], metadata={}}
RoutePredicateHandlerMapping   : [0fdcebda-1] Mapped to org.springframework.cloud.gateway.handler.FilteringWebHandler@1707078e
We can see that the ‘projects_route’ was matched and routed accordingly to downstream services.
We have now seen in detail how we can access secured resources i.e. Projects using the Gateway pattern and how the Gateway is carrying out the OAuth security validation.
3. Resources
Lesson 2: Sharing Principal Information in Microservices
1. Goal
In this lesson, we’ll learn how to share Principal information in a Microservice Application.
2. Lesson Notes
The relevant module you need to import when you’re starting with this lesson is: sharing-principal-information-start
If you want to have a look at the fully implemented lesson, as a reference, feel free to import: sharing-principal-information-end
2.1. Security Validations - Gateway vs Resource Servers
Keep in mind, in the previous lesson we developed our Microservice topology in which we were accessing secured resources -i.e. Projects and Tasks- using the Gateway pattern.
In terms of OAuth, the Gateway service was acting as a Resource Server and verifying the token.
But we still want additional validations, such as scope checks, to be performed in the Resource Servers as these are, most likely, domain-specific.
In this lesson, we’ll configure our Resource Servers to do this, by using the standard Pre-Authentication mechanism provided by Spring Security out of the box.
2.2. Pre-Authentication
The Pre-Authentication concept is used when a user has already been authenticated by a provider external to the application but we still need to access the Principal’s information to perform some additional security checks in our application.
In this case, the Gateway application will be the one authenticating the user by creating the Principal object based on the provided Access Token. Then, it will transmit this information to the Resource Servers.
In Spring, we can achieve this by using filters and support classes both in the Gateway and in the Resource Server applications.
Let’s build out the mechanism of validating scopes in the individual Resource Servers. With this, we can customize how the Principal information is transmitted between the services in any way we want.
In this lesson, we’ll opt for a very simple approach which is adding headers to the request with the corresponding data.
The first step is to enable security functionality in our Project Resource Server.
2.3. Project Resource Server - Enabling Security
Let’s open the project-resource-server - pom.xml and add the Spring Security starter dependency to enable the Security features in our application:
<dependency>
  <groupId>org.springframework.boot</groupId>
  <artifactId>spring-boot-starter-security</artifactId>
</dependency>
Next, let’s create a new config class and add the basic security configuration and the scope level validations for our GET and POST URLs:
@Configuration
public class ProjectResourceSecurityConfig extends WebSecurityConfigurerAdapter {
    @Override
    protected void configure(HttpSecurity http) throws Exception {
        http.authorizeRequests()
          .antMatchers(HttpMethod.GET, "/api/projects/**")
            .hasAuthority("SCOPE_read")
          .antMatchers(HttpMethod.POST, "/api/projects")
            .hasAuthority("SCOPE_write")
          .anyRequest()
            .authenticated()
          // ...
    }

}
Next, we want to create a stateless session in the Resource Server, so let’s add the corresponding configuration here
@Override
protected void configure(HttpSecurity http) throws Exception {
      // ...
      .and()
        .sessionManagement()
          .sessionCreationPolicy(SessionCreationPolicy.STATELESS);
}
Also, we need to disable CSRF protection since this is used by non-browser clients:
@Override
protected void configure(HttpSecurity http) throws Exception {
    http.csrf().disable()
    // ...
}
Let’s start the server and try accessing our Projects page - http://localhost:8082/lsso-client/projects, hit login and enter credentials: john@test.com : 123
We can see that the page is retrieving a 403 - Forbidden response, because the expected scopes are not sent by the Gateway yet.
Let’s do the next step now to send these scopes from the Gateway to the Resource Servers via filters.
2.4. Gateway - Adding a Custom Filter
We can create global filters in the Gateway module to intercept any request to the downstream servers and perform any changes or validations.
Let’s create the filter and override the filter method to add our custom logic:
@Component
public class AddCustomHeadersGlobalFilter implements GlobalFilter {

    @Override
    public Mono<Void> filter(ServerWebExchange exchange, GatewayFilterChain chain) {
      // ...
    }
}
First, we extract the Principal and cast it to the Authentication type to be able to access the authorities:
@Override
public Mono<Void> filter(ServerWebExchange exchange, GatewayFilterChain chain) {
    return exchange.getPrincipal()
        .filter(Authentication.class::isInstance)
        .cast(Authentication.class)
        // ...
}
Next, we’ll add the headers and continue the filter chain:
@Override
public Mono<Void> filter(ServerWebExchange exchange, GatewayFilterChain chain) {
        // ...
        .map(authentication -> addHeaders(exchange, authentication))
        .flatMap(chain::filter);
}
Let’s now write the logic for the addHeaders method:
private ServerWebExchange addHeaders(ServerWebExchange exchange, Authentication authentication) {
    String[] authorities = authentication.getAuthorities()
        .stream()
        .map(GrantedAuthority::getAuthority)
        .toArray(String[]::new);
        // ...
}
Here, we have converted the authorities -i.e. scopes- present in the Access Token to a String array.
Next, we pass this array of scopes as headers in the request, together with a header for the username or id
private ServerWebExchange addHeaders(ServerWebExchange exchange, Authentication authentication) {
    // ...
    exchange.getRequest()
        .mutate()
        .header("BAEL-authorities", authorities)
        .header("BAEL-username", authentication.getName());
    return exchange;
}
Let’s restart our Gateway module again so that it starts sending the custom headers to the downstream Resource Servers.
2.5. Project Resource Server - Pre-Authentication Filter
Next, let’s add the logic in the Project Resource Server to extract these headers and perform the necessary validations.
Let’s open the ProjectResourceSecurityConfig and add an AbstractPreAuthenticatedProcessingFilter bean. We’ll mainly do two things here: first, we’ll configure the principal header, that is, which header to extract from the request and treat it as the principal name. In our case, that header is BAEL-username
@Bean
public AbstractPreAuthenticatedProcessingFilter preAuthFilter() throws Exception {
    RequestHeaderAuthenticationFilter preAuthFilter = new RequestHeaderAuthenticationFilter();
    preAuthFilter.setPrincipalRequestHeader("BAEL-username");
    preAuthFilter.setAuthenticationManager(authenticationManager());
    // ...
}
We have also configured the filter with a reference to the default Authentication Manager object.
The method authenticationManager() we’re using here is defined in the parent WebSecurityConfigurerAdapter class.
Second, we need to set the authentication detail source. For this, we’ll create a custom AuthenticationDetailsSource that will parse the scopes sent in headers by the Gateway and build the authentication details.
Let’s create a new class that implements this interface, and override the buildDetails() method to extract the scopes from the BAEL-authorities header:
public class CustomAuthenticationDetailsSource implements AuthenticationDetailsSource<HttpServletRequest, GrantedAuthoritiesContainer> {
    @Override
    public GrantedAuthoritiesContainer buildDetails(HttpServletRequest context) {
        Enumeration<String> headerValues = context.getHeaders("BAEL-authorities");
        // ...
    }
}
Next, we convert these into a collection of GrantedAuthority and build our authentication detail:
@Override
public GrantedAuthoritiesContainer buildDetails(HttpServletRequest context) {
    // ...
    Collection<GrantedAuthority> authorities = Collections.list(headerValues)
        .stream()
        .map(value -> new SimpleGrantedAuthority(value))
        .collect(Collectors.toList());
    return new PreAuthenticatedGrantedAuthoritiesWebAuthenticationDetails(context, authorities);
}
Let’s switch back to our preAuthFilter bean that we were defining in ProjectResourceSecurityConfig and set the authentication details source to the custom one we created just now:
public AbstractPreAuthenticatedProcessingFilter preAuthFilter() throws Exception {
    // ...
    CustomAuthenticationDetailsSource authDetailsSource = new CustomAuthenticationDetailsSource();
    preAuthFilter.setAuthenticationDetailsSource(authDetailsSource);
    return preAuthFilter;
}
Next, let’s inject this filter in our security chain using the DSL addFilterAt() right at the beginning of the security configuration:
@Override
protected void configure(HttpSecurity http) throws Exception {
    http.addFilterAt(preAuthFilter(), AbstractPreAuthenticatedProcessingFilter.class)
        .csrf().disable()
    // ...
}
But we still need to carry out one final step here to make this work. That is, we need to override Boot’s default in-memory UserDetailsService by providing our own AuthenticationProvider instance.
Our pre-authentication provider won’t have much logic as all it needs to do is obtain the UserDetails from the Authentication object that the filter will create:
@Bean
public AuthenticationProvider preAuthAuthenticationProvider() {
    PreAuthenticatedAuthenticationProvider provider = new PreAuthenticatedAuthenticationProvider();
    provider.setPreAuthenticatedUserDetailsService(new PreAuthenticatedGrantedAuthoritiesUserDetailsService());
    return provider;
}
Our pre-auth filter configuration is now complete, and we have achieved scope level validation in the Project Resource Server by using the Pre-Authentication concept.
Let’s restart the project-resource-server and check the application again.
As we go to http://localhost:8082/lsso-client, hit login and enter credentials: john@test.com : 123 , we can see the projects list starts getting displayed again.
Note that we’ve included the pre-authentication logic in our Tasks Resource Server in the start module as well, so now we can simply navigate to the Tasks details page without any issues.