CHANGE STATE AFTER WE LOGIN
We have a missing piece now. If we try to login, we are not immediately logged in - we must do a page reload, which is not nice.
Let’s login the user immediately after the login process is successful.
In components/LoginModal.js we need to import the useStoreActions object from easy-peasy :
import { useStoreActions } from 'easy-peasy'
then inside the LoginModal component we initialize setLoggedIn and setHideModal :
const setLoggedIn = useStoreActions((actions) => actions.login.setLoggedIn)
const setHideModal = useStoreActions((actions) => actions.modals.setHideModal)
Then we call them inside the submit() function after we get a response:
const submit = async () => {
  const response = await axios.post('/api/auth/login', {
    email,
    password,
  })

  if (response.data.status === 'error') {
    alert(response.data.message)
    return
  }

  setLoggedIn(true)
  setHideModal(true)
}
Here is the full component source code:
import { useState } from 'react'
import axios from 'axios'
import { useStoreActions } from 'easy-peasy'

export default function LoginModal(props) {
  const [email, setEmail] = useState('')
  const [password, setPassword] = useState('')

  const setLoggedIn = useStoreActions((actions) => actions.login.setLoggedIn)
  const setHideModal = useStoreActions((actions) => actions.modals.setHideModal)

  const submit = async () => {
    const response = await axios.post('/api/auth/login', {
      email,
      password,
    })

    if (response.data.status === 'error') {
      alert(response.data.message)
      return
    }

    setLoggedIn(true)
    setHideModal(true)
  }

  return (
    <>
      <h2>Log in</h2>
      <div>
        <form
          onSubmit={(event) => {
            submit()
            event.preventDefault()
          }}
        >
          <input
            id='email'
            type='email'
            placeholder='Email address'
            onChange={(event) => setEmail(event.target.value)}
          />
          <input
            id='password'
            type='password'
            placeholder='Password'
            onChange={(event) => setPassword(event.target.value)}
          />
          <button>Log in</button>
        </form>
      </div>
      <p>
        Don't have an account yet?{' '}
        <a href='javascript:;' onClick={() => props.showSignup()}>
          Sign up
        </a>
      </p>
    </>
  )
}
The code for this lesson is available at https://github.com/flaviocopes/airbnb-clone-react-nextjs-2020/tree/5-6
LOG IN AFTER REGISTRATION
We now repeat the same process for the registration modal, with one more step: when we register, we need to send back the cookie like we do for the login process.
In pages/api/auth/register.js we first:
import Cookies from 'cookies'
then right before the call to send a successful response:
res.end(JSON.stringify({ status: 'success', message: 'User added' }))
We add the session cookie:
const cookies = new Cookies(req, res)
cookies.set('nextbnb_session', sessionToken, {
  httpOnly: true, // true by default
})
In the frontend, in components/RegistrationModal.js , we import useStoreActions from easy-peasy :
import { useStoreActions } from 'easy-peasy'
Then we define setLoggedIn and setHideModal:
const setLoggedIn = useStoreActions((actions) => actions.login.setLoggedIn)
const setHideModal = useStoreActions((actions) => actions.modals.setHideModal)
If the response is an error, we alert and we return immediately after, otherwise we set the user as logged in:
const submit = async () => {
  const response = await axios.post('/api/auth/register', {
    email,
    password,
    passwordconfirmation,
  })

  if (response.data.status === 'error') {
    alert(response.data.message)
    return
  }

  setLoggedIn(true)
  setHideModal(true)
}
Try the application: you should be able to create a new user using the registration form, the UI should change to show that you are logged in.
To logout, you can delete the cookie manually using the devtools (you can later implement logout yourself), or open a new incognito browser window.
The code for this lesson is available at https://github.com/flaviocopes/airbnb-clone-react-nextjs-2020/tree/5-7
CREATE THE MODELS AND MOVE DATA TO THE DB
The first thing we’re going to do is to move the houses from the simple JSON file we now have in houses.js to the new Postgres database we defined, by first creating the Sequelize models for the data, and then letting Sequelize create the tables for us.
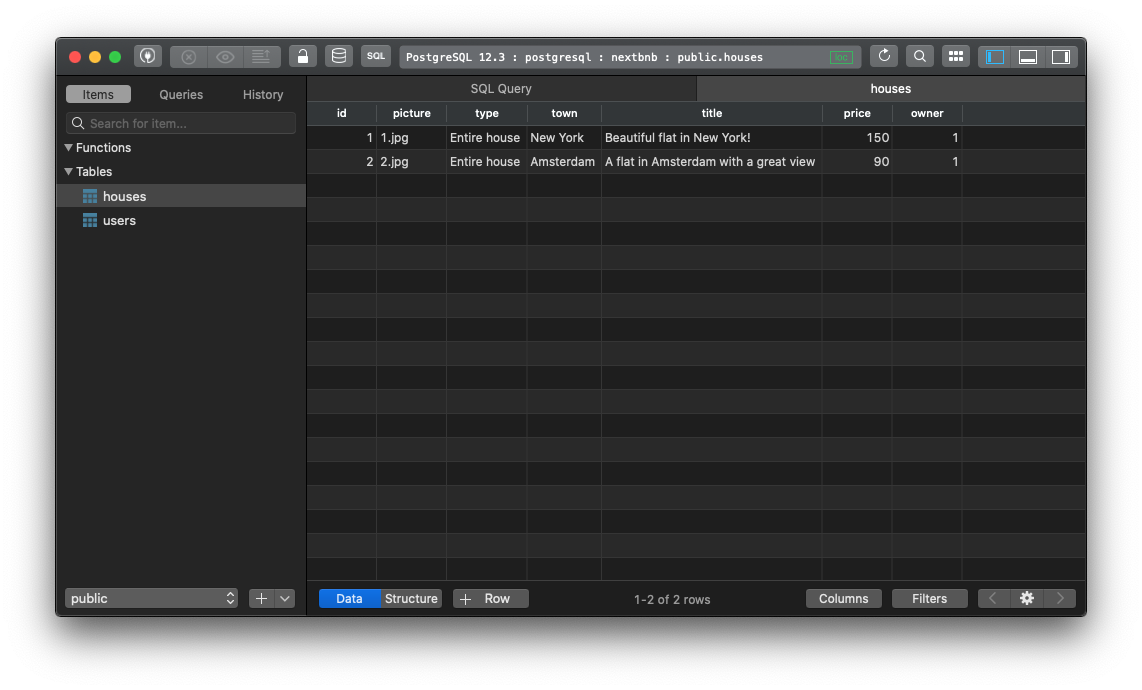
The file houses.js currently hosts this content, which forms all our application data so far:
houses.js
export default [
  {
    id: 1,
    picture: '/img/1.jpg',
    type: 'Entire house',
    town: 'New York',
    title: 'Beautiful flat in New York!',
    price: '150.00',
  },
  {
    id: 2,
    picture: '/img/2.jpg',
    type: 'Entire house',
    town: 'Amsterdam',
    title: 'A flat in Amsterdam with a great view',
    price: '90.00',
  },
]
Let’s move this to a Sequelize model in src/model.js . You can add this code at the bottom of the file, before the export { sequelize, User } line:
class House extends Sequelize.Model {}

House.init(
  {
    id: {
      type: Sequelize.DataTypes.INTEGER,
      autoIncrement: true,
      primaryKey: true,
    },
    picture: { type: Sequelize.DataTypes.STRING, allowNull: false },
    type: { type: Sequelize.DataTypes.STRING, allowNull: false },
    town: { type: Sequelize.DataTypes.STRING, allowNull: false },
    title: { type: Sequelize.DataTypes.STRING, allowNull: false },
    price: { type: Sequelize.DataTypes.INTEGER, allowNull: false },
    owner: { type: Sequelize.DataTypes.INTEGER, allowNull: false },
  },
  {
    sequelize,
    modelName: 'house',
    timestamps: false,
  }
)
The owner field will contain a reference to a user.
Then add House to the list of exports:
export { sequelize, User, House }
Great!
Now we can make Sequelize automatically create the houses table by calling House.sync() . We can add this call into an API call like the one in pages/api/auth/login.js , temporarily, then we remove it:
import { User, House, sequelize } from '../../../model.js'

//...

export default async (req, res) => {
  if (req.method !== 'POST') {
    res.status(405).end() //Method Not Allowed
    return
  }
  House.sync()
  ...
It’s a nice feature that allows us to avoid creating the table separately.
Once you hit the endpoint, you can remove the code from that file, as the table has been created.
If you modify a model, you can call this sync() model method again to keep the table in sync with the model, with the alter property:
User.sync({ alter: true })
House.sync({ alter: true })
You can add this line at the end of the model.js file.
The alter: true option makes sure tables are updated when we change the model, something very useful as we build the app.
The code for this lesson is available at https://github.com/flaviocopes/airbnb-clone-react-nextjs-2020/tree/6-1
USE THE DATABASE INSTEAD OF THE FILE
Now that we created the model that uses the DB to serve the data, it’s time to use it!
First, I’m going to manually add the houses data we had in the file to the database, creating 2 rows in the houses table:
Now, the houses.js file is imported by 2 files:
pages/houses/[id].jspages/index.js
We need to change this reliance on the file, and use a new API instead.
Let’s work on the list page first.
HOUSES LIST
Instead of loading the houses from the JSON file, we’re going to use the House model.
We can use the model inside the getServerSideProps() method. Next.js becomes an hybrid between frontend and backend.
Let’s start from pages/index.js .
We can import the model:
import { House as HouseModel } from '../model.js'
Then in getServerSideProps() we get the houses using:
const houses = await HouseModel.findAndCountAll()
and we return the value iterating over the results, getting the dataValues property, which returns a plain JS object with the data we need:
return {
  props: {
    nextbnb_session: nextbnb_session || null,
    houses: houses.rows.map((house) => house.dataValues),
  },
}
Now we get houses as a prop in the Home component:
export default function Home({ nextbnb_session, houses }) {
  //...
and we need to do a little refactoring of how we print the JSX. We need to embed the content inside the JSX, otherwise it can’t access the value of the prop, like this:
import House from '../components/House'
import Layout from '../components/Layout'
import Cookies from 'cookies'
import { useStoreActions } from 'easy-peasy'
import { useEffect } from 'react'
import { House as HouseModel } from '../model.js'

export default function Home({ nextbnb_session, houses }) {
  const setLoggedIn = useStoreActions((actions) => actions.login.setLoggedIn)

  useEffect(() => {
    if (nextbnb_session) {
      setLoggedIn(true)
    }
  }, [])

  return (
    <Layout
      content={
        <div>
          <h2>Places to stay</h2>

          <div className='houses'>
            {houses.map((house, index) => {
              return <House key={index} {...house} />
            })}
          </div>

          <style jsx>{`
            .houses {
              display: grid;
              grid-template-columns: 49% 49%;
              grid-template-rows: 300px 300px;
              grid-gap: 2%;
            }
          `}</style>
        </div>
      }
    />
  )
}

export async function getServerSideProps({ req, res, query }) {
  const cookies = new Cookies(req, res)
  const nextbnb_session = cookies.get('nextbnb_session')
  const houses = await HouseModel.findAndCountAll()

  return {
    props: {
      nextbnb_session: nextbnb_session || null,
      houses: houses.rows.map((house) => house.dataValues),
    },
  }
}
THE HOUSE DETAIL
We do the same in pages/houses/[id].js .
We import the model:
import { House as HouseModel } from '../../model.js'
Then we use it to get the house by id:
const house = await HouseModel.findByPk(id)
and we can return its dataValues in the return object:
return {
  props: {
    house: house.dataValues,
    nextbnb_session: nextbnb_session || null,
  },
}
In this case we were already returning a house prop, so nothing needs to be changed.
Here is the full source code:
import Head from 'next/head'
import Layout from '../../components/Layout'
import DateRangePicker from '../../components/DateRangePicker'
import { useState, useEffect } from 'react'
import { useStoreActions } from 'easy-peasy'
import Cookies from 'cookies'
import { House as HouseModel } from '../../model.js'

const calcNumberOfNightsBetweenDates = (startDate, endDate) => {
  const start = new Date(startDate) //clone
  const end = new Date(endDate) //clone
  let dayCount = 0

  while (end > start) {
    dayCount++
    start.setDate(start.getDate() + 1)
  }

  return dayCount
}

export default function House({ house, nextbnb_session }) {
  const [dateChosen, setDateChosen] = useState(false)
  const [numberOfNightsBetweenDates, setNumberOfNightsBetweenDates] = useState(
    0
  )

  const setShowLoginModal = useStoreActions(
    (actions) => actions.modals.setShowLoginModal
  )

  const setLoggedIn = useStoreActions((actions) => actions.login.setLoggedIn)

  useEffect(() => {
    if (nextbnb_session) {
      setLoggedIn(true)
    }
  }, [])

  return (
    <Layout
      content={
        <div className='container'>
          <Head>
            <title>{house.title}</title>
          </Head>
          <article>
            <img src={house.picture} width='100%' alt='House picture' />
            <p>
              {house.type} - {house.town}
            </p>
            <p>{house.title}</p>
          </article>
          <aside>
            <h2>Choose a date</h2>
            <DateRangePicker
              datesChanged={(startDate, endDate) => {
                setNumberOfNightsBetweenDates(
                  calcNumberOfNightsBetweenDates(startDate, endDate)
                )
                setDateChosen(true)
              }}
            />

            {dateChosen && (
              <div>
                <h2>Price per night</h2>
                <p>${house.price}</p>
                <h2>Total price for booking</h2>
                <p>${(numberOfNightsBetweenDates * house.price).toFixed(2)}</p>
                <button
                  className='reserve'
                  onClick={() => {
                    setShowLoginModal()
                  }}
                >
                  Reserve
                </button>{' '}
              </div>
            )}
          </aside>

          <style jsx>{`
            .container {
              display: grid;
              grid-template-columns: 60% 40%;
              grid-gap: 30px;
            }

            aside {
              border: 1px solid #ccc;
              padding: 20px;
            }
          `}</style>
        </div>
      }
    />
  )
}

export async function getServerSideProps({ req, res, query }) {
  const { id } = query
  const cookies = new Cookies(req, res)
  const nextbnb_session = cookies.get('nextbnb_session')
  const house = await HouseModel.findByPk(id)

  return {
    props: {
      house: house.dataValues,
      nextbnb_session: nextbnb_session || null,
    },
  }
}
You can now remove the houses.js file.
The code for this lesson is available at https://github.com/flaviocopes/airbnb-clone-react-nextjs-2020/tree/6-2
HANDLE BOOKINGS
We’re now ready to implement booking a house!
Let’s keep things simple now and let’s defer payments to later.
A person can book if the dates chosen do not overlap with another booking for that house.
First, instead of allowing to reserve before being logged in, like we have now:
pages/houses/[id].js
<button
  className='reserve'
  onClick={() => {
    setShowLoginModal()
  }}>
  Reserve
</button>
we do a check on the user property from the easy-peasy store, and if we’re not logged in, we’ll show a “Log in to Reserve” button instead.
First we need to import useStoreState :
pages/houses/[id].js
import { useStoreActions, useStoreState } from 'easy-peasy'
then we declare, inside the component function body the loggedIn value:
pages/houses/[id].js
const loggedIn = useStoreState((state) => state.login.loggedIn)
Now we can use this inside our JSX:
pages/houses/[id].js
{
  loggedIn ? (
    <button
      className='reserve'
      onClick={() => {
        //todo: add code to reserve
      }}
    >
      Reserve
    </button>
  ) : (
    <button
      className='reserve'
      onClick={() => {
        setShowLoginModal()
      }}
    >
      Log in to Reserve
    </button>
  )
}
Now when the Reserve now button is clicked I want to trigger a function that calls an endpoint on the server to book the place.
Server side I’m going to add the booking to a new table in the database, which we’ll call bookings .
Once I’m done with that, I’ll create a way to check if a house is booked in a particular period, to avoid people booking days already booked.
We’ll integrate that with the calendar, so people can’t book places booked, and we’ll check if the dates are still valid when we actually go to book.
Let’s do it.
Let’s start with the model, in the model.js file:
model.js
class Booking extends Sequelize.Model {}

Booking.init(
  {
    id: {
      type: Sequelize.DataTypes.INTEGER,
      autoIncrement: true,
      primaryKey: true,
    },
    houseId: { type: Sequelize.DataTypes.INTEGER, allowNull: false },
    userId: { type: Sequelize.DataTypes.INTEGER, allowNull: false },
    startDate: { type: Sequelize.DataTypes.DATEONLY, allowNull: false },
    endDate: { type: Sequelize.DataTypes.DATEONLY, allowNull: false },
  },
  {
    sequelize,
    modelName: 'booking',
    timestamps: true,
  }
)
And export it:
export { sequelize, User, House, Booking }
It’s very similar to the models we already have.
Now like we did before, we can call Booking.sync() to create the table in the database.
You can add this line at the end of the model.js file.
Booking.sync({ alter: true })
Ok, now that we have the model ready for our data, we can go and implement the booking functionality in the frontend.
In pages/houses/[id].js I first import axios :
import axios from 'axios'
In the component code, I declare 2 new state variables:
const [startDate, setStartDate] = useState()
const [endDate, setEndDate] = useState()
and when the datepicker tells us new dates have been set, we update them.
Change:
<DateRangePicker
  datesChanged={(startDate, endDate) => {
    setNumberOfNightsBetweenDates(
      calcNumberOfNightsBetweenDates(startDate, endDate)
    )
    setDateChosen(true)
  }}
/>
to:
<DateRangePicker
  datesChanged={(startDate, endDate) => {
    setNumberOfNightsBetweenDates(
      calcNumberOfNightsBetweenDates(startDate, endDate)
    )
    setDateChosen(true)
    setStartDate(startDate)
    setEndDate(endDate)
  }}
/>
Now when clicking the “Reserve” button I now invoke a new function, that POSTS data to the /api/reserve endpoint:
<button
  className='reserve'
  onClick={async () => {
    try {
      const response = await axios.post('/api/reserve', {
        houseId: house.id,
        startDate,
        endDate,
      })
      if (response.data.status === 'error') {
        alert(response.data.message)
        return
      }
      console.log(response.data)
    } catch (error) {
      console.log(error)
      return
    }
  }}
>
  Reserve
</button>
In this function I hit the /api/reserve API endpoint with Axios, passing the house id, the start date, and the end date. The user is figured out in the server side thanks to seessions.
I added some simple console.log() calls to figure out what the server responds.
THE ENDPOINT IMPLEMENTATION
Here’s the endpoint implementation, which we create into pages/api/reserve.js :
import { User, Booking } from '../../model.js'

export default async (req, res) => {
  if (req.method !== 'POST') {
    res.status(405).end() //Method Not Allowed
    return
  }

  const user_session_token = req.cookies.nextbnb_session
  if (!user_session_token) {
    res.status(401).end()
    return
  }

  User.findOne({ where: { session_token: user_session_token } }).then(
    (user) => {
      Booking.create({
        houseId: req.body.houseId,
        userId: user.id,
        startDate: req.body.startDate,
        endDate: req.body.endDate,
      }).then(() => {
        res.writeHead(200, {
          'Content-Type': 'application/json',
        })
        res.end(JSON.stringify({ status: 'success', message: 'ok' }))
      })
    }
  )
}
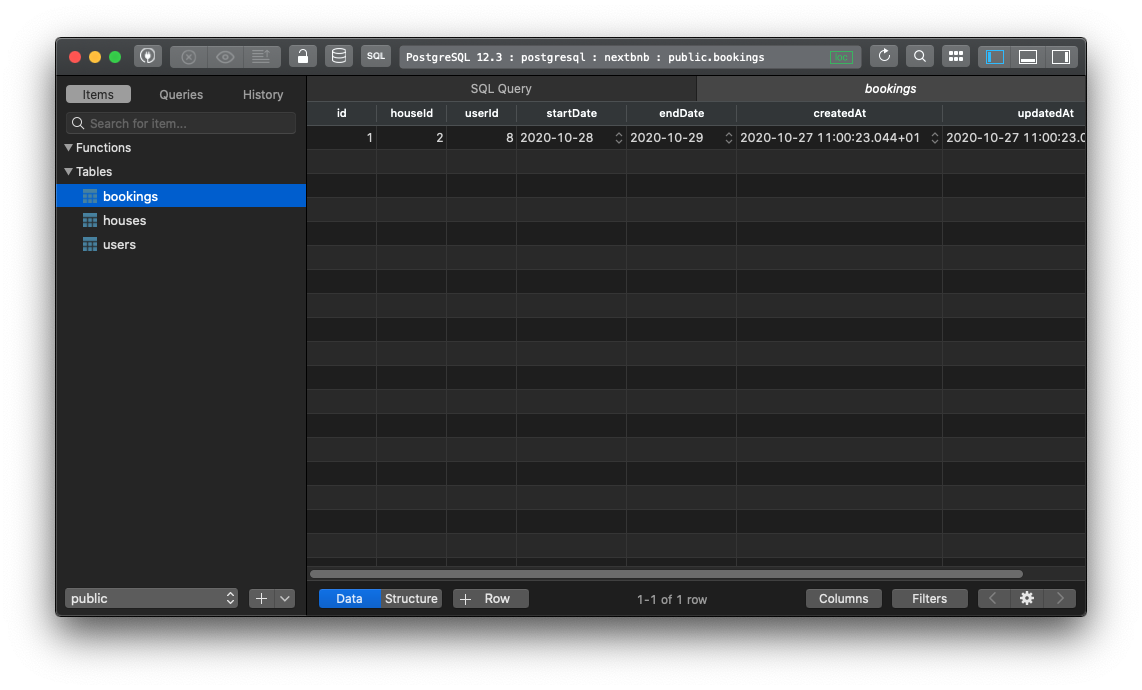
Great! Now the booking data is stored successfully:
The code for this lesson is available at https://github.com/flaviocopes/airbnb-clone-react-nextjs-2020/tree/6-3
HANDLE BOOKED DATES
We’re going to implement 2 server HTTP POST endpoints.
THE POST /API/HOUSES/BOOKED ENDPOINT
The first endpoint we’re going to build returns the list of the booked dates of a house.
Let me first give you the code, and then we discuss it.
pages/api/houses/booked.js
import { Booking } from '../../../model.js'
import { Sequelize } from 'sequelize'

const getDatesBetweenDates = (startDate, endDate) => {
  let dates = []
  while (startDate < endDate) {
    dates = [...dates, new Date(startDate)]
    startDate.setDate(startDate.getDate() + 1)
  }
  dates = [...dates, endDate]
  return dates
}

export default async (req, res) => {
  if (req.method !== 'POST') {
    res.status(405).end() //Method Not Allowed
    return
  }
  const houseId = req.body.houseId

  const results = await Booking.findAll({
    where: {
      houseId: houseId,
      endDate: {
        [Sequelize.Op.gte]: new Date(),
      },
    },
  })

  let bookedDates = []

  for (const result of results) {
    const dates = getDatesBetweenDates(
      new Date(result.startDate),
      new Date(result.endDate)
    )

    bookedDates = [...bookedDates, ...dates]
  }

  //remove duplicates
  bookedDates = [...new Set(bookedDates.map((date) => date))]

  res.json({
    status: 'success',
    message: 'ok',
    dates: bookedDates,
  })
}
Given a house id, when you call this endpoint you’ll get back the booked dates for the house.
The endpoint makes use of a getDatesBetweenDates() function, which is returns the days contained between 2 dates.
As you can see, in that function we compare JavaScript dates by comparing the Date objects directly: startDate < endDate .
To get the bookings list, we run Booking.findAll() passing a special option [Op.gte] :
const Op = require('sequelize').Op

//...

const results = await Booking.findAll({
  where: {
    houseId: houseId,
    endDate: {
      [Op.gte]: new Date(),
    },
  },
})
Which in this context means that the end date is in the future compared to today’s date.
This statement:
bookedDates = [...new Set(bookedDates.map((date) => date))]
is used to remove the duplicates using that special statement which adds all items in the array to a Set data structure, and then creates an array from that Set.
Check the explanation on this technique to remove array duplicates on https://flaviocopes.com/how-to-get-unique-properties-of-object-in-array/
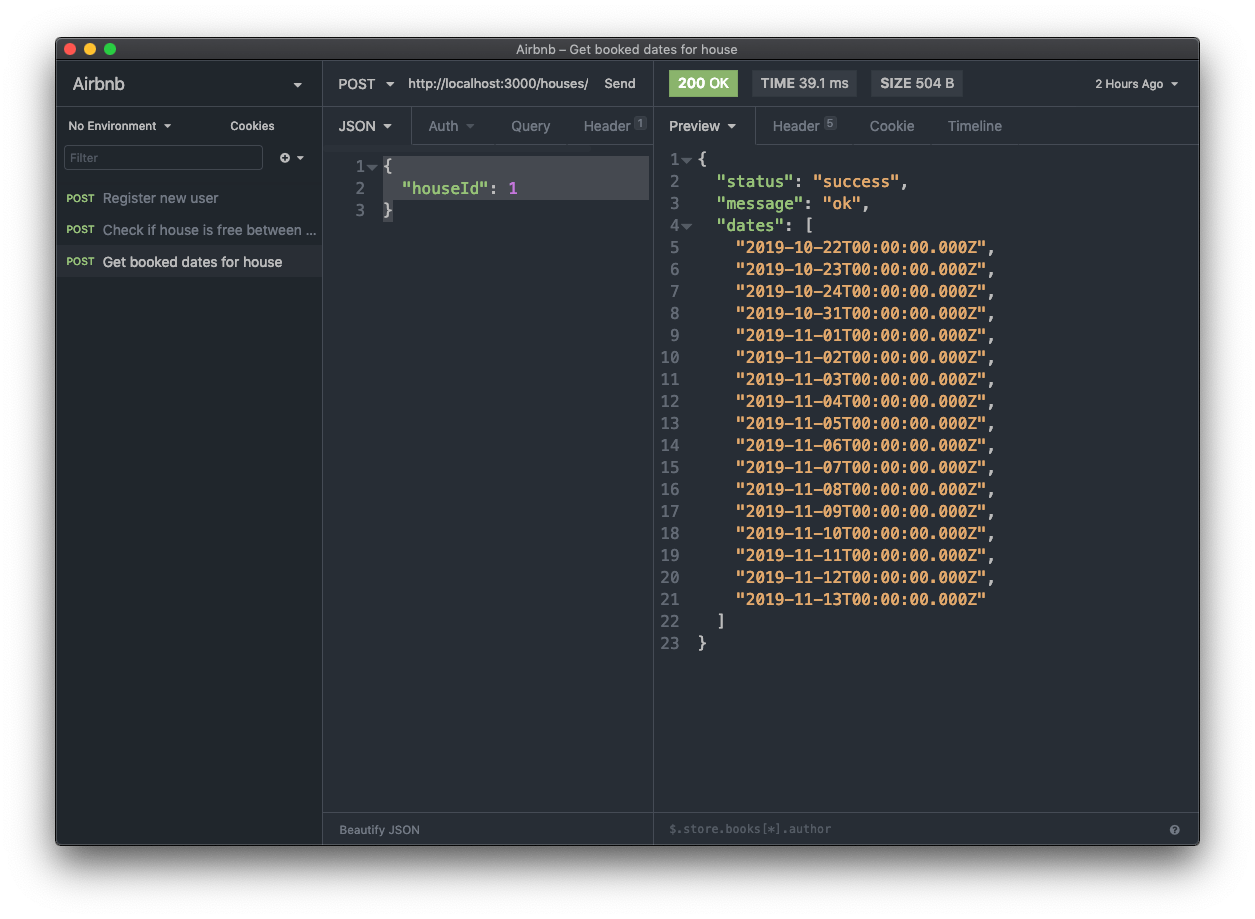
You can try to add a few bookings to a house, using the web app, and then hit the http://localhost:3000/api/houses/booked endpoint with this JSON data, using Insomnia , passing this argument:
{
  "houseId": 1
}
You should get an array of dates as a response:
THE POST /API/HOUSES/CHECK ENDPOINT
Next, we implement another endpoint in the pages/api/houses/check.js file.
The goal of this endpoint is to check, given a start date, and end date and an house id, if we can book that house on the dates we chose, or if we have other bookings matching those dates.
I’m going to extract the check in this function:
const canBookThoseDates = async (houseId, startDate, endDate) => {
  const results = await Booking.findAll({
    where: {
      houseId: houseId,
      startDate: {
        [Sequelize.Op.lte]: new Date(endDate),
      },
      endDate: {
        [Sequelize.Op.gte]: new Date(startDate),
      },
    },
  })
  return !(results.length > 0)
}
I searched how to determine whether two date ranges overlap on Google to find this “formula”. Basically, we check if the start date of a booking is after the end date we look for, and if the end date of a booking is before the starting date we want to check.
We then check if this query returns a result, which means the house is busy.
What we must do in our /api/houses/check endpoint is to determine if the house can be booked. If so, we return a ‘free’ message. If not, a ‘busy’ message:
check.js
import { Booking } from '../../../model.js'
import { Sequelize } from 'sequelize'

const canBookThoseDates = async (houseId, startDate, endDate) => {
  const results = await Booking.findAll({
    where: {
      houseId: houseId,
      startDate: {
        [Sequelize.Op.lte]: new Date(endDate),
      },
      endDate: {
        [Sequelize.Op.gte]: new Date(startDate),
      },
    },
  })
  return !(results.length > 0)
}

export default async (req, res) => {
  if (req.method !== 'POST') {
    res.status(405).end() //Method Not Allowed
    return
  }
  const startDate = req.body.startDate
  const endDate = req.body.endDate
  const houseId = req.body.houseId

  let message = 'free'
  if (!(await canBookThoseDates(houseId, startDate, endDate))) {
    message = 'busy'
  }

  res.json({
    status: 'success',
    message: message,
  })
}
REMOVE DATES FROM CALENDAR
Let’s now put the endpoints we created into good use.
I want to remove the already booked dates from the calendar.
In pages/houses/[id].js I am going to define a function that using Axios gets the booked dates. I use HTTP POST, maybe GET would be better from a semantical point of view, but I’d have to switch how to pass parameters and I like to stick to one way:
pages/houses/[id].js
const getBookedDates = async (id) => {
  try {
    const response = await axios.post(
      'http://localhost:3000/api/houses/booked',
      { houseId: id }
    )
    if (response.data.status === 'error') {
      alert(response.data.message)
      return
    }
    return response.data.dates
  } catch (error) {
    console.error(error)
    return
  }
}
This method returns the dates array.
We call this method inside the getServerSideProps function:
pages/houses/[id].js
export async function getServerSideProps({ req, res, query }) {
  const { id } = query
  const cookies = new Cookies(req, res)
  const nextbnb_session = cookies.get('nextbnb_session')
  const house = await HouseModel.findByPk(id)
  const bookedDates = await getBookedDates(id)

  return {
    props: {
      house: house.dataValues,
      nextbnb_session: nextbnb_session || null,
      bookedDates,
    },
  }
}
So now we have bookedDates passed as a prop to House .
In turn, we pass bookedDates as a prop to the DateRangePicker component:
pages/houses/[id].js
export default function House({ house, nextbnb_session, bookedDates }) {

//...
<DateRangePicker
  datesChanged={(startDate, endDate) => {
    setNumberOfNightsBetweenDates(
      calcNumberOfNightsBetweenDates(startDate, endDate)
    )
    setDateChosen(true)
    setStartDate(startDate)
    setEndDate(endDate)
  }}
  bookedDates={bookedDates}
/>
and we can switch to editing that component, by opening the components/DateRangePicker.js file.
The bookedDates prop we send to this component is now a list of strings representing dates, like this:
;[
  '2019-11-26T00:00:00.000Z',
  '2019-11-27T00:00:00.000Z',
  '2019-11-26T00:00:00.000Z',
  '2019-11-27T00:00:00.000Z',
  '2019-11-28T00:00:00.000Z',
  '2019-11-29T00:00:00.000Z',
]
We need to iterate over each of those strings, and get back Date objects instead. We do so by adding:
export default function DateRangePicker({ datesChanged, bookedDates }) {

//...

bookedDates = bookedDates.map((date) => {
  return new Date(date)
})
and now we can add bookedDates to our DayPickerInput components, like this:
components/DateRangePicker.js
<div>
  <label>From:</label>
  <DayPickerInput
    formatDate={formatDate}
    format={format}
    value={startDate}
    parseDate={parseDate}
    placeholder={`${dateFnsFormat(new Date(), format)}`}
    dayPickerProps={{
      modifiers: {
        disabled: [
          ...bookedDates,
          {
            before: new Date()
          }
        ]
      }
    }}
    onDayChange={day => {
      setStartDate(day)
      const newEndDate = new Date(day)
      if (numberOfNightsBetweenDates(day, endDate) < 1) {
        newEndDate.setDate(newEndDate.getDate() + 1)
        setEndDate(newEndDate)
      }
      datesChanged(day, newEndDate)
    }}
  />
</div>
<div>
  <label>To:</label>
  <DayPickerInput
    formatDate={formatDate}
    format={format}
    value={endDate}
    parseDate={parseDate}
    placeholder={`${dateFnsFormat(new Date(), format)}`}
    dayPickerProps={{
      modifiers: {
        disabled: [
          startDate,
          ...bookedDates,
          {
            before: startDate
          }
        ]
      }
    }}
    onDayChange={day => {
      setEndDate(day)
      datesChanged(startDate, day)
    }}
  />
</div>
See? I used ...bookedDates to expand the array, so we pass each single item inside the disabled array to DayPickerInput .
Great! We can now also use this function to see if an end date is selectable, by calling it first thing inside the endDateSelectableCallback() function:
You should now be prevented to choose already booked days!
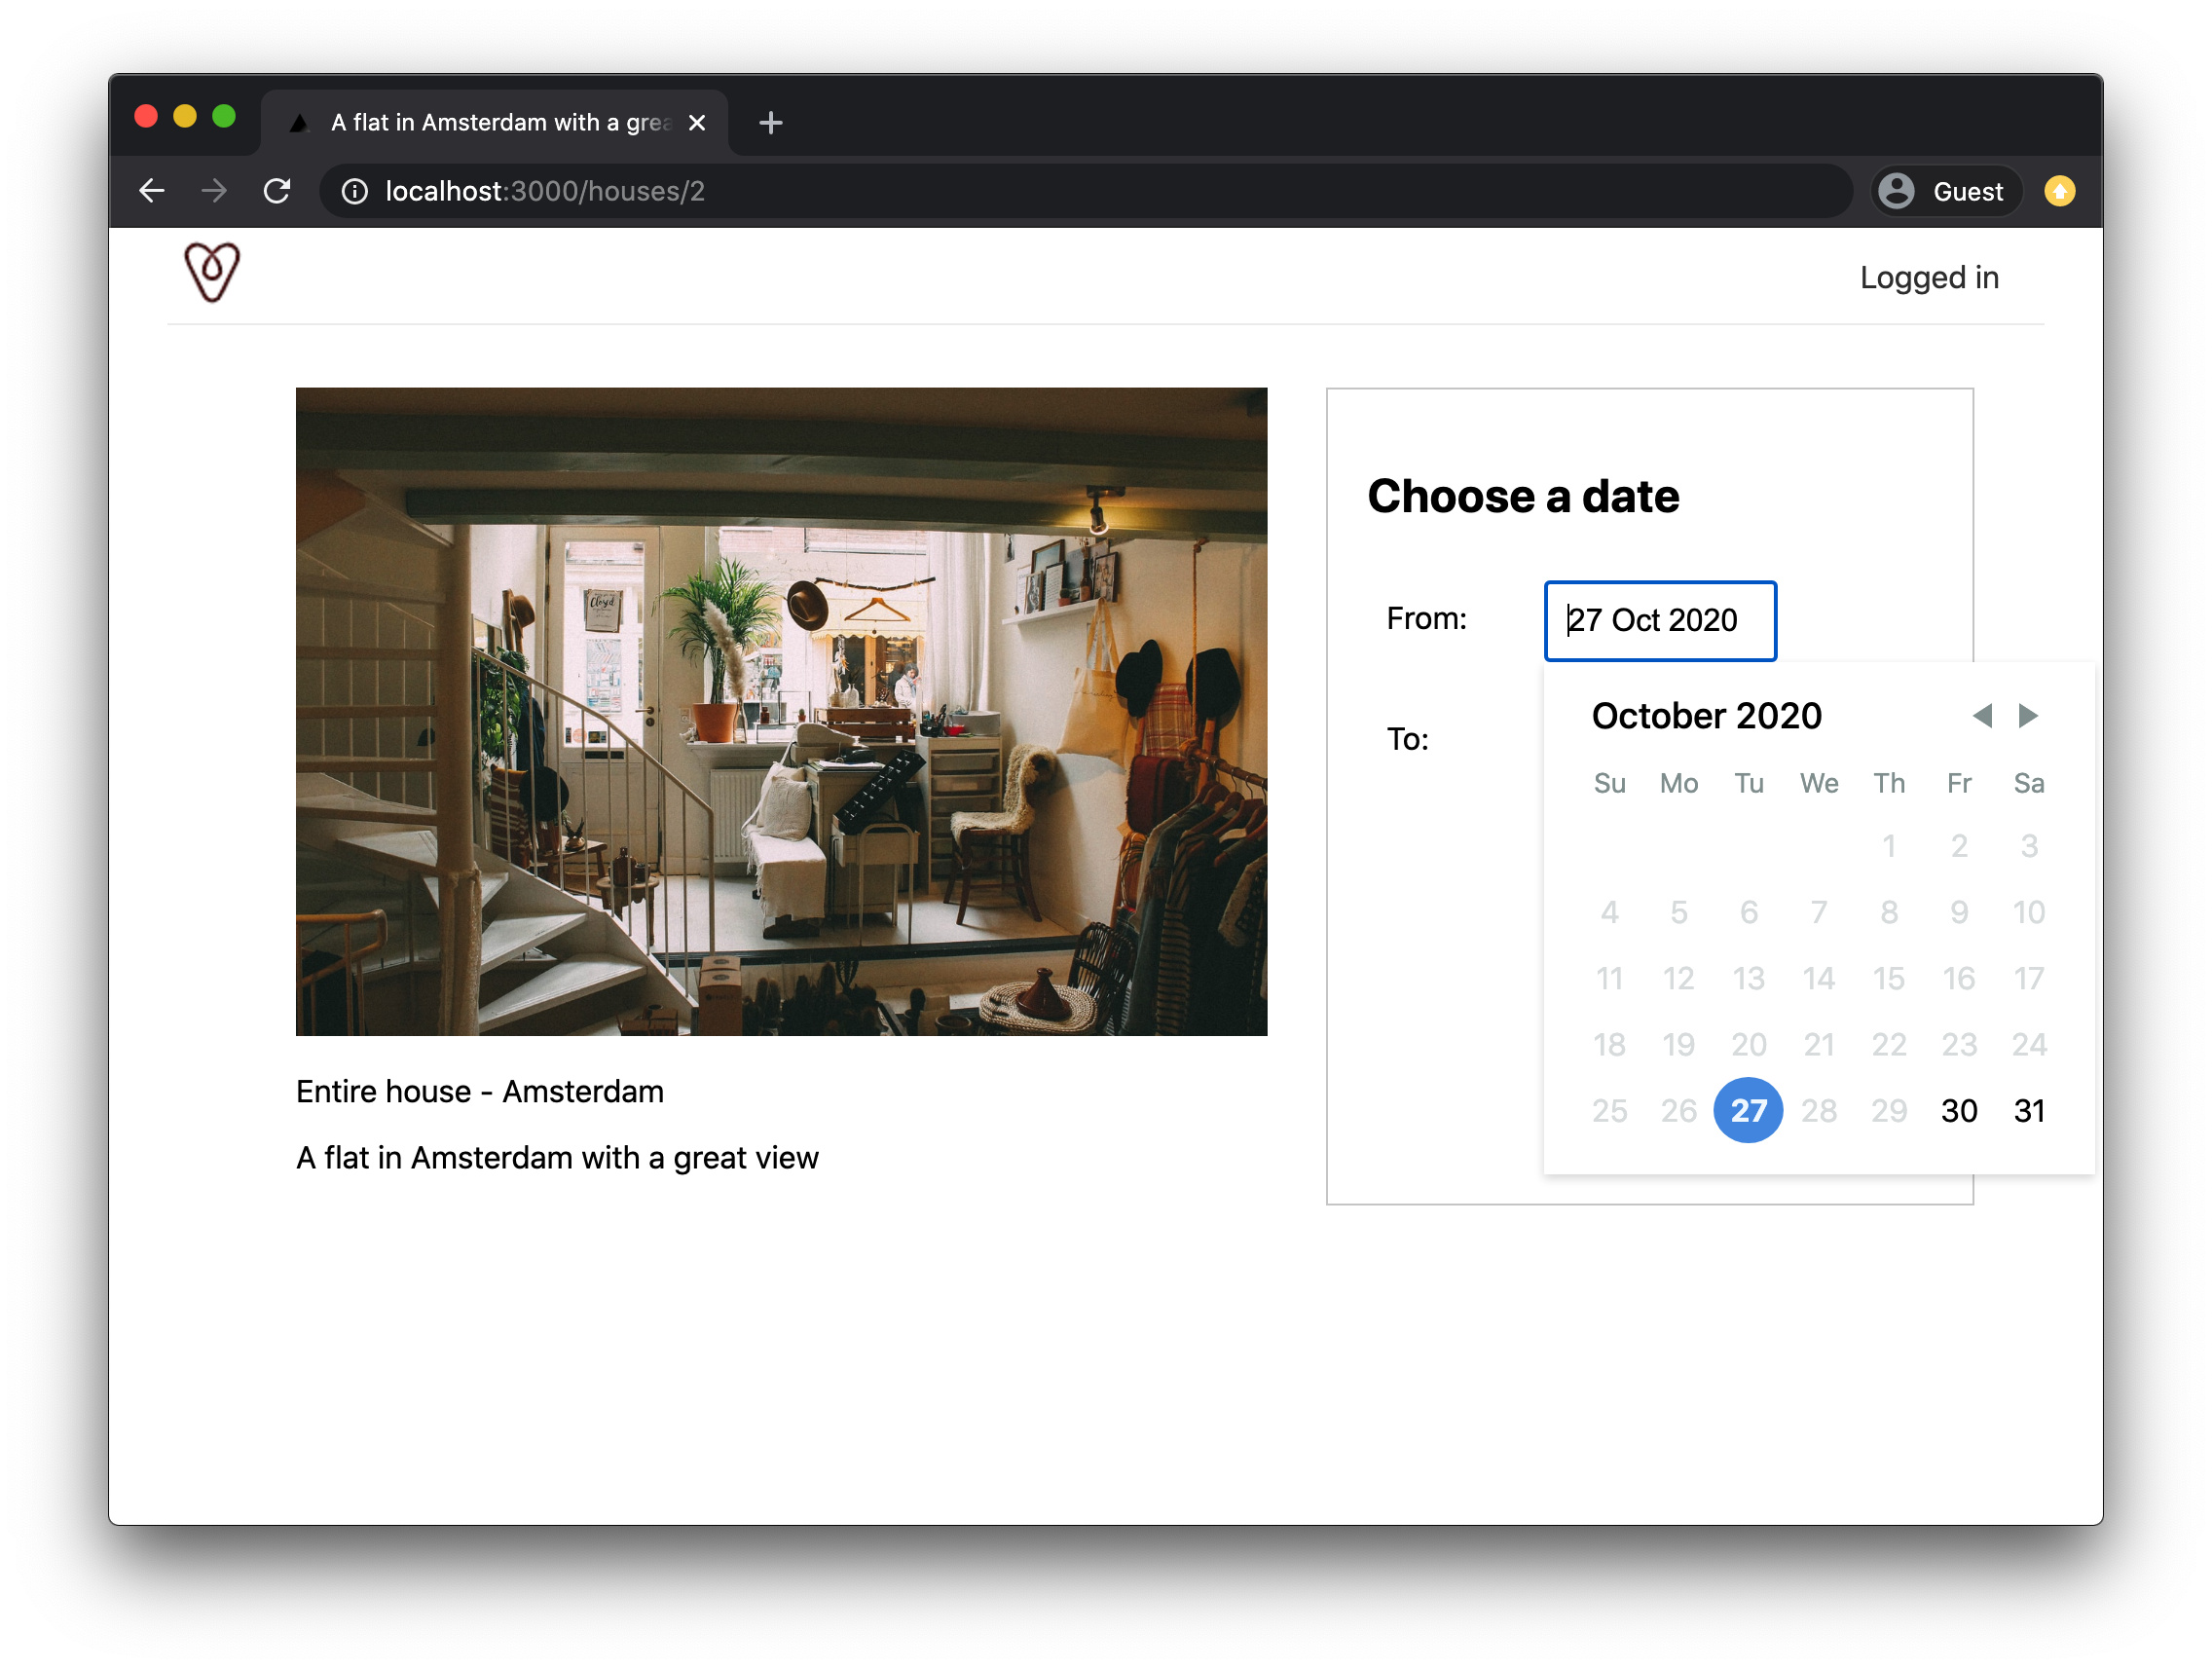
PREVENT BOOKING IF ALREADY BOOKED
Now there’s a problem because in the screenshot for example we can choose Oct 21 as a starting date, and Oct 30 as ending, but all the days between are booked.
We need to make good use of our /houses/check endpoint to check if in the dates we want to book, some are already booked!
We do this by adding this canReserve() function to pages/houses/[id].js :
pages/houses/[id].js
const canReserve = async (houseId, startDate, endDate) => {
  try {
    const response = await axios.post(
      'http://localhost:3000/api/houses/check',
      { houseId, startDate, endDate }
    )
    if (response.data.status === 'error') {
      alert(response.data.message)
      return
    }

    if (response.data.message === 'busy') return false
    return true
  } catch (error) {
    console.error(error)
    return
  }
}
This function is calling the server-side /api/houses/check endpoint we created previously, and if we get ‘busy’ as a message in the response, we return false .
We can use this boolean return value to disallow going on with the booking, in the “Reserve” button onClick callback function we already wrote.
That function now is:
pages/houses/[id].js
<button
  className='reserve'
  onClick={async () => {
    try {
      const response = await axios.post('/api/reserve', {
        houseId: props.house.id,
        startDate,
        endDate,
      })
      if (response.data.status === 'error') {
        alert(response.data.message)
        return
      }
      console.log(response.data)
    } catch (error) {
      console.log(error)
      return
    }
  }}
>
  Reserve
</button>
We do it as the first thing:
pages/houses/[id].js
<button
  className='reserve'
  onClick={async () => {
    if (!(await canReserve(props.house.id, startDate, endDate))) {
      alert('The dates chosen are not valid')
      return
    }

    try {...
The code for this lesson is available at https://github.com/flaviocopes/airbnb-clone-react-nextjs-2020/tree/6-4
ADDING STRIPE FOR PAYMENTS
In this lesson we’re going to add payment integration using Stripe.
Stripe has a product called Connect that allows to create a marketplace where people get money directly from customers.
That looks something worth exploring, but not in our context. In our app we’ll do like Airbnb does: we collect the payment ourselves, and we’ll distribute the earning in the backend, once every month or so.
This is not something we’ll implement in the course.
What we’ll do is, we’ll collect the payment for the booking. That’s it.
We do this using Stripe Checkout.
Sign up to Stripe if you don’t have an account yet.

We have 2 different types of Checkout.
One is the client-only integration, the other is the client & server integration.
From the Stripe docs:
With the client-only integration, you define your products directly in the Stripe Dashboard and reference them by ID on the client side. This approach makes it possible to integrate Checkout into your website without needing any server-side code. It is best suited for simple integrations that don’t need dynamic pricing.
It’s clear that this is not enough. We must define each product separately, as a “booking”, because our prices vary depending on the house, and on the duration of the stay.
Also client-only integration does not support placing a hold on a card before charging it . This could be interesting: you don’t charge a card immediately, but just after the person stayed at the house. Or checks in.
But in our case, to simplify the workflow, we’ll bill directly at the booking time .
So, the work on the following workflow:
- we create a checkout session server-side, when the user clicks “Reserve now”, and we provide a success URL that will be where people are sent, on our site, after the payment was successful
- we store the booking, set as paid=false
- we redirect to checkout on Stripe’s webpage
- as soon as the payment is done, Stripe redirects to the success URL, where we’ll later set up the lists of booked places of the user, along with the dates
- meanwhile, Stripe will send us a confirmation via Webhook to set the booking as paid
As soon as a person clicks “Reserve now”, we’ll add the reservation into the database, along with the Stripe session id.
This clears the possibility that a person books meanwhile another person books, so the dates are immediately marked as unavailable on the calendar.
We’ll store it with a new paid field set to false.
As soon as Stripe calls our Webhook to inform of the payment, we’ll set the reservation to paid = true .
Let’s do it!
I start by adding this new paid field to the Booking model, and a new sessionId string, too:
Booking.init(
  {
    //...
    paid: {
      type: Sequelize.DataTypes.BOOLEAN,
      defaultValue: false,
      allowNull: false,
    },
    sessionId: { type: Sequelize.DataTypes.STRING },
  },
  {
    //...
  }
)
Remember to call Booking.sync({ alter: true }) to sync the database table. You can add this line at the end of the model.js file.
Next we install the stripe npm package for server-side usage:
npm install stripe
and we need to add the Stripe frontend code:
<script src="https://js.stripe.com/v3/"></script>
How? In the components/Layout.js file, which is what every page component includes, we’re going to add this to the top:
import Head from 'next/head'
and then, when we return the JSX:
return (
  <div>
    <Head>
      <script src='https://js.stripe.com/v3/'></script>
    </Head>
This will put this script tag in the page <head> tag.
Now I’m going to modify the process we use to reserve the house, a little bit.
Before actually POSTing to /api/reserve , I’m going to POST to a new endpoint we’ll create that listens on /api/stripe/session and wait for the end result.
In that endpoint we’ll set up the payment, with the amount and details, and Stripe will give us a sessionId for the payment, which we’ll use in the frontend.
Before going on, we must go on the Stripe dashboard and gather the API secret key and the public key . The first must never be exposed to the frontend, while the second will be used in code that can be seen by users (hence the name public ).
In my case they look like sk_SOMETHING and pk_SOMETHING .
We add them to a file in the root folder of the project. The folder that hosts the package.json file, among others…
In there, create a file called .env and write there the keys, like this:
STRIPE_SECRET_KEY=sk_SOMETHING
STRIPE_PUBLIC_KEY=pk_SOMETHING
BASE_URL=http://localhost:3000
The syntax is a bit strange, because it’s not JavaScript. It’s a shell script.
Now we install this special package:
npm install dotenv
which allows us to gather those variables in the Node.js code like this:
import dotenv from 'dotenv'

dotenv.config()

console.log(process.env.STRIPE_SECRET_KEY) //prints the secret key
console.log(process.env.STRIPE_PUBLIC_KEY) //prints the public key
It’s very handy to keep all keys OUTSIDE of the code. You can for example publish your project on GitHub (like I do with the example) and use .gitignore to ignore the content of the .env file, so it’s never made public.
Create a pages/api/stripe/session.js endpoint:
import dotenv from 'dotenv'
dotenv.config()

export default async (req, res) => {
  if (req.method !== 'POST') {
    res.status(405).end() //Method Not Allowed
    return
  }

  const amount = req.body.amount

  const stripe = require('stripe')(process.env.STRIPE_SECRET_KEY)
  const session = await stripe.checkout.sessions.create({
    payment_method_types: ['card'],
    line_items: [
      {
        name: 'Booking house on Airbnb clone',
        amount: amount * 100,
        currency: 'usd',
        quantity: 1,
      },
    ],
    success_url: process.env.BASE_URL + '/bookings',
    cancel_url: process.env.BASE_URL + '/bookings',
  })

  res.writeHead(200, {
    'Content-Type': 'application/json',
  })
  res.end(
    JSON.stringify({
      status: 'success',
      sessionId: session.id,
      stripePublicKey: process.env.STRIPE_PUBLIC_KEY,
    })
  )
}
We get the amount value from the POST request body,and once we have that, we can require the stripe library and create a session. We pass an object that defines the payment, which includes the payment accepted, the item purchased and 2 lines that set the URLs of the pages to redirect to, after the purchase is done or cancelled.
Finally, we return the session id value, and also the process.env.STRIPE_PUBLIC_KEY , because the frontend can’t access it directly and we’ll need it later to invoke the Stripe checkout.
Now we can call this endpoint in pages/houses/[id].js before we call /api/reserve :
const sessionResponse = await axios.post('/api/stripe/session', {
  amount: props.house.price * numberOfNightsBetweenDates,
})
if (sessionResponse.data.status === 'error') {
  alert(sessionResponse.data.message)
  return
}

const sessionId = sessionResponse.data.sessionId
const stripePublicKey = sessionResponse.data.stripePublicKey
Once this is done, we pass sessionId to the api/reserve call, because we want to store it in the bookings table.
Why? Because when the Stripe payment confirmation webhook will be sent to us, that’s the way we can link the payment with the booking.
const reserveResponse = await axios.post('/api/reserve', {
  houseId: props.house.id,
  startDate,
  endDate,
  sessionId,
})
In the pages/api/reserve.js , in the reserve endpoint, we now need to gather this new sessionId field and then we pass it to Booking.create() :
import { User, Booking } from '../../model.js'

export default async (req, res) => {
  //...

  User.findOne({ where: { session_token: user_session_token } }).then(
    (user) => {
      Booking.create({
        houseId: req.body.houseId,
        userId: user.id,
        startDate: req.body.startDate,
        endDate: req.body.endDate,
        sessionId: req.body.sessionId,
      }).then(() => {
        res.writeHead(200, {
          'Content-Type': 'application/json',
        })
        res.end(JSON.stringify({ status: 'success', message: 'ok' }))
      })
    }
  )
}
Finally in pages/houses/[id].js , I can redirect the user to Stripe checkout, with this code:
pages/houses/[id].js
const stripe = Stripe(stripePublicKey)
const { error } = await stripe.redirectToCheckout({
  sessionId,
})
This all happens transparently to the user. They are immediately sent to the Stripe checkout:
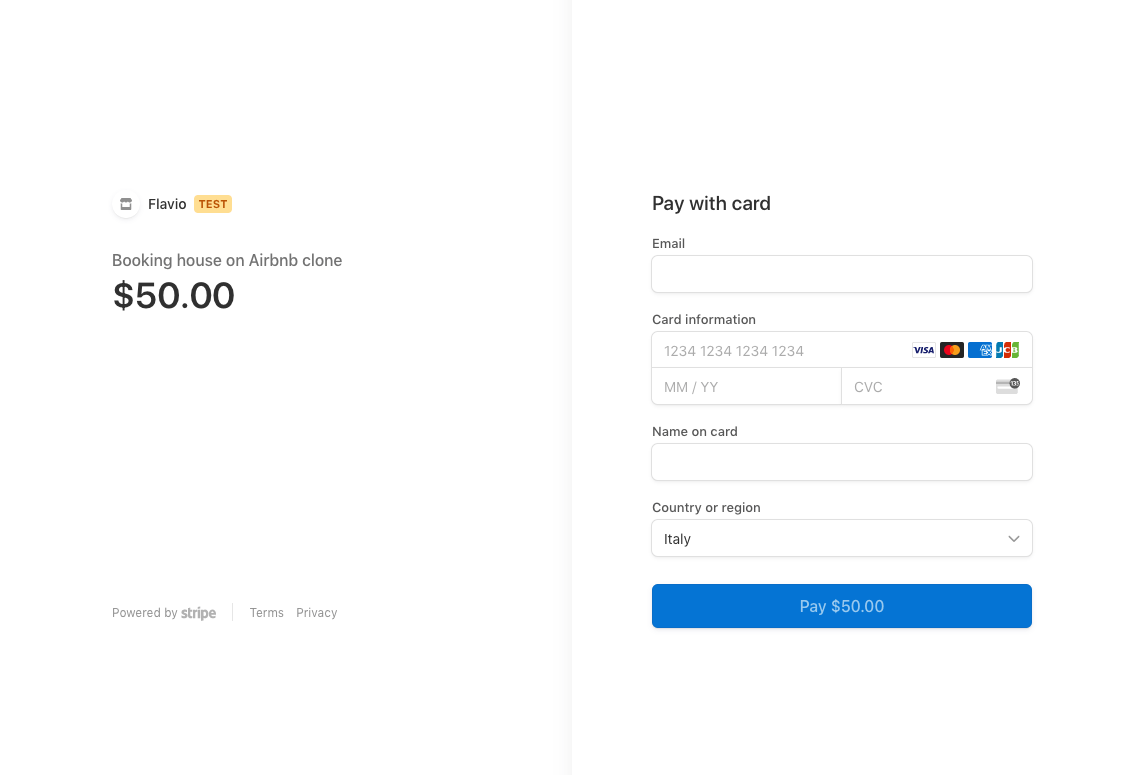
Stripe has this great testing tool that lets you add a credit card numbered 4242 4242 4242 4242 , you add 4 or 2 to the expiration date and code, and it’s considered valid.
THE SUCCESS URL ROUTE
Remember? In the /api/stripe/session API endpoint, we set
success_url: process.env.BASE_URL + '/bookings',
This is a page on our site, where people will be redirected to when the Stripe payment is successful.
Let’s create this page. Create a pages/bookings.js file, and add this content to it:
import Layout from '../components/Layout'

const Bookings = () => {
  return <Layout content={<p>TODO</p>} />
}

export default Bookings
The app should respond to http://localhost:3000/bookings with:

This will later list our bookings.
THE STRIPE WEBHOOK HANDLER
Now we must implement the Stripe webhook handler. A webhook is an HTTP call in response to something, and in our case that’s sent to us when the payment is successful.
USING WEBHOOKS LOCALLY
When the app will be “live” on a real server, you’d go to https://dashboard.stripe.com/account/checkout/settings and click “Configure webhooks” in the “Checkout client & server integration” section to configure the real webhook.
But since we are running the app locally, what can we do? Stripe does not let us use localhost as a valid domain, and for a good reason: they must be able to access your app, and if it’s running on localhost it’s just not possible - unless you set up an ip tunnel using ngrok for example.
Luckily for us, Stripe has this great tool called Stipe CLI that can provide a way to automatically get webhooks to our local server.
See here how to install it. In my case, on macOS, it’s
brew install stripe/stripe-cli/stripe
Once installed I run
stripe login
and follow the instructions to log in.
Then run
stripe listen --forward-to localhost:3000/api/stripe/webhook
This command will return a webhook signing secret code, which you’ll need to put in the .env file:
STRIPE_WEBHOOK_SECRET=whsec_SOMETHING
and it will keep running in the background.
Important: you now need to stop the Next.js npm run dev command, and start it again, to apply the .env setting.
THE WEBHOOK HANDLER
Now let’s create the Webhook POST handler.
Create a file pages/api/stripe/webhook.js
We return a { received: true } JSON response to Stripe, to tell them “we got it!”:
server.post('/api/stripe/webhook', async (req, res) => {
  res.writeHead(200, {
    'Content-Type': 'application/json',
  })
  res.end(JSON.stringify({ received: true }))
})
Before doing so however, we can use this code (which I found on the Stripe documentation) that we use to analyze the Webhook:
const sig = req.headers['stripe-signature']

let event

try {
  event = stripe.webhooks.constructEvent(rawBody, sig, endpointSecret)
} catch (err) {
  res.writeHead(400, {
    'Content-Type': 'application/json',
  })
  console.error(err.message)
  res.end(
    JSON.stringify({
      status: 'success',
      message: `Webhook Error: ${err.message}`,
    })
  )
  return
}
See that I use the rawBody variable. This is not a property available by default to us, but stripe.webhooks.constructEvent() wants the raw request body passed to it, to verify for security purposes.
We must tell Next.js to avoid parsing the body:
export const config = {
  api: {
    bodyParser: false,
  },
}
Then we can install the raw-body library:
npm install raw-body
and we have access to the raw body using
const rawBody = await getRawBody(req, {
  encoding: 'utf-8',
})
Since we get lots of various Webhook notifications from Stripe we need to filter out the one we need, which is called checkout.session.completed .
When this happens we get the session id from the event and we use that to update the booking with the same session id assigned (remember? we added it into the table) and it sets the paid column to true :
if (event.type === 'checkout.session.completed') {
  const sessionId = event.data.object.id

  try {
    Booking.update({ paid: true }, { where: { sessionId } })
  } catch (err) {
    console.error(err)
  }
}
This is the complete code:
import { Booking } from '../../../model.js'
import dotenv from 'dotenv'
dotenv.config()
import getRawBody from 'raw-body'

export const config = {
  api: {
    bodyParser: false,
  },
}

export default async (req, res) => {
  if (req.method !== 'POST') {
    res.status(405).end() //Method Not Allowed
    return
  }
  const stripe = require('stripe')(process.env.STRIPE_SECRET_KEY)
  const endpointSecret = process.env.STRIPE_WEBHOOK_SECRET
  const sig = req.headers['stripe-signature']

  const rawBody = await getRawBody(req, {
    encoding: 'utf-8',
  })

  let event

  try {
    event = stripe.webhooks.constructEvent(rawBody, sig, endpointSecret)
  } catch (err) {
    res.writeHead(400, {
      'Content-Type': 'application/json',
    })
    console.error(err.message)
    res.end(
      JSON.stringify({
        status: 'success',
        message: `Webhook Error: ${err.message}`,
      })
    )
    return
  }

  if (event.type === 'checkout.session.completed') {
    const sessionId = event.data.object.id

    try {
      Booking.update({ paid: true }, { where: { sessionId } })
      console.log('done')
    } catch (err) {
      console.error(err)
    }
  }

  res.writeHead(200, {
    'Content-Type': 'application/json',
  })
  res.end(JSON.stringify({ received: true }))
}
This is a central part of our application.
As soon as the user is back from the payment from Stripe, if all goes well the booking has already been marked as paid in our database.
TESTING WEBHOOKS
As with every entity that’s introduced in your application that you don’t have full control over, testing webhooks is complicated.
Luckily Stripe provides us the stripe CLI tool we already used to allow local webhooks to run.
If you open another window, you can invoke it again like this:
stripe trigger checkout.session.completed
This lets you test the Webhook code without having to follow the payments workflow manually over and over again.
You can now try the whole workflow, and ideally you should get a booking marked as paid in the database!
CLEARING UNPAID BOOKINGS
Now we have a little issue. Since we book dates before paying, some people might not complete the payment (it will happen!) and this leaves us with booked dates that are not really confirmed.
To solve this, we need to clear out bookings from time to time.
I made a POST endpoint to do this, in server.js :
server.js
import { Booking } from '../../../model.js'

export default async (req, res) => {
  if (req.method !== 'POST') {
    res.status(405).end() //Method Not Allowed
    return
  }

  Booking.destroy({
    where: {
      paid: false,
    },
  })

  res.writeHead(200, {
    'Content-Type': 'application/json',
  })

  res.end(
    JSON.stringify({
      status: 'success',
      message: 'ok',
    })
  )
}
It calls Booking.destroy to remove all unpaid bookings.
Ideally you’d remove all bookings that have been created, say, more than 1 hour ago, and are still unpaid.
This needs some refinement, but it’s good for us now. I added an Insomnia POST request to help me clean the database, manually:

The code for this lesson is available at https://github.com/flaviocopes/airbnb-clone-react-nextjs-2020/tree/6-5