Setup
Exercises
Objective
Welcome to your first exercise! We’re delighted to have you along for the course.
Before we can start creating Rails apps, we need to get Ruby and Rails installed on your computer. Depending on your operating system, you may already have a version of Rails installed. But for this course you’ll need to be running Rails 6.0.0 .
So just follow the steps below for your favorite operating system—Mac, Windows, or Linux— and we’ll be on our way!
Mac OS X
The best way we’ve found to install Ruby and Rails on a Mac is using rbenv. It’s a command-line tool that makes it easy to install and manage Ruby versions. We’ll be installing Ruby 2.6.5 and Rails 6.0.0.
If you already have Ruby 2.5+ installed, you can jump straight to installing Rails.
Note that Mac OS X ships with a version of Ruby. However, it’s best not to mess around with the system-installed Ruby as it’s intended to be used by the operating system and apps installed by Apple. So we’ll use rbenv to install a separate user-level Ruby environment, rather than changing the system-installed Ruby.
- Start by finding the Terminal application (it’s under the Applications -> Utilities directory) and dragging it onto your dock. You’ll end up using Terminal a lot as a Rails developer, so it’s good to have it handy. Then open a new Terminal session. You should see a new window with a cursor and a prompt that looks something like this:
enoch:~ mike$
If this is the first time you’ve seen this side of a Mac, it may seem rather intimidating. Don’t let it throw you. It’s simply a way to interact with your computer by entering commands. The default prompt includes the computer name ( enoch in my case), the current working directory (tilde represents your home directory), the current user name (mike), and a trailing $ which is the prompt for input.We’ll use the command prompt throughout the course to run commands and perform tasks on our Rails app. In fact, here comes our first command…
2. To install rbenv, first we need to install Homebrew which makes it easy to install and compile software packages from source.To install Homebrew, copy the following command and paste it after your Terminal prompt:
/usr/bin/ruby -e “$(curl -fsSL https://raw.githubusercontent.com/Homebrew/install/master/install)”
If you’re asked about installing Apple’s Command Line Tools for Xcode, go ahead and answer “yes”.
3. Now we can use Homebrew to install rbenv. To do that, run the following command in your Terminal session:
brew install rbenv
- Next, set up rbenv in your Terminal’s shell by running the following command and following the printed instructions:
rbenv init
- Then close your Terminal session and open a fresh new Terminal session so that the changes take effect.
- Now that we have rbenv installed and the Terminal’s shell set up properly, we’re ready to install Ruby 2.6.5. To do that, type
rbenv install 2.6.5
This will download, compile, and install Ruby into a directory managed by rbenv. (If you’re curious, it’s under the ~/.rbenv directory.)Installing Ruby may take a while, so feel free to grab a refreshing beverage or a tasty snack. Mmm…
7. When installation is complete, set Ruby 2.6.5 as the global Ruby version by typing:
rbenv global 2.6.5
This sets Ruby 2.6.5 as the default version to be used whenever you open any new Terminal sessions.
8. Then verify that Ruby 2.6.5 is the current Ruby version by typing:
ruby -v
You should see something like the following, though your exact patch number, date, and revision may be slightly different:
ruby 2.6.5p114 (2019-10-01 revision 67812) [x86_64-darwin18]
- With Ruby installed, now we’re ready to install Rails! Rails is distributed via RubyGems: the standard Ruby package manager. When you installed Ruby, the RubyGems system came along for the ride. With RubyGems already installed, it’s easy to install Rails and its dependencies.Install Rails 6.0.0 by typing
gem install rails -v 6.0.0 --no-document
Then sit back and relax as RubyGems downloads all the Rails-related gems. After a minute or so, you should end up with a couple dozen gems installed.
10. Installing Rails gives us a rails command, but to use it we first need to inform rbenv about that command. To do that, type
rbenv rehash
- Finally, verify that Rails 6.0.0 was successfully installed by typing
rails -v
You should see:
Rails 6.0.0
- Finally, you’ll also need to install Node.js and install Yarn. This duo gives you a JavaScript runtime that’s compatible with Rails. Since you already have Homebrew installed, you can use it to install Node.js and Yarn:
brew install node yarn
Excellent! Now you have Ruby and Rails installed.
Choose A Code Editor
Throughout the course we’ll be creating a Rails application by writing Ruby code in one or more files. You’ll need a code editor to create and edit these files. The editor doesn’t need to have a lot of features. In fact, a basic code editor that has Ruby syntax highlighting and a file/directory browser works best.
We’ll make the decision easy for you. Unless you already have a code editor that you’re very comfortable using, we recommend using Visual Studio Code as we do in the videos. VS Code runs equally well on Mac, Windows, or Linux and it’s completely free! We also recommend installing the Simple Ruby ERB extension which provides both Ruby and ERB syntax highlighting.
You’re now ready to start creating Rails apps!
Windows 10
The best way we’ve found to install Ruby and Rails on Windows is using RubyInstaller. It’s a self-contained Windows-based installer that includes a Ruby language execution environment and the Windows DevKit.
- Navigate to the RubyInstaller downloads page and click the Ruby+Devkit 2.6.5-1 (x64) executable installer. Save the file to your Desktop , for example, and then run the file once it has finished downloading. You may need to use Windows Explorer to navigate to where you saved the executable file and double-click it to start the installation process.
- After accepting the license agreement, the installer will ask you to select components to install. Make sure the checkmark labeled “MSYS2 development toolchain” is checked! MSYS2 is required to install Ruby gems with C extensions, and some of the gems used by Rails do indeed have C extensions. Then click “Next” and Ruby will be installed in the C:\Ruby26-x64 directory as promised. Wait! Do not click “Finish” on the last installer screen until you’ve made sure the checkmark labeled “Run ‘ridk install’ to setup MSYS2” is checked. Which that checkbox checked, when you click “Finish”, a new command window will open asking you which components of MSYS you want to install. Choose “1” which is the base MSYS2 installation. It will proceed to install a bunch of stuff, and then return back to the prompt asking which components you want to install. You should see the message “MSYS2 seems to be properly installed”. Go ahead and close that command window.
- Next, open a new command prompt by selecting the Start menu, typing
cmdinto the search box, and pressingEnter. You should see a new window with a blinking cursor and a command prompt that looks something like this:
C:\Users\mike>
If this is the first time you’ve seen this command prompt it may seem rather intimidating, but don’t let it throw you. It’s simply a way to interact with your computer by entering commands. We’ll use the command prompt throughout the course to run Ruby and use some related command-line tools. In fact, here comes our first command…
4. Verify that Ruby 2.6.5 was successfully installed by typing the following at the command prompt:
ruby -v
You should see something like this, though your exact patch number, date, and revision may be slightly different:
ruby 2.6.5p114 (2019-10-01 revision 67812) [x64-mingw32]
If instead you see “Command not found”, then you either need to open a new command prompt and try again, or check that your PATH environment variable includes the C:\Ruby26-x64\bin directory.
5. Windows requires a specific version of the sqlite3 gem. Run the following command to install it:
gem install sqlite3 -v ‘1.4.1’ --source ‘https://rubygems.org/’
This builds a native extension, so it could take a couple minutes.
6. Next, install Rails 6.0.0 by typing
gem install rails -v 6.0.0 --no-document
Then sit back and relax as all the Rails-related gems are downloaded. After a few minutes, you should end up with 40 or so gems installed.
7. And verify that Rails 6.0.0 was successfully installed by typing
rails -v
You should see:
Rails 6.0.0
- Finally, you’ll also need to install Node.js and install Yarn using the Windows Installers. This duo gives you a JavaScript runtime that’s compatible with Rails.After installing Yarn, update its packages by running:
yarn install --check-files
You’re now ready to start creating Rails apps!
Choose A Code Editor
Throughout the course we’ll be creating a Rails application by writing Ruby code in one or more files. You’ll need a code editor to create and edit these files. The editor doesn’t need to have a lot of features. In fact, a basic code editor that has Ruby syntax highlighting and a file/directory browser works best.
We’ll make the decision easy for you. Unless you already have a code editor that you’re very comfortable using, we recommend using Visual Studio Code as we do in the videos. VS Code runs equally well on Mac, Windows, or Linux and it’s completely free! We also recommend installing the Simple Ruby ERB extension which provides both Ruby and ERB syntax highlighting.
You’re now ready to start creating Rails apps.
Linux
Folks who run Linux tend to already be comfortable with the command line, installing and building software, and configuring things just the way they like. We’re not so bold as to tell you exactly how to tweak your Linux install. The important thing is that you get Ruby 2.6.5, Rails 6.0.0, and SQLite 3 installed to match the versions we’ll use throughout this course.
Unless you have a strong preference, we recommend installing Ruby on Linux using rbenv. It’s a command-line tool that makes it easy to install and manage Ruby versions.
- Start by updating apt-get and installing the dependencies required for rbenv and Ruby:
sudo apt-get update sudo apt-get install git-core curl zlib1g-dev build-essential libssl-dev libreadline-dev libyaml-dev libsqlite3-dev sqlite3 libxml2-dev libxslt1-dev libcurl4-openssl-dev software-properties-common libffi-dev nodejs yarn
- Then install rbenv and the ruby-build plugin by cloning them into ~/.rbenv, like so:
git clone https://github.com/rbenv/rbenv.git ~/.rbenv git clone https://github.com/rbenv/ruby-build.git ~/.rbenv/plugins/ruby-build
- Then add their respective bin directories to your $PATH so you can access their command-line utilities:
echo ‘export PATH="$HOME/.rbenv/bin:$PATH"’ >> ~/.bashrc echo ‘export PATH="$HOME/.rbenv/plugins/ruby-build/bin:$PATH"’ >> ~/.bashrc
- You also need to add rbenv init to your ~/.bashrc file so it loads rbenv automatically:
echo ‘eval “$(rbenv init -)”’ >> ~/.bashrc
- And then refresh your shell:
source ~/.bashrc
- Once you have rbenv and ruby-build installed, it’s then easy to get Ruby and and Rails installed by picking up with step 6 in the Mac OS X instructions above.
If you need additional help with other shells, more examples can be found in the Basic GitHub Checkout section of the official rbenv installation documentation.
Choose A Code Editor
Throughout the course we’ll be creating a Rails application by writing Ruby code in one or more files. You’ll need a code editor to create and edit these files. The editor doesn’t need to have a lot of features. In fact, a basic code editor that has Ruby syntax highlighting and a file/directory browser works best.
We’ll make the decision easy for you. Unless you already have a code editor that you’re very comfortable using, we recommend using Visual Studio Code as we do in the videos. VS Code runs equally well on Mac, Windows, or Linux and it’s completely free! We also recommend installing the Simple Ruby ERB extension which provides both Ruby and ERB syntax highlighting.
You’re now ready to start creating Rails apps!
Create the App
Exercises
Objective
Now that we have Rails installed, it’s time to start creating a Rails app!
In this exercise we’ll create a new Rails app called flix. It’s a super-short exercise just to get everything up and running. We’ll incrementally add features to the flix app throughout subsequent exercises.
1. Generate the Skeleton App
All Rails apps have a common application directory structure and a set of supporting files. Creating all the directories and files by hand would be really tedious, not to mention being prone to error. Instead, with a single command we can generate a working Rails app. We often refer to this as a skeleton app because it’s a bare-bones app that we then customize by putting some meat on the bones. Bone appétit!
- Start by creating a directory named
rails-studioto hold the app you’ll create while taking this course. Then change into that directory. The commands to do that are the same regardless of which operating system you’re using, but the directory structure is slightly different.If you’re running Mac OS X or Linux , create therails-studiodirectory in your home directory (represented by the tilde character). To create the directory and change into it, type the following two commands:
mkdir ~/rails-studio cd ~/rails-studio
If you’re running Windows , create the rails-studio directory in the top-level C:\ directory (represented by the backslash character) since Windows doesn’t really have the concept of a user’s home directory. To create the directory and change into it, type the following two commands:
cd c:\ mkdir \rails-studio cd \rails-studio
- Next, use the rails command to generate a new Rails app called flix:
rails _6.0.0_ new flix
Note: The 6.0.0 part makes sure that the correct version of Rails is used to generate the app, in the event that you have multiple versions of Rails installed.
Running this command will generate all the standard Rails directories and supporting files inside of a new flix directory. All the required gems listed in the Gemfile will be automatically installed, as well.
3. Go ahead and change into the new flix directory:
cd flix
- Then open that directory in your code editor. For example, if you’re using Visual Studio Code then you can either open the directory using the File -> Open… menu item or from the command line by typing:
code .
Have a quick look around at what got generated, just to get your bearings. There’s a lot of stuff in there, but don’t let it throw you. We’ll visit each directory as needed throughout the course.
2. Run the App
The Rails application generator is kind enough to generate a working application, which means we can run it without having to first fuss around with configuration.
- Inside the flix application directory, start your new Rails app by typing:
rails server
Or, if you’re the type of person who loves to show off your power moves around the office, you can use the shortcut:
rails s
This command starts a web server and you should see output that looks something like this:
=> Booting Puma
=> Rails 6.0.0 application starting in development
=> Run `rails server --help` for more startup options
Puma starting in single mode...
* Version 3.12.1 (ruby 2.6.5-p114), codename: Llamas in Pajamas
* Min threads: 5, max threads: 5
* Environment: development
* Listening on tcp://localhost:3000
Use Ctrl-C to stop
Now you have a web server listening on port 3000 of your local machine.
2. Next, open your favorite web browser and browse to the URL http://localhost:3000. You should see the default Rails welcome page. Yay!As a skeleton app this app doesn’t do much (yet), but it’s always good to fire up a newly-generated app and make sure everything works before customizing it.
3. Now would be a really good time to check the information on the default Rails page to verify that you’re running the correct versions of Ruby and Rails. 
4. Finally, leave the app running in your current Terminal or command prompt window, and open a new session. That way you can type the commands in future exercises without having to stop and restart the server. Don’t forget to change into the flix application directory in your new session.
Solution
All the exercise solutions for the movie-review app you’re writing in the exercises, as well as the code for the events app we’re writing in the videos, is available for download in the code bundle file (right-click to save).
When you unzip the file, you’ll end up with a directory named pragstudio-rails-code . Inside that directory you’ll find the following directories:
-
eventzcontains the events app we build in the videos. The code is organized into directories matching the course modules. For example, the create-app directory contains a snapshot of how theeventzcode looks at the end of the “Create the App” video. -
flixcontains the application you build in the exercises. The code is organized into directories matching the course modules. For example, after completing the exercise for the “Create the App” module, your code should roughly match the code in the create-app directory. -
prepared-filescontains files we’ve prepared for you to copy into the project as needed later on in the course to save tedious typing.
The full solution for this exercise is in the create-app directory of the code bundle.
Bonus Round
Some folks just aren’t satisfied to gloss over all those generated files and directories. We know, it’s just too tempting to go digging around in there. So if you’re feeling curious, go ahead and get familiar with what got generated. Here’s a rundown of what’s in each directory:
-
app is where you’ll put the bulk of your application code. This is where you’ll spend most of your time. Rails puts a lot of emphasis on keeping code organized, so the app directory has a number of subdirectories:
- models , views , and controllers are appropriately-named directories where you’ll organize your (wait for it) model, view, and controller code.
- assets contains sub-directories where you’ll store your application’s static assets such as images and stylesheets.
- channels is where you put Ruby classes for handling real-time features using Action Cable.
- helpers is where you put Ruby modules that define utility methods for views.
- javascript is where you put JavaScript modules that get compiled by Webpack.
- jobs is where you put Ruby classes for running background jobs.
- mailers is where you put Ruby classes for generating and sending e-mails.
- bin isn’t something you’ll mess with. It contains the rails script file and other scripts.
-
config is where you go to tweak the configuration settings of your application. Initially you won’t have to touch most of the files in here because generated Rails apps are configured with “sensible defaults”. Later in this course we’ll make stops at the following key places:
- database.yml configures the database used by each environment.
- routes.rb maps incoming requests (URLs) to application code.
- environments is a directory that contains three files that define specific settings for each environment: development, test, and production.
- initializers is a directory where you put Ruby code that needs to be run when the application starts.
- db contains everything related to the database, including migration files and, in the case of using the default SQLite3 database, the database file itself.
-
lib is where you put any reusable “library” code that’s not a model, view, or controller. It’s more common these days to package this sort of code as a gem. But it has one important subdirectory:
- tasks is where you would put any custom Rake tasks for your application, with each file having a .rake extension.
- log is where Rails automatically creates log files so you have a record of what happened when your app ran. Each environment gets its own log file.
- public is the document “root” directory of the app. It contains static files that are served directly by the web server. For example, 404.html lives here and gets served when a page can’t be found.
- storage is where Active Storage stores uploaded files when running in the development environment.
- test is where you put test files if you use the default testing library.
- tmp is where Rails stores any temporary files needed by the app. We can’t recall the last time we even peeked in this directory.
- vendor is where, in the old days, we used to put third-party code. Nowadays we generally use gems declared in the Gemfile instead.
- Last, but by no means least, the Gemfile file in the top-level directory contains a list of third-party dependencies (Ruby gems) that your application needs.
See, it wasn’t too intimidating after all.
Wrap Up
Pat yourself on the back—you just created your first Rails app! Now you’re ready to start customizing it with your own code. Onward and upward to the next section!
Views and Controllers
Exercises
Objective
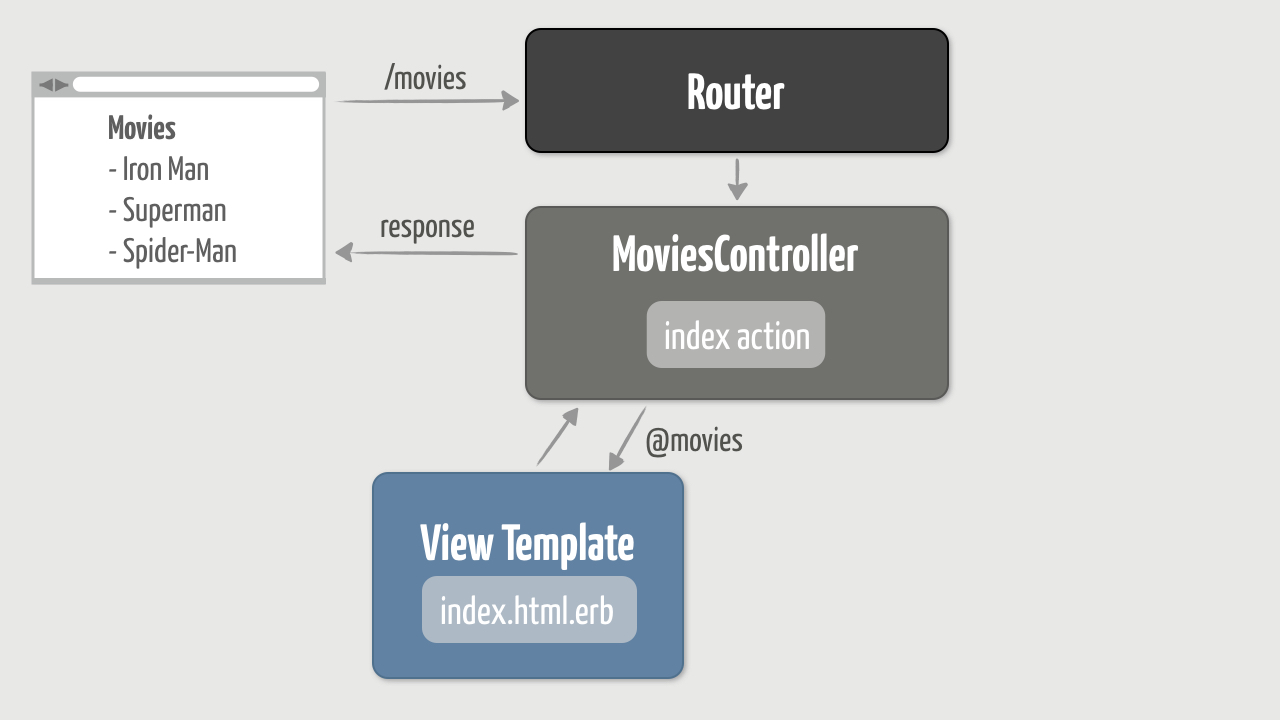
Now that we’ve generated a skeleton application, it’s time to start customizing it by adding features. The first feature we want to add is a page that lists movie titles. This is conventionally called the “index” page. The index page will be displayed when a user requests the URL http://localhost:3000/movies.
To make that work, we have three primary tasks:
- Add a route to handle requests for /movies
- Generate a MoviesController and define an index action that prepares an array of movie titles
- Create a view template (index.html.erb) that dynamically generates an HTML list of movie titles
Here’s a visual of our objective:
We’ll take this step-by-step, using the error messages as a guide along the way. So let’s get started!
1. Display a List of Movie Titles
We’ll start by displaying a hard-coded list of movie titles just to shake everything out before making things more dynamic.
- Start by making sure you have the flix app running in a Terminal or command prompt window:
rails s
If the app is already running on port 3000, then you’ll get an “Address already in use” error.
2. It’s common to leave the server running in one window, and using a second Terminal or command prompt window to type in commands. So make sure you have a second command prompt ready to accept commands inside of the flix project directory.
3. Then use your web browser to browse to http://localhost:3000/movies. You should get the following error message:
Routing Error

No route matches [GET] "/movies"
- Error messages like this are your friend. They’re actually trying to help you fix (and understand) problems. Unfortunately, we’re accustomed to errors being bad things, and when we see them we panic! Here’s a little secret: Even the best Rails programmers get error messages—often! But they don’t panic. Instead, good programmers actually read the error messages. Seriously, if you take the time to understand what Rails is trying to tell you in an error message, after a while you’ll be able to quickly recognize (and fix) common errors.In this case, here’s what happened: The web browser issued a request for the URL http://localhost:3000/movies. The http://localhost:3000 part of that URL is the address of the web server that fired up when we started the Rails app. So the web server received the request, then forwarded the /movies part of the URL on to the router . (Here comes the gist of the error message.) The router picked up the request and tried to find a route that matched a GET request for /movies. But we haven’t told the router what to do with those types of requests, so we get the error.
- You tell the router how to handle certain requests by changing the config/routes.rb file. Open that file and remove all the comments until your file simply looks like this:
Rails.application.routes.draw do
end
- What we’re left with is an empty Ruby block. Out of the gate, the router doesn’t have any routes.
- Returning to our objective, when the router receives a GET request for /movies, we want a listing of movie titles to get sent back to the user’s browser. The router’s role in that process is simply to call some Ruby code we write to handle the request. In Rails parlance, the router calls an action (a Ruby method) that’s defined in a controller (a Ruby class). The syntax for adding a route is a bit unorthodox, so here’s a reminder of the generic format:
verb "url" => "name_of_controller#name_of_action"
The stuff on the left-hand side of the => identifies what the request looks like and the stuff on the right-hand side identifies the code to run to handle that request. We know what the request looks like, but what should we use as the names on the right-hand side?
Because we want a listing of movies, by convention the name of the controller will be movies and the name of the action will be index. We’ll actually create those a bit later, but for now it’s enough just to know their names.
In the config/routes.rb file, add a route that maps a GET request for /movies to the index action of the movies controller.
Answer
Rails.application.routes.draw do
  get "movies" => "movies#index"
end
Refresh your browser (you’re still accessing http://localhost:3000/movies) and this time you should get a different error message:
Routing Error

uninitialized constant MoviesController
Oh no, another error message! Yup, and you’re not panicking. You’re calmly reading what it says. It tells us that the route we added is trying to do what we told it to do. It’s trying to send the request to a controller. We said the name of the controller was movies, but the router applied a naming convention and went looking for a Ruby class named MoviesController. We don’t have a class with that name in our project, so the next step is to create it.
- Back at your command line prompt, inside of the
flixproject directory, generate a MoviesController class by typing:
rails generate controller movies
Or if you’re feeling frisky, you can use the shortcut:
rails g controller movies
Note that the generator takes the name of the controller, which by convention should be plural. In this case, we want a controller named “movies”.
2. You should end up with an empty MoviesController class defined in the app/controllers/movies_controller.rb file, like so
class MoviesController < ApplicationController
end
- Although it’s not important right now, it’s worth noticing that the class inherits (subclasses) from the ApplicationController class. ApplicationController is the parent class of all controllers and can be found in the app/controllers/application_controller.rb file. It’s through this inheritance relationship that MoviesController knows how to act like a controller.
- Refresh your browser again and this time you should get yet another (different!) error message:
Unknown action

The action 'index' could not be found for MoviesController
- OK, now we’re getting somewhere. This time the router found the MoviesController class, and then tried to call the index action. That’s what the route says to do. But as the error so smartly points out, the MoviesController doesn’t have a method named index.
- In the MoviesController class, define an empty
indexaction. Remember, an action is simply a publicly-accessible Ruby method defined in a controller class.
Answer
class MoviesController < ApplicationController
  def index
  end
end
Refresh your browser again and—you guessed it!—you should get another error message (it’s like we’re poking a hole through our app, one error message at a time):
No template for interactive request

MoviesController#index is missing a template...
We’re almost there! Again, the error message is fairly helpful. The router has now successfully sent the request to the index action of the MoviesController. The index action runs, but we’re missing something. We need to send a list of movie titles back to the browser. To do that, the action needs to render a view template which in turn generates HTML. So we get the error because we don’t have a view template for the index action.
Wait, our index action is empty. So how does Rails know which view template to render? The short answer is “convention over configuration.” Whenever an action runs and you don’t explicitly tell it which view template to render, Rails uses a simple naming convention to find the corresponding view template. In this case, because the name of the action is index, which is defined in the MoviesController class, Rails assumes it should look for a view template file called index.html.erb in the app/views/movies directory. And the error message tells us that we’re missing that file.
Create a file named index.html.erb in the app/views/movies directory.
Then inside the new file, add the following HTML snippet:
  <li>Iron Man</li>
  <li>Superman</li>
  <li>Spider-Man</li>
</ul>
- Make sure to save your new file!
- Refresh your browser, and this time you should be rewarded with a list of blockbuster movie titles.
Excellent! Now we know that the request is successfully flowing through our application: from the router, to the action in the controller, through the view template, and back out to the web browser.
2. Use an Instance Variable
This works, but we’d like to make things more dynamic. After all, these are superhero movies, and they deserve a little POW! The first step toward that is to realign the responsibilities of the view and the controller.
Currently the view has a hard-coded list of movie titles. We’ll likely want to add or remove movies, and later on we’ll want to pull them from a database. To that end, we’d rather the view not know the specifics of how movies are created. The view should only be concerned with how to display the movies. It’s the controller action’s job to set up data for the view to display. And the way an action passes data to a view is by setting instance variables. So any data we want to make available to the view template needs to be assigned to instance variables in the action.
- In the
indexaction, assign an array of movie titles (strings) to an instance variable named @movies.
Answer
def index
  @movies = ["Iron Man", "Superman", "Spider-Man"]
end
- As a quick check that the movies are accessible in the view, add the following ERb snippet to the bottom of the
index.html.erbview template:
<%= @movies %>
- Refresh your browser and you should see the movie titles displayed in an array format, like this:
["Iron Man", "Superman", "Spider-Man"]
That format isn’t very user friendly (unless all your users are programmers), but we’ll fix that next…
3. Generate the List Dynamically
Finally, we want to replace the hard-coded list of movie titles in the index.html.erb file with a dynamically generated list that reflects the titles in the @movies instance variable. To do that, we’ll need to use a mix of HTML and Ruby code in the index.html.erb file. We’ll use Ruby to iterate through all the strings in the @movies instance variable. And for each movie title, we’ll generate an HTML list item.
This is where the name of view template files becomes important. The name of our view file is index.html.erb. It has three parts: index is the name of the action, html is the type of content the view generates, and erb is the templating system used to generate the content.
In a Rails app, ERb (Embedded Ruby) is the default templating system. It lets us mix Ruby code with HTML in a view template. Then, when the view template is rendered, the embedded Ruby code runs and we end up with a dynamically generated response.
So a typical Rails view template is just a mixture of HTML tags and ERb tags. ERb tags come in two flavors:
- <%= a Ruby expression %>: runs the Ruby expression and substitutes the result of the expression into the view template
- <% a Ruby expression %>: runs the Ruby expression but does not substitute the result into the template (no text is generated). This form is typically used for Ruby conditonal and control flow statements.
The difference between the two is really subtle: the first flavor has an equal sign (=). Every Rails programmer on the planet has at one point mistakenly forgotten to include that extra character. Then they scratched their head for a few minutes wondering why nothing showed up in their browser. Consider yourself warned!
- In the index.html.erb file, use Ruby to iterate (loop) through each movie title in the @movies array. For each movie title, generate an HTML li element that contains the movie title. The goal is to end up with the same HTML as the hard-coded list of movie titles.
answer
<% @movies.each do |movie| %>
  <li><%= movie %></li>
<% end %>
</ul>
- Once you have a nicely-formatted listing of all the movie titles that were set up in the index action, go ahead and remove the hard-coded list of movie titles. Follow that up with a celebratory KA-CHOW!
- Finally, now that you’ve separated the concerns of where the data comes from (the controller action) from how it’s displayed (the view template), you can easily make changes in one place without adversely affecting the other. For example, add another movie title to the @movies array.
Answer
class MoviesController < ApplicationController
  def index
    @movies = ["Iron Man", "Superman", "Spider-Man", "Batman"]
  end
end
- Refresh and the new movie title should be displayed in the listing. What’s important here is you didn’t have to change the view template. It simply takes whatever data it’s given and displays it.
The benefits of this separation of concerns aren’t very pronounced at this point, but being able to make changes in one place becomes increasingly important as the application grows.
Solution
The full solution for this exercise is in the views-and-controllers directory of the code bundle.
Bonus Round
View the Log File
It’s useful to have a look at what happens behind the scenes. Every time Rails handles a request it leaves an audit trail in the log file.
Bring the window where your Rails server is running front and center, and then refresh the movie listing page in your browser. You should see something like this in the server window:
Started GET "/movies" for ::1 at 2019-05-01 17:45:27 -0600
Processing by MoviesController#index as HTML
  Rendering movies/index.html.erb within layouts/application
  Rendered movies/index.html.erb within layouts/application (Duration: 0.1ms | Allocations: 8)
Completed 200 OK in 8ms (Views: 7.6ms | ActiveRecord: 0.0ms | Allocations: 6592)
Notice that it shows the incoming request, the controller and action that handled it, and the view template that was rendered. Every time you refresh the page, this request-response cycle happens. Go ahead and refresh a few more times just to give Rails a workout.
Now, when you close the window you’ll lose that information, but fear not. A permanent record of every request is kept in the log/development.log file. In fact, what you see in the console window is simply a reflection of what Rails adds to the log file.
So, when you want to know what really happened, peek at the log file.
Wrap Up
Whew! We accomplished a lot in this exercise. We took a stock Rails app and customized it to display a listing of movies. Not too shabby for the first exercise. As with learning anything new, the initial hurdle is to get comfortable with the vocabulary. We touched on all the major stages a request goes through when it enters a Rails app. Along the way you:
- added your first route
- generated your first controller
- defined your first action
- wrote your first view template
Early on we said that Rails uses an “MVC” design. In this section we focused on the view (V) and controller © to get something up and running quickly. In the next section we’ll shift gears and focus on the model (M) which will let us put the movies in a database.
Onward and upward to the next section!
Models
Exercises
Objective
In the previous exercise, we brought our web app to life in the browser using a controller and a view. In this exercise, we’ll turn our attention to the model with the goal being to store movies in the database.
The objectives of this exercise are to:
- generate a Movie model
- use a migration to create a movies database table
- create three movies and save them in the database
- read movies from the database
- update a movie’s attributes in the database
- delete a movie from the database
In the end we’ll have a Movie model that we can use to create, read, update, and delete (CRUD) movies in the database. Here’s visually what we want:
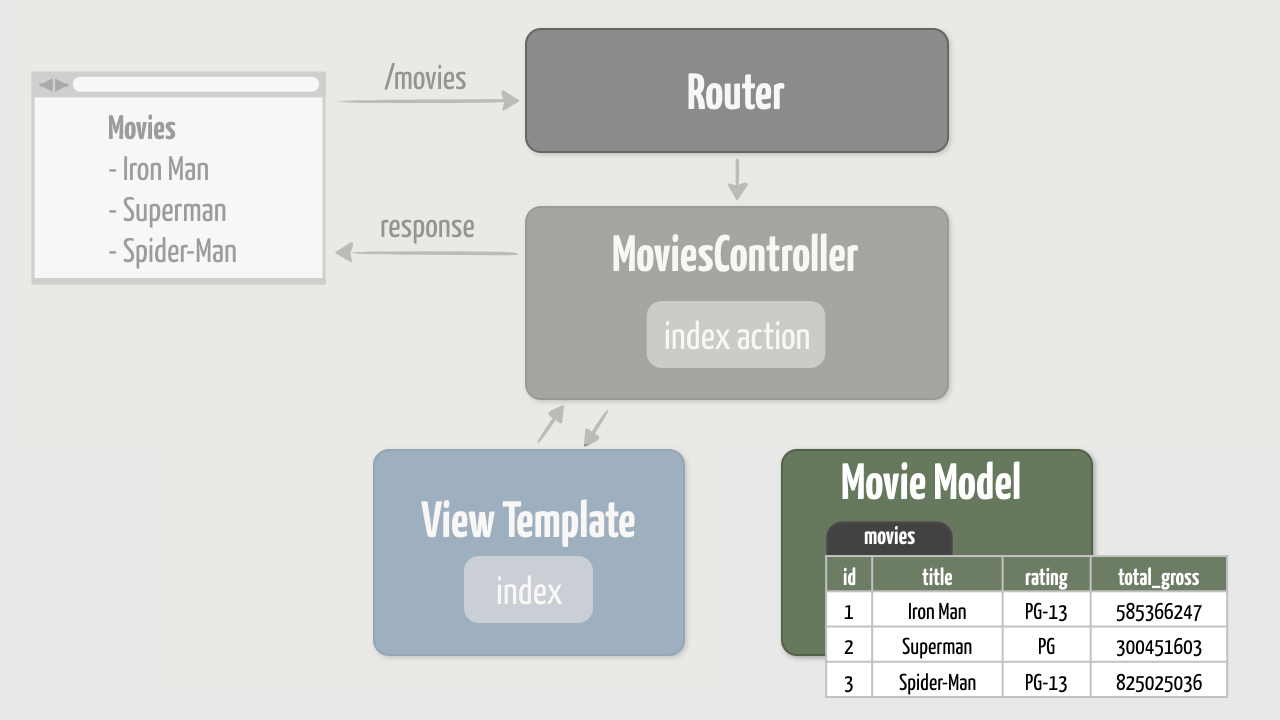
In the next section we’ll actually connect the model to the controller, but that’s getting ahead of ourselves. First things first.
1. Generate the Movie Model & Migration
In Rails, a model is simply a Ruby class that lives in the app/models directory. The role of a model is to provide access to application-level data and encapsulate the application’s business logic. Although it’s not a requirement, most models in a Rails app are connected to an underlying database since that’s where application data is typically stored.
Up to this point we’ve been representing a movie simply as a title string. Now we want a movie to have three attributes: a title, a rating such as PG, and the total gross (in dollars) the movie has earned. So we’ll represent the movies in the database with the following fields and types:
| name | type |
|---|---|
| title | string |
| rating | string |
| total_gross | decimal |
To do that, we’ll need to create a database table to store the movies and also define a Movie model that accesses that table. Sounds like a lot of tedious configuration work, right? Thankfully, Rails takes all the grunt work off our hands.
In the same way that we used a generator to quickly create a controller in the previous exercise, we’ll use another generator to generate the Movie model and the instructions for creating the corresponding database table. And by following a simple set of conventions, Rails lets us avoid any configuration. It’s another example of “convention over configuration.”
- First, just to get a feel for how to use the model generator, print the usage information by typing the following while inside of your
flixproject directory:
rails generate model
At the top you’ll see that the generator takes the model name followed by a list of fields and types separated by colons:
rails generate model NAME [field[:type][:index] field[:type][:index]] [options]
- For future reference, here’s a list of supported database column types:
- string
- text
- integer
- decimal
- float
- boolean
- binary
- date
- time
- datetime
- primary_key
- timestamp
- Now use the generator to generate a model named Movie (singular) with the fields and types listed above.
rails g model movie title:string rating:string total_gross:decimal
Running that command should generate several files.
Open the generated Movie model in the app/models/movie.rb file and it should look like this:
class Movie < ApplicationRecord
end
- That’s all we got!? Just an (empty) Ruby class! It doesn’t have any attributes or methods. Not even a gratuitous comment. The only intriguing part is that it inherits from the ApplicationRecord class. Believe it or not, that’s all we need for a model to connect to its underlying database. It’s not magic; it’s just an example of the power of Rails conventions (and Ruby meta-programming). We’ll dig into this a bit more later.
- The generator also generated a timestamped database migration file in the db/migrate/ YYYYMMDDHHMMSS _create_movies.rb file. The YYYYMMDDHHMMSS timestamp is embedded in the filename so migrations can be kept in chronological order. Open that file and you should see the following:
  def change
    create_table :movies do |t|
      t.string  :title
      t.string  :rating
      t.decimal :total_gross

      t.timestamps
    end
  end
end
- Think of a migration file as instructions for modifying your database. In this case, when we told the generator we wanted a Movie model that had specific fields (attributes), the generator was smart enough to generate the instructions for creating the corresponding database table. And the instructions are written in Ruby. You have to admit, that’s pretty handy!All the action happens in the change method. This is where we “change” the database. Since this migration needs to create the movies table, the generated code calls the create_table method and passes it the name of the table as a symbol (:movies). It’s important to note that the name of the model is singular (movie) and the name of the database table is plural (movies). Rails uses this simple naming convention to automatically connect the model to the database table.The create_table method also has an attached block. Inside of the block, table columns are created by calling methods on the t object which references the table being created. In this case, the generated code calls the appropriate methods to create the three columns we asked for when we ran the generator. The generator also added the t.timestamps line which is a shortcut that ends up creating two additional columns: created_at and updated_at. Finally, although there’s no line for it here, an id column will be automatically created. We’ll see a bit later how Rails takes care of populating these additional columns.Think about that: You can express your migrations in generic Ruby code, and Rails automatically translates the code into a language the database understands. So no matter which database you use—SQLite, MySQL, PostgreSQL, Oracle, or the like—the same migration files will work on any of them. And that’s pretty darn convenient!
2. Run the Migration
OK, so we’ve generated the instructions (migration) for creating the database table, but the generator doesn’t actually carry out the instructions. To do that, we need to run the migration.
- Before we pull the lever, you might be wondering which database will get changed when the migration is run. As usual, Rails is one step ahead of us. Peek inside the config/database.yml file and you should see something like the following (we’ve removed any comments):
default: &default
  adapter: sqlite3
  pool: <%= ENV.fetch("RAILS_MAX_THREADS") { 5 } %>
  timeout: 5000

development:
  <<: *default
  database: db/development.sqlite3

test:
  <<: *default
  database: db/test.sqlite3

production:
  <<: *default
  database: db/production.sqlite3
- This YAML file tells Rails which database to use depending on which environment it’s running in: development , test , or production . By default, your Rails app runs in the development environment. We’ll talk more about the other environments a bit later in the course.The default stanza is special: it specifies the configuration information that’s common across all environments. Then each environment stanza references the default configuration to pull in those bits of configuration. In other words, using default avoids having to duplicate all the common lines in each environment stanza.Notice that SQLite is configured as the default development database. SQLite is a lightweight, single-user database that works great for development. SQLite databases are stored in files, and the default development database will live in the db/development.sqlite3 file. That file doesn’t exist (yet).You generally don’t need to mess around with database.yml until you’re ready to deploy your app to a production environment. When that time comes, you’ll need to change the production settings to use another database such as MySQL, PostgreSQL, Oracle, or the like. But we’ll talk more about that when we get to deployment.The takeaway is we don’t have to worry about configuring a database!
- Now on to running the migration. This is a fairly common task that Rails automates for you. To see all the tasks at your disposal, inside the flix application directory type:
rails -T
The resulting list of tasks is fairly long, so here’s a tip: You can filter it down to only show the database-specific tasks by adding db after the -T option, like so
rails -T db
From that list of tasks, identify the task that migrates the database and run it.
answer
rails db:migrate
You should see the following output:
== 20190502122806 CreateMovies: migrating =============
-- create_table(:movies)
   -> 0.0010s
== 20190502122806 CreateMovies: migrated (0.0011s) ====
- Cool! Running the task executed the instructions in our migration file. It did that by looking at all the migration files in the db/migrate directory and running any migrations that had not already been run. In this case, we only have one migration file to run. To “run” the migration, the change method in that file was automatically called which created the movies database table.
- Next, check the status of the migration by running the db:migrate:status task:
rails db:migrate:status
You should get the following output, though your migration id will be different:
database: db/development.sqlite3

 Status   Migration ID    Migration Name
--------------------------------------------------
   up     20190502122806  Create movies
- Notice the word “up” in the Status column. That means that the migration has been run (applied). So far, so good!
- Now try running the migration again using:
rails db:migrate
his time you shouldn’t see any output. That’s because all the migrations in the db/migrate directory have already been run. Rails is clever about keeping track of which migrations have already run, and only running migrations that haven’t already been applied to the database. At this point we only have one migration, but in future exercises we’ll create more migrations.
3. Create a Few Movies
Now that we have the movies database table and a Movie model, we can use the model to create, read, update, and delete movies in the database. We don’t yet have a web interface for these operations, so we’ll use the Rails console in the meantime. The console lets you interact with your app from the command line, and you get instant feedback without having to launch a browser.
Let’s start by putting a few movies in the database…
- While still inside of your flix directory, fire up a Rails console session by typing:
rails console
Yup, there’s a shortcut for that:
rails c
Once it starts, you’ll see a prompt. (We’ll show the prompt as >> , but don’t worry if your prompt looks different.) You’re now in an irb session, so you can type in any Ruby expression. For example, type the following to get a random number:
>> rand(100)
Notice when you hit Return , the Ruby expression you typed in is evaluated and the result is printed out on the subsequent line ( => ) like this
=> 82
What’s unique (and very powerful) about this irb session is that it automatically loads the Rails environment. That means you can access components of your application, such as your models. For example, go ahead and try this:
>> Movie.all
You should get the following output:
Movie Load (0.2ms)  SELECT "movies".* FROM "movies" LIMIT ?  [["LIMIT", 11]]
=> #<ActiveRecord::Relation []>
Notice that the console prints out the SQL that was executed. In this case, we called the all method and behind the scenes Rails generated a SQL SELECT statement to query all the movies in the movies database table. We don’t have any movies in our database yet, so an empty array was returned.
So right off the bat it’s looking like the Movie model already has some smarts about the database. Let’s drill down a little deeper…
Create the First Movie
- Start by instantiating a new
Movieobject and assigning it to a variable named movie so we can use it later:
>> movie = Movie.new
You should get the following output:
=> #<Movie id: nil, title: nil, rating: nil, total_gross: nil, created_at: nil, updated_at: nil>
Hey, this is interesting! Notice that this new object has attributes for every column in the movies table: id, title, rating, total_gross, created_at, and updated_at. The values are all nil, but the attributes exist.
Wait just a doggone minute! Let’s look back at the definition of the Movie class:
class Movie < ApplicationRecord
end
- There’s nothing in this code that would indicate that the Movie class knows anything about the movies database table. So, how did it “magically” get all those attributes? The answer isn’t as impressive as magic, but it’s still very cool.The real key lies in the Movie class being a subclass of the ApplicationRecord class (defined in the app/models/application_record.rb file) which in turn is a subclass of the ActiveRecord::Base class. ActiveRecord is a library (gem) that’s included with Rails. It does all the heavy lifting when it comes to interacting with the database. So because Movie is a subclass of ApplicationRecord, it inherits special database powers from the ActiveRecord::Base class.Here’s what happens: When the Movie class is declared (like we did in the console), Rails looks at the class name (Movie) and assumes it should be mapped to a database table with the plural form of the name (movies). Then it goes off and queries the movies table schema to see which columns exist. It figures we probably want to be able to read and write values for each of those columns. So, through a nifty bit of meta-programming, ActiveRecord dynamically defines attributes for each column. And that’s why in the output above we see those attributes on the new Movie object.So, without any configuration, the Movie model has attributes that reflect the columns in the movies database table. Now we can use those attributes to finish creating our movie.
- Returning to the movie object in the console, all of its attributes currently have nil values. Let’s fix that. Start by assigning a value to the title attribute, like so:
>> movie.title = "Iron Man"
Then use the attribute to print the movie’s title:
>> movie.title
What’s neat about this is you read and write a model’s attributes exactly as you would any attributes of a standard Ruby class. The only difference here is that you didn’t have to define the attributes yourself. ActiveRecord takes care of that for you.
3. Now it’s your turn. Assign values for the movie’s rating (a string) and total_gross (a number). Then turn around and print each of their values.
Answer
>> movie.rating = "PG-13"
>> movie.total_gross = 585366247

>> movie.rating
>> movie.total_gross.to_s
With those attributes set, we’re ready to put the movie in the database. Remember, we instantiated the Movie object by calling the new method, but that doesn’t create a new movie in the database. To save the movie to the database, you have to explicitly call save at the end. Go ahead and do that now, and make sure to check out the generated SQL.
Answer
>> movie.save
What about those other columns: id, created_at, and updated_at?
Print the value of the id attribute:
Answer
>> movie.id
=> 1
When the movie was created, Rails automatically assigned a unique id as the primary key for the row in the database where this movie is stored. (Don’t worry if the id of your movie is different.)
Then print the values of the created_at and updated_at attributes:
Answer
>> movie.created_at

>> movie.updated_at
- When the movie was created, Rails automatically put a timestamp in the created_at and updated_at columns.
- In addition to having dynamic attributes, the Movie class also inherits a number of methods for conveniently accessing the database. For example, we’ve already used the all method to fetch all the movies from the database. Use the all method again to verify that the movie we just created exists.
Answer
>> Movie.all
You should get an array that contains the “Iron Man” movie.
You can also count all the movies in the database. Any guess as to which method does that for you?
Answer
>> Movie.count
=> 1
Create A Second Movie
OK, now let’s take what we learned and apply it toward putting a second movie in the database. We’ll do it slightly differently this time.
- To create our first movie, we used the new method and assigned attributes individually. This time create a second movie by calling the new method and passing it a hash with the following attribute names and values:
| name | value |
|---|---|
| title | “Superman” |
| rating | “PG” |
| total_gross | 300451603 |
Make sure to save the movie to the database.
Answer
>> movie = Movie.new(title: "Superman", rating: "PG", total_gross: 300451603)
>> movie.save
Now you should have two movies in the database. Use a method to verify the count.
Answer
>> Movie.count
=> 2
Then use another method to fetch all the movies in the database.
Answer
>> Movie.all
- The returned array should have the “Iron Man” and “Superman” movies.
Create A Third Movie
Let’s try that again, this time doing it all in one fell swoop…
- Create a third movie by calling the create method and passing it a hash of the following attribute names and values:
| name | value |
|---|---|
| title | “Spider-Man” |
| rating | “PG-13” |
| total_gross | 825025036 |
Answer
>> Movie.create(title: "Spider-Man", rating: "PG-13", total_gross: 825025036)
Check that you now have three movies in the database.
Answer
>> Movie.count
=> 3
Finish off by fetching all the movies.
Answer
>> Movie.all
The returned array should have the “Iron Man”, “Superman”, and “Spider-Man” movies.
4. Update a Movie
Now suppose we need to update a movie’s information in the database. We can use the Movie model to do that, too.
- First we need to read the movie we want to update into the console. The Movie class inherits a number of methods for finding a specific movie. For example, the find method takes an id as the parameter and returns the movie with that primary key.Still in the Rails console, find the “Iron Man” movie by its primary key (id) and assign the resulting object to a variable named iron_man.
>> iron_man = Movie.find(1)
Now change the movie’s title to “Iron Man 2” and double its total gross. Make sure to save the changes to the database.
>> iron_man.title = "Iron Man 2"
>> iron_man.total_gross *= 2.0
>> iron_man.save
Since we updated the record, we’d expect the updated_at column to have a new timestamp. Check that it was updated.
>> iron_man.updated_at
Now let’s suppose we want to change the movie’s title and total gross in one operation. Use the update method to change the title back to “Iron Man” and the total gross to 585366247.
>> iron_man.update(title: "Iron Man", total_gross: 585366247)
The update method is a handy convenience, but it exists for a far more important reason. In most cases you’ll create and update records from data submitted in an HTML form. (We’ll do that later.) When the form is submitted, the form data is captured in a hash of attribute names and values. It’s no coincidence then that the update method takes a hash of attribute names and values.
To check your work, print the values of the title and total_gross attributes to make sure they were updated.
>> iron_man.title
>> iron_man.total_gross.to_s
Delete a Movie
Finally, we might want to delete a movie from the database. Again, the Movie model inherits methods that make that really easy.
- As before, the first step is to read the movie we want to delete into the console. Let’s suppose we want to delete the “Spider-Man” movie, but we don’t know its id. Thankfully, ActiveRecord automatically creates a set of finder methods based on the names of database columns.Use the find_by method to find the “Spider-Man” movie and assign the resulting object to a variable named spider_man.
>> spider_man = Movie.find_by(title: "Spider-Man")
Then use the destroy method to delete the “Spider-Man” movie from the database.
>> spider_man.destroy
To check your work, call the find_by method again to verify that the movie no longer exists in the database. You should get a response of nil.
>> Movie.find_by(title: "Spider-Man")
Finally, just to practice what you’ve learned, recreate the “Spider-Man” movie using any of the creation methods you used previously.
When you’re done, exit the console session by typing, wait for it… exit (or Ctrl-D ):
>> exit
Solution
The full solution for this exercise is in the models directory of the code bundle.
Bonus Round
Poke Around in the Database
Running the first migration automatically created the database in the db/development.sqlite3 file. Bear in mind, you generally won’t need to interact directly with the database. Instead, you’ll use a model to access the database as we’ve done in this exercise. But just to better understand what the migration did for us, we’ll grovel around in the database for a moment.
- To see what’s inside the db/development.sqlite3 file, change into your flix application directory and start an interactive console for the database by typing:
rails dbconsole
This command figures out which database you’re using and opens a command-line interface to that database. We’re using SQLite, so once it starts you’ll see the following prompt where you can type in commands:
sqlite>
- First let’s list the names of tables in the database. SQLite commands begin with a dot ("."), so at the prompt type .tables like so and hit Return:
sqlite> .tables
You should see the names of two tables: movies and schema_migrations.
3. Now, to see the schema for the movies table, type:
sqlite> .schema movies
You should see the following output:
CREATE TABLE "movies" ("id" integer PRIMARY KEY AUTOINCREMENT NOT NULL, "title" varchar, "rating" varchar, "total_gross" decimal, "created_at" datetime(6) NOT NULL, "updated_at" datetime(6) NOT NULL);
- This is the SQL command that was executed to actually create the movies table in the SQLite database. What’s interesting about this is that our migration file was written in Ruby, but then when the migration ran it created the table with a schema appropriate for the configured database (SQLite in this case). For example, the string type we specified in the migration got translated into a varchar(255) type in SQLite. In other words, Rails uses the database adapter to figure out the appropriate column type depending on the configured database.
- What about that schema_migrations table that showed up earlier? It’s a special table that Rails uses to figure out which migrations have already been run. To show its schema, type:
sqlite> .schema schema_migrations
You should see the following output:
CREATE TABLE "schema_migrations" ("version" varchar NOT NULL PRIMARY KEY);
It’s a table with a single column named version. To see what’s in the table, type the following SQL command with a trailing semi-colon:
sqlite> select * from schema_migrations;
You should see a fairly big number. That’s actually a timestamp. In fact, it’s the same timestamp that’s embedded in our migration filename. That’s how Rails keeps track of which migrations in the db/migrate directory have already been run!
Finally, to quit the SQLite console session, use the .quit command:
sqlite> .quit
Wrap Up
Now you can easily create, read, update, and delete (CRUD) movies in the database! That’s pretty exciting. It may seem like we took a lot of steps to get here, but look back and you’ll notice we didn’t do much typing and we were able to:
- generate a model and migration
- run a migration
- create database records three different ways
- fetch records from the database
- update records in the database
- delete records from the database
That’s the power of Rails conventions. Initially, all the conventions can feel quite magical, and even confusing. But once you get comfortable with them, the conventions make things go a lot smoother.
In the next section we’ll connect our Movie model to the MoviesController so that the list of movies in the browser reflects the movie information in the database.
Connecting MVC
Exercises
Objective
Now that we have movies stored in the database and a Movie model that gives us access to those movies, it’s time to connect the model to the rest of our application. The goal is to end up with a movie listing page that shows the movie information that’s in the database. It’s a quick exercise that puts everything together to complete the MVC triad, like so:
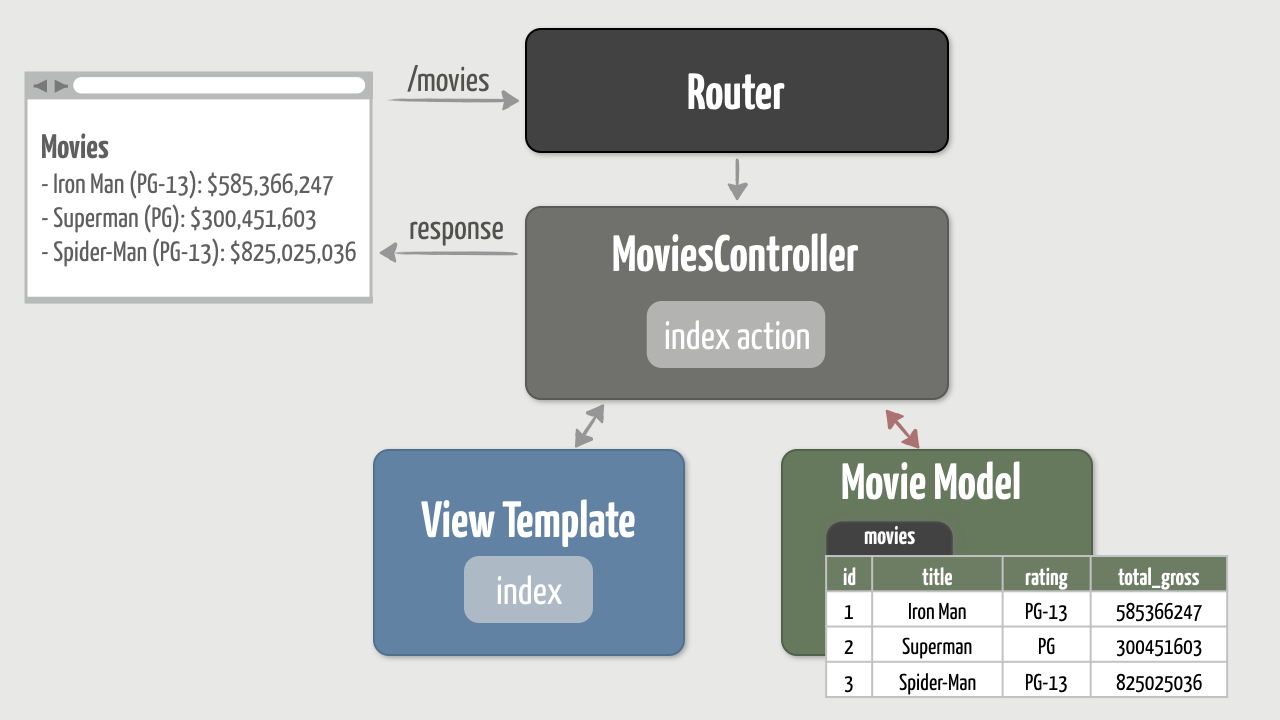
So let’s get right to it…
1. Connect Model and Controller
We’ll start by bringing the model into the mix so the controller has less responsibilities.
- As a reminder of where things stand, jump back into your browser and go to the movie listing page (http://localhost:3000/movies). You should see three movie titles. Recall that we hard-coded these titles in an array in the index action of the MoviesController, like so:
def index
  @movies = ["Iron Man", "Superman", "Spider-Man"]
end
Now we want to arrange things so that the array contains Movie objects that reflect the movies in the database.
Change the index action to fetch all the movies from the database. Assign the resulting array to the @movies instance variable.
def index
  @movies = Movie.all
end
- Notice there’s no need to require the Movie class as you’d need to do in a typical Ruby program. Rails auto-loads files in certain directories, including the models directory.
- Then refresh the movie listing page and you should see something like this:
#<Movie:0x007f9e341d03b0>
#<Movie:0x007f9e34167130>
#<Movie:0x007f9e34165dd0>
That’s not quite what we’re aiming for, but it’s a good start. What we’re seeing is the result of calling the default to_s method on a Movie object. Where’s that being called? Look back in the index.html.erb view template and you’ll see this line:
<%= movie %>
- We’re asking ERb to display the value of the movie object. To do that, ERb implicitly calls the object’s to_s method which returns that cryptic-looking string. This is progress! It means we’re actually dealing with Movie objects now, not just movie title strings.
2. Update the Movie Listing
Now that the @movies array contains actual Movie objects, let’s update the movie listing page to show each movie’s attributes.
- Change the index.html.erb view template to display the values for each movie’s title, rating, and total gross. Here’s the output you’re shooting for:
Iron Man (PG-13): $585,366,247
Superman (PG): $300,451,603
Spider-Man (PG-13): $825,025,036
<h1>Movies</h1>

<ul>
<% @movies.each do |movie| %>
  <li>
    <strong><%= movie.title %></strong> (<%= movie.rating %>):
    <%= movie.total_gross %>
  </li>
<% end %>
</ul>
- Now your movie listing should dynamically show what’s in the database. That means you can create, update, or delete movies in the database and the movie listing page will change accordingly.Give it a whirl! Hop back into a Rails console session and use what you learned in the previous exercise to add, update, or delete movies. Then refresh your browser and you should see the movie listing change accordingly.
- Then, just to show off a little, let’s format the total gross amount as currency. Formatting numbers as currency is so common that Rails has a built-in view helper method called number_to_currency. If you look at the documentation for this helper method, you’ll see that it takes a number and some options. The documentation also includes some helpful examples.Go ahead and give it a try! Use the precision option to remove the cents from the total gross value.
<%= number_to_currency(movie.total_gross, precision: 0) %>
We’ll look at helpers in more detail in a future exercise.
Cheat Sheets
We’ve covered a number of commands and conventions so far, and now might be a good time to download the following cheat sheets for quick reference as you proceed through the rest of the course:
- Rails Cheats PDF: A cheat sheet of Rails commands and methods used throughout the course.
- Rails Conventions PDF: An overview of common Rails conventions.
Solution
The full solution for this exercise is in the connecting-mvc directory of the code bundle.
Bonus Round
Vocabulary Check
Learning a new web development framework can feel a bit like learning a foreign language. Here’s a bonus exercise to help you practice your new skills.
- The ________ connects the requested URL to the appropriate code in the controller.
This is the job of the router.
Controllers and models share two similar characteristics. They are both Ruby ________ and they both _________ capabilities from a parent class.
Controllers and models are both Ruby classes and they both inherit capabilities from a parent class.
Are controller names singular or plural?
They are plural, as in EventsController or MoviesController.
Are model names singular or plural?
They are singular, as in Movie model.
Are database table names singular or plural?
They are plural because the table contains many records (or rows) that each represent one event, movie, or so on.
The model gets its power to create, read, update, and delete objects not by magic, but because it __________ from the _________________ class.
The model inherits from the ApplicationRecord class. ApplicationRecord in turn inherits from ActiveRecord::Base which does all the heavy lifting when it comes to interacting with the database. Subclasses of ApplicationRecord inherit these special database powers.
An _________ is simply a Ruby method defined inside a controller class.
An action, such as index, is simply a Ruby method. Once again, nothing magical going on here.
A controller action passes data to the view via ___________ ____________.
A controller action passes data to the view via instance variables, such as @movies.
A typical _____ template is a mixture of ______ tags and _____ tags.
A typical view template is a mixture of HTML tags and ERb tags.
Which ERb tag runs the Ruby code and substitutes the result back into the template: <%= %> or <% %>?
<%= %> tags run the Ruby code and substitute in the result. <% %> tags run the Ruby code, but do not generate any output.
Wrap Up
Now you have a model, view, and controller all working in harmony. Each component has its own responsibilities:
- The controller acts as a middleman. With one hand, it asks the model for application data (movies in this case) and assigns the data to instance variables. With the other hand it tells a view template to display the data in a view. Notice that the controller doesn’t tell the model or view how to do their jobs.
- The model provides convenient access to application-level data. In this case, our Movie model is connected to a database table that contains movie information. The model completely encapsulates the lower-level details of how each row of the database table is translated into a usable object. The model isn’t concerned with how the data will be used. Models can also define business logic (behavior) which we’ll look at a bit later.
- The view is simply the presentation of data in an arbitrary format. In this case we used a view template to generate an HTML view. The view doesn’t concern itself with how the data it’s displaying was assembled.
Here’s the thing: It’s easy to start adding code to a Rails project and impress your manager with the sheer speed of Rails development. But before you put your hands on the keyboard, it’s important to think about where to add the code. Is it a model, view, or controller concern? Because if you start mixing the MVC responsibilities, then you end up with an application that can be very difficult to change down the road. And since change is inevitable, it’s best if we’re prepared for it. So as we move forward with adding more features, we’ll need to be mindful of separating the model, view, and controller concerns.
And on that note, in the next exercise we’ll add a few more attributes to our Movie model. That change will force us to think through the parts of MVC that are affected.