Getting Started & Project Tour
If you don’t have an app ready to go into production yet but want to go through the motions with me then I’ve got an example project for you to use!
This project is a standard React Native project generated using the React Native CLI. With that said, you’ll need React Native installed on your system to run it.
Commands
- Install NPM Dependencies:
yarn install - Install CocoaPod Dependencies:
cd ios/ && pod install - Run iOS:
yarn run ios - Run Android:
yarn run android
Create Apple Developer Account
To build, upload, and submit an app to the Apple App Store there are two requirements:
- Enroll in the Apple Developer Program - $99/year.
- A Mac to build the app
Enrollment is very easy. You’ll need to have an Apple ID, which you likely have already if you’ve been working on a React Native app on iOS.
Enroll in the Apple Developer Program.
Create Google Developer Account
To upload and distribute and app on the Google Play Store you’ll first need to register for a Google Play Developer Account.
Once you’ve done that you’ll need to pay a one time $25 fee to be able to distribute your app(s).
Configuring Android App
Links
android/app/build.gradle
apply plugin: "com.android.application"

import com.android.build.OutputFile

/**
 * The react.gradle file registers a task for each build variant (e.g. bundleDebugJsAndAssets
 * and bundleReleaseJsAndAssets).
 * These basically call `react-native bundle` with the correct arguments during the Android build
 * cycle. By default, bundleDebugJsAndAssets is skipped, as in debug/dev mode we prefer to load the
 * bundle directly from the development server. Below you can see all the possible configurations
 * and their defaults. If you decide to add a configuration block, make sure to add it before the
 * `apply from: "../../node_modules/react-native/react.gradle"` line.
 *
 * project.ext.react = [
 *   // the name of the generated asset file containing your JS bundle
 *   bundleAssetName: "index.android.bundle",
 *
 *   // the entry file for bundle generation
 *   entryFile: "index.android.js",
 *
 *   // https://facebook.github.io/react-native/docs/performance#enable-the-ram-format
 *   bundleCommand: "ram-bundle",
 *
 *   // whether to bundle JS and assets in debug mode
 *   bundleInDebug: false,
 *
 *   // whether to bundle JS and assets in release mode
 *   bundleInRelease: true,
 *
 *   // whether to bundle JS and assets in another build variant (if configured).
 *   // See http://tools.android.com/tech-docs/new-build-system/user-guide#TOC-Build-Variants
 *   // The configuration property can be in the following formats
 *   //         'bundleIn${productFlavor}${buildType}'
 *   //         'bundleIn${buildType}'
 *   // bundleInFreeDebug: true,
 *   // bundleInPaidRelease: true,
 *   // bundleInBeta: true,
 *
 *   // whether to disable dev mode in custom build variants (by default only disabled in release)
 *   // for example: to disable dev mode in the staging build type (if configured)
 *   devDisabledInStaging: true,
 *   // The configuration property can be in the following formats
 *   //         'devDisabledIn${productFlavor}${buildType}'
 *   //         'devDisabledIn${buildType}'
 *
 *   // the root of your project, i.e. where "package.json" lives
 *   root: "../../",
 *
 *   // where to put the JS bundle asset in debug mode
 *   jsBundleDirDebug: "$buildDir/intermediates/assets/debug",
 *
 *   // where to put the JS bundle asset in release mode
 *   jsBundleDirRelease: "$buildDir/intermediates/assets/release",
 *
 *   // where to put drawable resources / React Native assets, e.g. the ones you use via
 *   // require('./image.png')), in debug mode
 *   resourcesDirDebug: "$buildDir/intermediates/res/merged/debug",
 *
 *   // where to put drawable resources / React Native assets, e.g. the ones you use via
 *   // require('./image.png')), in release mode
 *   resourcesDirRelease: "$buildDir/intermediates/res/merged/release",
 *
 *   // by default the gradle tasks are skipped if none of the JS files or assets change; this means
 *   // that we don't look at files in android/ or ios/ to determine whether the tasks are up to
 *   // date; if you have any other folders that you want to ignore for performance reasons (gradle
 *   // indexes the entire tree), add them here. Alternatively, if you have JS files in android/
 *   // for example, you might want to remove it from here.
 *   inputExcludes: ["android/**", "ios/**"],
 *
 *   // override which node gets called and with what additional arguments
 *   nodeExecutableAndArgs: ["node"],
 *
 *   // supply additional arguments to the packager
 *   extraPackagerArgs: []
 * ]
 */

project.ext.react = [
    entryFile: "index.js",
    enableHermes: false,  // clean and rebuild if changing
]

apply from: "../../node_modules/react-native/react.gradle"

/**
 * Set this to true to create two separate APKs instead of one:
 *   - An APK that only works on ARM devices
 *   - An APK that only works on x86 devices
 * The advantage is the size of the APK is reduced by about 4MB.
 * Upload all the APKs to the Play Store and people will download
 * the correct one based on the CPU architecture of their device.
 */
def enableSeparateBuildPerCPUArchitecture = false

/**
 * Run Proguard to shrink the Java bytecode in release builds.
 */
def enableProguardInReleaseBuilds = false

/**
 * The preferred build flavor of JavaScriptCore.
 *
 * For example, to use the international variant, you can use:
 * `def jscFlavor = 'org.webkit:android-jsc-intl:+'`
 *
 * The international variant includes ICU i18n library and necessary data
 * allowing to use e.g. `Date.toLocaleString` and `String.localeCompare` that
 * give correct results when using with locales other than en-US.  Note that
 * this variant is about 6MiB larger per architecture than default.
 */
def jscFlavor = 'org.webkit:android-jsc:+'

/**
 * Whether to enable the Hermes VM.
 *
 * This should be set on project.ext.react and mirrored here.  If it is not set
 * on project.ext.react, JavaScript will not be compiled to Hermes Bytecode
 * and the benefits of using Hermes will therefore be sharply reduced.
 */
def enableHermes = project.ext.react.get("enableHermes", false);

android {
    compileSdkVersion rootProject.ext.compileSdkVersion

    compileOptions {
        sourceCompatibility JavaVersion.VERSION_1_8
        targetCompatibility JavaVersion.VERSION_1_8
    }

    defaultConfig {
        applicationId "com.tictactoeinit"
        minSdkVersion rootProject.ext.minSdkVersion
        targetSdkVersion rootProject.ext.targetSdkVersion
        versionCode 1
        versionName "1.0"
    }
    splits {
        abi {
            reset()
            enable enableSeparateBuildPerCPUArchitecture
            universalApk false  // If true, also generate a universal APK
            include "armeabi-v7a", "x86", "arm64-v8a", "x86_64"
        }
    }
    signingConfigs {
        debug {
            storeFile file('debug.keystore')
            storePassword 'android'
            keyAlias 'androiddebugkey'
            keyPassword 'android'
        }

        release {
            if (project.hasProperty('TICTACTOEEXAMPLE_UPLOAD_STORE_FILE')) {
                storeFile file(TICTACTOEEXAMPLE_UPLOAD_STORE_FILE)
                storePassword TICTACTOEEXAMPLE_UPLOAD_STORE_PASSWORD
                keyAlias TICTACTOEEXAMPLE_KEY_ALIAS
                keyPassword TICTACTOEEXAMPLE_KEY_PASSWORD
            }
        }
    }
    buildTypes {
        debug {
            signingConfig signingConfigs.debug
        }
        release {
            // Caution! In production, you need to generate your own keystore file.
            // see https://facebook.github.io/react-native/docs/signed-apk-android.
            signingConfig signingConfigs.release
            minifyEnabled enableProguardInReleaseBuilds
            proguardFiles getDefaultProguardFile("proguard-android.txt"), "proguard-rules.pro"
        }
    }
    // applicationVariants are e.g. debug, release
    applicationVariants.all { variant ->
        variant.outputs.each { output ->
            // For each separate APK per architecture, set a unique version code as described here:
            // https://developer.android.com/studio/build/configure-apk-splits.html
            def versionCodes = ["armeabi-v7a": 1, "x86": 2, "arm64-v8a": 3, "x86_64": 4]
            def abi = output.getFilter(OutputFile.ABI)
            if (abi != null) {  // null for the universal-debug, universal-release variants
                output.versionCodeOverride =
                        versionCodes.get(abi) * 1048576 + defaultConfig.versionCode
            }

        }
    }
}

dependencies {
    implementation fileTree(dir: "libs", include: ["*.jar"])
    implementation "com.facebook.react:react-native:+"  // From node_modules

    if (enableHermes) {
        def hermesPath = "../../node_modules/hermes-engine/android/";
        debugImplementation files(hermesPath + "hermes-debug.aar")
        releaseImplementation files(hermesPath + "hermes-release.aar")
    } else {
        implementation jscFlavor
    }
}

// Run this once to be able to run the application with BUCK
// puts all compile dependencies into folder libs for BUCK to use
task copyDownloadableDepsToLibs(type: Copy) {
    from configurations.compile
    into 'libs'
}

apply from: file("../../node_modules/@react-native-community/cli-platform-android/native_modules.gradle"); applyNativeModulesAppBuildGradle(project)
Creating App Icon
Adding Splash Screen
Rather than reinvent the wheel, why not point you to content I’ve already created on the subject!
- Avoid React Native Splash Screen Flash on iOS (the easy way)
- How to Add a Splash Screen to a React Native App (iOS and Android)
Creating iOS App in App Store Connect
First, go to App Store Connect and log into the Apple Developer Account you previously created.
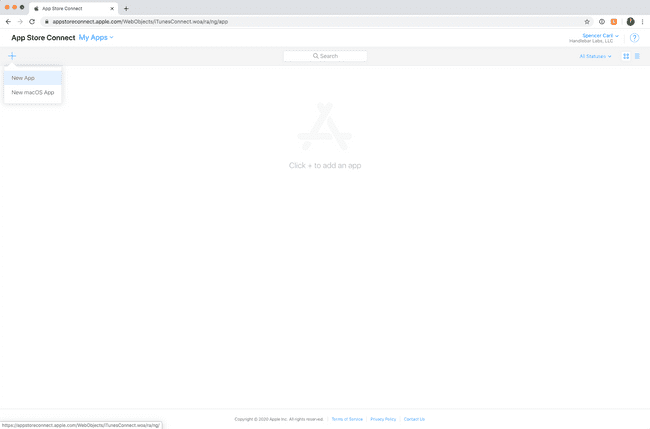
You’ll then want to create a “New App” by clicking the “+” in the top left corner.
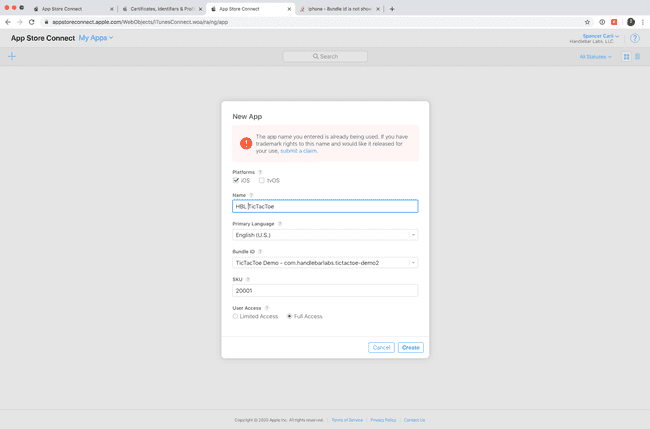
To create your new app enter the basic information requested on the screen. When choosing the Bundle ID choose the one we set up previously in Xcode.
If it doesn’t exist (which it most likely won’t) there should be a link under the drop down to create one. Or you could just create it here.
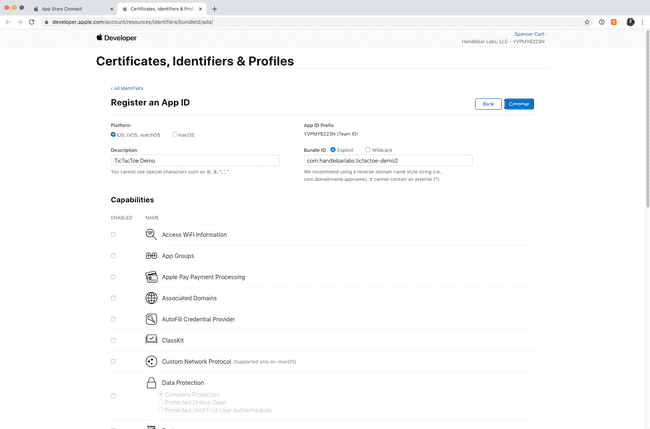
To create a new App ID you’ll need to specify the platform, set the bundle ID, and add any capabilities your app requires to function (such as payments). The TicTacToe app doesn’t require any so I’ll skip over that part.
Note: If the bundle ID doesn’t show up after creating it then log out of App Store Connect and try logging back in.
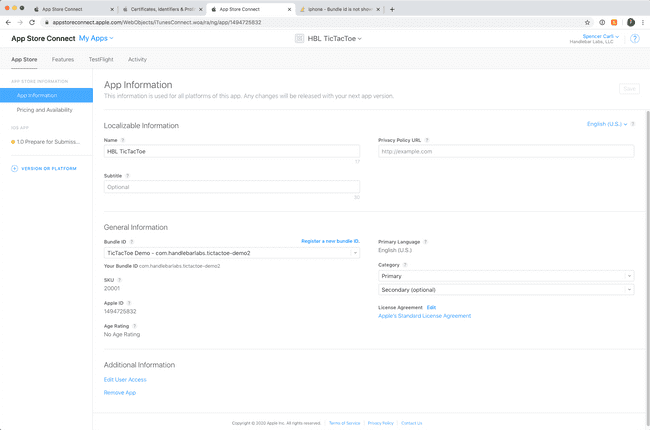
Once that’s done your app is registered with App Store Connect! You should see a screen similar to the one below.
Upload iOS App to App Store Connect
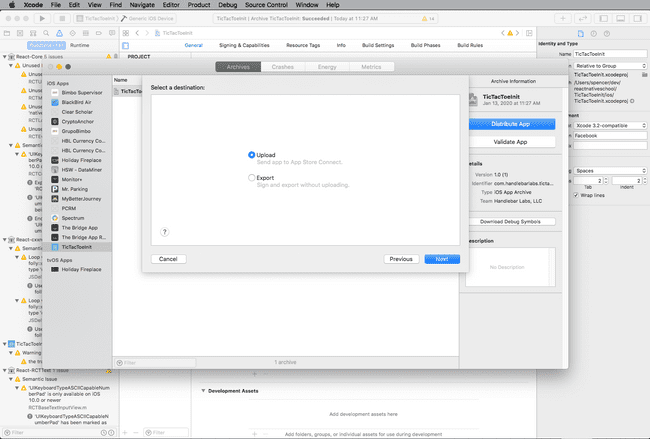
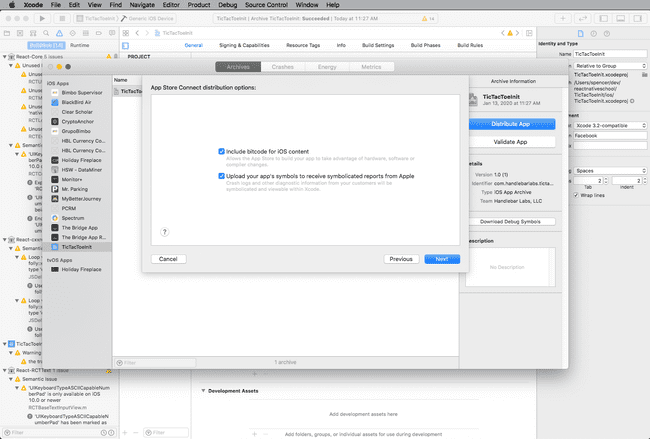
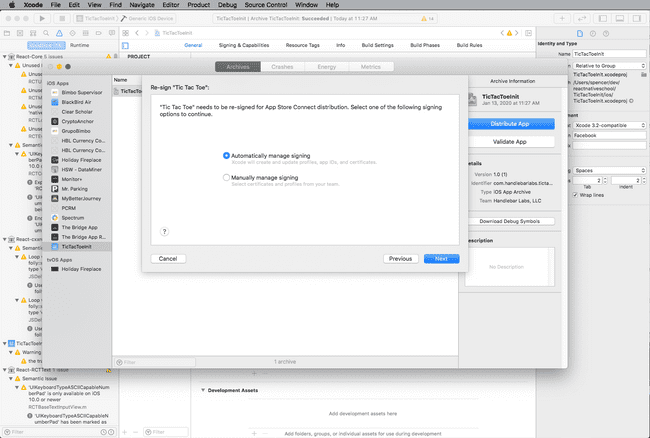
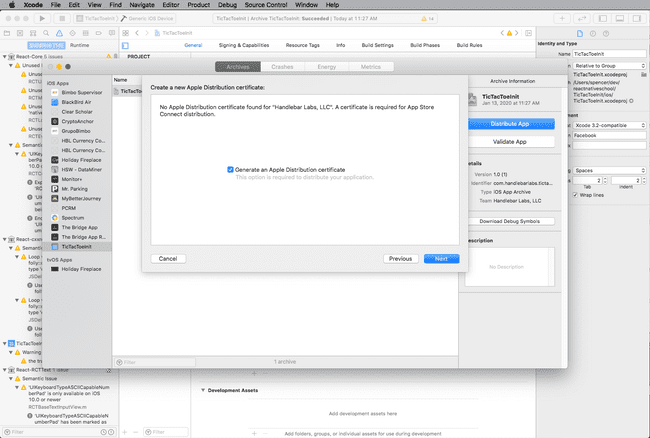
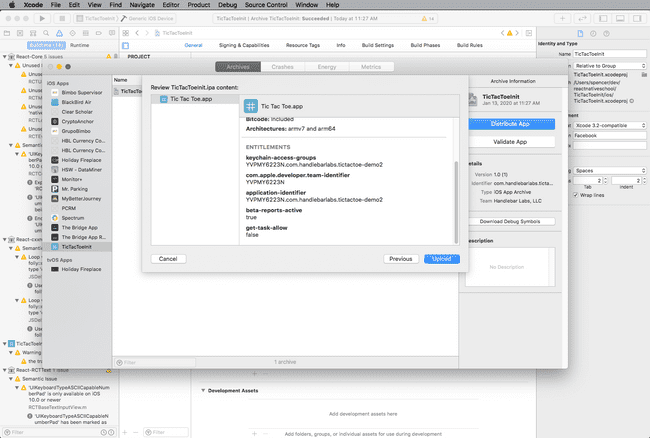
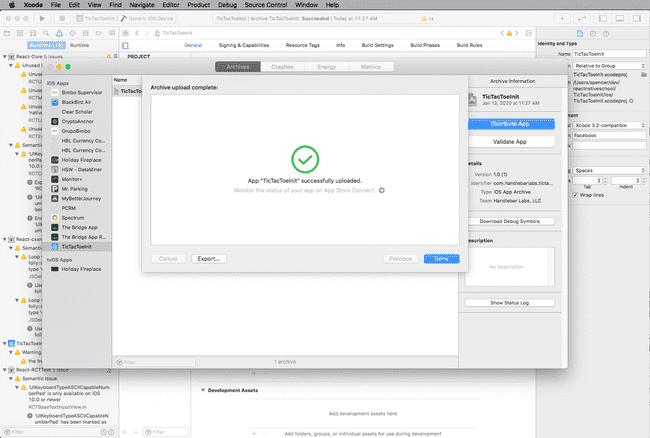
Uploading an App to the App Store is just a series of hoops to jump through. It all starts in Xcode and will result in an app you can test via TestFlight and, eventually, distribute to the App Store.
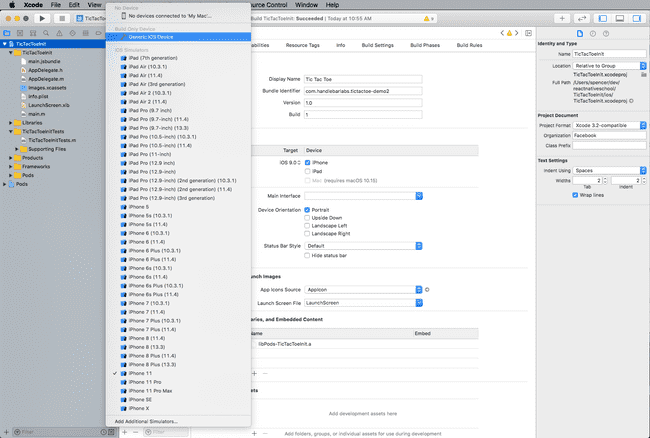
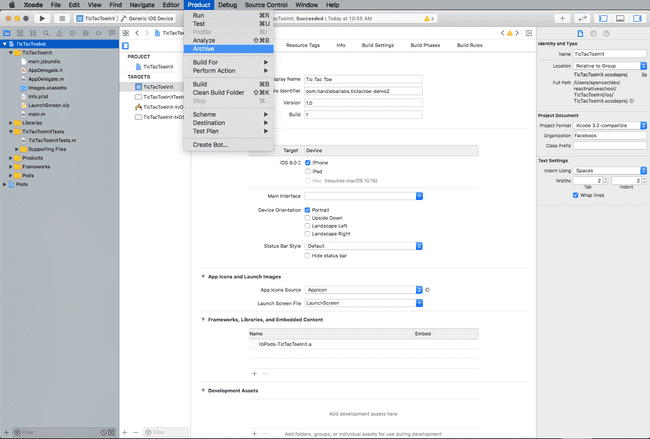
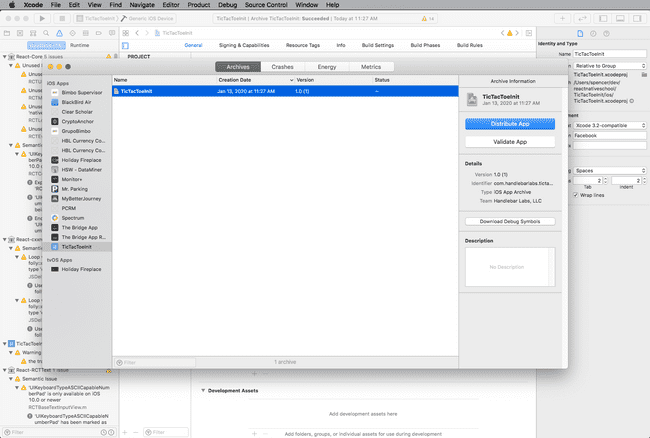
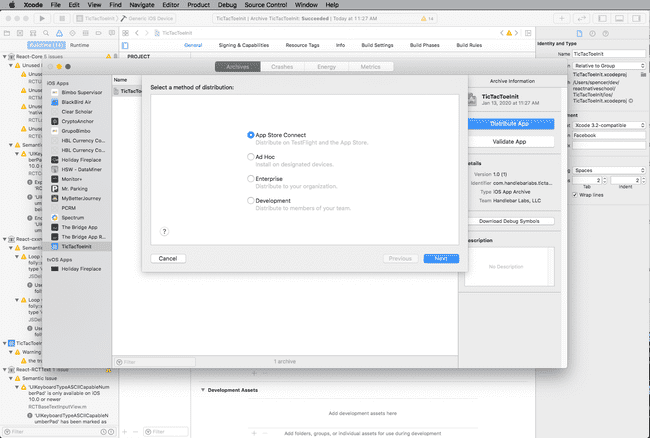
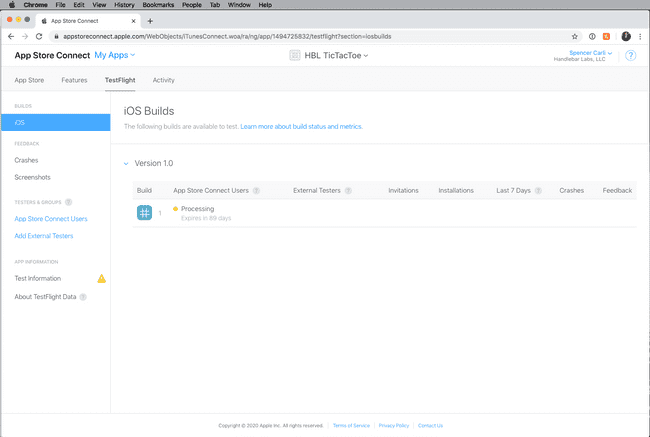
Here’s a step by step with pictures to follow:
- Select a generic device for a target to build against
- Archive the app
- Select “Distribute App”
- Follow the prompts to upload the app
- Check that the app is processing via the App Store Connect portal
Test iOS App with TestFlight
Once your app is in App Store Connect you can start distributing it via TestFlight.
TestFlight is a tool that allows you to beta test your iOS app. This means you designate exactly who gets access and you’re able to iterate much faster because you don’t need to submit the app for review or wait for Apple to review it.
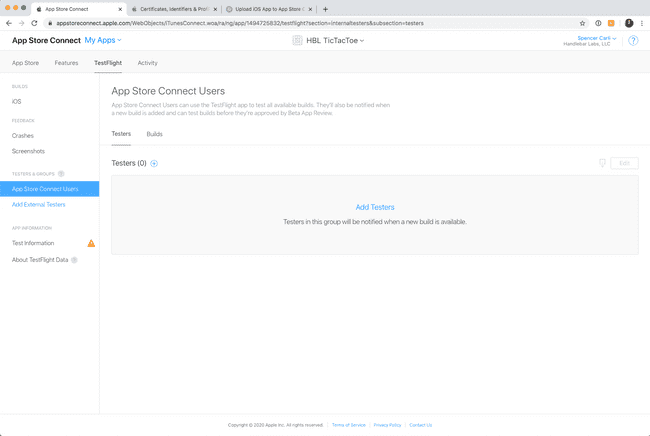
To use TestFlight you’ll need to download the TestFlight App from the app store (so will any of your beta testers). You’ll then need to add testers via the TestFlight tab in App Store Connect.
Once that’s complete and the app has finished processing you and your beta testers will receive an email asking if they would like to test the app. If they accept it will open TestFlight and download the app!
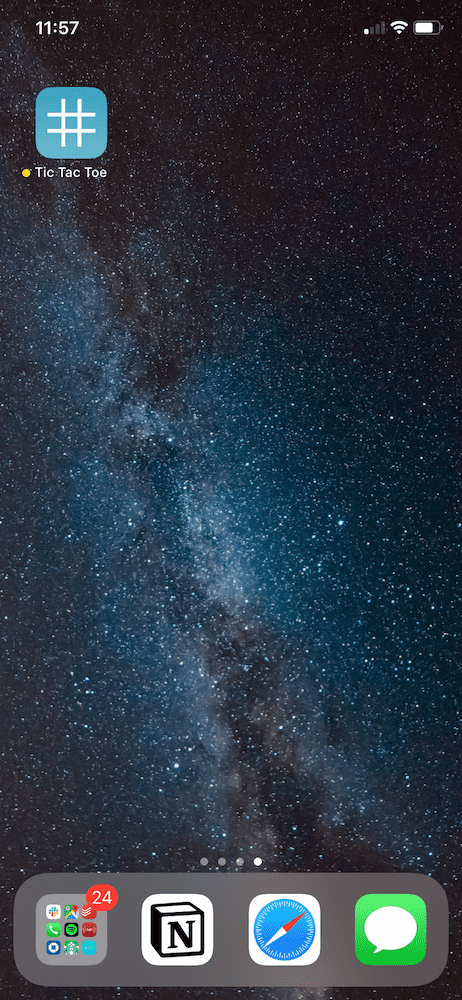
You can tell it’s a TestFlight build installed if the app name has a yellow dot next to it.
Submit iOS App for Review
The moment has come to submit your app to the app store! Let’s do it.
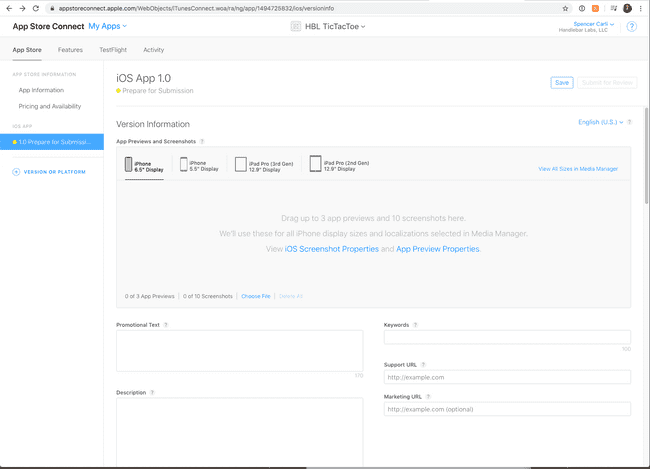
In App Store Connect you’ll want to select your app. Once there, under the “App Store” tab, you’ll need to select the “1.0 Prepare for Submission”. This should have a yellow dot next to it and will be automatically created when you upload a new version to TestFlight.
Once here you’ll see all the information you need to provide - it’s a lot.
Here’s a breakdown:
Screenshots
Show the users what they’ll see! You need at least one for a 6.5" display size and one for 5.5" display size. If you’re targeting an iPad as well you’ll need to supply those images as well. Apple will take those screenshots and generate other images for the other screen sizes.
You only need to do this the first time. For subsequent versions you can just use the previous screenshots (or override them with new ones if needed).
Text
You need to provide a few text based items:
- Promo text - short and punchy
- Description - the details
- Keywords - used in search
- Support URL - if someone needs to reach you, how do they do it?
- Marketing URL - if someone wants to learn more where do they go? This isn’t required.
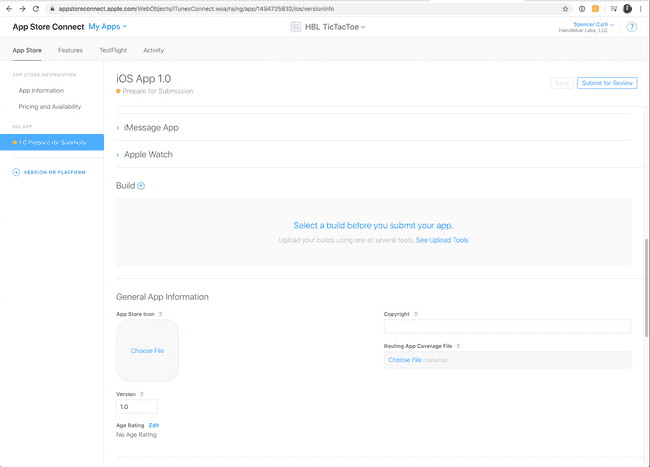
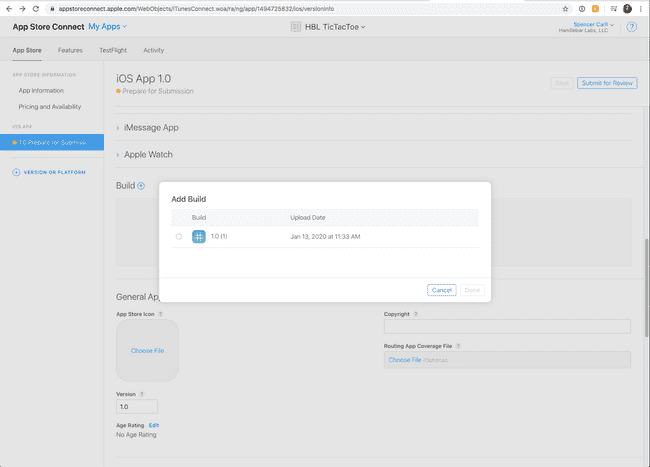
Selecting Build
Here you’ll want to choose the build to actually ship to production. You’ll most likely want to choose whichever build you’ve been testing on TestFlight.
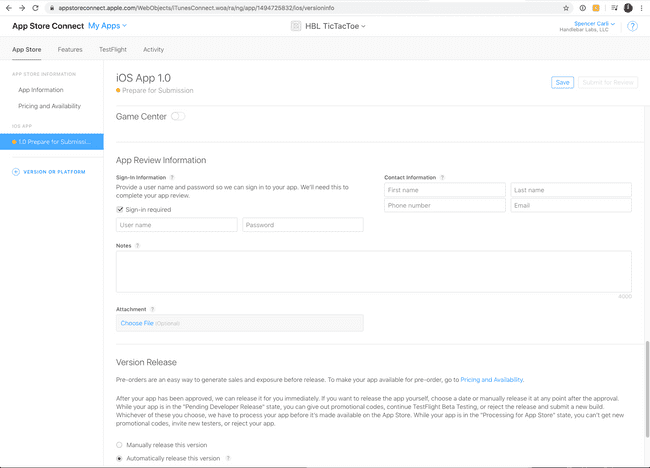
App Review Info
Apple reviews every new app version going out. How do they use the app? If you have sign-in requirements you need to set up an account for them to use to test the app. If not then you just need to tell them how to use your app.
Version Release
Finally, assuming all goes well, when should the app be released? You can choose to release it manually after it’s been approved, automatically as soon as it’s approved, or after a given date/time.
Those are the major pieces. Once you save it and press submit there will likely be some small pieces you need to add but the instructions are very clear. Once you’ve completed all of those steps hit “Submit for Review” and wait!
Creating Android App in Google Play Console
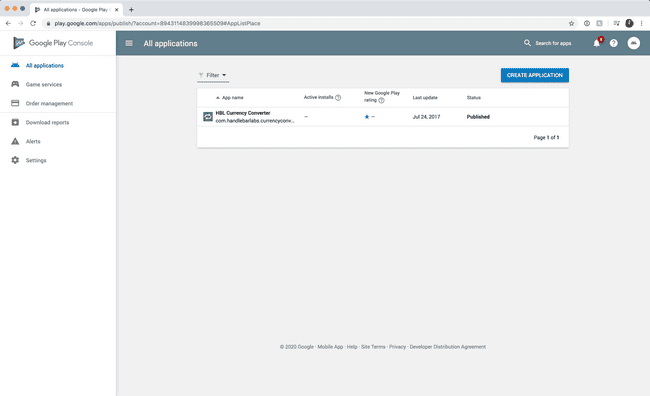
With your Google Play Developer account set up we’ll then go the the Google Play Console to create our app app.
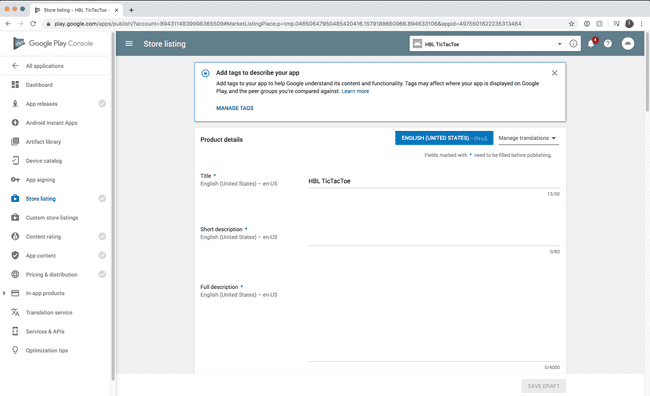
We’ll then have to fill out our product details, just like we did on iOS.
We’ll need descriptions of the app - pretty self explanatory.
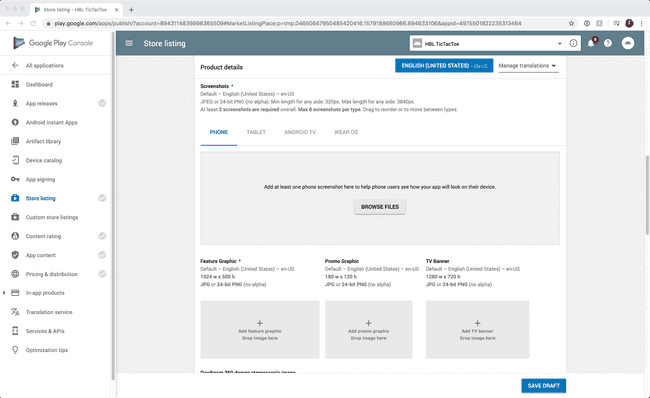
App Icon - unlike iOS we need to upload one specifically (it won’t be inferred from the build).
You’ll also need to add a few other graphics for the Play Store.
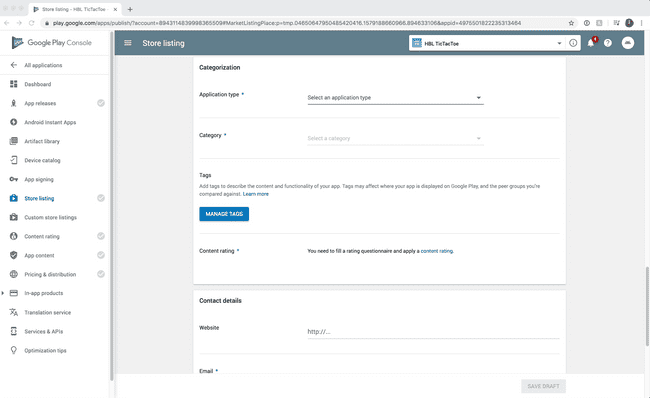
You’ll need to categorize your app and add contact info.
But that’s not all! See all those grey checkmarks on the left side? You need to complete all the required information before you can publish anything via the Google Play Console.
Once you complete that section the checkmark will turn green.
Test Android App with Release Tracks
There are a few ways to test an Android app. First is by just sending them the production APK build. The second is via Google Play Console.
But before we can do either, we need to actually create a production APK build!
To do that go to your terminal and run the following command.
cd android && ./gradlew bundleRelease
Note: Make sure you’ve created and configured your upload key as covered previously!
Once that’s done you’ll be able to find the new production APK in android/app/build/outputs/apk/release and it will be named app-release.apk .
You can then send that APK to anyone with an Android device and they can install it, immediately getting the app on their device.
A workflow I often use is to share it with the team via Slack. They can tap on the APK in Slack, download it, and then install it. Super quick!
Alternatively, you can take a more formal approach and share it with a larger audience via Google Play Console.
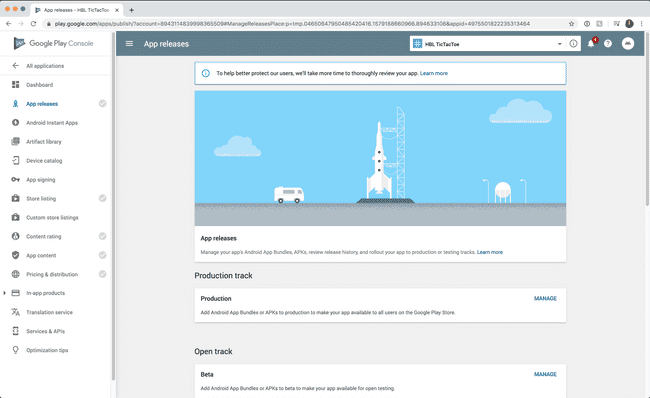
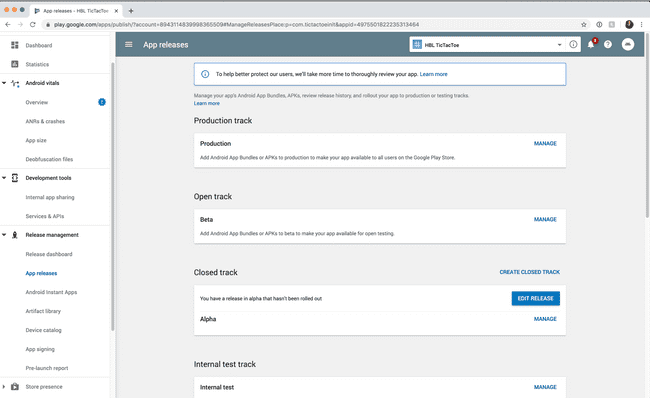
First, click “App releases” in the left navigation
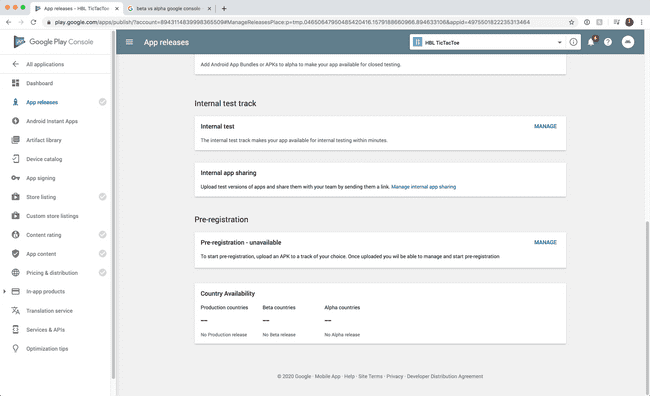
There are a few options:
- Production track - we’ll be covering this later
- Open track - for larger groups of testers
- Closed track - for a small group of very early adopters/testers
- Internal track - for your team. This will be the fastest option and the one we’ll cover now.
First, click “Manage”.
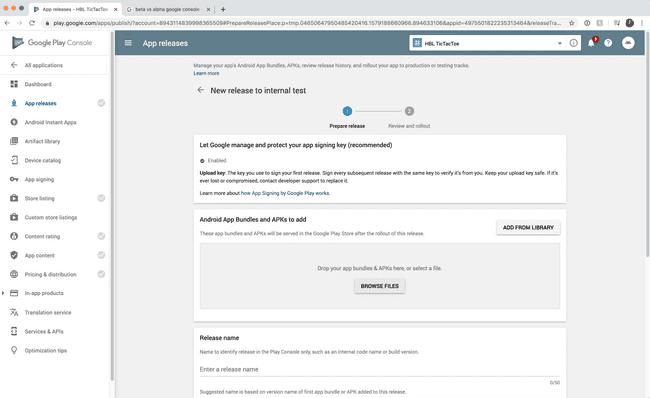
Then “Create Release”
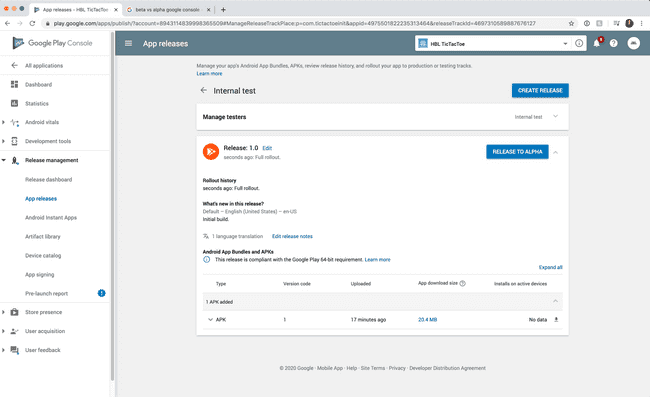
We’ll then configure our new release by uploading our production APK, naming our release, and adding any change notes we have for this release.
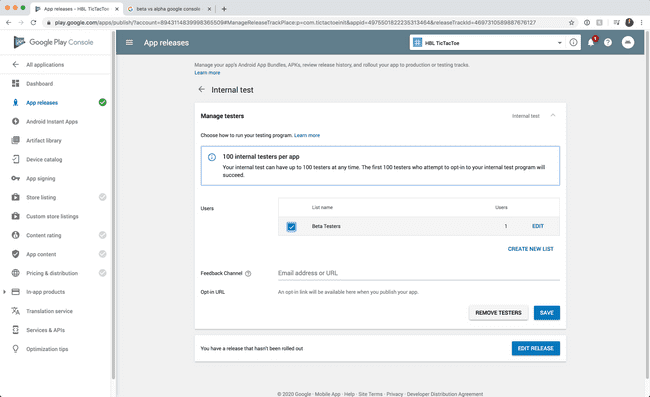
Before actually releasing it make sure you manage testers and add at least one. This can be done back on the “internal test” page.
You can then roll it out and manage from there! What’s nice here is that you can easily “promote” a build to different levels.
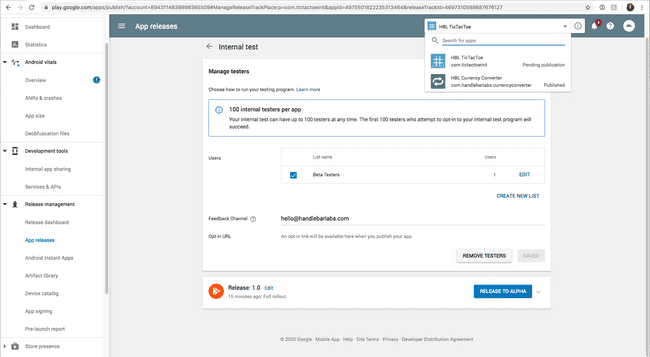
Once you roll it out you’ll likely have to wait a bit the first time. As you can see below, my new app is in the “Pending publication” stage. Once that’s in a published phase you’ll be able to get a link to opt-in to internal testing.
Send that link to your internal testers and they’ll then be able to opt-in!
Publish Android App
Once tests have succeeded it’s time to publish it to the full Play Store!
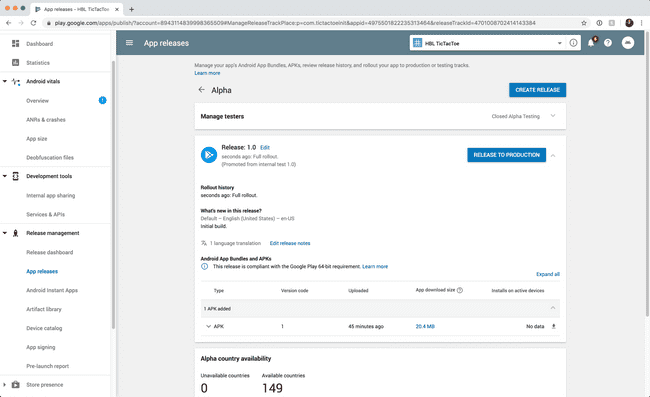
To do so go to the “App releases” tab in Google Play Console.
At this point you’ve got two options:
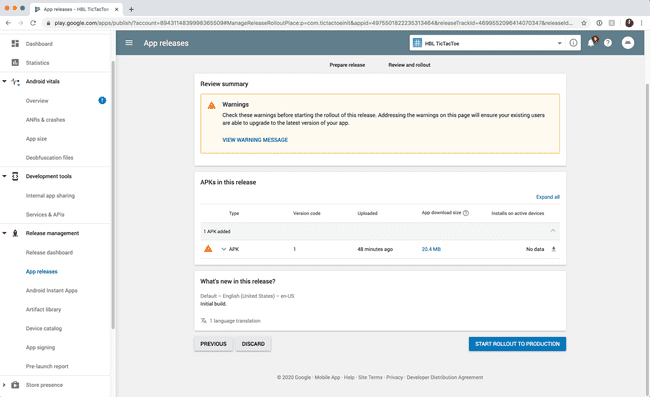
- Promote the build we previously used for Internal Testing from Internal -> Alpha -> Production. This lets you use the same build as you’ve been testing
- Skip that and go directly to production. You’ll need to increment the versionNumber and assemble a new release for this though.
We’ll go with option 1 today.
First I’ll promote it to Alpha, then I’ll promote to Production.
I can then go ahead and star the rollout to production.
