Vue 3 Reactivity
In this course we will understand the new Vue 3 Reactivity system. Learning how this is built from the ground up will help you understand the design patterns used inside Vue, improve your Vue debugging skills, enable you to use the new Vue 3 modularized Reactivity library, and perhaps even contribute to the Vue 3 source code yourself.
In this lesson we will start building a simple reactivity system using the very same techniques you’ll find in the Vue 3 source code.
Understanding Reactivity
Vue’s reactivity system can look like magic when you see it working for the first time.
Take this simple app:
<div id="app">
  <div>Price: ${{ product.price }}</div>
  <div>Total: ${{ product.price * product.quantity }}</div>
  <div>Taxes: ${{ totalPriceWithTax }}</div>
</div>
<script src="https://cdn.jsdelivr.net/npm/vue"></script>
<script>
  var vm = new Vue({
    el: '#app',
    data: {
      product: {
        price: 5.00,
        quantity: 2
      }
    },
    computed: {
      totalPriceWithTax() {
        return this.product.price * this.product.quantity * 1.03
      }
    }
  })
</script>
And somehow Vue’s Reactivity system just knows that if price changes, it should do three things:
- Update the
pricevalue on our webpage. - Recalculate the expression that multiplies
price * quantity, and update the page. - Call the
totalPriceWithTaxfunction again and update the page.
But wait, I hear you wonder, how does Vue’s Reactivity system know what to update when the price changes, and how does it keep track of everything?
This is not how JavaScript programming usually works
If it’s not obvious to you, programming usually doesn’t work this way. For example, if I run this code:
let product = { price: 5, quantity: 2 }
let total = product.price * product.quantity  // 10 right?
product.price = 20
console.log(`total is ${total}`)
What do you think it’s going to print? Since we’re not using Vue, it’s going to print 10.
>> total is 10
In Vue we want total to get updated whenever price or quantity get updated. We want:
>> total is 40
Unfortunately, JavaScript is procedural, not reactive, so this doesn’t work in real life. In order to make total reactive, we have to use JavaScript to make things behave differently.
For the rest of this lesson and the next 2 after this one, we will be building a Reactivity System from scratch using the same methodology as Vue 3 (which is very different than Vue 2). We will then look into the Vue 3 source code to discover these patterns we wrote from scratch.
Saving Code to Run Later
Problem
As you saw with the code above, in order to start building reactivity we need to save how we’re calculating the total , so we can re-run it when price or quantity changes.
Solution
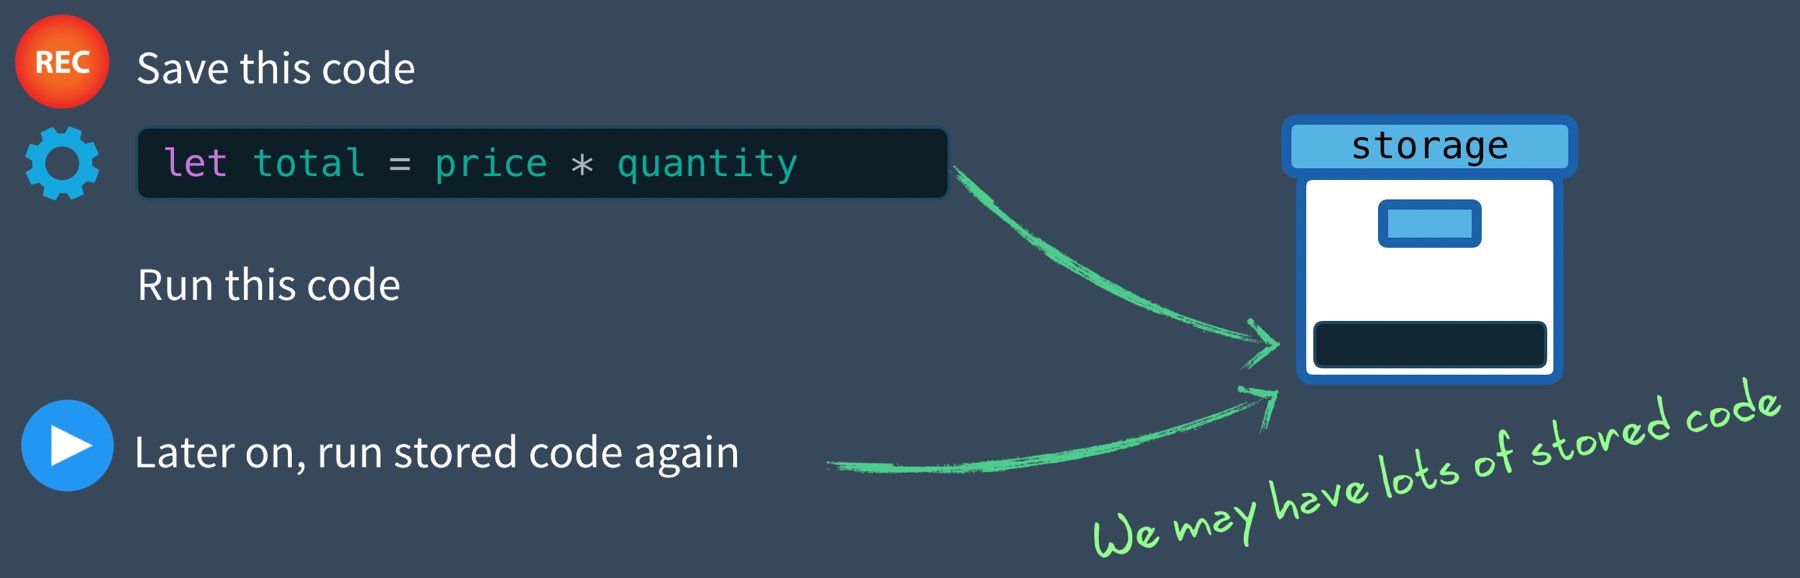
First off, we need some way to tell our application, “Store the code (effect) I’m about to run, I may need you to run it at another time.” Then we’ll want to run the code, and if price or quantity variables get updated, run the stored code again.
We might do this by recording the function (effect) so we can run it again.
let product = { price: 5, quantity: 2 }
let total = 0

let effect = function () {
  total = product.price * product.quantity
})

track() // Remember this in case we want to run it later
effect() // Also go ahead and run it
Notice that we store an anonymous function inside the effect variable, and then call a track function. Using the ES6 arrow syntax I could also write this as:
let effect = () => { total = product.price * product.quantity }
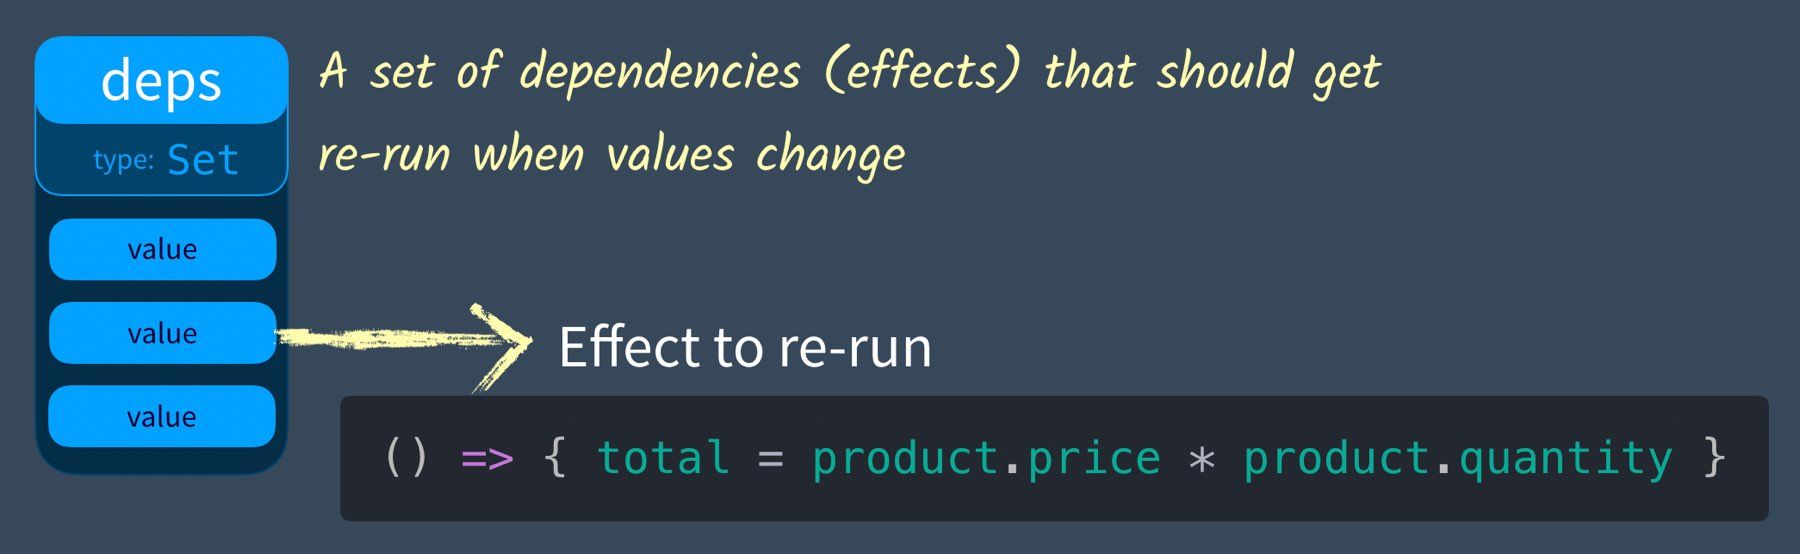
In order to define track , we need a place to store our effects, we may have many of them. We’ll create a variable called dep , as in dependency. We call it dependency because typically with the Observer design pattern a dependency has subscribers (in our case effects) which will get notified when an object changes state. We might make dependency a class with an array of subscribers, like we did in the Vue 2 version of this tutorial. However, since all it needs to store is a set of effects, we can simply create a Set .
let dep = new Set() // Our object tracking a list of effects
Then our track function can simply add our effects to this collection:
function track () {
  dep.add(effect) // Store the current effect
}
In case you’re not familiar, the difference between a JavaScript Array and Set, is that a Set cannot have duplicate values and it doesn’t use an index like arrays. Learn more about Set’s here if you’re not familiar.
We’re storing the effect (in our case the { total = price * quantity } ) so we can run it later. Here’s a visualization this dep Set:
Let’s write a trigger function that runs all the things we’ve recorded.
function trigger() {
  dep.forEach(effect => effect())
}
This goes through all the anonymous functions we have stored inside the dep Set and executes each of them. Then in our code, we can just:
product.price = 20
console.log(total) // => 10
trigger()
console.log(total) // => 40
Simple enough, right? Here’s the code in its entirety if you need to read through and try to grasp it one more time.
let product = { price: 5, quantity: 2 }
let total = 0
let dep = new Set()

function track() {
  dep.add(effect)
}

function trigger() {
  dep.forEach(effect => effect())
}

let effect = () => {
  total = product.price * product.quantity
}

track()
effect()

product.price = 20
console.log(total) // => 10

trigger()
console.log(total) // => 40

Problem: Multiple Properties
We could go on tracking effects as needed, but our reactive objects are going to have different properties, and those properties each need their own dep (which is a set of effects ). Take a look at our object here:
let product = { price: 5, quantity: 2 }
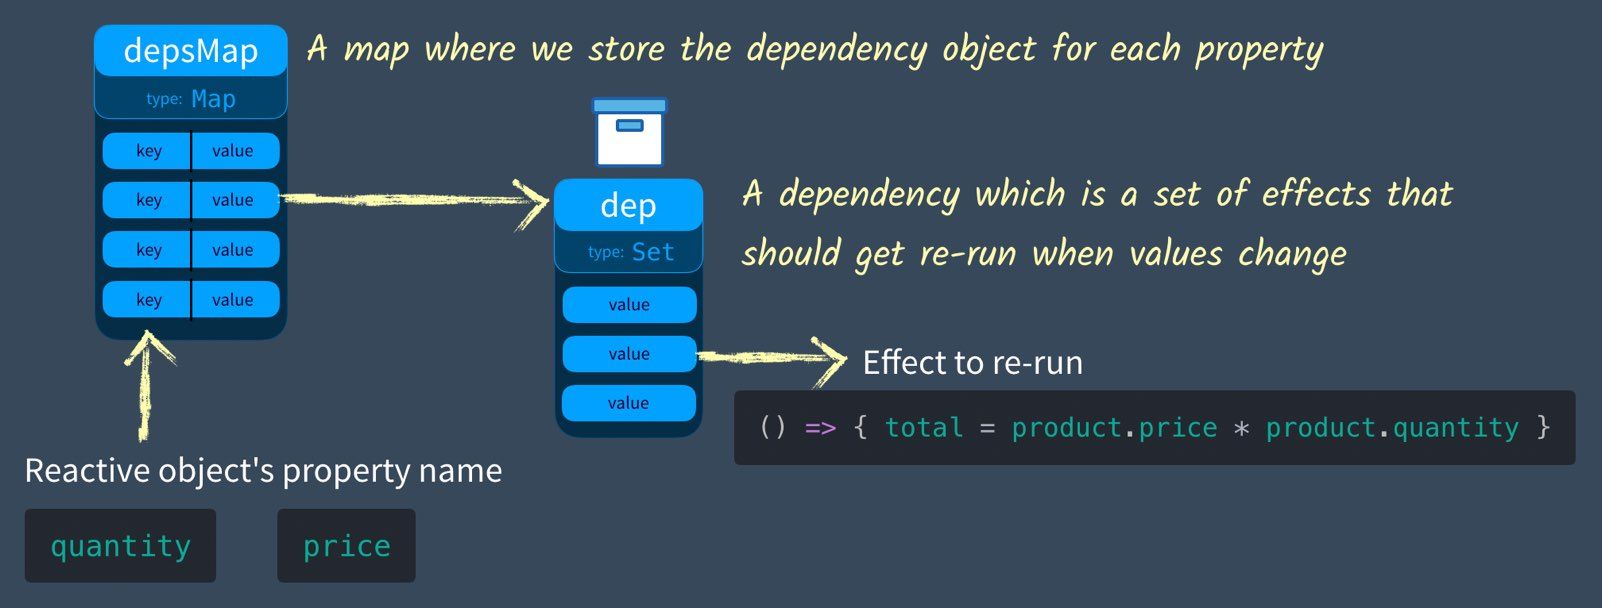
Our price property needs it’s own dep (set of effects ) and our quantity needs it’s own dep (set of effects ). Let’s build out our solution to properly record these.
Solution: depsMap
When we call track or trigger we now need to know which property in our object we’re targeting ( price or quantity ). To do this we’ll create a depsMap , which is of type Map (think keys and values) . Here’s how we might visualize it:
Notice how the depsMap has a key which will be the property name we want to add (or track) a new effect on. So we’ll need to send in this key to the track function.
const depsMap = new Map()
function track(key) {
  // Make sure this effect is being tracked.
  let dep = depsMap.get(key) // Get the current dep (effects) that need to be run when this key (property) is set
  if (!dep) {
    // There is no dep (effects) on this key yet
    depsMap.set(key, (dep = new Set())) // Create a new Set
  }
  dep.add(effect) // Add effect to dep
}
  }
function trigger(key) {
  let dep = depsMap.get(key) // Get the dep (effects) associated with this key
  if (dep) { // If they exist
    dep.forEach(effect => {
      // run them all
      effect()
    })
  }
}

let product = { price: 5, quantity: 2 }
let total = 0

let effect = () => {
  total = product.price * product.quantity
}

track('quantity')
effect()
console.log(total) // --> 10

product.quantity = 3
trigger('quantity')
console.log(total) // --> 40
Problem: Multiple Reactive Objects
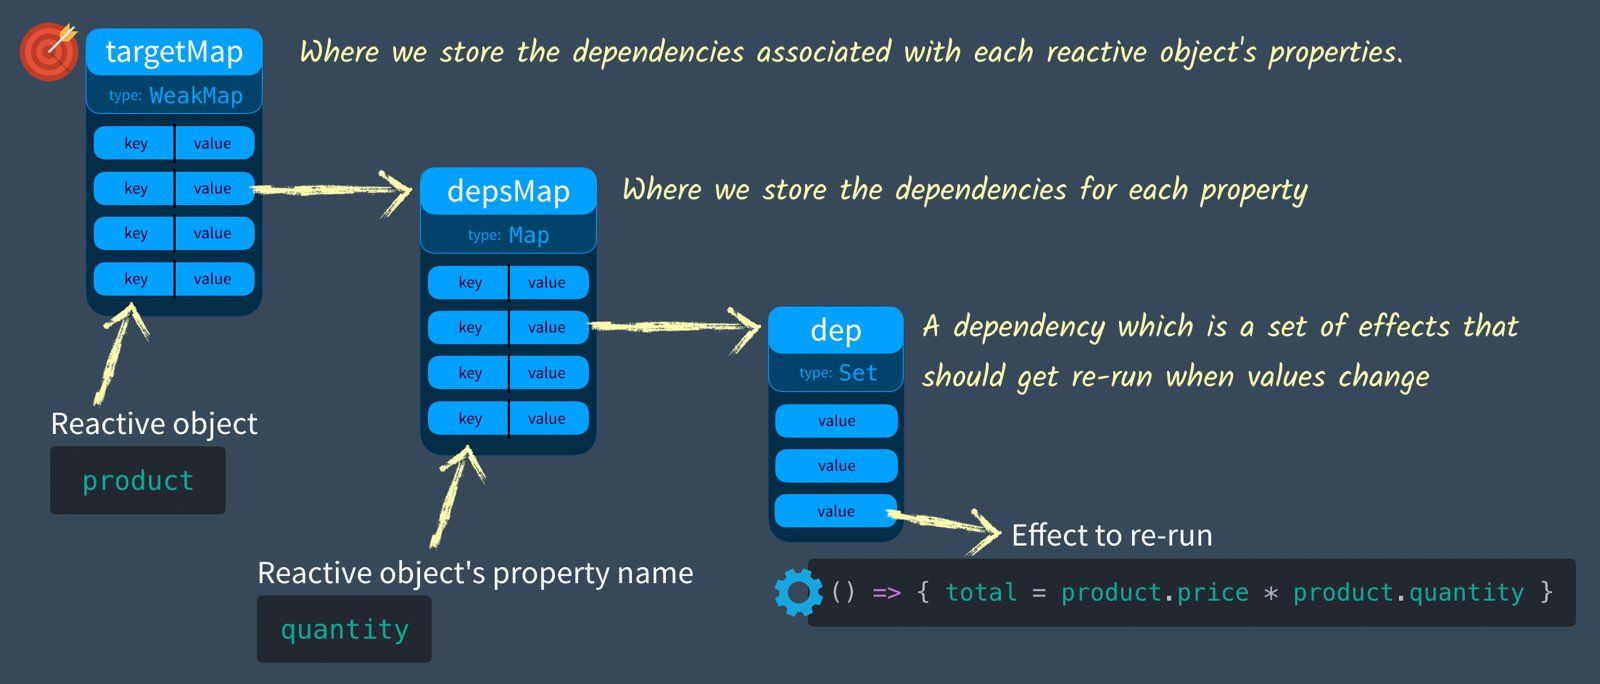
This works great, until we have multiple reactive objects (more than just product) which need to track effects. Now we need a way of storing a depsMap for each object (ex. product). We need another Map, one for each object, but what would be the key? If we use a WeakMap we can actually use the objects themselves as the key. WeakMap is a JavaScript Map that uses only objects as the key. For example:
let product = { price: 5, quantity: 2 }
const targetMap = new WeakMap()
targetMap.set(product, "example code to test")
console.log(targetMap.get(product)) // ---> "example code to test"
Obviously this isn’t the code we’re going to use, but I wanted to show you how our targetMap uses our product object as the key. We call our WeakMap targetMap because we’ll consider target the object we’re targeting. There’s another reason it’s called target which will become more obvious in the next lesson. Here is what we have visualized:
When we call track or trigger we now need to know which object we’re targeting. So, we’ll send in both the target and the key when we call it.
const targetMap = new WeakMap() // targetMap stores the effects that each object should re-run when it's updated

function track(target, key) {
  // We need to make sure this effect is being tracked.
  let depsMap = targetMap.get(target) // Get the current depsMap for this target

  if (!depsMap) {
    // There is no map.
    targetMap.set(target, (depsMap = new Map())) // Create one
  }

  let dep = depsMap.get(key) // Get the current dependencies (effects) that need to be run when this is set
  if (!dep) {
    // There is no dependencies (effects)
    depsMap.set(key, (dep = new Set())) // Create a new Set
  }

  dep.add(effect) // Add effect to dependency map
}

function trigger(target, key) {
  const depsMap = targetMap.get(target) // Does this object have any properties that have dependencies (effects)
  if (!depsMap) {
    return
  }

  let dep = depsMap.get(key) // If there are dependencies (effects) associated with this
  if (dep) {
    dep.forEach(effect => {
      // run them all
      effect()
    })
  }
}

let product = { price: 5, quantity: 2 }
let total = 0
let effect = () => {
  total = product.price * product.quantity
}

track(product, 'quantity')
effect()
console.log(total) // --> 10

product.quantity = 3
trigger(product, 'quantity')
console.log(total) // --> 15
So now we have a very effective way of tracking the dependencies on multiple objects, this is a big piece of the puzzle when building our reactivity system. Give yourself a pat on the back. The battle is half over. In the next lesson we will discover how to call track and trigger automatically using ES6 proxy.
Proxy and Reflect
In our last lesson we learned how Vue 3 keeps track of effects to re-run them when needed. However, we’re still having to manually call track and trigger . In this lesson we’ll learn how to use Reflect and Proxy to call them automatically.
Solution: Hooking onto Get and Set
We need a way to hook (or listen for) the get and set methods on our reactive objects.
GET property => We need to track the current effect
SET property => We need to trigger any tracked dependencies (effects) for this property
The first step to understanding how to do this, is to understand how in Vue 3 with ES6 Reflect and Proxy we can intercept GET and SET calls. Previously in Vue 2 we did this with ES5 Object.defineProperty .
Understanding ES6 Reflect
To print out an object property I can do this:
let product = { price: 5, quantity: 2 }
console.log('quantity is ' + product.quantity)
// or
console.log('quantity is ' + product['quantity'])
However, I can also GET values on an object by using Reflect . Reflect allows you to get a property on an object. It’s just another way to do what I wrote above:
console.log('quantity is ' + Reflect.get(product, 'quantity'))
Why use reflect ? Good question! Because it has a feature we’ll need later, hold that thought.
Understanding ES6 Proxy
A Proxy is a placeholder for another object, which by default delegates to the object. So if I run the following code:
let product = { price: 5, quantity: 2 }
let proxiedProduct = new Proxy(product, {})
console.log(proxiedProduct.quantity)
The proxiedProduct delegates to the product which returns 2 as the quantity. Notice the second argument on Proxy with {} ? This is called a handler and can be used to define custom behavior on the proxy object, like intercepting get and set calls. These interceptor methods are called traps and here’s how we would set a get trap on our handler :
let product = { price: 5, quantity: 2 }

let proxiedProduct = new Proxy(product, {
  get() {
    console.log('Get was called')
    return 'Not the value'
  }
})

console.log(proxiedProduct.quantity)
In the console I’d see:
Get was called
Not the value
We’ve re-written what get returns when the property value is accessed. We should probably return the actual value, which we can do like:
let product = { price: 5, quantity: 2 }

let proxiedProduct = new Proxy(product, {
  get(target, key) {  // <--- The target (our object) and key (the property name)
    console.log('Get was called with key = ' + key)
    return target[key]
  }
})

console.log(proxiedProduct.quantity)
Notice that the get function has two parameters, both the target which is our object ( product ) and the key we are trying to get, which in this case is quantity . Now we see:
Get was called with key = quantity
2
This is also where we can use Reflect and add an additional argument to it.
let product = { price: 5, quantity: 2 }
let proxiedProduct = new Proxy(product, {
  get(target, key, receiver) {  // <--- notice the receiver
    console.log('Get was called with key = ' + key)
    return Reflect.get(target, key, receiver) // <----
  }
})
Notice our get has an additional parameter called receiver which we’re sending as an argument into Reflect.get . This ensures that the proper value of this is used when our object has inherited values / functions from another object. This is why we always use Reflect inside of a Proxy , so we can keep the original behavior we are customizing.
Now let’s add a setter method, there shouldn’t be any big surprises here:
let product = { price: 5, quantity: 2 }

let proxiedProduct = new Proxy(product, {
  get(target, key, receiver) {
    console.log('Get was called with key = ' + key)
    return Reflect.get(target, key, receiver)
  }
  set(target, key, value, receiver) {
    console.log('Set was called with key = ' + key + ' and value = ' + value)
    return Reflect.set(target, key, value, receiver)
  }
})

proxiedProduct.quantity = 4
console.log(proxiedProduct.quantity)
Notice that set looks very similar to get except that it’s using Reflect.set which receives the value to set the target (product). Our output as expected is:
Set was called with key = quantity and value = 4
Get was called with key = quantity
4
There’s another way we can encapsulate this code, which is what you see in the Vue 3 source code. First, we’ll wrap this proxying code in a reactive function which returns the proxy, which should look familiar if you’ve played with the Vue 3 Composition API. Then we’ll declare our handler with it’s traps separately and send them into our proxy.
function reactive(target) {
  const handler = {
    get(target, key, receiver) {
      console.log('Get was called with key = ' + key)
      return Reflect.get(target, key, receiver)
    },
    set(target, key, value, receiver) {
      console.log('Set was called with key = ' + key + ' and value = ' + value)
      return Reflect.set(target, key, value, receiver)
    }
  }
  return new Proxy(target, handler)
}

let product = reactive({ price: 5, quantity: 2 }) // <-- Returns a proxy object
product.quantity = 4
console.log(product.quantity)
This would return the same as above, but now we can easily create multiple reactive objects.
Combining Proxy + Effect Storage
If we take the code we have for creating reactive objects, and remember:
GET property => We need to track the current effect
SET property => We need to trigger any tracked dependencies ( effects ) for this property
We can start to imagine where we need to call track and trigger with the code above:
function reactive(target) {
  const handler = {
    get(target, key, receiver) {
      let result = Reflect.get(target, key, receiver)
        // Track
      return result
    },
    set(target, key, value, receiver) {
      let oldValue = target[key]
      let result = Reflect.set(target, key, value, receiver)
      if (oldValue != result) { // Only if the value changes
        // Trigger
      }
      return result
    }
  }
  return new Proxy(target, handler)
}
Now let’s put the two pieces of code together:
const targetMap = new WeakMap() // targetMap stores the effects that each object should re-run when it's updated
function track(target, key) {
  // We need to make sure this effect is being tracked.
  let depsMap = targetMap.get(target) // Get the current depsMap for this target
  if (!depsMap) {
    // There is no map.
    targetMap.set(target, (depsMap = new Map())) // Create one
  }
  let dep = depsMap.get(key) // Get the current dependencies (effects) that need to be run when this is set
  if (!dep) {
    // There is no dependencies (effects)
    depsMap.set(key, (dep = new Set())) // Create a new Set
  }
  dep.add(effect) // Add effect to dependency map
}
function trigger(target, key) {
  const depsMap = targetMap.get(target) // Does this object have any properties that have dependencies (effects)
  if (!depsMap) {
    return
  }
  let dep = depsMap.get(key) // If there are dependencies (effects) associated with this
  if (dep) {
    dep.forEach(effect => {
      // run them all
      effect()
    })
  }
}

function reactive(target) {
  const handler = {
    get(target, key, receiver) {
      let result = Reflect.get(target, key, receiver)
      track(target, key) // If this reactive property (target) is GET inside then track the effect to rerun on SET
      return result
    },
    set(target, key, value, receiver) {
      let oldValue = target[key]
      let result = Reflect.set(target, key, value, receiver)
      if (oldValue != result) {
        trigger(target, key) // If this reactive property (target) has effects to rerun on SET, trigger them.
      }
      return result
    }
  }
  return new Proxy(target, handler)
}

let product = reactive({ price: 5, quantity: 2 })
let total = 0

let effect = () => {
  total = product.price * product.quantity
}
effect()

console.log('before updated quantity total = ' + total)
product.quantity = 3
console.log('after updated quantity total = ' + total)
Notice how we no longer need to call trigger and track because these are getting properly called inside our get and set methods. Running this code gives us:
before updated quantity total = 10
after updated quantity total = 15
Wow, we’ve come a long way! There’s only one bug to fix before this code is solid. Specifically, that we only want track to be called on a reactive object if it’s inside an effect . Right now track will be called whenever a reactive object property is get . We’ll polish this up in the next lesson.
activeEffect & ref
In this lesson we’ll continue to build out our reactivity code by fixing a small bug and then implementing reactive references, much like you might have seen in Vue 3. The bottom of our current code from the last lesson looks like this:
...
let product = reactive({ price: 5, quantity: 2 })
let total = 0

let effect = () => {
  total = product.price * product.quantity
}
effect()

console.log(total)

product.quantity = 3

console.log(total)
The problem arrives when we add code which GETs a property from our reactive object, like so:
console.log('Updated quantity to = ' + product.quantity)
The issue here is that track and all of it’s function will get called, even if we’re not inside an effect . We only want to look up and record the effect if get is called inside the active effect.
Solution: activeEffect
To solve this problem, we’ll first create an activeEffect , a global variable we’ll store the currently running effect in. We’ll then set this inside a new function called effect .
let activeEffect = null // The active effect running
...
function effect(eff) {
  activeEffect = eff  // Set this as the activeEffect
  activeEffect()      // Run it
  activeEffect = null // Unset it
}

let product = reactive({ price: 5, quantity: 2 })
let total = 0

effect(() => {
  total = product.price * product.quantity
})

effect(() => {
  salePrice = product.price * 0.9
})

console.log(
  `Before updated total (should be 10) = ${total} salePrice (should be 4.5) = ${salePrice}`
)

product.quantity = 3

console.log(
  `After updated total (should be 15) = ${total} salePrice (should be 4.5) = ${salePrice}`
)

product.price = 10

console.log(
  `After updated total (should be 30) = ${total} salePrice (should be 9) = ${salePrice}`
)
Notice that we no longer need to call the effect manually. It’s getting called automatically inside our new effect function. Notice I’ve also added a second effect , because why not  . I’ve also updated our
 console.log s to look more like tests, so we can verify the proper output. You can try out all the code yourself by grabbing it off github.
So good so far, but there’s one more change we need to make, and that’s inside the track function. It needs to use our new activeEffect .
function track(target, key) {
  if (activeEffect) { // <------ Check to see if we have an activeEffect
    let depsMap = targetMap.get(target)
    if (!depsMap) {
      targetMap.set(target, (depsMap = new Map()))
    }
    let dep = depsMap.get(key)
    if (!dep) {
      depsMap.set(key, (dep = new Set())) // Create a new Set
    }
    dep.add(activeEffect) // <----- Add activeEffect to dependency map
  }
}
Great, now if we run our code we properly get:
Before updated total (should be 10) = 10 salePrice (should be 4.5) = 4.5
After updated total (should be 15) = 15 salePrice (should be 4.5) = 4.5
After updated total (should be 30) = 30 salePrice (should be 9) = 9
If you want to walk through this code executing line by line, definitely check out the video.
The Need for Ref
When I was coding up this challenge I realized that the way I was calculating total might make a little more sense if it used the salePrice rather than price , like so:
effect(() => {
  total = salePrice * product.quantity
})
If we were creating a real store, we’d probably calculate the total based on the salePrice . However, this code wouldn’t work reactively. Specifically, when product.price is updated, it will reactively recalculate the salePrice with this effect:
effect(() => {
  salePrice = product.price * 0.9
})
But since salePrice isn’t reactive, the effect with total won’t get recalculated. Our first effect above won’t get re-run. We need some way to make salePrice reactive, and it’d be nice if we didn’t have to wrap it in another reactive object. If you’re familiar with the Composition API, which I teach in the Vue 3 Essentials Course, you might be thinking that I should use ref to create a Reactive Reference. Let’s do this:
let product = reactive({ price: 5, quantity: 2 })
let salePrice = ref(0)
let total = 0
According to the Vue documentation, a reactive reference takes an inner value and returns a reactive and mutable ref object. The ref object has a single property .value that points to the inner value. So we’d need to change around our effects a little to use .value .
effect(() => {
  total = salePrice.value * product.quantity
})

effect(() => {
  salePrice.value = product.price * 0.9
})
Our code should work now, properly updating the total when salePrice is updated. However, we still need to define ref . There’s two ways we could do it.
1. Defining Ref with Reactive
First, we could simply use reactive as we’ve defined it:
function ref(intialValue) {
  return reactive({ value: initialValue })
}
However, this isn’t how Vue 3 defines ref with primitives, so let’s implement it differently.
Understanding JavaScript Object Accessors
In order to understand how Vue 3 defines ref , we first need to make sure we are familiar with object accessors. These are sometimes also known as JavaScript computed properties (not to be confused with Vue computed properties). Below you can see a simple example which uses Object Accessors:
let user = {
  firstName: 'Gregg',
  lastName: 'Pollack',

  get fullName() {
    return `${this.firstName} ${this.lastName}`
  },

  set fullName(value) {
    [this.firstName, this.lastName] = value.split(' ')
  },
}

console.log(`Name is ${user.fullName}`)
user.fullName = 'Adam Jahr'
console.log(`Name is ${user.fullName}`)
The get and set lines are object accessors to get fullName and set fullName accordingly. This is plain JavaScript, and is not a feature of Vue.
2. Defining Ref with Object Accessors
Using Object Accessors, along with our track and trigger actions, we can now define ref using:
function ref(raw) {
  const r = {
    get value() {
      track(r, 'value')
      return raw
    },
    set value(newVal) {
      raw = newVal
      trigger(r, 'value')
    },
  }
  return r
}
That’s all there is to it. Now when we run the following code:
...
function ref(raw) {
  const r = {
    get value() {
      track(r, 'value')
      return raw
    },
    set value(newVal) {
      raw = newVal
      trigger(r, 'value')
    },
  }
  return r
}

function effect(eff) {
  activeEffect = eff
  activeEffect()
  activeEffect = null
}

let product = reactive({ price: 5, quantity: 2 })
let salePrice = ref(0)
let total = 0

effect(() => {
  total = salePrice.value * product.quantity
})

effect(() => {
  salePrice.value = product.price * 0.9
})

console.log(
  `Before updated quantity total (should be 9) = ${total} salePrice (should be 4.5) = ${salePrice.value}`
)
product.quantity = 3
console.log(
  `After updated quantity total (should be 13.5) = ${total} salePrice (should be 4.5) = ${salePrice.value}`
)
product.price = 10
console.log(
  `After updated price total (should be 27) = ${total} salePrice (should be 9) = ${salePrice.value}`
)
We get what we would expect:
Before updated total (should be 10) = 10 salePrice (should be 4.5) = 4.5
After updated total (should be 13.5) = 13.5 salePrice (should be 4.5) = 4.5
After updated total (should be 27) = 27 salePrice (should be 9) = 9
Our salePrice is now reactive and total gets updated when it changes!
Computed Values & Vue 3 Source
As we’ve been building out our Reactivity example, you may have been wondering “why haven’t we used computed for our values where we’ve been using effect ?” When looking at our example:
let product = reactive({ price: 5, quantity: 2 })
let salePrice = ref(0)
let total = 0
effect(() => {
  salePrice.value = product.price * 0.9
})
effect(() => {
  total = salePrice.value * product.quantity
})
It seems clear to me that if I was coding up Vue I would write both salePrice and total as computed properties. If you’re familiar with the Vue 3 composition API, you’re probably familiar with the computed syntax. If you’re not, maybe take our Vue 3 Essentials course. We might use the computed syntax like so (even though we haven’t defined it yet):
let product = reactive({ price: 5, quantity: 2 })

let salePrice = computed(() => {
  return product.price * 0.9
})
let total = computed(() => {
  return salePrice.value * product.quantity
})
Makes sense right? And notice how my salePrice computed property is included inside my total computed property, and that we access it using .value . This is our first clue to implementation. It looks like we’re creating another reactive reference. Here’s how we create our computed function:
function computed(getter) {
  let result = ref()  // Create a new reactive reference

  effect(() => (result.value = getter())) // Set this value equal to the return value of the getter

  return result // return the reactive reference
}
That’s all there is to it. You can view / run the code in its entirety over on Github. Our code prints out:
Before updated quantity total (should be 9) = 9 salePrice (should be 4.5) = 4.5
After updated quantity total (should be 13.5) = 13.5 salePrice (should be 4.5) = 4.5
After updated price total (should be 27) = 27 salePrice (should be 9) = 9
Vue Reactivity without a Caveat
It’s worth mentioning that we can do something with our reactive objects that was impossible with Vue 2. Specifically, we can add new reactive properties. Like so:
...
let product = reactive({ price: 5, quantity: 2 })
...

product.name = 'Shoes'
effect(() => {
  console.log(`Product name is now ${product.name}`)
})
product.name = 'Socks'
As you might expect, it prints out:
Product name is now Shoes
Product name is now Socks
This was impossible with Vue 2 because of how Reactivity was implemented, adding getters and setters to individual object properties using Object.defineProperty . Now with Proxy we can add new properties no problem and they’re instantly reactive.
Testing our code against Vue 3 Source
You might be wondering, would this code work against Vue 3 source? So I cloned the vue-next repo (currently alpha 5), ran yarn install , then yarn build reactivity . This gave me a bunch of files in my packages/reactivity/dist/ . I then took the reactivity.cjs.js file I found there and moved it next to my example files, the ones on github, and wrote this up to use Vue’s Reactivity code:
var { reactive, computed, effect } = require('./reactivity.cjs')

// Exactly the same code here from before, without the definitions

let product = reactive({ price: 5, quantity: 2 })

let salePrice = computed(() => {
  return product.price * 0.9
})

let total = computed(() => {
  return salePrice.value * product.quantity
})

console.log(
  `Before updated quantity total (should be 9) = ${total.value} salePrice (should be 4.5) = ${salePrice.value}`
)
product.quantity = 3
console.log(
  `After updated quantity total (should be 13.5) = ${total.value} salePrice (should be 4.5) = ${salePrice.value}`
)
product.price = 10
console.log(
  `After updated price total (should be 27) = ${total.value} salePrice (should be 9) = ${salePrice.value}`
)
product.name = 'Shoes'
effect(() => {
  console.log(`Product name is now ${product.name}`)
})
product.name = 'Socks'
Ran this with node 08-vue-reactivity.js , and as expected, I got all the same results!
Before updated quantity total (should be 9) = 9 salePrice (should be 4.5) = 4.5
After updated quantity total (should be 13.5) = 13.5 salePrice (should be 4.5) = 4.5
After updated price total (should be 27) = 27 salePrice (should be 9) = 9
Product name is now Shoes
Product name is now Socks
Wow, so our reactivity system works as well as Vue! Well, at a basic level … yes, but in reality Vue’s version is MUCH more complex. Let’s take a look through the files that make up Vue 3’s Reactivity system, to begin to get familiar.
Vue 3 Reactivity Files
If we take a look inside the Vue 3 source, inside /packages/reactivity/src/ we’ll find the following files. Yes they are TypeScript (ts) files, but you should be able to read them (even if you don’t know TypeScript).
-
effect.ts - Defines the
effectfunction to encapsulate code that may contain reactive references and objects. Containstrackwhich is called fromgetrequests andtriggerwhich is called fromsetrequests. -
baseHandlers.ts - Contains the
Proxyhandlers likegetandset, which calltrackandtrigger(from effect.ts). -
reactive.ts - Contains the functionality for the reactive syntax which creates an ES6 Proxy using
getandset(from basehandlers.ts). -
ref.ts - Defines how we create Reactive Ref erences, using object accessors (like we did). Also contains
toRefswhich converts reactive objects into a series of reactive references which access the original proxy. -
computed.ts - Defines the
computedfunction usingeffectand object accessors (a little different than we did).
There are a few more additional files, but these carry the core functionality. If you’re feeling like a challenge, you may want to dive into the source code. In the next two lessons we’ll speak to Evan You about how he implemented Reactivity in Vue 3 and give us a tour of the source himself.