Chapter 2: Server. Database. Session. Header and MenuDrop components.
-
HTTP
-
Express server
- Nodemon
- Index page
- Testing
-
Database
- dotenv
- Testing connection
-
Session
- Configure session
- Save session
- Testing
-
Update Header component
-
MenuDrop component
Before you start working on Chapter 2, get the 2-start codebase. The 2-start folder is located at the root of the book directory inside the builderbook repo.
- If you haven’t cloned the builderbook repo yet, clone it with
git clone https://github.com/builderbook/builderbook.git. - Inside the
2-startfolder, runyarnto install all packages.
These are the packages that we install specifically for Chapter 2:
"connect-mongo""dotenv""express""express-session""mongoose""nodemon"
Check out the package.json for Chapter 2.
- Be sure to use these specific packages and ignore any warnings about upgrading. We regularly upgrade all packages and test them in the book. But before testing, we cannot guarantee that a new package version will work properly.
By the end of Chapter 2, you will create a .env file with a MONGO_URL_TEST environmental variable.
In the previous chapter (Chapter 1), we discussed our app structure, as well as Next and server-side rendering. We also integrated our app with Material-UI and added a few global and shared styles.
At this point, our app is simply a static app - meaning the app does not have a server that receives requests ( req ) and returns responses ( res ). In this chapter, our main goals are to:
- create an Express server
- connect our app to a database (MongoDB)
- set up and customize session
At the end of this chapter, we will create a MenuDrop component and make improvements to our Header component.
Start your app ( yarn dev ) and navigate to http://localhost:3000 :

As you can see, our app is very basic and has no user authentication. The Index page is available to all users, and the Header component looks the same to all users. There is no way for a user to log in and see a unique dashboard page.
Before we can add user authentication to our app, we have to create a server and connect our app to a database. In a typical app, the server will receive a request from the client (a user’s browser) to log in and search for a user inside a database . If a user already exists on the database, then the server will send that user’s data to his/her browser. If a user does not exist on the database, then the server will create a new user.
Typically, the server listens for a request ( req ) from the client, executes some server-side functions, and then replies with a response ( res ). To better understand the concept of using a server, we should make a detour to understand the client-server protocol HTTP.
HTTP
To properly set up our server, we have to understand how HTTP’s request/response, headers, and methods work.
HTTP (HyperText Transfer Protocol) is a client-server protocol, a system of rules that define how data is exchanged within or between computers. Client is usually the web browser. Server is one or more machines that serve data as a response ( res ) to a request ( req ) from a client. HTTP is currently the most popular protocol on the web.
- Request is a message that is sent from client to server.
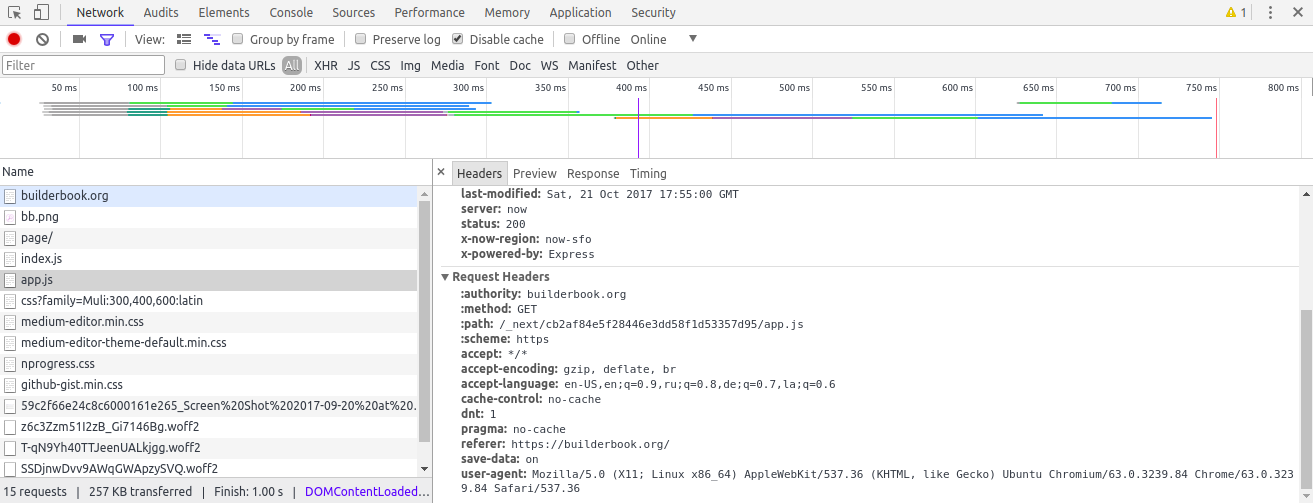
A request containsmethod,path,version of protocol, and optionalheadersorbody:
An HTTPmethodis an operation that the client wants to perform. Most often, the client gets data (e.g. a list of books) with GET or posts data (e.g creates a new book) with POST. Other methods are available for more complicated operations.pathis a relative route of the resource. Relative means that it does not include the protocol name (https://), main domain (builderbook.org), or port (443). In the example above, thepathis/_next/cb2af84e5f28446e3dd58f1d53357d95/app.js.version of protocolis the version of the HTTP protocol - either HTTP/1.1 or HTTP/2.0. The latter is designed to have lower latency for the end user. Read more about it here.headersprovide more descriptions (parameters) to the server. Among the many parameters on the screenshot above, you’ll noticednt: 1. This parameter tells the serverdo not track. More on headers.bodycontains data. In the context of our app, we will use the POST method to create a new book. Thebodyof this request will contain data such as the book’sname,price, andgithubRepo. - Response is a message sent from server to client.
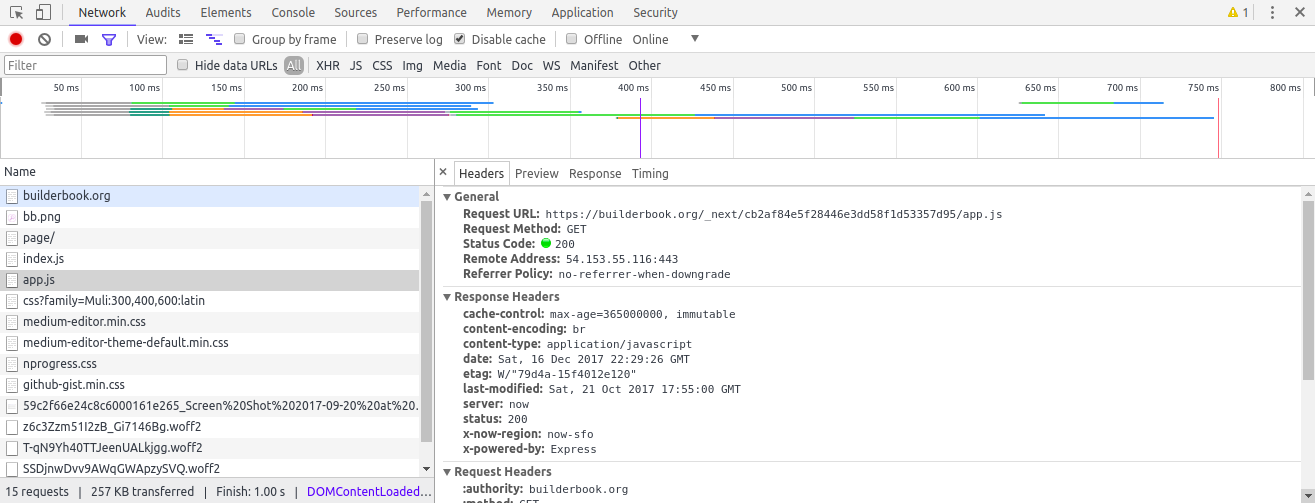
A response containsversion of protocol,status code,status message, and optionalheadersorbody.We already coveredversion protocol,headers, andbodywhen discussing request.status codeindicates if a request succeeded or failed.status messageis typically a one-word description that accompanies astatus code.Take a look at our screenshot of a typical response. The response status200 OKsays that our request succeeded. Success means that the response’s body contains the correct data that we requested with the GETmethodandpath. If our request used the POST method instead, then200 OKwould mean that data inside the request’s body was successfuly sent and received by the server.A full list of status codes is here.
A note on credentials - in Chapter 5, we will write code that sends a request to our server. Among other parameters, such as method type, we will specify credentials: same-origin . This option tells the client to include user credentials (e.g. cookie) in the request, providing that the request is sent to the same domain as the location of the script that sends the request (read docs).
Express server
In the previous section, you learned the concepts of client and server, request and response, and the HTTP methods GET and POST (we will use only these two methods to write all of our Express middleware and routes).
Express is the most popular framework built on top of Node.
In Chapter 5, when we dive into internal APIs, we will discuss Express middleware and routes in detail. In this section, let’s understand how a simple Express route works on a high level.
Consider the following example of an Express route (we will write this code in Chapter 3):
server/google.js :
server.get('/logout', (req, res) => {
  req.logout();
  res.redirect('/login');
});
Take a careful look, as this code has all features of a basic Express route:
- It has the route
/logout - It executes the function:
(req, res) => { ... } - It modifies
reqand/orres. In this case, both of them:req.logout();andres.redirect('/login'); - It uses the HTTP method GET:
server.get()
An Express server listens to requests from a client using Express routes. When a user goes to a particular route on his/her browser, a function in an Express route that matches the client route gets executed.
Typically, in our app, an Express route will call some static method for a particular Model to CRUD (create/read/update/delete) data. For example, on the Admin dashboard, our app calls the /books Express route to get a list of all books. When an Admin clicks the Add book button, our app calls the books/add Express route to create a new book document. You will see more examples in Chapter 5.
This introduction to Express routes will suffice to create our first Express server. However, if you’d like to learn more, read the official docs or check Chapter 5, section Internal APIs.
Time to create our Express server.
Create a server/app.js file with the following content.
server/app.js :
const express = require('express');

const server = express();

server.get('/', (req, res) => {
  res.send('My express server');
});

server.listen(3000, () => {
  console.log('Ready on port 3000!');  // eslint-disable-line no-console
});
Start your express server by running node server/app.js .
Navigate to http://localhost:3000 in your browser, and you will see a page with My express server! :

res.send() sends an HTTP response. When the argument is a String - this method sets Content-Type to text/html , so the output is a page with the body My express server . Read more about this method in the Express docs.
Notice that we used:
const express = require(‘express’);
instead of:
import express from ‘express’;
That’s because Node does not support ES6 syntax for import (Node will support it soon).
If you use import express from 'express' and then run node server/app.js , you will see a syntax error in your terminal:
SyntaxError: Unexpected token import
You have two options: 1) you can use this new ES6 import syntax, but you have to compile your server code with babel-node ; 2) you can use older syntax ( require/modules.export ). In this book we choose to do later since compiling server code with babel-node brings us one step closer to configuration hell (getting an error related to wrong configuration).
We will import modules using require instead of import , example:
const express = require(‘express’);
We will export modules using modules.export instead of default export and exports.X = X instead of export . Examples:
module.exports = User
exports.setupGithub = setupGithub
Nodemon
Currently, to see changes in our browser after we edit server/app.js , we have to stop and start our server manually. This is a big time waste. If, for example, we want to change a route inside our Express route from / to /aaa , we’d like to see this change on the browser without restarting our server manually.
To save time, we should restart the server automatically when a file changes - Nodemon does exactly that.
If you ran yarn at the beginning of this chapter, then you installed and added nodemon to devDependencies.
Go to your terminal and run:
yarn nodemon server/app.js
Navigate to http://localhost:3000 . Now edit the server/app.js file - for instance, change the text inside the response to My Express server 101 . Go back to your browser, refresh the tab, and you will see your changes (without restarting your server manually):

By default, nodemon will watch for file changes in the current directory. Let’s ask nodemon to watch for changes in our server/* directory. To do so, append the command with --watch server :
yarn nodemon server/app.js --watch server
To save time, add a new command called yarn dev-express to the script section of our package.json file:
"scripts": {
  "build": "next build",
  "start": "next start",
  "dev": "next",
  "lint": "eslint components pages lib server",
  "dev-express": "nodemon server/app.js --watch server"
},
Let’s use a new script command to start the server - yarn dev-express instead of yarn dev .
To reduce confusion when we start our express server, we will serve our app at port 8000 instead of the Next.js default port 3000. To do so, let’s define the port variable:
server/app.js :
const express = require('express');

const port = process.env.PORT || 8000;
const ROOT_URL = `http://localhost:${port}`;

const server = express();

server.get('/', (req, res) => {
  res.send('My express server');
});

server.listen(port, () => {
  console.log(`> Ready on ${ROOT_URL}`);  // eslint-disable-line no-console
});
If you set up Eslint properly (we did it in Chapter 1), then the line with console.log() will be highlighted with an Eslint warning/error:
[eslint] Unexpected console statement. (no-console)
You can disable this Eslint error by adding
// eslint-disable-line no-console
to the line that contains console.log() .
Read more about disabling Eslint errors.
At this point, we’ve created an Express server. Since we use the Next framework for this app, our actual goal is to configure a Next server. We’ll closely follow this official example.
In short, we need to import a Next server:
const next = require(‘next’);
Then, we need to pass NODE_ENV to this Next server (production or development). The boolean parameter dev is true when the enviroment is not production and false when the environment is production:
const dev = process.env.NODE_ENV !== 'production';
const app = next({ dev });
The official example defines a handler function as:
const handle = app.getRequestHandler()
and uses this function for GET requests:
app.prepare().then(() => {
  const server = express();

  server.get('/', (req, res) => {
    res.send('My express server');
  });

  server.get('*', (req, res) => handle(req, res));

  server.listen(port, (err) => {
    if (err) throw err;
    console.log(`> Ready on ${ROOT_URL}`); // eslint-disable-line no-console
  });
}
In summary, we get:
./server/app.js :
const express = require('express');
const next = require('next');

const port = process.env.PORT || 8000;
const ROOT_URL = `http://localhost:${port}`;

const dev = process.env.NODE_ENV !== 'production';
const app = next({ dev });
const handle = app.getRequestHandler();

app.prepare().then(() => {
  const server = express();

  server.get('/', (req, res) => {
    res.send('My express server');
  });

  server.get('*', (req, res) => handle(req, res));

  server.listen(port, (err) => {
    if (err) throw err;
    console.log(`> Ready on ${ROOT_URL}`); // eslint-disable-line no-console
  });
});
Index page
If you start your app with yarn dev-express and navigate to http://localhost:8000 , you will get:

This is a good example of how an Express server works, but our goal is to render our Index page at the / route. To do so, remove the following code snippet from server/app.js :
server.get('/', (req, res) => {
  res.send('My express server');
});
Go to your browser, and now you can see the content of our Index page at the / route:

Here is the code for our Index page from Chapter 1:
import Head from 'next/head';

import withLayout from '../lib/withLayout';

const Index = () => (
  <div style={{ padding: '10px 45px' }}>
    <Head>
      <title>Index page</title>
      <meta name="description" content="This is the description of the Index page" />
    </Head>
    <p>Content on Index page</p>
  </div>
);

export default withLayout(Index);
We wrote the Index page as a stateless functional component (see definition in Chapter 1). We are going to change that and pass one prop to our Index page - the user prop. Our goal is to display a user’s email ( user.email ) on the Index page.
But before doing that, we should make one update to our withLayout HOC. We want to pass the user prop to the Index page using Index.getInitialProps() . This is a Next.js method that acts on a page component and populates the page props with data. We discuss this method in more detail in Chapter 3, section getInitialProps().
Recall that withLayout takes BaseComponent as an argument and returns a new component, App . Here let’s write a a block of code that checks whether BaseComponent (for example the Index component) has initial data, and if it does, then pass that data to props of the App component. If BaseComponent has no initial data, then we pass an empty object:
App.getInitialProps = (ctx) => {
  if (BaseComponent.getInitialProps) {
    return BaseComponent.getInitialProps(ctx);
  }

  return {};
};
The code above will pass the user prop to App , and as a result, the Header component will get the user prop as well because of <Header {...this.props} /> . Then, by using a user object, we are able to show a user his/her avatar and name on the Header component. This is a typical UX for dashboards.
Add the code block above to the current version of our withLayout HOC, and you get:
lib/withLayout.js :
import React from 'react';
import PropTypes from 'prop-types';
import { MuiThemeProvider } from '@material-ui/core/styles';
import CssBaseline from '@material-ui/core/CssBaseline';

import getContext from './context';
import Header from '../components/Header';

function withLayout(BaseComponent) {
  class App extends React.Component {
    constructor(props) {
      super(props);
      const { pageContext } = this.props;
      this.pageContext = pageContext || getContext();
    }

    componentDidMount() {
      const jssStyles = document.querySelector('#jss-server-side');
      if (jssStyles && jssStyles.parentNode) {
        jssStyles.parentNode.removeChild(jssStyles);
      }
    }

    render() {
      return (
        <MuiThemeProvider
          theme={this.pageContext.theme}
          sheetsManager={this.pageContext.sheetsManager}
        >
          <CssBaseline />
          <div>
            <Header {...this.props} />
            <BaseComponent {...this.props} />
          </div>
        </MuiThemeProvider>
      );
    }
  }

  App.propTypes = {
    pageContext: PropTypes.object, // eslint-disable-line
  };

  App.defaultProps = {
    pageContext: null,
  };

  App.getInitialProps = (ctx) => {
    if (BaseComponent.getInitialProps) {
      return BaseComponent.getInitialProps(ctx);
    }

    return {};
  };

  return App;
}

export default withLayout;
Now that we have updated our withLayout HOC, let’s go back to our main objective: modifying the Index page so that we pass our user prop to it. In doing so, we will display a user’s email ( user.email ) on the Index page. Here are the 2 additions we should make to index.js :
- Validation of props and default props are optional, but we will use them:
Index.propTypes = {
 user: PropTypes.shape({
   email: PropTypes.string.isRequired,
 }),
};

Index.defaultProps = {
 user: null,
};
- Next’s
getInitialProps()is a static method that passes data to a page by populatingpropsof the page’s components.We will apply this static method to ourIndexcomponent:
Index.getInitialProps = async ({ query }) => ({ user: query.user });
Combine the code from steps 1 and 2, and you get:
pages/index.js :
import PropTypes from 'prop-types';

import Head from 'next/head';

import withLayout from '../lib/withLayout';

const Index = ({ user }) => (
  <div style={{ padding: '10px 45px' }}>
    <Head>
      <title>Index page</title>
      <meta name="description" content="This is the description of the Index page" />
    </Head>
    <p>Content on Index page</p>
    <p>Email: {user.email}</p>
  </div>
);

Index.getInitialProps = async ({ query }) => ({ user: query.user });

Index.propTypes = {
  user: PropTypes.shape({
    email: PropTypes.string.isRequired,
  }),
};

Index.defaultProps = {
  user: null,
};

export default withLayout(Index);
Our Index page gets the user prop populated by the getInitialProps() method. Now we need our server to pass the user object to getInitialProps() . We’ll do this in the next section by writing an Express route with the GET method and path / .
At this point, if you attempt to run your app, you will get an error saying that email is undefined. That’s expected, since we did not yet add an Express route that makes user available to getInitialProps() .
Testing
Consider the following Express route:
server.get('/', (req, res) => {
  res.send('My express server');
});
With this route, our server does not render any page from our application. The server simply sends an HTTP response, and since the argument is a String , the res.send() method sets Content-Type to text/html . The result is a page that contains a body with My express server as its content.
However, we would like to pass the user prop to our Index page, render that page , and then send the rendered HTML to the client. Next.js uses app.render(req, res, route, query) to achieve exactly that. In our case app.render(req, res, route, query) becomes app.render(req, res, '/', { user }); . Place this line of code in our Express route, and you will get:
server.get('/', (req, res) => {
  const user = { email: 'team@builderbook.org' };
  app.render(req, res, '/', { user });
});
Notice that the shorthand for { user: user } is simply { user } .
The above code snippet is responsible for:
- passing the
userquery to ourIndexpage (route/), - rendering the page on the server, and
- sending the rendered page to the client.
The Index page accesses the user value as query.user and sets the initial user prop with the getInitialProps method (Next.js method that populates pages props). Take a look at the Index page code:
Index.getInitialProps = async ({ query }) => ({ user: query.user });
At this point, our app has no connection to our database. We imitate a database connection by hard-coding the user and user email with:
const user = { email: ‘team@builderbook.org’ };
Add the Express route above to your app.js file. Paste it above this line:
server.get(’*’, (req, res) => handle(req, res));
Start your app with yarn dev-express and go to http://localhost:8000 :

Great! Our Express server passed the
user object (as query.user ) to the getInitialProps() method. This method populated the user prop in the Index page. Finally, the server returned a rendered page with data to the client at the / route.
In the example above, we hard-coded the email address of our user and essentially imitated a database. In the next section, we’ll connect our app to MongoDB.
Database
In the previous section, we created a custom server by integrating our Express server with Next. Now we need to connect this server to our database, MongoDB. We will use mongoose , express-session , and connect-mongo to achieve it. We will need the latter two packages to create and save a session (discussed in the next section, Session ).
- First, let’s import the Mongoose dependency to our main server code at
server/app.js:
const mongoose = require(‘mongoose’);
Mongoose simplfies the creation of schema-based Models. A schema defines a collection and the structure of any document within that collection. The schema for a blog post model may look like:
var blogSchema = new Schema({
 title:  String,
 author: String,
 body:   String,
 comments: [{ body: String, date: Date }],
 date: { type: Date, default: Date.now },
 hidden: Boolean,
 meta: {
   votes: Number,
   favs:  Number
 }
})
Another great feature of Mongoose is that all of its methods (such as findOne , create , update , etc.) return a Promise. This simplifies the syntax when we write static methods for particular models. More on this in Chapter 3, section Promise, then().For our app, we will have the following Mongoose models: User , Book , Chapter , EmailTemplate , and Payment . We will introduce these models gradually throughout this book.Model is an object made from a schema. Schema is the structure of the Model’s document. A document is one instance of a Model. We apply Mongoose’s CRUD methods on a model to create/read/update/delete documents in our database.
2. For now, let’s create our first model - the User model. And let’s define the schema for our User model as const Schema = mongoose.Schema . Create a server/models/User.js file with following content:
server/models/User.js :
const mongoose = require('mongoose');

const { Schema } = mongoose;

const mongoSchema = new Schema({
 googleId: {
   type: String,
   required: true,
   unique: true,
 },
 googleToken: {
   access_token: String,
   refresh_token: String,
   token_type: String,
   expiry_date: Number,
 },
 slug: {
   type: String,
   required: true,
   unique: true,
 },
 createdAt: {
   type: Date,
   required: true,
 },
 email: {
   type: String,
   required: true,
   unique: true,
 },
 isAdmin: {
   type: Boolean,
   default: false,
 },
 displayName: String,
 avatarUrl: String,

 isGithubConnected: {
   type: Boolean,
   default: false,
 },
 githubAccessToken: {
   type: String,
 },
});

const User = mongoose.model('User', mongoSchema);

module.exports = User;
Most of the parameters in our User schema are self-explanatory. All parameters have type ( String , Date , Boolean , Number ) - some are required and some have default values.After we integrate Google OAuth in Chapter 3, our app will receive googleId , googleToken , email , displayName , and avatarUrl from the Google profile of an authenticated user.Our app generates a slug and saves the createdAt date. Our app adds isGithubConnected when a user authorizes our app to access his/her Github profile, and our app receives githubAccessToken from Github (similar to the googleToken received from Google).Note that we used older export syntax module.exports = User instead of newer ES6 syntax export default User . We did so since we are not compiling server code with babel-node .
3. To connect a server to MongoDB with Mongoose, we use:
mongoose.connect(MONGO_URL)
To avoid some deprecation warnings from Mongoose, we will also define a list of options that include useNewUrlParser , useCreateIndex , and useFindAndModify . We tell Mongoose to use these options by including options in our mongoose.connect function.Note that you might still see the following Mongoose deprecation warning, although we have resolved it: collection.update is deprecated. Use updateOne, updateMany, or bulkWrite instead. . You can ignore this warning for now.Add the above line of code to our server code:
server/app.js :
const express = require('express');
const next = require('next');
const mongoose = require('mongoose');

const dev = process.env.NODE_ENV !== 'production';
const MONGO_URL = process.env.MONGO_URL_TEST;

const options = {
 useNewUrlParser: true,
 useCreateIndex: true,
 useFindAndModify: false,
};
mongoose.connect(
 MONGO_URL,
 options,
);

const port = process.env.PORT || 8000;
const ROOT_URL = `http://localhost:${port}`;

const app = next({ dev });
const handle = app.getRequestHandler();

app.prepare().then(() => {
 const server = express();

 server.get('/', (req, res) => {
   const user = { email: 'team@builderbook.org' };
   app.render(req, res, '/', { user });
 });

 server.get('*', (req, res) => handle(req, res));

 server.listen(port, (err) => {
   if (err) throw err;
   console.log(`> Ready on ${ROOT_URL}`); // eslint-disable-line no-console
 });
});
Make sure to define the MONGO_URL before you use it as an argument in mongoose.connect() . Define it with:
const MONGO_URL = process.env.MONGO_URL_TEST;
dotenv
If you attempt to run your app ( yarn dev-express ), you will get this error:
(node:49441) UnhandledPromiseRejectionWarning: Unhandled promise rejection (rejection id: 2): Error: URL malformed, cannot be parsed
The problem is that we did not define process.env.MONGO_URL_TEST . To manage multiple environmental variables (we will end up using about a dozen of them), we suggest using the dotenv package.
Important note: we will use dotenv to manage server-side environmental variables. In Chapter 8, we will introduce and discuss so-called universal environmental variables, which are available on both client and server.
You installed dotenv at the start of this chapter by running yarn inside of the 2-start folder. Create a .env file at the root of your app with the following content:
.env :
MONGO_URL_TEST=“XXXXXX”
If you plan to push your app’s code to Github, make sure to add .env to the .gitignore file, so you don’t publish sensitive information such as API keys.
Then import dotenv ( require('dotenv') ) and initialize it with require('dotenv').config() :
server/app.js :
const express = require('express');
const next = require('next');
const mongoose = require('mongoose');

require('dotenv').config();

const dev = process.env.NODE_ENV !== 'production';
const MONGO_URL = process.env.MONGO_URL_TEST;

const options = {
  useNewUrlParser: true,
  useCreateIndex: true,
  useFindAndModify: false,
};
mongoose.connect(
  MONGO_URL,
  options,
);

const port = process.env.PORT || 8000;
const ROOT_URL = `http://localhost:${port}`;

const app = next({ dev });
const handle = app.getRequestHandler();

app.prepare().then(() => {
  const server = express();

  server.get('/', (req, res) => {
    const user = { email: 'team@builderbook.org' };
    app.render(req, res, '/', { user });
  });

  server.get('*', (req, res) => handle(req, res));

  server.listen(port, (err) => {
    if (err) throw err;
    console.log(`> Ready on ${ROOT_URL}`); // eslint-disable-line no-console
  });
});
To retrieve a variable from our .env file, we prepend the variable’s name (specified in .env ) with process.env. , for example:
process.env.NODE_ENV
process.env.MONGO_URL_TEST
The final step before testing is to get an actual MONGO_URL .
We recommend creating a free tier database cluster at MongoDB Atlas. Sign up for MongoDB Atlas and follow this simple tutorial to create a free cluster.
Below are screenshots to help you create your free database cluster at MongoDB Atlas.
After signup, while at your dashboard, find and click a green Build a New Cluster button on the right:
You will see a new form to create a new cluster. The form contains multiple sections but to start quickly you need to modify only one section Cluster Tier :
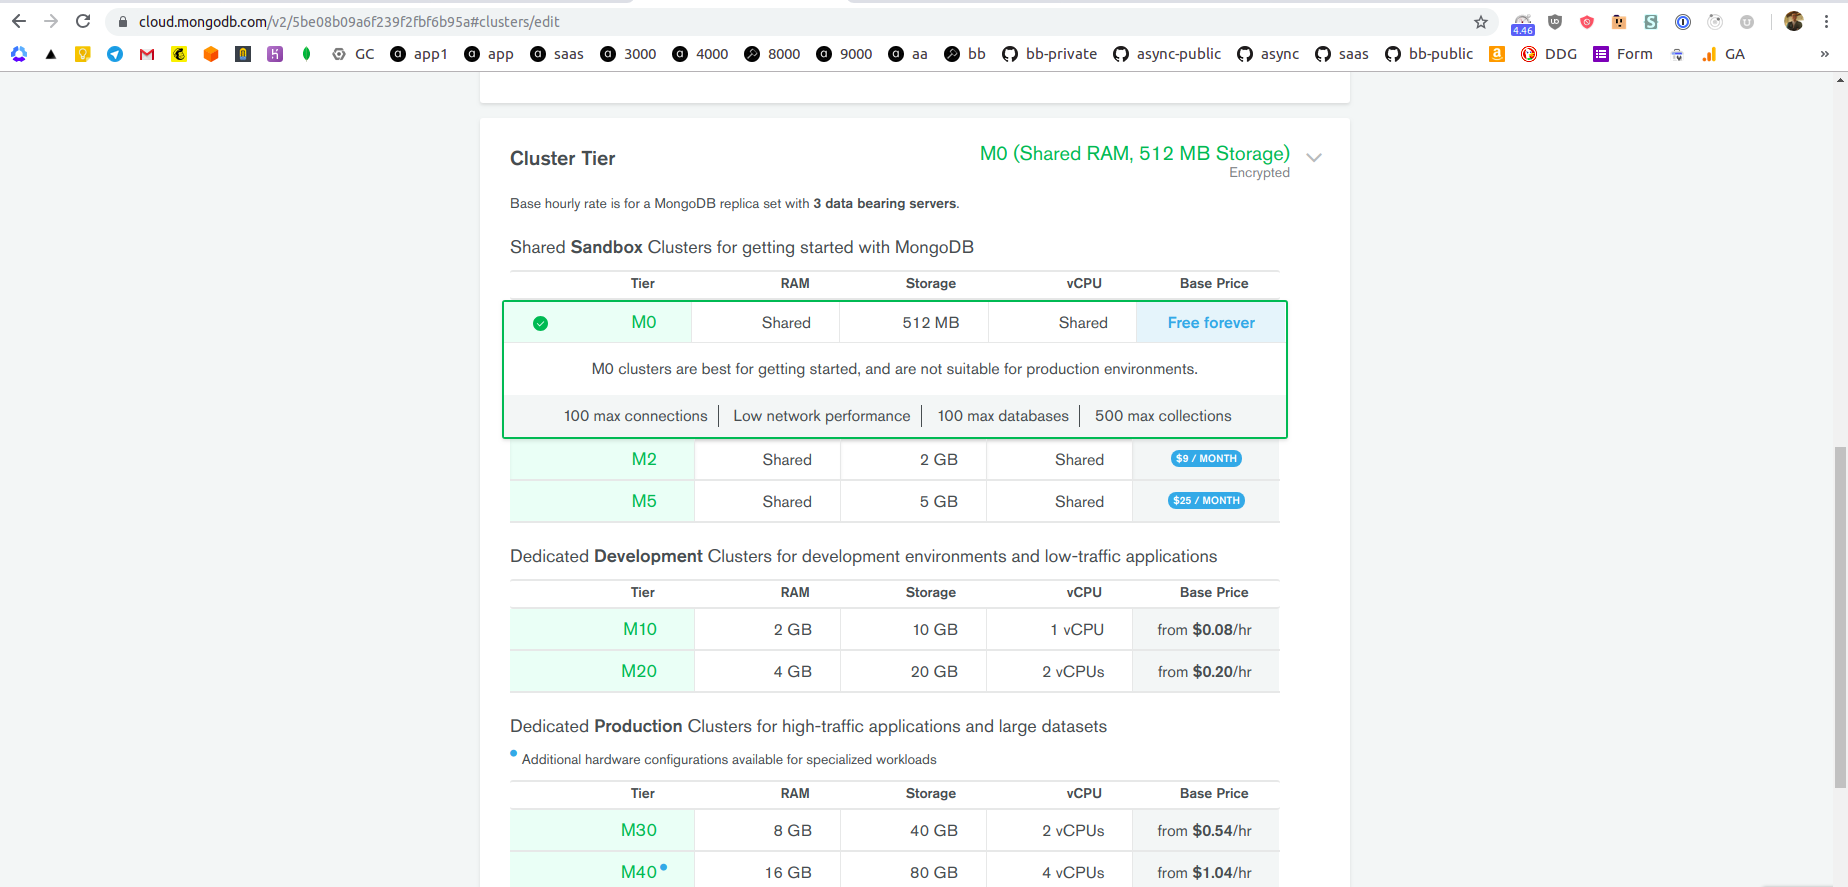
Make sure to select free M0 tier .
At the bottom of the form, click green Create Cluster .
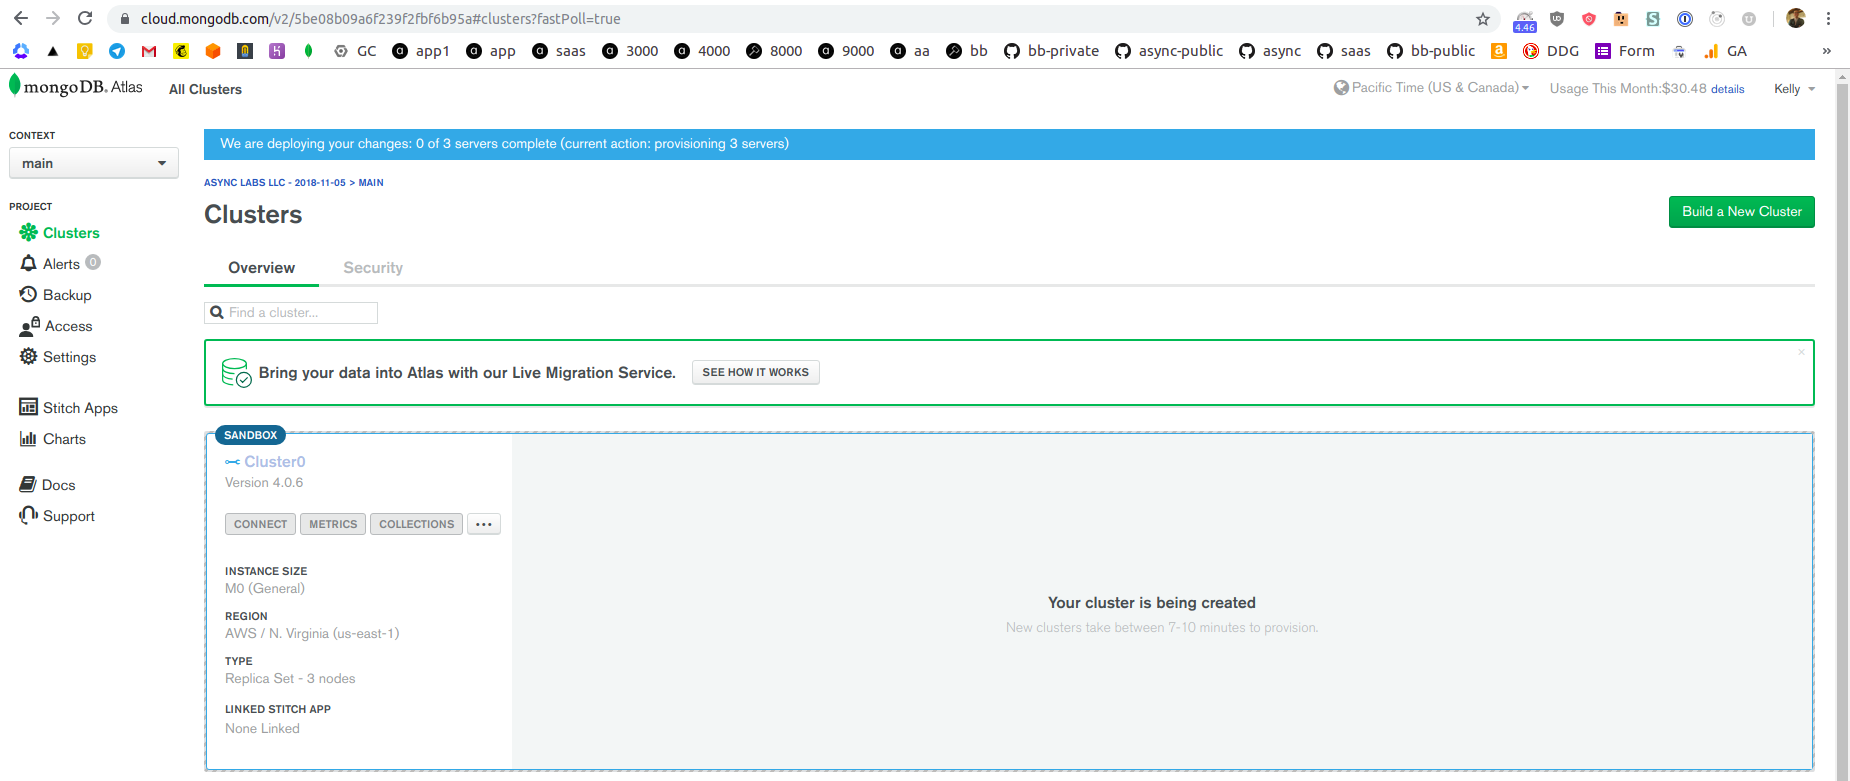
After clicking the button, you will redirected to main view of the dashboard, while your free cluster is being deployed - you will see a blue progress bar that informs you on the status.
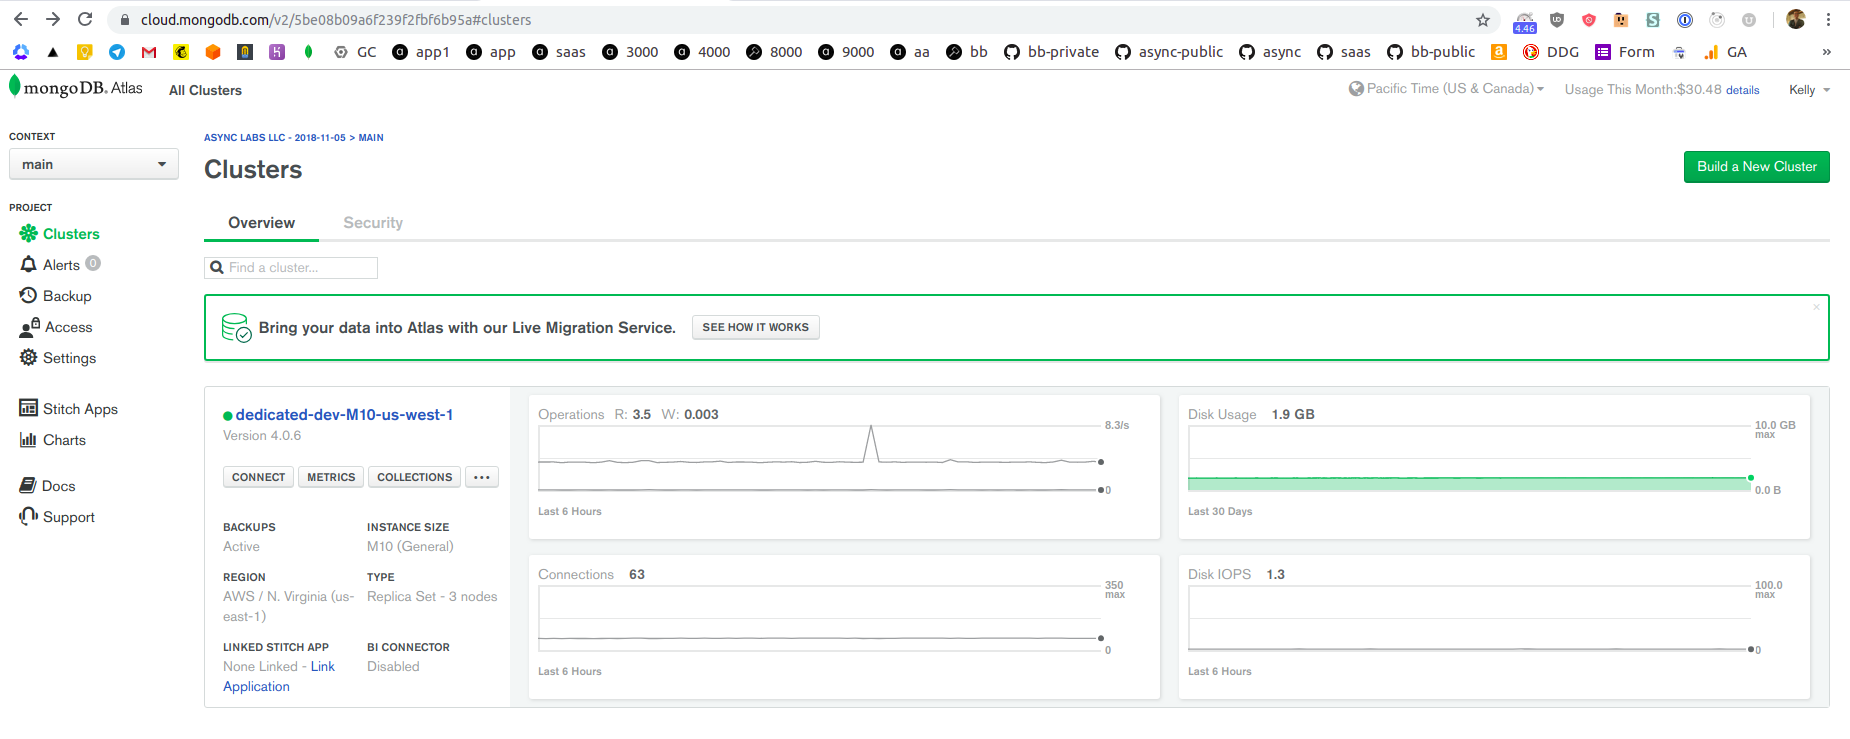
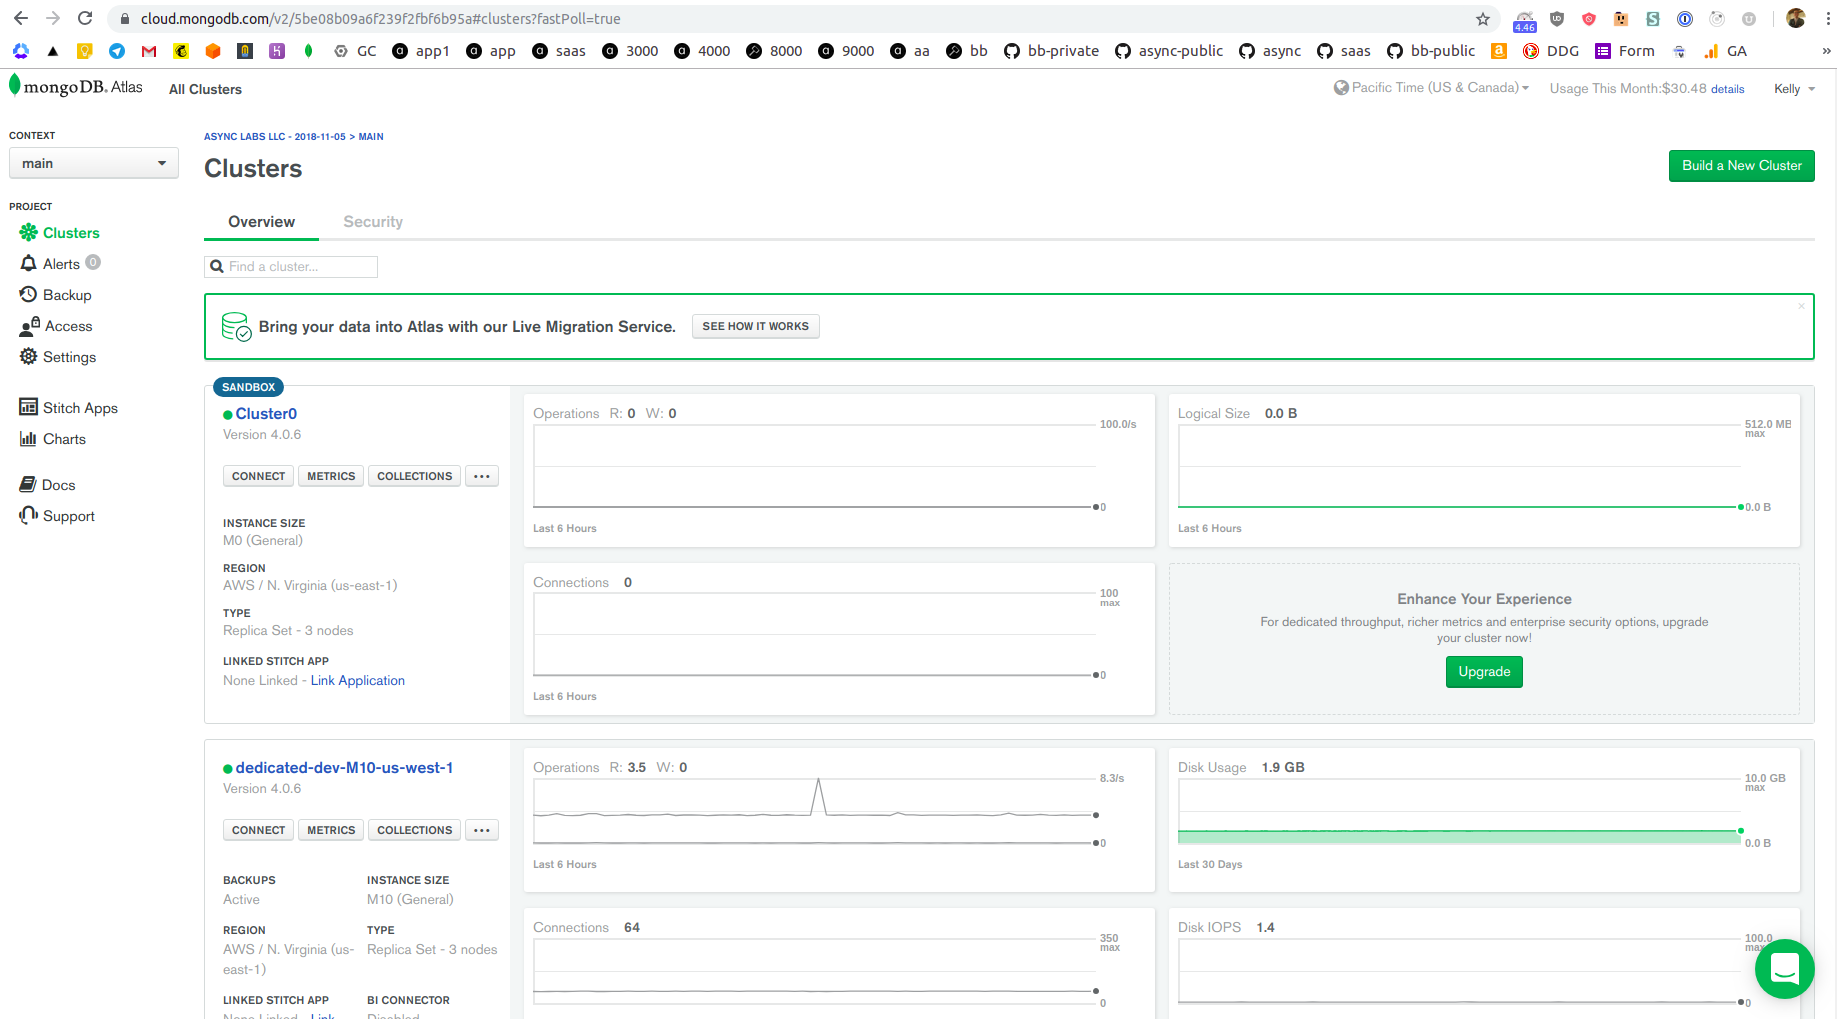
After free cluster is successfully deployed, progress bar disappears and free cluster appears on the list of all of your clusters at the main view of your dashboard:
The free cluster that you just created can contain multiple MongoDB databases. Keep in mind that since cluster is free, it has relatively limited resources (CPU and memory). All databases within cluster share these limited resources.
You created a free cluster, now let’s construct our MONGO_URL .
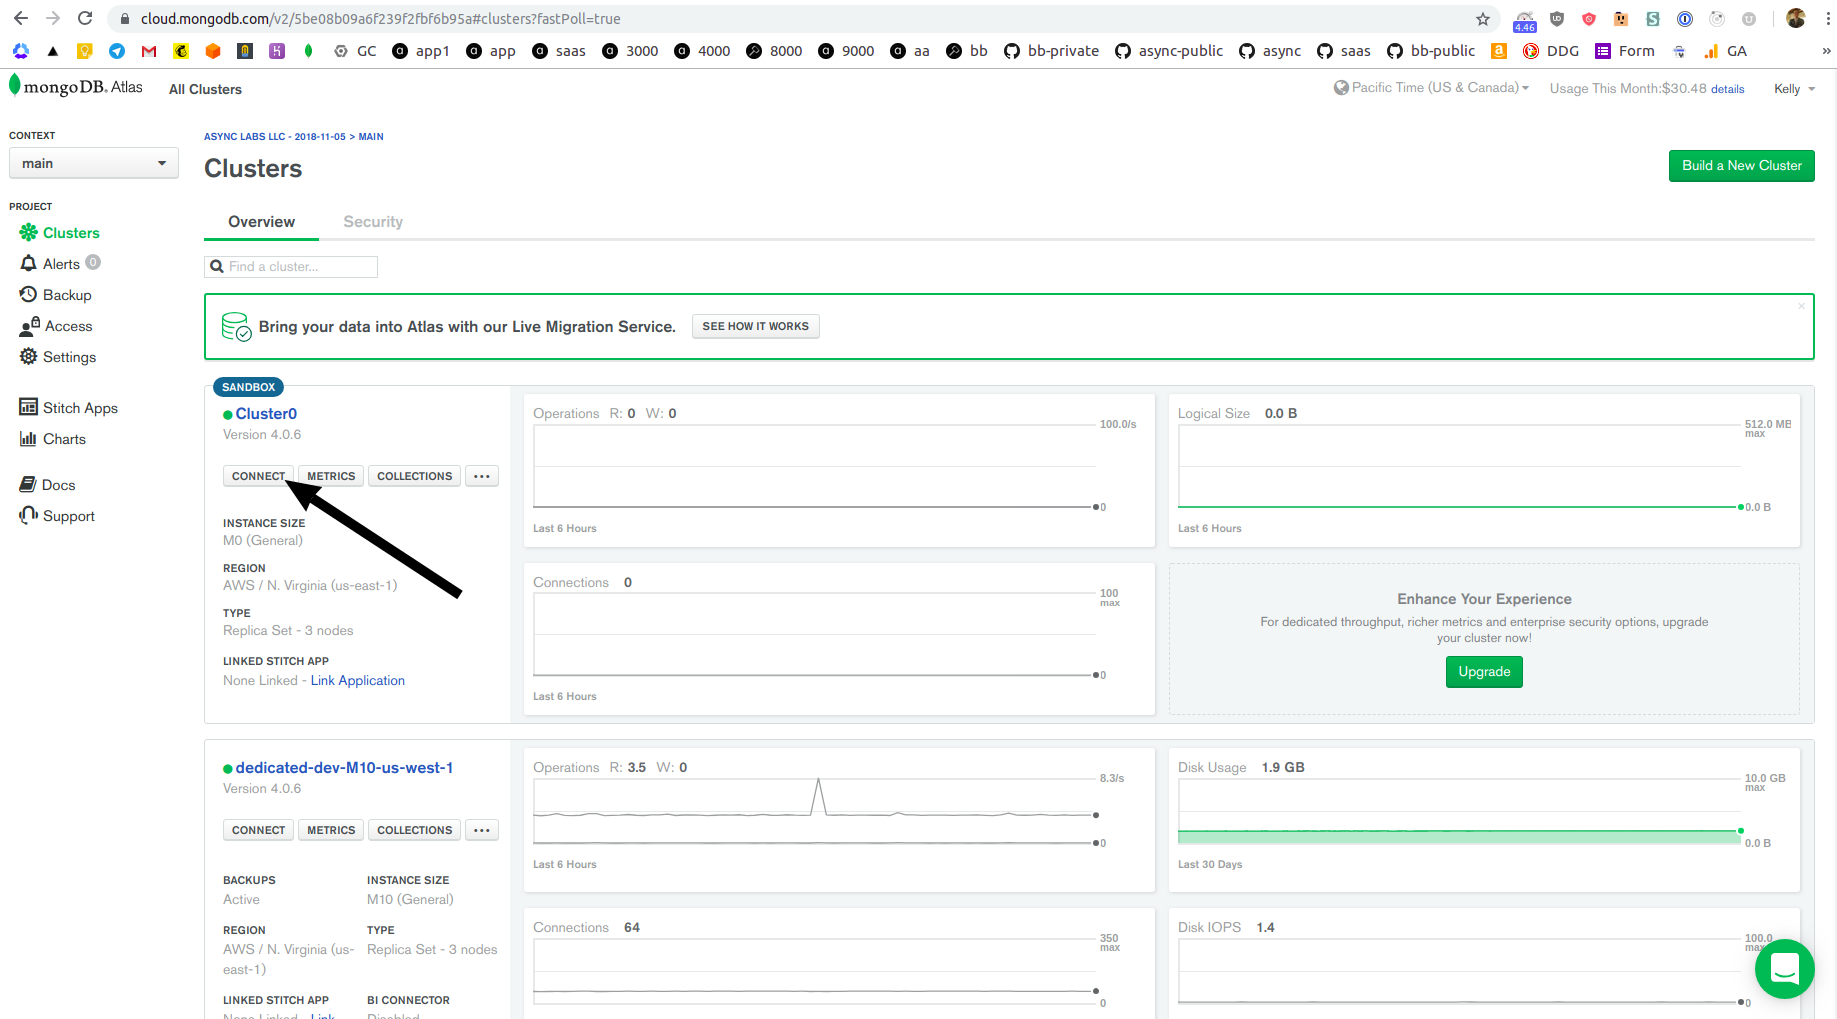
To find this URL, click Connect on your free cluster ( Cluster0 ) on the list of clusters:
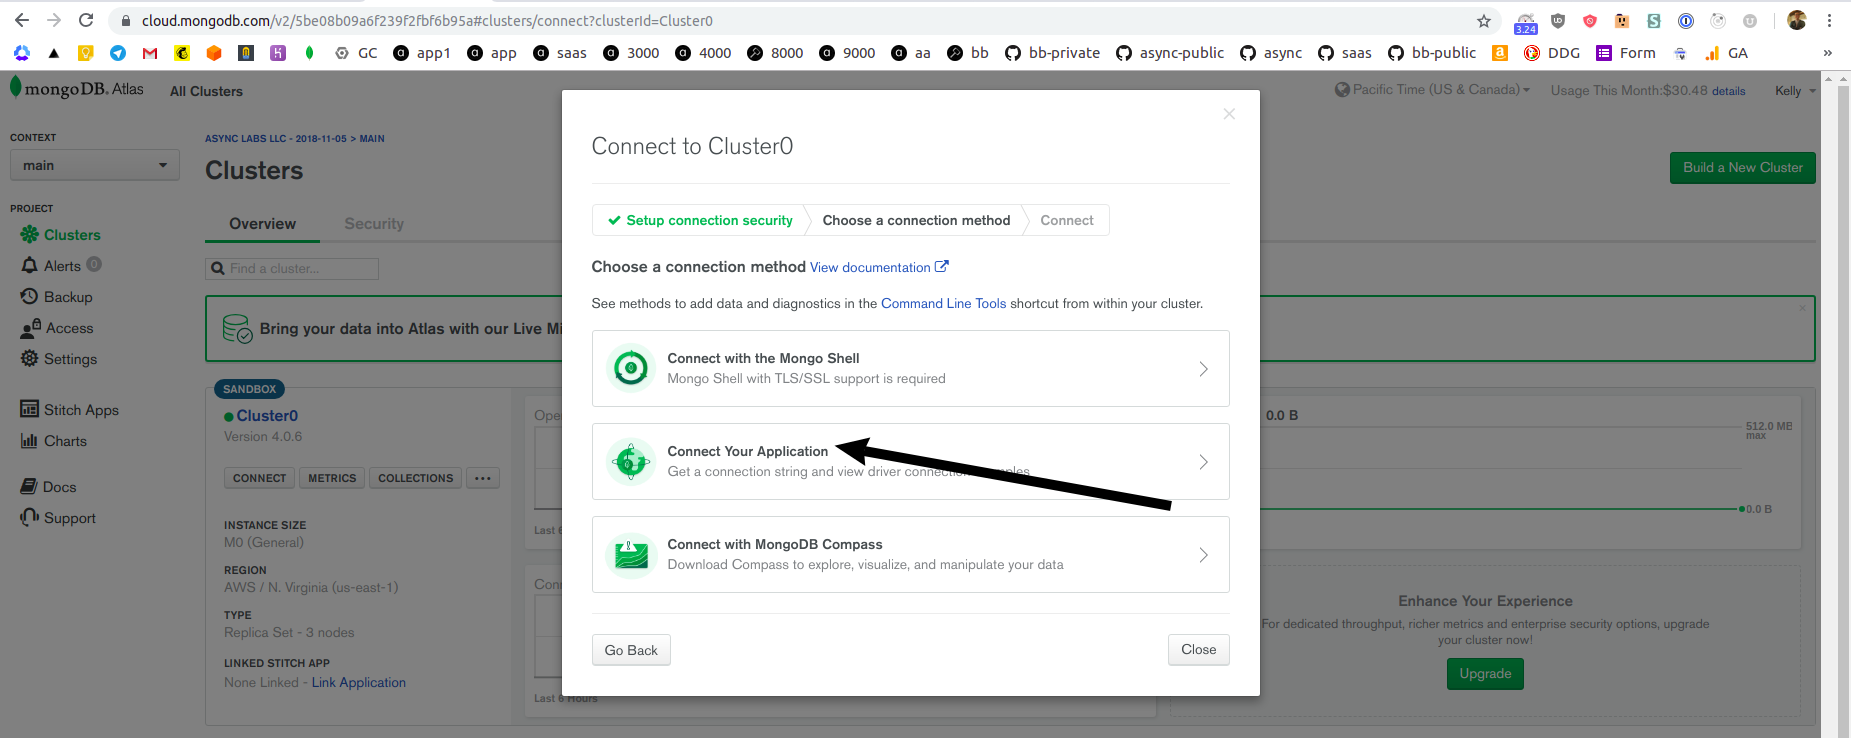
On the next screen, select option Connect Your Application :
For me, MONGO_URL looks like this:
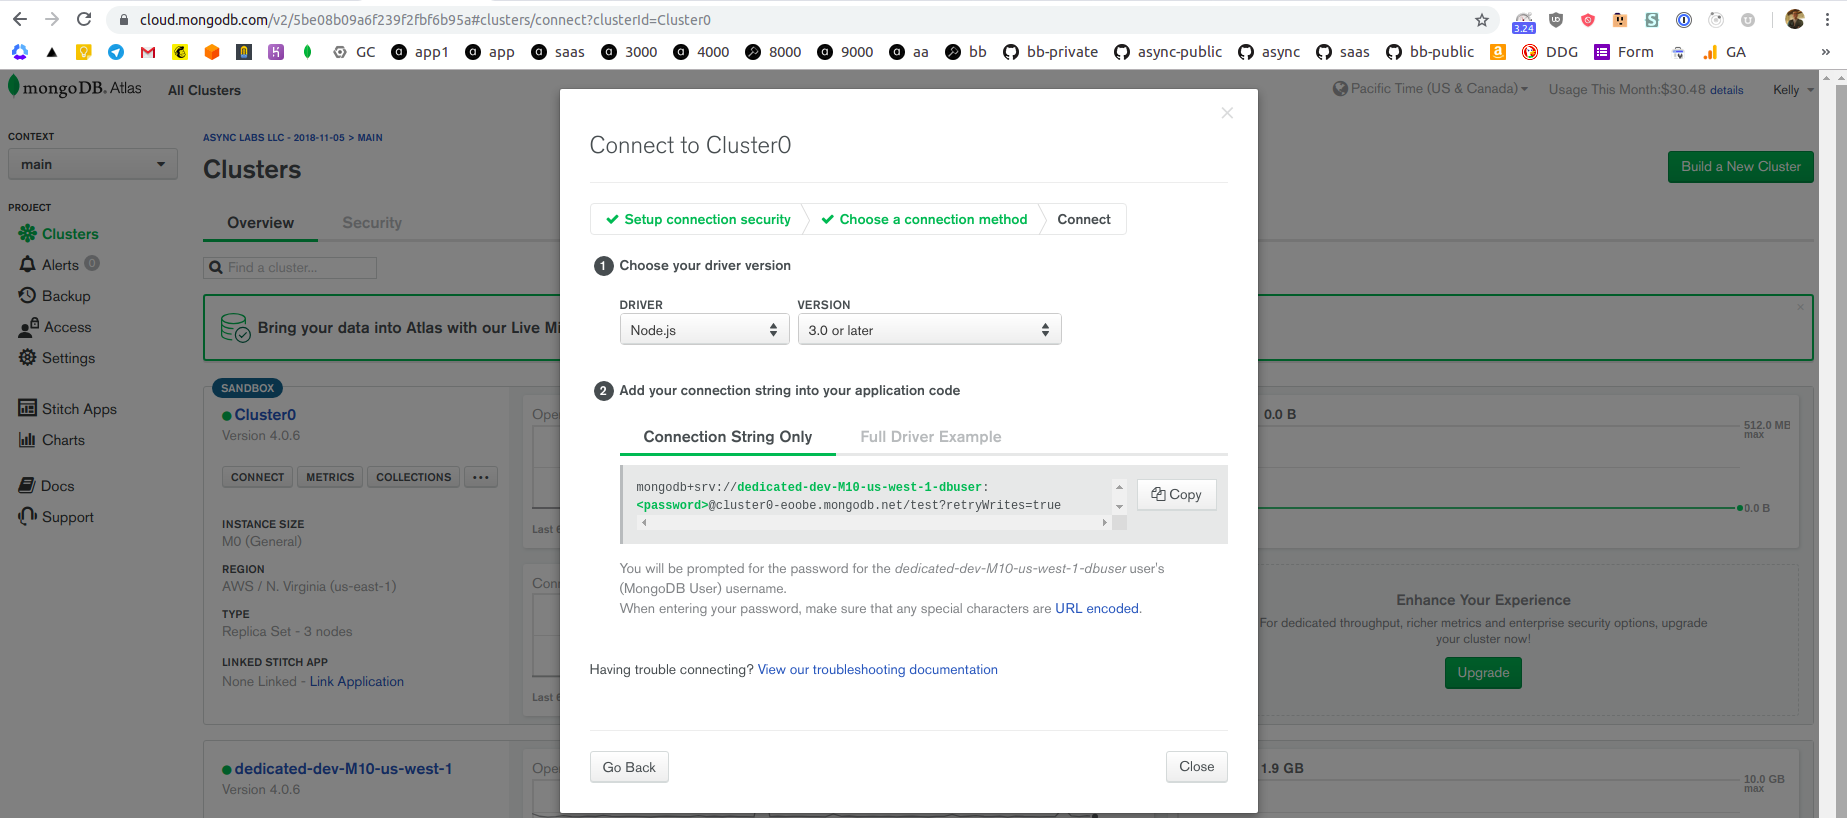
In general, MONGO_URL is:
mongodb+srv://:@cluster0-eoobe.mongodb.net/?retryWrites=true
You may notice a few things about MONGO_URL from the above screenshot:
-
dbis name of ther database and it istest, that’s because by default Atlas will create database with nametest. You are free to specify a different for your database. Note that Atlas will automatically create a new database on the first connection with the name you specified insideMONGO_URLstring. For simplicity, we will go withtestfor database’s name. - my
MONGO_URLhas prefilledusername- this is because I already created database user and Atlas prefillsusernameautomatically
If you are new to MongoDB Atlas, you should create your first database user.
Click on Security tab while you are on the main view of your dashboard (main view displays list of clusters):
Then click on the green + ADD NEW USER button on the right:
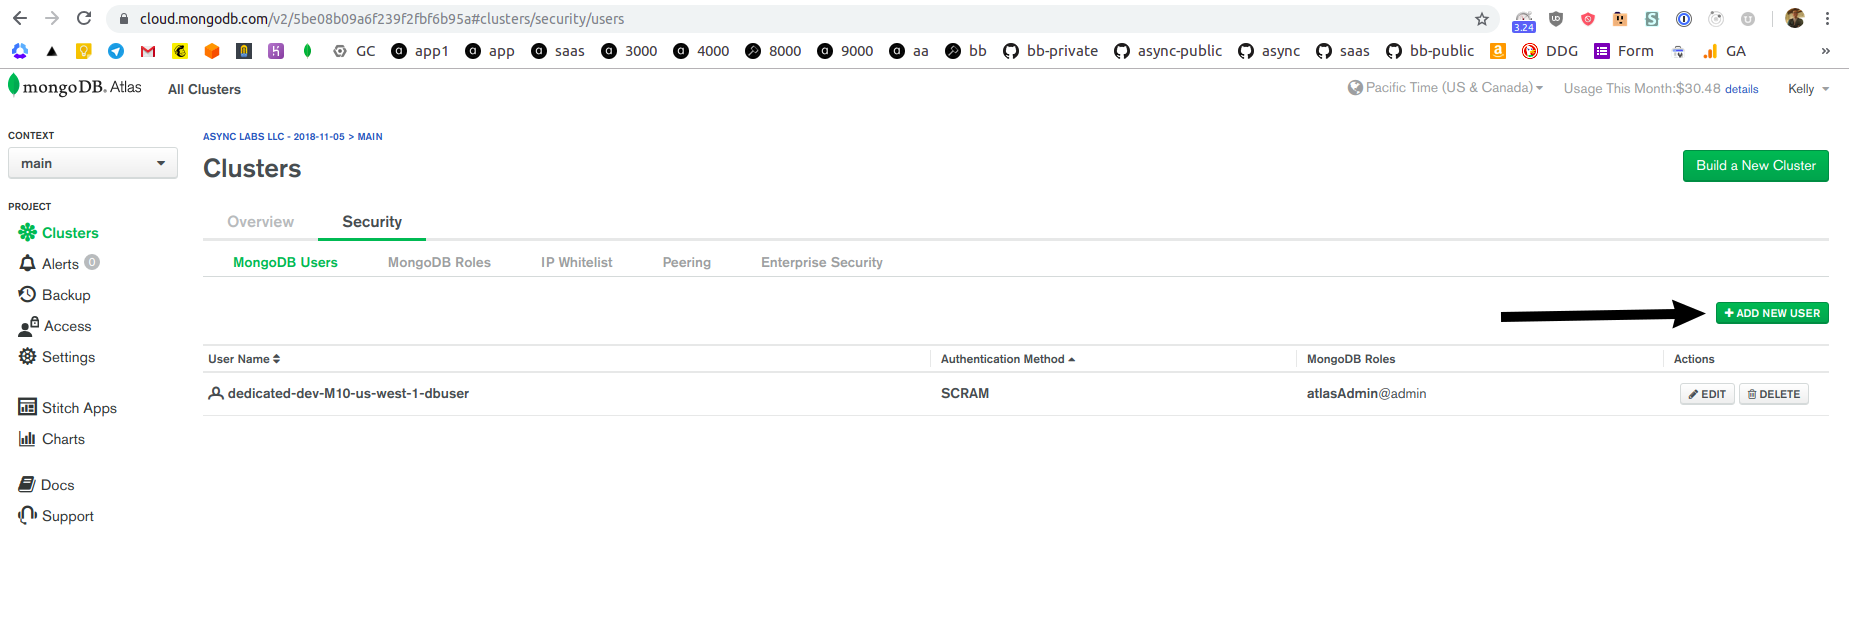
A form to create new database user will appear, no need to modify any of selected options. Simply fill out username and password and click green Add User button:

Replace <username> and <password> inside mongodb+srv://<username>:<password>@cluster0-eoobe.mongodb.net/test?retryWrites=true with the actual values from the database user you just created. Add the resulting URL (let’s call it MONGO_URL_TEST ) to your .env file.
Run your app again ( yarn dev-express ). Now you won’t get any error, since you provided a value for process.env.MONGO_URL_TEST in the .env file.
Important note: make sure to add .env to .gitignore . Storing API keys and secrets on a remote repository is not safe.
Testing connection
As we mentioned in the previous section, on the very first connection to your web application, Atlas will create database with name test .
In the previous section, you already started our app, so if we constructed proper MONGO_URL then Atlas created a new database. Go to the list of your clusters at MongoDB Atlas, find your free cluster ( Cluster0 ) and click Collections on it:
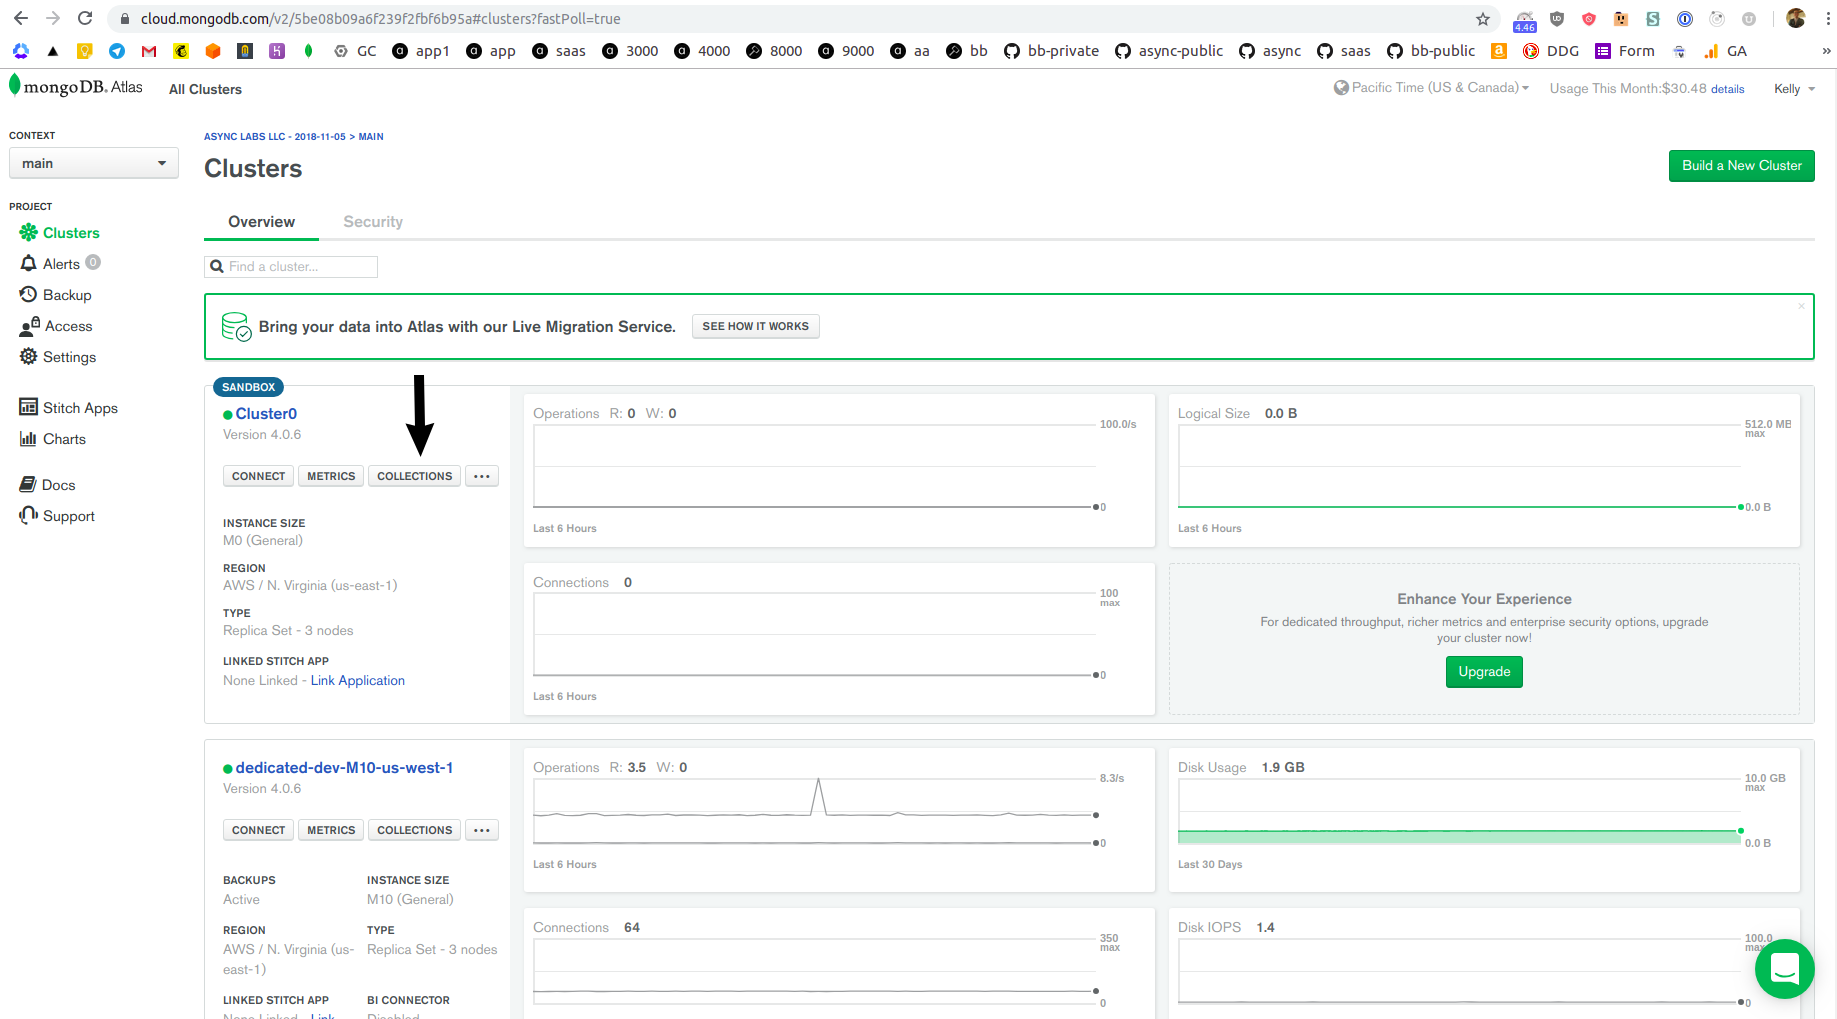
If you see test database in the list of the databases inside the free cluster then you successfully connected it to our custom Next/Express server! You should see:
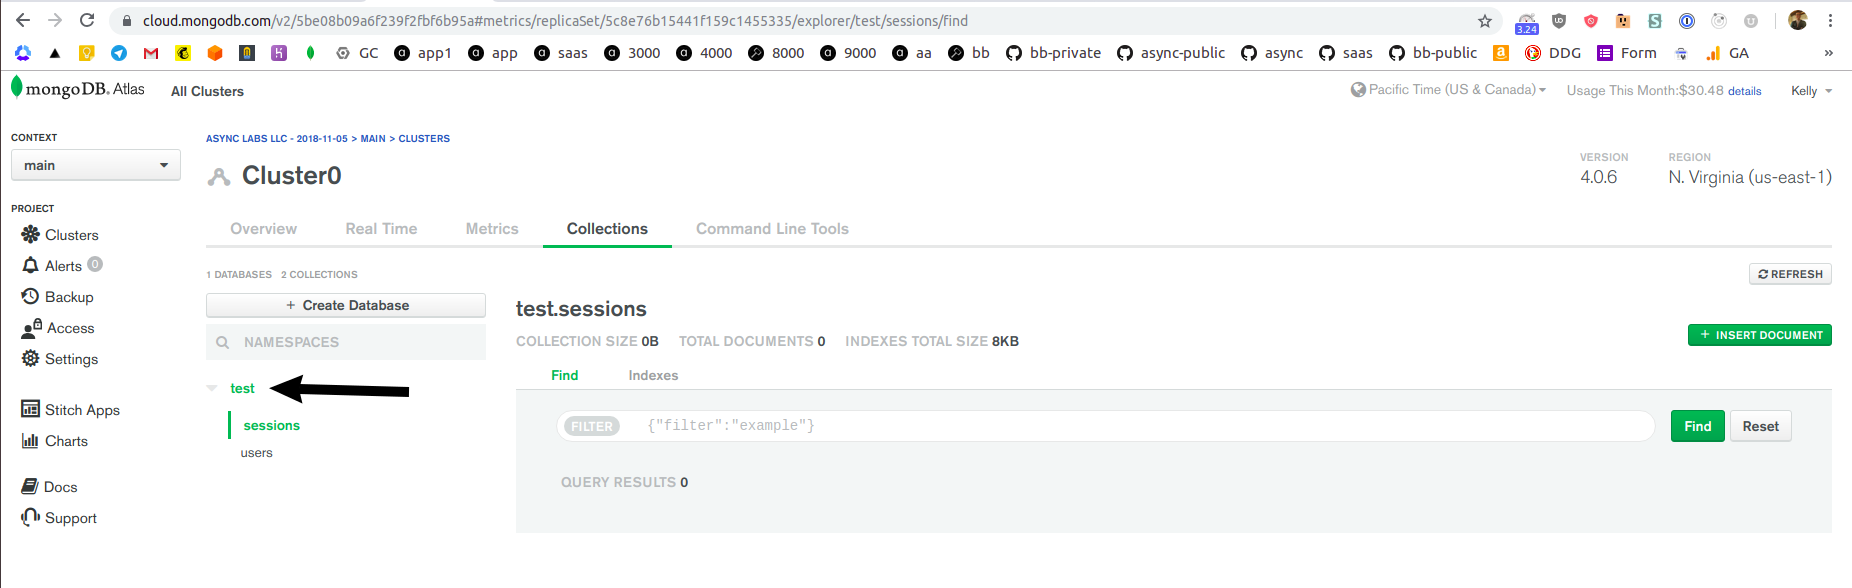
To further test that your DB is indeed connected, let’s create a dummy user. We’ll add a sample document into a “users collection” manually and display the data on the Index page ( pages/index.js ). We create a document manually because writing static methods that employ Mongoose methods (also called Mongoose Queries such as find() ) to create a user is not important at this point. Though we do write multiple static methods for our User model in Chapters 3-7.
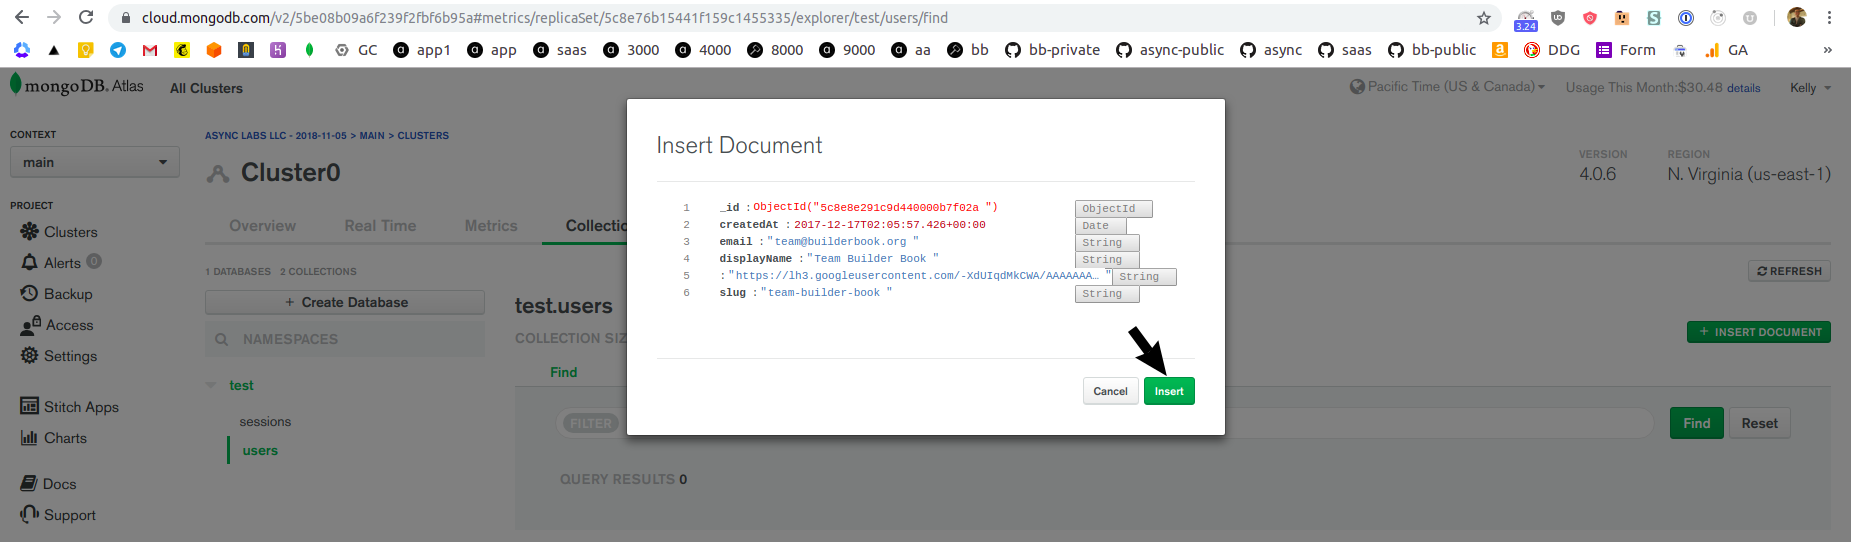
Click on users collection inside your test database, then click document by clicking green + INSERT DOCUMENT button:

Add following parameters and value pairs to the new user document:
createdAt: 2017-12-17T02:05:57.426+00:00
email: team@builderbook.org
displayName: Team Builder Book
avatarUrl: "https://lh3.googleusercontent.com/-XdUIqdMkCWA/AAAAAAAAAAI/AAAAAAAAAAA/4252rscbv5M/photo.jpg?sz=128"
slug: team-builder-book
Atlas will automatically generate id for new document, so your task is to manually add createdAt (type Date ), email (type String ), displayName (type String ), avatarUrl (type String ) and slug (type String ) to the document. After you are done, click green Insert button:
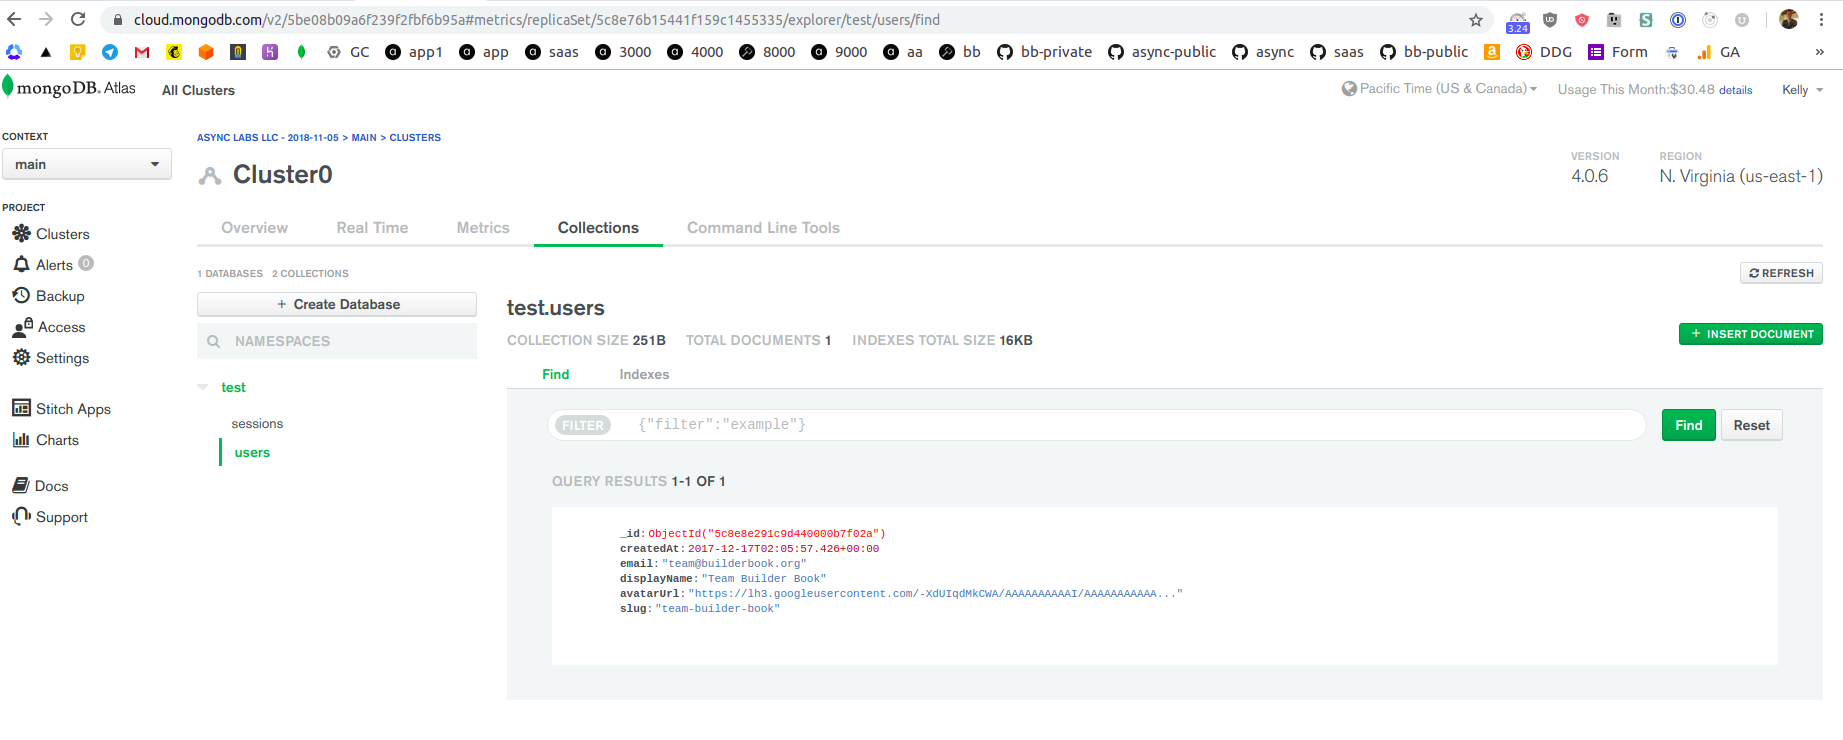
After you create a new user document, you will see it in test.users collection:
Our goal is to prove that our database is indeed connected to our server. To do so, we will display the email of our user on our Index page.
In the previous section, we successfully displayed a user email on our Index page by hard-coding the user inside our Express route. Remember this code snippet in ./server/app.js :
server.get('/', (req, res) => {
  const user = { email: 'team@builderbook.org' };
  app.render(req, res, '/', { user });
});
Now we want to get the user object from the database . If you are familiar with Mongoose, you know that we need to use Mongoose’s method Model.findOne to find a user on our database, say by using slug .
If you’re not familiar, just follow the first example from Mongoose’s docs:
Adventure.findOne({ type: ‘iphone’ })
In our case, we search for User instead of Adventure , and we search by slug instead of type . Thus:
User.findOne({ slug: ‘team-builder-book’ })
Though you may not be familiar with Promise and async/await concepts (we explain them in detail in Chapter 3), we will write this Express route using async/await . In short, an async function always returns a Promise, and JavaScript pauses on a line with await .
In the code snippet below, JavaScript pauses on:
const user = await User.findOne({ slug: ‘team-builder-book’ });
and waits until the method returns either the user object or null.
Our new Express route:
server.get(’/’, async (req, res) => { const user = await User.findOne({ slug: ‘team-builder-book’ }); app.render(req, res, ‘/’, { user }); });
Make sure you remove the old Express route that defines the user as:
const user = { email: ‘team@builderbook.org’ };
Since we use the findOne() method on User , remember to import User with:
const User = require(’./models/User’);
That’s it. We already prepared our Index page in the previous section, and now the page is ready to receive the user prop.
Start your app with yarn dev-express and navigate to http://localhost:8000 :

You’ve successfully connected MongoDB to the server if you see Email: team@builderbook.org on the Index page. Good job!
Configure session
Let’s create and configure session. We imported session from express-session . We encourage you to check the list of all session parameters in the official docs. At this step, we will configure only 5 parameters: name , secret , resave , saveUninitialized , and cookie :
session({
  name: 'builderbook.sid',
  secret: 'HD2w.)q*VqRT4/#NK2M/,E^B)}FED5fWU!dKe[wk',
  resave: false,
  saveUninitialized: false,
  cookie: {
    httpOnly: true,
    maxAge: 14 * 24 * 60 * 60 * 1000,
  },
})
- name is the cookie name - give it any name you like. It’s useful if you have multiple apps on the same domain , because you can give a unique name to each app’s cookies. Though this is not our case.
-
secret is a key used to encode/decode the session’s cookie. Specify your own key.It’s important to note that a cookie does not contain session data but only the session ID (encoded with secret). Read more about cookie. The server stores session data in memory. More on
storebelow. -
resave forces the session to be saved to
store, even if the session was not modified. -
saveUninitialized saves any new, unmodified (uninitialized) session to
store. -
cookie is the session’s cookie. For development purposes, we set
httpOnlyto true, since we develop athttp://localhsot:8000.httpOnly: truemeans that the cookie will not be available to client-side JavaScript and will only be sent with a request to the server. Simply put, the cookie is only available to server via HTTP and not accessible from client-side JavaScript. This is a security measure.The browser will remove the cookie aftermaxAgemilliseconds. We chose themaxAgeto be 14 days.You will see bothhttpOnlyandmaxAgeparameters in a cookie when looking inDeveloper tools > Application > Cookies > http://localhost:8000on your browser and inside the saved session in your database.
We configured session! To initialize session on the server, use Express’s app.use(). In our case, it’s server.use() since we defined const server = express(); .
server.use(session({
  name: 'builderbook.sid',
  secret: 'HD2w.)q*VqRT4/#NK2M/,E^B)}FED5fWU!dKe[wk',
  resave: false,
  saveUninitialized: false,
  cookie: {
    httpOnly: true,
    maxAge: 14 * 24 * 60 * 60 * 1000,
  },
}));
Note that since we did not specify the path inside server.use() , the default path is / . Thus, the session will be initialized/executed on every request to the server.
Now we’ve configured and initialized session on our server. One thing may not be clear though - where does the server store session (and session data)? By default, Express stores session in the server’s memory .
Save session
Storing a session in the transient server memory is not a scalable nor reliable way to store. It’s more reliable to save sessions to a database. It may be ok for development, but for production, we may choose to store a login session for 2 weeks. Thus, we need a more reliable and persistent way to store sessions.
Since we connected our server to MongoDB in the previous section, we should save a session to our database. To do so, we need to add a store parameter to the session configuration.
We imported MongoStore() from connect-mongo . Check out the official example:
const session = require('express-session');
const MongoStore = require('connect-mongo')(session);

app.use(session({
    secret: 'foo',
    store: new MongoStore(options)
}));
We use this method to connect a server to MongoDB and save a session to our database. Add this store parameter to our session configuration:
const session = require('express-session');
const mongoSessionStore = require('connect-mongo');

// some code

const MongoStore = mongoSessionStore(session);

store: new MongoStore({
  mongooseConnection: mongoose.connection,
  ttl: 14 * 24 * 60 * 60, // save session 14 days
}),
Since we already connected a server to our database in server/app.js via Mongoose, here we specify the mongooseConnection option. ttl is the session expiration time (seconds). We set it to 14 days, the same expiration time as our cookie (see cookie.maxAge above). You will see the ttl parameter as expires inside the session saved to our database.
In the snippet above, we used const MongoStore = mongoSessionStore(session); , since there is no easy way to achieve const MongoStore = require('connect-mongo')(session); with ES6 import.
Here is what you get after adding store to our session configuration:
const MongoStore = mongoSessionStore(session);

server.use(session({
  name: 'builderbook.sid',
  secret: 'HD2w.)q*VqRT4/#NK2M/,E^B)}FED5fWU!dKe[wk',
  store: new MongoStore({
    mongooseConnection: mongoose.connection,
    ttl: 14 * 24 * 60 * 60, // save session 14 days
  }),
  resave: false,
  saveUninitialized: false,
  cookie: {
    httpOnly: true,
    maxAge: 14 * 24 * 60 * 60 * 1000,
  },
}));
Let’s re-organize this code for more readability. Point the variable sess to the session object, the code snippet with curly braces {} :
const sess = {
  name: 'builderbook.sid',
  secret: 'HD2w.)q*VqRT4/#NK2M/,E^B)}FED5fWU!dKe[wk',
  store: new MongoStore({
    mongooseConnection: mongoose.connection,
    ttl: 14 * 24 * 60 * 60, // save session 14 days
  }),
  resave: false,
  saveUninitialized: false,
  cookie: {
    httpOnly: true,
    maxAge: 14 * 24 * 60 * 60 * 1000,
  },
}
Under this definition, we initialize the session on our server with server.use() :
server.use(session(sess))
Add the code snippet above, as well as missing imports, to server/app.js . You should get:
server/app.js :
const express = require('express');
const next = require('next');

const mongoose = require('mongoose');

const session = require('express-session');
const mongoSessionStore = require('connect-mongo');

const User = require('./models/User');

require('dotenv').config();

const dev = process.env.NODE_ENV !== 'production';
const MONGO_URL = process.env.MONGO_URL_TEST;

const options = {
  useNewUrlParser: true,
  useCreateIndex: true,
  useFindAndModify: false,
};
mongoose.connect(
  MONGO_URL,
  options,
);

const port = process.env.PORT || 8000;
const ROOT_URL = `http://localhost:${port}`;

const app = next({ dev });
const handle = app.getRequestHandler();

app.prepare().then(() => {
  const server = express();

  const MongoStore = mongoSessionStore(session);

  const sess = {
    name: 'builderbook.sid',
    secret: 'HD2w.)q*VqRT4/#NK2M/,E^B)}FED5fWU!dKe[wk',
    store: new MongoStore({
      mongooseConnection: mongoose.connection,
      ttl: 14 * 24 * 60 * 60, // save session 14 days
    }),
    resave: false,
    saveUninitialized: false,
    cookie: {
      httpOnly: true,
      maxAge: 14 * 24 * 60 * 60 * 1000,
    },
  };

  server.use(session(sess));

  server.get('/', async (req, res) => {
    const user = await User.findOne({ slug: 'team-builder-book' });
    app.render(req, res, '/', { user });
  });

  server.get('*', (req, res) => handle(req, res));

  server.listen(port, (err) => {
    if (err) throw err;
    console.log(`> Ready on ${ROOT_URL}`); // eslint-disable-line no-console
  });
});
Testing
We configured and initialized session and made sure that session store gets saved to MongoDB - now we’re ready for testing.
To identify a newly created session, add the foo parameter with the value bar to session with:
req.session.foo = ‘bar’
Add this line of code to our Express route from the section Database :
server.get('/', async (req, res) => {
  req.session.foo = 'bar';
  const user = await User.findOne({ slug: 'team-builder-book' });
  app.render(req, res, '/', { user });
});
With this change, when a user opens the Index page (route / ), our app will create a cookie on the user’s browser and save a session to our database. This new session will have foo: bar on the database.
Start your app ( yarn dev-express ) and navigate to http://localhost:8000 .
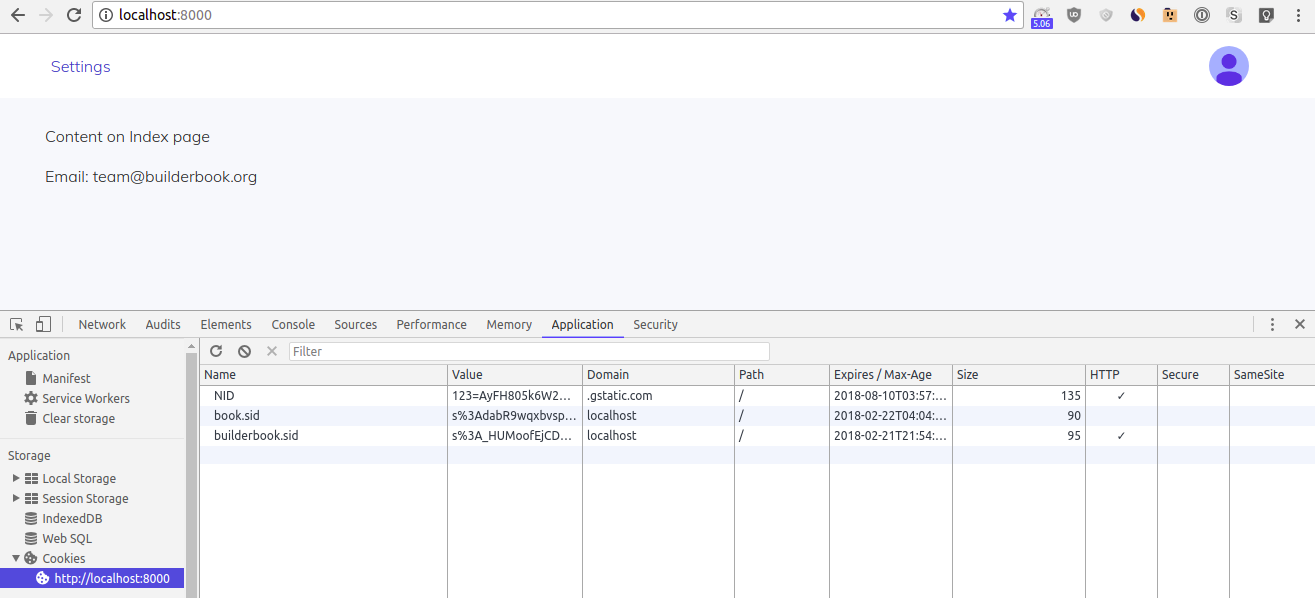
Enter Developer tools . Then select Application > Cookies > http://localhost:8000 :
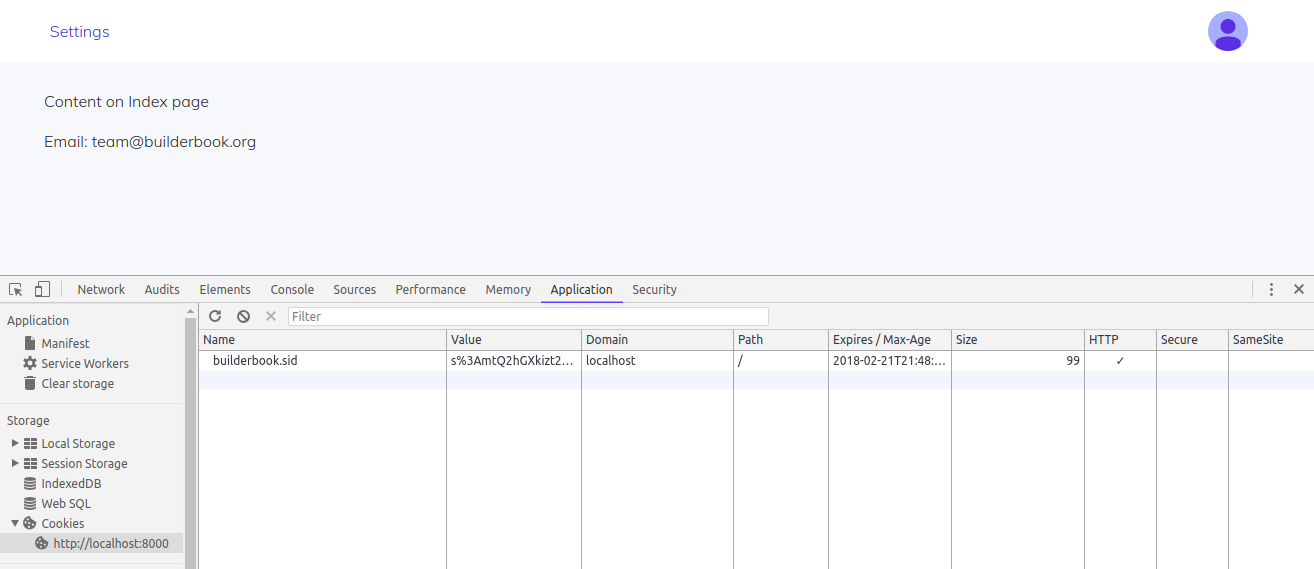
You see a builderbook.sid cookie! You can see the cookie name, that HTTP ( httpOnly ) is true (has a check mark), and that the cookie expires exactly 14 days after creation. Indeed, we specified the expiration data with maxAge: 14 * 24 * 60 * 60 * 1000 (14 days).
Go to MongoDB Atlas, navigate to the test.sessions collection, and find the newly created session:
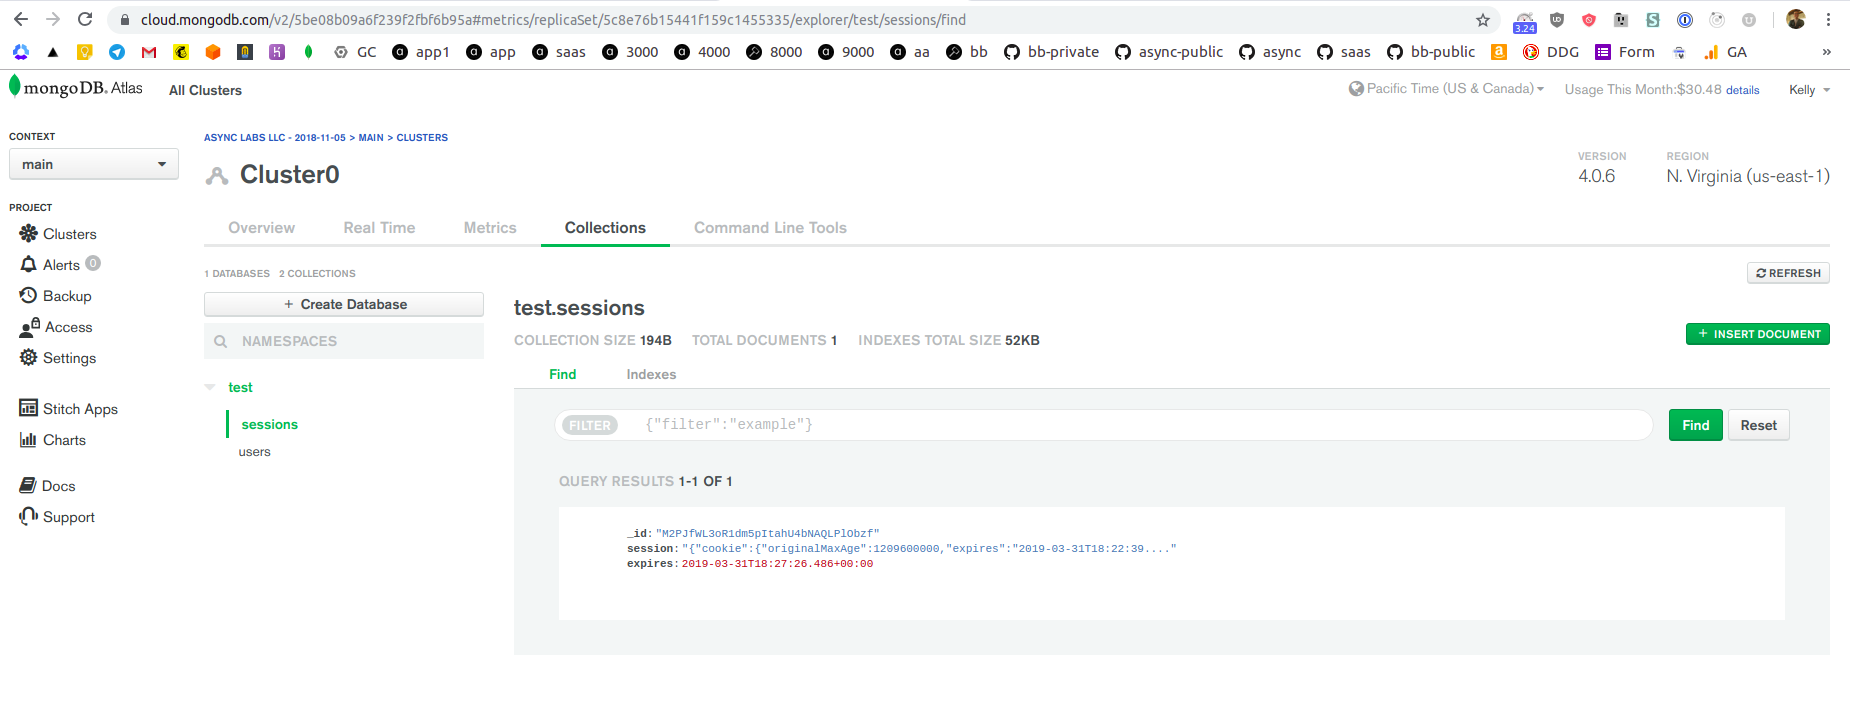
In our database, the session document has all parameters that we specified earlier in this section. For example, find httpOnly: true , cookie.orginalMaxAge: 1209600000 ( cookie.maxAge ), and foo: bar .
You are welcome to experiment with creating sessions and cookies. Try renaming the cookie and changing the value of httpOnly .
Go to server/app.js and change name: 'builderbook.sid' to name: 'book.sid' . Also change httpOnly: true to httpOnly: false . Save your server/app.js file. Go back to your browser and wait for the app to restart:
On your browser, go to Developer tools > Application > Cookies > http://localhost:8000 . As we expect - HTTP is false, and the cookie.name is book.sid .
In our database, in collection test.sessions , our app created a second session document with httpOnly: false .
We hope this practical exercise helped you understand the concepts of session/cookie better. We will use session in Chapter 3 when integrating Google OAuth to our app. We are not interested in using session to track a logged-out user but to create a persistent login session for a logged-in user. We will save a user id into a session, which will match a user object on the server with a cookie on the browser (cookie has an encoded session id).
Update Header component
Earlier in this chapter (in the section Database ) we passed a user prop to our Index page to display a user’s email. Let’s now modify our Header component to display a user’s photo.
It’s good UX to show logged-in users that they are indeed logged in. One way to do it is to show a user avatar (photo from Google profile) inside the Header component.
Let’s display a user avatar with the user.avatarUrl parameter that our app will receive from Google when we integrate our app with Google OAuth (Chapter 3).
Currently the Header component has no props:
import Link from 'next/link';

import Toolbar from '@material-ui/core/Toolbar';
import Grid from '@material-ui/core/Grid';

import { styleToolbar } from './SharedStyles';

const Header = () => (
  <div>
    <Toolbar style={styleToolbar}>
      <Grid container direction="row" justify="space-around" align="center">
        <Grid item xs={12} style={{ textAlign: 'right' }}>
          <Link prefetch href="/login">
            <a style={{ margin: '0px 20px 0px auto' }}>Log in</a>
          </Link>
        </Grid>
      </Grid>
    </Toolbar>
  </div>
);

export default Header;
Add propTypes and defaultProps to the Header component. If you’re not sure how, check how we did it in pages/index.js for the Index page. For the user prop in the Header component, you get:
Header.propTypes = {
  user: PropTypes.shape({
    avatarUrl: PropTypes.string,
    displayName: PropTypes.string,
  }),
};

Header.defaultProps = {
  user: null,
};
You may remember this line from pages/index.js :
Index.getInitialProps = async ({ query }) => ({ user: query.user });
The method getInitialProps populates the user prop. However, we don’t need to use this method on our Header component - becauset in Chapter 1, we added getInitialProps directly to our withLayout HOC. This HOC passes props, populated by getInitialProps , to our Header component. Check out lib/withLayout.js :
Header {…this.props}
Alright, so far we have the following for our Header component:
components/Header.js :
import PropTypes from 'prop-types';
import Link from 'next/link';
import Toolbar from '@material-ui/core/Toolbar';
import Grid from '@material-ui/core/Grid';
import Hidden from '@material-ui/core/Hidden';
import Avatar from '@material-ui/core/Avatar';

import { styleToolbar } from './SharedStyles';

function Header({ user }) {
  return (
    <div>
      <Toolbar style={styleToolbar}>
        <Grid container direction="row" justify="space-around" alignItems="center">

          // some code

        </Grid>
      </Toolbar>
    </div>
  );
}

Header.propTypes = {
  user: PropTypes.shape({
    avatarUrl: PropTypes.string,
    displayName: PropTypes.string,
  }),
};

Header.defaultProps = {
  user: null,
};

export default Header;
We want to add a user’s avatar and our logo to the Header component. We will use the <Avatar> component from Material-UI for both user avatar and our logo.
Here is how we want to change the structure of Header . Instead of having one column ( <Grid item> ) and no props, we will have two columns and the user prop:
- when there is no
userprop , we will show the logo (with<Avatar>) in the left column and aLog inlink in the right column - when there is a
userprop, we will show aSettingslink in the left column and the user’s avatar (with<Avatar>) in the right column
After we translate the description above from English to code:
<Grid item sm={10} xs={9} style={{ textAlign: 'left' }}>
  {user ? (
    <div>
      <Hidden smDown>
        <Link prefetch href="/">
          <a style={{ marginRight: '20px' }}>Settings</a>
        </Link>
      </Hidden>
    </div>
  ) : (
    <Link prefetch href="/">
      <Avatar
        src="https://storage.googleapis.com/builderbook/logo.svg"
        alt="Builder Book logo"
        style={{ margin: '0px auto 0px 20px' }}
      />
    </Link>
  )}
</Grid>
<Grid item sm={1} xs={3} style={{ textAlign: 'right' }}>
  {user ? (
    <div style={{ whiteSpace: ' nowrap' }}>
      <Avatar
        src={user.avatarUrl}
        alt={user.displayName}
        style={{ margin: '0px auto 0px 20px' }}
      />
    </div>
  ) : (
    <Link prefetch href="/login">
      <a style={{ margin: '0px 20px 0px auto' }}>Log in</a>
    </Link>
  )}
</Grid>
Replace // some code (in components/Header.js ) with the code snippet above.
The component <Hidden> hides elements on small screens. The component <Avatar> renders images to be circular. Read more about these components in the Material-UI docs.
We are ready to test. In the Database section, we manually created a user document in our users collection. This document has all necessary parameters: avatarUrl and displayName , as well as slug to find a user by slug.
Start your app ( yarn dev-express ) and navigate to http://localhost:8000 . With the user prop, you see:

Open lib/withLayout.js and find the line that contains: <Header {...this.props} />
Change this code to prevent props from being passed to the Header component. Delete the {...this.props} part: <Header />
Save the file. Go to http://localhost:8000 . Now you see:

In the last section of this chapter, we will make some UX improvements to our Header component with the help of a new component: MenuDrop .
MenuDrop component
In this last section of Chapter 2, let’s make one more improvement to our Header component. When a user clicks on his/her avatar, we want the app to show a menu dropdown with options.
We may re-use the menu dropdown somewhere else inside our app, so let’s make it a component (and thus reusable).
We will use the <Menu> component from Material-UI to create our own MenuDrop component. We will closely follow Material-UI’s example of a simple menu:
Here is the code for this example:
import React from 'react';
import Button from '@material-ui/core/Button';
import Menu from '@material-ui/core/Menu';
import MenuItem from '@material-ui/core/MenuItem';

class SimpleMenu extends React.Component {
  state = {
    anchorEl: null,
  }

  handleClick = (event) => {
    this.setState({ anchorEl: event.currentTarget });
  }

  handleClose = () => {
    this.setState({ anchorEl: null });
  }

  render() {
    const { anchorEl } = this.state;

    return (
      <div>
        <Button
          aria-owns={anchorEl ? 'simple-menu' : null}
          aria-haspopup="true"
          onClick={this.handleClick}
        >
          Open Menu
        </Button>
        <Menu
          id="simple-menu"
          anchorEl={anchorEl}
          open={Boolean(anchorEl)}
          onClose={this.handleClose}
        >
          <MenuItem onClick={this.handleClose}>Profile</MenuItem>
          <MenuItem onClick={this.handleClose}>My account</MenuItem>
          <MenuItem onClick={this.handleClose}>Logout</MenuItem>
        </Menu>
      </div>
    );
  }
}

export default SimpleMenu;
Notice that this component has a state, meaning it cannot be written as a stateless function. See Chapter 1 to learn about stateless functional component. We defined this component as a child of ES6 class using extends:
class MenuDrop extends React.Component
Another interesting point - notice that we did not use constructor syntax to initialize state for our MenuDrop component. We used state = { ... } instead.
It’s a matter of personal preference whether you like to use state = { ... } or constructor . Both of constructs compile to the same output. However, if you want to set initial state with props (i.e. you want to access props) then you should use constructor(props) with super(props) , like this:
constructor(props) {
  super(props);
  this.state = {
    color: props.initialColor
  };
}
We will change 3 things in the example above:
- replace the
Open Menubutton with a user avatar image - replace the
<MenuItem>component with<Link>and<a>elements - instead of hard-coding the text for menu items, we will pass
textandhrefas props
Make these 3 changes and you should get:
components/MenuDrop.js :
import React from 'react';
import PropTypes from 'prop-types';
import Link from 'next/link';
import Menu from '@material-ui/core/Menu';
import Avatar from '@material-ui/core/Avatar';

class MenuDrop extends React.Component {
  static propTypes = {
    src: PropTypes.string.isRequired,
    alt: PropTypes.string.isRequired,
    options: PropTypes.arrayOf(String).isRequired,
  };

  state = {
    open: false,
    anchorEl: undefined,
  };

  button = undefined;

  handleClick = (event) => {
    this.setState({ open: true, anchorEl: event.currentTarget });
  };

  handleClose = () => {
    this.setState({ open: false });
  };

  render() {
    const { options, src, alt } = this.props;

    return (
      <div>
        <Avatar
          role="presentation"
          aria-owns="simple-menu"
          aria-haspopup="true"
          onClick={this.handleClick}
          onKeyPress={this.handleClick}
          src={src}
          alt={alt}
          style={{ margin: '0px 20px 0px auto', cursor: 'pointer' }}
        />
        <Menu
          id="simple-menu"
          anchorEl={this.state.anchorEl}
          open={this.state.open}
          onClose={this.handleClose}
        >
          <p />
          {options.map(option => (
            <div id="wrappingLink" key={option.text}>
              <Link prefetch href={option.href} as={option.as || option.href}>
                <a style={{ padding: '0px 20px' }}>{option.text}</a>
              </Link>
              <p />
            </div>
          ))}
        </Menu>
      </div>
    );
  }
}

export default MenuDrop;
Open components/Header.js , and import the MenuDrop component with:
import MenuDrop from './MenuDrop'
Inside components/Header.js , replace:
<Avatar
  src={user.avatarUrl}
  alt={user.displayName}
  style={{ margin: '0px auto 0px 20px' }}
/>
with:
{user.avatarUrl ? (
  <MenuDrop options={optionsMenu} src={user.avatarUrl} alt={user.displayName} />
) : null}
Specify data for the MenuDrop props:
const optionsMenu = [
  {
    text: 'Got question?',
    href: 'https://github.com/builderbook/builderbook/issues',
  },
  {
    text: 'Log out',
    href: '/logout',
  },
];
Our updated Header component with the MenuDrop component will be:
components/Header.js :
import PropTypes from 'prop-types';
import Link from 'next/link';
import Toolbar from '@material-ui/core/Toolbar';
import Grid from '@material-ui/core/Grid';
import Hidden from '@material-ui/core/Hidden';
import Avatar from '@material-ui/core/Avatar';

import MenuDrop from './MenuDrop';

import { styleToolbar } from './SharedStyles';

const optionsMenu = [
  {
    text: 'Got question?',
    href: 'https://github.com/builderbook/builderbook/issues',
  },
  {
    text: 'Log out',
    href: '/logout',
  },
];

function Header({ user }) {
  return (
    <div>
      <Toolbar style={styleToolbar}>
        <Grid container direction="row" justify="space-around" alignItems="center">
          <Grid item sm={10} xs={9} style={{ textAlign: 'left' }}>
            {user ? (
              <div>
                <Hidden smDown>
                  <Link prefetch href="/">
                    <a style={{ marginRight: '20px' }}>Settings</a>
                  </Link>
                </Hidden>
              </div>
            ) : (
              <Link prefetch href="/">
                <Avatar
                  src="https://storage.googleapis.com/builderbook/logo.svg"
                  alt="Builder Book logo"
                  style={{ margin: '0px auto 0px 20px' }}
                />
              </Link>
            )}
          </Grid>
          <Grid item sm={1} xs={3} style={{ textAlign: 'right' }}>
            {user ? (
              <div style={{ whiteSpace: ' nowrap' }}>
                {user.avatarUrl ? (
                  <MenuDrop options={optionsMenu} src={user.avatarUrl} alt={user.displayName} />
                ) : null}
              </div>
            ) : (
              <Link prefetch href="/login">
                <a style={{ margin: '0px 20px 0px auto' }}>Log in</a>
              </Link>
            )}
          </Grid>
        </Grid>
      </Toolbar>
    </div>
  );
}

Header.propTypes = {
  user: PropTypes.shape({
    avatarUrl: PropTypes.string,
    displayName: PropTypes.string,
  }),
};

Header.defaultProps = {
  user: null,
};

export default Header;
Let’s test it out.
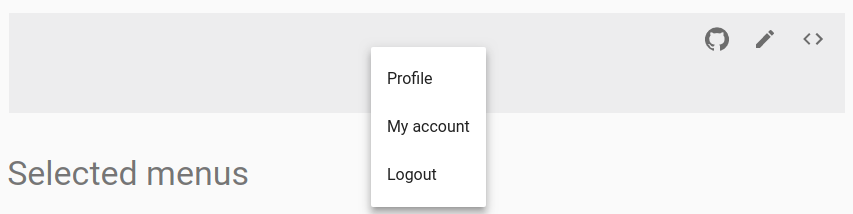
Start your app ( yarn dev-express ) and go to http://localhost:8000 :

Click the user avatar icon and you should see a menu dropdown with two links:

That’s the end of Chapter 2!
In this chapter, you successfully created an Express server and connected our app to a database. You learned about session and cookie , as well as how to save a session to the database. At the end of this Chapter, we made some UX/UI improvements to prepare our app for user authentication.
In Chapter 3, we will add user authentication. We will save a user id to the session that you added in this chapter in order to create a persistent login session. Among other things, you will learn key JavaScript concepts, such as Promise/then() and async/await . By the end of Chapter 3, our app will have user authentication with Google OAuth 2.0.
At the end of Chapter 2, your codebase should look like the codebase in 2-end . The 2-end folder is located at the root of the book directory inside the builderbook repo.
Compare your codebase and make edits if needed.
Enjoying the book so far? Please share a quick review. You can update your review at any time.