Chapter 3: Authentication HOC. Promise. Async/await. Static method for User model. Google OAuth.
-
Authentication HOC
- Parameters for withAuth HOC
-
getInitialProps() method
-
Login page and Nprogress
-
Promise.then()
-
Async/await
-
Static method signInOrSignUp()
-
Generate slug
-
Google OAuth: auth() function
-
Express routes for auth()
-
Initialize auth() on server.
-
Testing
Before you start working on Chapter 3, get the 3-start codebase. The 3-start folder is located at the root of the book directory inside the builderbook repo.
- If you haven’t cloned the builderbook repo yet, clone it to your local machine with
git clone https://github.com/builderbook/builderbook.git. - Inside the
3-startfolder, runyarnto install all packages.
These are the packages that we install specifically for Chapter 3:
"googleapis""lodash""nprogress""passport""passport-google-oauth"
Check out the package.json for Chapter 3.
- Be sure to use these specific packages and ignore any warnings about upgrading. We regularly upgrade all packages and test them in the book. But before testing, we cannot guarantee that a new package version will work properly.
Remember to include the .env file you created in Chapter 2 at the root of your app. By the end of Chapter 3, you will add Google_clientID and Google_clientSecret environmental variables to your .env file.
In this chapter, we will create a higher-order component (HOC) called withAuth.js (or simply withAuth ). This component, similiar to our withLayout HOC, will wrap our pages. The main purpose of withLayout is to server-side render and add Header and Notifier components to our pages. The main purpose of withAuth is to check a user’s session and send that user’s data to our pages.
Inside the withAuth HOC, we will use Next.js’s getInitialProps() method to fetch a user’s data and pass it to our wrapped pages. Later in this chapter, we will make a detour to discuss this method in more detail.
Besides creating the withAuth HOC, we will:
- add a Login page
- learn more about
Promise.then(),async/await, and the concept ofthis - add basic
static methodsto our User model
Authentication HOC
Adding user authentication to our app is a big task. In this chapter, our first goal is to write a withAuth HOC that passes user data to the pages it wraps. We will then integrate our app with Google OAuth and test out the entire authentication flow.
Two main goals for this section are:
- set up our
withAuthHOC atlib/withAuth.js- this component passes a user object to pages and redirects a user according to his/her login status - test our
withAuthHOC with a manually-added user in our database
Important note - from now on, we will start our custom server that we created in Chapter 2 with yarn dev instead of yarn dev-express . In the scripts section of package.json , replace:
“dev”: “next”
and
“dev-express”: “nodemon server/app.js --watch server”
with:
“dev”: “nodemon server/app.js --watch server”
In Chapter 2, we passed user data from our server to our Index page by using Next’s getInitialProps() method. That’s ok since it’s just one page. However, in our app, we will have multiple pages that require a user’s data. Passing user data to each page independently is not productive.
To be more productive, we create a HOC that will wrap pages and pass user data to all of those wrapped pages. So instead of using getInitialProps() directly on the Index page, we will use getInitialProps() inside a withAuth HOC that wraps the Index page.
Let’s place this new HOC in the same place as our withLayout HOC - inside the lib directory at ./lib/withAuth.js . Inside our withAuth component, we will specify simple boolean parameters - for example, loginRequired: true to control when an individual page requires user authorization. Then we will wrap a page in our withAuth HOC with these parameters to specify rules for that particular page.
The Index page (as you may have guessed) becomes a dashboard page for logged-in users. Once authenticated, we send a user’s data to this page.
The export code for our Index page will look like this:
export default withAuth(withLayout(Index), { loginRequired: true })
It says:
-
withLayoutHOC wraps theIndexpage (as a result, this page gets theHeadercomponent). -
withAuthHOC wraps theIndexpage as well. The boolean parameterloginRequiredrequires a user to be authenticated to access this page.
The structure of withAuth will be very similar to that of withLayout . The main purpose of withAuth is to receive a user prop with the help of the getInitialProps() method and then pass this user prop to a child component, which is any page that withAuth wraps.
In fact, our withLayout HOC does exactly that using Next.js’s getIntitialProps() method:
lib/withLayout.js :
import React from 'react';
import PropTypes from 'prop-types';
import { MuiThemeProvider } from '@material-ui/core/styles';
import CssBaseline from '@material-ui/core/CssBaseline';

import getContext from './context';
import Header from '../components/Header';

function withLayout(BaseComponent) {
  class App extends React.Component {
    constructor(props) {
      super(props);
      const { pageContext } = this.props;
      this.pageContext = pageContext || getContext();
    }

    componentDidMount() {
      const jssStyles = document.querySelector('#jss-server-side');
      if (jssStyles && jssStyles.parentNode) {
        jssStyles.parentNode.removeChild(jssStyles);
      }
    }

    render() {
      return (
        <MuiThemeProvider
          theme={this.pageContext.theme}
          sheetsManager={this.pageContext.sheetsManager}
        >
          <CssBaseline />
          <div>
            <Header {...this.props} />
            <BaseComponent {...this.props} />
          </div>
        </MuiThemeProvider>
      );
    }
  }

  App.propTypes = {
    pageContext: PropTypes.object, // eslint-disable-line
  };

  App.defaultProps = {
    pageContext: null,
  };

  App.getInitialProps = (ctx) => {
    if (BaseComponent.getInitialProps) {
      return BaseComponent.getInitialProps(ctx);
    }

    return {};
  };

  return App;
}

export default withLayout;
Following a similar structure as withLayout , we get this code for withAuth :
lib/withAuth.js :
import React from 'react';
import PropTypes from 'prop-types';

let globalUser = null;

function withAuth(BaseComponent) {
  class App extends React.Component {
    // specify propTypes and defaultProps

    componentDidMount() {
      const { user, isFromServer } = this.props;

      if (isFromServer) {
        globalUser = user;
      }
    }

    static async getInitialProps(ctx) {
      const isFromServer = !!ctx.req;
      const user = ctx.req ? ctx.req.user && ctx.req.user.toObject() : globalUser;

      if (isFromServer && user) {
        user._id = user._id.toString();
      }

      const props = { user, isFromServer };

      // Call child component's "getInitialProps", if it is defined
      if (BaseComponent.getInitialProps) {
        Object.assign(props, (await BaseComponent.getInitialProps(ctx)) || {});
      }

      return props;
    }

    render() {
      return <BaseComponent {...this.props} />;
    }
  }

  return App;
}

export default withAuth;
You may notice a few differences.
- The first difference is
// specify propTypes and defaultProps. Validation of types is optional. However, validating props viapropTypesand specifyingdefaultPropsmay become handy in situations when you pass the wrong data type to a prop, or when you need to specify a default value for a prop. Take a look at how we did it at./pages/index.jsin Chapter 1.Go ahead and replace the line// specify propTypes and defaultPropsin thewithAuthcarcass above with:
  static propTypes = {
    user: PropTypes.shape({
      displayName: PropTypes.string,
      email: PropTypes.string.isRequired
    }),
    isFromServer: PropTypes.bool.isRequired
  }

  static defaultProps = {
    user: null
  }
- The second difference is the new boolean prop
isFromServerdefined as!!ctx.req. This parameter ensures that context (ctx) is rendered on the server.Requestreqand thusctx.reqboth exist on the server.- In case
ctx.reqis not rendered on the server - it’sundefinedon the client and we get!!undefinedis false. - If
ctx.reqis rendered on the server and exists on the client, we get!!valueis true.Remember that the first!converts an object to boolean and negates it. The second!negates that boolean. In JavaScript,undefinedis falsy, meaning!undefinedis true, and!!undefinedis false.
- In case
- Third,
user._idis not a string but an object (link 1, link2), but on the client, we need it to be a string. Thus, we stringify MongoDB’s_idwith:
user._id = user._id.toString()
- Fourth,
withAuthhas no parameters.We will add two parameters to ourwithAuthHOC, but we’ll do that later in this chapter. For now, let’s go back to our main goal - fetch user data viawithAuthinstead of sending this data directly to ourIndexpage.
We mentioned the main property of the getInitialProps() method in Chapter 1 when we discussed our withLayout HOC. This method fetches data and populates props with that data. If you’d like to know more, we made a detour and wrote a getInitialProps() section right after this one.
At this point, we have a basic version of our withAuth HOC. Let’s make necessary changes to our Index page. Recall this page’s code:
- We wrote the page’s component as a stateless functional component in Chapter 1
- The page gets user data directly from the server via
Index.getInitialProps, which we set up in Chapter 2
Here is the page’s code:
pages/index.js :
import PropTypes from 'prop-types';

import Head from 'next/head';

import withLayout from '../lib/withLayout';

const Index = ({ user }) => (
  <div style={{ padding: '10px 45px' }}>
    <Head>
      <title>Index page</title>
      <meta name="description" content="This is the description of the Index page" />
    </Head>
    <p>Content on Index page</p>
    <p>Email: {user.email}</p>
  </div>
);

Index.getInitialProps = async ({ query }) => ({ user: query.user });

Index.propTypes = {
  user: PropTypes.shape({
    displayName: PropTypes.string,
    email: PropTypes.string.isRequired,
  }),
};

Index.defaultProps = {
  user: null,
};

export default withLayout(Index);
Let’s make three changes to the Index page:
- re-write the page’s component as a normal component (
class Index extends React.Component), - remove the
Index.getInitialPropsmethod so that user data is not directly sent to the Index page - import
withAuthand wrap this HOC around theIndexcomponent (we do so withexport default withAuth(withLayout(Index))):
After you make these changes, you should get:
pages/index.js :
import React from 'react';
import PropTypes from 'prop-types';
import Head from 'next/head';

import withAuth from '../lib/withAuth';
import withLayout from '../lib/withLayout';

class Index extends React.Component {
  static propTypes = {
    user: PropTypes.shape({
      displayName: PropTypes.string,
      email: PropTypes.string.isRequired,
    })
  };

  static defaultProps = {
    user: null,
  };

  render() {
    const { user } = this.props;
    return (
      <div style={{ padding: '10px 45px' }}>
        <Head>
          <title>Dashboard</title>
          <meta
            name="description"
            content="List of purchased books."
          />
        </Head>
        <p> Dashboard </p>
        <p>Email: {user.email}</p>
      </div>
    )
  }
}

export default withAuth(withLayout(Index));
We modified the title from “Index page” to “Dashboard”, since this page will become our user dashboard. We also modified the meta content from “This is the description of the Index page”" to “List of purchased books”, which we’ll discuss and add in Chapter 5.
Eslint will show you a warning:
[eslint] Component should be written as a stateless function (react/prefer-stateless-function)
But we will ignore it, since this page will get gradually more complicated, and we should start using ES6’s class Index extends React.Component version instead of a stateless function version.
Start your app with yarn dev , navigate to localhost:8000 . The app won’t start due to an error:
TypeError: Cannot read property ‘email’ of null
It means that we did not create an Express route on our server.
We need to create an Express route that sends a user’s data to the / route (route of the Index page). Go to the file with our main server code ( server/app.js ).
In lib/withAuth.js , we defined user as:
const user = ctx.req ? ctx.req.user && ctx.req.user.toObject() : globalUser
On our server code, make the following change to define req.user as user :
server/app.js :
server.get('/', (req, res) => {
    User.findOne({ slug: 'team-builder-book' }).then(user => {
      req.user = user
      app.render(req, res, '/')
    })
})
Add this code snippet after the server.use(session(sess)); line in server/app.js .
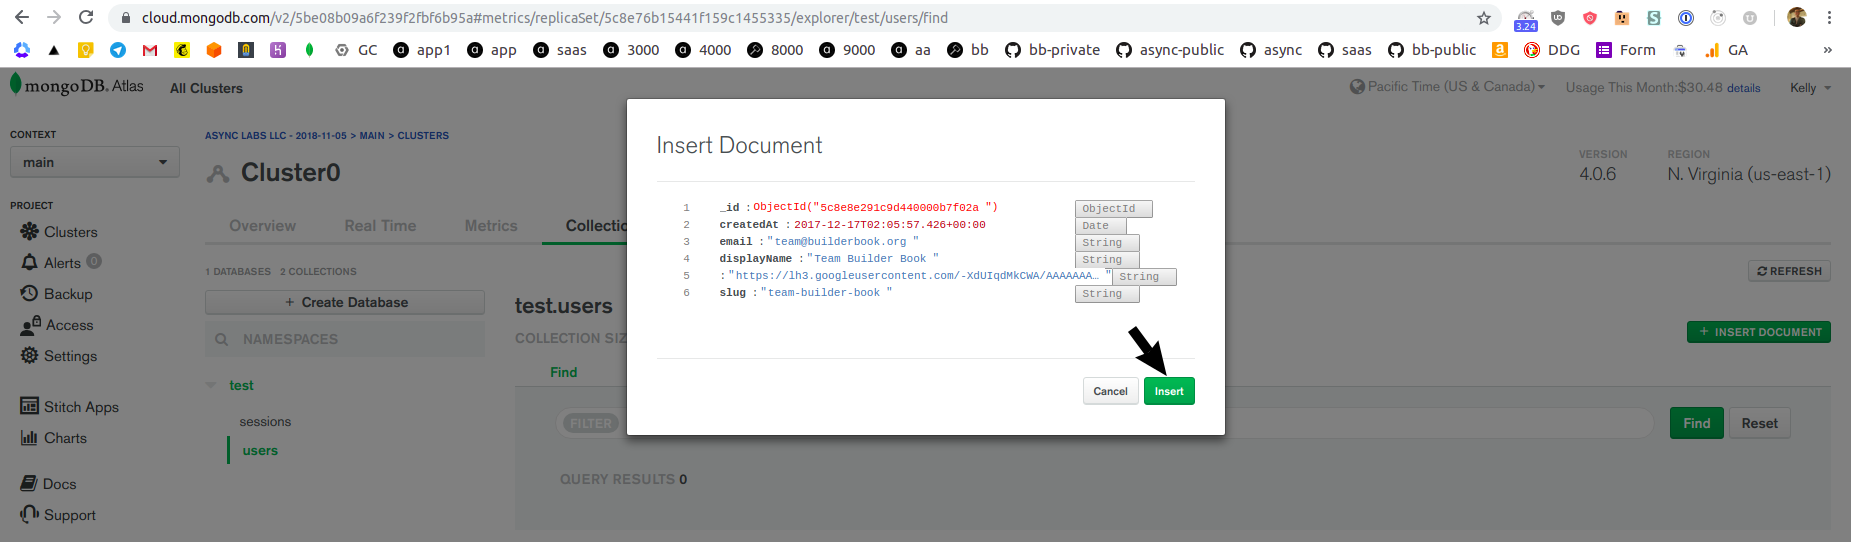
Make sure that your MongoDB has a user document in the users collection. We added this user in Chapter 2. The user should have team-builder-book as a slug . If not, go to MongoDB Atlas, click on your test.users collection, and create a new user document with the following content:
createdAt: 2017-12-17T02:05:57.426+00:00
email: team@builderbook.org
displayName: Team Builder Book
avatarUrl: "https://lh3.googleusercontent.com/-XdUIqdMkCWA/AAAAAAAAAAI/AAAAAAAAAAA/4252rscbv5M/photo.jpg?sz=128"
slug: team-builder-book
Atlas will automatically generate id for new document, so your task is to manually add createdAt (type Date ), email (type String ), displayName (type String ), avatarUrl (type String ) and slug (type String ) to the document. After you are done, click green Insert button:
Now start your app with yarn dev and navigate to localhost:8000 :

If you see your user’s email on the page, good job! You successfully passed the user prop to the Index page via our withAuth HOC!
In the next subsection, we will discuss and add two boolean parameters to our withAuth HOC.
Parameters for withAuth HOC
This is a good place to discuss what to do with a logged-out user. It’s good UX to redirect a logged-out user to the Login page when that user tries to access a page that requires logging in.
Currently, our withAuth HOC checks if a user object is server-side rendered, then passes the user prop to our Index page without checking whether that user is logged in or not.
After we add user authentication to our app, the Index page becomes a user’s dashboard and will require the user to be logged in to see it. At the same time, the Login page should not be available to a logged-in user.
To summarize, right now we have two problems:
-
Indexpage is available to all users, including logged-out users. -
Loginpage (which we create later in the chapter) is available to all users, including logged-in users.
We solve these problems with two boolean parameters: loginRequired and logoutRequired . These parameters have the following behaviors:
-
loginRequiredrequires a page to check whether a user is logged in. WhenloginRequiredis true but theuserprop is empty - our app should redirect the user to theLoginpage instead ofIndexpage and returnnullinstead of<Page {...this.props} />:
...
componentDidMount() {
  ...
  if (loginRequired && !logoutRequired && !user) {
      Router.push('/login')
      return
  }
  ...
}

...
render() {
      if (loginRequired && !logoutRequired && !user) {
        return null
      }
...
We will use the loginRequired parameter when we wrap our Index page.
For example, when a logged-out user goes to the / page (route of the Index page), our app will redirect the user to /login and won’t render the Index page.Returning null is how you prevent a component from rendering in React. Read more about it in the official docs.
-
logoutRequiredrequires a page to check if a user is logged out. WhenlogoutRequiredis true and the user prop is not empty - our app should redirect the user to the/page and returnnull:
...
if (logoutRequired && user) {
    Router.push('/');
}
...

...
render() {
    if (logoutRequired && user) {
        return null;
    }
}
...
We will use the logoutRequired parameter when we wrap our Login page.
For example, when a logged-in user goes to the /login page, our app will redirect that user to / and won’t render Login . Great! We don’t want to show a logged-in user the Login page.
Add these new parameters to our withAuth HOC. Let’s make loginRequired true by default and logoutRequired false by default:
lib/withAuth.js :
import React from 'react';
import PropTypes from 'prop-types';
import Router from 'next/router';

let globalUser = null;

function withAuth(BaseComponent, { loginRequired = true, logoutRequired = false } = {}) {
  class App extends React.Component {
    static propTypes = {
      user: PropTypes.shape({
        displayName: PropTypes.string,
        email: PropTypes.string.isRequired,
      }),
      isFromServer: PropTypes.bool.isRequired,
    };

    static defaultProps = {
      user: null,
    };

    componentDidMount() {
      const { user, isFromServer } = this.props;

      if (isFromServer) {
        globalUser = user;
      }

      // If login is required and not logged in, redirect to "/login" page
      if (loginRequired && !logoutRequired && !user) {
        Router.push('/login');
        return;
      }

      // If logout is required and user logged in, redirect to "/" page
      if (logoutRequired && user) {
        Router.push('/');
      }
    }

    static async getInitialProps(ctx) {
      const isFromServer = !!ctx.req;
      const user = ctx.req ? ctx.req.user && ctx.req.user.toObject() : globalUser;

      if (isFromServer && user) {
        // Convert "_id"(ObjectID from MongoDB) object to string
        user._id = user._id.toString();
      }

      const props = { user, isFromServer };

      // Call child component's "getInitialProps", if it is defined

      if (BaseComponent.getInitialProps) {
        Object.assign(props, (await BaseComponent.getInitialProps(ctx)) || {});
      }

      return props;
    }

    render() {
      const { user } = this.props;

      if (loginRequired && !logoutRequired && !user) {
        return null;
      }

      if (logoutRequired && user) {
        return null;
      }

      return <BaseComponent {...this.props} />;
    }
  }

  return App;
}

export default withAuth;
To see that user._id from the server is not a string but an object - you can add console.log() statements like following:
if (isFromServer && user) {
  console.log('before', typeof user._id, user._id);
  user._id = user._id.toString();
  console.log('after', typeof user._id, user._id);
}
Reload any page to get it server-side rendered, your terminal will print:
before object 5bccde65221770a1cc2e97c0
after string 5bccde65221770a1cc2e97c0
The actual id value for you will be different from the shown above.
Nice, we are done with withAuth HOC. From now on, we can use these parameters when we wrap pages with withAuth :
- export code for our
Indexpage becomes:
export default withAuth(withLayout(Index), { loginRequired: true })
However, loginRequired is true by default, so we simply omit it. Thus, there is no change to our Index page’s export code:
export default withAuth(withLayout(Index))
- export code for our
Loginpage becomes:
export default withAuth(withLayout(Login), { logoutRequired: true })
getInitialProps() method
In this section, we take a detour to learn about the getInitialProps() method. We won’t make any code changes in this section.
Next.js uses getInitialProps() to populates data to a component’s props.
We used getInitialProps() briefly in Chapter 2, as well as earlier in this chapter, to pass the user prop to our Index page, withLayout HOC, and withAuth HOC. In this section, let’s discuss the properties of this static method.
getInitialProps() is a static method that passes data to pages by populating the props of a component. Both HOCs and Next.js pages can use this method to get data, but child components cannot. Child components get props from a parent component. For example, we passed the user prop to our Header component from the withLayout HOC in Chapter 2.
In this app, we fetch data ( user prop) asynchronously by using async getInitialProps() inside the withAuth HOC.
Static method means the method defines functions that act on a class instead of a particular object of a class. For example, in Chapter 5, we will introduce the pages/customer/read-chapter.js page. As with any page of our app that is not written as a stateless functional component, we define the ES6 class as:
class ReadChapter extends React.Component {
  // some code
}
getInitialProps() is a static method of the ReadChapter class:
class ReadChapter extends React.Component {
  static async getInitialProps({ query }) {
    const { bookSlug, chapterSlug } = query;

    const chapter = await getChapterDetail({ bookSlug, chapterSlug });

    return chapter;
  }
}
In the example above, when a user loads the pages/customer/read-chapter.js page, getInitialProps() receives two slugs from the query part of the route, passes parameters to the API method getChapterDetail() , and returns the chapter prop . Now we are able to use the chapter prop to show chapter.title and chapter.content to the user.
In this example, we pass query to our method, but you can pass other parameters as well. Check out the full list of parameters in Next.js docs.
As you know from our discussion of server-side rendering in Chapter 1, the optimal strategy for fast loading is to render a page on the server for the initial page load and then on the client for subsequent loads. Thus, in Next.js, getInitialProps() executes on the server for the initial load of a page but executes on the client when a user navigates to that page via Link or Router.push .
Here are two choices for page rendering:
- If you want to render a page on the server for the initial load, you should fetch data with
getInitialProps(). - If you want to render a page on the client, without server-side rendering for the initial load, you should fetch data using the API method inside the
componentDidMountlifecycle hook.
Login page and Nprogress
For our Login page, the export code will have logoutRequired: true , since logoutRequired is false by default:
export default withAuth(withLayout(Login), { logoutRequired: true })
Let’s write our Login page as a stateless functional component. We created our Index page as a stateless functional component in Chapter 1. You should have no problem with writing code for the Login page:
pages/login.js :
import Head from 'next/head';
import Button from '@material-ui/core/Button';

import withAuth from '../lib/withAuth';
import withLayout from '../lib/withLayout';
import { styleLoginButton } from '../components/SharedStyles';

const Login = () => (
  <div style={{ textAlign: 'center', margin: '0 20px' }}>
    <Head>
      <title>
        Log in to Builder Book
      </title>
      <meta name="description" content="Login page for builderbook.org" />
    </Head>
    <br />
    <p style={{ margin: '45px auto', fontSize: '44px', fontWeight: '400' }}>
      Log in
    </p>
    <p>
      You’ll be logged in for 14 days unless you log out manually.
    </p>
    <br />
    <Button variant="contained" style={styleLoginButton} href="/auth/google">
      <img
        src="https://storage.googleapis.com/builderbook/G.svg"
        alt="Log in with Google"
        style={{ marginRight: '10px' }}
      />
      Log in with Google
    </Button>
  </div>
);

export default withAuth(withLayout(Login), { logoutRequired: true });
We previously discussed the usage of the Head component from Next.js and the Button component from Material-UI. Since we will be using Google OAuth for our users, both the login and signup buttons redirect a user to the /auth/google route. Later in this chapter, we will tell our server what to do when a user is on the /auth/google route.
Start your app with yarn dev , navigate to localhost:8000/login , and click the Log in button located on the right side of the Header :

Good job, you are one step closer to adding user authentication to your app!
Let’s make a big UX improvement.
You may have noticed that in the Header component, we used <Link prefetch href="/login"> syntax. We discussed Next.js’s prefetch method in Chapter 1. In short, when a user loads the app for the first time, the static code for the Login page will be prefetched in the background. Important note: the prefetch feature is production-only. If your page has dynamic data - the page will not prefetch that data, only static code (page code without dynamic data).
Fast loading is great, but our app still needs some visual element to indicate loading progress.
Try clicking the hyperlinked logo (left) and Log in link (right) in the Header - nothing tells you visually that the route has changed and that you should expect a new page to load. For comparison, load this page: http://ricostacruz.com/nprogress/
This page has a nice-looking blue progress bar at the top. The bar informs you that the page is loading and shows you the progress.
Let’s add this Nprogress bar to our app. At the beginning of this chapter, you ran yarn - so you already added the nprogress package.
We can add the Nprogress bar to our Header component or withLayout HOC. Some of our pages may not have Header , also we may create another Header component for some of the pages. Thus, we’re better off adding the loading bar to our withLayout HOC that will wrap all pages in our application.
Go to lib/withLayout.js and add two new imports to the imports section:
import Router from 'next/router';
import NProgress from 'nprogress';
Then add two basic methods, NProgress.start() and NProgress.done() , right after the imports section of
lib/withLayout.js file:
Router.onRouteChangeStart = () => NProgress.start();
Router.onRouteChangeComplete = () => NProgress.done();
Router.onRouteChangeError = () => NProgress.done();
If you’d like to learn more about router events in Next.js apps, check out the Next.js docs.
Go to http://ricostacruz.com/nprogress/nprogress.css and download the nprogress.css file. Next.js requires static files to be located in a static folder, so place this nprogress.css file into a new static folder of your app. After customizing styles, here is the content of our slightly edited nprogress.css :
static/nprogress.css :
/* Make clicks pass-through */
#nprogress {
  pointer-events: none;
}

/* color and other parameter */
#nprogress .bar {
  background: #1976D2;

  position: fixed;
  z-index: 1000;
  top: 0;
  left: 0;

  width: 100%;
  height: 2px;
}
Finally, to load the bar, add the following line of code to pages/_document.js . Add it just above the style tag:
<link rel="stylesheet" type="text/css" href="/static/nprogress.css" />
It’s important to note that you should use the static folder for development only. If you plan to deploy your app, then you should move all static resources to a content delivery network (CDN).
Since we plan to deploy our app in this book, let’s add the style above to a CDN. We minified nprogress.css and uploaded it to Google Cloud at:
https://storage.googleapis.com/builderbook/nprogress.min.css
In Chapter 1, we customized <Document> . Among other customizations, we added the following code to the <Head> section of our MyDocument component at pages/_document.js :
<link
  rel="stylesheet"
  href="https://storage.googleapis.com/builderbook/nprogress.min.css"
/>
This <link> tag will ensure that the Nprogress bar gets styles from Google’s CDN.
Remember to remove the <link rel="stylesheet" type="text/css" href="/static/nprogress.css" /> line of code as well as the /static/nprogress.css file.
Start your app with yarn dev , navigate to localhost:8000/login , click both the hyperlinked logo and Log in . You will notice a dark blue progress bar. The bar’s progress corresponds to the loading progress of our Header component.
At this point, we wrote our withAuth HOC and Login page. Our next step is to write the main static method signInOrSignUp for UserClass of our User model. This static method will either log in an existing user or create a user document for a new user. However, before we write this method, you should get familiar with the concepts of Promise and async/await .
The next two sections on Promise and Async/await are optional, in case you are already familiar with these concepts.
Promise.then()
Traditionally in JavaScript, developers used callback to figure out whether an asynchronous function has completed or not. An asynchronous function is one that completes with a delay. Callback is a function that is passed to an asynchronous function as an argument. When an asynchronous function completes - the callback function executes. As a result, you know that the asynchronous function has completed (either with success or error). Callback is typically used as an anonymous arrow function.
Note that you may use callback synchronously and execute it before the main function completes. But in this section, we discuss only asynchronous functions.
We will write two callbacks ( verify and verified ) later in this chapter when we write code for integration with Google OAuth. Let’s discuss the alternative to asynchronous callback - Promise.
Eventually, to make code more readable, developers began using Promises. Besides better readability, Promises have some additional advantages over callbacks - for example, asynchronous .then/catch handlers and promise chain.
To understand Promise, consider the following example:
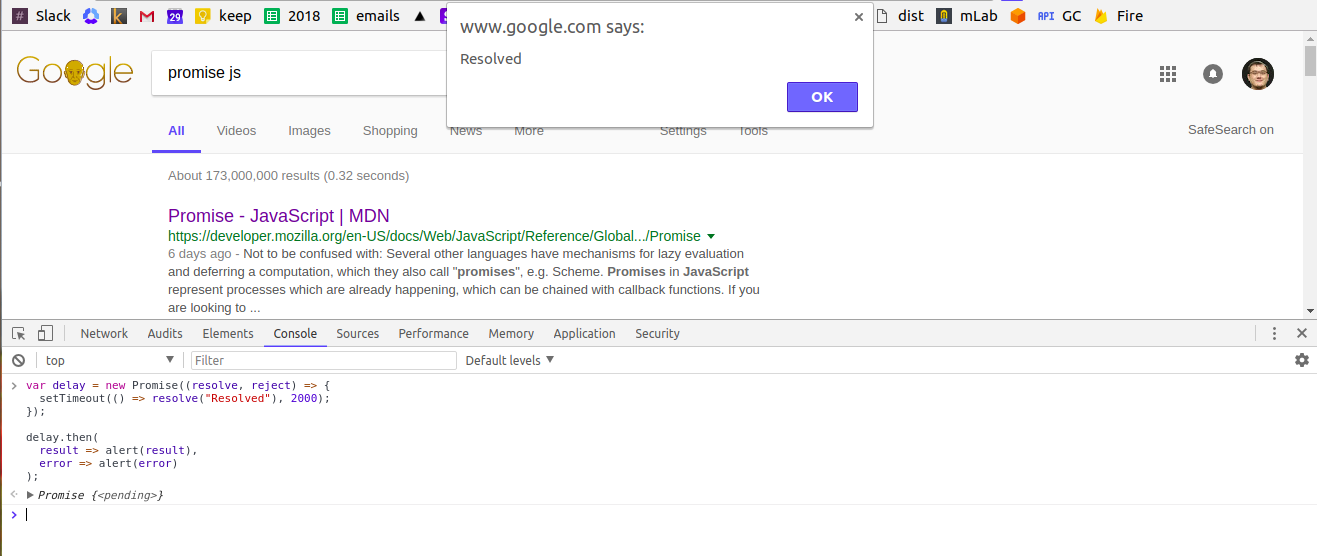
var delay = new Promise((resolve, reject) => {
  setTimeout(() => resolve("Resolved"), 2000);
});

delay.then(
  result => alert(result),
  error => alert(error)
);
Go to Chrome’s Developer tools , click Console , and paste the code above. Click enter to run the code. In the browser window, the alert modal says Resolved :
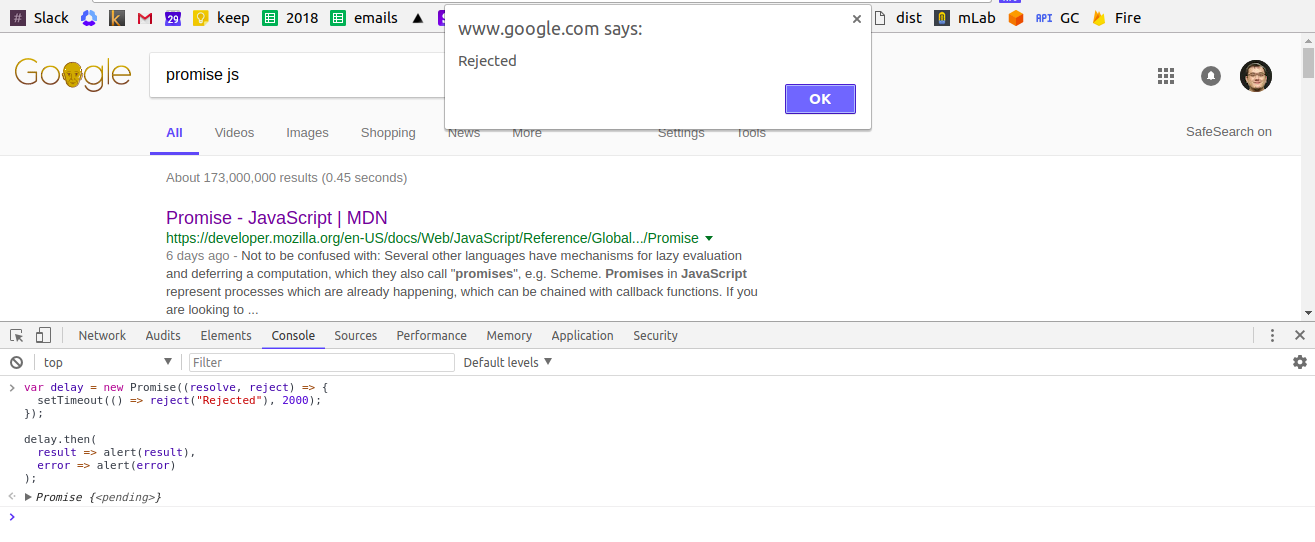
Now run this slightly modified code:
var delay = new Promise((resolve, reject) => {
  setTimeout(() => reject("Rejected"), 2000);
});

delay.then(
  result => alert(result),
  error => alert(error)
);
In the browser window, the alert modal says Rejected :
From this example, you can see that Promise has some similarities with asynchronous callback:
- the function
delaytakes time to complete (it’s the main asynchronous function, and callback is the argument of this function), -
.then()is waiting for the result and won’t execute unlessdelayhas completed (callback is waiting for the main function to complete), - function
delay.then()returnsresultorerror(this is new, see the explanation below)
In JavaScript, Promise is a special object that has state and result .
- The Promise object initially has
state: "pending", result: undefined. - When Promise calls
resolve("Resolved"), the object parameters becomestate: "fulfilled", result: "Resolved" - When Promise calls
reject("Rejected"), the object parameters become:state: "rejected", result: "Rejected"
The Promise object’s state and result are not available in the code and have to be accessed with .then() .
The asynchronous .then() handler that waits for the main function to return result or error is nice and a step up from callbacks. What about the second advantage that we mentioned - promise chain?
Promise chain is an instance when you need to run multiple functions one after another once the main function completes and the result is available. Go to Chrome’s Developer tools , click Console , paste and run the following promise chain:
var delay = new Promise((resolve, reject) => {
  setTimeout(() => resolve("Resolved"), 2000);
});

delay
.then(
  result => {
    alert(result);
    return result;
  }
)
.then(
  result => alert(result+" again"),
);
You will see two sequential alert modals. The first says Resolved , and the second says Resolved again .
There is one more thing you should know to start using Promise. In Chapter 5, when we write internal APIs for our app, the Express route for fetching a list of books will look like this:
router.get('/books', (req, res) => {
  Book.list()
    .then(books => res.json(books))
    .catch(err => res.json({ error: err.message || err.toString() }));
});
About .catch() - try running this code in your browser console:
var delay = new Promise((resolve, reject) => {
  setTimeout(() => reject("Rejected"), 2000);
});

delay.then(
  result => alert(result)
);
You won’t see any alert modal. Instead, the browser will tell you that error is uncaught :

Now, add null to .then and run the code again:
var delay = new Promise((resolve, reject) => {
  setTimeout(() => reject("Rejected"), 2000);
});

delay.then(null,
  result => alert(result)
);
In this case, you will see an alert modal that says Rejected - you caught the error successfully. To catch an error, instead of using .then(null, function) , you can use a shorter and more memorable .catch(function) . Run this code in your browser console:
var delay = new Promise((resolve, reject) => {
  setTimeout(() => reject("Rejected"), 2000);
});

delay.catch(
  result => alert(result),
);
Indeed, you see an alert modal with Rejected , indicating that the error was caught.
There are three popular solutions to asynchronous execution. Here they are in the order they were introduced in JavaScript:
- asynchronous callback
- promise with
.then() - async/await
Our favorite approach is async/await , which we’ll discuss in the next section. By the end of this book, we will use this construct over two dozen times.
Async/await
Node.js has supported async/await since version 7.6, so this feature is relatively new. We learned this feature before Promise’s .then() . As a result, this app uses async/await in most instances that require asynchronous execution. As you will see from the examples below, every Promise.then() can be replaced with more readable and concise async/await . The readability gain becomes more obvious with promise chain - I’ll provide an example at the end of this section to discuss our signInOrSignUp() method inside the User model.
At the end of this chapter, we will add static methods to our User model. In Chapter 5, we will add static methods to our Book model. To explain async/await more clearly, let’s consider a simplified version of our static method add() inside the Book model.
The static method add() generates a slug with generateSlug() from server/utils/slugify.js and creates a new book with Mongoose’s create() method. Normally, we would define add() using Promise’s method .then() :
static add({ name, price, githubRepo }) {
   return generateSlug(this, name).then(slug =>
      this.create({
         slug,
        // other parameters needed for creating new book
      }));
}
The method create() inside the asynchronous handler .then() will run only after generateSlug() returns slug (or null).
We can achieve the exact same result as the code above by using async/await :
static async add({ name, price, githubRepo }) {
   const slug = await generateSlug(this, name);
   return this.create({
      slug,
      // other parameters needed for creating new book
   });
}
Compare the two versions. Both achieve the same result, but the async/await version is more readable. When you simply prepend the function add() with async - you ensure that add() will always return a Promise. await makes Javascript pause and wait for slug to be generated and returned, since a new book requires slug among other parameters.
To better understand async behaviour, let’s run some code in our browser console. Go to Chrome and click Tools > Developer tools > Console . Paste this code and run it by clicking Enter :
var foo = () => {
  return 'Hello world!';
}

foo().then(alert);
No alert modal appears, and you can see an error that says Uncaught TypeError: foo(...).then is not a function :

That’s correct. Because foo() does not return a Promise, .then() can not catch any result or error .
Now, add async before the function () :
var foo = async () => {
  return 'Hello world!';
}

foo().then(alert);
Now the alert modal does appear :
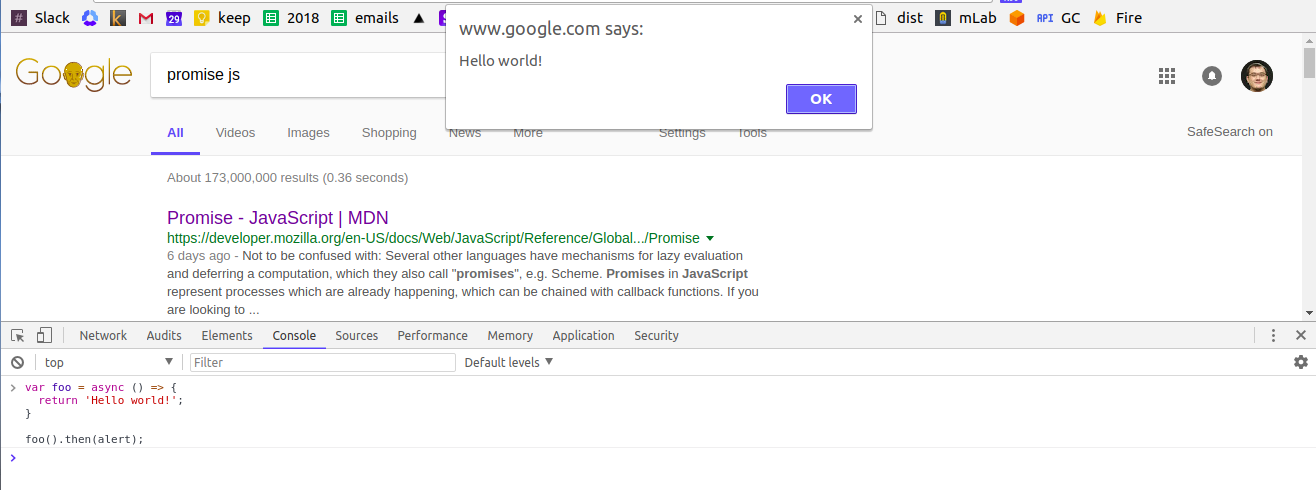
This proves that only the function with async returns a Promise. We learned in a previous section that .then() gets a result or error from a Promise object only. That proves that async () returns a Promise.
async is a very simple way to make a function return a Promise. As you learned from the examples above, a function always returns a Promise even for non-promise return values ( return 'Hello world!' ). When a return statement returns a non-promise value, JavaScript will automatically wrap that non-promise into a resolved Promise.
Let’s talk about the second half of the async/await construct: await . Inside the async function (not outside and not inside regular non-async functions - eslint will warn you), you may execute code in a synchronous fashion by adding await .
In the example for our add() static method, JavaScript will pause on the line that contains await :
const slug = await generateSlug(this, name);
JavaScript pauses until the Promise settles and returns a result (in this case, the book slug or null ).
To better understand how pausing happens on the line with await , let’s do a short exercise. In the Promise section, you ran this code:
var delay = new Promise((resolve, reject) => {
  setTimeout(() => resolve("Resolved"), 2000);
});

delay.then(
  result => alert(result)
);
Rewrite this code block using async/await :
- Replace the handle
.then(result => ...)that waits forresultwith a line that hasawaitand also waits forresult:
var result = await …
- Finally, decide which function you are waiting for. We are waiting for the
setTimeout()function. Thus:
var result = await setTimeout()
If you followed these hints, you get:
var delay = async () => {
  var foo = new Promise((resolve, reject) => {
    setTimeout(() => resolve("Resolved"), 2000)
  });

  var result = await foo;
  alert(result);
}

delay();
Run this code in your browser console and you will get the same alert modal that says Resolved after a 2 sec delay. We just achieved the same goal but with way more readable code, although there is no gain in size (we did not make the code more concise). We know that the code pauses at var result = await foo; line.
In practice, the code can become more concise. You will see this in Chapter 5, where we write many static methods for Mongoose models. By default, all Mongoose methods (aka Mongoose Queries), such as create() , update() , and findOne , return a Promise. Thus, we don’t need to use Promise((resolve, reject) => ...) when using await on any of these methods.
Another situation when code with async/await gets more concise is the promise chain. You will see this in the signInOrSignUp() static method of our User model (discussed in the next section of this chapter).
We use var foo = new Promise((resolve, reject) => ...) because the function after await must return a Promise. For JavaScript to pause at a line with await , the syntax is await foo , where foo must return a Promise. To demonstrate that JavaScript pauses on the line that contains await foo and that foo returns a Promise, run this code in your browser console:
var delay = async () => {
  var foo = new Promise((resolve, reject) => {
    setTimeout(() => resolve("Resolved"), 2000)
  });

  console.log('Line BEFORE await');
  var result = await foo;
  console.log('Line AFTER await');

  alert(result);
}

delay();
While running this code, notice the order in which the console prints text and the browser shows the alert modal:
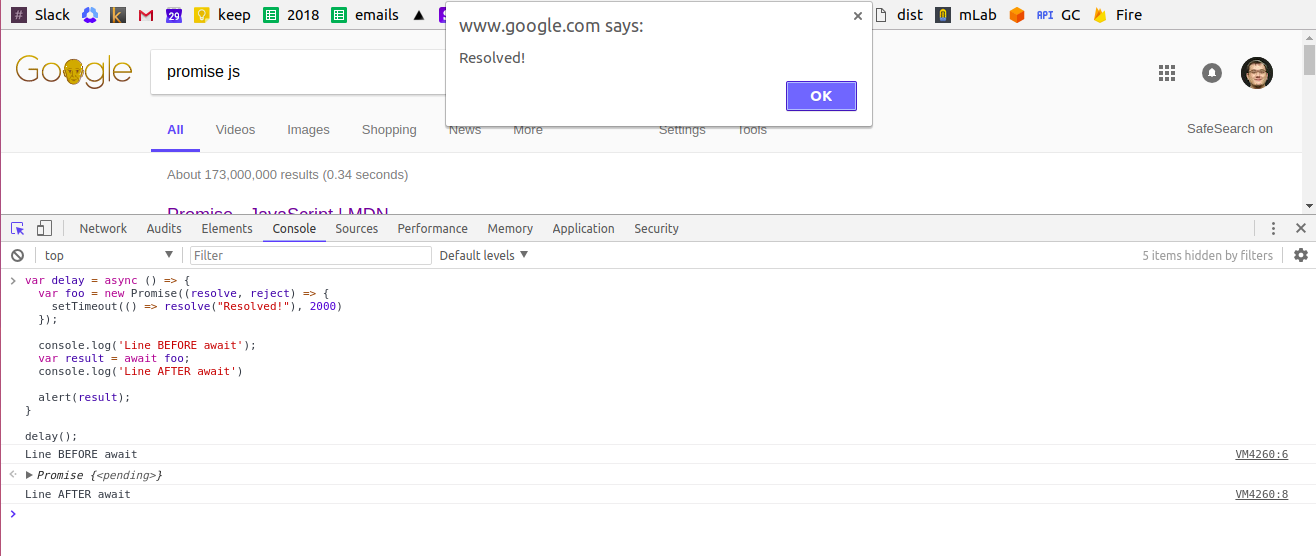
Events in chronological order:
- the console prints
Line BEFORE await - nothing happens for about 2 sec (code pauses for 2 sec at
await fooline) - the alert modal shows up
- the console prints
Line AFTER await
Now, let’s try running this code where foo does not return Promise:
var delay = async () => {
  var foo = setTimeout(() => alert('Resolved'), 2000);

  console.log('Line BEFORE await');
  var result = await foo;
  console.log('Line AFTER await');

  result;
}

delay();
This time, you see no pausing , and the console prints Line BEFORE await and Line AFTER await right after the code starts to execute. That’s exactly what we expected, since foo does not return a Promise (unlike the previous example).
Important note on catching an error with .catch() used after .then() - to catch an error with async/await , use try/catch.
We frequently use this construct with async/await when we need to catch an error. For example, our Express route /books awaits for the Book.list() static method to return a list of books (more on Express routes in Chapter 5):
router.get('/books', async (req, res) => {
  try {
    const books = await Book.list();
    res.json(books);
  } catch (err) {
    res.json({ error: err.message || err.toString() });
  }
});
In summary, async/await achieves the same goal as a Promise with .then() and as asynchronous callbacks. However, the syntax is more readable and thus developer-friendly.
We hope this section and the previous one showed you - via practical exercises - how asynchronous callbacks, Promise and .then() , and async/await solve the problem of asynchronous execution. In our app, we will use asynchronous callbacks a few times, Promise with .then() a half a dozen times, and async/await over two dozen times.
Static method signInOrSignUp()
In this section, we discuss and work on the static method signInOrSignUp for UserClass of our User model. From the getInitialProps section, you learned that developers use static methods to write functions that act on an entire class (for example, UserClass ) instead of individual objects within the class.
We will use async/await heavily inside our static async signInOrSignUp method. It’s important to mention again that Mongoose methods (we will use Model.findOne , Model.create , and Model.updateOne ) return a Promise by default. Since you read the Promise and Async/Await sections, you know what this means for us - we can use await on these Mongoose methods without creating Promises with Promise((resolve, reject) => ...) .
You probably guessed that our signInOrSignUp method is used to log in or sign up a user. This method checks if a user already exists with the Mongoose method this.findOne :
- if a user document (MongoDB document) exists, the method will use Mongoose
this.updateOneto update a user’s google tokens (we discuss Google OAuth later in this chapter). - if a user document does not exist, the method will use Mongoose’s
this.createto create a new user document.
Before we work on signInOrSignUp , let’s make a small detour to get familiar with this . If you read the Mongoose docs, you’ll find that the syntax for methods should be Model.findOne , Model.create , and Model.updateOne . In our case, it should be User.findOne , User.create , and User.updateOne , but we replaced User with this .
In JavaScript, this is used to access an object in the context. Sometimes, a method needs to access data inside an object. If so, that method can use this to access the object’s data. Consider the following example:
var user = {
  name: "Peter",
  occupation: "guitar player",

  printToConsole() {
    console.log('My name is '+ this.name + ', I am ' + this.occupation);
  }

};

user.printToConsole();
The method printToConsole() gains access to user data (object data) with this.name and this.occupation . Run the code in your browser console:

You get an output with the proper data. In our case, this.name and this.occupation are equal to user.name and user.occupation . Thus this in the context of printToConsole() is a user object. You can think of this in JavaScript like this in English. Say two developers are discussing a new app idea and one says we gotta build this .
In the context of this.findOne , this.create , and this.updateOne , this is equal to User (for our User model). Hence, these methods are equal to User.findOne , User.create , and User.updateOne , and the use of this allows us to properly find, create, or update a user document in our users collection.
Below, we will write our signInOrSignUp method. At the end of this section, we will add this method to our User model at server/models/User.js .
signInOrSignUp is a static method of the class UserClass . Mongoose creates ES6 classes using the loadClass() method. Here is an example:
class PersonClass {
  static findByFullName() {
    // some code
  }
}

schema.loadClass(PersonClass)
In our case, the class is UserClass , and we have two static methods instead of one:
class UserClass {
  static publicFields() {
    // some code
  }

  static signInOrSignUp() {
    // some code
  }
}

schema.loadClass(UserClass)
The publicFields() method contains user parameters that we call public parameters. We send public parameters to the client (browser). To render our app’s dashboard, the client needs to know if a user is Admin or not and needs to get the user’s Avatar - thus we add isAdmin and avatarUrl to our public parameters:
static publicFields() {
    return [
      'id',
      'displayName',
      'email',
      'avatarUrl',
      'slug',
      'isAdmin',
      'isGithubConnected',
    ]
  }
The parameters id , displayName , email , avatarUrl , slug , and isAdmin are self-explanatory. We will discuss isGithubConnected in Chapter 6.
The method signInOrSignUp() won’t be this easy, since it does way more:
- If a user exists, the method finds this exisitng user with
this.findOneand updates each token insidegoogleTokenwiththis.updateOne. - If user does not exist, the method creates a
slugout of the user’sdisplayNameand then creates a new user withthis.create.
static async signInOrSignUp({
    googleId, email, googleToken, displayName, avatarUrl
}) {
    const user = await this.findOne({ googleId }).select(UserClass.publicFields().join(' '));

    if (user) {
        // 1. for existing user, update each token inside googleToken
    }

    // 2. else, for new user, generate slug and create user
    }
The Mongoose method (aka aka Mongoose Query) select() specifies which document parameters to include. We want to include public parameters when we return a user to the client.
JavaScript’s join() method joins parameters into a string like this:
var elements = ['Fire', 'Wind', 'Rain'];

console.log(elements.join(' '));
// browser console: Fire Wind Rain
Let’s discuss the two main parts of our static method signInOrSignUp() .
- If a user exists, the method updates each token inside
googleToken.We have to update these tokens because they expire. A typicalgoogleTokenis an object that containsaccess_tokenandrefresh_token, among other parameters:
"googleToken": {
       "access_token": "ya29.GlwABQCOnfwd4zfuV7mpg8aePBLTafv9l3te62C97NyByJHPScsM3NPFZzcWITksb7zGdfXwlDEfzf33S7U",
       "refresh_token": "1/QpdBoQURq1uxY4m6p9T48nHtb_XMCGfMmag3WCqS0c0",
       "token_type": "Bearer",
       "expiry_date": 1510363003035
}
Google sets expiration rules on tokens. For example refresh_token expires in these situations:
- user did not use the app for 3+ months
- user resets the password to his/her Google Account
- user manually revokes permissionTo replace each parameter token inside
googleToken, we check if the parameter exists. If it exists, we add the parameter tomodifier. Later, we usemodifierto update the user document on our database:
const modifier = {};

if (googleToken.accessToken) {
 modifier.access_token = googleToken.accessToken;
}

if (googleToken.refreshToken) {
 modifier.refresh_token = googleToken.refreshToken;
}
If modifier is empty - say, Google did not provide tokens - then we should return a user without updating the user document:
if (_.isEmpty(modifier)) {
 return user;
}
Else, we update the user with modifier :
await this.updateOne({ googleId }, { $set: modifier });
Put these constructs together and you get:
if (user) {
 const modifier = {};

 if (googleToken.accessToken) {
   modifier.access_token = googleToken.accessToken;
 }

 if (googleToken.refreshToken) {
   modifier.refresh_token = googleToken.refreshToken;
 }

 if (_.isEmpty(modifier)) {
   return user;
 }

 await this.updateOne({ googleId }, { $set: modifier });

 return user;
}
We use _.isEmpty() from lodash to check if modifier is empty.
2. If a user does not exist, our signInOrSignUp() method creates a slug by waiting for generateSlug() (we define generateSlug() in the next section of this chapter):
const slug = await generateSlug(this, displayName);
When a slug is available, signInOrSignUp() creates a user with this.create :
const slug = await generateSlug(this, displayName);
const userCount = await this.find().countDocuments();

const newUser = await this.create({
 createdAt: new Date(),
 googleId,
 email,
 googleToken,
 displayName,
 avatarUrl,
 slug,
 isAdmin: userCount === 0,
});

return _.pick(newUser, UserClass.publicFields());
Note that we use this.find().countDocuments() instead of this.find().count() in order to avoid a deprecation warning described in the Mongoose docs and MongoDB docs.If our database has no users at all, we want to make the very first user an Admin. When userCount is zero, we add isAdmin: true to our user document. That means the very first user is Admin user.We can also get user count with this.count() . This method is similar in performance to this.find().count() . Check up these links: MongoDB docs, relevant discussion on Github.The lodash method _.pick picks/adds only public parameters to a returned new user. We don’t want to send all parameters. For example, sending googleToken to the client is unnecessary and unsafe.
Let’s add our static methods publicFields() and signInOrSignUp() to our UserClass carcass:
class UserClass {
  static publicFields() {
    // some code
  }

  static signInOrSignUp() {
    // some code
  }
}

schema.loadClass(UserClass)
You will get:
class UserClass {
  static publicFields() {
    return [
      'id',
      'displayName',
      'email',
      'avatarUrl',
      'slug',
      'isAdmin',
      'isGithubConnected',
    ];
  }

  static async signInOrSignUp({
    googleId, email, googleToken, displayName, avatarUrl,
  }) {
    const user = await this.findOne({ googleId }).select(UserClass.publicFields().join(' '));

    if (user) {
      const modifier = {};

      if (googleToken.accessToken) {
        modifier.access_token = googleToken.accessToken;
      }

      if (googleToken.refreshToken) {
        modifier.refresh_token = googleToken.refreshToken;
      }

      if (_.isEmpty(modifier)) {
        return user;
      }

      await this.updateOne({ googleId }, { $set: modifier });

      return user;
    }

    const slug = await generateSlug(this, displayName);
    const userCount = await this.find().countDocuments();

    const newUser = await this.create({
      createdAt: new Date(),
      googleId,
      email,
      googleToken,
      displayName,
      avatarUrl,
      slug,
      isAdmin: userCount === 0,
    });

    return _.pick(newUser, UserClass.publicFields());
  }
}

schema.loadClass(UserClass)
This code is easy to read. Our signInOrSignUp() method will wait for this.findOne() . If a user exists, then the method will wait for this.updateOne() to update the user’s tokens. If a user does not exist, our method will wait for generateSlug() and then will wait for this.create() .
Compare the readability of this code above (written with async/await ) to the code below (written with Promise and .then() ):
class UserClass {
  static publicFields() {
    return [
      'id',
      'displayName',
      'email',
      'avatarUrl',
      'slug',
      'isAdmin',
      'isGithubConnected',
    ];
  }

  static signInOrSignUp({
    googleId, email, googleToken, displayName, avatarUrl,
  }) {
    return this.findOne({ googleId }, UserClass.publicFields().join(' ')).then((user) => {

      if (user) {
        const modifier = {};

        if (googleToken.accessToken) {
          modifier.access_token = googleToken.accessToken;
        }

        if (googleToken.refreshToken) {
          modifier.refresh_token = googleToken.refreshToken;
        }

        if (isEmpty(modifier)) {
          return Promise.resolve(user);
        }

        return this.updateOne({ googleId }, { $set: modifier }).then(() => Promise.resolve(user));
      }

      const userCount = await this.find().countDocuments();

      return generateSlug(displayName).then(slug =>
        this.create({
          createdAt: new Date(),
          googleId,
          email,
          googleToken,
          displayName,
          avatarUrl,
          slug,
          isAdmin: userCount === 0,
        }).then(newUser => Promise.resolve(pick(newUser, UserClass.publicFields()))));
    });
  }
}

mongoSchema.loadClass(UserClass);
Take the UserClass version that we wrote using async/await and add it to our User model at server/models/User.js above the following line of code:
const User = mongoose.model(‘User’, mongoSchema);
Remember to add all missing imports as well:
server/models/User.js :
const mongoose = require('mongoose');
const _ = require('lodash');
const generateSlug = require('../utils/slugify');

const { Schema } = mongoose;

const mongoSchema = new Schema({
  googleId: {
    type: String,
    required: true,
    unique: true,
  },
  googleToken: {
    access_token: String,
    refresh_token: String,
    token_type: String,
    expiry_date: Number,
  },
  slug: {
    type: String,
    required: true,
    unique: true,
  },
  createdAt: {
    type: Date,
    required: true,
  },
  email: {
    type: String,
    required: true,
    unique: true,
  },
  isAdmin: {
    type: Boolean,
    default: false,
  },
  displayName: String,
  avatarUrl: String,

  isGithubConnected: {
    type: Boolean,
    default: false,
  },
  githubAccessToken: {
    type: String,
  },
});

class UserClass {
  static publicFields() {
    return [
      'id',
      'displayName',
      'email',
      'avatarUrl',
      'slug',
      'isAdmin',
      'isGithubConnected',
    ];
  }

  static async signInOrSignUp({
    googleId, email, googleToken, displayName, avatarUrl,
  }) {
    const user = await this.findOne({ googleId }).select(UserClass.publicFields().join(' '));

    if (user) {
      const modifier = {};

      if (googleToken.accessToken) {
        modifier.access_token = googleToken.accessToken;
      }

      if (googleToken.refreshToken) {
        modifier.refresh_token = googleToken.refreshToken;
      }

      if (_.isEmpty(modifier)) {
        return user;
      }

      await this.updateOne({ googleId }, { $set: modifier });

      return user;
    }

    const slug = await generateSlug(this, displayName);
    const userCount = await this.find().countDocuments();

    const newUser = await this.create({
      createdAt: new Date(),
      googleId,
      email,
      googleToken,
      displayName,
      avatarUrl,
      slug,
      isAdmin: userCount === 0,
    });

    return _.pick(newUser, UserClass.publicFields());
  }
}

mongoSchema.loadClass(UserClass);

const User = mongoose.model('User', mongoSchema);

module.exports = User;
At this point in the chapter, we’ve written our withAuth HOC and Login page. We’ve also wrapped our Index page with withAuth and written the main static method signInOrSignUp() that logs in or signs up our users.
In the next section of Chapter 3, we will discuss and write the generateSlug() method.
Generate slug
In the previous section, we created two static methods for UserClass . The method signInOrSignUp() requires generateSlug() , which is imported from server/utils/slugify.js . The method generateSlug() is a utility method - thus we place it in our server/utils/* directory.
Before our method generates a unique slug , we make a slug from name without checking for uniqueness.
The function slugify() performs simple string operations using the JavaScript methods .toString() , .toLowerCase() , .trim() , and .replace . For example, for a user with name: John Johnson , we want the slug to be john-johnson :
const _ = require('lodash');

// https://devdocs.io/lodash~4/index#kebabCase

const slugify = text => _.kebabCase(text);
To learn more about kebabCase , check out Lodash’s official docs.
Here are examples of how kebabCase() works:
_.kebabCase('Foo Bar');
// => 'foo-bar'

_.kebabCase('fooBar');
// => 'foo-bar'

_.kebabCase('__FOO_BAR__');
// => 'foo-bar'
kebabCase() transformation is exacty what we need to generate slug from person’s name.
Let’s create generateSlug() . This method is Model-agnostic and will generate a unique slug for our User, Book, and Chapter models from name . The method will take Model and name as arguments. To ensure that two chapters can have the same slug providing that the chapters belong to two different books, we add one extra argument filter .
To generate a non-unique slug , simply use the slugify() function that we wrote above:
const origSlug = slugify(name);
Then wait for Model.findOne() to find a user with the same slug value.
If a user with the same slug does not exist, then deem this slug original and return it as an output of generateSlug() :
if (!user) {
  return origSlug;
}
Else , if a user with the same slug exists, call the createUniqueSlug() function that appends slug with a number to make it unique.
Let’s summarize this discussion to create our generateSlug(Model, name, filter = {}) method. Prepend the function with export default and async :
async function generateSlug(Model, name, filter = {}) {
  const origSlug = slugify(name);

  const user = await Model.findOne(Object.assign({ slug: origSlug }, filter), 'id');

  if (!user) {
    return origSlug;
  }

  return createUniqueSlug(Model, origSlug, 1);
}

module.exports = generateSlug;
The function createUniqueSlug() is very similar to generateSlug() . At first, it adds a number to slug with ${slug}-${count} .
Then, like generateSlug() , it waits for Model.findOne() to find a user with the same slug (in case a user with ${slug}-${count} already exists).
If a user does not exist, the function deems ${slug}-${count} unique and returns it as an output of generateSlug() .
Else , if a user with the slug value ${slug}-${count} exists, the function increases count by 1 and runs again:
async function createUniqueSlug(Model, slug, count) {
  const user = await Model.findOne({ slug: `${slug}-${count}` }, 'id');

  if (!user) {
    return `${slug}-${count}`;
  }

  return createUniqueSlug(Model, slug, count + 1);
}
Here is an example of how generateSlug() works. Say a user named Jack Frost signs up on our app. If our database already has a user with the slug jack-frost and does not have a user with slug jack-frost-1 , then generateSlug() will return jack-frost-1 . If a user with the slug jack-frost-1 already exists, then the function will return jack-frost-2 .
Create a new server/utils/slugify.js file and put the three pieces of code from above into this file in the following order:
- first,
const slugify - second, we have to define
createUniqueSlug()before we can use it - third,
generateSlug()
You should get:
server/utils/slugify.js
const _ = require('lodash');

// https://devdocs.io/lodash~4/index#kebabCase

const slugify = text => _.kebabCase(text);

async function createUniqueSlug(Model, slug, count) {
  const user = await Model.findOne({ slug: `${slug}-${count}` }, 'id');

  if (!user) {
    return `${slug}-${count}`;
  }

  return createUniqueSlug(Model, slug, count + 1);
}

async function generateSlug(Model, name, filter = {}) {
  const origSlug = slugify(name);

  const user = await Model.findOne(Object.assign({ slug: origSlug }, filter), 'id');

  if (!user) {
    return origSlug;
  }

  return createUniqueSlug(Model, origSlug, 1);
}

module.exports = generateSlug;
Phew, done!
In the next sections, we will work on a big task - adding Google OAuth to our app. Once added, we will test the entire authentication flow of our app.
At this point, we’ve completed half of the work to add user authentication to our app. We wrote a withAuth HOC (at lib/withAuth.js ) that passes user data to the pages it wraps and redirects a user depending on his/her authentication state. We created a key static method signInOrSignUp() (for our User model) that either logs in a user (and updates googleToken ) or signs up a user (creates a new user document).
The only missing part in our user authentication is Google OAuth. In this chapter, we will write the main authentication function auth() (located at server/google.js ).
If you start your app and navigate between pages, you will notice that redirects from the withAuth HOC don’t work and that both Index and Login pages are available to the public, logged-out user. Since we have not added Google OAuth yet, this behaviour is expected.
To implement Google OAuth, we will use the packages passport and passport-google-oauth , as well as Google OAuth2 documentation
Google Oauth: auth() function
In server/google.js , we will define an auth() function. Later in this chapter, we will initialize this function on our server ( server/app.js ). We use auth() to:
- create a new strategy by calling
new Strategy() - pass env variables to this strategy
- get
googleId,email,googleToken,displayName, andavatarURLfrom Google’s response - pass this data to
User.signInOrSignUp()to create or update a user - serialize/deserialize a user
- initialize passport and session
- define three Express routes:
/auth/google,/auth/google/callback, and/logout(to be done in the next section calledExpress routes)
To write auth() , we will follow this official example for Google OAuth 2.0 authentication strategy.
The author gives this example of configuring Strategy:
passport.use(new GoogleStrategy({
    clientID: GOOGLE_CLIENT_ID,
    clientSecret: GOOGLE_CLIENT_SECRET,
    callbackURL: "http://www.example.com/auth/google/callback"
  },
  function(accessToken, refreshToken, profile, cb) {
    User.findOrCreate({ googleId: profile.id }, function (err, user) {
      return cb(err, user);
    });
  }
));
The function function(accessToken, refreshToken, profile, cb) is a verify callback. This function receives tokens and a user profile from Google. In our implementation, we will explicitly call this function verify .
You know from Chapter 1 that we use the dotenv package to manage env variables. We can access any variable’s value by prepending process.env to the variable’s name. For example, MONGO_URL in server/app.js is defined as const MONGO_URL = process.env.MONGO_URL_TEST . Thus, we define Google-related variables as:
clientID: process.env.Google_clientID,
clientSecret: process.env.Google_clientSecret,
callbackURL: `${ROOT_URL}/auth/google/callback`
Pass these env variables and our verify function to new Strategy() . Create a server/google.js file with the following carcass for our auth() function:
server/google.js :
const passport = require('passport');
const Strategy = require('passport-google-oauth').OAuth2Strategy;
const User = require('./models/User');

function auth({ ROOT_URL, server }) {
  passport.use(new Strategy(
    // 1. define `verify` function: get profile and googleToken from Google AND
    // 2. call and wait for static method `signInOrSignUp` to return user
    {
      clientID: process.env.Google_clientID,
      clientSecret: process.env.Google_clientSecret,
      callbackURL: `${ROOT_URL}/auth/google/callback`
    },
    verify
  ))

  // 3. serialize user AND
  // deserialize user;

  // 4. initial passport AND
  // save session to keep user logged in (via browser cookie);

  // Express routes (see next section)
}

module.exports = auth;
Note that instead of calling User.findOrCreate() (as shown in the example), we will call and wait for our User.signInOrSignUp() method.
Let’s discuss and write code for each of the four steps in the boilerplate code above.
-
The function
verify()receivesprofileandgoogleTokenfrom Gooogle’s response. Passport requires averifyfunction to have averified()callback (function that is an argument of another function). -
Remember that we will call and wait for
User.signInOrSignUp(), thus we useasync/awaitsyntax. So far, this is what we know aboutverify():
const verify = async (accessToken, refreshToken, profile, verified) => { … }
From profile , we get the following data:
-
googleId(profile.id) -
email(profile.emails[0].value) -
displayName(profile.displayName) -
avatarUrl(profile.image.url)As you can see,profile.emailsis an array, so we will take the first email from it:
if (profile.emails) {
 email = profile.emails[0].value;
}
Also we will specify the profile image size by appending ?sz=128 instead of ?sz=50 to profile.image.url :
if (profile.photos && profile.photos.length > 0) {
 avatarUrl = profile.photos[0].value.replace('sz=50', 'sz=128');
}
Read more about the JavaScript method replace() in the Mozilla docs.Plug these two code snippets into verify() , and we get:
const verify = async (accessToken, refreshToken, profile, verified) => {
 let email;
 let avatarUrl;

 if (profile.emails) {
   email = profile.emails[0].value;
 }

 if (profile.photos && profile.photos.length > 0) {
   avatarUrl = profile.photos[0].value.replace('sz=50', 'sz=128');
 }

 // call and wait for `User.signInOrSignUp()`
};
- Since we wait for
User.signInOrSignUp()to returnuser:
const user = await User.signInOrSignUp()
We need to pass all data we received from Google to User.signInOrSignUp() :
const user = await User.signInOrSignUp({
 googleId: profile.id,
 email,
 googleToken: { accessToken, refreshToken },
 displayName: profile.displayName,
 avatarUrl,
});
Also we need to catch an error in case there is one. Thus we use try/catch in combination with async/await . We discussed how async/await works with try/catch earlier in this chapter:
try {
 const user = await User.signInOrSignUp({
   googleId: profile.id,
   email,
   googleToken: { accessToken, refreshToken },
   displayName: profile.displayName,
   avatarUrl,
 });

 verified(null, user);
} catch (err) {

 verified(err);
 console.log(err); // eslint-disable-line
}
The callback verified() has the following arguments: verified(err, user, info) .
- in case of success, we return
nullforerroranduser:verified(null, user) - in case of error, we return
nullforuseranderr:verified(err, null)
Alright, add the try/catch construct to our verify() code, and you will get
const verify = async (accessToken, refreshToken, verified) => {
 let email;
 let avatarUrl;

 if (profile.emails) {
   email = profile.emails[0].value;
 }

 if (profile.photos && profile.photos.length > 0) {
   avatarUrl = profile.photos[0].value.replace('sz=50', 'sz=128');
 }

 try {
   const user = await User.signInOrSignUp({
     googleId: profile.id,
     email,
     googleToken: { accessToken, refreshToken },
     displayName: profile.displayName,
     avatarUrl,
   });
   verified(null, user);
 } catch (err) {
   verified(err);
   console.log(err); // eslint-disable-line
 }
};
Say you log in to our web app, close a tab within the app, re-open that tab, and then see that you are still logged in. This means you have a persistent login session. How does this work? A unique cookie on your browser matches (after decoding) a unique session in our database (sessions collection in MongoDB). This session has your unique user id.
To allow a user to stay logged in, Passport associates a session with a user by saving user.id to the session using the passport.serializeUser() method:
passport.serializeUser((user, done) => {
   done(null, user.id)
 })
The callback done has a null value for an error argument as you learned from the verified() callback.
Recall our experiments with session in Chapter 2. A typical session in our DB looks like:
{
   "_id": "NUpFf89Dwy9PNYmsC2DTRF9MP1GqTGQ_",
   "session": "{\"cookie\":{\"originalMaxAge\":null,\"expires\":null,\"httpOnly\":true,\"path\":\"/\"}}",
   "expires": {
       "$date": "2017-11-25T00:17:12.829Z"
   }
}
Here is a snapshot of the session document that contains a user id (added to session by passport.serializeUser() ):

The method passport.serializeUser() indeed saves a user id into the session document at session.passport.user.id .
If the cookie from the browser matches with the session, and that session contains a user id, then we need to take that id and find the user in our database with User.findById() . We only send public parameters to the client with User.publicFields() (as dicussed earlier in this chapter).
Once we find a user by id, Passport uses passport.deserializeUser() to pass the user object to req.user .
passport.deserializeUser((id, done) => {
   User.findById(id, User.publicFields(), (err, user) => {
     done(err, user)
   })
})
Let’s discuss the importance of req.user .
For every request-response cycle, Passport will create a req.user on the server. As you can see from the code snippet above, req.user contains a user object with public user parameters. The server uses req.user in two important places in our app:
- Our
withAuthHOC usesreq.uservia thegetInitialProps()method. ThewithAuthHOC passes theuserprop to any page it wraps.At the end of this chapter, we want to displayuser.emailanduser.avatarUrlon theIndexpage (route/). TheIndexpage becomes a dashboard for logged-in users. Here is howwithAuthusesreq.userto pass theuserprop (we wrote this code earlier in this chapter):
static async getInitialProps(ctx) {
 const isFromServer = !!ctx.req;
 const user = ctx.req ? ctx.req.user && ctx.req.user.toObject() : globalUser;

 if (isFromServer && user) {
   user._id = user._id.toString();
 }

 const props = { user, isFromServer };

 if (Page.getInitialProps) {
   Object.assign(props, (await Page.getInitialProps(ctx)) || {});
 }

 return props;
}
- In Chapter 5, section
Internal APIs, we will write Express middleware and routes for our Admin and Customer users atserver/api/admin.jsandserver/api/customer.js, respectively. For example, here is how we usereq.userinside middleware that checks if a user is authorized to use an API endpoint:
router.use((req, res, next) => {
if (!req.user || !req.user.isAdmin) {
 res.status(401).json({ error: 'Unauthorized' });
 return;
}

next();
});
Note that req.user does not come from the client. Instead, our Express server (with Passport’s help) creates req.user for internal use on the server and stores its value in server memory.
Read more about serialize/deserialize methods in the passport docs.
- You may remember from Chapter 2 that
server.use()mounts/initializes middleware on our Express server. For example, findserver.use(session(sess));inserver/app.js.
To initialize passport on our Express server, we mountpassport.initialize():
server.use(passport.initialize())
To create a persistent login session, we mount passport.session() :
server.use(passport.session())
Important note - later on, when we export and import auth() to our server ( server/app.js ) - for Passport’s serialization to work properly, we should initiate auth() after server.use(session(sess)); .
Let’s outline what happens behind the scenes when a logged-in user opens a tab on the browser:
- user opens a tab
- browser sends a request to the server via HTTP (extremely simplified)
- this request contains
headersand inside themcookie - on the server, cookie (from
req.headers.cookie) findssession(see Chapter 2, sectionSession) -
sessioncontains a user id (done withserializeUser()when the user is logged in) - passport finds
userby id - passport via
deserializeUser()storesusertoreq.user - server uses
req.userto passuserdata towithAuthand some other API endpoints (see Chapter 5, sectionInternal APIs)
We are almost done. The only missing part in our auth() function is the Express routes. Nevertheless, let’s put the four code snippets above into server/google.js . Add them in the order we discussed them:
server/google.js :
const passport = require('passport');
const Strategy = require('passport-google-oauth').OAuth2Strategy;
const User = require('./models/User');

function auth({ ROOT_URL, server }) {
  const verify = async (accessToken, refreshToken, profile, verified) => {
    let email;
    let avatarUrl;

    if (profile.emails) {
      email = profile.emails[0].value;
    }

    if (profile.photos && profile.photos.length > 0) {
      avatarUrl = profile.photos[0].value.replace('sz=50', 'sz=128');
    }

    try {
      const user = await User.signInOrSignUp({
        googleId: profile.id,
        email,
        googleToken: { accessToken, refreshToken },
        displayName: profile.displayName,
        avatarUrl,
      });
      verified(null, user);
    } catch (err) {
      verified(err);
      console.log(err); // eslint-disable-line
    }
  };
  passport.use(new Strategy(
    {
      clientID: process.env.Google_clientID,
      clientSecret: process.env.Google_clientSecret,
      callbackURL: `${ROOT_URL}/oauth2callback`,
    },
    verify,
  ));

  passport.serializeUser((user, done) => {
    done(null, user.id);
  });

  passport.deserializeUser((id, done) => {
    User.findById(id, User.publicFields(), (err, user) => {
      done(err, user);
    });
  });

  server.use(passport.initialize());
  server.use(passport.session());

  // Express routes
}

module.exports = auth;
In the next section, we will discuss Express routes. We need to tell our server what to do when a user navigates to authentication-related routes, such as /auth/google .
Express routes for auth()
In this section, we want to tell our server what to do when a user accesses (or is redirected) to the following routes:
/auth/google/oauth2callback/logout
You may not be familiar with Express routes. We explain how routes and middleware work in Chapter 5, section Internal APIs . You can check up that section and/or read the official docs about routing.
At a high level, an Express route listens for requests that match its endpoint or route. If a request has the proper route, the Express route executes some function.
A basic route looks like this:
app.get('/', function (req, res) {
  res.send('hello world')
})
This Express route has a path ( / in the example above), a request method ( GET ), and a function that modifies the response res . In some cases, the function extracts data from req (could be data stored in a query string or data from the req body).
Here is an official example for implementing two main routes when using passport:
app.get('/auth/google',
  passport.authenticate('google', { scope: ['profile'] }));

app.get('/auth/google/callback',
  passport.authenticate('google', { failureRedirect: '/login' }),
  function(req, res) {
    // Successful authentication, redirect home.
    res.redirect('/');
  });
We will follow this example closely. As usual, let’s construct a boilerplate for all three routes. Unlike the example, we prefer using the arrow function ( => ):
server.get('/auth/google',
  passport.authenticate('google', {
  // 1. options such as scope and prompt
}));

server.get('/oauth2callback',
  passport.authenticate('google', { failureRedirect: '/login' }),
  (req, res) => {
  // 2. if successful, redirect user to Index page (`/`)
  })

server.get('/logout', (req, res) => {
  // 3. remove `req.user` property and user id from session, redirect to Login page (`/login`)
})
Notice that we are using /oauth2callback as suggested by Google; however, you can make this route whatever you want, as long as you specify this route on your Google Cloud dashboard when creating credentials for this app.
On the /auth/google route, we want to access a Google profile with two API scopes: userinfo.profile and userinfo.email ;
Read more about profile and email scopes.
We define these options (scopes and prompt) as:
scope: ['profile', 'email'],
prompt: 'select_account',
Since we only need profile and email data for an authenticated user, we don’t need any other scopes. You can access these scopes without any additional approval from Google.
We also want to ask a user to select a Google account from prompt on every login event. This is useful in case a user wants to log in with multiple accounts or logged in with a wrong account the very first time. This is also useful when you test the app with the two types of users: Admin and Customer.
Check out all of the options for scope and prompt in Google’s documentation.
- After Google authenticates a user, Google will redirect the user back to our application’s callbackURL (for the local app, this URL is
http://localhost:8000/oauth2callback). Passport requires passport authentication again on the callback route/oauth2callback. We simply callpassport.authenticate()again, as we did on the/auth/googleroute:
server.get('/oauth2callback',
 passport.authenticate('google', {
   failureRedirect: '/login'
 }),
 (req, res) => {
   res.redirect('/');
 });
- When Google redirects a user back to our app, we call
passport.authenticate()a second time. If this authentication fails, we redirect the user to theLoginpage. Else , we redirect the user to the Index page, which becomes the user dashboard. - Passport exposes a
logout()function onreq(see docs). When an Express route callsreq.logout(), this method sets thereq.userproperty to null and removesuserfrom thesession:
req.logout()
res.redirect('/login')
- In fact, you can see what
req.logout()does by reading passport’s code. Look at this snippet:
var property = this._passport.instance._userProperty || 'user';

this[property] = null; // sets req.user to null
delete this._passport.session.user; // removes user from session.passport.user
To redirect a user, we use the Express method res.redirect() (read docs).
Combine the three Express routes above and plug them into our main auth() function:
server/google.js :
const passport = require('passport');
const Strategy = require('passport-google-oauth').OAuth2Strategy;
const User = require('./models/User');

function auth({ ROOT_URL, server }) {
  const verify = async (accessToken, refreshToken, profile, verified) => {
    let email;
    let avatarUrl;

    if (profile.emails) {
      email = profile.emails[0].value;
    }

    if (profile.photos && profile.photos.length > 0) {
      avatarUrl = profile.photos[0].value.replace('sz=50', 'sz=128');
    }

    try {
      const user = await User.signInOrSignUp({
        googleId: profile.id,
        email,
        googleToken: { accessToken, refreshToken },
        displayName: profile.displayName,
        avatarUrl,
      });
      verified(null, user);
    } catch (err) {
      verified(err);
      console.log(err); // eslint-disable-line
    }
  };
  passport.use(new Strategy(
    {
      clientID: process.env.Google_clientID,
      clientSecret: process.env.Google_clientSecret,
      callbackURL: `${ROOT_URL}/oauth2callback`,
    },
    verify,
  ));

  passport.serializeUser((user, done) => {
    done(null, user.id);
  });

  passport.deserializeUser((id, done) => {
    User.findById(id, User.publicFields(), (err, user) => {
      done(err, user);
    });
  });

  server.use(passport.initialize());
  server.use(passport.session());

  server.get('/auth/google', passport.authenticate('google', {
    scope: ['profile', 'email'],
    prompt: 'select_account',
  }));

  server.get(
    '/oauth2callback',
    passport.authenticate('google', {
      failureRedirect: '/login',
    }),
    (req, res) => {
      res.redirect('/');
    },
  );

  server.get('/logout', (req, res) => {
    req.logout();
    res.redirect('/login');
  });
}

module.exports = auth;
A couple of important points. Typical Express route looks like:
app.get('/secret', (req, res, next) => {
  console.log('Accessing the secret section ...')
  next() // pass control to the next handler
})
First. You can see from the above code that we used passport.authenticate() instead of (req, res, next) . That’s correct because passport.authenticate() returns authenticate(req, res, next) . Here is a link to passport’s internal code. Here is a [link](https://github.com/builderbook/builderbook/issues/168 at ) to a discussion about Express routes for Google OAuth in our public repo at GitHub.
Second. By default package passport-google-oauth uses Google+ API to fetch user’s email address and image URL from Google. However, Google began depreciation of Google+ API in January 2019. The author of passport-google-oauth has made a fix to account for depreciation. To be able to get user’s information from Google make sure that package version for passport-google-oauth is 2.0.0 or higher.
passport.use(new Strategy(
  {
    clientID: process.env.Google_clientID,
    clientSecret: process.env.Google_clientSecret,
    callbackURL: `${ROOT_URL}/oauth2callback`,
  },
  verify,
));
We are done with Google OAuth. We finished writing our auth() function - good job!
The only remaining task before we test our authentication flow is to add auth() to our main server code at server/app.js .
Initialize auth() on server
We are almost done implementing Google OAuth in our app.
We need to import and pass the function auth() to our custom next/express server.
Open server/app.js and add this import:
const auth = require(’./google’);
Remove the following Express route that helped us fetch our Index page with user data (this route is from Chapter 2 - it retrieves a single user and points req.user to user ):
server.get('/', (req, res) => {
    User.findOne({ slug: 'team-builder-book' }).then(user => {
        req.user = user
        app.render(req, res, '/')
    })
})
Remember to remove the import code for User, since you don’t use User from our User model in server/app.js anymore. Remove this line: const User = require('./models/User');
In Chapter 2, we also experimented with saving an express session to our database. Remember to delete the corresponding block of code as well:
// this is testing code, remove later
server.get('/', async (req, res) => {
  req.session.foo = 'bar';
  const user = await User.findOne({ slug: 'team-builder-book' });
  app.render(req, res, '/', { user });
});
In place of the removed block of code, after server.use(session(sess)) , add our new auth() function:
auth({ server, ROOT_URL })
Make sure that the server.use(session(sess)) line is above auth({ server, ROOT_URL }) . For a login session to work properly, session(sess) should precede passport.session() (which is part of auth() ). Read more in passport’s docs.
Time to create API keys and add them your .env file.
Go to Google Cloud Platform to create credentials for your app. Here is an official tutorial on how to create a project and generate OAuth credentials.
Follow the guide and complete all steps to acquire Client ID and Client secret . Pay close attention to the steps for Authorized JavaScript origins and Authorized redirect URIs . Their values are http://localhost:8000 and http://localhost:8000/oauth2callback , respectively.
If you look at the .env file, you will see that we provided you with sample Google_clientID and Google_clientSecret values. These keys are working; however, we strongly encourage you create your own keys. We may remove the sample keys without notice, and you should learn how to create credentials at Google Cloud Platform.
After you have your own Client ID and Client secret , add them to your .env file.
Testing
Done! Time to test out the entire Google OAuth flow in our app. Start the app with yarn dev and navigate to http://localhost:8000/login .
Login page (same page for signup):
Select your Google account from the list:
Dashboard that displays proper user.email :

Click on your avatar, then click Log out - you’ll be logged out and redirected to the Login page:

Here is a user document at MongoDB. The schema of this document was created by calling the static method User.signInOrSignUp from server/google.js :
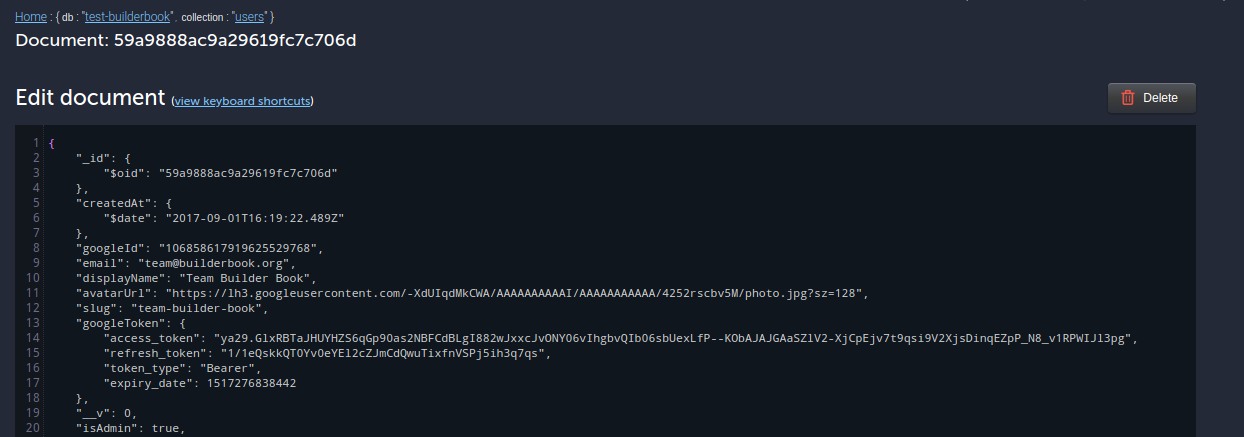
Navigate to https://myaccount.google.com/permissions - you can see a list of apps that access your Google profile via Google APIs. In the list of apps, you can find our app builderbook.org :
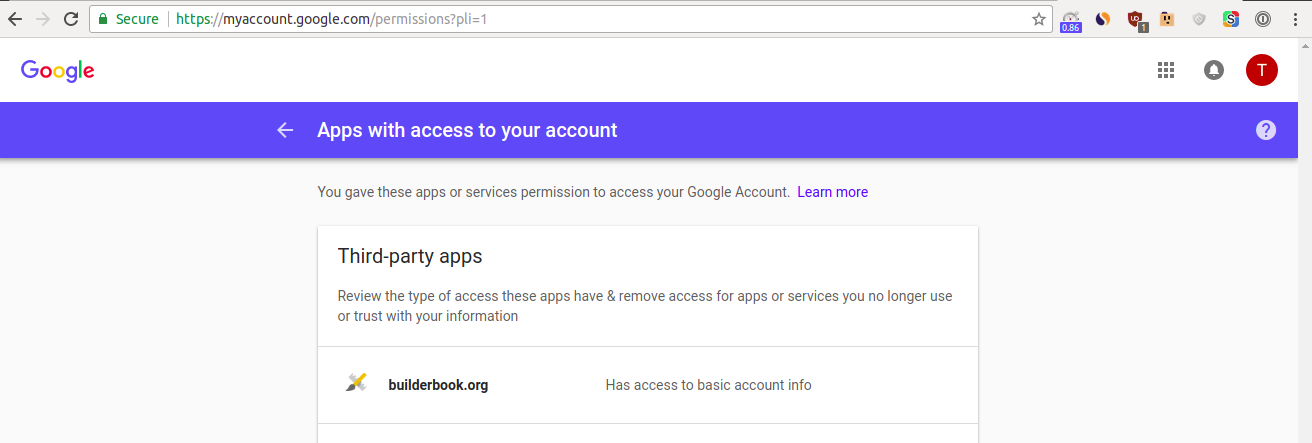
Finally, let’s test out the persistence of our login session. Log into the app. Close the tab, open a new tab, and navigate to http://localhost:8000 - you are still logged in. The login session is persistent. Click Ctrl+Shift+I (Ubuntu) on Chrome to enter Developer tools . Then select Application > Cookies > http://localhost:8000 :
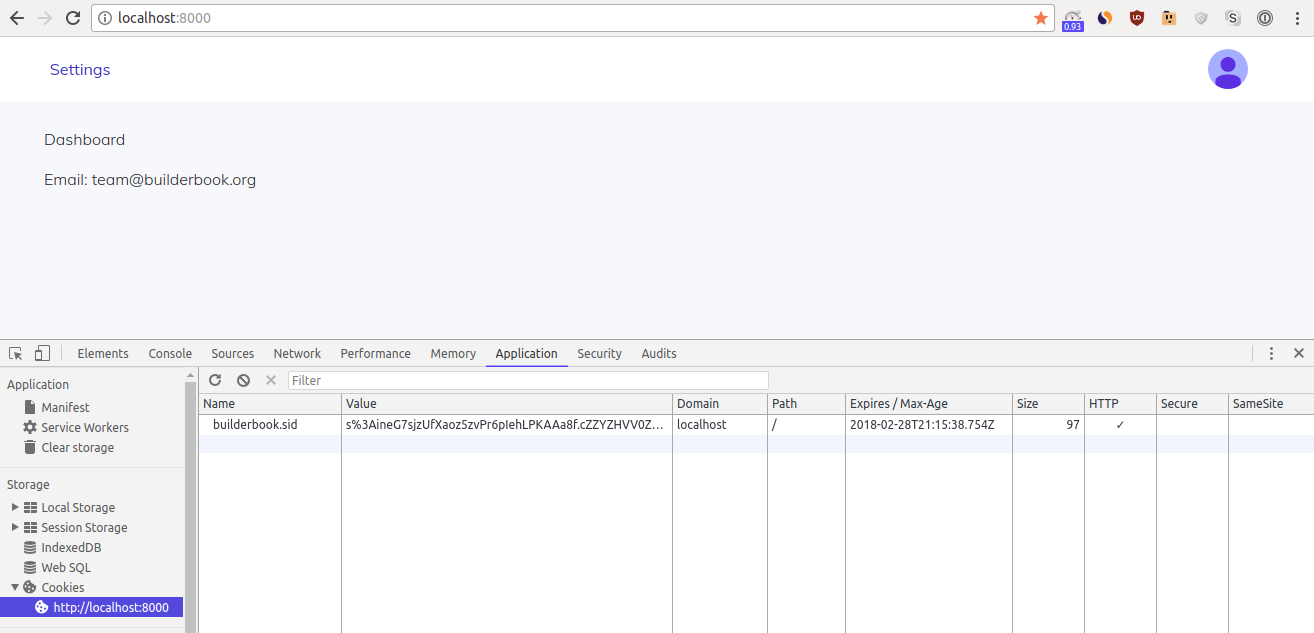
Select the builderbook cookie from the list and click the X icon to delete this cookie. Refresh the tab and behold - you are logged out !
No cookie => no way to find session => no way to find user id => no way to create req.user => no data to send to Index page => redirect user to Login page.
Good job so far!
In the next chapter (Chapter 4), we will learn how to test with Jest, debug with Winston, integrate AWS SES, and add transactional emails and in-app notifications.
At the end of Chapter 3, your codebase should look like the codebase in 3-end . The 3-end folder is located at the root of the book directory inside the builderbook repo.
Compare your codebase and make edits if needed.
Enjoying the book so far? Please share a quick review. You can update your review at any time.