Chapter 4: Testing with Jest. Debugging with Winston. Transactional emails. In-app notifications.
-
Testing with Jest
-
Debugging with Winston
-
Transactional emails
- Set up, keys, env variables
- sendEmail() method
- Export and import in server code
- insertTemplates() method
- getEmailTemplate() method
- Update User model
- Testing
-
In-app notifications
- Notifier component
- notify() function
- Example of usage
Before you start working on Chapter 4, get the 4-start codebase. The 4-start folder is located at the root of the book directory inside the builderbook repo.
- If you haven’t cloned the builderbook repo yet, clone it to your local machine with
git clone https://github.com/builderbook/builderbook.git. - Inside the
4-startfolder, runyarnto install all packages.
These are the packages that we install specifically for Chapter 4:
"aws-sdk""email-addresses""jest""winston"
Check out the package.json for Chapter 4.
- Be sure to use these specific packages and ignore any warnings about upgrading. We regularly upgrade all packages and test them in the book. But before testing, we cannot guarantee that a new package version will work properly.
Remember to include your .env at the root of your app. By the end of Chapter 4, you will add Amazon_accessKeyId , Amazon_secretAccessKey , Amazon_region , and EMAIL_SUPPORT_FROM_ADDRESS environmental variables to your .env file.
In the previous chapters, we:
- set up and integrated our Next.js app with Material-UI (Chapter 1)
- created our custom server, session, and User model (Chapter 2)
- added user athentication with Google OAuth 2.0 (Chapter 3)
In this chapter (Chapter 4), our main goals are:
- to get familiar with unit testing and error logging
- set up transactional emails in our app with AWS SES
- add in-app notifications and tooltips
Testing with Jest
As our app grows, it takes more time to test our code. When the app’s codebase gets large and interconnected, manual testing becomes more time-consuming. To stay productive as a developer, we can create automated tests. You can write a test as small as checking one single object/function (unit test) or as complex as checking multiple interconnected objects (integration test). More on test types.
In this subsection, we get familiar with automated code testing. As an example, we want to test if our code generates the proper slug in different scenarios. We placed our slug-generating code at server/utils/slugify.js . You may remember from Chapter 3 that we used the generateSlug() function to generate a slug for the User model. We will also use this function to generate a slug for the Book and Chapter models (Chapter 6). However, for testing, we will focus only on the User model.
We will use Jest, a popular JavaScript testing library by Facebook. We will write a simple unit test that checks if the generateSlug() function generates the proper slug .
First, we need to decide where to store our unit test. Jest automatically finds files containing test code. We have to either place our files in a __tests__ folder or create a file with a .test.js extension. We use the second option - for no particular reason.
Below, we will create a slugify.test.js file to test our code in slugify.js . We place the former file into test/server/utils/slugify.test.js . Go ahead and create the new folder and file.
To design our unit test, we should look at the generateSlug(Model, name) function inside server/utils/slugify.js and see what this function does:
const _ = require('lodash');

// https://devdocs.io/lodash~4/index#kebabCase

const slugify = (text) => _.kebabCase(text);

async function createUniqueSlug(Model, slug, count) {
  const user = await Model.findOne({ slug: `${slug}-${count}` }, 'id');

  if (!user) {
    return `${slug}-${count}`;
  }

  return createUniqueSlug(Model, slug, count + 1);
}

async function generateSlug(Model, name, filter = {}) {
  const origSlug = slugify(name);

  const user = await Model.findOne(Object.assign({ slug: origSlug }, filter), 'id');

  if (!user) {
    return origSlug;
  }

  return createUniqueSlug(Model, origSlug, 1);
}

module.exports = generateSlug;
The generateSlug() function does a few things.
- First, the function converts
nameintoslugusingslugify()defined at the top of the file. - Then the function checks if a user with the same slug already exists:
Model.findOne({ slug: origSlug }) - If a user with the same
slugdoes not exist, the function returns theif (!user) {return origSlug;} - If a user with the same slug does exist, the function adds a number at the end of the
slugand returns this new slug:createUniqueSlug(Model, origSlug, 1.
Ok, we understand what the function does. Now what are the scenarios in which we need to test for proper slug creation?
- Scenario 1. We should test if the function generates the proper slug when no user exists with the same
slug. In this scenario, we basically test ifslugify()convertsnameintoslugusing_.kebabCase(text)(see Lodash docs). Let’s call this testno duplication. - Scenario 2. We should test if the function generates the proper
slugwhen a user with the sameslugalready exists. Let’s call this testone duplication. - Scenario 3. Optionally, we should test if the function generates the proper
slugwhen a user with sameslugalready exists and another user with thatslugappended with-1exists as well. We’ll call this testmultiple duplications.
Let’s follow the example in Jest’s docs on how to write a unit test for a simple function. Here is the function:
function sum(a, b) {
  return a + b;
}

export default sum
For this function, the sum checker test is:
import sum from './sum';

test('sum checker', () => {
  expect(sum(1, 2)).toBe(3);
});
Following the example above, for the test no duplication and function generateSlug() , you get:
test('no duplication', () => {
  expect.assertions(1);

  return generateSlug(MockUser, 'John Jonhson').then((slug) => {
    expect(slug).toBe('john-jonhson');
  });
});
This test says that for a user with name John Jonhson , expect the slug to be john-jonhson .
The only unknown code in the block above might be expect.assertions(1) . The number of assertions is the number of expect().toBe() assertions that you expect inside the test.
In our case, the number of assertions is one. By specifying expect.assertions(1); - we tell Jest to call that one assertion that we have in the code expect(slug).toBe('john-jonhson-jr-'); . Without specifying expect.assertions(1); - our assertion may or may not be called. If we specify the wrong number of assertions - our test will fail.
When the number of assertions is 2 or more, use expect.assertions(number) to make sure that all assertions are called. You can read more about expect.assertions(number) in the Jest docs.
You just wrote one test - no duplication . Now write our two other tests ( one duplication and multiple duplications ) and put all three of them into the so called test suite by using Jest’s describe(name, fn) syntax:
test/server/utils/slugify.test.js :
const generateSlug = require('../../../server/utils/slugify');

const MockUser = {
  slugs: ['john-jonhson-jr', 'john-jonhson-jr-1', 'john'],
  findOne({ slug }) {
    if (this.slugs.includes(slug)) {
      return Promise.resolve({ id: 'id' });
    }

    return Promise.resolve(null);
  },
};

describe('slugify', () => {
  test('no duplication', () => {
    expect.assertions(1);

    return generateSlug(MockUser, 'John Jonhson.').then((slug) => {
      expect(slug).toBe('john-jonhson');
    });
  });

  test('one duplication', () => {
    expect.assertions(1);

    return generateSlug(MockUser, 'John.').then((slug) => {
      expect(slug).toBe('john-1');
    });
  });

  test('multiple duplications', () => {
    expect.assertions(1);

    return generateSlug(MockUser, 'John Jonhson Jr.').then((slug) => {
      expect(slug).toBe('john-jonhson-jr-2');
    });
  });
});
MockUser returns a user if the generated slug does match a value from the slugs: ['john-jonhson-jr', 'john-jonhson-jr-1', 'john'] array.
MockUser returns null if the generated slug does not match any value from the slugs: ['john-jonhson-jr', 'john-jonhson-jr-1', 'john'] array.
Think of this slugs array as an imitation of MongoDB - our “database” has 3 users with the slugs john-jonhson-jr , john-jonhson-jr-1 , and john .
This setup for a “database” may look confusing, and it is. Let’s discuss 2 examples to better understand the setup.
- Take a look at the
no duplicationtest. Remember thatgenerateSlug(Model, name)generated theslugjohn-johnsonfor aMockUserwith thenameJohn Johnson. Sincejohn-johnsondoes not match any value from theslugs: ['john-jonhson-jr', 'john-jonhson-jr-1', 'john']array,MockUserreturnsPromise.resolve(null). This means that in our “database”, there is no user with thejohn-johnsonslug. Thus, the following code gets executed insidegenerateSlug():
if (!user) {
 return origSlug;
}
If user does not exist, origSlug is indeed original and becomes our user’s slug .
2. Take a look at the one duplication test. Again, this method generates the slug john . Since john does match a value in the slugs: ['john-jonhson-jr', 'john-jonhson-jr-1', 'john'] array, instead of Promise.resolve(null) , MockUser returns Promise.resolve({ id: 'id' }) . Thus, the following code inside generateSlug() gets executed:
return createUniqueSlug(Model, origSlug, 1);
origSlug is not original, so the createUniqueSlug() function adds -1 to the john slug, thereby outputting john-1 .
Alright, now that you know how tests work - it’s time for testing.
To run Jest, add this extra command to our scripts in package.json :
“test”: “jest”
Go to terminal and run yarn test . Jest will generate the following report:
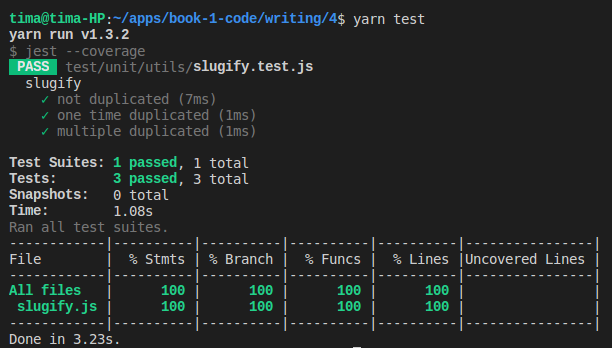
From this jest report, we see that our test suite called slugify passed. This suite consists of three tests: no duplication , one duplication , and multiple duplications .
To see how the report looks when the test fails, go to server/utils/slugify.js . Find line 24:
return createUniqueSlug(Model, slug, count + 1);
Modify this line to be:
return createUniqueSlug(Model, slug, count + 2);
Go to terminal and run yarn test . Jest will generate a new report:

This report shows that the third test called multiple duplications failed. As a result, the entire test suite failed. Jest specifies the reason for failure:
Expected value to be (using ===):
  "john-jonhson-jr-2"
Received:
  "john-jonhson-jr-3"
In this case, our generateSlug() function failed the test because it generated john-jonhson-jr-3 instead of john-jonhson-jr-2 . Don’t forget to go back to server/utils/slugify.js and fix the code to pass all tests.
One final note on Jest - saving reports is easy. We simply modify package.json as follows.
Edit the test command in scripts :
“test”: “jest --coverage”
Under the scripts section, add a new section:
  "jest": {
    "coverageDirectory": "./.coverage"
  }
Go to terminal and run yarn test . Jest will save the generated report to .coverage/lcov-report/index.html . Open the index.html file in your browser to see a summary of the report:

You should add the .coverage directory to your .gitignore file to exclude it from your remote repository on Github.
In some situations, integration tests are more appropriate than a group of unit tests. In our app, we theoretically can write an integration test that simultaneously tests static CRUD methods in our Book or User model.
One of our book readers (@YuriGor) suggested test that tests entire static method User.signInOrSignUp() . You can find this test hosted on GithubGist. Here is test:
const mongoose = require('mongoose');
const User = require('../../../server/models/User');

describe('slugify', () => {
  beforeAll(async () => {
    await mongoose.connect(global.__MONGO_URI__);
    console.log('connected');
  });
  afterAll(async () => {
    await mongoose.disconnect();
    console.log('disconnected');
  });
  test('no duplication', async () => {
    expect.assertions(1);
    await User.remove();
    const user = await User.signInOrSignUp({
      googleId: 'test1',
      email: 'test1@test.ts',
      googleToken: { accessToken: 'test1', refreshToken: 'test1' },
      displayName: 'Test Name',
      avatarUrl: 'test1',
    });
    expect(user.slug).toBe('test-name');
  });
});
This test
- connects server to DB via Mongoose,
- creates user in DB using static method
User.signInOrSignUp(), - then checks if created
userobject has proper value for parameterslug, - finally, server disconnects from DB.
Debugging with Winston
In this subsection, we will set up simple logging with Winston.
Winston logging allows us categorize server logs by priority. Why is this useful? With a logger such as Winston, we can output a particular level of messages in development mode but not in production mode.
For example, we may want to see error and warning messages in our local app (locally, or in development mode, you see server logs in your terminal) but only see error messages in the logs of our deployed app (in production mode, you log in into your remote server). Winston helps us achieve exactly that.
Once we set up Winston logger, instead of using console.log() for all server logs, we can make some messages more important. For example, errors messages ( logger.error() ) are more important than non-critical info messages ( logger.info() ).
You may use some of your info messages for debugging. In that case, you should not log these messages on your production server, but you also don’t want to delete them manually before each deploy. You can achive that by configuring Winston to output messages with certain level of importance.
Before we use Winston logger, we should configure it using the winston.createLogger() method. We put this custom configuration into our server/logs.js file. In this book, for the sake of keeping things simple, we specify only 3 options. See the official docs for the entire list of options. Our custom logger looks like:
server/logs.js :
const winston = require('winston');

const logger = winston.createLogger({
  level: process.env.NODE_ENV === 'production' ? 'info' : 'debug',
  format: winston.format.combine(winston.format.splat(), winston.format.simple()),
  transports: [new winston.transports.Console()],
});

module.exports = logger;
In our custom logger, we specified 3 options:
-
leveloption. This option allows you to specify the message level. The logger will only output messages of a specified level and higher. Here, we simply said the following: in production mode, only log messages with the levelinfoor higher; in development mode, only log messages with the leveldebugor higher. There are 6 levels of messages. Here is a list ordered from highest (0) to lowest priority (5):
{
 error: 0,
 warn: 1,
 info: 2,
 verbose: 3,
 debug: 4,
 silly: 5
}
It’s clear now that in production mode, we want to see error , warn , and info messages, but we don’t want to see verbose , debug , and silly ones. In development mode, we will also see debug and verbose messages. The debug messages are handy if you debug often and occasionaly forget to delete a debug code when preparing your app for production.
2. format option. This option allows you to choose the format of your output. By default, you should choose a simple format winston.format.simple() , which will output ${info.level}: ${info.message} JSON.stringify({ ...rest }) . However, in addition to simple format, we add splat format to account for following exception. In Winston logger, if object that you like to print has properties level or message - these properties won’t be printed since level and message are reserved (read more here). To be able to print level and message properties of an object, we have to use so called splat format in addition to simple format.
3. transports option. This option allows you to send and save logs to a particular file. However, we won’t save logs to a file. We will only output messages to our terminal with the [new winston.transports.Console()] option.
We are almost ready to test. Open the server/app.js file and find this line:
console.log(> Ready on ${ROOT_URL}); // eslint-disable-line no-console
Replace the line with:
logger.info(> Ready on ${ROOT_URL});
Remember to import our custom logger by adding import logger from './logs'; to the import section of the server/app.js file.
Start your app with yarn dev and look at the terminal’s output:

If you see a similar output, good job - you configured your custom logger! Now the debugging process will be more productive.
For debugging, use logger.debug() . For errors, use logger.error() . Later in this chapter, we will have an opportunity to use our logger for messages of different levels.
In the next section, we will add transactional emails to our app, and we will use our custom logger to output errors in some methods (for example, inside our insertTemplates() method).
Transactional emails with AWS SES
In this section, we’ll add transactional emails to our app by using AWS SES.
Our open source project for our Builder Book app has multiple transactional emails. However, in this book, we will show you how to send only one transactional email - the welcome email to users after they sign up. You can follow this welcome email example to create any other transactional email your app needs.
Your package.json file should have two dependencies that we need. The first one is aws-sdk , which we’ll use to access AWS SES API. The second one is lodash (introduced in Chapter 3), which we’ll use to add variables to our email. For example, we will add a user name variable to address a user by his/her name in our welcome email. If you ran yarn on the 4-start codebase, then you already installed these dependencies and are ready to go. If not, run yarn now.
Set up, keys, env variables
Sign up for AWS and navigate to AWS SES.
In this subsection, we want to achieve the following:
- verify your email address (SES will email users on behalf of this email address)
- generate an AWS access key and secret access key
- add keys to our list of environmental variables at
.env
Below, we walk you through each step.
- Go to
Email Addressesin your SES dashboard. Check the snapshot below to find the link on your dashboard:
Click the dark blue buttonVerify a New Email Address. Follow the instructions. Once your email address is verified, you can use it to send emails. You will be able to send test emails from the SES dashboard, as well as from your app using SES API. Important note : it may take some time for AWS SES to verify your email. Our app will use this verified email asfromemail address for transactional emails.Also note that all new AWS SES accounts are placed in the Amazon SES sandbox , which has limits on which addresses you can send mail from and send mail to. These limits, and instructions on how to remove your account from the sandbox, are described here in the official AWS SES docs.You may see warnings about these limits in your SES control panel, but for going through this book, you do not need to upgrade from a sandbox account. - To access AWS API from our app, we need to generate an access key and secret access key at Security Credentials. Follow the snapshot below to access your Security Credentials:
Open the section “Access keys (access key ID and secret access key)” and click the dark blue buttonCreate New Access Key. Copy your access key and secret access key. Keep them in a safe place! After you create your keys, you won’t be able to find or edit your secret access key. If you lose your secret access key, you’ll have to create a new pair of keys. - Take your newly generated
Amazon_accessKeyId,Amazon_secretAccessKey, and verified email addressEMAIL_SUPPORT_FROM_ADDRESS. Also select anAmazon_regionfor your account (for example,us-east-1,us-west-2, oreu-west-1). Open your.envfile and paste your values:


MONGO_URL_TEST="XXXXXXXXXX"

Google_clientID="XXXXXXXXXX"
Google_clientSecret="XXXXXXXXXX"

Amazon_accessKeyId="XXXXXXXXXX"
Amazon_secretAccessKey="XXXXXXXXXX"
Amazon_region="XXXXXXXXXX"

EMAIL_SUPPORT_FROM_ADDRESS="XXXXXXXXXX@XXXXXXXX.com"
Done!
Note that we us-east-1 is our particular region for AWS SES, but you can configure AWS SES with the specific region for your account.
Also note that you can pass global configurations to AWS as well as unique configurations to a particular AWS service. The latter can be done by following the AWS docs.
In the next sections, we’ll write a sendEmail() function, create a welcome email, and update our User model to send a welcome email to every signed-up user.
sendEmail() method
We will use the ses.sendEmail() API method to send emails. Before we jump to it, let’s configure our aws.SES() service. Take a look at the proper syntax in the official docs for AWS SES API. We specify region , accessKeyId , and secretAccessKey . We use the dotenv package to manage environmental variables and retrieve our keys from .env using process.env . Let’s place code that configures AWS to server/aws.js file:
server/aws.js :
aws.config.update({
  region: process.env.Amazon_region,
  accessKeyId: process.env.Amazon_accessKeyId,
  secretAccessKey: process.env.Amazon_secretAccessKey,
});
Next, we initialize SES service with the latest apiVersion :
const ses = new aws.SES({ apiVersion: ‘latest’ });
AWS SES offers multiple options for ses.sendEmail() API method. For example, ToAddresses , CcAddresses , BccAddresses , ReplyToAddresses , Source , Subject , Body and more.
Let’s pass 6 parameters to ses.sendEmail method. However, if we choose to, when we actually pass parameters to sendEmail method ( sendEmail calls ses.sendEmail ) we may choose to pass only a subset of parameters.
We will use: Source (let’s call it options.from ), ToAddresses ( options.to , nested in the Destination array), CcAddresses ( options.cc , nested in the Destination array), Data ( options.subject , nested in the Message>Subject array), another Data ( options.body , nested in the Message>Body>Html array), and ReplyToAddresses ( options.replyTo ). The names of the options are self-explanatory. We get:
server/aws.js :
ses.sendEmail(
  {
    Source: options.from,
    Destination: {
      CcAddresses: options.cc,
      ToAddresses: options.to,
    },
    Message: {
      Subject: {
        Data: options.subject,
      },
      Body: {
        Html: {
          Data: options.body,
        },
      },
    },
    ReplyToAddresses: options.replyTo,
  },
)
Time to put it all these code snippets together: configuration, initialization of a new service with the latest version of AWS SES API, and the ses.sendEmail() API method with 6 options.
Make the sendEmail() function return a Promise. If err is returned after ses.sendEmail() is called - the Promise returns reject(err) . If info is returned without err - the Promise returns resolve(info) :
server/aws.js :
const aws = require('aws-sdk');

function sendEmail(options) {
  aws.config.update({
    region: process.env.Amazon_region,
    accessKeyId: process.env.Amazon_accessKeyId,
    secretAccessKey: process.env.Amazon_secretAccessKey,
  });

  const ses = new aws.SES({ apiVersion: 'latest' });

  return new Promise((resolve, reject) => {
    ses.sendEmail(
      {
        Source: options.from,
        Destination: {
          CcAddresses: options.cc,
          ToAddresses: options.to,
        },
        Message: {
          Subject: {
            Data: options.subject,
          },
          Body: {
            Html: {
              Data: options.body,
            },
          },
        },
        ReplyToAddresses: options.replyTo,
      },
      (err, info) => {
        if (err) {
          reject(err);
        } else {
          resolve(info);
        }
      },
    );
  });
}

module.exports = sendEmail;
The full list of options and rules for the ses.sendEmail() API method is in the official AWS SES docs.
You may noticed that we did not write any code that sends a request from our server to AWS SES server. Package aws-sdk does it for us, the same way passport package sends request from our server to Google OAuth servers. In Chapters 6 and 8, we will add Github and Mailchimp integrations to our app respectively. For Github and Mailchimp integrations, unlike for Google OAuth and AWS SES, we will explicitly write code that sends server-to-server POST request.
If you like to practice more on how to integrate app with AWS SES, check out our tutorial at codeburst.io.
Export and import in server code
This subsection is a detour from transactional emails. In this book, we make a detour from time to time. We do so only when we think the detour is important to learn and its location is logical.
This detour subsection will not require you to modify any of your app’s code.
Let’s talk about exporting and importing modules.
Consider function sendEmail() .
If our file server/aws.js had multiple functions to export, we would export sendEmail() like this:
function sendEmail(options) {
  // some code
};

function createTemplate(options) {
  // some code
};

export.sendEmail = sendEmail;
The import code may look like:
const { sendEmail } = require(’…/aws.js’);
However, in our case, sendEmail() is the only function that we export from server/aws.js , so we specify it by using default export syntax, module.exports , in our export command:
function sendEmail(options) {
  // some code
};

module.exports = sendEmail;
A side note. If we had used babel-node to compile server code, we could’ve used newer ES6 syntax and replaced module.exports with export default . All client code is automatically compiled by Next.js that uses babel internally. That means that inside client code you may and do use export instead of export.X = X ; export default instead of module.exports ; import instead of require .
The import code in the case of default export will be:
const sendEmail = require(’…/aws’);
If you’d like to give this imported function a different name (say you want to give it a more informative name in the new context), you can simply do:
const differentName = require(’…/aws’);
In this book, we build a relatively simple app and aim to keep one function per file, give that function an informative name. We will use default export/import ( module.exports = sendEmail; and const { sendEmail } = require('../aws.js'); ) more frequently than standard export/import ( export.sendEmail = sendEmail; and const { sendEmail } = require('../aws.js') ).
In situations where you need to use multiple API methods and maintain good modularity and readibility in your code, we recommend creating a new directory.
Let’s say you have 2 AWS SES methods: sendEmail() and createTemplate() . We would create a server/aws folder and place 3 files in it: sendEmail.js (with default export of sendEmail ), createTemplate.js (with default export of createTemplate ) and index.js . The latter file would contain:
server/aws/index.js :
const sendEmail = require('../aws/sendEmail');
const userApi = require('../aws/createTemplate');

export.sendEmail = sendEmail;
export.createTemplate = createTemplate;
Now you can import sendEmail() with:
const { sendEmail } = require(’…/aws’)
You can import all functions with:
const aws = require(’…/aws’);
and access functions as aws.sendEmail and aws.createTemplate .
Or you could import all functions like this:
const { sendEmail, createTemplate } = require(’…/aws’);
Note that we import function(s) from ../aws instead of ../aws/index.js .
insertTemplates() method
Back to transactional emails. In this subsection, we’ll write an email template for our welcome email.
AWS SES has an API method to create templates (i.e. pre-written emails, such as a personalized welcome email). The method is called ses.createTemplate() and is similar to ses.sendEmail() . Read more about it here.
But in this book, we will not use ses.createTemplate() . We will write and add email templates to our code (hardcode it). After our app starts, it will save hardcoded email templates to our database, where we can edit the templates manually (if needed).
Saving templates to our database will ultimately save us time. If we don’t save email templates to our database and decide to modify these templates, we would have to edit code and redeploy our app. Editing templates in our database does not require editing code and redeploying our app.
We will create a new Mongoose model called EmailTemplate, and we’ll insert a document in our EmailTemplate collection when our app’s server starts. Later, when a user signs up in our app, we will send that user a welcome email. The welcome email will be stored in our database as a document in the EmailTemplate collection.
Recall how we created our User model using Mongoose in Chapter 2.
server/models/User.js :
const mongoose = require('mongoose');

const { Schema } = mongoose;

const mongoSchema = new Schema({
  googleId: {
    type: String,
    required: true,
    unique: true,
  },
  googleToken: {
    access_token: String,
    refresh_token: String,
    token_type: String,
    expiry_date: Number,
  },
  slug: {
    type: String,
    required: true,
    unique: true,
  },
  // more parameters

});

//some code

const User = mongoose.model('User', mongoSchema);

module.exports = User;
Similar to the User model, the basic EmailTemplate model will be:
server/models/EmailTemplate.js :
const mongoose = require('mongoose');

const { Schema } = mongoose;

const mongoSchema = new Schema({
  name: {
    type: String,
    required: true,
    unique: true,
  },
  subject: {
    type: String,
    required: true,
  },
  message: {
    type: String,
    required: true,
  },
});

const EmailTemplate = mongoose.model('EmailTemplate', mongoSchema);

module.exports = EmailTemplate;
Go ahead and create a server/models/EmailTemplate.js file.
As we mentioned above, when the app’s server starts, we want the server to insert a new document in the emailtemplates collection of our database. Let’s call this function insertTemplates() . For now, it’s main purpose is to check if a template with a specific name already exists in our database and if not, insert that template as a new document in the emailtemplate collection.
An example of the insertTemplates() function looks like:
function insertTemplates() {
  const templates = [
    {
      name: 'welcome',
      subject: 'Welcome to builderbook.org',
      message: 'some text goes here',
    },
  ];

  templates.forEach(async (template) => {
    // 1. if template with the same name exists in database - return undefined

    // 2. otherwise create EmailTemplate document
  });
}
- For each template (
templates.forEach()) that we want to insert - we search our database asynchronously (with theasync/awaitconstruct) for template(s) with the same name (EmailTemplate.find({ name: template.name })):
if ((await EmailTemplate.find({ name: template.name }).count()) > 0) {
 return;
}
We discussed async/await in Chapter 3, and I’ll cover it more in Chapter 5, where we will use this construct several times. Here, the code pauses on the line with await until count is returned. If our method finds a template with the same name, then the count is 1 or more, and the method returns undefined .
2. If we don’t find a template with the same name (count is 0), we create a document with Mongoose’s method create() : EmailTemplate.create() .
This document will be created with data inside the const templates = [] array by using the .create(template) method. This method copies the name, subject, and message of a template in our code to an newly created empty document in our database:
EmailTemplate
 .create(template)
 .catch((error) => {
   logger.error('EmailTemplate insertion error:', error);
 });
If EmailTemplate.create() returns an error, we want to catch it and log it to terminal with logger.error() . Thanks, Winston!
After putting all parts of the insertTemplates() function together:
function insertTemplates() {
  const templates = [
    {
      name: 'welcome',
      subject: 'Welcome to builderbook.org',
      message: 'some text goes here',
    },
  ];

  templates.forEach(async (template) => {
    if ((await EmailTemplate.find({ name: template.name }).count()) > 0) {
      return;
    }

    EmailTemplate
      .create(template)
      .catch((error) => {
        logger.error('EmailTemplate insertion error:', error);
      });
  });
}
Let’s modify some text in our welcome email, then add and call the insertTemplates() method inside our EmailTemplate model:
server/models/EmailTemplate.js :
const EmailTemplate = mongoose.model('EmailTemplate', mongoSchema);

function insertTemplates() {
  const templates = [
    {
      name: 'welcome',
      subject: 'Welcome to builderbook.org',
      message: `<%= userName %>,
        <p>
          Thanks for signing up for Builder Book!
        </p>
        <p>
          In our books, we teach you how to build complete, production-ready web apps from scratch.
        </p>

        Kelly & Timur, Team Builder Book
      `,
    },
  ];

  templates.forEach(async (template) => {
    if ((await EmailTemplate.find({ name: template.name }).count()) > 0) {
      return;
    }

    EmailTemplate
      .create(template)
      .catch((error) => {
        logger.error('EmailTemplate insertion error:', error);
      });
  });
}

insertTemplates();
getEmailTemplate() method
We are almost done.
We wrote a function that inserts an email template to our database. To send the welcome email, we need another function that retrieves the EmailTemplate document from our database and replaces variables, such user name, with the document’s values.
We name this function getEmailTemplate() . Inside this function, we want to achieve a few things:
- finds a template by its name
- if unable to find a template, return an error
- else, apply the
_.template()method to the found template
_.template() is a method that replaces any lodash variable (variable enclosed like this: <%= variable %> ) with actual values. This allows us to personalize our emails by including the variable <%= userName %> in our email template and replacing it with a user displayName before sending (we define userName: displayName ). Thus, personalization.
Let’s convert what we just said in English into JavaScript:
export default async function getEmailTemplate(name, params) {
  // 1. await till method finds template by name,

  // 2. if method finds no template - return error

  // 3. else, apply `_.template()` to subject and message parameters of template
}
Here’s how we’ll achieve 1-3:
- We’ll use Mongoose’s
EmailTemplate.findOne()method to find a template by name. We use theasync/awaitconstruct that we briefly mentioned when discussing theinsertTemplates()method:
const source = await EmailTemplate.findOne({ name });
Our code pauses on the line with await until the result is returned (either template or null). We describe async/await with detailed examples in Chapter 5.
2. If null is returned instead of template !source , then let’s throw an informative error with the format throw new Error('error description') :
if (!source) {
 throw new Error('No EmailTemplates found. Please check that at least one is generated at server startup, restart your server and try again.');
}
According to the throw behaviour (read offical docs), the thrown error will be caught by the first .catch method. Later in this section, we will catch this error when modifying the this.create() method inside our User model ( server/models/User.js ).
3. When the EmailTemplate.findOne() method returns a template, apply the _.template() method to the subject and message of template:
return {
 message: _.template(source.message)(params),
 subject: _.template(source.subject)(params),
};
After combining these three parts of getEmailTemplate() , we finally get:
async function getEmailTemplate(name, params) {
  const source = await EmailTemplate.findOne({ name });

  if (!source) {
    throw new Error('No EmailTemplates found. Please check that at least one is generated at server startup, restart your server and try again.');
  }

  return {
    message: _.template(source.message)(params),
    subject: _.template(source.subject)(params),
  };
}
Now that we’ve discussed and built both insertTemplates() and getEmailTemplate() functions, it’s time to add them to our basic EmailTemplate model:
Add the insertTemplates() and getEmailTemplate() functions to our EmailTemplate model:
server/models/EmailTemplate.js :
const mongoose = require('mongoose');
const _ = require('lodash');
const logger = require('../logs');

const { Schema } = mongoose;

const mongoSchema = new Schema({
  name: {
    type: String,
    required: true,
    unique: true,
  },
  subject: {
    type: String,
    required: true,
  },
  message: {
    type: String,
    required: true,
  },
});

const EmailTemplate = mongoose.model('EmailTemplate', mongoSchema);

function insertTemplates() {
  const templates = [
    {
      name: 'welcome',
      subject: 'Welcome to builderbook.org',
      message: `<%= userName %>,
        <p>
          Thanks for signing up for Builder Book!
        </p>
        <p>
          In our books, we teach you how to build complete, production-ready web apps from scratch.
        </p>
        Kelly & Timur, Team Builder Book
      `,
    },
  ];

  templates.forEach(async (template) => {
    if ((await EmailTemplate.find({ name: template.name }).count()) > 0) {
      return;
    }

    EmailTemplate
      .create(template)
      .catch((error) => {
        logger.error('EmailTemplate insertion error:', error);
      });
  });
}

insertTemplates();

async function getEmailTemplate(name, params) {
  const source = await EmailTemplate.findOne({ name });
  if (!source) {
    throw new Error('No EmailTemplates found. Please check that at least one is generated at server startup, restart your server and try again.');
  }

  return {
    message: _.template(source.message)(params),
    subject: _.template(source.subject)(params),
  };
}

exports.insertTemplates = insertTemplates;
exports.getEmailTemplate = getEmailTemplate;
As always, we remember to add the missing imports ( in this case for lodash and logger ):
const _ = require('lodash');
const logger = require('../logs');
You may have noticed that we did not export EmailTemplate . That’s because we do not plan to use the EmailTemplate model in any of our code. But we did export the getEmailTemplate() function, which we will use inside the User model (welcome email) and Book model (purchase email, Chapter 7) to find a corresponding email template.
If start app, we won’t see welcome email template inserted to DB. This is because for insertTemplates to run it needs to referenced explicitly. We can achieve it by requiring insertTemplates in server/app.js .
Before we test, open server/app.js and import insertTemplates :
const { insertTemplates } = require(’./models/EmailTemplate’);
Above line auth({ server, ROOT_URL }); , add the following line:
await insertTemplates();
Finally, make the function that starts server asynchronous.
Replace:
app.prepare().then(() => {
With:
app.prepare().then(async () => {
When app starts, insertTemplates will be called and app won’t start till insertion is complete.
We added the above import because Node will execute code inside insertTemplates only when this function is referenced explicitly. For more information, you read this issue.
Time to test - start your app with yarn dev and go to the list of collections on your Atlas dashboard. Go to Cluster0 cluster, click on Collections . Click on the test.emailtemplates collection of test database. You should see that our welcome email template was added to DB:

Hooray! Upon server start, the app successfully inserts our welcome email template to the database.
In the next subsection, we will update our User model to ensure that every newly created user gets a welcome email.
Update User model
So far, we’ve created:
-
sendEmail()function that sends an email via AWS SES API -
insertTemplates()that saves a welcome email template to our database -
getEmailTemplate()that retrieves the welcome email from our database and passes a value to the<%= userName %>variable
The last step is to modify the signInOrSignUp() static method of our User model (see server/models/User.js ). This method either finds an existing user and updates the Google OAuth tokens of that user or creates a new user. We would like to update the part of signInOrSignUp() that creates a new user, since our app will send a welcome email to newly created users.
- First, make the
async signInOrSignUp()static methodawaitfor thetemplatethat is returned by ourgetEmailTemplate()method:
const template = await getEmailTemplate('welcome', {
  userName: displayName,
});
We pass userName to our getEmailTemplate method so that <%= userName %> gets an actual value.
- Second,
awaitfor thesendEmail()method to send an email. Pass thetemplatethat you got fromgetEmailTemplate()tosendEmail(). To send an email, pass values to thefromandtoparameters.
To catch potential errors from sendEmail() , we use the try/catch construct in combination with async/await :
  try {
    await sendEmail({
      from: `Kelly from Builder Book <${process.env.EMAIL_SUPPORT_FROM_ADDRESS}>`,
      to: [email],
      subject: template.subject,
      body: template.message,
    });
  } catch (err) {
    logger.error('Email sending error:', err);
  }
A note about errors - logger.error('Email sending error:', err); outputs errors from sendEmail() . We catch and output all other errors from our signInOrSignUp() method in server/google.js at:
  try {
    const user = await User.signInOrSignUp({
      googleId: profile.id,
      email,
      googleToken: { accessToken, refreshToken },
      displayName: profile.displayName,
      avatarUrl,
    });
    verified(null, user);
  } catch (err) {
    verified(err);
    console.log(err); // eslint-disable-line
  }
A note on to: [email] - though the email is saved in our database as a string, we pass the email as an array with a single string to satisfy an AWS SES API requirement.
Alright, we are done updating the signInOrSignUp() method!
Modify this method inside the User model at server/models/User.js . This part of signInOrSignUp() :
  const slug = await generateSlug(this, displayName);
  const userCount = await this.find().countDocuments();

  const newUser = await this.create({
    createdAt: new Date(),
    googleId,
    email,
    googleToken,
    displayName,
    avatarUrl,
    slug,
    isAdmin: userCount === 0,
  });

  return _.pick(newUser, UserClass.publicFields());
becomes:
  const slug = await generateSlug(this, displayName);
  const userCount = await this.find().countDocuments();

  const newUser = await this.create({
    createdAt: new Date(),
    googleId,
    email,
    googleToken,
    displayName,
    avatarUrl,
    slug,
    isAdmin: userCount === 0,
  });

  const template = await getEmailTemplate('welcome', {
    userName: displayName,
  });

  try {
    await sendEmail({
      from: `Kelly from Builder Book <${process.env.EMAIL_SUPPORT_FROM_ADDRESS}>`,
      to: [email],
      subject: template.subject,
      body: template.message,
    });
  } catch (err) {
    logger.error('Email sending error:', err);
  }

  return _.pick(newUser, UserClass.publicFields());
Remember to add all missing imports to server/models/User.js :
const sendEmail = require('../aws');
const { getEmailTemplate } = require('./EmailTemplate');
const logger = require('../logs');
Our User model with updated signInOrSignUp() method:
server/model/User.js :
const mongoose = require('mongoose');
const _ = require('lodash');

const generateSlug = require('../utils/slugify');
const sendEmail = require('../aws');
const { getEmailTemplate } = require('./EmailTemplate');
const logger = require('../logs');

const { Schema } = mongoose;

const mongoSchema = new Schema({
  googleId: {
    type: String,
    required: true,
    unique: true,
  },
  googleToken: {
    access_token: String,
    refresh_token: String,
    token_type: String,
    expiry_date: Number,
  },
  slug: {
    type: String,
    required: true,
    unique: true,
  },
  createdAt: {
    type: Date,
    required: true,
  },
  email: {
    type: String,
    required: true,
    unique: true,
  },
  isAdmin: {
    type: Boolean,
    default: false,
  },
  displayName: String,
  avatarUrl: String,

  isGithubConnected: {
    type: Boolean,
    default: false,
  },
  githubAccessToken: {
    type: String,
  },
});

class UserClass {
  static publicFields() {
    return ['id', 'displayName', 'email', 'avatarUrl', 'slug', 'isAdmin', 'isGithubConnected'];
  }

  static async signInOrSignUp({
    googleId, email, googleToken, displayName, avatarUrl,
  }) {
    const user = await this.findOne({ googleId }).select(UserClass.publicFields().join(' '));

    if (user) {
      const modifier = {};

      if (googleToken.accessToken) {
        modifier.access_token = googleToken.accessToken;
      }

      if (googleToken.refreshToken) {
        modifier.refresh_token = googleToken.refreshToken;
      }

      if (_.isEmpty(modifier)) {
        return user;
      }

      await this.updateOne({ googleId }, { $set: modifier });

      return user;
    }

    const slug = await generateSlug(this, displayName);
    const userCount = await this.find().countDocuments();

    const newUser = await this.create({
      createdAt: new Date(),
      googleId,
      email,
      googleToken,
      displayName,
      avatarUrl,
      slug,
      isAdmin: userCount === 0,
    });

    const template = await getEmailTemplate('welcome', {
      userName: displayName,
    });

    try {
      await sendEmail({
        from: `Kelly from Builder Book <${process.env.EMAIL_SUPPORT_FROM_ADDRESS}>`,
        to: [email],
        subject: template.subject,
        body: template.message,
      });
    } catch (err) {
      logger.error('Email sending error:', err);
    }

    return _.pick(newUser, UserClass.publicFields());
  }
}

mongoSchema.loadClass(UserClass);

const User = mongoose.model('User', mongoSchema);

module.exports = User;
Testing
Time to test!
Let’s test whether our app sends a welcome email to a new user via AWS SES API.
Run your app with yarn dev and go to the /login page. Make sure that the Google account you are about to sign up with has never been used to sign up on the app. If your Google account has already been used, and you still want to use it - go to your Atlas dashboard, click on the test.users collection, and delete the document corresponding to the Google account you want to use.
After sign up, you will be redirected to the app’s dashboard at / route:

Open your Gmail inbox and find the welcome email. In our example, the email is sent from team@builderbook.org :

Here is our welcome email (the one we composed inside our server code and inserted into our database as a document in the emailtemplates collection):

If you received an email, then good job on setting up transactional emails!
In the next section, we will build in-app notifications - messages that our app shows a user to communicate success or failure of the user’s action. For example, when the Admin user edits a book, we would like our app to show a Saved success message.
In-app notifications
So far in this chapter, we learned how to test with Jest, debug with Winston, and send a transactional welcome email to a new user. In this last section, we will discuss and build a component that shows success or failure messages to our app’s user.
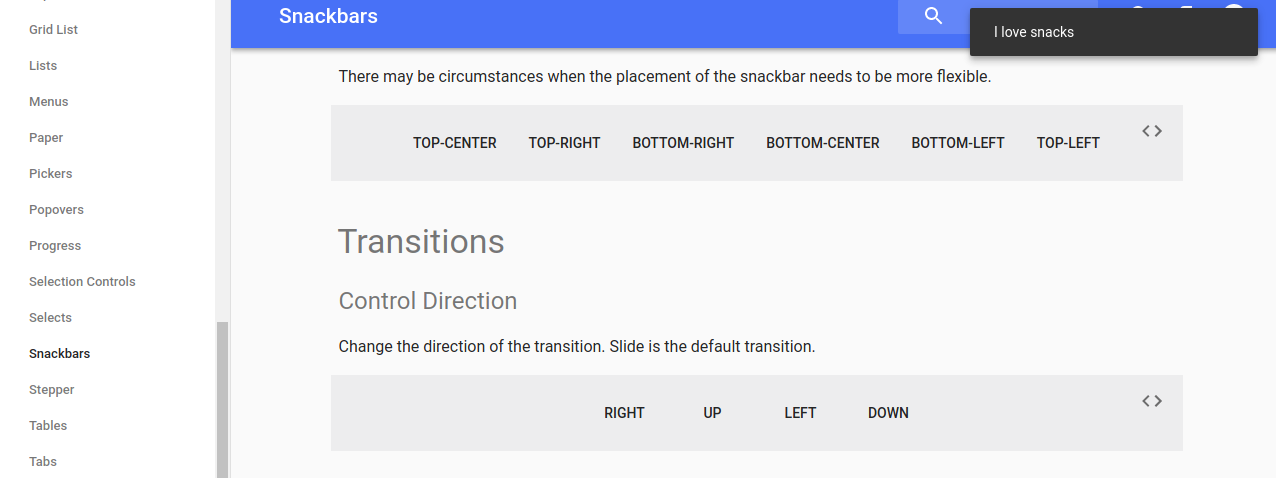
In Material Design and Material-UI, an in-app notification is called a snackbar. The top-right version of the simplest snackbar I love snacks looks like this:
We will build in-app notifications in three steps:
- Notifier component
-
notify()function - update pages where we want to show in-app notifications.
Notifier component
To create a Notifier component, we’ll closely follow Material-UI’s example for a simple snackbar.
Before constructing our Notifier component out of Material-UI’s Snackbar component, check out the full list of Snackbar component props.
We will use the open and message props for the state of our Notifier component. Initially, we want the Snackbar to be closed and message to be an empty string:
  state = {
    open: false,
    message: '',
  };
We want the Snackbar to close (set open to false ) when a user clicks away. We’ll do this with the handleSnackbarRequestClose function:
handleSnackbarRequestClose = () => {
  this.setState({
    open: false,
    message: '',
  });
};
We set the message to an empty string, so any new in-app notification does not inherit a message from the previous in-app notification.
We will point the onClose prop to the handleSnackbarRequestClose function:
onClose={this.handleSnackbarRequestClose}
Finally, let’s render our Notifier component.
In addition to open , message , and onClose props, we will use 3 more props from this list of options):
-
anchorOrigin(specifies location of the Snackbar) -
autoHideDuration(specifies duration of the Snackbar in milliseconds) -
ContentProps(binds the Snackbar to an element that contains itsmessage)
Notifier’s render() :
render() {
  const message = (
    <span id="snackbar-message-id" dangerouslySetInnerHTML={{ __html: this.state.message }} />
  );

  return (
    <Snackbar
      anchorOrigin={{ vertical: 'top', horizontal: 'right' }}
      message={message}
      autoHideDuration={5000}
      onClose={this.handleSnackbarRequestClose}
      open={this.state.open}
      ContentProps={{
        'aria-describedby': 'snackbar-message-id',
      }}
    />
  );
}
You may wonder why we use dangerouslySetInnerHTML={{ __html: this.state.message }} . The dangerouslySetInnerHTML option allows you, as the developer of this app, to use HTML code inside the Snackbar’s message prop. This is handy if you want to add a hyperlink to the Notifier’s message .
Create a components/Notifier.js file and put the Notifier component together using the bits code above:
components/Notifier.js :
import React from 'react';
import Snackbar from '@material-ui/core/Snackbar';

class Notifier extends React.Component {
  state = {
    open: false,
    message: '',
  };

  handleSnackbarRequestClose = () => {
    this.setState({
      open: false,
      message: '',
    });
  };

  render() {
    const message = (
      <span id="snackbar-message-id" dangerouslySetInnerHTML={{ __html: this.state.message }} />
    );

    return (
      <Snackbar
        anchorOrigin={{ vertical: 'top', horizontal: 'right' }}
        message={message}
        autoHideDuration={5000}
        onClose={this.handleSnackbarRequestClose}
        open={this.state.open}
        ContentProps={{
          'aria-describedby': 'snackbar-message-id',
      }}
      />
    );
  }
}

export default Notifier;
If you carefully look at our Notifier component’s code, you’ll see that the Snackbar always stays in a closed state. The initial state has open set to false , and there is no event that triggers open to become true .
Material-UI’s example for a simple Snackbar at least contains a button. Clicking the button sets open to true via the handleClick function:
handleClick = () => {
  this.setState({ open: true });
};
In other words, the user triggers Notifier with an action.
Most of our in-app messages will be triggered by successful or failed events. For example, we’ll show a success notification when our Admin user successfully changes a book’s price or when our Customer user successfully creates a bookmark inside a chapter.
We import our Notifier component into our higher-order component, withLayout.js , and trigger the Notifier component to show up with notify() . We import and use the notify() function inside any page that shows users an in-app message.
In the following section, we’ll introduce the openSnackbar function that opens (sets open to true ) the Snackbar and passes a message to it. We will use the openSnackbar function to construct a notify() function - we will then use this notify() function inside different pages to open our Notifier component.
notify() function
The openSnackbar function does two things, both via state :
- it opens the Snackbar by setting the
openprop of the Snackbar component totrue - it passes a message prop to the Snackbar component
openSnackbar = ({ message }) => {
this.setState({ open: true, message });
};
In order to access the openSnackbar() function from anywhere in the app, we need to set its value to another function ( openSnackbarFn ) that is available outside of the Notifier component. Thus:
...
let openSnackbarFn;

...
export function openSnackbar({ message }) {
  openSnackbarFn({ message });
}
...
Then, inside the Notifier component, after the component is mounted:
componentDidMount() {
  openSnackbarFn = this.openSnackbar;
}
Take the 3 code snippets above and add them to components/Notifier.js :
components/Notifier.js :
import React from 'react';
import Snackbar from '@material-ui/core/Snackbar';

let openSnackbarFn;

class Notifier extends React.Component {
  state = {
    open: false,
    message: '',
  };

  componentDidMount() {
    openSnackbarFn = this.openSnackbar;
  }

  handleSnackbarRequestClose = () => {
    this.setState({
      open: false,
      message: '',
    });
  };

  openSnackbar = ({ message }) => {
    this.setState({ open: true, message });
  };

  render() {
    const message = (
      <span id="snackbar-message-id" dangerouslySetInnerHTML={{ __html: this.state.message }} />
    );

    return (
      <Snackbar
        anchorOrigin={{ vertical: 'top', horizontal: 'right' }}
        message={message}
        autoHideDuration={5000}
        onClose={this.handleSnackbarRequestClose}
        open={this.state.open}
        ContentProps={{
          'aria-describedby': 'snackbar-message-id',
        }}
      />
    );
  }
}

export function openSnackbar({ message }) {
  openSnackbarFn({ message });
}

export default Notifier;
We use our exported openSnackbar() function to define a notify() function at lib/notifier.js . Create this file:
lib/notifier.js :
import { openSnackbar } from '../components/Notifier';

export default function notify(obj) {
  openSnackbar({ message: obj.message || obj.toString() });
}
Most messages that we will pass to our openSnackbar function are plain text strings. However, we will use openSnackbar to display errors, and some of the error objects do not have a message property (there is no obj.message property inside object). To solve this, we define a notify(obj) function that takes obj and passes either obj.message or stringified obj.toString() as a message to the openSnackbar function.
Throughout our app, we’ll use the notify() function to show success, error, or occasionaly some informational notifications to users.
It’s time to see our Notifier component and notify() function in action.
Example of usage
As a test, let’s set up a tooltip on our Index page.
- First, import the Notifier component to our higher-order
withLayout.jscomponent atlib/withLayout.js:
import Notifier from ‘…/components/Notifier’;
Then add <Notifier /> to lib/withLayout.js like this:
<MuiThemeProvider
  theme={this.pageContext.theme}
  sheetsManager={this.pageContext.sheetsManager}
>
  <CssBaseline />
  <div>
    {noHeader ? null : <Header hideHeader={hideHeader} {...this.props} />}
    <BaseComponent hideHeader={hideHeader} {...this.props} />
    <Notifier />
  </div>
</MuiThemeProvider>
- Second, import the
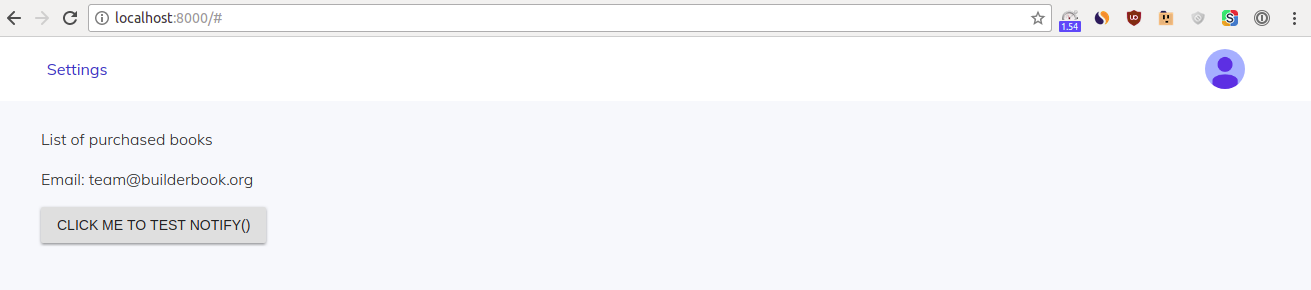
notify()function andButtoncomponent from Material-UI to theIndex page(pages/index.js). And add the following code snippet right after<p>Email: {user.email}</p>line:
<Button variant="contained" onClick={() => notify('success message')}>
  Click me to test notify()
</Button>
You should get:
pages/index.js :
import React from 'react';
import PropTypes from 'prop-types';
import Head from 'next/head';

import Button from '@material-ui/core/Button';

import withAuth from '../lib/withAuth';
import withLayout from '../lib/withLayout';
import notify from '../lib/notifier';

class Index extends React.Component {
  static propTypes = {
    user: PropTypes.shape({
      displayName: PropTypes.string,
      email: PropTypes.string.isRequired,
    }),
  }

  static defaultProps = {
    user: null,
  }

  render() {
    const { user } = this.props;
    return (
      <div style={{ padding: '10px 45px' }}>
        <Head>
          <title>Dashboard</title>
          <meta
            name="description"
            content="List of purchased books."
          />
        </Head>
        <p>List of purchased books</p>
        <p>Email: {user.email}</p>

        <Button variant="contained" onClick={() => notify('success message')}>
          Click me to test notify()
        </Button>

      </div>
    );
  }
}

export default withAuth(withLayout(Index));
Start your app with yarn dev and log in. Your Index page will be:
Click the button:
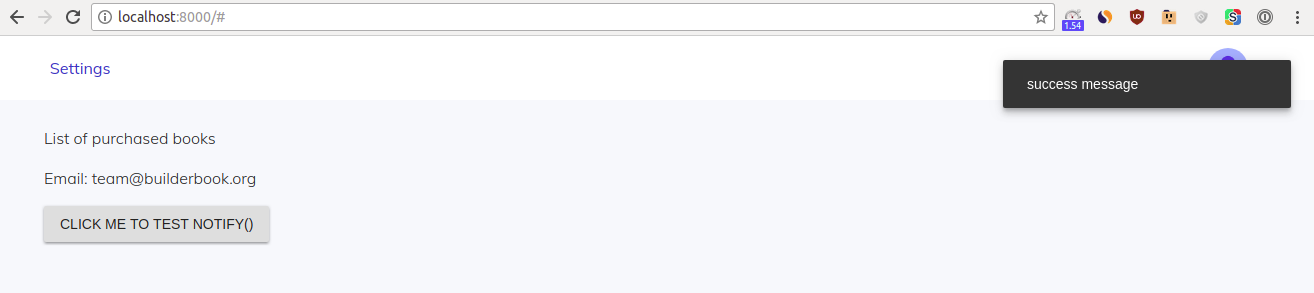
Success - your in-app notification opens up as expected (and disappears in 5 seconds as well)!
As we create more pages, we will use our notify() function several times. Mostly for our Admin user: add/edit book, sync book’s content with Github. Occasionaly for our Customer: creating a bookmark. Keep an eye out for more of notify() , especially in Chapters 5 and 6.
In the next chapter (Chapter 5), you will set up internal APIs. You will learn that implementing a data exchange between client and server consists of four steps. For example, data may travel from page to API method to Express route to static method of some model.
At the end of Chapter 4, your codebase should look like the codebase in 4-end . The 4-end folder is located at the root of the book directory inside the builderbook repo.
Compare your codebase and make edits if needed.
You’re halfway through the book! If you’re enjoying it, please share a quick review. You can update your review at any time.