Chapter 5: Book and Chapter models. Internal API. Render chapter.
-
Book model
- Schema for Book
- Static methods for Book
-
Chapter model
- Schema for Chapter
- Static methods for Chapter
- Index in MongoDB
-
Internal APIs
- Intro to Express routes
- Basics of internal API
- Express routes
- API methods
- Pages
-
Render Chapter page
- Express route
- API method getChapterDetail()
- Page
-
Testing
Before you start working on Chapter 5, get the 5-start codebase. The 5-start folder is located at the root of the book directory inside the builderbook repo.
- If you haven’t cloned the builderbook repo yet, clone it to your local machine with
git clone https://github.com/builderbook/builderbook.git. - Inside the
5-startfolder, runyarnto install all packages.
These are the packages that we install specifically for Chapter 5:
"isomorphic-unfetch"
Check out the package.json for Chapter 5.
- Be sure to use these specific packages and ignore any warnings about upgrading. We regularly upgrade all packages and test them in the book. But before testing, we cannot guarantee that a new package version will work properly.
Remember to include your .env at the root of your app.
In the previous chapter (Chapter 4), you learned testing with Jest and debugging with Winston, integrated AWS SES to send transactional emails, and created a Notifier component to show users success, error and informational in-app messages.
In this chapter (Chapter 5), we introduce the Book and Chapter models (you will be able to sell a book once you add a paywall and integrate Stripe in Chapter 8). We will write an integration to access Github’s API, so we can use Github as our content management system (CMS). In particular, we’d like to host all of our chapter content on Github, then sync this content with our database and render the content inside of our app.
As discussed in the Introduction chapter, our app has two types of users - an Admin who writes a book and a Customer who buys and reads the book. We will gradually discuss and introduce dashboards for each user. For example, an Admin should be able to create a book and set the book’s price; a Customer should be able to see a list of purchased books and all available books.
Book model
In this section, we’ll introduce a simplified Book model. Simplified means that this model will not have any code related to Github API or Stripe API. We’ll cover Github integration in Chapter 6 and Stripe integration in Chapter 8.
At this point in the book, you’ve successfully created User and EmailTemplate models. From the User model, you learned how to create Mongoose’s schema and model:
const { Schema } = mongoose;

const mongoSchema = new Schema({
  // parameters
});

const Book = mongoose.model('Book', mongoSchema);
You also learned (in Chapter 3) how to add static methods to a model by using Mongoose’s class . These static methods typically create and edit documents in a collection:
class BookClass {
  // methods
};

mongoSchema.loadClass(BookClass);
Based on what you learned, we can create the Book model in two steps:
- discuss and add parameters to the Book’s Schema (parameters such as
nameandprice) - discuss and write static methods, then add them to the Book’s class,
BookClass(methods such asaddandedit)
Here’s the carcass of the Book model (it’s similar to any other model, like our User model):
server/models/Book.js :
const mongoose = require('mongoose');

const { Schema } = mongoose;

const mongoSchema = new Schema({
  // parameters
});


class BookClass {
  // methods
}

mongoSchema.loadClass(BookClass);

const Book = mongoose.model('Book', mongoSchema);

module.exports = Book;
Schema for Book
For our Book object, we want four common-sense parameters: name , slug (generated from name ), createdAt , price :
const { Schema } = mongoose;

const mongoSchema = new Schema({
  name: {
    type: String,
    required: true,
  },
  slug: {
    type: String,
    required: true,
    unique: true,
  },
  createdAt: {
    type: Date,
    required: true,
  },
  price: {
    type: Number,
    required: true,
  },
  githubRepo: {
    type: String,
    required: true,
  },
  githubLastCommitSha: String,
});
The parameters githubRepo and githubLastCommitSha are related to integration with Github. We host a book on Github as a repository. This book repo contains a list of .md files, each of which corresponds to one chapter.
The githubRepo parameter is the name of the repo on Github that contains our book’s content (chapters). For example, for our first test book, githubRepo will have the value:
“githubRepo”: “builderbook/builderbook”
This is the repo named builderbook inside the organization builderbook .
The githubLastCommitSha parameter is the ID of the latest commit and may look like:
“githubLastCommitSha”: “908c5d7d28531ea85a451193eb3b6535c619700d”
We will discuss these Github-related parameters in more detail in Chapter 6, although we added the parameters to our Book model Schema right now.
Static methods for Book
Alright, we are done with Schema. Now let’s define static methods inside the BookClass .
You learned about Mongoose’s class properties in Chapter 3 when we discussed UserClass and added static methods publicFields() (specifies public parameters for user object) and signInOrSignUp() (either finds an existing user or creates a new user).
We will have four static methods for BookClass :
-
list()retrieves a list of all books. When constructing our app’s internal APIs, we’ll use this method to display a list of all available or purchased books. -
getBySlug()finds one unique book by its slug. We’ll use it to display a single book - for example, when a Customer reads a book. -
add()adds a new book to our Book collection. We’ll use it in our admin’s internal API (later in this chapter). -
edit()finds and edits a book’sname,price, orgithubRepo. Like theadd()method, only an admin can access this method, so we’ll use it in our admin’s internal API.
To summarize what we just discussed:
class BookClass {
  static async list({ offset = 0, limit = 10 } = {}) {
    // some code
  }

  static async getBySlug({ slug }) {
    // some code
  }

  static async add({ name, price, githubRepo }) {
    // some code
  }

  static async edit({
    id, name, price, githubRepo,
  }) {
    // some code
  }
}

mongoSchema.loadClass(BookClass);
- The static and async
list()method (static async list()) takes two arguments:offsetandlimit. The method waits (await) until all books are found (this.find()) and returns an array of book objects ({}). Inside thelist()method, we apply three MongoDB methods to reorganize the array of book objects: .sort(), .skip(), .limit:
static async list({ offset = 0, limit = 10 } = {}) {
const books = await this.find({})
 .sort({ createdAt: -1 })
 .skip(offset)
 .limit(limit);
return { books };
}
.sort({ createdAt: -1 }) sorts book objects by creation date, from the most to least recently created.
.skip(offset) with offset = 0 ensures that we do not skip any books.
.limit(limit) and limit=10 returns no more than 10 books. If we return too many books, MongoDB’s query time may be high and user-unfriendly.The default value for the .skip() method is zero, so we don’t need to specify it explicitly. However, let’s keep the offset argument. We may need later if we decide to add pagination to our list of books.
2. The static and async getBySlug() method ( static async getBySlug() ) takes one argument: slug . The main method waits ( await ) until Mongoose’s this.findOne() method finds one book ( slug is unique, take a look above at the Book’s model Schema). If a book can’t be found - we throw anerror:
throw new Error(‘Book not found’);
Otherwise, we take the book document we found and convert it into a plain JavaScript object by using Mongoose’s toObject method:
const book = bookDoc.toObject();
static async getBySlug({ slug }) {
const bookDoc = await this.findOne({ slug });
if (!bookDoc) {
 throw new Error('Book not found');
}

const book = bookDoc.toObject();

return book;
}
We are not done with the getBySlug() method just yet. Before we return a JS object from our book with return book; , we want to retrieve the book’s chapters. Retrieving the book along with its chapters is useful for building a Table of Contents (link to Chapter 6). To find all chapters of a particular book, we use Mongoose’s Chapter.find() . We search for all chapters with the proper bookId value ( bookId: book._id ). For each chapter, we retrieve title and slug .We sort our array of chapters with the order parameter and go through each chapter document in our array with the .map JS method.We convert each chapter document into a plain JS object with Mongoose’s toObject() method:
static async getBySlug({ slug }) {
const bookDoc = await this.findOne({ slug });
if (!bookDoc) {
 throw new Error('Book not found');
}

const book = bookDoc.toObject();

book.chapters = (await Chapter.find({ bookId: book._id }, 'title slug')
 .sort({ order: 1 }))
 .map(chapter => chapter.toObject());
return book;
}
- The static
add()method (static async add()) takes three arguments: bookname,price, andgithubRepo. This method calls and waits forgenerateSlug()method to return a uniqueslugfor a book. We discussedasync/awaitconstruct in detail in Chapter 3. After we getslug, we use the Mongoose method/Querycreate()to create a new book document in our database. The new document getsname,price, andgithubRepothat are passed from the client (Admin specifies these values on theAddBookpage). The new document also getsslugandcreatedAtparameters:
static async add({ name, price, githubRepo }) {
 const slug = await generateSlug(this, name);

 if (!slug) {
   throw new Error(`Error with slug generation for name: ${name}`);
 }

 return this.create({
   name,
   slug,
   price,
   githubRepo,
   createdAt: new Date(),
 });
}
One of our readers has noted that we can add default option to createdAt parameter in Book’s schema like this:
createdAt: {
 type: Date,
 required: true,
 default: Date.now,
},
If you do so then you can drop createdAt parameter from the above this.create() , so it becomes:
return this.create({
 name,
 slug,
 price,
 githubRepo,
});
Read more about Mongoose’s default option in offical docs.Later, in Chapter 6, we will add one more parameter for Book model, githubLastCommitSha .
4. The static and async edit() method ( static async edit() ) takes four parameters: id , name , price and githubRepo . This method finds one book by its id with Mongoose’s findById() method (this method uses Mongo’s findOne() method).Unlike the getBySlug() method, we do not convert the book’s document into a plain JS object with edit() , so we can use the book variable instead of bookDoc . Waiting ( await ) to find one book by its id, then retrieving the book’s slug and name will look like:
const book = await this.findById(id, ‘slug name’);
Similar to the getBySlug() method, if a book is not found, we throw an error:
throw new Error(‘Book is not found by id’);
And catch error later when we write our internal APIs.If a book is found, we define a modifier variable that points to an array of two parameters:
const modifier = { price, githubRepo };
Then we check if the book’s name in our database ( book.name ) matches a new name ( name !== book.name ). If it does not, we add a new name to our modifier by extending it ( modifier.name = name; ). We also generate and add slug to our modifier:
modifier.slug = await generateSlug(this, name);
Finally, for book found by its id, we modify the book’s parameters ( name , price and githubRepo ) with Mongoose/Mongo’s this.updateOne() method. We replace the values of all four parameters ( name , slug , price , githubRepo ) with new values by using the well-known $set operator that does just that.After translating English to JavaScript, we get:
static async edit({
 id, name, price, githubRepo,
}) {
 const book = await this.findById(id, 'slug name');

 if (!book) {
   throw new Error('Book is not found by id');
 }

 const modifier = { price, githubRepo };

 if (name !== book.name) {
   modifier.name = name;
   modifier.slug = await generateSlug(this, name);
 }

 await this.updateOne({ _id: id }, { $set: modifier });

 const editedBook = await this.findById(id, 'slug');

 return editedBook;
}
Notice that we updated the book document, then we found this edited book document by id and returned it to the Express route that will send the document to the client. This returned book object, called editedBook , contains _id (added to all returned objects by default) and slug (specified explicitly by us):
- we need
_idon the client to successfully call thesyncContent()API method that requires book_id - we need
slugon the client to successfully redirect a user to theBookDetailpage, as this page’s URL contains the newslugof the edited bookMongoDB’s API allows us to find and update document with just one query. The method to achieve this is findOneAndUpdate(). As one of our readers (@YuriGor, link) suggested, we can replace these two queries:
await this.updateOne({ _id: id }, { $set: modifier });

const editedBook = await this.findById(id, 'slug');
With one:
const editedBook = await this.findOneAndUpdate(
 { _id: id },
 { $set: modifier },
 { fields: 'slug', new: true },
);
Done. We are ready to put it all together for our Book model.
Now, add the Schema above and the four static methods to our carcass for the Book model:
server/models/Book.js :
const mongoose = require('mongoose');
const generateSlug = require('../utils/slugify');
const Chapter = require('./Chapter');

const { Schema } = mongoose;

const mongoSchema = new Schema({
  name: {
    type: String,
    required: true,
  },
  slug: {
    type: String,
    required: true,
    unique: true,
  },
  githubRepo: {
    type: String,
    required: true,
  },
  githubLastCommitSha: String,

  createdAt: {
    type: Date,
    required: true,
  },
  price: {
    type: Number,
    required: true,
  },
});


class BookClass {
  static async list({ offset = 0, limit = 10 } = {}) {
    const books = await this.find({})
      .sort({ createdAt: -1 })
      .skip(offset)
      .limit(limit);
    return { books };
  }

  static async getBySlug({ slug }) {
    const bookDoc = await this.findOne({ slug });
    if (!bookDoc) {
      throw new Error('Book not found');
    }

    const book = bookDoc.toObject();

    book.chapters = (await Chapter.find({ bookId: book._id }, 'title slug')
      .sort({ order: 1 }))
      .map(chapter => chapter.toObject());
    return book;
  }

  static async add({ name, price, githubRepo }) {
    const slug = await generateSlug(this, name);

    if (!slug) {
      throw new Error(`Error with slug generation for name: ${name}`);
    }

    return this.create({
      name,
      slug,
      price,
      githubRepo,
      createdAt: new Date(),
    });
  }

  static async edit({
    id, name, price, githubRepo,
  }) {
    const book = await this.findById(id, 'slug name');

    if (!book) {
      throw new Error('Not found');
    }

    const modifier = { price, githubRepo };
    if (name !== book.name) {
      modifier.name = name;
      modifier.slug = await generateSlug(this, name);
    }


    const editedBook = await this.findOneAndUpdate( { _id: id }, { $set: modifier }, { fields: 'slug', new: true } );

    return editedBook;
  }
}


mongoSchema.loadClass(BookClass);

const Book = mongoose.model('Book', mongoSchema);

module.exports = Book;
Good job! Now you’ll have an easier time constructing the Chapter model.
Chapter model
Aright, we’ve introduced the Book model, now time is for the Chapter model.
Our book consists of chapters. You became familiar with Chapter objects when writing the getBySlug() static method for our Book model. You learned that each Chapter document will have a bookId parameter, which you can use to fetch all chapters that belong to one book.
At this point, writing the basic version of the Chapter model is straightforward, since we’ve already written a User model in Chapter 2 and a Book model earlier in this chapter.
The carcass always contains Schema and ModelClass :
server/models/Chapter.js :
const mongoose = require('mongoose');

const { Schema } = mongoose;

const mongoSchema = new Schema({
  // parameters
});

class ChapterClass {
  // methods
}

mongoSchema.loadClass(ChapterClass);

const Chapter = mongoose.model('Chapter', mongoSchema);

module.exports = Chapter;
Schema for Chapter
In this subsection, let’s go over all parameters that we need for a Chapter object.
- To find and fetch all chapters that belong to one book - we use
bookId. - Each Chapter needs
createdAt(creation date),title,slug(generated from title),seoTitle, andseoDescription. We use the latter two parameters to display a title and description to Googlebot for proper indexing of our web app. - Some chapters - for example the first chapter that we call “Introduction” - will be completely free with no paywall hiding their content. We use the boolean parameter
isFreeand set the default value tofalse. But for free chapters, such as Introduction chapter, we set the value totrue. - Every chapter should have
content(markdown content), htmlContent (HTML content),excerpt(markdown content that is free to all visitors, even if they didn’t sign up or buy a book),htmlExcerpt(HTML excerpt) andgithubFilePath(path inside our github repo that points to the.mdfile containing the chapter’s content). - The final parameter is
order. This is the ordinal number that is extracted from each chapter’s title and used to order chapters inside our table of contents. Note that the Introduction chapter is always first thus"order": 1.
server/models/Chapter.js :
const { Schema } = mongoose;

const mongoSchema = new Schema({
  bookId: {
    type: Schema.Types.ObjectId,
    required: true,
  },
  isFree: {
    type: Boolean,
    required: true,
    default: false,
  },
  title: {
    type: String,
    required: true,
  },
  slug: {
    type: String,
    required: true,
  },
  content: {
    type: String,
    default: '',
    required: true,
  },
  htmlContent: {
    type: String,
    default: '',
    required: true,
  },
  excerpt: {
    type: String,
    default: '',
  },
  htmlExcerpt: {
    type: String,
    default: '',
  },
  createdAt: {
    type: Date,
    required: true,
  },
  githubFilePath: {
    type: String,
  },
  order: {
    type: Number,
    required: true,
  },
  seoTitle: String,
  seoDescription: String,
  sections: [
    {
      text: String,
      level: Number,
      escapedText: String,
    },
  ],
});
In the Markdown to HTML section of Chapter 6, we discuss how to convert markdown content to HTML. In the same section, we will discuss how to make array sections .
Great, we are done with the Chapter Schema. Next we’ll write static methods for the class of our Chapter model, ChapterClass .
Static methods for Chapter
In our Book model, we wrote four static methods for BookClass . These methods help us retrieve one book with chapters, create a book, edit a book, and fetch a list of all books. We will call these methods when we write our app’s backend internal APIs (inside server/api/* ).
Do we need to write CRUD static methods for Chapter model? Create or edit methods? Nope, because we will host Chapter on Github. Instead (when we get to Github integration), we will create a syncContent() static method that will create and update chapters using files hosted in our book’s repo on Github.
Do we need a method to list all of our chapters? No again, becaues we already did it. We wrote the static method getBySlug() for BookClass - that method finds a book by its slug and attaches a list of chapters ordered by our order parameter:
book.chapters = (await Chapter.find({ bookId: book._id }, 'title slug')
   .sort({ order: 1 }))
   .map(chapter => chapter.toObject());
The only static method we need to create for ChapterClass is getBySlug() .
This method:
- finds a book by its slug:
const book = await Book.getBySlug({ slug: bookSlug }); - if unsuccessful, it throws an error:
throw new Error('Not found'); - if successful, the method finds a chapter by its slug:
const chapter = await this.findOne({ bookId: book._id, slug: chapterSlug }); - finally, the method converts MongoDB documents (Chapter and Book) into plain JS objects:
const chapterObj = chapter.toObject();
chapterObj.book = book;
After translating English to JavaScript, we get the following for our static method getBySlug({ bookSlug, chapterSlug }) :
class ChapterClass {
  static async getBySlug({ bookSlug, chapterSlug }) {
    const book = await Book.getBySlug({ slug: bookSlug });

    if (!book) {
      throw new Error('Not found');
    }

    const chapter = await this.findOne({ bookId: book._id, slug: chapterSlug });

    if (!chapter) {
      throw new Error('Not found');
    }

    const chapterObj = chapter.toObject();
    chapterObj.book = book;

    return chapterObj;
  }
}
Done with the Chapter model!
Add the above Schema and one static method to our carcass for the Chapter model:
server/models/Chapter.js :
const mongoose = require('mongoose');

const Book = require('./Book');

const { Schema } = mongoose;

const mongoSchema = new Schema({
  bookId: {
    type: Schema.Types.ObjectId,
    required: true,
  },
  isFree: {
    type: Boolean,
    required: true,
    default: false,
  },
  githubFilePath: {
    type: String,
  },
  title: {
    type: String,
    required: true,
  },
  slug: {
    type: String,
    required: true,
  },
  content: {
    type: String,
    default: '',
    required: true,
  },
  htmlContent: {
    type: String,
    default: '',
    required: true,
  },
  excerpt: {
    type: String,
    default: '',
  },
  htmlExcerpt: {
    type: String,
    default: '',
  },
  createdAt: {
    type: Date,
    required: true,
  },
  order: {
    type: Number,
    required: true,
  },
  seoTitle: String,
  seoDescription: String,
  sections: [
    {
      text: String,
      level: Number,
      escapedText: String,
    },
  ],
});

class ChapterClass {
  static async getBySlug({ bookSlug, chapterSlug, user }) {
    const book = await Book.getBySlug({ slug: bookSlug, user });
    if (!book) {
      throw new Error('Not found');
    }

    const chapter = await this.findOne({ bookId: book._id, slug: chapterSlug });

    if (!chapter) {
      throw new Error('Not found');
    }

    const chapterObj = chapter.toObject();
    chapterObj.book = book;

    return chapterObj;
  }
}


mongoSchema.loadClass(ChapterClass);

const Chapter = mongoose.model('Chapter', mongoSchema);

module.exports = Chapter;
In the next section, we will create a MongoDB index and update our Chapter model to ensure that our database does not create two chapters with similar parameter values (to prevent duplication).
Index in MongoDB
Take a look at our getBySlug static method in the Chapter model. In particular, look at this line:
this.findOne({ bookId: book._id, slug: chapterSlug });
The findOne() method is the way to go in every situation when you need to find one unique document in our Book collection on MongoDB. For this method to work, the bookId and slug pair must be unique. If it’s not unique, then two or more books exist with the exact same parameter values. This will cause findOne() to return the first document according to insertion/creation order. That document may not be the one you wanted to find. That’s a problem.
MongoDB can identify a duplication in values of parameter(s), but we have to configure it by specifying a unique compound index. This index will check that two or more parameters are unique and not duplicated. When this.create() or this.update() create a document with parameters that cause duplication - MongoDB will throw an error:
E11000 duplicate key error index
Before we explain how to configure a unique compound index, let’s first understand index, compound index, unique index, and finally unique compound index:
- Index. In MongoDB, a collection contains documents (e.g. Book collection contains Book documents). When you want to find one document in a database by its
_idparameter - the database has to scan each document within the collection (a collection scan). This can be time consuming. Index is a data structure that stores values for one or more parameters - so our database saves by scanning index instead of performing a collection. In fact, MongoDB creates an index for our_idparameter by default (created when the collection is created). However, we have to configure MongoDB to create an index for other parameters.To create a simple index, we use MongoDB’s methodcreateIndex():
db.records.createIndex( { someParameter: 1 } )
1 indicates that the values of someParameter will be sorted in ascending order ( -1 would specify a descending order).However, since we use Mongoose, the syntax is:
mongoSchema.index({ someParameter: 1 } )
Mongoose will call the createIndex() method for every index() in your code.
- Compound index is an index that holds values for more than one parameter. The syntax is simple as this:
mongoSchema.index({ someParameter: 1, someOtherParameter: 1 } )
-
Unique index is an index that ensures there is no duplication in the values of an indexed parameter. For example, by default MongoDB creates a unique index for the
_idparameter. If there are two documents with the same_idvalue, our database will notify us with an error. ForsomeParameter, the syntax is:
mongoSchema.index({ someParameter: 1 }, { unique: true } )
- Unique compound index. We think you have a pretty good guess here. It’s an index that stores two or more parameters and ensures uniqueness in the combination of those parameters’ values:
mongoSchema.index({ someParameter: 1, someOtherParameter: 1 }, { unique: true } )
Now we know how a unique compound index works. Create one for our bookId and slug parameters to ensure uniqueness in the combination of these values. In other words, chapters may belong to the same book (same bookId ), but they must have a unique slug . Or chapters may have the same slug , but they must belong to different books (unique bookId ). If the combination of values is duplicated - the findOne() method may give us the wrong chapter. By using Mongoose’s syntax from above:
mongoSchema.index({ bookId: 1, slug: 1 }, { unique: true });
Small note - you might remember generateSlug() function ( server/utils/slugify.js ) from Chapter 4. This function ensures uniqueness of the slug parameter. However, it’s good practice to set up a unique index to prevent duplication. To enforce index uniqueness, you don’t want to rely completely on code, code may have bugs.
Later on, we will add a second static method called syncContent() to ChapterClass . We mentioned above that this method replaces the add() and edit() methods and creates/updates chapter documents by using data from Github. Inside the syncContent() method, we will look for a unique chapter by using findOne() :
const chapter = await this.findOne({
   bookId: book.id,
   githubFilePath: path,
});
You may realize that the combination of values for bookId and githubFilePath must be unique. Two chapters can belong to the same book (same bookId ), but they must have a unique githubFilePath . If not, both chapters will get their data from the same .md file. This will create a problem.
Since we do not ensure uniqueness of githubFilePath anywhere in our code, it’s even more important to create a unique compound index for the bookId and githubFilePath pair:
mongoSchema.index({ bookId: 1, githubFilePath: 1 }, { unique: true });
Add these two unique compound indices above to our Chapter model. You’ll get:
server/models/Chapter.js :
const mongoose = require('mongoose');
const Book = require('./Book');

const { Schema } = mongoose;

const mongoSchema = new Schema({
  bookId: {
    type: Schema.Types.ObjectId,
    required: true,
  },
  isFree: {
    type: Boolean,
    required: true,
    default: false,
  },
  title: {
    type: String,
    required: true,
  },
  slug: {
    type: String,
    required: true,
  },
  content: {
    type: String,
    default: '',
    required: true,
  },
  excerpt: {
    type: String,
    default: '',
  },
  htmlExcerpt: {
    type: String,
    default: '',
  },
  createdAt: {
    type: Date,
    required: true,
  },
  githubFilePath: {
    type: String,
  },
  order: {
    type: Number,
    required: true,
  },
  seoTitle: String,
  seoDescription: String,
});

class ChapterClass {
  static async getBySlug({ bookSlug, chapterSlug, user }) {
    const book = await Book.getBySlug({ slug: bookSlug, user });
    if (!book) {
      throw new Error('Not found');
    }

    const chapter = await this.findOne({ bookId: book._id, slug: chapterSlug });

    if (!chapter) {
      throw new Error('Not found');
    }

    const chapterObj = chapter.toObject();
    chapterObj.book = book;

    return chapterObj;
  }
}


mongoSchema.index({ bookId: 1, slug: 1 }, { unique: true });
mongoSchema.index({ bookId: 1, githubFilePath: 1 }, { unique: true });

mongoSchema.loadClass(ChapterClass);

const Chapter = mongoose.model('Chapter', mongoSchema);

module.exports = Chapter;
Before we test, open server/app.js and import Chapter :
const Chapter = require('./models/Chapter');
No need to use Chapter any where inside server/app.js just yet. We added this import because Node will execute code inside server/models/Chapter.js only when this module is referenced explicitly. For more information, you read this issue.
Time to test. When we start our app, it should automatically create indices, which will show up on our MongoDB Atlas dashboard in test.chapters collection of test database.
- Start your app with
yarn dev.Navigate to MongoDB Atlas, go totest.chapterscollection. Click on Indexes tab. As expected, MongoDB has automatically created only one index (for the_idparameter).
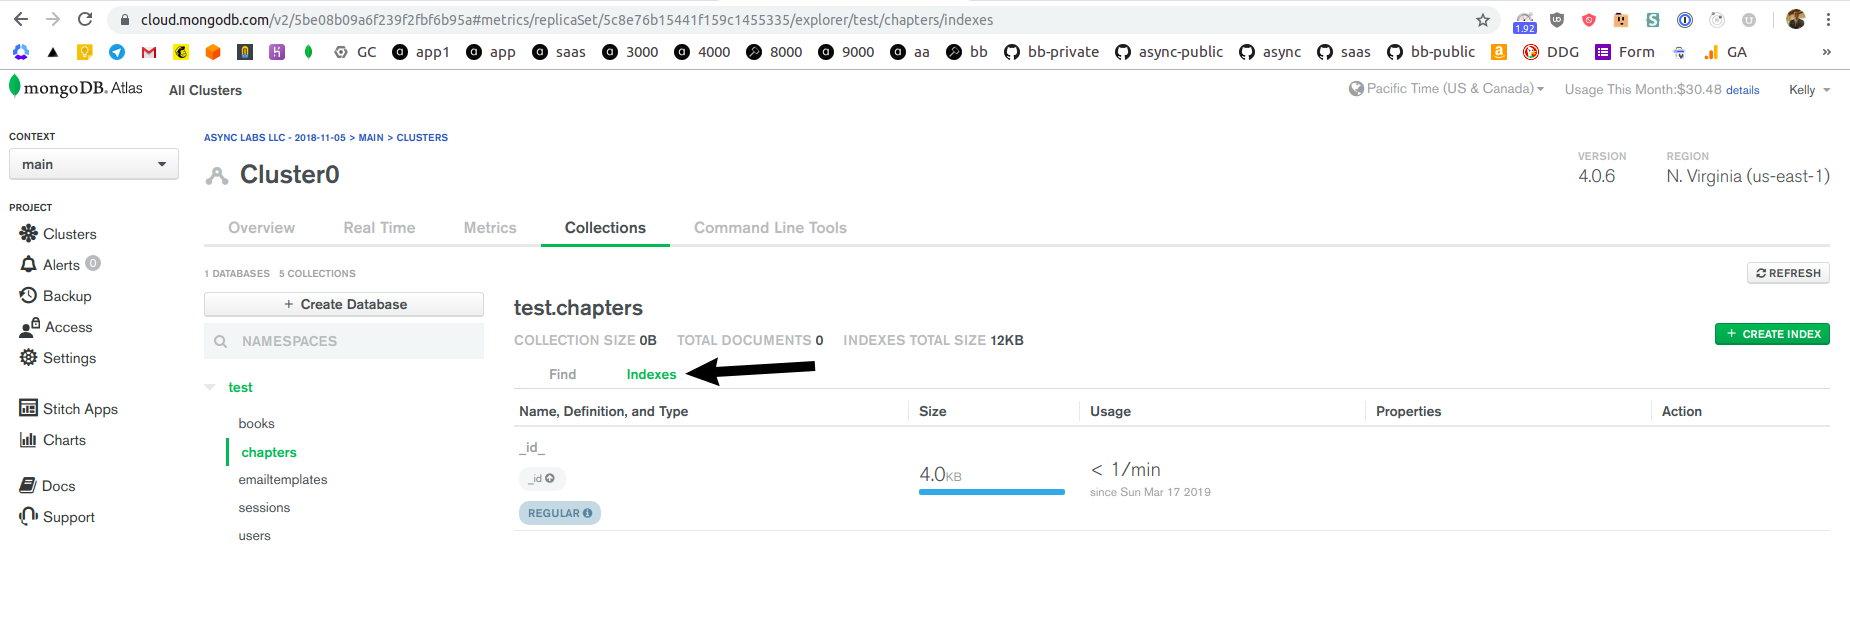
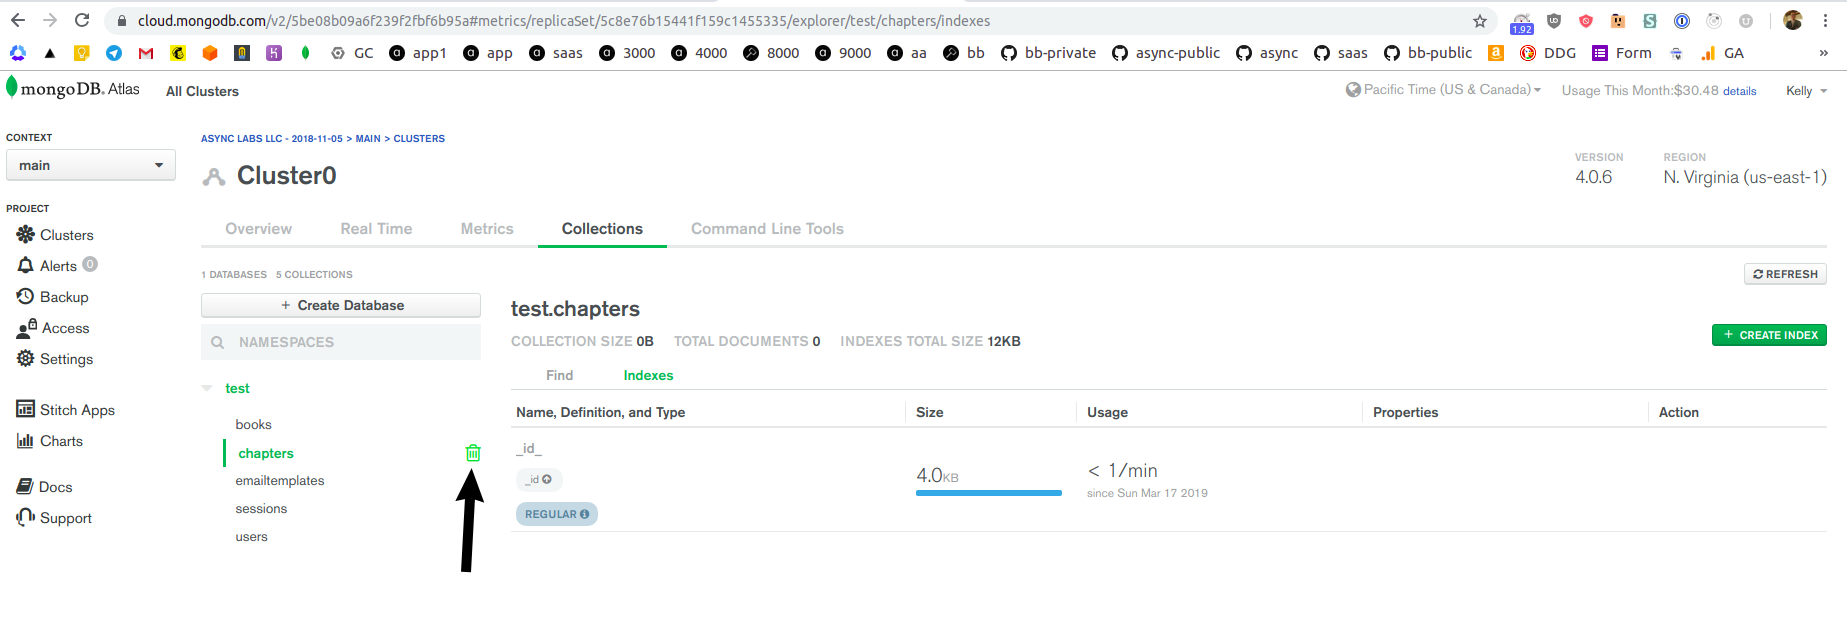
Delete the test.chapters collection. We will re-create this collection in the next step. We need to delete this collection, since our database creates indices when it creates a new collection.
This screenshot shows you how to delete test.chapters collection:
- Open
server/app.js. Right aboveserver.listen(port, (err) => {, add the following code block:
Chapter.create({ bookId: '59f3c240a1ab6e39c4b4d10d' }).catch((err) => {
   logger.info(err);
});
The above code attempts to create a new document in our Chapter collection. This executes code for our Chapter model ( server/models/Chapter.js ), creates a collection (the one we deleted in the previous step), and runs these two lines of code:
mongoSchema.index({ bookId: 1, slug: 1 }, { unique: true });
mongoSchema.index({ bookId: 1, githubFilePath: 1 }, { unique: true });
As discussed earlier, each line above calls createIndex() and creates a unique compound index.Save the changes you made to server/app.js .
Start yout app with yarn dev . Navigate to newly created test.chapters collection, click on Indexes tab:
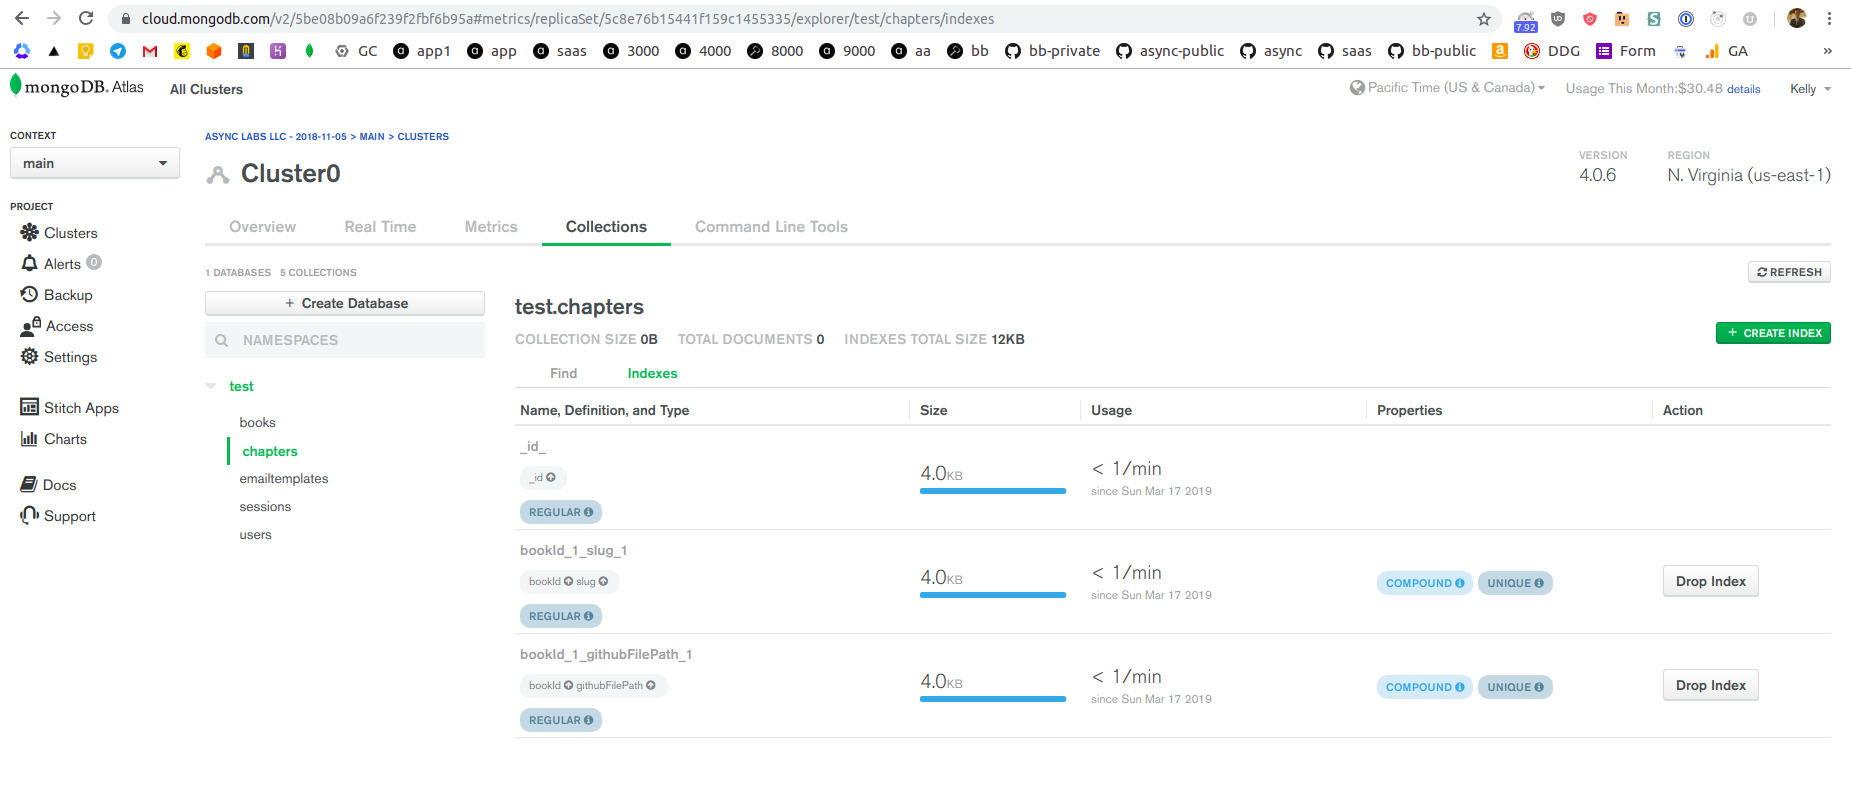
As you can see, we indeed created 2 unique compound indices: one for the combination of bookId and slug , and one for the combination of bookId and githubPathFile .
We hope this brief tutorial on MongoDB’s index helps you understand how indices work and how a unique compound index prevents duplication of documents inside a collection.
Remember to undo changes you made to the server code at server/app.js .
In the upcoming ‘Internal API’ section, we will write:
- server code that retrieves/saves data from our database and
- client code that sends data to particular pages.
Internal APIs
Our primary goal in this book is to learn how to build a production-ready JavaScript web app. Part of this process is writing internal APIs or API endpoints for our app. We do this for any data exchange between client and server via a unique URL (endpoint) - for example, fetching a single book or list of books, creating a chapter, or updating chapter content. To understand API endpoints, you should have a basic grasp of HTTP and Express technologies - I’ll discuss them below in the context of our app.
In this section, we’ll discuss properties of request and response for HTTP protocol, get familiar with Express middleware and Express routes, and finally write one complete (server and client code) API endpoint for our Admin user.
For greater readability of our code, we put code for API endpoint in different folders, according to which user API endpoint belongs to: Admin/Customer/Public. Here is a list of some permissions:
- The Admin user creates books, writes chapters, sells books, sends out newsletters, etc.
- The Customer user is logged in to our app. This user can see the full content of any books he/she purchased, create bookmarks, and see a list of purchased books.
- The Public user is not logged in to our app. This user can see the
Loginpage, read chapter excerpts (non-paywalled content), read blog posts, and subscribe to newsletters. The Public user can’t see all chapter content and can’t create bookmarks.
If you are new to Express and HTTP, you may not understand construct such as
router.get(’/books’, async (req, res) => { … }
That’s OK.
Here we will make a short detour to learn Express routes. After this detour, we will resume talking about internal APIs.
Intro to Express routes
To make the code of any app more readable, you should strive to make it modular. In our app, we have three types of users: Admin, Public, and Customer. Let’s isolate our API endpoints into the same three groups so that we have these routes for our API endpoints:
/api/v1/admin/*/api/v1/public/*/api/v1/customer/*
Modular code is code which is separated into independent modules (pages, components, Express routes, etc). It’s much easier to read, maintain, refactor and test individual modules.
In Express, we make modular API endpoints with Router instance, express.Router() . We define and export Router instance in our server/api/admin.js file:
server/api/admin.js :
const router = express.Router();

module.exports = router;
This file will contain all API endpoints specific to the Admin user only. We will do the same for the Public and Customer APIs to achieve modularity and thus better readability.
Express route has similar syntax and properties as basic middleware. Read about Express middleware here. In short, both Express route and Express middleware execute some function to modify req and res . However, middleware calls the next middleware in a stack with next() to end the req - res cycle.
We will write Express routes inside server/api/* , but instead of server.use() and server.get() , we will use router.use() or router.get() . Later, before importing these routes to the main server code at server/app.js , we will apply server.use() on them at server.api/index.js .
Let walk through two examples to get a better understanding of how to write Express middleware and routes.
In both examples, we’ll focus on only the API endpoints for the Admin user. All Admin API endpoints have the same base route: /api/v1/admin .
Examples:
- In our first example, let’s discuss Express middleware. We want to write a request that checks if a user exists and if the user is an Admin:
if (!req.user || !req.user.isAdmin). If both conditions are true, we will execute the rest of the middleware withnext().If not, we attach an error to the response using res.status() and return undefined withreturn;. We will use router.use(), which works in the same way as server.use().Important note - the middleware in this example is calledrouter-levelmiddleware, and it only executes on routes specified in the router. For example, for our Admin user, this middleware will run for all routes that start with/api/v1/admin.Simply put - when the client calls any API endpoint that contains/api/v1/adminas a base, the function insiderouter.use()will run. Putting together what you already know about middleware:
server/api/admin.js:
router.use('/api/v1/admin', (req, res, next) => {
 if (!req.user || !req.user.isAdmin) {
   res.status(401).json({ error: 'Unauthorized access' });
   return;
 }

 next();
});
The function inside router.use() does not retrieve or save data; instead, it acts as a permission gateway. This function makes sure that only the Admin user has access to Admin-specific API endpoints. To end this request-response cycle, we need to execute a function downstream of our middleware (for example, a function inside router.get(/api/v1/admin/books) ). We do so by using next() . We use next to pass control from one middleware function to another in cases when upstream middleware function does not end request-response cycle (for example, does not send response to browser). Here is an example of this situation from the Express docs:
var express = require('express')
var app = express()

var myLogger = function (req, res, next) {
 console.log('LOGGED')
 next()
}

app.use(myLogger)

app.get('/', function (req, res) {
 res.send('Hello World!')
})

app.listen(3000)
In the above example, middleware function function (req, res, next) does not end request-response cycle so it must call next to prevent a request from hanging.
2. After checking permission, we use an Express route that calls a static method from our Book model. Unlike our example above, this route will have no next() method. Let’s create an API endpoint that GETs a list of all books. We will use our favorite async/await function with try ... catch (link to Chapter 3). We will try and await for the static method Book.list() to return a list of books. If we catch an error, we will attach it to a response with res.json():
server/api/admin.js :
router.get('api/v1/admin/books', async (req, res) => {
 try {
   const books = await Book.list();
   res.json(books);
 } catch (err) {
   res.json({ error: err.message || err.toString() });
 }
});
We provided links to the Express API methods that we use in this app. For a full list of API methods, go to the official docs.
Basics of internal API
As mentioned earlier in the section, we have three types users and API endpoints: Admin, Public, and Customer. In general, our internal APIs will be one of following:
- Express routes located in
server/api/*(server code). For our Admin user, we put routes intoserver/api/admin. When this user triggers an API method, the method sends a request that matches the correct API endpoint. In return, our Express routes will call and pass data from the client to the static method specified in our Models. - API methods. A user calls these methods from pages. We define methods at
lib/api/*(for our Admin user - atlib/api/admin.js). When called, these methods send GET or POST requests to our Express routes. - Pages. Our pages contain data-less static code and API methods that get data. In the context of a page, methods are called upon particular user actions (e.g. clicking a button or loading a page). For better organization, we place Admin pages into
pages/admin/*.
To demonstrate how to set up internal APIs, we will set up just one API endpoint: /api/v1/admin/books . More specifically, we will write and connect the following:
- Server-side Express route. In response to a request, function inside Express route calls and waits for the static method
Book.list(). Static method returns a list of all books and sends it to the client via API method. Our route uses the GET method (router.get('/books')), and the route’s API endpoint is/books. - API method. We can add the API method
getBookList()to any Admin page. This method, when called, sends a request (GET or POST) to an API endpoint, and then the corresponding Express route is executed. We definegetBookList()API method inlib/api/admin.js. - Page. We will import and use
getBookList()in main Admin page (pages/admin/index.js). We will show a list of books on this page once the page is loaded - no need for any user action. This means that we will place our API method in thecomponentDidMountlifecycle hook of page’s component. We place page topages/admin/all-books.js.
You already know that on the server side, we keep all API endpoints in three files:
server/api/admin.jsserver/api/public.jsserver/api/customer.js
In the previous subsection, we went through two examples of how to write Express middleware and route:
- router-level middleware:
router.use('/api/v1/admin', (req, res, next) => { ... } - route:
router.get('api/v1/admin/books', async (req, res) => { ... }
Writing long routes such as api/v1/admin/books is not productive. To solve this problem, let’s put all the base routes in one file and mount them on server with server.use() :
server/api/index.js :
const publicApi = require('./public');
const customerApi = require('./customer');
const adminApi = require('./admin');

function api(server) {
  server.use('/api/v1/public', publicApi);
  server.use('/api/v1/customer', customerApi);
  server.use('/api/v1/admin', adminApi);
}

module.exports = api;
We import Express routes from server/api/admin.js into server/api/index.js . Then we pass base endpoints (for example /api/v1/admin ) and imported routes to server.use() and export out the api() function. We later import api() into our main server code at server/app.js :
const api = require(’./api’);
And initialize Express routes on server by adding following line of code above server.get('*', (req, res) => handle(req, res)); :
api(server);
Since our api(server) function is located in the index file index.js , we can simply import from ./api , not from ./api/index.js .
Here is how we get more productive - since we specified base routes in server/api/index.js , we don’t need to specify them over and over inside our routes.
The route inside server/api/admin.js was:
router.get(‘api/v1/admin/books’, … )
But now we simply write:
router.get(’/books’, …)
Express routes
Our ultimate goal is to display a list of books on the page. In this subsection, we do roughly 1/3 of what’s needed to achieve our goal. We set up our first Express route with the API endpoint /api/v1/admin/books .
Previously, we gave you two examples of Express routes: one using router.use() , and one using router.get() . Let’s put these two examples together. Remember that we don’t need to specify the full route:
server/api/admin.js :
const express = require('express');
const Book = require('../models/Book');

const router = express.Router();

router.use((req, res, next) => {
  if (!req.user || !req.user.isAdmin) {
    res.status(401).json({ error: 'Unauthorized' });
    return;
  }

  next();
});

router.get('/books', async (req, res) => {
  try {
    const books = await Book.list();
    res.json(books);
  } catch (err) {
    res.json({ error: err.message || err.toString() });
  }
});

// more routes

module.exports = router;
Alright, we wrote router-level middleware that verifies our user is Admin. If so, then the user has access to all API endpoints with the base route /api/v1/admin/* . If the client (web browser) sends a GET request to /api/v1/admin/books - our router calls the static method Book.list() that returns the list of books. If successful, the router returns JSON data: res.json(books) .
In the next section, we will discuss an API method that, when triggered, sends a GET request from the client to our Express route (server).
API methods
In the explanation above, we used the phrase client sends a request to /api/v1/admin/books . What exactly needs to happen for this request to send from client to server? Our app’s user has to trigger an API method (we can call it getBookList() ), which will in turn send a GET request to the Express route.
For example, a user may click a button that calls the getBookList() method or a user may simply load a page. In the case of the book list, we implement the latter: when an Admin user goes to the /admin route, we will render a list of books on that page.
After the admin renders, we will call the API method getBookList() . This method will send a request to the proper API endpoint and trigger the corresponding Express route on our server. The Express route calls the static method Book.list() and returns a response res with the list of books in JSON format.
We will store our API methods in the lib/api/* folder. For three types of API endpoints, we have three files:
lib/api/admin.jslib/api/public.jslib/api/customer.js
Our client-side method getBookList() will execute the sendRequest() function:
lib/api/admin.js :
import sendRequest from './sendRequest';

const BASE_PATH = '/api/v1/admin';

export const getBookList = () =>
  sendRequest(`${BASE_PATH}/books`, {
    method: 'GET',
  });

// more API methods
The reasons to introduce sendRequest() function are again reusability and readability. As you may guess, we will write an Express route and corresponding API method for every API endpoint. Each API method that we will write in this book will do following:
- call and wait for
fetch()method
const response = await fetch(
  `${ROOT_URL}${path}`,
  Object.assign( // method type, headers, more parameters ),
);
- return data in json format
const data = await response.json();
- returns data
return data;
Method fetch() takes route as argument, sends HTTP request to that route and returns HTTP response. We discussed HTTP request and response in detail in Chapter 2, section HTTP.
Instead of repeating code that sends a request and waits for response - we will define the sendRequest() and reuse it. This function will accept parameters such as HTTP method (GET or POST), so we can modify it for different requests.
Each request will have either GET or POST method . POST request will have body . Example, Admin user creates new book - POST request from browser to server will have body that contains book name and price.
So you see that sendRequest() will take multiple parameters depending on situation. All requests need route ( path ), HTTP method, POST requests will have body and some GET requests will have headers with cookie .
Use async/await to define sendRequest() based on above discussion:
lib/api/sendRequest.js :
import 'isomorphic-unfetch';

const port = process.env.PORT || 8000;
const ROOT_URL = `http://localhost:${port}`;

export default async function sendRequest(path, opts = {}) {
  // define headers

  const response = await fetch(
    `${ROOT_URL}${path}`,
    Object.assign(// pass parameters),
  );

  const data = await response.json();

  if (data.error) {
    throw new Error(data.error);
  }

  return data;
}
In the code above, you see that we imported package isomorphic-unfetch, this makes fetch() method to be available in our app. Our code awaits for fetch() to return a response with data. fetch(path, options) is a global JavaScript method that takes a route and the parameters of a request, then returns a response with data available from the API endpoint. You can read more about the properties of fetch() here.
The fetch() method is not available on older browsers. That why we import isomorphic-unfetch , which makes global fetch() method available in our code.
After creating a new headers object out of three smaller objects with Object.assign() :
const headers = Object.assign({}, opts.headers || {}, {
  'Content-type': 'application/json; charset=UTF-8',
});
Three smaller objects are:
-
{}, -
opts.headeror{}, -
{ 'Content-type': 'application/json; charset=UTF-8' }.
We discussed creating new object with Object.assign() in detail at Chapter 1.
We create new request object using three smaller objects with Object.assign() as well:
Object.assign(
  {
    credentials: 'same-origin',
  },
  opts,
  { headers },
)
In this case, three smaller objects are:
-
{ credential: 'same-origin' }, -
opts(which is emptry by default) -
{ headers }.
Put it together, you finally get:
lib/api/sendRequest.js :
import 'isomorphic-unfetch';

const port = process.env.PORT || 8000;
const ROOT_URL = `http://localhost:${port}`;

export default async function sendRequest(path, opts = {}) {
  const headers = Object.assign({}, opts.headers || {}, {
    'Content-type': 'application/json; charset=UTF-8',
  });

  const response = await fetch(
    `${ROOT_URL}${path}`,
    Object.assign({ method: 'POST', credentials: 'same-origin' }, opts, { headers }),
  );

  const data = await response.json();

  if (data.error) {
    throw new Error(data.error);
  }

  return data;
}
We will discuss page organization and one of the Admin pages in the next subsection.
Pages
We’ve completed 3 steps out of 4 to implement our /api/v1/admin/books API endpoint:
- Static method
list()in Book model (done) - Express routes
/api/v1/admin/books(done) - API method
getBookList()(done) - Page that displays a list of books (this subsection).
We use Next.js for many reasons - one of them is to easily assign routes to pages. For example, if we create our admin.js file inside our pages folder, Next.js shows the contents of the admin.js page on the /admin route.
Once built, our app will have over a dozen pages. We can store all pages at the root of pages ; however, our app’s readability and modularity will suffer. Alternatively, pages can be split into three groups according to which API endpoints they use (Admin, Public, or Customer):
pages/admin/*
pages/public/*
pages/customer/*
Look inside the current pages folder. Consider the Login page, which we created in Chapter 3. This page is public (meaning it’s visible to logged-out guest users). When we move our login.js page to the public folder, the new destination becomes pages/public/login.js , and the new route becomes /public/login . That’s not a pretty login route - /login was way simpler.
There is an obvious trade-off. We would like to store page in three folders and have nice-looking, short routes. To achieve both of these goals, we have implement two changes:
- Tell our Express server to treat
/loginas/public/login. - Make our
<Link>element, which leads to the Login page, use theasparameter to show/loginas the route but actually fetch/public/login:<Link prefetch href="/public/login" as="/login"> ... </Link>. Read more about<Link>parameters in the Next.js docs.
Let’s achieve our first goal with const url = URL_MAP[req.path]; . Edit our main server code at server/app.js by adding two code snippets:
server/app.js :
const URL_MAP = {
  '/login': '/public/login',
};
Then using URL_MAP for every request to server:
server.get('*', (req, res) => {
  const url = URL_MAP[req.path];
  if (url) {
    app.render(req, res, url);
  } else {
    handle(req, res);
  }
});
To achieve our second goal, add as to the <Link> element for all pages that are mentioned in URL_MAP . We will show you two examples. Edit links inside the Header component as follows:
components/Header.js :
<Link prefetch href="/public/login" as="/login">
  <a style={{ margin: '0px 20px 0px auto' }}>Log in</a>
</Link>
Almost done.
After you move login.js file from pages/ folder to pages/public/ , make sure to update import routes inside login.js :
import withAuth from '../lib/withAuth';
import withLayout from '../lib/withLayout';
import { styleLoginButton } from '../components/SharedStyles';
Becomes:
import withAuth from '../../lib/withAuth';
import withLayout from '../../lib/withLayout';
import { styleLoginButton } from '../../components/SharedStyles';
Done!
Custom routing requires to write a bit of code to keep routes short ( /login vs /public/login ). The upside is higher modularity of code - we organize all pages into three folders ( pages/admin , /pages/customer , pages/public ).
Test it out. Start app with yarn dev and go to http://localhost:8000/login . Though you put page code in pages/public/login.js , you access page on the browser at /login .
Later in this chapter and in the beginning of the next chapter (Chapter 6), we will discuss our Admin, Public, and Customer pages in detail. Here, I’d like to introduce just one page - the page that displays a list of books by calling the getBookList() method (which in turn executes our /api/v1/admin/books API endpoint). This page is the main Admin page with the route /admin , which we store at pages/admin/index.js .
pages/admin/index.js :
import { Component } from 'react';
import PropTypes from 'prop-types';
import Link from 'next/link';

import notify from '../../lib/notifier';

import withLayout from '../../lib/withLayout';
import withAuth from '../../lib/withAuth';
import {
  getBookList,
} from '../../lib/api/admin';


const Index = ({
  books,
}) => (
  <div style={{ padding: '10px 45px' }}>
    <div>
      <h2>Books</h2>
      <ul>
        {books.map(book => (
          <li key={book._id}>
            <Link
              as={`/admin/book-detail/${book.slug}`}
              href={`/admin/book-detail?slug=${book.slug}`}
            >
              <a>{book.name}</a>
            </Link>
          </li>
          ))}
      </ul>
    </div>
  </div>
);

Index.propTypes = {
  books: PropTypes.arrayOf(PropTypes.shape({
    name: PropTypes.string.isRequired,
    slug: PropTypes.string.isRequired,
  })).isRequired,
};

class IndexWithData extends Component {
  state = {
    books: [],
  };

  async componentDidMount() {
    try {
      const { books } = await getBookList();
      this.setState({ books }); // eslint-disable-line
    } catch (err) {
      notify(err);
    }
  }

  render() {
    return (
      <Index
        {...this.state}
      />
    );
  }
}

export default withAuth(withLayout(IndexWithData), { adminRequired: true });
In Chapter 3, you learned about optional validation for propTypes .
IndexWithData component renders Index component. Latter component displays a list of books but initially has no data.
Once the IndexWithData component is mounted ( componentDidMount lifecycle hook), we call and wait for the getBookList() method using our favorite async/await with try/catch construct:
class IndexWithData extends Component {
  state = {
    books: [],
  };

  async componentDidMount() {
    try {
      const { books } = await getBookList();
      this.setState({ books }); // eslint-disable-line
    } catch (err) {
      notify(err);
    }
  }

  render() {
    return (
      <Index
        {...this.state}
      />
    );
  }
}
As you see from above code, once data is available, we pass it to state with:
this.setState({ books });
Then we render the Index with state that has data:
render() {
  return (
    <Index
      {...this.state}
    />
  );
}
When we export the IndexWithData component, we pass adminRequired: true to our withAuth HOC ( server/withAuth.js ). This ensures that only an Admin user has access to this page.
... inside {...this.state} is called a spread operator, and it’s a ES6 feature. We use spread operator to pass all parameters inside state object to component. In React, often, spread operator is used to pass all props parameters (i.e. entire props object) to a component. Here is a simple example. See our discussion in Chapter 1about spread operator.
In our case, we use it because of shorter syntax. Later on, we may add more data to state (e.g. the tutorials list in addition to the books list). So instead of writing <Index books={state.books} tutorials={state.tutorials} /> , we use the spread operator ... :
state = {
  books: [],
  tutorials: [],
};
and <Index {...this.state} /> .
A final note worth mentioning is that this page is rendered on the client. Instead of using getInitialProps() (used for server-side rendering), we send JSON data to the client. The client re-renders the page with data, following instructions specified in async componentDidMount() .
Time to test.
Before you test, make sure that your user is an Admin. Go to MongoDB Atlas and find your user document in the test.users collection of test database (that is located in your free Cluster0 cluster). Add this parameter to this user document: "isAdmin": true .
Let’s create two dummy book documents as well. In MongoDB Atlas, inside test database of Cluster0 cluster, go to the test.books collection and manually add two new book documents:
name: dummy-1
slug: dummy-1
price: 49
createdAt: 2017-11-21T23:39:18.426+00:00
and
name: dummy-2
slug: dummy-2
price: 49
createdAt: 2017-11-21T23:29:18.426+00:00
Note Atlas will automatically generate id for new document, so your task is to manually add name (type String ), slug (type String ), price (type Int32 ) and createdAt (type Date ) to the document. If you forgot how to create a new document in Atlas, check up Chapter 2.
Start your app ( yarn dev ) and navigate to the /admin page:
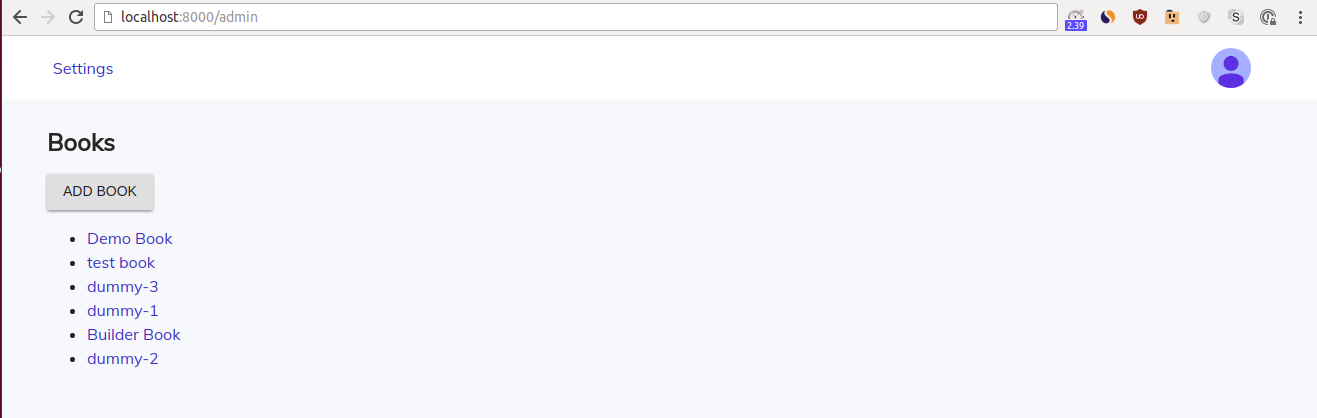
If you see a list of books, then you successfully implemented /api/v1/admin/books . To display list of books on /admin page, we did following:
- created
list()static method in Book model (server/models/Book.js), - created Express route
/books(server/api/admin.js), - create API method
getBookList()(lib/api/admin.js), - place above method to
componentDidMount()lifecycle hook of Admin page (pages/admin/index.js).
In this book we will write about a dozen of API endpoints - that’s doable. A new technology called GraphQL is an alternative to multiple endpoints APIs. In GraphQL, you send or get data from a single endpoint. Instead of writing all code associated for multiple API endpoints, you save time by constructing proper queries and mutations and send them to single API endpoint.
We should make one more UX improvement - right now, app redirects user to / page after login. Instead, we want user to be redirected to /admin page. Open server/google.js file and find following Express route:
server.get(
  '/oauth2callback',
  passport.authenticate('google', {
    failureRedirect: '/login',
  }),
  (req, res) => {
    res.redirect('/');
  },
);
The code inside Express code redirects user to / page if login when passport authentication succeeds. Change code so code redirects user to /admin page:
server.get(
  '/oauth2callback',
  passport.authenticate('google', {
    failureRedirect: '/login',
  }),
  (req, res) => {
    res.redirect('/admin');
  },
);
Log out of app, log in again, you’ll be automatically redirected to /admin .
At this point, we’ve introduced Book and Chapter models but did not add any code related to Github’s integration. That’s why you had to manually insert two books to MongoDB for testing the /admin page.
Before integrating with Github (Chapter 6), let’s create a ReadChapter page ( pages/public/read-chapter.js ) where we will display our dummy chapter. Dummy , since you will create a chapter document manually in your database. Customer users will preview chapter content and read their purchased books on the ReadChapter page (we discuss preview and payments in Chapter 7).
ReadChapter page
You see that we placed the ReadChapter page into the pages/public/* folder. This page uses API method(s) from lib/api/public.js and Express routes from server/api/public.js .
Earlier in this chapter, you learned how to display a list of books on the /admin page at pages/admin/index.js . It’s a four-step process of writing static method for model, Express route, API method, and adding method to page.
Since we already wrote the static method getBySlug() for our Chapter model (see section “Chapter model”), then we only have three steps to implement.
To display chapter content on the ReadChapter page, follow these three steps:
- On the server (
server/api/public.js), we will create an Express route with the GET method and route (or API endpoint)/get-chapter-detail. Inside this Express route, we call theChapter.getBySlug()static method (we wrote it earlier in this chapter). - On the client (
lib/api/public.js), we will create an API method calledgetChapterDetail()that calls the API endpoint/get-chapter-detailand passes necessary data to the corresponding Express routes. - Also on the client, we add the above API method to the ReadChapter page. When a user visits the route
/books/:bookSlug/:chapterSlug, we will render the page frompages/public/read-chapter.js. In the page’s code, we will call thegetChapterDetail()API method insidegetInitialProps(). Unlike anAdminpage (pages/admin/index.js), which is rendered on the client, theReadChapterpage will be rendered on the server. The API methodgetChapterDetail()will be executed inside Next.js’sgetInitialProps()instead of acomponentDidMount()lifecycle hook.
Express route
Express route with the GET method and /get-chapter-detail API endpoint:
router.get('/get-chapter-detail', async (req, res) => ... ) .
On the browser, a user will access /books/:bookSlug/:chapterSlug , so we need to extract bookSlug and chapterSlug values from this query string. Express achieves this with req.query. For example, if the query string is:
/get-chapter-detail?bookSlug=${bookSlug}&chapterSlug=${chapterSlug} ,
then we can access parameters inside this query string with:
  const bookSlug = req.query.bookSlug;
  const chapterSlug = req.query.chapterSlug;
After using object destructuring, we can simplify it and get:
const { bookSlug, chapterSlug } = req.query;
Let’s use our favorite async/await with the try/catch construct. Await for the static method Chapter.getBySlug() to find and return the proper chapter object:
  const chapter = await Chapter.getBySlug({
    bookSlug,
    chapterSlug,
    userId: req.user && req.user.id,
    isAdmin: req.user && req.user.isAdmin,
  });
We will use userId and isAdmin in Chapter 8. The first parameter checkes whether a user has purchased a book, and the second parameter shows the full content of the chapter to an Admin user. For now, we’ll ignore these parameters but we do discuss them in Chapter 8, Section ReadChapter page.
If we successfully retrieve the right chapter, we will send a response with JSON data:
res.json(chapter);
Otherwise, we will catch an error and send a response with an error message:
res.json({ error: err.message || err.toString() });
After putting this all together and adding try/catch , our final server/api/public.js becomes:
  const express = require('express');
  const Book = require('../models/Book');
  const Chapter = require('../models/Chapter');

  const router = express.Router();

  router.get('/books', async (req, res) => {
    try {
      const books = await Book.list();
      res.json(books);
    } catch (err) {
      res.json({ error: err.message || err.toString() });
    }
  });

  router.get('/books/:slug', async (req, res) => {
    try {
      const book = await Book.getBySlug({ slug: req.params.slug, userId: req.user && req.user.id });
      res.json(book);
    } catch (err) {
      res.json({ error: err.message || err.toString() });
    }
  });

  router.get('/get-chapter-detail', async (req, res) => {
    try {
      const { bookSlug, chapterSlug } = req.query;
      const chapter = await Chapter.getBySlug({
        bookSlug,
        chapterSlug,
      });
      res.json(chapter);
    } catch (err) {
      res.json({ error: err.message || err.toString() });
    }
  });

  module.exports = router;
API method getChapterDetail()
The API method getChapterDetail() will send a request with the following API endpoint:
${BASE_PATH}/get-chapter-detail?bookSlug=${bookSlug}&chapterSlug=${chapterSlug}
sendRequest(
  `${BASE_PATH}/get-chapter-detail?bookSlug=${bookSlug}&chapterSlug=${chapterSlug}`,
  Object.assign(
    {
      method: 'GET',
    },
    options,
  ),
);
This method takes an API endpoint, specifies a method (GET) and options ( req.headers , check page’s code), and sends a request to the server. Query string has values of two parameters: ${bookSlug} and ${chapterSlug} values. These two values are taken from the query string when a user accesses /books/:bookSlug/:chapterSlug route with req.query (discussed earlier):
const { bookSlug, chapterSlug } = req.query;
Our API method:
lib/api/public.js :
import sendRequest from './sendRequest';

const BASE_PATH = '/api/v1/public';

export const getChapterDetail = ({ bookSlug, chapterSlug }, options = {}) =>
  sendRequest(
    `${BASE_PATH}/get-chapter-detail?bookSlug=${bookSlug}&chapterSlug=${chapterSlug}`,
    Object.assign(
      {
        method: 'GET',
      },
      options,
    ),
  );
Page
We want our users to see the route /books/:bookSlug/:chapterSlug on their browsers. However, we want our app to render a page that is located at pages/public/read-chapter.js . To make server pass data to /books/:bookSlug/:chapterSlug route, we need to add Express route:
server.get('/books/:bookSlug/:chapterSlug', (req, res) => {
  const { bookSlug, chapterSlug } = req.params;
  app.render(req, res, '/public/read-chapter', { bookSlug, chapterSlug });
});
Add above code snippet above server.get('*', (req, res) => handle(req, res)); line in the server/app.js file.
Let’s discuss req.params . In a way, req.params is similar to req.query . The latter extracts values from a query string (route accessed by user on browser). The former extracts parameters values from the server route (a parameter inside the route has to have a colon : prepended to the name). Read more about route parameters here.
For example, Express route has /books/:bookSlug/:chapterSlug route. When user navigates to the URL:
http://localhost:8000/books/book-1/introduction
then req.params object is:
req.params: { “bookSlug”: “book-1”, “chapterSlug”: “introduction” }
You may not be familiar with app.render() . The general syntax for the Express method app.render() Express is:
app.render(view, [locals], callback)
The parameter view is a path to file that we render. In our case, it’s /public/read-chapter .
Local variables [locals] contain parameters that get passed to view . In our case, it’s { bookSlug, chapterSlug } .
In summary, the Express route above receives the { bookSlug, chapterSlug } parameters from our app user’s browser, sends them to the /public/read-chapter page, and then renders this page.
The page ReadChapter sends bookSlug and chapterSlug parameters to our server as parameters of query object:
const bookSlug = query.bookSlug;
const chapterSlug = query.chapterSlug;
After using ES6 object destructuring:
const { bookSlug, chapterSlug } = query;
getInitialProps() method accepts query parameter, defines { bookSlug, chapterSlug } and passes paramters to API method getChapterDetail() :
static async getInitialProps({ req, query }) {
  const { bookSlug, chapterSlug } = query;

  // pass parameters to API method getChapterDetail()
  // return data
}
The parameter query is a query string section of a route. For our /books/:bookSlug/:chapterSlug route, ES6 object destructuring for query is:
const { bookSlug, chapterSlug } = query;
At this point, we’ve created multiple pages in our app. From Chapters 2 and 3, you know about ES6 class component declaration:
class ReadChapter extends React.Component
You also know about the optional but recommended use of propTypes :
static propTypes = {
  chapter: PropTypes.shape({
    _id: PropTypes.string.isRequired,
  }),
};

static defaultProps = {
  chapter: null,
};
You are familiar with state :
this.state = {
  chapter,
  htmlContent,
};
Let’s outline what we need to do inside ReadChapter page:
- Inside
renderMainContent(), render the chapter’stitleandhtmContent. - Page has
<Head>with chapter title and description - We use
<Grid>Materil-UI (you learned about<Grid>in Chapter 1) - get values of
chapterandhtmlContentfromstate:
const { chapter, htmlContent } = this.state;
- Since
chapter.htmlContentis a HTML string, we use React version of DOM methodinnerHTML,dangerouslySetInnerHTM, to set HTML content of element:<div className="main-content" dangerouslySetInnerHTML={{ __html: htmlContent }} />. - We also know that
Chapter.geBySlug()static method returnsbookobject in addition tochapterobject. Thus we can get book data with:
const book = chapter.book;
With object destructuring:
const { book } = chapter;
- If chapter is null, show 404 page (provided by Next.js):
if (!chapter) {
  return <Error statusCode={404} />;
}
- In export code, we wrap
ReadChapterpage component withwithLayoutHOC, thus page has<Header>. - In export code, we wrap
ReadChapterpage component withwithAuthHOC with parameterloginRequired: false. Which means that logged out user can see this page.
Put together these bits of knowledge, and we get a high-level structure for our ReadChapter page:
pages/public/read-chapter.js :
import React from 'react';
import PropTypes from 'prop-types';
import Error from 'next/error';
import Head from 'next/head';
import Grid from '@material-ui/core/Grid';

import { getChapterDetail } from '../../lib/api/public';
import withLayout from '../../lib/withLayout';
import withAuth from '../../lib/withAuth';

const styleGrid = {
  flexGrow: '1',
};

class ReadChapter extends React.Component {
  static propTypes = {
    chapter: PropTypes.shape({
      _id: PropTypes.string.isRequired,
    }),
  };

  static defaultProps = {
    chapter: null,
  };

  constructor(props, ...args) {
    // 1. define state
  }

  componentWillReceiveProps(nextProps) {
    // 2. render new chapter
  }

  static async getInitialProps({ req, query }) {
    // 3. call API method, pass neccessary data to server
  }

  renderMainContent() {
    const { chapter, htmlContent } = this.state;

    return (
      <div>
        <h3>Chapter: {chapter.title}</h3>

        <div className="main-content" dangerouslySetInnerHTML={{ __html: htmlContent }} />

      </div>
    );
  }

  render() {
    const { chapter } = this.state;

    if (!chapter) {
      return <Error statusCode={404} />;
    }

    const { book } = chapter;

    return (
      <div style={{ padding: '10px 45px' }}>
        <Head>
          <title>
          {chapter.title === 'Introduction'
              ? 'Introduction'
              : `Chapter ${chapter.order - 1}. ${chapter.title}`}
          </title>
          {chapter.seoDescription ? (
            <meta name="description" content={chapter.seoDescription} />
          ) : null}
        </Head>

        <Grid style={styleGrid} container direction="row" justify="space-around" align="flex-start">

          <Grid
            item
            sm={10}
            xs={12}
            style={{
              textAlign: 'left',
              paddingLeft: '25px',
            }}
          >
            <h2>Book: {book.name}</h2>

            {this.renderMainContent()}

          </Grid>
        </Grid>
      </div>
    );
  }
}

export default withAuth(withLayout(ReadChapter), { loginRequired: false });
Let’s discuss parts of ReadChapter page that are missing code:
- So far, we haven’t used
constructor(props). It’s straightforwad as you will see below.In React,constructor(props)sets an initialstateand is called before a component is mounted. In our case, initialstateis simply:
this.state = {
 chapter,
 htmlContent,
};
The official React docs advise to always call super(props) before any statement (to make this.props available inside constructor since this is not initialized until super() is called) and initiate state with this.state instead of setState . After considering these two rules, we get:
constructor(props) {
 super(props);

 this.state = {
   chapter,
   htmlContent,
 };
}
As we discussed in Chapter 2 while building MenuDrop component - we could’ve used state = { ... } to state initial state if we don’t need to access props. We chose constructor(props) instead since we need access to chapter and htmlContent props to set initial state.You don’t need to use constructor if you don’t use props for setting initial state. For example, take a look at components/MenuDrop.js , we set initial state for MenuDrop component without constructor.The constructor above does not define chapter and htmlContent . After adding these two definitions:
constructor(props) {
 super(props);

 const { chapter } = props;

 let htmlContent = '';
 if (chapter) {
   htmlContent = chapter.htmlContent;
 }

 this.state = {
   chapter,
   htmlContent,
 };
}
When we test ReadChapter page, it’s important that we create chapter document on database that contains chapter.htmlContent parameter. Value of this parameter should a string of HTML code.
2. componentWillReceiveProps() is one of our component’s lifecycle methods. We discussed componentDidMount() but not this one. componentWillReceiveProps(nextProps) is invoked before a mounted component receives new props. This lifecycle will get executed even when props have not changed, thus it is important to compare this.props (current) and nextProps (incoming). To re-render component, we update state with this.setState() (same way as in componentDidMount() ).If incoming prop chapter exists ( const chapter = nextProps.chapter or with ES6 object destructuring: const { chapter } = nextProps ) and chapter id has changed ( chapter._id !== this.props.chapter._id ), then a user navigated to new chapter (component did receive new chapter prop). If user navigated to new chapter, we want to re-render page component with this.setState() :
componentWillReceiveProps(nextProps) {
 const { chapter } = nextProps;

 if (chapter && chapter._id !== this.props.chapter._id) {
   const { htmlContent } = chapter;
   this.setState({ chapter, htmlContent });
 }
}
- We’ve used
getInitialProps()method inIndexpage to render a user email, usage inReadChapterpage is a bit more complicated. Here we call thegetChapterDetailAPI method instead of getting user object from query.As we discussed in Chapter 3,getInitialProps()populates page’spropswith data. We wantReadChapterpage with data to be rendered on the server. To achieve that in Next.js app, we call thegetChapterDetail()method inside ofgetInitialProps(). If we wanted to render data on the client (which is not the case forReadChapterpage), we would callgetChapterDetail()inside ofcomponentDidMount().General usage ofgetInitialProps()(which can be async):
static async getInitialProps({ req, query }) {
 // pass data and call `getChapterDetail()` method
}
Take a look at the getChapterDetail() method ( lib/api/public.js ). This method takes bookSlug , chapterSlug , headers , and options . Once user is on the /books/:bookSlug/:chapterSlug route, we send request to server. Request has data that we pass to getInitialProps() method via req and query . In turn, getInitialProps passes data to API method getChapterDetail() method.In Next.js, query is a query string section of a URL (similar to Express’s req.query and req.params ). By using ES6 destructuring:
const { bookSlug, chapterSlug } = query;
We get bookSlug and chapterSlug from query .By using req.headers.cookie , we can pass cookies from client (browser) to the server to identify logged-in user (see the section on Session in Chapter 2):
const headers = {};
 if (req && req.headers && req.headers.cookie) {
   headers.cookie = req.headers.cookie;
 }
Finally, to pass bookSlug , chapterSlug , and headers to the server via our API method getChaperDetail() :
const chapter = await getChapterDetail({ bookSlug, chapterSlug }, { headers });
In summary, we have:
static async getInitialProps({ req, query }) {
 const { bookSlug, chapterSlug } = query;

 const headers = {};
 if (req && req.headers && req.headers.cookie) {
   headers.cookie = req.headers.cookie;
 }

 const chapter = await getChapterDetail({ bookSlug, chapterSlug }, { headers });

 return { chapter };
}
Add the missing code snippets from steps 1-3 to the ReadChapter page:
pages/public/read-chapter.js :
import React from 'react';
import PropTypes from 'prop-types';
import Error from 'next/error';
import Head from 'next/head';
import Grid from '@material-ui/core/Grid';

import { getChapterDetail } from '../../lib/api/public';
import withLayout from '../../lib/withLayout';
import withAuth from '../../lib/withAuth';

const styleGrid = {
  flexGrow: '1',
};

class ReadChapter extends React.Component {
  static propTypes = {
    chapter: PropTypes.shape({
      _id: PropTypes.string.isRequired,
    }),
  };

  static defaultProps = {
    chapter: null,
  };

  constructor(props) {
    super(props);

    const { chapter } = props;

    let htmlContent = '';
    if (chapter) {
      htmlContent = chapter.htmlContent;
    }

    this.state = {
      chapter,
      htmlContent,
    };
  }

  componentWillReceiveProps(nextProps) {
    const { chapter } = nextProps;

    if (chapter && chapter._id !== this.props.chapter._id) {
      const { htmlContent } = chapter;
      this.setState({ chapter, htmlContent });
    }
  }

  static async getInitialProps({ req, query }) {
    const { bookSlug, chapterSlug } = query;

    const headers = {};
    if (req && req.headers && req.headers.cookie) {
      headers.cookie = req.headers.cookie;
    }

    const chapter = await getChapterDetail({ bookSlug, chapterSlug }, { headers });

    return { chapter };
  }

  renderMainContent() {
    const { chapter, htmlContent } = this.state;

    return (
      <div>
        <h3>Chapter: {chapter.title}</h3>

        <div className="main-content" dangerouslySetInnerHTML={{ __html: htmlContent }} />

      </div>
    );
  }

  render() {
    const { chapter } = this.state;

    if (!chapter) {
      return <Error statusCode={404} />;
    }

    const { book } = chapter;

    return (
      <div style={{ padding: '10px 45px' }}>
        <Head>
          <title>
            {chapter.title === 'Introduction'
              ? 'Introduction'
              : `Chapter ${chapter.order - 1}. ${chapter.title}`}
          </title>
          {chapter.seoDescription ? (
            <meta name="description" content={chapter.seoDescription} />
          ) : null}
        </Head>

        <Grid style={styleGrid} container direction="row" justify="space-around" align="flex-start">

          <Grid
            item
            sm={10}
            xs={12}
            style={{
              textAlign: 'left',
              paddingLeft: '25px',
            }}
          >
            <h2>Book: {book.name}</h2>

            {this.renderMainContent()}

          </Grid>
        </Grid>
      </div>
    );
  }
}

export default withAuth(withLayout(ReadChapter), { loginRequired: false });
In the next subsection, we finally test our page, API method, and Express route.
Testing
We are almost there. You wrote static method for Chapter model, an Express route, API method, and placed API method to page. Time to test if our page indeed displays chapter data.
From our previous tests, the current database contains two dummy books with names dummy-1 and dummy-2 . Let’s create a new book dummy-3 and add an introduction chapter to this book.
- Create a new book. Navigate to Atlas dashboard, go to
test.bookscollection and manually create a new book document:
name: dummy-3
slug: dummy-3
price: 40
createdAt: 2017-11-21T23:29:18.426+00:00
Note Atlas will automatically generate id for new document, so your task is to manually add name (type String ), slug (type String ), price (type Int32 ) and createdAt (type Date ) to the document. If you forgot how to create a new document in Atlas, check up Chapter 2.
- Create an introduction chapter for
dummy-3. Navigate to Atlas dashboard, go totest.chapterscollection and manually create a new chapter document:
bookId: ObjectId ("5a42c6f2a437e1289c66f063")
title: Introduction
slug: introduction
order: 1
seoTitle: Builder Book
seoDescription: Build modern, production-ready web application from scratch.
createdAt: 2017-12-26T23:39:18.426+00:00
content:
htmlContent: <a\n        class=\"section-anchor\"\n        name=\"heading-h2\"\n        href=\"#heading-h2\"\n      >\n        <h2 class=\"chapter-section\" style=\"color: #222; font-weight: 400;\">\n          Heading h2\n        <\/h2>\n      <\/a><a\n        name=\"heading-h4\"\n        href=\"#heading-h4\"\n      >\n        <h4 style=\"color: #222;\">\n          Heading h4\n        <\/h4>\n      <\/a><ul>\n<li><strong>bold<\/strong><\/li>\n<li><em>emphasized<\/em><\/li>\n<li><code>highlighted<\/code><\/li>\n<li>regular text<\/li>\n<\/ul>\n<pre><code><span class=\"hljs-function\"><span class=\"hljs-keyword\">function<\/span> <span class=\"hljs-title\">Square<\/span>(<span class=\"hljs-params\">props<\/span>) <\/span>{\n  <span class=\"hljs-keyword\">return<\/span> (\n    <span class=\"xml\"><span class=\"hljs-tag\"><<span class=\"hljs-name\">button<\/span> <span class=\"hljs-attr\">className<\/span>=<span class=\"hljs-string\">\"square\"<\/span> <span class=\"hljs-attr\">onClick<\/span>=<span class=\"hljs-string\">{props.onClick}<\/span>><\/span>\n      {props.value}\n    <span class=\"hljs-tag\"></<span class=\"hljs-name\">button<\/span>><\/span><\/span>\n  );\n}\n<\/code><\/pre>"
excerpt:
isFree: true
Note Atlas will automatically generate id for new document, so your task is to manually add bookId (type ObjectId ), title (type String ), slug (type String ), order (type Int32 ), seoTitle (type String ), seoDescription (type String ), createdAt (type Date ), content (type String , value is empty string), htmlContent (type String ), excerpt (type String , value is empty string), isFree (type Boolean ) to the document. If you forgot how to create a new document in Atlas, check up Chapter 2 where we manually created a user document in test.users collection.
Notice two important things:
- chapter parameter
bookIdshould have the same value asdummy-3book_id, - parameter
htmlContentis a HTML string. We need this parameter for testing since onReadChapterpage, we defined:
let htmlContent = '';
if (chapter) {
  htmlContent = chapter.htmlContent;
}
Look carefully at HTML string at htmlContent inside above chapter document. You will see many classes which start with hljs . In Chapter 6, we will convert markdown content content to HTML content htmlContent . When do so, we will add hljs classes to some elements inside <pre> and <code> tags. Open file ( pages/_document.js ), find line <link rel="stylesheet" href="https://storage.googleapis.com/builderbook/vs.min.css" /> .
This line adds styles that are responsible for adding different colors elements with hljs classes. We use Google Cloud CDN to add styles to our app.
In the same file ( pages/_document.js ), find following code:
blockquote {
  padding: 0 1em;
  color: #555;
  border-left: 0.25em solid #dfe2e5;
}
pre {
  display:block;
  overflow-x:auto;
  padding:0.5em;
  background:#FFF;
  color: #000;
  border: 1px solid #ddd;
}
code {
  font-size: 14px;
}
We introduced these styles in Chapter 1 when modifying <Document> of Next.js. These styles improve the way blockquote, code and pre tags look like.
We are ready to test.
Start your app ( yarn dev ), no need to log in, navigate to http://localhost:8000/books/dummy-3/introduction :
Instead of this page, you will encounter an error: Book.getBySlug is not a function.
When you load ReadChapter page, page’s code calls getChapterDetail method. getChapterDetail method sends request to /get-chapter-detail Express route. This route executes Chapter.getBySlug . Finally, Chapter.getBySlug calls Book.getBySlug . However, Book model is not available in server/models/Chapter.js because Book and Chapter models form so called circular dependency: Book model is imported to and used to define Chapter model, at the same time, Chapter model is imported to and used to define Book model. Read more on circular dependencies and how to deal with them here.
Since we don’t want to refactor models entirely, we chose one of the simplest solutions. We will import Book model at the very end of server/models/Chapter.js and we will import Chapter at the very end of server/models/Book.js .
After you made the above changes, you will have for Chapter model
server/models/Chapter.js :
/* eslint-disable no-use-before-define */

// some code

// const Book = require('./Book');


// some code

const Chapter = mongoose.model('Chapter', mongoSchema);

module.exports = Chapter;

const Book = require('./Book');
And for Book model
server/models/Book.js :
/* eslint-disable no-use-before-define */

// some code

// const Chapter = require('./Chapter');


// some code

const Book = mongoose.model('Book', mongoSchema);

module.exports = Book;

const Chapter = require('./Chapter');
We commented out imports at the top of the files to indicate that Chapter and Book models are circularly dependent. Also we added /* eslint-disable no-use-before-define */ at the beggining of each file to disable ESLint warning about defining variable after it was used.
Done with circular dependencies. If you see that page loads successfully with data that you added to DB then your are done implementing the most complex page in this book!
Good job!
In this chapter, you learned about data exchange between client and server. And you built two complete internal APIs for our app:
- you rendered a list of books on our
Adminpage (pages/admin/index.js), - you rendered chapter content on our
ReadChapterpage (public/read-chapter.js).
Building a complete internal API means that we handled data flow from page ( cookie , bookSlug , chapterSlug ) => API method => Express route => static method on Model and back to page ( book and chapter objects).
In the next chapter (Chapter 6), we will integrate our app with Github, add missing internal APIs for our Admin, and test out the entire Admin experience in our web application.
At the end of Chapter 5, your codebase should look like the codebase in 5-end . The 5-end folder is located at the root of the book directory inside the builderbook repo.
Compare your codebase and make edits if needed.
Enjoying the book so far? Please share a quick review. You can update your review at any time.