Chapter 7: Table of Contents. Highlight for section. Hide Header. Mobile browser.
-
Table of Contents
- Sections
- Sidebar
- Toggle TOC
-
Highlight for section
-
Hide Header
-
Mobile browser
Before you start working on Chapter 7, get the 7-start codebase. The 7-start folder is located at the root of the book directory inside the builderbook repo.
- If you haven’t cloned the builderbook repo yet, clone it to your local machine with
git clone https://github.com/builderbook/builderbook.git. - Inside the
7-startfolder, runyarnto install all packages.
Check out the package.json for Chapter 7.
- Be sure to use these specific packages and ignore any warnings about upgrading. We regularly upgrade all packages and test them in the book. But before testing, we cannot guarantee that a new package version will work properly.
Remember to include your .env at the root of your app.
In Chapter 5, you built the ReadChapter page, which displays the content of one chapter. In this chapter, we will make multiple improvements to this page.
For example, a user should be able to navigate between chapters and between sections within one chapter. To achieve that, we need to introduce a Table of Contents (TOC). The TOC should contain:
- hyperlinked sections within each chapter
- hyperlinked titles of all chapters
Here’s an example of what the TOC would look like:
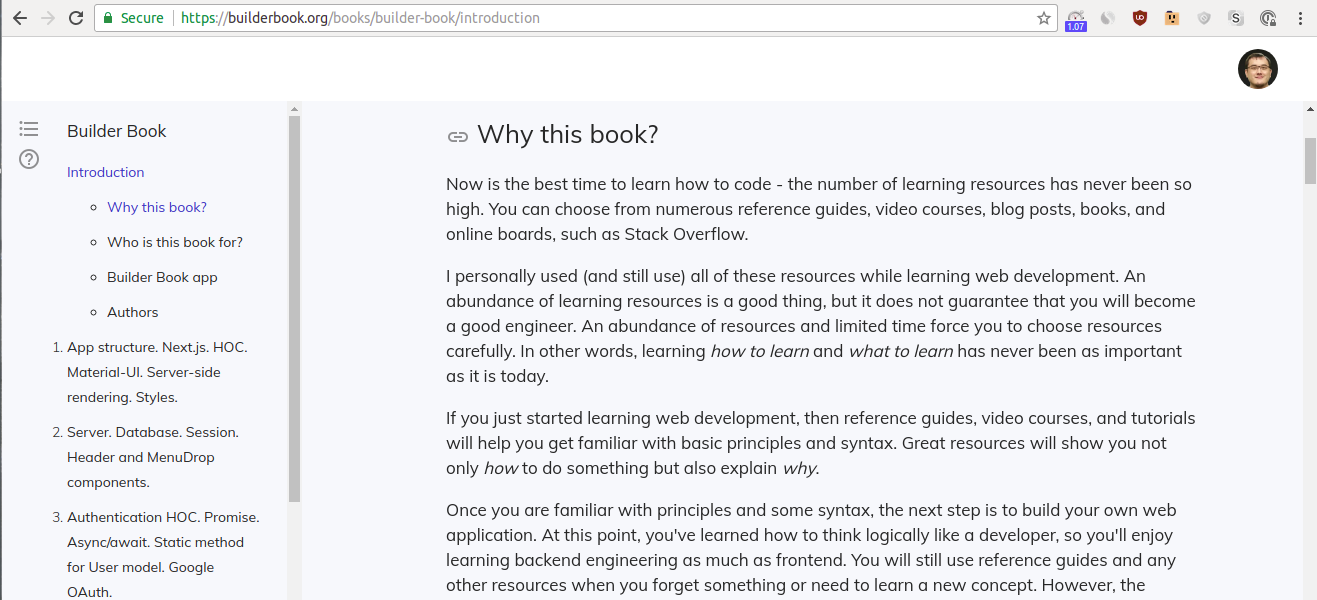
Table of Contents
On a high level, we will add the TOC to our ReadChapter page in two main steps. We will discuss and write:
-
renderSections()function that returns a list of hyperlinked sections within one chapter -
renderSidebar()function that returns a list of hyperlinked titles for all chapters and includesrenderSections()under each chapter’s title
We will add the renderSidebar() function to the ReadChapter component’s render() function and then test out the TOC.
Sections
In this subsection, we define the renderSections() function. This function returns a list of hyperlinked sections for one chapter.
Recall how we defined the sections parameter in our Chapter model. Open server/models/Chapter.js and look at the schema:
sections: [
  {
    text: String,
    level: Number,
    escapedText: String,
  },
],
Sections is an array of objects, and each object has text , level , and escapedText . Where do these three parameters come from? In the same server/models/Chapter.js file, find how we generate the sections array:
const sections = getSections(content);
Definition of getSections() :
function getSections(content) {
  const renderer = new marked.Renderer();

  const sections = [];

  renderer.heading = (text, level) => {
    if (level !== 2) {
      return;
    }

    const escapedText = text
      .trim()
      .toLowerCase()
      .replace(/[^\w]+/g, '-');

    sections.push({ text, level, escapedText });
  };

  marked.setOptions({
    renderer,
  });

  marked(he.decode(content));

  return sections;
}
Marked parses markdown content and finds headings with level equal to 2 (any heading that has ## ). For every heading, we push an object to the sections array:
sections.push({ text, level, escapedText })
In other words, if your markdown content has:
Why this book?
Then getSections(content) will return this array:
[
  {
    "text": "Why this book?",
    "level": 2,
    "escapedText": "why-this-book-"
  },
]
We will use text as text inside <a>{text}</a> and use escapedText for href . When a user clicks on a hyperlinked section inside the TOC, we want the page to scroll to the beginning of that section. In fact, when we wrote our markdownToHtml() function in Chapter 6, we defined the <h2> heading as follows:
if (level === 2) {
  return `<h${level} class="chapter-section" style="color: #222; font-weight: 400;">
    <a
      class="section-anchor"
      name="${escapedText}"
      href="#${escapedText}"
      style="color: #222;"
    >
      <i class="material-icons" style="vertical-align: middle; opacity: 0.5; cursor: pointer;">link</i>
    </a>
    ${text}
  </h${level}>`;
}
Let’s say we have the heading ## Why this book? in our markdown content. When user a clicks on the link icon next to that heading, two things will happen:
- the URL in the browser address bar gets
#why-this-book-appended to it - the page scrolls to the beginning of that section because
<a>has the name attribute
We want to get the exact same behaviour when a user clicks on the hyperlinked section text inside our TOC. Thus we get:
<a href={`#${s.escapedText}`}>
  {s.text}
</a>
Keep in mind that sections is an array. Thus, you should use JavaScript’s method .map():
<ul>
  {sections.map(s => (
    <li key={s.escapedText} style={{ paddingTop: '10px' }}>
      <a href={`#${s.escapedText}`}>
        {s.text}
      </a>
    </li>
  ))}
</ul>
You already used this method earlier in this book. Check out books.map() in pages/admin/index.js .
At this point, the main part of our renderSection() function is actually done.
Open pages/public/read-chapter.js . Remember that we send a chapter object to a page with:
const chapter = await getChapterDetail()
And then we set the initial state of our ReadChapter page component with:
this.state = {
  chapter,
  htmlContent,
};
Now let’s use ES6 object destructuring to define sections as this.state.chapter.sections :
const { sections } = this.state.chapter
Also, let’s return null if the section array does not exist or has zero objects:
if (!sections || !sections.length === 0) {
  return null;
}
Put together these two code snippets, plus return a list of hyperlinked sections, and you get:
renderSections() {
  const { sections } = this.state.chapter;

  if (!sections || !sections.length === 0) {
    return null;
  }

  return (
    <ul>
      {sections.map(s => (
        <li key={s.escapedText} style={{ paddingTop: '10px' }}>
          <a href={`#${s.escapedText}`}>
            {s.text}
          </a>
        </li>
      ))}
    </ul>
  );
}
Good job if you got the same result. We’ll add this to our read-chapter.js page at the end of the next subsection.
Sidebar
In this subsection, we discuss the renderSidebar() function that returns a list of hyperlinked titles for all chapters. We will then add our renderSection() function from above to add a list of all sections under each chapter title.
Similar to how we defined renderSections() , we will use list, list item, and anchor elements together with the JavaScript method .map() for our renderSidebar() function:
renderSidebar() {
  return (
    <div>
      <p>{book.name}</p>
      <ol>
        {chapters.map((ch, i) => (
          <li key={ch._id} role="presentation">
            <Link
              prefetch
              as={`/books/${book.slug}/${ch.slug}`}
              href={`/public/read-chapter?bookSlug=${book.slug}&chapterSlug=${ch.slug}`}
            >
              <a>{ch.title}</a>
            </Link>
          </li>
        ))}
      </ol>
    </div>
  );
}
The only differences are:
- instead of an unordered list
<ul>, we use an ordered list<ol> - we wrap the anchor
<a>with Next.js’s<Link>, so we can take advantage of theprefetchfeature in production - we also display the book name on the top of the TOC with
<p>{book.name}</p>
Time to add renderSections() to renderSidebar() to our code. In doing so, we should think about creating good UX. Do we want every chapter to have a list of sections on the TOC? That might be an overwhelming amount of information.
It’s sufficient to show sections for only the chapter that is currently rendered on the ReadChapter page. In other words, if the chapter id from the page’s state ( chapter._id ) equals the chapter id from the list ( ch._id ), then we display the list of sections. Otherwise, we return null:
{chapter._id === ch._id ? this.renderSections() : null}
Add this line of code right after the hyperlinked title of the chapter in the ReadChapter page:
renderSidebar() {
  return (
    <div>
      <p>{book.name}</p>
      <ol>
        {chapters.map((ch, i) => (
          <li key={ch._id} role="presentation">
            <Link
              prefetch
              as={`/books/${book.slug}/${ch.slug}`}
              href={`/public/read-chapter?bookSlug=${book.slug}&chapterSlug=${ch.slug}`}
            >
              <a>{ch.title}</a>
            </Link>
            {chapter._id === ch._id ? this.renderSections() : null}
          </li>
        ))}
      </ol>
    </div>
  );
}
Alright, the main part of our renderSidebar() function is done. However, if you look at the code above, you may notice that we have not defined the following three variables:
-
chapter(we used it inchapter._id) -
book(used inbook.name) -
chapters(used inchapters.map())
Let’s discuss in more detail.
- Defining
chapteris easy, since we initiatestatewithchapterin it. Thus:
const { chapter } = this.state;
- To understand how to define
book, we should look into how we definechapter. Inpages/public/read-chapter.js, find the line:
const chapter = await getChapterDetail()
The API method getChapterDetail() sends a request to our Express route router.get('/get-chapter-detail') . Open server/api/public.js and find this Express route:
router.get('/get-chapter-detail', async (req, res) => {
 try {
   const { bookSlug, chapterSlug } = req.query;
   const chapter = await Chapter.getBySlug({
     bookSlug,
     chapterSlug,
   });
   res.json(chapter);
 } catch (err) {
   res.json({ error: err.message || err.toString() });
 }
});
Ok, now we remember that chapter gets returned by the Chapter.getBySlug static method. Let’s look back at that method. Open server/models/Chapter.js and find getBySlug() static method:
static async getBySlug({ bookSlug, chapterSlug }) {
 const book = await Book.getBySlug({ slug: bookSlug, userId });
 if (!book) {
   throw new Error('Book not found');
 }

 const chapter = await this.findOne({ bookId: book._id, slug: chapterSlug });

 if (!chapter) {
   throw new Error('Chapter not found');
 }

 const chapterObj = chapter.toObject();
 chapterObj.book = book;

 return chapterObj;
}
Aha! So the book object is part of the chapter object! Because chapterObj.book = book; and const chapter = await getChapterDetail() , then:
const book = chapter.book
Or with ES6 object destructuring:
const { book } = chapter
- To define
chapters, we need to dig a bit deeper. InsideChapter.getBySlug(), we definedbookas follows:
const book = await Book.getBySlug()
Open server/models/Book.js and find the static method getBySlug() :
static async getBySlug({ slug }) {
 const bookDoc = await this.findOne({ slug });
 if (!bookDoc) {
   throw new Error('Book not found');
 }

 const book = bookDoc.toObject();

 book.chapters = (await Chapter.find({ bookId: book._id }, 'title slug')
   .sort({ order: 1 }))
   .map(chapter => chapter.toObject());
 return book;
}
We can clearly see that the chapters object is part of the book object. Thus:
const chapters = chapter.book.chapters
Or with ES6 object destructuring:
const { chapters } = book
Put these definitions of chapter , book , and chapters into renderSidebar() :
renderSidebar() {
  const {  chapter } = this.state;

  const { book } = chapter;
  const { chapters } = book;

  return (
    <div>
      <p>{book.name}</p>
      <ol>
        {chapters.map((ch, i) => (
          <li key={ch._id} role="presentation">
            <Link
              prefetch
              as={`/books/${book.slug}/${ch.slug}`}
              href={`/public/read-chapter?bookSlug=${book.slug}&chapterSlug=${ch.slug}`}
            >
              <a>{ch.title}</a>
            </Link>
            {chapter._id === ch._id ? this.renderSections() : null}
          </li>
        ))}
      </ol>
    </div>
  );
}
This book assumes that you have basic knowledge of CSS, so we won’t discuss styling in great detail. Below, we simply added inline CSS to style some HTML elements:
renderSidebar() {
  const {  chapter } = this.state;

  const { book } = chapter;
  const { chapters } = book;

  return (
    <div
      style={{
        textAlign: 'left',
        position: 'absolute',
        bottom: 0,
        top: '64px',
        left: 0,
        overflowY: 'auto',
        overflowX: 'hidden',
        width: '400px',
        padding: '0px 25px',
      }}
    >
      <p style={{ padding: '0px 40px', fontSize: '17px', fontWeight: '400' }}>{book.name}</p>
      <ol start="0" style={{ padding: '0 25', fontSize: '14px', fontWeight: '300' }}>
        {chapters.map((ch, i) => (
          <li
            key={ch._id}
            role="presentation"
            style={{ listStyle: i === 0 ? 'none' : 'decimal', paddingBottom: '10px' }}
          >
            <Link
              prefetch
              as={`/books/${book.slug}/${ch.slug}`}
              href={`/public/read-chapter?bookSlug=${book.slug}&chapterSlug=${ch.slug}`}
            >
              <a style={{ color: chapter._id === ch._id ? '#1565C0' : '#222' }}>{ch.title}</a>
            </Link>
            {chapter._id === ch._id ? this.renderSections() : null}
          </li>
        ))}
      </ol>
    </div>
  );
}
The ternary operator on styles is worth mentioning. We’ve used the ternary operator many times before, and you can use it inside inline styles:
condition ? value1 : value2
Look at the style of a list item in <li> :
style={{ listStyle: i === 0 ? ‘none’ : ‘decimal’ }}
If a list item has an index of zero, then the list style type is none .
If a list item has an index other than zero, then the list style type is decimal .
This will ensure that our rendered TOC looks like:
Introduction
1. App structure...
The Introduction chapter won’t have a number as a list item marker, but the rest of the chapters will.
Another use of the ternary operator:
style={{ color: chapter._id === ch._id ? ‘#1565C0’ : ‘#222’ }}
This allows us to highlight the chapter title of only the currently rendered chapter on the ReadChapter page. For example, if a reader is on Chapter 7, then the TOC will only highlight the title of Chapter 7.
At this point, we are ready to add our renderSections() and renderSidebar() functions to the ReadChapter page.
Add these functions to the pages/public/read-chapter.js file like this:
pages/public/read-chapter.js :
import React from 'react';
import PropTypes from 'prop-types';
import Error from 'next/error';
import Head from 'next/head';
import Link from 'next/link';

import { getChapterDetail } from '../../lib/api/public';
import withLayout from '../../lib/withLayout';
import withAuth from '../../lib/withAuth';

const styleIcon = {
  opacity: '0.75',
  fontSize: '24px',
  cursor: 'pointer',
};

class ReadChapter extends React.Component {
  static propTypes = {
    chapter: PropTypes.shape({
      _id: PropTypes.string.isRequired,
    }),
  };

  static defaultProps = {
    chapter: null,
  };

  constructor(props) {
    super(props);

    const { chapter } = props;

    let htmlContent = '';
    if (chapter) {
      htmlContent = chapter.htmlContent;
    }

    this.state = {
      chapter,
      htmlContent,
    };
  }

  componentWillReceiveProps(nextProps) {
    const { chapter } = nextProps;

    if (chapter && chapter._id !== this.props.chapter._id) {
      const { htmlContent } = chapter;
      this.setState({ chapter, htmlContent });
    }
  }

  static async getInitialProps({ req, query }) {
    const { bookSlug, chapterSlug } = query;

    const headers = {};
    if (req && req.headers && req.headers.cookie) {
      headers.cookie = req.headers.cookie;
    }

    const chapter = await getChapterDetail({ bookSlug, chapterSlug }, { headers });

    return { chapter };
  }

  renderMainContent() {
    const { chapter, htmlContent } = this.state;

    return (
      <div>
        <h2>Chapter: {chapter.title}</h2>

        <div className="main-content" dangerouslySetInnerHTML={{ __html: htmlContent }} />
      </div>
    );
  }

  renderSections() {
    const { sections } = this.state.chapter;

    if (!sections || !sections.length === 0) {
      return null;
    }

    return (
      <ul>
        {sections.map(s => (
          <li key={s.escapedText} style={{ paddingTop: '10px' }}>
            <a href={`#${s.escapedText}`}>
              {s.text}
            </a>
          </li>
        ))}
      </ul>
    );
  }

  renderSidebar() {
    const {  chapter } = this.state;

    const { book } = chapter;
    const { chapters } = book;

    return (
      <div
        style={{
          textAlign: 'left',
          position: 'absolute',
          bottom: 0,
          top: '64px',
          left: 0,
          overflowY: 'auto',
          overflowX: 'hidden',
          width: '400px',
          padding: '0px 25px',
        }}
      >
        <p style={{ padding: '0px 40px', fontSize: '17px', fontWeight: '400' }}>{book.name}</p>
        <ol start="0" style={{ padding: '0 25', fontSize: '14px', fontWeight: '300' }}>
          {chapters.map((ch, i) => (
            <li
              key={ch._id}
              role="presentation"
              style={{ listStyle: i === 0 ? 'none' : 'decimal', paddingBottom: '10px' }}
            >
              <Link
                prefetch
                as={`/books/${book.slug}/${ch.slug}`}
                href={`/public/read-chapter?bookSlug=${book.slug}&chapterSlug=${ch.slug}`}
              >
                <a style={{ color: chapter._id === ch._id ? '#1565C0' : '#222' }}>{ch.title}</a>
              </Link>
              {chapter._id === ch._id ? this.renderSections() : null}
            </li>
          ))}
        </ol>
      </div>
    );
  }


  render() {
    const { chapter } = this.state;

    if (!chapter) {
      return <Error statusCode={404} />;
    }

    return (
      <div>
        <Head>
          <title>
            {chapter.title === 'Introduction'
              ? 'Introduction'
              : `Chapter ${chapter.order - 1}. ${chapter.title}`}
          </title>
          {chapter.seoDescription ? (
            <meta name="description" content={chapter.seoDescription} />
          ) : null}
        </Head>

        {this.renderSidebar()}

        <div
          style={{
            textAlign: 'left',
            padding: '0px 10px 20px 30px',
            position: 'fixed',
            right: 0,
            bottom: 0,
            top: '64px',
            left: '400px',
            overflowY: 'auto',
            overflowX: 'hidden',
          }}
          id="main-content"
        >
          {this.renderMainContent()}
        </div>

        <div
          style={{
            position: 'fixed',
            top: '80px',
            left: '15px',
          }}
        >
          <i // eslint-disable-line
            className="material-icons"
            style={styleIcon}
          >
            format_list_bulleted
          </i>
        </div>
      </div>
    );
  }
}

export default withAuth(withLayout(ReadChapter), { loginRequired: false });
Notice that we added the Material icon format_list_bulleted that does nothing at this point.
Time to test, we will test using the book made from the /demo-book repo (see Chapter 6).
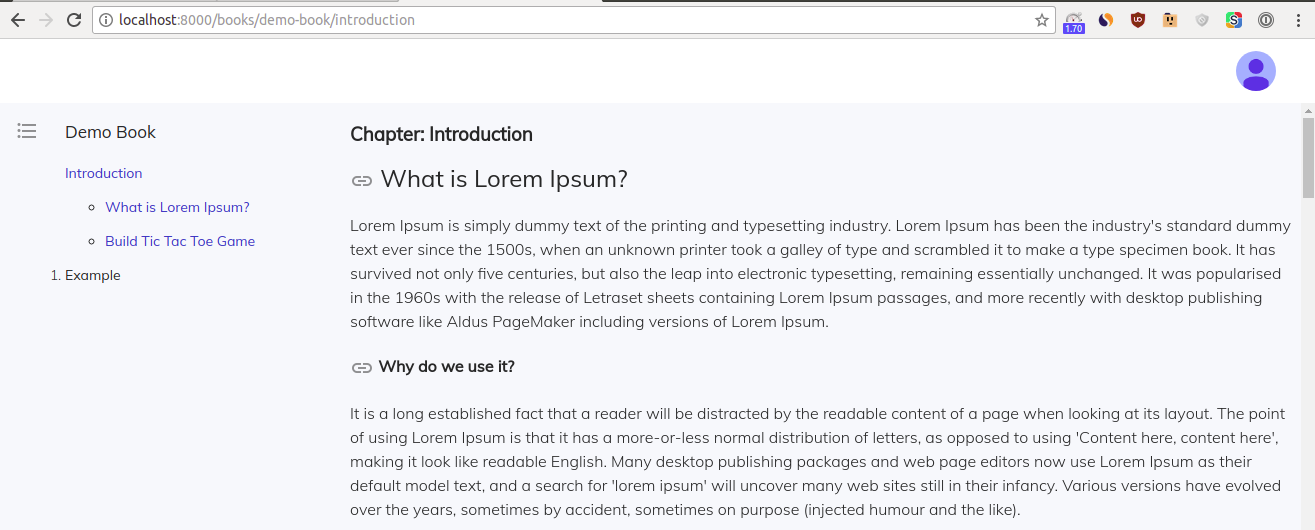
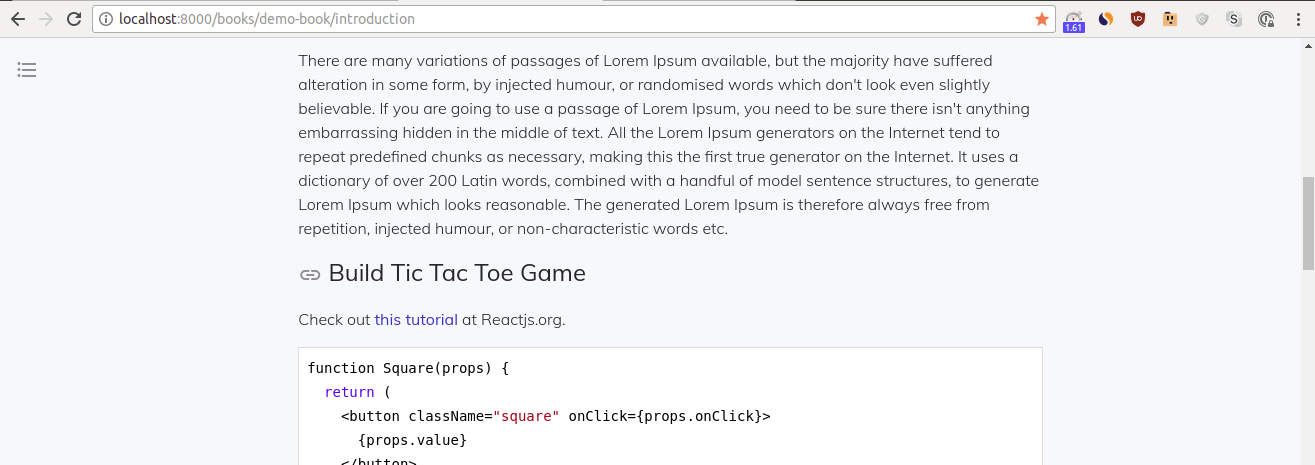
Start your app with yarn dev and go to http://localhost:8000/books/demo-book/introduction :
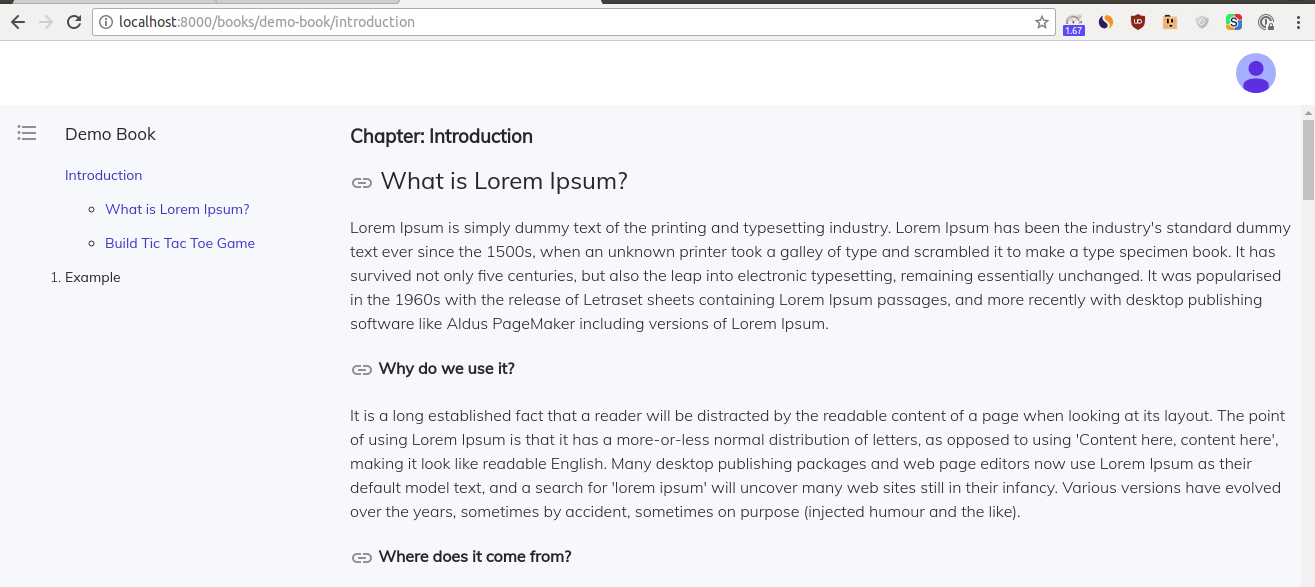
Not bad! Try clicking on sections within the Introduction. Also try clicking “Example”, the title of Chapter 1.
Having the TOC always present is not good UX, since it takes attention away from the main content. In the next subsection, let’s add a boolean parameter that allows a reader to hide/reveal the TOC.
Toggle TOC
In this subsection, we want make the TOC closed on the initial load of the ReadChapter page. The easiest way to achieve this is to introduce a showTOC boolean parameter and set it to false when we initiate state. The page’s constructor becomes:
constructor(props, ...args) {
  super(props, ...args);

  const { chapter } = props;

  let htmlContent = '';
  if (chapter) {
    htmlContent = chapter.htmlContent;
  }

  this.state = {
    showTOC: false,
    chapter,
    htmlContent,
  };
}
Next, modify the renderSidebar() function. This line:
const { chapter } = this.state;
Becomes:
const { showTOC, chapter } = this.state;
Under this line, add a code snippet that ensures that renderSidebar() returns null when showTOC is false:
if (!showTOC) {
  return null;
}
This code snippet above will ensure that the TOC is closed on initial page load.
Next, we want to define a function that gets executed when a user clicks on on format_list_bulleted icon:
toggleChapterList = () => {
  this.setState({ showTOC: !this.state.showTOC });
};
Add this toggleChapterList function right before the line that has:
renderMainContent()
Clicking on an icon should change showTOC from its default false value to true . Modify our icon code for format_list_bulleted like this:
<i // eslint-disable-line
  className="material-icons"
  style={styleIcon}
  onClick={this.toggleChapterList}
  onKeyPress={this.toggleChapterList}
  role="button"
>
  format_list_bulleted
</i>
Start your app with yarn dev and go to http://localhost:8000/books/demo-book/introduction .
Initial load:
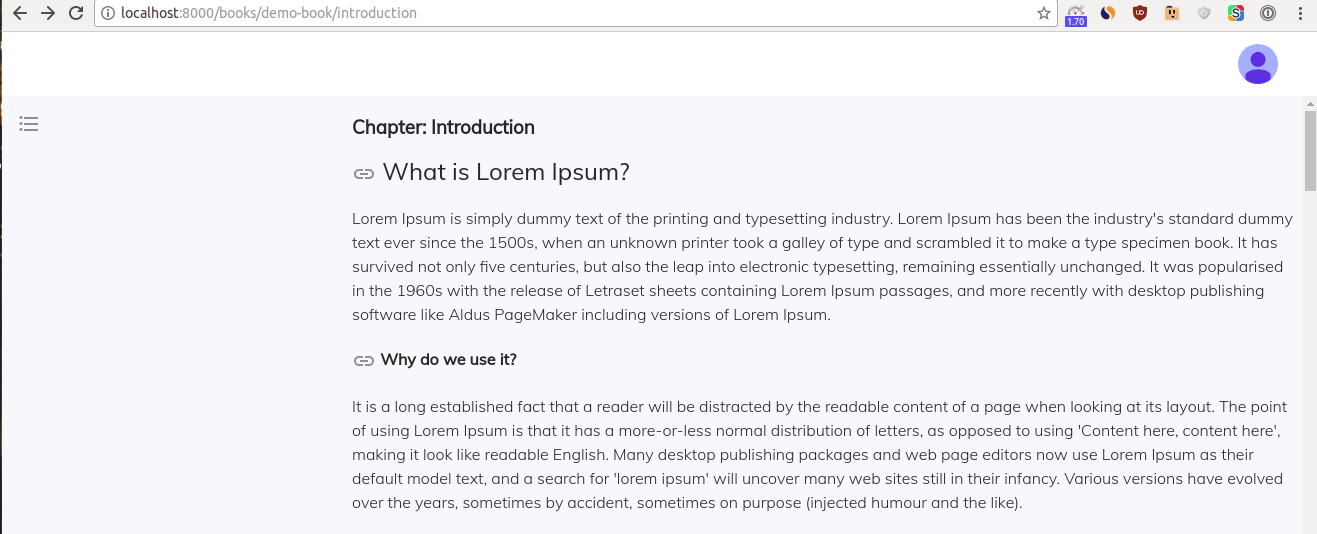
After clicking the format_list_bulleted icon:
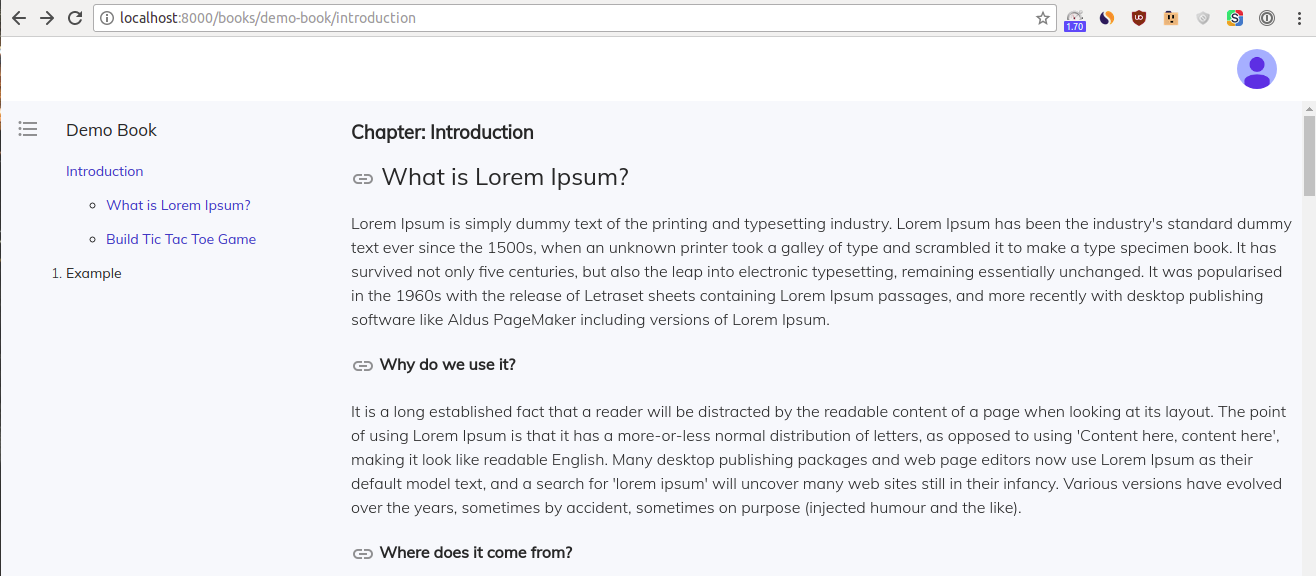
Nice, this is much better than having an open TOC at all times.
In the next section, we will make another UX improvement for our TOC.
Highlight for section
In the previous section, we highlighted a chapter title on the TOC with a blue color if that chapter was rendered on the page. This is a nice feature that helps a user navigate a book:
In this snapshot, you see that the TOC highlights Introduction , since the page shows the Introduction chapter.
However, you’ll notice that both sections within the Introduction chapter are highlighted as well. It would be great if our TOC highlights only one section from the chapter - the section that is currently in view. That way, the highlighted section tells a user which particular section he/she is reading.
To highlight a section, we need to somehow detect if a particular section inside our content is in view.
Active section
In Chapter 6, when we wrote the markdownToHtml() function inside our server/models/Chapter.js file, we specified the following rule for conversion of the <h2> heading:
if (level === 2) {
  return `<h${level} class="chapter-section" style="color: #222; font-weight: 400;">
    <a
      name="${escapedText}"
      href="#${escapedText}"
      style="color: #222;"
    >
      <i class="material-icons" style="vertical-align: middle; opacity: 0.5; cursor: pointer;">link</i>
    </a>
    <span class="section-anchor" name="${escapedText}">
      ${text}
    </span>
  </h${level}>`;
}
Back in Chapter 6, we added class="section-anchor" to the <span> element without explaining why. We will use this class to detect all <span> elements and match them to sections in the TOC. When matched, we will highlight corresponding section in the TOC.
Each chapter has multiple <h2> headings (i.e. sections). To highlight a particular section inside the TOC, we need to know which <span> element with the class section-anchor is in view. Once we know which <span> element is in view, we extract the ${escapedText} value from the name attribute of this <span> element.
After we know the ${escapedText} value of the <span> element in view, we can compare it to the ${s.escapedText} value of the section inside the TOC. If the values match, we highlight that section in the TOC with a blue color.
To detect which <span> element is in view, we should do the following:
- on every scroll event, execute an
onScrollfunction - find all
span.section-anchorelements inside thisonScrollfunction, then create anactiveSectionobject and add the${s.escapedText}value to it asactiveSection.hash - set state with
activeSection - write a conditional style with the ternary operator to highlight a section on the TOC
- properly detect which element is in view and consider all edge cases
Below we discuss each step in detail.
- To detect a scroll event, we use JavaScript’s addEventListener and type
scroll:
document.getElementById(‘main-content’).addEventListener(‘scroll’);
To execute a function ( onScroll ) on every scroll event:
document.getElementById(‘main-content’).addEventListener(‘scroll’, this.onScroll);
Important: add id="main-content" to the <div> element that is located right below the <Head>...</Head> element inside render() at pages/public/read-chapter.js . If you don’t add this line, then scrolling won’t be detected.Since we detect a scroll event on the client (browser), we should place code inside the componentDidMount() lifecycle hook:
componentDidMount() {
 document.getElementById('main-content').addEventListener('scroll', this.onScroll);
}
When a user navigates to a new page, the app does not need to listen for scrolling events on this new page. Thus, we should remove the event listener with:
componentWillUnmount() {
 document.getElementById('main-content').removeEventListener('scroll', this.onScroll);
}
Add the following code snippet right after constructor :
componentDidMount() {
 document.getElementById('main-content').addEventListener('scroll', this.onScroll);
}

componentWillUnmount() {
 document.getElementById('main-content').removeEventListener('scroll', this.onScroll);
}
- In this step, let’s create a basic version of our
onScrollfunction:
onScroll = () => {
 // some code
};
We need to detect all <span> elements with class="section-anchor" :
const sectionElms = document.querySelectorAll(‘span.section-anchor’);
Let’s define an activeSection object as:
let activeSection;

activeSection = {
 hash: s.attributes.getNamedItem('name').value,
};
Method getNamedItem(‘name’).value gets us the value of the name attribute.We can use a for loop to run code for every <span> element:
let activeSection;

for (let i = 0; i < sectionElms.length; i += 1) {
 const s = sectionElms[i];

 activeSection = {
   hash: s.attributes.getNamedItem('name').value,
 };
}
Put these code snippets together, and you get:
onScroll = () => {
 const sectionElms = document.querySelectorAll('span.section-anchor');

 let activeSection;

 for (let i = 0; i < sectionElms.length; i += 1) {
   const s = sectionElms[i];

   activeSection = {
     hash: s.attributes.getNamedItem('name').value,
   };
 }

};
- This one is easy, simply add
this.setState({ activeSection })at the end of theonScrollfunction:
onScroll = () => {
 const sectionElms = document.querySelectorAll('span.section-anchor');

 let activeSection;

 for (let i = 0; i < sectionElms.length; i += 1) {
   const s = sectionElms[i];

   activeSection = {
     hash: s.attributes.getNamedItem('name').value,
   };
 }

 this.setState({ activeSection });
};
Add this function after the componentWillUnmount() lifecycle hook in pages/public/read-chapter.js .
4. Inside the renderSections() function ( pages/public/read-chapter.js ), after line:
const { sections } = this.state.chapter;
Add:
const { activeSection } = this.state;
console.log(activeSection);
Inside the renderSections() function, add a conditional style to the <a> element with the ternary operator. If activeSection exists and if activeSection.hash equals s.escaptedText (we take this value from our database with chapter.sections.map(s => ..) ) - then we highlight the section ( s.text ) with a blue color:
<a
 href={`#${s.escapedText}`}
 style={{
   color: activeSection && activeSection.hash === s.escapedText ? '#1565C0' : '#222',
 }}
>
 {s.text}
</a>
Before we move to final step (step 5), we should test what we have so far.Start your app with yarn dev and navigate to http://localhost:8000/books/demo-book/introduction . Open the browser console ( Developer tools > Console ) and then open the TOC.Scroll down the chapter and look at the browser console:
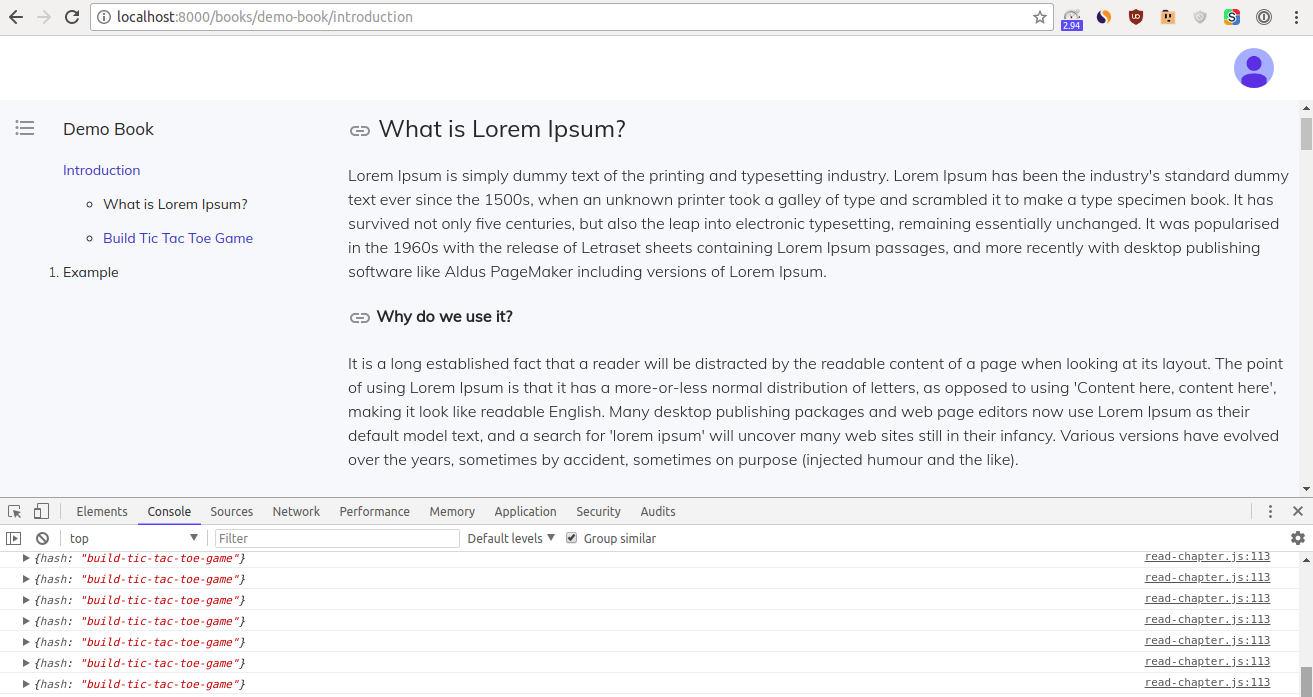
activeSection objects printed on your browser console:
{hash: “build-tic-tac-toe-game”}
That’s the expected behavior - good job if you see it! However we should consider some improvements. For example, even a small scroll results in over two dozen of activeSection objects. That means a small scroll fires the onScroll function over two dozen times. This is overkill. A common way to throttle a function in JavaScript applications is to use throttle from lodash. Let’s update our onScroll function like this:
onScroll = throttle(() => {
 const sectionElms = document.querySelectorAll('span.section-anchor');

 let activeSection;

 for (let i = 0; i < sectionElms.length; i += 1) {
   const s = sectionElms[i];

   activeSection = {
     hash: s.attributes.getNamedItem('name').value,
   };
 }

 this.setState({ activeSection });
}, 500);
Remember to add the missing import:
import throttle from ‘lodash/throttle’;
This is better - with throttle, the function will fire only once per every 500 milliseconds.Go to http://localhost:8000/books/demo-book/introduction . Refresh the tab, open the TOC, and open the browser console.
Scroll down the chapter - now with throttle, a small scroll only prints a few activeSection objects to your browser console. Exactly what we want.You may have noticed that the activeSection object printed to the browser console is always:
{hash: “build-tic-tac-toe-game”}
We never see an activeSection for the first <span> element ( What is Lorem Ipsum? ).Also you must have noticed that the TOC highlights the Build Tic Tac Toe Game section only. The TOC never highlights the What is Lorem Ipsum? section.That’s because our for loop runs without break. For loop runs for i=0, then for i=1, and the final result is activeSection :
{hash: "build-tic-tac-toe-game"} In other words, the way we wrote our onScroll function will always highlight the last section in a chapter. Obviously, we did not finish writing the onScroll function. In the next step, let’s discuss how to highlight the proper section.
5. We need to find the position of the <span> element and compare it to the top and bottom of the window. To get the relative position of an element, we can use the getBoundingClientRect() method. Modify the onScroll function like this:
onScroll = throttle(() => {
 const sectionElms = document.querySelectorAll('span.section-anchor');
 let activeSection;

 for (let i = 0; i < sectionElms.length; i += 1) {
   const s = sectionElms[i];
   const b = s.getBoundingClientRect();

   const anchorTop = b.top;
   const anchorBottom = b.bottom;

   console.log(i, anchorTop, anchorBottom, window.innerHeight);

 }

 this.setState({ activeSection });
}, 500);
This new code is self-explanatory, except perhaps window.innerHeight, which outputs the height of the current window. The relative positions of an element from the top and bottom of the window are anchorTop and anchorBottom , respectively.Before we test the onScroll function above, comment out the following line of code inside the renderSections() function:
// console.log(activeSection);
Start your app with yarn dev and navigate to http://localhost:8000/books/demo-book/introduction . Open the browser console ( Developer tools > Console ) and then open the TOC.Scroll a bit and look at the console:
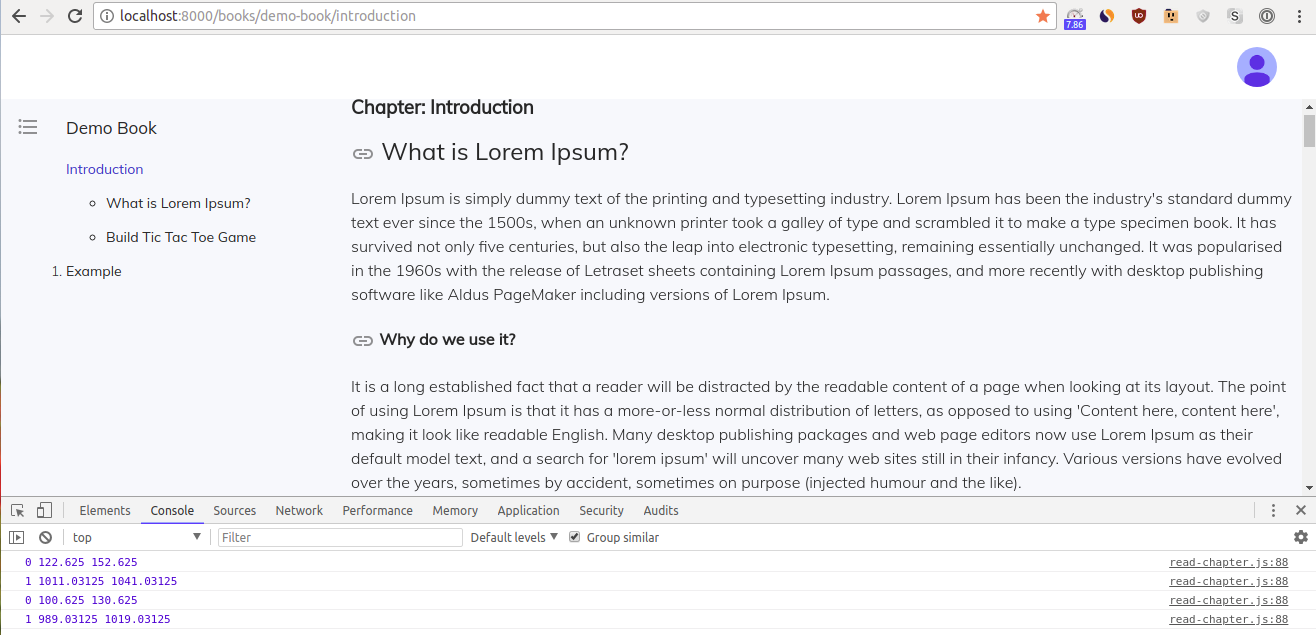
You see that the browser console outputs the relative positions of the <span> elements What is Lorem Ipsum? ( i=0 ) and Build Tic Tac Toe Game ( i=1 ). The first number is the index of the element, second number is the distance to the top of the window (px), third number is the distance to the bottom of the window (px), and last number is the height of the window (px):
  0 122.625 152.625 461
  1 1011.03125 1041.03125 461
  0 100.625 130.625 461
  1 989.03125 1019.03125 461
Scroll down and try to note trends in the values for the relative positions. For the sake of discussion, let’s only focus on one element, <span>Build Tic Tac Toe Game</span> ( i=1 ). For now, modify your onScroll function to include a line if (i === ) as shown below:
  onScroll = throttle(() => {
    const sectionElms = document.querySelectorAll('span.section-anchor');
    let activeSection;

    for (let i = 0; i < sectionElms.length; i += 1) {
      const s = sectionElms[i];
      const b = s.getBoundingClientRect();

      const anchorTop = b.top;
      const anchorBottom = b.bottom;

      if (i === 1) {
        console.log(i, anchorTop, anchorBottom, window.innerHeight);
      }

    }

    this.setState({ activeSection });
  }, 500);
Start your app with yarn dev and navigate to http://localhost:8000/books/demo-book/introduction . Open the browser console ( Developer tools > Console ) and then open the TOC.
Scroll a bit and look at the console:
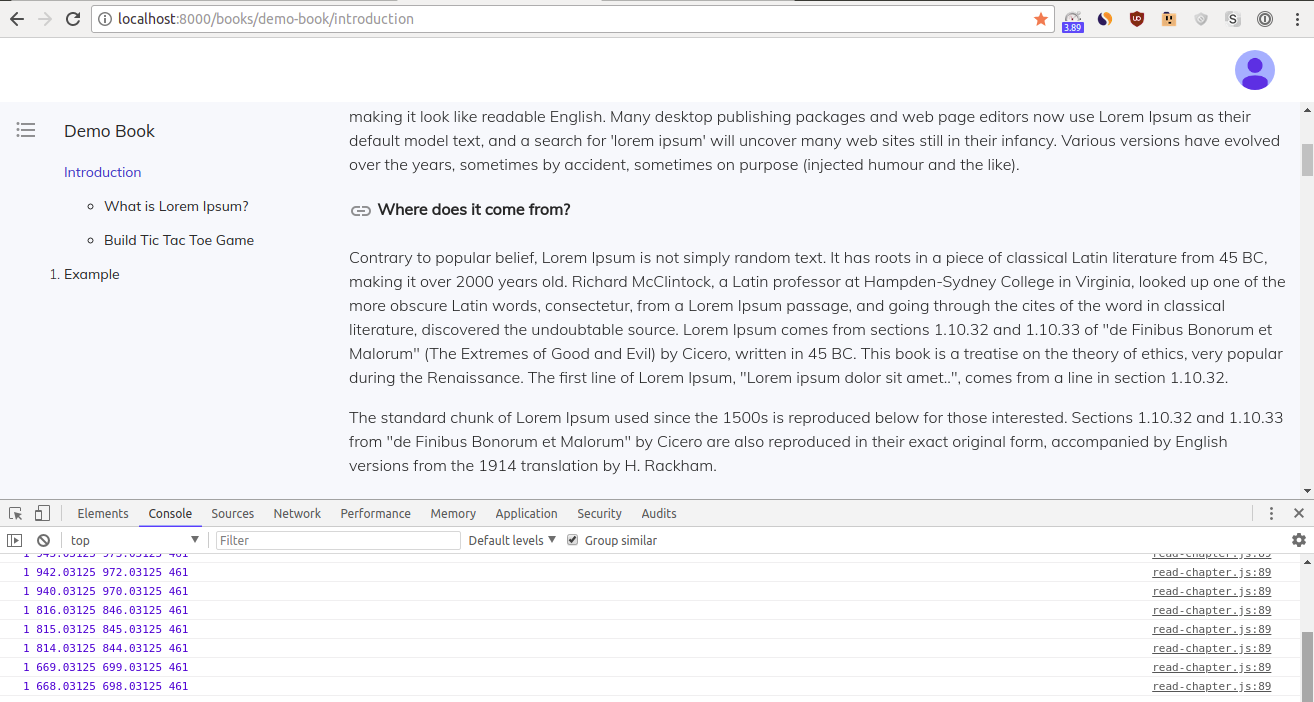
You see that the anchorTop and anchorBottom distances of the i=1 element go down as you scroll. As expected, no changes occur in the value of window.innerHeight (we did not change the height of the window).
As you keep scrolling, you will notice that you begin to see <span>Build Tic Tac Toe Game</span> when anchorBottom equals window.innerHeight . As you keep scrolling, anchorBottom becomes 0 when the <span> element disappears for the first time.
This makes perfect sense, because anchorBottom ( or getBoundingClientRect().bottom) is the distance between the bottom border of an element and upper border of the window. The length of the red line in this snapshot is anchorBottom :
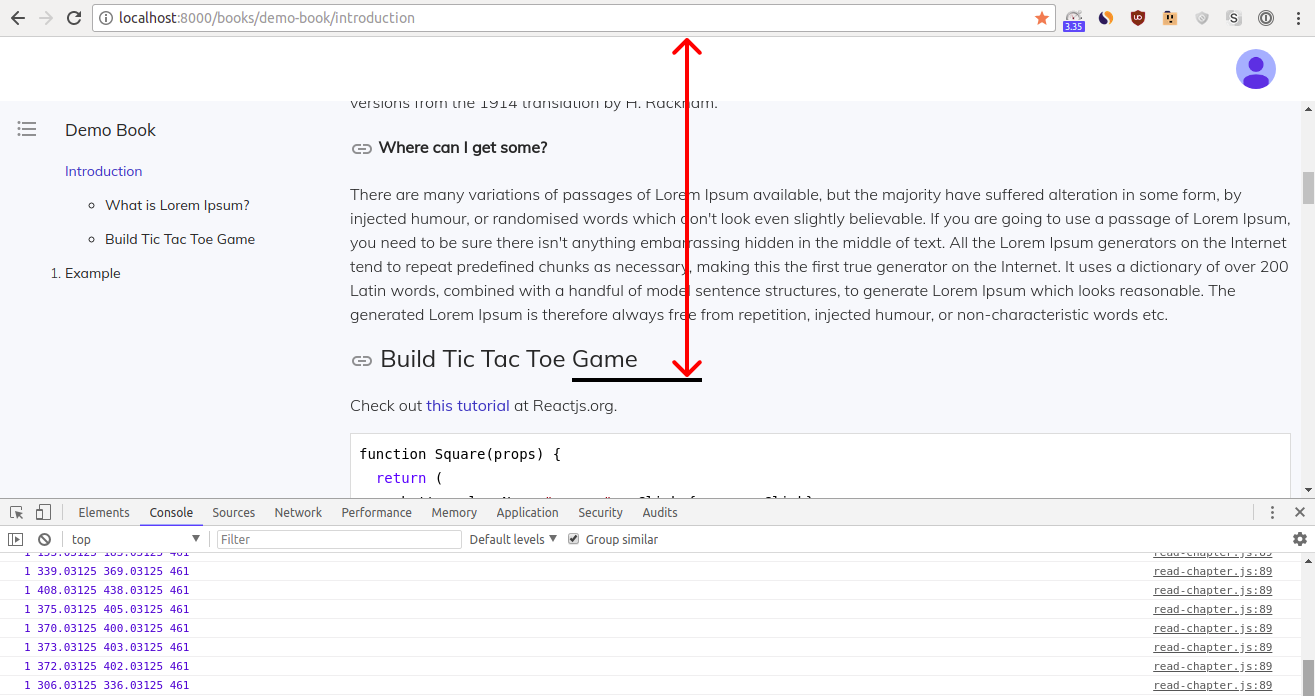
By combining these two conditions we just explained, we conclude that the section element is in view when:
anchorBottom >= 0 && anchorBottom <= window.innerHeight
When a section element is in view, let’s simply pass the value of the name attribute of <span> to activeSection.hash :
  if (anchorBottom >= 0 && anchorBottom <= window.innerHeight) {
    activeSection = {
      hash: s.attributes.getNamedItem('name').value,
    };

    break;
  }
When a section element is not in view and is below the lower border of the window, then:
anchorBottom > window.innerHeight
To visualize this, you can see how the length of the red line ( anchorBottom ) is longer than the height of window ( window.innerHeight ) when our <span>Build Tic Tac Toe Game</span> element is below the lower border of the window:
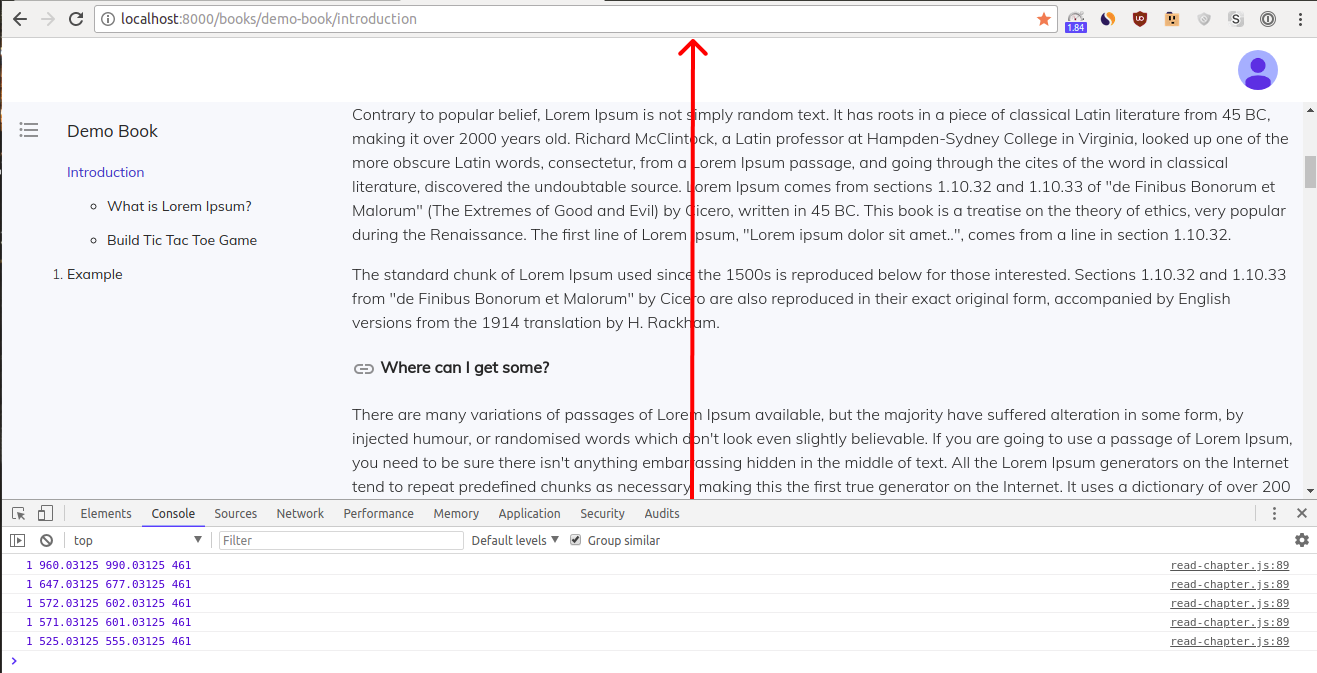
When a section element is not in view and below the lower border of the window, we want to highlight the previous section, sectionElms[i - 1] , instead of sectionElms[i] :
  if (anchorBottom > window.innerHeight && i > 0) {
    if (sectionAbove.bottom <= 0) {
      activeSection = {
        hash: sectionElms[i - 1].attributes.getNamedItem('name').value,
      };
      break;
    }
  } else if (i + 1 === sectionElms.length) {
    activeSection = {
      hash: s.attributes.getNamedItem('name').value,
    };
  }

  sectionAbove = b;
In other words, when <span>Build Tic Tac Toe Game</span> is below the lower border of the window, we want the TOC to highlight the previous section ( [i-1] ), which is <span>What is Lorem Ipsum?</span> . Once hash gets a value, we break the for loop .
When a section element is below the lower border of the window ( anchorBottom > window.innerHeight ) and there is a section element above the upper border of the window( sectionAbove.bottom <= 0 ), then we want to highlight the [i-1] section. We use the i > 0 condition, since the very first section element has no section above it.
Another special case is the very last section element ( i + 1 === sectionElms.length ). The very last section element has no section below it, so the code with condition anchorBottom > window.innerHeight won’t work. Thus we added:
  else if (i + 1 === sectionElms.length) {
    activeSection = {
      hash: s.attributes.getNamedItem('name').value,
    };
  }
After following steps 1-5, you get the final version of the onScroll function:
onScroll = throttle(() => {
  const sectionElms = document.querySelectorAll('span.section-anchor');
  let activeSection;

  let sectionAbove;
  for (let i = 0; i < sectionElms.length; i += 1) {
    const s = sectionElms[i];
    const b = s.getBoundingClientRect();
    const anchorBottom = b.bottom;

    if (anchorBottom >= 0 && anchorBottom <= window.innerHeight) {
      activeSection = {
        hash: s.attributes.getNamedItem('name').value,
      };

      break;
    }

    if (anchorBottom > window.innerHeight && i > 0) {
      if (sectionAbove.bottom <= 0) {
        activeSection = {
          hash: sectionElms[i - 1].attributes.getNamedItem('name').value,
        };
        break;
      }
    } else if (i + 1 === sectionElms.length) {
      activeSection = {
        hash: s.attributes.getNamedItem('name').value,
      };
    }

    sectionAbove = b;
  }


  if (!isEqual(this.state.activeSection, activeSection)) {
    this.setState({ activeSection });
  }
}, 500);
You might have noticed that we made one more improvement with:
if (!isEqual(this.state.activeSection, activeSection)) {
  this.setState({ activeSection });
}
With this code, we tell our app that when the current activeSection object is the same as object inside the state (i.e. did not change), then the app should not update state and re-render the page. Our app should only do so when the activeSection object has actually changed. Unlike hideHeader and isMobile boolean parameters, we can’t use !== for comparison of two activeSection objects. To compare two objects we used isEqual method from lodash . Remember to import isEqual from lodash :
import isEqual from ‘lodash/isEqual’;
Time to test. Uncomment this line in renderSections() function of ReadChapter page:
console.log(activeSection);
Start your app with yarn dev and navigate to http://localhost:8000/books/demo-book/introduction . Open the browser console ( Developer tools > Console ) and open the TOC.
Scroll and look at the console:
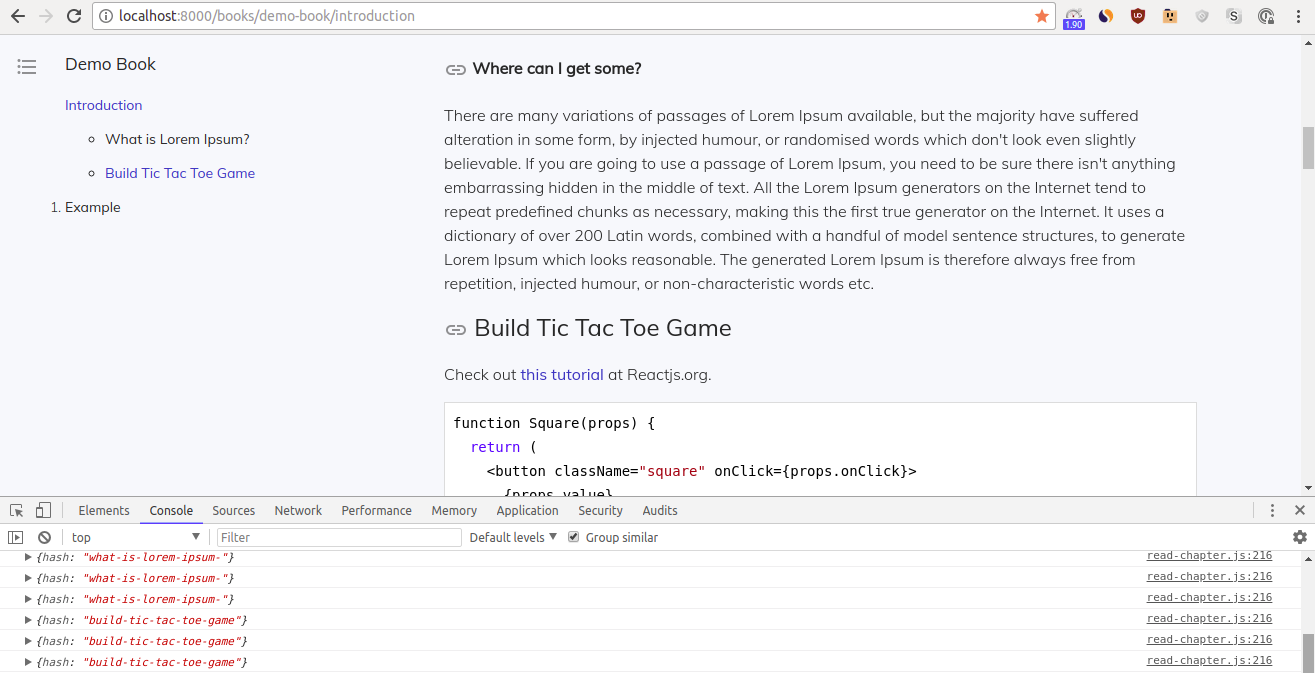
As you scroll, the console prints the activeSection object:
{hash: "what-is-lorem-ipsum-"}
{hash: "what-is-lorem-ipsum-"}
{hash: "what-is-lorem-ipsum-"}
When you have <span>Build Tic Tac Toe Game</span> in view, the console prints out the new activeSection object:
{hash: "what-is-lorem-ipsum-"}
{hash: "what-is-lorem-ipsum-"}
{hash: "what-is-lorem-ipsum-"}
{hash: "build-tic-tac-toe-game"}
{hash: "build-tic-tac-toe-game"}
{hash: "build-tic-tac-toe-game"}
Good job if you observed this behaviour!
In the last two sections of the chapter 7, we are going to improve our TOC further. We will:
- hide the
Headeronce a user scrolls past a certain distance - add conditional styles to the TOC and main content, so our web app looks good on both desktop and mobile browsers
Hide Header
In the previous section, we did plenty of scrolling. You may have noticed that the Header component is always present. However, the user only needs to see the Header component on rare occasions - when navigating to the dashboard or logging out. Thus, our app should hide the Header component when you a user scrolls past a certain distance. This will allow the user have an unobstructed view of the main content while reading. To try out a similar UX, go to any Medium article, scroll down and observe the Header behavior.
You just implemented dynamic highlights for sections - you know how to detect scrolling with event listener. We may choose to write again:
document.getElementById(‘main-content’).addEventListener(‘scroll’, this.onScrollHideHeader);
However, having two event listeners and two throttle methods is bad design. Similar to how we strive to reuse components, we should strive to reuse functions. We should use a single event listener that executes one function with throttle. This one function should call two functions: onScrollActiveSection and onScrollHideHeader .
Open pages/public/read-chapter.js , find the componentDidMount() lifecycle hook:
componentDidMount() {
  document.getElementById('main-content').addEventListener('scroll', this.onScroll);
}
Let’s make re-define onScroll function, make it call two function and add throttle to it:
onScroll = throttle(() => {
  this.onScrollActiveSection();
  this.onScrollHideHeader();
}, 500);
Add above function right after the componentWillUnmount() lifecycle hook.
Update the old onScroll function that highlights sections - rename it to onScrollActiveSection and remove throttle:
onScrollActiveSection = () => {
  const sectionElms = document.querySelectorAll('span.section-anchor');
  let activeSection;

  let aboveSection;
  for (let i = 0; i < sectionElms.length; i += 1) {
    const s = sectionElms[i];
    const b = s.getBoundingClientRect();
    const anchorBottom = b.bottom;

    if (anchorBottom >= 0 && anchorBottom <= window.innerHeight) {
      activeSection = {
        hash: s.attributes.getNamedItem('name').value,
      };

      break;
    }

    if (anchorBottom > window.innerHeight && i > 0) {
      if (aboveSection.bottom <= 0) {
        activeSection = {
          hash: sectionElms[i - 1].attributes.getNamedItem('name').value,
        };
        break;
      }
    } else if (i + 1 === sectionElms.length) {
      activeSection = {
        hash: s.attributes.getNamedItem('name').value,
      };
    }

    aboveSection = b;
  }

  if (!isEqual(this.state.activeSection, activeSection)) {
    this.setState({ activeSection });
  }
};
Next, let’s define onScrollHideHeader function and finish other code related to highlighting sections:
- define
hideHeaderparameter insideonScrollHideHeaderfunction - pass
hideHeaderas a prop to theHeadercomponent - update our
Headercomponent with a conditional style that hides theHeadercomponent when a user scrolls - add conditional styles to elements on the
ReadChapterpage.
Let’s discuss each step in detail.
- Inside
onScrollHideHeader, we need to select the<div>element withid="main-content", then get the distance from this element’s top to the topmost visible content ,distanceFromTop. The JavaScript method scrollTop]) does exactly that:
const distanceFromTop = document.getElementById(‘main-content’).scrollTop;
We define a boolean parameter hideHeader by comparing distanceFromTop to 500 ( Header gets hidden after ua ser scrolls for 500px or more):
const hideHeader = distanceFromTop > 500;
Finally, we need to set state . However, we want to set state only when the hideHeader value changes (we did the same for activeSection in the previous section):
if (this.state.hideHeader !== hideHeader) {
 this.setState({ hideHeader });
}
Define onScrollHideHeader based on the above considerations:
onScrollHideHeader = () => {
 const distanceFromTop = document.getElementById('main-content').scrollTop;
 const hideHeader = distanceFromTop > 500;

 if (this.state.hideHeader !== hideHeader) {
   this.setState({ hideHeader });
 }
};
To set initial state , remember to add hideHeader: false to constructor (we discussed usage of constructor in Chapter 2 and Chapter 5) in pages/public/read-chapter.js :
this.state = {
 showTOC: false,
 chapter,
 htmlContent,
 hideHeader: false,
};
- Passing the
hideHeaderprop to theHeadercomponent is tricky, since ourReadChapterpage does not have aHeadercomponent. In fact, ourwithLayoutHOC addsHeaderto the page it wraps. Insidepages/public/read-chapter.js, find this line:
export default withAuth(withLayout(ReadChapter), { loginRequired: false });
Open lib/withLayout.js and find <Header {...this.props} /> line.One way to solve this problem is to add some boolean parameter to our withLayout HOC. For example, noHeader . When noHeader is true, withLayout HOC won’t add Header to the page it wraps. Let’s do it - edit lib/withLayout.js in two places:
- Add a
noHeaderparameter with default valuefalseto thewithLayoutfunction as an argument.
Replace:
function withLayout(BaseComponent)With:
function withLayout(BaseComponent, { noHeader = false } = {}) - Add the ternary operator. Replace line:
<Header {...this.props} />With:
{noHeader ? null : <Header {...this.props} />} - And finally, add a
noHeaderparameter to the export code for theReadChaptercomponent inpages/public/read-chapter.js:
export default withAuth(withLayout(ReadChapter, { noHeader: true }), { loginRequired: false });Start your app with yarn dev and go to http://localhost:8000/books/demo-book/introduction :

Header - great! That was our goal. To pass the hideHeader prop to the Header component, we need to add the Header component directly to our ReadChapter page. This requires not adding the Header component to the page indirectly with our withLayout HOC.Import Header to pages/public/read-chapter.js with:
import Header from ‘…/…/components/Header’;
In pages/public/read-chapter.js , right above the line with {this.renderSidebar()} , add <Header user={user} hideHeader={hideHeader} /> line.After these changes, render() should look like:
render() {
 const { user } = this.props;

 const {
   chapter, showTOC, hideHeader,
 } = this.state;

 if (!chapter) {
   return <Error statusCode={404} />;
 }

 return (
   <div>
     <Head>
       <title>
         {chapter.title === 'Introduction'
           ? 'Introduction'
           : `Chapter ${chapter.order - 1}. ${chapter.title}`}
       </title>
       {chapter.seoDescription ? (
         <meta name="description" content={chapter.seoDescription} />
       ) : null}
     </Head>

     <Header user={user} hideHeader={hideHeader} />

     {this.renderSidebar()}

     <div
       style={{
         textAlign: 'left',
         padding: '0px 10px 20px 30px',
         position: 'fixed',
         right: 0,
         bottom: 0,
         top: '64px',
         left: '400px',
         overflowY: 'auto',
         overflowX: 'hidden',
       }}
       id="main-content"
     >
       {this.renderMainContent()}
     </div>

     <div
       style={{
         position: 'fixed',
         top: '80px',
         left: '15px',
       }}
     >
       <i //eslint-disable-line
         className="material-icons"
         style={styleIcon}
         onClick={this.toggleChapterList}
         onKeyPress={this.toggleChapterList}
         role="button"
       >
         format_list_bulleted
       </i>
     </div>
   </div>
 );
}
Notice that we passed the user prop and got hideHeader from state with:
const { user } = this.props;

const {
 chapter, showTOC, hideHeader,
} = this.state;
- We are getting close. We passed the
hideHeaderprop to theHeadercomponent, but we did not actually use thispropto hide theHeaderyet. Opencomponents/Header.js, update this line of code:
function Header({ user })With:
function Header({ user, hideHeader })Then addhideHeaderto propTypes and defaultProps:
Header.propTypes = {
 user: PropTypes.shape({
   avatarUrl: PropTypes.string,
   displayName: PropTypes.string,
 }),
 hideHeader: PropTypes.bool,
};

Header.defaultProps = {
 user: null,
 hideHeader: false,
};
To the very first <div> element of the Header component, which has no styles, add the following styles:
<div
 style={{
   overflow: 'hidden',
   position: 'relative',
   display: 'block',
   top: hideHeader ? '-64px' : '0px',
   transition: 'top 0.5s ease-in',
 }}
>
 <Toolbar style={styleToolbar}>
   // some code
 </Toolbar>
</div>
Save. We are ready to test!Start your app with yarn dev and navigate to http://localhost:8000/books/demo-book/introduction .Scroll down more than 500px:
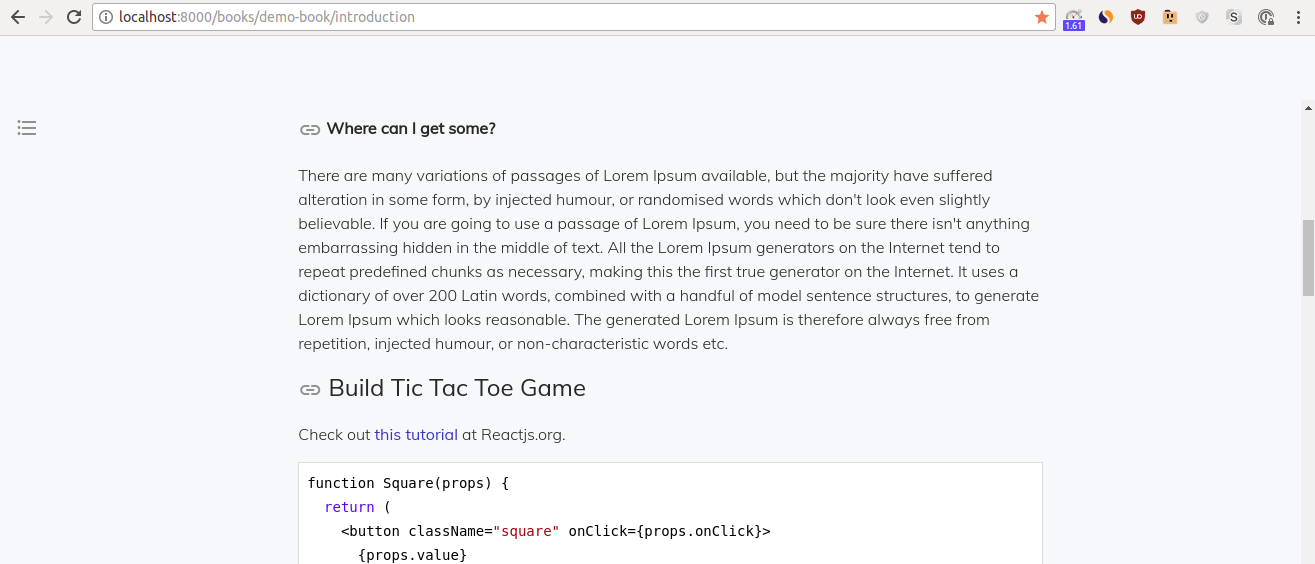
Header indeed slides up and disappears. However, it leaves an empty space after disappearing.4. After the
Header disappears, it leaves an empty space, which does not look good. The best UX would be to slide up the main content, TOC, and icons as the Header slides up to disappear. To do so, we need to add conditional styles to three <div> elements inside the ReadChapter page.
- find the very first
<div>element inside therenderSidebar()function:
<div
style={{
 textAlign: 'left',
 position: 'absolute',
 bottom: 0,
 top: '64px',
 left: 0,
 overflowY: 'auto',
 overflowX: 'hidden',
 width: '400px',
 padding: '0px 25px',
}}
>
// some code
</div>
```Update the  `top`  CSS property with the ternary operator  `hideHeader ? 0 : '64px'` . Also, add a  `transition`  property:
Remember to get hideHeader from state . Inside the renderSidebar() function, make sure that you have:
const {
 showTOC, chapter, hideHeader,
} = this.state;
- The remaining two
<div>elements are inside therender()function. Right under line{this.renderSidebar()}, find the following code snippet:
<div
 style={{
   textAlign: 'left',
   padding: '0px 10px 20px 30px',
   position: 'fixed',
   right: 0,
   bottom: 0,
   top: '64px',
   left: '400px',
   overflowY: 'auto',
   overflowX: 'hidden',
 }}
 id="main-content"
>
 {this.renderMainContent()}
</div>

<div
 style={{
   position: 'fixed',
   top: '80px',
   left: '15px',
 }}
>
 <i // eslint-disable-line
   className="material-icons"
   style={styleIcon}
   onClick={this.toggleChapterList}
   onKeyPress={this.toggleChapterList}
   role="button"
 >
   format_list_bulleted
 </i>
</div>
</div>
```Update the  `top`  CSS property with the ternary operator  `hideHeader ? 0 : '64px'` . Also, add a  `transition`  property:
Let’s test again.
Start your app with yarn dev and navigate to http://localhost:8000/books/demo-book/introduction .
Scroll down more than 500px:
As expected, three <div> elements slide up at the same time as the Header . Thus, we solved the UX problem of an empty space that remains after Header disappears.
In the next and final section of this chapter, we will add conditional styles to the ReadChapter page to make it look good on both desktop and mobile browsers.
Mobile browser
ReadChapter page looks great on desktop but not on the mobile browser. These are the problems:
- if we add ample
padding- say{{ padding: '20px 20%' }}- to our<div>that contains chapter content (htmlContent), then the content will look good on the desktop browser but be unreadable on the mobile browser - on mobile, we want the TOC to have
{{ width: '100%' }}, but that would be a disaster on desktop - on mobile, since chapter content is not visible when the TOC is opened, we want the TOC to auto-close when a user clicks on any link within the TOC
- when a user closes the TOC on both desktop and mobile browsers, the TOC leaves an empty space after disappearing
- when a user clicks on a new chapter link inside the TOC, the page preserves the scroll level instead of showing the user the beginning of a new chapter
Last two UX issues are problems on both mobile and desktop browsers:
In this chapter, we wrote a bunch of conditional styles. As a result, you probably guessed that to solve the above issues, we are going to introduce a boolean parameter: isMobile . And we’re going to write several conditional styles (with the ternary operator) with this parameter.
To define isMobile , we should compare window.innerWidth to 768px, a typical breakpoint for mobile view. Where should we define isMobile ? Actually, we have no choice but to define it in the componentDidMount() lifecycle hook.
When an initial request comes from browser to server, Next.js renders the page on the server. At this point, the window object is not available on the server. On the browser, after ReadChapter component mounts, the window object becomes available. You can try using window.innerWidth in the server code or inside the componentWillMount() lifecycle hook - but you will get an error:
ReferenceError: window is not defined
Defining isMobile is straightforward after you defined hideHeader earlier:
const hideHeader = distanceFromTop > 500
isMobile is true when:
const isMobile = window.innerWidth < 768
We set state in the same we did for activeSection and hideHeader :
if (this.state.isMobile !== isMobile) {
  this.setState({ isMobile }); // eslint-disable-line
}
Update the componentDidMount() lifecycle hook inside the ReadChapter page:
componentDidMount() {
  document.getElementById('main-content').addEventListener('scroll', this.onScroll);

  const isMobile = window.innerWidth < 768;

  if (this.state.isMobile !== isMobile) {
    this.setState({ isMobile }); // eslint-disable-line
  }
}
Remember to initiate state with isMobile and add isMobile to constructor . Find and update the following code snippet:
this.state = {
  showTOC: false,
  chapter,
  htmlContent,
  hideHeader: false,
  isMobile: false,
};
Now we can use isMobile to write conditional styles (if browser is mobile, app will apply mobile-specific styles). We will discuss and solve 5 problems stated earlier in this section.
- Find function
renderMainContent()inpages/public/read-chapter.js. We will add a conditional style to thepaddingproperty of the very first<div>element. Remember to defineisMobileinside therenderMainContent()function:
const {
 chapter, htmlContent, showTOC, isMobile,
} = this.state;
Padding will depend on both isMobile (mobile/desktop view) and showTOC (when TOC is closed, give larger padding):
let padding = '20px 20%';

if (!isMobile && showTOC) {
 padding = '20px 10%';
} else if (isMobile) {
 padding = '0px 10px';
}
At this point, we defined padding and can use as inline style with simple style={{ padding }} :
<div style={{ padding }} id="chapter-content">
 <h2 style={{ fontWeight: '400', lineHeight: '1.5em' }}>
   {chapter.order > 1 ? `Chapter ${chapter.order - 1}: ` : null}
   {chapter.title}
 </h2>
 <div
   // eslint-disable-next-line react/no-danger
   dangerouslySetInnerHTML={{ __html: htmlContent }}
 />
</div>
Notice that we added id="chapter-content" . We will use this to identify an element when solving a problem in step 5.
2. Find the renderSidebar() function. In the very first <div> element, add the ternary operator isMobile ? '100%' : '400px' to the width property like this:
<div
 style={{
   textAlign: 'left',
   position: 'absolute',
   bottom: 0,
   top: hideHeader ? 0 : '64px',
   transition: 'top 0.5s ease-in',
   left: 0,
   overflowY: 'auto',
   overflowX: 'hidden',
   width: isMobile ? '100%' : '400px',
   padding: '0px 25px',
 }}
>
 // some code
</div>
As always, remember to define variables inside the function:
const {
 showTOC, chapter, hideHeader, isMobile,
} = this.state;
- To solve this issue, we need to write a function
closeTocWhenMobile:
closeTocWhenMobile = () => {
 this.setState({ showTOC: !this.state.isMobile });
};
Add this function right above the renderMainContent() function.We defined the function, and now we need to make sure that the function gets executed when a user clicks on hyperlinks inside the TOC. We need to add an onClick DOM event handler that executes closeTocWhenMobile :Inside the renderSections() function, update <a> as follows:
<a
 style={{
   color: activeSection && activeSection.hash === s.escapedText ? '#1565C0' : '#222',
 }}
 href={`#${s.escapedText}`}
 onClick={this.closeTocWhenMobile}
>
 {s.text}
</a>
Inside the renderSidebar() function, update <a> as follows:
<a // eslint-disable-line
 style={{ color: chapter._id === ch._id ? '#1565C0' : '#222' }}
 onClick={this.closeTocWhenMobile}
 >
 {ch.title}
</a>
- To solve the empty space problem to the left of the
<div>withid="main-content", we need to add a conditional style to the CSS propertyleft. Insiderender()atpages/public/read-chapter.js, remember to defineisMobile:
const {
 chapter, showTOC, hideHeader, isMobile,
} = this.state;
Define left by using both isMobile and showTOC :
let left = '20px';
if (showTOC) {
 left = isMobile ? '100%' : '400px';
}
Add this snippet right above return () inside render() .Now that you’ve defined left , add it as an inline style with the simple style={{ left }} :
<div
 style={{
   textAlign: 'left',
   padding: '0px 10px 20px 30px',
   position: 'fixed',
   right: 0,
   bottom: 0,
   top: hideHeader ? 0 : '64px',
   transition: 'top 0.5s ease-in',
   left,
   overflowY: 'auto',
   overflowX: 'hidden',
 }}
 id="main-content"
>
 // some code
</div>
Done.
5. When a user clicks a hyperlinked chapter title inside the TOC, this new chapter loads at the same scroll depth as the previous chapter.
To scroll an element into view, we use the JavaScript method scrollIntoView() on the <div> element with id="chapter-content (we added this id in step 1):
document.getElementById(‘chapter-content’).scrollIntoView();
Add this single line of code above to the componentWillReceiveProps(nextProps) lifecycle hook that we discussed in Chapter 5 as follows:
componentWillReceiveProps(nextProps) {
 const { chapter } = nextProps;

 if (chapter && chapter._id !== this.props.chapter._id) {
   document.getElementById('chapter-content').scrollIntoView();
   const { htmlContent } = chapter;
   this.setState({ chapter, htmlContent });
 }
}
We are done with conditional styles for mobile browser.
Start your app with yarn dev and inspect the conditional styles with Developer tools > Elements .
To toggle between devices, go to Developer tools and click the Toggle device icon that is located to the left of the Elements tab. You should see how our styles change between mobile devices and the desktop.
It’s important to mention user experience on a mobile browser. Since we placed const isMobile = window.innerWidth < 768 inside page’s componentDidMount() - user will see a flash of style. In other words, on the first page load on a mobile browser, the end user will see desktop browser styles. A moments later, after componentDidMount() code block is executed and page component rerenders, the end user will see mobile browser styles. Thus the end user will see a brief flash of style.
To avoid the flash of style, our app’s server has to know whether the user uses a mobile browser on the very first HTTP request. If the server knows that the browser is mobile, then the server can apply mobile browser styles to the page and render it. In other words, a page will be server-side rendered with styles for a mobile browser. This can be achieved if the server reads so-called User-Agent that contains detailed information about user’s browser. We implemented such logic in our open source SaaS boilerplate, check out isMobile.ts file.
In the next chapter (Chapter 8), we will add all code necessary to sell a book.
At the end of Chapter 7, your codebase should look like the codebase in 7-end . The 7-end folder is located at the root of the book directory inside the builderbook repo.
Compare your codebase and make edits if needed.
One chapter left! If you’re enjoying the book, please share a quick review. You can update your review at any time.