Chapter 8: BuyButton component. Buy book logic. ReadChapter page. Checkout flow. MyBooks page. Mailchimp API. Deploy app.
-
BuyButton component
-
Buy book logic
- API method buyBook()
- Express route ‘/buy-book’
- Static method Book.buy()
- stripeCharge() function
- Purchase model
-
ReadChapter page
- Excerpt and full content
- BuyButton
- Testing
-
Checkout flow
-
MyBooks page
- API method getMyBookList()
- Express route ‘/my-books’
- Static method Book.getPurchasedBooks()
-
Mailchimp API
-
Deploy app
- Prepare server
- Env keys
- Admin user
- Now
Before you start working on Chapter 8, get the 8-start codebase. The 8-start folder is located at the root of the book directory inside the builderbook repo.
- If you haven’t cloned the builderbook repo yet, clone it to your local machine with
git clone https://github.com/builderbook/builderbook.git. - Inside the
8-startfolder, runyarnto install all packages.
These are the packages that we install specifically for Chapter 8:
"compression""helmet""htmlescape""react-stripe-checkout""sitemap""stripe"
Check out the package.json for Chapter 8.
- Be sure to use these specific packages and ignore any warnings about upgrading. We regularly upgrade all packages and test them in the book. But before testing, we cannot guarantee that a new package version will work properly.
Remember to include your .env at the root of your app. By the end of Chapter 8, you will add:
-
Stripe_Test_SecretKeyandStripe_Live_SecretKey, -
Stripe_Test_PublishableKeyandStripe_Live_PublishableKey, -
MAILCHIMP_API_KEY,MAILCHIMP_REGION, andMAILCHIMP_PURCHASED_LIST_IDenvironmental variables to your.envfile.
In the previous chapter (Chapter 7), we made many UX improvements to our ReadChapter page. In this chapter, we will add all code related to selling a book. Here is a high-level overview of what we want to accomplish:
- introduce a
BuyButtoncomponent - define all necessary code to make the buy button functional: API method, Express route, and static methods for our Book model, Stripe API, and Purchase model
- add a
BuyButtoncomponent to ourReadChapterpage and test the checkout flow - show books that a user bought on the
MyBookspage (user dashboard) - add the email of a user who bought a book to a mailing list on Mailchimp
Like with any other new feature that needs to GET or POST data, the flow of data is usually as follows:
- there is a page or component that calls an API method
- the API method sends a request to a particular route, which executes a matching Express route
- the function inside the matching Express route calls a static method for a model, waits for data, and returns data to the client
By using this blueprint above, we’ve already implemented data exchange between client and server many times in this book. In Chapters 5 and 6, we added many pages/components, API methods, Express routes, and static methods related to our Admin user. In this section, we will write code related to our Customer user, who buys and reads a book.
Our first step, as per the blueprint, is to create a BuyButton component that we eventually import and add to our ReadChapter page. Inside this component, we will call the buyBook() API method.
BuyButton component
In Chapter 2, we wrote our Header component as a stateless functional component (link) and MenuDrop component as a regular component (link).
The BuyButton component will have both props and state. Thus, we should write it as a regular component. Check out components/MenuDrop.js to remember how we write regular components. To define our new BuyButton component with ES6 class:
class BuyButton extends React.Component { … }
We export a single value with default export:
export default BuyButton
Since the BuyButton component is for our Customer user only, create a components/customer/BuyButton.js file.
The carcass of the BuyButton component with all necessary imports is:
components/customer/BuyButton.js :
import React from 'react';
import PropTypes from 'prop-types';
import StripeCheckout from 'react-stripe-checkout';
import NProgress from 'nprogress';

import Button from '@material-ui/core/Button';

import { buyBook } from '../../lib/api/customer';
import notify from '../../lib/notifier';

const styleBuyButton = {
  margin: '20px 20px 20px 0px',
  font: '14px Muli',
};

class BuyButton extends React.Component {
  // 1. propTypes and defaultProps

  // 2. constructor (set initial state)

  // 3. onToken function

  // 4. onLoginClicked function

  render() {
    // 5. define variables with props and state

    if (!book) {
      return null;
    }

    if (!user) {
      return (
        // 6. Regular button with onClick={this.onLoginClicked} event handler
      );
    }

    return (
      // 7. StripeCheckout button with token and stripeKey parameters
    );
  }
}

export default BuyButton;
We discuss all code snippets in detail below.
- When we wrote our
Headercomponent as a stateless function (components/Header.js), we usedHeader.propTypesto specify types of props. But when we define a regular component with ES6 class, we specify types of props withstatic propTypes. For ourBuyButtoncomponent, we should use the latter method, since we defined this component as a child ES6 classclass BuyButton extends React.Component. You get:
static defaultProps = {
 book: null,
 user: null,
 showModal: false,
};
We will define and use these three props later in this section.
2. Similar to how there are two ways to specify types of props, there are two popular ways to set initial state. When you don’t use a prop to set an initial state object, you can simply write the following without using constructor:
state = {
 open: false,
 anchorEl: undefined,
};
We discussed constructor usage cases in detail in Chapter 2 and Chapter 5.Open components/MenuDrop.js to see how this was done for our MenuDrop component.However, in the case of our BuyButton component, we want to use a showModal prop to set the initial state. Thus, we should use constuctor :
constructor(props) {
 super(props);

 this.state = {
   showModal: !!props.showModal,
 };
}
Later in this chapter, we plan to pass a showModal prop from the ReadChapter page to our BuyButton component. showModal: !!props.showModal ensures that when showModal is true in the ReadChapter page, then showModal is true in the BuyButton component as well.As we discussed in Chapter 5, calling super(props) makes props available inside constructor.
3. As discussed earlier in this book (Chapter 1, SSR) - for SSR, we call an API method inside getInitialProps() ; for CSR, we call an API method inside componentDidMount() or inside an event-handling function.In the BuyButton component, we want to call a buyBook() API method after our user takes an action (clicks the buy button). So we defintely don’t want to do SSR and execute this buyBook() API method on the server. To execute buyBook() on the client, we would normally place buyBook() inside componentDidMount() . However, if placed inside componentDidMount() , this API method will be called right after the component mounts on the client. This is not what we want - we want to call our API method on a click event . Thus, we place buyBook() inside an onToken function that gets executed after a user clicks the buy button.We will point onToken to an async anonymous function and use the try/catch construct along with async/await (as we did many times before in this book). If you want to refresh your memory, check out Chapter 3. Let’s write an async anonymous function that calls the buyBook() API method and uses Nprogress and notify() to communicate success to our user. You should get:
onToken = async (token) => {
 NProgress.start();
 const { book } = this.props;
 this.setState({ showModal: false });

 try {
   await buyBook({ stripeToken: token, id: book._id });
   notify('Success!');
   NProgress.done();
 } catch (err) {
   NProgress.done();
   notify(err);
 }
};
When a user clicks the BuyButton component, our code calls the onToken function.We pass book prop from the ReadChapter page to the BuyButton component. (We’ll discuss this more in the next section when we add BuyButton to ReadChapter .) Thus, constant book is defined as this.props.book . Using ES6 object destructuring:
const { book } = this.props
After a user clicks the buy button, we want to close the modal (Stripe modal with a form for card details):
this.setState({ showModal: false })
Then the code calls and waits for successful execution of our API method buyBook() that takes two arguments:
await buyBook({ stripeToken: token, id: book._id });
At this point, the rest of the code should be self-explanatory.
4. Why do we need an onLoginClicked function? If a user is logged in, then we simply call the onToken function and buyBook() API method. However, if a user is not logged in, we want to redirect the user to the /auth/google route (Google OAuth).Similar to the book prop, we pass the user prop from our ReadChapter page to the BuyButton component:
const { user } = this.props
We check if a user object exists, and it if does not exist or is empty, we redirect to Google OAuth:
if (!user) {
 window.location.href = '/auth/google';
}
Put these two snippets together and you define onLoginClicked :
onLoginClicked = () => {
 const { user } = this.props;

 if (!user) {
   window.location.href = '/auth/google';
 }
};
- Define
bookanduserconstants (block-scoped variables) asthis.props.bookandthis.props.user, respectively. Also define theshowModalconstant asthis.state.showModal. Using ES6 object destructuring:
const { book, user } = this.props;
const { showModal } = this.state;
- If a user is not logged in, we simply show a button from Material-UI. This button has an
onClickevent handler that points to{this.onLoginClicked}:
<div>
 <Button
   variant="contained"
   style={styleBuyButton}
   color="primary"
   onClick={this.onLoginClicked}
 >
   Buy for ${book.price}
 </Button>
</div>
- If a user is logged in, we again show a button, but now we wrap it with
<StripeCheckout>...</StripeCheckout>from the react-stripe-checkout package.Take a look at this example of usage. TheStripeCheckoutcomponent requires two props:stripeKeyandtoken. Other props are optional, and you are familiar with all of them exceptdesktopShowModal. This prop controls whether the Stripe modal is open or closed. Read more about desktopShowModal.Wrap the Material-UI<Button>with<StripeCheckout>:
<StripeCheckout
 stripeKey={StripePublishableKey}
 token={this.onToken}
 name={book.name}
 amount={book.price * 100}
 email={user.email}
 desktopShowModal={showModal || null}
>
 <Button variant="contained" style={styleBuyButton} color="primary">
   Buy for ${book.price}
 </Button>
</StripeCheckout>
As you can see from above, Stripe requires us to pass a publishable key to our component on the client . To do so, we need to define the global variable StripePublishableKey and make this variable available to our components/customer/BuyButton.js file. The problem is that env variables inside .env are only available on server .
There are multiple ways to make environmental variables universally available. Universally, in this context, means on both client and server. Next.js provides at least two examples.
The first solution is to use the babel plugin babel-plugin-transform-define . With this plugin, we can create a file that contains universally available variables. This solution requires us to create a configuration file for Babel ( .babelrc ), so we can extend Babel functionality with the babel-plugin-transform-define plugin. As a team, we strive to keep as few configurations as possible. Otherwise, we may find ourselves in a so-called ‘configuration hell’.
The second solution does not require configuring Babel. Instead, it requires us to pass environmental variables as part of a command, like this:
StripePublishableKey=pk_test_12345 yarn dev
We simply prepended StripePublishableKey=pk_test_12345 to our yarn dev command. After you run the above command, you are able to access the StripePublishableKey environmental variable in your application as process.env.StripePublishableKey . However, process.env.StripePublishableKey is only accessible on the server, it’s not universally accessible.
We can make the StripePublishableKey environmental variable available on the client by adding it to _document.js . When a user loads a page for the first time, our Next.js app renders _document.js on the server and sends it to the client together with any environmental variables.
Open your pages/_document.js file. Under the imports section, add the following code snippet:
const { StripePublishableKey } = process.env;
// console.log(StripePublishableKey);

const env = { StripePublishableKey };
// console.log(env);
The first line simply defines our new variable StripePublishableKey , which points to process.env.StripePublishableKey .
The fourth line, creates an env.StripePublishableKey parameter inside the env object. This parameter’s value is StripePublishableKey (defined on the first line).
We used ES6 object destructuring for both of the above lines.
We also used object shorthand on the fourth line - we wrote const env = { StripePublishableKey } instead of const env = { StripePublishableKey: StripePublishableKey } .
Start your app with StripePublishableKey=pk_test_12345 yarn dev . Uncomment the console.log() statements and reload the page so your app executes _document.js . Your terminal will print:
pk_test_12345
{ StripePublishableKey: 'pk_test_12345' }
This terminal output means that we successfully accessed our StripePublishableKey value using process.env and successfully created an env object that has the env.StripePublishableKey name-value pair.
The next step is to add an env object to the MyDocument component. Find this location in page/_document.js :
<Main />
<NextScript />
Modify like this:
<Main />
{/* eslint-disable-next-line react/no-danger */}
<script dangerouslySetInnerHTML={{ __html: `__ENV__ = ${htmlescape(env)}` }} />
<NextScript />
The first of these newly added lines simply disables the Eslint warning for dangerouslySetInnerHTML .
The second line adds a script tag to the Document component.
Two explanatory notes:
- You may have noticed two underscore symbols on each side of
__ENV__. We’ve added underscores to avoid name collision and to indicate that tge variable is used on the browser. This is a practical convention, read more about it here. - The JavaScript object
envcan’t be rendered as HTML since it’s not a string. We need to stringifyenv. The proper way to stringify it is to usehtmlescape()overJSON.stringify()since JSON is not exactly a subset of JavaScript. Some characters inside the string that are accepted by JSON are not accepted by JavaScript.
Go to your browser, open Dev Tools > Elements , and find our newly added script tag:
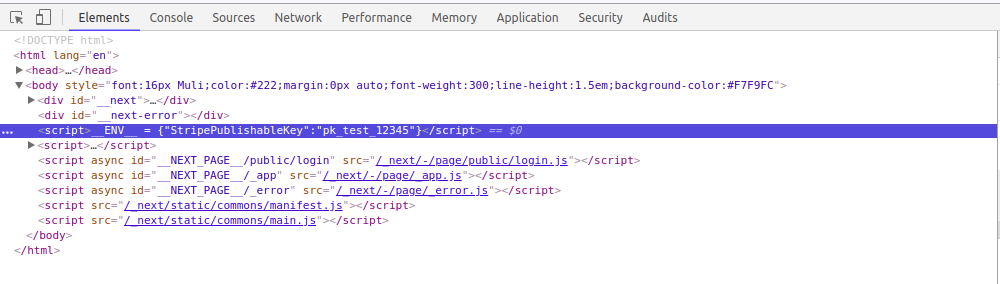
On the client (browser console), we have an __ENV__ object with the expected value for StripePublishableKey .
In Next.js, the initial load is server-side rendered and subsequent loads are client-side rendered. Thus we need to write conditional code to account for this conditional behavior.
Create a lib/env.js file that contains only a single line of code:
export default (typeof window !== ‘undefined’ ? window.ENV : process.env);
If a window objects exists ( typeof window !== 'undefined' ), then this file exports window.__ENV__ , which is {"StripePublishableKey":"pk_test_12345"} . That’s because in our browser window, we have a script tag with content __ENV__ = {"StripePublishableKey":"pk_test_12345"} .
Else , when a window object does not exist (server environment), the file exports the server-side environment, which is process.env .
That’s pretty much it! We’ve covered both cases for page rendering: server-side and client-side.
Open your components/customer/BuyButton.js file. Import env from lib/env.js :
import env from ‘…/…/lib/env’;
Then access StripePublishableKey like this:
const { StripePublishableKey } = env;
From now on, when you run your app locally, remember to start your app with:
StripePublishableKey=pk_test_xxxxxx yarn dev
Replace pk_test_xxxxxx with your actual value for the test publishable key from Stripe.
Plug the code from steps 1-7 into our BuyButton component carcass that we outlined in the beginning of this section:
import React from 'react';
import PropTypes from 'prop-types';
import StripeCheckout from 'react-stripe-checkout';
import NProgress from 'nprogress';
import Button from '@material-ui/core/Button';

import { buyBook } from '../../lib/api/customer';
import notify from '../../lib/notifier';

import env from '../../lib/env';

const { StripePublishableKey } = env;

const styleBuyButton = {
  margin: '20px 20px 20px 0px',
  font: '14px Muli',
};

class BuyButton extends React.Component {
  static propTypes = {
    book: PropTypes.shape({
      _id: PropTypes.string.isRequired,
    }),
    user: PropTypes.shape({
      _id: PropTypes.string.isRequired,
    }),
    showModal: PropTypes.bool,
  };

  static defaultProps = {
    book: null,
    user: null,
    showModal: false,
  };

  constructor(props) {
    super(props);

    this.state = {
      showModal: !!props.showModal,
    };
  }

  onToken = async (token) => {
    NProgress.start();
    const { book } = this.props;
    this.setState({ showModal: false });

    try {
      await buyBook({ stripeToken: token, id: book._id });
      notify('Success!');
      NProgress.done();
    } catch (err) {
      NProgress.done();
      notify(err);
    }
  };

  onLoginClicked = () => {
    const { user } = this.props;

    if (!user) {
      window.location.href = '/auth/google';
    }
  };

  render() {
    const { book, user } = this.props;
    const { showModal } = this.state;

    if (!book) {
      return null;
    }

    if (!user) {
      return (
        <div>
          <Button
            variant="contained"
            style={styleBuyButton}
            color="primary"
            onClick={this.onLoginClicked}
          >
            Buy for ${book.price}
          </Button>
        </div>
      );
    }

    return (
      <StripeCheckout
        stripeKey={StripePublishableKey}
        token={this.onToken}
        name={book.name}
        amount={book.price * 100}
        email={user.email}
        desktopShowModal={showModal || null}
      >
        <Button variant="contained" style={styleBuyButton} color="primary">
          Buy for ${book.price}
        </Button>
      </StripeCheckout>
    );
  }
}

export default BuyButton;
Above, we wrote the basic version of our BuyButton component. As we progress in this chapter, we will improve the UX of our checkout flow and make necessary changes to this component. We will make these improvements in the section called Checkout flow .
We will test out our BuyButton component at the end of the next section, after adding it to our ReadChapter page.
As you’ve probably noticed from the code above - after a user submits card details, we call the onToken function that calls a buyBook() API method. In the next section, we discuss this API method and its corresponding Express route and static method for the Book model. We also discuss Stripe API and create a new Purchase model.
Buy book logic
In this section, we will discuss the buyBook() API method, Express route /buy-book , and static method buy() for our Book model. As you learned in Chapters 5 and 6:
- a page or component calls an API method
- the API method sends a request to an Express route
- that Express route calls and waits for a static method
- the static method fetches or updates data using Mongoose methods (aka Mongoose Queries)
API method buyBook()
Let’s decide which type of method to use for a request sent by our buyBook API method. Since we send book._id (as id ) and token (as stripeToken ) to the server , the method should be POST. Because the method is POST, you don’t need to specify it explicitly, as POST is a default method (check out lib/api/sendRequest.js , which we wrote in Chapter 5).
Next, let’s decide the route to use for the API endpoint; for example, let it be /buy-book .
If you don’t remember how we wrote API methods, check out lib/api/admin.js and Chapter 5, Section Internal APIs. For example, to display a list of books on our Admin dashboard:
lib/api/admin.js :
import sendRequest from './sendRequest';

const BASE_PATH = '/api/v1/admin';

export const getBookList = () =>
  sendRequest(`${BASE_PATH}/books`, {
    method: 'GET',
  });
Create a lib/api/customer.js file with the buyBook API method:
lib/api/customer.js :
import sendRequest from './sendRequest';

const BASE_PATH = '/api/v1/customer';

export const buyBook = ({ id, stripeToken }) =>
  sendRequest(`${BASE_PATH}/buy-book`, {
    body: JSON.stringify({ id, stripeToken }),
  });
Notice that we pass stringified id and stripeToken values to the request body. We will get these values from the request body when we write our Express route.
Express route ‘/buy-book’
First things first, we need to make sure that Customer-related API endpoints are indeed defined on the server. Open your server/api/index.js file and find the line server.use('/api/v1/customer', customerApi); :
server/api/index.js :
const publicApi = require('./public');
const customerApi = require('./customer');
const adminApi = require('./admin');

function api(server) {
  server.use('/api/v1/public', publicApi);
  server.use('/api/v1/customer', customerApi);
  server.use('/api/v1/admin', adminApi);
}

module.exports = api;
To remember how you wrote these Express routes, open up server/api/admin.js . Here is one Express route that calls and waits for the static method Book.list() :
server/api/admin.js :
const express = require('express');
const Book = require('../models/Book');
const User = require('../models/User');
const { getRepos } = require('../github');
const logger = require('../logs');

const router = express.Router();

router.use((req, res, next) => {
  if (!req.user || !req.user.isAdmin) {
    res.status(401).json({ error: 'Unauthorized' });
    return;
  }

  next();
});

router.get('/books', async (req, res) => {
  try {
    const books = await Book.list();
    res.json(books);
  } catch (err) {
    res.json({ error: err.message || err.toString() });
  }
});

module.exports = router;
To write an Express route for our buyBook API method, keep in mind a few differences:
- inside the Express middleware that checks for user permissions, we don’t need to check for
!req.user.isAdmin - the route is
/buy-book - the method is
POST; thus, userouter.post()instead ofrouter.get() - call
Book.buy()instead ofBook.list() - pass three parameters to the
buy()static method: book id asid, Stripe token asstripeToken, anduserWe get the first two parameters from the request bodyreq.bodyusing ES6 object destructuring:
const { id, stripeToken } = req.body;
The third parameter is from req.user that we discussed in detail in Chapter 3.
Go to your server/api/customer.js file.
Take into account these specifics above and put together the Express middleware and Express route:
server/api/customer.js :
const express = require('express');
const Book = require('../models/Book');
const logger = require('../logs');

const router = express.Router();

router.use((req, res, next) => {
  if (!req.user) {
    res.status(401).json({ error: 'Unauthorized' });
    return;
  }

  next();
});

router.post('/buy-book', async (req, res) => {
  const { id, stripeToken } = req.body;

  try {
    await Book.buy({ id, stripeToken, user: req.user });
    res.json({ done: 1 });
  } catch (err) {
    logger.error(err);
    res.json({ error: err.message || err.toString() });
  }
});

module.exports = router;
In a typical Express route with the GET method, we would send a response that contains some data from our database (for example, a book or chapter object). However, in a typical Express route with the POST method, we can simply respond with the object done: 1 or save: 1 or success: 1 .
Static method Book.buy()
With the API method and Express route out of way, let’s discuss the static method buy() in our Book model. This static method will do multiple things:
- use Mongoose’s
findById()to find a book - check if a user already bought a book by searching (and waiting) for a
Purchasedocument withuserIdandbookId - if a user did not buy a book, call and wait for a
stripeCharge()method defined atserver/stripe.js(discussed later in this section) - send an email to a user (same way we sent a welcome email in Chapter 4)
- finally, create a new
Purchasedocument with all necessary parameters
High-level structure of our buy static method that takes the three arguments discussed earlier:
server/models/Book.js :
static async buy({ id, user, stripeToken }) {
  if (!user) {
    throw new Error('User required');
  }

  // 1. find book by id

  if (!book) {
    throw new Error('Book not found');
  }

  // 2. check if user bought book already

  // 3. call stripeCharge() method

  // 4. send transactional email confirming purchase

  // 5. create new Purchase document
}
The only two snippets of code that we did not mention are those that throw errors in case user and book objects do not exist.
Let’s discuss each step in detail:
- Open
server/models/Book.jsand find the static methodsyncContent()that finds a book by id using the Mongoose methodfindById():
const book = await this.findById(id, ‘userId githubRepo githubLastCommitSha’);
In our case, instead of returning userId githubRepo githubLastCommitSha parameters, we want to return name slug price . Thus, the code for step 1 is simply:
const book = await this.findById(id, ‘name slug price’);
- At this point in the code, we have both
userandbookobjects. Here we useuser._idfromuserandidfrombookto check if aPurchasedocument exists on our database. If a user bought a book already, we create aPurchasedocument in thePurchasecollection of our database. It’s important to check if thisPurchasedocument exists, so a user does not buy a book twice. This is an unlikely edge case, but let’s take care of it.Define the boolean parameterisPurchased, which is true if the count of found documents is greater than zero:
const isPurchased = (await Purchase.find({ userId: user._id, bookId: id }).countDocuments()) > 0;
If isPurchased is true, then we throw an error. Our code for step 2 is:
const isPurchased = (await Purchase.find({ userId: user._id, bookId: id }).countDocuments()) > 0;
if (isPurchased) {
 throw new Error('Already bought this book');
}
- In this step, we pass three parameters to the
stripeCharge()method. Parameters:book.pricefrombookasamount,stripeToken.idfromstripeToken(we passed this to the server from client via ourbuyBookAPI method) astoken,user.emailfromuserasbuyerEmail(we define this method in the next subsection). Code for step 3:
const chargeObj = await stripeCharge({
 amount: book.price * 100,
 token: stripeToken.id,
 buyerEmail: user.email,
});
For bookkeeping, we will save chargeObj as a parameter in the Purchase document in step 5.
4. Remember how we send the transactional welcome email to new users - open server/models/User.js and find the static method signInOrSignUp() inside it:
const template = await getEmailTemplate('welcome', {
 userName: displayName,
});

try {
 await sendEmail({
   from: `Kelly from Builder Book <${process.env.EMAIL_SUPPORT_FROM_ADDRESS}>`,
   to: [email],
   subject: template.subject,
   body: template.message,
 });
} catch (err) {
 logger.error('Email sending error:', err);
}
The code for sending an email after a user bought a book will be very similar. Here are small differences to keep in mind:
- First, in addition to passing the
userNameparameter togetEmailTemplate(), we will passbookTitleandbookUrl. - Second, the template name is
purchaseinstead ofwelcome(we don’t want to send the welcome email again). - Third, since we are not inside the User model but Book model, the value of
toinside thesendEmail()method is[user.email]instead of[email].With these change in mind, you will get the following code for step 4:
const template = await getEmailTemplate('purchase', {
 userName: user.displayName,
 bookTitle: book.name,
 bookUrl: `${ROOT_URL}/books/${book.slug}/introduction`,
});

try {
 await sendEmail({
   from: `Kelly from builderbook.org <${process.env.EMAIL_SUPPORT_FROM_ADDRESS}>`,
   to: [user.email],
   subject: template.subject,
   body: template.message,
 });
} catch (error) {
 logger.error('Email sending error:', error);
}
Since we used ROOT_URL , we have to define it within a scope of server/models/Book.js . Add following line of code right after section with imports:
const ROOT_URL = 'http://localhost:8000'; We don’t have an EmailTemplate with the name purchase . Open server/models/EmailTemplate.js and add a purchase template right after the welcome template:
{
 name: 'purchase',
 subject: 'You purchased book at builderbook.org',
 message: `<%= userName %>,
   <p>
     Thank you for purchasing our book! You will get confirmation email from Stripe shortly.
   </p>
   <p>
     Start reading your book: <a href="{{bookUrl}}" target="_blank">{{bookTitle}}</a>
   </p>
   <p>
     If you have any questions while reading the book,
     please fill out an issue on
     <a href="https://github.com/builderbook/builderbook/issues" target="blank">Github</a>.
   </p>

   Kelly & Timur, Team Builder Book
 `,
},
Done. The next time you start your app, a new EmailTemplate document with "name": "purchase" will be created on MongoDB.
5. This one is straightforward. To create a new Purchase document, we use the Mongoose method create() on our Purchase model. Besides adding a createdAt timestamp, we pass the following parameters to the document: user._id , book._id , book.price , and chargeObject as userId , bookId , amount , and stripeCharge , respectively:
return Purchase.create({
 userId: user._id,
 bookId: book._id,
 amount: book.price * 100,
 stripeCharge: chargeObj,
 createdAt: new Date(),
});
Plug in the code from steps 1 to 5 into our high-level structure of the buy static method. Add this method within BookClass of our Book model at server/models/Book.js :
static async buy({ id, user, stripeToken }) {
  if (!user) {
    throw new Error('User required');
  }

  const book = await this.findById(id, 'name slug price');
  if (!book) {
    throw new Error('Book not found');
  }

  const isPurchased = (await Purchase.find({ userId: user._id, bookId: id }).countDocuments()) > 0;
  if (isPurchased) {
    throw new Error('Already bought this book');
  }

  const chargeObj = await stripeCharge({
    amount: book.price * 100,
    token: stripeToken.id,
    buyerEmail: user.email,
  });

  const template = await getEmailTemplate('purchase', {
    userName: user.displayName,
    bookTitle: book.name,
    bookUrl: `${ROOT_URL}/books/${book.slug}/introduction`,
  });

  try {
    await sendEmail({
      from: `Kelly from builderbook.org <${process.env.EMAIL_SUPPORT_FROM_ADDRESS}>`,
      to: [user.email],
      subject: template.subject,
      body: template.message,
    });
  } catch (error) {
    logger.error('Email sending error:', error);
  }

  return Purchase.create({
    userId: user._id,
    bookId: book._id,
    amount: book.price * 100,
    stripeCharge: chargeObj,
    createdAt: new Date(),
  });
}
This is pretty much the final version of our buy() static method. We will make only one upgrade - later in this chapter, we will call the subscribe() method to add a user’s email to a Mailchimp list.
Remember to add all missing imports to server/models/Book.js :
const Purchase = require('./Purchase');
const getEmailTemplate = require('./EmailTemplate');
const { stripeCharge } = require('../stripe');
const sendEmail = require('../aws');
In the next two subsections, we will discuss stripeCharge() and Purchase model. We imported and used them inside Book.buy() , but we have not defined them.
stripeCharge() method
To create a charge with Stripe, we use the stripe package and follow this official example:
var stripe = require('stripe')('sk_test_...');

var customer = await stripe.customers.create(
  { email: 'customer@example.com' }
);
There is no strong reason for us to create customer as shown in the official example, since buying a digital book is a one-time transaction. Instead of creating customer , we want to create charge , so the code will be stripe.charges.create() instead of stripe.customers.create .
Let’s define API_KEY for development and production environments:
const dev = process.env.NODE_ENV !== 'production';
const API_KEY = dev ? process.env.Stripe_Test_SecretKey : process.env.Stripe_Live_SecretKey;
Next, define the constant client as well as stripe with the passed API_KEY :
const client = stripe(API_KEY);
We will specify only five parameters out of two dozen possible parameters for stripeCharge() (to see all parameters, check Charge, Stripe API). In addition to the three parameters that we passed to stripeCharge() inside our Book.buy() static method, we will add two more:
currency: 'usd',
description: 'Payment for the book at builderbook.org',
For charge creation, you get:
return client.charges.create({
  amount,
  source: token,
  receipt_email: buyerEmail,
  currency: 'usd',
  description: 'Payment for the book at builderbook.org',
});
Create a server/stripe.js file. Add definitions of API_KEY , client and above snippet that creates charge:
server/stripe.js :
const stripe = require('stripe');

function stripeCharge({
  amount, token, buyerEmail,
}) {
  const dev = process.env.NODE_ENV !== 'production';
  const API_KEY = dev ? process.env.Stripe_Test_SecretKey : process.env.Stripe_Live_SecretKey;
  const client = stripe(API_KEY);

  return client.charges.create({
    amount,
    source: token,
    receipt_email: buyerEmail,
    currency: 'usd',
    description: 'Payment for the book at builderbook.org',
  });
}

exports.stripeCharge = stripeCharge;
Remember to get Stripe_Test_SecretKey and Stripe_Live_SecretKey values from your Stripe account and add them to the .env file.
You will need to add a total of 4 Stripe keys to .env file, 2 publishable and 2 secret. After you create Stripe account, find keys at https://dashboard.stripe.com/account/apikeys.
Purchase model
Our Purchase model is straighforward to write. There are no static methods to define. We want to ensure the uniqueness of our index with:
mongoSchema.index({ bookId: 1, userId: 1 }, { unique: true });
We discussed MongoDB indices in detail in Chapter 5, section Chapter model.
Check out User, Book, Chapter, and EmailTemplate models to remember how to create a model and specify Schema:
const Purchase = mongoose.model(‘Purchase’, mongoSchema);
We create a Purchase document inside the Book.buy() static method with:
return Purchase.create({
  userId: user._id,
  bookId: book._id,
  amount: book.price * 100,
  stripeCharge: chargeObj,
  createdAt: new Date(),
});
Based on the information above, define Schema:
const { Schema } = mongoose;

const mongoSchema = new Schema({
  userId: {
    type: Schema.Types.ObjectId,
    required: true,
  },
  bookId: {
    type: Schema.Types.ObjectId,
    required: true,
  },
  amount: {
    type: Number,
    required: true,
  },
  stripeCharge: {
    id: String,
    amount: Number,
    created: Number,
    livemode: Boolean,
    paid: Boolean,
    status: String,
  },
  createdAt: {
    type: Date,
    required: true,
  },
});
Create a server/models/Purchase.js file and add the following code:
server/models/Purchase.js :
const mongoose = require('mongoose');

const { Schema } = mongoose;

const mongoSchema = new Schema({
  userId: {
    type: Schema.Types.ObjectId,
    required: true,
  },
  bookId: {
    type: Schema.Types.ObjectId,
    required: true,
  },
  amount: {
    type: Number,
    required: true,
  },
  stripeCharge: {
    id: String,
    amount: Number,
    created: Number,
    livemode: Boolean,
    paid: Boolean,
    status: String,
  },
  createdAt: {
    type: Date,
    required: true,
  },
});

mongoSchema.index({ bookId: 1, userId: 1 }, { unique: true });

const Purchase = mongoose.model('Purchase', mongoSchema);

module.exports = Purchase;
In the next section ReadChapter page , we will add our BuyButton component to the ReadChapter page and make a few UX improvements to our checkout flow.
ReadChapter page
In this section, we will make necessary changes to our ReadChapter page so that a logged-out user can see preview content and then buy the full content of a book. Two main goals for this section are:
- conditionally show
chapter.htmlExcerpt(preview content) andchapter.htmlContent(full content) - add the
BuyButtoncomponent and pass props to it
Excerpt and full content
In this subsection, we modify the ReadChapter page so it shows either chapter.htmlExcerpt or chapter.htmlContent depending on whether a user bought a book or not.
Open pages/public/read-chapter.js and find instances of htmlContent . In Chapter 5, we simply defined htmlContent as:
let htmlContent = '';
if (chapter) {
  htmlContent = chapter.htmlContent;
}
With this definition, the content you write inside a .md file of a Github repo will be displayed on the webpage, unpaywalled. This is fine for writing a free book or documentation. However, we would like our app to support both free and paid content. Thus, we introduce the isFree parameter for chapters.
In Chapter 6, you forked our demo-book repo. Navigate to the chapter-1.md file and click the Edit icon. Here is a link to the original file, and here is snapshot of the page:
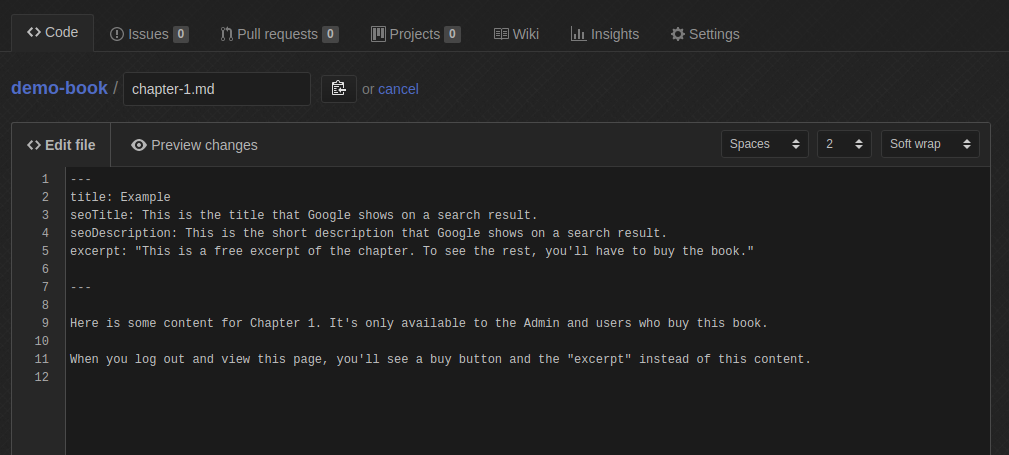
If you add isFree: true to the metadata section of the chapter-1.md file, then the Chapter document created from this file will get a "isFree": true parameter after an Admin user clicks the Sync with Github button. We introduced the code responsible for saving parameters from metadata to a Chapter document in Chapter 6.
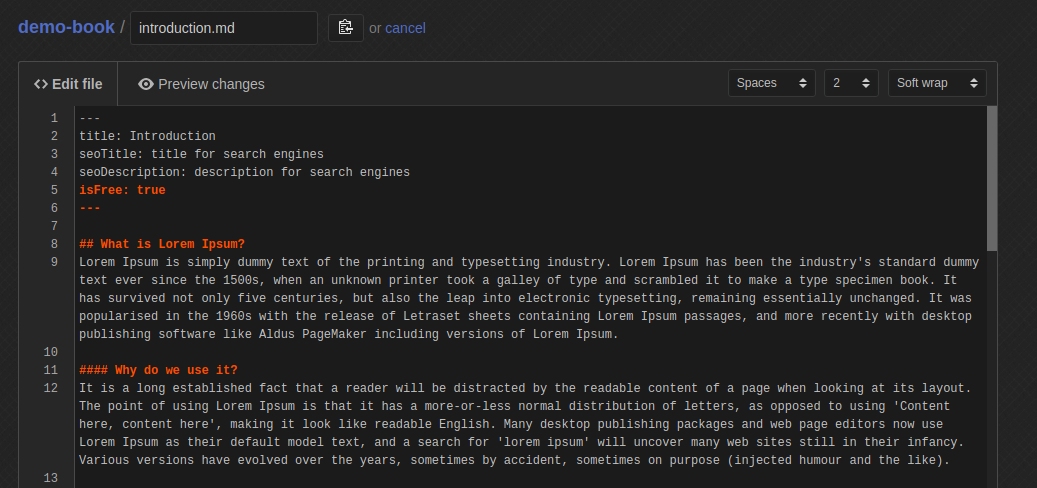
To make sure that this code works, navigate to the introduction.md file of your forked demo-book repository and click the Edit icon. You will see isFree: true inside the metadata section:
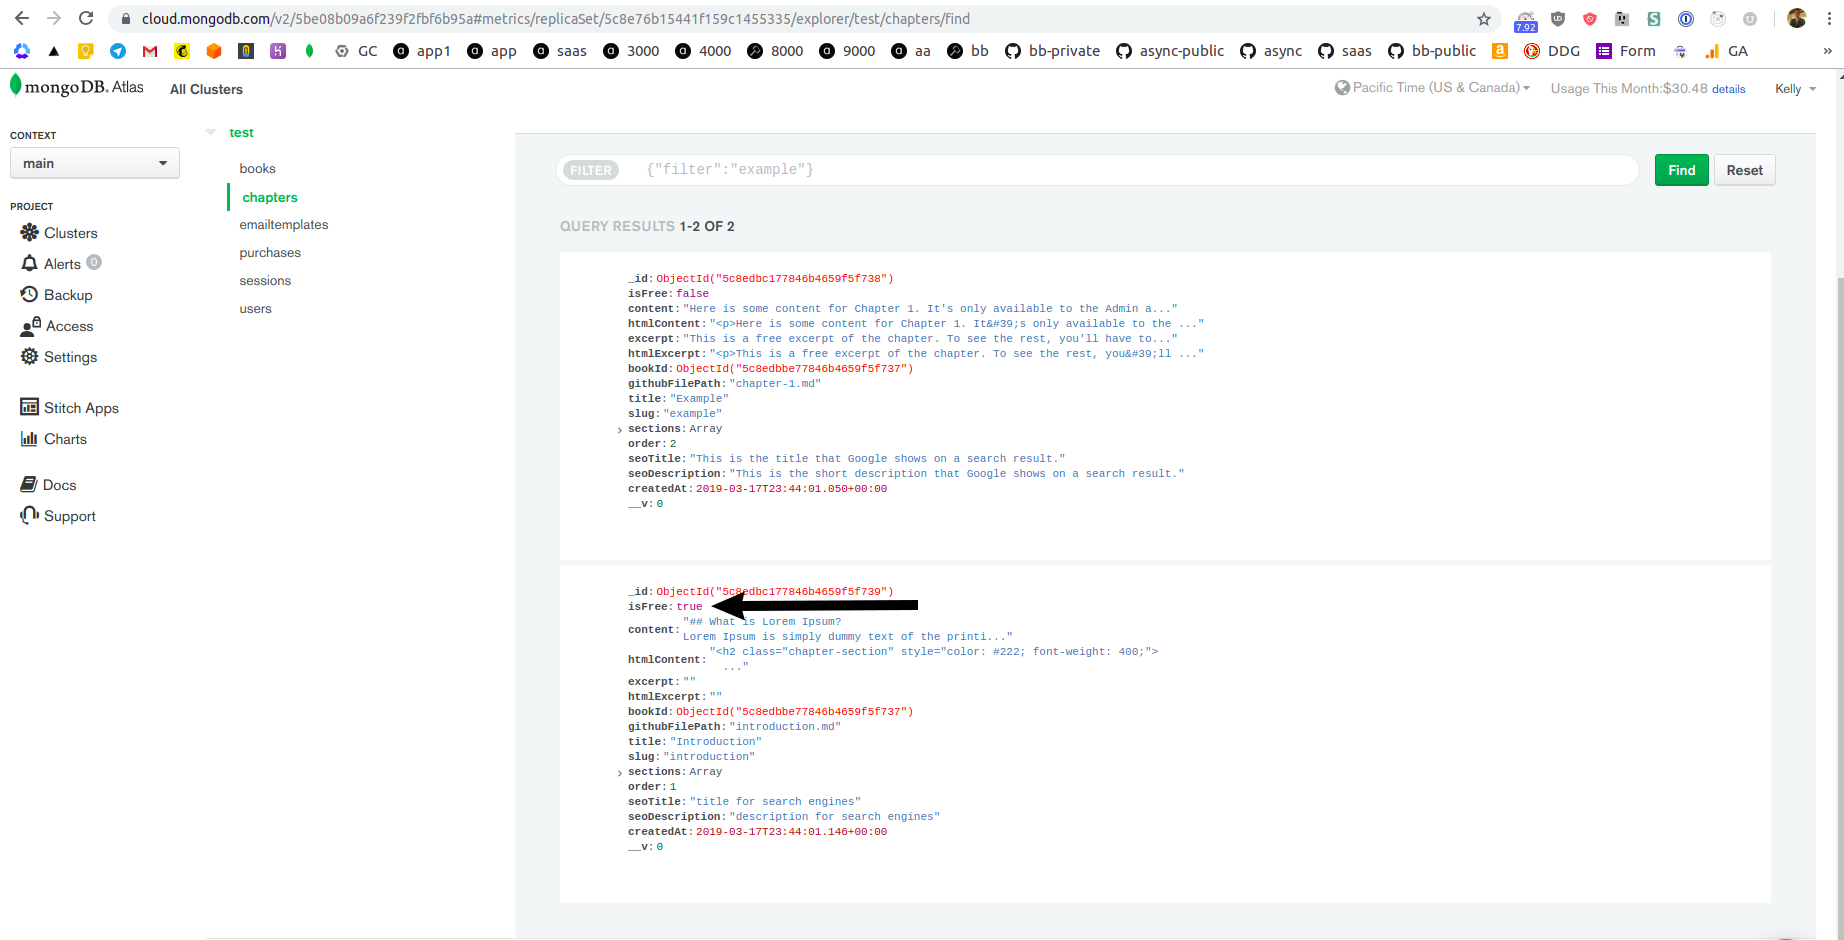
Now go to Atlas, go to the test.chapters collection, and find the chapter document created from the introduction.md file. You will indeed see the proper isFree parameter:
Alright, now we have a useful boolean parameter, chapter.isFree , that we can use to control whether we show chapter.htmlExcerpt or chapter.htmlContent . When chapter.isFree is true, the page should display chapter.htmlContent . When false, chapter.htmlExcerpt .
The next step is to introduce another boolean parameter: chapter.isPurchased . This will allow users who purchased a book to see its content. When the chapter.isPurchased parameter is true, the page should display chapter.htmlContent , even when chapter.isFree is false. To set isPurchased on the chapter object, we have to modify the getBySlug() static method inside our Chapter model.
Open server/models/Chapter.js and find the getBySlug() static method:
static async getBySlug({ bookSlug, chapterSlug }) {
  const book = await Book.getBySlug({ slug: bookSlug });
  if (!book) {
    throw new Error('Book not found');
  }

  const chapter = await this.findOne({ bookId: book._id, slug: chapterSlug });

  if (!chapter) {
    throw new Error('Chapter not found');
  }

  const chapterObj = chapter.toObject();
  chapterObj.book = book;

  return chapterObj;
}
In Chapter 5, when we wrote the getBySlug static method, we passed userId and isAdmin parameters to this method from corresponding Express route. But we haven’t used them yet (though we mentioned that we would in Chapter 8).
Add these two parameters in the getBySlug() function like this:
static async getBySlug({
  bookSlug, chapterSlug, userId, isAdmin,
})
Now, let’s modify the getBySlug static method by adding code that checks whether the chapter isPurchased . We’ll add the code before we return chapterObj with return chapterObj . Follow the example from our Book.buy() static method located at server/models/Book.js . There, we defined isPurchased like this:
const isPurchased = (await Purchase.find({ userId: user._id, bookId: id }).countDocuments()) > 0;
Here, we will make some slight changes. We will check:
- that the purchase document exists (
Purchase.findOne({ userId, bookId: book._id })) - whether a user is Admin (
isAdmin), - whether the chapter is free (
chapter.isFree)
To check for all three, you may get something like this:
if (userId) {
  const purchase = await Purchase.findOne({ userId, bookId: book._id });

  chapterObj.isPurchased = !!purchase || isAdmin;
}

const isFreeOrPurchased = chapter.isFree || chapterObj.isPurchased;

if (!isFreeOrPurchased) {
  delete chapterObj.htmlContent;
}
First note - chapterObj.isPurchased is true if a purchase exists or if a user is Admin.
Second note - we remove the full content of htmlContent from the chapterObj object when chapterObj.isFreeOrPurchased is false. If a chapter is not free and not purchased, then chapterObj will not contain htmlContent . This is a very important step, since our app renders ReadChapter page initially on the server . Writing conditional logic that hides full content on the client is not sufficient that’s why we added above server-side logic.
Add the above code snippet to the getBySlug method in our Chapter model. Paste the snippet above this line of code:
return chapterObj;
Remember to import the Purchase model to server/models/Chapter.js with:
const Purchase = require(’./Purchase’);
Great, we have both boolean parameters we wanted: chapter.isFree and chapter.isPurchased !
Writing a conditional construct inside the ReadChapter page will be easy. Open pages/public/read-chapter.js and find two places where we defined htmlContent . First, inside constructor :
let htmlContent = '';
if (chapter) {
  htmlContent = chapter.htmlContent;
}
Second, inside componentWillReceiveProps() :
const { htmlContent } = chapter;
Replace both of these definitions of htmlContent with:
let htmlContent = '';
if (chapter && (chapter.isPurchased || chapter.isFree)) {
  htmlContent = chapter.htmlContent;
} else {
  htmlContent = chapter.htmlExcerpt;
}
The condition (chapter.isPurchased || chapter.isFree) ensures that we show the full content of chapter.htmlContent only in the following cases:
- user bought the book
- user is an Admin
- Admin user specifies
isFree: truein the metadata of a.mdfile
BuyButton
Now that we’ve set up conditions for showing free or paid content to particular users, let’s add a buy button to appear on paid books.
Go to the ReadChapter page. Open the pages/public/read-chapter.js file and import the BuyButton component:
import BuyButton from ‘…/…/components/customer/BuyButton’;
In the same file, find the renderMainContent() function. Inside this function, find the element:
<div
  // eslint-disable-next-line react/no-danger
  dangerouslySetInnerHTML={{ __html: htmlContent }}
/>
Under this element, which is htmlContent , add the buy button ( BuyButton component):
{!chapter.isPurchased && !chapter.isFree ? (
  <BuyButton user={user} book={chapter.book} />
) : null}
This conditional construct ensures that a page does not display the buy button on a chapter when chapter.isPurchased or chapter.isFree is true.
We pass user , book , and showModal props to our BuyButton component. We have already defined the props user and book inside the ReadChapter page component. Go ahead and find them:
- we defined a
userconstant inside therender()method asconst { user } = this.props;, since we passuserprop to theHeadercomponent - we defined a
bookconstant inside therenderSidebar()function asconst { book } = chapter;, we usebookforbook.slug
So we know how to define user and book inside the local scope of the renderMainContent() function:
renderMainContent() {
  const { user } = this.props;

  const {
    chapter, htmlContent, showTOC, isMobile,
  } = this.state;

  const { book } = chapter;

  let padding = '20px 20%';
  if (!isMobile && showTOC) {
    padding = '20px 10%';
  } else if (isMobile) {
    padding = '0px 10px';
  }

  return (
    <div style={{ padding }} id="chapter-content">
      <h2 style={{ fontWeight: '400', lineHeight: '1.5em' }}>
        {chapter.order > 1 ? `Chapter ${chapter.order - 1}: ` : null}
        {chapter.title}
      </h2>
      <div
        // eslint-disable-next-line react/no-danger
        dangerouslySetInnerHTML={{ __html: htmlContent }}
      />
      {!chapter.isPurchased && !chapter.isFree ? (
        <BuyButton user={user} book={book} />
      ) : null}
    </div>
  );
}
Time to test.
Testing
We should make UX improvements to our checkout flow, but before we do, let’s test the code we wrote so far in this chapter.
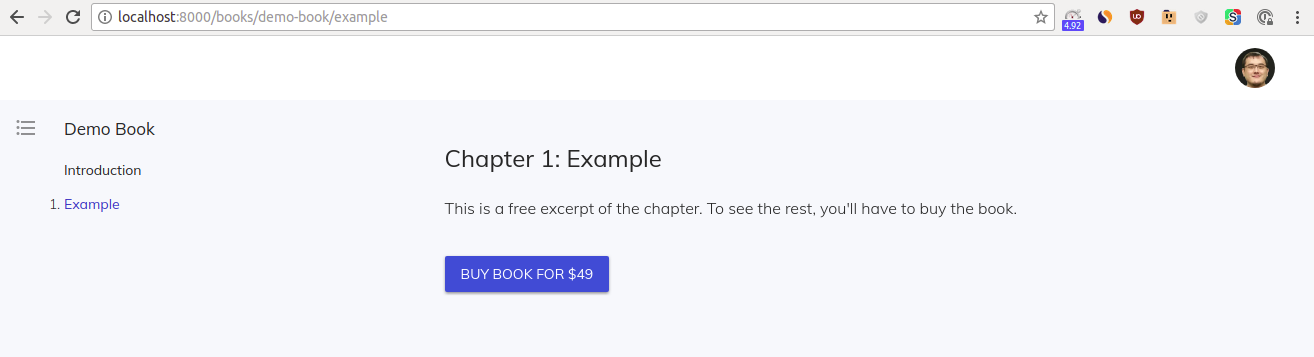
Start your app with yarn dev , log in with a non-Admin user, and navigate to
http://localhost:8000/books/demo-book/example
As expected, you will see chapter.htmlExcerpt and the BuyButton component!
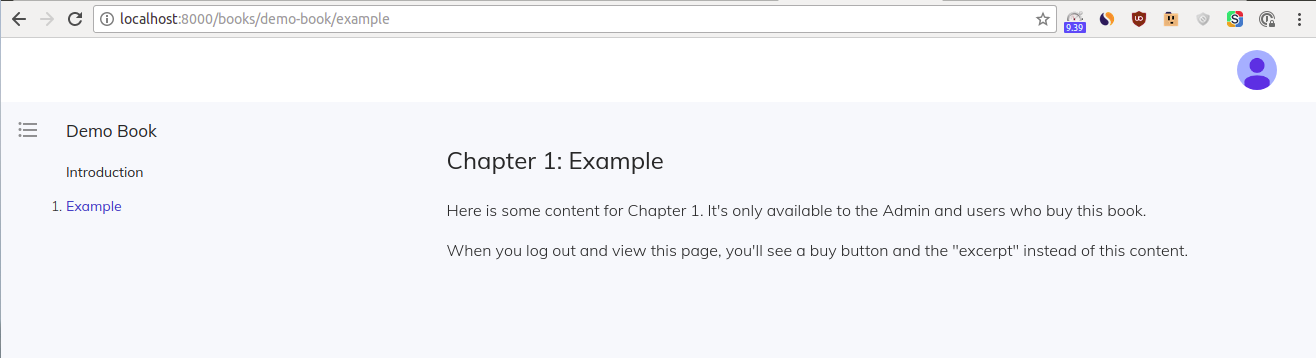
Log out, and log in with an Admin user (if you have only one Google account, set "isAdmin": true on your user document at MongoDB).
Navigate to http://localhost:8000/books/demo-book/example .
As expected, the page displays the full content of chapter.htmlContent , and the BuyButton component has disappeared:
If you try to test the checkout flow, it will fail with the error Not found . The Book.buy() method fails because the EmailTemplate document with the name purchase can’t be found in our database.
To make our app create this missing EmailTemplate document, you need to go to Atlas and delete the current emailtemplates collection. Then stop your app and start it again with yarn dev . Check the newly created emailtemplates collection - it will contain two documents with the names welcome and purchase . Now we are ready for testing the checkout flow.
Notice that at this point your database has no purchases collection.
Log out and log in with a non-Admin user again (or remove "isAdmin": true from your user document at MongoDB).
Navigate to http://localhost:8000/books/demo-book/example .
Click the Buy book button and you will see the Stripe modal:
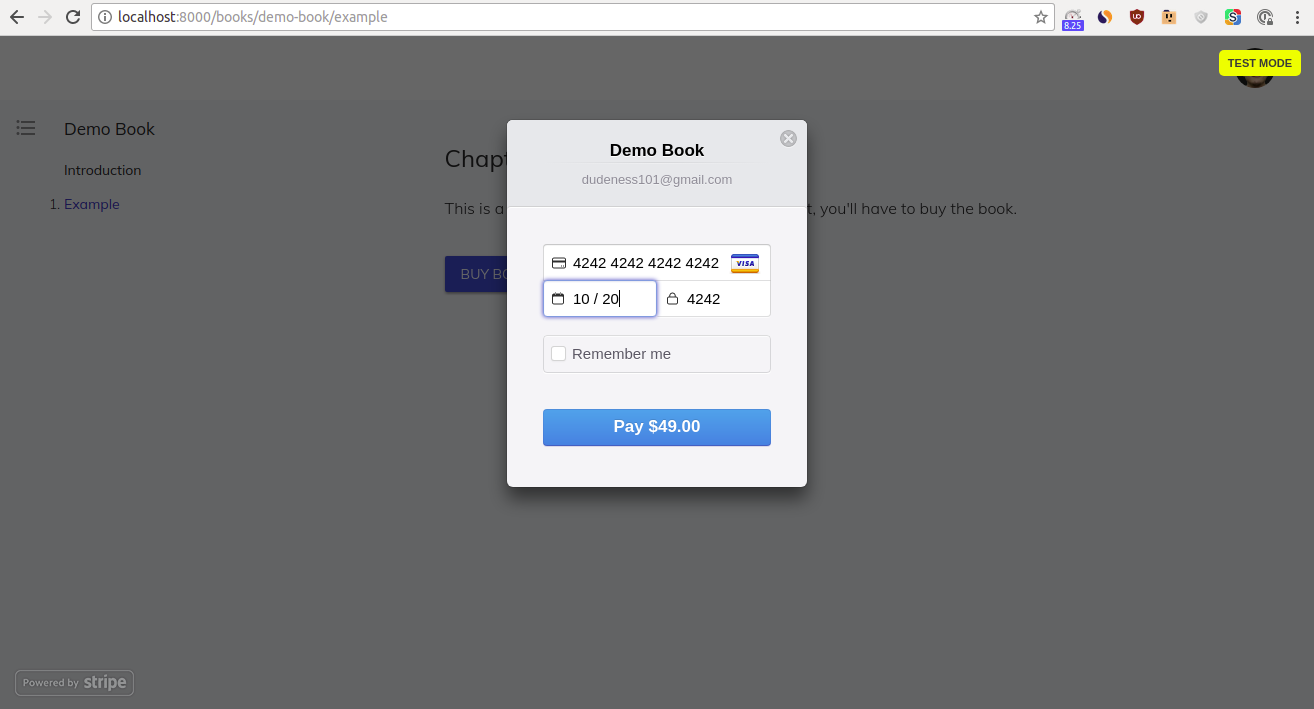
In test mode, Stripe suggests using the card number 4242 4242 4242 4242 with any CVC (why not 4242) and any date in the future.
Click the Pay $49 button on the Stripe modal, and you will see a Success! in-app message. Then after reloading the page, you will see the full content:
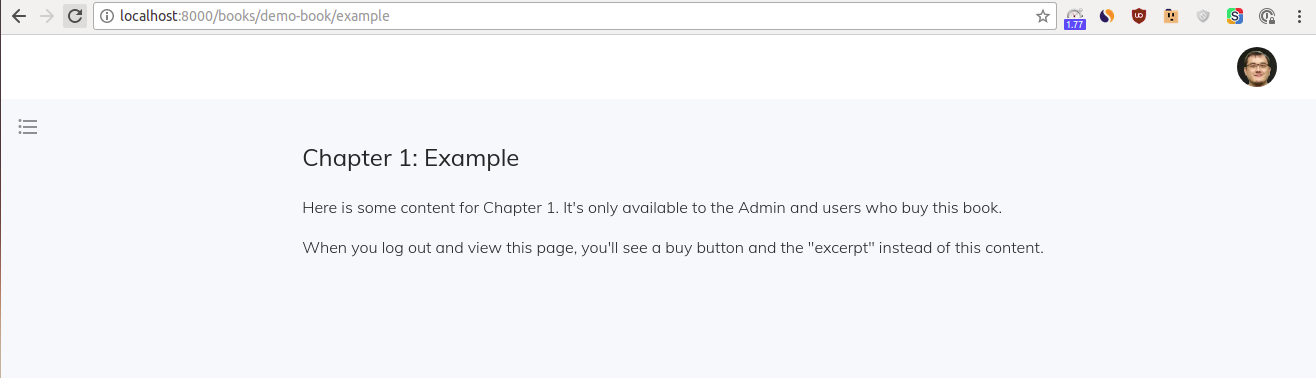
In your database, the app created a new collection called purchases . The very first Purchase document looks like:
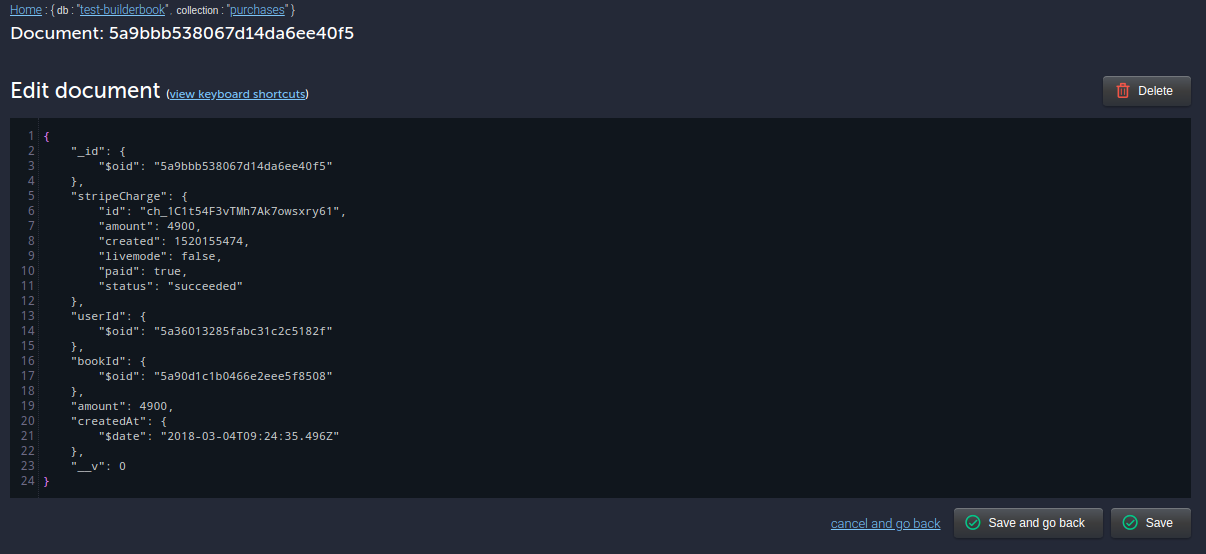
Success, the checkout flow indeed works.
Reloading a page manually to see the full content is not a good UX. In the next section, we will reload the page automatically and make a few more UX improvements.
Checkout UX
In the previous section, we implemented a checkout flow and showed that it works as expected. However, a few experiences inside our checkout flow are not smooth. For example:
- After you buy a book, you have to manually refresh the page in order to see the full content.
- If you are logged out while viewing the
ReadChapterpage and then log in, you will be redirected to theMyBookspage. It would be better to redirect back to theReadChapterpage. - If you are logged out and click the
Buy bookbutton (on theReadChapterpage), you will be redirected to theMyBookspage. It would be better to redirect back to theReadChapterpage you were reading when you clicked theBuy bookbutton. - If you are logged out and click the
Buy bookbutton, you have to sign in and then click theBuy bookbutton again . It would better to see the Stripe modal right after logging in, so you only need to click theBuy Bookbutton once .
Let’s discuss how we will solve each of the UX problems above.
- You may think of at least two ways to solve this problem. Ultimately, the goal is to re-run the
getInitialProps()method inside theReadChapterpage (pages/public/read-chapter.js). Re-rendering a component withsetState()will not triggergetInitialProps()to execute again. We need to re-run thegetInitialProps()method to addhtmlContentparameter to thechapterObjso full content can be displayed on the page. One complication is that, to re-rungetInitialProps(), we need to passheaders.cookietogetInitialProps()again. We have to saveheaders.cookiein props.Here is the reason why thegetInitialProps()method requirescookieas an argument. As discussed earlier in Chapter 2, section Session, the server needs a cookie to identify a session. Then the server uses session to get a user id, and finally the server uses user id to get a user fromreq.user. In ourBook.buy()static method (server/models/Book.js), we useuseranduser.isAdminto see if a user bought a book or if a user is an Admin.A simpler solution is to trigger a window reload after thebuyBook()API method has executed. Opencomponents/customer/BuyButton.jsand find this snippet:
try {
 await buyBook({ stripeToken: token, id: book._id });
 notify('Success!');
 NProgress.done();
} catch (err) {
 NProgress.done();
 notify(err);
}
As you know from Chapter 3, section Async/await, the code pauses at the line with await buyBook() . After this line, add a new line:
window.location.reload(true); This method location.reload(true) reloads a page from the server.
2. Imagine you bought a book but you logged out of the app. Say you go back to Chapter 2 of the book. Let’s modify the code so that when you click the Log in link (in the Header ) and log in with Google, you’ll be automatically redirected back to Chapter 2 instead of the MyBooks page.Take a look at the code responsible for redirecting a user after Google login at server/google.js . Find this anonymous arrow function:
(req, res) => {
 if (req.user && req.user.isAdmin) {
   res.redirect('/admin');
 } else {
   res.redirect('/my-books');
 }
},
We need to modify the above conditional logic. We still want to redirect an Admin user to /admin . But a Customer user should be redirected to the ReadChapter page if the user clicked the Log in link or Buy book button while on the ReadChapter page.We suggest creating a new parameter, redirectUrl , that contains the URL of the ReadChapter page.We can append this redirectUrl value to the Login page URL ( /login ) and Google OAuth URL ( /auth/google ). Then, after a user logs in, we can read redirectUrl from the appended URL and redirect a user back to the ReadChapter page. For example, for the URL:
The redirectUrl would be:
%2Fbooks%2Fbuilder-book%2Ftable-of-contents-highlight-for-section-hide-header-mobile-browser
URL encoded %2F stands for slash / .First, let’s work on the redirect when a user clicks the Log in link inside the Header component. Open server/google.js and find the /auth/google Express route:
server.get(
 '/auth/google',
 passport.authenticate('google', {
   scope: ['profile', 'email'],
   prompt: 'select_account',
 }),
);
We want to re-write this route in order to save a redirectUrl string value to the req.session object before calling passport.authenticate('google') . We want both req.query and req.query.redirectUrl to exist and make sure that the latter starts with / . We do so with the JavaScript method startsWith(’/’) that outputs true or false:
if (req.query && req.query.redirectUrl && req.query.redirectUrl.startsWith('/')) {
 req.session.finalUrl = req.query.redirectUrl;
} else {
 req.session.finalUrl = null;
}
If all three conditions are true, we save redirectUrl to our session object as req.session.finalUrl .
The updated Express route will look like:
server.get('/auth/google', (req, res, next) => {
 if (req.query && req.query.redirectUrl && req.query.redirectUrl.startsWith('/')) {
   req.session.finalUrl = req.query.redirectUrl;
 } else {
   req.session.finalUrl = null;
 }

 passport.authenticate('google', {
   scope: ['profile', 'email'],
   prompt: 'select_account',
 })(req, res, next);
});
Third argument next in the above middleware functions ensures that Express passes control to downstream middleware function since these the above middleware functions do not end request-response cycle (for example, they don’t send any response to user).At this point, we saved a redirectUrl value to req.session . The next step is to use it for an actual redirect. In the same file, find this function inside the /oauth2callback Express route:
(req, res) => {
 if (req.user && req.user.isAdmin) {
   res.redirect('/admin');
 } else {
   res.redirect('/my-books');
 }
},
Before the else condition, we should add an else if condition to redirect a user to req.session.finalUrl with res.redirect(req.session.finalUrl) :
else if (req.session.finalUrl) {
 res.redirect(req.session.finalUrl);
}
Updated function:
(req, res) => {
 if (req.user && req.user.isAdmin) {
   res.redirect('/admin');
 } else if (req.session.finalUrl) {
   res.redirect(req.session.finalUrl);
 } else {
   res.redirect('/my-books');
 }
},
This conditional logic redirects an Admin user to /admin and redirects a Customer user to req.session.redirectUrl if req.query.redirectUrl exists. However, based on the last statement, our redirect feature does not work yet. It will only work when req.query (i.e. the part of the URL after ?redirectUrl= ) has a value (see how we defined req.session.finalUrl earlier). Our next step is to engineer req.query.redirectUrl .Let’s keep in mind what we want to achieve. We want a user who is on the ReadChapter page and who clicks the Log in link in the Header component to be redirected back to the same ReadChapter page after logging in. That means that:
- The URL of the
Loginpage must contain the?redirectUrl=query with a value. - Once the URL of the
Loginpage has this query, the app will be able to read the query value and pass it to/auth/google?redirectUrl=. - After that, the updated Express route
server.get('/auth/google)will take care of the rest.Start your app and make sure you are logged out. Go to Chapter 1 (titled “Example”) of the demo-book repo you forked earlier. The URL of this page is:
http://localhost:8000/books/demo-book/example
We want to make sure that when you click Log in in the Header , the URL of the Login page is:
http://localhost:8000/public/login?redirectUrl=%2Fbooks%2Fdemo-book%2Fexample
Instead of:
http://localhost:8000/public/login
The easiest way to achieve this is to pass the redirectUrl prop from the ReadChapter page to the Header component. Let’s make neccesary changes to ReadChapter and Header .
- In
pages/public/read-chapter.js, make the following 3 changes:- To
static PropTypes, add a newrouterprop:
- To
router: PropTypes.shape({
asPath: PropTypes.string.isRequired,
}).isRequired,
2. Inside the main `render()` method, define a `prop` variable as `this.props.router` :
const { user, router } = this.props;
3. Pass a router.asPath value to the redirectUrl prop on the Header component like this:
Header user={user} hideHeader={hideHeader} redirectUrl={router.asPath}
Read about router object, its type, and its asPath parameter in the Next.js docs for router object.
In our case, router.asPath is /books/demo-book/example .
If in doubt, print this value to the browser console ( Developer tools > Console ) by adding console.log(router.asPath); after const { user, router } = this.props; inside render() of the pages/public/read-chapter.js file.Add import:
import { withRouter } from ‘next/router’;
Then add router prop to props:
static propTypes = {
chapter: PropTypes.shape({
  _id: PropTypes.string.isRequired,
}),
user: PropTypes.shape({
  _id: PropTypes.string.isRequired,
}),
router: PropTypes.shape({
  asPath: PropTypes.string.isRequired,
}).isRequired,
};
Remember to wrap ReadChapter page component with withRouter to pass router prop to ReadChapter component:
export default withAuth(withLayout(withRouter(ReadChapter), { noHeader: true }), {
loginRequired: false,
});
- In
components/Header.js, make the following 3 changes:- Add a
redirectUrlprop to theHeaderfunction:
- Add a
function Header({ user, hideHeader, redirectUrl })
2. Update the `href` value in the `<Link>` element for `Log in` . It becomes:
<Link
prefetch
href={{ pathname: '/public/login', asPath: '/login', query: { redirectUrl } }}>
<a style={{ margin: '0px 20px 0px auto' }}>Log in</a>
</Link>
We specified that query is a value after ?redirectUrl= with this property shorthand: query: { redirectUrl } .
3. Add the redirectUrl prop to propTypes and defaultProps . Add redirectUrl: PropTypes.string and redirectUrl: '' to propTypes and defaultProps blocks respectively.We are ready to test.
Start your app. While logged out, go to http://localhost:8000/books/demo-book/example .
Click the Log in link in the Header . You will be redirected to the Login page that has URL:
http://localhost:8000/public/login?redirectUrl=%2Fbooks%2Fdemo-book%2Fexample
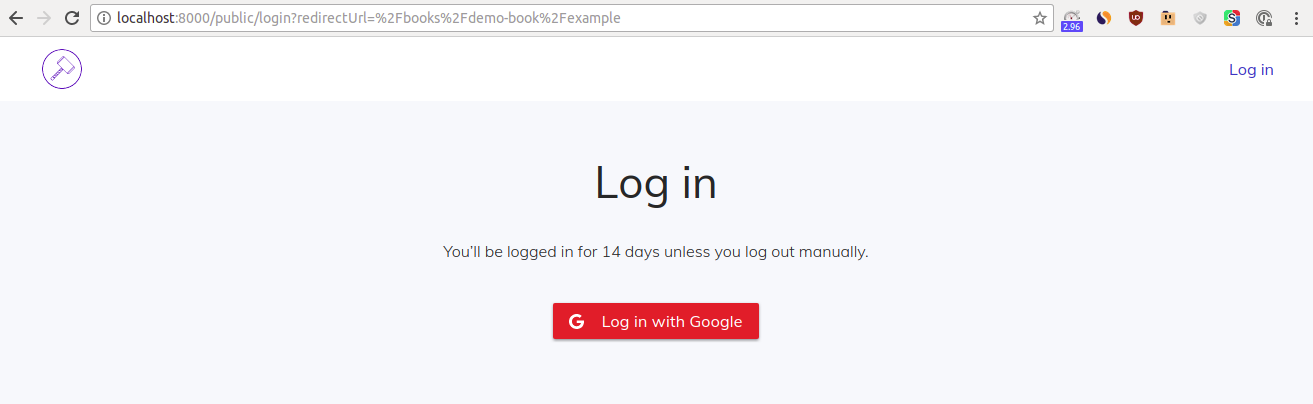
It almost works!
query parameter is added to the URL, however asPath parameter did not work: we still see /public/login/... instead of /login/... .As we found out after writing this book, asPath on
Link component does not work and work around is to pass as to Link :
<Link
 prefetch
 href={{ pathname: '/public/login', query: { redirectUrl } }}>
 as={{ pathname: '/login', query: { redirectUrl } }}>
 <a style={{ margin: '0px 20px 0px auto' }}>Log in</a>
</Link>
Pass as object to Link component as it shown in the above snippet.
Go to http://localhost:8000/books/demo-book/example and click on Log in link inside the Header .
Now browser will show you proper URL:
http://localhost:8000/login?redirectUrl=%2Fbooks%2Fdemo-book%2Fexample
Try clicking the red Log in with Google button and log in as a Customer (non-Admin) user. Login worked but you are not be redirected back to Chapter 1. That’s because we did not pass the redirectUrl query to the /auth/google route yet.
Open pages/public/login.js and make these 4 changes:
- Rewrite
Loginas a function instead of a constant - Add the
routerprop toLogin.propTypes - Define
redirectUrlas:
const redirectUrl = (router && router.query && router.query.redirectUrl) || ‘’;
- Pass
redirectUrlto thehrefattribute of the<Button>element with:
/auth/google?redirectUrl=${redirectUrl}
- Wrap
Loginpage component withwithRouterHOC soLoginreceivesrouterprop.After all changes, the updatedpages/public/login.jsfile is:
pages/public/login.js:
import Head from 'next/head';
import { withRouter } from 'next/router';
import PropTypes from 'prop-types';
import Button from '@material-ui/core/Button';

import withAuth from '../../lib/withAuth';
import withLayout from '../../lib/withLayout';
import { styleLoginButton } from '../../components/SharedStyles';

function Login({ router }) {
const redirectUrl = (router && router.query && router.query.redirectUrl) || '';

return (
 <div style={{ textAlign: 'center', margin: '0 20px' }}>
   <Head>
     <title>
       Log in to Builder Book
     </title>
     <meta name="description" content="Login page for builderbook.org" />
   </Head>
   <br />
   <p style={{ margin: '45px auto', fontSize: '44px', fontWeight: '400' }}>
     Log in
   </p>
   <p>
     You’ll be logged in for 14 days unless you log out manually.
   </p>
   <br />
   <Button
     variant="contained"
     style={styleLoginButton}
     href={`/auth/google?redirectUrl=${redirectUrl}`}
   >
     <img
       src="https://storage.googleapis.com/builderbook/G.svg"
       alt="Log in with Google"
       style={{ marginRight: '10px' }}
     />
     Log in with Google
   </Button>
 </div>
);
}

Login.propTypes = {
router: PropTypes.shape({
 query: PropTypes.shape({
   redirectUrl: PropTypes.string,
 }),
}).isRequired,
};

export default withAuth(withLayout(withRouter(Login), { logoutRequired: true });
Now we can test this entire new feature.
Start your app. While logged out, go to:
http://localhost:8000/books/demo-book/example
Click Log in in the Header . You will be redirected to the Login page with this URL:
http://localhost:8000/public/login?redirectUrl=%2Fbooks%2Fdemo-book%2Fexample
Hover your cursor over the Log in with Google button, and you will see the following URL in the bottom-left corner of your browser window:
http://localhost:8000/auth/google?redirectUrl=/books/demo-book/example
Log in as a Customer (non-Admin) user, and you will be redirected back to:
http://localhost:8000/books/demo-book/example
Hooray!
- The next step is to work on a slightly different redirect - taking a user back to the
ReadChapterpage when a logged-out user clicks theBuy bookbutton. We’ve actually written most of the code for this feature. We will rely on the code we added toserver/google.js. That means that we need to add aredirectUrlquery to the URL when a logged-out user clicks theBuy bookbutton on theReadChapterpage.Do you remember which function handles a click onBuy bookfrom a logged-out user? It’s theonLoginClickedfunction from theBuyButtoncomponent (components/customer/BuyButton.js):
onLoginClicked = () => {
 const { user } = this.props;

 if (!user) {
   window.location.href = '/auth/google';
 }
};
We need to make sure that /auth/google gets the redirectUrl query. In this local scope, define redirectUrl as location.pathname. location.pathname gives the same value as Next.js’s router.asPath (see above). It’s the part of the URL without the domain root:
const redirectUrl = window.location.pathname;
Append the value of redirectUrl to /auth/google?redirectUrl= . Set the page’s URL to this appended URL by using location.href:
const redirectUrl = window.location.pathname;
window.location.href = `/auth/google?redirectUrl=${redirectUrl}`;
Updated onLoginClicked function:
onLoginClicked = () => {
 const { user } = this.props;

 if (!user) {
   const redirectUrl = window.location.pathname;
   window.location.href = `/auth/google?redirectUrl=${redirectUrl}`;
 }
};
Time to test it out.Make sure you are logged out and navigate to: http://localhost:8000/books/demo-book/example
Click on the blue Buy book button.
You will see the Google OAuth prompt. After logging in (as a Customer), you will be automatically redirected back to:
http://localhost:8000/books/demo-book/example
Good job.The only part that still sucks, UX-wise, is that the Stripe modal did not appear automatically. You clicked the Buy book button because you intend to buy a book. But our app requires you to click Buy book one more time. That’s annoying.
4. To show the Stripe modal to a user who clicked on the Buy book button while logged out, we need to somehow change the value of the showModal prop inside the BuyButton component. We need to detect that a logged-user clicked the Buy book button on the ReadChapter page. Then we need to pass a showModal prop with the value true from the ReadChapter page to the BuyButton component.
Earlier in this chapter, we set the initial state of the Buy book component with:
this.state = {
 showModal: !!props.showModal,
};
This code ensures that showModal from the ReadChapter page has the same value as showModal in the scope of the BuyButton component.The question is when should the ReadChapter page pass this showModal prop to the BuyButton component?An easy solution is to modify our onLoginClicked function so that /auth/google?redirectUrl=${redirectUrl} is further appended with a unique query, say ?buy=1 . Inside our onLoginClicked function, append ?buy=1 to /auth/google?redirectUrl=${redirectUrl} so that it becomes:
/auth/google?redirectUrl=${redirectUrl}?buy=1
Next, make changes to the ReadChapter page component so it passes showModal to the BuyButton component:
- Update the
<BuyButton>component by passing this extra prop:
BuyButton user={user} book={book} showModal={showStripeModal}
Inside renderMainContent , define showStripeModal as this.props.showStripeModal with ES6 destructuring:
const { user, showStripeModal } = this.props;
- Add
showStripeModaltostatic PropTypes:
showStripeModal: PropTypes.bool.isRequired - Finally, write code that makes
showStripeModaldetect thebuy=1query in the URL:
const showStripeModal = req ? !!req.query.buy : window.location.search.includes(‘buy=1’);
This code above says that, when req exists, showStripeModal is true when the query ?buy= exists ( req.query.buy exists thus !!req.query.buy is true). When req does not exist, then showStripeModal is true when window.location.search.includes('buy=1') exists. location.search returns the query part of the URL - in our case, everything after the first ? symbol. For example, for Chapter 1 of our demo book, window.location.search :
?redirectUrl=/books/demo-book/example?buy=1
The JavaScript method includes(‘buy=1’) checks if buy=1 is included in window.location.search .We defined showStripeModal with conditional logic because sometimes the page is server-side rendered ( req.query.buy is available on the server) and sometimes client-side rendered ( window.location.search is available on client).Add the above definition of showStripeModal inside the getInitialProps() method like this:
static async getInitialProps({ req, query }) {
const { bookSlug, chapterSlug } = query;

const headers = {};
if (req && req.headers && req.headers.cookie) {
  headers.cookie = req.headers.cookie;
}

const chapter = await getChapterDetail({ bookSlug, chapterSlug }, { headers });

const showStripeModal = req ? !!req.query.buy : window.location.search.includes('buy=1');

return { chapter, showStripeModal };
}
Our code is ready for testing.While logged out, navigate to: http://localhost:8000/books/demo-book/example
Click on the blue Buy book button. Log in as a Customer (non-Admin) user.
You will be automatically redirected back to Chapter 1:
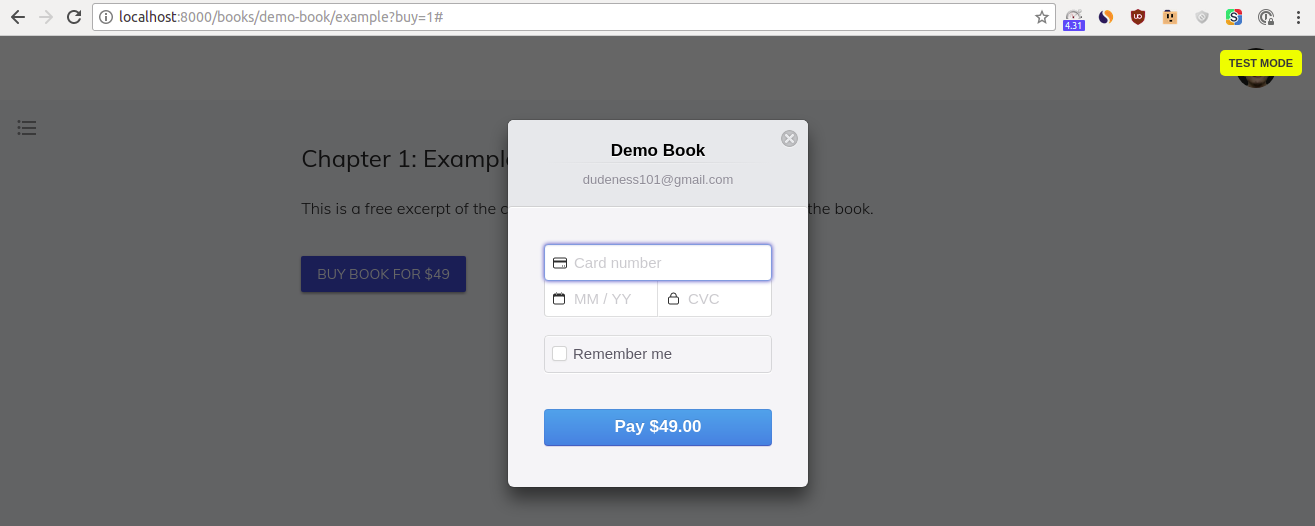
http://localhost:8000/books/demo-book/example?buy=1
This time you will the Stripe modal and there is no need for you to click Buy book again:
We are done with UX improvements to our checkout flow. In the next section, we will work on the MyBooks page. Our main goal is to display a hyperlinked title for the book purchased by a Customer user.
MyBooks page
The MyBooks page is a Customer page, and it contains a list of books purchased by a user. Think of it as the Customer’s dashboard.
Before we start writing code for any new page, the first step is to decide how to render that page - server-side or client-side.
For example, the Admin page ( pages/admin/index.js ) is client-side rendered, and the getBookList() API method is called inside the componentDidMount() lifecycle hook. If you load the /admin page, you will notice that the page loads without data (without the list of books). Data appears with a small but noticable delay. If Admin UX is our priority, we would display some kind of loading UI while the Admin user waits for data to appear. For example, we could’ve displayed Nprogress, a spinner, or simply text loading... .
In comparison, the ReadChapter page is server-side rendered (on initial load), and the getChapterDetail() API method is called inside the getInitialProps() method instead of componentDidMount() . The UX advantage of a server-side rendered page is that it does not require loading UI. The page loads with data, never without data.
Admin UX is not our first priority - Customer UX is. Thus, we will implement the MyBook page so that it is server-side rendered on initial load. We will place the API method getMyBookList() inside the getInitialProps() method.
You created multiple page at this point. The most recent server-side rendered page was the ReadChapter page. Take a look at the getInitialProps() method at pages/public/read-chapter.js :
static async getInitialProps({ req, query }) {
  const { bookSlug, chapterSlug } = query;

  const headers = {};
  if (req && req.headers && req.headers.cookie) {
    headers.cookie = req.headers.cookie;
  }

  const chapter = await getChapterDetail({ bookSlug, chapterSlug }, { headers });
  const showStripeModal = req ? !!req.query.buy : window.location.search.includes('buy=1');

  return { chapter, showStripeModal };
}
One similarity between the MyBooks and ReadChapter pages is that we will pass a cookie as headers.cookie to the server. If we don’t do this, then req.user won’t be available on the server. (You remember from Chapter 3 that cookie has encoded session id, session has user id, and with this user id, the server can find a user and create req.user that is used in many Express routes to check user permissions or to update user parameters.)
The difference between these pages is that ReadChapter shows chapter.htmlExcerpt to a logged-out user, but MyBooks should not be available at all to a logged-out user. Good UX would be to redirect the logged-out user, who stumbled upon the /my-books route, to the Login page:
if (req && !req.user) {
  res.redirect('/login');
  return { purchasedBooks: [] };
}
If a user is logged in, then we define and return an array of purchased books purchasedBooks like this:
const { purchasedBooks } = await getMyBookList({ headers });
return { purchasedBooks };
Summarize the above description of the getInitialProps() method:
static async getInitialProps({ req, res }) {
  if (req && !req.user) {
    res.redirect('/login');
    return { purchasedBooks: [] };
  }

  const headers = {};
  if (req && req.headers && req.headers.cookie) {
    headers.cookie = req.headers.cookie;
  }

  const { purchasedBooks } = await getMyBookList({ headers });
  return { purchasedBooks };
}
Remember how you rendered a list of sections using the map() JavaScript method. Open pages/public/read-chapter.js and find the renderSections() function:
renderSections() {
  const { sections } = this.state.chapter;
  const { activeSection } = this.state;

  if (!sections || !sections.length === 0) {
    return null;
  }

  return (
    <ul>
      {sections.map(s => (
        <li key={s.escapedText} style={{ paddingTop: '10px' }}>
          <a
            style={{
              color: activeSection && activeSection.hash === s.escapedText ? '#1565C0' : '#222',
            }}
            href={`#${s.escapedText}`}
            onClick={this.closeTocWhenMobile}
          >
            {s.text}
          </a>
        </li>
      ))}
    </ul>
  );
}
Let’s use this example above for purchasedBooks :
{purchasedBooks && purchasedBooks.length > 0 ? (
  <div>
    <h3>Your books</h3>
    <ul>
      {purchasedBooks.map(book => (
        <li key={book._id}>
          <Link
            as={`/books/${book.slug}/introduction`}
            href={`/public/read-chapter?bookSlug=${book.slug}&chapterSlug=introduction`}
          >
            <a>{book.name}</a>
          </Link>
        </li>
      ))}
    </ul>
  </div>
) : (
  <div>
    <h3>Your books</h3>
    <p>You have not purchased any book.</p>
  </div>
)}
That’s it, the page is pretty much done. Go to your pages/customer/my-books file and put together the getInitialProps() and render() methods. Inside render() , remember to define purchasedBooks with:
const { purchasedBooks } = this.props;
Add missing imports, propTypes, defaultProps, and <Head> with <title> . Wrap the page component with withLayout and withAuth HOCs. Export with export default withAuth(withLayout(MyBooks)); :
pages/customer/my-books.js :
import React from 'react';
import PropTypes from 'prop-types';
import Link from 'next/link';
import Head from 'next/head';

import { getMyBookList } from '../../lib/api/customer';
import withLayout from '../../lib/withLayout';
import withAuth from '../../lib/withAuth';


class MyBooks extends React.Component {
  static propTypes = {
    purchasedBooks: PropTypes.arrayOf(PropTypes.shape({
      name: PropTypes.string.isRequired,
    })),
  };
  static defaultProps = {
    purchasedBooks: [],
  };

  static async getInitialProps({ req, res }) {
    if (req && !req.user) {
      res.redirect('/login');
      return { purchasedBooks: [] };
    }

    const headers = {};
    if (req && req.headers && req.headers.cookie) {
      headers.cookie = req.headers.cookie;
    }

    const { purchasedBooks } = await getMyBookList({ headers });
    return { purchasedBooks };
  }

  render() {
    const { purchasedBooks } = this.props;

    return (
      <div>
        <Head>
          <title>My Books</title>
        </Head>
        <div style={{ padding: '10px 45px' }}>
          {purchasedBooks && purchasedBooks.length > 0 ? (
            <div>
              <h3>Your books</h3>
              <ul>
                {purchasedBooks.map(book => (
                  <li key={book._id}>
                    <Link
                      as={`/books/${book.slug}/introduction`}
                      href={`/public/read-chapter?bookSlug=${book.slug}&chapterSlug=introduction`}
                    >
                      <a>{book.name}</a>
                    </Link>
                  </li>
                ))}
              </ul>
            </div>
          ) : (
            <div>
              <h3>Your books</h3>
              <p>You have not purchased any book.</p>
            </div>
          )}
        </div>
      </div>
    );
  }
}

export default withAuth(withLayout(MyBooks));
This page won’t get any data yet, since we did not define the getMyBookList API method and did not write an Express route nor static method for getMyBookList in our Book model.
API method getMyBookList
Since we pass headers to getMyBookList , we should take a look at the getChapterDetails API method that accepts headers as well. Open lib/api/public.js :
export const getChapterDetail = ({ bookSlug, chapterSlug }, options = {}) =>
  sendRequest(
    `${BASE_PATH}/get-chapter-detail?bookSlug=${bookSlug}&chapterSlug=${chapterSlug}`,
    Object.assign(
      {
        method: 'GET',
      },
      options,
    ),
  );
Re-write the above API method. Keep in mind that we pass headers as options.headers , and the non-base part of API endpoint is /my-books :
lib/api/customer.js :
export const getMyBookList = (options = {}) =>
  sendRequest(
    `${BASE_PATH}/my-books`,
    Object.assign(
      {
        method: 'GET',
      },
      options,
    ),
  );
Express route ‘/my-books’
Our next step is to write an Express route with the method GET and route /my-books . At this point, you know that a function inside /my-books Express route should call and wait for static method and then return purchasedBooks . Let’s make the static method Book.getPurchasedBooks() return purchasedBooks :
const { purchasedBooks } = await Book.getPurchasedBooks({ purchasedBookIds });
The above static method requires ids of books that are purchased by a user. Where do we get these ids? Since we did pass a cookie to the server, then req.user exists. We can look into req.user.purchaseBookIds for ids of books purchased by a user. This means that we need to modify our Book.buy() static method so that the user document of a user who buys a book gets purchaseBookIds array as a parameter.
Open server/models/User.js and make 2 small changes to the file:
- add
purchasedBookIds: [String]to mongoSchema, - add
'purchasedBookIds'tostatic publicFields()
Open server/models/Book.js . Add a line of code that finds and updates a user who bought a book. Use the Mongoose method findByIdAndUpdate() :
User.findByIdAndUpdate(user.id, { $addToSet: { purchasedBookIds: book.id } }).exec();
Add the above line of code right before the line with const template = await getEmailTemplate() inside the static method buy() .
Remember to import User to server/models/Book.js . Eslint should tell you if an import is missing.
Back to the Express route.
Let’s define purchasedBooksIds with ES6 object destructuring:
const { purchasedBookIds = [] } = req.user;
We are ready to put our Express route together. As always, we suggest using try/catch with async/await :
server/api/customer.js :
router.get('/my-books', async (req, res) => {
  try {
    const { purchasedBookIds = [] } = req.user;

    const { purchasedBooks } = await Book.getPurchasedBooks({ purchasedBookIds });

    res.json({ purchasedBooks });
  } catch (err) {
    res.json({ error: err.message || err.toString() });
  }
});
The only missing part in our client-server data exchange is the static method getPurchasedBooks() .
Static method Book.getPurchasedBooks()
In the previous section, we wrote code that saves a purchased book id to a user document.
Start your app. Make sure you use a Customer user who did not buy demo-book . If necessary, go to your test.purchases collection at MongoDB Atlas and delete the Purchase document for your Customer user who bought demo-book . Now buy a book and go to your test.users collection at MongoDB Atlas, test database. Open the user document and you will see a new array:
"purchasedBookIds": [
    "5a90d1c1b0466e2eee5f8508"
]
The static method getPurchasedBooks() finds all books in the books collection using the purchasedBookIds array, and the method returns purchasedBooks to the Express route /my-books . We will use the find() and sort() Mongoose methods that you know well by this point:
server/models/Book.js :
static async getPurchasedBooks({ purchasedBookIds }) {
  const purchasedBooks = await this.find({ _id: { $in: purchasedBookIds } }).sort({
    createdAt: -1,
  });
  return { purchasedBooks };
}
You may not be familiar with the { $in: [array] } operator. $in allows us to find all documents with a field value matching one of the values inside an array:
{ field: { $in: [, , … ] } }
Start your app, log in, and navigate to http://localhost:8000/my-books :
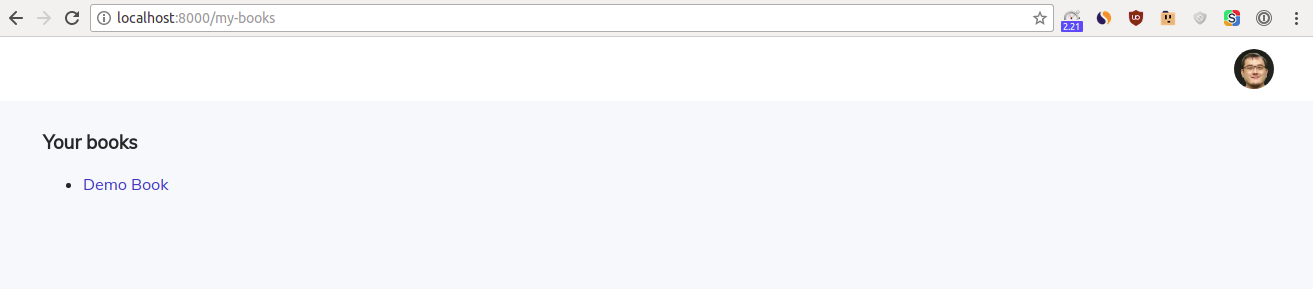
Ta-da, you now see a list of purchased books.
In the next section, we discuss how to add user emails to a Mailchimp list. In the section after that, you will learn how to prepare your app for production and deploy it.