Mailchimp API
In this section, our goal is to modify the static method Book.buy() , which we wrote earlier in this chapter, so that the email of a user who purchases a book gets added to a Mailchimp list.
After publishing and selling a book, you may occasionally need to send announcements to everyone who bought the book. For example, you may add a new chapter or make a major update to the book. We’ll set up an API so that you can email people who bought a book by using a Mailchimp list.
Open server/models/Book.js and find the static method buy() . Find this line of code that creates a new Purchase document:
return Purchase.create()
Before this line, add a try/catch construct that calls and waits for the subscribe() method (which we will define at server/mailchimp.js ):
try {
  await subscribe({ email: user.email });
} catch (error) {
  logger.error('Mailchimp error:', error);
}
The subscribe() method will take a user’s email and add it to a Mailchimp list. The list name is not the actual name of the list on your Mailchimp dashboard but the name of the variable that points to a unique List ID . More on this below.
Inside the subscribe() method, our goal is to send a POST request from our server to a Mailchimp server.
In this book, you wrote code related to third party APIs for Google OAuth, Github, AWS SES,and Stripe. If you remember, for Google OAuth, AWS SES, Stripe - we did not write any code related to an actual request (request from our server to a third party server). We used packages to send requests (usually, GET and/or POST) from our server to third party platform services. We wrote request-related code only in one instance - building Github integration.
Go ahead and open server/github.js and find the code for request:
request.post(
  {
    url: TOKEN_URI,
    headers: { Accept: 'application/json' },
    form: {
      client_id: CLIENT_ID,
      code,
      client_secret: API_KEY,
    },
  },
  async (err, response, body) => {
    // code that manages error
    // code that manages success
  },
);
This request is sent via POST ( request.post ) to Github’s server when an Admin user authorizes our app to access data on his/her Github account. You see that we pass CLIENT_ID and API_KEY of our app to Github’s server with form . For Mailchimp, we will pass the API key with Authorization header ( headers.Authorization ). Syntax for Authorization header: Authorization: <type> <credentials>
In our case:
Authorization: Basic apikey:API_KEY
The API_KEY must be base64 encoded. Recall how we did base64 decoding for chapter.data.content in Chapter 6.
After encoding:
Authorization: Basic ${Buffer.from(apikey:${API_KEY}).toString('base64')}
Accept header in a Mailchimp request is the same as in a Github request. Follow the above example of a request to Github to put together a request to Mailchimp:
request.post(
  {
    uri: `${ROOT_URI}${path}`,
    headers: {
      Accept: 'application/json',
      Authorization: `Basic ${Buffer.from(`apikey:${API_KEY}`).toString('base64')}`,
    },
    json: true,
    body: data,
  },
  (err, response, body) => {
    if (err) {
      reject(err);
    } else {
      resolve(body);
    }
  },
);
We used the variables ROOT_URI and API_KEY .
ROOT_URI is the Mailchimp API endpoint to which our app sends a request. In general, it is:
https://usX.api.mailchimp.com/3.0/lists/{list_id}/members
Read more about the API to add members to a list.
Region usX is a subdomain. Follow these steps to find the subdomain for an API endpoint:
- sign up or log in to Mailchimp
- go to
Account > Extras > API keys > Your API keys - your API key will look like
xxxxxxxxxxxxxxxxxxxxxxxxxxxxxx-us17
That means the region is us17 and your app will send requests to the Mailchimp subdomain:
https://us17.api.mailchimp.com/3.0/lists/{list_id}/members
Let’s add the LIST_IDS variable to request uri:
https://us17.api.mailchimp.com/3.0/lists/${LIST_IDS}/members/
We can add an actual value, but let’s add the variable in case we decide to save emails to a different list at some point. We define LIST_IDS as:
const LIST_IDS = process.env.MAILCHIMP_PURCHASED_LIST_ID;
And we define API_KEY as:
const API_KEY = process.env.MAILCHIMP_API_KEY;
This is a good place to add MAILCHIMP_PURCHASED_LIST_ID and MAILCHIMP_API_KEY to your .env file. We discussed how to find the API_KEY above, it looks like: ``xxxxxxxxxxxxxxxxxxxxxxxxxxxxxx-us17`.
To find List ID , follow these steps:
- on your Mailchimp dashboard, go to
Lists > click the list name > Settings > List name and defaults - find the section
List ID - get the
xxxxxxxxxxvalue from this section
Now we are ready to put together the subscribe() method that sends POST request to Mailchimp server. Follow these steps:
- Create
server/mailchimp.jsfile. - Import
request - Add
require('dotenv').config();since access env variables withprocess.env. - Save
parameteremail todata.email_address. Setdata.statustosubscribed(we passdatato request’sbody).
You will get:
server/mailchimp.js :
const request = require('request');

require('dotenv').config();

async function subscribe({ email }) {
  const data = {
    email_address: email,
    status: 'subscribed',
  };

  const LIST_IDS = process.env.MAILCHIMP_PURCHASED_LIST_ID;

  const API_KEY = process.env.MAILCHIMP_API_KEY;

  await new Promise((resolve, reject) => {
    request.post(
      {
        uri: `https://us17.api.mailchimp.com/3.0/lists/${LIST_IDS}/members/`,
        headers: {
          Accept: 'application/json',
          Authorization: `Basic ${Buffer.from(`apikey:${API_KEY}`).toString('base64')}`,
        },
        json: true,
        body: data,
      },
      (err, response, body) => {
        if (err) {
          reject(err);
        } else {
          resolve(body);
        }
      },
    );
  });
}

exports.subscribe = subscribe;
Done!
In above construct we used async/await as well as new Promise() . You may remember from Chapter 3, section Async/await that function after await must return a Promise.
Time to test. Make sure that the actual values of MAILCHIMP_PURCHASED_LIST_ID and MAILCHIMP_API_KEY are in your .env file.
To test the subscribe() method, we need to run the static method buy() from our Book model. This means you have to buy a book. When testing, make sure you login with a Customer user who has not bought a book . In case your Customer user bought a book , here’s how to un-buy a book:
- on your database, delete the user’s corresponding Purchase document from the purchases collection
- find the user document for your User (users collection) and delete the parameter
purchasedBookIds.
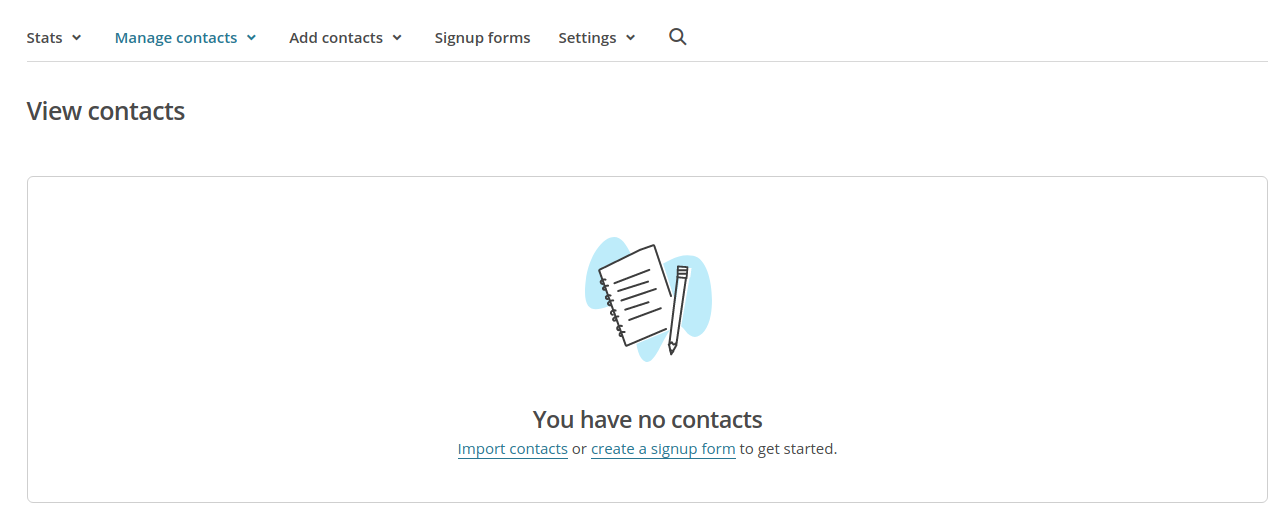
Go to your Mailchimp dashboard and access Lists > click on list name . Notice that the list is empty:
Start your app and go to http://localhost:8000/books/demo-book/example . Click the Buy book button and go through the checkout.
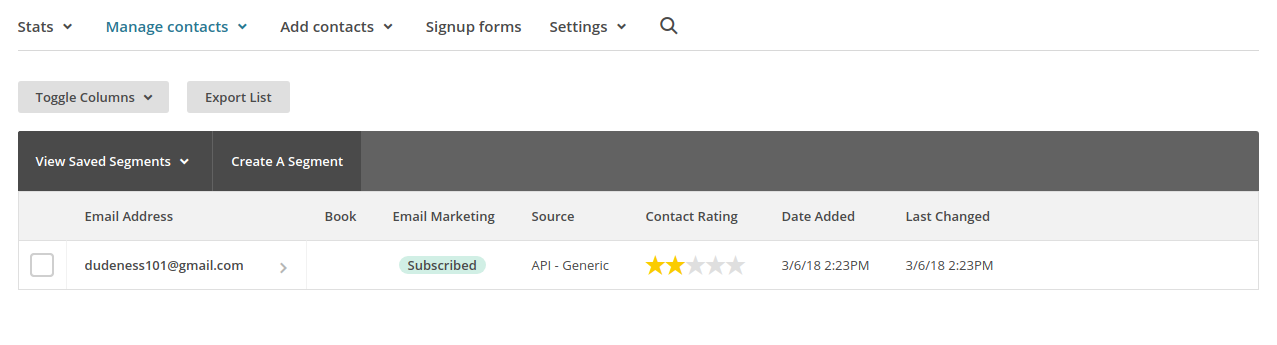
After successfully purchasing the book, refresh the page on Mailchimp. You will see a new subscriber:
Nice! Now you have a communication method with people who bought your book. Use it wisely, never spam.
For deeper dive into Mailchimp integration, check our our tutorial at freeCodeCamp. In this tutorial, we did extensive testing of Mailchimp integration with Postman and browser console.
In the next and final section of our book, we will prepare our app for production and deploy it.
Deploy app
So far we’ve been running our app locally at http://localhost:8000 . However to deploy our app, we need to:
- set the root URL to
https://builderbook.orginstead ofhttp://localhost:8000 - set
NODE_ENVto production - when
NODE_ENVis in production, tell our app to use production (i.e. live) API keys instead of development (i.e. test) keys.
Once we prepare our app for production, we will deploy it with Now and optimize the app for search engines.
NODE_ENV, ROOT_URL, MONGO_URL
Throughout our app, we defined dev with this line of code:
const dev = process.env.NODE_ENV !== ‘production’;
Most recently, we wrote this line at env-config.js . Find this line of code in server/app.js , server/stripe.js , and server/github.js as well.
This code says that dev is true when NODE_ENV is not production . Open server/app.js and find this snippet:
const dev = process.env.NODE_ENV !== 'production';
const MONGO_URL = process.env.MONGO_URL_TEST;

const options = {
  useNewUrlParser: true,
  useCreateIndex: true,
  useFindAndModify: false,
};
mongoose.connect(
  MONGO_URL,
  options,
);

const port = process.env.PORT || 8000;
const ROOT_URL = `http://localhost:${port}`;
Add the following three console.log() statements right after the code snippet above:
console.log(process.env.NODE_ENV);
console.log(dev);
console.log(ROOT_URL);
Start your app with yarn dev and pay attention to the terminal output:
undefined
true
http://localhost:8000
So dev is true because process.env.NODE_ENV is undefined (we did not set it!), and ROOT_URL is http://localhost:8000 .
Our goal is to set process.env.NODE_ENV and once it is set, use it to specify a production-specific ROOT_URL and other environmental variables, such as API keys.
Open package.json and find the scripts block.
Prepend NODE_ENV=production to the dev command, so it becomes:
“dev”: “NODE_ENV=production nodemon server/app.js --watch server”,
Start your app with yarn dev and now the terminal prints:
production
false
http://localhost:8000
> Could not find a valid build in the '.next' directory! Try building your app with 'next build' before starting the server.
[nodemon] app crashed - waiting for file changes before starting...
Alright, not bad! You successfully set the environment to production .
Next.js tells us that we need to build our app with NODE_ENV=production before we run it. In the scripts of package.json , modify the build command like this:
“build”: “NODE_ENV=production next build”,
Run yarn build . When complete, start your app with yarn dev . Now the app runs locally but with NODE_ENV=production . You’ll notice that the ROOT_URL is still http://localhost:8000 . Let’s change that by writing a conditional construct. Replace this line inside server/app.js :
const ROOT_URL = http://localhost:${port};
with:
const ROOT_URL = dev ? http://localhost:${port} : ‘https://builderbook.org’;
Now run yarn build and yarn dev . The terminal outputs:
production
false
https://builderbook.org
Try logging in - you’ll see that it will fail. This makes sense because we did not add routes from server/google.js , https://builderbook.org/auth/google , and https://builderbook.org/oauth2callback , to our Google OAuth app on Google Cloud Platform. We only added development-related routes http://localhost:8000/auth/google and http://localhost:8000/oauth2callback .
We added Express routes /auth/google and /oauth2callback to our server with:
auth({ server, ROOT_URL });
Thus we took care of ROOT_URL for Google OAuth.
However, the sendRequest() function inside lib/api/sendRequest.js also uses ROOT_URL , and all API methods in our app use the sendRequest() function to send a request ( GET or POST ) from client to server. Open lib/api/sendRequest.js and find this snippet:
const response = await fetch(
  `${ROOT_URL}${path}`,
  Object.assign({ method: 'POST', credentials: 'same-origin' }, options, { headers }),
);
We suggest, for the sake of reusability, creating a getRootUrl() function that contains conditional logic and outputs the proper ROOT_URL depending on NODE_ENV . Create a new file lib/api/getRootUrl.js with the following content:
export default function getRootURL() {
  const port = process.env.PORT || 8000;
  const dev = process.env.NODE_ENV !== 'production';
  const ROOT_URL = dev ? `http://localhost:${port}` : 'https://builderbook.org';

  return ROOT_URL;
}
To use getRootUrl in lib/api/sendRequest.js , follow these steps:
- import
getRootUrlwith
import getRootUrl from ‘./getRootUrl’;
- update the snippet that contains
ROOT_URLlike this:
const response = await fetch(
`${getRootUrl()}${path}`,
Object.assign({ method: 'POST', credentials: 'same-origin' }, options, { headers }),
);
- remove unnecessary code:
const port = process.env.PORT || 8000;
const ROOT_URL = `http://localhost:${port}`;
Go ahead and use getRootUrl inside server/app.js as well:
- import
getRootUrlwith
const getRootUrl = require(’…/lib/api/getRootUrl’);
- update the snippet that contains
ROOT_URLby replacing:
const ROOT_URL = dev ? http://localhost:${port} : ‘https://builderbook.org’;
with:
const ROOT_URL = getRootUrl();
- keep the following line of code, since
server.listen()usesport:
const port = process.env.PORT || 8000;
The third and final location where we will use getRootUrl is server/models/Book.js :
- import
getRootUrlwith
const getRootUrl = require(’…/…/lib/api/getRootUrl’);
- replace this line:
const ROOT_URL = ‘http://localhost:8000’;
with:
const ROOT_URL = getRootUrl();
Start your app with yarn dev and look at the terminal:
production
false
https://builderbook.org
This output proves that getRootUrl() successfully set the proper value for ROOT_URL .
Please note that whe you deploy app to your own custom domain you should replace https://builderbook.org with your actual domain name. Even better, you can replace https://builderbook.org everywhere in code with process.env.ROOT_URL and then specify ROOT_URL environmental variable with proper value inside .env .
We should make sure that our app uses live API keys instead of test ones. Let’s test it out for our Github keys. Open server/github.js . Find the const API_KEY line of code and add console.log() right after it:
const API_KEY = dev ? process.env.Github_Test_SecretKey : process.env.Github_Live_SecretKey;
console.log(API_KEY);
Important note - the Github OAuth app does not support multiple domains. Therefore, you should create a second Github OAuth app and set https://builderbook.org and https://builderbook.org/auth/github/callback for the domain and callback URL. Reminder - in your first Github OAuth app, you set http://localhost:8000 and http://localhost:8000/auth/github/callback .
Paste process.env.Github_Live_SecretKey and process.env.Github_Live_ClientID to your .env file.
Start your app with yarn dev and you will see that the terminal printed the proper value for API_KEY , which is the value you specified for process.env.Github_Live_SecretKey inside .env .
Before we deploy our app, we need to modify the start command. We stopped using the yarn next command to start our app since Chapter 2, where we introduced Express server. When we deploy our app on Now , Now will use the start command to start our app. Thus, we should update it to start our custom Express/Next server. Update it like this:
“start”: “node server/app.js”
For development, remember to remove NODE_ENV=production from the dev command that we used to run our app locally. The final scripts section inside package.json should be:
"scripts": {
  "dev": "nodemon server/app.js --watch server",
  "build": "NODE_ENV=production next build",
  "start": "node server/app.js",
  "lint": "eslint components pages lib server",
  "test": "jest --coverage"
},
After you are done with testing, remove all the console.log() statements from server/app.js and server/github.js .
We deployed this very site with the following scripts. Check it out on Github.
Let’s make one more improvement, go to server/app.js and replace:
const MONGO_URL = process.env.MONGO_URL_TEST;
With:
const MONGO_URL = dev ? process.env.MONGO_URL_TEST : process.env.MONGO_URL;
It is a good idea to use a different databases for production and development. The above change will make our app use environmental variable MONGO_URL instead of MONGO_URL_TEST in production .
In the next subsection, we will discuss best security practices for Express server.
Security
Besides setting NODE_ENV and ROOT_URL , we should prepare our server for production from a security point of view. We encourage you to read about the best practices for Express in the official Express docs.
In this subsection, we will discuss the following security settings:
-
helmet package
-
trust proxy
-
cookie.secure
-
The Helmet dependency is a collection of 12 Express middleware functions that set headers to prevent some standard attacks. Read more about each of the 12 middleware functions in the Helmet docs. You can use all functions or only one. By default, helmet mounts 7 out 12 middleware functions. One of them is helmet.hidePoweredBy() that simply hides the
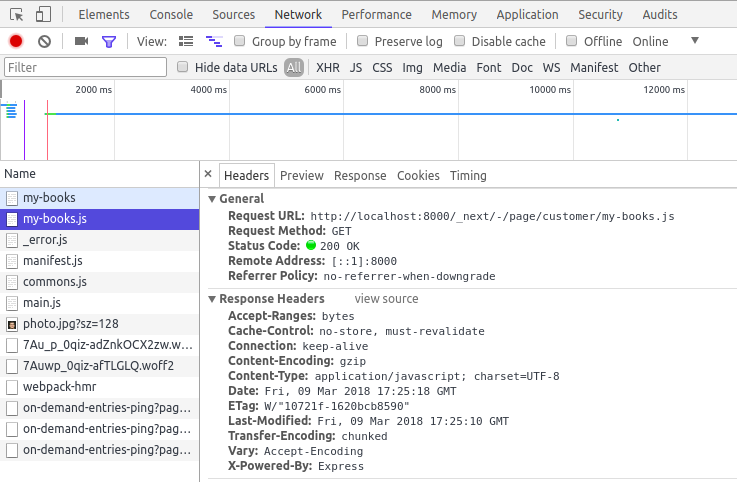
Your app should have theX-Powered-Byheader, making it a bit harder to guess which technology you use.Start your app, go to theMyBookspage, and look at theResponse Headers. To do so, openDeveloper tools > Network > click on my-book.js > select Headers. You will clearly see that our app uses Express sinceX-Powered-By:Express:
helmetpackage if you ranyarnat the start of this chapter. To usehelmet, add the following line of code right afterconst server = express();:
server.use(helmet())
Check the Response Headers of my-books.js , and this time you won’t see X-powered-By :

- Most hosting platforms scale an app by adding load balancers that distribute requests from the client among multiple servers. A load balancer is a proxy server, an intermediary server that sits between client and server. To pass information from client to server, we need to make the server trust the proxy server. We only need to do so in our production environment:
if (!dev) {
  server.set('trust proxy', 1);
}
The snippet of code above ensures that our server trusts its immediate proxy. Once set, the client can pass the following information to the server via a proxy server:
-
req.hostnameinside the X-Forwarded-Host header -
req.protocolinside the X-Forwarded-Proto header -
req.ipinside the X-Forwarded-For headerIf we don’t setserver.set('trust proxy', 1);, then our server will see the IP address of the proxy server as the IP address of the client . -
In this step, we set a production-only cookie.secure setting for session:
if (!dev) {
  sess.cookie.secure = true;
}
Our app will set cookie only when the client accesses the app via HTTPS protocol. Our app won’t set cookie if the client used HTTP.Combine this cookie setting with the trust proxy setting, and you get:
if (!dev) {
  server.set('trust proxy', 1);
  sess.cookie.secure = true;
}
Add the above code snippet right before the server.use(session(sess)); line of code in your server/app.js file.
SEO
This step is optional, but if you want better SEO, you can provide extra information to search engine bots that index your website. There are two ways to provide information to indexing bots:
-
sitemap.xml(placed at/sitemap.xml), -
robots.txt(placed at/robots.txt).
Inside sitemap.xml , you specify which routes to index ( url ), how often to index them ( changefreq ), and how important each one is to index ( priority ).
Inside robots.txt , you can create disallow rules, which specify routes that indexing bots should not crawl.
Let’s discuss the content of each file:
- To generate content for
sitemap.xml, we use a third party package sitemap that you installed at the beginning of this chapter. We will follow the official example for an Express server:
var sm = require('sitemap');

var sitemap = sm.createSitemap ({
  hostname: 'http://example.com',
  cacheTime: 600000,        // 600 sec - cache purge period
  urls: [
    { url: '/page-1/',  changefreq: 'daily', priority: 0.3 },
    { url: '/page-2/',  changefreq: 'monthly',  priority: 0.7 },
    { url: '/page-3/'},    // changefreq: 'weekly',  priority: 0.5
    { url: '/page-4/',   img: "http://urlTest.com" }
  ]
});

app.get('/sitemap.xml', function(req, res) {
  sitemap.toXML( function (err, xml) {
      if (err) {
        return res.status(500).end();
      }
      res.header('Content-Type', 'application/xml');
      res.send( xml );
  });
});
In our web app, the most important pages to crawl are chapters that are located at the /books/builder-book/${chapter.slug} route for our book with the slug builder-book . Take a look at the address bar of this page to see an example of that route. In the above example, objects inside the urls are manually added. However, we want to add the urls to our sitemap automatically from our database. Let’s use the Chapter model and Mongoose method/query find() to find all chapters in our database:
Chapter.find({}, 'slug').then((chapters) => {
  chapters.forEach((chapter) => {
    sitemap.add({
      url: `/books/builder-book/${chapter.slug}`,
      changefreq: 'daily',
      priority: 1,
    });
  });
});
Important note - if you have multiple books in your database, you should modify this code. For example, instead of fetching all chapter documents from the database, find chapters by bookId for each book and set the proper book slug in the route for the url parameter.
- Create a
static/robots.txtfile with the following content:
User-agent: *
Allow: /books/builder-book/
Disallow: /admin
These rules tell all indexing bots ( User-agent: * ) to crawl all routes under /books/builder-book/ but disallow crawling under the /admin route.In Express, we use the res.sendFile() method to serve files from a particular path:
res.sendFile(path.join(__dirname, ‘…/static’, ‘robots.txt’));
By now, you know how to write an Express route with the GET method:
server.get('/robots.txt', (req, res) => {
  res.sendFile(path.join(__dirname, '../static', 'robots.txt'));
});
We are done with the sitemap.xml and robots.txt files. The only remaining step is to add routes to our Express server. Let’s combine the Express routes under one function setup() , export this function, and import it to server/app.js .
Put together all the code discussed above. Keep in mind the following:
- in the sitemap example above, replace all instances of
apptoserver(since we defined our Express server asserverinsideserver/app.js) -
hostnameishttps://builderbook.org - instead of writing
urlsmanually, we do it withChapter.find() - remember to add the
/robots.txtExpress route - remember to import
sitemapandpath(pathis a Node module; it is not listed in thepackage.jsonfile)
You will get:
const sm = require('sitemap');
const path = require('path');
const Chapter = require('./models/Chapter');

const sitemap = sm.createSitemap({
  hostname: 'https://builderbook.org',
  cacheTime: 600000, // 600 sec - cache purge period
});

function setup({ server }) {
  Chapter.find({}, 'slug').then((chapters) => {
    chapters.forEach((chapter) => {
      sitemap.add({
        url: `/books/builder-book/${chapter.slug}`,
        changefreq: 'daily',
        priority: 1,
      });
    });
  });

  server.get('/sitemap.xml', (req, res) => {
    sitemap.toXML((err, xml) => {
      if (err) {
        res.status(500).end();
        return;
      }

      res.header('Content-Type', 'application/xml');
      res.send(xml);
    });
  });

  server.get('/robots.txt', (req, res) => {
    res.sendFile(path.join(__dirname, '../static', 'robots.txt'));
  });
}

module.exports = setup;
Put this code into a new server/sitemapAndRobots.js file.
Update server/app.js in the following ways:
- import
sitemapAndRobots:
const sitemapAndRobots = require(’./sitemapAndRobots’);
- under the line with
routesWithSlug({ server, app });, add this new line:
sitemapAndRobots({ server });
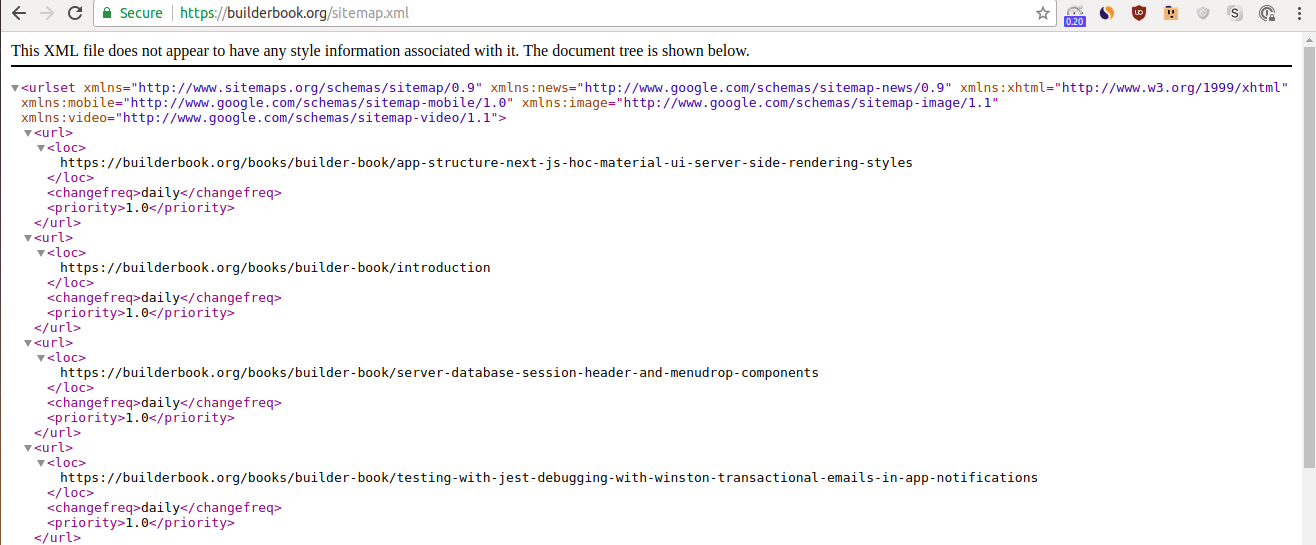
Start your app with yarn dev . Check out the /sitemap.xml and /robots.txt routes! For example, in our case, the /sitemap.xml route shows the sitemap.xml file:
You can make sure that Google bots find sitemap.xml and robots.txt at Search Console.
Now (V1 is depreciated)
IMPORTANT: Now v1 is depreciated by Zeit. This subsection is no longer relevant since Now v1 is depreciated. There are no plans to add a subsection about Now v2. Please skip to the next section (Heroku) to learn about deploying your app to Heroku.
At this point, we’ve prepared our app for production and are ready to deploy. You will learn how to deploy your app with Now by Zeit. Now is a command-line interface tool that allows you to deploy a JavaScript app in under a minute and with one command, now . This tool will definitely make you more productive. It’s built by Zeit on top of AWS and GCP infrastructure.
In this subsection, we will discuss some features of Now . For a list of all features, check out the official documentation.
We will discuss the following topics in this subsection:
-
installing
Now -
first deployment
-
frozen state and scale
-
logs, source
-
adding custom domain
-
useful commands
-
To install
Now, run:
npm install -g now
To see all available commands (this confirms that you installed Now ):
now help
Attempt running:
now
This will produce an error and ask you to sign up for Zeit and click a verification link inside an email from Zeit.After you click the verification link, you will be able to deploy and use the rest of the Now commands.
2. Create a now.json file at the root of your app folder. File content:
{
 "version": 1,
 "env": {
     "NODE_ENV": "production",
     "StripePublishableKey": "pk_live_xxxxxx"

 },

 "dotenv": true
}
The first parameter sets NODE_ENV , and the second parameter tells Now that our app uses the dotenv dependency and that our environmental variables are in a .env file.Since you set NODE_ENV to production in now.json , you can remove NODE_ENV=production from the build script in your package.json file.Remember to add your live publishable key from Stripe ( pk_live_xxxxxx ) to now.json . This will ensure that your StripePublishableKey value is available on both client and server. As you know by now, all environmental variables inside .env are avaiable on the server only. When you run your app locally, you use your test publishable key pk_test_xxxxxx and run the app with StripePublishableKey=pk_test_xxxxxx yarn dev .In your terminal, navigate to the root directory of your app.
Deploy your app with this command:
now
Now will:
- upload code
- install dependencies from
yarn.lock - run
npm build - run
npm start - automatically re-start server if it stopped runningThe terminal prints out all events:
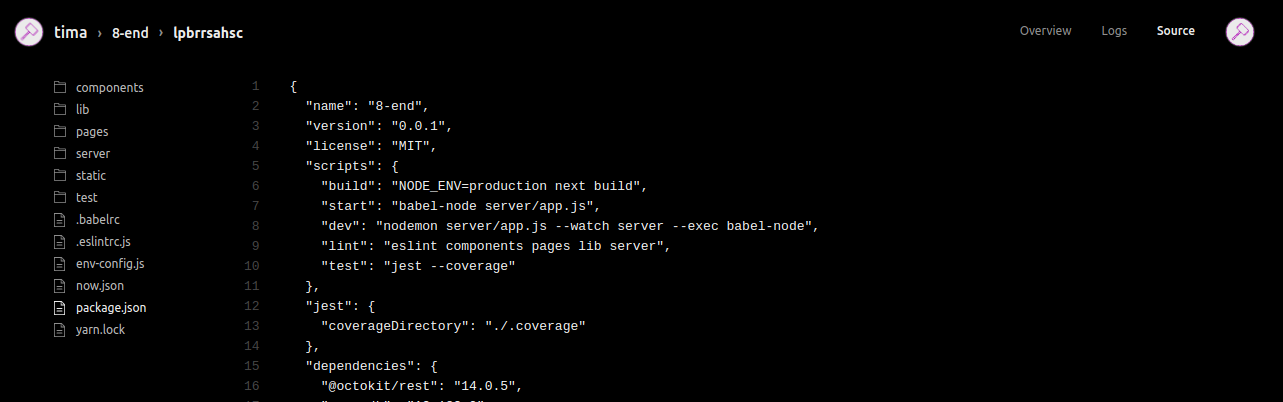
Access your deployment at the URL provided byNow. In our case, it’s:
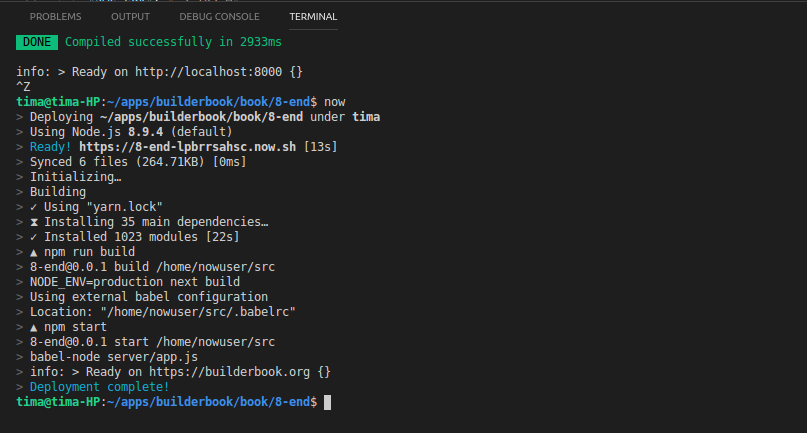
> Ready! https://8-end-lpbrrsahsc.now.sh
On our browser:
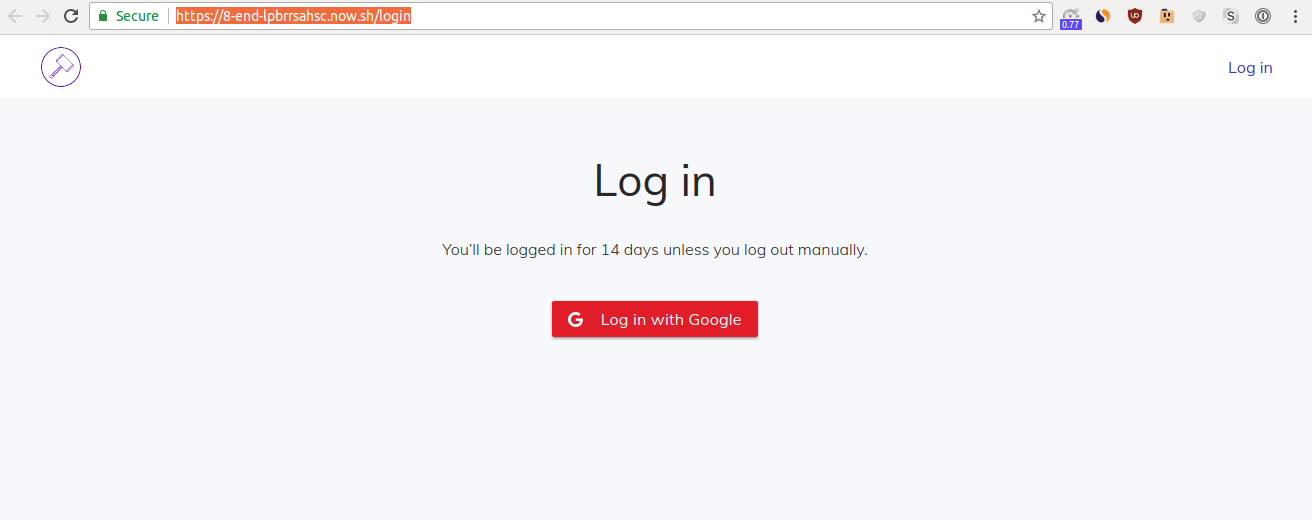
lpbrrsahsc .The name of deployment is the same as a name inside package.json file.Important note - Now will upload all files from your app root directory. Tell Now to ignore any file or folder by adding its name to a .npmignore file. More on this in Now’s docs.3. Your newly created deployment will go into a
frozen state if it does not get any requests. Run:
now scale ls
Output:
url                                           cur      min      max     auto      age
8-end-lpbrrsahsc.now.sh                         1        0        1        ✔       9m
Scale number indicates number of live instances of deployment. The value at min equals 0, this means that the deployment will go into a frozen state. To start frozen deployment, you have to visit it and wait for 10-20 seconds.To keep deployment alive, even when your app receives no traffic, you have to scale it to 1 or more instances:
now scale https://8-end-lpbrrsahsc.now.sh 1
If you want to deploy to 2 or more instances automatically when your app gets more traffic, run:
now scale https://8-end-lpbrrsahsc.now.sh 1 2 auto
Check the scaling docs for more features.
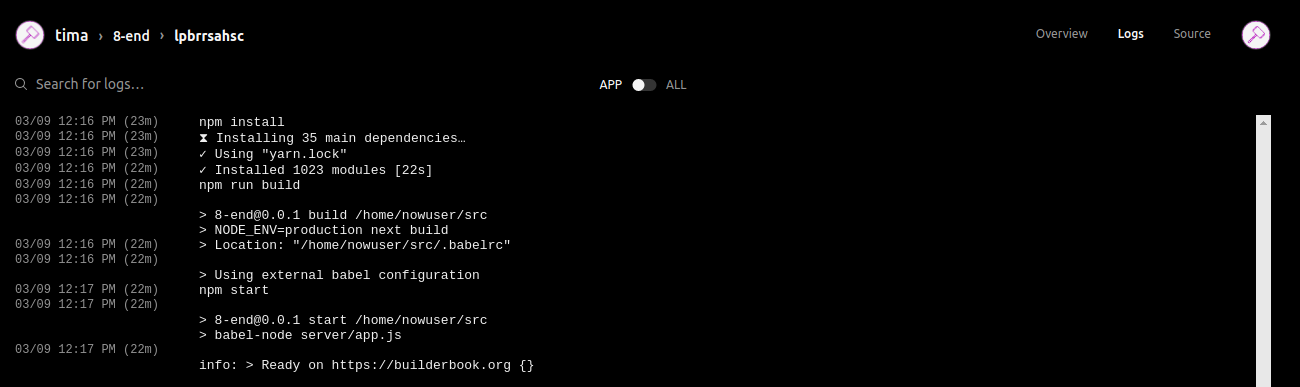
4. Go to https://zeit.co/dashboard . You will see something like:
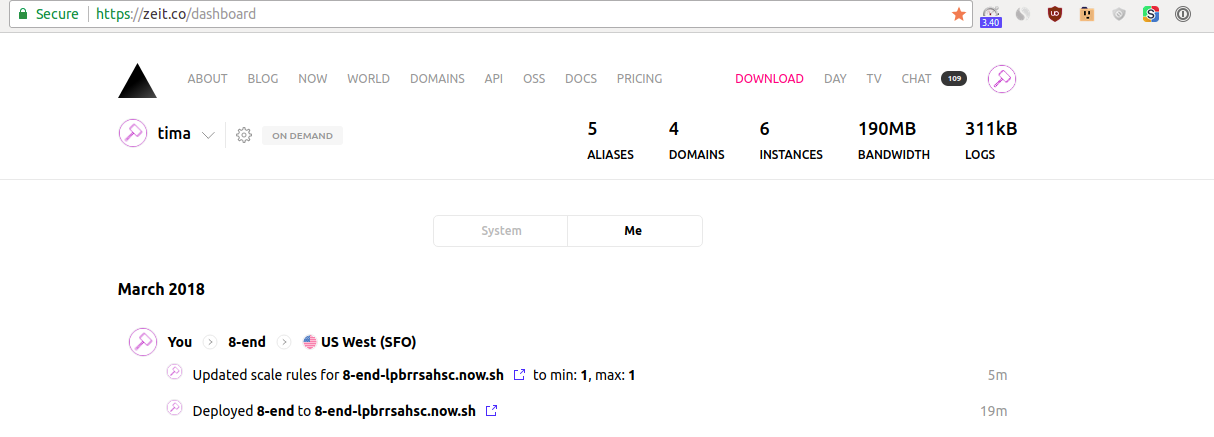
Click on

Logs and Source :Both the production logs and deployment’s actual code are useful for debugging.
5. The URL of our deployment is not memorable. It simply allows you to deploy an app and test it out before mapping it to an actual, memorable domain.
One way to create a more memorable URL is:
now ln 8-end-lpbrrsahsc.now.sh builderbook.now.sh
Now we can access our deployment at https://builderbook.now.sh .Another (more common) way is to point your deployment to a custom domain. Run this (remember to use your actual domain):
now ln 8-end-lpbrrsahsc.now.sh test.builderbook.org
Now we can access our deployment at https://test.builderbook.org .If the now ln command produces an error, then you need to either add CNAME to your domain records or add a domain to zeit.world. Here is a link with instructions for either case.
6. You do not pay for deployments that are in a frozen state. The cool part about the now ln command is that a newly aliased deployment will assume the scale settings of a previous deployment that was aliased to the same custom domain. At the same time, the old deployment will become frozen . For example, if the scale setting for our domain test.builderbook.org is 1 2 auto and then we alias a new deployment to this domain, the new deployment will get 1 2 auto settings automatically. Our old deployment, which got un-aliased, will get 0 1 auto settings and will go into a frozen state.As a consequence, you will accumulate many frozen deployments. To reduce clutter, you can remove them with:
now rm 8-end-lpbrrsahsc.now.sh
If you don’t like the Are you sure? step, run:
now rm 8-end-lpbrrsahsc.now.sh -y
If you like to remove all deployments with a particular name that are not aliased, use:
now rm 8-end --safe -y
The above command will remove all deployments that have the name 8-end accept deployment that is aliased.
IMPORTANT: Now v1 is depreciated by Zeit. This subsection is no longer relevant since Now v1 is depreciated. There are no plans to add a subsection about Now v2. Please skip to the next section (Heroku) to learn about deploying your app to Heroku.
Heroku
In this last subsection of the book we will learn how to deploy our app to Heroku cloud. We will deploy our Next-Express app to lightweight Heroku container called dyno.
We will discuss the following topics in this subsection:
- installing Heroku on Linux-based OS
- creating app on Heroku dashboard
- preparing app for deployment
- configuring env variables
- deploying app
- checking logs
- adding custom domain
Let’s go step by step.
- Install Heroku CLI (command-line interface) on your OS. Follow the official guide. In this book we provide instructions for Linux-based systems, in particular, a Ubuntu OS. For Ubuntu OS, run in your terminal:
sudo snap install --classic heroku
To confirm a successful installation, run:
heroku --version
As example, my output that confirms successful installation, looks like:
heroku/7.22.7 linux-x64 node-v11.10.1
-
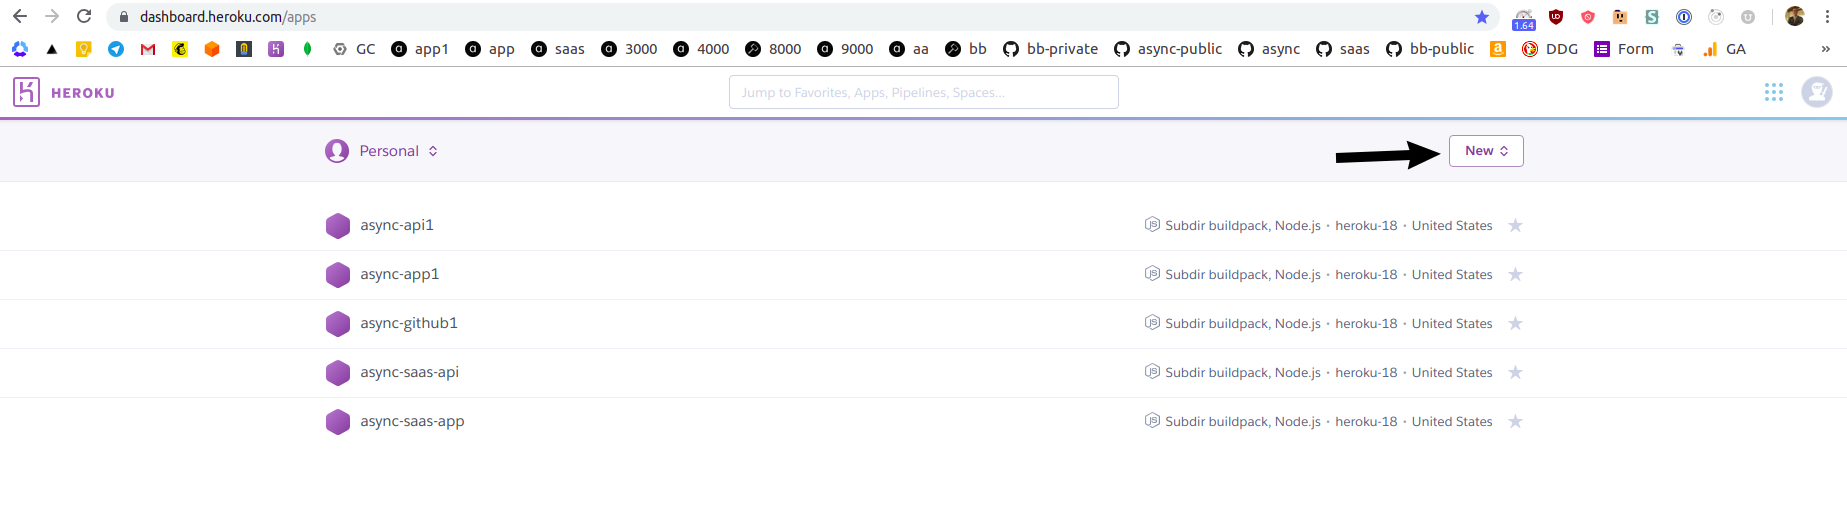
Sign up for Heroku, go to your Heroku dashboard and click purple New button on the right:
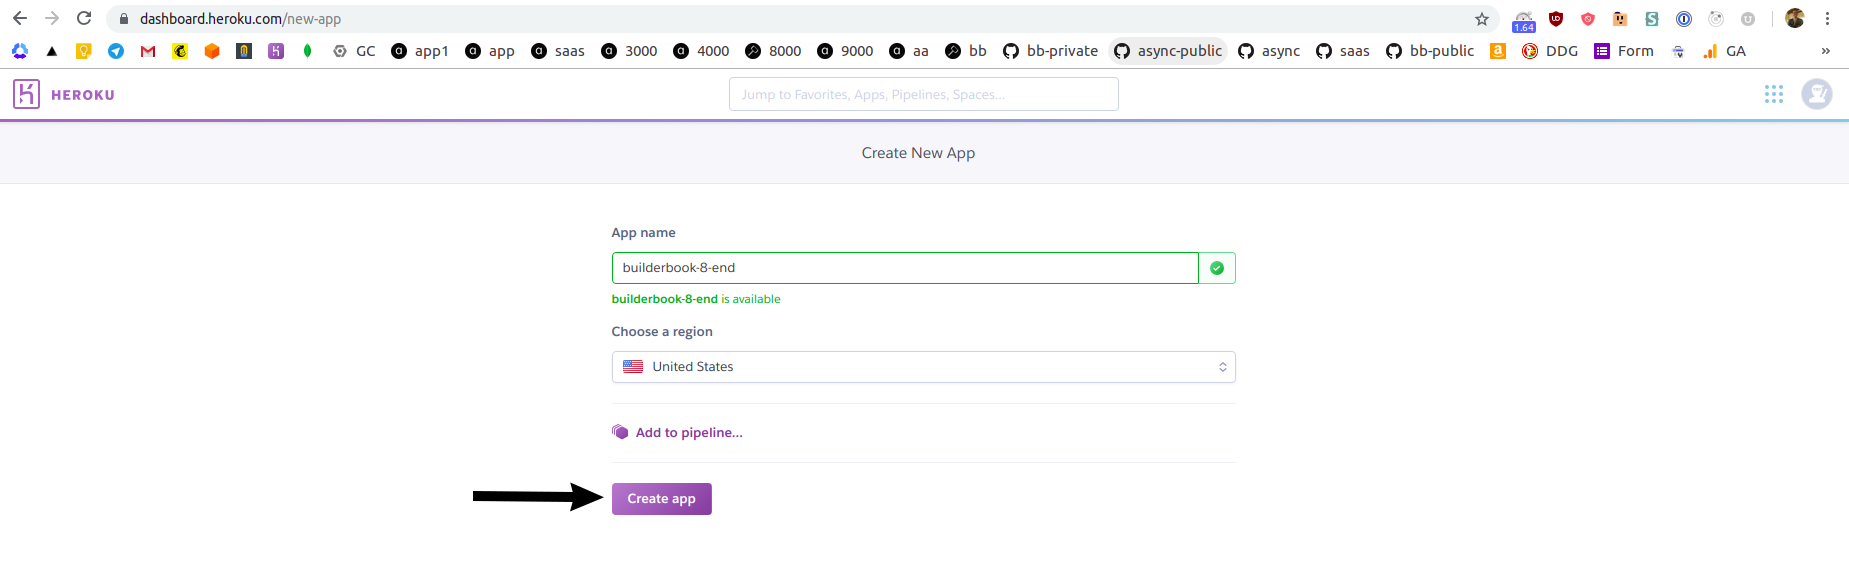
On the next screen, give a name to your app and select a region. Click purple Create app button at the bottom:
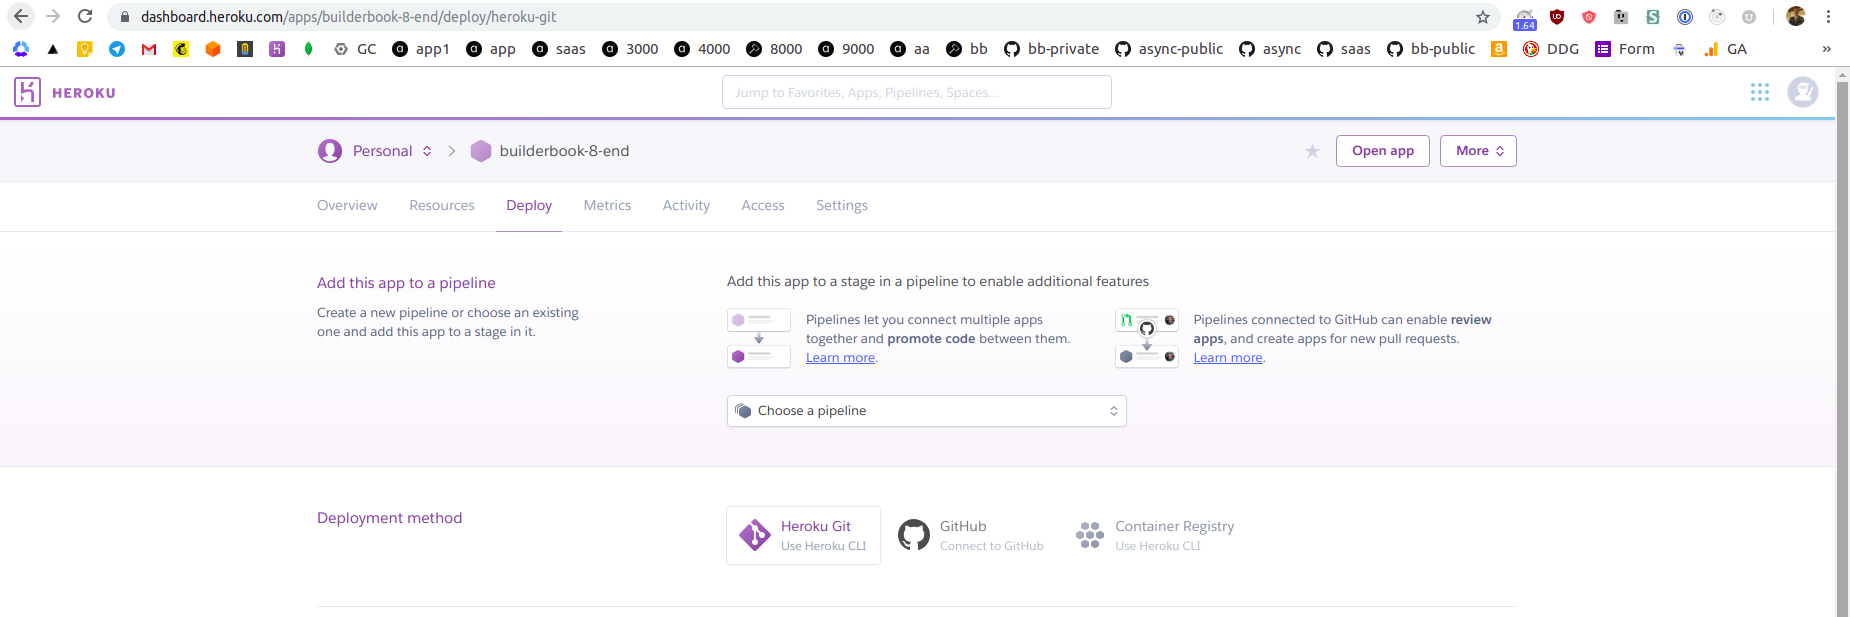
You will be redirected toDeploytab of your newly created Heroku app:
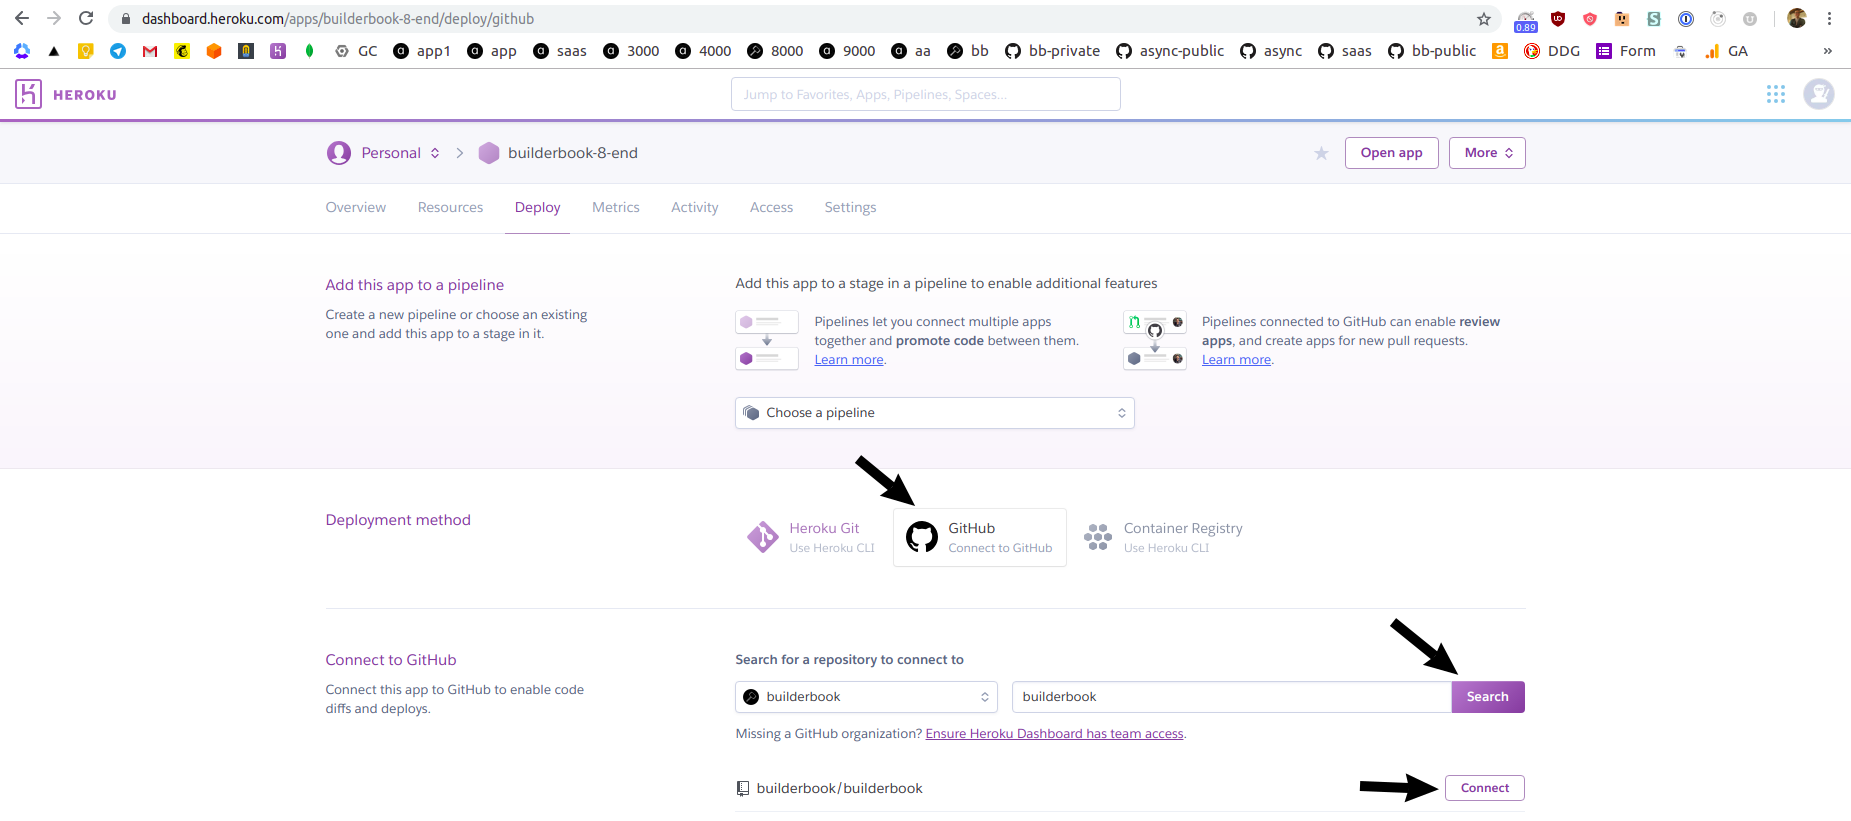
- As you can see from the above screenshot, you have two options. You can deploy the app directly from your local machine using Heroku CLI or directly from GitHub.
In this tutorial, we will deploy abuilderbook/builderbook/book/8-endapp from our public builderbook/builderbook repo hosted on GitHub. Deploying from a private repo will be a similar process.Deploying from GitHub has a few advantages. Heroku uses git to track changes in a codebase. It’s possible to deploy app from the local machine using Heroku CLI, however you have to create a Git repo forbuilderbook/builderbook/book/8-endwithpackage.jsonfile at the root level. A first advantage is that we can deploy from a non-root folder using GitHub instead of Heroku CLI.A second advantage is automation, later on you can create a branch that automatically deploy every new commit to Heroku. For example, we have a deploy branchfor our demo for SaaS boilerplate. When we commit tomasterbranch - there is no new deployment, when we commit todeploybranch - new change is automatically deployed to Heroku app.Let’s set up deploying from GitHub. OnDeploytab of your Heroku app at Heroku dashboard, click Connect to GitHub , then search for your repo, then click Connect next to the name of the proper repo:
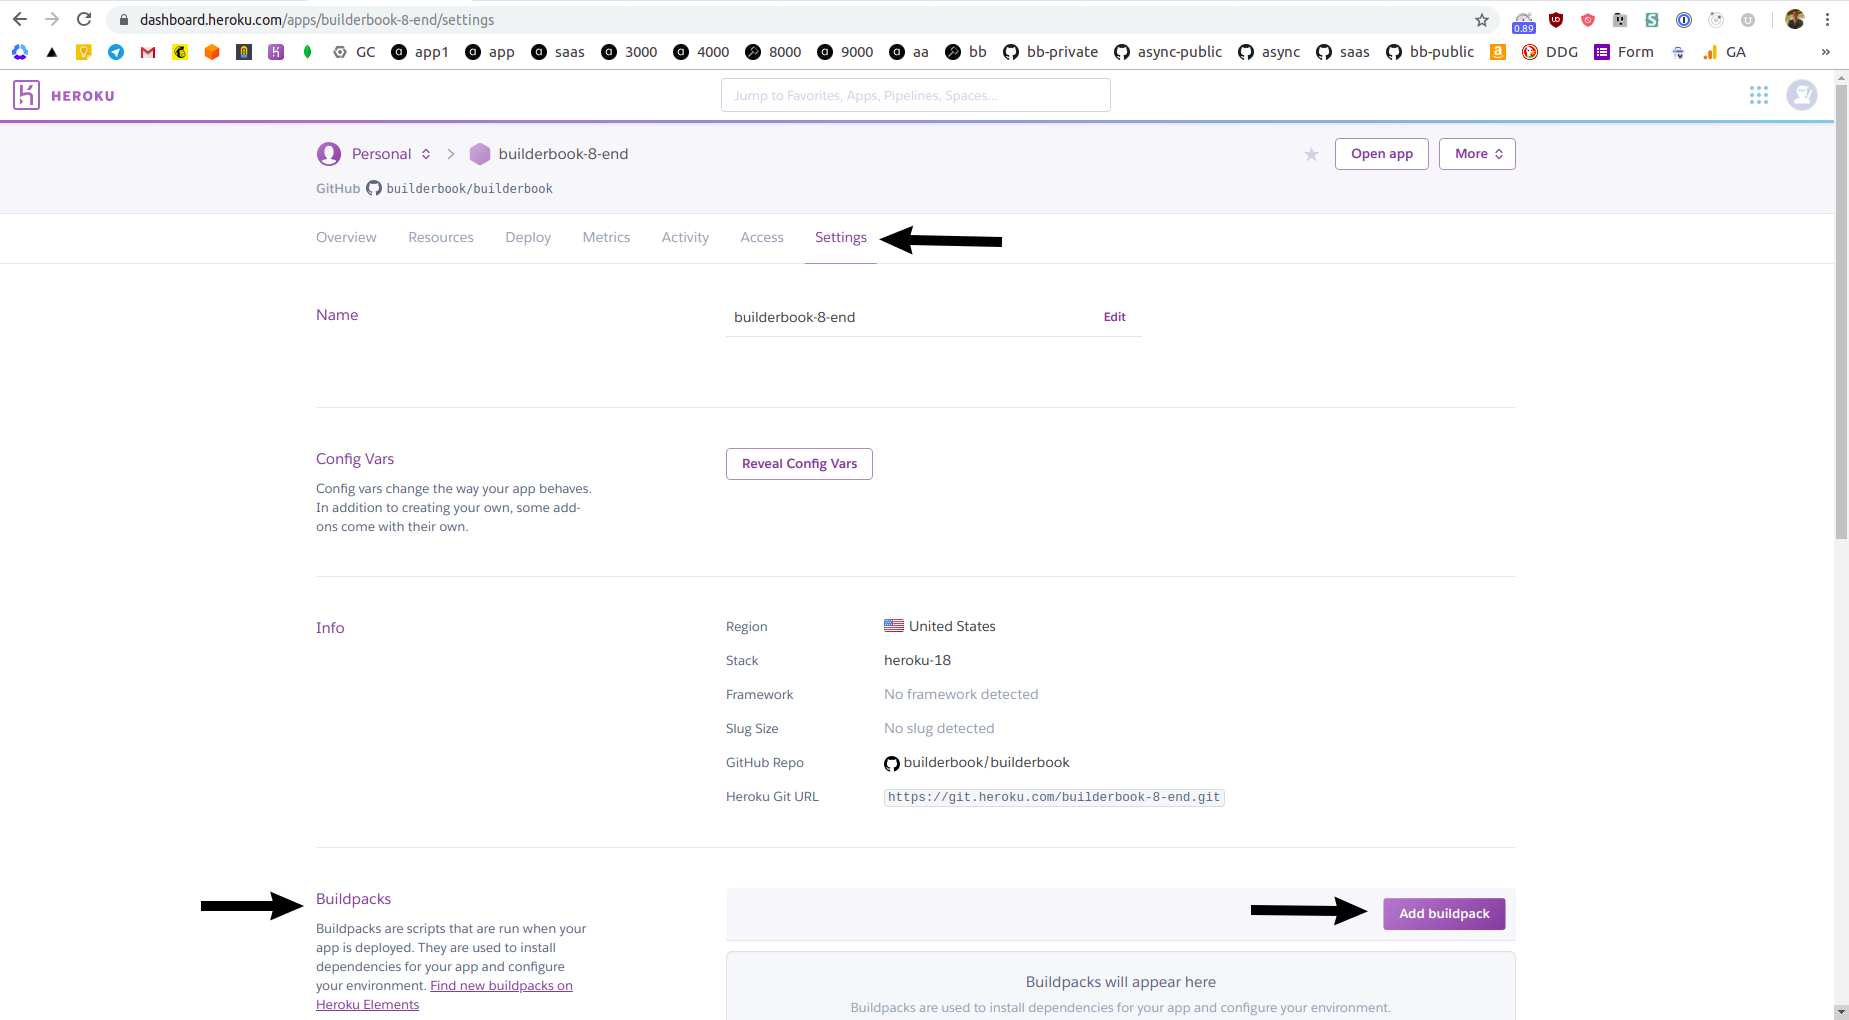
If successful, you will see green textConnectedand be offered to select a branch and deploy app automatically or manually. Automatic deployment will deploy every new commit, manual deployment requires you to manually click on Deploy Branch button. For simplicity, we will deploy manually frommasterbranch of ourbuilderbook/builderbookrepo.Before we perform a manual deployment via GitHub, we need Heroku to run some additional code while app is being deploying. Firstly, we need to tell Heroku that8-endapp in thebuilderbook/builderbookrepo is not at the root level, it’s actually nested at/book/8-end. Secondly, Heroku needs to know that our app is Node.js app so Heroku findspackage.jsonfile, properly installs dependencies and runs proper scripts (such asbuildandstartscripts frompackage.json). To achieve this, we need to add so calledbuildpacksto our Heroku app. ClickSettingstab, scroll toBuildpackssection and click purple Add buildpack button:
Add two buildpacks, first ishttps://github.com/timanovsky/subdir-heroku-buildpackand second isheroku/nodejs:
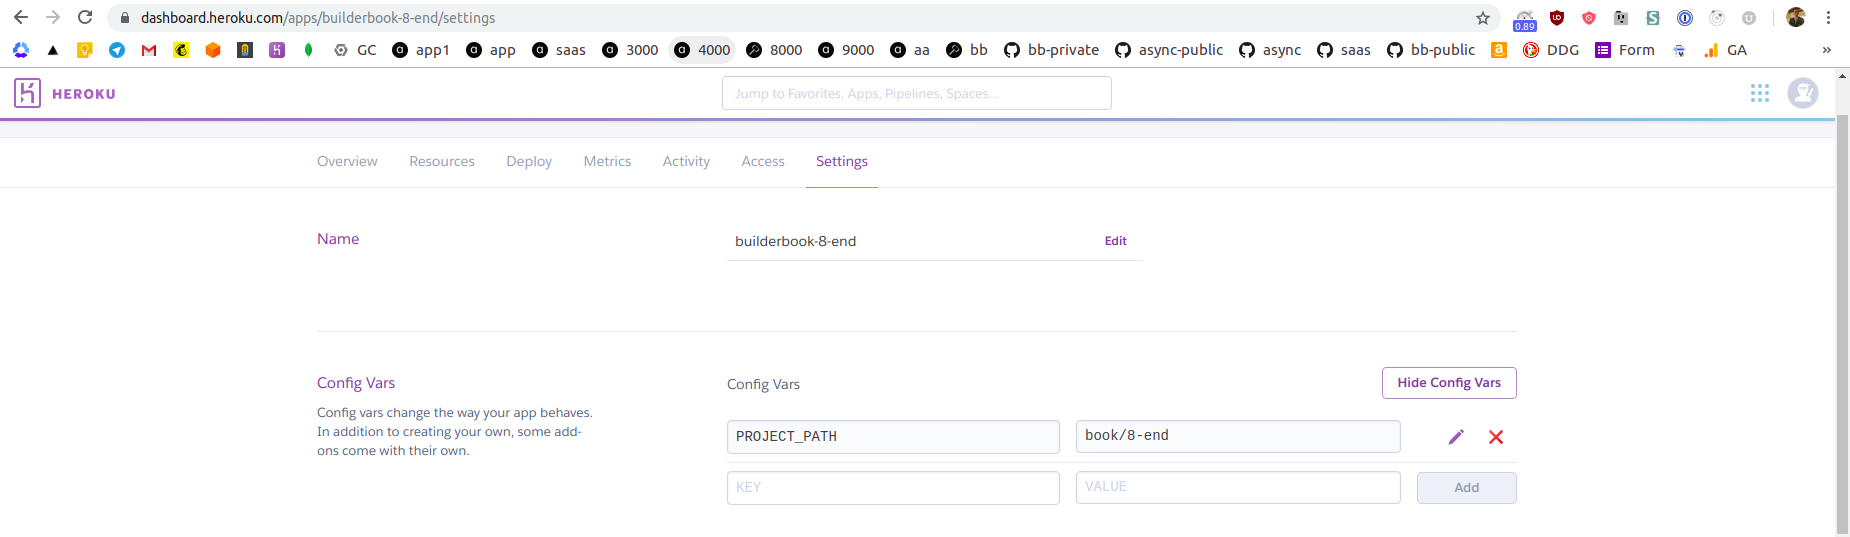
Next, scroll up while onSettingstab and click purple Reveal Config Vars button, create a new environmental variablePROJECT_PATHwith valuebook/8-end:
The above variable will be used by the first buildpacksubdir-heroku-buildpackto deploy app from repo’s subdirectory. - If we deploy app at this point, our app will deploy with errors since we did not add environmental variables. Similar to how you added
PROJECT_PATHvariable, add all environmental variables frombook/8-end/.envfile to your Heroku app. Remember to add:

-
MONGO_URL, -
Google_clientID, -
Google_clientSecret, -
EMAIL_SUPPORT_FROM_ADDRESS, -
Github_Test_ClientID, -
Github_Test_SecretKey, -
Github_Live_ClientID, -
Github_Live_SecretKey, -
Stripe_Test_SecretKey, -
Stripe_Live_SecretKey, -
MAILCHIMP_API_KEY, -
MAILCHIMP_PURCHASED_LIST_ID, -
SESSION_SECRET.
- While on
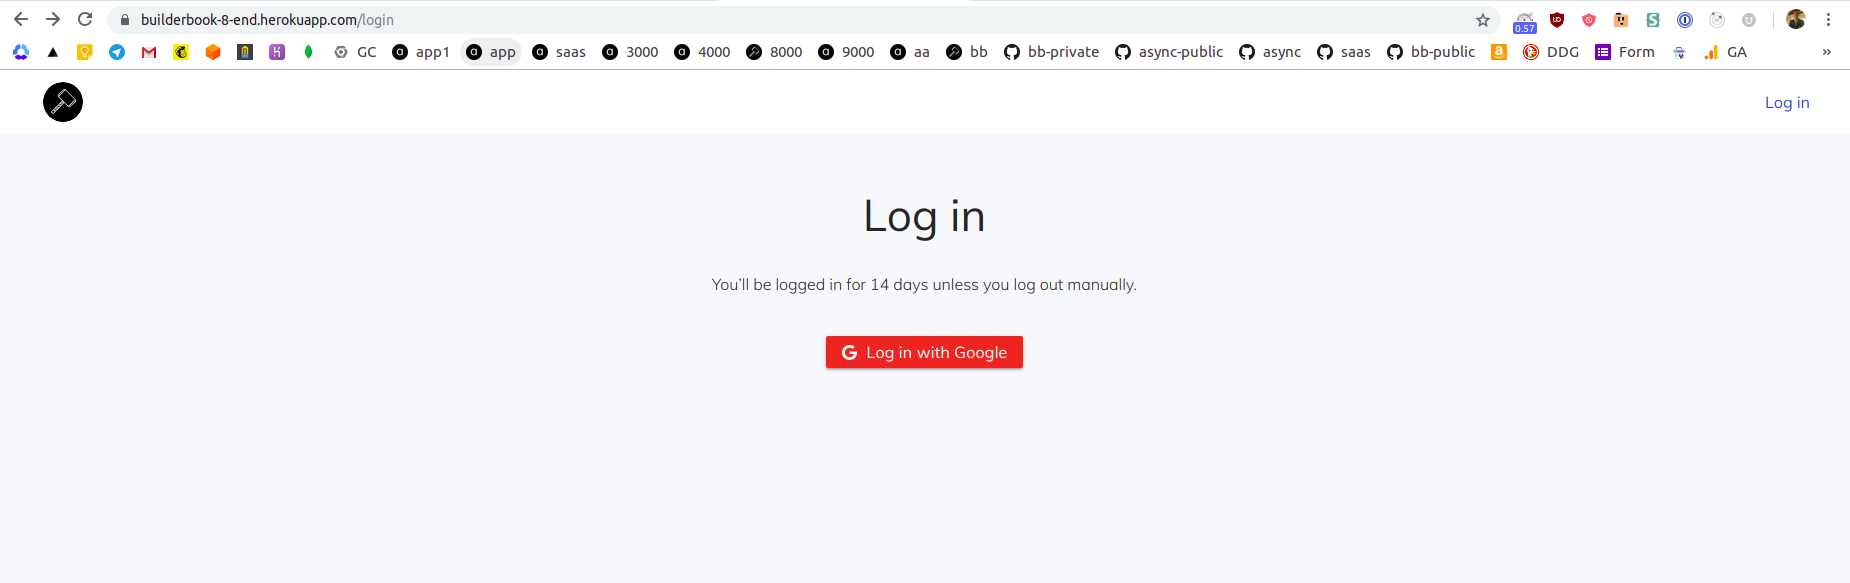
Settingstab, scroll toDomains and certificatessection and note your app’s URL. My app’s URL is: https://builderbook-8-end.herokuapp.com
Let’s deploy, go toDeploytab, scroll toManual deploysection and click Deploy branch button.
After deployment process is complete , navigate to your app’s URL:
- Server logs are not available on Heroku dashboard. To see logs, you have to use Heroku CLI.
In your terminal, run:
heroku login
Follow instructions to log in to Heroku CLI.After successful login, terminal will print:
Logged in as email@domain.com
Where email@domain.com is an email address that you used to create your Heroku account.To see logs, in your terminal run:
heroku logs --app builderbook-8-end --tail
In your terminal, you will see your most recent logs and be able to see a real-time logs.You can output certain number of lines (N) for retrieved logs by adding --num N to the heroku logs command.
You can print only app’s logs by adding --source app or system’s logs by adding --source heroku .
7. Time to add a custom domain. The Heroku app that we created is deployed on free dyno . Free dyno plan does not let you to add a custom domain to your app. To add custom domain, go to Resources tab and click purple Change Dyno Type button:

Hobby plan and click Save button.Navigate to Settings tab and scroll to the Domains and certificates and click purple Add domain button:Type your custom domain name, I added
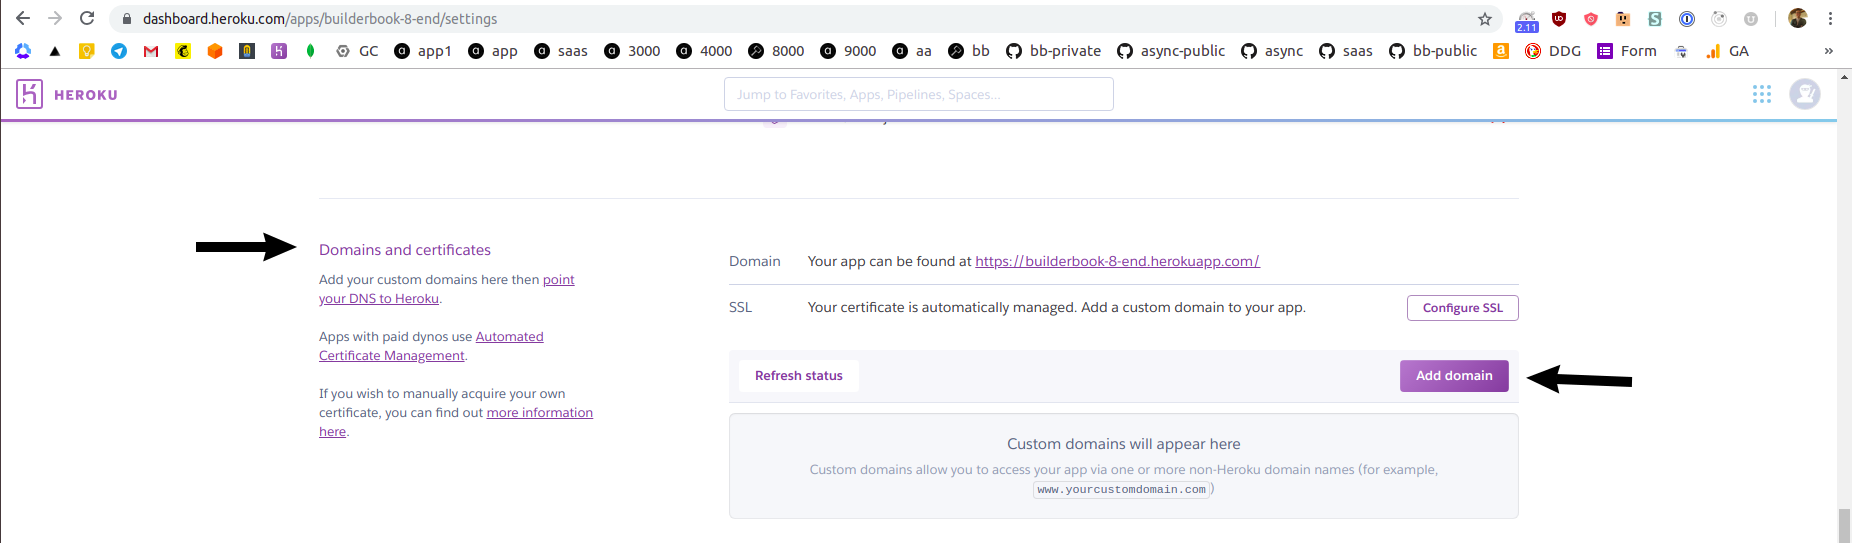
heroku.builderbook.org as a custom domain, click Save changes button.Heroku will displa you a value for CNAME record that you have to create for your custom domain. For me, custom domain is heroku.builderbook.org and I manage DNS records at Now by Zeit.After you create a CNAME, ACM status on Heroku's dashboard will change to Ok` :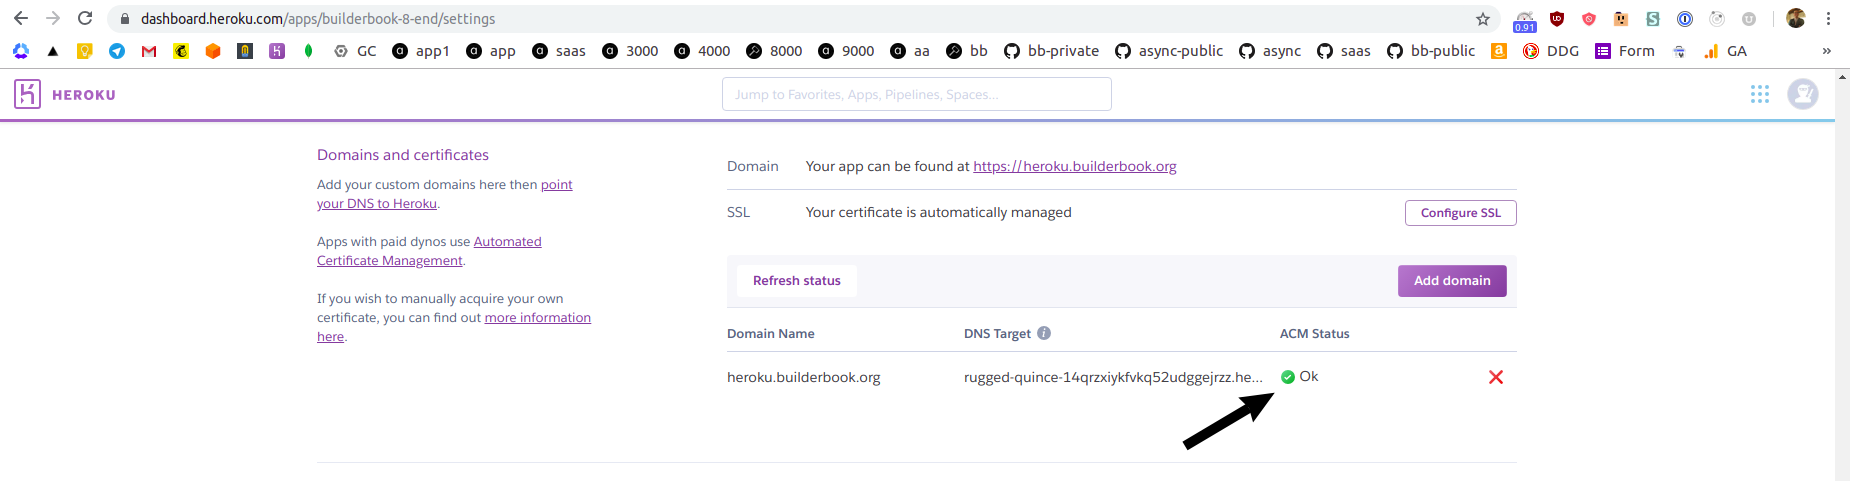
It’s important that you remember to manually add your custom domain to the settings of your Google OAuth app (Chapter 3) and GitHub OAuth app (Chapter 6). If you forget to do it, you will see errors when you try to log in to your app or when you try to connect GitHub to your app.
This was the last subsection of the last section in the last chapter of this book.
If you got this far - wow, this is the end of the book!
We hope that you learned a lot and that you glued many concepts together while building this web application.
By now, you should answer this question from the Introduction chapter with a resounding Yes :
Have you ever built a production-ready web application from scratch by yourself?
If you have any questions or feedback, feel free to create an issue at:
To give a review of our book, please fill out this form:
At the end of Chapter 8, your codebase should look like the codebase in 8-end . The 8-end folder is located at the root of the book directory inside the builderbook repo.
Compare your codebase and make edits if needed.