Create a Serverless Slack Bot with AWS Lambda and Python#
Serverless Computing may sound like a scary topic, but with the rise of AWS Lambda and mature tools supporting it - it’s more approachable than ever. In this newline course, we’re going to learn what serverless technology is and isn’t, and why it belongs in your developer toolbox. We’ll see that for certain common projects - like custom chat bot creation - AWS Lambda really shines for it’s simplicity, affordability, and ability to integrate with the wider AWS ecosystem.
Some developers love using serverless tech because it helps them save money, scale quickly, and deliver on reliability goals. While all of those things are possible with Lambda (especially cost savings which are common - but certainly not guaranteed), it’s the development agility and reduction of operations overhead that drives my love for the service. It’s a relief to be able to get right into the code, without worrying about configuring operating systems, deploying containers, or scaling clusters. Serverless on Lambda gives developers the resources needed to write, deploy, and maintain production-ready software - all without significant operational overhead.
In true newline-fashion, we’ll get rolling with a practical application right away. RPG players rejoice - we’re creating a fully functional, dice-rolling chat bot for Slack! While the example bot will be for Slack, the same idea can be easily adapted to create a bot for Telegram, Discord, or nearly any other chat service with a bot API.
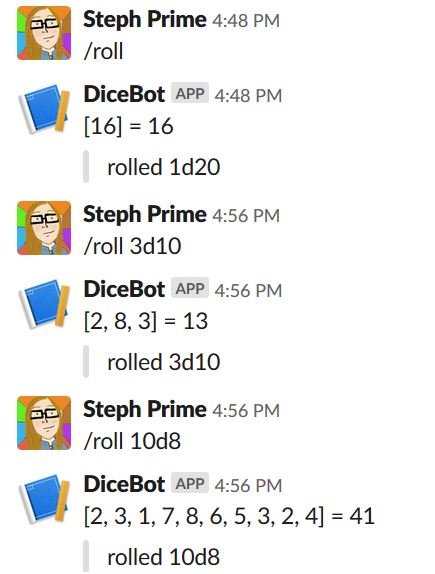
Once you’ve learned the foundations of serverless, you can make much more sophisticated bots (or full applications) that use the stack we’re going to learn here.
We will be using Python 3 for this project, but it’s worth noting that AWS Lambda works with other common languages and runtimes, including NodeJS , Java , ruby , go , and .NET . The basic mechanisms of creating, testing, and deploying your Lambda do not vary significantly based on your runtime choice.
Why AWS Lambda?#
Amazon Web Services (AWS), which released AWS Lambda in 2014 - is estimated to control 50% of the cloud computing market. At this time of this writing, it’s estimated that AWS controls 3x more resources than its closest competitor, Microsoft Azure. AWS is widely used by startups and enterprises alike, has relationships with schools and startup incubators to provide free credits, and is battle tested from years of production experience. The underlying technology that AWS provides to it’s customers, is the same technology that Amazon uses to host their own site - and it’s available to use throughout the world for reasonable prices.
I spent some time working at AWS in Seattle - and I saw the internals of this organization first-hand. Even though my role at AWS revolved around troubleshooting things that could go wrong - I was always impressed by how much AWS does right. No company is perfect, but the folks at AWS take their job seriously and the core systems at AWS are as solid as technology gets. I remember attending an meeting with the Lambda team presenting their work internally, right before the public announcement was released. Since then, I’ve grown even more excited as I’ve seen the great work that AWS has put into improving Lambda, adding features and integrations - all without sacrificing reliability and scalability. No matter the size or the stakes - every place I’ve worked at in my post-AWS career has found a practical use for Lambda in their technological ecosystem, and is happy to have made the investment in using it.
Why Python?#
Python has been supported by AWS Lambda since the very early days. If you search around, you’ll find a treasure trove of documentation, blog posts, and GitHub repos for Python Lambdas, many of these written by AWS employees themselves!
It’s a language that is approachable both to systems engineers and developers, and it has mature and widely-used libraries that work great for everything from Image Processing, Machine Learning, and network automation. It’s a great general utility language to be familiar with, and works with Lambda right out of the box.
Some terms to know#
These terms are commonly used in the Cloud Computing industry and do relate to serverless - so it’s good to have some familiarity with them.
- IaaS (Infrastructure as a Service) A service that provides network and server infrastructure that consumers can use to run software on top of. Typically, this means a set of APIs that allow consumers to create virtualized servers that operate on hardware which is managed by the provider, and typically shared by multiple clients. Examples: Amazon Web Services (AWS), Microsoft Azure, and Google Compute are common IaaS providers.
- PaaS (Platform as a Service) A service that provides tools to streamline software deployment on top of IaaS providers. These services typically abstract the of infrastructure management side away from the consumer, and handle automatic scaling of infrastructure. Examples: Heroku, AWS Elastic Beanstalk, Google App Engine, Managed Kubernetes (offered by multiple providers)
-
Serverless An architecture used for developing, and deploying software without managing any underlying servers. In many cases, the code is executed within a container that was is managed by a PaaS provider, which runs on a server managed by an IaaS provider. But since the end user is not seeing or managing the server underneath everything, we just pretend like it isn’t there and call it serverless. Examples: AWS Lambda, Azure Serverless. NOTE : there is a particular application framework for managing certain serverless deployments that is called serverless . That specific tooling is not necessary to use Serverless technology in general, and frankly naming a framework
serverlesswas kind of a confusing move. We won’t be using that framework it in this course, because everything we need is provided by a different framework, AWS Serverless Application Model.
Ready?#
Before we get to the fun stuff though - we must be prepared to configure a few pieces of tooling in our local development environment. If you’re already using AWS, this should go fairly quickly. If you don’t have an AWS Account, you will need to create an AWS account and get it configured and secured according to best practices - which may take a few hours to complete. Whatever your situation, select the link that applies to your situation and we’ll help you get sorted out!
AWS Environment Setup#
There’s no AWS Lambda without AWS . That means we’ll need a few AWS resources created and configured on the AWS side of things to develop and effectively.
Those resources include:
- Access to an AWS Account
- An
IAM Useron that AWS Account which has rights to interact with AWS Lambda, and related services. The rights that come withAdministrator AccessorPower User Accesscover most everything we will touch. - API Access Key credentials for our
IAM User. This key will be saved on our local development machine and used to deploy our Lambda’s programatically.
Additionally, even if you have all of the above ready - we recommend reading the Securing Your AWS Account section to learn how to keep your AWS Account secured.
Spending 15 minutes now will save you hours later if you ever need regain access after a compromise!
Every AWS Account is a potential target. A common misconception about AWS is the belief that it is not necessary to secure your account when it’s only being used for testing or minor projects. Many attackers don’t want to steal your data - they want to steal your AWS compute resources. An attacker will often use compromised accounts to spin up expensive instances for crypto mining or botnet attacks. Sometimes they use unusual AWS regions and dedicated instances so those instances don’t appear visible in a user’s usual dashboard. Some users don’t realize they have been attacked until they receive an expensive bill! Alternatively, AWS may reach out and temporarily disable a compromised account if they detect it is being used for malicious purposes. This can be a serious headache that can affect uptime for anyone running legitimate production services.
A note on Free-Tier usage and costs in AWS#
Every exercise in this course will comply with AWS free-tier offerings. If we are using an account that is still free-tier eligible, there should be no billed charged for completing any exercises as defined in the book. Some projects could potentially incur cost past free-tier with heavy usage (ie, deploying the dicebot project into a popular channel where it gets invoked frequently). However - simply deploying and testing these applications will not incur cost if free-tier is active. Steps for removing the deployed project from AWS will also be included. It is recommended to always cleanup work after completion. We can always re-deploy projects later.
Additional Recommended Reading on this topic Guidance for Avoiding Unexpected Charges.
Common AWS Scenarios#
We recognize that exposure to AWS might vary wildly among our readers. You can use the links below to jump to whichever section of the course is most relevant to your needs.
- I need to create a new AWS Account for myself or my organization
- My work or school has an AWS Account, but I need access to it
- I can log into my AWS Account, but I do not have an API Access Key
- I can log into my AWS Account, and I have an API Access Key
Account Provisioning#
For Developers new to AWS (Standard Signup)#
For everyone else, we will need to register a standard AWS Account in our own name, or in our business’ name on the AWS Signup Page. Be aware - creating an AWS Account requires a valid credit card, even if we only intend to use free-tier services and/or promotional credits.
WARNING - Automated Fraud Prevention AWS Fraud detection may enforce a hold-period of up to 24-hours when registering an account associated with a high-fraud risk locale!
For Members of Organizations that already use AWS (AWS Organizations)#
If your workplace or organization already uses AWS - you may be able to request access to an existing account or ask your AWS Account Admin to provision you a new one through the AWS Organizations service.
For Students (AWS Educate)#
If you are a student with a valid .edu email address, you can register for a special AWS account that includes promotional credit and other training resources through the AWS Educate Program.
Securing an AWS Account#
Security changes only take a few minutes to make, but they will significantly improve the risk posture of an AWS account. Don’t put this step off for later,- do it on first login to any new AWS account.
For readers who did not create their own AWS account, and instead were provided access to a user within a shared account - you can log in with that user and skip down to Enable MFA on IAM User
Configure CloudTrail#
Note for Accounts created by
AWS OrganizationMany AWS Organizations-created accounts already have CloudTrail configured by default If CloudTrail is already enabled by organization policy, skip this step.
CloudTrail is a service which keeps records for the last 90 days worth of management API events in AWS. This includes information about which user logged in, where they logged in from, and any changes they made to account users and permissions. These events are incredibly useful when you need to monitor an account that is shared by multiple users, and have value for auditing purposes even when you don’t plan to share an AWS account.
If you are the owner of your AWS account, it’s highly recommended that you create a custom CloudTrail configuration that spans all regions and logs management events to a S3 bucket for long-term storage. Creating an S3 bucket along with this Trail will allow you to save events longer than the default length of 90 days, but can incur some cost if your account is very active and generates large volumes of data for storage. If you are not running productions services or staying in free-tier is important, you can choose not to configure a S3 bucket. The first management trail you configure in any AWS account is free, so you will only see charges if you create multiple management trails, create data trails (Trails which log in-depth information for AWS Resources beyond basic management resources - very useful for troubleshooting at times), or if you configure a S3 bucket with your trail. You can read more details on pricing and decide if long-term storage is right for you.
Create a Management Trail#
Navigate to the AWS CloudTrail console by typing CloudTrail into the home page of the AWS web console.

Create the CloudTrail config by clicking the 1Create trail1 button from the CloudTrail management page.

The next page will look like this:
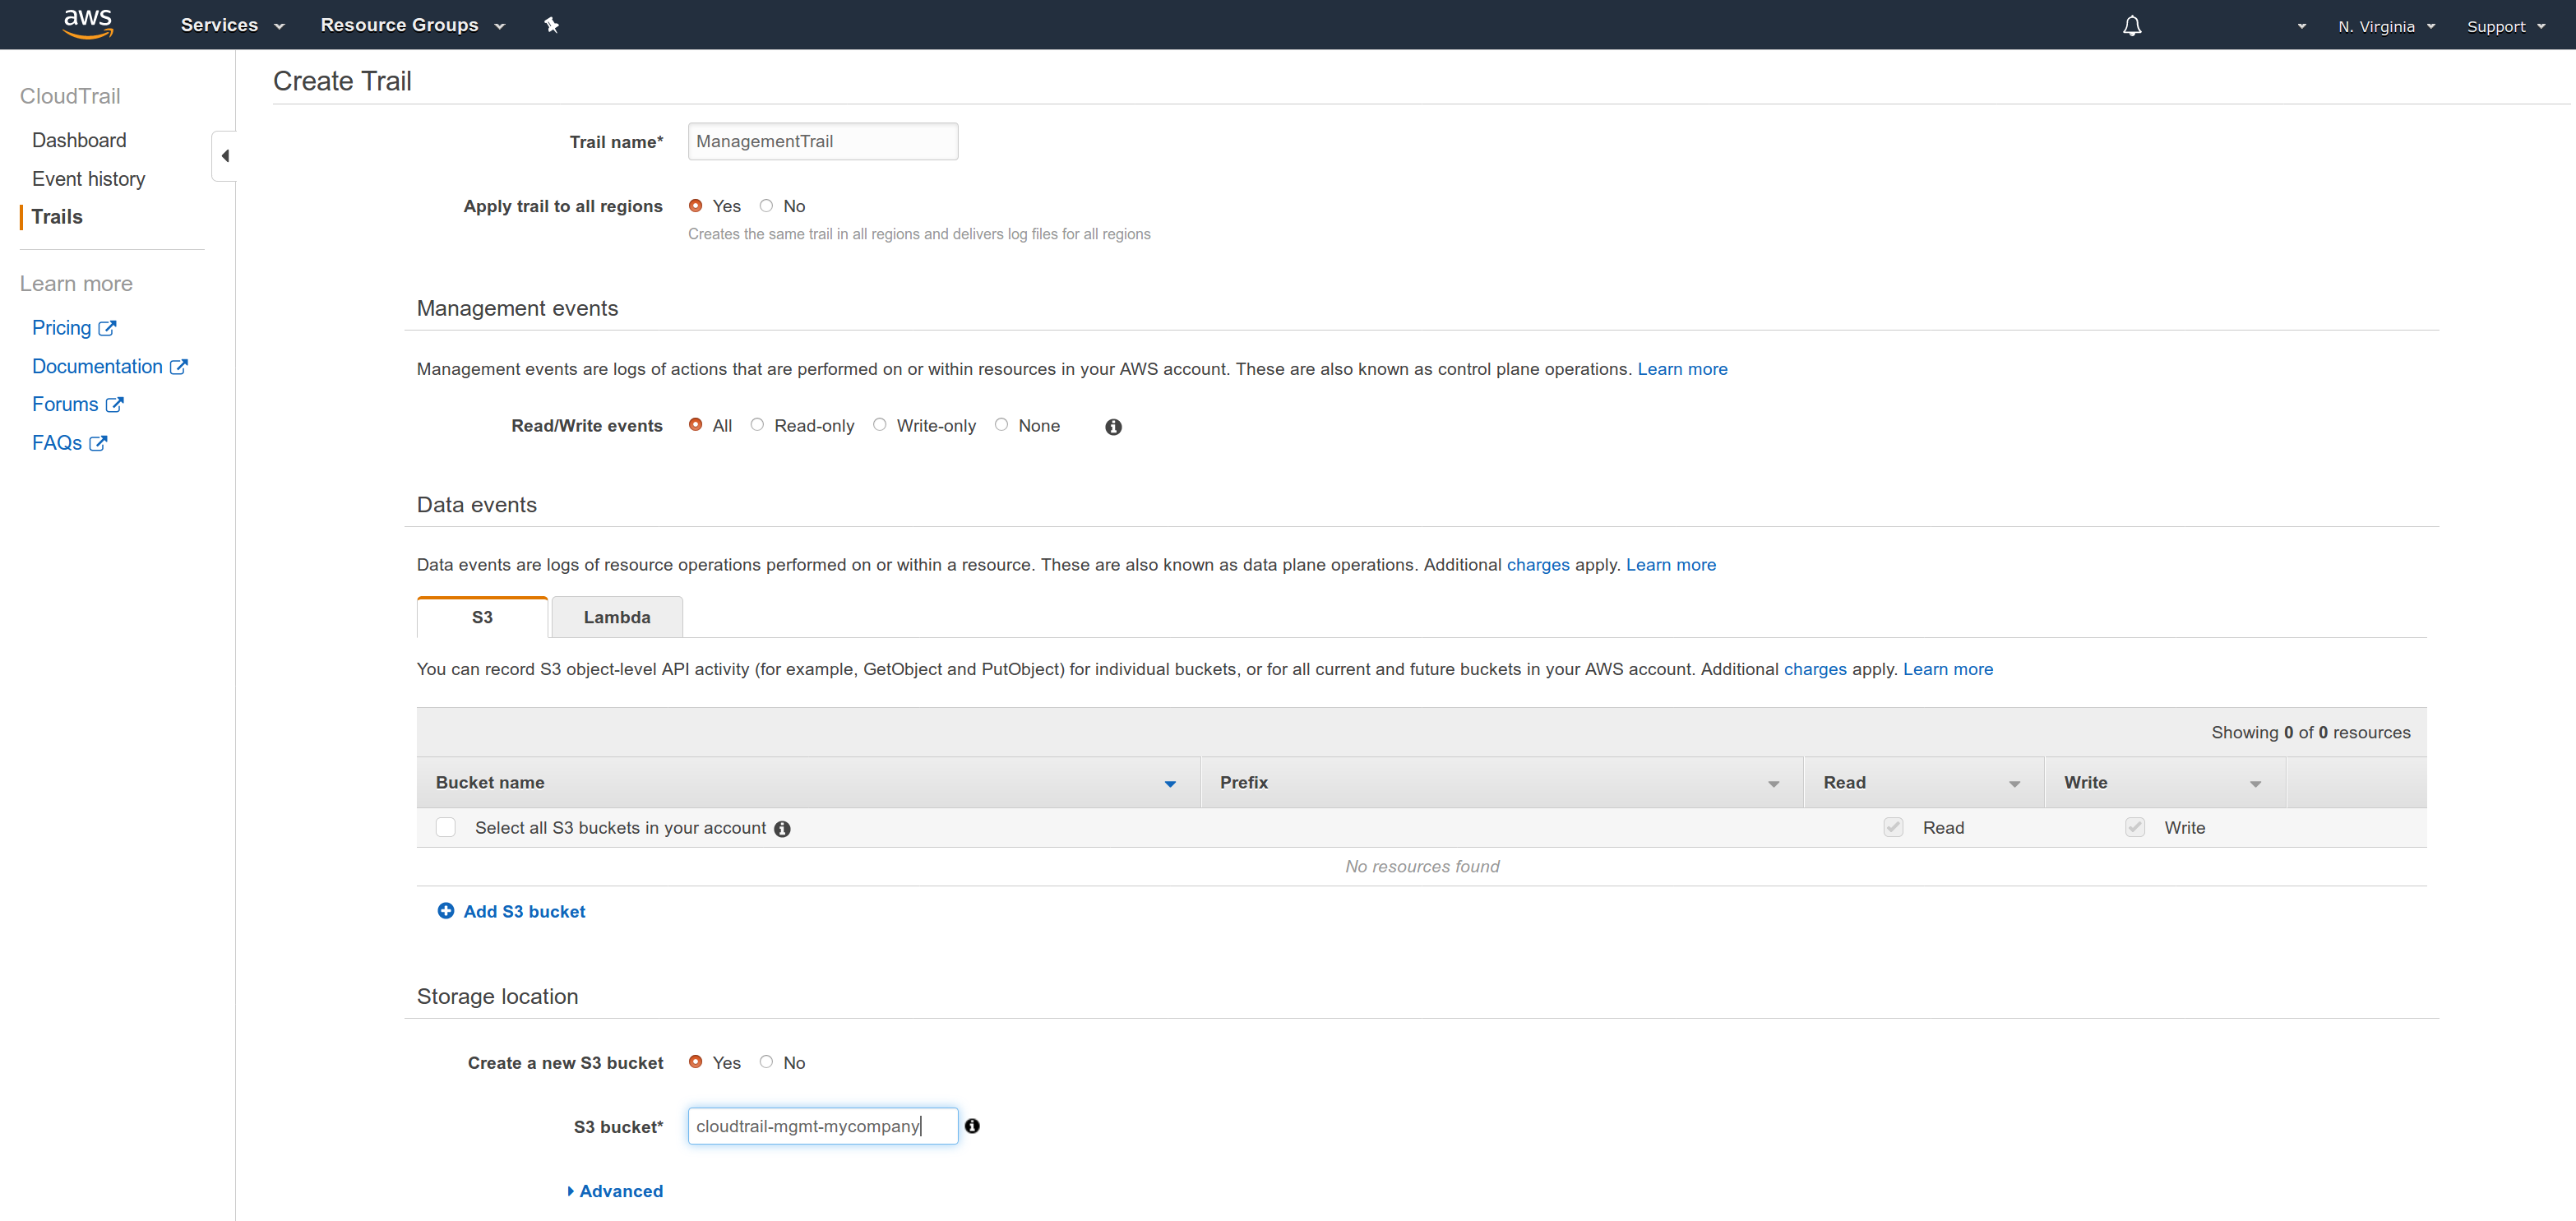
Configure the trail settings as shown below:
Trail Name : Name the trail something obvious, like ManagementTrail .
Apply Trail to all regions : Should be Yes .
Read/write events : Use the default of All so you don’t lose any potentially data.
Storage Location
- Create a new S3 Bucket
-
Yesif we decided to store events beyond 90 days in S3 (which may incur small charges beyond free-tier if the account is highly utilized). If selectingNo, skip the setting below forS3 Bucket - S3 bucket
- the name for a new bucket. S3 buckets names must always be globally unique - meaning unique across every AWS account, so try a name formatted like
cloudtrail-mgmt-myname.
Click the blue button below to finish creating the trail. The trail will now appear in the CloudTrail Dashboard.

Billing Alerts#
Billing Alerts are useful to manage your costs, but they also have security benefits since cost-overrun alerts can warn us of a potential account compromise situation.
Contact AWS Support in case of cost concerns
If you ever do find yourself experiencing an unusual cost over-run, contact AWS Support immediately for assistance. If your account was compromised - they can help you lock it down and usually reverse any charges generated by an attacker. Even if your account wasn’t compromised, AWS Support will often refund unexpected costs when they happen due to misunderstanding or accidental misconfiguration - so ask!
Enable Billing Alerts#
While still signed in as the root user, go to the AWS Billing Dashboard
On the left side, select Billing Preferences
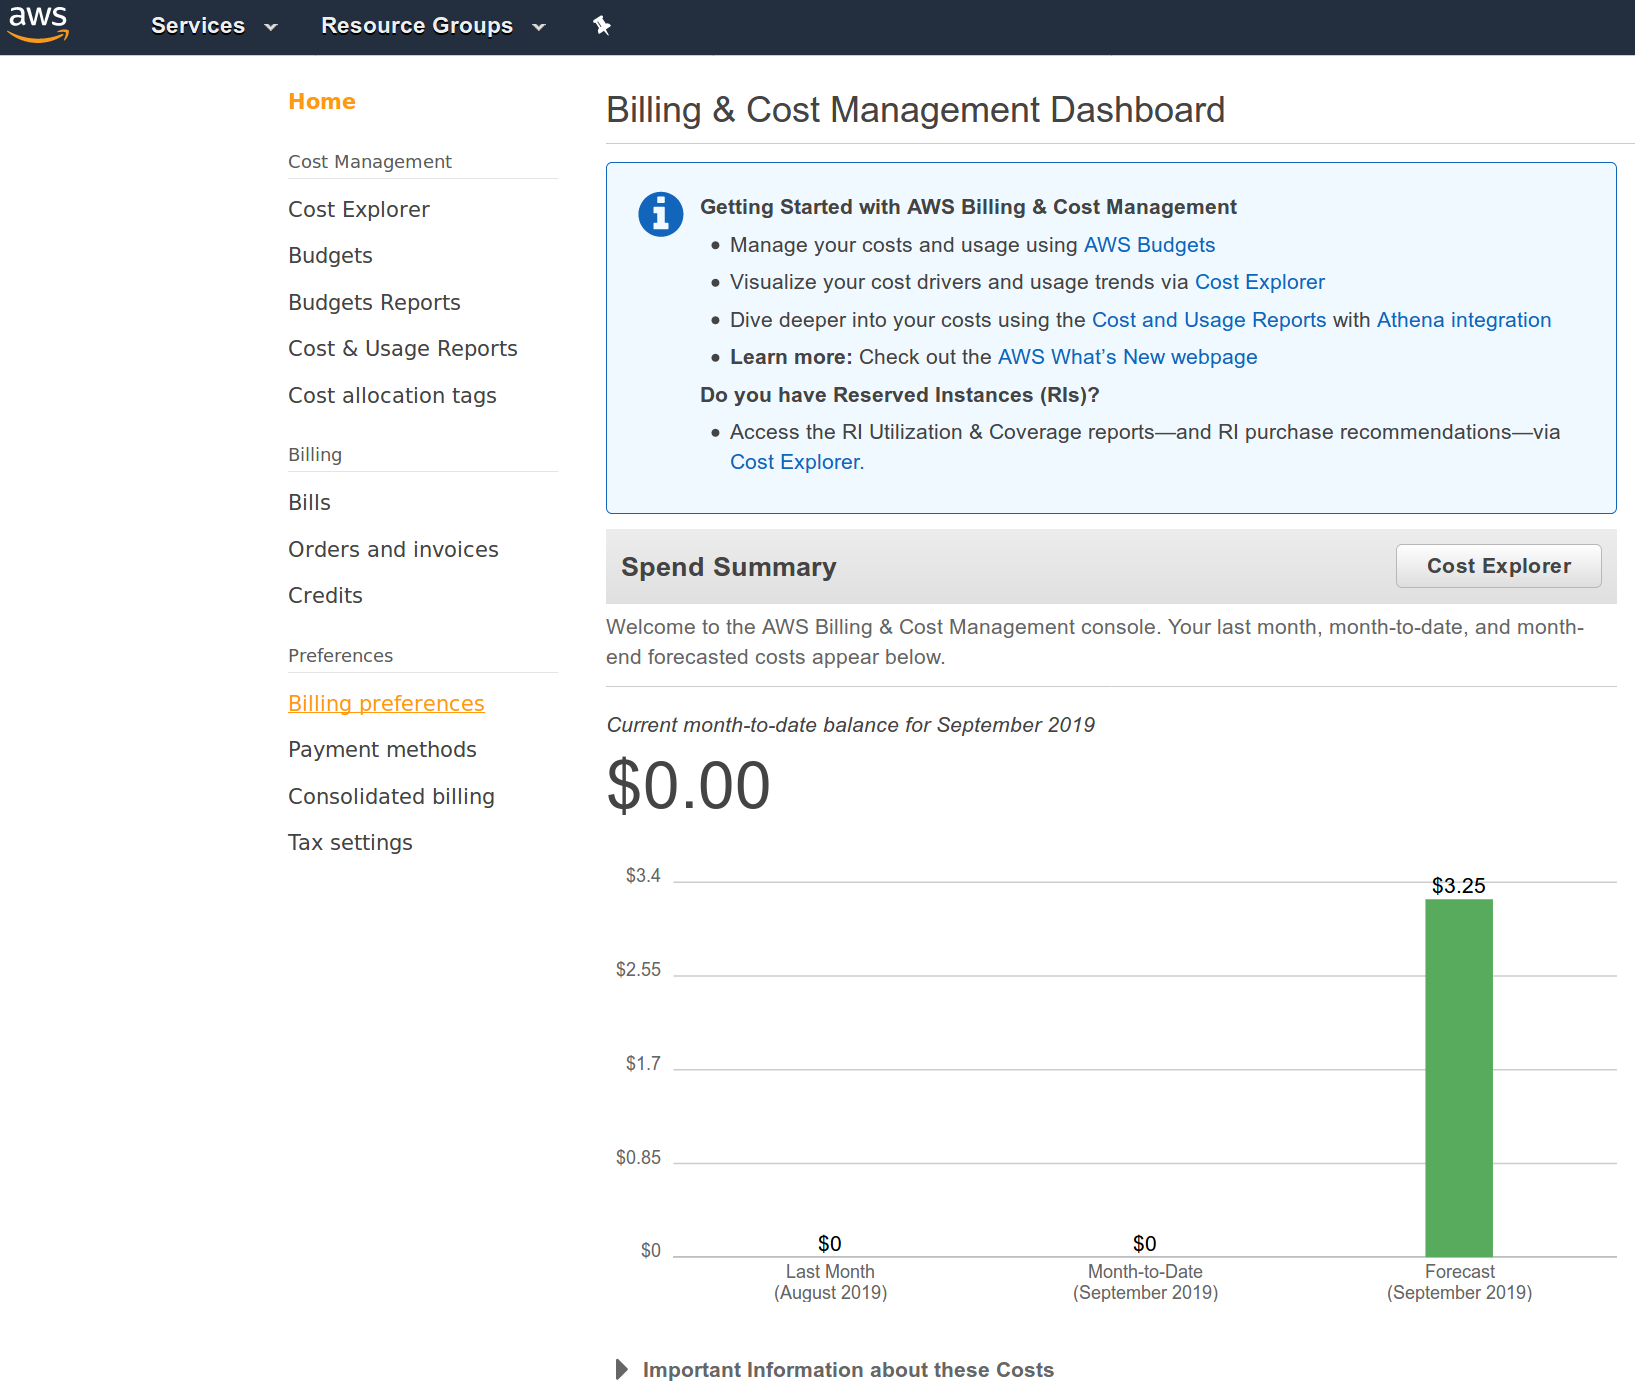
The screen below should appear with options for enabling alerts.
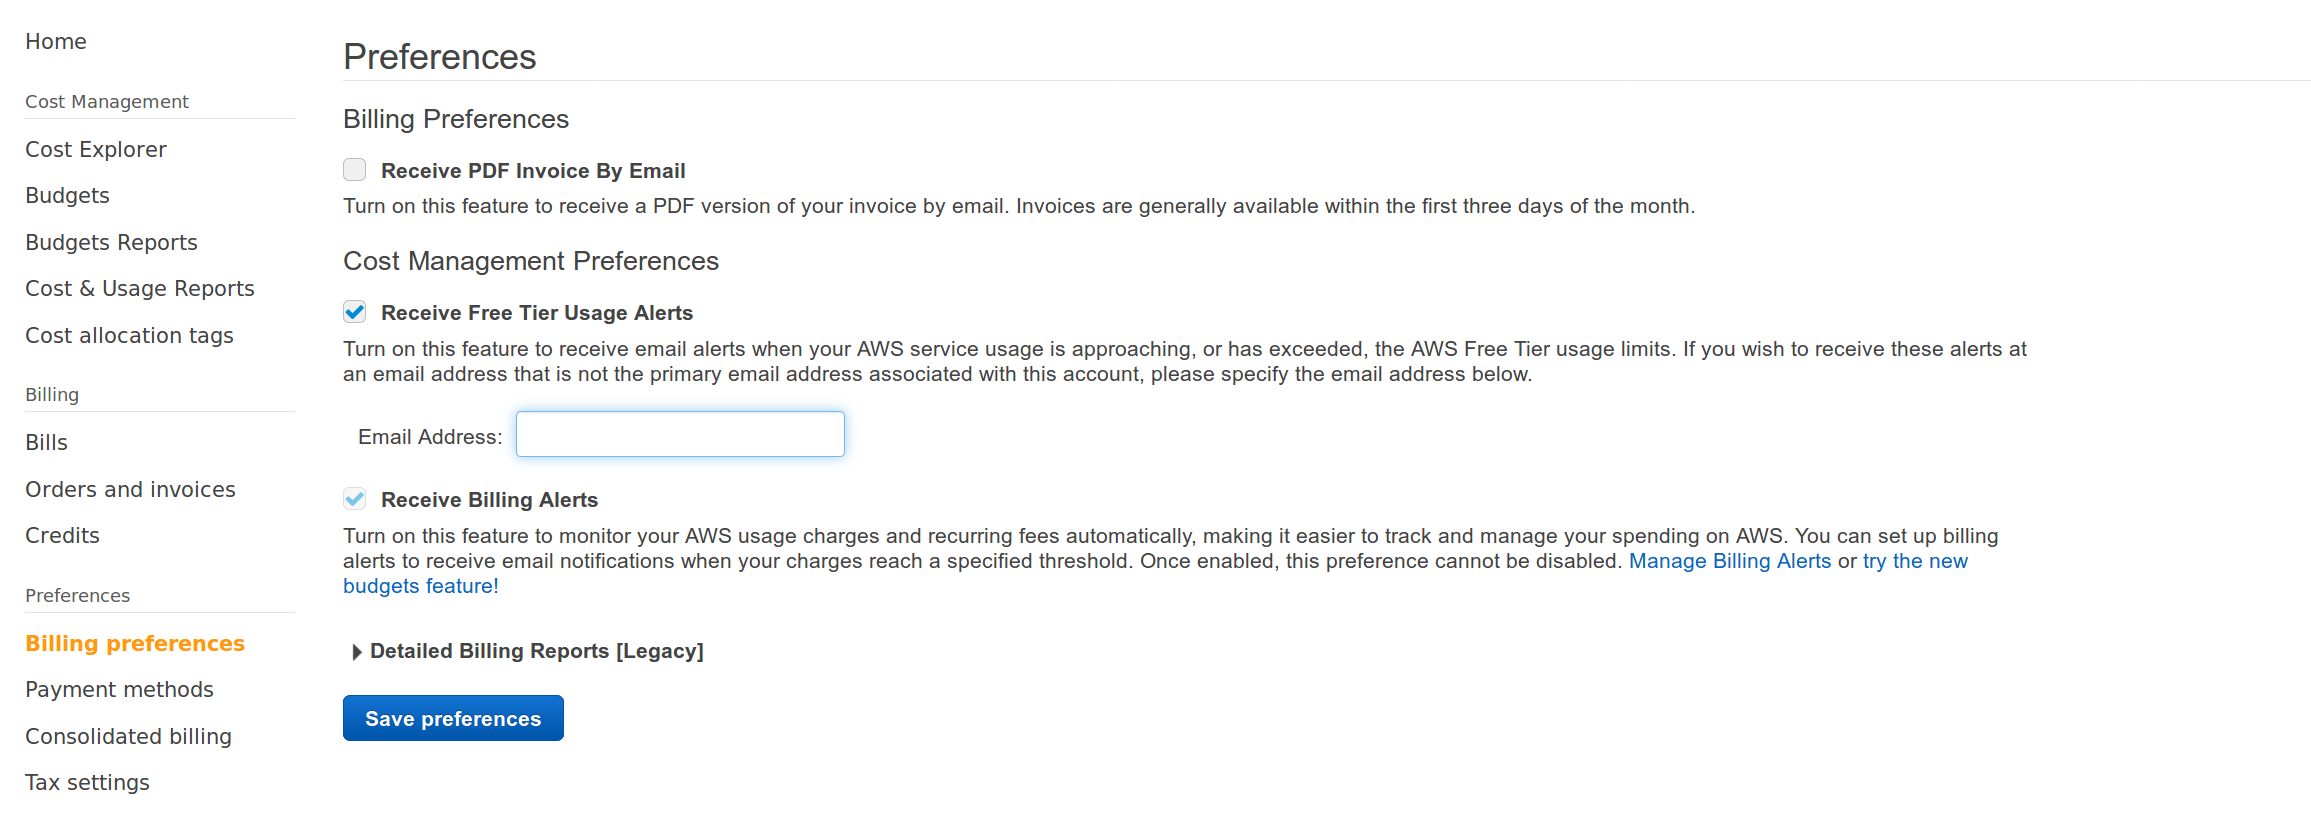
If you are planning to use free-tier, ensure the box for Receive Free Tier Usage Alerts is checked. You may add an email address into the field shown if you need alerts for free-tier usage alerts to be sent to an email address other than the account default email.
If you would like to receive alerts that are tailored to a specific cost threshold (ie, alert if estimate exceeds $10), then select the Receive Billing Alerts box. From there, click through on the Manage Billing Alerts Link to go to the CloudWatch page for Billing alerts. See the AWS Documentation for complete information about configuring CloudWatch Billing Alarms
Set a password policy for the account#
The default password policy that comes configured with new accounts is comically weak. It’s important to update this policy before you add any new users.
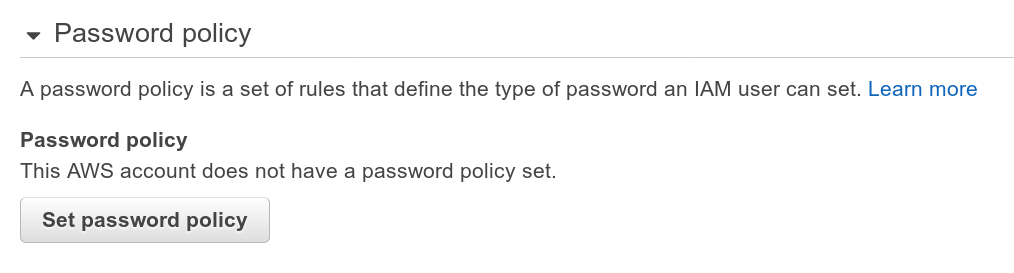
To update the default password policy: Go to IAM > Account Settings from the AWS Dashboard.

Click the grey button that says Set password policy to bring up the policy configuration screen.
The password policy can vary depending on organizational security policy, but aim to be as strong or stronger than the policy shown here:
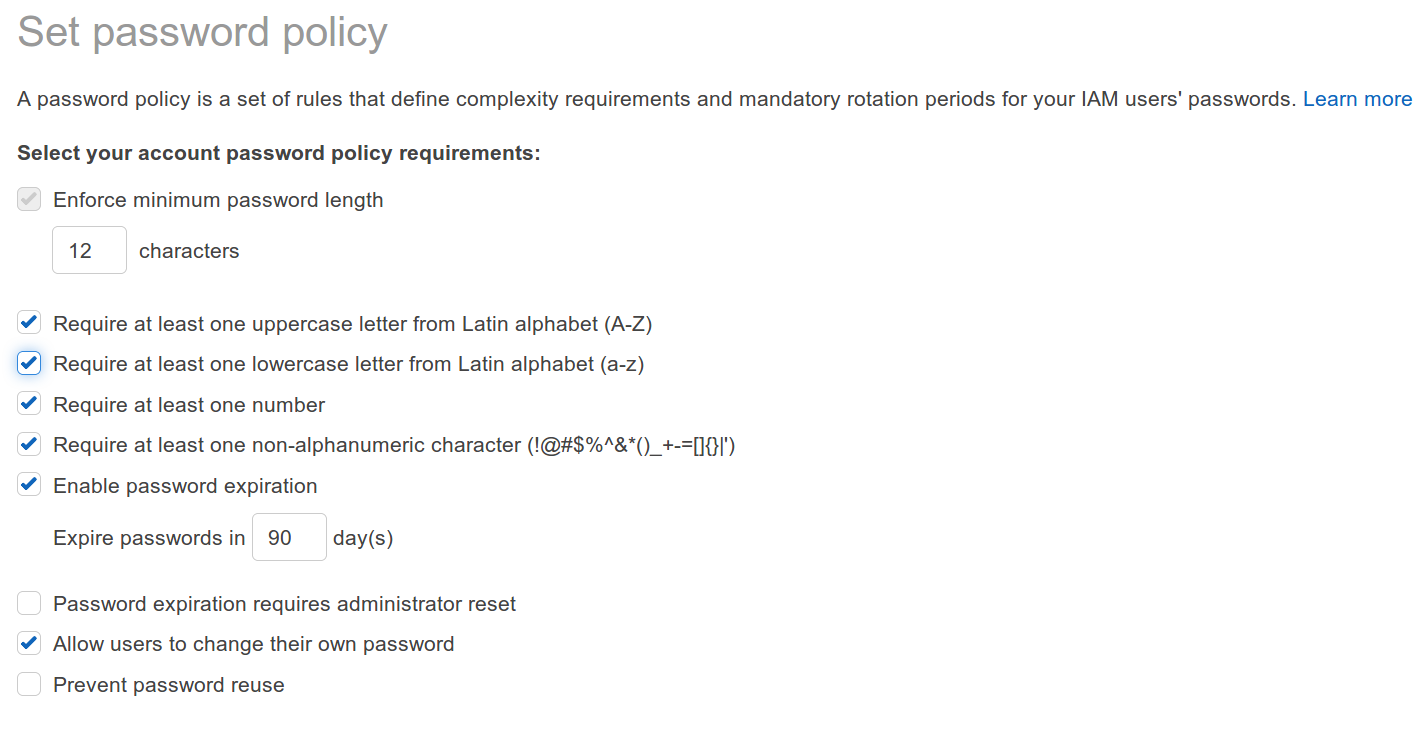
- Update the character length under “Enforce minimum password length” to AT LEAST 12
- Require at least one uppercase letter
- Require at least one lowercase letter
- Require at least one number
- Require at least one non-alphanumeric character
- Enable password expiration of at least 90 days
- Allow users to change their own password
Save the changes.
Deactivate Regions not in use (optional)#
AWS supports many different regions to allow you to deploy to endpoints closest to your users. In practice though, many AWS customers only ever use one or two regions.
When an AWS account is compromised, attackers often choose to utilize lesser-used regions in hopes that their changes to resource usage will go unnoticed. But more commonly - it’s just easy to forget about resources that were created in rarely-used regions you don’t normally use and end up paying for them longer than you intended.
From the IAM > Account Settings page, we can deactivate regions that we do not plan to us. This ensures that any authentication credentials created for our account cannot be used for those de-activated regions.
In the example below, the deactivate option has been clicked on every region except us-east-1 and us-west-2 .
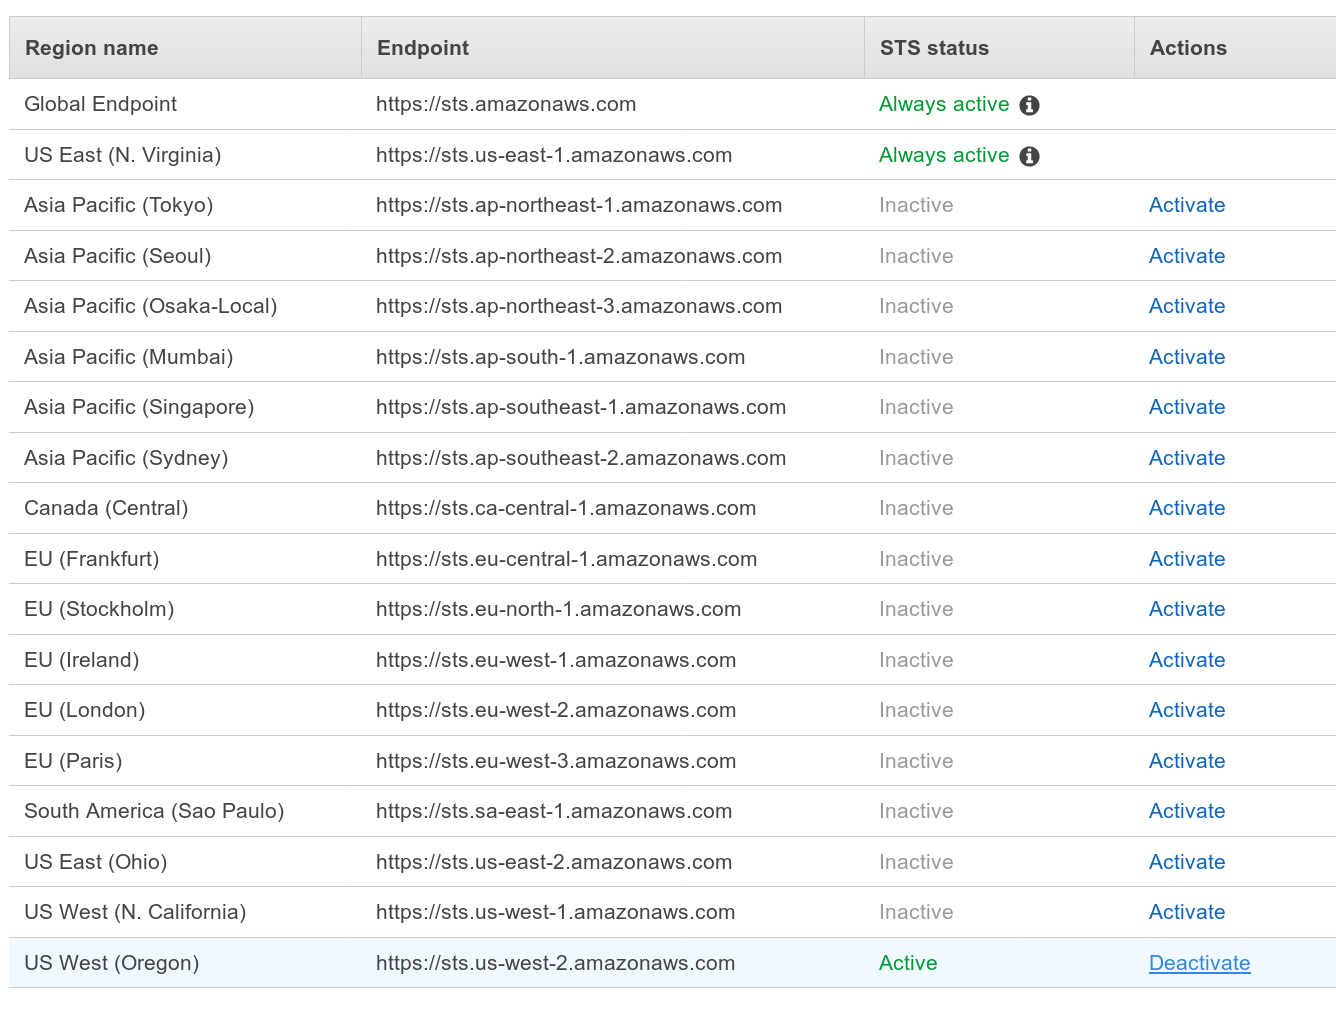
Why isn’t it possible to deactivate US East (us-east-1)?
The
us-east-1region was the first region created by AWS, and as such, it is a bit of a snowflake. Many services that are not specific to any particular region (“global” services such asIAMandBilling), are actually running fromus-east-1.
Create an IAM Admin User#
If you were given an account access by an account administrator you probably already have an IAM user configured. If that is the case, please contact your administrator to verify if your permissions are sufficient for AWS Lambda development, and ask them for API credential keys if you do not already have them.
For those of us who created our own account, we will need to configure a named user with AdministratorAcess or PowerUserAccess permissions. This user will be used for all future AWS work. This step is strictly required - it’s never a good idea to use the AWS account root user (the email address associated with account setup) for any development work.
Steps:
Create the new user by navigating to the AWS Dashboard for IAM > Users
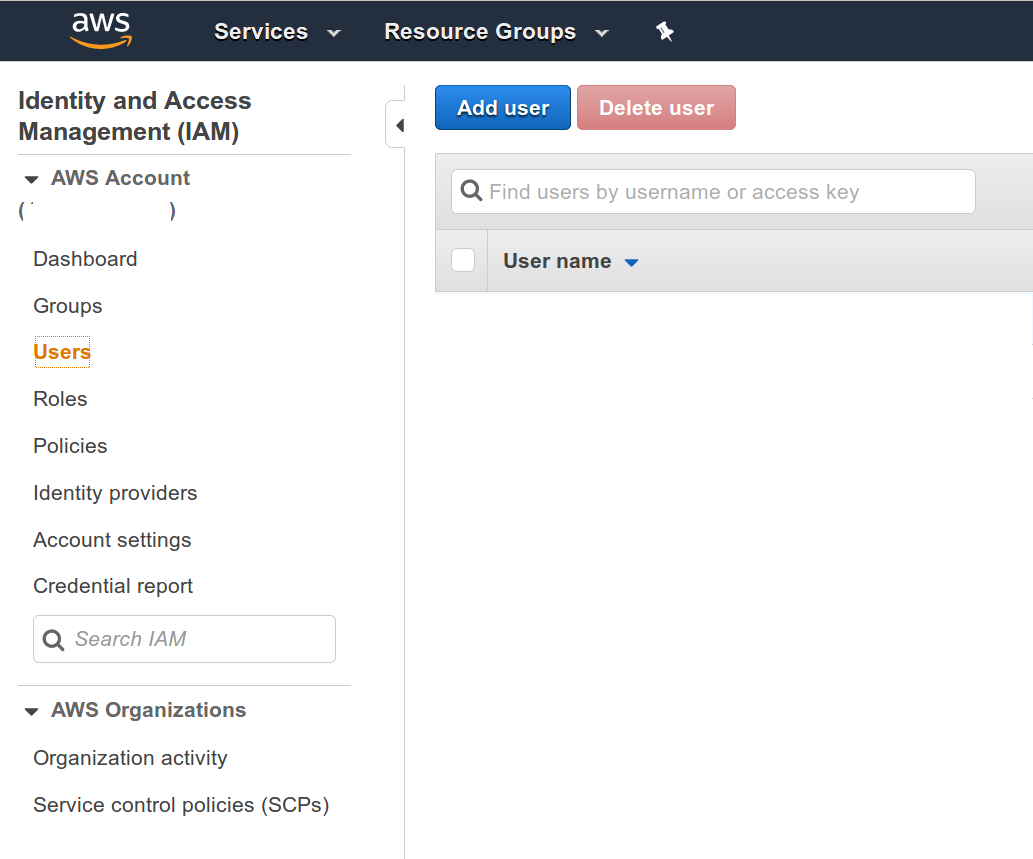
Create a new user by clicking the blue Add User button
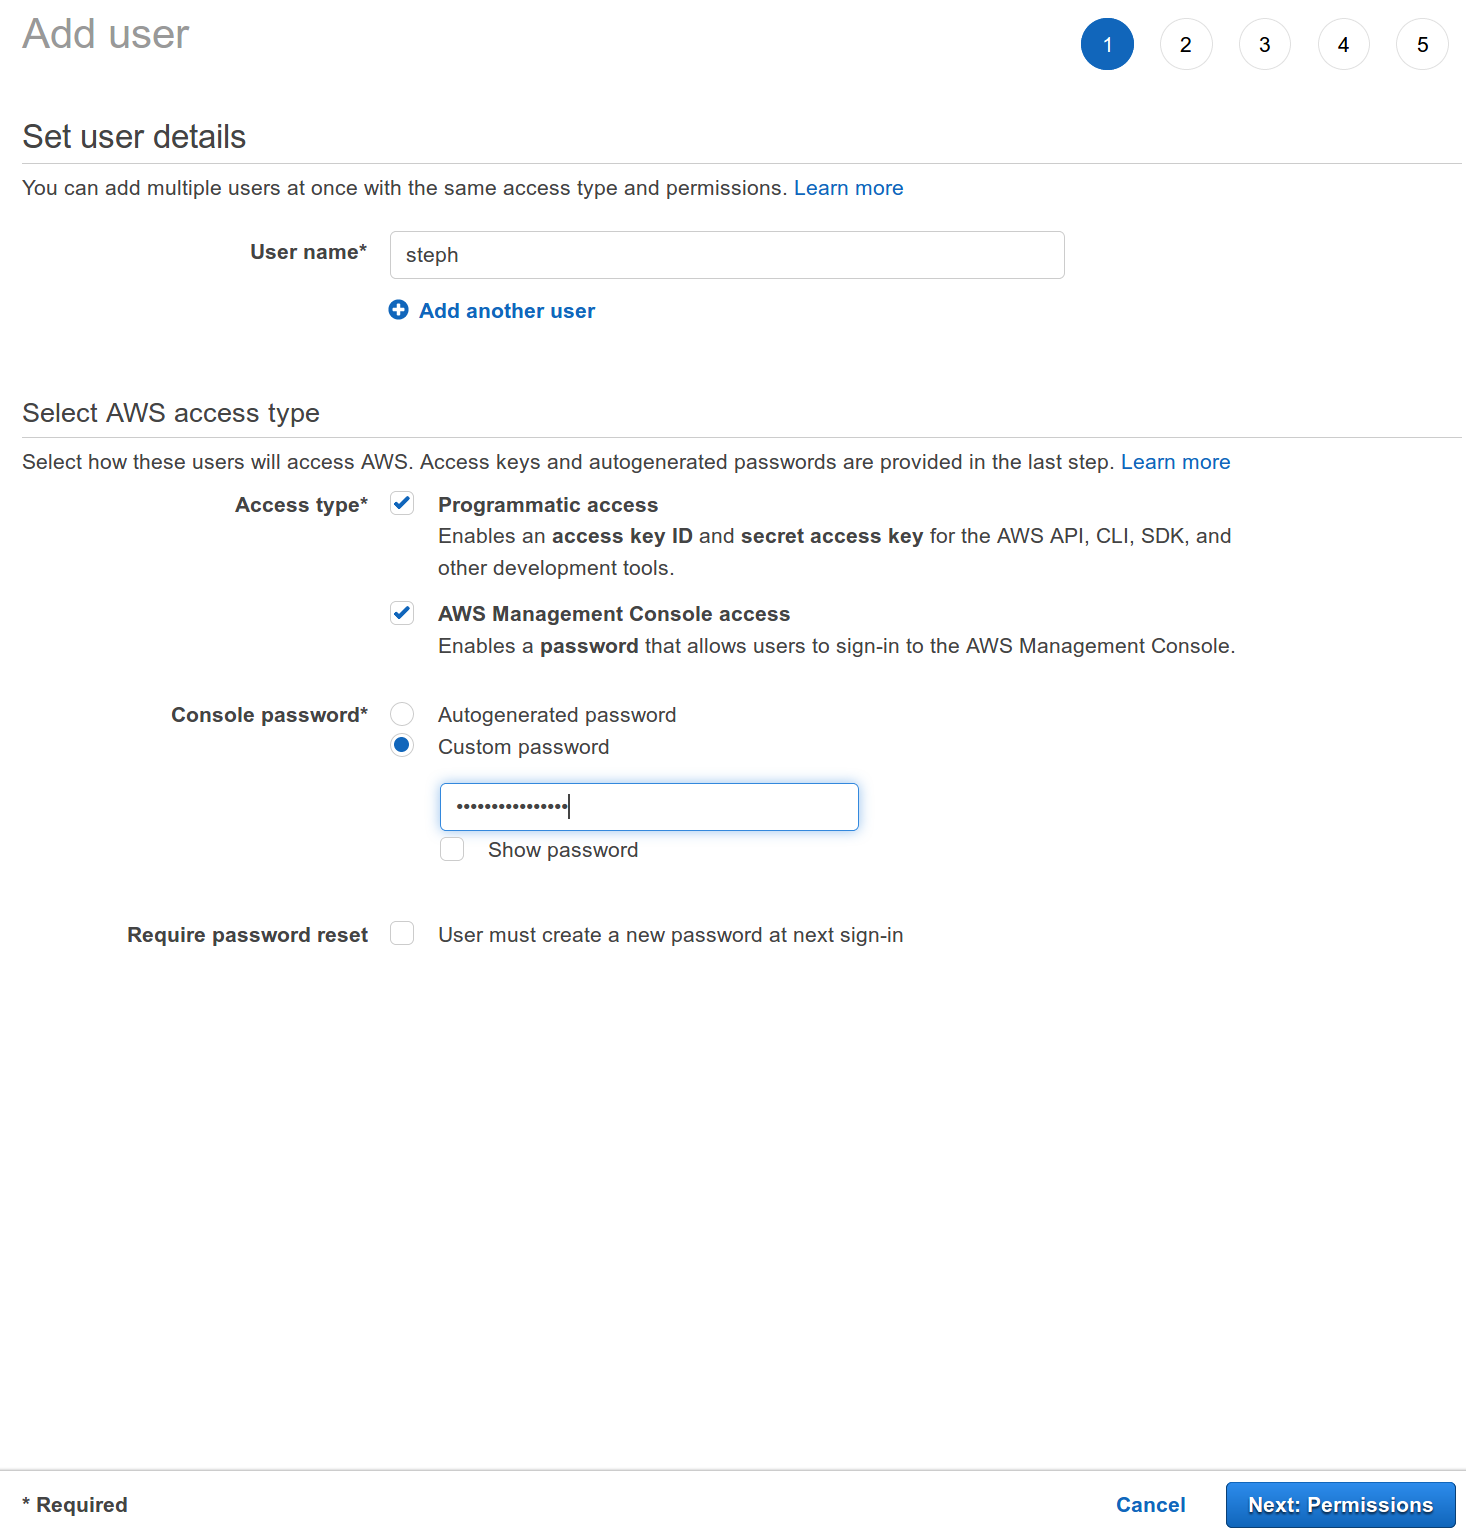
We will be directed to a screen with user configuration options as shown below:
Name : The username should be something memorable that doesn’t already exist in the current account. AWS will show a warning if an invalid user name is given
AWS Account Access Type : Programmatic access : Ensure this option is selected. This option ensures that API credential keys are created for the new user. Those keys are required to deploy Lambdas with the aws-sam-cli , as we will soon in the Configure SAM CLI step.
: AWS Managed Console access : Ensure this option is selected. This allows the new user to login into the AWS Web console as that user. After initial account setup has been completed, it’s advised to always login with this user and NOT the email address used to setup the account
Password : Custom password : Ensure selected We are planning to use this user immediately, so we can safely select this option and set a password now. : Require password reset : Ensure unselected Uncheck this box. We don’t want to reset the password at next login. This setting should only be used when creating an account that will be given to someone else. : Autogenerated passwords : Ensure unselected Uncheck this box. This option is also intended for use when creating an account that will be given to somebody else.
Click the blue Next: Permissions button on the right side of the page to continue.
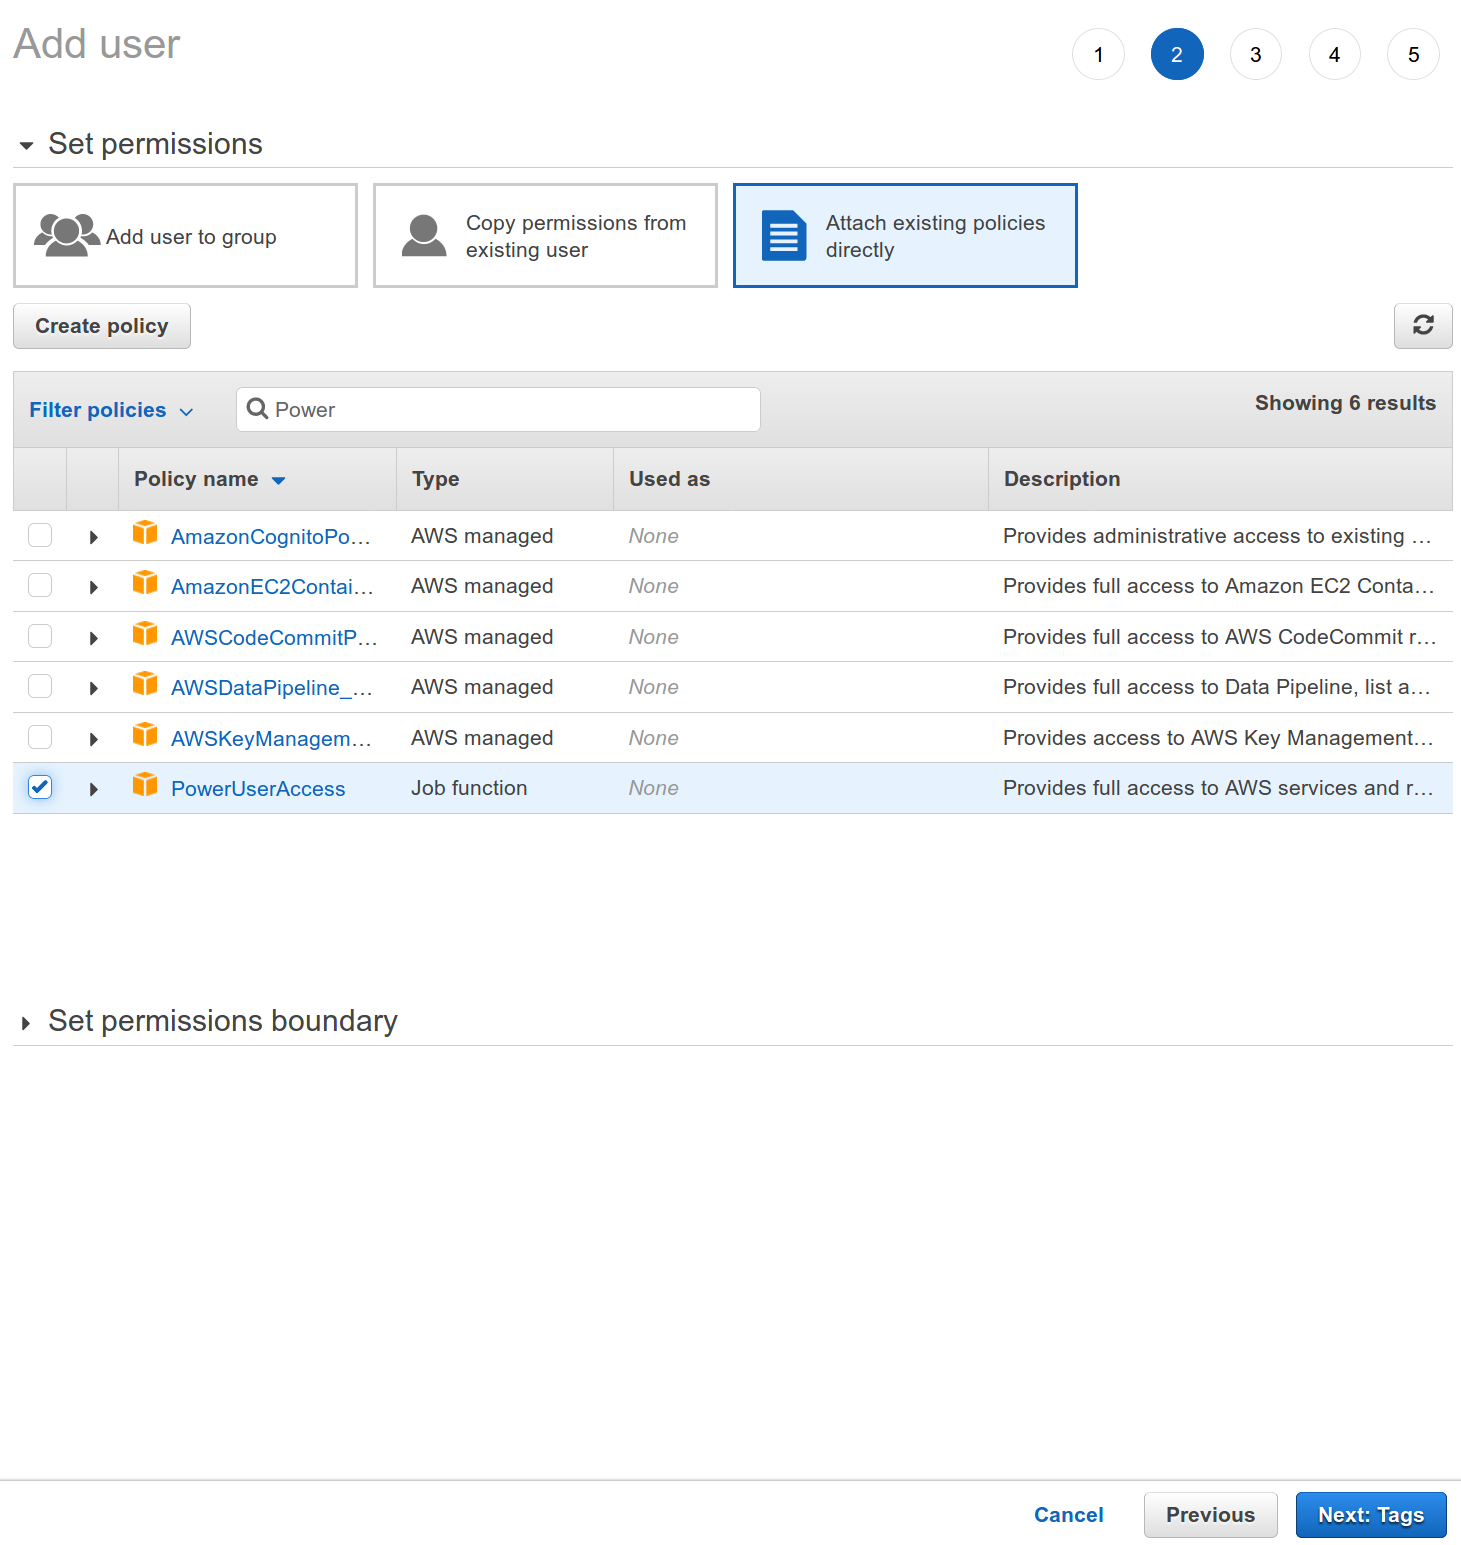
From this permissions screen, select the right-most box with the text Attach existing policies directly .
After selecting that box, a list with a search box should appear below. To create an Admin User, type “Admin” into the search box and then select only the AdminstratorAccess option.
AdminstratorAccessis powerful
AdministratorAccessgives a user power over almost every resource in an AWS account. Billing control is the one notable exception here. Never share the password or keys for this account with others. Always make a separate account for each user, and provide minimum necessary access permissions depending on each user’s role. AWS Identity and Access Management (IAM) can be a complex topic in its own right, so don’t hesitate to consult AWS Docs on IAM
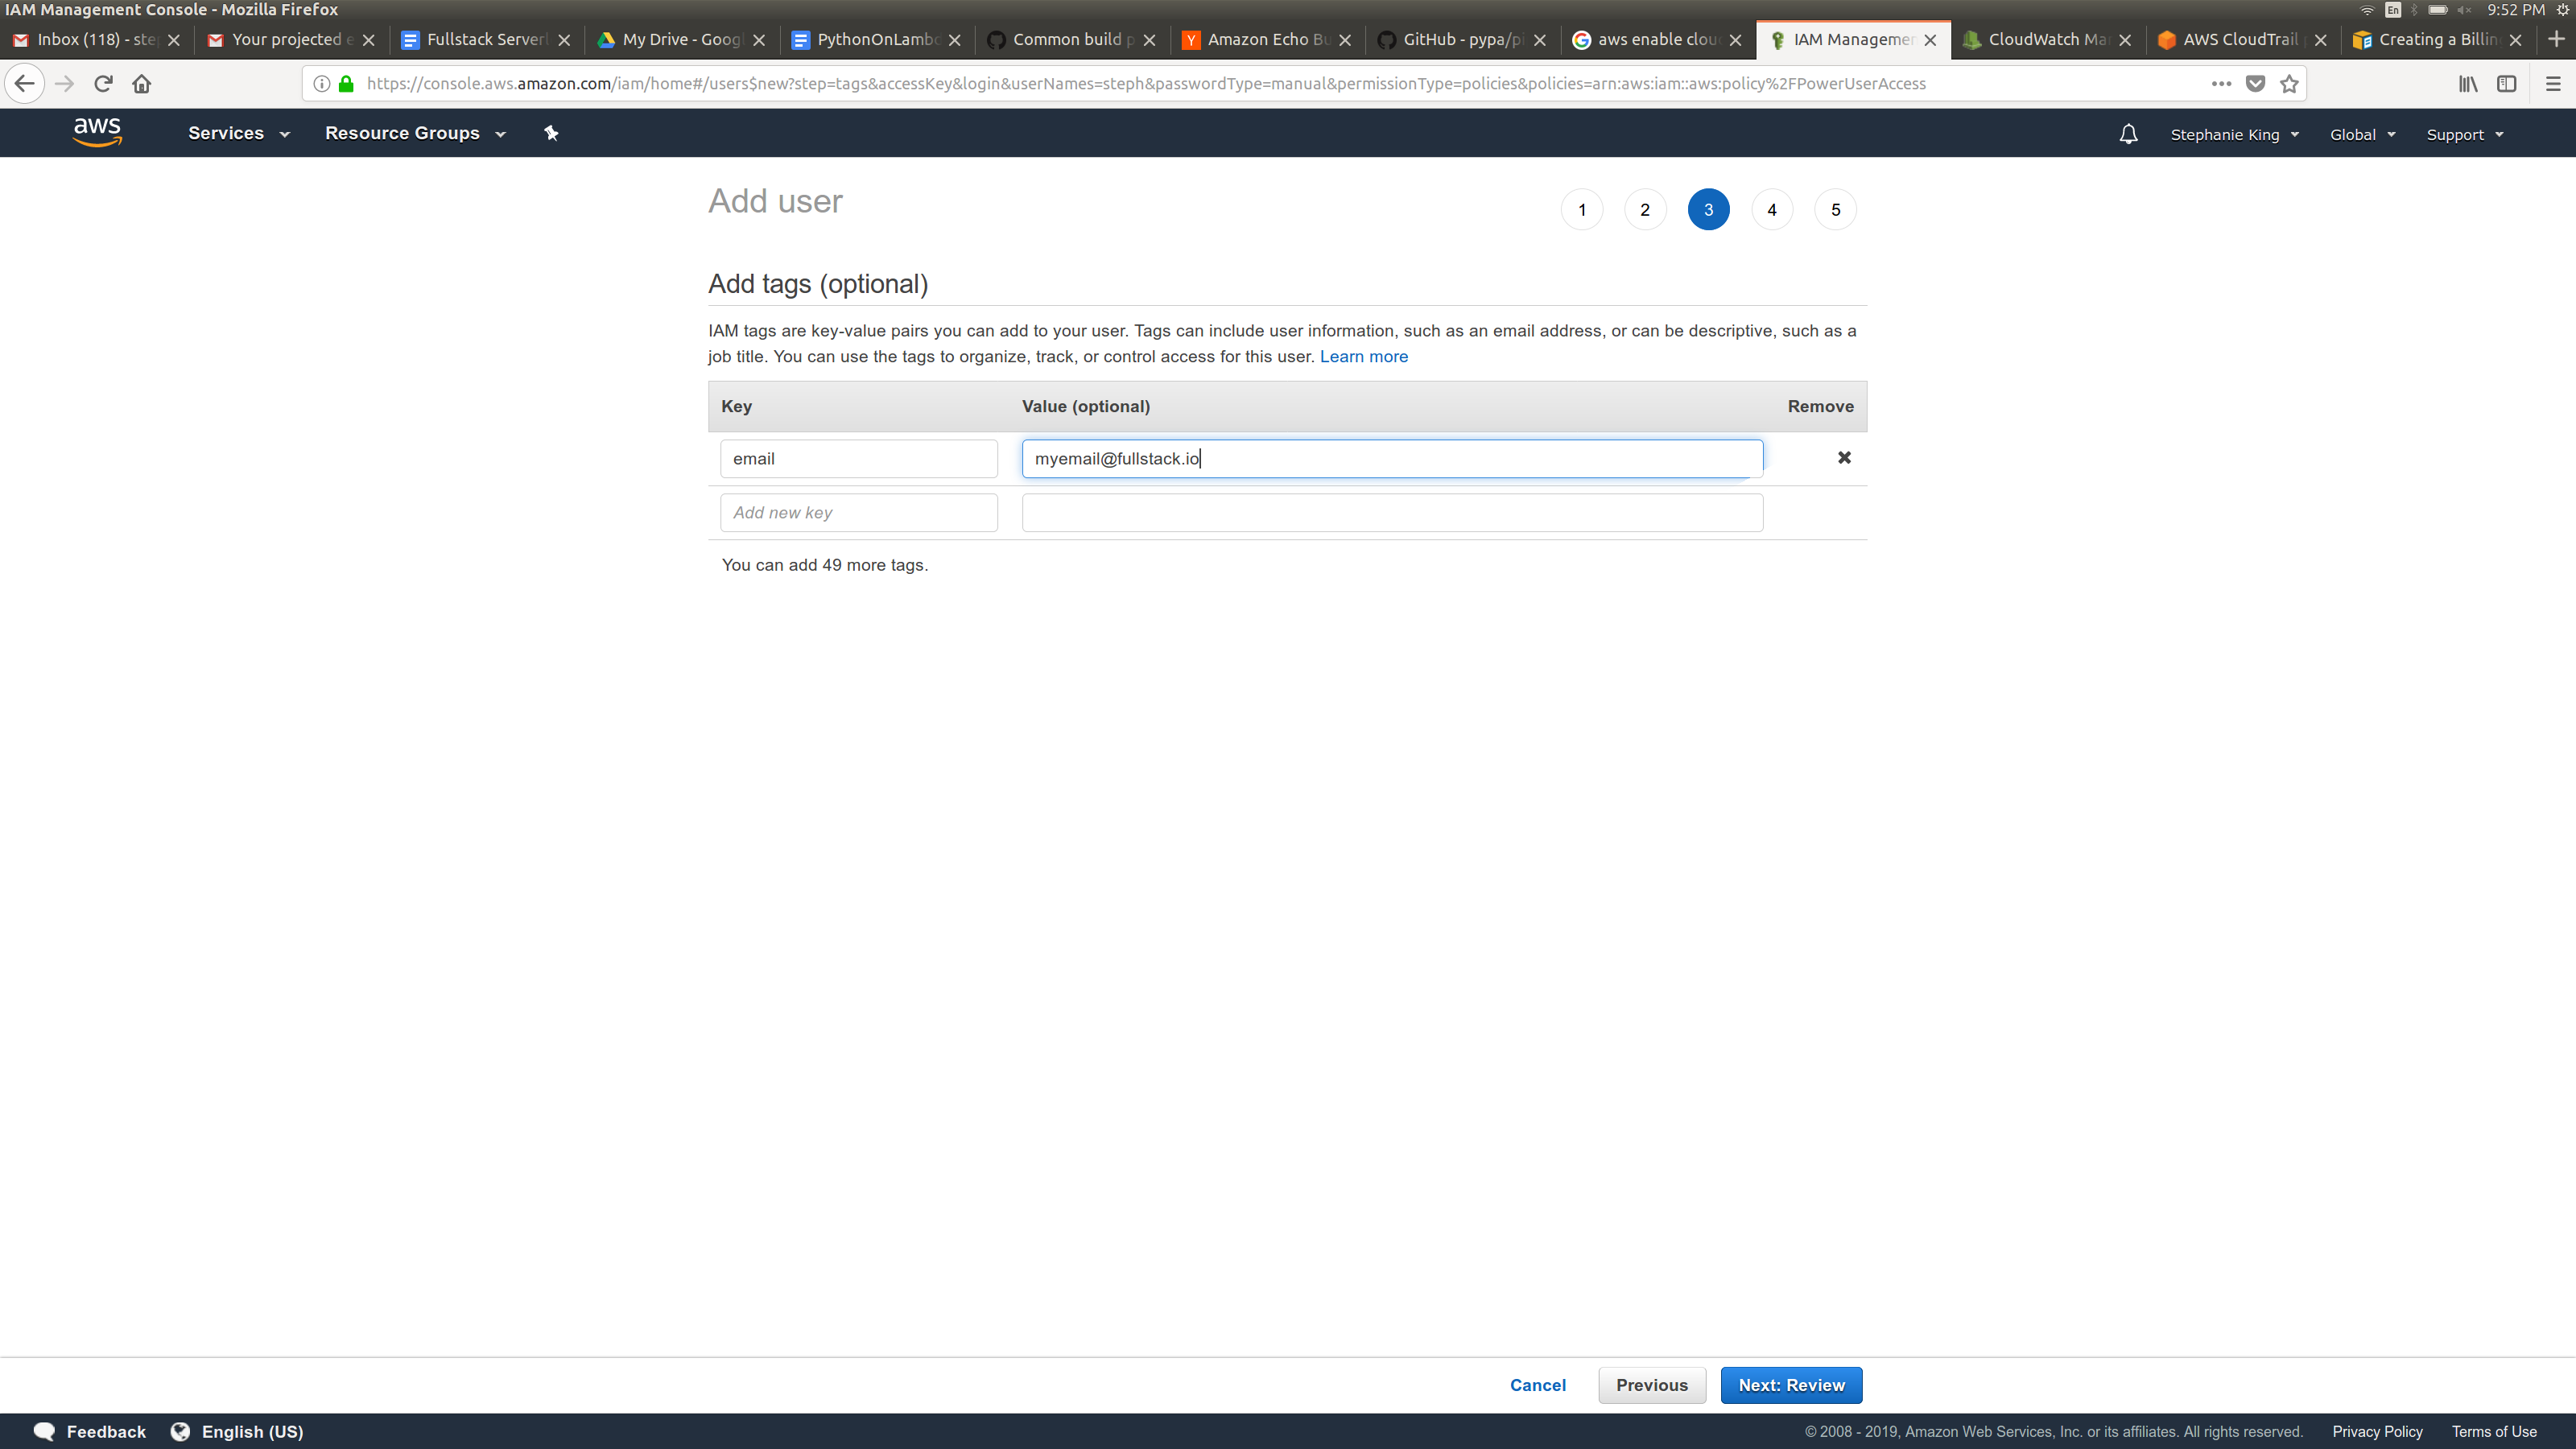
Click the blue button for Next: Tags
Tags are optional key-value pairs that are available on many different AWS resources. These tags are not required, but may be helpful for managing users. In the example we added a tag with the key email for a user’s email address.
Tagging in AWS
Tags are case-sensitive, and input is not validated by AWS when the tag is saved. They are mainly used for categorizing resources. Check that a tag value is correct. Whenever a shared AWS Account is used, it’s recommended to agree on a set of “Tag Standards” that are used consistently.
Click the blue button for Next: Review
Check the review page to ensure there were no typos or mis-clicks, and then click the blue Create User button
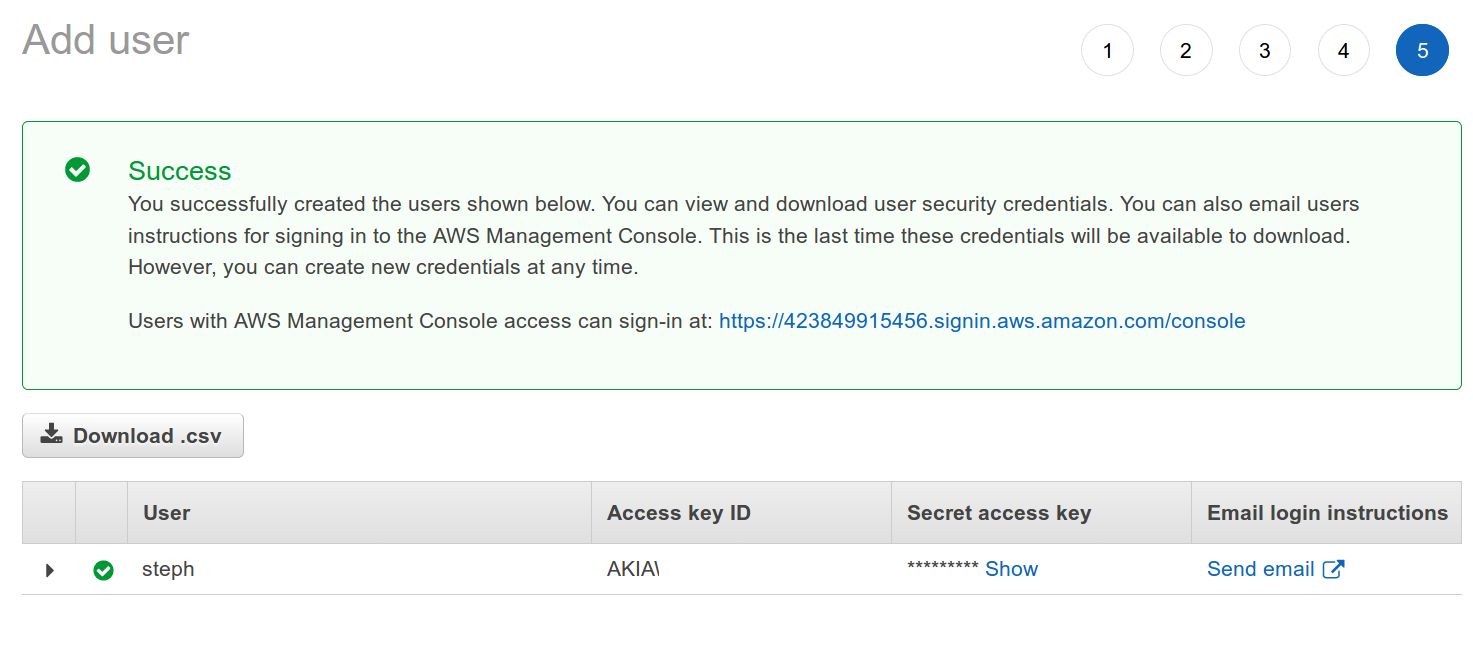
We will then see the screen with the information about our user.
Click the button that says Download .csv and save the contents somewhere secure. We will not have the opportunity to download these again later. However, if we do lose that file, we can follow the process in the Configuring SAM and AWS CLI step to generate a new set of credentials.
Guard the Access Key CSV file!
If the the contents from the AccessKey file downloaded here are ever accidentally shared or committed to a public repo - those credentials must be disabled immediately. Deleting the file from the public repo after a leak is not enough Attackers have scrapers that target Github and other repo services specifically looking for AWS Credentials - so even if it’s there for a second - the creds will need to be disabled. Creds can be disabled the IAM User’s security credential page, which is shown in the IAM Creds step below.
Enable MFA on IAM User#
Multi-factor Authentication (MFA) absolutely should be enabled for any user with login access to the AWS web console. AWS does not support sending MFA codes directly over SMS, so most users will want to use a Virtual MFA to secure their AWS account. Hardware MFA devices can also be configured if necessary.
To use virtual MFA device, we will need to install a software application that supports the TOTP protocol on a device we have physical access to - typically a phone. Widely used Virtual MFA applications include Authy, Duo Mobile Google Authenticator and many others. If you already have a particular virtual MFA application installed on your phone, you will most likely be able to use the same one for AWS.
Have a MFA Backup Plan!
If the device that is used for virtual MFA is lost or destroyed - the MFA codes that were on it may be lost with it! Fortunately, most Virtual MFA applications have tooling to restore lost MFA access using either a password encrypted cloud backup, or a series of passcodes that can be stored away from the device. Test these processes early to avoid surprises later.
If you do happen to get locked out of MFA for AWS - you can always contact AWS Support for assistance getting back in. Be prepared, re-gaining access can be a time-consuming process that might require photo ID and/or private billing information to complete.
The example below will use Google Authenticator on Android.
From the AWS Web console, navigate to the IAM console and click Users on the left
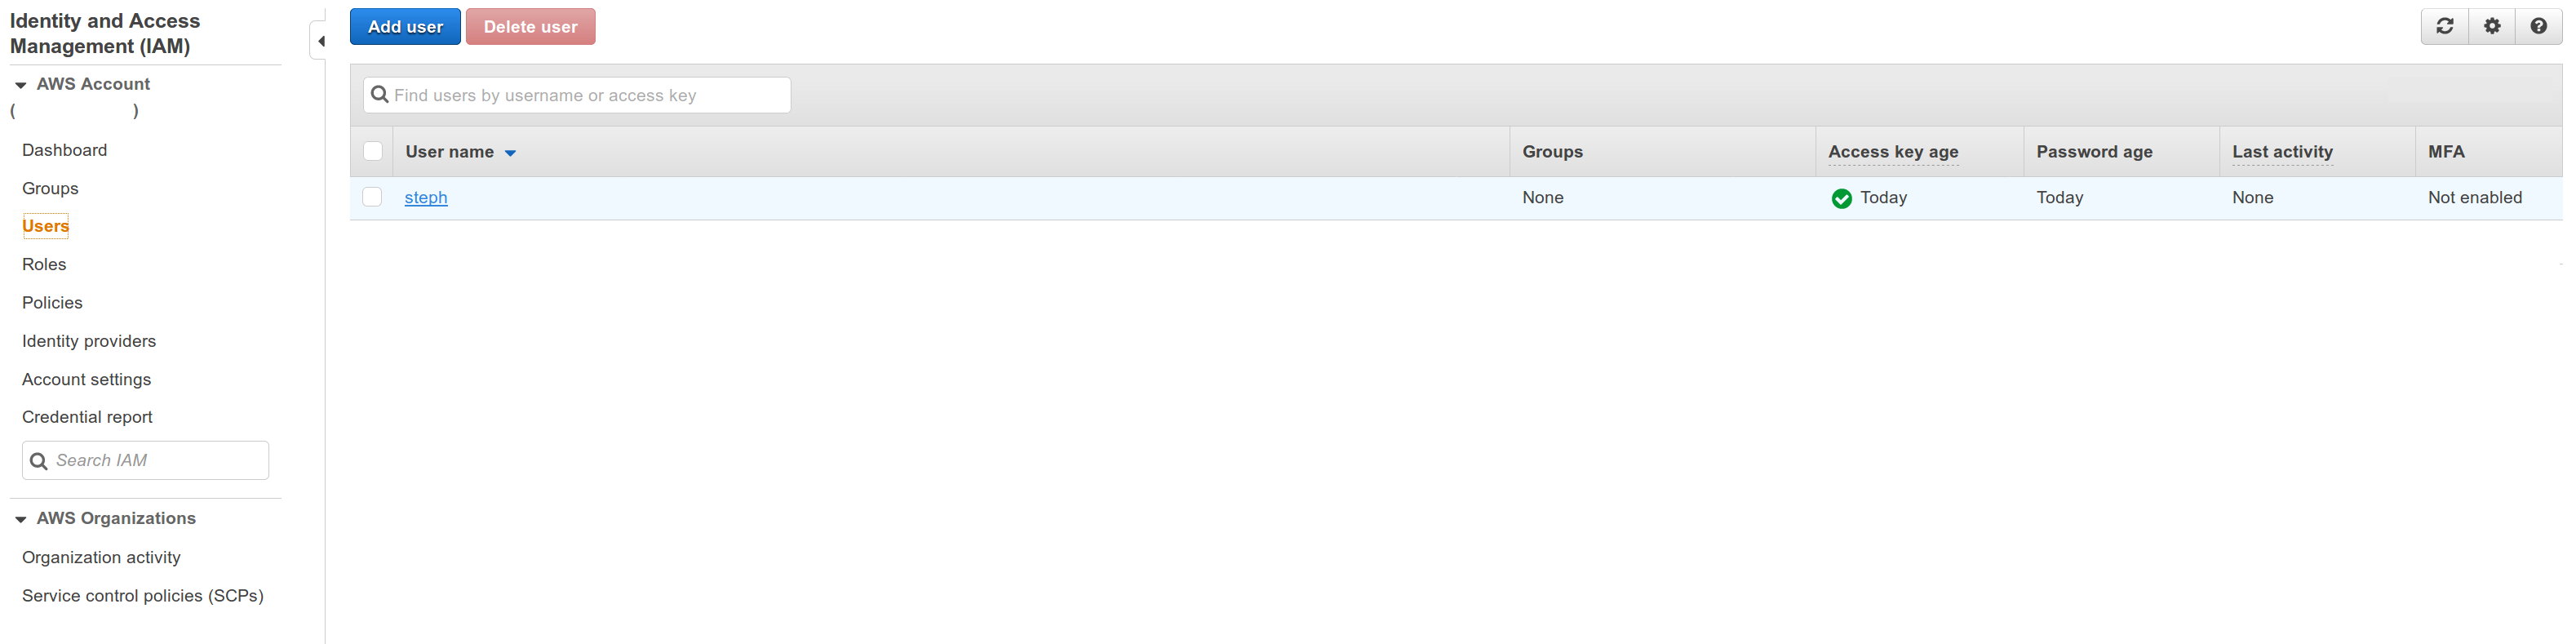
Select the user that was just created during the Create IAM Admin User step from the list of users to the right.

Click the Security Credentials Tab

To the right of Assigned MFA Device , click the blue link for Manage
A screen like this will appear. If using a virtual MFA, ensure the box for Virtual MFA device is selected and click Continue

On the next page, we will click the Show QR code button, and open the virtual MFA application on our mobile device.
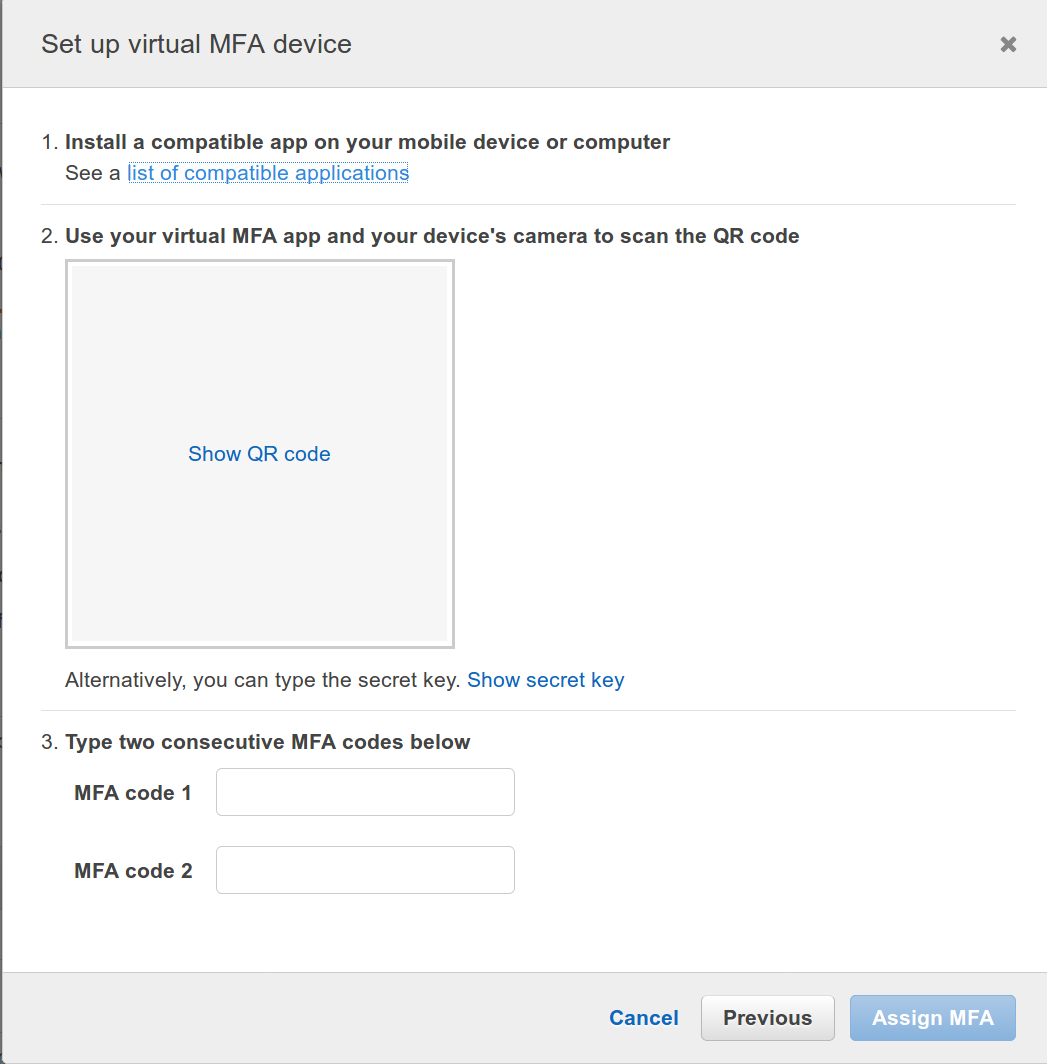
This user account is now ready to be added to the Virtual MFA Application. This process may vary slightly by application.
For Google Authenticator this means: 1. Open the application, and click the red + button at the bottom right side of the screen 2. Click Scan barcode 3. Point the QR code to the QR code shown on the AWS console page in the browser 4. From the browser - enter the first 6 digit number that appears in the box for MFA code 1 5. Wait for that number to change to a different number (takes about 30 seconds) 6. From the browser - Enter the new 6 digit number in the box for MFA code 2 above 7. From the browser - click Assign MFA 8. From Google Authenticator, click the blue ADD ACCOUNT link to save the newly configured account.
After adding the MFA device, the text next to Assigned MFA device on the IAM User credentials tab will no longer say Not Assigned .
Enable Root Account MFA#
This step is only for users who are the admins of their own AWS Account. Ignore this if you provided credentials from a shared account
The process to enable Root Account MFA is very similar to the process for setting up a user’s MFA. It is possible to use the exact same virtual MFA app used in the previous step for root configuration configuration.
Click the link here to access the Activate MFA for root credentials.
Alternatively, this page can be navigated to from the AWS web console via the steps below:
- To enable Root MFA, go to the IAM dashboard.
- Find the table underneath the header
Security Status. - Click on the row that says
Enable MFA on your root account - click
Manage MFA

A pop-up screen warning about the use of root security credentials may appear. Click continue .

After that box is dismissed, click the blue box for Activate MFA .
After clicking Activate MFA , follow the same procedure from Enable MFA on IAM User section above.
Disable Any Root User Access Keys#
This step is only for users who are the admins of their own AWS Account. Ignore this if you provided credentials from a shared account
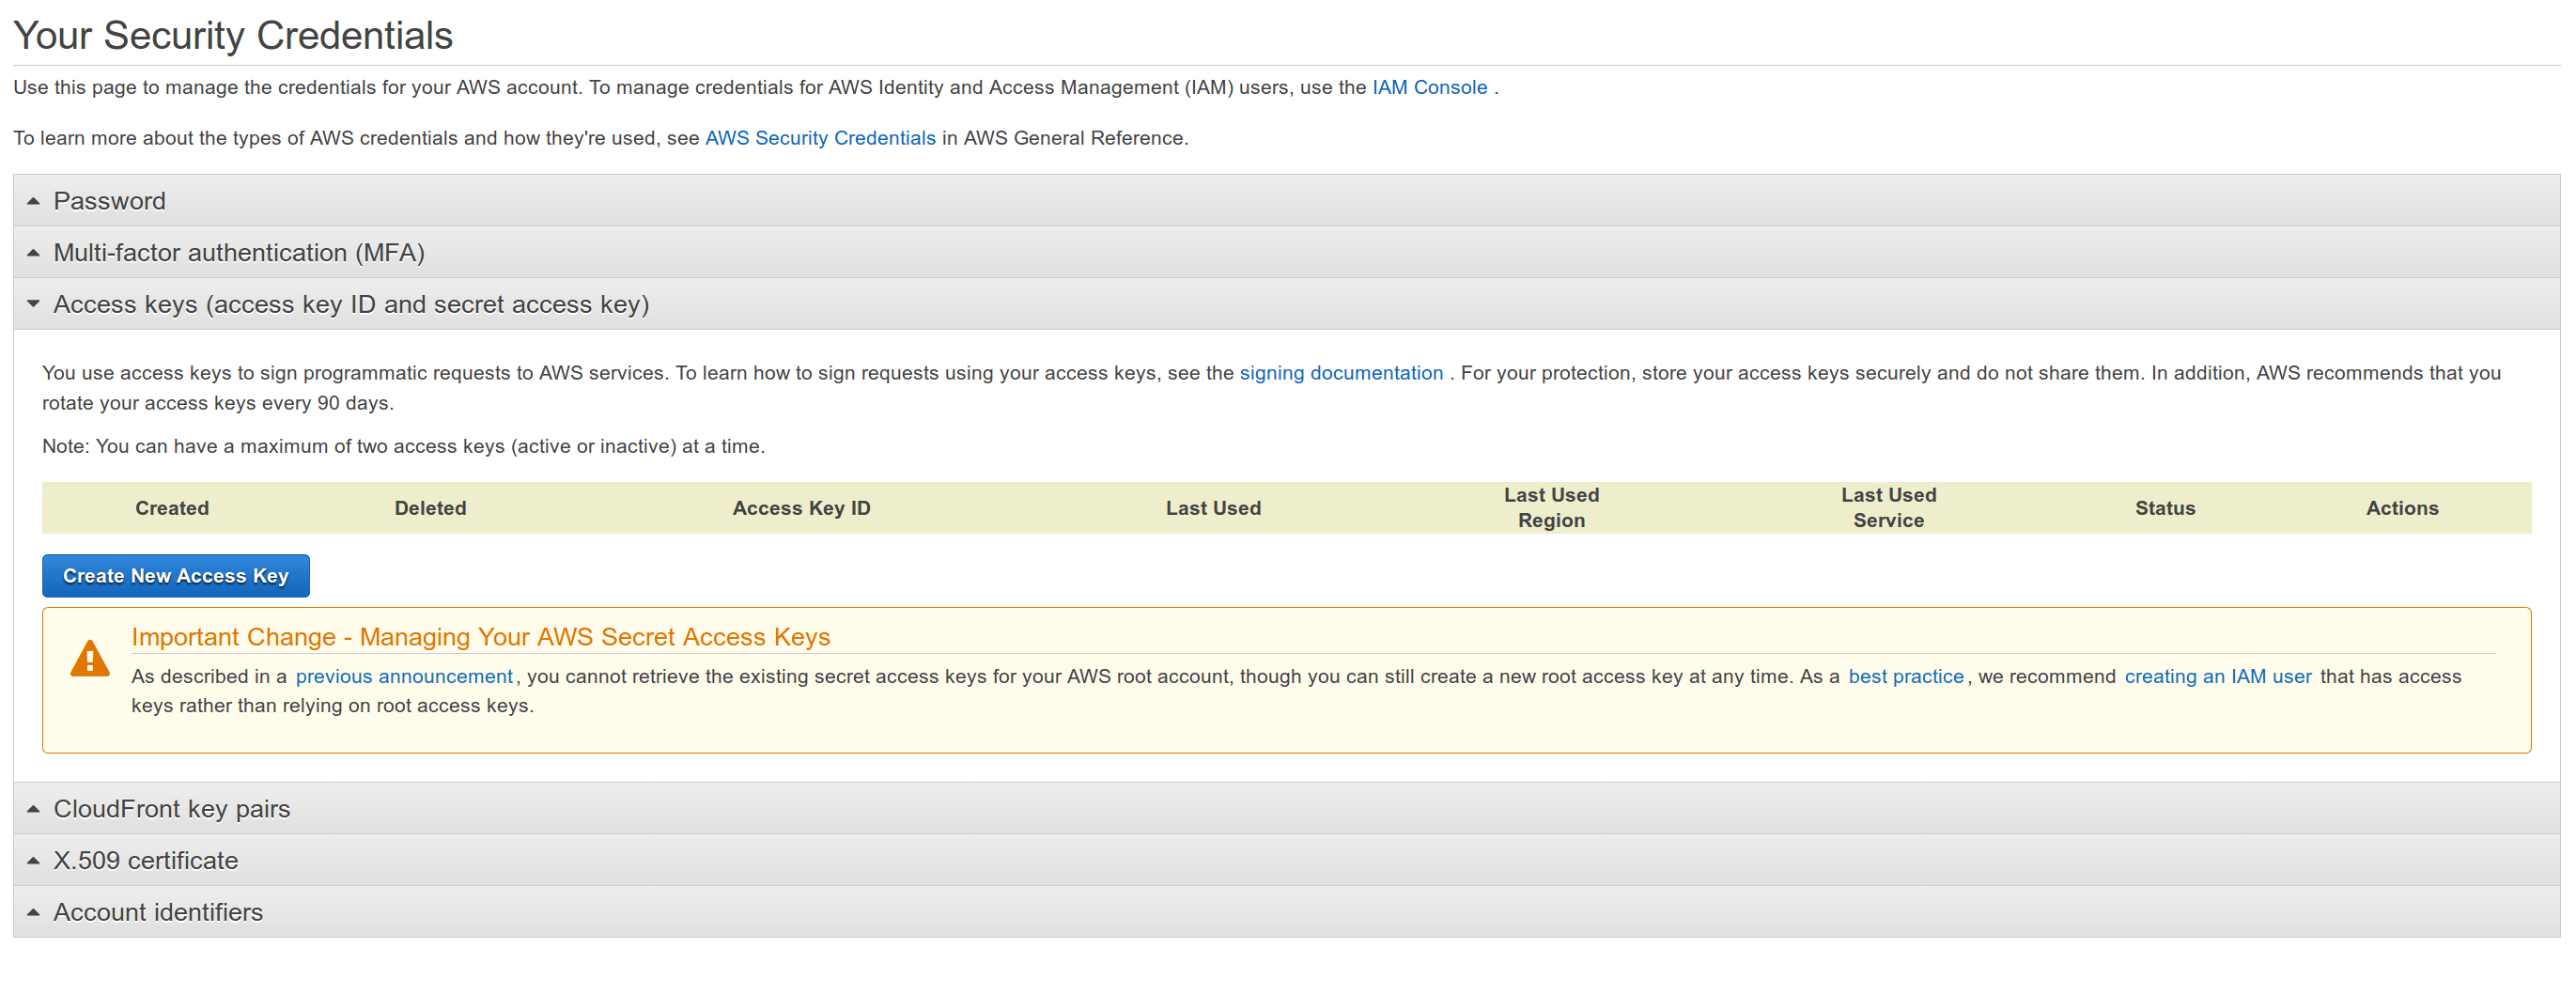
From the same screen as the Activate MFA setting
Click the row for “Access Keys”.
If there are any access keys which exist for the root account, disable them immediately.
That table should look completely empty, as shown below.
Final notes on security#
If this AWS account is intended to be shared with other user - there are a few other configuration changes that we strongly recommend implementing before granting any additional access. The configuration of these settings is beyond the scope of this particular course, but they are critical for ensuring a sane and secured multi-user environment.
- Create user groups in IAM with specific policies attached rather than giving all users Power User access
- Force all users have MFA enabled and give them rights to configure
Configuring Our AWS Workspace#
Remote Workspace - (Optional)#
Now that our AWS Account is largely configured - it is possible to configure an AWS Workspace or AWS EC2 Instance as the development environment to use for developing for AWS Lambda.
These tools are best used for cases where developers are unable to install the required development software onto their local development machine due to technical limitations or permissions issues. See pricing info before using any of these
AWS Workspaces - Standard with Amazon Linux 2#
AWS Workspaces provides persistent computer workspaces (complete with a GUI) that can be used from almost any client that has access to internet. AWS provides a free-tier eligible workspace bundle called Standard with Amazon Linux 2 - and that should work just fine with everything shown in this course. It’s possible to connect to Amazon Linux Workspaces from Windows, Mac OS, ChromeOS, Android, and iOS. At this time - Linux can connect to some Amazon Linux 2 Workspaces via Firefox or Chrome - though it can connect to Windows workspaces. Hopefully future updates will resolve that issue. If a remote solution is needed for Linux, consider using EC2, as shown below
Workspace Pricing information (Important if not using free-tier!) : https://aws.amazon.com/workspaces/pricing/.
Instructions for launching an AWS Workspace : https://docs.aws.amazon.com/workspaces/latest/adminguide/getting-started.html
AWS EC2 Instance (Amazon Linux 2)#
It is also possible to use a plain Amazon Linux 2 EC2 Instance for developing for Lambda. The setup for this is more complex than for AWS Workspaces, but works fine for users familiar with EC2 already.
Remember to select a free-tier qualifying instance (such as t2.micro ) if that is important, and ensure that the instance has an AWS Security group that is locked down tight. A standard GUI will not be available easily when taking this path, but this course is very oriented to terminal usage anyhow. Instructions are provided below for using VSCode over SSH, which is recommended when using this setup.
Connect VSCode to remote SSH : https://code.visualstudio.com/docs/remote/ssh
Configure Local AWS Credentials#
If we created our own user in the Create an Administrator Account for Yourself step above, we do not need to create credentials again. The CSV downloaded at the last step of user creation will have the necessary information present.
Otherwise, we’ll need to create a set of credentials using the instructions below.
- Navigate to the IAM console
- Click
Userson the left - Select our user name from the list of users to the right
- Click the
Security CredentialsTab - Click the
Create access keybutton underneath theAccess keysheader. - On the pop-up which appears, click
Download .csv fileand save that file to a secure, local location.
Do not commit access keys or share them
Never commit any file that contains the secret access key to source control, and do not leave any file that contains it on a shared server, even internally. EC2 Servers and application code should never use a secret key to connect to any other EC2 services.
IAM Roles(discussed in later chapters) are the ONLY acceptable way to authenticate for applications.If we ever accidentally commit code with a secret key present, or otherwise find ourselves in a situation where the key may have been leaked - go to the same page where the key was added and click
deactivate keyimmediately. It will be required to re-provision a new key in that leaked key’s place.
With our API Access Credentials in hand (check the Credentials.csv file from step above), we can now pre-configure our local development machine to store those values so that they will be used with the AWS tooling.
To do this, follow the instructions provided by AWS to Create a shared Credentials File. If you already have a shared credentials file configured, you probably do not need to update it unless you are using a different account and IAM user for Lambda development.
We’ll hold off on further configuration steps, like setting a default region, until we’ve got the aws cli tool installed.
Configure Local Development Machine#
That’s it for the AWS-specific portion of setup. Next up, we’ll need to configure our local development machine
Preparing your Local Development Environment For AWS Lambda and Python Development#
We can comfortably develop for AWS Lambda with python on any modern Operating System. Almost any up-to-date version of Linux, MacOS, or Windows will support the software tooling. The most demanding piece of software from a local-hardware perspective is Docker which is used for replicating production Lambda environments and executing tests. It is possible to develop and deploy without docker, but not recommended.
We are going to provide complete setup and install instructions for local development workstations with the following configurations below. If your workstation configuration is not listed below - it’s still possible that core the tooling can work so long as docker and python 3.7.4 can be installed. Due to space constraints though, we are going to focus on the most common configurations that we know work.
Operating Systems : Windows: : Windows 10 Professional 64bit with latest updates for Windows Subsystem for Linux : Mac OS: Sierra 10.12 + : Linux: Amazon Linux 2 , Ubuntu 18.04 +
Hardware: : CPU: x86_64 architecture : RAM: 4GB+
For the purpose of demonstration, examples shown throughout this course have been executed on a AWS Amazon Linux 2 .
Software used in this course#
This course will provide full install steps for each of the packages below. The version listed here is the version used at time of writing and testing from this course.
| software name | version       | installed from |
|---------------|---------------|----------------|
| Python        | `3.7.4`       | compiled from source by `pyenv`|
| pipenv        |  `2018.11.26` | `pip` |
| awscli        | `1.16.255`    | `pip` |
| aws-sam-cli   | `0.22.0`      | `pip` |
| cookiecutter  | `1.6.0`       | `pip` |
| docker        |  `18`         | `amazonlinux 2 yum repo` |
NOTE : If your local workstation configuration is unsupported , or you have permissions restrictions on your workspace that prevent you from installing any of the software listed above - you may still be able to develop by using a client for
AWS Workspacesas explained in more detail in the Remote Workspace section.
Selecting a code editor for python development#
Python 3 support is available for many popular, general-purpose editors, either natively or through the use of plug-ins. For readers who already have high proficiency and comfort using a specific editor - don’t feel pressured to switch to something more specialized. Code-highlighting and linting features are available for almost every editor, though it may require a plugin to get them configured.
For the rest of us - VSCode or PyCharm are solid options for providing a fully featured python IDE experience right out-of-the-box.
VSCode : VSCode is maintained by Microsoft and released under the MIT License.
PyCharm : PyCharm is maintained by Jetbrains, and provides two editions. One that requires purchase a professional license, and a community edition, licensed under Apache 2.
Both editors are supported on all major operating systems and are widely used within the Python developer community. They have first-class support for Python and comprehensive documentation available. Either is an excellent choice. For the purpose of this course, any editor examples will use VSCode.
Install docker#
Docker updates so frequently it’s always best just to check the latest docs at https://docs.docker.com/install/.
Account Setup at Docker Hub Possibly Required
Docker has started to re-direct users through to an account sign-up process to download the latest products. Linux users don’t need to do that in most cases, but others who wish to use the latest
Docker Desktopmay need to sign up. They don’t request a credit card to sign up, but will ask for an email.Docker Desktopisn’t strictly required, so if you have a functioning older version of docker, it may be easier to just update that one in place to avoid the sign-up process.
Install docker on Mac OS#
The AWS SAM CLI supports Docker running on macOS Sierra 10.12 or above. AWS recommends using Docker Desktop for Mac.
For older version of MacOS, Docker Toolbox is available.
Install docker on Windows#
To install Docker for Windows 10 Professional, see Install Docker Desktop for Windows
For older or Non-Professional versions of Windows, use Docker Toolbox
Install docker on Linux (Amazon Linux 2)#
The version of docker in the Amazon Linux 2 works fine. No need to use the docker-specific repo.
sudo yum -y install docker
sudo usermod -a -G docker $USER
After running usermod, log out and log back in for the permission changes to take effect . Failure to do this will result in all docker commands failings with a permission error.
Windows Subsystem for Linux (Optional - Windows 10 Only)#
Up-to-date versions of Windows 10 Professional provide a feature called Windows Subsystem for Linux which allows user run Linux commands on your windows workstation. If you have this available, it may be worth configuring to make it easier to follow along with the shell commands shown in this course.
Using WSL also ensures that you can use the native versions of the pyenv tool, and not the windows fork, pyenv-win . WSL is not strictly required though, and the work to get docker working with WSL is admittedly, not insignificant. That said, WSL was tested over the course of developing this course, and was found to work well after the initial setup was completed.
If you do choose to use WSL, be sure to follow the Ubuntu 18.04 instructions in all subsequent steps!
Enable Windows Subsystem for Linux (Optional-WSL)#
Install all pending Windows updates before attempting this.
First, we will open Powershell with Run as Administrator . This is accomplished by hitting the key with the windows icon, typing “power”, and clicking the Run as Administrator option as shown below.
Next, paste the command below into Powershell and hit enter.
Enable-WindowsOptionalFeature -Online -FeatureName Microsoft-Windows-Subsystem-Linux
After that is complete, restart your computer for the changes to take effect.
Not Supported on Every Windows:
If you get errors here, it’s possible that this feature is not supported on your operating system. If that’s the case, don’t fret, as WSL isn’t a hard requirement. Just skip past anything with
WSLin the title and follow the standard Windows Instructions for the next sections.
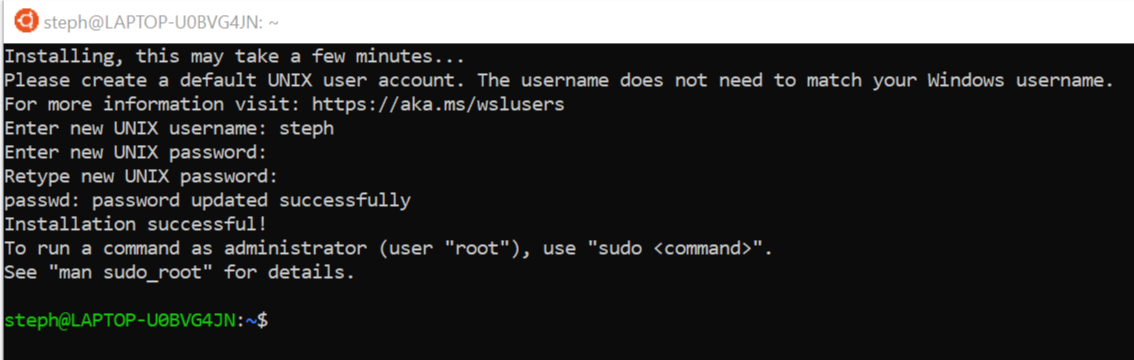
Install Ubuntu 18.04 (Optional - WSL)#
Install Ubuntu 18.04 from the Windows Store by searching for it there. It should say that the developer is Canonical .
Hit the blue Launch button on the Windows Store page after install is complete, and follow the prompts to finish installing it.
Install and use tmux (Optional - WSL)#
It’s easy to accidentally close the WSL terminal and leave a process running that is now inaccessible. If this happens during package installation, it can cause a bit of a headache. A good way to prevent this problem is to use terminal-multiplexing software like tmux to re-attach if needed.
Tmux Cheatsheets
Search images on google for “tmux cheatsheet” to find some very helpful guides to tmux shortcuts. Print one of these out and keep it nearby if new to tmux.
Commands to install and start tmux:
$ sudo apt update
$ sudo apt install -y tmux
$ tmux
If we accidentally closed our window and lost our spot, we can now get it back by opening a new terminal, and typing the command tmux attach .
Configure Docker Support for WSL#
This is the most painful part. Luckily, there is an amazing blog post written by the excellent Nick Janetakis, which describes the full process to get this working.
See: https://nickjanetakis.com/blog/setting-up-docker-for-windows-and-wsl-to-work-flawlessly
Next, we’ll setup Python
Installing Python 3 and Pyenv on MacOS, Windows, and Linux#
We will be using the AWS Lambda runtime for the latest stable version of Python 3 - python3.7 .
AWS supports a few different runtime environments for python, so if we ever need a particular version, we will need to check that it’s supported by lambda first. A full list of supported runtime versions is available on the AWS Documentation page for Lambda Runtimes.
Check for already installed python versions#
If we are using an operating system like Linux or Mac OS - we may already have some version of python installed on our local development machine. This version of python, commonly referred to as the system python, is rarely the latest version that we need for development. We can confirm if we have a system python version installed and see what version it is with the command python --version , as shown below.
$ python --version
Python 2.7.6
The output above indicates that the system version of python installed is much older than 3.7. In other cases, the command above could fail completely, indicting that python is not installed at all. In cases where older are versions present, it is unsafe to update system python directly. Updating it can break certain tools that our operating system needs for essential tasks, including dependency management software . Fortunately, there is a tool called pyenv that will allow us to safely install the latest python version - regardless of whether we have a system python version installed or not.
Install Pyenv#
Pyenv is an open-source tool used for managing multiple python environments. It allows developers to define which version of python to use on a per-project basis. It’s similar to the better-known tool that is commonly used in ruby development - rbenv . Prior to pyenv becoming popular, many python developers used virtualenv to manage environment versions. virtualenv is still widely used - but it lacks some crucial features that pyenv provides for standardized installation methods.
We will walk through the most common installation scenarios here, but if you encounter issues, consult the full installation instructions for the project: https://github.com/pyenv/pyenv#installation
Different operating systems have different dependency needs, the latest of which are documented here: https://github.com/pyenv/pyenv/wiki/Common-build-problems
Installing pyenv on Mac OS using homebrew#
Many developers may already have homebrew installed. It’s a widely used dependency manager for Mac OS that provides installation packages for many open-source software projects. The commands to install brew are provided below.
- Install dependencies for
brew
xcode-select --install
Install brew
/usr/bin/ruby -e "$(curl -fsSL https://raw.githubusercontent.com/Homebrew/install/master/install)"
Install dependencies pyenv requires
brew update
brew install openssl readline sqlite3 xz zlib
If using Mojave or above , use this command to install an additional required dependency:
$ sudo installer -pkg /Library/Developer/CommandLineTools/Packages/macOS_SDK_headers_for_macOS_10.14.pkg -target /
Install pyenv
brew install pyenv
Update the shell to ensure autocomplete for pyenv is functional
echo -e 'if command -v pyenv 1>/dev/null 2>&1; then\n  eval "$(pyenv init -)"\nfi' >> ~/.bash_profile
exec "$SHELL"
Pyenv on Windows#
If using a version of Windows with Windows Subsystem for Linux configured then skip down to instructions for Ubuntu 18.04
Otherwise - we will need to use a pyenv fork, pyenv-win . The instructions underneath the “install by zip” instructions in the pyenv-win wiki provide instructions for pyenv-win installation.
Pyenv on Amazon Linux 2#
The following commands will install the required pyenv dependencies on Amazon Linux 2
sudo yum -y update
sudo yum -y install git tmux
sudo yum -y install @development zlib-devel bzip2 bzip2-devel readline-devel sqlite \
sqlite-devel openssl-devel xz xz-devel libffi-devel findutils
Once dependencies are installed, use the pyenv-installer to finish installation.
Pyenv Installer (Linux)#
Linux users will find the pyenv-installer helpful for completing the installation, as shown below.
$ curl -L https://github.com/pyenv/pyenv-installer/raw/master/bin/pyenv-installer | bash
...
WARNING: seems you still have not added 'pyenv' to the load path.

# Load pyenv automatically by adding
# the following to ~/.bashrc:

export PATH="/home/user/.pyenv/bin:$PATH"
eval "$(pyenv init -)"
eval "$(pyenv virtualenv-init -)"
Copy the last 3 lines from the output into your local clipboard from your terminal, and paste those into bottom of the file at ~/.bashrc. Don’t paste from this book directly - the exported PATH variable will be specific to your install.
Steps to paste the output using vim :
- Open
~/.bashrcwithvim
vim ~/.bashrc
vim commands to modify ~/.bashrc
GG
o
(right-click to paste)
:wq (enter)