Pyenv on Ubuntu Linux 18.04 {id:install-pyenv-ubuntu}#
The following commands will install the required pyenv dependencies on Ubuntu Linux 18.04
sudo apt update
sudo apt install -y make build-essential libssl-dev zlib1g-dev libbz2-dev \
libreadline-dev libsqlite3-dev wget curl llvm libncurses5-dev libncursesw5-dev \
xz-utils tk-dev libffi-dev liblzma-dev python-openssl git
Use pyenv to install python 3.7 (All Operating Systems)#
The command pyenv install --list can be used to fetch a list of all versions of python which are available to be installed with pyenv .
The output from command above can be extremely long though! Since we’re using Amazon Linux 2 for examples, we have grep already installed, which will allow us to filter out everything that isn’t 3.7.
$ pyenv install --list | grep 3.7.
  3.7.0
  3.7.1
  3.7.2
  3.7.3
  3.7.4
That’s a much more manageable output. In this case, it looks like 3.7.4 is the latest release, so we will install that.
We can install install any number of versions of python side-by-side using the pyenv install command. Each version gets installed into its own local directory, which ensures it will not conflict with our system python, or any other version. Since pyenv has to compile each new version of python it installs, it can take 5-10 minutes to complete an install this way.
So to install python 3.7.4 specifically, we use:
pyenv install 3.7.4
Once the install completes, we can check which versions of python are now available for use with the pyenv versions command.
$ pyenv versions
* system (set by /home/ec2-user/.pyenv/version)
  3.7.4
In the output above, the system version listed is the default 2.7 version we detected when running python --version earlier. The * next to system means that system is currently selected as default python.
Since we want to use the new 3.7 version for development, we are going to need to set it as the global python version so it is used by default in this shell, and future ones we launch. We can change the global at any time by specifying the version of python we wish to use (it must be one we currently have installed).
The pyenv global command for 3.7.4 is shown below.
pyenv global 3.7.4
After that, when we run pyenv versions again, we can verify that 3.7.4 is in use because it has * next to it.
$ pyenv versions
  system
* 3.7.4 (set by /home/ec2-user/.pyenv/version)
Likewise, when we run python --version , we should see that the installed version matches up.
$ python --version
Python 3.7.4
Install pipenv#
Now that pyenv is configured to use the latest version of python, we will setup pipenv to handle dependency management in python projects. Pipenv provides features that are missing from the older dependency management tool - pip . Using pipenv will ensure we can keep each project’s dependency needs installed into virtual environments, and defined in lockfiles.
Let’s upgrade pip to the latest version first
$ pip install --upgrade pip
Successfully installed pip-19.2.3
We can now install pipenv with the --user flag
$ pip install --user pipenv
...
Installing collected packages: virtualenv-clone, certifi, virtualenv, pipenv
Successfully installed certifi-2019.9.11 pipenv-2018.11.26 virtualenv-16.7.5 virtualenv-clone-0.5.3
Don’t use
sudowith pip, use--userIt should not be necessary to use
sudowith pip. In most cases, simply using the--userflag afterpip installwill ensure the package gets installed correctly and can be used without resorting to running withsudo.
Install dev modules from pip#
Besides pipenv , there are a few other modules that we’ll want to go ahead and install with pip . In general, we’ll use pip install --user to install modules that are used across all projects for development purposes - but use pipenv install for project-specific modules that are imported by our lambdas.
The packages we’ll want to install across the dev env - awscli , aws-sam-cli , pylint , and cookiecutter can be installed with the command below:
pip install --user awscli aws-sam-cli pylint cookiecutter
Install project modules with pipenv#
To define and install project-specific dependencies, we will need to create a project folder and navigate to it. Remember to always check your current directory before invoking pipenv - it must always be invoked from within a project’s directory to work correctly. We can confirm current terminal location with the command pwd , as shown below
$ mkdir chap1
$ cd chap1/
$ pwd
/home/ec2-user/Development/chap1
From this new directory, pipenv --python 3.7 to initiate the creation of a Pipfile . This command creates a blank file that pipenv uses to store project dependencies, and the --python 3.7 populates a configuration setting in that Pipfile which locks the environment to python 3.7. Output is shown below:
$ pipenv --python 3.7
Creating a virtualenv for this project…
Pipfile: /home/ec2-user/chap1/Pipfile
Using /home/ec2-user/.pyenv/versions/3.7.4/bin/python3.7m (3.7.4) to create virtualenv…
⠴ Creating virtual environment...Already using interpreter /home/ec2-user/.pyenv/versions/3.7.4/bin/python3.7m
Using base prefix '/home/ec2-user/.pyenv/versions/3.7.4'
New python executable in /home/ec2-user/.local/share/virtualenvs/chap1-rs-3yCsf/bin/python3.7m
Also creating executable in /home/ec2-user/.local/share/virtualenvs/chap1-rs-3yCsf/bin/python
Installing setuptools, pip, wheel...
done.
Running virtualenv with interpreter /home/ec2-user/.pyenv/versions/3.7.4/bin/python3.7m

✔ Successfully created virtual environment!
Virtualenv location: /home/ec2-user/.local/share/virtualenvs/chap1-rs-3yCsf
Creating a Pipfile for this project…
A file named Pipfile now exists in our project directory. Let’s check out its contents.
$ cat Pipfile
[[source]]
name = "pypi"
url = "https://pypi.org/simple"
verify_ssl = true

[dev-packages]

[packages]

[requires]
python_version = "3.7"
While it’s possible to modify this Pipfile directly, it’s better practice to just allow pipenv to make those changes on our behalf. So let’s go ahead and install a commonly used library, boto3 for use in this new project. We can install it with the command pipenv install boto3
pipenv install boto3
A note on
boto3The module
boto3is widely used for interacting with the AWS API via python. In fact, it’s used so frequently that all python Lambdas come withboto3already packaged! That said, installing it here will not cause any issues - so it’s a safe example to practice with.
If we cat the Pipfile again, we should see a new line under [packages] that shows boto3 .
$ cat Pipfile
[[source]]
name = "pypi"
url = "https://pypi.org/simple"
verify_ssl = true

[dev-packages]

[packages]
boto3 = "*"

[requires]
python_version = "3.7"
Additionally, we should see a new file in our directory called Pipfile.lock . This is the file that contains the full information about which version of the boto3 module is installed, as well as information about any modules that were installed as dependencies of boto3
Configuring the AWS CLI#
The easiest way to configure our local development with our credentials is to run the command aws configure . We can then paste in the values for Access Key ID and Secret Access Key that we received from the credentials.csv in previous steps.
For default region name, use the region id that matches whichever region we plan to use the most frequently.
Some common ones:
- US Virginia:
us-east-1 - US Oregon:
us-west-2 - EU Frankfurt:
eu-central-1
Selecting default region
In general, it’s good practice to use the region that is physically closes to us (or closest to our customers) to reduce latency. AWS works hard to ensure that there are many regions available, but it’s not guaranteed that each region supports every AWS Service. A full breakdown of regions and their supported service endpoints is available at the AWS Documentation page for region endpoints
For our example, we’re going to use us-east-1 .
So from our terminal, we’ll run aws configure and respond to the prompts as shown below.
AWS Access Key ID : If you’ve already set up your sharedCredentials File) as described in the previous section, this value will be pulled automatically. If it shows a value like [********ABCD] , in the prompt, press enter so that it preserves that value. If you did not set up your shared credentials file. Otherwise, paste in the value from the Access Key ID column of the Credentials.csv that was downloaded when you IAM user was created. Hint: Usually starts with “AKIA”.
AWS Secret Access Key : If you’ve already set up your sharedCredentials File) as described in the previous section, this value will be pulled automatically. If it shows a value like [********ABCD] , press enter so that it preserves that value. Otherwise, paste in the value from the Secret Access Key Column from the Credentials.csv file that was downloaded when you IAM user was created.
Default region name : Region id - example is using us-east-1
Default output format : output for aws cli commands. recommend using json .
Example:
$ aws configure
AWS Access Key ID [************AIFO]:
AWS Secret Access Key [**************z9fs]:
Default region name [None]: us-east-1
Default output format [None]: json
We now can validate that the aws cli is using the correct keys by running aws sts get-caller-identity .
$ aws sts get-caller-identity
{
    "UserId": "AKIA********",
    "Account": "423849915456",
    "Arn": "arn:aws:iam::423849915456:user/steph"
}
The UserId should match our AWS Access Key Id from above. Likewise, the Account should match our AWS Account ID, and the Arn should match the Arn for our IAM Admin user.
Some developers may need to manage multiple sets of access keys in order to access multiple AWS Accounts. For any users who need this functionality, research the “profiles” feature for the AWS CLI. More information on setting up local profiles is available on the AWS Documentation page for CLI Configuration
Dice Rolling Slack Bot#
Your local machine is ready to go! Now it’s time to move onto the real action: Create a dice Rolling Slack Bot
How Our Slack Bot “Dicebot” Will Work#
Our first lambda function is going to give us a fully functional back-end for a basic chat bot. We’re going to develop this for Slack, since Slack is widely used and available for free.
Dicebot Project Description#
Our first lambda function is going to give us a fully functional back-end for a basic chat bot. We’re going to develop this for Slack, since Slack is widely used and available for free.
The use case is as follows:
Dicebot should provide users in a slack channel the ability to roll one or more dice by invoking a slash command /roll . The dice being rolled can have any number of sides, but our bot will default to rolling a single 20-sided die when no parameters are specified. When multiple dice are rolled at the same time, the bot should provide the sum of all rolled values in addition to each individual roll.
We will use the dice rolling terminology standardized by various Role-Playing Games as input for Dicebot. In terms of slack input, that means are command usage will be \roll {NUM_DICE}d{DICE_SIDES} .
NUM_DICE is an integer value that denotes the number of dice that we wish to roll. Whenever not specified, NUM_DICE will default to 1
Directly following NUM_DICE , the letter d should be used as a separator between the NUM_DICE and DICE_SIDES values.
DICE_SIDES is another integer, and it the third and final value in the command input. This value represents the number of sides that each dice has. When not specified DICE_SIDES should default to 20 .
There should be no spaces separating each input value. For example, to roll two 6-sided dice, we would send the command as /roll 2d6 .
Edge case: If the character d is not included, and the input is only a single integer (eg, /roll 3 ), that is taken to mean _roll 3 dice with the default number of sides - aka equivalent to /roll 3d20 .
Creating an S3 Bucket for Lambda Artifacts#
(Do this once ever) = create an S3 bucket for artifacts#
Before building our first lambda, we’ll first need to have a bucket in Amazon S3 that will be used to hold our deployment artifacts. This S3 bucket will be used by AWS to fetch our Lambda code, and acts as an artifact repository that we can browse if we ever want to see the exact contents of previous Lambda versions. S3 is cheap, extremely reliable, and commonly used with all kinds of AWS services. By default, S3 buckets are locked down to be available to our account only. While it’s possible to change those settings and make an S3 bucket available to anyone on the internet (this is called a public S3 bucket ), it’s not advised to do that unless you really know what you’re doing! Any permissions that need to be modified, will be called out explicitly here - and we will not be creating a public S3 bucket.
One interesting thing about S3 buckets, is that they must be given a name that is globally unique across all AWS accounts . So if we try to create a bucket named lambda-resources , it probably won’t work since someone has taken that name. Instead, try pre-pending some unique string to your desired myuniquename-lambda-resources . S3 bucket names must be all lower case, and there can be no spaces or special characters (other than a - ).
When we’ve settled on a name, we can create it either through the S3 web console, or by sending an AWS CLI command for aws s3api create-bucket as shown below. If you use the AWS CLI, set the flag to --acl private to keep permissions on lock.
$ aws s3api create-bucket --bucket "supercoolsteph-lambda-resources" --acl private
{
    "Location": "/supercoolsteph-lambda-resources"
}
This bucket can be re-used for other future lambda projects. If you decide to create a different bot later - you can just reference this bucket for that project as well.
Creating A Basic Hello-World Lambda from SAM Cookiecutter Template#
From the chap1 project directory, we will clone a sample project that AWS provides for Python and SAM.
git clone https://github.com/aws-samples/cookiecutter-aws-sam-python.git
From that same directory, we will use sam init --location cookiecutter-aws-sam-python to create our dicebot lambda directory. We will be prompted for certain parameters after sending this command, so fill them in according to the example shown below.
$ sam init --location cookiecutter-aws-sam-python
[+] Initializing project structure...
project_name [Name of the project]: dice_bot
project_short_description [A short description of the project]: A bot that rolls dice
include_apigw [y]: y
include_xray [y]: n
include_safe_deployment [y]: n
include_experimental_make [n]: n
 [INFO]: Removing Makefile from project due to chosen options...
 [SUCCESS]: Project initialized successfully! You can now jump to dice_bot folder
 [INFO]: dice_bot/README.md contains instructions on how to proceed.
[*] Project initialization is now complete
We should now see a directory called dice_bot created within our chap1 directory. This dice_bot directory will contain all of the important code for this project. So go ahead and navigate into that directory and init a git project there, as shown below.
cd dice_bot
git init .
If we have VSCode installed, we can use the command code . to open VSCode with the explorer already pointing to this directory.
Poke around the directory structure a bit to see the basic scaffolding created by cookiecutter . We won’t need to touch most of these files yet, but there are a few essential files we need to review, and modify.
The main files we will be concerned with are:
-
README.md- Always write useful instructions into the README.md file. InVSCode, we this file and doCtrl+Shift+Vto preview it. -
template.yaml- This is a SAM infrastructure template that defines resources being deployed to AWS -
first_function/app.py- Python application code that AWS Lambda will execute -
events/first_function.json- Sample event that will be used when testing the Lambda locally. This will simulate the slack slash command.
Update the SAM template#
The SAM template.yaml file provided by AWS is almost ready to use as-is. It has defined a generic lambda resource and an API Gateway that we can use with slack. We need to just make a few minor tweaks to make it ready to go.
Update Properties for FirstFunction#
The first item under Resources in template.yaml should be the lambda function, called FirstFunction . If we inspect the Properties defined for it, we should a key for Runtime , which is set to python3.6 by default.
    FirstFunction:
        Type: AWS::Serverless::Function # More info about Function Resource: https://github.com/awslabs/serverless-application-model/blob/master/versions/2016-10-31.md#awsserverlessfunction
        Properties:
            CodeUri: first_function/build/
            Handler: app.lambda_handler
            Runtime: python3.6 # https://docs.aws.amazon.com/lambda/latest/dg/lambda-x-ray.html
            Events:
                CatchAll:
                    Type: Api # More info about API Event Source: https://github.com/awslabs/serverless-application-model/blob/master/versions/2016-10-31.md#api
                    Properties:
                        Path: /first/{any_argument+}
                        Method: any
We will need to edit the value for Runtime in this value to use python3.7 instead, as shown below.
Runtime: python3.7
Additionally, we’ll want to change the CodeUri value from first_function/build/ to first_function /.
CodeUri: first_function/
Lastly, under the key Environment , let’s add a placeholder value for “SLACK_WEBHOOK”.
            Environment: # More info about Env Vars: https://github.com/awslabs/serverless-application-model/blob/master/versions/2016-10-31.md#environment-object
                Variables:
                    SLACK_WEBHOOK: LOCAL
Add a requirements.txt to first_function directory#
Within the first_function directory, we’ll need to add an empty file named requirements.txt in order for the build step to complete. In most projects, we’ll use pipenv to generate this file, but since this project is simple and just needs to build, just create an empty file by that name in the first_function directory.
Linux or Mac users can create one using the touch command shown below
$ touch first_function/requirements.txt
$ ls first_function/
__init__.py  app.py  requirements.txt
Testing a hello_world AWS Lambda Function Locally with Docker#
At this point, before we’ve even made any code updates - we have a fully functioning and deployable lambda. Sure it just says “Hello World” - but it’s a start. We’ll go ahead and invoke it locally just to confirm our environment is configured correctly.
From our dicebot directory, we will use the command sam build -u build a SAM package with docker. The -u flag is necessary to ensure docker is used to build the package. Using -u is not strictly required, but we recommended always using it so that we are sure our package is being built against the correct target environment.
Once the package building step has completed, we can then send a test function to it with sam local invoke --event events/first_function_event.json and see the output.
In most cases, we’ll just chain these two commands together, and send sam build -u && sam local invoke --event events/first_function_event.json
Expected output from sam build -u
Starting Build inside a container
...
Build Succeeded

Built Artifacts  : .aws-sam/build
Built Template   : .aws-sam/build/template.yaml

Commands you can use next
=========================
[*] Invoke Function: sam local invoke
[*] Package: sam package --s3-bucket <yourbucket>
Expected output from sam local invoke --event events/first_function_event.json
...
START RequestId: 1c51e099-6a41-1283-9fc7-235472bed91c Version: $LATEST
END RequestId: 1c51e099-6a41-1283-9fc7-235472bed91c
REPORT RequestId: 1c51e099-6a41-1283-9fc7-235472bed91c  Duration: 3.21 ms       Billed Duration: 100 ms Memory Size: 128 MB     Max Memory Used: 31 MB
{"statusCode":200,"body":"{\"hello\": \"world\"}"}
Alright! That last line is the critical piece. We can see that the default lambda is functioning and is returning a JSON that has a statusCode of 200 along with the body that of {\"hello\": \"world\"} . It’s a good rule of thumb to check ensure we _ always have a statusCode and body (case sensitive) in a Lambda’s return value, otherwise our Lambdas may fail when they are triggered by API Gateway.
Troubleshooting tip: Adding the flag --debug to any SAM command will provide verbose output.
Deploying Your First AWS Lambda Hello-World Function Into Production#
It may not rolling dice yet, but let’s go ahead and deploy it! It may seem like we’re getting ahead of ourselves, but the truth is that we need to deploy it so that our API Gateway Infrastructure can be created and used in the next portion of the work.
Before we deploy, we will need to package our built lambda. Go ahead and run the command sam package --help to see the full details around how this command is used.
For our case, we will run this from the same dicebot directory we have been using. Use the example shown below, but replace <your-bucket-name> with the name of the S3 Bucket you created above.
sam package \
    --template-file template.yaml \
    --output-template-file packaged.yaml \
    --s3-bucket <your-bucket-name>
The output should look like:
Uploading to 8f2252e7beae23803e866250271c52bf  1369 / 1369.0  (100.00%)
Successfully packaged artifacts and wrote output template to file packaged.yaml.
Execute the following command to deploy the packaged template
aws cloudformation deploy --template-file /home/ec2-user/Development/dicebot/packaged.yaml --stack-name <YOUR STACK NAME>
As you can see, they’re nice enough to include the next deploy command in the next step! We just need to pick a name to give it in place of <YOUR STACK NAME> . Let’s call it, “DicebotChap1”. We’ll also need to add one more flag to that for it to work - --capabilities CAPABILITY_IAM . That flag just ensures that CloudFormation has the permissions necessary to create IAM resources for our Lambda.
Note: sam deploy is an alias to the aws cloudformation deploy command shown in the output above.
So let’s go ahead and deploy it as shown below. It will take a few minutes to do a first-time deploy.
$ sam deploy --template-file packaged.yaml --stack-name "DicebotChap1" --capabilities CAPABILITY_IAM

Waiting for changeset to be created..
Waiting for stack create/update to complete
Successfully created/updated stack - DicebotChap1
Now that it’s deployed let’s grab the API Gateway information from the stack output:
$ aws cloudformation describe-stacks --stack-name "DicebotChap1" --query Stacks[0].Outputs
[
    {
        "OutputKey": "FirstFunction",
        "OutputValue": "arn:aws:lambda:us-east-1:423849915456:function:DicebotChap1-
FirstFunction-12BTPV2KUERM0",
        "Description": "First Lambda Function ARN"
    },
    {
        "OutputKey": "FirstApigwURL",
        "OutputValue": "https://al7dk1tt29.execute-api.us-east-1.amazonaws.com/Prod/
first/proxy",
        "Description": "API Gateway endpoint URL for Prod environment for First Func
tion"
    }
]
Save the OutputValue for the FirstApigwURL . We’ll need it for the next step.
Creating a Slack App for our Custom Serverless Slack Bot#
In order to properly use this bot, we’ll need a Slack workspace that we have admin over. If your slack admin has granted normal users permission to create apps in a workspace you have access to, that will also work.
It’s possible to create new slack workspaces quickly and easily - without even providing a credit card. You’ll just need an email that will be associated your slack login. For this course, I created a new, workspace called “PythonOnLambda”. It takes less than 5 minutes to create a free slack workspace , so if you don’t have your own slack workspace already - just follow the steps here to create one: https://slack.com/get-started#create
Create a Slack App for Dicebot#
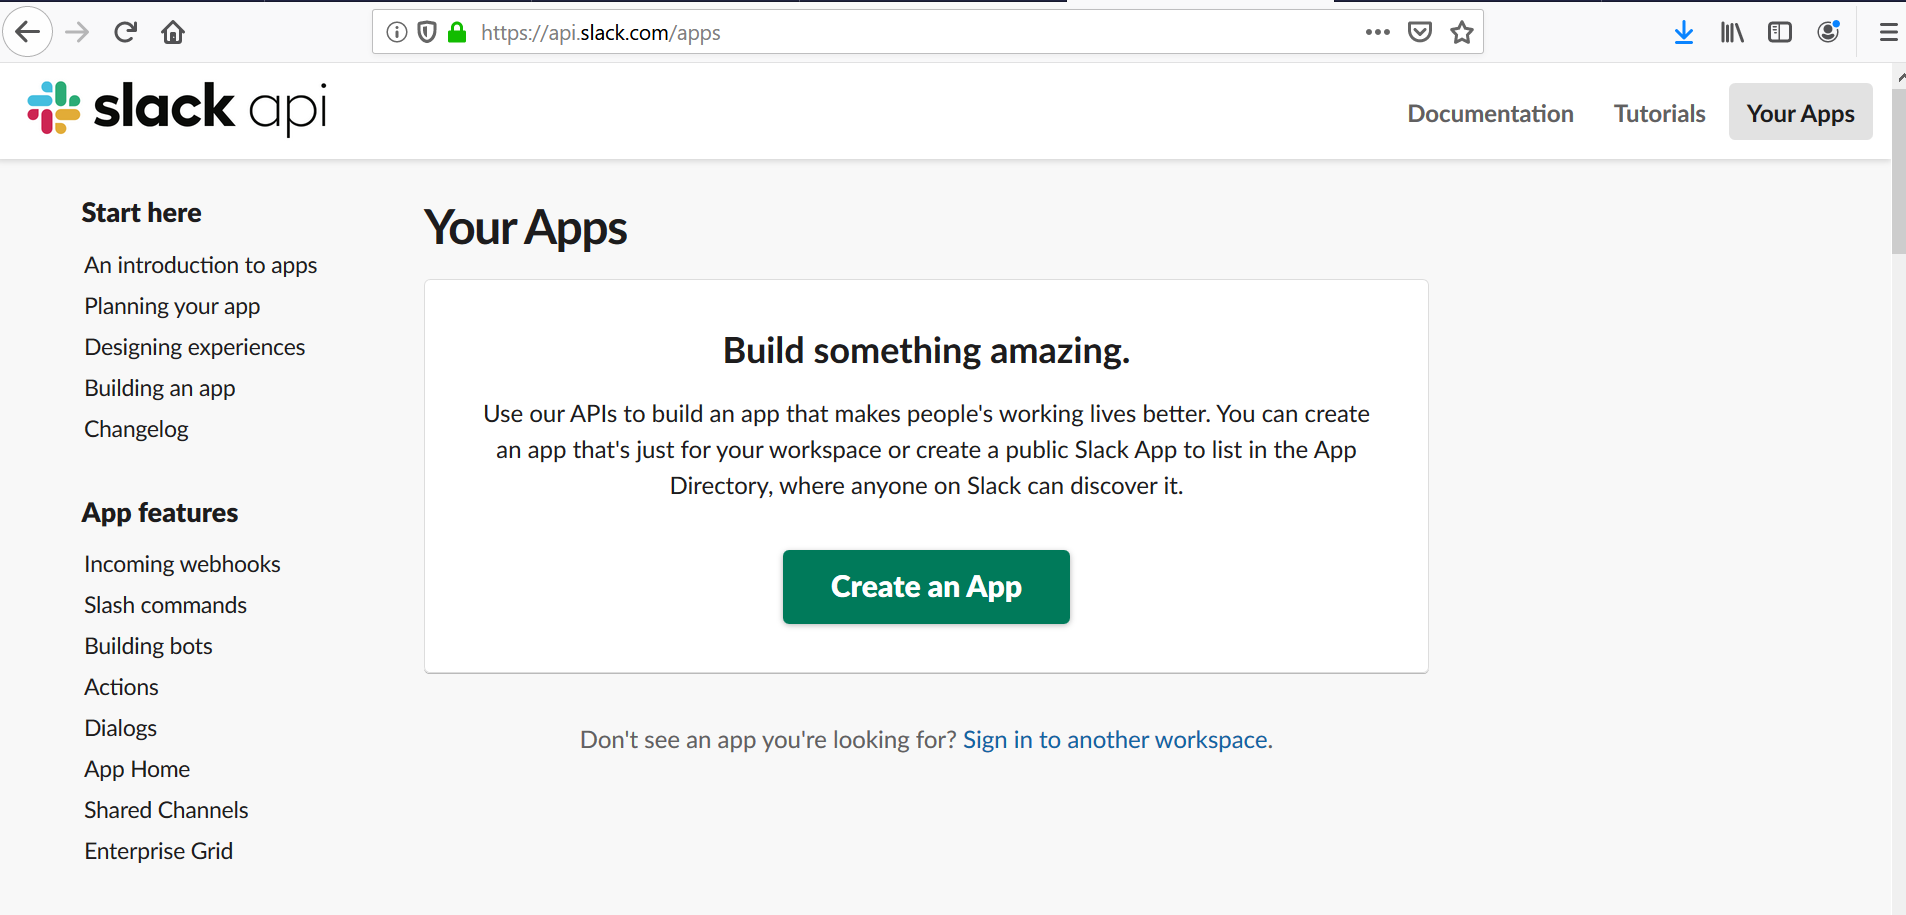
From the web browser, ensure you are logged into slack as your admin slack user. Then, go to https://api.slack.com/apps and click the green button that says Create an App :
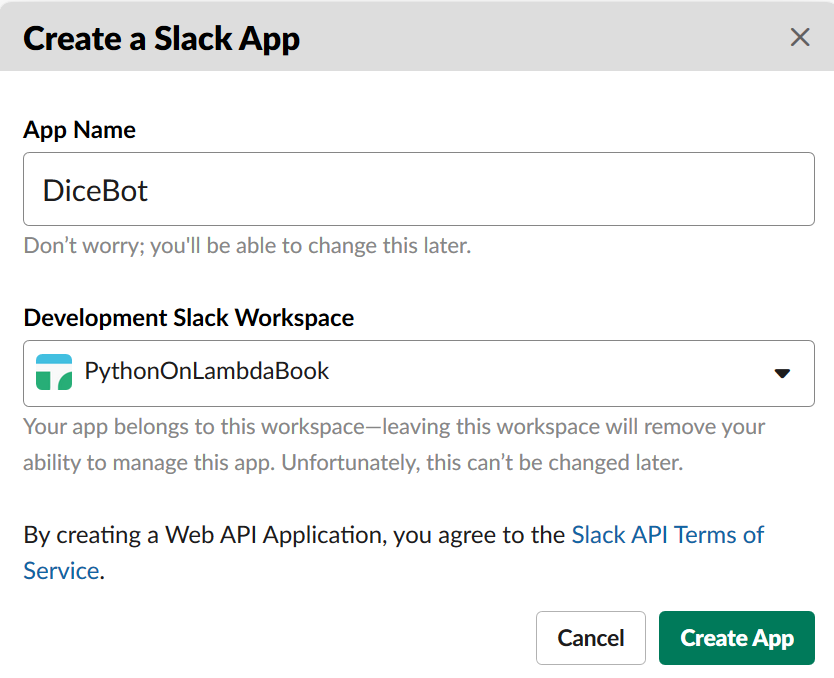
We will be prompted to enter in a name for your new application and choose your slack workspace. Let’s name it “Dicebot”, and ensure we have the correct workspace selected.
From the next page, we can configure the application settings.
Add Slack Slash Command#
We will select the “Add Slash Command” setting for our application now.
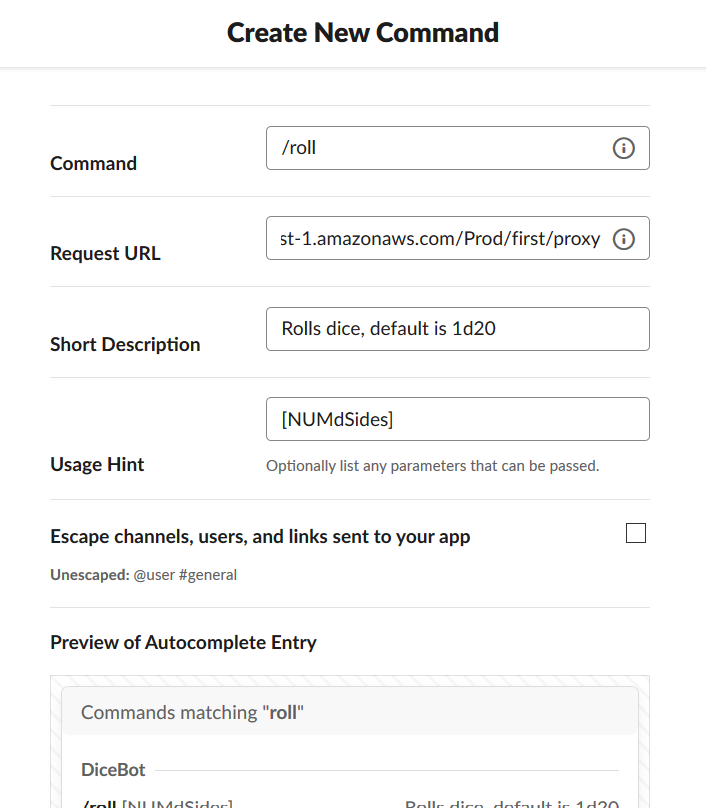
From this page, click “Create Slack Command”

The configuration show be filled in as shown in the example below.
Command : The command that will invoke the bot API Example /roll
Request URL : Must be the full URL for the API GW, that was deployed in the Deploy Hello World step above. Example: https://RANDOMVALUE.execute-api.us-east-1.amazonaws.com/Prod/first/proxy
Short description : The description of the commands functionality Example: A dice rolling chat bot
Usage Hint : A reminder that will pop up when slack users type /roll Example: [NUMdSIDES]
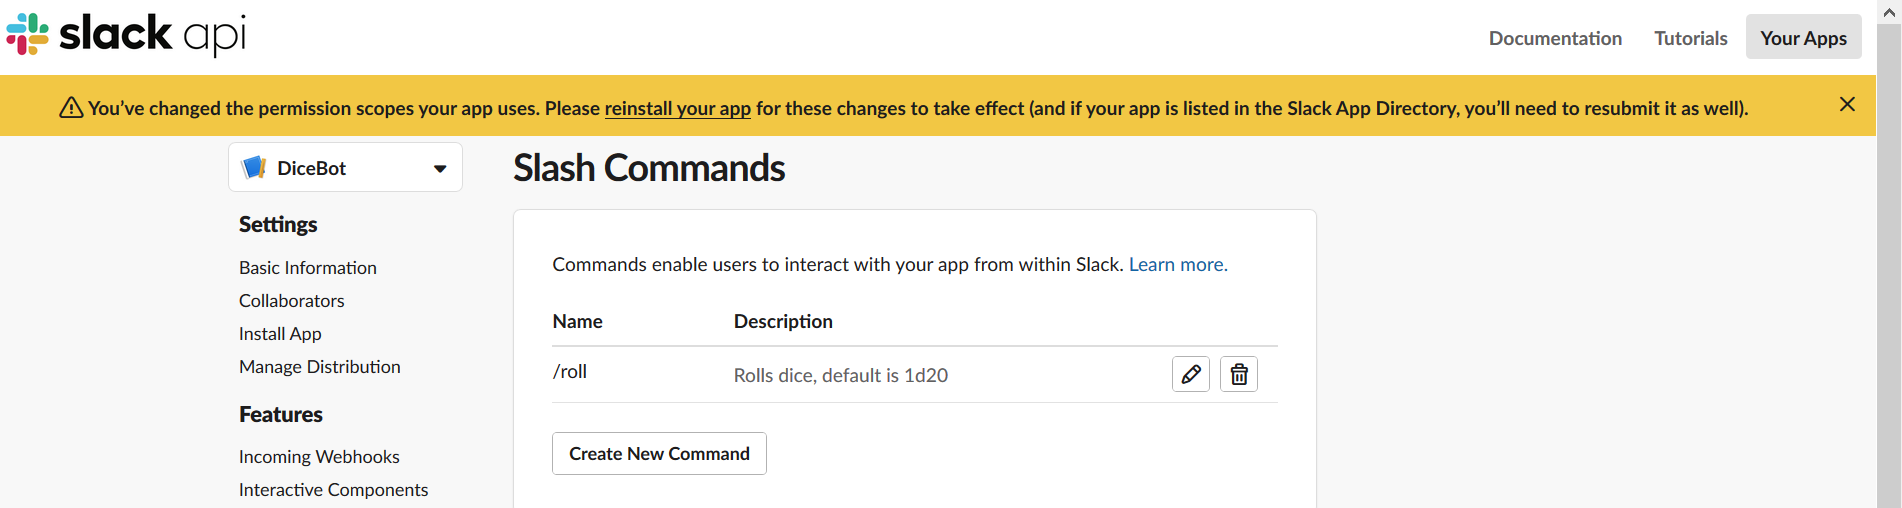
If you prompted, click the link in the yellow banner shown and then select a slack channel to be used with the dicebot next page.
If we try to run /roll at this point, you unfortunately won’t get a working bot. But we’re not far off now!
Exploring the Dicebot Core Code#
Dicebot code explained - non-Lambda portion#
To get the dice rolling, we’ve provided the core “dicebot” library code below. We’ll talk through some of the details, but to get oriented, here’s the full listing:
# dicebot.py
# !/usr/bin/env python3
"""Library for the dice-rolling chat bot used in chapter1 of
   Fullstack Serverless - Python on AWS Lambda

Logic for interpreting text as a command to roll one or more dice.
Includes functionality to format roll output for slack.

Available functions:
- parse_text: Determine if a String value is a valid dice roll command
- roll_dice: Simulate the rolling of one or more dice with an arbitrary number of sides
- format_slack_response: Turn the result of a roll_dice into a slack compatible output dict
"""
# imports
from random import randint

# globals
DEFAULT_NUM_DICE = 1  # Default to rolling 1 dice when not specified
DEFAULT_DICE_SIDES = 20  # Role-playing game enthusiasts unite!
DEFAULT_DIVIDER_STR = "d"  # string to divide num_dice and dice_sides


def parse_text(text):
    """Take a roll definition string, checks if it's valid, and then returns
        a dict to be used as kwargs for the roll_dice function.

        Args:
            text: a String value defining a roll according to SRD standard (ie "2d10")

        Returns: a dict with the output required for roll_dice function
            num_dice: integer value for how many dice will be rolled
            dice_sides: integer value for sides on each dice. represents maximum roll value.
        ex: {"num_dice":1, "dice_sides":20}
    """
    num_dice = DEFAULT_NUM_DICE
    num_sides = DEFAULT_DICE_SIDES
    divider = DEFAULT_DIVIDER_STR.lower()

    if text:
        lower_text = str(text).lower()  # ex: convert "D" to "d"
        # if a divider is present, attempt to parse the values before and after it
        if divider in lower_text:
            # returns partitiioned tuple: (num_dice,"d",num_sides)
            parted_text = lower_text.partition(divider)
            # if num_dice is defined, convert to int and use it
            if parted_text[0]:
                num_dice = int(parted_text[0])  # throws ValueError
            # if num_sides is defined, convert to int and use it
            if parted_text[2]:
                num_sides = int(parted_text[2])  # throws ValueError
        else:
            # if no divider is present, as single int is accepted as num_dice
            num_dice = int(text)  # throws ValueError

    output = {"num_dice": num_dice, "dice_sides": num_sides}
    return output


def roll_dice(num_dice=DEFAULT_NUM_DICE, dice_sides=DEFAULT_DICE_SIDES):
    """Creates a dict with random roll values

    Args:
        num_dice: integer value for how many dice will be rolled
        dice_sides: integer value for sides on each dice. represents maximum roll value.

    Returns: dict with that contains the roll definition and results
        keys and values in the output inlcude:
        dice_roll: a string defining the dice roll (ie, "1d20")
        results: a list of ints representing rolled values (ie, [20])
        ex: {"dice_roll": "1d20", "results":[20]}
    """
    dice_results = [randint(1, dice_sides) for i in range(num_dice)]
    dice_result_dict = {"dice_roll": "{}d{}".format(num_dice, dice_sides), "results": dice_results}
    return dice_result_dict


def format_slack_response(dice_result):
    """Takes the output from the roll_dice function and creates a slack-formatted dict with output

    Args:
        dice_result: a dict with the output from roll_dice.
           expects keys and values for:
               dice_roll: a string defining the dice roll (ie, "1d20")
               results: a list of ints representing rolled values (ie, [20])
            ex: {"dice_roll": "1d20", "results":[20]}

    Returns: A dict with containing a result message as expected by the slack API
        ex:
    {
    "response_type": "in_channel",
    "text": "20",
    "attachments": [{
            "text":"rolled 1d20"
        }]
    }
    """
    sum_results = sum(dice_result["results"])
    output_dict = {"response_type": "in_channel"}
    output_dict["text"] = "{} = {}".format(dice_result["results"], str(sum_results))
    output_dict["attachments"] = [{"text": "rolled {}".format(dice_result["dice_roll"])}]
    return output_dict
The dicebot.py file shown here works totally separately of AWS Lambda. We can even invoke it from a local, interactive python terminal to play around with it and see how it works.
Let’s go ahead and copy that dicebot.py code into a new file within the first_function directory. From that first_function directory, we will open an interactive python interpreter, as shown below.
$ cd first_function
$ python
Python 3.7.4 (default, Oct  8 2019, 13:59:00)
[GCC 7.4.0] on linux
Type "help", "copyright", "credits" or "license" for more information.
Our first step towards using dicebot.py is to import the dicebot code into our local interpreter. Since we invoked our python interpreter from the first_function directory, we can use the command import dicebot to get access to that code.
We can confirm that it is working and imported from our local directory with the command print(dicebot)
>>> import dicebot
>>> print(dicebot)
<module 'dicebot' from '/home/ec2-user/Development/dicebot/dicebot/first_function/dicebot.py'>
Now, sure we could just look at the source code, but let’s use this opportunity to learn about a useful feature of python: the __doc__ attribute. Since the developer of dicebot.py has followed python best practices for documentation, the docstring comment from the module is accessible from our interactive python shell.
Let’s give it a go by running print(dicebot.__doc__) from our python interpreter.
>>> print(dicebot.__doc__)
"""
Library for the dice-rolling chat bot used in chapter1 of
   Fullstack Serverless - Python on AWS Lambda

Logic for interpreting text as a command to roll one or more dice.
Includes functionality to format roll output for slack.

Available functions:
- parse_text: Determine if a String value is a valid dice roll command
- roll_dice: Simulate the rolling of one or more dice with an arbitrary number of sides
- format_slack_response: Turn the result of a roll_dice into a slack compatible output dict
"""
Cool, now we know the functions that dicebot provides are called parse_text , roll_dice , and format_slack_response .
We can see the documentation for those specific functions the same way. To print the docs for a specific function in a module, use print(MODULENAME.FUNCTIONNAME.__doc) .
Give it a go for parse_text , roll_dice , and format_slack_response too.
Test parse_text function#
If we review the __doc__ attribute for parse_text , we’ll see that it takes a single argument - called text . So let’s try invoking it by giving it a few different values as text and see what we get.
To invoke it and then print the value returned by the invocation, we can use: print(dicebot.parse_text(TEXT)) .
Some examples are given below.
>>> print(dicebot.parse_text.__doc__)
"""
Take a roll definition string, checks if it's valid, and then returns
        a dict to be used as kwargs for the roll_dice function.

        Args:
            text: a String value defining a roll according to SRD standard (ie "2d10")

        Returns: a dict with the output required for roll_dice function
            num_dice: integer value for how many dice will be rolled
            dice_sides: integer value for sides on each dice. represents maximum roll value.
        ex: {"num_dice":1, "dice_sides":20}
"""
>>> print(dicebot.parse_text("3d6"))
{'num_dice': 3, 'dice_sides': 6}

>>> print(dicebot.parse_text(""))
{'num_dice': 1, 'dice_sides': 20}

>>> print(dicebot.parse_text(2))
{'num_dice': 2, 'dice_sides': 20}

>>> print(dicebot.parse_text("a"))
Traceback (most recent call last):
  File "<stdin>", line 1, in <module>
  File "/home/ec2-user/Development/dicebot/first_function/dicebot.py", line 53, in parse_text
    num_dice = int(text)  # throws ValueError
ValueError: invalid literal for int() with base 10:
For the last example, the text value given was just the string a , which doesn’t really define anything about rolling a dice… In that case, the expected behavior of a python function is raise an Exception , in this case it raised a ValueError to indicate that the value of text was not compatible with the function.
Invoke roll_dice function locally#
So the roll_dice function can be used in a similar manner. We’ll give the number of dice to roll ( num__dice ), and the sides of dice being rolled( dice_sides ), and it gives us a dict with output we can use to render a response.
The inputs this time are integer values, so we will need to test accordingly.
>>> print(dicebot.roll_dice.__doc__)
"""
Creates a dict with random roll values

    Args:
        num_dice: integer value for how many dice will be rolled
        dice_sides: integer value for sides on each dice. represents maximum roll value.

    Returns: dict with that contains the roll definition and results
        keys and values in the output include:
        dice_roll: a string defining the dice roll (ie, "1d20")
        results: a list of ints representing rolled values (ie, [20])
        ex: {"dice_roll": "1d20", "results":[20]}
"""
>>> print(dicebot.roll_dice(1,20))
{'dice_roll': '1d20', 'results': [3]}

>>> print(dicebot.roll_dice(1,20))
{'dice_roll': '1d20', 'results': [15]}
>>>

>>> print(dicebot.roll_dice(3,6))
{'dice_roll': '3d6', 'results': [2, 2, 4]}

>>> print(dicebot.roll_dice(1,20))
{'dice_roll': '1d20', 'results': [14]}

>>> print(dicebot.roll_dice(2,20))
{'dice_roll': '2d20', 'results': [15, 2]}
We should see different, random values appear in the results output list even when the input is the same. Otherwise, the length of the results list and the dice_roll value output should be consistent.
Invoke format_slack_response function locally#
The input for the format_slack_response function matches up nicely to the output of the roll_dice function from above. So we can invoke this one either by typing in a dict with example outputs manually, or by saving the output of roll_dice to a value and calling it. Both are shown below.
>>> print(dicebot.format_slack_response.__doc__)
"""
    Takes the output from the roll_dice function and creates a slack-formatted dict with output

    Args:
        dice_result: a dict with the output from roll_dice.
           expects keys and values for:
               dice_roll: a string defining the dice roll (ie, "1d20")
               results: a list of ints representing rolled values (ie, [20])
            ex: {"dice_roll": "1d20", "results":[20]}

    Returns: A dict with containing a result message as expected by the slack API
        ex:
    {
    "response_type": "in_channel",
    "text": "20",
    "attachments": [{
            "text":"rolled 1d20"
        }]
    }
"""

>>> print(dicebot.format_slack_response({'dice_roll':'1d20','results':[20]}))
{'response_type': 'in_channel', 'text': '[20] = 20', 'attachments': [{'text': 'rolle
d 1d20'}]}

>>> roll_1d20 = dicebot.roll_dice(1,20)

>>> print(dicebot.format_slack_response(roll_1d20))
{'response_type': 'in_channel', 'text': '[11] = 11', 'attachments': [{'text': 'rolled 1d20'}]}
And that’s everything! So now that we know how to use the dicebot module, let’s make our lambda use it too.
Turning Our Hello-World Serverless Function into A Slack Dicebot#
Modify app.py to use dicebot#
Open up the app.py file, in the first_function directory to modify the core lambda code.
Add imports to app.py#
First, we’ll want to add two import statements to top of app.py to support our bot. Add these lines at line 4, underneath the imports already in place.
import dicebot  # used to import dicebot functionality
from urllib.parse import parse_qs  # used to parse slack input
The dicebot import allows us to handle dice rolling like we did in our interactive shell.
The line from urllib.parse import parse_qs will give us access to the parse_qs library from urllib.parse . That function allows us to parse the slack slash command data from the default value of x-www-form-urlencoded into a python dict.
Update code under lambda_handler function in app.py#
Next, we’ll add some modifications to the lambda_handler function in app.py . We will remove all of the default code underneath the considerably huge default docstring, and replace it with the code below. Delete the get_message function as well.
Ensure all code is properly indented throughout! Since this code is underneath the lambda_function each line must have at least 4 spaces before any text.
    dice_input = None
    status_code = 500 # fallback value
    result_output = {} # fallback
    print(event) # ensure event input is logged
    if "body" in event:
        dice_input = event["body"]
    try:
        dice_query = parse_qs(event["body"])
        print(dice_query) # log parsed message from slack
        if "text" in dice_query:
            dice_input = dice_query["text"][0] # The text field is an array
        else:
            dice_input = "" # default to empty string if missing
        parsed_input = dicebot.parse_text(dice_input)
    except Exception as e:
        status_code = 400
        result_output = {"text": str(e)}
    else:
        dice_results = dicebot.roll_dice(**parsed_input)
        print(dice_results)
        result_output = dicebot.format_slack_response(dice_results)
        status_code = 200
    finally:
        return {
            "statusCode": status_code,
            "body": json.dumps(result_output)
        }
Save these changes, and if you are tracking your project in a git repo, go ahead and commit now.
Most of that code is just there for error handling, which we will explain in-depth in chapter 2. The core bot logic works as follows:
- Check that the key
bodywas provided in theeventthat was passed to thelambda_handlerfunction by API Gateway.
    if "body" in event:
        dice_input = event["body"]
Attempts to parse the event["body] into a dictionary using the parse_qs function, and stores the parsed value in the variable dice_query .
 try:
        dice_query = parse_qs(event["body"])
        print(dice_query) # log parsed message from slack
If dice_query has a key for text, use the first item in the value associated with that key as dice_input. If not, set dice_input to a default value - an empty string “”.
      if "text" in dice_query:
        dice_input = dice_query["text"][0] # The text field is an array
      else:
        dice_input = "" # default to empty string if missing
Attempts to parse a dice_input value from above into a valid roll definition, which is stored as parsed_input .
parsed_input = dicebot.parse_text(dice_input)
Rolls dice, using parsed_input as keyword arguments for the roll_dice function. Stores roll information in variable dice_results
    dice_results = dicebot.roll_dice(**parsed_input)
    print(dice_results)
Formats the dice_results variable into a slack command, and sets the status code to 200 to indicate all steps completed
    result_output = dicebot.format_slack_response(dice_results)
    status_code = 200
Sends a response with keys for statusCode and body which is string-formatted JSON containing result_output from above. API Gateway can format this return value into a valid HTTP 200 response that slack will use for the bot message.
    return {
        "statusCode": status_code,
        "body": json.dumps(result_output)
    }
Create event for roll_1d20#
Now we’ve got our lambda handler function rolling dice, we should test it locally. We’ll use the existing events directory in the dicebot directory and create and store a new event there.
Create a new file in this directory called valid_roll_2d20.json .
The content of this file should look like:
{
  "body": "text=2d20"
}
If tracking project work in git, don’t forget to add these event files to the repo as well!
Next, we’ll test it out
Testing Our Serverless Slack Dicebot with Docker Locally#
As we did in the Test hello_world step above, let’s test our new events!
Remember to execute this command from the dicebot directory, and not the first_function or events directory!
$ sam build -u && sam local invoke --event events/valid_roll_2d20.json
...
START RequestId: 210c2c8c-290e-1d47-64ff-bfc7b693234c Version: $LATEST
{'body': 'text=2d20'}
{'dice_roll': '2d20', 'results': [5, 7]}
END RequestId: 210c2c8c-290e-1d47-64ff-bfc7b693234c
REPORT RequestId: 210c2c8c-290e-1d47-64ff-bfc7b693234c  Duration: 3.49 ms       Bill
ed Duration: 100 ms     Memory Size: 128 MB     Max Memory Used: 31 MB
{"statusCode":200,"body":"{\"response_type\": \"in_channel\", \"text\": \"[5, 7] = 1
2\", \"attachments\": [{\"text\": \"rolled 2d20\"}]}"}

$ sam build -u && sam local invoke --event events/invalid_roll_a.json
...START RequestId: 5edfc030-edde-1961-4131-50d50ccb8d84 Version: $LATEST
{'body': 'text=a'}
END RequestId: 5edfc030-edde-1961-4131-50d50ccb8d84
REPORT RequestId: 5edfc030-edde-1961-4131-50d50ccb8d84  Duration: 2.91 ms       Bill
ed Duration: 100 ms     Memory Size: 128 MB     Max Memory Used: 31 MB
{"statusCode":400,"body":"{\"text\": \"invalid literal for int() with base 10: 'a'\"
}"}
Great, so the output shows a statusCode of 200 was returned when valid input was given, and statusCode of 400 when invalid input was given. If the function was to fail for a reason besides invalid input or output, we would expect to see a status code of 500 returned. If that happens, it means we messed up somewhere in our function code and need to check the log output!
Deploy dicebot to AWS#
Since we already did the initial deployment for (#hello-world-deploy], this section will actually be an update to that deployment, but the commands are exactly the same.
From the dicebot directory, re-package this update first.
sam package \
    --template-file template.yaml \
    --output-template-file packaged.yaml \
    --s3-bucket <your-bucket-name>
Then, we can run the deploy command. We should see messages about a CloudFormation changeset , indicating that it performing an update.
$ sam deploy --template-file packaged.yaml --stack-name "DicebotChap1" --capabilities CAPABILITY_IAM

Waiting for changeset to be created..
Waiting for stack create/update to complete
Successfully created/updated stack - DicebotChap1
Test from Slack#
Now for the moment of truth! Let’s go to our slack channel and try the /roll command!
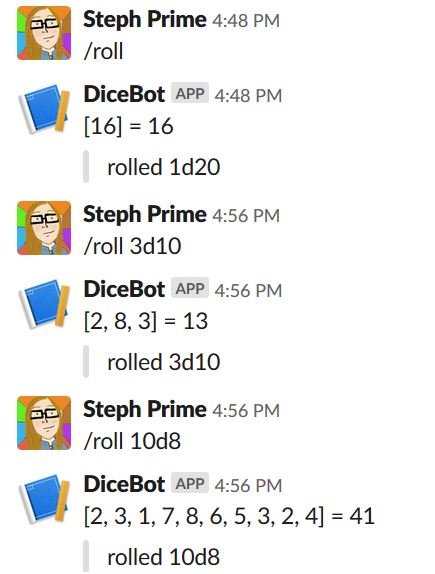
WOOT!
Additional Exercises (Optional)#
Dicebot does it’s job pretty well, but we could make it a lot more flexible with a few changes. For particularly adventurous readers out there, especially those comfortable with python - here are a few additional features that can be developed, tested, and deployed using knowledge from this chapter. Remember to add local test events any time you create a new input options!
- Whenever a dice result is the maximum possible roll, attach a celebratory image to the slack message. hint: to test this one, just send a dice roll of
1d1 - Update dicebot to accept input of more than one dice at a time, ie
/roll 1d10 1d4 - Allow users to add or subtract a value from the sum of the result, ie
/roll 1d20 + 5
Clean up the deployment#
Well that was exciting! As cool as dicebot is, we probably don’t want it hanging around forever. The API we deployed is public - which is awesome for easy testing and integration - but it also means anyone could trigger it if they know the URL. . It’s not a huge deal for this particular project - since there is no private data being shared and attackers don’t really have much use for a dice rolling chat bot. Still, it’s good practice not to leave public accessible endpoints lying around when not in use.
We’ll learn more about authentication and ways to lock down your API Gateways for Lambda in upcoming chapters.
So, if we’re done with dicebot, it’s best to go ahead and remove the stack, and all AWS resources associated with it.
From our dicebot directory, we can delete the stack that we used to deploy this application with the command: aws cloudformation delete-stack --stack-name DicebotChap1
$ aws cloudformation delete-stack --stack-name "DicebotChap1"
It doesn’t actually give any nice output to confirm it worked unfortunately. But if we try to describe stack output like we did in earlier steps, that should now fail since DicebotChap1 is gone.
$ aws cloudformation describe-stacks --
stack-name "DicebotChap1" --query Stacks[0].Outputs

An error occurred (ValidationError) when calling the DescribeStacks operation: Stack with id DicebotChap1 does not exist
Remember to re-describe stack output on re-deploy
If you re-deploy the app after removing the stack, the URL for the API Gateway will change to a new random value. So be sure to fetch the new value and use that one in the Slack setup (as shown in deploy hello world if you re-deploy it!
To remove the now, non-functioning, Dicebot from slack, we can either remove the slash command for the Dicebot app - or remove the Dicebot application altogether.