This Book’s Mission
The Ethereum blockchain has been described as the driving force behind the next generation of the internet. This blockchain solution has built-in smart contract capabilities, a large developer community, and its own native cryptocurrency. Although the platform has been established since 2015, there is still a long way to go before Ethereum (and other tools like it) can change the nature of the internet as we know it.
Ethereum has been used to create a variety of tools to disintermediate how people access services across many industries. Traditionally, people using the internet rely on third parties to obtain access to services, such as using Paypal or eBay to buy, sell and send money around the world.
Conversely, Ethereum leverages its public, decentralized infrastructure to create services that perform the same functions, without the need for those third parties. This eliminates the need to establish trust with and pay fees to them. Users can also have free access to audit the code that performs the functions. A couple of Ethereum-based web applications you could look at are:
- MakerDAO - created a token called Dai, a digital currency that is pegged to the US Dollar and can be used anywhere
- Rarible - created a marketplace where digital collectibles can be bought and sold
Both of these platforms exist on the Ethereum blockchain. As long as someone has internet they will be able to use the applications mentioned.
We will learn the fundamentals of blockchain and then start writing smart contracts for the Ethereum blockchain. After we write the smart contracts, we will send the code of the smart contracts to the Ethereum blockchain. Once the contracts are sent to the blockchain,we will learn how to interact with the code that lives on the Ethereum blockchain.
The first smart contract we will create will be a simple smart contract. It will teach the basics of the smart contract language called Solidity. Once we understand some of the fundamentals, we will dive into a slightly more complex smart contract (how to set up a smart contract that interacts with a cryptocurrency called Ether). Once we understand how smart contracts can interact with cryptocurrencies that have value, then we will design and deploy an ERC 20 token smart contract.
Some of the languages and tools we will cover in this book to write and deploy smart contracts include Solidity, Remix, and Truffle JS.
What Do I Need to Know?
The target audience for this book is someone who is comfortable with Javascript. Don’t worry if you are rusty or unfamiliar, but you’ll find the content much more accessible if you spend a little time (re)familiarizing yourself. There are tons of great resources online, such as this one https://javascript.info/variables.
The code examples also use ES6 format, so if you’re unfamiliar with the wonderful world of arrow functions () ⇒ {} and const , spend a few minutes looking at a quick overview like https://www.taniarascia.com/es6-syntax-and-feature-overview/ or https://babeljs.io/docs/en/learn/. The ES6 features are mostly just syntactic sugar and not fundamental changes, so you could also dive straight in and look up anything unfamiliar when you get to it.
When Should You Use Ethereum (or Blockchain)?
Ethereum is a platform that enables open access to digital money and data for anyone with an internet connection. To ensure that you are using the Ethereum blockchain for the right use case, there are a few factors to guide your decision-making. These factors include:
- the number of participants in your system
- the geographical distribution of users of your system
- your performance requirements
The Ethereum blockchain becomes a viable option when you want to manage and secure digital relationships or a shared system of record. If the system of record involves parties that don’t normally trust each other, then a distributed network like blockchain can be a strong option for protecting the shared system of record. This is because whenever changes are made to the records, the party that is making the change has to sign off.
The Ethereum blockchain because a strong solution for system of records that are used by users from around the world. The information would be stored on the Ethereum blockchain which is accessible by anyone that has internet.
One thing to be weary of is the current limitations of the Ethereum blockchain. The Ethereum blockchain users an algorithm called Proof of Work. Proof of Work is a system that uses a large amount of effort to validate information. This makes the Ethereum blockchain slow and not highly scalable (for now). The developers that are working on improving the Ethereum blockchain are looking into alternative algorithms (e.g. Proof of Stake) to tackle some of the speed and scalability issues.
Along with these factors, blockchain is best applied in the following circumstances:
- There is a need for a common database between users that do not trust each other
- Multiple users can update the database (not necessarily from the same organization)
- There are currently trusted third parties involved in the process that facilitate interactions between multiple parties (services may include: escrow, data providers, licensing authorities, background verification, etc.)
- Cryptography is being used to protect data
- There are uniform rules governing the users in the system
- Decision-making in the system is transparent
- There is a need for an immutable log of facts
Furthermore, blockchain should not be used:
- when dealing with confidential data
- with large amounts of data
- when external services are used to gather data
- when the rules of the system change frequently
What Makes Ethereum?
Ethereum is a generalized blockchain for smart contract development. Developers working with Ethereum could build the next version of the internet, which will have the following characteristics:
- money and payments are built-in
- users can own their data, without applications that spy and steal
- everyone has access to an open financial system
- built on neutral, open-access infrastructure, controlled by no company or person
Ethereum has a native cryptocurrency called Ether (ETH). ETH is purely digital money, and can be sent to anyone, anywhere in the world, instantly. The supply of ETH isn’t controlled by any government or company - it is decentralized, and it is scarce. People all over the world use ETH to make payments, as a store of value, or as collateral.
But unlike other blockchains, Ethereum can do much more. Ethereum is programmable, which means that developers can use it to build new kinds of applications.
Smart contracts
A program that runs on the Ethereum blockchain is called a smart contract. It is a collection of functions and data that resides on the Ethereum blockchain as code and state.
Smart contracts are public on the blockchain and can be thought of as open APIs. APIs that can invoke a function or read some data. In addition to being open, they are permissionless. This means that anyone can write a smart contract, deploy it to the Ethereum blockchain and have it accessed by anyone that has an internet connection. To send a smart contract to Ethereum, you would be changing the state of the Ethereum blockchain. This means that you need to pay a transaction fee so the smart contract can be added to the state of the blockchain.
Dapps
These decentralized applications (or dapps ) gain the benefits of cryptocurrency and blockchain technology. The applications can be trustworthy, meaning that once they are “uploaded” to Ethereum, they will always run as programmed. They can control digital assets in order to create new kinds of financial applications. They can be decentralized, meaning that no single entity or person controls them.
Right now, thousands of developers all over the world are building applications on Ethereum, and inventing new kinds of applications, many of which can be used today. Amongst these are:
- cryptocurrency wallets that allow you to make cheap, instant payments with ETH or other assets
- financial applications with which you can borrow, lend, or invest your digital assets
- decentralized markets which enable you to trade digital assets, or even “predictions” about real-world events
Any program that runs on the Ethereum Virtual Machine (EVM) is commonly referred to as a “smart contract”. The most popular language for writing smart contracts on Ethereum is Solidity. The language is inspired by C++, Python, and JavaScript.
Key Technologies and Other Considerations#
In this section we will explore the technologies which will be used to create the fullstack application in this book.
Node.js
Node.js is an open-source, cross-platform, JavaScript runtime environment that executes JavaScript code outside of a browser. It allows developers to use JavaScript to produce dynamic web page content before the page is sent to the user’s web browser.
What’s in This Book?
In this course, we’ll jump straight into writing our first smart contract with Remix. Once we’re comfortable writing Solidity smart contracts, we’ll learn how to handle more complex features of the Solidity smart contract language with which to write code that can be useful to people around the world. Once we have a smart contract that we are happy with, we can compile it, deploy it, and learn how to use libraries like Truffle, web3.js and ethers.js to interact with our smart contracts once they live on the Ethereum blockchain.
We will also look at getting our smart contract working on various Ethereum blockchains (i.e. local blockchains, test networks).
Details
Let’s break down what we will be covering during this course. There will be two major sections, each comprising two to three modules explaining the key concepts behind building a fullstack Ethereum application.
This section borrows code and code examples from throughout the internet to explain some of the key concepts of blockchain and Solidity development. The code has been commented on, explained, and updated as needed. Special thanks to these authors for helping the blockchain community more approachable through the code and blogs that they created - StephenGrider, Savjee, Xavier Decuyper, and Alibaba Cloud - thank you for the inspiration!
The first section will introduce some key blockchain fundamentals, explore some of the more detailed nuances around the Ethereum blockchain, and then get you writing and deploying smart contracts to a blockchain network.
Some of the key goals for this section will be:
- writing a blockchain in JavaScript from scratch
- inbox smart contract
- money game smart contract
Once you understand what it means for a smart contract to exist on a blockchain network, you can dive into the next section, where you will learn some of the best practices in the smart contract space to design and develop an ERC 20 token smart contract. An ERC 20 token smart contract is a token (like bitcoin) that can hold value and be sent and received.
This section borrows audited code from OpenZeppelin. This organisation focuses on enabling developers to use battle tested smart contracts to create other smart contracts.
- write and use ERC-20 token smart contracts
As tokens are created on the Ethereum blockchain, you can exchange ether for a token. A token can be a digital asset that is being built on the Ethereum blockchain. An example of a token can be a representation of gold on the Ethereum blockchain as digital gold. Another example of a token can be a company stock like TSLA for Tesla.
How Should I Read This Book?
This book is meant to be read in a linear fashion — most chapters build on things we’ve learned in the previous ones. If you have experience with Solidity or Ethereum, I still recommend going through each chapter, even if you skim through them. There is a lot to learn, and there are insights for practitioners of all levels to be found throughout the book.
Most of the chapters will involve you writing the code as you read. I want you to learn as much as possible from this book, and the hands-on examples are crafted to be as effective as possible. Make sure you don’t copy and paste the code examples — you might get through the book more quickly, but will be more likely to forget the exact commands.
Most of the chapters’ code has a /draft folder, where you will work, and a /completed folder, which contains the final product. Feel free to reference the /completed folder if you get stuck or need an example.
Please note that all of the code in this book can be found in the /code/project/ folder and a zipped version of the code can be found in the project.zip file in the /code/ folder.
Getting Help
The code in this book has been vigorously tested to ensure that it works in all modern environments. But if you run into any part that is confusing, or if you get stuck anywhere, please reach out!
The best way to get help is in to join us over at the #crypto channel in our Discord server here.
Of course, you can also send an email to us@fullstack.io detailing the issue and we’ll get back to you as soon as possible.
Let’s Get Started!
With that all said, we’re ready to embark on our Fullstack Ethereum journey! Get ready to make secure and robust smart contracts with Solidity, learn the nitty gritty of Ethereum, and integrate your smart contract with a fullstack web application. Let’s dig in!
Basics of Blockchain
Blockchain is a combination of databases, cryptography, and network dynamics. Back in the 1990s, the concept of blocks of data being chained together (like a linked list) was developed. Fast-forward to 2008, when a white paper proposed the idea of Bitcoin, a digital currency with the underlying technology being blockchain.
The whitepaper proposed that a peer-to-peer version of electronic cash would allow online payments to be sent from one party to another without going through a financial institution. This gave way to the concept of blockchains .
Blockchain is a set of data (organized like a table of data) that is locked at each point of editing. Once data is added to the blockchain, the information is permanent.
What is a Blockchain? (Deeper Dive)
Beyond the textbook definition of a blockchain, there are a number of properties that make the solution a viable platform for storing data and value.
These key properties make blockchain solutions a highly suitable option for sharing information and value across the internet:
- Decentralized data
- No intermediaries
- Quick settlement
Decentralized Data
Simply put, there is no central authority or party responsible for storing and managing blockchain data. Instead, the data is on a digital ledger which is owned by individuals or parties around the world on their hard drives and servers.
This ensures that no single party has absolute control over all the data and that malicious actors cannot control the data on the blockchain.
No Intermediaries
The implication of this is that there is no third-party person or organization needed to validate the information being sent to the blockchain. To incentivize people to do this, there is a network fee. The network fee is usually a lot lower than fees required to store and validate similar information using third parties like banks.
Quick Settlement
Information and value (transactions) on a blockchain can settle a lot quicker than in traditional infrastructures where data is typically managed in a centralized manner. Blockchains have the ability to remain online 24/7 and because of this, transactions are not constrained by the rigid working hours of institutions such as banks.
What is a Transaction?
Blockchains capture the “state” of data. Whether is the state of cryptocurrency in all network participants, or some other kind of data, blockchains will always give the latest information.
To update or modify the state of a blockchain, a user or network participant must propose a change, with a network fee. This proposal is batched with a set of other proposals and processed by network participants. This is what we call a blockchain transaction.
How does Verification of a Transaction Occur?
Verification of some of the biggest blockchains fall onto a group of “miners”. Miners are people with computers configured to solve very complex math equations. Miners will scan the blockchain to see which transactions have the highest network fee and process these transactions first.
The equations are a product of encryption and designed to product transaction data on a blockchain.
The first miner to solve the equations (thus verifying incoming transactions) receives a reward, also referred to as a block reward , and usually paid out in the blockchain’s native coin or token. For example: a miner on the Ethereum blockchain gets a block reward in ether.
Setting up a Basic Development Environment
In this section we will prepare your development environment so that you can start writing some JavaScript. The main tools we will install include Visual Studio Code (VSCode), Node.js and Node Package Manager(npm).
If you already have a JavaScript development environment, please feel free to skip this section.
This software can be installed on MacOS, Windows, and Linux environments. If you need further guidance in getting these tools set up, please reach out.
Before Installing Software
Before we download and install VSCode, Node.js and npm, let’s ensure that you have a folder on your Desktop (or somewhere else on your computer) to can store projects you will work on.
I have created a dev folder in my desktop. All my projects are stored there.
Visual Studio Code
Visual Studio Code is a free source-code editor that was created by Microsoft. It is a power development, supporting debugging, syntax highlighting, embedded Git, and several other features. It also has an embedded terminal and several extensions to enhance your coding experience. It supports several programming languages (e.g. JavaScript, php, Python, etc.).
To start the installation, click https://code.visualstudio.com. The page you land on should look something like this (the button labelled “Download for Mac” will vary depending on the machine and operating system that you are using).
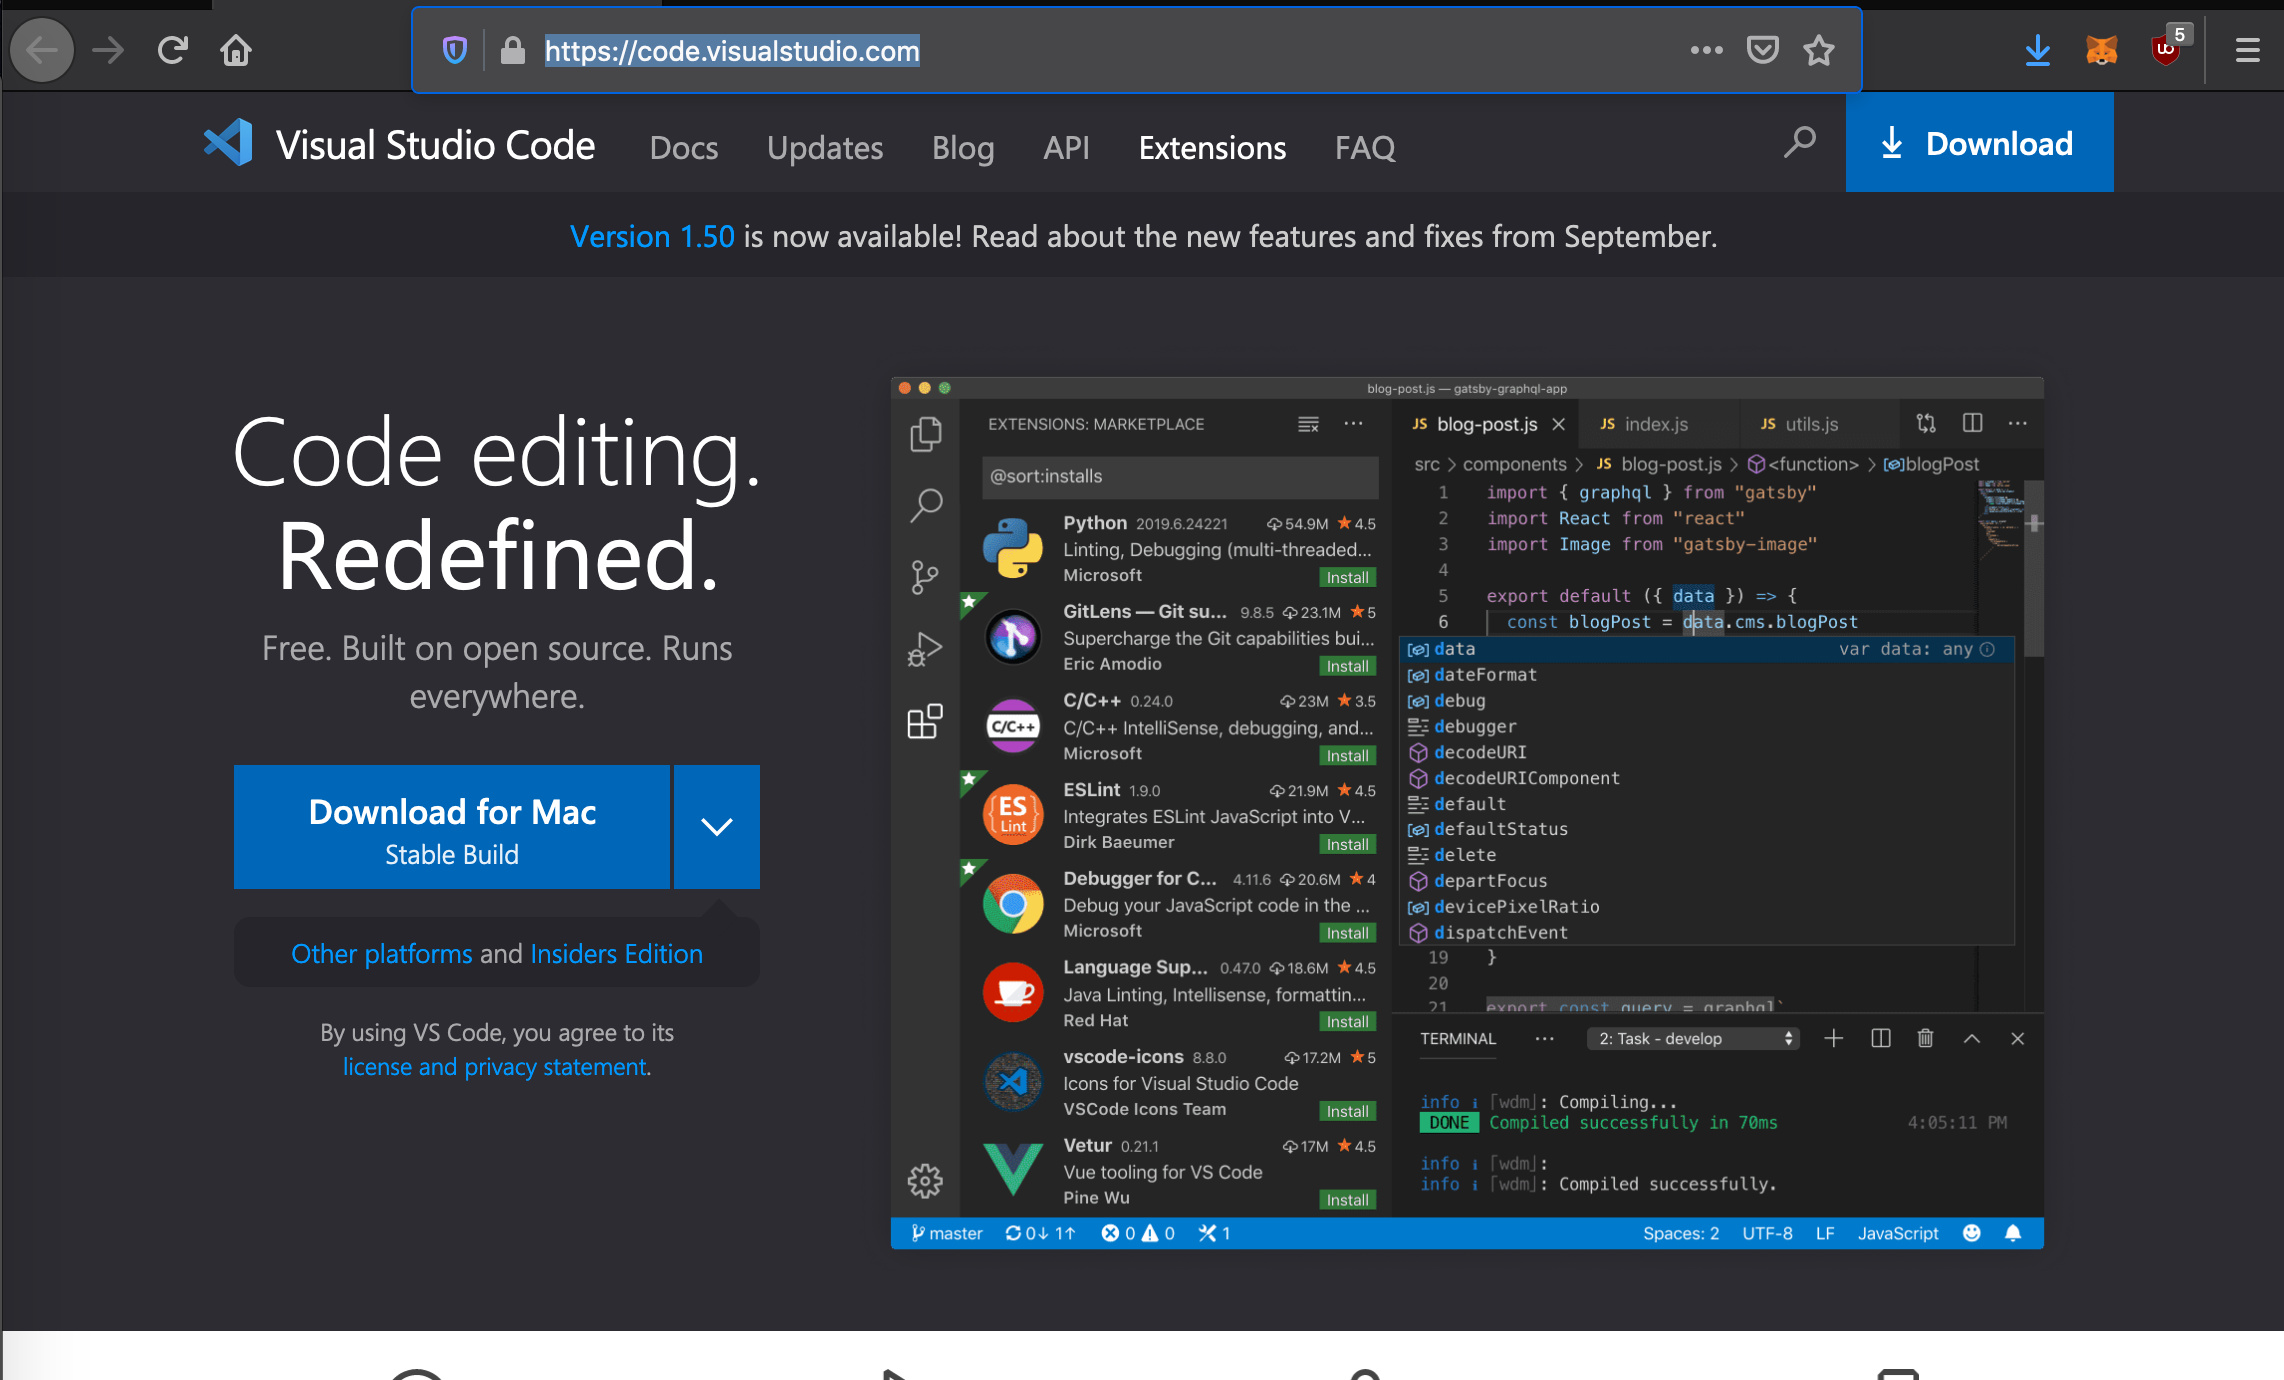
After clicking download, click through the steps from the downloaded installer file to complete the installation process for VSCode.
To enhance your developer experience, you can install various extensions in VSCode. Here are some of the ones that I use to make it easier to read JavaScript and Solidity.
- Prettier - Code formatter (v5.7.1)
- solidity (v0.0.76)
Node.js and Node Package Manager
Node.js is a JavaScript runtime environment that can execute JavaScript code outside a web browser. With this, we will use Visual Studio Code to run and test the JavaScript code we write for the web applications we will create.
When installing Node.js, you will also receive Node Package Manager (npm), which is a tool that provides hosting for software development and version control for various JavaScript libraries. We will be using npm to install various packages for the web application and smart contract development we will do.
To install Node.js and npm, visit https://nodejs.org/en/ and click the button “Recommended for Most Users”. When I was writing this book, the version of Node.js used was v12.19.0 LTS.

After downloading and launching the installer and going through the steps, you will have Node.js and npm installed on your computer. Both of these will be usable in your VSCode development environment.
Creating the Blockchain#
Now that we have VSCode, Node.js and npm installed, let’s use these tools to create our own blockchain using JavaScript. This will allow us to really understand some of the key concepts behind blockchain and it gives us the opportunity to brush up on some JavaScript.
To kick things off, let’s open VSCode.
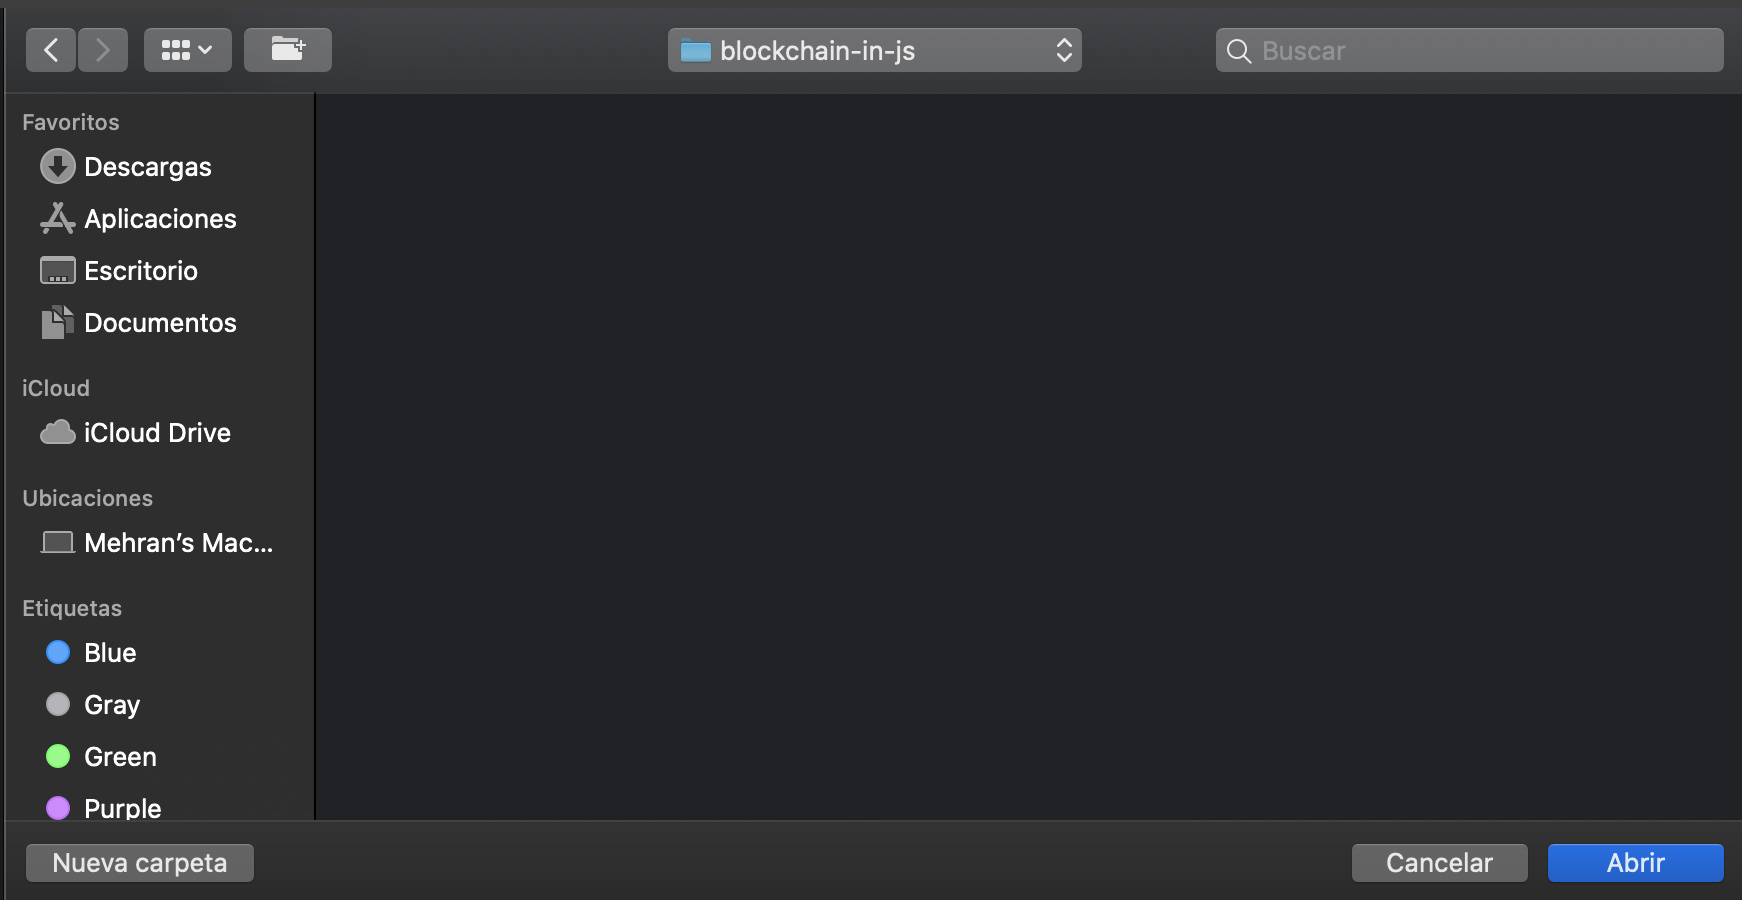
From here we will select File > Open . This will take you to a file explorer. From here, create a new folder and call it blockchain-in-js .


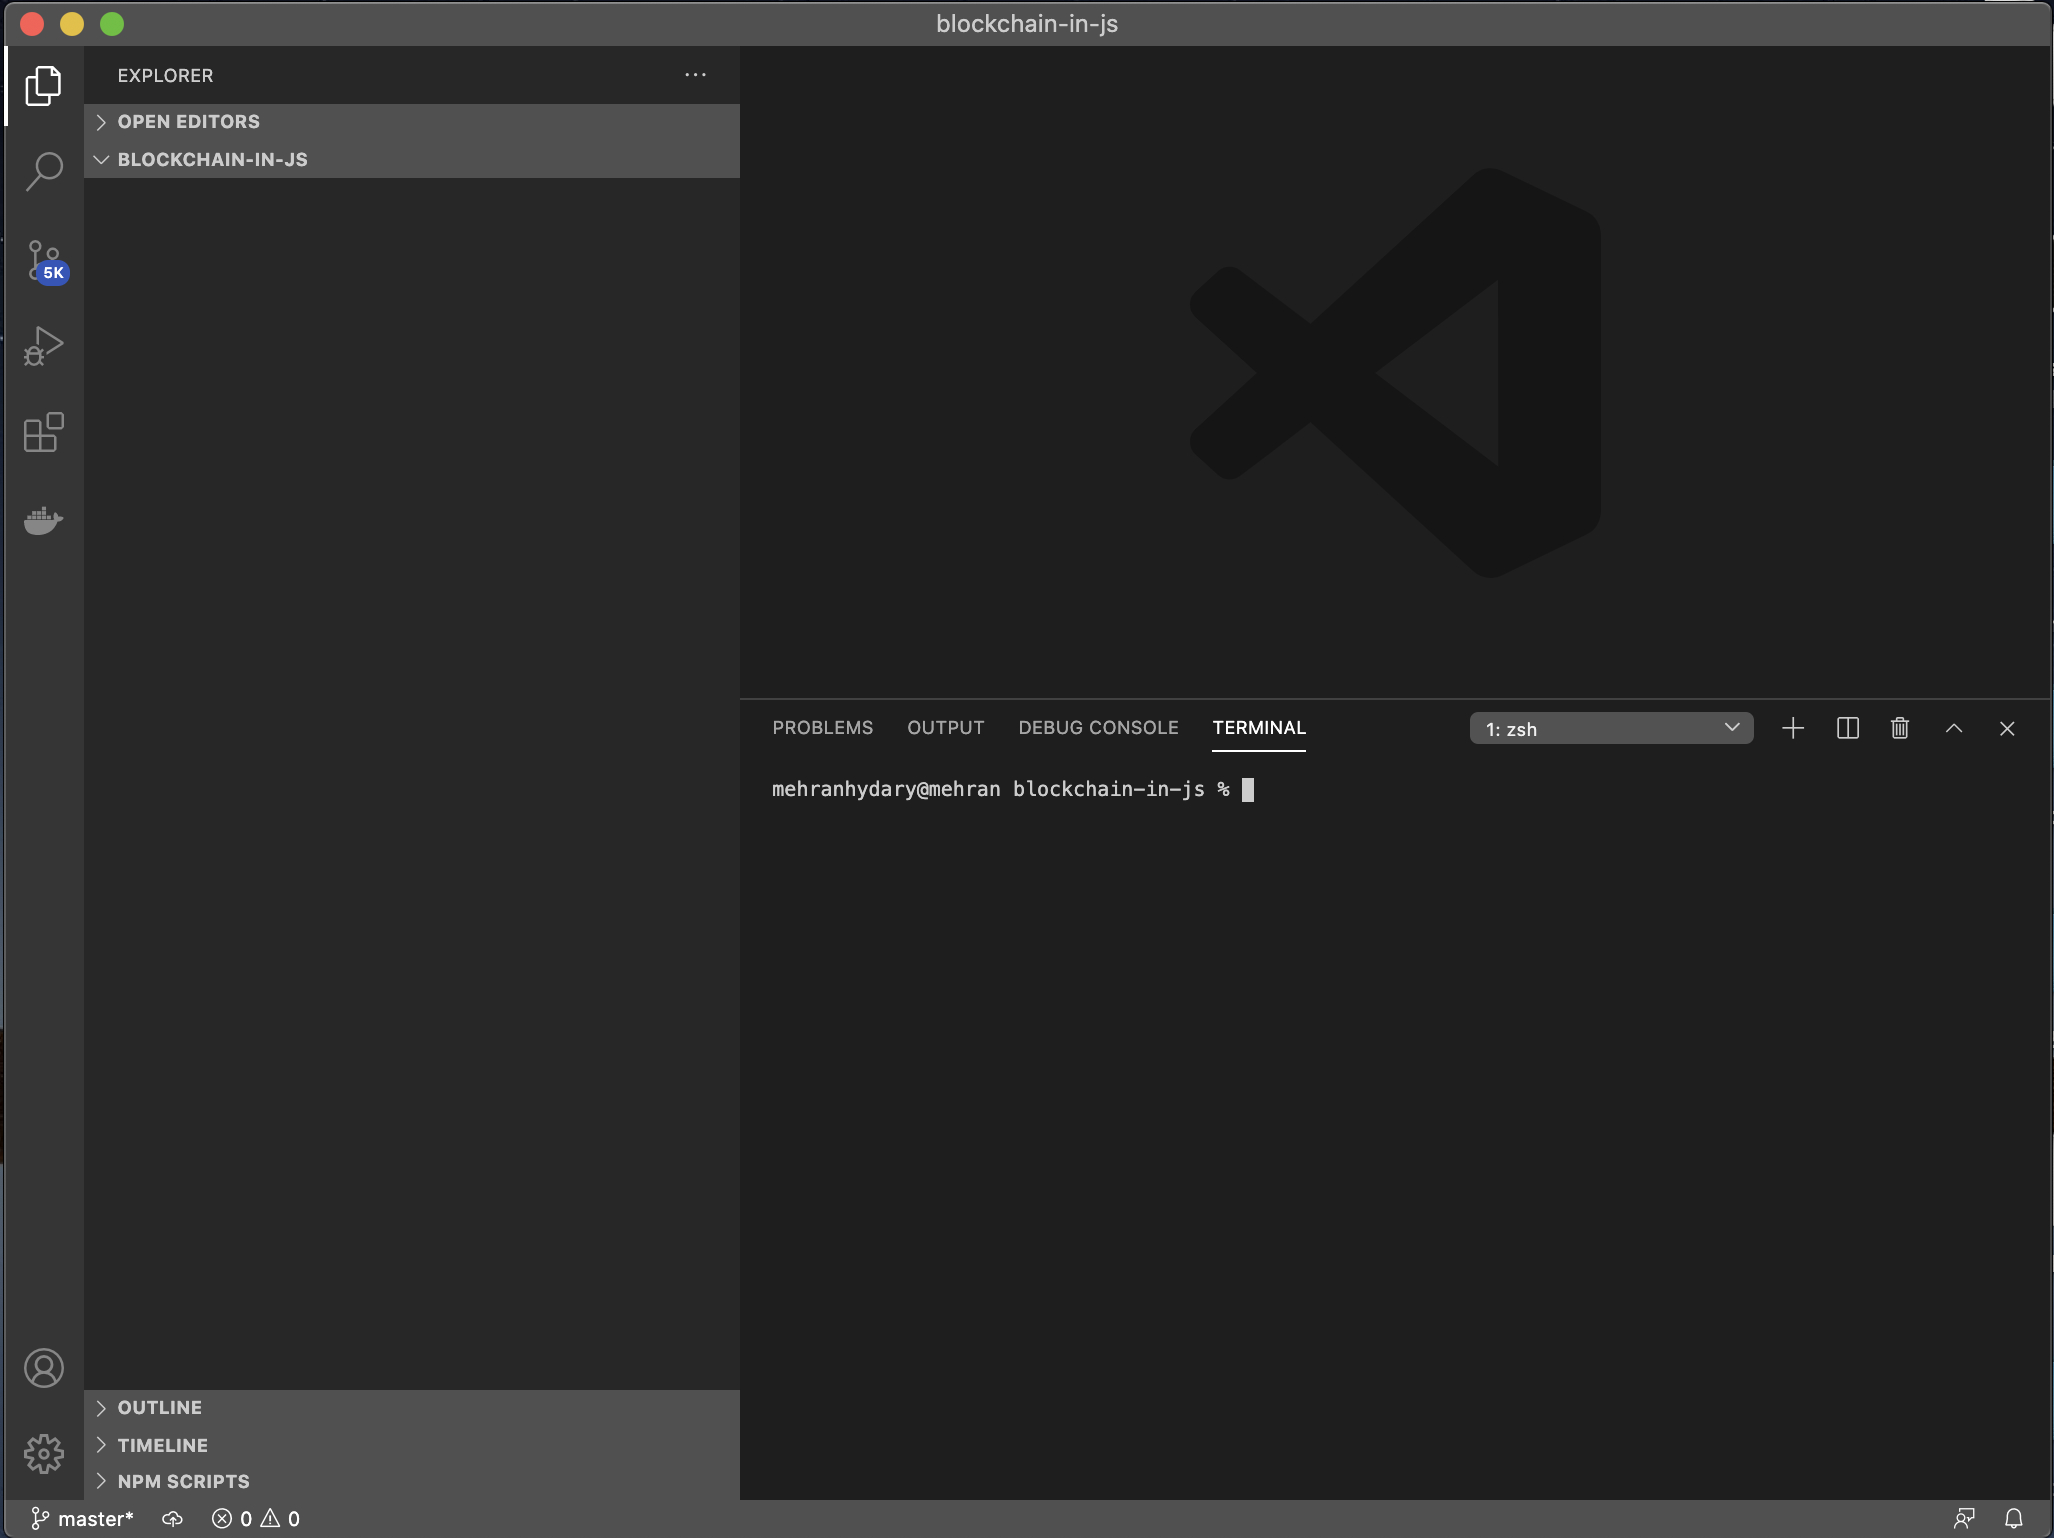
Now that we have the empty folder open, let’s get VSCode ready for the next few steps. We want to get a terminal up and be able to see the file explorer .
To enable the terminal view, click through from the main menu: Terminal > New Terminal . If you cannot see the file explorer , click View > Appearance > Show Sidebar from the main menu.
Your view should now look something like this:
Now that our development environment is ready, we will run npm init in the terminal. This will trigger a script that allows you to create a package.json file our project.
To keep things simple to start with, hit enter through the prompts of this script. Once completed, you should see a package.json file has been created with the following content:
{
  "name": "blockchain-in",
  "version": "1.0.0",
  "description": "",
  "main": "index.js",
  "scripts": {
    "test": "echo \"Error: no test specified\" && exit 1"
  },
  "author": "",
  "license": "ISC"
}
As we won’t need any dependencies just yet, we will leave this file for the moment.
Block Class#
Now, let’s create a file called blockchain.js in the folder we are working in. To do this, right-click (or two-finger click on Mac OS) to open a menu in the Visual Studio Code side bar. You can select New File from the menu that appears.
A blockchain is a “chain of blocks”. Let us start off by writing a class for a block .
class Block {

}
Now that we have the block class, we will add a set of functions that will give us what we need to represent a block. The values of a block that we will be capturing include a timestamp, the data we want on the blockchain, a reference to a previous block and a reference of the current block. In addition, we will have a value that allows us to index the block.
calculateHash function#
We will add a function called calculateHash that takes in the values being captured for the block, and generates and returns a hash. A hash is a function that converts one value to another. To calculate the hash for our block, we will import a library called SHA256. To have it available for our code, we will have to run it in the code directory.
$ npm install crypto-js
Once we have this package saved, we will import a SHA256 library. Add the following line of code to the top of your file (before you declare the block class).
const SHA256 = require('crypto-js/sha256');
Now that you have the SHA256 function available, let’s start writing the calculateHash function in the block class.
calculateHash() {
    return SHA256(
        this.index
        + this.previousHash
        + this.timestamp
        + JSON.stringify(this.data)
    ).toString()
}
To capture the required values, we will create a constructor to instantiate variables for them. We will be passing in the variables mentioned and then setting them in the constructor function. To generate the hash for this block, we will be calling the calculateHash function that we just created.
constructor(index, timestamp, data, previousHash = '') {
    this.index = index;
    this.timestamp = timestamp;
    this.data = data;
    this.previousHash = previousHash;
    this.hash = this.calculateHash(); // calculate the hash
}
At this point, code should look something like this:
const SHA256 = require('crypto-js/sha256');

class Block {
    constructor(index, timestamp, data, previousHash = '') {
        this.index = index;
        this.timestamp = timestamp;
        this.data = data;
        this.previousHash = previousHash;
        this.hash = this.calculateHash(); // calculate the hash
    }

    calculateHash() {
        return SHA256(
            this.index
            + this.previousHash
            + this.timestamp
            + JSON.stringify(this.data)
        ).toString()
    }
}
Blockchain Class#
Now that we have a Block class, let’s create the Blockchain class. For this class, we will need the following functions:
- constructor
- createGenesisBlock
- getLatestBlock
- addBlock
- isChainValid
We will start off by declaring the Blockchain class.
class Blockchain {

}
Constructor and createGenesisBlock Function#
The constructor function starts the blockchain. The first block in a blockchain is referred to as a genesis block. Let’s create a function createGenesisBlock that will help us create a genesis block with an index set to 0.
createGenesisBlock() {
    return new Block(0, '01/01/2020', 'Genesis Block', '0');
}
Now that we have a function to create the genesis block, let’s create our constructor. We will be setting a variable called chain to be equal to the function we created. We will treat the chain variable as an array of blocks .
constructor() {
    this.chain = [this.createGenesisBlock()];
}
Our constructor now starts our blockchain for us, so let’s add some functionality around adding blocks, reading block information, and checking that the blockchain we have is valid.
getLatestBlock Function#
We will write a function to get the latest block, getLatestBlock . Since the chain is an array, we will return the last value of the array.
getLatestBlock() {
    return this.chain[this.chain.length - 1];
}
addBlock Function#
The next function, addBlock will allow additional blocks to be added to the chain array.
To create a new block, the block’s values will be passed into the function, which will then set a previousHash variable and a new block hash variable.
Once we set those variables, we will push the new block into the chain variable.
addBlock(newBlock) {
    newBlock.previousHash = this.getLatestBlock().hash;
    newBlock.hash = newBlock.calculateHash();
    this.chain.push(newBlock);
}
Since we now have blocks with hashes that point to the hash of the block that came before it, we can write a function to check if the chain variable is valid.
isChainValid Function#
We will create a function called isChainValid which will loop through all the blocks to confirm if the hashes all correspond as they should. In the blockchain that we are building, we simply need the block we are looking at to have the hash of the block that precedes it. If the hash doesn’t correspond, then the function will return false .
The other thing that we can check as we are looping through the blocks is whether the hash that is created for the current block is the hash that gets created if we call the calculateHash function that we wrote for the block class.
isChainValid() {
    for(let i = 1; i < this.chain.length; i++) {
        const currentBlock = this.chain[i];
        const previousBlock = this.chain[i-1];

        if(currentBlock.hash !== currentBlock.calculateHash()) {
            return false;
        }
        if(currentBlock.previousHash !== previousBlock.hash) {
            return false;
        }
    }
    return true;
}
We now have a simple blockchain function that will behave as basic blockchains do.
Test the Functions#
To test this functionality, let’s run some code to see how the blockchain works.
To ensure that the code that we have created makes sense, let’s run through some simple tests to validate the code and functionality. To start this process, let’s initialize the simple blockchain we are working on.
let simpleBlockchain = new Blockchain()
We can add a block to the blockchain we created with the following function.
simpleBlockchain.addBlock(new Block(1, '22/01/2020', { amount: 1 }))
Let’s add one more block…
simpleBlockchain.addBlock(new Block(1, '23/01/2020', { amount: 4 }))
Now we can call getLatestBlock or isChainValid on the blockchain that we created. Try changing some parameters around and see if the function calls give you the results that you expect.
console.log(simpleBlockchain.isChainValid())
console.log(simpleBlockchain.getLatestBlock())
Adding Proof of Work Consensus#
To enhance the blockchain that we wrote in the previous section, we now have to upgrade the protocol at which blocks can be added upon.
The protocol that is most common in blockchains nowadays is called proof of work consensus . This protocol is used to confirm transactions and produce new blocks to the chain. With proof of work, miners compete against each other to complete transactions on the network and get rewarded.
Miners are users who are responsible for adding transactions to a blockchain.
Adding the Nonce to Blocks#
A nonce is an abbreviation for “number only used once,” which is a number added to a hashed or encrypted block in a blockchain that, when rehashed, meets the difficulty level restrictions as described below. Since miners will be adding blocks to our blockchain, the nonce is something that we need to add to our blocks.
Update the block constructor to include a nonce variable
constructor(index, timestamp, data, previousHash = '') {
    this.index = index;
    this.timestamp = timestamp;
    this.data = data;
    this.previousHash = previousHash;
    this.hash = this.calculateHash();
    this.nonce = 0 // NEW
We will also need to update the calculateHash function to include the nonce .
calculateHash() {
    return SHA256(
        this.index
        + this.previousHash
        + this.timestamp
        + JSON.stringify(this.data)
        + this.nonce // NEW
    ).toString()
}
mineBlock Function#
Since mining blocks on a blockchain is how transactions and blocks get added to a blockchain, let’s create a function that will let us do that.
We will create a function called mineBlock in our Block class. This function will take in a variable called difficulty . This value will be used to find a hash with a certain number of 0s prior to it. The hashes will be created with the calculateHash function. A while loop will be used to run the calculateHash function until the difficulty is met. Each time the hash gets calculated, the block’s nonce will increase by 1.
mineBlock(difficulty) {
    while(this.hash.substring(0, difficulty) !== Array(difficulty + 1).join('0')) {
        this.nonce++;
        this.hash = this.calculateHash();
    }
    console.log('Block mined', this.hash)
}
Next we have to make some minor changes to the blockchain class. Let’s add the difficulty, and update the addBlock function to account for the new mineBlock function we created in the block class.
The constructor will now have a difficulty variable.
    constructor() {
        this.chain = [this.createGenesisBlock()];
        this.difficulty = 5;
    }
Next, the addBlock function will be updated so that it mines blocks with the new difficulty variable.
    addBlock(newBlock) {
        newBlock.previousHash = this.getLatestBlock().hash;
        newBlock.mineBlock(this.difficulty);
        this.chain.push(newBlock);
    }
Test the Proof Of Work Changes#
To ensure that the code that we have created makes sense, let’s run through some simple tests to validate the code and its functionality. To start this process, let’s initialize the proof of work blockchain we are working on.
let proofOfWorkBlockchain = new Blockchain()
Once the blockchain is initialized, we can add a block with mining with the following function call.
proofOfWorkBlockchain.addBlock(new Block(1, '22/01/2020', { amount: 1 }))
Add another block with mining
proofOfWorkBlockchain.addBlock(new Block(1, '23/01/2020', { amount: 4 }))
Now you can check the nonce to see if it has been updated. In addition to checking the nonce, you can also see if the hashes that were generated have five 0s.
console.log(proofOfWorkBlockchain.getLatestBlock().nonce)
console.log(proofOfWorkBlockchain.getLatestBlock().hash)
console.log(proofOfWorkBlockchain.getLatestBlock().previousHash)
Adding Transactions#
We have said that transactions are sent to a blockchain and then aggregated to create a block. Let’s see how that translates into code and into the blockchain that we are writing.
Transaction Class#
Firstly we will introduce a Transaction class. The class will track a few things:
- who is creating the transaction
- the amount that is being transferred with the transaction
- who is receiving the amount being transferred
    class Transaction {

    }
We will add a constructor to the class to capture the transaction’s values.
    constructor(fromAddress, toAddress, amount) {
        this.fromAddress = fromAddress;
        this.toAddress = toAddress;
        this.amount = amount;
    }
The Transaction class can now be used in our blockchain:
    class Transaction {
        constructor(fromAddress, toAddress, amount) {
            this.fromAddress = fromAddress;
            this.toAddress = toAddress;
            this.amount = amount;
        }
    }
Modify Block and Blockchain classes to use Transaction class#
To ensure that our Block and Blockchain classes can use the Transaction class, let’s make a few modifications to them. For the Block class we need to ensure that we capture the transactions that are a part of the block that is being added to the blockchain.
The Block class constructor should take and set an input variable called transactions .
this.transactions = transactions
The Block class constructor function should now look like this:
    constructor(timestamp, transactions, previousHash = '') {
        this.timestamp = timestamp;
        this.transactions = transactions;
        this.previousHash = previousHash;
        this.hash = this.calculateHash();
        this.nonce = 0
    }
Some other functions in our Block class will also be affected by adding the transactions variable. Let’s take a look at calculateHash and mineBlock to see if changes are required.
The calculateHash function is responsible for taking the information in the block and hashing it with a SHA256 function. Since we are now tracking the transactions variable as well, we need to add this to the string that is being hashed. The calculateHash function should now take the transactions variable and convert it into a string. Then we can append it to the other values in the block:
    calculateHash() {
        return SHA256(
            this.previousHash
            + this.timestamp
            + JSON.stringify(this.transactions) // we are now hashing transactions as well
            + this.nonce
        ).toString()
    }
Since the mineBlock function only takes the hash that we created and processes it, we don’t need to add any additional code to this function to make it work with our Transaction class.
Let’s now jump into the Blockchain class. We have the following functions: constructor , createGenesisBlock , getLatestBlock , addBlock , and isChainValid . The only function that is impacted by the new Transaction class is the constructor . We will however be adding some new functions:
- minePendingTransactions
- createTransaction
- getBalanceOfAddress
To kick off the changes for the Blockchain class, let’s add an array of pending transactions to the constructor.
this.pendingTransactions = []
We also need to add a mining reward to incentivize the people mining or processing transactions with some value. For this blockchain, let’s set it to 100:
this.miningReward = 100
The constructor should now look like this:
        this.chain = [this.createGenesisBlock()]
        this.difficulty = 2
        this.pendingTransactions = []
        this.miningReward = 100
    }
Now let’s look at the createTransaction function, which will simply be used to add transactions to our pendingTransactions array. The function will take in a transaction and push it into the the array we created in the constructor .
  createTransaction(transaction) {
    this.pendingTransactions.push(transaction)
  }
The minePendingTransactions function will take in a variable called miningRewardAddress and create a new block with the information in the pendingTransactions variable. Let’s start by creating the function:
    }
*/
In this function we will add the following lines of code:
    let block = new Block (Date.now(), this.pendingTransactions)
    block.mineBlock(this.difficulty)
    console.log("Block successfully mined...")
The first line leverages the Block class constructor to create the new block. Then we can use the mineBlock function in this new block. Once complete, we notify the user that the block was successfully mined. Now the block is mined, we can add it to the rest of our chain.
this.chain.push(block)
The last thing to do is create a new transaction so that the miner gets their reward.
this.pendingTransactions = [new Transaction(null, miningRewardAddress, this.miningReward)]
Now that we are done with this function, let’s remove the addBlock function that we had created earlier in this Blockchain class.
The last function we will create, getBalanceOfAddress , will be used to get the balance of the addresses we have on our blockchain. Addresses can be used to represent miners or people interacting on your blockchain. The function will take in one variable, the address of the user or account we want to query. The function will return the balance of the account.
    getBalanceOfAddress(address) {

    }
We can start by creating a variable called balance in the function.
let balance = 0
Now we have to loop through our blockchain to see what the total value is for this address. We will use two for loops. The first for loop will go through every block in our chain.
    for (const block of this.chain) {

    }
The second loop will go through the transactions in each of the blocks
    for (const transaction of block.transactions) {

    }
The two nested loops should look like this:
    for (const block of this.chain) {
        for (const transaction of block.transactions) {

        }
    }
In the second loop we will add two checks to see if we need to add or remove values from our initial balance variable.
    if (transaction.fromAddress === address) {
        balance -= transaction.amount
    }
    if (transaction.toAddress === address) {
        balance += transaction.amount
    }
Our function now looks like this:
  getBalanceOfAddress(address) {
    let balance = 0
    for (const block of this.chain) {
      for (const transaction of block.transactions) {
        if (transaction.fromAddress === address) {
          balance -= transaction.amount
        }
        if (transaction.toAddress === address) {
          balance += transaction.amount
        }
      }
    }
  }
The last thing we need to do is return the balance to the person calling this function. This return statement will be outside of the two for loops.
  getBalanceOfAddress(address) {
    let balance = 0
    for (const block of this.chain) {
      for (const transaction of block.transactions) {
        if (transaction.fromAddress === address) {
          balance -= transaction.amount
        }
        if (transaction.toAddress === address) {
          balance += transaction.amount
        }
      }
    }
    return balance
  }
We are now done updating our Block and Blockchain classes to accommodate the new Transaction class.
Adding Transaction Sign-Off#
There is one more thing to address. Right now, anyone can create a transaction to spend value or coins even if they are not theirs. To solve this problem we will make it mandatory for transactions to be signed with a public and private key. This means that you can only use the value or coins in an address if you have the public and private key of that wallet.
A private key is secret number used to encrypt transactions and the public key is a number that used to decrypt the transaction. The blockchain we are creating will use this principle to introduce signing of transactions to our blockchain. We will start off by adding the elliptic library which will allow us to create a public and private key for a user.
Elliptic Library#
To do this, at the top of your file, you should have the following code added:
const EC = require(elliptic').ec;
Install elliptic with npm , from the command line where the file you are editing sits.
Run npm install elliptic and wait for the library to be available. Once this is complete, you can close the terminal and go back to your file.
We can create an instance of the elliptic library by adding the following code after we import elliptic .
    const ec = new EC('secp256k1'); // secp256k1 is the elliptic curve we will use to sign transactions (same as the Bitcoin blockchain)

If you are interested in learning more about elliptic curves, you can check out this Wikipedia page: https://en.wikipedia.org/wiki/Elliptic_curve
Key Generation#
To test the generation of keys, you can create a public and private key pair. To create the keys add the following line of code:
const key = ec.genKeyPair();
Once the key is generated, we can get the public and private key.
    const publicKey = key.getPublic('hex');
    const privateKey = key.getPrivate('hex');
    console.log('Private key:', privateKey);
    console.log('Public key:', publicKey);
Integrate the Keys#
In your file, if you run node <nameOfYourFile.js> then you should see the private and public key. We will need these two values to sign transactions and verify our balance (what money / crypto / coin is in the wallets / accounts for our blockchain).
For our Transaction class we will start integrating our new key code by adding a calculateHash function. This function will return a hash of the fromAddress , toAddress , and amount for the transaction.
    calculateHash() {
        return SHA256(this.fromAddress + this.toAddress + this.amount).toString()
    }
The second function we will add to the Transaction class will be signTransaction . We will pass in the signing key ( ec.genKeyPair() ) to this function as signingKey .
    signTransaction(signingKey) {
        // before we sign the transaction, we can add a check to ensure the right keys are passed in
        if(signingKey.getPublic('hex') !== this.fromAddress) {
            throw new Error('You cannot sign transactions for other wallets');
        }
        const hashTx = this.calculateHash();
        const sig = signingKey.sign(hashTx, 'base64');
        this.signature = sig.toDER('hex'); // signing function to get the signature into a specific format
    }
Validating the Transaction#
We will also add another function called isValid to verify if the transaction has been correctly signed. We have to take our mining reward function ( minePendingTransactions in the Blockchain class). This is because that function creates a new transaction once a block is mined.
Before we create the isValid function, let’s add two lines of code to minePendingTransactions in the Blockchain class. The function will now also create a new transaction to reward the miner and add it to the pending transactions block. Ensure that you are passing in the address that will get rewarded.
Creating the reward transaction:
const rewardTx = new Transaction(null, miningRewardAddress, this.miningReward)
Adding the transaction to the pendingTransactions block:
this.pendingTransactions.push(rewardTx)
The function should look like this now (after updating the this.pendingTransactions = [] at the end of the function since we need to clear the transaction list once the pending ones have been mined):
  minePendingTransactions(miningRewardAddress) {
    const rewardTx = new Transaction(
      null,
      miningRewardAddress,
      this.miningReward
    )
    this.pendingTransactions.push(rewardTx)

    let block = new Block(Date.now(), this.pendingTransactions)
    block.mineBlock(this.difficulty)

    console.log("Block successfully mined...")

    this.chain.push(block)
    this.pendingTransactions = []
  }
Now let’s go back to the isValid function we are creating. This function will check a few things:
- ensure that the fromAddress is not blank
- ensure that the signature is not blank
- confirm that the signature that we received matches the address that created the transaction
    isValid() {
        if(this.fromAddress === null) return false;

        if(!this.signature || this.signature.length === 0) {
            throw new Error('No signature in this transaction');
        }

        const publicKey = ec.keyFromPublic(this.fromAddress, 'hex');
        return publicKey.verify(this.calculateHash(), this.signature);
    }
Now that we are done updating our Transaction class, let’s return to the Block class. We will add a function to iterate over and verify all of the transactions in that block.
In your class, add the following function:
    hasValidTransactions() {
        for(const tx of this.transactions) {
            if(!tx.isValid()) {
                return false;
            }
        }
        return true;
    }
Finally, we can make some changes to our Blockchain class. At the bottom of the class, we will modify the isChainValid function.
Let’s add some code to leverage the hasValidTransactions function we added to the Block class.
The statement we will add is:
    if(!currentBlock.hasValidTransactions()) {
        return false;
    }
Our isChainValid function should now look like this:
    isChainValid() {
        // returns true or false
        for(let i = 1; i < this.chain.length; i++) {
            const currentBlock = this.chain[i];
            const previousBlock = this.chain[i-1];
            if(!currentBlock.hasValidTransactions()) {
                return false;
            }
            if(currentBlock.hash !== currentBlock.calculateHash()) {
                return false;
            }
            if(currentBlock.previousHash !== previousBlock.hash) {
                return false;
            }
        }
        return true;
    }
We also have to update our createTransaction function. We will update this function so that is now called addTransaction . In the function we need to perform a couple of checks:
- Check the
fromAddress - Check the
toAddress
    if(!transaction.fromAddress || !transaction.toAddress) {
        throw new Error('Transaction must include from and to address');
    }
We will also check if the transaction is valid
    if(!transaction.isValid()){
        throw new Error('Cannot add a transaction that is not valid to the blockchain');
    }
Our createTransaction function should now look something like this:
    createTransaction(transaction) {
        if(!transaction.fromAddress || !transaction.toAddress) {
            throw new Error('Tranaction must include from and to address')
        }
        if(!transaction.isValid()) {
            throw new Error('Cannot add invalid transaction to change')
        }
        this.pendingTransactions.push(transaction)
    }
These are all the updates we need to make in the blockchain that we created. All the code for this file can be found in blockchain-signing.js in the code samples section.
Testing your Blockchain#
The following code can be used to test out the blockchain we just created. Comments are inline to explain what each line of code does.
const myKey = ec.genKeyPair(); // Generates a public and private key pair
const myWalletAddress = myKey.getPublic('hex'); // Your public key is stored here (account for the blockchain)

const secondKey = ec.genKeyPair(); // Generates another public and private key pair
const secondWalletAddress = secondKey.getPublic('hex'); // Creates another public and private key pair

let sampleBlockchain = new Blockchain(); // Creates a new blockchain
const tx1 = new Transaction(myWalletAddress, secondWalletAddress, 10) // put another public key in the empty quotes //
tx1.signTransaction(myKey)
sampleBlockchain.createTransaction(tx1)

sampleBlockchain.minePendingTransactions(myWalletAddress) // Since you're one of the few members in your blockchain, you can be the miner as well
console.log('Balance of my wallet:', sampleBlockchain.getBalanceOfAddress(myWalletAddress))
console.log('Balance of second wallet:', sampleBlockchain.getBalanceOfAddress(secondWalletAddress))
Understanding blockchain fundamentals#
That was a lot of code to illustrate some of the main functionality for blockchain. Now that you understand how they work, let’s explore the main blockchain platform you will be working on to create the smart contracts for this book.
The code here won’t be relevant to the web application and the smart contracts we will be writing in the next set of chapters but you can always reflect on this code to understand what is happening “under the hood” in blockchain by retracing some of the functionality we have worked on.
Section Introduction#
This section will explain what the Ethereum blockchain is, reviewing some of the core concepts behind the platform such as the protocol itself, accounts, and the cryptocurrency (ether) that is native to the platform.
What is Ethereum#
Ethereum is an open-source, public, blockchain-based distributed computing platform and operating system featuring smart contract (scripting) functionality. It supports a modified version of proof-of-work consensus via transaction-based state transitions.
Proof of work (PoW) is a form of cryptographic zero-knowledge proof in which one party (the prover) proves to others (the verifiers) that a certain amount of computational effort has been expended for some purpose. Verifiers can subsequently confirm this expenditure with minimal effort on their part. Source
Go Ethereum Protocol#
Ethereum provides a decentralized virtual machine, the Ethereum Virtual Machine (EVM), which can execute scripts using an international network of public nodes. The virtual machine’s instruction set, in contrast to others like Bitcoin Script, is Turing-complete. This means that the EVM can simulate a Turing machine. A Turing machine is a mathematical model of a hypothetical computing machine which can use a predefined set of rules to determine a result from a set of input variables. Gas , an internal transaction pricing mechanism, is used to mitigate spam and allocate resources on the network.
One of the largest implementations of the Ethereum blockchain is in Go language. This implementation is what is running on computers around the world, securing the Ethereum blockchain. Go is an open source programming langauge that enables develoeprs to create simple, reliable and efficient software. Though the Ethereum protocol is written in Go, we will not be using any Go in this book. The reason that Ethereum is written in Go is because the language is easy to learn, scalable for large projects, and performs automatic memory management.
Ethereum Accounts#
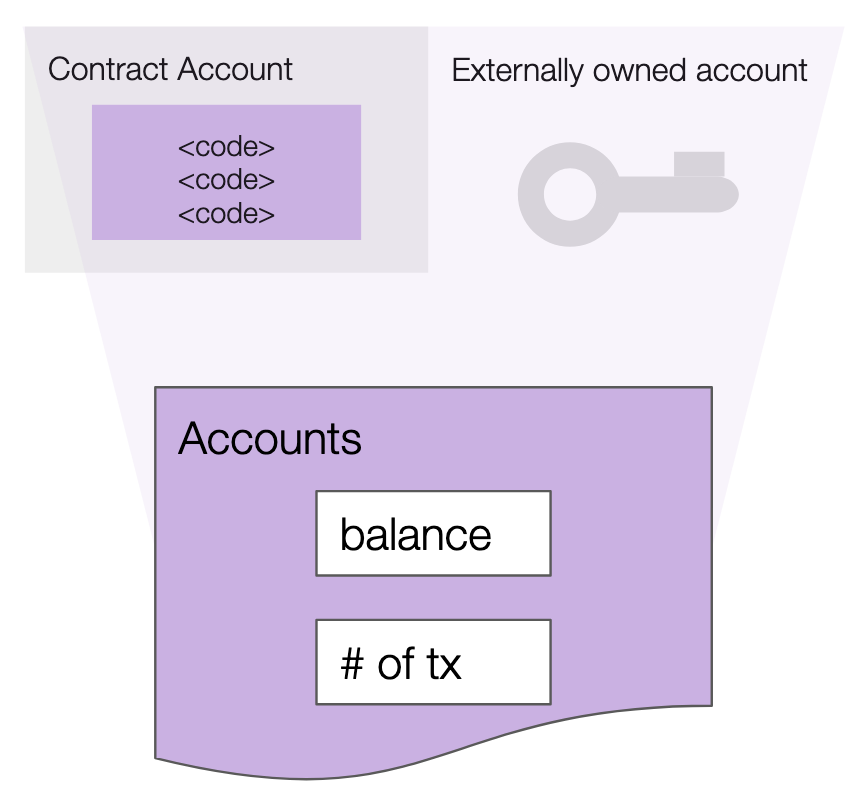
Ethereum accounts can be used to interact with the Ethereum blockchain. There are two types of accounts in Ethereum state:
- externally owned: controlled by anyone with the private keys
- contract: a smart contract deployed to the network, controlled by code
Both types of accounts have an ether balance and can interact with deployed smart contracts.
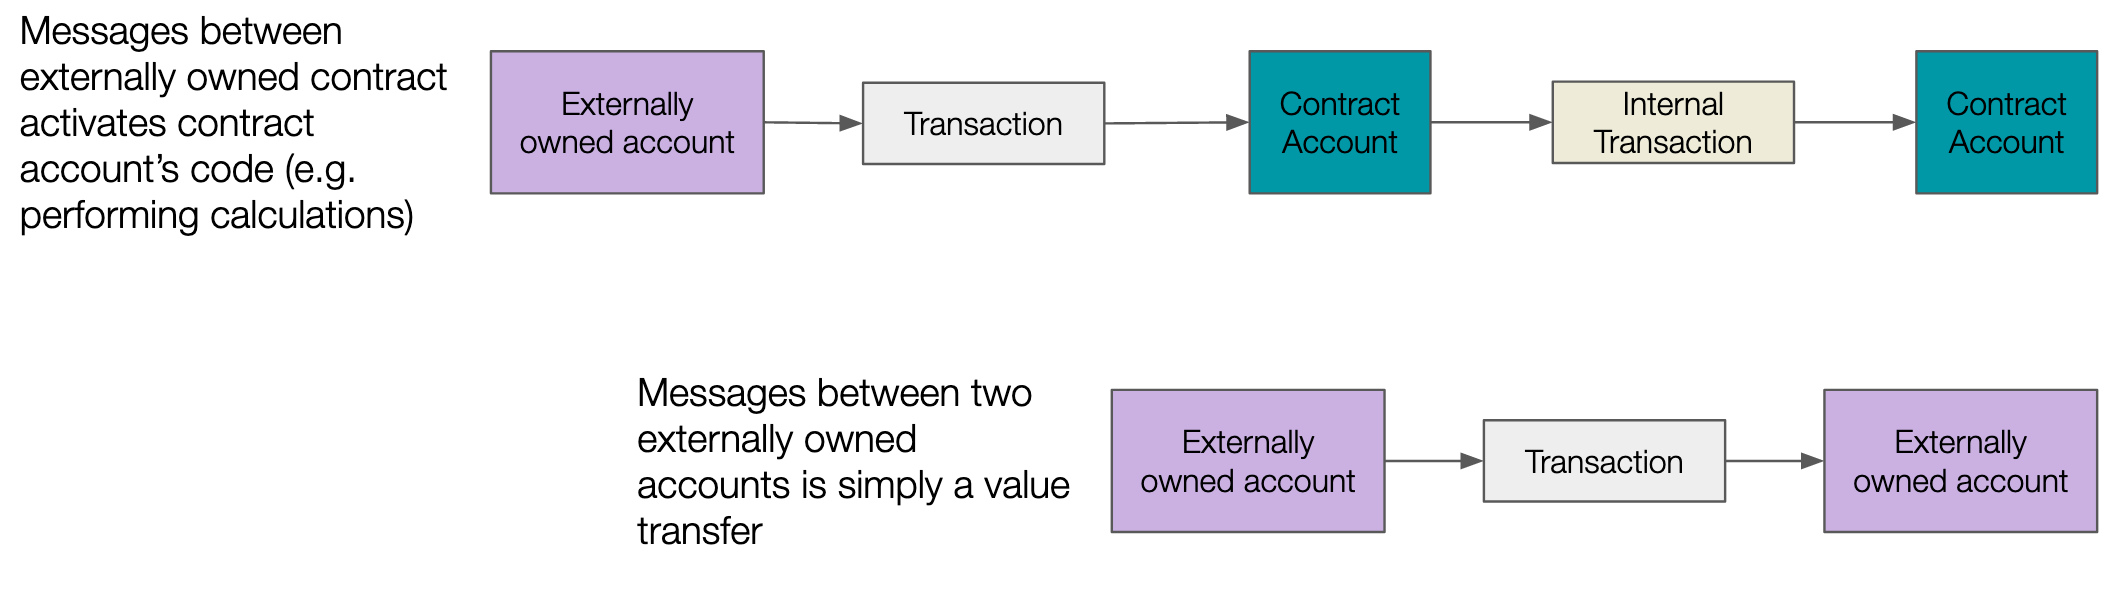
Transactions can be created from both types of accounts. Contracts can only start transactions when another transaction has been received by the contract. Therefore, all action on the Ethereum blockchain is set in motion by transactions created from externally-controlled accounts.
The simplest transactions are ether transfer transactions.
Externally-Owned Accounts#
As a participant on the Ethereum blockchain, most people will interact with externally-owned accounts, rather than a contract account. Externally-owned accounts are controlled by private keys, rather than contract code, which controls contract accounts.
Externally-owned accounts are free to make, can start transactions on the Etheruem blockchain and transactions between externally-owned accounts can only be ether (ETH) transfers.
Contract accounts#
A contract account, by contrast, costs ether (ETH) to be created. This is because network storage is being used. The contract accounts cannot operate without an external transaction (from an externally owned account or another contract account) triggering it first. This means that the contract account is also able to faciliate transactions. Contract accounts can transfer tokens or even create new contracts.
Public Key Cryptography#
Blockchain wallets on the Bitcoin and Ethereum blockchain are built on public-key cryptography. This system uses public keys and private keys.
- public keys : shared publicly and essential for identification
- private keys : kept secret and used for authentication and encryption
The private key grants ownership to the funds in a blockchain wallet. When actions are conducted through a blockchain wallet, the wallet uses your private key to sign-off on your transaction (without publicly disclosing it) and indicate to the blockchain network that you have authority to conduct that transaction. It is impossible to get the private key from the public key.
Note: A public address is associated with a balance and is used for sending and receiving funds on a blockchain. A public address is a shorter representative form of the public key. It is not possible to get the public key from the public address.
These are some of the blockchain wallet activities that your private key can sign off:
- send your ether cryptocurrency to a friend
- write a smart contract and send it to the Ethereum blockchain
- sign messages to prove that you a
Ether and Gas#
Ether is the cryptocurrency created by the Ethereum blockchain as a reward to the people providing the computer power for the computations performed, and is the only currency accepted in the payment of transaction fees on the Ethereum blockchain.
Transaction fees are calculated with small amounts of ether. These are measured in a unit called gas. A user sends gas with there transaction to the Ethereum blockchain. This means that the user wants to change the state of the Ethereum blockchain.
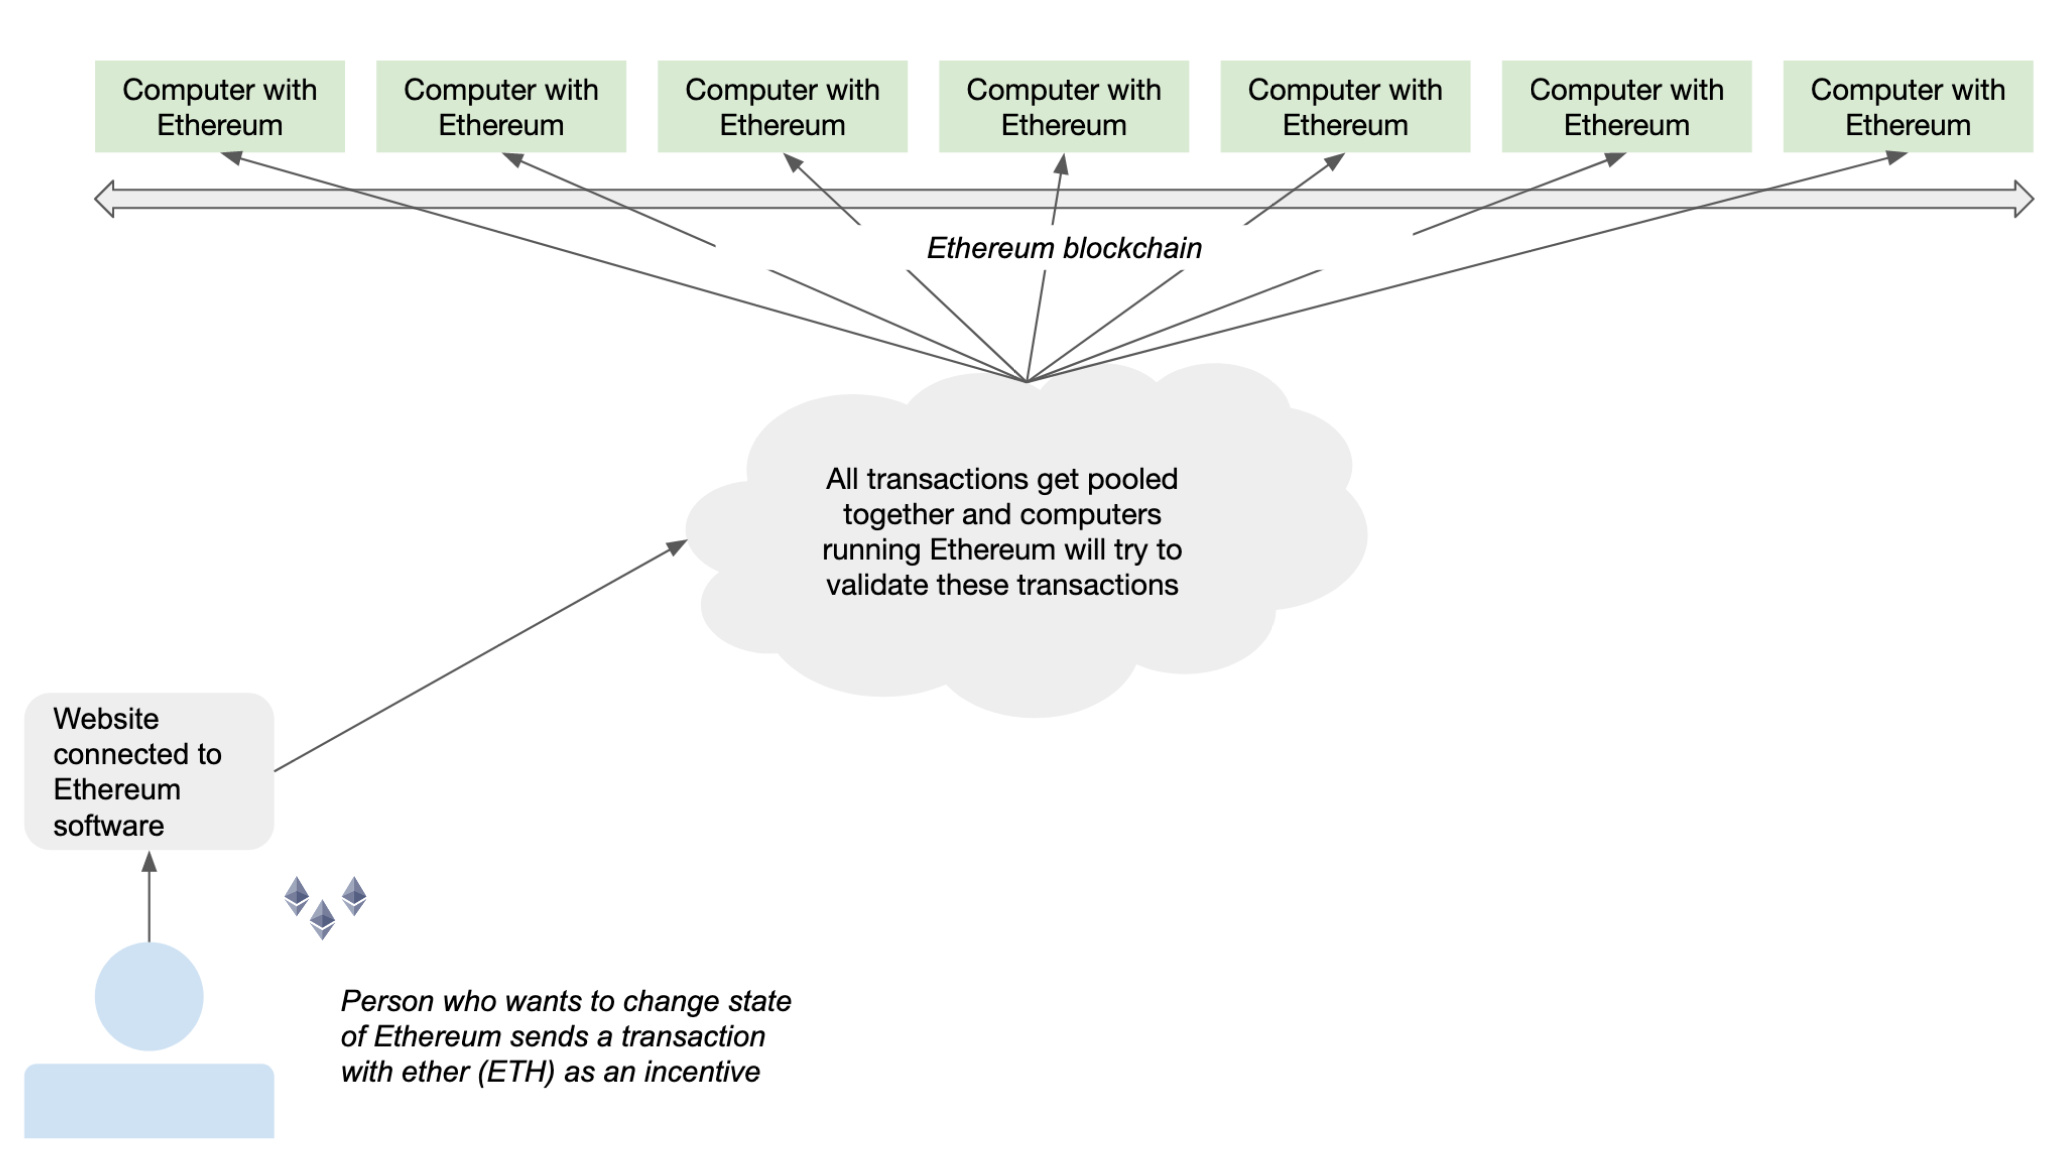
All other transactions also get pooled together and then all computers around the world that are running Ethereum software try to validate the transactions. Whichever computer validates the transactions first gets rewarded in ether.
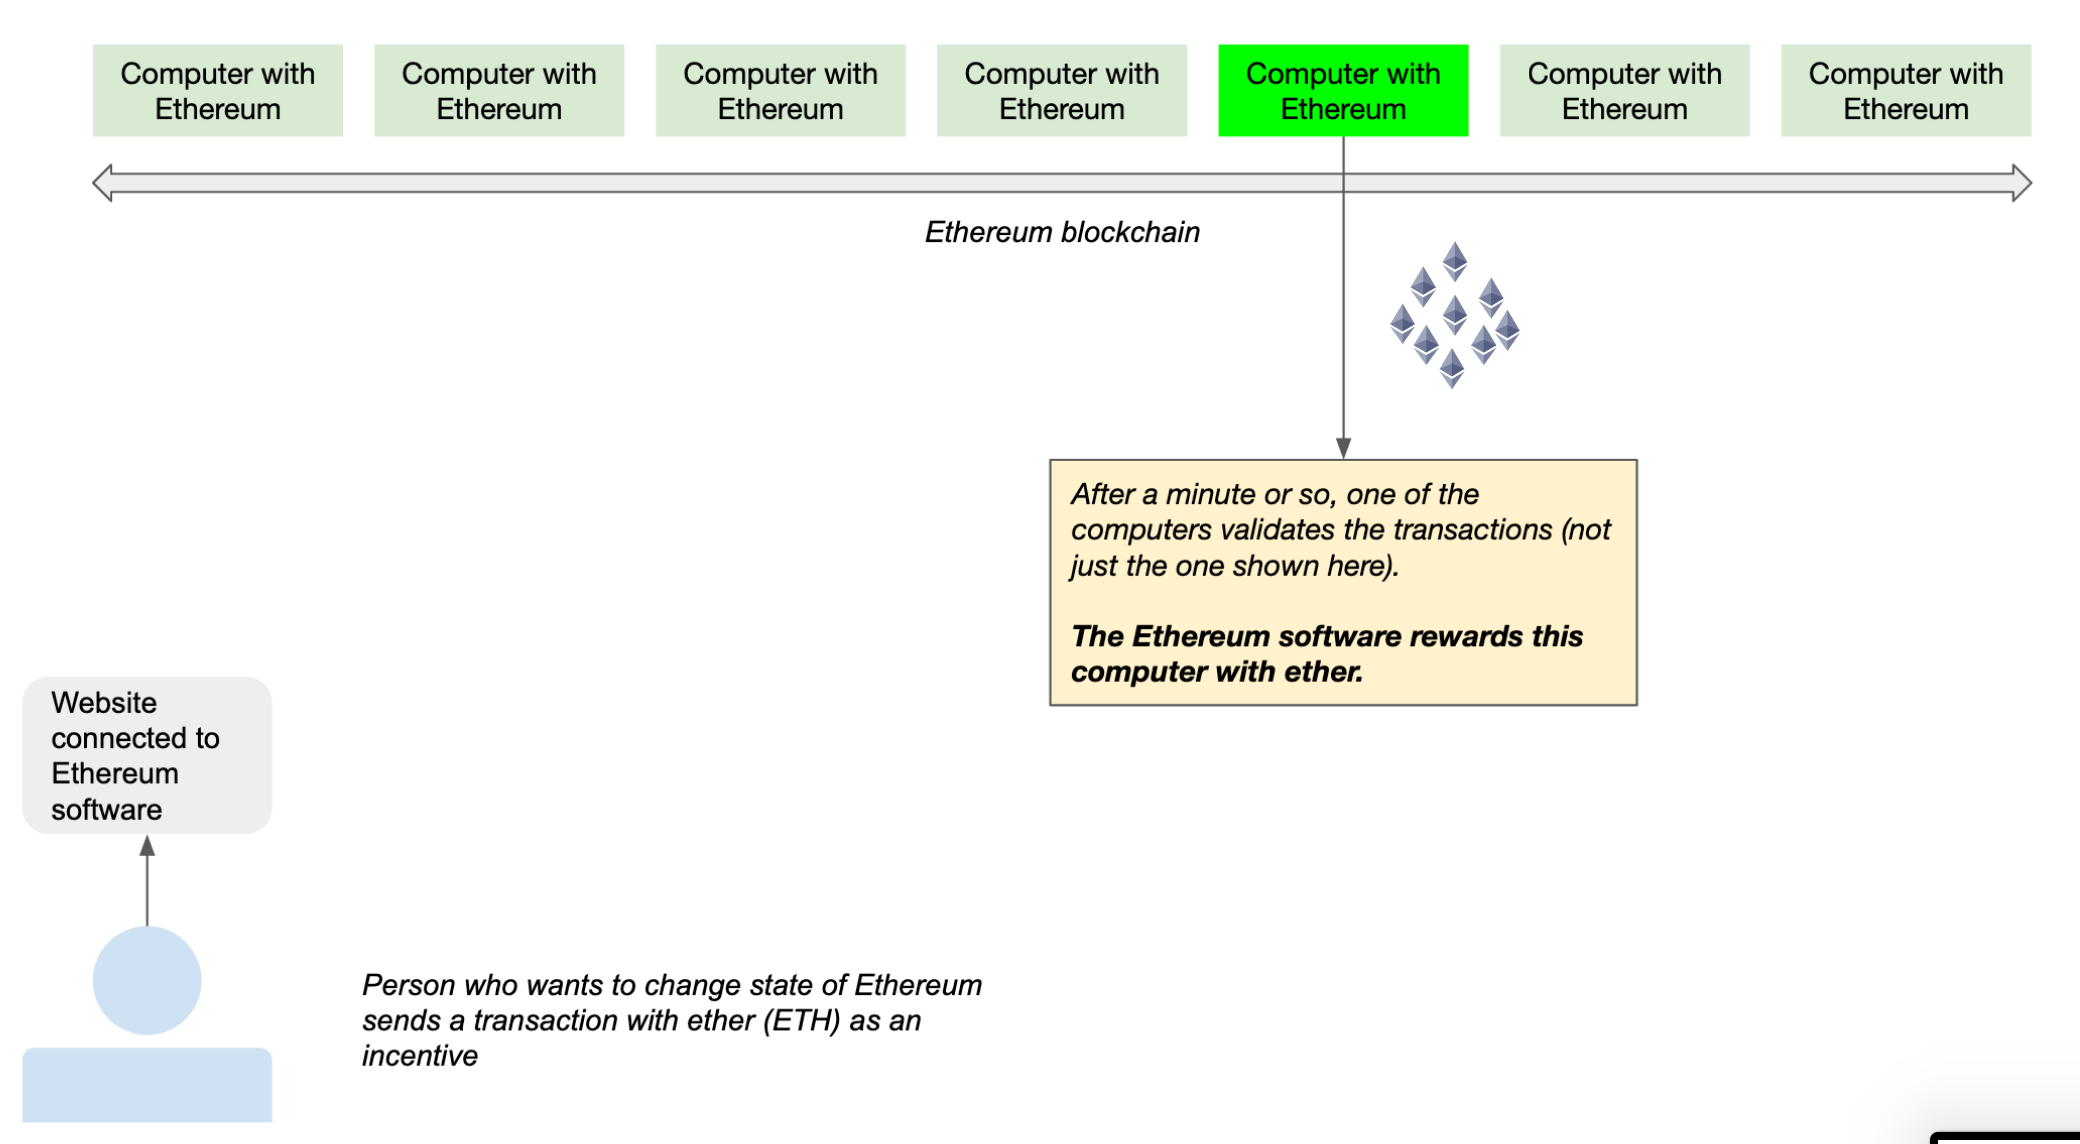
Ether is the token running the Ethereum blockchain. Ether powers the Ethereum network. The computers that are distributed around the world running the Ethereum blockchain software, validating transactions, are called miners.
Ethereum is an open-source platform that can run smart contracts. When smart contracts are run on a blockchain, the code that makes the smart contract can execute on its own if certain conditions are met. The execution of smart contracts requires computational resources that must be paid for in some way: this is where ether comes in.
Ether is the cryptocurrency that allows smart contracts to run. It provides the incentive for nodes or miners to confirm and validate blocks on the platform, which has the smart contract code. Each time a block is validated, ethers are created and awarded to the successful miner. A new block is propagated approximately every twenty seconds.
There are two ways people can interact with the Ethereum blockchain. They can read information or they can update information. The Ethereum blockchain has a state that is shared amongst everyone running the Ethereum software. If anyone wants to make a change to the Ethereum blockchain state, they have to pay a fee in ether (ETH).
People interacting with decentralized applications on Ethereum will be required to pay the network in ether. Developers are incentivized to create decentralized applications because they will be paid in ether for their work. Developers are also incentivized to write quality applications because wasteful applications will be more expensive and likely will not be used as frequently.
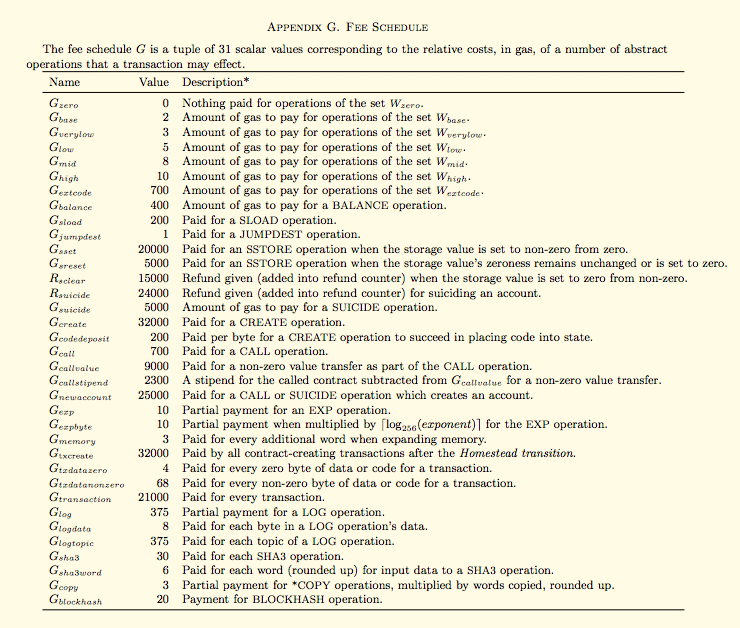
Gas is a unit that measures how much computational effort is required to execute operations on the Ethereum blockchain.
The Ethereum Virtual Machine (EVM) allows smart contracts to exist and function for the Ethereum blockchain. It is a Turing-complete, 256-bit machine that can solve any problem given the right resources.
Since smart contracts run on the EVM, it is important to understand that each line of smart contract code requires a certain amount of gas (ether) to be executed. Each transaction on the EVM takes at least 21,000 gas. The Ethereum Yellow Paper explains why this is.
A simple analogy to help explain how gas is used on the EVM:
- You are a person with a car and you need gas
- You go to a gas station and specify how much gas your car needs
- The gas is added to your car
- You pay the gas station how much you owe for the gas
How does this relate to the gas that pays for transactions on the EVM?
- The car is the operation you want to execute (e.g. sending ether to a friend)
- Gas is gas
- Gas station is a network validator (or a miner)
- The money you pay is the miner fees
In this and all scenarios gas is used to incentivize network validators. Since the Ethereum blockchain uses proof-of-work, the blockchain needs to make the system profitable so that more people validate the information coming into the Ethereum blockchain.
Incentivisation exists on the Ethereum blockchain because the users that are running the Ethereum blockchain software on their computers using expensive resources need a reason to keep their computers on. For the Ethereum blockchain, if a user keeps the Ethereum software running on their computer, they are rewarded in Ether.
How does Gas Convert into Ether?#
The sender of a transaction is someone that is using the smart contracts that are being accessed through an app (e.g. a website or a mobile application). There are some smart contract functions that change the state of the Ethereum blockchain. This means that a transaction fee must be paid to Ethereum miners so that they can change the state of the blockchain and other miners can validate the transaction.
Gas price is usually determined by how many other users / applications are trying to change the state of the Ethereum blockchain. The gas price of a transaction goes up if more people are trying to update the Ethereum blockchain state. Information can be read from the Ethereum blockchain by advanced developers (or web tools) and users of smart contracts can use this information to set gas prices that can help prioritize their transaction amongst many others. Smart contract applications (e.g. websites) typically set the gas price on behalf of the user (by keeping tabs on the Ethereum blockchain).
There is no fixed conversion rate between gas and ether. The sender of a transaction specifies the gas price and then the miner will validate the transactions that they like. Usually the ones with the highest gas price get validated first.
The average cost of a unit of gas is around 0.00000001 ETH) or around 10 Gwei ( a denomination of ether). As network traffic increases, this fee also goes up since the demand for miners to validate transactions goes up.
There is something called a gas limit which is the maximum amount of gas the sender is willing to pay for a transaction. There are some considerations to be taken into account when setting the gas limit:
- if the gas limit is too low , the miner will stop processing the transaction when gas runs out and the transaction gets reverted and not executed. Fees will still be paid to the miners for the resources used to process a part of the transaction.
- blocks have a parameter called a block gas limit. This means that if users set the gas limit too high for their transaction, the block cannot process the transaction. The network validators can only include transactions which add up to be less than or equal to the block gas limit. Instead of processing transactions that will require miners to return the excess gas fees specified, it is more economical for them to process transactions that are close to the actual cost of the transaction.
What comes after the Ethereum blockchain?#
Now that we understand what the fundamentals of the Ethereum blockchain is (e.g. smart contracts, gas, miners, etc.), we will now dive into one of the largest use cases in the blockchain space - cryptocurrencies.
In the next chapter we will dive into what cryptocurrencies are and what types of these cryptocurrencies can exist on the Ethereum blockchain. We will also talk about how smart contracts play a role in defining what type of cryptocurrencies can exist on this distributed network.
Basics of Cryptocurrencies#
Cryptocurrencies are electronic peer-to-peer currencies. They don’t have any physical representation. In many instances, cryptocurrencies are used to pay for transactions fees on a blockchain.
The Ethereum blockchain requires users to pay transaction fees in its own cryptocurrency, ether. Even though ether and other cryptocurrencies do not have a physical representation, it does not mean that they are not worth anything. There are people and companies around the world willing to pay a lot of money to acquire cryptocurrencies.
There are thousands of types of virtual coin that investors can buy. If you have technical resources and some time to spare you can code your own set of virtual coins. Bitcoin, created in 2008, was introduced to the world as a platform that could address the various delays, latencies, and flaws in existing financial systems, such as the time and cost for banks to settle cross-border payments for their customers.
Basics of Smart Contracts#
Throughout this book, we will be taking a look at and writing several examples of smart contracts. A smart contract is a computer protocol that is used to digitally facilitate, verify, or enforce the negotiation or performance of a set business rules . Smart contracts are called “smart” because the code / contract is automatically run when specific sets of requirements are met.
Smart contracts allow credible transactions to take place without a third party being involved. Furthermore, the transactions are traceable and irreversible (Source).
One of the largest smart contract coding languages is Solidity . Smart contracts written in Solidity can be used on the Ethereum Virtual Machine. Smart contracts, or a set of business rules that have been digitized for the Ethereum blockchain, can read or update the state of the Ethereum blockchain. These smart contracts are usually accessed by a user using a website. The website will have endpoints that talk to the Ethereum blockchain and the smart contracts.
Basics of Tokens#
The main focus of this book will be to create smart contracts that represent tokens. There are two types of tokens: utility and security (Source).
Utility Tokens#
Utility tokens are essentially cryptocurrencies that are used for a specific purpose, like buying particular goods or service. For example, if you want to store information online, the most common way today is to become a customer of a hosting service like Google Drive, Dropbox or Amazon Web Services. You reserve a certain amount of storage space on those companies’ servers and pay for it with dollars, euros, yen or other national currencies.
But there is another way. The Filecoin network, for instance, expects to provide similar cloud storage services without operating buildings full of massive servers. Instead, its users will store their data, in encrypted form, on the spare hard-drive space of other regular people. This needs a different way to track how much space a person uses, and a new way to pay those people whose hard-drives host the data. Enter the utility token, in this case Filecoin.
As a customer stores more data, the network will deduct from their balance of Filecoin tokens and will send those tokens to each storage provider based on how much data they’re hosting. Customers can buy more tokens with whatever currency they wish, and hosts can exchange them for any currency they choose – or keep them to spend on storage of their own data.
In addition to automating the data use and payments, Filecoin tokens offer another advantage over regular currencies: they can be used in much smaller increments than pennies, so prices can be very accurate.
Filecoin’s goal is a cloud storage system that is as trustworthy and secure as commercial operations, but decentralized. The utility token is simply a tool that makes this approach possible.
Security Tokens#
A security token, sometimes called a “tokenized security” or a “crypto-security,” is more than a currency – it often represents ownership in an underlying real-world asset. Like traditional stocks or bonds, they’re regulated by the U.S. Securities and Exchange Commission. Regular securities are tracked either on paper or – more likely these days – in a centralized database. Security tokens use a blockchain system – a decentralized database – to track who owns which assets.
Using blockchain-based security tokens expands trading beyond regular bankers’ and stock-market hours, and may enable faster finalization of transactions. In addition, a software-based marketplace that allows smart contracts can automate various aspects of regulations and reporting.
Security tokens make it easy for customers to access multiple investments: just as a single E-Trade investment account can keep records for a variety of different stocks and bonds, a blockchain-based digital wallet can do the same for a range of different security tokens, representing equity, debt and even real estate.
Connection to Cryptocurrencies#
Neither kind of token requires its own blockchain, the way the bitcoin and Ethereum cryptocurrencies do. Instead, tokens can outsource their ownership accounting systems, attaching them to preexisting blockchain ledgers. This in effect creates a new subledger, say of the Ethereum network’s ledger, just for that particular token. Every user who sends a token that is tracked and recorded on Ethereum pays a small transaction fee to the Ethereum network to validate the transaction.
Tokens are still at an early stage of development. I expect to see lots of innovation around how to use them for years to come.
Token Standards#
ERCs (Ethereum Request for Comments) are technical documents used by smart contract developers at Ethereum (there are a group of open source developers that are funded by the Ethereum Foundation and other institutions to drive the growth of the Ethereum network and protocol). They define a set of rules required to implement tokens for the Ethereum ecosystem. These documents are usually created by developers, and they include information about protocol specifications and contract descriptions. Before becoming a standard, an ERC must be revised, commented and accepted by the community through an EIP (Ethereum Improvement Proposal) (Source).
The ERC-20 standard is the most widely known and common among Ethereum token standards. It defines a set of six functions that the smart contracts within the Ethereum ecosystem use, including how tokens are transferred and how users can access data about a token. The smart contracts that we will be writing will leverage this token standard (Source).
Examples of ERC-20 Tokens#
There are several ERC-20 token implementations that are successfully being used in the real world. Here are some examples:
DAI : Dai is an Ethereum ERC-20 token that is pegged to $1 USD. Every Dai is worth $1, and will always be worth $1, regardless of how much Dai is in existence. The mechanisms which control the price, keeping it as close as possible to $1, are handled with a smart contract (Source).
DAI is a stable coin that is backed by the ether cryptocurrency. It also has a set of smart contracts that allow people to lock their ether and create stablecoins called Dai. The Dai token has a price target of $1 USD and allows people to trade between other cryptocurrencies without worrying about volatility.
REP : Augur, a prediction market, uses tokens called Reputation (REP) to incentivize reporters on its network to back their reports with tokens. The reputation token holders are entitled to a percentage of the trading fees generated on the platform. (Source)
REP is a token that’s used with the Augur protocol. Augur is a prediction market that lives on the Ethereum blockchain as a set of smart contracts. The smart contracts allow people to place bets on various topics.
LPT : LPT, or Live Peer Token, is an open-source project focused on decentralizing live video broadcasting (streaming) over the internet. People who run the Livepeer software can earn Livepeer Token, which may have a value if the market deems it so (Source).
LPT is a token that is used on the Live Peer Network. Live Peer Network resides on the Ethereum blockchain as a video transcoding protocol. The LPT tokens are used to secure the video protocol on the Ethereum blockchain.
All of these projects have their own set of business rules that have been transformed into smart contracts that live on the Ethereum blockchain. The business rule contracts coincide with the token smart contracts that they also have.
Decentralized Finance#
We will give a brief introduction to Decentralized Finance in this book because of the application we are creating. We’ve been alluding to the fact that we are creating an exchange on the Ethereum blockchain. Let’s explore what exactly that means.
What is Decentralized Finance#
Decentralized finance is also commonly referred to as DeFi . It is another phrase for “open finance”. The goal of DeFi is to recreate and reimagine traditional finance systems (lending and borrowing, exchanging between different assets, etc). As more and more financial services and funds make their way into the DeFi space, implied automation through smart contracts will allow finance to evolve into something much more complex whilst being open to more and more people around the world. The only caveat is that the person using DeFi has access to internet.
Some of the common blocks that can be used to create a DeFi ecosystem include: stablecoins (we can use ERC-20 tokens to create a version of this), lending protocols and exchanges.
Stablecoins#
These are tokens or cryptocurrencibes that are engineered to remain stable at a fixed value. Most stablecoins aim to be $1 USD per token but there are other stablecoins that have different price targets. Different stablecoins have different ways of achieving their price targets (such as automatically creating or removing total supply).
Lending Protocols#
These are smart contracts that enable holds of crypto to earn interest while other users are borrowing and using their crypto. Some popular lending protocols include AAVE and Compound (Source).
Automated Market Making#
Decentralized exchanges can also occur using smart contracts on the Ethereum blockchain. This protocol will enable users to buy and sell cryptocurrencies without going through central parties such as a bank or Binance (a centralized cryptocurrency exchange)).
The exchange we will create in this book is also known as an automated market maker (AMM) . The principles behind AMMs allow:
- exchanges to algorithmically provide liquidity
- buyers and sellers to pull liquidity from smart contracts directly instead of having to interact with an orderbook
AMMs use smart contracts to encourage people to pool their tokens and crypto into the smart contracts. This crypto and these tokens are automatically traded by an algorithm instead of an orderbook. This eliminates the need of a traditional order book and assets (crypto and tokens) can be excahnged against the pool’s latest price (Source).
Exchanges typically match people who want to buy and sell something for something else with an order book. The order book lists all the buy requests and sell requests and tries to match them. An AMM replaces the order book (Source).
Liquidity is the availability of assets for a certain service.
The price of the tokens on this type of exchange are determined by the token quantity desired and the liquidity available.
Ready to jump into smart contracts?#
Now that we have an idea of what smart contracts we can write with Solidity (related to cryptocurrencies), the next few chapters will dive into learning how to write smart contracts.
We will start off with the absolute basics (e.g. where do I start writing smart contracts). Once we get a grasp of how smart contracts are written, then we will figure out how to send them to the Ethereum blockchain. Once it is sent to the blockchain we will use the smart contract to read information from / write information to the Ethereum blockchain.
Writing a Simple Smart Contract#
This section will introduce you to the Solidity programming language and a developer tool called Remix. With Remix and Solidity, you will be able to write a simple smart contract that will be responsible for storing messages on the Ethereum blockchain.
The following code was inspired by StephenGrider. The Inbox.sol and Lottery.sol use cases are perfect and straight-forward examples that explain some of the key concepts in the smart contract development space. Some updates have been made to the code (comments, version updates, syntax, etc.).