Your Turn: Add Redux
In the last lesson you saw how to add Redux to a React app.
Now, you get to try it yourself!
Remember: doing these little exercises will help you be able to code on your own later on. Don’t skip! (even if it feels really easy)
Clone this Github repo or open it in CodeSandbox.
It’s a plain React app displaying a “Room” with a lightswitch. Clicking the button toggles the state, which turns the light on and off.
It has no Redux-related code yet, and everything is in one file – a subtle difference from the example, but one that I think you can handle 
Your task is to add Redux to this app, and move the lightswitch state out of the React component and into Redux.
Once you’re done, clicking the button should dispatch an action, and the reducer should return the updated lightswitch state.
No tricks here: the code should end up looking very similar to the code from the lesson you just watched
You can leave everything in one file, or split out the Room component into its own file if you like.
If you do leave it all in index.js, you won’t need to export the connected Room component. Instead, save it in a separate variable, like const ConnectedRoom = connect(mapStateToProps)(Room) – and update the ReactDOM.render call to render the ConnectedRoom.
Here’s a solution to this exercise. (make sure to try it yourself first!)
Exercise: Step Counter
Pure Redux / Redux Core Concepts
Now that you’ve learned about action creators, action constants, and mapDispatchToProps, it’s time to practice them on your own!
In this exercise you’re going to build a Step Counter. (see what I did there). It’s just like a Fitbit, except entirely manual.

I’m also taking the training wheels off  We’ll start from a blank project this time.
My goals for you here are to get more experience creating a React + Redux app from scratch, creating action constants & creators, and using mapDispatchToProps.
Feel free to ignore the CSS! I just wanted to make the screenshot look nice
Create a brand new React project with Create React App or CodeSandbox. Delete the boilerplate code from index.js and start fresh.
Add Redux to the project as you’ve done before.
There’s just one component here: the StepCounter. It should have 2 buttons, one “Add Step” and one “Reset Steps”, as shown above. Clicking “Add Step” should increment the step counter by 1, and “Reset Steps” should clear it. (think: how many actions will you need?)
For each action, create an action constant and an action creator. Use mapDispatchToProps to pass the actions in as props to the StepCounter component. Try out the object form of mapDispatch as well as the function form.
You can break the project up into files if you like, or keep it all in one file. If you want a suggestion, try for an index.js with the createStore + reducer, a StepCounter.js with the component and any necessary connect() setup, and an actions.js with the actions (don’t forget to export them!).
If you want to make it pretty, go for it. But it’s fine to leave it unstyled like this:

“Did I do it right?”
It’s natural to wonder if you’re doing it “correctly.” Whether you named things right, or used the right patterns, or put things in the right files…
Right now though, push that feeling aside and instead, ask yourself: “does it work?”
If you have a working step counter, where the data is stored in Redux (not in React state), then it is a success. Move on
Don’t stress about perfect project structure or perfect naming conventions or other minutiae right now. Get the concepts solid first, then we’ll worry about tuning the other bits.
Here is a solution to this exercise. (try it yourself first!)
Exercise: Write Some Reducers
Pure Redux / Redux Core Concepts
In these exercises you’ll write a few reducers of your own. For each one, break down the problem into:
- the state shape
- the actions
- and finally, write the reducer
The aim of this exercise is to practice thinking about state shape, actions, and reducers. The only requirement is that you write a standalone reducer that handles the appropriate actions – but if you want to go one step further and turn these into working apps, that’s even better.
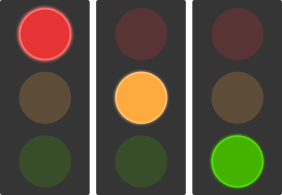
Traffic Light
If you drive, you’ve likely encountered one of these in the wild. It’s essentially a fancy state machine on a timer.
Design the state shape for the traffic light, and the action(s) to control it.
Bonus: build a React + Redux app that displays a traffic light and allows you to advance it by clicking a button.
Extra bonus: advance the light on a timer instead of with a button. Will you set up the timer inside a component, or outside? Why?
Super bonus: extend your app to display two traffic lights, and write the reducer to ensure that the lights are never conflicting. In other words, avoid deadlocks or traffic collisions 
Digital Clock

The clock displays hours and minutes, and has 2 buttons: one to increment the hour , and one to increment the minute .
Pretend the clock is frozen in time, and design your state + actions + reducer for the use case of setting the clock.
Bonus: build a React + Redux app that displays a clock, lets you set the time, and increments the values as time passes.
User Session
One of the prime use cases of Redux is storing user session data. This might seem like a fancy thing on the surface, but when you look at the Redux side of things, you only need to think about two events: the user logged in , and the user logged out .

Imagine that your user info comes back from the server and it looks like this:
{
userid: 42,
username: “you”,
token: “abcdefg”
}
Decide on a state shape to store this user info. Then write the reducer to handle the actions when the user logs in, and logs out.
Don’t worry about fetching data, or performing any real login calls right now. Copy-paste the fake user data above and pretend that it came from a server
This might seem like a silly fake exercise, but it’s actually half the battle. You’ll need code like this in order to handle user logins in your app; figuring it out in isolation like this is easier than taking on the whole problem at once.
Here are solutions to these exercises.
Exercise: Immutable Arrays Practice
Pure Redux / Immutability in Practice
Now that you know how to perform immutable updates on arrays, it’s time to practice that skill!
You Will Need:
- The
map,filter, andreducefunctions from arrays. - A little bit of time.
- This array of events:
[
{ id: 0, type: ‘SALE’, value: 3.99 },
{ id: 1, type: ‘REFUND’, value: -1.99 },
{ id: 2, type: ‘SALE’, value: 17.49 }
]
Use that array as your initial state .
Exercises
- Add an event to the beginning of the array.
- Add an event to the end of the array.
- Insert an event after the first item.
- Remove the second event from the list.
- Remove the event with id 1.
- Produce an array that only contains sales.
Exercise: Immutable Objects Practice
Pure Redux / Immutability in Practice
Now that you know how to update objects in an immutable way, work through these exercises to hone your skills.
Copy this object into your code:
const airplane = {
altitude: 1200,
airspeed: 120,
position: {
latitude: 72,
longitude: 42
},
plannedRoute: [“KBOS”, “KBED”, “KORH”],
seats: {
0: {
name: “Dave”
},
1: null,
2: null,
3: null
}
}
How To Do These
You can write a reducer that handles each of these as an action, and dispatch actions through it. That’s the Redux-y way.
Immutable update code works just as well outside Redux though, so if you’d prefer, you can write these each as a series of transformations:
let airplane = { /* the one above / }
airplane = {
…airplane,
/ code to update the altitude */
}
console.log(airplane);
Exercises
- Update the altitude to 1300.
- Update the latitude to 73
- Put a passenger (represented by an object) in seat #1.
- Change the pilot’s name (at seat 0) to “Lynne”.
- Add an airport to the plannedRoute (“KAFN” is a nice choice. Don’t miss a walk to the ice cream stand
- Clear the plannedRoute (by setting it to an empty array).
Exercise: DevTools Practice
Install the Redux DevTools in your browser from the official repository.
Then open up this app in CodeSandbox - it’s a bog-standard TODO app that you’ve perhaps seen before.
Open up the Redux DevTools. They won’t be working, because the store hasn’t been configured yet. Set it up like you saw in the lesson , following the link from the Redux DevTools. You might need to Save the CodeSandbox to make the change take effect (don’t worry, it won’t modify the original copy).
Alternatively, try the redux-devtools-extension package - it’s even easier than copy/pasting the window.REDUX_DEVTOOLS_EXTENSION stuff. Learn how to use it here.
Then try a few things in the app:
- Add an item to the list
- Remove an item from the list
- Check off an item
- Inspect the actions in the action log.
- Try skipping an action.
- Try scrolling back through time with the scrollbar at the bottom.
Bonus: enable the “trace” feature. In the lesson, we saw the Trace tab but did not turn it on. To enable it, pass an object with trace: true into the __REDUX_DEVTOOLS_EXTENSION__ function call like this:

Then save, and close/re-open the Redux DevTools. Perform a few actions, then click on an action and look at the Trace tab. Can you figure out where the action was called from?
Exercise: redux-thunk Practice
You’ve seen a small example of using redux-thunk to fetch some data. Now you’ll get to try using it on your own
Create an app that fetches your local weather from the free MetaWeather API - it doesn’t even need an API key!
The MetaWeather API returns the current weather along with a 5-day forecast, and they even have some images you can use! Their documentation is all on one short page.
Unfortunately the API doesn’t set the CORS header, so requests from browsers get denied. I set up a proxy that’ll set the CORS header for you: https://weather.daveceddia.com - to use it, make your API calls to my server instead of metaweather, e.g.:
https://weather.daveceddia.com/api/location/search/?query=san
instead of:
https://www.metaweather.com/api/location/search/?query=san
Getting the weather is a 2-step process:
- Search for the location by city name or latitude/longitude. The response will contain a field called woeid (Where on Earth ID). Make a request to /api/location/search/?query=yourquery
- Request the weather for a specific location by passing up the woeid . Make a request to /api/location/the_woeid
So this will require two HTTP calls. (you could also cheat, by hard-coding your location once you figure out the woeid, but where’s the fun in that?
Create a blank React app from scratch, and add Redux + redux-thunk.
Then, write an app that accepts a location name as input, and calls MetaWeather (twice!) to fetch the weather for that location.
It can look however you want (you don’t even have to style it if you don’t want to!). Roughly speaking, you’ll want a text box, a button, and a display of the weather. Something like this:

(that uppercase font is Bebas Neue, if you care
Show a loading spinner while the weather is being fetched, and gray out or hide the weather if you change the city name after fetching it.
Exercise: Try Immer
You’ve seen how Immer can make immutable updates easier. Now it’s time to practice.
The exercises below will probably look familiar! Try them out with Immer to compare/contrast with the “long hand” way you’ve already practiced with arrays and objects.
Another feature of immer : you can return the new state from the produce function, just as you would with a regular reducer. Try it out by copy-pasting some existing reducer code (the whole switch/case body) into an Immer produce function – it should work the same. This is great if you have an existing project without Immer but you want to introduce it without having to rewrite all your reducers.
Array Exercises
Use this array as your initial state:
[
{ id: 0, type: ‘SALE’, value: 3.99 },
{ id: 1, type: ‘REFUND’, value: -1.99 },
{ id: 2, type: ‘SALE’, value: 17.49 }
]
Write a reducer that performs each of these in response to an action:
- Add an event to the beginning of the array.
- Add an event to the end of the array.
- Insert an event after the first item.
- Remove the second event from the list.
- Remove the event with id 1.
- Produce an array that only contains sales.
Object Exercises
Next, copy this object into your code and use it as the initial state for a new reducer.
const airplane = {
altitude: 1200,
airspeed: 120,
position: {
latitide: 72,
longitude: 42
},
plannedRoute: [“KBOS”, “KBED”, “KORH”],
seats: {
0: {
name: “Dave”
},
1: null,
2: null,
3: null
}
}
Write a reducer that handles each of these as an action:
- Update the altitude to 1300.
- Update the latitude to 73
- Put a passenger (represented by an object) in seat #1.
- Change the pilot’s name (at seat 0) to “Lynne”.
- Add an airport to the plannedRoute (“KASH” has a nice little cafe on the field!)
- Clear the plannedRoute (by setting it to an empty array).
Exercise: Test This Reducer
Using the example from the video as a starting point, add tests for the rest of the actions in the reducer.
Here’s the code. Add your tests alongside the others in reducer.test.js .
Test These Actions:
- ADD_HOUSE_AFTER
- ADD_HOUSE_MIDDLE
- REMOVE_HOUSE_BY_INDEX
- ADD_POINTS
Exercise: Test These Action Creators
Here is a set of action creators.
Write tests for the first 3 (fetchProductsBegin/Success/Failure).
(the last one, fetchProducts, is a thunk action – leave that one untested for now)
Exercise: Test These Thunk Actions
Write tests for the fetchProducts thunk action creator in this gist.
Make sure to mock out the fetch function (as we did in the lesson) and write tests for both the SUCCESS and FAILURE codepaths.
Exercise: Handle the BEGIN and ERROR actions
Pure Redux / Real World Example
In the last lesson we handled the ADD_COURSE_SUCCESS action when a new course is saved to the server.
For this exercise, implement the handling for ADD_COURSE_BEGIN and ADD_COURSE_ERROR. Refer back to the lesson on redux-thunk in Module 1 if you need a reminder of how to handle these actions.
Here is the solution to this exercise. Try it on your own first!
Exercise: Add the Price field
Pure Redux / Real World Example
Right now, courses in our system only have a name . It’d be nice if we could set a price on them, too.
Your exercise, then, is to add a price field. This will require:
- adding another input on the Create Course page where the user can enter a price
- updating the action to include the price
- sending the price to the server via the API call (just include it in the payload object, and the server will accept it)
- displaying the price in the list of courses
The json-server API we’re using will automatically handle any fields you pass up. Right now we’re just passing an object like { name: name }, so records only get a name field. If you were to pass { name: name, price: price } then each record would have both fields.
Here is the solution to this exercise. Try it on your own first!
Exercise: Write a getCourseById Selector
Pure Redux / Real World Example
Write a selector that retrieves a course from the store, based on the courseId prop.
HINT: You’ll need to write a selector for all courses before you can write one to pick out a specific course…
Here is the solution to this exercise. Try it on your own first!