Ubuntu and CentOS Download Links (OVA Files)
This course is Linux distribution independent and by the end of it, you’ll know how to use any Linux distribution.
However, I’d recommend you to use Ubuntu and/or CentOS because these are the most used Linux distributions out there.
For some labs, you will need two Linux VMs, as well.
I’d recommend you to install it by yourself so that you can also learn how to do it and understand better what happens during the installation process.
But, if you are in a hurry or get stuck, I’ve exported two VMs (Ubuntu 20.20 and CentOS 8) as OVA files. All you have to do is download the files and import them (by double-clicking on the file) in VirtualBox.
Ubuntu 20.04 OVA file (username student and password student ). Big file: 5 GB.
CentOS 8 OVA file (username student and password student ). Big file: 3.5 GB.
If you want to enable USB support in your VM you also have to install on your host OS (Windows, Linux, or Mac) Oracle VM VirtualBox Extension Pack: https://download.virtualbox.org/virtualbox/6.1.12/Oracle_VM_VirtualBox_Extension_Pack-6.1.12.vbox-extpack
Alternatively, you can run one or more Linux VMs in the DigitalOcean cloud. You can create one or more droplets (the DigitalOcean name for VM) with a running Linux distro in seconds. They will have their own public IP address and you will connect to the droplets using SSH.
Use my referral link below to create your account on DigitalOcean and you’ll get $100 in credit over 60 days: https://m.do.co/c/f1d4debf213f
The Linux Terminal
How to solve these challenges:
- To be consistent with the filenames and paths run the commands on Ubuntu
- Write your solution in a terminal and test it.
- If your solution is not correct, then try to understand the error messages, watch the video again, rewrite the solution, and test it again. Repeat this step until you get the correct solution.
- Save the solution in a file for future reference or recap.
Challenge #1
- Run the following command both as a non-privileged user and as root: tail /etc/shadow
- Use the TAB key for auto-completion.
Are you stuck? Do you want to see the solution to this challenge?? Click here.
Challenge #2
- Become root temporarily in a terminal.
- Run the following command as root: apt update && apt install nmap
- Logout root from the terminal using a keyboard shortcut
Are you stuck? Do you want to see the solution to this challenge? Click here.
Challenge #3
- Change (set) the root password
- Become root in a terminal by running the su command
- Run as root the following command: lshw
Are you stuck? Do you want to see the solution to this challenge? Click here.
Challenge #4
- Consider the nmap program installed in a previous challenge. Open its man page and search for the option -sV
- Run as root: nmap -sV -p 80 www.example.com
- Find the IP address of your Default Gateway running route -n and then run as root: nmap -sV -p 80,443 default_gateway_ip (Example: nmap -sV -p 80,443 192.168.0.1)
Are you stuck? Do you want to see the solution to this challenge? Click here.
Challenge #5
- Display the user’s history
- Remove line no. 4 from the history
- Run a command without being recorded in history. Check that it wasn’t saved in the shell history.
- Remove the entire history.
Are you stuck? Do you want to see the solution to this challenge?? Click here.
Challenges - Paths, ls, File Timestamps and Types, Viewing Files
How to solve these challenges:
- To be consistent with the filenames and paths run the commands on Ubuntu
- Write your solution in a terminal and test it.
- If your solution is not correct, then try to understand the error messages, watch the video again, rewrite the solution, and test it again. Repeat this step until you get the correct solution.
- Save the solution in a file for future reference or recap.
Challenge #1
- Move into the current user’s home directory using the cd command.
- List the contents of /etc using the ls command and an absolute path.
- Display the contents of /var/log/dmesg using the cat command and an absolute path.
- Move into the root directory ( / ) using an absolute path.
- List the contents of /etc using the ls command and an absolute path.
Are you stuck? Do you want to see the solution to this challenge? Click here.
Challenge #2
- Move into the current user’s home directory using the cd command and an absolute path.
- List the contents of the current directory using the ls command and a relative path.
- List the contents of /home using the ls command and an absolute path.
- List the contents of /home using the ls command and a relative path.
- List the contents of /etc using the ls command and an absolute path.
- List the contents of /etc using the ls command and a relative path.
- Display the contents of /var/log/dmesg using the cat command and an absolute path.
- Display the contents of /var/log/dmesg using the cat command and a relative path.
Are you stuck? Do you want to see the solution to this challenge? Click here.
Challenge #3
- Move into the root directory ( / ) using the cd command and an absolute path.
- Display the contents of /var/log/boot.log using the cat command and a relative path.
- Run the previous command as root.
- Move to /var/log directory using an absolute path.
- Display the contents of the Desktop directory using both an absolute and relative path.
Are you stuck? Do you want to see the solution to this challenge? Click here.
Challenge #4
- Display the man page of ls and search for -d option.
- Display the contents of /var/log using a long listing format.
- Display information about the /var/log directory in a long listing format.
- Display the contents of /etc on a single column.
- Display all the files and directories (including hidden ones) from the user’s home directory.
Are you stuck? Do you want to see the solution to this challenge? Click here.
Challenge #5
- Display the contents of /var/log sorted by size in a human-readable format.
- Rerun the previous command adding an option that omits the files that end in .log from listing.
- List the contents of /etc recursively.
Are you stuck? Do you want to see the solution to this challenge? Click here.
Challenge #6
- Create a new file called linux.txt in the user’s home directory using the touch command.
- Notice the file timestamps using both stat and ls commands.
- Display the entire timestamp of the file using the ls command.
Are you stuck? Do you want to see the solution to this challenge? Click here.
Challenge #7
- Consider the file created in the previous challenge. Notice its timestamps and then update them to the system’s current date and time.
- Change only the modification and change time to the current system time. See the change.
- Change only the modification time manually to 1990, January 15, 10:30:55 AM .
Are you stuck? Do you want to see the solution to this challenge? Click here.
Challenge #8
Consider the file called linux.txt created in the previous challenge. Notice its timestamps and then update them to the values of /etc/passwd . See the changes.
Are you stuck? Do you want to see the solution to this challenge? Click here.
Challenge #9
List the contents of /var/log displaying the access time of the files and sorting by filenames in reverse order.
Are you stuck? Do you want to see the solution to this challenge? Click here.
Challenge #10
Notice and try to recognize all Linux file types by running ls -l , ls -F and file commands.
Run the commands on the following files:
/etc/passwd
/var
/vmlinuz
/usr/bin/ls
/dev/sda1
/dev/tty1
/run/initctl
/run/snapd.socket
Are you stuck? Do you want to see the solution to this challenge? Click here.
Challenge #11
List the contents of /var/log/dmesg using the cat command and displaying the line numbers as well.
Are you stuck? Do you want to see the solution to this challenge? Click here.
Challenge #12
- Display the contents of /etc/ssh/ssh_config page by page using less .
- Go to the end and then to the beginning of the file using the right shortcuts.
- Search forward for the string Ciphers
- Quit less
Are you stuck? Do you want to see the solution to this challenge? Click here.
Challenge #13
- Display the first 3 lines of /etc/passwd
- Display the last 5 lines of /etc/shadow
- Display the contents of /etc/group starting with line 5
Are you stuck? Do you want to see the solution to this challenge? Click here.
Challenge #14
- Display the last 12 lines of /var/log/auth.log in real-time.
- Become root in another terminal and notice how the display is automatically updated.
Are you stuck? Do you want to see the solution to this challenge? Click here.
Challenge #15
- Display the contents of the user’s home directory repeatedly every 2 seconds.
- Create a new file in the user’s home directory and notice the differences between the refreshes.
Are you stuck? Do you want to see the solution to this challenge? Click here.
Challenges - cp, mv, rm, shred
How to solve these challenges:
- To be consistent with the filenames and paths run the commands on Ubuntu
- Write your solution in a terminal and test it.
- If your solution is not correct, then try to understand the error messages, watch the video again, rewrite the solution, and test it again. Repeat this step until you get the correct solution.
- Save the solution in a file for future reference or recap.
Challenge #1
- Install the tree command which is necessary.
- Using shell commands create the following directory structure.

Are you stuck? Do you want to see the solution to this challenge? Click here.
Challenge #2
Considering this directory structure, copy the file called security.txt to the updates directory.
Are you stuck? Do you want to see the solution to this challenge? Click here.
Challenge #3
Considering the solution from the previous challenge remove the file called security.txt from the directory called updates .
Are you stuck? Do you want to see the solution to this challenge? Click here.
Challenge #4
Considering the initial directory structure, copy the directory called updates from centos to ubuntu .
Are you stuck? Do you want to see the solution to this challenge? Click here.
Challenge #5
Considering the solution from the previous challenge, remove the directory called updates from ubuntu directory.
Are you stuck? Do you want to see the solution to this challenge? Click here.
Challenge #6
Considering the initial directory structure and using only one command copy the file called apt.txt and the directory called updates to linux directory.
Are you stuck? Do you want to see the solution to this challenge? Click here.
Challenge #7
Considering the solution from the previous challenge remove the file called apt.txt and the directory called updates from the linux directory interactively (by prompting the user).
Are you stuck? Do you want to see the solution to this challenge? Click here.
Challenge #8
Considering the initial directory structure, rename the directory called centos to redhat and then back to centos .
Are you stuck? Do you want to see the solution to this challenge? Click here.
Challenge #9
Considering the initial directory structure, copy the file called security.txt to ubuntu directory as sec.txt
Are you stuck? Do you want to see the solution to this challenge? Click here.
Challenge #10
- Create a file named users.txt by redirecting the output of the who command.
- Display the file contents.
- Remove the file in a secure manner by overwriting the file 50 times before removing it.
Are you stuck? Do you want to see the solution to this challenge? Click here.
Challenge #11
Remove the entire directory structure without prompting.
Are you stuck? Do you want to see the solution to this challenge? Click here.
Challenges - tar, ln
How to solve these challenges:
- To be consistent with the filenames and paths run the commands on Ubuntu
- Write your solution in a terminal and test it.
- If your solution is not correct, then try to understand the error messages, watch the video again, rewrite the solution, and test it again. Repeat this step until you get the correct solution.
- Save the solution in a file for future reference or recap.
Challenge #1
- Using tar , create an archive of /etc in the current directory.
- Display the contents of the archive searching for a specific file in the archive.
- Extract the archive in the current directory.
Are you stuck? Do you want to see the solution to this challenge? Click here.
Challenge #2
- Using tar , create a compressed archive of /etc using gzip in the current directory.
- Display the contents of the archive searching for a specific file in the archive.
- Extract the archive in another directory.
Are you stuck? Do you want to see the solution to this challenge? Click here.
Challenge #3
- Create a file using a command redirection and a directory.
- Create 2 hard links to the file. Check the no. of hard links.
- Create a symlink to the initial file. Check the symlink.
- Delete the initial file and see what happens with the other 2 hard links and with the symlink.
Are you stuck? Do you want to see the solution to this challenge? Click here.
Challenge #4
- Create a symlink to the Desktop directory in another directory.
- Create a hard link to the Desktop directory in another directory.
Are you stuck? Do you want to see the solution to this challenge? Click here.
Challenges - locate, find
How to solve these challenges:
- To be consistent with the filenames and paths run the commands on Ubuntu
- Write your solution in a terminal and test it.
- If your solution is not correct, then try to understand the error messages, watch the video again, rewrite the solution, and test it again. Repeat this step until you get the correct solution.
- Save the solution in a file for future reference or recap.
Challenge #1
- Check if locate is installed. Install it if necessary.
- Create a new file and search for it using locate .
- Update the database used by locate and search for the file again.
Are you stuck? Do you want to see the solution to this challenge? Click here.
Challenge #2
- Remove the file created in the previous challenge.
- Search for it using locate .
- Update the database used by locate and search for the file again.
Are you stuck? Do you want to see the solution to this challenge? Click here.
Challenge #3
- Find all regular files in /var that have a size bigger than 2 MB.
Are you stuck? Do you want to see the solution to this challenge? Click here.
Challenge #4
- Find all regular files in /etc that have been modified in the last hour.
- Execute cat on each found file.
- Create a new directory and copy all found files in that directory (backup).
Are you stuck? Do you want to see the solution to this challenge? Click here.
Challenge #5
- Find all regular files in /var that are not owned by root.
Are you stuck? Do you want to see the solution to this challenge? Click here.
Challenge #5
- Create a directory and a new file in it.
- Find all files that have the change time in the last minute in the newly created directory and delete them automatically.
Are you stuck? Do you want to see the solution to this challenge? Click here.
Challenges - User Accounts
How to solve these challenges:
- To be consistent with the filenames and paths run the commands on Ubuntu
- Write your solution in a terminal and test it.
- If your solution is not correct, then try to understand the error messages, watch the video again, rewrite the solution, and test it again. Repeat this step until you get the correct solution.
- Save the solution in a file for future reference or recap.
Challenge #1
- Create a new user using the useradd command with no other options. Check if the home directory of the user was created as well.
- Set a password for the user.
- Log in as the new user (in a terminal or GUI).
Are you stuck? Do you want to see the solution to this challenge? Click here.
Challenge #2
- Create a new user using the useradd specifying the following: the home directory (which will be created as well), the Bash shell, and a comment.
- Set a password for the user.
- Create a new group using the groupadd command and then add the user to the newly created group.
- Check the groups to which the user belongs.
Are you stuck? Do you want to see the solution to this challenge? Click here.
Challenge #3
- Try to execute a command as root (like say sudo cat /etc/shadow or sudo ls -l /root ). Run the command as the user you created at the previous challenge. Notice what will happen.
- Make this user an admin one and rerun the command as root.
Are you stuck? Do you want to see the solution to this challenge? Click here.
Challenge #4
- Create 2 new groups and add the user from the previous challenge to those groups without taking it out of the groups it already belongs to.
Are you stuck? Do you want to see the solution to this challenge? Click here.
Challenge #5
- Remove the groups and the users (including their home directory) created in the previous challenges.
Are you stuck? Do you want to see the solution to this challenge? Click here.
Challenge #6
- Understand the concept of salt used in Linux passwords. Create 2 new users and set the same password for both of them. Check that the save password in /etc/shadow is different for each user.
Are you stuck? Do you want to see the solution to this challenge? Click here.
Challenges - File Permissions
How to solve these challenges:
- To be consistent with the filenames and paths run the commands on Ubuntu
- Write your solution in a terminal and test it.
- If your solution is not correct, then try to understand the error messages, watch the video again, rewrite the solution, and test it again. Repeat this step until you get the correct solution.
- Save the solution in a file for future reference or recap.
Refer to the image below…
Create a directory with a regular file in it. Work as a non-privileged user.
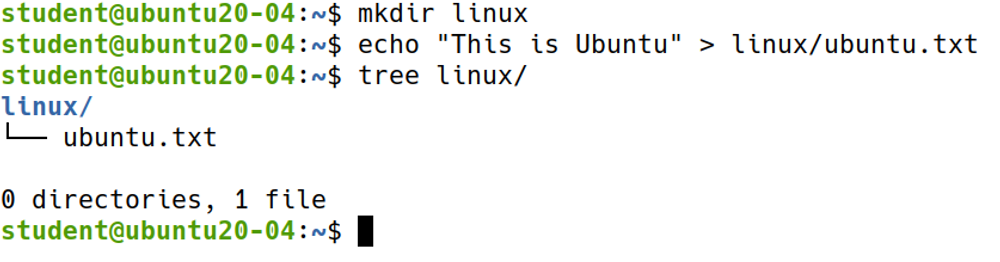
Based on the above image answer the following questions:
Challenge #1
- Display the permissions of ubuntu.txt
- Remove all permissions of others.
Are you stuck? Do you want to see the solution to this challenge? Click here.
Challenge #2
- Remove the read permission of ubuntu.txt for the owner and check if the owner can read the file.
Are you stuck? Do you want to see the solution to this challenge? Click here.
Challenge #3
- Using the octal notation, set the permissions of the directory to rwxrwx— and of the file to rw-r-----
Are you stuck? Do you want to see the solution to this challenge? Click here.
Challenge #4
- Set the permissions of the directory to 0667 . Check if the user (owner) can list its contents, move to the directory and remove it.
Are you stuck? Do you want to see the solution to this challenge? Click here.
Challenge #5
- Set the permissions of all the files in the user’s home directory to 0640 and the permissions of all directories to 0750 .
Are you stuck? Do you want to see the solution to this challenge? Click here.
Challenge #6
- As a non-privileged user list the contents of /root using the ls command. See what will happen.
- As root set SUID to ls and list the contents of /root again as a non-privileged user.
- Check the SUID permission set on ls
- As root remove the SUID bit.
Are you stuck? Do you want to see the solution to this challenge? Click here.
Challenge #7
- Set the directory permissions to 0777 and the file permissions to 0000 . As another non-privileged user, try to remove the file.
- Create a new file in the directory and set its permissions to 0644 .
- Set the Sticky Bit on the directory.
- As another non-privileged user, try to remove the file.
Are you stuck? Do you want to see the solution to this challenge? Click here.
Challenge #8
- Change the owner and the group owner of all files in the current user home directory to the current user and its primary group.
Are you stuck? Do you want to see the solution to this challenge? Click here.
Challenges - Linux Processes
How to solve these challenges:
- To be consistent with the filenames and paths run the commands on Ubuntu
- Write your solution in a terminal and test it.
- If your solution is not correct, then try to understand the error messages, watch the video again, rewrite the solution, and test it again. Repeat this step until you get the correct solution.
- Save the solution in a file for future reference or recap.
Challenge #1
- List all running processes.
- Check if a process named bash is running (use both ps and pgrep ).
Are you stuck? Do you want to see the solution to this challenge? Click here.
Challenge #2
- Using the ps command list all processes sorted by memory in reverse order.
- Redirect the output to a file called processes.txt
Are you stuck? Do you want to see the solution to this challenge? Click here.
Challenge #3
- Start top , sort processes by CPU and highlight the running processes and the sorting column.
Are you stuck? Do you want to see the solution to this challenge? Click here.
Challenge #4
- Generate a text file that contains 3 runs (refreshes) of top with a delay of 1second.
Are you stuck? Do you want to see the solution to this challenge? Click here.
Challenge #5
- Install htop and start it.
Are you stuck? Do you want to see the solution to this challenge? Click here.
Challenge #6
- Using the kill command send the default signal (SIGTERM - 15) to the current terminal.
Are you stuck? Do you want to see the solution to this challenge? Click here.
Challenge #7
- Start a graphical application like gedit or firefox .
- Find its PID and send the SIGINT (2) signal to the application.
Are you stuck? Do you want to see the solution to this challenge? Click here.
Challenge #8
- Start a graphical application like gedit from a terminal in the background.
- Kill the application using pkill .
Are you stuck? Do you want to see the solution to this challenge? Click here.
Challenge #9
- Run a command that takes some time to complete like ls -lR / in the foreground. After a few seconds stop (pause) the command by pressing Ctrl + Z.
- Print its JOBID and PID and resume the command in the foreground.
Are you stuck? Do you want to see the solution to this challenge? Click here.
Challenge #10
- Run sleep 100 in the background.
- Close the terminal, open it again and check if the process is still running.
- If it’s not running, run sleep 100 again making it immune to the closing terminal.
Are you stuck? Do you want to see the solution to this challenge? Click here.
Challenges - Network Interfaces
How to solve these challenges:
- To be consistent with the filenames and paths run the commands on Ubuntu
- Write your solution in a terminal and test it.
- If your solution is not correct, then try to understand the error messages, watch the video again, rewrite the solution and test it again. Repeat this step until you get the correct solution.
- Save the solution in a file for future reference or recap.
Do not solve these challenges on a remote machine to which you are connected with SSH.
Run the following commands only on a local machine.
Challenge #1
- List the IP address, the Default Gateway, the Mac Address and the DNS Servers.
- Use both ifconfig and ip commands.
Are you stuck? Do you want to see the solution to this challenge? Click here.
Challenge #2
- Using ifconfig , disable the Ethernet interface.
- Using ip, enable the Ethernet interface.
- Check its status both with ifconfig and ip .
Are you stuck? Do you want to see the solution to this challenge? Click here.
Challenge #3
- Set a new temporary IP address using both ip and ifconfig .
Are you stuck? Do you want to see the solution to this challenge? Click here.
Challenge #4
- Using ifconfig , set a secondary IP address on the Ethernet interface.
Are you stuck? Do you want to see the solution to this challenge? Click here.
Challenge #5
- Change the MAC address to a random one.
Are you stuck? Do you want to see the solution to this challenge? Click here.
Challenges - SSH, scp, rsync
How to solve these challenges:
- To be consistent with the filenames and paths run the commands on Ubuntu
- Write your solution in a terminal and test it.
- If your solution is not correct, then try to understand the error messages, watch the video again, rewrite the solution, and test it again. Repeat this step until you get the correct solution.
- Save the solution in a file for future reference or recap.
Challenge #1
- Start 2 Linux VMs with the network in bridged mode and check that they are reachable using ping .
Are you stuck? Do you want to see the solution to this challenge? Click here.
Challenge #2
- Install OpenSSH on one Linux VM, check the service status, and then connect to it using the ssh client from the other Linux VM.
Are you stuck? Do you want to see the solution to this challenge? Click here.
Challenge #3
- Secure the SSH Daemon:
- change the listening Port to 2266
- allow only a single non-privileged user to connect to the SSH server.
- Disable root login entirely.
Are you stuck? Do you want to see the solution to this challenge? Click here.
Challenge #4
- Create a directory and a file in the user’s home directory.
- Using scp , copy both the file and the directory to the remote Linux VM where the SSH daemon is running.
Are you stuck? Do you want to see the solution to this challenge? Click here.
Challenge #5
- Using scp , copy a file from the remote VM where the SSH daemon is running to the local machine, in the current directory.
Are you stuck? Do you want to see the solution to this challenge? Click here.
Challenge #6
- Solve the last 2 challenges using rsync instead of scp .
Are you stuck? Do you want to see the solution to this challenge? Click here.
Challenges - dpkg, apt
How to solve these challenges:
- To be consistent with the filenames and paths run the commands on Ubuntu
- Write your solution in a terminal and test it.
- If your solution is not correct, then try to understand the error messages, watch the video again, rewrite the solution, and test it again. Repeat this step until you get the correct solution.
- Save the solution in a file for future reference or recap.
Challenge #1
- Download the Google Earth package (.deb) for Ubuntu from this address: https://www.google.com/intl/en_in/earth/versions/
- Install the app using the locally downloaded .deb file and dpkg
- Start the application.
Are you stuck? Do you want to see the solution to this challenge? Click here.
Challenge #2
- Remove the Google Earth application using dpkg
- Install Google Earth again using apt and the deb file.
Are you stuck? Do you want to see the solution to this challenge? Click here.
Challenge #3
- Display all installed applications using dpkg
- Take any Linux command and check to which package it belongs.
- List all other files from that package
Are you stuck? Do you want to see the solution to this challenge? Click here.
Challenge #4
- Install the nginx web server using apt .
- Start and check the service by connecting to localhost using the browser.
- Remove the web server.
Are you stuck? Do you want to see the solution to this challenge? Click here.
Challenge #5
- Search for a package named squid in the official repositories and display information about it.
Are you stuck? Do you want to see the solution to this challenge? Click here.
Challenge #6
- List all upgradable applications.
- Upgrade all applications assuming yes to each prompt.
Are you stuck? Do you want to see the solution to this challenge? Click here.
Challenges - System Administration
How to solve these challenges:
- To be consistent with the filenames and paths run the commands on Ubuntu
- Write your solution in a terminal and test it.
- If your solution is not correct, then try to understand the error messages, watch the video again, rewrite the solution, and test it again. Repeat this step until you get the correct solution.
- Save the solution in a file for future reference or recap.
Challenge #1
- For the currently logged-in user, create a cron job that writes the current date and time to a file every 3 minutes.
Are you stuck? Do you want to see the solution to this challenge? Click here.
Challenge #2
- Create a cron job that runs as root and fully upgrades the system every Sunday at 5:10 AM
Are you stuck? Do you want to see the solution to this challenge? Click here.
Challenge #3
- Identify the partition where the root file system (/) is mounted.
- Create a directory on the Desktop and mount that partition there as well.
Are you stuck? Do you want to see the solution to this challenge? Click here.
Challenge #4
- Consider this iso file.
- Mount it to a directory in the user’s home directory.
Are you stuck? Do you want to see the solution to this challenge? Click here.
Challenge #5
- Install the nginx web server.
- Check that it’s running.
- Set the server NOT to start automatically when the computer boots up.
Are you stuck? Do you want to see the solution to this challenge? Click here.
Note: For the following challenges, if possible, you should run the commands on a system where Linux runs as the main OS.
Challenge #6
- Generate an HTML file that contains complete hardware information.
Are you stuck? Do you want to see the solution to this challenge? Click here.
Challenge #7
- Find out what is the maximum RAM memory that can be installed on the system.
- Find out the amount of RAM memory that is already installed on the system.
- Display the amount of RAM memory that is free and used (by the running system).
Are you stuck? Do you want to see the solution to this challenge? Click here.
Challenge #8
- Display as much information as possible about the WiFi card.
Note: You should run the commands on a system where Linux runs as the main OS.
Are you stuck? Do you want to see the solution to this challenge? Click here.
Challenge #9
- Display as much information as possible about the hard disks.
Are you stuck? Do you want to see the solution to this challenge? Click here.
Challenge #10
- Benchmark the read speeds performance of the disks installed on your system.
Are you stuck? Do you want to see the solution to this challenge? Click here.
Challenge #11
- On a laptop, run a command that will display information about the battery status.
Are you stuck? Do you want to see the solution to this challenge? Click here.
Bash Scripting Basics
Bash Scripting Basics
How to solve these challenges:
- To be consistent with the filenames and paths run the commands on Ubuntu
- Write your solution in a terminal or in a shell script and test it.
- If your solution is not correct, then try to understand the error messages, watch the video again, rewrite the solution and test it again. Repeat this step until you get the correct solution.
- Save the solution in a file for future reference or recap.
Challenge #1
- Suppose you connect frequently to a server located in a remote data center by running: ssh -l u123h -p 9956 191.169.0.1
- Create an alias named main for the command and make it persistent after reboot.
Are you stuck? Do you want to see the solution to this challenge? Click here.
Challenge #2
- Create a Bash script named script1.sh . Add the shebang .
- Define a variable called country that holds the country you are living in.
- Print the message: You live in YOUR_COUNTRY.
- Run the script in different ways.
Are you stuck? Do you want to see the solution to this challenge? Click here and here.
Challenge #3
- Create a script and define two string variables.
- Add a commented line after the shebang and another inline comment.
- Create a new variable by concatenating the two string variables.
- Run the script.
Are you stuck? Do you want to see the solution to this challenge? Click here.
Challenge #4
- Develop a Bash script that creates a new group and a new username. The group will be the user’s secondary group.
- The username and the group will be given as input by the user that runs the script.
- The script will also display the last 2 lines from the files where the users and the groups are saved in Linux.
- Test the script by running it as root.
Are you stuck? Do you want to see the solution to this challenge? Click here.
Challenge #5
- Create a script called fix_permissions.sh that prompts the user for a directory and changes the permissions of all subdirectories to 755 and to all files to 644 recursively.
Are you stuck? Do you want to see the solution to this challenge? Click here.
Flow Control (if…elif…else) and Command Substitution
Flow Control (if…elif…else) and Command Substitution
How to solve these challenges:
- To be consistent with the filenames and paths run the commands on Ubuntu
- Write your solution in a terminal and test it.
- If your solution is not correct, then try to understand the error messages, watch the video again, rewrite the solution, and test it again. Repeat this step until you get the correct solution.
- Save the solution in a file for future reference or recap.
Challenge #1
- Create a script that takes an argument and tests if it’s a file or not.
Are you stuck? Do you want to see the solution to this challenge? Click here.
Challenge #2
- Consider the solution from the previous challenge. Change it so that it tests if the script is run with exactly one argument.
Are you stuck? Do you want to see the solution to this challenge? Click here.
Challenge #3
- Create a script that clears the contents of a text file which is the script’s argument.
- Test that the argument is a file.
Are you stuck? Do you want to see the solution to this challenge? Click here.
Challenge #4
- Create a script that drops the packets from an IP address given by the user.
- Example: The command to drop the packets from 100.0.0.1 is: iptables -I INPUT -s 100.0.0.1 -j DROP
- Run the script as root and test the connection to different IP addresses.
Are you stuck? Do you want to see the solution to this challenge? Click here.
Challenge #5
- Change the solution from the previous challenge so that the IP address is given as the first argument of the script.
- Test that the script is run with exactly one argument.
Are you stuck? Do you want to see the solution to this challenge? Click here.
Challenge #6
- Develop a script that appends to a file the currently logged-in users and the current date and time.
Are you stuck? Do you want to see the solution to this challenge? Click here.
Challenge #7
- Create a script that prompts the user for a character.
- If the character is Y, display “YES” . If the character is N, display “NO”. Use double quotes when displaying YES and NO. If the user enters any other character exit the script.
Are you stuck? Do you want to see the solution to this challenge? Click here.
Challenge #8
- Change the previous script this way: If the character is Y or y display “YES”. If the character is N or n display “NO”. If the user enters any other character exit the script. Use the OR operator (||) for testing the lowercase y and n .
Are you stuck? Do you want to see the solution to this challenge? Click here.
Challenge #9
- Create a script that takes exactly two arguments. The first argument is a shell command and the second argument is a string. The script will check if the string belongs to the output of the command.
Example: ./search_in_output.sh “ifconfig -a” “flags” will say if the string flags belongs to the output of ifconfig -a
Are you stuck? Do you want to see the solution to this challenge? Click here.
Loops in Bash: for, while
Loops in Bash: for, while
How to solve these challenges:
- To be consistent with the filenames and paths run the commands on Ubuntu
- Write your solution in a terminal and test it.
- If your solution is not correct, then try to understand the error messages, watch the video again, rewrite the solution and test it again. Repeat this step until you get the correct solution.
- Save the solution in a file for future reference or recap.
Challenge #1
- Consider the following variable: friends=“Anne John Jenna Arena Paul Dan”
- Create a script that uses a simple for loop and says Hello to each friend in the list.
Are you stuck? Do you want to see the solution to this challenge? Click here.
Challenge #2
- Create a script that prompts the user for a file. Test that it’s a file.
- Prompt the user for 2 positive integers n and m.
- Display the lines (from line number n to m, both inclusive) of the text file.
Are you stuck? Do you want to see the solution to this challenge? Click here.
Challenge #3
- Create a script that displays odd numbers between 1 and 50.
Are you stuck? Do you want to see the solution to this challenge? Click here.
Challenge #4
- Develop a script that will create 5 text files in the current directory.
Are you stuck? Do you want to see the solution to this challenge? Click here.
Challenge #5
- Develop a script that prompts the user for a number n and then creates n text files in the current directory.
Are you stuck? Do you want to see the solution to this challenge? Click here.
Challenge #6
- Consider the solution from the previous challenge. Add a testing condition so that the user enters a positive integer less than 100.
Are you stuck? Do you want to see the solution to this challenge? Click here.
Challenge #7
- Consider the solution from the previous challenge.
- Change the script so that it creates a file every 3 seconds and the name of each file will be current_minute_second
Are you stuck? Do you want to see the solution to this challenge? Click here.
Challenge #8
- Create a script that takes some IP addresses as arguments and sends one ping packet to each ip address.
Are you stuck? Do you want to see the solution to this challenge? Click here and here.
Challenge #9
- Change the solution from the previous challenge so that the script reads the IP addresses from a text file that is given by the user.
Are you stuck? Do you want to see the solution to this challenge? Click here and here.
Challenge #10
- Create a script that takes 3 arguments: a file extension, a source directory, and a destination directory given as absolute or relative paths to the script. The script will copy all the files with that extension from the source directory to the destination directory.
Example: ./copy_files.sh png ~/images ~/backup/images
Are you stuck? Do you want to see the solution to this challenge? Click here and here.
Functions and Menus in Bash
Functions and Menus
How to solve these challenges:
- To be consistent with the filenames and paths run the commands on Ubuntu
- Write your solution in a terminal and test it.
- If your solution is not correct, then try to understand the error messages, watch the video again, rewrite the solution, and test it again. Repeat this step until you get the correct solution.
- Save the solution in a file for future reference or recap.
Challenge #1
- Create a function called now that prints out the current date and type in the format: YYYY-MM-DD HH:MM:SS
- Call the function.
Are you stuck? Do you want to see the solution to this challenge? Click here.
Challenge #2
- Create a function called rectangle_area that takes 2 arguments: width and height.
- The function computes and prints out the area of the rectangle.
- Call the function with different arguments.
Are you stuck? Do you want to see the solution to this challenge? Click here.
Challenge #3
- Create a Bash Menu with the following entries:
- Display Date and Time
- List users logged in
- Display disk usage
- Change the Menu Prompt to the string Choose:
- Implement each entry in the menu using the if…elif…else statements.
Are you stuck? Do you want to see the solution to this challenge? Click here.
Challenge #4
- Change the solution from the previous challenge so that you use case instead of if…elif…else to implement the menu entries.
Are you stuck? Do you want to see the solution to this challenge? Click here.
DigitalOcean Referral Link, Ubuntu and CentOS Download Links (OVA Files)
To get the most out of this course, you’ll need one or even better more Linux VMs that run on the Internet and have public IP addresses.
One of the easiest ways is to use Linux VMs in the DigitalOcean cloud. You can create one or more droplets (the DigitalOcean name for VM) with a running Linux distro in seconds.
Use my referral link below to create your account on DigitalOcean and you’ll get $100 in credit over 60 days: https://m.do.co/c/f1d4debf213f
Alternatively, you can create locally one or two Linux VMs in VirtualBox or in VMWare.
I’d recommend you to install Ubuntu since I’ve used it in this course and it’s a great and modern distro as well.
But, if you are in a hurry or get stuck, I’ve exported two VMs (Ubuntu 20.20 and CentOS 8) as OVA files. All you have to do is to download the files and import them (by double-clicking on the file) in VirtualBox.
Ubuntu 20.04 OVA file (username student and password student ). Big file: 5 GB.
CentOS 8 OVA file (username student and password student ). Big file: 3.5 GB.
If you want to enable USB support in your VM you also have to install on your host OS (Windows, Linux, or Mac) Oracle VM VirtualBox Extension Pack: https://download.virtualbox.org/virtualbox/6.1.12/Oracle_VM_VirtualBox_Extension_Pack-6.1.12.vbox-extpack
Challenges - Docker
Docker
How to solve these challenges:
- To be consistent with the filenames and paths run the commands on Ubuntu. Install it locally in a VM or at a cloud provider. Use my referral link below to create your account on DigitalOcean and you’ll get $100 in credit over 60 days: https://m.do.co/c/f1d4debf213f
- Write your solution in a terminal or in a shell script and test it.
- If your solution is not correct, then try to understand the error messages, watch the video again, rewrite the solution, and test it again. Repeat this step until you get the correct solution.
- Save the solution in a file for future reference or recap.
Challenge #1
- Using the docker client, display the help of the docker management command container and the help of the run subcommand.
Are you stuck? Do you want to see the solution to this challenge? Click here.
Challenge #2
- Using the Docker CLI search on Docker Hub for an image called mariadb
Are you stuck? Do you want to see the solution to this challenge? Click here.
Challenge #3
- Using the docker client pull the image called alpine with the edge tag.
- List all images downloaded locally.
Are you stuck? Do you want to see the solution to this challenge? Click here.
Challenge #4
- Launch a container from the alpine:edge image. Get shell access to the container.
- Create a new file called a.txt in the /root directory of the container
- Exit the container without stopping it
- Check that the container is still running
- Attach to the container by running the sh command in the container
- Check that the file (a.txt) still exists
- Exit the container by running exit
Are you stuck? Do you want to see the solution to this challenge? Click here.
Challenge #5
- Run the Nginx web server in Docker container, in the background, and publish port 80
- Connect to the server from another machine using a browser
- Check the web server logs
- Attach to the container in which nginx is running
Are you stuck? Do you want to see the solution to this challenge? Click here.
Challenge #6
- Run two Nginx and two Apache containers that publish random ports
- Connect to the web servers from another machine using a browser
- Stop the containers
- Remove all stopped containers
Are you stuck? Do you want to see the solution to this challenge? Click here.
Challenge #7
- Run ubuntu:latest in a container and attach to it (get shell access)
- Install the OpenSSH server in the container (apt update && apt install ssh), add a user, and set its password
- Exit the container without stopping it (Ctrl P + Q)
- Check the IP address of the container and connect to it using SSH and the user you’ve just created
Are you stuck? Do you want to see the solution to this challenge? Click here.
Challenge #8
- Consider the previous challenge when you’ve installed the OpenSSH server in a Ubuntu docker container
- Commit the changes to a new image named myubuntu with the tag custom
- Start a container from this new image and check that the ssh daemon is installed and is running
- Push the image to Docker Hub
Are you stuck? Do you want to see the solution to this challenge? Click here.
Challenge #9
- Go to Docker Hub and search for Apache
- Go to the Dockerfile of the image with the latest tag
- Copy the Dockerfile locally and build a custom image from that file
Note: You’ll need a file called httpd-foreground as well. The file is available in the GitHub repository, where the Dockerfile resides.
Download the httpd-foreground file as well and set the execution permission before building the image.
- Start a container from the image and test that it works as expected
Are you stuck? Do you want to see the solution to this challenge? Click here.
Challenge #10
- Create a volume named webapp1
- Inspect the volume
- Copy a few files in the volume’s directory
- Start the Apache web server (httpd image) in a docker container with the volume mounted in its DirectoryRoot (/usr/local/apache2/htdocs)
- Access the files in the volume with a browser
Are you stuck? Do you want to see the solution to this challenge? Click here.
Challenges - DNS and BIND
DNS
How to solve these challenges:
- To be consistent with the filenames and paths run the commands on Ubuntu. Install it locally in a VM or at a cloud provider. Use my referral link below to create your account on DigitalOcean and you’ll get $100 in credit over 60 days: https://m.do.co/c/f1d4debf213f
- Write your solution in a terminal or in a shell script and test it.
- If your solution is not correct, then try to understand the error messages, watch the video again, rewrite the solution, and test it again. Repeat this step until you get the correct solution.
- Save the solution in a file for future reference or recap.
Challenge #1
- Find out the IP address of ubuntu.com using the host command.
Are you stuck? Do you want to see the solution to this challenge? Click here.
Challenge #2
- Find out the IP address of ubuntu.com using nslookup
Are you stuck? Do you want to see the solution to this challenge? Click here.
Challenge #3
- Find out the IP address of wikileaks.org using the dig command.
Are you stuck? Do you want to see the solution to this challenge? Click here.
Challenge #4
- Find out the authoritative nameservers ( ns ) of wikileaks.org
Are you stuck? Do you want to see the solution to this challenge? Click here.
Challenge #5
- Find out the IP address of one of the authoritative nameservers of parrotsec.org
Are you stuck? Do you want to see the solution to this challenge? Click here.
Challenge #6
- Find out the authoritative nameservers ( ns ) of kali.org from the DNS server with IP address 1.1.1.1
Are you stuck? Do you want to see the solution to this challenge? Click here.
Challenge #7
- You’ve just acquired the ilovelinux.tk domain and want to host it on your own DNS server. What should you add to /etc/bind/named.conf.local so that your name server will be authoritative for the domain?
Are you stuck? Do you want to see the solution to this challenge? Click here.
Challenges - Apache2
The Apache2 Web Server
How to solve these challenges:
- To be consistent with the filenames and paths run the commands on Ubuntu. Install it locally in a VM or at a cloud provider. Use my referral link below to create your account on DigitalOcean and you’ll get $100 in credit over 60 days: https://m.do.co/c/f1d4debf213f
- Write your solution in a terminal or in a shell script and test it.
- If your solution is not correct, then try to understand the error messages, watch the video again, rewrite the solution, and test it again. Repeat this step until you get the correct solution.
- Save the solution in a file for future reference or recap.
Challenge #1
- Install Apache, check that it’s running, and connect to the Web server using the Browser and server’s IP address;
Are you stuck? Do you want to see the solution to this challenge? Click here.
Challenge #2
- Configure Virtual Hosting for a domain and access the website using the domain name;
- In the DocumentRoot directory of the Virtual Host, create a directory called mysite and a file named myfile.html . Access the file with the Browser;
Are you stuck? Do you want to see the solution to this challenge? Click here.
Challenge #3
- Request a free certificate from Let’s Encrypt and configure HTTPS for the Virtual Host;
- Test that HTTP is redirected to HTTPS;
Are you stuck? Do you want to see the solution to this challenge? Click here.
Challenge #4
- Create a directory called admin in the Virtual Host’s DocumentRoot directory and limit the access to it by IP address using … ;
- Allow only your public/private IP address to access the directory.
Are you stuck? Do you want to see the solution to this challenge? Click here.
Challenge #5
- Consider the previous challenge. Implement the same requirements using .htaccess instead of … ;
Are you stuck? Do you want to see the solution to this challenge? Click here.
Challenge #6
- Consider the previous challenge. Disable the use of .htaccess in the admin directory;
- Test that the directives in .htaccess have no effect on the admin directory;
Are you stuck? Do you want to see the solution to this challenge? Click here.
Challenge #7
- Create a directory called projects in the Virtual Host’s DocumentRoot directory and limit file access by IP address using … ;
- PDF and XLS files can be accessed only from your public/private IP address. All other files can be accessed from all IP addresses;
Are you stuck? Do you want to see the solution to this challenge? Click here.
Challenge #8
- Consider the previous challenge. Implement the same requirements using .htaccess instead of … ;
Challenge #9
- Create a directory called team in the Virtual Host’s DocumentRoot directory and enable HTTP Digest Authentication for accessing the directory. Use … ;
Are you stuck? Do you want to see the solution to this challenge? Click here.
Challenge #10
- Consider the previous challenge. Add IP based authorization to the team directory;
- Access to the team directory is allowed if both the user authenticated successfully and came from a permitted source IP address (user your public/private IP address);
Are you stuck? Do you want to see the solution to this challenge? Click here.
Challenge #11
- Create a directory called website in the Virtual Host’s DocumentRoot directory and configure that home.html is delivered by default to the clients when accessing the directory (and only that directory and its subdirectories);
- If the home.html does not exist, the server will not list the directory contents;
Are you stuck? Do you want to see the solution to this challenge? Click here.
Challenge #12
- Activate and test HTTP compression using mod_deflate;
Are you stuck? Do you want to see the solution to this challenge? Click here.
Challenge #13
- Activate the status module and monitor the server using the module;
- Permit only your public/private IP address to access the monitoring page;
Are you stuck? Do you want to see the solution to this challenge? Click here.
Ansible
Automation
How to solve these challenges:
- To be consistent with the filenames and paths run the commands on Ubuntu
- Write your solution in a terminal or in a shell script and test it.
- If your solution is not correct, then try to understand the error messages, watch the video again, rewrite the solution, and test it again. Repeat this step until you get the correct solution.
- Save the solution in a file for future reference or recap.
- To solve these challenges you need more Linux VMs. One of the easiest ways is to use Linux VMs in the DigitalOcean cloud. You can create one or more droplets (the DigitalOcean name for VM) with a running Linux distro in seconds.
- Use my referral link below to create your account on DigitalOcean and you’ll get $100 in credit over 60 days: https://m.do.co/c/f1d4debf213f
Challenge #1
- Create 4 Linux VMs. One will be the Ansible control node and the other 3 the managed nodes.
- Check that the control node can access the managed nodes using SSH.
- Install Ansible on the control machine.
- Create an inventory file that contains the managed nodes and gather them in a group called servers.
- Test Ansible SSH authentication using the ansible command and the ping module.
Are you stuck? Do you want to see the solution to this challenge? Click here.
Challenge #2
- Consider the inventory file from the previous lecture.
- Add behavioral inventory parameters for the username, password, and SSH port.
- Run the ansible command without -u user -k to check that it uses the parameters from the inventory file.
Are you stuck? Do you want to see the solution to this challenge? Click here.
Challenge #3
- Consider the inventory file from the previous challenge.
- Using the Ansible shell module and a Linux command, display the IP address of the default gateway of each managed node.
Are you stuck? Do you want to see the solution to this challenge? Click here.
Challenge #4
- Consider the solution of the previous challenge.
- Change the solution so that it redirects to a file the IP address (and ONLY the IP) of the default gateway of each managed node.
Are you stuck? Do you want to see the solution to this challenge? Click here.
Challenge #5
- Using the Ansible shell module and a Linux command, display the CPU on each managed node.
Are you stuck? Do you want to see the solution to this challenge? Click here.
Challenge #6
- Using the Ansible shell module, create on each managed node a new user called toor that belongs to the sudo group. Run the command that creates the user as root.
- Display the last created user on each managed node.
Are you stuck? Do you want to see the solution to this challenge? Click here.
Challenge #7
- On Ansible control node, create a shell script that synchronizes (mirrors) the /etc directory to /root/etc-backup
- Using Ansible and the script module, run the script on each managed node.
Are you stuck? Do you want to see the solution to this challenge? Click here.
Challenge #8
- Using Ansible and the apt module, install the nginx web server on each managed node.
Are you stuck? Do you want to see the solution to this challenge? Click here.
Challenge #9
- Using Ansible and the apt module, upgrade all packages to their latest versions on each managed node
Are you stuck? Do you want to see the solution to this challenge? Click here.
Challenge #10
- Using Ansible and the service module, restart SSH on all managed nodes.
Are you stuck? Do you want to see the solution to this challenge? Click here.
Challenge #11
- Using Ansible and the service module, set nginx to start on boot on all nodes.
Are you stuck? Do you want to see the solution to this challenge? Click here.
Challenge #12
- Using Ansible and the group module, create a group called managers on all nodes.
Are you stuck? Do you want to see the solution to this challenge? Click here.
Challenge #13
- Using Ansible and the user module, create a user called toor on all nodes.
- Add the user to the sudo and managers groups.
Are you stuck? Do you want to see the solution to this challenge? Click here.
What about macOS?
If you are using macOS you should follow the same steps for generating the keys and configuring the SSH Daemon as in the case of Linux. macOS and Linux are configured the same for SSH Public Key Authentication.