This is still a work in progress. New content is synced here as it gets ready.
Introduction
I believe the majority of developers learn Node the wrong way. Most tutorials, books, and courses about Node focus on the Node ecosystem – not the Node runtime itself. They focus on teaching what can be done with all the packages available for you when you work with Node, like Express and Socket.IO, rather than teaching the capabilities of the Node runtime itself.
There are good reasons for this. Node is raw and flexible. It doesn’t provide complete solutions, but rather provides a rich runtime that enables you to implement solutions of your own. Libraries like Express.js and Socket.IO are more of complete solutions, so it makes more sense to teach those libraries, so you can enable learners to use these complete solutions.
The conventional wisdom seems to be that only those whose job is to write libraries like Express.js and Socket.IO need to understand everything about the Node runtime, but I think this is wrong. A solid understanding of the Node runtime itself is the best thing you can do before using those complete solutions. You should at least have the knowledge and confidence to judge a package by its code so you can make an educated decision about using it.
The Node Knowledge Challenge
Let me give you a taste of the kind of questions you will be able to answer after reading this book. Look at this as your Node knowledge challenge. If you can answer most of these questions, this book is probably not for you.
- What is the relationship between Node and V8? Can Node work without V8?
- come when you declare a global variable in any Node file it’s not really global to all modules?
- When exporting the API of a Node module, why can we sometimes use
exportsand other times we have to usemodule.exports? - What is the Call Stack? Is it part of V8?
- What is the Event Loop? Is it part of V8?
- What is the difference between
setImmediateandprocess.nextTick? - What are the major differences between
spawn,exec, andfork? - How does the cluster module work? How is it different than using a load balancer?
- What will Node do when both the call stack and the event loop queue are empty?
- What are V8 object and function templates?
- What is libuv and how does Node use it?
- How can we do one final operation before a Node process exits? Can that operation be done asynchronously?
- Besides V8 and libuv, what other external dependencies does Node have?
- What’s the problem with the process
uncaughtExceptionevent? How is it different than theexitevent? - What are the 5 major steps that the require function does?
- How can you check for the existence of a local module?
- What are circular modular dependencies in Node and how can they be avoided?
- What are the 3 file extensions that will be automatically tried by the require function?
- When creating an http server and writing a response for a request, why is the end() function required?
- When is it ok to use the file system
*Syncmethods? - How can you print only one level of a deeply nested object?
- How come top-level variables are not global?
- The objects
exports,require, andmoduleare all globally available in every module but they are different in every module. How? - If you execute a JavaScript file that has the single line:
console.log(arguments);with Node, what exactly will Node print? - How can a module be both “requirable” by other modules and executable directly using the node command?
- What’s an example of a built-in stream in Node that is both readable and writable?
- What happens when the line
cluster.fork()gets executed in a Node script? - What’s the difference between using event emitters and using simple callback functions to allow for asynchronous handling of code?
- What’s the difference between the Paused and the Flowing modes of readable streams?
- How can you read data from a connected socket?
- The
requirefunction always caches the module it requires. What can you do if you need to execute the code in a required module many times? - When working with streams, when do you use the pipe function and when do you use events? Can those two methods be combined?
Fundamentals
Okay, I would categorize some of the questions above as fundamentals. Let me start by answering these:
What is the Call Stack and is it part of V8?
The Call Stack is definitely part of V8. It is the data structure that V8 uses to keep track of function invocations. Every time we invoke a function, V8 places a reference to that function on the call stack and it keeps doing so for each nested invocation of other functions. This also includes functions that call themselves recursively.
When the nested invocations of functions reaches an end, V8 will pop one function at a time and use its returned value in its place.
Why is this important to understand for Node? Because you only get ONE Call Stack per Node process. If you keep that Call Stack busy, your whole Node process is busy. Keep that in mind.
What is the Event Loop? Is it part of V8?
The event loop is provided by the libuv library. It is not part of V8.
The Event Loop is the entity that handles external events and converts them into callback invocations. It is a loop that picks events from the event queues and pushes their callbacks into the Call Stack. It is also a multi-phase loop.
The Event Loop is part of a bigger picture that you need to understand first in order to understand the Event Loop. You need to understand the role of V8, know about the Node APIs, and know how things get queued to be executed by V8.
The Node API hosts functions like setTimeout or fs.readFile. These are not part of JavaScript itself. They are just functions provided by Node.
The Event Loop sits in the middle between V8’s Call Stack and the different phases and callback queues and it acts like an organizer. When the V8 Call Stack is empty, the event loop can decide what to execute next.
What will Node do when the Call Stack and the event loop queues are all empty?
It will simply exit.
When you run a Node program, Node will automatically start the event loop and when that event loop is idle and has nothing else to do, the process will exit.
To keep a Node process running, you need to place something somewhere in event queues. For example, when you start a timer or an HTTP server you are basically telling the event loop to keep running and checking on these events.
Besides V8 and libuv, what other external dependencies does Node have?
The following are all separate libraries that a Node process can use:
- http-parser
- c-ares
- OpenSSL
- zlib
All of them are external to Node. They have their own source code. They also have their own license. Node just uses them.
You want to remember that because you want to know where your program is running. If you are doing something with data compression, you might encounter trouble deep in the zlib library stack. You might be fighting a zlib bug. Do not blame everything on Node.
How come top-level variables are not global?
If you have module1 that defines a top-level variable g :
module1.js
var g = 42;
And you have module2 that requires module1 and try to access the variable g, you would get g is not defined.
Why?? If you do the same in a browser, you can access top-level defined variables in all scripts included after their definition.
Every Node file gets its own IIFE (Immediately Invoked Function Expression) behind the scenes. All variables declared in a Node file are scoped to that IIFE.
When is it okay to use the file system *Sync methods (like readFileSync )
Every fs method in Node has a synchronous version. Why would you use a sync method instead of the async one?
Sometimes using the sync method is fine. For example, it can be used in any initializing step while the server is still loading. It is often the case that everything you do after the initializing step depends on the data you obtain there. Instead of introducing a callback-level, using synchronous methods is acceptable as long as what you use the synchronous methods for is a one-time thing.
However, if you are using synchronous methods inside a handler like an HTTP server on-request callback, that would simply be 100% wrong. Do not do that.
How to Learn the Node Runtime
Learning Node can be challenging. Here are some of the guidelines that I hope will help along that journey:
Learn the good parts of JavaScript and learn its modern syntax (ES2015 and beyond)
Node is a set of libraries on top of a VM engine that can compile JavaScript, so it goes without saying that the important skills for JavaScript itself are a subset of the important skills for Node. You should start with JavaScript itself.
Do you understand functions, scopes, binding, the this keyword, the new keyword, closures, classes, module patterns, prototypes, callbacks, and promises? Are you aware of the various methods that can be used on Numbers, Strings, Arrays, Sets, Objects, and Maps? Getting yourself comfortable with the items on this list will make learning the Node API much easier. For example, trying to learn the fs module methods before you have a good understanding of callbacks may lead to unnecessary confusion.
Understand the non-blocking nature of Node
Callbacks and promises (and generators/async patterns) are especially important for Node. You need to understand how asynchronous operations are first class in Node.
You can compare the non-blocking nature of lines of code in a Node program to the way you order a Starbucks coffee (in the store, not the drive-thru):
- Place your order | Give Node some instructions to execute (a function)
- Customize your order, no whipped cream for example | Give the function some arguments:
({whippedCream: false}) - Give the Starbucks worker your name with the order | Give Node a callback with your function:
({whippedCream: false}, callback) - Step aside and the Starbucks worker will take orders from people who were after you in line | Node will take instructions from lines after yours.
- When your order is ready, the Starbucks worker will call your name and give you your order | When your function is computed and Node has a ready result for you, it’ll call your callback with that result:
callback(result)
Learn the JavaScript concurrency model and how it is based on an event loop
The simplified picture has a Call Stack and some Event Queues and the Event Loop sits in the middle organizing the communication between them. The Node asynchronous APIs place callbacks in Event Queues and the Event Loop dequeues them to the Call Stack.
Understand how a Node process never sleeps and will exit when there is nothing left to do
A Node process can be idle but it never sleeps. It keeps track of all the callbacks that are pending and if there is nothing left to execute it will simply exit. To keep a Node process running you can, for example, use a setInterval function because that would create a permanent pending callback in the Event Loop.
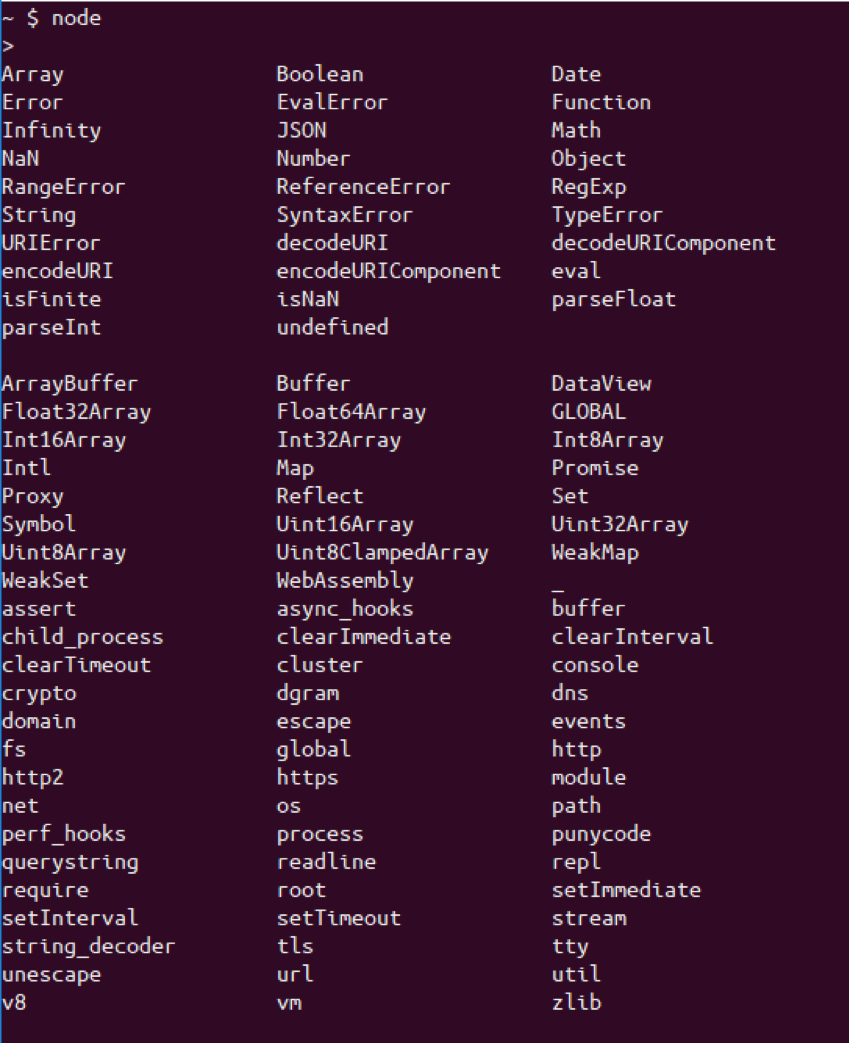
Learn the global variables that you can use like process, module, and Buffer
They’re all defined on a global variable (which is usually compared to the window variable in browsers). In a Node’s REPL, type global . (with a dot) and hit tab twice to see all the items available (or simply hit the tab key twice on an empty line). Some of these items are JavaScript structures (like Array and Object ). Some of them are Node library functions (like setTimeout , or console to print to stdout / stderr ), and some of them are Node global objects that you can use for certain tasks (for example, process.env can be used to read the host environment variables).
You need to understand most of what you see in that list.
Learn what you can do with the built-in libraries that ship with Node and how they have a focus on “networking”
Some of those will feel familiar, like Timers for example, because they also exist in the browser and Node is simulating that environment. However, there is much more to learn, like fs , path , readline , http , net , stream , cluster , etc. The auto-complete list above has them all.
For example, you can read/write files with fs , you can run a streaming-ready web server using “ http ”, and you can run a TCP server and program sockets with “ net ”. Node today is so much more powerful than it was just a year ago, and it’s getting better by the commit. Before you look for a package to do some task, make sure that you can’t do that task with the built-in Node packages first.
The events module is especially important because most of Node architecture is event-driven.
Understand why Node is named Node
You build simple single-process building blocks (nodes) that can be organized with good networking protocols to have them communicate with each other and scale up to build large distributed programs. Scaling a Node application is not an afterthought – it’s built right into the name.
Read and try to understand some code written for Node
Pick a framework, like Express, and try to understand some of its code. Ask specific questions about the things you don’t understand.
Finally, write a web application in Node without using any frameworks. Try to handle as many cases as you can, respond with an HTML file, parse query strings, accept form input, and create an endpoint that responds with JSON.
Also try writing a chat server, publishing an npm package, and contributing to an open-source Node-based project.
This Book
This book is not for the beginner. I assume that the reader is comfortable with JavaScript and has a basic knowledge of Node. To be specific about this, if you don’t know how to execute a script with Node, require an NPM package, or use Node as a simple web server, you are probably not ready for this book. I create courses for Pluralsight and they have some good starting resources for Node. Check their Node.js path at pluralsight.com/paths/node-js.
All the examples I will be using in this book are Linux-based. On Windows, you need to switch the commands I use with their Windows alternatives.
Throughout the book, I use the term Node instead of Node.js for brevity. The official name of the runtime is Node.js but referring to it as just Node is a very common thing.
Some of the content of this book was first drafted with articles I wrote on EdgeCoders.com and medium.freecodecamp.org, and some of it was inspired by my Advanced Node.js course on Pluralsight.
Thanks for reading!
Requiring Modules
Node uses two core modules for managing module dependencies:
- The
requiremodule, which is available on the global scope – no need torequire('require') - The
modulemodule, which is also available on the global scope – no need torequire('module')
You can think of the require module as the command and the module module as the organizer of all required modules.
Requiring a module in Node isn’t that complicated of a concept.
const config = require (’/path/to/file’);
The main object exported by the require module is a function (as used in the above example). When Node invokes that require() function with a local file path as the function’s only argument, Node goes through the following sequence of steps:
- Resolving: To find the absolute path of the file
- Loading: To determine the type of the file content
- Wrapping: To give the file its private scope. This is what makes both the require and module objects local to every file we require
- Evaluating: This is what the VM eventually does with the loaded code
- Caching: So that when we require this file again, we don’t go over all the steps another time
In this article, I’ll attempt to explain with examples these different stages and how they affect the way we write modules in Node.
Let me first create a directory to host all the examples using my terminal:
mkdir ~/learn-node && cd ~/learn-node
All the commands in the rest of this article will be run from within ~/learn-node .
Resolving a Local Path
Let me introduce you to the module object. You can check it out in a simple REPL session:
~/learn-node $ node > module Module { id: ‘’, exports: {}, parent: undefined, filename: null, loaded: false, children: [], paths: [ … ] }
Every module object gets an id property to identify it. This id is usually the full path to the file, but in a REPL session it’s simply <repl> .
Node modules have a one-to-one relation with files on the file-system. We require a module by loading the content of a file into memory.
However, since Node allows many ways to require a file (for example, with a relative path or a pre-configured path), before we can load the content of a file into the memory we need to find the absolute location of that file.
When we require a 'find-me' module without specifying a path:
require(“find-me”);
Node will look for find-me.js in all the paths specified by module.paths – in order.
~/learn-node $ node > module.paths [ ‘/Users/samer/learn-node/repl/node_modules’, ‘/Users/samer/learn-node/node_modules’, ‘/Users/samer/node_modules’, ‘/Users/node_modules’, ‘/node_modules’, ‘/Users/samer/.node_modules’, ‘/Users/samer/.node_libraries’ ]
The paths list is basically a list of node_modules directories under every directory from the current directory to the root directory. It also includes a few legacy directories whose use is not recommended.
If Node can’t find find-me.js in any of these paths, it will throw a “ cannot find module error. ”
~/learn-node $ node > require (‘find-me’) Error: Cannot find module ‘find-me’ at Function.Module._resolveFilename (module.js:470:15) at Function.Module._load (module.js:418:25) at Module.require (module.js:498:17) at require (internal/module.js:20:19) at repl:1:1 at ContextifyScript.Script.runInThisContext (vm.js:23:33) at REPLServer.defaultEval (repl.js:336:29) at bound (domain.js:280:14) at REPLServer.runBound [as eval] (domain.js:293:12) at REPLServer.onLine (repl.js:533:10)
If you now create a local node_modules directory and put a find-me.js in there, the require('find-me') line will find it.
~/learn-node $ mkdir node_modules ~/learn-node $ echo “console.log(’ I am not lost ');” > node_modules/find-me.js ~/learn-node $ node > require (‘find-me’); I am not lost {} >
If another find-me.js file existed in any of the other lookup paths Node will not use it. For example, if we have a node_modules directory under the home (~) directory and we have a different find-me.js file in there:
$ mkdir ~/node_modules $ echo “console.log(’ I am the root of all problems ');” > ~/node_modules/find-me.js
When we require('find-me') from within the learn-node directory – which has its own node_modules/find-me.js , the find-me.js file that is under the home directory will not be loaded at all:
~/learn-node $ node > require (‘find-me’) I am not lost {} >
But if we remove the local node_modules directory under ~/learn-node and try to require find-me one more time, the file under the home’s node_modules directory would be used:
~/learn-node $ rm -r node_modules/ ~/learn-node $ node > require(‘find-me’) I am the root of all problems {} >
Requiring a Folder
Modules don’t have to be files. We can also create a find-me folder under node_modules and place an index.js file in there. The same require('find-me') line will use that folder’s index.js file:
~/learn-node $ mkdir -p node_modules/find-me ~/learn-node $ echo “console.log(’ Found again. ');” > node_modules/find-me/index.js ~/learn-node $ node > require (‘find-me’); Found again. {} >
Note how require ignored the home directory’s node_modules path again since we have a local one now.
An index.js file will be used by default when we require a folder, but we can control what file name to start with under the folder using the main property in package.json . For example, to make the require('find-me') line resolve to a different file under the find-me folder, all we need to do is add a package.json file in there and specify which file should be used to resolve this folder:
~/learn-node $ echo “console.log(’ I rule ');” > node_modules/find-me/ start.js ~/learn-node $ echo ‘{ “name”: “find-me-folder” , “main”: “start.js” }’ > node_modules/find-me/package.json ~/learn-node $ node > require (‘find-me’); I rule {} >
Resolve Only
If you want to only resolve the module and not execute it, you can use the require.resolve function. This function behaves exactly the same as the main require function, but it does not load the file. It will still throw an error if the file does not exist and it will return the full path to the file when found.
require.resolve (‘find-me’); ‘/Users/samer/learn-node/node_modules/find-me/start.js’ > require.resolve(‘not-there’); Error: Cannot find module ‘not-there’ at Function.Module._resolveFilename (module.js:470:15) at Function.resolve (internal/module.js:27:19) at repl:1:9 at ContextifyScript.Script.runInThisContext (vm.js:23:33) at REPLServer.defaultEval (repl.js:336:29) at bound (domain.js:280:14) at REPLServer.runBound [as eval] (domain.js:293:12) at REPLServer.onLine (repl.js:533:10) at emitOne (events.js:101:20) at REPLServer.emit (events.js:191:7) >
This can be used, for example, to check whether an optional package is installed or not and only use it when it’s available.
Relative and Absolute Paths
Besides resolving modules from within the node_modules directories, we can also place the module anywhere we want and require it with either relative paths ( ./ and ../ ) or with absolute paths starting with / .`
If, for example, the find-me.js file was under a lib folder instead of the node_modules folder, we can require it with:
require("./lib/find-me");
Parent-child Relation Between Files
Create a lib/util.js file and add a console.log line there to identify it. Also, console.log the module object itself:
~/learn-node $ mkdir lib ~/learn-node $ echo “console.log(‘In util’, module);” > lib/util.js
Do the same for an index.js file, which is what we’ll be executing with the node command. Make this index.js file require lib/util.js :
~/learn-node $ echo “console.log(‘In index’, module); require (’./lib/util’);” > index.js
Now, execute the index.js file with the node command:
~/learn-node $ node index.js In index Module { id: ‘.’, exports: {}, parent: null, filename: ‘/Users/samer/learn-node/index.js’, loaded: false, children: [], paths: [ … ] } In util Module { id: ‘/Users/samer/learn-node/lib/util.js’, exports: {}, parent: Module { id: ‘.’, exports: {}, parent: null, filename: ‘/Users/samer/learn-node/index.js’, loaded: false, children: [ [Circular] ], paths: […] }, filename: ‘/Users/samer/learn-node/lib/util.js’, loaded: false, children: [], paths: […] }
Note how the main index module (id: '.') is now listed as the parent for the lib/util module. However, the lib/util module was not listed as a child of the index module. Instead, we have the [Circular] value there because this is a circular reference. If Node prints the lib/util module object, it will go into an infinite loop. That’s why it simply replaces the lib/util reference with [Circular] .
More importantly now, what happens if the lib/util module required the main index module? This is where we get into what’s known as the circular modular dependency, which is allowed in Node.
To understand it better, let’s first understand a few other concepts on the module object.
Synchronous Loading of Modules
In any module, exports is a special object. If you’ve noticed above, every time we’ve printed a module object, it had an exports property which has been an empty object so far. We can add any attribute to this special exports object. For example, let’s export an id attribute for index.js and lib/util.js :
// Add the following line at the top of lib/util.js exports.id = “lib/util”; // Add the following line at the top of index.js exports.id = “index”;
When we now execute index.js , we’ll see these attributes as managed on each file’s module object:
~/learn-node $ node index.js In index Module { id: ‘.’, exports: { id: ‘index’ }, loaded: false, … } In util Module { id: ‘/Users/samer/learn-node/lib/util.js’, exports: { id: ‘lib/util’ }, parent: Module { id: ‘.’, exports: { id: ‘index’ }, loaded: false, … }, loaded: false, … }
I’ve removed some attributes in the above output to keep it brief but note how the exports object now has the attributes we defined in each module. You can put as many attributes as you want on that exports object, and you can actually change the whole object to be something else. For example, to change the exports object to be a function instead of an object, we do the following:
// Add the following line in index.js before the console.log module.exports = function() {};
When you run index.js now, you’ll see how the exports object is a function:
~/learn-node $ node index.js In index Module { id: ‘.’, exports: [Function], loaded: false, … }
Note how we did not do exports = function() {} to make the exports object into a function. We can’t actually do that because the exports variable inside each module is just a reference to module.exports which manages the exported properties. When we reassign the exports variable, that reference is lost and we would be introducing a new variable instead of changing the module.exports object.
The module.exports object in every module is what the require function returns when we require that module. For example, change the require('./lib/util') line in index.js into:
const UTIL = require("./lib/util"); console.log(“UTIL:”, UTIL);
The above will capture the properties exported in lib/util into the UTIL constant. When we run index.js now, the very last line will output:
UTIL: { id: “lib/util”; }
Let’s also talk about the loaded attribute on every module. So far, every time we printed a module object, we saw a loaded attribute on that object with a value of false .
The module module uses the loaded attribute to track which modules have been loaded (true value) and which modules are still being loaded (false value). For example, we can see the index.js module fully loaded if we print its module object on the next cycle of the event loop using a setImmediate call:
// In index.js setImmediate(() => { console.log(“The index.js module object is now loaded!”, module); });
The output of that would be:
The index.js module object is now loaded! Module { id: ‘.’, exports: [Function], parent: null, filename: ‘/Users/samer/learn-node/index.js’, loaded: true, children: [ Module { id: ‘/Users/samer/learn-node/lib/util.js’, exports: [Object], parent: [Circular], filename: ‘/Users/samer/learn-node/lib/util.js’, loaded: true, children: [], paths: [Object] } ], paths: [ ‘/Users/samer/learn-node/node_modules’, ‘/Users/samer/node_modules’, ‘/Users/node_modules’, ‘/node_modules’ ] }
Note how in this delayed console.log output both lib/util.js and index.js are fully loaded.
The exports object becomes complete when Node finishes loading the module (and labels it so). The whole process of requiring/loading a module is synchronous . That’s why we were able to see the modules fully loaded after one cycle of the event loop.
This also means that we cannot change the exports object asynchronously. For example, we cannot do the following in any module:
fs.readFile("/etc/passwd", (err, data) => { if (err) throw err; exports.data = data; // Will not work. });
Circular Module Dependency
Let’s now try to answer the important question about circular dependency in Node: What happens when module 1 requires module 2, and module 2 requires module 1?
To find out, let’s create two files module1.js and module2.js under lib/ and have them require each other:
lib/module1.js
exports.a = 1; require("./module2"); exports.b = 2; exports.c = 3;
lib/module2.js
const Module1 = require("./module1"); console.log(“Module1 is partially loaded here”, Module1);
When we execute module1.js , we see the following:
~/learn-node $ node lib/module1.js Module1 is partially loaded here { a: 1 }
We required module2 before module1 was fully loaded and since module2 required module1 while it wasn’t fully loaded, what we get from the exports object at that point are all the properties exported prior to the circular dependency. Only the a property was reported because both b and c were exported after module2 required and printed module1 .
Node keeps this really simple. During the loading of a module, it builds the exports object. You can require the module before it’s done loading and you’ll just get a partial exports object with whatever was defined so far.
JSON and C/C++ Addons
We can natively require JSON files and C++ addon files with the require function. You don’t even need to specify a file extension to do so.
If a file extension was not specified, the first thing Node will try to resolve is a .js file. If it can’t find a .js file, it will try a .json file and it will parse the .json file if found as a JSON text file. After that, it will try to find a binary .node file. However, to remove ambiguity, you should probably specify a file extension when requiring anything other than .js files.
Requiring JSON files is useful if, for example, everything you need to manage in that file is some static configuration values, or some values that you periodically read from an external source. For example, if we had the following config.json file:
{ “host”: “localhost”, “port”: 8080 }
We can require it directly like this:
const { host, port } = require("./config"); console.log(Server will run at https://${host}:${port});
Running the above code will have this output:
Server will run at http://localhost:8080
If Node can’t find a .js or a .json file, it will look for a .node file and it would interpret the file as a compiled addon module.
The Node documentation site has a sample addon file which is written in C++. It’s a simple module that exposes a hello() function which outputs “world.”
You can use the node-gyp package to compile and build the .cc file into a .addon file. You just need to configure a binding.gyp file to tell node-gyp what to do.
Once you have the addon.node file (or whatever name you specify in binding.gyp ) then you can natively require it just like any other module:
const addon = require(" ./addon "); console.log( addon.hello() );
We can actually see the support of the three extensions by looking at require.extensions .
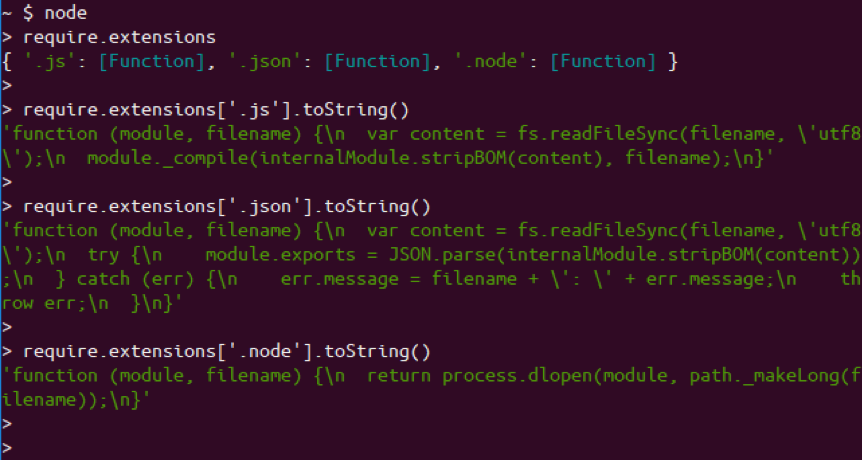
Looking at the functions for each extension, you can clearly see what Node will do with each. It uses module._compile for .js files, JSON.parse for .json files, and process.dlopen for .node files.
Module Wrapping
Node’s wrapping of modules is often misunderstood. To understand it, let me remind you about the exports / module.exports relation.
We can use the exports object to export properties, but we cannot replace the exports object directly because it’s just a reference to module.exports .
exports.id = 42; // This is ok. exports = { id: 42 }; // This will not work. module.exports = { id: 42 }; // This is ok.
How exactly does this exports object, which appears to be global for every module, get defined as a reference on the module object?
Let me ask one more question before explaining Node’s wrapping process.
In a browser, when we declare a variable in a script like this:
var answer = 42;
That answer variable will be globally available in all scripts after the script that defined it.
This is not the case in Node. When we define a variable in one module, the other modules in the program will not have access to that variable. So how come variables in Node are magically scoped?
The answer is simple. Before compiling a module, Node wraps the module code in a function, which we can inspect using the wrapper property of the module module.
~ $ node > require (‘module’).wrapper > [ '(function (exports, require, module, __filename, __dirname}) { ', > ‘\n});’ >
Node does not execute any code you write in a file directly. It executes this wrapper function which will have your code in its body. This is what keeps the top-level variables that are defined in any module scoped to that module.
This wrapper function has 5 arguments: exports , require , module , filename , and `` dirname . This is what makes them appear to look global when in fact they are specific to each module.
All of these arguments get their values when Node executes the wrapper function. exports is defined as a reference to module.exports prior to that. require and module are both specific to the function to be executed, and filename / `` dirname variables will contain the wrapped module’s absolute filename and directory path.
You can see this wrapping in action if you run a script with a problem on its first line:
~/learn-node $ echo “euaohseu” > bad.js ~/learn-node $ node bad.js ~/bad.js:1 ( function (exports, require, module, filename, dirname) { euaohseu ^ ReferenceError: euaohseu is not defined
Note how the first line of the script as reported above was the wrapper function, not the bad reference.
Moreover, since every module gets wrapped in a function, we can actually access that function’s arguments with the arguments keyword:
~/learn-node $ echo " console.log(arguments); " > index.js ~/learn-node $ node index.js { ‘0’: {}, ‘1’: { [Function: require] resolve: [Function: resolve], main: Module { id: ‘.’, exports: {}, parent: null, filename: ‘/Users/samer/index.js’, loaded: false, children: [], paths: [Object] }, extensions: { … }, cache: { ‘/Users/samer/index.js’: [Object] } }, ‘2’: Module { id: ‘.’, exports: {}, parent: null, filename: ‘/Users/samer/index.js’, loaded: false, children: [], paths: [ … ] }, ‘3’: ‘/Users/samer/index.js’, ‘4’: ‘/Users/samer’ }
The first argument is the exports object, which starts empty. Then we have the require/module objects, both of which are instances that are associated with the index.js file that we’re executing. They are not global variables. The last two arguments are the file’s path and its directory path.
The wrapping function’s return value is module.exports . Inside the wrapped function, we can use the exports object to change the properties of module.exports , but we can’t reassign exports itself because it’s just a reference.
What happens is roughly equivalent to:
function (require, module, __filename, __dirname) { // let exports = module.exports; // Your Code… // return module.exports; }
If we change the whole exports object, it would no longer be a reference to module.exports . This is the way JavaScript reference objects work everywhere, not just in this context.
The “require” Object
There is nothing special about require. It’s an object that acts mainly as a function that takes a module name or path and returns the module.exports object. We can simply override the require object with our own logic if we want to.
For example, maybe for testing purposes we want every require call to be mocked by default and just return a fake object instead of the required module exports object. This simple reassignment of require will do the trick:
require = function() { return { mocked: true }; };
After doing the above reassignment of require , every require('something') call in the script will just return the mocked object.
The require object also has properties of its own. We’ve seen the resolve property, which is a function that performs only the resolving step of the require process. We’ve also seen require.extensions above.
There is also require.main which can be helpful to determine if the script is being required or run directly.
Say, for example, that we have this simple printInFrame function in print-in-frame.js :
print-in-frame.js
const printInFrame = (size, header) => { console.log(’’.repeat(size)); console.log(header); console.log(’’.repeat(size)); };
The function takes a numeric argument size and a string argument header and it prints that header in a frame controlled by the size we specify.
We want to use this file in two ways:
- From the command-line directly like this:
~/learn-node $ node print-in-frame 8 Hello
Passing 8 and Hello as command line arguments to print “Hello” in a frame of 8 stars.
- With require:
Assuming the required module will export the printInFrame function and we can just call it:
const print = require("./print-in-frame"); print(5, “Hey”);
To print the header “Hey” in a frame of 5 stars.
Those are two different usages. We need a way to determine if the file is being run as a stand-alone script or if it is being required by other scripts.
This is where we can use this simple if statement:
if (require.main === module) { // The file is being executed directly (not with require) }
We can use this condition to satisfy the usage requirements above by invoking the printInFrame function differently:
print-in-frame.js
const printInFrame = (size, header) => { console.log(’’.repeat(size)); console.log(header); console.log(’’.repeat(size)); }; if (require.main === module) { printInFrame(process.argv[2], process.argv[3]); } else { module.exports = printInFrame; }
When the file is not being required, we just call the printInFrame function with process.argv elements. Otherwise, we just change the module.exports object to be the printInFrame function itself.
Module Caching
Caching is important to understand. Let me use a simple example to demonstrate it.
Say that you have the following ascii-art.js file that prints a cool looking header message:

We want to display this header every time we require the file. If we require the file twice, we want the header to show up twice.
require("./ascii-art"); // will show the header. require("./ascii-art"); // will not show the header.
The second require will not show the header because of modules’ caching. Node caches the first call and does not load the file on the second call.
We can see this cache by printing require.cache after the first require. The cache registry is simply an object that has a property for every required module. Those properties values are the module objects used for each module. We can simply delete a property from that require.cache object to invalidate that cache. If we do that, Node will re-load the module to re-cache it.
However, this is not the most efficient solution for this case. The simple solution is to wrap the log line in ascii-art.js with a function and export that function. This way, when we require the ascii-art.js file, we get a function that we can execute to invoke the log line every time:
require("./ascii-art")(); // will show the header. require("./ascii-art")(); // will also show the header.
Thanks for reading!
Node’s Event-Driven Architecture
Most of Node’s objects - like HTTP requests, responses, and streams - implement the EventEmitter module so they can provide a way to emit and listen to events.
The simplest form of the event-driven nature is the callback style of some of the popular Node.js functions - for example, fs.readFile. In this analogy, the event will be fired once (when Node is ready to call the callback) and the callback acts as the event handler.
Let’s explore this basic form first.
Callbacks (and Promises)
Call me back when you’re ready, Node!
The original way Node handled asynchronous events was with callbacks. This was a long time ago, before JavaScript had native promises support and the async/await feature.
Callbacks are basically just functions that you pass to other functions. This is possible in JavaScript because functions are first class objects.
It’s important to understand that callbacks do not indicate an asynchronous call in the code. A function can call the callback both synchronously and asynchronously.
For example, here’s a host function fileSize that accepts a callback function cb and can invoke that callback function both synchronously and asynchronously based on a condition:
function fileSize (fileName, cb) {
if (typeof fileName !== ‘string’) {
return cb(new TypeError(‘argument should be string’)); // Sync
}
fs.stat(fileName, (err, stats) => {
if (err) { return cb(err); } // Async
cb(null, stats.size); // Async
});
}
Note that this is a bad practice that leads to unexpected errors. Design host functions to consume callback either always synchronously or always asynchronously.
Let’s explore a simple example of a typical asynchronous Node function that’s written with a callback style:
const readFileAsArray = function(file, cb) {
fs.readFile(file, function(err, data) {
if (err) {
return cb(err);
}
const lines = data.toString().trim().split(’\n’);
cb(null, lines);
});
};
readFileAsArray takes a file path and a callback function. It reads the file content, splits it into an array of lines, and calls the callback function with that array.
Here’s an example use for it. Assuming that we have the file numbers.txt in the same directory with content like this:
10
11
12
13
14
15
If we have a task to count the odd numbers in that file, we can use readFileAsArray to simplify the code:
readFileAsArray(’./numbers.txt’, (err, lines) => {
if (err) throw err;
const numbers = lines.map(Number);
const oddNumbers = numbers.filter(n => n%2 === 1);
console.log(‘Odd numbers count:’, oddNumbers.length);
});
The code reads the numbers content into an array of strings, parses them as numbers, and counts the odd ones.
Node’s callback style is used purely here. The callback has an error-first argument err that’s nullable and we pass the callback as the last argument for the host function. You should always do that in your functions because users will probably assume that. Make the host function receive the callback as its last argument and make the callback expect an error object as its first argument.
The modern JavaScript alternative to callbacks
In modern JavaScript, we have promise objects. Promises can be an alternative to callbacks for asynchronous APIs. Instead of passing a callback as an argument and handling the error in the same place, a promise object allows us to handle success and error cases separately and it also allows us to chain multiple asynchronous calls instead of nesting them.
If the readFileAsArray function supports promises, we can use it as follows:
readFileAsArray(’./numbers.txt’)
.then(lines => {
const numbers = lines.map(Number);
const oddNumbers = numbers.filter(n => n%2 === 1);
console.log(‘Odd numbers count:’, oddNumbers.length);
})
.catch(console.error);
Instead of passing in a callback function, we called a .then function on the return value of the host function. This .then function usually gives us access to the same lines array that we get in the callback version, and we can do our processing on it as before. To handle errors, we add a .catch call on the result and that gives us access to an error when it happens.
Making the host function support a promise interface is easier in modern JavaScript thanks to the new Promise object. Here’s the readFileAsArray function modified to support a promise interface in addition to the callback interface it already supports:
const readFileAsArray = function(file, cb = () => {}) {
return new Promise((resolve, reject) => {
fs.readFile(file, function(err, data) {
if (err) {
reject(err);
return cb(err);
}
const lines = data.toString().trim().split(’\n’);
resolve(lines);
cb(null, lines);
});
});
};
So we make the function return a Promise object, which wraps the fs.readFile async call. The promise object exposes two arguments, a resolve function and a reject function.
Whenever we want to invoke the callback with an error we use the promise reject function as well, and whenever we want to invoke the callback with data we use the promise resolve function as well.
The only other thing we needed to do in this case is to have a default value for this callback argument in case the code is being used with the promise interface. We can use a simple, default empty function in the argument for that case: () ⇒ {}.
Consuming promises with async/await
Adding a promise interface makes your code a lot easier to work with when there is a need to loop over an async function. With callbacks, things become messy.
Promises improve that a little bit, and function generators improve on that a little bit more. This said, a more recent alternative to working with async code is to use the async function, which allows us to treat async code as if it was synchronous, making it a lot more readable overall.
Here’s how we can consume the readFileAsArray function with async/await:
async function countOdd () {
try {
const lines = await readFileAsArray(’./numbers’);
const numbers = lines.map(Number);
const oddCount = numbers.filter(n => n%2 === 1).length;
console.log(‘Odd numbers count:’, oddCount);
} catch(err) {
console.error(err);
}
}
countOdd();
We first create an async function, which is just a normal function with the word async before it. Inside the async function, we call the readFileAsArray function as if it returns the lines variable, and to make that work, we use the keyword await. After that, we continue the code as if the readFileAsArray call was synchronous.
To get things to run, we execute the async function. This is very simple and more readable. To work with errors, we need to wrap the async call in a try/catch statement.
With this async/await feature, we did not have to use any special API (like .then and .catch). We just labeled functions differently and used pure JavaScript for the code.
We can use the async/await feature with any function that supports a promise interface. However, we can’t use it with callback-style async functions (like setTimeout for example).
The EventEmitter Module
The EventEmitter is a module that facilitates communication between objects in Node. EventEmitter is at the core of Node asynchronous event-driven architecture. Many of Node’s built-in modules inherit from EventEmitter.
The concept is simple: emitter objects emit named events that cause previously registered listeners to be called. So, an emitter object basically has two main features:
Emitting name events.
Registering and unregistering listener functions.
To work with the EventEmitter, we just create a class that extends EventEmitter.
class MyEmitter extends EventEmitter {
}
Emitter objects are what we instantiate from the EventEmitter-based classes:
const myEmitter = new MyEmitter();
At any point in the lifecycle of those emitter objects, we can use the emit function to emit any named event we want.
myEmitter.emit(‘something-happened’);
Emitting an event is the signal that some condition has occurred. This condition is usually about a state change in the emitting object. We can add listener functions using the on method, and those listener functions will be executed every time the emitter object emits their associated name event.
Events != Asynchrony
Let’s take a look at an example:
const EventEmitter = require(‘events’);
class WithLog extends EventEmitter {
execute(taskFunc) {
console.log(‘Before executing’);
this.emit(‘begin’);
taskFunc();
this.emit(‘end’);
console.log(‘After executing’);
}
}
const withLog = new WithLog();
withLog.on(‘begin’, () => console.log(‘About to execute’));
withLog.on(‘end’, () => console.log(‘Done with execute’));
withLog.execute(() => console.log(’*** Executing task ***’));
Class WithLog is an event emitter. It defines one instance function execute. This execute function receives one argument, a task function, and wraps its execution with log statements. It fires events before and after the execution.
To see the sequence of what will happen here, we register listeners on both named events and finally execute a sample task to trigger things.
Here’s the output of that:
Before executing
About to execute
*** Executing task ***
Done with execute
After executing
What I want you to notice about the output above is that it all happens synchronously. There is nothing asynchronous about this code.
We get the “Before executing” line first.
The begin named event then causes the “About to execute” line.
The actual execution line then outputs the “* Executing task *” line.
The end named event then causes the “Done with execute” line
We get the “After executing” line last.
Just like plain-old callbacks, do not assume that events mean synchronous or asynchronous code.
This is important, because if we pass an asynchronous taskFunc to execute, the events emitted will no longer be accurate.
We can simulate the case with a setImmediate call:
// …
withLog.execute(() => {
setImmediate(() => {
console.log(’*** Executing task ***’)
});
});
Now the output would be:
Before executing
About to execute
Done with execute
After executing
*** Executing task ***
This is wrong. The lines after the async call, which were caused the “Done with execute” and “After executing” calls, are not accurate any more.
To emit an event after an asynchronous function is done, we’ll need to combine callbacks (or promises) with this event-based communication. The example below demonstrates that.
One benefit of using events instead of regular callbacks is that we can react to the same signal multiple times by defining multiple listeners. To accomplish the same with callbacks, we have to write more logic inside the single available callback. Events are a great way for applications to allow multiple external plugins to build functionality on top of the application’s core. You can think of them as hook points to allow for customizing the story around a state change.
Asynchronous Events
Let’s convert the synchronous sample example into something asynchronous and a little bit more useful.
const fs = require(‘fs’);
const EventEmitter = require(‘events’);
class WithTime extends EventEmitter {
execute(asyncFunc, …args) {
this.emit(‘begin’);
console.time(‘execute’);
asyncFunc(…args, (err, data) => {
if (err) {
return this.emit(‘error’, err);
}
  this.emit('data', data);
  console.timeEnd('execute');
  this.emit('end');
});
}
}
const withTime = new WithTime();
withTime.on(‘begin’, () => console.log(‘About to execute’));
withTime.on(‘end’, () => console.log(‘Done with execute’));
withTime.execute(fs.readFile, __filename);
The WithTime class executes an asyncFunc and reports the time that’s taken by that asyncFunc using console.time and console.timeEnd calls. It emits the right sequence of events before and after the execution. And also emits error/data events to work with the usual signals of asynchronous calls.
We test a withTime emitter by passing it an fs.readFile call, which is an asynchronous function. Instead of handling file data with a callback, we can now listen to the data event.
When we execute this code , we get the right sequence of events, as expected, and we get a reported time for the execution, which is helpful:
About to execute
execute: 4.507ms
Done with execute
Note how we needed to combine a callback with an event emitter to accomplish that. If the asynFunc supported promises as well, we could use the async/await feature to do the same:
class WithTime extends EventEmitter {
async execute(asyncFunc, …args) {
this.emit(‘begin’);
try {
console.time(‘execute’);
const data = await asyncFunc(…args);
this.emit(‘data’, data);
console.timeEnd(‘execute’);
this.emit(‘end’);
} catch(err) {
this.emit(‘error’, err);
}
}
}
I don’t know about you, but this is much more readable to me than the callback-based code or any .then/.catch lines. The async/await feature brings us as close as possible to the JavaScript language itself, which I think is a big win.
Events Arguments and Errors
In the previous example, there were two events that were emitted with extra arguments.
The error event is emitted with an error object.
this.emit(‘error’, err);
The data event is emitted with a data object.
this.emit(‘data’, data);
We can use as many arguments as we need after the named event, and all these arguments will be available inside the listener functions we register for these named events.
For example, to work with the data event, the listener function that we register will get access to the data argument that was passed to the emitted event and that data object is exactly what the asyncFunc exposes.
withTime.on(‘data’, (data) => {
// do something with data
});
The error event is usually a special one. In our callback-based example, if we don’t handle the error event with a listener, the node process will actually exit.
To demonstrate that, make another call to the execute method with a bad argument:
class WithTime extends EventEmitter {
execute(asyncFunc, …args) {
console.time(‘execute’);
asyncFunc(…args, (err, data) => {
if (err) {
return this.emit(‘error’, err); // Not Handled
}
  console.timeEnd('execute');
});
}
}
const withTime = new WithTime();
withTime.execute(fs.readFile, ‘’); // BAD CALL
withTime.execute(fs.readFile, __filename);
The first execute call above will trigger an error. The node process is going to crash and exit:
events.js:163
throw er; // Unhandled ‘error’ event
^
Error: ENOENT: no such file or directory, open ‘’
The second execute call will be affected by this crash and will potentially not get executed at all.
If we register a listener for the special error event, the behavior of the node process will change. For example:
withTime.on(‘error’, (err) => {
// do something with err, for example log it somewhere
console.log(err)
});
If we do the above, the error from the first execute call will be reported but the node process will not crash and exit. The other execute call will finish normally:
{ Error: ENOENT: no such file or directory, open ‘’ errno: -2, code: ‘ENOENT’, syscall: ‘open’, path: ‘’ }
execute: 4.276ms
Note that Node currently behaves differently with promise-based functions and just outputs a warning, but that will eventually change:
UnhandledPromiseRejectionWarning: Unhandled promise rejection (rejection id: 1): Error: ENOENT: no such file or directory, open ‘’
DeprecationWarning: Unhandled promise rejections are deprecated. In the future, promise rejections that are not handled will terminate the Node.js process with a non-zero exit code.
The other way to handle exceptions from emitted errors is to register a listener for the global uncaughtException process event. However, catching errors globally with that event is a bad idea.
The standard advice about uncaughtException is to avoid using it, but if you must do (say to report what happened or do cleanups), you should just let the process exit anyway:
process.on(‘uncaughtException’, (err) => {
// something went unhandled.
// Do any cleanup and exit anyway!
console.error(err); // don’t do just that!
// FORCE exit the process too.
process.exit(1);
});
However, imagine that multiple error events happen at the exact same time. This means the uncaughtException listener above will be triggered multiple times, which might be a problem for some cleanup code. An example of this is when multiple calls are made to a database shutdown action.
The EventEmitter module exposes a once method. This method signals to invoke the listener just once, not every time it happens. So, this is a practical use case to use with the uncaughtException because with the first uncaught exception we’ll start doing the cleanup and we know that we’re going to exit the process anyway.
Order of Listeners
If we register multiple listeners for the same event, the invocation of those listeners will be in order. The first listener that we register is the first listener that gets invoked.
// प्रथम
withTime.on(‘data’, (data) => {
console.log(Length: ${data.length});
});
// दूसरा
withTime.on(‘data’, (data) => {
console.log(Characters: ${data.toString().length});
});
withTime.execute(fs.readFile, __filename);
The above code will cause the “Length” line to be logged before the “Characters” line, because that’s the order in which we defined those listeners.
If you need to define a new listener, but have that listener invoked first, you can use the prependListener method:
// प्रथम
withTime.on(‘data’, (data) => {
console.log(Length: ${data.length});
});
// दूसरा
withTime.prependListener(‘data’, (data) => {
console.log(Characters: ${data.toString().length});
});
withTime.execute(fs.readFile, __filename);
The above will cause the “Characters” line to be logged first.
And finally, if you need to remove a listener, you can use the removeListener method.
Thanks for reading!
Node’s Streams
Streams are Node’s best and most misunderstood idea.
— Dominic Tarr
Node streams have a reputation for being hard to work with, and even harder to understand. Well I’ve got good news for you – that’s no longer the case.
Over the years, developers created a lot of packages out there with the sole purpose of making working with streams easier. However, in this article, I’m going to focus on the native Node streams API.
What Exactly Are Streams?
Streams are collections of data – just like arrays or strings. The difference is that streams might not be available all at once and they don’t have to fit in memory. This makes streams really powerful when working with large amounts of data, or data that’s coming from an external source one chunk at a time.
However, streams are not only about working with big data. They also give us the power of composability in our code. Just like we can compose powerful Linux commands by piping other smaller Linux commands, we can do exactly the same in Node with streams.

const grep = … // A stream for the grep output const wc = … // A stream for the wc input grep.pipe(wc)
Many of the built-in modules in Node implement the streaming interface:
| Readable Streams | Writable Streams |
|---|---|
| HTTP response, on the client | HTTP requests, on the client |
| HTTP requests, on the server | HTTP responses, on the server |
| fs read streams | fs write streams |
| zlib streams | zlib streams |
| crypto streams | crypto streams |
| TCP sockets | TCP sockets |
| child process stdout & stderr | child process stdin |
| process.stdin | process.stdout, process.stderr |
The list above has some examples for native Node objects that are also readable or writable streams. Some of these objects are both readable and writable streams, like TCP sockets, zlib and crypto streams.
Notice that the objects are also closely related. While an HTTP response is a readable stream on the client, it’s a writable stream on the server. This is because in the HTTP case, we basically read from one object ( http.IncomingMessage ) and write to the other ( http.ServerResponse ).
Also note how the stdio streams ( stdin , stdout , stderr ) have the inverse stream types when it comes to child processes. This allows for a really easy way to pipe to, and from, these child process stdio streams using the main process stdio streams.
A Streams Practical Example
Theory is great, but often not 100% convincing. Let’s see an example demonstrating the difference streams can make in code when it comes to memory consumption.
Let’s create a big file first:
const fs = require(“fs”); const file = fs. createWriteStream ("./big.file"); for (let i = 0; i <= 1e6; i++) { file.write( “Lorem ipsum dolor sit amet, consectetur adipisicing elit, sed do eiusmod tempor incididunt ut labore et dolore magna aliqua. Ut enim ad minim veniam, quis nostrud exercitation ullamco laboris nisi ut aliquip ex ea commodo consequat. Duis aute irure dolor in reprehenderit in voluptate velit esse cillum dolore eu fugiat nulla pariatur. Excepteur sint occaecat cupidatat non proident, sunt in culpa qui officia deserunt mollit anim id est laborum.\n” ); } file.end();
Look what I used to create that big file. A writable stream!
The fs module can be used to read from and write to files using a stream interface. In the example above, we’re writing 1 million lines with a loop to that big.file through a writable stream.
Running the script above generates a file that’s about ~400 MB.
Here’s a simple Node web server designed to exclusively serve the big.file :
const fs = require(“fs”); const server = require(“http”).createServer(); server.on(“request”, (req, res) => { fs.readFile("./big.file", (err, data) => { if (err) throw err; res.end(data); }); }); server.listen(8000);
When the server gets a request, it’ll serve the big file using the asynchronous method, fs.readFile . But hey, it’s not like we’re blocking the event loop or anything. Everything is great, right? Right?
Well, let’s see what happens when we run the server, connect to it, and monitor the memory while doing so.
When I ran the server, it started out with a normal amount of memory, 8.7 MB :
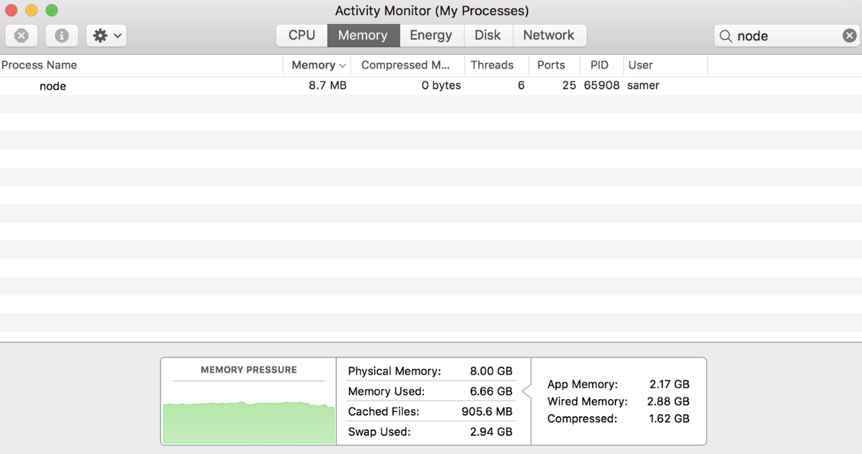
Then I connected to the server. Note what happened to the memory consumed:

The memory consumption jumped to 434.8 MB .
We basically put the whole big.file content in memory before we wrote it out to the response object. This is very inefficient.
The HTTP response object ( res in the code above) is also a writable stream. This means if we have a readable stream that represents the content of big.file , we can just pipe those two on each other and achieve mostly the same result without consuming ~400 MB of memory.
Node’s fs module can give us a readable stream for any file using the createReadStream method. We can pipe that to the response object:
const fs = require(“fs”); const server = require(“http”).createServer(); server.on(“request”, (req, res) => { const src = fs.createReadStream("./big.file"); src.pipe(res); }); server.listen(8000);
Now, when you connect to this server, a magical thing happens (look at the memory consumption):
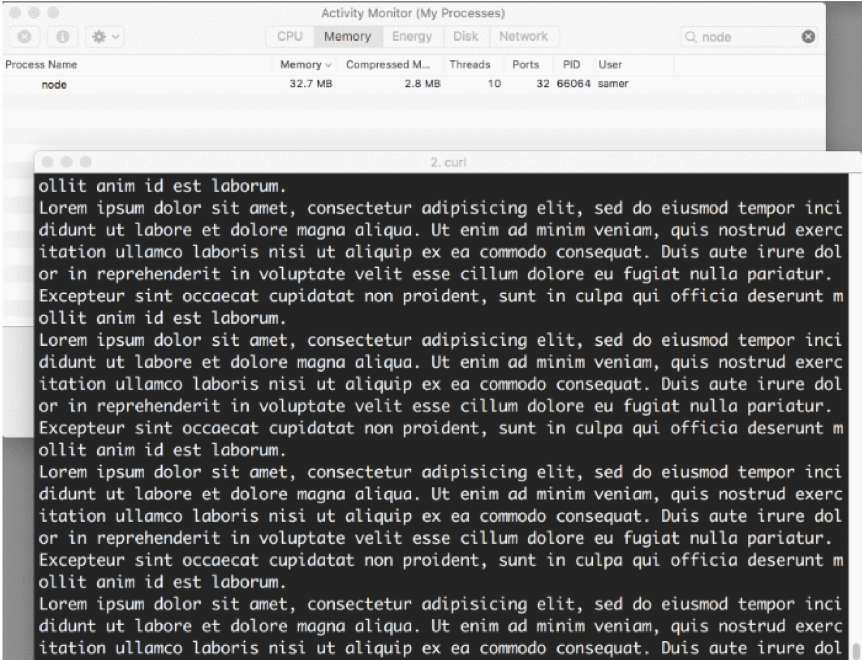
What’s happening?
When a client asks for that big file, we stream it one chunk at a time, which means we don’t buffer it in memory at all. The memory usage grew by about 25 MB and that’s it.
You can push this example to its limits. Regenerate the big.file with 5 million lines instead of just 1 million, which would take the file to well over 2 GB , and that’s actually bigger than the default buffer limit in Node.
If you try to serve that file using fs.readFile , you simply can’t by default (you can change the limits). But with fs.createReadStream , there is no problem at all streaming 2 GB of data to the requester and, best of all, the process memory usage will roughly be the same.
Ready to learn streams now?
Streams 101
There are four fundamental stream types in Node: Readable, Writable, Duplex, and Transform streams.
- A readable stream is an abstraction for a source from which data can be consumed. An example of that is the
fs.createReadStreammethod. - A writable stream is an abstraction for a destination to which data can be written. An example of that is the
fs.createWriteStreammethod. - A duplex stream is both Readable and Writable. An example of that is a TCP socket.
- A transform stream is basically a duplex stream that can be used to modify or transform the data as it is written and read. An example of that is the
zlib.createGzipstream to compress the data using gzip. You can think of a transform stream as a function where the input is the writable stream part and the output is readable stream part. You might also hear transform streams referred to as “ through streams .”
All streams are instances of EventEmitter . They emit events that can be used to read and write data. However, we can consume streams data in a simpler way using the pipe method.
The pipe method
Here’s the magic line that you need to remember:
readableSrc.pipe(writableDest);
In this simple line, we’re piping the output of a readable stream – the source of data, as the input of a writable stream – the destination. The source has to be a readable stream and the destination has to be a writable one. Of course, they can both be duplex/transform streams as well. In fact, if we’re piping into a duplex stream, we can chain pipe calls just like we do in Linux:
readableSrc .pipe(transformStream1) .pipe(transformStream2) .pipe(finalWrtitableDest);
The pipe method returns the destination stream, which enabled us to do the chaining above. For streams a (readable), b and c (duplex), and d (writable), we can:
a.pipe(b) .pipe© .pipe(d); // Which is equivalent to: a.pipe(b); b.pipe©; c.pipe(d); // Which, in Linux, is equivalent to: // $ a | b | c | d
The pipe method is the easiest way to consume streams. It’s generally recommended to either use the pipe method or consume streams with events, but avoid mixing these two. Usually when you’re using the pipe method you don’t need to use events, but if you need to consume the streams in more custom ways, events would be the way to go.
Stream events
Besides reading from a readable stream source and writing to a writable destination, the pipe method automatically manages a few things along the way. For example, it handles errors, end-of-files, and the cases when one stream is slower or faster than the other.
However, streams can also be consumed with events directly. Here’s the simplified event-equivalent code of what the pipe method mainly does to read and write data:
// readable.pipe(writable) readable.on(“data”, chunk => { writable.write(chunk); }); readable.on(“end”, () => { writable.end(); });
Here’s a list of the important events and methods that can be used with readable and writable streams:
| Readable Streams | Writable Streams | |
|---|---|---|
| Events | data, end, error, close, readable | drain, finish, error, close, pipe, unpipe |
| Methods | pipe(), unpipe(), wrap(), destroy() | write(), destroy(), end() |
| read(), unshift(), resume(), pause(), isPaused(), setEncoding() | cork(), uncork(), setDefaultEncoding() |
The events and methods in the lists above are somehow related because they are usually used together.
The most important events on a readable stream are:
- The
dataevent, which is emitted whenever the stream passes a chunk of data to the consumer - The
endevent, which is emitted when there is no more data to be consumed from the stream.
The most important events on a writable stream are:
- The
drainevent, which is a signal that the writable stream can receive more data. - The
finishevent, which is emitted when all data has been flushed to the underlying system.
Events and functions can be combined for custom and optimized use of streams. To consume a readable stream, we can use the pipe / unpipe methods or the read / unshift / resume methods. To consume a writable stream, we can make it the destination of pipe / unpipe , or just write to it with the write method and call the end method when we’re done.
Paused and Flowing Modes
Readable streams have two main modes that affect the way we can consume them:
- They can be either in the paused mode
- Or in the flowing mode
Those modes are sometimes referred to as pull and push modes.
All readable streams start in the paused mode by default, but they can be easily switched to flowing and back to paused when needed. Sometimes, the switching happens automatically.
When a readable stream is in the paused mode, we can use the read() method to read from the stream on demand. However, for a readable stream in the flowing mode, the data is continuously flowing and we have to listen to events to consume it.
In the flowing mode, data can actually be lost if no consumers are available to handle it. This is why when we have a readable stream in flowing mode, we need a data event handler. In fact, just adding a data event handler switches a paused stream into flowing mode and removing the data event handler switches the stream back to paused mode. Some of this is done for backward compatibility with the older Node streams interface.
To manually switch between these two stream modes, you can use the resume() and pause() methods.
When consuming readable streams using the pipe method, we don’t have to worry about these modes as pipe manages them automatically.
Implementing Streams
When we talk about streams in Node, there are two main different tasks:
- The task of implementing the streams.
- The task of consuming them.
So far, we’ve been talking about only consuming streams. Let’s implement some!
Stream implementers are usually the ones who require the stream module.
Implementing a Writable Stream
To implement a writable stream, we need to use the Writable constructor from the stream module.
const { Writable } = require(“stream”);
We can implement a writable stream in many ways. For example, we can extend the Writable constructor if we want:
class myWritableStream extends Writable {}
However, I prefer the simpler constructor approach. We just create an object from the Writable constructor and pass it a number of options. The only required option is a write function, which exposes the chunk of data to be written.
const { Writable } = require(“stream”); const outStream = new Writable({ write(chunk, encoding, callback) { console.log(chunk.toString()); callback(); } }); process.stdin.pipe(outStream);
This write method takes three arguments.
- The
chunkis usually a buffer unless we configure the stream differently. - The
encodingargument is needed in that case, but we can usually ignore it. - The
callbackis a function that we need to call after we’re done processing the data chunk. It’s what signals whether the write was successful or not. To signal a failure, call the callback with an error object.
In outStream , we simply console.log the chunk as a string and call the callback after that without an error to indicate success. This is a very simple and probably not so useful echo stream. It will echo back anything it receives.
To consume this stream, we can simply use it with process.stdin , which is a readable stream, so we can just pipe process.stdin into our outStream .
When we run the code above, anything we type into process.stdin will be echoed back using the outStream console.log line.
This is not a very useful stream to implement because it’s actually already implemented and built-in. This is very much equivalent to process.stdout . We can just pipe stdin into stdout and we’ll get the exact same echo feature with this single line:
process.stdin.pipe(process.stdout);
Implement a Readable Stream
To implement a readable stream, we require the Readable interface and construct an object from it:
const { Readable } = require(“stream”); const inStream = new Readable({});
There is a simple way to implement readable streams. We can just directly push the data that we want the consumers to consume.
const { Readable } = require(“stream”); const inStream = new Readable(); inStream.push(“ABCDEFGHIJKLM”); inStream.push(“NOPQRSTUVWXYZ”); inStream.push(null); // No more data inStream.pipe(process.stdout);
When we push a null object, that means we want to signal that the stream does not have any more data.
To consume this simple readable stream, we can simply pipe it into the writable stream process.stdout .
When we run the code above, we’ll be reading all the data from inStream and echoing it to the standard out. Very simple, but also not very efficient.
We’re basically pushing all the data in the stream before & piping it to process.stdout . The much better way is to push data on demand , when a consumer asks for it. We can do that by implementing the read() method in a readable stream configuration:
const inStream = new Readable({ read (size) { // there is a demand on the data… // Someone wants to read it. } });
When the read method is called on a readable stream, the implementation can push partial data to the queue. For example, we can push one letter at a time, starting with character code 65 (which represents A ), and increment the code on every push:
const inStream = new Readable({ read(size) { this.push (String.fromCharCode(this.currentCharCode++)); if (this.currentCharCode > 90) { this.push (null); } } }); inStream.currentCharCode = 65; inStream.pipe(process.stdout);
While the consumer is reading a readable stream, the read method will continue to fire and we’ll push more letters. We need to stop this cycle somewhere, and that’s why I used an if statement to push null when the currentCharCode is greater than 90 (which represents Z ).
This code is equivalent to the simpler one we started with, but now we’re pushing data on demand when the consumer asks for it. You should always do that.
Implementing Duplex/Transform Streams
With Duplex streams, we can implement both readable and writable streams with the same object. It’s as if we inherit from both interfaces.
Here’s an example duplex stream that combines the two writable and readable examples implemented above:
const { Duplex } = require(“stream”); const inoutStream = new Duplex({ write(chunk, encoding, callback) { console.log(chunk.toString()); callback(); }, read(size) { this.push(String.fromCharCode(this.currentCharCode++)); if (this.currentCharCode > 90) { this.push(null); } } }); inoutStream.currentCharCode = 65; process.stdin.pipe(inoutStream).pipe(process.stdout);
By combining the methods, we can use this duplex stream to read the letters from A to Z and we can also use it for its echo feature. We pipe the readable stdin stream into this duplex stream to use the echo feature and we pipe the duplex stream itself into the writable stdout stream to see the letters A through Z .
It’s important to understand that the readable and writable sides of a duplex stream operate completely independently from one another. This is merely a grouping of two features into an object.
A transform stream is the more interesting duplex stream because its output is computed from its input.
For a transform stream, we don’t have to implement the read or write methods, we only need to implement a transform method, which combines both of them. It has the signature of the write method and we can use it to push data as well.
Here’s a simple transform stream which echoes back anything you type into it after transforming it to uppercase format:
const { Transform } = require(“stream”); const upperCaseTr = new Transform({ transform (chunk, encoding, callback) { this.push(chunk.toString().toUpperCase()); callback(); } }); process.stdin.pipe(upperCaseTr).pipe(process.stdout);
In this transform stream, which we’re consuming exactly like the previous duplex stream example, we only implemented a transform() method. In that method, we convert the chunk into its uppercase version and then push that version as the readable part.
Streams Object Mode
By default, streams expect Buffer/String values. There is an objectMode flag that we can set to have the stream accept any JavaScript object.
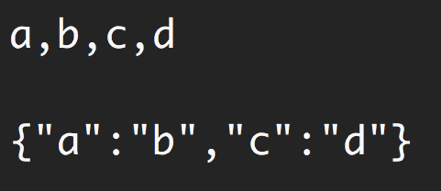
Here’s a simple example to demonstrate that. The following combination of transform streams makes a feature to map a string of comma-separated values into a JavaScript object. So "a,b,c,d" becomes {a: b, c: d}
const { Transform } = require(“stream”); const commaSplitter = new Transform({ readableObjectMode: true, transform(chunk, encoding, callback) { this.push( chunk .toString() .trim() .split(",") ); callback(); } }); const arrayToObject = new Transform({ readableObjectMode : true, writableObjectMode : true, transform(chunk, encoding, callback) { const obj = {}; for (let i = 0; i < chunk.length; i += 2) { obj[chunk[i]] = chunk[i + 1]; } this.push(obj); callback(); } }); const objectToString = new Transform({ writableObjectMode : true, transform(chunk, encoding, callback) { this.push(JSON.stringify(chunk) + “\n”); callback(); } });
Then, to use these streams:
process.stdin .pipe(commaSplitter) .pipe(arrayToObject) .pipe(objectToString) .pipe(process.stdout);
We pass the input string (for example, “ a,b,c,d ”) through commaSplitter , which pushes an array as its readable data ( [“a”, “b”, “c”, “d”] ). Adding the readableObjectMode flag on that stream is necessary because we’re pushing an object there, not a string.
We then take the array and pipe it into the arrayToObject stream. We need a writableObjectMode flag to make that stream accept an object. It’ll also push an object (the input array mapped into an object) and that’s why we also needed the readableObjectMode flag there as well. The last objectToString stream accepts an object but pushes out a string, and that’s why we only needed a writableObjectMode flag there. The readable part is a normal string (the stringified object).
Built-in transform streams
Node has a few very useful built-in transform streams such as the zliband crypto streams.
Here’s an example that uses the zlib.createGzip() stream combined with the fs readable/writable streams to create a file-compression script:
const fs = require(“fs”); const zlib = require(“zlib”); const file = process.argv[2]; fs.createReadStream(file) .pipe(zlib.createGzip()) .pipe(fs.createWriteStream(file + “.gz”));
You can use this script to gzip any file you pass as the argument. We’re piping a readable stream for that file into the zlib built-in transform stream and then into a writable stream for the new gzipped file. Simple.
The cool thing about using pipes is that we can actually combine them with events if we need to. Say, for example, I want the user to see a progress indicator while the script is working and a “Done” message when the script is done. Since the pipe method returns the destination stream, we can chain the registration of events handlers as well:
const fs = require(“fs”); const zlib = require(“zlib”); const file = process.argv[2]; fs.createReadStream(file) .pipe(zlib.createGzip()) .on(“data”, () => process.stdout.write(".")) .pipe(fs.createWriteStream(file + “.zz”)) .on(“finish”, () => console.log(“Done”));
With the pipe method, we get to easily consume streams, but we can still further customize our interaction with those streams using events where needed.
What’s great about the pipe method though is that we can use it to compose our program piece by piece, in a much readable way. For example, instead of listening to the data event above, we can simply create a transform stream to report progress and replace the .on() call with another .pipe() call:
const fs = require(“fs”); const zlib = require(“zlib”); const file = process.argv[2]; const { Transform } = require(“stream”); const reportProgress = new Transform({ transform(chunk, encoding, callback) { process.stdout.write("."); callback(null, chunk); } }); fs.createReadStream(file) .pipe(zlib.createGzip()) .pipe(reportProgress) .pipe(fs.createWriteStream(file + “.zz”)) .on(“finish”, () => console.log(“Done”));
This reportProgress stream is a simple pass-through stream, but it reports the progress to standard out as well. Note how I used the second argument in the callback() function to push the data inside the transform() method. This is equivalent to pushing the data first.
The applications of combining streams are endless. For example, if we need to encrypt the file before or after we gzip it, all we need to do is pipe another transform stream in that exact order that we needed. We can use Node’s crypto module for that:
const crypto = require(“crypto”); // … fs.createReadStream(file) .pipe(zlib.createGzip()) .pipe(crypto.createCipher(“aes192”, “a_secret”)) .pipe(reportProgress) .pipe(fs.createWriteStream(file + “.zz”)) .on(“finish”, () => console.log(“Done”));
The script above compresses and then encrypts the file it receives as an argument. Only those who have the secret can use the outputted file. We can’t unzip this file with the normal unzip utilities because it’s encrypted.
To actually be able to unzip anything zipped with the script above, we need to use the opposite streams for crypto and zlib in a reverse order, which is simple:
fs.createReadStream(file) .pipe(crypto.createDecipher(“aes192”, “a_secret”)) .pipe(zlib.createGunzip()) .pipe(reportProgress) .pipe(fs.createWriteStream(file.slice(0, -3))) .on(“finish”, () => console.log(“Done”));
Assuming the file used is the compressed version, the code above will create a read stream from that, pipe it into the crypto createDecipher() stream (using the same secret), pipe the output of that into the zlib createGunzip() stream, and then write things out back to a file without the extension part.
Thanks for reading!