Node’s Child Processes
Single-threaded, non-blocking performance in Node works great for a single process. But eventually, one process in one CPU is not going to be enough to handle the increasing workload of your application.
No matter how powerful your server may be, a single thread can only support a limited load.
The fact that Node runs in a single thread does not mean that we can’t take advantage of multiple processes and, of course, multiple machines as well.
Using multiple processes is the best way to scale a Node application. Node is designed for building distributed applications with many nodes. This is why it’s named Node . Scalability is baked into the platform and it’s not something you start thinking about later in the lifetime of an application.
The Child Processes Module
We can easily spin a child process using Node’s child_process module and those child processes can easily communicate with each other with a messaging system.
The child_process module enables us to access Operating System functionalities by running any system command inside a, well, child process.
We can control that child process input stream and listen to its output stream. We can also control the arguments to be passed to the underlying OS command, and we can do whatever we want with that command’s output. For example, we can pipe the output of one command as the input to another (just like we do in Linux) as all inputs and outputs of these commands can be presented to us using Node streams.
There are four different ways to create a child process in Node: spawn() , fork() , exec() , and execFile() .
We’re going to see the differences between these four functions and when to use each.
Spawned Child Processes
The spawn function launches a command in a new process and we can use it to pass that command any arguments. For example, here’s code to spawn a new process that will execute the pwd command.
const { spawn } = require(“child_process”); const child = spawn(“pwd”);
We simply destructure the spawn function out of the child_process module and execute it with the OS command as the first argument.
The result of executing the spawn function (the child object above) is a ChildProcess instance, which implements the EventEmitter API. This means we can register handlers for events on this child object directly. For example, we can do something when the child process exits by registering a handler for the exit event:
child.on(" exit ", function(code, signal) { console.log( "child process exited with " + code ${code} and signal ${signal} ); });
The handler above gives us the exit code for the child process and the signal , if any, that was used to terminate the child process. This signal variable is null when the child process exits normally.
The other events that we can register handlers for with the ChildProcess instances are disconnect , error , close , and message .
- The
disconnectevent is emitted when the parent process manually calls thechild.disconnectmethod. - The
errorevent is emitted if the process could not be spawned or killed. - The
closeevent is emitted when thestdiostreams of a child process get closed. - The
messageevent is the most important one. It’s emitted when the child process uses theprocess.send()function to send messages. This is how parent/child processes can communicate with each other. We’ll see an example of this below.
Every child process also gets the three standard stdio streams, which we can access using child.stdin , child.stdout , and child.stderr .
When those streams get closed, the child process that was using them will emit the close event. This close event is different than the exit event because multiple child processes might share the same stdio streams, so one child process exiting does not mean that the streams got closed.
Since all streams are event emitters, we can listen to different events on those stdio streams that are attached to every child process. Unlike in a normal process though, in a child process the stdout / stderr streams are readable streams while the stdin stream is a writable one. This is basically the inverse of those types found in a main process. The events we can use for those streams are the standard ones. Most importantly, on the readable streams we can listen to the data event, which will have the output of the command or any error encountered while executing the command:
child.stdout.on(“data”, data => { console.log(child stdout:\n${data}); }); child.stderr.on(“data”, data => { console.error(child stderr:\n${data}); });
The two handlers above will log both cases to the main process stdout and stderr . When we execute the spawn function above, the output of the pwd command gets printed and the child process exits with code 0 , which means no error occurred.
We can pass arguments to the command that’s executed by the spawn function using the second argument of the spawn function, which is an array of all the arguments to be passed to the command. For example, to execute the find command on the current directory with a -type f argument (to list files only), we can do:
const child = spawn(“find”, [".", “-type”, “f”]);
If an error occurs during the execution of the command (for example, if we give find an invalid destination above) the child.stderr data event handler will be triggered and the exit event handler will report an exit code of 1 , which signifies that an error has occurred. The error values actually depend on the host OS and the type of error.
A child process stdin is a writable stream. We can use it to send a command some input. Just like any writable stream, the easiest way to consume it is using the pipe function. We simply pipe a readable stream into a writable stream. Since the main process stdin is a readable stream, we can pipe that into a child process stdin stream. For example:
const { spawn } = require(“child_process”); const child = spawn(“wc”); process.stdin.pipe(child.stdin); child.stdout.on(“data”, data => { console.log(child stdout:\n${data}); });
In the example above, the child process invokes the wc command, which counts lines, words, and characters in Linux. We then pipe the main process stdin (which is a readable stream) into the child process stdin (which is a writable stream). The result of this combination is that we get a standard input mode where we can type something, and when we hit Ctrl+D what we typed will be used as the input of the wc command.
We can also pipe the standard input/output of multiple processes on each other, just like we can do with Linux commands. For example, we can pipe the stdout of the find command to the stdin of the wc command to count all the files in the current directory:
const { spawn } = require(“child_process”); const find = spawn(“find”, [".", “-type”, “f”]); const wc = spawn(“wc”, ["-l"]); find.stdout.pipe(wc.stdin); wc.stdout.on(“data”, data => { console.log(Number of files ${data}); });
I added the -l argument to the wc command to make it count only the lines. When executed, the code above will output a count of all files in all directories under the current one.
Shell Syntax and the exec Function
By default, the spawn function does not create a shell to execute the command we pass into it. This makes it slightly more efficient than the exec function, which does create a shell. The exec function has one other major difference. It buffers the command’s generated output and passes the whole output value to a callback function (instead of using streams, which is what spawn does).
Here’s the previous find | wc example implemented with an exec function.
const { exec } = require(“child_process”); exec(“find . -type f | wc -l”, (err, stdout, stderr) => { if (err) { console.error(exec error: ${err}); return; } console.log(Number of files ${stdout}); });
Since the exec function uses a shell to execute the command, we can use the shell synta directly here, making use of the shell pipe feature.
Note that using the shell syntax comes with a security risk if you’re executing any kind of dynamic input provided externally. A user can simply do a command injection attack using shell syntax characters like ; and $ (for example, command + '; rm -rf ~' )
The exec function buffers the output and passes it to the callback function (the second argument to exec ) as the stdout argument there. This stdout argument is the command’s output that we want to print out.
The exec function is a good choice if you need to use the shell syntax and if the size of the data expected from the command is small. (Remember, exec will buffer the whole data in memory before returning it.)
The spawn function is a much better choice when the size of the data expected from the command is large because that data will be streamed with the standard IO objects.
We can make the spawned child process inherit the standard IO objects of its parents if we want to, but more importantly, we can make the spawn function use the shell syntax as well. Here’s the same find | wc command implemented with the spawn function:
const child = spawn(“find . -type f | wc -l”, { stdio: “inherit”, shell: true });
Because of the stdio: 'inherit' option above, when we execute the code, the child process inherits the main process stdin , stdout , and stderr . This causes the child process data events handlers to be triggered on the main process.stdout stream, making the script output the result right away.
Because of the shell: true option above, we were able to use the shell syntax in the executed command, just like we did with exec . But with this code, we still get the advantage of the streaming of data that the spawn function gives us. This is really the best of both worlds.
There are a few other good options we can use in the last argument to the child_process functions besides shell and stdio . For example, we can use the cwd option to change the working directory of the script. For example, here’s the same count-all-files example done with a spawn function using a shell and with a working directory set to my Downloads folder. The cwd option here will make the script count all files I have in ~/Downloads:
const child = spawn(“find . -type f | wc -l”, { stdio: “inherit”, shell: true, cwd: “/Users/samer/Downloads” });
Another option we can use is env to specify the environment variables that will be visible to the new child process. The default for this option is process.env which gives any command access to the current process environment. If we want to override that behavior, we can simply pass an empty object as the env option or new values there to be considered as the only environment variables:
const child = spawn(“echo $ANSWER”, { stdio: “inherit”, shell: true, env: { ANSWER: 42 } });
The echo command above does not have access to the parent process’s environment variables. For example, it cannot access $HOME , but it can access $ANSWER because it was passed as a custom environment variable through the env option.
One last important child process option to explain here is the detached option, which makes the child process run independently of its parent process.
Assuming we have a file timer.js that keeps the event loop busy:
setTimeout(() => { // keep the event loop busy }, 20000);
We can execute it in the background using the detachedoption:
const { spawn } = require(“child_process”); const child = spawn(“node”, [“timer.js”], { detached: true, stdio: “ignore” }); child.unref();
The exact behavior of detached child processes depends on the OS. On Windows, they will have their own console window while on Linux they will be made the leaders of new process groups and sessions.
If the unref function is called on the detached process, the parent process can exit independently of the child. This can be useful if the child is executing a long-running process, but to keep it running in the background the child’s stdio configurations also have to be independent of the parent.
The example above will run a node script ( timer.js ) in the background by detaching and also ignoring its parent stdio file descriptors so that the parent can terminate while the child keeps running in the background.
The execFile Function
If you need to execute a file without using a shell, the execFile function is what you need. It behaves exactly like the exec function, but does not use a shell, which makes it a bit more efficient. On Windows, some files cannot be executed on their own, like .bat or .cmd files. Those files cannot be executed with execFile and either exec or spawn with shell set to true is required to execute them.
The *Sync Functions
The functions spawn , exec , and execFile from the child_process module also have synchronous blocking versions that will wait until the child process exits.
const { spawnSync, execSync, execFileSync } = require(“child_process”);
Those synchronous versions are potentially useful when trying to simplify scripting tasks or any startup processing tasks, but they should be avoided otherwise.
The fork Function
The fork function is a variation of the spawn function for spawning node processes. The biggest difference between spawn and fork is that a communication channel is established to the child process when using fork , so we can use the send function on the forked process along with the global process object itself to exchange messages between the parent and forked processes. We do this through the EventEmitter module interface. Here’s an example:
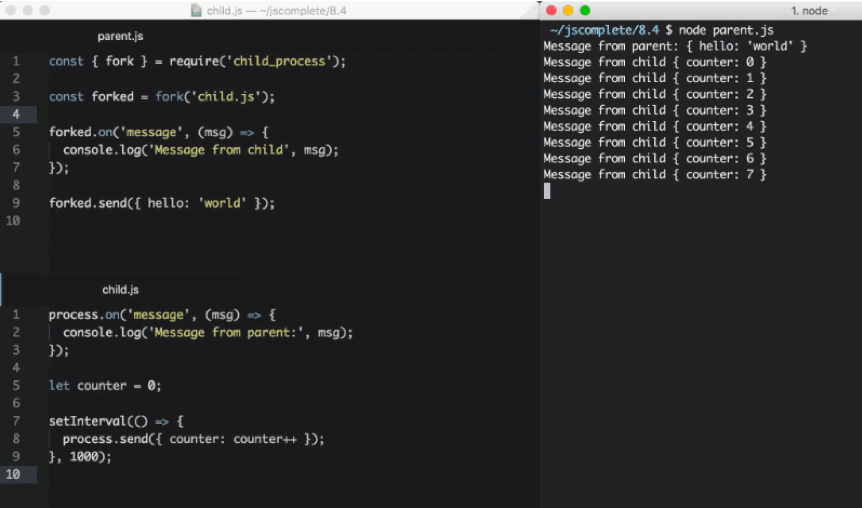
The parent file, parent.js:
const { fork } = require(“child_process”); const forked = fork(“child.js”); forked.on(“message”, msg => { console.log(“Message from child”, msg); }); forked.send({ hello: “world” });
The child file, child.js :
process.on(“message”, msg => { console.log(“Message from parent:”, msg); }); let counter = 0; setInterval(() => { process.send({ counter: counter++ }); }, 1000);
In the parent file above, we fork child.js (which will execute the file with the node command) and then we listen for the message event. The message event will be emitted whenever the child uses process.send , which we’re doing every second.
To pass down messages from the parent to the child, we can execute the send function on the forked object itself. Then, in the child script, we can listen to the message event on the global process object.
When executing the parent.js file above, it’ll first send down the { hello: 'world' } object to be printed by the forked child process and then the forked child process will send an incremented counter value every second to be printed by the parent process.
Let’s do a more practical example about the fork function.
Let’s say we have an http server that handles two endpoints. One of these endpoints ( /compute below ) is computationally expensive and will take a few seconds to complete. We can use a long for loop to simulate that:
const http = require(“http”); const longComputation = () => { let sum = 0; for (let i = 0; i < 1e9; i++) { sum += i; } return sum; }; const server = http.createServer(); server.on(“request”, (req, res) => { if (req.url === “/compute”) { const sum = longComputation(); return res.end(
Sum is ${sum}
); } else { res.end(“Ok”); } }); server.listen(3000);
This program has a big problem; when the /compute endpoint is requested, the server will not be able to handle any other requests because the event loop is busy with the long for loop operation.
There are a few ways we can solve this problem depending on the nature of the long operation but one solution that works for all operations is to just move the computational operation into another process using fork .
We first move the whole longComputation function into its own file and make it invoke that function when instructed via a message from the main process:
In a new compute.js file:
const longComputation = () => { let sum = 0; for (let i = 0; i < 1e9; i++) { sum += i; } return sum; }; process.on(“message”, msg => { const sum = longComputation(); process.send(sum); });
Now, instead of doing the long operation in the main process event loop, we can fork the compute.js file and use the messages interface to communicate messages between the server and the forked process.
const http = require(“http”); const { fork } = require(“child_process”); const server = http.createServer(); server.on(“request”, (req, res) => { if (req.url === “/compute”) { const compute = fork(“compute.js”); compute.send(“start”); compute.on(“message”, sum => { res.end(
Sum is ${sum}
); }); } else { res.end(“Ok”); } }); server.listen(3000);
When a request to /compute happens now with the above code, we simply send a message to the forked process to start executing the long operation. The main process’s event loop will not be blocked.
Once the forked process is done with that long operation, it can send its result back to the parent process using process.send .
In the parent process, we listen to the message event on the forked child process itself. When we get that event, we’ll have a sum value ready for us to send to the requesting user over http.
The code above is limited by the number of processes we can fork, but when we execute it and request the long computation endpoint over http, the main server is not blocked at all and can take further requests.
Node’s cluster module, which is the topic of the likn:/learn/node-beyond-basics/scaling-node-apps[next article^], is based on this idea of child process forking and load balancing the requests among the many forks that we can create on any system.
Scaling Node.js Applications
Scalability in Node is not an afterthought. It’s something that’s baked into the core of the runtime. Node is named Node to emphasize the idea that a Node application should comprise multiple small distributed nodes that communicate with each other.
Are you running multiple nodes for your Node applications? Are you running a Node process on every CPU core of your production machines and load balancing all the requests among them? Did you know that Node has a built-in module to help with that?
Node’s cluster module not only provides an out-of-the-box solution to utilizing the full CPU power of a machine, but it also helps with increasing the availability of your Node processes and provides an option to restart the whole application with a zero downtime. This article covers all that goodness and more.
Strategies of Scalability
The workload is the most popular reason we scale our applications, but it’s not the only one. We also scale our applications to increase their availability and tolerance to failure.
There are mainly three different things we can do to scale an application:
1 – Cloning
The easiest thing to do to scale a big application is to clone it multiple times and have each cloned instance handle part of the workload (with a load balancer, for example). This does not cost a lot in terms of development time and it’s highly effective. This strategy is the minimum you should do and Node has the built-in module, named cluster , to make it easier for you to implement the cloning strategy on a single server.
2 – Decomposing
We can also scale an application by decomposing it based on functionalities and services. This means having multiple applications with different code bases and sometimes with their own dedicated databases and User Interfaces.
This strategy is commonly associated with the term Microservice , where micro indicates that those services should be as small as possible, but in reality, the size of the service is not what’s important but rather the enforcement of loose coupling and high cohesion between services. The implementation of this strategy is often not easy and could result in long-term unexpected problems, but when done right the advantages are great.
3 – Splitting
We can also split the application into multiple instances where each instance is responsible for only a part of the application’s data. This strategy is often named horizontal partitioning , or sharding , in databases. Data partitioning requires a lookup step before each operation to determine which instance of the application to use. For example, maybe we want to partition our users based on their country or language. We need to do a lookup of that information first.
Successfully scaling a big application should eventually implement all three strategies. Node makes it easy to do so but I am going to focus on the cloning strategy in this article and explore the built-in tools available in Node to implement it.
The Cluster Module
The cluster module can be used to enable load balancing over an environment’s multiple CPU cores. It’s based on the child process module fork method and it basically allows us to fork the main application process as many times as we have CPU cores. It will then take over and load balance all requests to the main process across all forked processes.
The cluster module is Node’s helper for us to implement the cloning scalability strategy, but only on one machine. When you have a big machine with a lot of resources or when it’s easier and cheaper to add more resources to one machine rather than adding new machines, the cluster module is a great option for a really quick implementation of the cloning strategy.
Even small machines usually have multiple cores and even if you’re not worried about the load on your Node server, you should enable the cluster module anyway to increase your server availability and fault-tolerance. It’s a simple step, and when using a process manager (like PM2 ) it becomes as simple as just providing an argument to the launch command!
But let me tell you how to use the cluster module natively and explain how it works.
The structure of what the cluster module does is simple. We create a master process which forks a number of worker processes and manages them. Each worker process represents an instance of the application that we want to scale. All incoming requests are handled by the master process, which is the one that decides which worker process should handle an incoming request.
The master process’s job is easy because it actually just uses a round-robin algorithm to pick a worker process. This is enabled by default on all platforms except Windows and it can be globally modified to let the load-balancing be handled by the operation system itself.
The round-robin algorithm distributes the load evenly across all available processes on a rotational basis. The first request is forwarded to the first worker process, the second to the next worker process in the list, and so on. When the end of the list is reached, the algorithm starts again from the beginning.
This is one of the simplest and most used load balancing algorithms, but it’s not the only one. More featured algorithms allow assigning priorities and selecting the least loaded server or the one with the fastest response time.
Load-Balancing an HTTP Server
Let’s clone and load balance a simple HTTP server using the cluster module. Here’s the simple Node’s hello-world example server slightly modified to simulate some CPU work before responding:
server.js
const http = require(“http”); const pid = process.pid; http .createServer((req, res) => { for (let i = 0; i < 1e7; i++); // simulate CPU work res.end(); }) .listen(8080, () => { console.log(Started process ${pid}); });
To verify that the balancer we’re going to create is going to work, I’ve included the process pid in the HTTP response to identify which instance of the application is actually handling a request.
Before we create a cluster to clone this server into multiple workers, let’s do a simple benchmark of how many requests this server can handle per second. We can use the Apache Benchmarking tool ( ab ) for that. After running the simple server.js code above, run this ab command:
ab -c200 -t10 http://localhost:8080/
This command will test-load the server with 200 concurrent connections for 10 seconds.
On my machine, the single node server was able to handle about 51 requests per second. Of course, the results here will be different on different platforms and this is a very simplified test of performance that’s not a 100% accurate, but it will clearly show the difference that a cluster would make in a multi-core environment.
Now that we have a reference benchmark, we can scale the application with the cloning strategy using the cluster module.
On the same level as the server.js file above, we can create a new file ( cluster.js ) for the master process with this content (explanation follows):
cluster.js
const cluster = require(“cluster”); const os = require(“os”); if (cluster.isMaster) { const cpus = os.cpus().length; console.log(Forking for ${cpus} CPUs); for (let i = 0; i < cpus; i++) { cluster.fork(); } } else { require("./server"); }
In cluster.js , we first required both the cluster module and the os module. We use the os module to read the number of CPU cores we can work with using os.cpus().
The cluster module gives us the handy Boolean flag isMaster to determine if this cluster.js file is being loaded as a master process or not. The first time we execute this file, we will be executing the master process and that isMaster flag will be set to true. In this case, we can instruct the master process to fork our server as many times as we have CPU cores.
Now, we just read the number of CPUs we have using the os module, then with a for loop over that number, we call the cluster.fork method. The for loop will simply create as many workers as the number of CPUs in the system to take advantage of all the available processing power.
When the cluster.fork line is executed from the master process, the current file, cluster.js , is run again, but this time in worker mode with the isMaster flag set to false .
There is actually another flag set to true in this case if you need to use it, which is the isWorker flag.
When the application runs as a worker, it can start doing the actual work. This is where we need to define our server logic, which, for this example, we can do by requiring the server.js file that we have already.
That’s basically it. That’s how easy it is to take advantage of all the processing power in a machine. To test the cluster, run the cluster.js file:
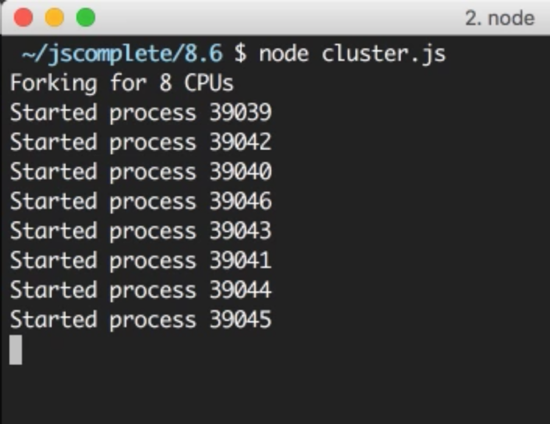
I have 8 cores on my machine so it started 8 processes. It’s important to understand that these are completely different Node processes. Each worker process here will have its own event loop and memory space.
When we now hit the web server multiple times, the requests will start to get handled by different worker processes with different process IDs. The workers will not be exactly rotated in sequence because the cluster module performs some optimizations when picking the next worker, but the load will be somehow distributed among the different worker processes.
We can use the same ab command above to load-test this cluster of processes. The cluster I created on my machine was able to handle 181 requests per second in comparison to the 51 requests per second that we got using a single Node process. The performance of this simple application tripled with just a few lines of code.
Broadcasting Messages to All Workers
Communicating between the master process and the workers is simple because under the hood the cluster module is just using the child_process.fork API, which means we also have communication channels available between the master process and each worker.
Based on the server.js/cluster.js example above, we can access the list of worker objects using cluster.workers , which is an object that holds a reference to all workers and can be used to read information about these workers. Since we have communication channels between the master process and all workers, to broadcast a message to all them we just need a simple loop over all the workers. For example:
Object.values(cluster.workers).forEach(worker => { worker.send(Hello Worker ${worker.id}); });
We simply used Object.values to get an array of all workers from the cluster.workers object. Then, for each worker, we can use the send function to send over any value that we want.
In a worker file, server.js in our example, to read a message received from this master process, we can register a handler for the message event on the global process object. For example:
process.on(“message”, msg => { console.log(Message from master: ${msg}); });
Here is what I see when I test these two additions to the cluster/server example:
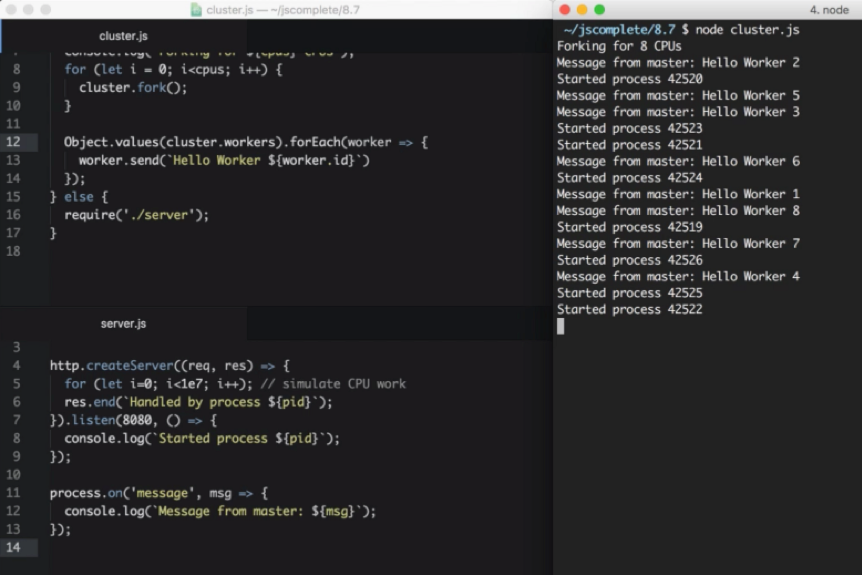
Every worker received a message from the master process. Note how the workers did not start in order.
Let’s make this communication example a little bit more practical. Let’s say we want our server to reply with the number of users we have created in our database. We’ll create a mock function that returns the number of users we have in the database and just have it square its value every time it’s called (dream growth):
// Mock DB Call const numberOfUsersInDB = function() { this.count = this.count || 5; this.count = this.count _ this.count; return this.count; }
Every time numberOfUsersInDB is called, we’ll assume that a database connection has been made. What we want to do here – to avoid multiple DB requests – is to cache this call for a certain period of time, such as 10 seconds. However, we still don’t want the 8 forked workers to do their own DB requests and end up with 8 DB requests every 10 seconds. Instead, we can have the master process do just one request and tell all of the 8 workers about the new value for the user count using the communication interface.
In the master process mode, we can use the same loop to broadcast the users count value to all workers:
// Right after the fork loop within the isMaster=true block const updateWorkers = () => { const usersCount = numberOfUsersInDB(); Object.values(cluster.workers).forEach(worker => { worker.send({ usersCount }); }); }; updateWorkers(); setInterval(updateWorkers, 10000);
Here we’re invoking updateWorkers for the first time and then invoking it every 10 seconds using a setInterval . This way, every 10 seconds, all workers will receive the new user count value over the process communication channel and only one database connection will be made.
In the server code, we can use the usersCount value using the same message event handler. We can simply cache that value with a module global variable and use it anywhere we want.
For example:
const http = require(“http”); const pid = process.pid; let usersCount; http .createServer((req, res) => { for (let i = 0; i < 1e7; i++); // simulate CPU work res.write(Handled by process ${pid}\n); res.end(Users: ${usersCount}); }) .listen(8080, () => { console.log(Started process ${pid}); }); process.on(“message”, msg => { usersCount = msg.usersCount; });
The above code makes the worker web server respond with the cached usersCount value. If you test the cluster code now, during the first 10 seconds you’ll get “25” as the users count from all workers (and only one DB request would be made). After another 10 seconds, all workers would start reporting the new user count, 625 (and only one other DB request would be made).
This is all possible thanks to the communication channels between the master process and all workers.
Increasing Server Availability
One of the problems in running a single instance of a Node application is that when that instance crashes, it has to be restarted. This causes some downtime between these two actions, even if the process was automated as it should be.
This also applies to the case when the server has to be restarted to deploy new code. With one instance, there will be downtime that affects the availability of the system.
When we have multiple instances, the availability of the system can be easily increased with just a few extra lines of code.
To simulate a random crash in the server process, we can simply do a process.exit call inside a timer that fires after a random amount of time:
// In server.js setTimeout(() => { process.exit(1) // death by random timeout }, Math.random() * 10000);
When a worker process exits like this, the master process will be notified using the exit event on the cluster model object. We can register a handler for that event and just fork a new worker process when any worker process exits.
For example:
// Right after the fork loop within the isMaster=true block cluster .on(" exit ", (worker, code, signal) => { if (code !== 0 && !worker.exitedAfterDisconnect) { console.log(Worker ${worker.id} crashed. + “Starting a new worker…”); cluster.fork(); } });
It’s good to add the if condition above to make sure the worker process actually crashed and was not manually disconnected or killed by the master process itself. For example, the master process might decide that we are using too many resources based on the load patterns it sees and it will need to kill a few workers in that case. To do so, we can use the disconnect methods on any worker and, in that case, the exitedAfterDisconnect flag will be set to true so if statement above will guard against forking a new worker.
If we run the cluster with the handler above (and the random crash in server.js ), after a random number of seconds, workers will start to crash and the master process will immediately fork new workers to increase the availability of the system. You can actually measure the availability using the same ab command and see how many requests the server will not be able to handle overall (because some of the unlucky requests will have to face the crash case and that’s hard to avoid.)
When I tested the code, only 17 requests failed out of over 1800 in the 10-second testing interval with 200 concurrent requests.
That’s over 99% availability. By just adding a few lines of code, we now don’t have to worry about process crashes anymore. The master guardian will keep an eye on those processes for us.
Zero-downtime Restarts
What about the case when we want to restart all worker processes when, for example, we need to deploy new code?
We have multiple instances running, so instead of restarting them together we can simply restart them one at a time to allow other workers to continue to serve requests while one worker is being restarted.
Implementing this with the cluster module is easy. Since we don’t want to restart the master process once it’s up, we need a way to send this master process a command to instruct it to start restarting its workers. This is easy on Linux systems because we can simply listen to a process signal like SIGUSR2 , which we can trigger by using the kill command on the process id and passing that signal:
// In Node process.on(‘SIGUSR2’, () => { … }); // To trigger that $ kill -SIGUSR2 PID
This way, the master process will not be killed and we have a way to instruct it to start doing something. SIGUSR2 is a proper signal to use here because this will be a user command.
If you’re wondering why not SIGUSR1 , it’s because Node uses that for its debugger and you want to avoid any conflicts.
Unfortunately, on Windows, these process signals are not supported and we would have to find another way to command the master process to do something. There are some alternatives. For example, we can use standard input or socket input. We can also monitor the existence of a process.pid file and track any remove event on it. However, to keep this example simple, we’ll just assume this server is running on a Linux platform.
Node works very well on Windows, but I think it’s a much safer option to host production Node applications on a Linux platform. This is not just because of Node itself, but many other production tools which are much more stable on Linux.
By the way, on recent versions of Windows, you can actually use a Linux subsystem and it works very well. I’ve tested it myself and it was nothing short of impressive. If you’re developing Node applications on Windows, check out the Linux Subsystem for Windows and give it a try.
In our example, when the master process receives the SIGUSR2 signal, that means it’s time for it to restart its workers, but we want to do that one worker at a time. This simply means the master process should only restart the next worker when it’s done restarting the current one.
To begin this task, we need to get a reference to all current workers using the cluster.workers object and we can simply just store the workers in an array:
const workers = Object.values(cluster.workers);
Then, we can create a restartWorker function that receives the index of the worker to be restarted. This way we can do the restarting in sequence by having the function call itself when it’s ready for the next worker. Here’s an example restartWorker function that we can use (explanation follows):
const restartWorker = workerIndex => { const worker = workers[workerIndex]; if (!worker) return; worker.on(“exit”, () => { if (!worker.exitedAfterDisconnect) return; console.log(Exited process ${worker.process.pid}); cluster.fork().on(“listening”, () => { restartWorker(workerIndex + 1); }); }); worker.disconnect(); }; restartWorker(0);
Inside the restartWorker function, we got a reference to the worker to be restarted. Since we will be calling this function recursively to form a sequence, we need a stop condition. When we no longer have a worker to restart, we can just return. We then basically want to disconnect this worker (using worker.disconnect ), but before restarting the next worker we need to fork a new worker to replace this current one that we’re disconnecting.
We can use the exit event on the worker itself to fork a new worker when the current one exists, but we have to make sure that the exit action was actually triggered after a normal disconnect call. We can use the exitedAfetrDisconnect flag. If this flag is not true, the exit was caused by something else other than a disconnect call, and in that case, we should just return and do nothing. But if the flag is set to true, we can go ahead and fork a new worker to replace the one that we’re disconnecting.
When this new forked worker is ready, we can restart the next one. However, remember that the fork process is not synchronous, so we can’t just restart the next worker after the fork call. Instead, we can monitor the listening event on the newly forked worker, which tells us that this worker is connected and ready. When we get this event, we can safely restart the next worker in sequence.
That’s all we need for a zero-downtime restart. To test it, you’ll need to read the master process ID to be sent to the SIGUSR2 signal:
console.log(Master PID: ${process.pid});
Start the cluster, copy the master process id, and then restart the cluster using the kill -SIGUSR2 PID command. You can also run the same ab command while restarting the cluster to see the effect that this restart process will have on availability. Spoiler alert, you should get ZERO failed requests.
Process monitors like PM2, which I use in production, make all the tasks we went through so far extremely easy and provide a lot more features to monitor the health of a Node application. For example, with PM2, to launch a cluster for any app, all you need to do is use the -i argument:
pm2 start server.js -i max
And to do a zero downtime restart you just issue this magic command:
pm2 reload all
However, I find it helpful to first understand what actually will happen under the hood when you use these commands.
Shared State and Sticky Load Balancing
Good things always come with a cost. When we load balance a Node application, we lose some features that are only suitable for a single process. This problem is somehow similar to what’s known in other languages as thread safety, which is about sharing data between threads. In our case, it’s sharing data between worker processes.
For example, with a cluster setup, we can no longer cache things in memory because every worker process will have its own memory space. If we cache something in one worker’s memory, other workers will not have access to it.
If we need to cache things with a cluster setup, we have to use a separate entity and read/write to that entity’s API from all workers. This entity can be a database server or if you want to use in-memory cache you can use a server like Redis or create a dedicated Node process with a read/write API for all other workers to communicate with.
Don’t look at this as a disadvantage though, because using a separate entity for your application caching needs is part of decomposing your app for scalability. You should probably be doing that even if you’re running on a single core machine.
Other than caching, when we’re running on a cluster, stateful communication in general becomes a problem. Since the communication is not guaranteed to be with the same worker, creating a stateful channel on any one worker is not an option.
The most common example for this is authenticating users. With a cluster, the request for authentication comes to the master balancer process and gets sent to one worker. That worker will start recognizing the state of this user. However, when the same user makes another request, the load balancer will eventually send them to other workers which do not have them as authenticated. Keeping a reference to an authenticated user session in one instance memory is not going to work anymore.
This problem can be solved in many ways. We can simply share the state across the many workers we have by storing these sessions’ information in a shared database or a Redis node. However, applying this strategy requires some code changes, which is not always an option.
If you can’t do the code modifications needed to make a shared storage of sessions here, there is a less invasive but not as efficient strategy. You can use what’s known as Sticky Load Balancing . This is much simpler to implement as many load balancers support this strategy out of the box.
The idea is simple. When a user authenticates with a worker instance, we keep a record of that relation on the load balancer level. Then, when the same user sends a new request, we do a lookup in this record to figure out which server has their session authenticated and keep sending them to that server instead of the normal distributed behavior. This way, the code on the server side does not have to be changed, but we don’t really get the benefit of load balancing for authenticated users here, so only use sticky load balancing if you have no other option.
The cluster module actually does not support sticky load balancing, but a few other load balancers can be configured to do sticky load balancing by default.