1. Course Modules
Each Module is organized in several video Lessons - containing lesson notes and other resources.
The material is meant to be experienced as video, and the lesson notes should be used as a reference not as comprehensive documentation .
2. Course Code
2.1. Codebase Approach
Notice that each lesson has a small section that explains exactly which project you need to start with when you start the lesson. For example:
The relevant module you need to import for this lesson is: lsso-module2/oauth-client-start
So, in case you’re not sure exactly what project you should import and work on a particular lesson - that’s where you’ll need to look.
Keep in mind that each lesson is primarily focused on a core security concept , with the overall goal of exploring that concept and keeping the rest of the example as simple as possible. That will mean simplifying other aspects not central to the lesson, like - not encoding passwords, hard-coding credentials, etc. that would not be advisable in a real-world application.
2.2. Getting the Code from GitHub
The project code is hosted over on Github. To clone it, simply run the following command:
git clone https://github.com/eugenp/learn-spring-security.git
The code for each module is hosted on its own branch. To switch the the branch corresponding to the module you’re on - for example, Module 2:
cd learn-spring-security
git checkout lsso-module2
Note: The branches for the course have the prefix “lsso-”.
2.3. Project Code and IDE
All projects are built using Maven, so you can work with any IDE you’re familiar with.
A quick (optional) recommendation is using Eclipse STS.
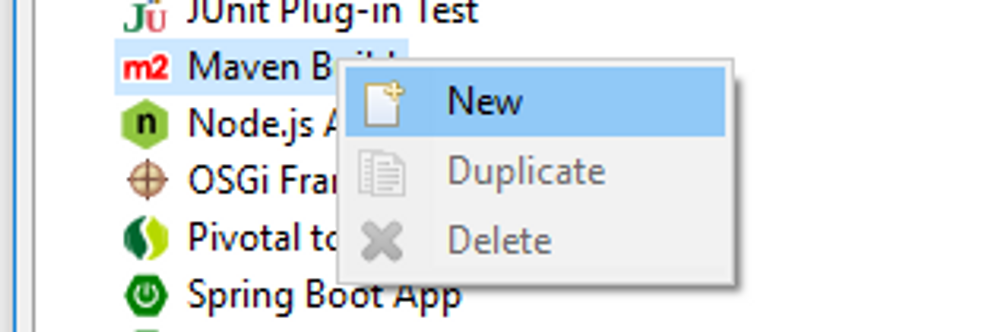
To import the project into Eclipse, you’ll simply need to go to File - Import - Maven - Existing Maven Project:
You can find more details on this in the lesson “The Project in your IDE” .
2.4. Building the Project
Let’s start with the JDK - the project is using JDK 13 . You can use any version equal to or higher than Java 13, as long as you have the specific JDK installed.
To simply build the entire project - just run the standard Maven build:
mvn clean install
Notice that we’re not skipping tests - at least not on the first run. This is important because a full run with tests will prepare the testing jars and install them in your local Maven repository. After that point, you can run the build with tests skipped if you need to:
mvn clean install -Dmaven.test.skip=true
2.5. Running the Project
The project code is generally ready to go.
The recommended way to run the projects is using Spring Boot.
Each lesson project usually has 3 child projects: an Authorization Server, a Client and a Resource Server.
Each of these has a simple runner, for e.g. for client project its called LssoClientApplication.java.
To run each project from the command line, use the command in the project directory:
mvn spring-boot:run
Note: the Authorization Server, Client and Resource Server are configured to run on ports 8083, 8082 and 8081 respectively. Naturally, you can change this in application.yml if you need to.
All standard modules are using Boot for deployment. The reason is simple: it’s easier to deploy with Boot, and deployment isn’t the focus of the course, so the simpler option is best.
2.6. Database Setup
The projects that require a database use an embedded in-memory H2 database. So you don’t need any additional setup to run them.
3. Asking Questions
I structured the course material to make sure you have everything you need to go through it.
But, of course, if you do have any question, you can always reach out and ask me directly.
I’ve set up a specific inbox for this and, of course, I check it daily: course@baeldung.com
The Project in your IDE
1. Overview
The primary IDE I used for the course is Eclipse.
The project code is of course a Maven project, so you can use any IDE you want.
If you are going to use Eclipse, I recommend using the STS distribution. And I generally recommend using the latest version here.
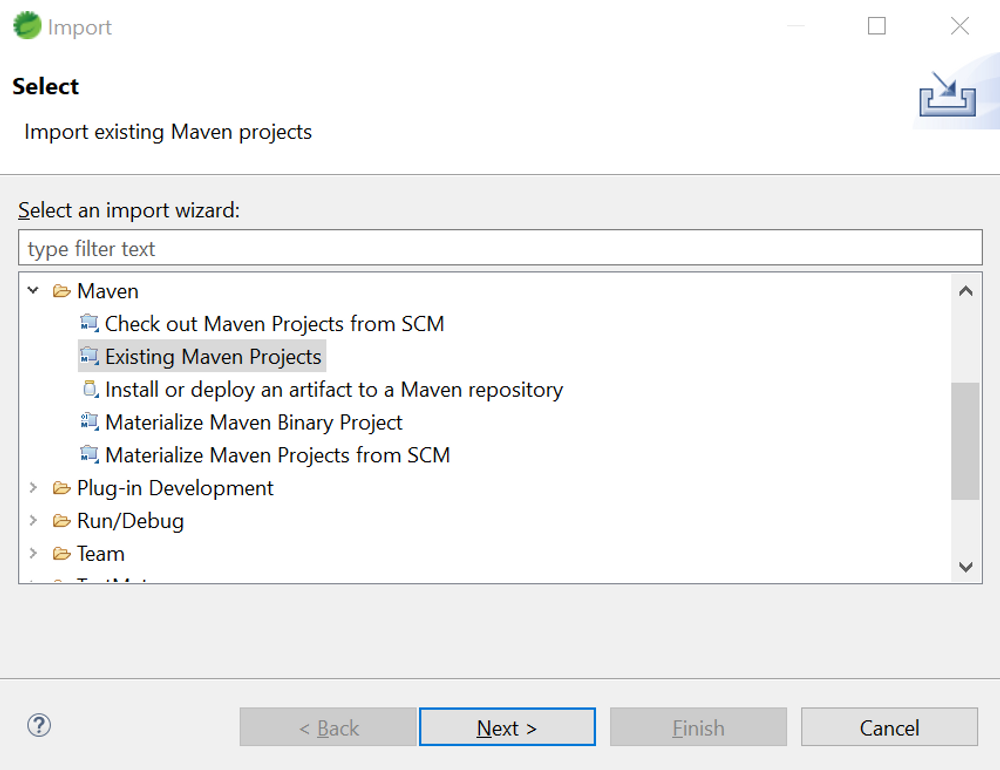
2. Importing the Project
In Eclipse, there are several ways you can import a project.
Since this is a Maven project, you can use the “Existing Maven Project” option:
2.1. Importing the Parent
Now, you can import the parent modules or you can import the individual modules of a lesson.
To run the main build, you’ll need to import the top parent :

2.2. Importing the Children
Now, you can import the children modules - the modules of a single lesson.
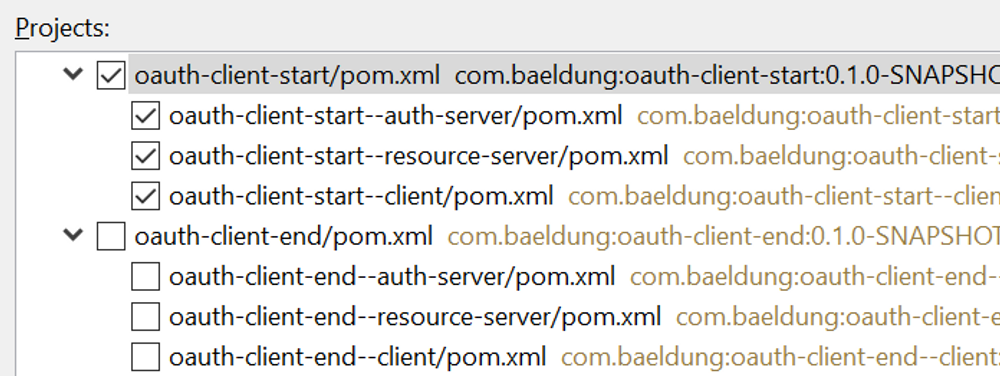
Let’s say we want to import the starting point of the lesson “The New OAuth Client Support” of Module 2, which is oauth-client-start. We’ll have to select the 3 child modules of this lesson - oauth-client-start–auth-server , oauth-client-start–resource-server , oauth-client-start–client :
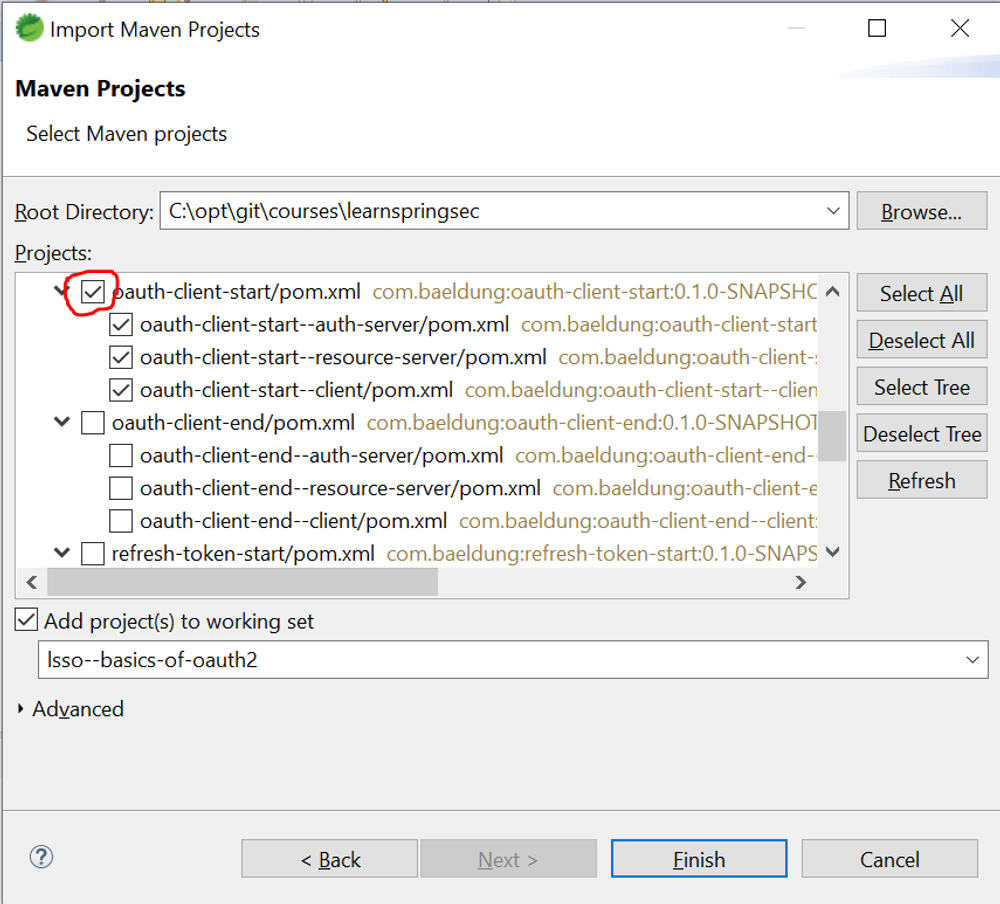
Notice how we’re only importing the modules of that particular lesson.
3. Building in Eclipse
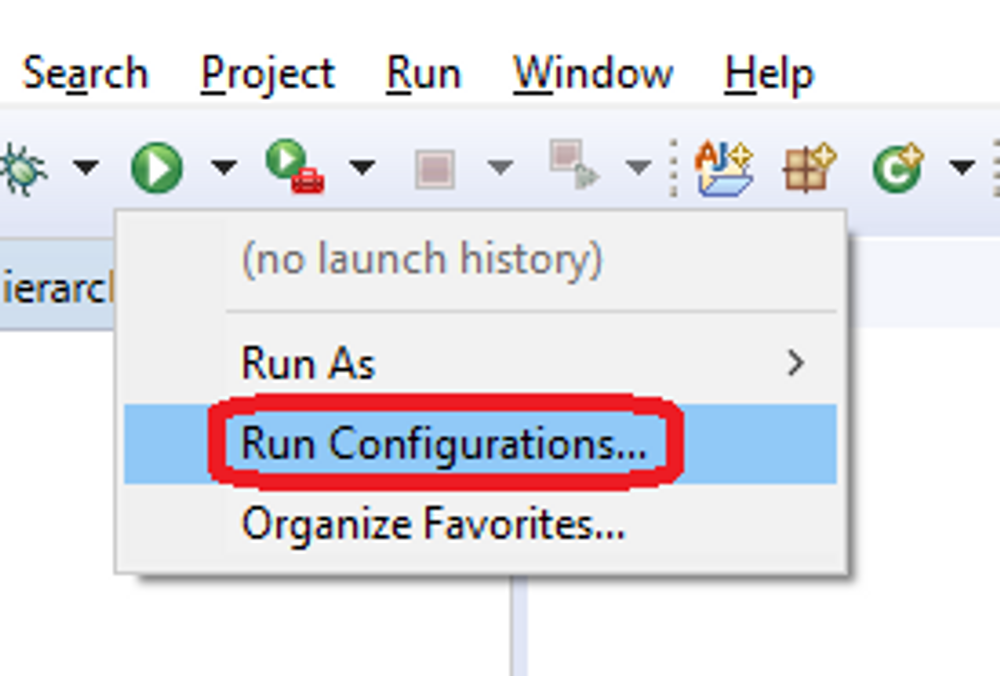
Now that we have the modules imported, it’s important to know how to run a Maven build in Eclipse.
There are several ways of doing that, but I recommend following this one because it’s simple and flexible.
First, let’s define a Run Configuration in Eclipse:
Then, create a new Maven run configuration:
Set the:
- Base directory to: ${project_loc} (if not already set)
- Goals: clean install
Here’s what that looks like:
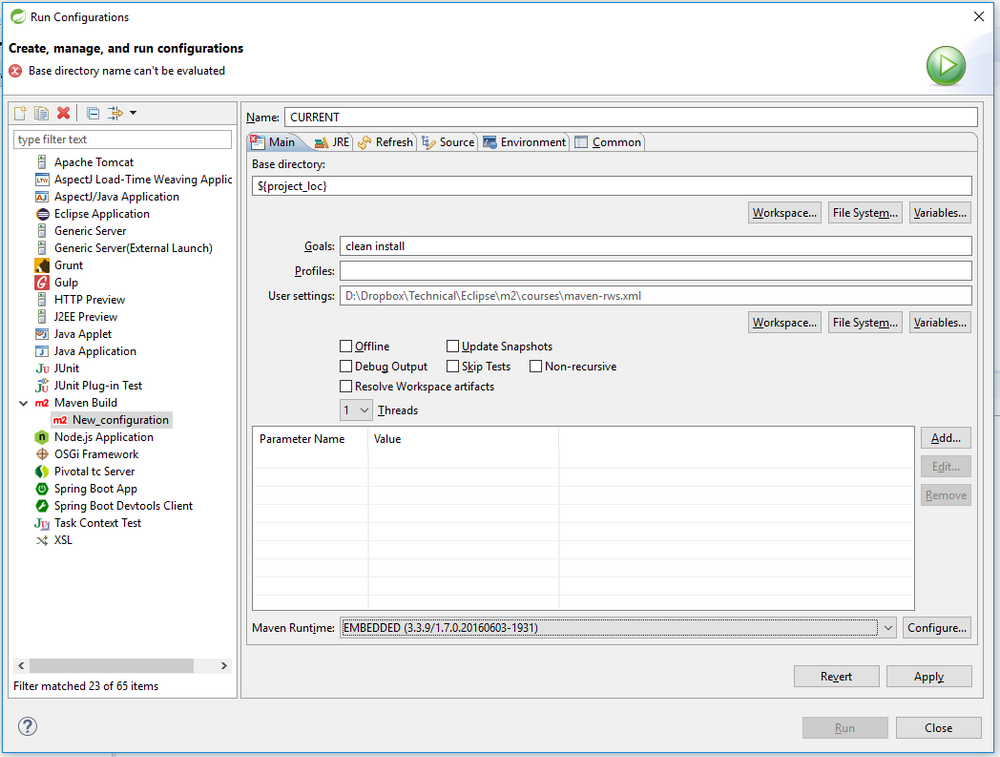
That’s it. Now, the run configuration is ready to go and you’re ready to build any project in your IDE.
So - if you want to build the parent, you select the parent, and run this run config:

This is a very flexible way to define a single run configuration and use it for whatever project you have imported in your IDE.
4. Running the Projects in Eclipse
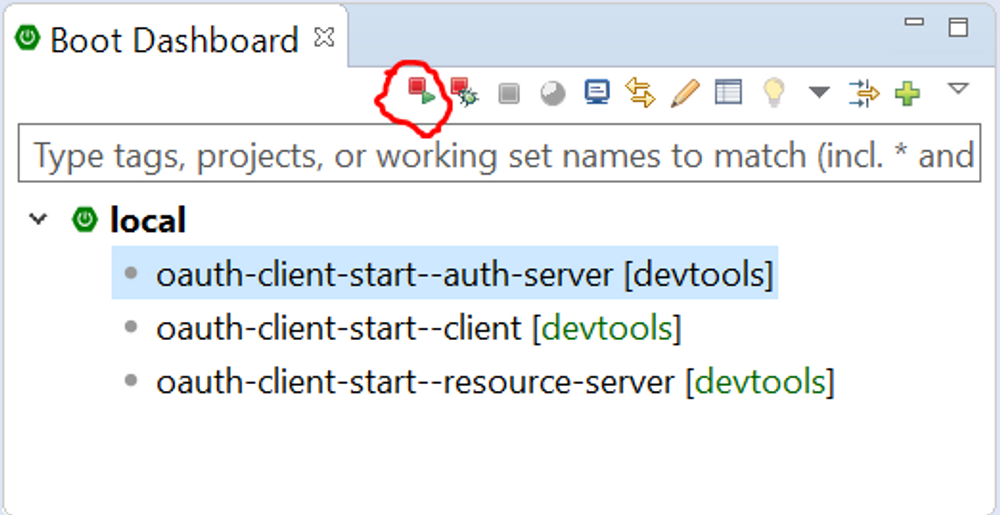
If the Eclipse is the STS distribution then running a project becomes quite easy as STS comes with a Boot Dashboard.
The Boot Dashboard lists all your Boot Projects and you can simply click on any of the projects and select to Run or Debug them:
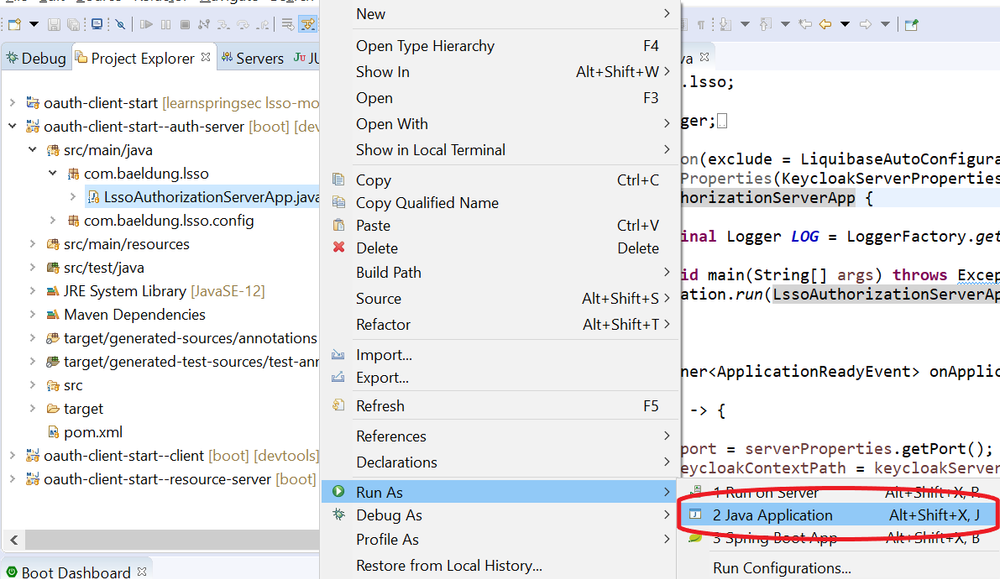
If the Boot Dashboard is not present in your version of Eclipse, then each of the child projects auth-server , client and resource-server contains a main class annotated with @SpringBootApplication. You can simply do a right-click on that class and Run it as a Java Application:
5. Before You Start
Before you start working on a new module, make sure to import the parent of that module into your IDE like this - and run a build on it.
Don’t start working if you don’t have a successful build at this point.
The New OAuth Material, Release Schedule and Text-Only Lessons
If you’re getting started with OAuth2 now, or if you’re an OAuth veteran - understanding the current landscape of OAuth in Spring Security is critical.
The Big Rewrite
Simply put, the Spring Security core team has decided to re-write and consolidate the OAuth2 support in the framework.
That’s very rare - it almost never happens in the Spring ecosystem.
This also sets a really strong direction in the framework - OAuth is a critical part of the Spring Security and the current stack is somewhat fragmented and harder to understand.
So, the core goal of the new stack is to consolidate and streamline the support.
Lessons in the Course
The new stack is, naturally, resulting in a lot of new material here, in the new course.
I’ll release new lessons as text-only first , and then add full videos.
There are two main reasons for that.
One - the new stack is not yet fully out. A lot of functionality is already GA, but there are still big pieces under development, so recording video is a bit early.
And two - it gives you access earlier to the lessons.
Release Schedule (updated)
The full material will be out by October 15, 2021.
Of course, I’ll start releasing new videos all the way up to that point.
As always, ping me if you have any questions.
Cheers,
Eugen.
Lesson 1: Intro to OAuth2 and the OAuth2 Roles (theory) (text-only)
1. Goal
In this lesson, we are going to have a high-level look at the OAuth2 framework. The details will come later; here we’re simply going to focus on the core concepts of OAuth.
2. Lesson Notes
2.1. What is OAuth2?
OAuth2 is basically a standard for authorization, not authentication.
It’s critical to distinguish between these concepts to understand what OAuth is.
So, in very simple terms:
- authentication - identifying a user
- authorization - determining what the user has access to
With that in mind, basically, OAuth allows applications to obtain limited access to a service or to a resource.
One of the core goals of OAuth is to help users no longer have to provide their full credentials directly into third-party applications to allow access to their resources.
This is an important security enhancement as these third-party apps will only have minimal access to do what they need to do and nothing more, which naturally lowers the risk of compromising the user’s credentials.
To better understand the problem, let’s see an example of a real-world scenario where OAuth is useful.
You’ve probably seen many instances before where an application requests permission to access your data from Google or Facebook.
For example, a planning website would like to get access to your Google Calendar.
This website represents the third-party application that needs access to your resources, in this case - the resource being the Calendar info.
So the question is: How to allow this app to view and potentially edit your Calendar events?
One option is for the user to provide the app with their Google credentials. This is obviously very risky and not recommended, as the app will now have access to your entire Google account and all the other resources associated with it.
2.2. The OAuth Flow
This is where OAuth comes in - instead of asking for the user’s credentials, the website delegates the authorization to a dedicated service.
This way, the user’s password is not shared with any other service
The application sends a request to the Google Authorization Server asking for access to the user’s Calendar.
When receiving the request, the Authorization Server will go back to the user and present the well-known “permission” screen to ask for this access to be granted.
The application will receive back a key that identifies the user and the Calendar permission.
Now the application can interact with the user’s Calendar using this key, without knowing the user’s Google password or being able to access any other resources besides the ones it was given permission for. The access is also temporary.
The user can now share different resources with different applications by using a single account handled by the Authorization Server and the applications don’t need to worry about the authorization aspect.
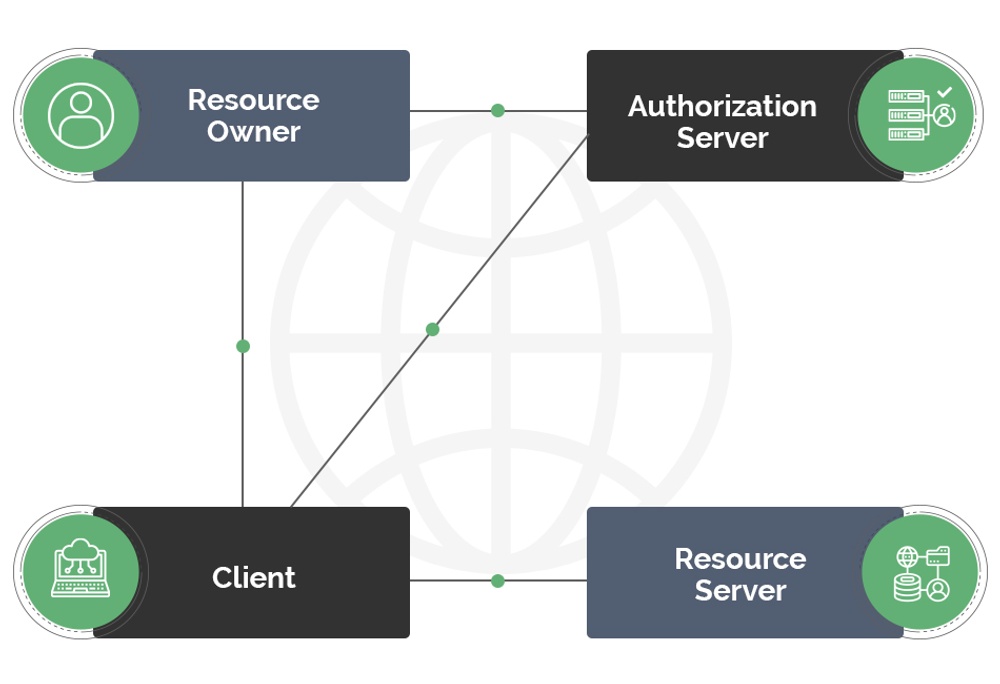
2.3. OAuth2 Roles
It’s important to understand a crucial aspect of all OAuth flows - clearly separating each role in the interaction.
Simply put, OAuth2 defines 4 roles; let’s go through these with an eye towards being clear about the exact OAuth terminology:
- The user who is the owner of the resources referred to in the spec as the Resource Owner.
- This is separate from the Client application which needs access to these resources.
- The Authorization Server is the central server responsible for, simply put, giving Clients access to protected resources on behalf of the Resource Owner. More specifically, this is responsible for issuing tokens defining authorization semantics and, further on, identity.
- The protected resources themselves can be hosted by a separate Resource Server.
Let’s dive into each of these in a bit more detail.
The Resource Owner is the actor capable of granting access to a protected resource. Most often, this is a user as it was in our example, but it can also be another application.
The Resource Server hosts the protected resources. This is often an API.
The Authorization Server is the application that issues tokens to authorized Clients. We’ll look at Tokens in more detail later on.
The Client is the application making requests for protected resources on behalf of the Resource Owner. It can be a website, mobile app, etc.
2.4. Trust Relationships Between Actors
For this (or any) flow to work, trust relationships must exist between some of the actors.
First, between the Resource Server and the Authorization Server. The Resource Server has to be able to validate the keys or tokens issued by the Authorization Server before allowing access to the resources.
The Client also has to register with the Authorization Server in order to receive Tokens.
2.5. Access Tokens
Another critical concept we referenced throughout this lesson is the Token - now used to access protected resources instead of the user credentials.
More concretely, Access Tokens are issued by the Authorization Server to the Client and are used to access protected resources in the Resource Server.
Access Tokens can have different formats and structures and can be used in different ways according to the security requirements of the Resource Server.
What we’ve seen so far is a high-level interaction flow between the actors. In practice, this can be implemented through multiple flows or grant types that we’ll see in more detail in the next lessons.
3. Resources
Lesson 2: Picking the Right OAuth Grant Type/Flow to Use (theory)
1. Goal
In this lesson, we’re going to focus on how to pick the right OAuth 2 Grant Type for different types of applications and different scenarios.
2. Lesson Notes
It’s worth mentioning before we get started that the decision flow we present here is a simplified and updated version of the traditional OAuth decision flow and based, mainly, on the current official guidance.
2.1. The Updated Grant Types Panorama
Technically, we have four possible Grant Types that can be used when implementing OAuth2:
- Authorization Code
- Client Credentials
- Implicit
- Resource Owner Password Credentials
On top of this, there is also an extension to the Authorization Code Grant Type that has been defined more recently, the Proof Key for Code Exchange spec (or PKCE for short) which addresses some limitations of the standard flow.
Even though the four base Grant Types are all defined in the OAuth spec, the current guidance disallows implementing the Resource Owner Password Credentials flow and discourages the use of the Implicit Grant Type , which is, of course, reflected in our decision diagram.
That’s why the primary flow we’ll focus on is the Authorization Code flow both on its own, but also with the PKCE extension.
Even though it’s really useful to understand how this evolution took place and the reasons for these flows to be deprecated -not to mention the fact that there are a lot of services that still use these solutions-, the focus of this lesson will be centered around the two remaining approaches: the Authorization Code and the Client Credentials Grant Types.
2.2. Determining Factors - Client Confidentiality
There are two determining factors here that affect which Grant Type we’ll use, and how we’ll implement it:
- the Client confidentiality
- who assumes the role of the Resource Owner
Client confidentiality refers to the capability of keeping credentials private , and is a critical factor to classify the type of Client that is taking part in the OAuth authorization framework.
Based on this, we can divide Clients into 2 categories:
- Confidential Clients
- Public Clients
The Client is simply an application requesting protected resources, and naturally, it can take many different forms.
For example, a Client may be:
- a traditional server-based MVC application running on a web server
- a native application running on a mobile device
- a Javascript-based application executed within a user-agent (such as a web browser); for instance, a Single Page Application
As you can guess, browser-based and native apps can’t be considered confidential Clients simply because they are executed in an environment where we don’t have a lot of control.
2.3. Determining Factors - Who Is the Resource Owner
Usually, the Resource Owner in the process is an end-user , meaning - a person.
For example, GitHub contains information about me, my profile information, or information about my public and private repositories. These are resources, and I am, then, the owner of these resources. Therefore, I can grant access to some of these resources.
In other cases, the Client itself can represent the owner of the resources and request access to them.
For example, imagine an organization where the information is spread among different services and thus authorization has to be effectively granted to one of these services to obtain data from the others to carry out a particular process. Here there is no end-user involved, and the Client that carries out the process represents the Resource Owner of the information.
Let’s now see which Grant Type is best suited for each scenario.
2.4. Grant Types - Authorization Code
This is probably the most common and safe solution up to this point, as it’s the optimal grant type for both confidential Clients and public Clients. One notable difference is that public Clients won’t be using the Client Secret used to validate the Client’s identity as this is considered sensitive information.
In this flow, the end-user authorizes the Client to have limited access to its resources . This is done using a User-Agent, commonly a browser.
With this, the Client obtains a code (known as Authorization Code) and after a series of steps, the Client exchanges that code for a Token from the Authorization Server, which allows it to access the resources for some time.
2.5. Grant Types - PKCE Extension
The PKCE, or Proof Key for Code Exchange extension, can be used on top of the Authorization Code Grant Type.
Although it was first defined as a solution to the threat of the Authorization Code being intercepted for public Clients, best practices recommend this for any kind of Client as it plainly represents an extra security improvement.
We won’t go into much details here about the implementation of this solution, but just to have a basic understanding, the Client has to create a one-time key, transform it and use those values separately in the OAuth authorization process for the Authorization Server to verify that the transformed value corresponds with the key.
That means that the Authorization Server has to provide support for this feature , and this is certainly a factor that comes into consideration when deciding how we’ll implement the Authorization Code flow, or when choosing the OAuth provider.
2.6. Grant Types - Client Credentials
There is one special case in which the Authorization Code Grant Type is not applicable. That is when there is no end-user involved in the authorization process; instead, we have machine-to-machine communication.
For example, imagine a case where an organization runs a cron job process periodically to send their employees a daily sales report. In this situation, there’s no end-user present to interact with, and the Client that requests access to the information to carry out the process acts as the Resource Owner of the information.
This process is simpler than the Authorization Code as the service can directly obtain a token presenting its Client credentials. Because of this, it’s suitable only for confidential Clients.
2.7. The Decision Flowchart
It’s time to wrap up what we’ve seen in this lesson and try to condense everything into a decision flowchart.
This flowchart is quite simple, especially compared to other charts available on the web, as I’ve decided not to take into consideration the deprecated grant type.
It’s rather clear that ideally, we’d simply choose the Authorization Code flow whenever there is an end-user involved and alternatively the Client Credentials flow when we need a machine-to-machine communication.
Of course, there will be some variations on how we implement the Authorization Code flow based on whether we’re dealing with confidential or public Clients, as in the latter case the use of the PKCE extension acquires a greater importance, and because some sensitive information won’t be used.
Also, note that here we’re pointing out the best current solutions in each case in a hierarchical list.
For example, in the case of browser-based applications we should, naturally, use the Authorization Code flow with the PKCE if that’s possible. Otherwise, we would use it without the extension, and use the Implicit flow only if the Authorization Server doesn’t support exchanging the Authorization Code for an Access Tokens without providing the Client secret, and therefore there are no other alternatives:
3. Resources
Lesson 3: The State of OAuth2 in Spring Security 5
1. Goal
In this lesson, we’ll summarize the current state of the OAuth2 support in Spring and the work around it.
2. Lesson Notes
Before we look into any practical examples, let’s first understand the current state of OAuth in Spring Security 5.1 and beyond.
At the very start of 2018, the core team announced a really bold new direction in the development of OAuth support in Spring Security, which is basically a re-write of the functionality .
In the Spring ecosystem, rewrites are highly uncommon. So the fact that the team took this step means one thing: the OAuth2 support in Spring Security is getting a lot better.
This will modernize the implementation, as well as set the ground work for a lot of changes at the specification level. To have this as the reference implementation in Java, there’s a need to be in sync with the OAuth specification. To be clear - this is a multi-year process.
Broadly speaking, the effort is split into 3 major areas:
- Client support
- Resource Server support
- Authorization Server support
Of course, there’s plenty of functionality that cuts across two or all three of these aspects.
The Client Support has been released with 5.0 and 5.1. Resource Server support was 5.1 and now 5.2.
And finally, regarding the Authorization Server, the Spring Security team decided not to give support for this feature for the time being, and instead work on that as a separate experimental project, which is currently in its early stages.
The existing OAuth stack is still fully supported and will be for a while. However, this is now in maintenance mode, meaning it’s getting security updates and minor features, but nothing major.
But the focus of the core team is now on the new functionality.
So which stack do we use?
At this point, there’s not yet full parity between the existing and the new functionality. Therefore, if you’re working with OAuth functionality that’s already supported in the new GA releases of Spring Security, then use that. If it’s not yet supported, then use the old functionality.
Finally, there’s a very useful feature matrix that shows exactly what’s supported and where between the 2 stacks: OAuth2 Feature Matrix . This is updated as new functionality is being developed.
3. Resources
Lesson 4: Setting up the Project (text-only)
1. Goal
In this lesson we’ll have a look at how to setup our development environment to work with the Learn Spring Security OAuth course.
2. Lesson Notes
More precisely, in this lesson we’ll have a look at the tools and technologies we’ll need to work on the different topics and the code repository containing the implementation examples.
We’ll also analyze the project structure that we’ll be using in most lessons, and finally we’l briefly explain how we manage the Postman requests in the lessons.
2.1. Tools and Technologies
The main tools required to get started are:
- Java
- Maven
- Git
- native Postman application
- an IDE
In this lesson and throughout the course I’ll be using Eclipse, but of course, it can be IntelliJ or any other IDE that supports Maven.
Naturally, this course is aimed to advanced developers so, apart from these basic tools, we’ll need at least a working knowledge of:
- Spring framework
- Spring Boot framework
- core Spring Security concepts
If you’re not quite there yet make sure you first go through the Learn Spring course and the basics in Learn Spring Security Core.
2.2. The Course Repository
You can find all the code shown in the lessons in the Github repository: https://github.com/eugenp/learn-spring-security
One important note: there is one branch for each module in the course.
The branches are prefixed with lsso-. Each lesson that involves working with code examples will include a link to the corresponding branch and the project, usually with a ‘start’ and an ‘end’ version.
For instance, to get the code used in this module, we’ll simply checkout the lsso-module1 branch:
git checkout lsso-module1
And here we can see the code related to this lesson in the setting-up-project directory.
2.3. The Project Structure
After we import this project in the IDE we’ll realize it contains several Maven sub-modules. This structure or a very similar one will be present for most of the lessons.
Simply put, we have one sub-module for each service that comes into play when dealing with OAuth:
- Authorization Server
- Resource Server
- Client
Note: the course uses Java 13 , so if you see that the projects have compilation errors you might need to update your IDE version as the old versions may not support the latest Java versions efficiently.
2.4. Postman Scripts
Postman is a very popular tool used to send and handle HTTP requests and responses.
If you’re not familiar with it, have a look at the documentation in the Resources section, though note you only need a basic understanding of the tool to follow this course.
You’ll see that I often use a Postman collection in the lesson videos to clarify different aspects and to see the code in action.
Even though you don’t need to use this collection yourself to understand the lessons, you may still find it useful to analyze in detail the requests sent. Thus, you can find it in the master branch of the repository.
Note that you can even import it directly to Postman using the raw JSON file URL:
The LSSO collection has a directory structure following the modules and lessons in the course.
When the request parameters are the focus of the lesson, I’ll show how to add them manually in the video. However, in other lessons where we have to carry out a series of steps that are not the main focus of the lesson, we won’t be stopping to analyze each request. Instead we’ll rely on Postman scripts to process the output of a request and load automatically the values that will be used in the next request.
For example, if we have a look at the following request in the collection:
LSSO > Intro to OAuth2 and the OAuth2 Roles > Setting up the Project >
GET 1 - Script processed request
You’ll notice in the Tests tab we’re setting up a bael.formAction variable and then using it in the next request:
LSSO > Intro to OAuth2 and the OAuth2 Roles > Setting up the Project >
GET 2- Automatically filled request
We’re using the variable as the URL we’re requesting, but of course, we could use it just anywhere we want to in the request.
With this we can execute the requests sequentially, avoiding the overhead of copy-pasting the variables from one request to the other.
3. Resources
Lesson 1: The Authorization Code Flow (theory)
1. Goal
In this lesson we’re going to analyze a very popular OAuth2 Grant Type Flow, the Authorization Code Flow.
2. Lesson Notes
We’ll focus only on understanding how the flow is executed, with no code involved at this point. Therefore, there is no need to checkout anything from our code repository.
2.1. The Authorization Code Flow Actors
Let’s begin with the high-level actors that will interact in the flow:
The Resource Owner will be the end-user of our application. Its role is to explicitly grant access to the Client for its protected resources.
Now, there are many types of clients, but, for the purpose of our discussion here, we’re going to consider a traditional MVC application with a server-side component as well as a client-side component executed by a user-agent - the browser in our case.
The Authorization Code flow involves redirections and interactions with the user as we’ll see next.
2.2. The Authorization Code Flow Steps
Step 1: The Authorization Endpoint
The flow starts when the Client requests authorization to access a protected resource. The user-agent will be redirected to the Authorization Endpoint of the Authorization Server.
The OAuth2 specification indicates that the following parameters can be included in the request:
response_type
With a code value when we use the Authorization Code flow.
client_id
Represents the identifier of the client previously registered in the Authorization Server.
redirect_uri
A URI pointing to an endpoint in the Client application capable of handling the Authorization response.
It is usually required to register a whitelist of valid Redirect URIs.
scope
Indicates which ‘permissions’ will be granted with the Access Token, for example, read and write access.
The supported values are defined by the Authorization Server.
Multiple values can be specified in the request by separating them with whitespaces.
state
This is used for security purposes, to prevent Cross-Site Request Forgery (CSRF) attacks.
For example, the request to this endpoint might look like this:
TEXT
GET /authorize?response_type=code &client_id=s6BhdRkqt3 &state=xyz &redirect_uri=https%3A%2F%2Fclient%2Eexample%2Ecom%2Fcallback
Note there are no client credentials involved in the request; their confidentiality can’t be guaranteed on the client-side.
Step 2: Authenticating the Resource Owner
The Authorization Server authenticates the Resource Owner and asks to grant or deny the permissions that the Client requested .
Step 3: The Redirection URI
This interesting step is what makes this flow different and more secure than the other OAuth flows.
The Access Token is not issued yet at this point, because, as we said, this is all passing through the user agent - the browser - on the client-side, and there is no guarantee that things are handled securely in this domain.
Instead, the Authorization Server returns an intermediary code, the Authorization Code (hence the name of the flow).
Basically, the browser is redirected back to the redirect URI in the Client application. Remember, we supplied that URI at the very beginning of the flow.
The call includes the Authorization Code as a query parameter. This is a code generated by the Authorization Server, usually short-lived for security reasons and that should be used only once.
Let’s see how this URI might look like:
TEXT
https://client.example.com/callback?code=SplxlOBeZQQYbYS6WxSbIA&state=xyz
Naturally, the state param has to match the one provided in the Authorization request, and the Client should perform this validation.
If the Resource Owner denied access, then the response includes error information instead of the code parameter:
- error : the error code ( access_denied , invalid_request , unauthorized_client ,…)
- error_description : with additional information to help understand the error that occurred
- error_uri : pointing to a web page with information about the error
Step 4: The Access Token Endpoint
The Client app now needs to exchange the Authorization Code for an Access Token. This is done by sending a POST request to the Authorization Server’s Token Endpoint with some specific parameters:
grant_type
Has to be authorization_code to indicate we’re using this flow .
code
The temporary code issued in a previous step .
redirect_uri
Has to match exactly with the one sent previously .
Additionally, the Client has to authenticate with the Authorization Server , usually by providing the Client Id and a Client Secret. These can be sent using HTTP Basic Authentication or in the body of the request:
TEXT
`POST /token
Authorization: Basic czZCaGRSa3F0MzpnWDFmQmF0M2JW
Content-Type: application/x-www-form-urlencoded
grant_type=authorization_code&code=SplxlOBeZQQYbYS6WxSbIA&redirect_uri=https%3A%2F%2Fclient%2Eexample%2Ecom%2Fcallback`
Note that, unlike the previous steps where everything was passing through the user-agent, here the request is made from the Client application on the server-side directly to the Authorization Server.
That’s why it can be considered safe to handle the Client credentials at this stage and include these in the request together with the Authorization Code.
Step 5: The Access Token Response
If the request is valid and authorized, the Authorization Server finally issues an Access Token . The token and its validity period is retrieved in this response, among other relevant fields:
JSON
{ "access_token":"2YotnFZFEjr1zCsicMWpAA", "token_type":"example", "expires_in":3600, "refresh_token":"tGzv3JOkF0XG5Qx2TlKWIA", "example_parameter":"example_value" }
Step 6: Access the Protected Resource
Now finally the Client can request secured resources using the Access Token.
The Authorization Server includes information on how to use the Token within the Access Token response.
For instance, if the token_type value of the response is Bearer , then the Token is utilized by simply including it in a request header.
2.3. Refresh Token Support
It’s also worth mentioning that in the Authorization Code flow, the usage of Refresh Tokens is a mechanism to deal with the short-lived Access Tokens.
But we’ll analyze this topic in a future lesson.
3. Resources
- Front-End App with Spring Security OAuth – Authorization Code Flow
Lesson 2: The Authorization Server with Keycloak
1. Goal
In this lesson, we’ll learn how to set up an Authorization Server using Keycloack.
2. Lesson Notes
The relevant module you need to import when you’re starting with this lesson is: lsso-module2/authorization-server-keycloak-start
If you want to have a look at the fully implemented lesson, as a reference, feel free to import: lsso-module2/authorization-server-keycloak-end.
2.1. Why Keycloak?
Naturally, we may consider setting up an Authorization Server using Spring since the old Spring Security OAuth stack offers this possibility. However, as this project is deprecated in favour of Spring Security, the capabilities offered by this Authorization Server are limited.
The Spring team has decided not to add Authorization Server support in the Spring Security library for the time being , and instead work on that as a separate experimental project. This is, of course, not a problem at all since any Authorization Server should respect the OAuth 2 directives.
The alternative I’ve chosen as an Authorization Server for this course is Keycloak.
Keycloak is an open source Identity and Access Management solution developed in Java by JBoss and under the administration of RedHat. It supports not only OAuth2 but also other standard protocols such as OpenID Connect and SAML.
2.2. Running a Keycloak Server
There are various ways to start a Keycloak server:
- Standalone Server distribution - if we want to start the server locally
- Docker image - if we want to start the server using Docker
For more details on the installation, we can check the official documentation.
In our case, in order to make things easier we opted for a 3rd approach: developing a Spring Boot application that starts the Authorization Server and loads some initial configurations . Also, for simplicity, this uses an in-memory H2 database.
This way, with a simple click, we can have a fresh setup with only the configurations that we need to run a Keycloak server.
Let’s now start the application.
2.3. Keycloak Configuration
Now we will see how we can pull off the following configuration in Keycloak:
- client registration : lssoClient/lssoSecret
- redirect uri : http://localhost:8082/lsso-client/login/oauth2/code/custom
- enable Authorization Code flow
- user registration : john@test.com/123
Note that this Keycloak configuration will be loaded automatically when the service starts for all the lessons in the course as it’s included in the baeldung-realm.json file .
This lesson instead shows how to do the same setup manually in the Keycloak admin console in order to better understand what the setup achieves.
Here, we won’t go into too much detail about the implementation of the Spring Boot application that backs the Keycloack server. It’s enough to know that when the service is launched, it configures a Keycloak admin account which can be customized using application properties. In the application.yml of the auth-server module, we can find those properties under the adminUser key.
Then, the service loads a JSON file to configure a realm defined in the realmImportFile property.
in Keycloak, a Realm is simply an isolated user management unit . It means that users belong to and logs into a realm.
In this lesson, we won’t define any realm from the beginning as we’ll configure it manually.
2.4. Creating the Realm
Let’s start by browsing to http://localhost:8083/auth and logging into the Admin Console using the admin credentials: bael-admin / pass
When the Keycloak server gets initiated, it creates the Master realm in which the admin accounts have permissions to view and manage other realms.
Now we can easily create a new realm. To do this, hover the “Master” label in the top left side of the screen (with a drop-down arrow) and click the “Add realm” button. Let’s name the new realm as baeldung. Then, click “Create” and the realm gets created.
2.5. Adding the User
Now that the realm is created and we’re in its configuration dashboard, we’ll add a new user to this realm . To do this, click the “Users” option on the left and then click the “Add user” button.
At this point, we’ll define only its username: john@test.com, and click the “Save” button.
After that, we should define its password. In the Credentials tab, let’s insert 123 in both “Password” and “Password Confirmation” fields. Let’s also disable the “Temporary option” in order to avoid asking the user to change the password when he/she logs in for the first time. Now, click the “Set Password” button and confirm the action.
2.6. Registering the Client
Next, we should register an OAuth Client. To this end, let’s explore the “Clients” option on the left. Here, we can find a list of default clients and the option to add a new one.
Let’s create a new client with the lssoClient id.
Then, in the “Client Settings”, we’ll indicate that this is a confidential client , which will allow us to define a client secret code.
We can see that the “Standard Flow Enabled” option gets activated. It means that the Authorization Code Flow is enabled.
Note that for simplicity the Consent Required option is disabled. With this, the consent screen to confirm the granted scopes won’t be shown when authorizing a Client.
We also have to specify the redirect URI :
http://localhost:8082/lsso-client/login/oauth2/code/custom
At this point, we’re ready to save the changes.
The next step would be defining the client secret, but, as we can see in the “Credentials” tab, Keycloak doesn’t allow us to customize the secret from the Admin Console. We’ll configure the client secret directly in the JSON file which gets loaded when the Authorization Server is initialized.
2.7. Adding Custom Scopes
Finally, we’ll create 2 new custom scopes to use in our applications: read and write .
Let’s go to the “Client Scopes” option on the left and click on “Create”. Let’s fill in the name field with “read” and the click the “Save” button.
After that, let’s go back to the the “Client Scopes” option and create a “write” scope in the same way.
Now we should assign these scopes to the Client that we previously created. To do this, let’s go to “Clients” on the left and select the the lssoClient . In the “Client Scopes” tab, we have two listings:
- Default Client Scopes - always applied when issuing tokens
- Optional Client Scopes - applied only when they are requested in the Authorization request
The last option is the one that we’re going to use. To finalize, select both scopes from the bottom-left list and press the “Add selected” button.
2.8. Obtaining a Token
Now we’re at a good position to simulate the OAuth Authorization Code Flow.
First of all, we need an Authorization Code. By default, in Keycloak, this is short-lived (its validity is one minute) which represents no problem in case of automatic execution. Here, in this lesson, we’re carrying all operations manually and we risk not having enough time to perform all the operations. To minimize the risk, let’s increase the duration of the Authorization Code .
Let’s go to the “Realm Settings” (on the left) and browse the “Tokens” tab. Here, we can find many useful settings for session management, token revocation and login timeouts. Let’s set the “Client login timeout” option to a duration that we’re comfortable with (5 minutes in our case) and save the configuration.
Now, in the browser, we’ll navigate to the authorization endpoint :
and log in with the user credentials we’ve created before: john@test.com / 123
At this point, the Autorization Code gets created.
Note: the error page is not a concern in this case, since, normally, a service would receive this request and use the code to request an access token.
Here, we’ll execute this process manually by extracting the code value from the URL and using it to request a token .
In Postman, we should execute a request " POST - Keycloak Token Endpoint " that is available in the following folder:
LSSO > The Basics of OAuth2 (New Stack) > Authorization Server with Keycloak
The only missing part of the request is the Client secret we’ve generated above. Just to recall, we may find it in the “LssoClient Credentials” tab of the Keycloak admin console. Let’s add the code and secret into the POST request and send it.
At this point, the Authorization Server should issue a new Access Token that can be used as a Bearer token.
3. Resources
Lesson 3: The New OAuth2 Client Support - part 1
1. Goal
In this lesson, we’ll implement the Client as part of the simple OAuth application we’re building here.
We’re going to use the new OAuth stack here as we now have full Client support rolled out.
2. Lesson Notes
The relevant module you need to import when you’re starting with this lesson is: lsso-module2/oauth-client-start.
If you want to have a look at the fully implemented lesson, as a reference, feel free to import: lsso-module2/oauth-client-end.
We’ll also be running the other two applications: the Authorization and the Resource Servers. These aren’t the focus of this lesson, but we naturally do need them running as we’re developing the Client.
Now let’s start working on the new Client here.
2.1. Configuration
We’re starting from a simple Boot application that’s just an empty application.
Let’s add the new OAuth Client dependency. Spring Boot provides a starter library for this:
<dependency>
    <groupId>org.springframework.boot</groupId>
    <artifactId>spring-boot-starter-oauth2-client</artifactId>
</dependency>
This includes the core Spring Security library and therefore we can just remove the spring-boot-starter-security dependency from our pom.xml file.
Now that we have the support in, we’re going to drive the core of the Client functionality via properties.
Let’s start by defining a custom client:
spring:
  security:
    oauth2:
      client:
        registration:
          custom:
            client-id: lssoClient
            client-secret: lssoSecret
            scope: read,write
            authorization-grant-type: authorization_code
            redirect-uri: http://localhost:8082/lsso-client/login/oauth2/code/custom
Here, we’ve used the spring.security.oauth2.client.registration namespace, which is the root namespace for registering any Client.
We’ve defined the Client exactly as it’s registered in the Authorization Server, by setting the client-id and client-secret properties, as well as the scopes and authorization grant type.
Finally, we set the redirect URI property to complete our Client definition. You’ll notice we didn’t create this endpoint manually in the Client application; the framework defines it for us.
Next, we need to define the Service Provider for our Client which is basically the information of the Authorization Server . This is using the provider namespace and it’s, naturally, also custom.
What we need here is to point to the URIs that will be involved in the process.
Keep in mind we defined a Realm in the Authorization Server called baeldung, so all our endpoints will be under this base path:
http://localhost:8083/auth/realms/baeldung
And we’ll just use the URIs provided by the Keycloak server 
spring:
  security:
    oauth2:
      client:
        registration:
          # ...
        provider:
          custom:
            authorization-uri: http://localhost:8083/auth/realms/baeldung/protocol/openid-connect/auth
            token-uri: http://localhost:8083/auth/realms/baeldung/protocol/openid-connect/token
            user-info-uri: http://localhost:8083/auth/realms/baeldung/protocol/openid-connect/userinfo
            user-name-attribute: preferred_username
With this configuration, the framework will extract the preferred_username attribute from the UserInfo endpoint response to populate the principal that identifies the authenticated user.
We can gather all this information from the metadata that Keycloak exposes:
http://localhost:8083/auth/realms/baeldung/.well-known/openid-configuration
By default, with this setup Spring Security provides a WebSecurityConfigurerAdapter bean and enables the OAuth 2.0 Login functionality.
But, since here we’re already defining a WebSecurityConfigurerAdapter instance, we’ll have to enable the new functionality ourselves:
@EnableWebSecurity
public class ClientSecurityConfig extends WebSecurityConfigurerAdapter {

    @Override
    protected void configure(HttpSecurity http) throws Exception {
        http
          // ...
          .and()
            .oauth2Login()
          .and()
            .logout().logoutSuccessUrl("/");
    }
}
Here we’re using OAuth2 as a mean to authenticate into our application, but we have the possibility of configuring our app simply as an OAuth2 Client with the .oauth2Client() directive.