Lesson 3: Testing OAuth2 Clients (text-only)
1. Goal
In this lesson, we’ll learn about the support that Spring Security provides for testing OAuth2 Clients.
2. Lesson Notes
The relevant module you need to import when you’re starting with this lesson is: lsso-module4/testing-oauth2-clients-start
If you want have a look at the fully implemented lesson, as a reference, feel free to import: lsso-module4/testing-oauth2-clients-end
2.1. Overview
Spring Security provides solid support for testing OAuth2 Clients.
We can configure an OAuth2 Authorized Client in our tests or configure Token attributes such as scopes to test our Client endpoints.
To use the oauth2Client() API, we need to add the spring-security-test dependency in our client app:
<dependency>
    <groupId>org.springframework.security</groupId>
    <artifactId>spring-security-test</artifactId>
    <scope>test</scope>
</dependency>
2.2. Mocking an Authorized Client
Let’s first create an endpoint which will display a simple message and expects an authorized “custom” client:
@Controller
public class ProjectClientController {

    // ...

    @ResponseBody
    @GetMapping("/profile-simple")
    public String getUserProfileInfo(@RegisteredOAuth2AuthorizedClient("custom") OAuth2AuthorizedClient authorizedClient) {
        return "Your user profile";
    }

}
Spring can resolve the OAuth2AuthorizedClient using @RegisteredOAuth2AuthorizedClient.
Now that we’ve created this endpoint, let’s add an integration test for it.
In our OAuth2ClientIntegrationTest class, let’s add the necessary annotations to test our controller and autowire the MockMvc 
@AutoConfigureMockMvc
public class OAuth2ClientIntegrationTest {

    @Autowired
    private MockMvc mvc;

    // ...
}
We will start by writing a test which simply calls the endpoint without an active OAuth client:
@Test
public void givenSecuredEndpoint_whenCallingEndpoint_thenSuccess() throws Exception {
   this.mvc.perform(get("/profile-simple"))
       .andExpect(status().is3xxRedirection());
}
Notice that we’re expecting back a redirection because, naturally, without a client we’ll be redirected to authenticate on the server side.
The OAuth2AuthorizedClientManager which is responsible for the management of OAuth2AuthorizedClient(s) tries to resolve the authorized Client required by the endpoint.
But since this isn’t present in the request, we get redirected to the authorization URI of our OAuth2 Authorization Server that is defined in our application.properties .
Now let’s do the same thing but this time use the oauth2Client() when configuring the request and mock our “custom” client
@Test
public void givenSecuredEndpoint_whenCallingEndpoint_thenSuccess() throws Exception {
    // ...

    this.mvc.perform(get("/profile-simple").with(oauth2Client("custom")))
        .andExpect(status().isOk());
}
When we run the test, we can see that it passes this time because our mocked OAuth2AuthorizedClient was present in the request.
2.3. Testing Scopes
Now let’s see how we can test the OAuth2 Access Token scopes.
If our controller inspects scopes then we can configure them using the accessToken() method.
We’ll add a simple endpoint which will inspect the scopes and, based on them, return different responses:
@ResponseBody
@GetMapping("/profile")
public String getUserProfileInfoWithScopes(@RegisteredOAuth2AuthorizedClient("custom") OAuth2AuthorizedClient authorizedClient) {
    Set<String> scopes = authorizedClient.getAccessToken()
        .getScopes();
    if (scopes.contains("admin.users:read")) {
        return "All users";
    } else if (scopes.contains("users:read")) {
        return "Your user profile";
    } else {
        throw new ResponseStatusException(HttpStatus.FORBIDDEN, "Forbidden.");
    }
}
Notice we’re retrieving the scopes from the Access Token. For the admin.users.read and users:read scopes, we’re returning different messages. and for any other scope, a 403 Forbidden Response .
Now, that our endpoint is ready, let’s write a test mocking these scopes.
We’ll start by testing the admin.users:read scope:
@Test
public void givenOauth2Client_whenUsingScopes_thenSuccess() throws Exception {
    this.mvc.perform(get("/profile").with(oauth2Client("custom")
        .accessToken(new OAuth2AccessToken(BEARER, "token", null, Instant.now(), Collections.singleton("admin.users:read")))))
        .andExpect(content().string("All users"))
        .andExpect(status().isOk());
}
Here, we’ve configured the Client using oauth2Client() API as before, then used the accessToken() method to configure a token with the admin.users:read scope , and verified the expected result.
In the same method, we’ll test the users:read scope using the same approach:
@Test
public void givenOauth2Client_whenUsingScopes_thenSuccess() throws Exception {
    // ...

    this.mvc.perform(get("/profile").with(oauth2Client("custom")
        .accessToken(new OAuth2AccessToken(BEARER, "token", null, Instant.now(), Collections.singleton("users:read")))))
        .andExpect(content().string("Your user profile"))
        .andExpect(status().isOk());
}
and finally, let’s test it without providing any scopes:
@Test
public void givenOauth2Client_whenUsingScopes_thenSuccess() throws Exception {
    // ...

    this.mvc.perform(get("/profile").with(oauth2Client("custom")))
        .andExpect(status().isForbidden());
}
As you can see, we called the endpoint 3 times, each time with different scopes. We can then run the test to verify all 3 assertions pass.
2.4. Testing the Principal Name
Similar to the scopes, if the controller inspects the Resource Owner name, then we can configure it using principalName() .
Again, let’s write a simple endpoint which will permit only the Resource Owner whose name ends with “@baeldung.com”.
We’ll add a similar method as before, that retrieves the Authorized Client, then check the principalName and return a welcome text if it matches the pattern or else return Forbidden status:
@ResponseBody
@GetMapping("/principal-name")
public String getPrincipalName(@RegisteredOAuth2AuthorizedClient("custom") OAuth2AuthorizedClient authorizedClient) {
    if (authorizedClient.getPrincipalName()
        .endsWith("@baeldung.com")) {
        return "Welcome admin";
    } else {
        throw new ResponseStatusException(HttpStatus.FORBIDDEN, "Forbidden.");
    }
}
Next, let’s write the test for the above endpoint.
We start by testing the Resource Owner whose name ends with “@baeldung.com”:
public class OAuth2ClientIntegrationTest {

    // ...

    @Test
    public void givenOauth2Client_whenSetPrincipalName_thenSuccess() throws Exception {
        this.mvc.perform(get("/principal-name").with(oauth2Client("custom").principalName("admin@baeldung.com")))
            .andExpect(content().string("Welcome admin"))
            .andExpect(status().isOk());
    }

}
Next, let’s add another test in the same method for a Resource Owner whose name ends with “@gmail.com”:
@Test
public void givenOauth2Client_whenSetPrincipalName_thenSuccess() throws Exception {
    // ...

    this.mvc.perform(get("/principal-name").with(oauth2Client("custom").principalName("user@gmail.com")))
        .andExpect(status().isForbidden());
}
As we run the test we can verify that it passes successfully.
2.5. Using a Real Client Registration
This is useful if we want to test our controllers using a real ClientRegistration from our properties file.
To retrieve our Client configuration we need to autowire the ClientRegistrationRepository in our OAuth2ClientIntegrationTest:
public class OAuth2ClientIntegrationTest {

	// ...

    @Test
    public void givenClient_whenGetRegistration_thenSuccess() throws Exception {
    }
}
Next, we’ll retrieve the clientRegistration by id and verify its properties:
@Test
public void givenClient_whenGetRegistration_thenSuccess() {
    ClientRegistration clientRegistration = this.clientRegistrationRepository.findByRegistrationId("custom");
    assertThat(clientRegistration.getRegistrationId()).isEqualTo("custom");
    assertThat(clientRegistration.getClientId()).isEqualTo("lssoClient");
    // ...
}
We can verify several properties here - such as the grant type or scopes.
Finally, let’s test the “/profile-simple” endpoint we previously created, using our “custom” Client as seen above:
@Test
public void givenRealClient_whenCallingEndpoint_thenSuccess() throws Exception {
    this.mvc.perform(get("/profile-simple").with(oauth2Client().clientRegistration(this.clientRegistrationRepository.findByRegistrationId("custom"))))
        .andExpect(status().isOk());
}
Notice that here we have provided the ClientRegistration using the ClientRegistrationRepository we autowired.
When we run the test we can see that is passes successfully.
3. Resources
- Spring Security Reference - OAuth 2.0 Client
- Next Generation OAuth Support with Spring Security 5.0
- Spring WebClient and OAuth2 Support
Lesson 1: OAuth2 and SPAs (theory) (text-only)
1. Goal
In this new lesson out of Learn Spring Security OAuth we’re going to discuss Single Page Applications, focusing on how to use a SPA client with OAuth 2.
2. Lesson Notes
We’ll focus only in understanding why SPAs have gained popularity over the last years and on the considerations we have to take into account with this approach, with no code involved at this point.
2.1. Brief Background on Web Applications Evolution
First, let’s take a step back and discuss the background of how web applications have evolved over the last few years and why SPAs have gained popularity in the process.
In the traditional, MVC-style web application, the server would generate the entire web page on the server-side and just return that to the browser.
For example, in a Spring MVC application, navigation would mean different requests resulting in different HTML documents being rendered by the browser.
But, as both REST APIs and Javascript have gained popularity, this approach changed and evolved as well.
2.2. Single Page Applications
As you can guess from the name, in Single Page Applications only one page is served and then navigation and all other user interactions are handled on the Client-side by manipulating the DOM directly, and making requests to the server APIs when needed.
Of course, the application heavily uses Javascript behind the scenes.
Naturally, there are a number of security and architectural aspects that should be taken into account when building an application such as this one. All these aspects are out of the scope of these SPA-related lessons.
A common solution is the Client application, which can be a Spring Boot application, simply exposing all the static resources like the actual HTML page, the CSS and the JavaScript files to be loaded by the browser.
After loading all the resources, the application running in the client-side can obtain an Access Token from the Authorization Server using the Authorization Code flow together with the PKCE extension, and then use it to access the secured resources in the Resource Server.
2.3. Considerations when Implementing SPAs
Now that we understand the big picture, we can touch on a few considerations we usually need to take into account when using a browser-based OAuth Client.
First, since the entire source is available to the browser, this Client cannot maintain the confidentiality of sensitive data, and therefore, it’s considered a public Client.
In this scenario, and in-line with the current guidance, we should be using the Authorization Code flow together with the PKCE extension.
When using the Authorization Code flow, then the Authorization Server may include a Refresh Token together with the Access Token response , although this can’t be guaranteed; this can differ based on the provider we use.
The reason is that this still represents a potential security vulnerability and, when provided, the guidance notes suggest the use of an expiration and rotation strategy to mitigate the attacks against the Refresh Token being leaked (for example, that a rotated refresh token lifetime shouldn’t extend the lifetime of the initial refresh token).
Finally, an important consideration that we’ll have to keep in mind is that the Client application will be communicating to the other services from the browser, so we may need to add CORS settings to the services if they belong to different origins.
3. Resources
-
IETF - OAuth 2.0 Security Best Current Practice - Protecting Redirect-Based Flows
-
IETF - RFC7636 - Proof Key for Code Exchange (PKCE) specifications
Lesson 2: OAuth2 and SPAs (implementation) (text-only)
1. Goal
In this lesson, we’ll learn how to set up a simple Single Page Application (SPA) acting as an OAuth2 Client.
For this, we’ll use Javascript, therefore moving away from the traditional server-based MVC framework and the Spring Security Client support for a moment.
2. Lesson Notes
The relevant module you need to import when you’re working with this lesson is: lsso-module5/oauth2-and-SPAs
This lesson only needs a single reference codebase, so there is no end version of the project.
Note that all the changes we mention in the following sections are already included in the code. So, even though it’s useful to know exactly what we configured, you can simply start the services right away without having to change anything.
If you want to simply focus on the SPA Client implementation, then feel free to skip the next two subsections where we analyze the Authorization and Resource Servers setup.
2.1. Authorization Server Setup
Naturally, using a Single Page Application as a public OAuth2 Client has an impact on our registered Client configuration in the Authorization Server.
The first configuration we have to set up is making the Client public, which means it shouldn’t rely on Client Secrets as these can’t be properly secured. We can do this in Keycloak, by setting the Access Type option to public:

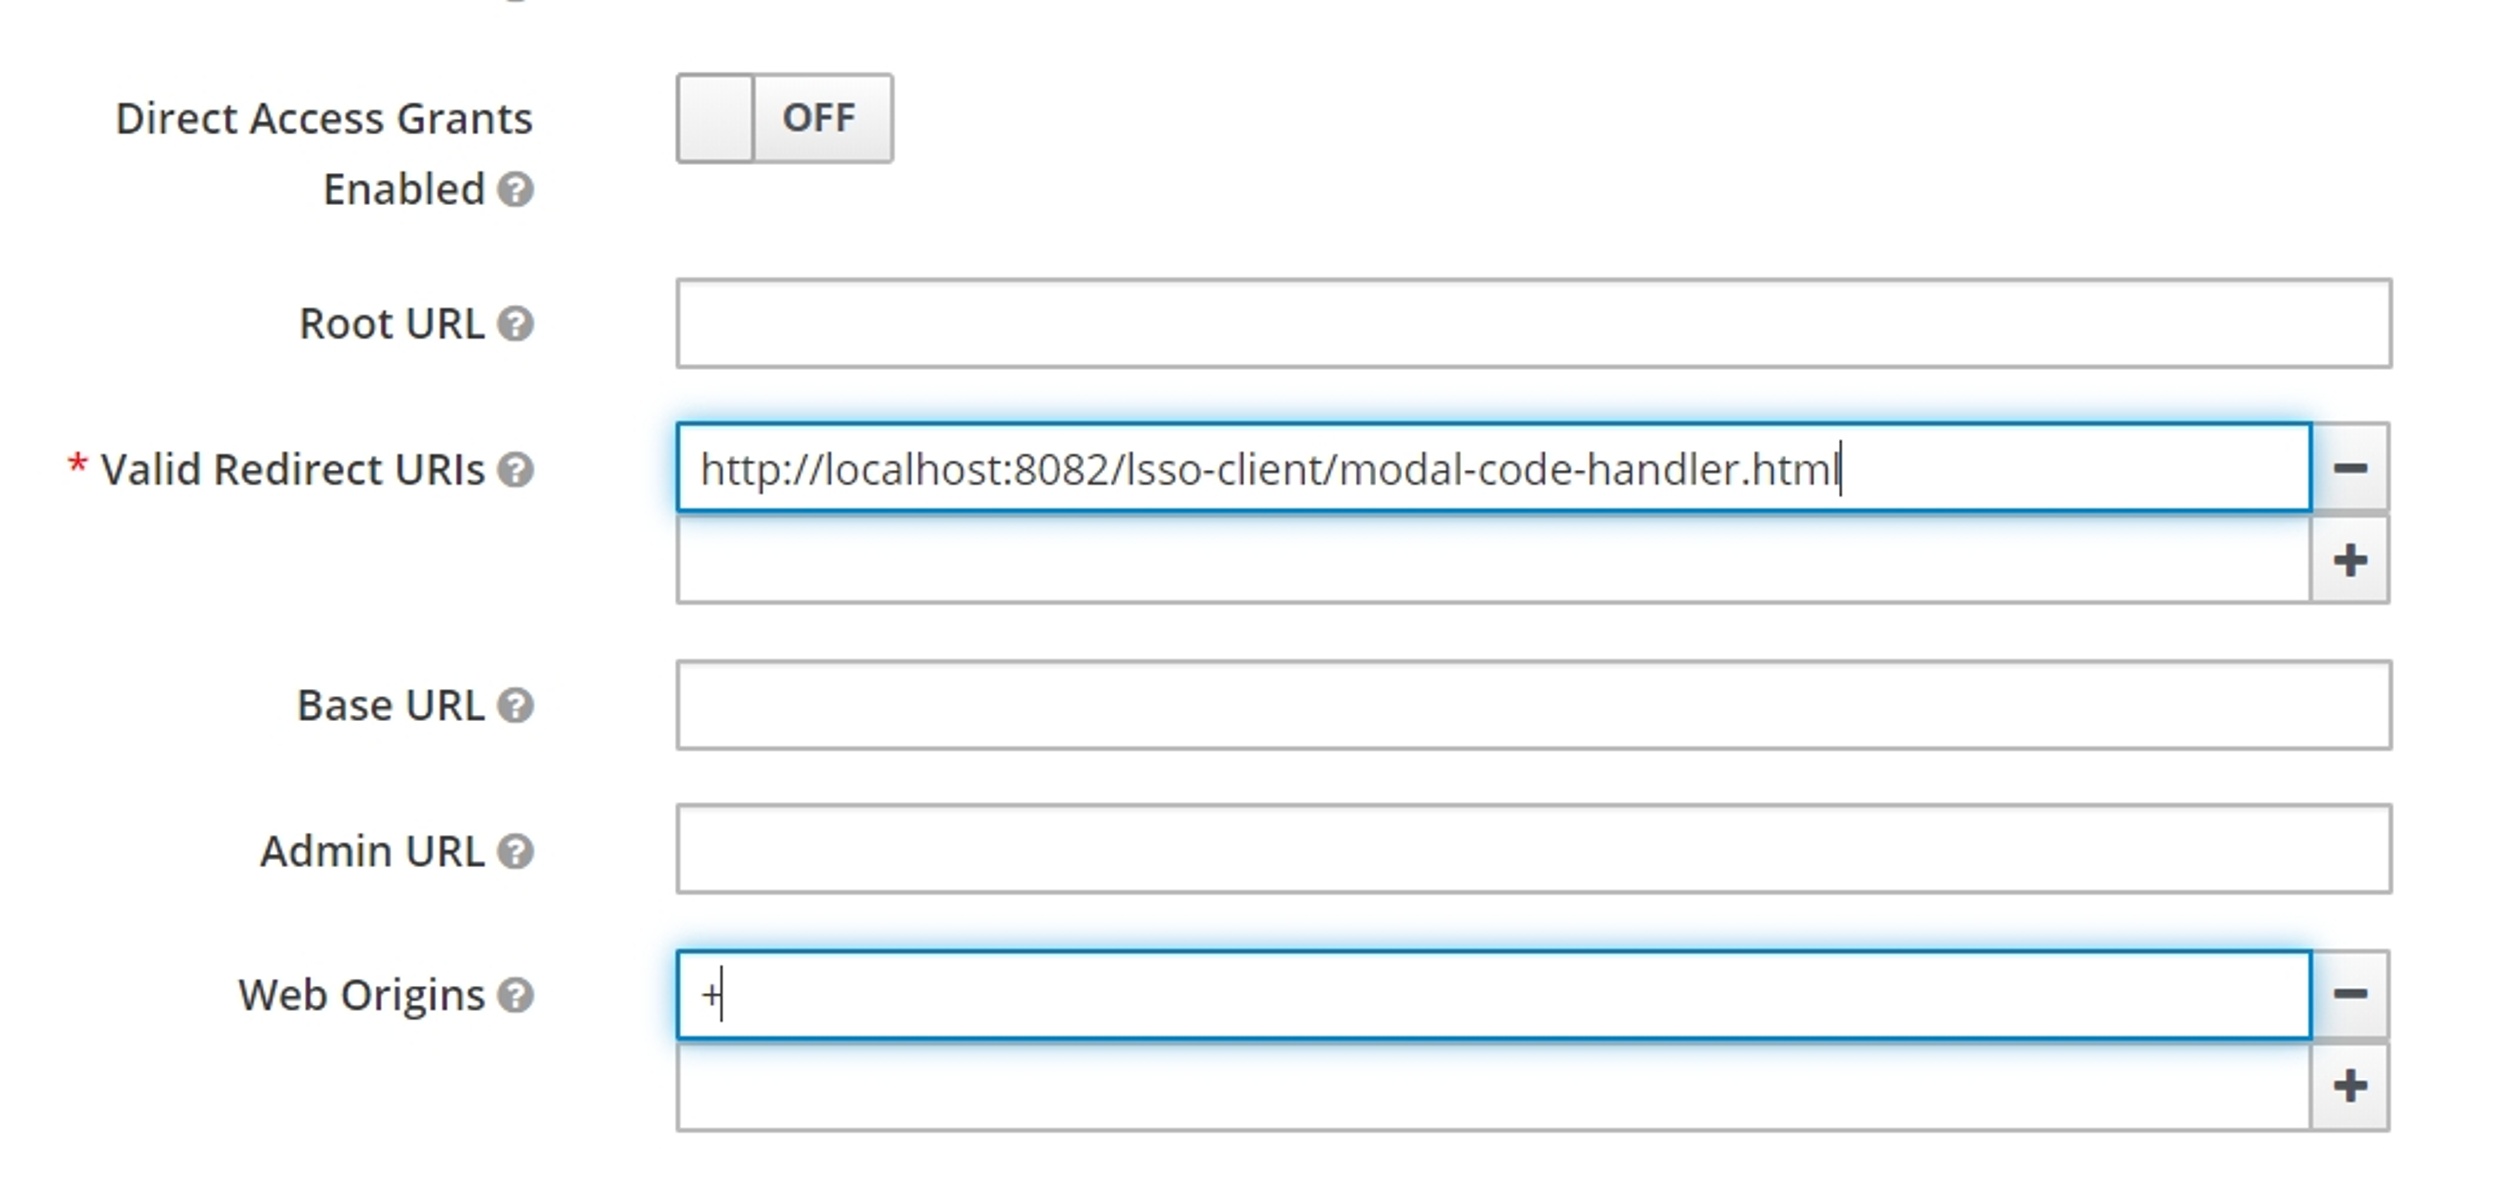
The next thing we have to update is the Redirect URI we’ll be using, as it should now point to a page in our new SPA client.
Also, use a plus (+) sign in the Web Origins input to allow all the Valid Redirect URIs origins for CORS (Cross-Origin Resource Sharing). This is necessary since now the Token Endpoint will be accessed from the browser and, in this case, from a different domain:
At this point, the Authorization Server would be able to work using PKCE if it detects a request with the corresponding parameters.
But it’s also a good practice to disable the possibility of using a plain code challenge method as this makes the protocol inefficient . We can do this by indicating only the S256 challenge method is allowed:

Finally, just to improve the functionality of the Client we also added some extra information to the existing user. Namely, the first name and a last name fields.
2.2. Enabling CORS on Our Resource Server
We need to prepare our Resource Server endpoints so that the CORS browser validations don’t block the communications.
First we have to indicate the security framework that we’ll be enabling CORS support and rely on a CORS configuration source bean:
public class ResourceSecurityConfig extends WebSecurityConfigurerAdapter {

    @Override
    protected void configure(HttpSecurity http) throws Exception {
        http.cors(withDefaults())
            .authorizeRequests()
            // ...
    }
    // ...
}
and now we can define the corresponding bean:
@Bean
CorsConfigurationSource corsConfigurationSource() {
    CorsConfiguration configuration = new CorsConfiguration();
    configuration.setAllowedOrigins(singletonList("http://localhost:8082"));
    configuration.setAllowedMethods(asList("GET", "POST"));
    configuration.setAllowedHeaders(asList(HttpHeaders.AUTHORIZATION, HttpHeaders.CONTENT_TYPE));
    UrlBasedCorsConfigurationSource source = new UrlBasedCorsConfigurationSource();
    source.registerCorsConfiguration("/**", configuration);
    return source;
}
Here we’ve enabled the access to the Client host, particuarly for the GET and POST HTTP methods, and allowed the different headers that will be sent from our Client application.
And finally, we’ve configured the URL-based configuration source and registered it for all the endpoints.
2.3. Quick Look at the SPA Structure
Let’s analyze the SPA structure and then debug it to see how it executes this OAuth flow and how it interacts with our Resource Server to render the relevant information:
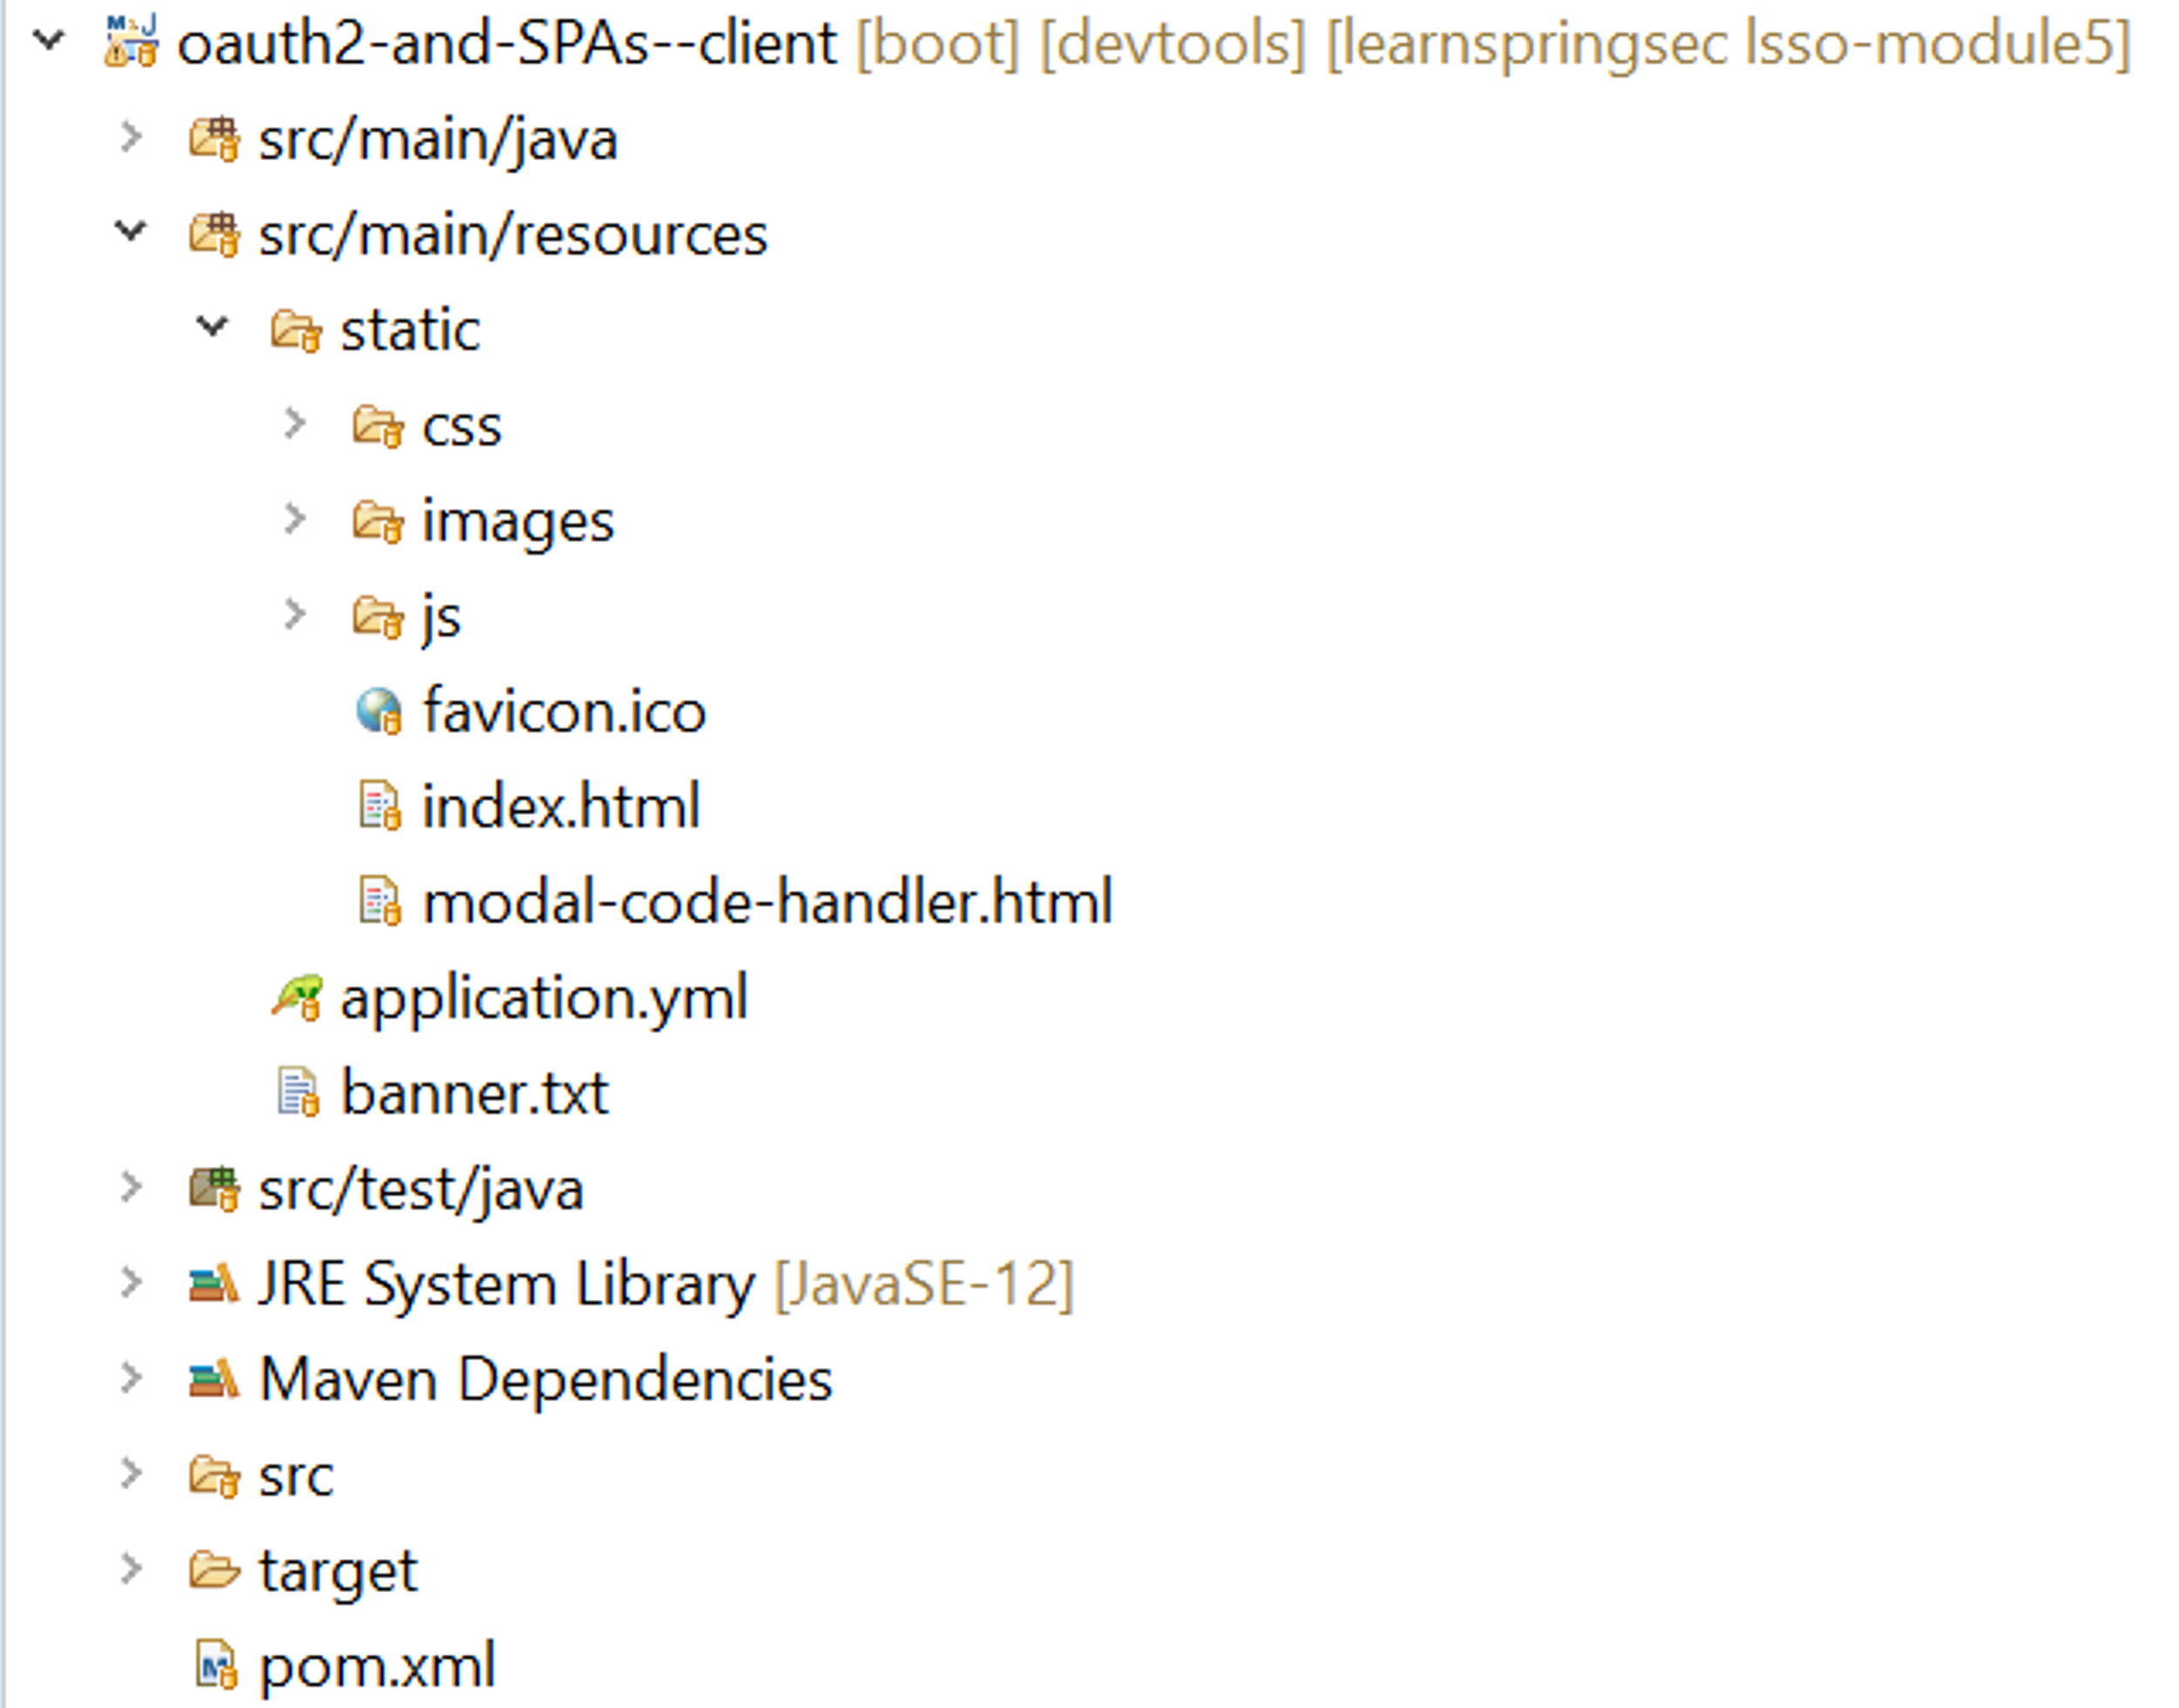
As we can see, our application is just serving static HTML, CSS and JS files; there is no endpoint declared or business logic executed on the server-side.
If we open the Client pom.xml in the dependencies section, we can verify that we’re not even using the OAuth Client dependencies in our project at all.
So, in practice, our entry point will be the index.html file, this will be the single page our application will be using and where all interactions will be happening.
In the index.html file we’ve declared the styles file, the libraries we’ll be using to get this working and the components that will take part in the execution of the application so that its functionality is accessible when loading this page.
Our main App component (src/main/resources/static/js/components/app.js) will contain the general state of the application and will be in charge of executing the main functionality of the page and of rendering the different components that come into play.
Let’s start the application and browse the client to see this in action.
2.4. SPA and Auth Code + PKCE in Action
A heads up before we get started is that we’re using a pop up modal to present the Authorization Endpoint whilst maintaining the state in our main page, so we need to enable this feature for our site.
Let’s browse http://localhost:8082/lsso-client to get presented the initial view of our SPA. Here we have some checkboxes we can use to indicate which scopes we want to request when asking for authorization in our Authorization Server.
Naturally, we don’t usually see this in real-case scenarios but here it will be handy to verify that the interactions with our Resource Server and our Authorization Server are getting executed correctly.
We’ll also open the Sources tab in the browser dev console to explore all the loaded static resources.
Open localhost:8082 -> lsso-client -> js -> components -> app.js and add a breakpoint in the onLoginFn definition so that the execution pauses before invoking the generateAuthURL function.
Step 1: Authorization Request
Let’s start by clicking on the LOGIN button and the execution should be paused at the breakpoint we just placed:
const onLoginFn = async () => {
  const { state, codeVerifier, authorizationURL, queryParamsObject } = await generateAuthURL();
  // ...
};
The first instruction is to generate the Authorization URL.
Let’s step in the generateAuthUrl:
const generateAuthURL = async () => {
  const { AUTH_URL, CLIENT_ID, CONFIGURED_REDIRECT_URI } = PROVIDER_CONFIGS;
  const state = generateState();
  console.log(`0- Generated state: ${state}`);
  const codeVerifier = generateCodeVerifier();
  console.log(`0- Generated Code Verifier: ${codeVerifier}`);
  const codeChallenge = await generateCodeChallenge(codeVerifier);
  console.log(`0- Generated Code Challenge from Code Verifier: ${codeChallenge}`);
  const scopesString = generateScopesString();
  const queryParamsObject = {
    client_id: CLIENT_ID,
    response_type: 'code',
    scope: scopesString,
    redirect_uri: CONFIGURED_REDIRECT_URI,
    state,
    code_challenge_method: 'S256',
    code_challenge: codeChallenge,
  };
  const params = new URLSearchParams();
  Object.entries(queryParamsObject).forEach(([key, value]) => params.append(key, value));
  const authorizationURL = `${AUTH_URL}\?${params.toString()}`;
  return { state, codeVerifier, authorizationURL, queryParamsObject };
};
As we step further we can see we’re creating the state and the codeVerifier as random values
The specs suggest a code_verifier with at least 256 bits of entropy. This can be achieved by generating a sequence of 32 random bytes.
Then we need to encode this octet sequence as base64url to produce a URL-safe string.
We are using the following base64url encoding function:
function base64urlencode(byteArray) {
  const stringCode = String.fromCharCode.apply(null, byteArray);
  const base64Encoded = btoa(stringCode);
  const base64urlEncoded = base64Encoded.replace(/\+/g, '-').replace(/\//g, '_').replace(/=/g, '');
  return base64urlEncoded;
}
We are creating a Code Verifier field with the following JavaScript function:
function generateCodeVerifier() {
  let randomByteArray = new Uint8Array(32);
  window.crypto.getRandomValues(randomByteArray);
  return base64urlencode(randomByteArray);
}
Back in the generateAuthUrl function, the Code Challenge is generated by transforming the Code Verifier. This is done using the SHA256 hash function, and then encoding the resulting octet sequence as base64url
function generateCodeChallenge = async (codeVerifier) => {
  const strBuffer = new TextEncoder('utf-8').encode(codeVerifier);
  const hashBuffer = await window.crypto.subtle.digest('SHA-256', strBuffer);
  const hashedByteArray = Array.from(new Uint8Array(hashBuffer));
  return base64urlencode(hashedByteArray);
};
An important note is that this is a one-time-key; a unique Code Verifier (and its matching Code Challenge) should be created for every authorization request.
Of course, these are just reference implementations, we’re using features that might not be supported by all browsers, so relying on a library for this task is not a bad idea.
We then combine the active scopes in a string and finally we create the Authorization URL.
Note that we’re using only the Code Challenge and the Code Challenge method in the URL; the Code Verifier has to be sent afterwards when requesting the Access Token together with the Authorization Code so that the Authorization Server can match both codes.
We can continue the execution until we are back to the onLoginFn:
const onLoginFn = async () => {
  const { state, codeVerifier, authorizationURL, queryParamsObject } = await generateAuthURL();
  window.addEventListener('message', onChildResponseFn, { once: true, capture: false });
  console.log('1- Opening modal pointing to Authorization URL...');
  console.log('1- Query params:', queryParamsObject);
  let newModal = window.open(authorizationURL, 'external_login_page', 'width=800,height=600,left=200,top=100');
  setModal(newModal);
  setAuthRequest({
    codeVerifier,
    state,
  });
};
Now we have to send the request to the Authorization Endpoint, but we come across a limitation at this point i.e. we’ll need to use the Code Verifier we generated later.
So, if we use this same browser window to make the request, the internal state of the page would get lost including the code.
One solution would be to temporarily store the value, for example, using Cookies.
Another approach, which is the one we have followed here, is to create a child window, a modal to make the request and then communicate between these two windows to maintain the internal state here.
We have to take into account that with this approach the user will have to allow our site to open popup windows.
So, what we’ll need to do is to create an event listener to receive the messages sent by the child window. As we can see, the onChildResponseFn function will be handling these messages, so let’s place a new breakpoint there.
As we step over, the modal pointing to the Authorization URL we created before is opened.
Finally, this method will be storing the state and the codeVerifier values in the internal state of the page since we’ll need them later.
Step 2: Authenticating With Authorization Server
Now we can continue the process by logging in with credentials john@test.com/123. The execution should stop at the onChildResponseFn breakpoint:
const onChildResponseFn = (e) => {
  const receivedValues = { state: e.data.state, code: e.data.authCode };
  console.log('2- Received state and Authorization Code from the modal');
  console.log('2- Values:', receivedValues);
  if (receivedValues.state !== refAuthRequest.current.state) {
    window.alert('Retrieved state [' + receivedValues.state + "] didn't match stored one! Try again");
    return;
  }
  const { CLIENT_ID, CONFIGURED_REDIRECT_URI } = PROVIDER_CONFIGS;
  const tokenRequestBody = {
    grant_type: 'authorization_code',
    redirect_uri: CONFIGURED_REDIRECT_URI,
    code: receivedValues.code,
    code_verifier: refAuthRequest.current.codeVerifier,
    client_id: CLIENT_ID,
  };

  requestAccessToken(tokenRequestBody);
};
Let’s see what is happening here, first, the modal passed the state and the Authorization Code back to the Client application.
Of course, the first step should be to check that the state is the same as we sent.
Next, we create the tokenRequestBody that we’ll be sending to request the Access Token using the Authorization Code and the Code Verifier.
Step 3 & 4: Requesting and Receiving an Access Token
As we step into the requestAccessToken method:
const requestAccessToken = (tokenRequestBody) => {
  // ...
  Object.entries(tokenRequestBody).forEach(([key, value]) => params.append(key, value));
  console.log('3- Sending request to Token Endpoint...');
  console.log('3- Body:', tokenRequestBody);
  axios
    .post(PROVIDER_CONFIGS.TOKEN_URI, params, { headers })
    .then((response) => {
      const newAuth = response.data
      console.log('4- Received Access Token:', newAuth);
      setTimeoutForRefreshToken(newAuth);
      fetchUserInfo(newAuth);
      setAuth(newAuth);
    })
    // ...
};
Since Axios is Promise-based, we’ll add a breakpoint inside the lambda function of the then clause, which will get invoked eventually, if the request succeeds.
We resume the debugger to proceed with the retrieval of Access Token.
An important note is that since we’re actually using the Authorization Code flow, the Authorization Server might retrieve a Refresh Token giving us the possibility of setting up a periodic task to obtain a valid Access Token for longer.
In the setTimeoutForRefreshToken function we’re setting up a background task to periodically refresh the token.
Step 5: Fetching Secured Resources
Now with the Access Token we can fetch the User information or we can store it in the state of the page to use it in some other process later.
Let’s see how we use the authorization data to fetch User information:
const fetchUserInfo = (newAuth) => {
  // ...
  const headers = newAuth
      ? {
          headers: {
            Authorization: 'Bearer ' + newAuth.access_token,
          },
        }
      : {};
  console.log('5- Fetching User Info...');
  axios
    .get(USERINFO_URI, headers)
    .then((response) => {
      const username = extractProfileField(response.data, USER_FIELDS.USERNAME);
      const lastName = extractProfileField(response.data, USER_FIELDS.LAST_NAME);
      const firstName = extractProfileField(response.data, USER_FIELDS.FIRST_NAME);
      const picture = extractProfileField(response.data, USER_FIELDS.PICTURE);
      const user = { username, firstName, lastName, picture };
      setUser(user);
    })
    // ...
};
A similar process is followed in the Projects Page component to fetch the data from the Resource Server. As we resume the execution by closing the dev console, we can see the list of Projects is rendered in the page.
Since we requested the write scope, we can create new Projects and the view will be updated right away.
With this information stored in the internal memory of the application we can navigate through the different views and the application will be able to render it accordingly and refreshing the information when suitable.
However, if we refresh the whole page (F5) then the internal state is lost, and we’ll have to log in again to access the secured resources. We won’t be covering how to persist information between requests in this lesson. This, as with many other different aspects we have to consider when implementing a SPA, has to be properly analyzed as it can represent a security vulnerability for our application.
3. Resources
Lesson 3: Exploring JWS with OAuth2 (text-only)
1. Goal
In this lesson, we’ll learn about JSON Web Signature (JWS) and its significance in the OAuth2 space. We’ll also see how to configure JWS properties and understand JWS verification with Spring Security.
2. Lesson Notes
The relevant module you need to import when you’re starting with this lesson is: lsso-module5/exploring-jws-with-oauth2-start
If you want have a look at the fully implemented lesson, as a reference, feel free to import: lsso-module5/exploring-jws-with-oauth2-end
2.1. What is JWS?
JWS is a standard for signing data. The content is in the form of a JSON data which is encoded in Base64 encoding.
A JWS consists of 3 primary components:
- header - describes the digital signature applied on this JWS; primarily contains the signature algorithm and a payload type
- payload - the message, this can be any type of payload - plain string, JSON etc.
- signature - actual signature over the header and the payload
2.2. JWT vs JWS
Technically, a signed JWT becomes a JWS, where the payload of the JWS is a JSON object that contains claims in JSON format.
But, not all JWTs are JWS. In addition to a signed JWT, we can also have encrypted JWTs called JWE (JSON Web Encryption).
What we have learned until now about JWT still holds true as we’ve only used signed JWTs so far.
JSON Object Signing and Encryption (JOSE) is an umbrella standard for signing and encryption of any content. It contains a collection of specifications that includes JWS, JWK, JWT and other related specifications.
2.3. JWS and OAuth
When the Resource Server receives an Access Token in the form of a JWS, it parses the JWS and verifies its signature.
This is done by fetching JWKs (public keys) from the Authorization Server or from a specified file or location.
2.4. Configuring the Resource Server - minimal configuration
The basic configuration is the same as we’ve seen previously and is present in the application.yml of our Resource Server application:
spring:
  security:
    oauth2:
      resourceserver:
        jwt:
          issuer-uri: http://localhost:8083/auth/realms/baeldung
          jwk-set-uri: http://localhost:8083/auth/realms/baeldung/protocol/openid-connect/certs
The jwk-set-uri is the endpoint hosted by the Authorization Server that returns the set of public keys.
We can open this endpoint in our browser and it will return the keys like below:
{
    "keys": [
        {
            "kid": "eRKUXmtLXJ0pA6LAKoZZJ5fU4T8BvlJtDBozWjqEvxc",
            "kty": "RSA",
            "alg": "RS256",
            "use": "sig",
            "n": "sw-lmV2HbpgXllKS-ccyCerlWDir32Y3yFvXF3CbzYRKVg_....",
            "e": "AQAB",
            "x5c": [
                "MIICnzCCAYcCBgFuhB77/jANBgkqhkiG9w0BAQsFADATMREwDwYDV...."
            ],
            "x5t": "2uAS3KEmOV7i9D_0GWmPjcQlAvY",
            "x5t#S256": "VNKt-HPgWvccTsTlOak5mZmA0K3a-JCER5zLjh3wSCA"
        }
    ]
}
This is simply the public key in JSON format hence, the name - JSON Web Key(s) or JWK in short.
It’s these public keys that the Resource Server uses to validate the JWS signature of the Access Token that it has received.
2.5. Verifying the JWS
Let’s understand the verification process by debugging the code.
We’ll start early in the call stack - from the BearerTokenAuthenticationFilter which checks if a Bearer Token is present in the request received by the Authorization Server. Let’s add a breadkpoint in the doFilterInternal method:
public final class BearerTokenAuthenticationFilter extends OncePerRequestFilter {

    @Override
    protected void doFilterInternal(HttpServletRequest request, HttpServletResponse response, FilterChain filterChain)
            throws ServletException, IOException {
    // ...
    }
}
This will eventually trigger the authentication provider to parse, decode and verify the JWS.
So, let’s also add a breakpoint in JwtAuthenticationProvider as well in the authenticate method:
public final class JwtAuthenticationProvider implements AuthenticationProvider {

    @Override
    public Authentication authenticate(Authentication authentication) throws AuthenticationException {
        BearerTokenAuthenticationToken bearer = (BearerTokenAuthenticationToken) authentication;

    // ...
    }
}
Finally, let’s add a third breakpoint, this time, in the Client app so that we can follow exactly where the Client will start the process of communicating with the Resource Server. Let’s add the breakpoint in ProjectClientController - getProjects.
We’ll start the Authorization Server, then the Resource Server and Client in debug mode and hit our Client’s App landing page - http://localhost:8082/lsso-client. Next, we enter the credentials: john@test.com/123.
Once we’re done with the authentication into the Authorization Server this, naturally, returns the JWS and we get back to the Client to the ProjectClientController - getProjects method where we have added our breakpoint:
public class ProjectClientController {

    // ...
    @GetMapping("/projects")
    public String getProjects(Model model) {
        List<ProjectModel> projects = this.webClient.get()
    // ...
}
Here, we’re about to make the request to the Resource Server to fetch the Project resources. Once we do that, we can see that the debug point is hit in the BearerTokenAuthenticationFilter .
As we step further to the first try block we can see that it tries to resolve the Bearer Token from the request
public final class BearerTokenAuthenticationFilter extends OncePerRequestFilter {


    @Override
    protected void doFilterInternal(HttpServletRequest request, HttpServletResponse response, FilterChain filterChain)
            throws ServletException, IOException {

        String token;

        try {
            token = this.bearerTokenResolver.resolve(request);
        } catch ( OAuth2AuthenticationException invalid ) {
        // ...
        }
    // ...
}
If the token is present, it will next start the auth process via the AuthenticationManager
@Override
protected void doFilterInternal(HttpServletRequest request, HttpServletResponse response, FilterChain filterChain)
        throws ServletException, IOException {

    // ...
    try {
        AuthenticationManager authenticationManager = this.authenticationManagerResolver.resolve(request);
        Authentication authenticationResult = authenticationManager.authenticate(authenticationRequest);

    // ...
    } catch (AuthenticationException failed) {
    // ...
    }
}
As we’ve already set a breakpoint in the in the JwtAuthenticationProvider, as we resume, our debugger will stop in JwtAuthenticationProvider -> authenticate method:
public final class JwtAuthenticationProvider implements AuthenticationProvider {

    // ...
    @Override
    public Authentication authenticate(Authentication authentication) throws AuthenticationException {
        BearerTokenAuthenticationToken bearer = (BearerTokenAuthenticationToken) authentication;

        Jwt jwt;
        try {
            jwt = this.jwtDecoder.decode(bearer.getToken());
        } catch (BadJwtException failed) {
            throw new InvalidBearerTokenException(failed.getMessage(), failed);
        } catch (JwtException failed) {
            throw new AuthenticationServiceException(failed.getMessage(), failed);
        }

        AbstractAuthenticationToken token = this.jwtAuthenticationConverter.convert(jwt);
        token.setDetails(bearer.getDetails());

        return token;
    }

    // ...
}
Let’s understand what happens here. We first use a decoder to decode the Bearer Token and finally, if there is no exception an Authentication token gets created.
Let’s focus on the decode process here as that’s where the majority of the logic we care about - will happen.
We’ll step inside this.jwtDecoder.decode(bearer.getToken()) method and this will take us to NimbusJwtDecoder -> decode method:
public final class NimbusJwtDecoder implements JwtDecoder {

    public Jwt decode(String token) throws JwtException {
        JWT jwt = parse(token);
        if (jwt instanceof PlainJWT) {
            throw new BadJwtException("Unsupported algorithm of " + jwt.getHeader().getAlgorithm());
        }
        Jwt createdJwt = createJwt(token, jwt);
        return validateJwt(createdJwt);
    }
}
First, let’s add a couple of quick breakpoints here: createJwt(token, jwt) and validateJwt(createdJwt).
Here, first, the token we got from the Client request gets parsed from the raw String we got it in, into a proper JWT class. Note that this is recognized as a SignedJWT .
Also, we need to keep in mind that the JWT token here is basically the JWS and this is the part where the Resource Server will verify the JWS signature.
Let’s see exactly how that happens; first, we’re going to step into createJWT here:
private Jwt createJwt(String token, JWT parsedJwt) {
    try {
        // Verify the signature
        JWTClaimsSet jwtClaimsSet = this.jwtProcessor.process(parsedJwt, null);

        Map<String, Object> headers = new LinkedHashMap<>(parsedJwt.getHeader().toJSONObject());
        Map<String, Object> claims = this.claimSetConverter.convert(jwtClaimsSet.getClaims());

        return Jwt.withTokenValue(token)
                .headers(h -> h.putAll(headers))
                .claims(c -> c.putAll(claims))
                .build();
    }
    // ...
}
Before we step further inside the jwtProcessor -> process method, let’s set a quick control breakpoint at return Jwt.withTokenValue on the return.
Let’s now step inside the jwtProcessor -> process this will take us to the DefaultJWTProcessor
public class DefaultJWTProcessor<C extends SecurityContext> implements ConfigurableJWTProcessor<C> {

    // ...
    @Override
    public JWTClaimsSet process(final JWT jwt, final C context)
        throws BadJOSEException, JOSEException {

        if (jwt instanceof SignedJWT) {
            return process((SignedJWT)jwt, context);
        }

        if (jwt instanceof EncryptedJWT) {
            return process((EncryptedJWT)jwt, context);
        }

        if (jwt instanceof PlainJWT) {
            return process((PlainJWT)jwt, context);
        }
    }
}
Here, the token is processed based on its type i.e. whether its an instance of a Signed, Encrypted or Plain JWT.
As we’re working with a SignedJWT , we’ll step further into the process((SignedJWT)jwt, context) method.
The implementation here does quite a bit of work. After some internal checks we are at below step in the method:
@Override
public JWTClaimsSet process(final SignedJWT signedJWT, final C context)
    throws BadJOSEException, JOSEException {

    // ...
    JWTClaimsSet claimsSet = extractJWTClaimsSet(signedJWT);

    List<? extends Key> keyCandidates = selectKeys(signedJWT.getHeader(), claimsSet, context);
    // ...
}
Here, first, it’s extracting the claims from the JWS.
Next, it perform another crucial step of selecting the keys.
Before we go further inside we add a breakpoint in the next line so that we are return to the correct step after selecting keys.
As we step inside selectKeys method and again inside the getJWSKeySelector().selectJWSKeys(…) we are now inside another important class JWSVerificationKeySelector
public class JWSVerificationKeySelector<C extends SecurityContext> extends AbstractJWKSelectorWithSource<C> implements JWSKeySelector<C> {

    @Override
    public List<Key> selectJWSKeys(final JWSHeader jwsHeader, final C context)
        throws KeySourceException {
        // ...
    }
}
Here, we’ll fetch the public keys from the Authorization Server and match those keys with the key used to sign the JWS that we need to verify.
The first step starts from creating the JWKMatcher on the basis of the algorithm present in the JWS header.
Next, in the second step we make the call to the Authorization Server:
public class JWSVerificationKeySelector<C extends SecurityContext> extends AbstractJWKSelectorWithSource<C> implements JWSKeySelector<C> {

    @Override
    public List<Key> selectJWSKeys(final JWSHeader jwsHeader, final C context)
        throws KeySourceException {

        JWKMatcher jwkMatcher = createJWKMatcher(jwsHeader);
        if (jwkMatcher == null) {
            return Collections.emptyList();
        }

        List<JWK> jwkMatches = getJWKSource().get(new JWKSelector(jwkMatcher), context);

    // ...
    }
}
As we step further inside the getJWKSource().get(…) it will take the control to RemoteJWKSet -> get method that actually makes the call to the Authorization Server to fetch the keys.
Before we step further inside let’s add a breakpoint to the next line.
Now, as we step further inside the RemoteJWKSet -> get method:
public class RemoteJWKSet<C extends SecurityContext> implements JWKSource<C> {

    @Override
    public List<JWK> get(final JWKSelector jwkSelector, final C context)
        throws RemoteKeySourceException {

        JWKSet jwkSet = jwkSetCache.get();
        if (jwkSet == null) {
            jwkSet = updateJWKSetFromURL();
        }
    //...
    }
}
Here, first, it tries to fetch the key set from the cache. This is useful because once the public keys are fetched from the Authorization Server, the set is not going to change very often and we can keep it in the cache.
If our cache is empty or our key is not present in the cache, which will be the case for the first time, we update it from the jwk URI in the next step.
Let’s step further into the method updateJWKSetFromURL
private JWKSet updateJWKSetFromURL()
    throws RemoteKeySourceException {
    Resource res;
    try {
        res = jwkSetRetriever.retrieveResource(jwkSetURL);
    } catch (IOException e) {
        throw new RemoteKeySourceException("Couldn't retrieve remote JWK set: " + e.getMessage(), e);
    }
    // ...
}
Here in the try block, we are making a call to the Authorization Server and fetching the keys.
As we step out we are back into the get method wherein we select the key and returns the matching key from this method.
Further, as we step out we are back to JWSVerificationKeySelector breakpoint we had added:
public class JWSVerificationKeySelector<C extends SecurityContext> extends AbstractJWKSelectorWithSource<C> implements JWSKeySelector<C> {


    @Override
    public List<Key> selectJWSKeys(final JWSHeader jwsHeader, final C context)
        throws KeySourceException {

        // ...
        List<JWK> jwkMatches = getJWKSource().get(new JWKSelector(jwkMatcher), context);

        List<Key> sanitizedKeyList = new LinkedList<>();

        for (Key key: KeyConverter.toJavaKeys(jwkMatches)) {
            if (key instanceof PublicKey || key instanceof SecretKey) {
                sanitizedKeyList.add(key);
            } // skip asymmetric private keys
        }

        return sanitizedKeyList;
    }
}
Here we convert the JWK to Java Security Key and finally, we return from this method back to DefaultJWTProcessor -> process.
Now, we have the Key that we’ll be using to verify the JWS:
public class DefaultJWTProcessor<C extends SecurityContext> implements ConfigurableJWTProcessor<C> {

    @Override
    public JWTClaimsSet process(final SignedJWT signedJWT, final C context)
        throws BadJOSEException, JOSEException {

        // ...
        List<? extends Key> keyCandidates = selectKeys(signedJWT.getHeader(), claimsSet, context);

        ListIterator<? extends Key> it = keyCandidates.listIterator();

        while (it.hasNext()) {

            JWSVerifier verifier = getJWSVerifierFactory().createJWSVerifier(signedJWT.getHeader(), it.next());

            // ...
        }
    }
}
Next, the Key obtained is used to create a JWSVerifier and finally, this verifier will check the signature of our JWS:
public JWTClaimsSet process(final SignedJWT signedJWT, final C context)
    throws BadJOSEException, JOSEException {

    // ...
    while (it.hasNext()) {

        JWSVerifier verifier = getJWSVerifierFactory().createJWSVerifier(signedJWT.getHeader(), it.next());

        if (verifier == null) {
            continue;
        }

        final boolean validSignature = signedJWT.verify(verifier);
        // ...
    }
}
Internally, for messages signed with RS256 algorithm, this verifier computes the hash of the signature present as the third component of the JWS using the Public Key obtained from the Authorization Server.
Next, it computes the hash of the header and payload of the JWS also called as signing input and verifies that both hashes are equal.
This step completes the JWS verification process and in case of no errors our JWS is marked as verified. Once the JWS is verified, the Claims of the JWS will also be validated.
Finally, we’ll have a new JWT token to be used within the scope of the Resource Server.
2.6. Advanced JWS Configurations
Using our standard property-based configuration we can further set the algorithms that we’re expecting the tokens to be signed with.
This is generally needed when the Authorization Server has signed the token with an algorithm other than RS256.
Let’s go ahead and change the configuration by adding the jws-algorithm property:
spring:
  security:
    oauth2:
      resourceserver:
        jwt:
          // ...
          jws-algorithm: RS512
Now, the token will be verified using RS512 algorithm.
We can also configure our Resource Server to trust multiple algorithms for signature verifications:
public class ResourceSecurityConfig extends WebSecurityConfigurerAdapter {

    @Value("${spring.security.oauth2.resourceserver.jwt.jwk-set-uri}")
    private String jwkSetUri;

    @Bean
    JwtDecoder jwtDecoder() {
        return NimbusJwtDecoder.withJwkSetUri(this.jwkSetUri)
            .jwsAlgorithm(SignatureAlgorithm.RS512)
            .jwsAlgorithm(SignatureAlgorithm.RS256)
            .build();
    }
}
Here, we’ve defined our JwtDecoder bean, then used the keys uri in our builder, and defined the algorithms that we want to configure using the jwsAlgorithm() method .
Note that JWS Algorithms defined using the JwtDecoder bean will have more priority than the JWS Algorithm defined in the properties file.