LOGIN AND SIGNUP FORMS
When people click the “Reserve” button, we’re now going to show a modal, to let people log in to the site.
Like they do on Airbnb, when you’re not logged in:
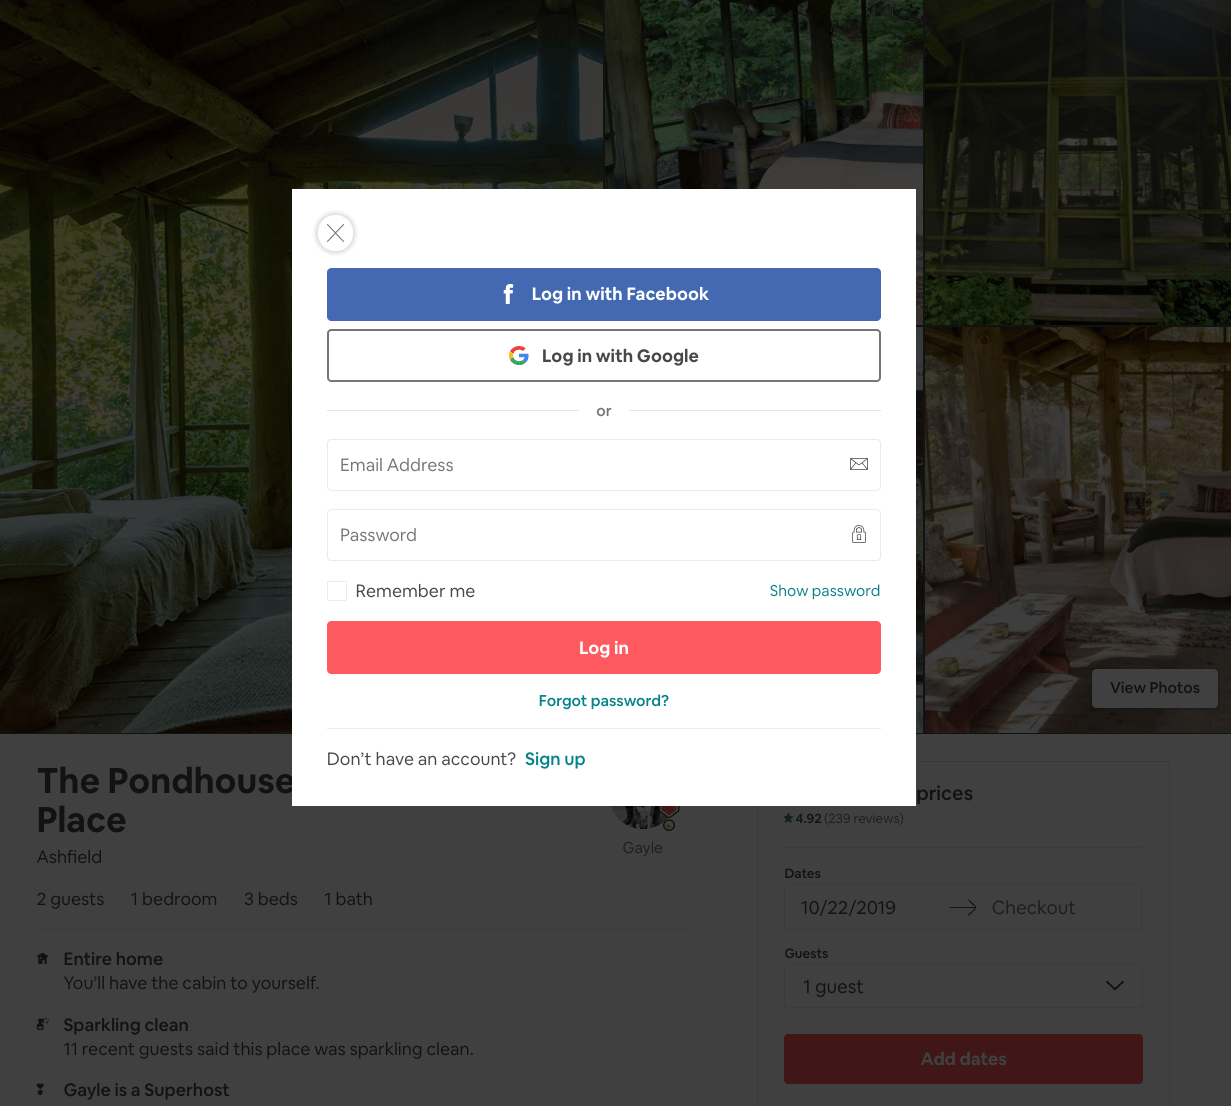
Right now we don’t have the option to log in, so people can’t be logged in - we don’t have a lot of logic we must implement. Let’s just show up a modal with the registration form.
Then we’ll add a “Already registered? Login in” link, which will just show the login and password fields.
We’ll skip the workflow to reset the password, which is something you’d need in production, but we can avoid now.
Let’s make the modal form.
We start simple, by creating a test modal. Make a components/Modal.js file, with this content:
components/Modal.js
export default function Modal(props) {
  return (
    <div className='nav-container'>
      <div
        className='modal-background'
        onClick={() => console.log('close')}
      ></div>

      <div className='modal'>{props.children}</div>
      <style jsx global>{`
        .modal-background {
          position: fixed;
          top: 0;
          left: 0;
          width: 100%;
          height: 100%;
          background: rgba(0, 0, 0, 0.3);
        }

        .modal {
          position: absolute;
          left: 50%;
          top: 50%;
          width: calc(100vw - 4em);
          max-width: 32em;
          max-height: calc(100vh - 4em);
          overflow: auto;
          transform: translate(-50%, -50%);
          padding: 1em;
          border-radius: 0.2em;
          background: white;
        }
      `}</style>
    </div>
  )
}
This makes a simple modal component, that once imported can be used like this:
<Modal>test</Modal>
and it will render “test” inside a modal.
That’s what we’re going to do.
Open components/Layout.js , add
components/Layout.js
import { useState } from 'react'

import Modal from './Modal'
and then inside the component body, add
components/Layout.js
const [showModal, setShowModal] = useState(true)
and add this in the JSX, after the main tag:
components/Layout.js
{
  showModal && <Modal>test</Modal>
}
Here’s the code:
import Header from './Header'

import { useState } from 'react'
import Modal from './Modal'

export default function Layout(props) {
  const [showModal, setShowModal] = useState(true)
  return (
    <div>
      <Header />
      <main>{props.content}</main>
      {showModal && <Modal>test</Modal>}
      <style jsx>{`
        main {
          position: relative;
          max-width: 56em;
          background-color: white;
          padding: 2em;
          margin: 0 auto;
          box-sizing: border-box;
        }
      `}</style>
    </div>
  )
}
This is the result that you should have if you try reloading the page:

Awesome! Now we know the modal is working, in terms of the basic functionality we need.
If you click outside of the modal, nothing happens but you’ll get a “close” string in the console because we have this line:
components/Modal.js
<div className='modal-background' onClick={() => console.log('close')}></div>
Instead, let’s invoke a close prop, which we assume it’s a function passed to us by the parent component ( Layout ). We’ll handle closing the modal in that component, by using the setShowModal hook.
components/Modal.js
<div className='modal-background' onClick={() => props.close()}></div>
components/Layout.js
{
  showModal && <Modal close={() => setShowModal(false)}>test</Modal>
}
Now you should be able to close the modal clicking outside it!
Now let’s create 2 specialized modals: components/RegistrationModal.js and components/LoginModal.js .
In their content, just add
components/RegistrationModal.js
export default function RegistrationModal(props) {
  return <p>Registration Modal</p>
}
and
components/LoginModal.js
export default function LoginModal(props) {
  return <p>Login Modal</p>
}
Everything we write inside the opening and closing <Modal> tags will be rendered in the modal, because we used props.children in the Modal component JSX, so just as we entered the test string, we can add another component.
In particular, we can add (depending on our goal) the RegistrationModal or the LoginModal components.
We add 2 more items in the Layout component state, using hooks like we did for showModal :
components/Layout.js
const [showLoginModal, setShowLoginModal] = useState(true)
const [showRegistrationModal, setShowRegistrationModal] = useState(false)
Notice I set showLoginModal to default to true , so we can default to showing the login modal for our testing purposes.
Now in the Layout component, import LoginModal and RegistrationModal:
In the JSX instead of
{
  showModal && <Modal>test</Modal>
}
we embed the LoginModal or RegistrationModal components depending on the component state:
{
  showModal && (
    <Modal close={() => setShowModal(false)}>
      {showLoginModal && <LoginModal />}
      {showRegistrationModal && <RegistrationModal />}
    </Modal>
  )
}
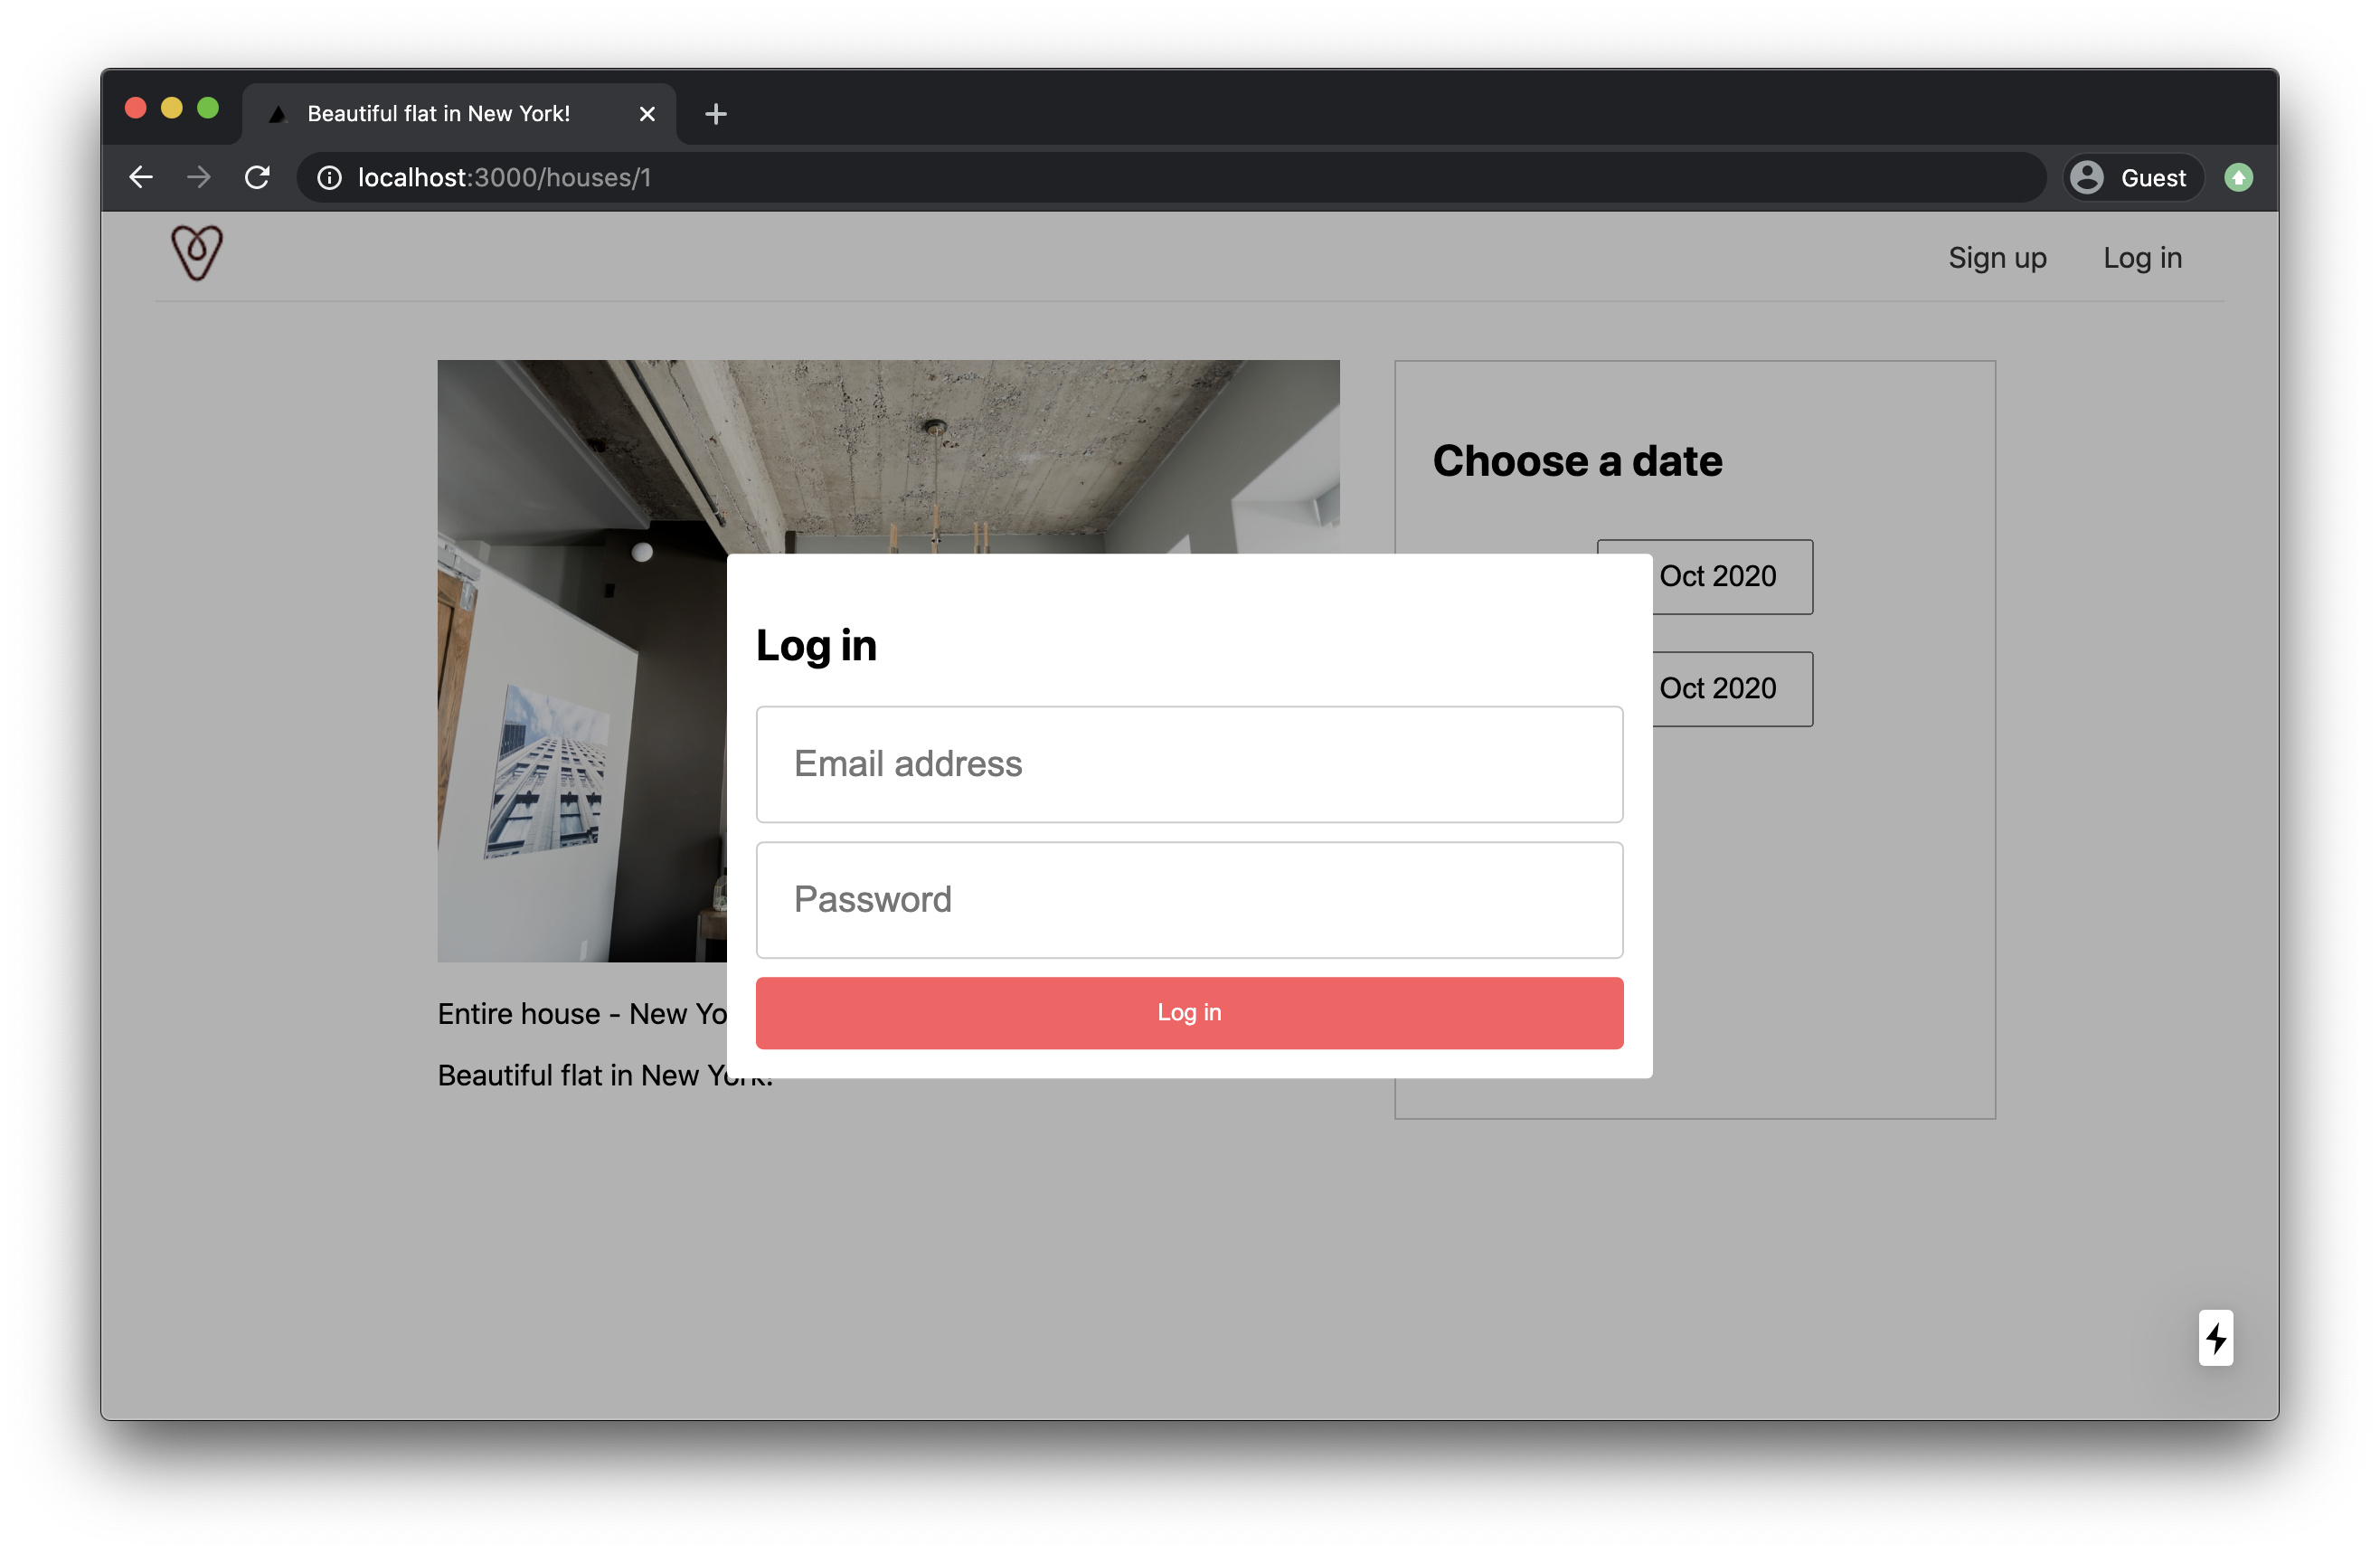
This should already display the LoginModal component in the modal.
Now let’s define this LoginModal component in details. We want to define a form with an email and password fields:
components/LoginModal.js
export default function LoginModal(props) {
  return (
    <>
      <h2>Log in</h2>
      <div>
        <form>
          <input id='email' type='email' placeholder='Email address' />
          <input id='password' type='password' placeholder='Password' />
          <button>Log in</button>
        </form>
      </div>
    </>
  )
}
This is just some basic HTML. We need some CSS, but since we are going to use the same CSS in the registration modal too, let’s add the CSS in the styles/globals.css file as part of the global styles:
button {
  background-color: rgb(255, 90, 95);
  color: white;
  font-size: 13px;
  width: 100%;
  border: none;
  height: 40px;
  border-radius: 4px;
  cursor: pointer;
}

input[type='text'],
input[type='email'],
input[type='password'] {
  display: block;
  padding: 20px;
  font-size: 20px !important;
  width: 100%;
  border: 1px solid #ccc;
  border-radius: 4px;
  box-sizing: border-box;
  margin-bottom: 10px;
}
Notice how the button stying is the same as the one we added in pages/houses/[id].js to style the “Reserve” button, so we can remove the corresponding CSS from that file, to avoid redundancy.
Things should look pretty good by now:
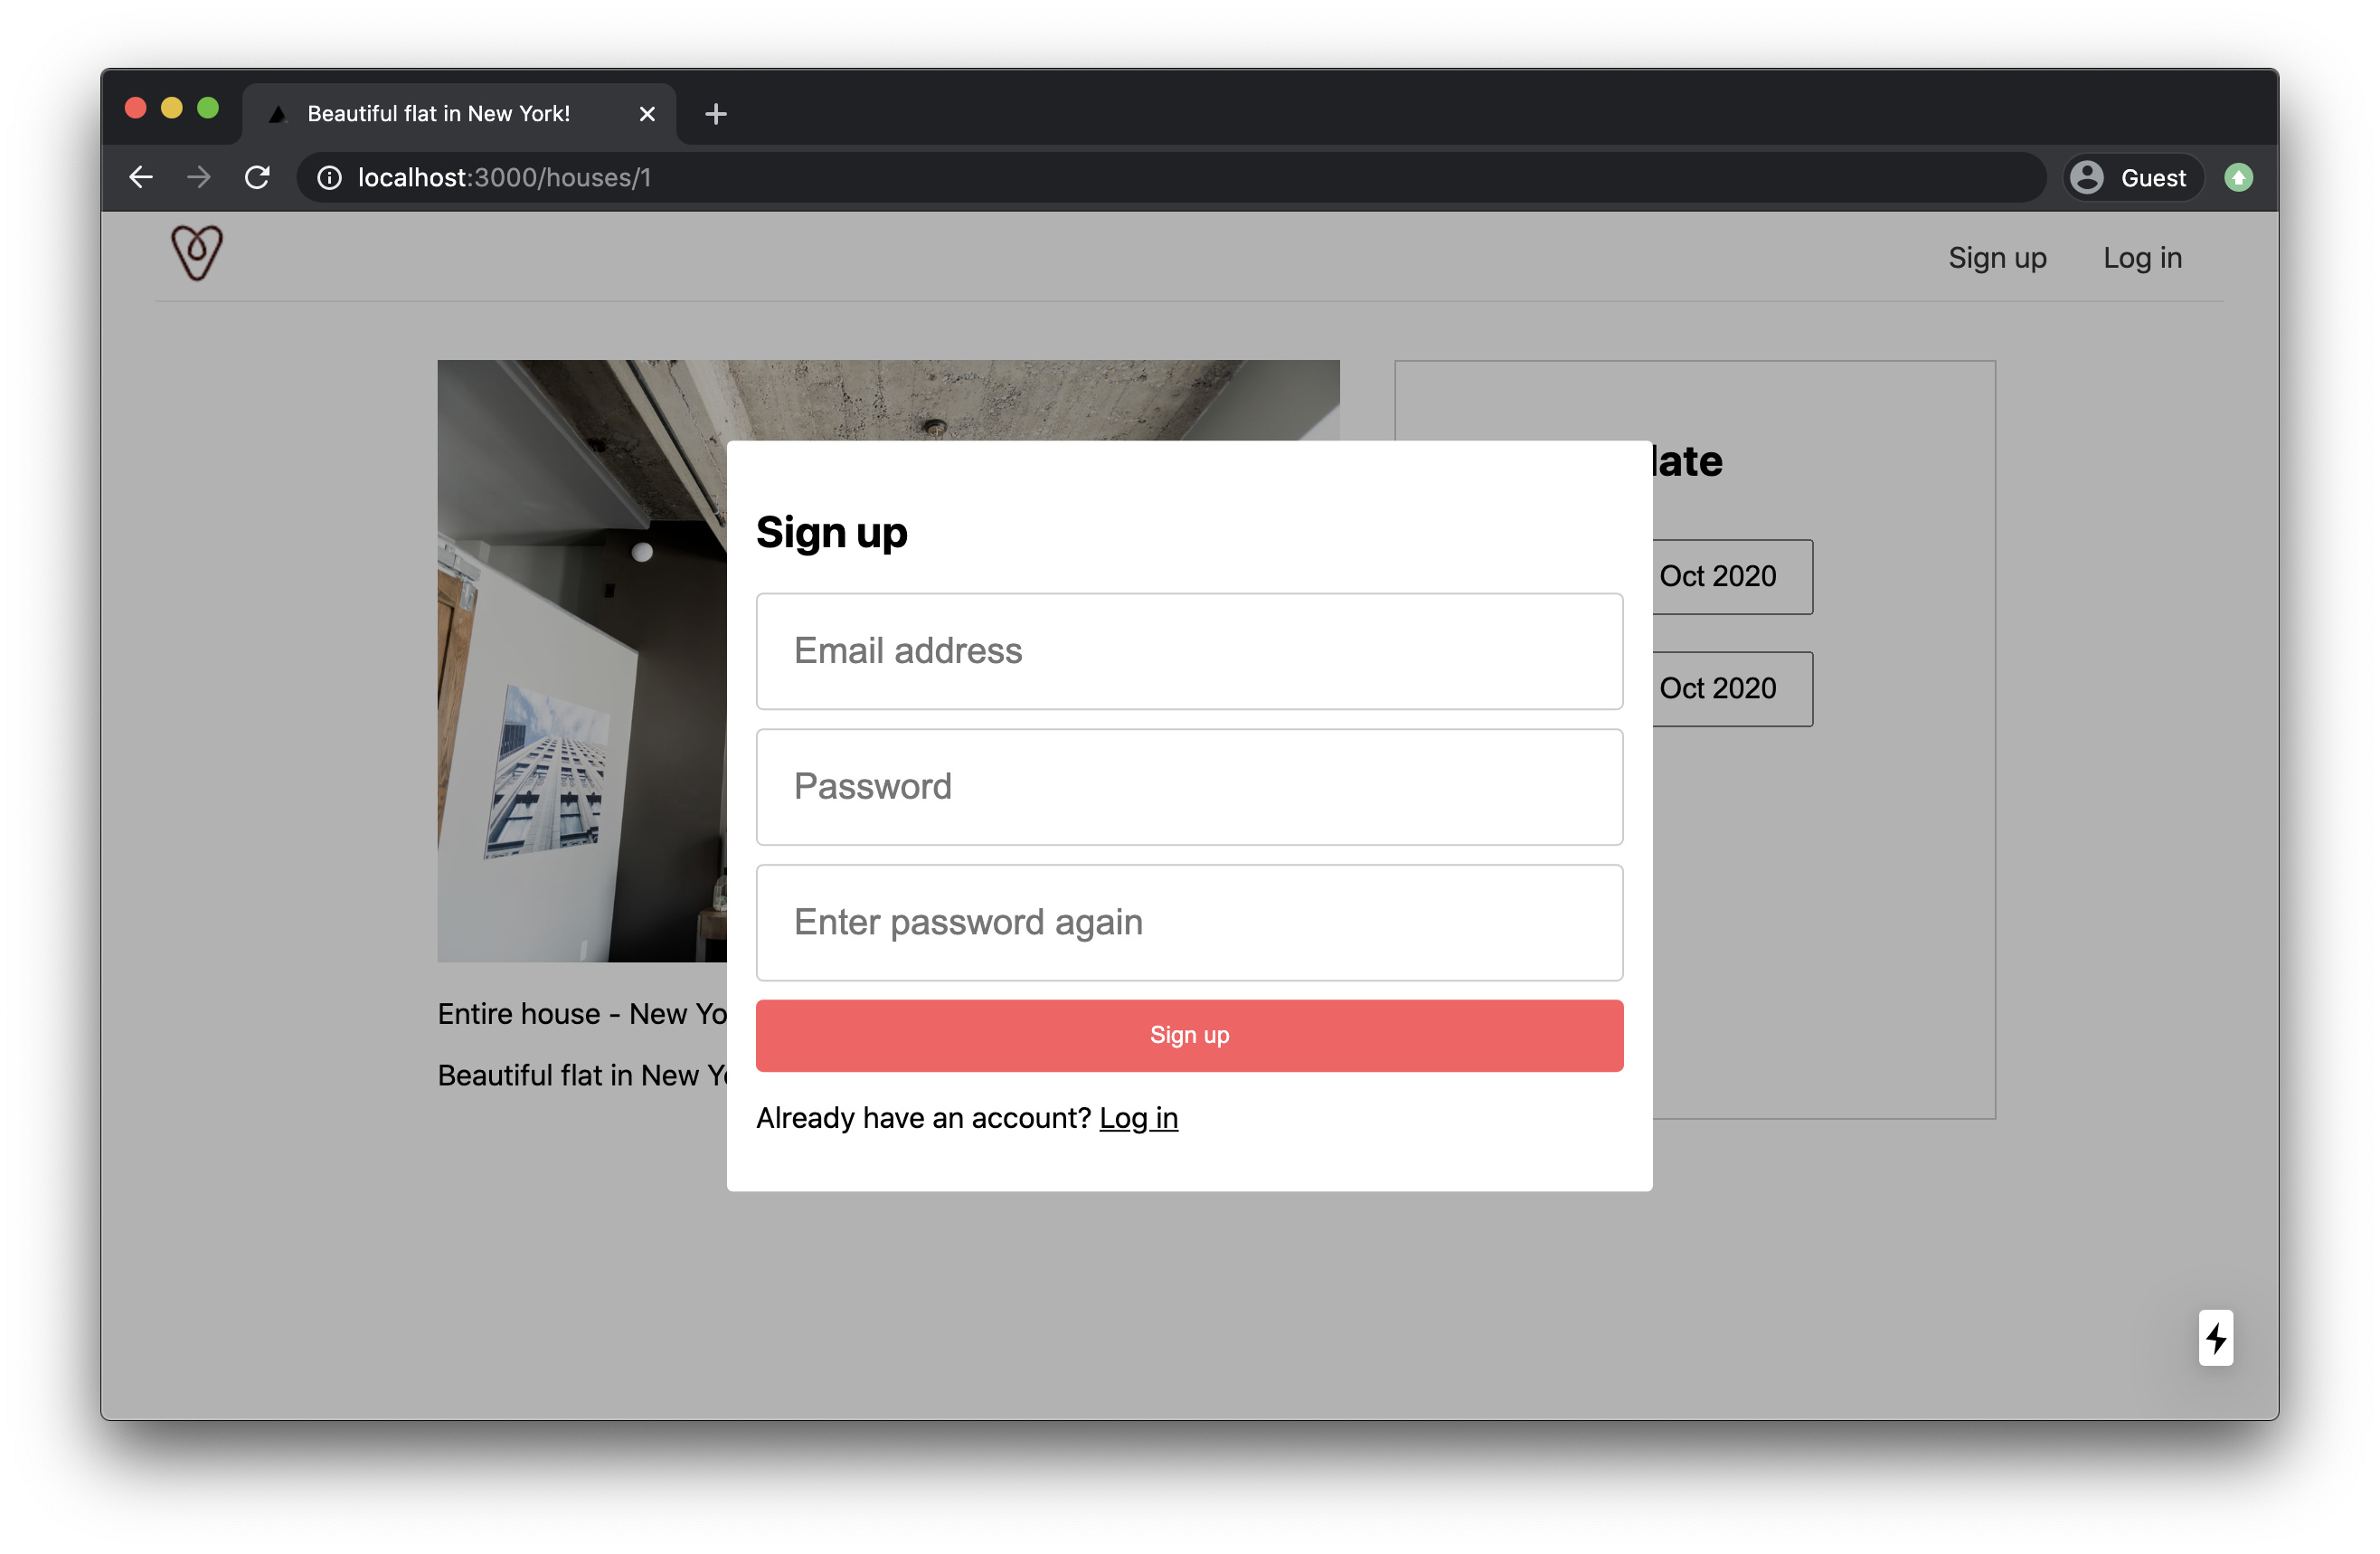
The registration component is going to be very similar:
export default function RegistrationModal(props) {
  return (
    <>
      <h2>Sign up</h2>
      <div>
        <form>
          <input id='email' type='email' placeholder='Email address' />
          <input id='password' type='password' placeholder='Password' />
          <input
            id='passwordconfirmation'
            type='password'
            placeholder='Enter password again'
          />
          <button>Sign up</button>
        </form>
      </div>
    </>
  )
}
Now we add a way to go from one form to another by adding a link at the bottom of each form:
<p>
  Don't have an account yet?{' '}
  <a href='javascript:;' onClick={() => props.showSignup()}>
    Sign up
  </a>
</p>
and
<p>
  Already have an account?{' '}
  <a href='javascript:;' onClick={() => props.showLogin()}>
    Log in
  </a>
</p>
I used javascript:; as the href value, to tell the browser we’ll use JS to handle the click, and simultaneously avoid the URL to change if I use href="#" . See https://flaviocopes.com/links-for-javascript/ for more info on this method I used.
Notice how we call props.showSignup() and props.showLogin() . Those are 2 functions we pass as props from the parent component, Layout .
Now in Layout.js we handle for each component the corresponding prop:
{
  showModal && (
    <Modal close={() => setShowModal(false)}>
      {showLoginModal && (
        <LoginModal
          showSignup={() => {
            setShowRegistrationModal(true)
            setShowLoginModal(false)
          }}
        />
      )}
      {showRegistrationModal && (
        <RegistrationModal
          showLogin={() => {
            setShowRegistrationModal(false)
            setShowLoginModal(true)
          }}
        />
      )}
    </Modal>
  )
}
You can try the frontend, you should be able to switch between the forms:
Remove the text-decoration: none; line from the a tag in styles/globals.css to make the link have an underline.
Let’s add a form submit event, by adding an event handler to the onSubmit event on the form tags in both forms:
<form
	onSubmit={event => {
		alert('Log in!')
		event.preventDefault()
	}}>
	...
and in the registration form:
<form
	onSubmit={event => {
		alert('Sign up!')
		event.preventDefault()
	}}>
	...
Here’s the full LoginModal.js component
export default function LoginModal(props) {
  return (
    <>
      <h2>Log in</h2>
      <div>
        <form
          onSubmit={(event) => {
            alert('Sign up!')
            event.preventDefault()
          }}
        >
          <input id='email' type='email' placeholder='Email address' />
          <input id='password' type='password' placeholder='Password' />
          <button>Log in</button>
        </form>
      </div>
      <p>
        Don't have an account yet?{' '}
        <a href='javascript:;' onClick={() => props.showSignup()}>
          Sign up
        </a>
      </p>
    </>
  )
}
and here’s the full RegistrationModal.js component:
export default function RegistrationModal(props) {
  return (
    <>
      <h2>Sign up</h2>
      <div>
        <form
          onSubmit={(event) => {
            alert('Log in!')
            event.preventDefault()
          }}
        >
          <input id='email' type='email' placeholder='Email address' />
          <input id='password' type='password' placeholder='Password' />
          <input
            id='passwordconfirmation'
            type='password'
            placeholder='Enter password again'
          />
          <button>Sign up</button>
        </form>
      </div>
      <p>
        Already have an account?{' '}
        <a href='javascript:;' onClick={() => props.showLogin()}>
          Log in
        </a>
      </p>
    </>
  )
}
Great!
In the next lesson we’ll link these modals to the rest of the application.
The code for this lesson is available at https://github.com/flaviocopes/airbnb-clone-react-nextjs-2020/tree/4-2
ACTIVATE THE MODAL
Let’s first hide the form, which now loads by default on every page load.
We just need to default to false the hooks we defined in components/Layout.js .
Instead of:
const [showModal, setShowModal] = useState(true)
const [showLoginModal, setShowLoginModal] = useState(true)
We set:
const [showModal, setShowModal] = useState(false)
const [showLoginModal, setShowLoginModal] = useState(false)
Now, we are going to enable the modals when these event occur:
- the Sign Up or Log in links are clicked in the nav bar, in
components/Header.js - the Reserve button in the
pages/houses/[id].jscomponent is clicked after a user chooses a set of dates
It’s just 3 different places, but we can immediately spot a problem: the state of the modals is being centralized and we’d need to pass around both the state and the functions to update it, too much.
And we’re just starting out.
Soon we’ll have to manage the user logins, and that would also need more state management.
So, we’re going to add one library to our project, one library that helps us manage the state easily .
There are solutions in React that are quite complicated, and I’m sure they are useful in many scenarios, but I like to keep my code as simple as possible.
Simple is understandable.
Simple is beautiful.
Complexity should be avoided at all costs, and if possible hidden away in libraries that expose a simple interface to us.
It’s the case of this library, which is called easy-peasy .
Go take a look at their website https://easy-peasy.now.sh/ and then come back.
First of all, stop the Next.js server and run
npm install easy-peasy
to install the library.
Then restart the Next.js server with npm run dev .
Now, first of all we need to create a store . The store is the place where we’ll store our state, and the functions needed to modify it.
Create the store in the file store.js in the root of the project, with this content:
store.js
import { createStore, action } from 'easy-peasy'

export default createStore({})
We’ll add more things to this file later.
Now we need to do one thing - we need to wrap all the Next.js app into a component provided by easy-peasy, and the way Next.js provides us to do it is to create a file called _app.js in the pages folder.
Open pages/_app.js , which now has this content:
pages/_app.js
import App from 'next/app'
import '../styles/globals.css'

function MyApp({ Component, pageProps }) {
  return <Component {...pageProps} />
}

export default MyApp
Now we’re going to import the store we defined in store.js , and we also import the StoreProvider component from easy-peasy .
With this component, we wrap the default Component and we pass the store as a prop to it:
pages/_app.js
import '../styles/globals.css'
import { StoreProvider } from 'easy-peasy'
import store from '../store'

function MyApp({ Component, pageProps }) {
  return (
    <StoreProvider store={store}>
      <Component {...pageProps} />
    </StoreProvider>
  )
}

export default MyApp
This operation makes now our store available in every component of the app .
So let’s now centralize the state we added to components/Layout.js in the last lesson, to the store.js file.
If you think we wasted some time in the last lesson, we didn’t - most of the times those implementations are iterative. You first try the simplest solution, and then move on to more complex scenarios as the needs evolve. Now we know what things we need.
store.js
import { createStore, action } from 'easy-peasy'

export default createStore({
  modals: {
    showModal: false,
    showLoginModal: false,
    showRegistrationModal: false,
    setShowModal: action((state) => {
      state.showModal = true
    }),
    setHideModal: action((state) => {
      state.showModal = false
    }),
    setShowLoginModal: action((state) => {
      state.showModal = true
      state.showLoginModal = true
      state.showRegistrationModal = false
    }),
    setShowRegistrationModal: action((state) => {
      state.showModal = true
      state.showLoginModal = false
      state.showRegistrationModal = true
    }),
  },
})
We defined a modals object with some properties, and 4 actions, which we’ll use in our app components to change the state.
Let’s start from the Header.js component. When our Log in and Sign up buttons are clicked, we want to activate the correct modal.
In there, we import useStoreActions to be able to access the store functions:
import { useStoreActions } from 'easy-peasy'
and inside the component we initialize those actions to be used:
const setShowLoginModal = useStoreActions(
  (actions) => actions.modals.setShowLoginModal
)
const setShowRegistrationModal = useStoreActions(
  (actions) => actions.modals.setShowRegistrationModal
)
Now we can call setShowLoginModal and setShowRegistrationModal as regular functions, and this is what we’re going to do:
<nav>
  <ul>
    <li>
      <a href='#' onClick={() => setShowRegistrationModal()}>
        Sign up
      </a>
    </li>
    <li>
      <a href='#' onClick={() => setShowLoginModal()}>
        Log in
      </a>
    </li>
  </ul>
</nav>
Great! Now switch to the components/Layout.js file. In there, we import the useStoreState and useStoreActions from easy-peasy .
import { useStoreState, useStoreActions } from 'easy-peasy'
useStoreState is new to us, and we’ll use it to access the store state properties.
Inside the Layout component function body, let’s initialize a few variables:
const showModal = useStoreState((state) => state.modals.showModal)
const showLoginModal = useStoreState((state) => state.modals.showLoginModal)
const showRegistrationModal = useStoreState(
  (state) => state.modals.showRegistrationModal
)

const setHideModal = useStoreActions((actions) => actions.modals.setHideModal)
const setShowRegistrationModal = useStoreActions(
  (actions) => actions.modals.setShowRegistrationModal
)
const setShowLoginModal = useStoreActions(
  (actions) => actions.modals.setShowLoginModal
)
The first 3 are properties, which we’ll use to determine if modals should be shown or not, just like we did before using the properties generated using the useState hook:
{
  showModal && (
    <Modal close={() => setHideModal()}>
      {showLoginModal && (
        <LoginModal
          showSignup={() => {
            setShowRegistrationModal()
          }}
        />
      )}
      {showRegistrationModal && (
        <RegistrationModal
          showLogin={() => {
            setShowLoginModal()
          }}
        />
      )}
    </Modal>
  )
}
See, I called setHideModal() . Before I had setShowModal(false) , but I think setHideModal() is clearer. We could have passed a parameter as part of our easy-peasy action, too.
And instead of calling
setShowRegistrationModal(true)
setShowLoginModal(false)
I called
setShowRegistrationModal()
because we abstract away all the logic in the store. We don’t need to manage all the details, we just tell it to show the registration modal.
Same for the login modal.
The other part where we’ll show a modal, as we said, is the Reserve button in the pages/houses/[id].js component.
Users click the button when they finally chose the dates for the stay, and we can go on with the purchase flow.
So let’s now switch to the pages/houses/[id].js file.
In there, we first import useStoreActions :
import { useStoreActions } from 'easy-peasy'
pages/houses/[id].js
and in the component body we initialize the setShowLoginModal action:
const setShowLoginModal = useStoreActions(
  (actions) => actions.modals.setShowLoginModal
)
and finally we call it when the button is clicked:
<button
  className='reserve'
  onClick={() => {
    setShowLoginModal()
  }}
>
  Reserve
</button>
Awesome! Our modal should be correctly working now. We’re ready to start implementing the registration functionality now.
Oh, one thing to note: I changed the links I previously defined as <a href="javascript:;" ... to <a href="#" ... because I noticed that React complained about using javascript: URLs in the DevTools console, about them being deprecated (although they are a perfectly find JavaScript feature). A reminder to always check the DevTools if React tells us something is wrong.
The code for this lesson is available at https://github.com/flaviocopes/airbnb-clone-react-nextjs-2020/tree/4-3
SEND REGISTRATION DATA TO THE SERVER
In this lesson we’re going to add and set up authentication into the application, so we can manage user logins and registrations.
But first, let me do a little bit of analysis here.
What’s the authentication story of our application? Let’s talk about it.
We’re going to use a database to store our users data (no Firebase, Auth0 or other cloud-based solutions).
We are NOT going to use OAuth (which serves a different purpose) or JWT tokens (which are better suited for API access tokens).
We’ll use what I believe is the most sensible solution to a simple authentication strategy: server based sessions, stored in HTTP-only cookies.
First, we’re going to add an API route to the Next.js application.
By convention Next.js considers a server route any JavaScript file under pages/api/ .
Create the file pages/api/auth/register.js . In there, we initialize and export a function:
pages/api/auth/register.js
export default (req, res) => {}
I only want to respond to POST requests, so we filter out requests that do not have this HTTP method:
pages/api/auth/register.js
export default (req, res) => {
  if (req.method !== 'POST') {
    res.status(405).end() //Method Not Allowed
    return
  }
  console.log('POST request received')
}
We’ll now use the Axios npm library to POST to this route to create a new user.
Open components/RegistrationModal.js .
We create 3 state properties in the component, add we’ll bind them to the form elements.
Let’s import useState from react :
import { useState } from 'react'
then we create 3 state properties, one for each element in the form:
components/RegistrationModal.js
export default (props) => {
  const [email, setEmail] = useState('')
  const [password, setPassword] = useState('')
  const [passwordconfirmation, setPasswordconfirmation] = useState('')

  return <>...</>
}
Now to each form item, we add an onChange event listener, which uses the corresponding hook updater function to set the state value when the user types into the form fields:
components/RegistrationModal.js
import { useState } from 'react'

export default (props) => {
  const [email, setEmail] = useState('')
  const [password, setPassword] = useState('')
  const [passwordconfirmation, setPasswordconfirmation] = useState('')

  return (
    <>
      <h2>Sign up</h2>
      <div>
        <form
          onSubmit={(event) => {
            alert('Sign up!')
            event.preventDefault()
          }}
        >
          <input
            id='email'
            type='email'
            placeholder='Email address'
            onChange={(event) => setEmail(event.target.value)}
          />
          <input
            id='password'
            type='password'
            placeholder='Password'
            onChange={(event) => setPassword(event.target.value)}
          />
          <input
            id='passwordconfirmation'
            type='password'
            placeholder='Enter password again'
            onChange={(event) => setPasswordconfirmation(event.target.value)}
          />
          <button>Sign up</button>
        </form>
        <p>
          Already have an account?{' '}
          <a href='#' onClick={() => props.showLogin()}>
            Log in
          </a>
        </p>
      </div>
    </>
  )
}
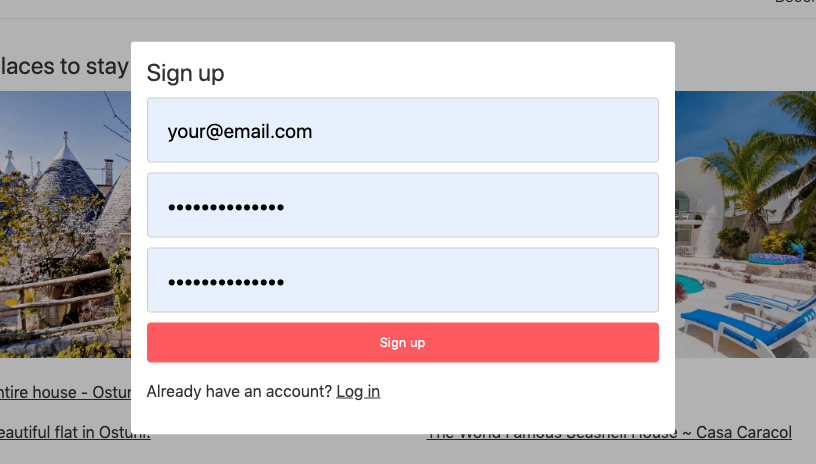
Great! When the form is submitted, now, we can console.log the values of the state to make sure they are updated, as we expect:
components/RegistrationModal.js
<form
  onSubmit={event => {
    console.log(email, password, passwordconfirmation)
    event.preventDefault()
  }}>
If you try to sign up using the website, you should see the values you entered printed in the browser console.
Now go to the terminal and install a the Axios npm package:
npm install axios
Then run npm run dev again to start the Next.js app.
Now switch back to the editor and include Axios in the RegistrationModal component:
components/RegistrationModal.js
import axios from 'axios'
and in the form onSubmit event handler function, let’s send those form values to the server, to the auth/register endpoint:
const submit = async () => {
  const response = await axios.post('/api/auth/register', {
    email,
    password,
    passwordconfirmation,
  })
  console.log(response)
}
and use this function on the submit event:
<form onSubmit={submit}>
See? We use the /api/auth/register route, which directly points to the pages/api/auth/register.js file.
Unfamiliar with Axios? See my Axios tutorial
Great! Now if you try to fill the registration form and submit the data:
you’ll see the server prints “POST request received” in the terminal where npm run dev started.
Now in the API endpoint let’s add console.log(req.body) and let’s also send a 200 response back to the client:
pages/api/auth/register.js
export default (req, res) => {
  if (req.method !== 'POST') {
    res.status(405).end() //Method Not Allowed
    return
  }
  console.log(req.body)
  res.end()
}
In the terminal, you’ll see the data coming in correctly to the server:
And in the client a successful response.
The code for this lesson is available at https://github.com/flaviocopes/airbnb-clone-react-nextjs-2020/tree/4-4
ADD POSTGRES
In this lesson we’re going to install Postgres locally on the computer, and set it up.
We’re also going to create the first table, to host our users data.
Let’s start! The instruction to install Postgres are based on macOS.
Search “how to install postgres on windows” or “how to install postgres on your linux distribution ” if you’re using other platforms. It should not differ a lot, especially past the installation phase.
On macOS we’ll use Homebrew. If you don’t have Homebrew installed yet, go to https://brew.sh/ and follow the instructions there.
Once you are done, get back and in the command line run:
brew install postgresql
and after it finished, run:
brew services start postgresql
to start Postgres as a daemon, which means it will keep running in the background, listening for connections.
postgresql is the more complex to pronounce name of Postgres, but they are the same thing. It just embeds SQL in the name. What’s SQL ? SQL, pronouced “sequel”, means Structured Query Language, and it’s a special language we use to interact with a relational database .
If you’re new to database, it’s a lot of new terms for you! Basically a relational database organizes the data into tables , and provides a way to insert and extract data from those tables. That’s SQL.
And we’re going to use it soon.
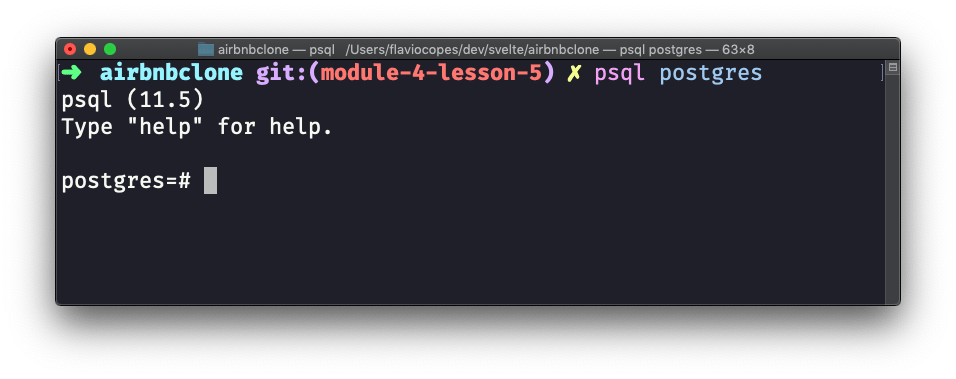
Right after we log in to Postgres!
Go back to the command line, and type
psql postgres
This will give you access to the postgres database, which is created by default, with your macOS username. Homebrew automatically created your user at installation.
Now that we are into the psql application, we can create a new database:
CREATE DATABASE nextbnb;
Don’t forget the semicolon
;, because it’s needed by SQL otherwise the command will not run.
Now in a new line, we switch to this database using
\c nextbnb
The prompt will tell something like this:
You are now connected to database "nextbnb" as user "<your username >". .
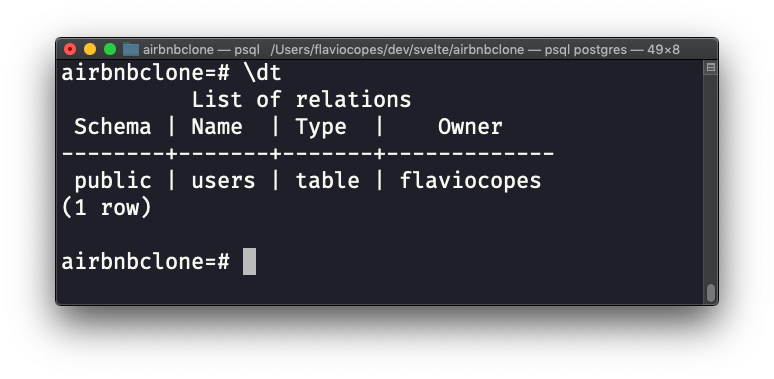
Now we’re going to create a new table.
Use this syntax:
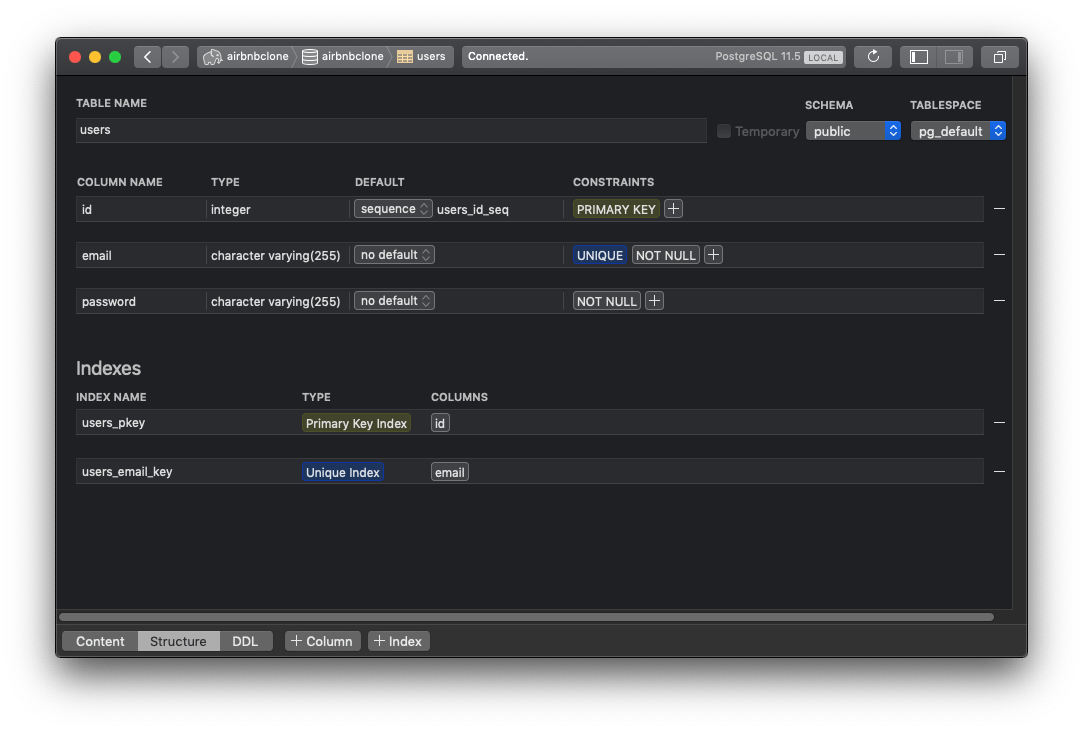
CREATE TABLE users (
  id SERIAL PRIMARY KEY,
  email VARCHAR(255) UNIQUE NOT NULL,
  password VARCHAR(255) NOT NULL,
  session_token VARCHAR(255),
  session_expiration TIMESTAMP
);
Now if you run this, and now error shows up, you will have the table in the system.
You can see it by running the command
\dt
which will show you the database tables:
If you did any error, you can delete the table by running the command
DROP TABLE users
To finally quit psql , run
\q
Now that you know how things work under the hood, I will show you an easier way to work with Postgres, on macOS: the Postico app:
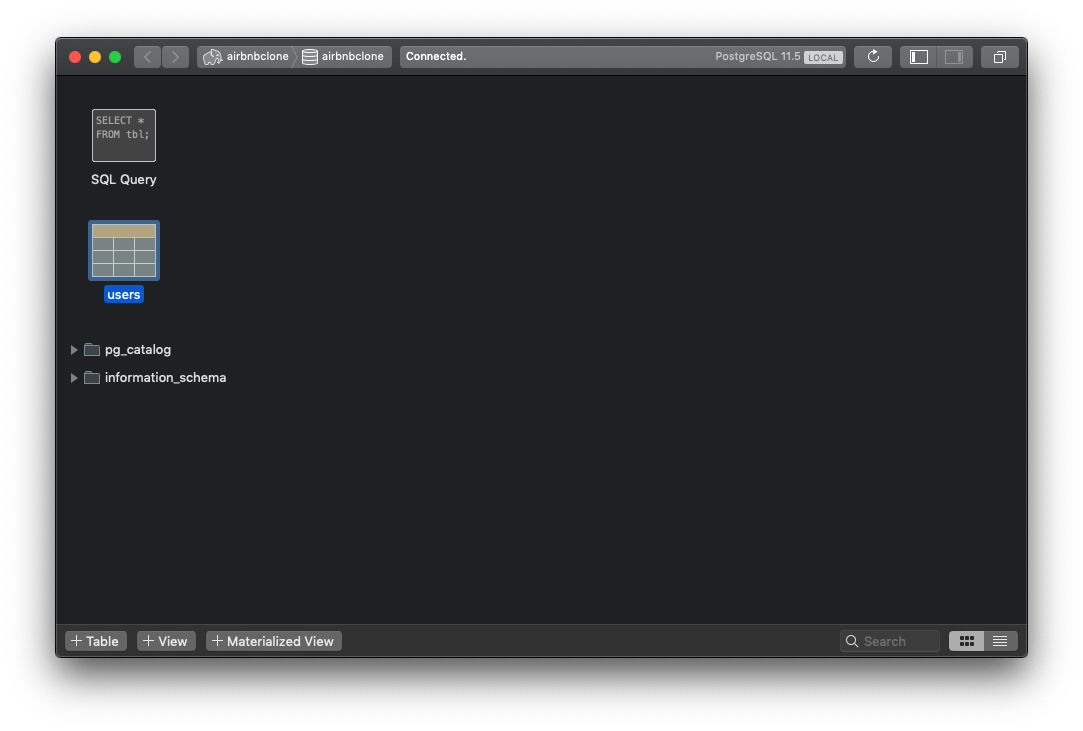

It’s handy especially to keep track of the data inserted, and to edit table fields without messing directly with the SQL.
There are of course many alternatives for Windows and Linux, you can Google for those.
IMPLEMENT MODEL AND DB CONNECTION
In this lesson we’re going to add the user to the Postgres table when they fill the registration form, and we’re going to create a session.
The user will be immediately logged in when they register.
Let’s do it!
First, I want to simulate the registration form, because I don’t want to keep using the website interface to test our functionality.
I do so using Insomnia, a powerful application to work with network requests, for HTTP requests and also for GraphQL (it’s cross platform, works on Mac / Windows / Linux).
Remember that in the registration form we have those 3 fields:
emailpasswordpasswordconfirmation
and we submit those to the /api/auth/register server-side endpoint, as JSON data.
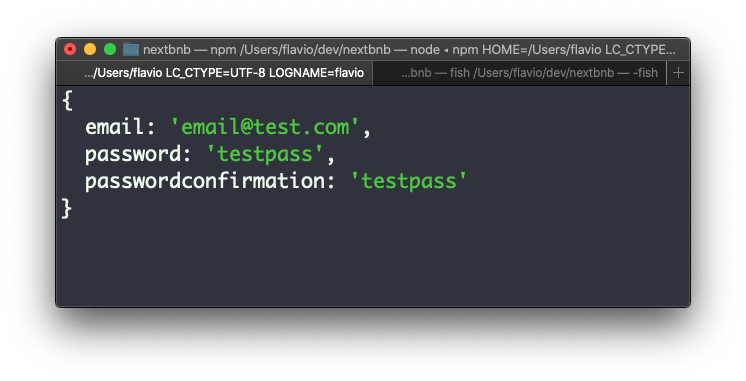
Let’s replicate this in an Insomnia request:
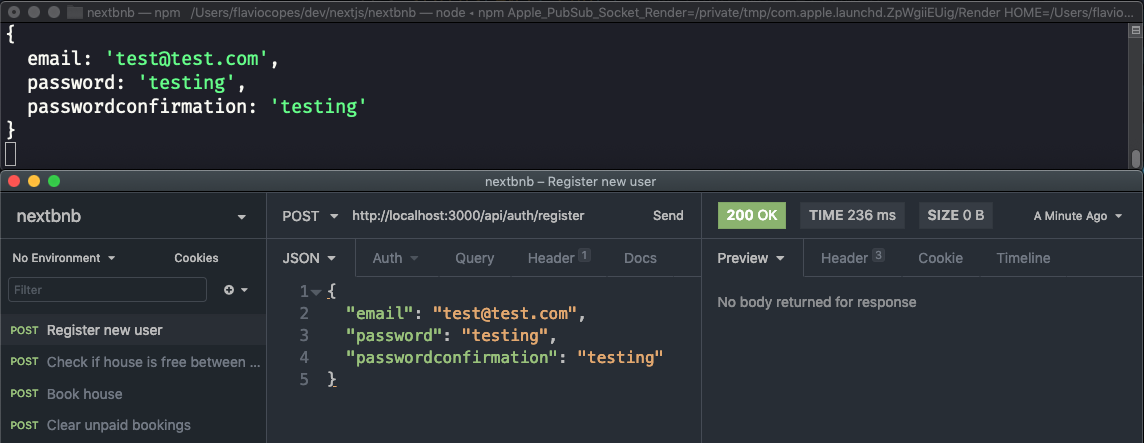
If all went well, the server should now print the data you sent in.
Let’s make the connection to Postgres now, so we can store the data in the users table.
Install the pg and sequelize npm packages:
npm install pg sequelize
pg handles the Postgres connection. Sequelize instead is an ORM, a tool that makes working with a database much, much easier than working with plain SQL.
Then create a database.js file with this content:
export const user = '<username>'
export const password = ''
export const host = 'localhost'
export const database = 'nextbnb'
and change the user variable with your username.
In this file we’ll just store the database credentials.
Next, create a model.js file, and import those 3 objects from sequelize :
import { Sequelize, Model, DataTypes } from 'sequelize'
We initialize a Sequelize instance passing the data to access our database, imported from database.js , telling it which kind of database this is in the dialect property (it can handle more than just Postgres).
We also disable logging, because it can be very verbose as it logs all the SQL queries, which we don’t really need to look at (unless you’re debugging a problem):
import { Sequelize, Model, DataTypes } from 'sequelize'
import { user, password, host, database } from './database.js'

const sequelize = new Sequelize(database, user, password, {
  host,
  dialect: 'postgres',
  logging: false,
})
Then we create a model for our users table, describing the data it contains and the rules we want to apply. In this case, we disable null , to always require an email and password:
export class User extends Model {}

User.init(
  {
    email: {
      type: DataTypes.STRING,
      allowNull: false,
    },
    password: {
      type: DataTypes.STRING,
      allowNull: false,
    },
    session_token: {
      type: DataTypes.STRING,
    },
    session_expiration: {
      type: DataTypes.DATEONLY,
    },
  },
  {
    sequelize,
    modelName: 'user',
    timestamps: false,
  }
)
I also tell timestamps: false otherwise we’d get an error, as Sequelize expects the createdAt and updatedAt fields in the table, which we don’t have. You could add them, but it’s unnecessary I think.
Now we use this model in the pages/api/auth/register.js file. We import it from the model.js file:
import { User } from '../../../model.js'
and then we call User.create() when we get a POST request, to add the user to the database.
I use await because this method returns a promise, so I also add async to the function assigned to post :
pages/api/auth/register.js
import { User } from '../../../model.js'

export default async (req, res) => {
  if (req.method !== 'POST') {
    res.status(405).end() //Method Not Allowed
    return
  }

  const { email, password, passwordconfirmation } = req.body

  const user = await User.create({ email, password })
  res.end(JSON.stringify({ status: 'success', message: 'User added' }))
}
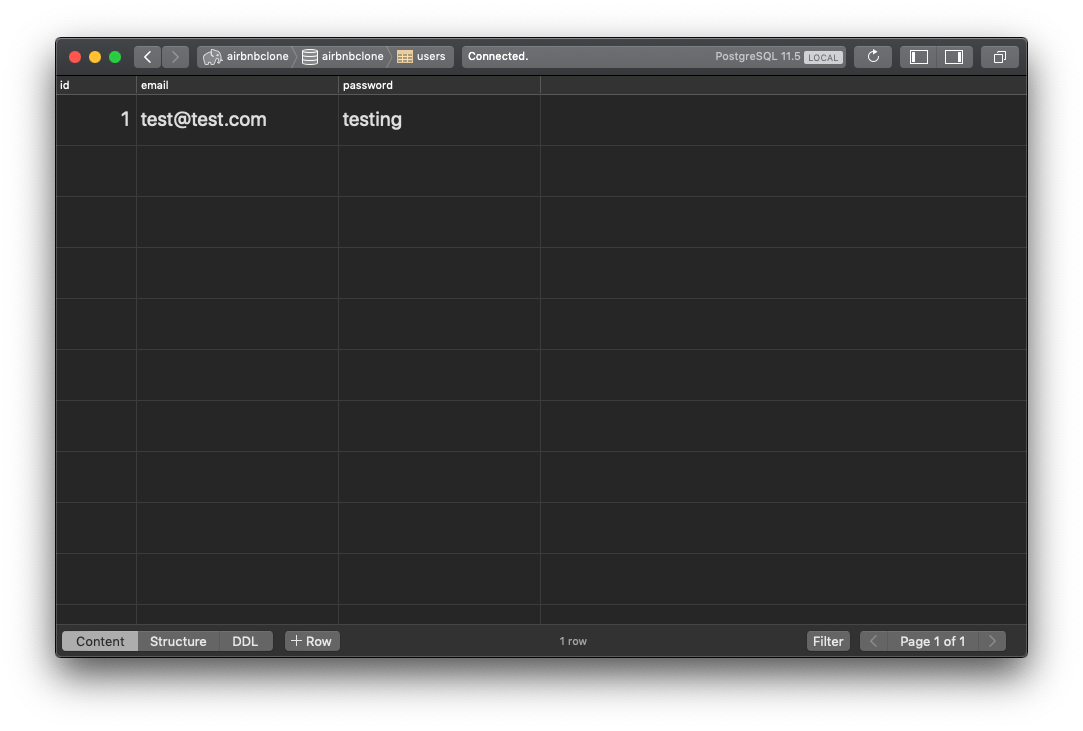
Great! So now if you try to send the data using Insomnia, you’ll see the data into the table:
and a JSON message back:
{
  "status": "success",
  "message": "User added"
}
I want to check if the password confirmation matches the password, and if not I’ll show an error and halt the user registration process:
pages/api/auth/register.js
if (password !== passwordconfirmation) {
  res.end(
    JSON.stringify({ status: 'error', message: 'Passwords do not match' })
  )
  return
}
Here’s the full code so far
pages/api/auth/register.js
import { User } from '../../../model.js'

export default async (req, res) => {
  if (req.method !== 'POST') {
    res.status(405).end() //Method Not Allowed
    return
  }

  const { email, password, passwordconfirmation } = req.body

  if (password !== passwordconfirmation) {
    res.end(
      JSON.stringify({ status: 'error', message: 'Passwords do not match' })
    )
    return
  }

  const user = await User.create({ email, password })
  res.end(JSON.stringify({ status: 'success', message: 'User added' }))
}
We need to do something important now: we need to encrypt the password stored in the database .
You never store passwords as plain text, as it is very dangerous for your reputation and your users.
We’re going to add a configuration to Sequelize to automatically encrypt passwords using bcrypt .
Install bcrypt using npm:
npm install bcrypt
(it might take a little while)
now import bcrypt in the model.js file:
import bcrypt from 'bcrypt'
and add this code to the second argument you pass to User.init() in the model.js file:
model.js
hooks: {
  beforeCreate: async (user) => {
    const saltRounds = 10
    const salt = await bcrypt.genSalt(saltRounds)
    user.password = await bcrypt.hash(user.password, salt)
  }
}
We’re also going to add a new method to the User object prototype, which we call isPasswordValid() :
User.prototype.isPasswordValid = async function (password) {
  return await bcrypt.compare(password, this.password)
}
which we’ll use later on to verify the password is correct.
The full code should be:
model.js
import { Sequelize, Model, DataTypes } from 'sequelize'
import { user, password, host, database } from './database.js'
import bcrypt from 'bcrypt'

const sequelize = new Sequelize(database, user, password, {
  host,
  dialect: 'postgres',
  logging: false,
})

class User extends Model {}

User.init(
  {
    email: {
      type: DataTypes.STRING,
      allowNull: false,
    },
    password: {
      type: DataTypes.STRING,
      allowNull: false,
    },
    session_token: {
      type: DataTypes.STRING,
    },
    session_expiration: {
      type: DataTypes.DATEONLY,
    },
  },
  {
    sequelize,
    modelName: 'user',
    timestamps: false,
    hooks: {
      beforeCreate: async (user) => {
        const saltRounds = 10
        const salt = await bcrypt.genSalt(saltRounds)
        user.password = await bcrypt.hash(user.password, salt)
      },
    },
  }
)

User.prototype.isPasswordValid = async function (password) {
  return await bcrypt.compare(password, this.password)
}

export { sequelize, User }
In the next lesson we’ll go on with handling the session.
The code for this lesson is available at https://github.com/flaviocopes/airbnb-clone-react-nextjs-2020/tree/5-2
CREATE A SESSION TOKEN WHEN REGISTERING THE USER
We worked on registration in the previous module, introducing a POST call to the /api/auth/register URL in the file pages/api/auth/register.js .
Right now when we receive this POST request, we invoke User.create() to add a new user to the database.
First, I now want to check if the user exists before calling User.create. We use User.findOne() to do so. If the user does not exist we create it:
let user = await User.findOne({ where: { email } })

if (!user) {
  user = await User.create({ email, password })
  res.end(JSON.stringify({ status: 'success', message: 'User added' }))
} else {
  res.end(JSON.stringify({ status: 'error', message: 'User already exists' }))
}
Let’s do one more thing: we want to create a session token .
The session is a random string stored in the session_token field.
I first write this function to create a random string of a specific length:
const randomString = (length) => {
  const chars = '0123456789abcdefghijklmnopqrstuvwxyzABCDEFGHIJKLMNOPQRSTUVWXYZ'
  let result = ''
  for (let i = length; i > 0; --i) {
    result += chars[Math.floor(Math.random() * chars.length)]
  }
  return result
}
THen I call this to get a token:
const sessionToken = randomString(255)
And I call User.update() to update the user’s data stored in the table, passing this token and a session expiration date set 30 days from now:
const sessionToken = randomString(255)
const d = new Date()
d.setDate(d.getDate() + 30)
User.update(
  {
    session_token: sessionToken,
    session_expiration: d,
  },
  { where: { email } }
)
Here is the full code so far:
import { User, sequelize } from '../../../model.js'

const randomString = (length) => {
  const chars = '0123456789abcdefghijklmnopqrstuvwxyzABCDEFGHIJKLMNOPQRSTUVWXYZ'
  let result = ''
  for (let i = length; i > 0; --i) {
    result += chars[Math.floor(Math.random() * chars.length)]
  }
  return result
}

export default async (req, res) => {
  if (req.method !== 'POST') {
    res.status(405).end() //Method Not Allowed
    return
  }

  const { email, password, passwordconfirmation } = req.body

  if (password !== passwordconfirmation) {
    res.end(
      JSON.stringify({ status: 'error', message: 'Passwords do not match' })
    )
    return
  }

  let user = await User.findOne({ where: { email } })

  if (!user) {
    user = await User.create({ email, password })

    const sessionToken = randomString(255)
    const d = new Date()
    d.setDate(d.getDate() + 30)
    User.update(
      {
        session_token: sessionToken,
        session_expiration: d,
      },
      { where: { email } }
    )
    res.end(JSON.stringify({ status: 'success', message: 'User added' }))
  } else {
    res.end(JSON.stringify({ status: 'error', message: 'User already exists' }))
  }
}
The code for this lesson is available at https://github.com/flaviocopes/airbnb-clone-react-nextjs-2020/tree/5-3
IMPLEMENT LOGIN
Let’s now implement login!
It’s going to be very similar to the registration, except we call /api/auth/login , and we don’t have to handle the password confirmation. And contrary to registration, we fail if the user is not there yet.
Let’s first install the cookies package from npm:
npm install cookies
Now create a pages/api/auth/login.js file.
In there, we first receive the email and password fields from the request, and we see if we can find a user with that email. If not, we return an error message:
import { User, sequelize } from '../../../model.js'

export default async (req, res) => {
  if (req.method !== 'POST') {
    res.status(405).end() //Method Not Allowed
    return
  }

  const { email, password } = req.body

  let user = await User.findOne({ where: { email } })

  if (!user) {
    res.end(JSON.stringify({ status: 'error', message: 'User does not exist' }))
    return
  }
}
If the user exists, we check if the password is valid:
const isPasswordValid = await user.isPasswordValid(password)

if (!isPasswordValid) {
  res.end(JSON.stringify({ status: 'error', message: 'Password not valid' }))
  return
}
If the password is valid, we check the session is not expired. If it’s expired, we generate a new session token and a new expiration date. If not, we just expand the expiration date of 30 days:
let sessionToken = null
const sessionExpiration = new Date()
sessionExpiration.setDate(sessionExpiration.getDate() + 30)

if (new Date(user.session_expiration) < new Date()) {
  sessionToken = randomString(255)
  User.update(
    {
      session_token: sessionToken,
      session_expiration: sessionExpiration,
    },
    { where: { email } }
  )
} else {
  sessionToken = user.session_token
  User.update(
    {
      session_expiration: sessionExpiration,
    },
    { where: { email } }
  )
}
Finally we create a cookie and store the session token in there, and we terminate the network request:
const cookies = new Cookies(req, res)
cookies.set('nextbnb_session', sessionToken, {
  httpOnly: true, // true by default
})

res.end(JSON.stringify({ status: 'success', message: 'Logged in' }))
Here’s the full source code of login.js :
import { User, sequelize } from '../../../model.js'
import Cookies from 'cookies'

const randomString = (length) => {
  const chars = '0123456789abcdefghijklmnopqrstuvwxyzABCDEFGHIJKLMNOPQRSTUVWXYZ'
  let result = ''
  for (let i = length; i > 0; --i) {
    result += chars[Math.floor(Math.random() * chars.length)]
  }
  return result
}

export default async (req, res) => {
  if (req.method !== 'POST') {
    res.status(405).end() //Method Not Allowed
    return
  }

  const { email, password } = req.body

  let user = await User.findOne({ where: { email } })

  if (!user) {
    res.end(JSON.stringify({ status: 'error', message: 'User does not exist' }))
    return
  }
  const isPasswordValid = await user.isPasswordValid(password)

  if (!isPasswordValid) {
    res.end(JSON.stringify({ status: 'error', message: 'Password not valid' }))
    return
  }

  let sessionToken = null
  const sessionExpiration = new Date()
  sessionExpiration.setDate(sessionExpiration.getDate() + 30)

  if (new Date(user.session_expiration) < new Date()) {
    sessionToken = randomString(255)
    User.update(
      {
        session_token: sessionToken,
        session_expiration: sessionExpiration,
      },
      { where: { email } }
    )
  } else {
    sessionToken = user.session_token
    User.update(
      {
        session_expiration: sessionExpiration,
      },
      { where: { email } }
    )
  }

  const cookies = new Cookies(req, res)
  cookies.set('nextbnb_session', sessionToken, {
    httpOnly: true, // true by default
  })

  res.end(JSON.stringify({ status: 'success', message: 'Logged in' }))
}
In the components/LoginModal.js file, we are going to to like we did for the registration form and use useState to create 2 state variables for the email and the password, and we’re going to use Axios to perform the network request to /api/auth/login when the form is submitted:
import { useState } from 'react'
import axios from 'axios'

export default function LoginModal(props) {
  const [email, setEmail] = useState('')
  const [password, setPassword] = useState('')

  const submit = async () => {
    const response = await axios.post('/api/auth/login', {
      email,
      password,
    })
    console.log(response)

    if (response.data.status === 'error') {
      alert(response.data.message)
    }
  }

  return (
    <>
      <h2>Log in</h2>
      <div>
        <form
          onSubmit={(event) => {
            submit()
            event.preventDefault()
          }}
        >
          <input
            id='email'
            type='email'
            placeholder='Email address'
            onChange={(event) => setEmail(event.target.value)}
          />
          <input
            id='password'
            type='password'
            placeholder='Password'
            onChange={(event) => setPassword(event.target.value)}
          />
          <button>Log in</button>
        </form>
      </div>
      <p>
        Don't have an account yet?{' '}
        <a href='javascript:;' onClick={() => props.showSignup()}>
          Sign up
        </a>
      </p>
    </>
  )
}
The code for this lesson is available at https://github.com/flaviocopes/airbnb-clone-react-nextjs-2020/tree/5-4
DETERMINE IF WE ARE LOGGED IN, IN THE CLIENT SIDE
Great! Now we have the session information stored in the nextbnb_session cookie
Now I want to get the cookie value from the server on the first page load we do, and we store the login state.
Remember the store.js file we created in the previous module?
Add a new store value:
export default createStore({
  login: {
    loggedIn: false,
    setLoggedIn: action((state) => {
      state.loggedIn = true
    }),
  },
  modals: {
    //...
Now we need to add some code to pages/index.js and pages/houses/[id].js , the 2 entry points.
In pages/index.js :
//at the top
import Cookies from 'cookies'

//at the bottom
export async function getServerSideProps({ req, res, query }) {
  const cookies = new Cookies(req, res)
  const nextbnb_session = cookies.get('nextbnb_session')

  return {
    props: {
      nextbnb_session: nextbnb_session || null,
    },
  }
}
This makes the nextbnb_session prop available in the component.
We use useEffect now to check if this prop is available, and if so, we are going to call the setLoggedIn state action:
//at the top
import { useStoreActions } from 'easy-peasy'
import { useEffect } from 'react'

//...
export default function Home({ nextbnb_session }) {
  const setLoggedIn = useStoreActions((actions) => actions.login.setLoggedIn)

  useEffect(() => {
    if (nextbnb_session) {
      setLoggedIn(true)
    }
  }, [])

  //...
We do the same in pages/houses/[id].js . Here is the full code of the component:
import Head from 'next/head'
import houses from '../../houses.js'
import Layout from '../../components/Layout'
import DateRangePicker from '../../components/DateRangePicker'
import { useState, useEffect } from 'react'
import { useStoreActions } from 'easy-peasy'
import Cookies from 'cookies'

const calcNumberOfNightsBetweenDates = (startDate, endDate) => {
  const start = new Date(startDate) //clone
  const end = new Date(endDate) //clone
  let dayCount = 0

  while (end > start) {
    dayCount++
    start.setDate(start.getDate() + 1)
  }

  return dayCount
}

export default function House({ house, nextbnb_session }) {
  const [dateChosen, setDateChosen] = useState(false)
  const [numberOfNightsBetweenDates, setNumberOfNightsBetweenDates] = useState(
    0
  )

  const setShowLoginModal = useStoreActions(
    (actions) => actions.modals.setShowLoginModal
  )

  const setLoggedIn = useStoreActions((actions) => actions.login.setLoggedIn)

  useEffect(() => {
    if (nextbnb_session) {
      setLoggedIn(true)
    }
  }, [])

  return (
    <Layout
      content={
        <div className='container'>
          <Head>
            <title>{house.title}</title>
          </Head>
          <article>
            <img src={house.picture} width='100%' alt='House picture' />
            <p>
              {house.type} - {house.town}
            </p>
            <p>{house.title}</p>
          </article>
          <aside>
            <h2>Choose a date</h2>
            <DateRangePicker
              datesChanged={(startDate, endDate) => {
                setNumberOfNightsBetweenDates(
                  calcNumberOfNightsBetweenDates(startDate, endDate)
                )
                setDateChosen(true)
              }}
            />

            {dateChosen && (
              <div>
                <h2>Price per night</h2>
                <p>${house.price}</p>
                <h2>Total price for booking</h2>
                <p>${(numberOfNightsBetweenDates * house.price).toFixed(2)}</p>
                <button
                  className='reserve'
                  onClick={() => {
                    setShowLoginModal()
                  }}
                >
                  Reserve
                </button>{' '}
              </div>
            )}
          </aside>

          <style jsx>{`
            .container {
              display: grid;
              grid-template-columns: 60% 40%;
              grid-gap: 30px;
            }

            aside {
              border: 1px solid #ccc;
              padding: 20px;
            }
          `}</style>
        </div>
      }
    />
  )
}

export async function getServerSideProps({ req, res, query }) {
  const { id } = query
  const cookies = new Cookies(req, res)
  const nextbnb_session = cookies.get('nextbnb_session')

  return {
    props: {
      house: houses.filter((house) => house.id === parseInt(id))[0],
      nextbnb_session: nextbnb_session || null,
    },
  }
}
Now we need to change components/Header.js to show a “Logged in” state in the header instead of the links to login and signup.
We first import
import { useStoreState, useStoreActions } from 'easy-peasy'
and inside the component we define
const loggedIn = useStoreState((state) => state.login.loggedIn)
const setLoggedIn = useStoreActions((actions) => actions.login.setLoggedIn)
Finally we add this JSX:
{
  loggedIn ? (
    <nav>
      <ul>
        <li>
          <a>Logged in</a>
        </li>
      </ul>
    </nav>
  ) : (
    <nav>
      <ul>
        <li>
          <a href='#' onClick={() => setShowRegistrationModal()}>
            Sign up
          </a>
        </li>
        <li>
          <a href='#' onClick={() => setShowLoginModal()}>
            Log in
          </a>
        </li>
      </ul>
    </nav>
  )
}
The code for this lesson is available at https://github.com/flaviocopes/airbnb-clone-react-nextjs-2020/tree/5-5