The iCamp System Design Template
In this section, we will review our approach for System Design interviews. We will then use this template while implementing Systems in this week’s content.
Let’s use our old example: Design a taxi hailing service such as Uber/Lyft
Note: We are assuming that this is a general System Design Interview, which mostly involves backend design. If you are interviewing for a frontend-specific role, you will focus more on the UI.
Important: This section assumes you have gone through the following sections, which describe our approach and assumptions. If you don’t go through these, you might misunderstand our template.
- Section: Anatomy of a Scalable Web Application
- Approach for System Design Interviews + Uber/Lyft Design
- The iCamp Template for System Design Interviews
Keep in mind : Before each step, you should tell your interviewer what you are doing. Sometimes, they might want something else:
Example :
You: “I am thinking of defining 2-3 core features of our system. This will make it easy to figure our system’s requirements. Later on, we can always add new features and modify our design accordingly. Is that ok?”
Interviewer: “That sounds good. Let’s just make sure that in our core features, we have a location tracking service to track the driver’s location.”
You: “Ok, I will add that, thanks”
Step 1: Define your FEATURES (2-3 Core features)
Step 2: Narrow down USE CASES
Step 2.5: Clarify that you are designing with scale in mind and any other assumptions.
Note : Sometimes, the interviewer will want you to start with one machine and scale from there. For that case, please refer to the Anatomy of a Scalable Web Application section, where we walk through scaling a system from one machine to multiple machines.
Step 3: What to STORE
Listing what to Store helps you think about the problem and how you will structure your system. You need not define a database model here, just entities you will need to store. Examples are in this weeks sections.
Step 4 : HIGH-LEVEL DESIGN
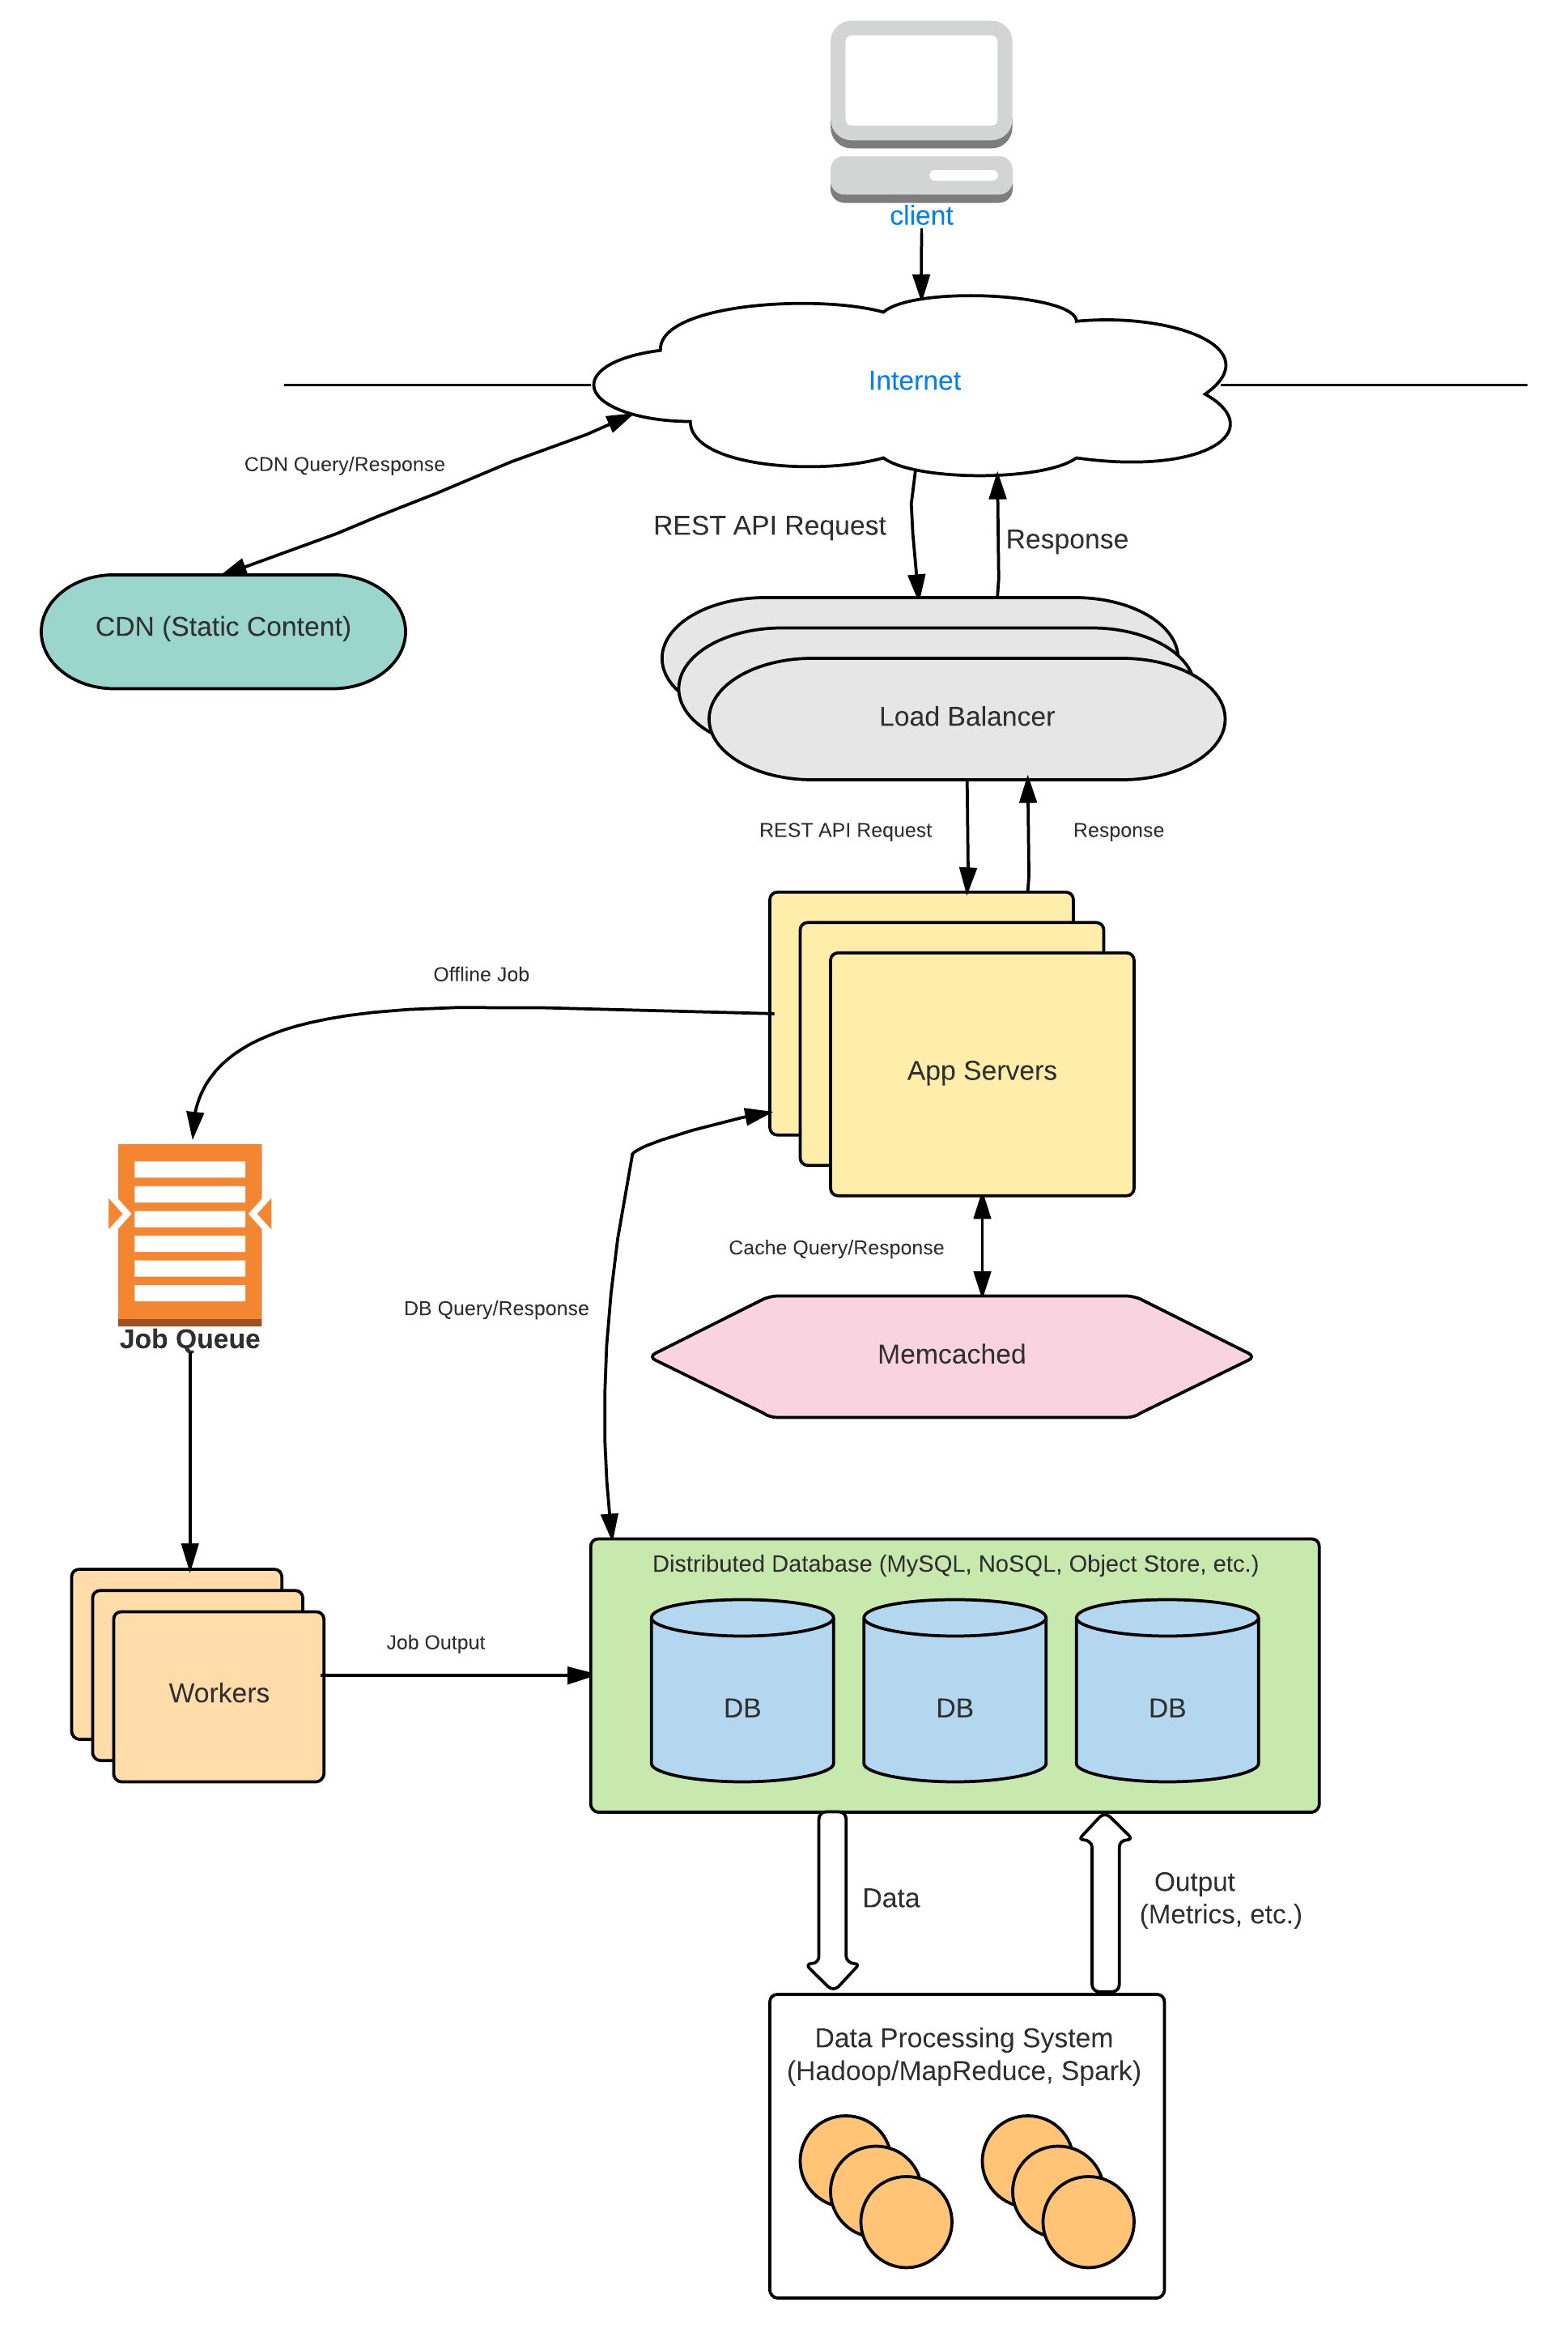
For most questions, you should be able to modify the Anatomy of a Web Backend diagram to fit the system’s needs. You will see examples in our System Designs.
Step 5: DETAILED DESIGN according to what the interviewer wants to discuss.
You can use the acronym FUSHED to remember this sequence. Its Pushed with an F.
Important: The first 4 Steps should only take around 5-10 minutes. You want to spend a majority of the interview discussing Detailed Design. The first 4 Steps set you up for Step #5.
Once you have a high-level diagram of your system, you have given the interviewer a menu of systems to pick from. Typically, this can go in 3 directions:
- DEEPER into a Subsystem: The interviewer wants to dig deeper into a specific component. For example, the interviewer wants to know how you would design and scale the database. Or how the load balancer works. You can utilize our sections for each of those components.
Interviewer: Cool, can you tell me more about the database. What kind of database will you use?
Or
Interviewer: Let’s talk about the file storage system here. How would you scale a large file storage system that might have millions of files?
- DEEPER into a Feature: The interviewer wants you to talk more about each interaction and how it will be processed in your high-level system. They might even ask you to add a new feature and modify your design to update it.
Interviewer: Great, can you tell me more about the location tracking functionality. How would you track the driver’s location and update the rider’s app?
Interviewer: Let’s talk about caching. What will you use your cache for?
- BROADER into more Features:
Interviewer: Let’s say we wanted to add a way for users to schedule a ride. How would you add that in your system?
It will typically be a mix of the 3 directions. For example, The interviewer might ask you to talk more about a feature, and then want to get into the details of scaling a Cache (our Sharding Section).
During your prep, practice going into all of these directions.
Design an E-commerce Application like Amazon
Note: We are assuming that this is a general System Design Interview, which mostly involves backend design. If you are interviewing for a frontend-specific role, you will focus more on the UI.
Important: This section assumes you have gone through the following sections, which describe our approach and assumptions. If you don’t go through these, you might misunderstand our template.
- Section: Anatomy of a Scalable Web Application
- Approach for System Design Interviews + Uber/Lyft Design
- The iCamp Template for System Design Interviews
Step 1: Define your FEATURES (2-3 Core features)
List of features we want in our e-commerce website:
-
List of Products on Home Page
-
Product Details Page for each Product
-
Cart
-
Checkout
Here, we have added a Cart but you could argue that its optional in our MVP (Checkout is needed of course!). You can ask the interviewer if they want the Cart in your first design, or if they’re ok with adding it later.
Step 2: Narrow down USE CASES
Our core use cases are as follows:
-
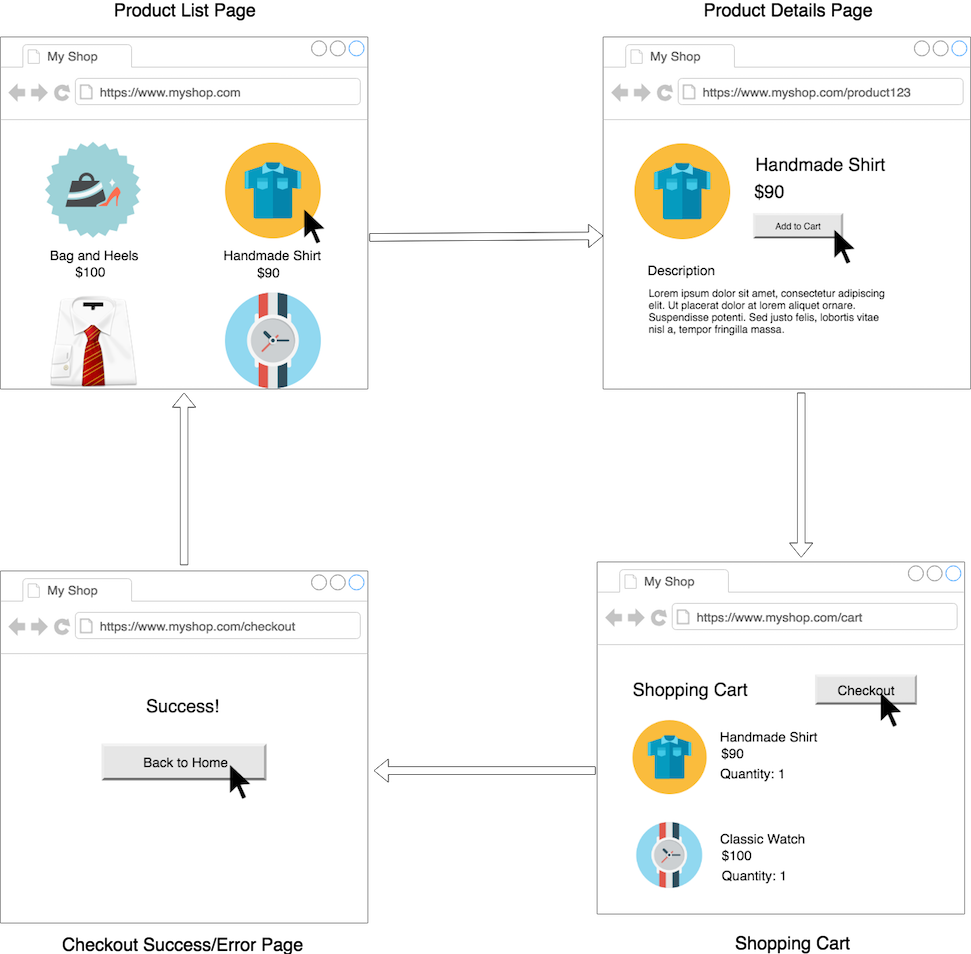
User browses a list of products.
-
User clicks on a product and views product details.
-
User adds a product to Cart
-
User checks out the Cart
The use cases are illustrated below. It is good to draw this wireframe diagram in an interview:
Of course, we will also have a simple User Profile, with actions such as login and account details. We will keep the User Profile Simple, with just a Username, Password, and Payment Info.
Step 2.5: Clarify that you are designing with scale in mind. You are assuming here that the website needs to scale to millions of users, and you are designing with that in mind. Hence your backend will be designed to scale.
Step 3: What to STORE
We get what to store from our Use Cases above. We will need to store the following data:
Product
- Id
- Name
- Description
- Image
- Price
- Availability
Product List
- List of Product Id’s to display the homepage
Note: In the initial design, we are assuming a static list for all users. Eventually, we can have a custom list for each user.
User
- Id
- Username
- Password
- Items in Cart
- Credit Card Details
You can also store Orders separately. While not strictly needed for our website, this is a core component of the site and any analytics will involve orders. It neatly ties our two objects (User & Product) together. We are assuming that an order is created when a checkout succeeds.
Order
- User Id
- List
- Timestamp
Step 4 : HIGH-LEVEL DESIGN
For our high-level design, we use our framework for scaling web applications. We extend it to the e-commerce store use case. Here is what it looks like:
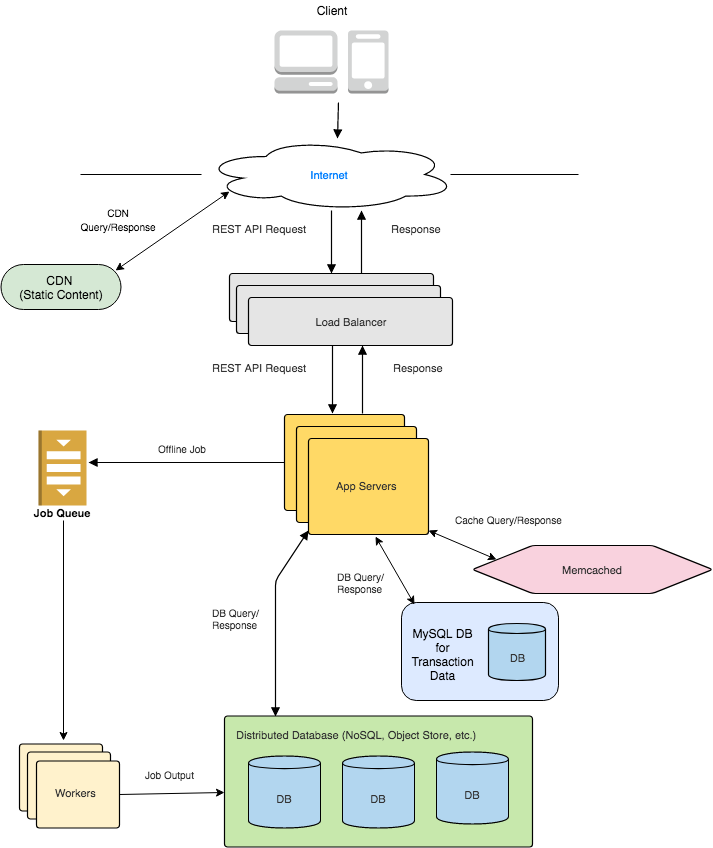
We can use Distributed NoSQL Database (such as a Wide Column Store ) to store Users, Products, and Orders. These databases scale well out-of-the-box.
The exception here is each Product’s Availability - the number of items available. That needs strict guarantees - we don’t want two people to buy the same item. So, we need Transaction support. We want to ensure that
-
The product availability is reduced only when the payment is processed, and
-
No two people can reduce the availability at the same time. While one user is buying a product or processing a payment, no one else can come in and change the availability.
The Transaction Processing Section goes over this exact scenario in detail. We will use a separate Relational Database (such as MySQL) for storing availabilities. In practice, this data will not be a lot. For example, if we store a map of [ Product Id(long) -> Availability(int) ] for each product, we are using 8 bytes (long) + 4 bytes (int) = 12 bytes. Even if we use 100 bytes on average per product, with a million products, we are using 1 million * 100 bytes = 100 MB of memory. The key here is that only put things we really need to store in the Relational DB. The rest can be handled by our NoSQL store.
Database Model:
Wide-Column Store
PRODUCT
-
id (string)
-
name (string)
-
description (string)
-
image_link (string)
-
price (int)
PRODUCT_LIST
-
page_number
-
product_id_list
Note: Above, the list_number is for pagination. We set a fixed number of products for each row (e.g, 25). So if the browser requests the 1st page, we return list_number 1. For 2nd page - list_number 2, and so on. Again, this is an initial basic design and we can update it later to store different lists for different users.
USER
-
id (string)
-
username (string)
-
password (encrypted string)
-
cart:item1, cart:item2 (list of cart items)
-
credit_card_info (JSON)
ORDER
-
id (string)
-
list
-
timestamp
-
total price
Relational Database
AVAILABILITY
-
product_id (string)
-
available_items (int)
Object Store - To Store Images
IMAGE
-
link
-
image bitmap
Feature Walkthrough
Keep in mind that in our design, the app server will be Stateless, so any app server can handle any request. For more about Stateless App Servers, please refer to the Load Balancer section of the course.
Home Page - Product List :
When a user requests the home page, an app server receives the request. The app server is responsible for returning the list of products to be displayed. It sends the page number to the PRODUCT_LIST table. The Product List table returns a list of product_id’s, which the app server passes back to the browser with the homepage HTML. In this model, the app server just sends the product_id and the browser is responsible for querying each product’s info. Another option is for the Product List table to store the product’s name, price and image_link along with its product_id so that there is only one call required from the browser.
Now, in our current version, this PRODUCT_LIST will be the same for all users, so it makes sense to cache it using Memcached. That way, the app server can quickly retrieve it from the cache. Keep in mind that you still need the database version because that is the persistent copy at the end of the day. The cache is only used to speed up lookups, not to permanently store things.
Product Details:
When a user clicks on a product, it takes them to a product details page. This page lays out the product’s properties. This is pretty simple in the backend. The App Server simply queries the Product table.
Images - Notice that we only store the image link in the wide-column store. The object store is a better place to store images and videos. We return the image link to the browser, and the browser is responsible for querying the image from the object store. We don’t send images in web pages anyway. For example, if you want to load the image in a web page, you might put the link in an ’ ’ tag.
For faster loading, you can send 2 links, one of a low-quality image and one of a high-quality image. This way, for slower connections, the browser can quickly render the low-quality image while waiting for the high-quality image to load. You can also use a CDN to load images faster. CDN’s cache your content in different geographic locations so that it loads faster.
Add to Cart:
When a user adds a product to his/her Cart, it gets appended to the User table’s cart column. The cart column stores a product_id and the quantity of each product, so if the user adds the same item to his/her cart again, we will update the quantity . We can walk through items in the user’s cart and see if it already exists. If it exists, we will update the quantity , else we will add the new product_id with quantity=1 .
View Cart:
To view the cart, the App Server simply queries the cart column of the User. The column contains product_ids in the cart along with quantities of each product_id . The AppServer can then query the Product table and get each product_id’s details to place on the Cart page.
Checkout:
The checkout process needs some extra attention. When the user clicks on checkout, we are simply processing the purchase, assuming that the user has already saved his/her credit card info, kind of like Amazon’s “Buy with 1-click” button. This is going to be a transaction with two things - reducing the product availability and processing the payment. If you have gone through the Transaction Processing section, we go through this exact scenario and explain how it’s done. In that section, we use a 2-Phase commit to ensure that both the tasks either succeed or fail and there are no partial successes. However, there might be other ways to do it as well.
Here’s another approach - you might first reduce the availability, and if it succeeds, process the payment. If the payment fails, you could add back the availability. This works as well. However, the 2-Phase Commit is extendable to several such tasks. For example, let’s say you also had to send the purchase to an order processing system and ensure the system accepted the order. You could add several such tasks involved in a purchase and use the same 2-phase commit protocol to perform all of them.
If the purchase completes, we show a success message and add details of the purchase to the Order table. If it fails, we show an error message. The error message could reflect which task failed.
PERFORMANCE IMPROVEMENTS
Geolocation : In most System Design interviews, you should bring up geo-location as a performance improvement technique. We can place servers in different locations around the world, and even in different parts of the country. We can use CDN to serve static content like images and videos. This reduces latency for users near those locations.
Caching : You can cache a lot of things on an e-commerce website. In our current model, you can cache the list of products, popular products’ details, and even the entire homepage since it is currently the same for all users.
In Memory Databases : In our current design, there is no real need to use an in-memory DB. Typically in-memory databases are useful for data that needs quick updates or processing. It’s fast because everything happens in the RAM.
Here are some features where you can use it: If we are live-updating a package’s location on a map, you want the location to be updated and retrieved quickly. Or, let’s say you want very fast queries over a dataset. For example, if you are implementing search suggestions, where a user gets instant suggestions for any string they type, you can consider using an in-memory DB to speed up the queries.
Offload Tasks to Job Queue : Tasks that don’t need immediate processing should be done offline via a job queue. For example, if the user adds a product to his/her Cart, the backend can queue a job and quickly return a success message. The actual processing is pretty trivial and not prone to errors, so it can be done in a job queue. Keep in mind that we need to make sure that the job queue is not backlogged because we don’t want the cart to take too long to update. It improves user experience.
In the odd case where the job runs into an error, we can retry the operation. In the rare case that this predictable operation fails again, we can find a way to communicate it to the user, such as a notification. In our current design, we will ignore that case.
Notice that above, we ignored a failure case. This might sound odd right? Ignoring a failure case sounds like bad design! However, as long as you tell the interviewer that you are aware of such limitations in your system, and can address it if you really need to, that is a good sign. It shows that you are aware of those corner cases and can probably solve them if they asked you to.
Indexing for Quick Queries :
In our current design, we don’t need any additional index. But let’s say we added a feature to find items priced from $0-$50, $51-$100, $101-$150, and so on. It will take a while to query all items and filter out items from $50-$100. So, we pre-populate another table in the database which has a list of product_id’s in those ranges.
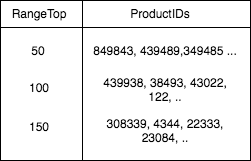
Now, there is a tradeoff here to maintain this index. Every time we add a new product or update the price of an existing product, we also need to update this index to make sure it is accurate.
Step 5: DETAILED DESIGN according to what the interviewer wants to discuss.
Once you have a high-level diagram of your system, you have given the interviewer a menu of systems to pick from. Typically, this can go in 3 directions:
1. DEEPER into a Sub-System (Most Common) : Refer to our lectures on each subsystem
Interviewer: Cool, can you tell me more about the database. How does your NoSQL store scale with data?
Or
Interviewer: Let’s talk about the file storage system here. How would you scale a large file storage system that might have millions of files?
2. DEEPER into a Feature:
Interviewer: Great, can you tell me more about the Add to Cart functionality?
3. BROADER into more Features:
Interviewer: Let’s say we wanted to add a way for users to add reviews. How would you add that into your system?
ADDITIONAL FEATURE - RATINGS AND REVIEWS
Let’s say that we now want to add Reviews for each product, along with ratings for each review. Again, we use the approach we outlined above to define the features. Let’s say we want simple text reviews of max 1000 characters and a rating from 1-5. We can add a REVIEW Table to our database with the following properties:
REVIEW
-
id (string)
-
product_id (string)
-
writer_id (string)
-
review_text (string)
-
rating (int)
We will display a form on the product details page, and create a new entry when a user submits a review.
But that is not enough, we need a fast way to display reviews/rating for each product. So we will also add new properties to the PRODUCT table. The table will now look as follows:
PRODUCT
-
id (string)
-
name (string)
-
description (string)
-
image_link (string)
-
price (int)
- rating_total (int)
- rating_count (int)
- list<review_ids>
This way, when the browser asks for the Product Details page, we have this list of review_ids ready to send. The browser can then query details for each review_id depending on how many reviews it wants to display.
So now, whenever a new review is added, we update the list of review_ids for that product and also update the rating_total and rating_count , so that we can easily calculate the average rating.
We can similarly add other features if the interviewer wants us to. Things like Personalized Product Lists, Wish Lists, etc. can be appended to this system with additions and modifications.
Design a Social Networking Service like Instagram
Design a social networking service such as Instagram
Note: We are assuming that this is a general System Design Interview, which mostly involves backend design. If you are interviewing for a frontend-specific role, you will focus more on the UI.
Important: This section assumes you have gone through the following sections, which describe our approach and assumptions. If you don’t go through these, you might misunderstand our template.
- Section: Anatomy of a Scalable Web Application
- Approach for System Design Interviews + Uber/Lyft Design
- The iCamp Template for System Design Interviews
Keep in mind : Before each step, you should tell your interviewer what you are doing. Sometimes, they might want something else.
Step 1: Define your FEATURES (2-3 Core features)
A network like Instagram can have the following core features:
-
User Profile with Friends
-
Upload Photo
-
Browse Feed
-
Like
The ‘Like’ here is optional in our initial design. I like to add it because it is easy to implement.
Step 2: Narrow down USE CASES
Our core use cases are as follows:
-
User uploads a photo with a caption.
-
User adds another user as a friend
-
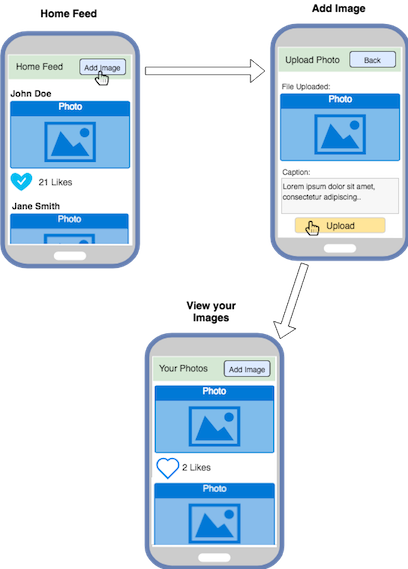
User browses feed, which contains friend’s photos. (To clarify with the interviewer: The feed is chronological and not ranked, so they will see friends’ photos regardless of how close they are with the friend. Later on, we can add ranking in order to calculate the affinity between two users.)
-
User Likes a photo in his/her feed
-
User views a list of their own photos with captions and number of likes
Because this is a simple UI-based service, we can draw quick screenshots of your implementation.
Of course, we will also have a simple User Profile, with actions such as login and account details. We will keep the User Profile Simple, with just a Username and Password.
Step 2.5: Clarify that you are designing with sale in mind and any other assumptions. If an interviewer wants you to start from a single machine,
Note : Sometimes, the interviewer will want you to start with one machine and scale from there. For that case, please go over the Anatomy of a Scalable Web Application section, where we walk through scaling a system from one machine to multiple machines.
Step 3: What to STORE
We need to store the following data. You will notice how defining this makes it a lot easier to walk through features later on.
Post
-
id
-
creator’s user id
-
low resolution image link
-
high resolution image link
-
number of likes
We store the image in high and low resolutions to improve load time in low network conditions.
As usual, we store the link to the image. The image itself is stored in an object store and can be retrieved from the browser or mobile app.
User
-
id
-
username
-
password
-
list of friend’s user_id’s
-
list of post id’s uploaded by user
Feed
-
user_id
-
list of latest 100 posts in their feed
-
lists of older posts in their feed, up to a certain limit, say 100,000
posts_latest stores the latest 100 posts in your feed. posts_old will store older 100,000 posts (this is one design, there can be many other ways to store the feed). This is so that the user can quickly get the latest posts. If they need more than 100,000, which is a rare case, we will either have to generate them dynamically or store all their historical feed items in another place.
Why did we pick 100,000? Let’s say the post_id is 10 bytes long. 100,000 posts would mean storing 1 MB of post Id’s per user, which is pretty trivial. You can configure this in many ways, this is just one setup.
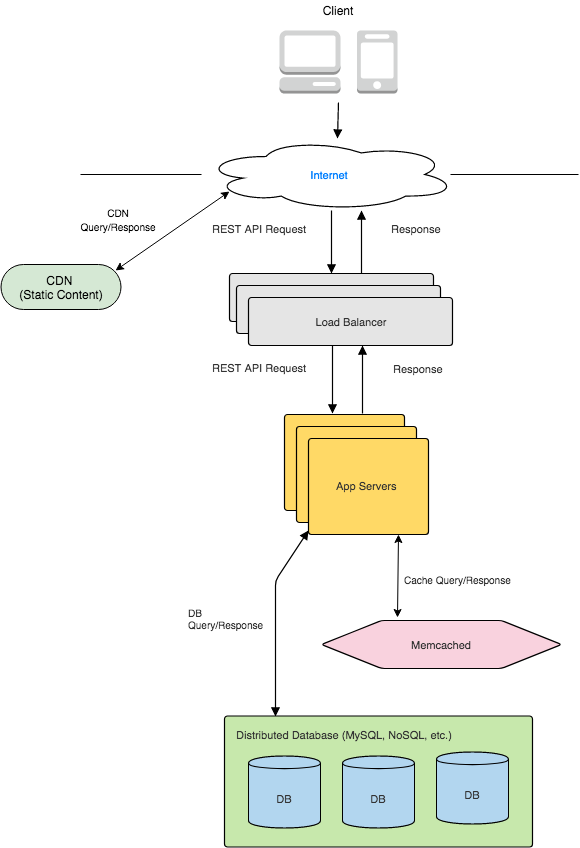
Step 4 : HIGH-LEVEL DESIGN
The high-level design is very similar to our Scalable Web Backend template. We can use a NoSQL Wide-Column store as our database. This data does not need strong consistency (except for username/password updates), so we can use any NoSQL store, such as Cassandra, which provides quick reads and writes and high availability. For username/password updates, we can use Cassandra’s consistent-write mode, which waits for all replicas to be updated before returning.
Keep in mind that all these tables are sharded automatically by the NoSQL store based on their primary key.

Database Model:
Wide-Column or Key-Value NoSQL Store
Post
-
id (string)
-
creator_id (string)
-
image_low_res_link (string)
-
image_high_res_link (string)
-
caption (string)
-
like_count (int)
User
-
id (string)
-
username (string)
-
password (string, encrypted)
-
friends (list<user_ids>)
-
posts (list<post_ids>)
Feed
-
user_id (string)
-
latest_100_posts (list<post_ids>)
-
older_posts (list<post_ids>)
Object Store
Image
-
object_id
-
bitmap data
Feature Walkthrough
Photo Upload: The user sends an image with a caption to our App Server. The App Server stores the image in our Object Store, gets the link and creates a new Post entry. The Post entry contains the image_link and caption . It also adds the post_id to the User’s table entry.
Feed : This is the most complicated part of the system. Each user has a list of posts in the Feed table. Whenever a user asks for their feed, we ideally want to simply read the list and return it. That means that the list should be populated before this. How can we do this?
As soon as a user adds a new photo, we can kick off a job to update all of their friends’ feeds. This list of friends is readily available in that User’s table entry. This job will happen offline through a Job Queue.
In our current design, we are storing 100 latest feed items in one field and 100,000 older items in another field. With this model, if the count of the latest feed exceeds 100, we will move the oldest items to the older feed. This way, we can simply return the latest 100 feed items in one database call. We can also cache all active users’ 100 feed items for quick access, and also update the cached feed if there is a new item.
In the rare case that the user wants more than 100,100 feed items (100 + 100,000), we can process it dynamically by looking at the user’s friends and collecting older items from their User entries. Note that all users’ items are stored in their respective User entry. Collecting them will take a longer time but it is a very rare case. Another way to do this is to have a place to store all their historical feed items, but that might not be necessary for such a rare use case.
Like : The Like button simply updates the like_count feed in the Post table. in our model, we are not storing which users liked a post, which can be easily done by adding a new liked_users field in the Post table. As usual, we don’t perform the like while the request is processing. We simply kick an offline job and send a success message to the browser or device. Later on, we can also kick off jobs to notify the post owner of the like, but we don’t have that feature yet.
Add Friend : This is a pretty simple feature. We simply Add the Users to each other’s friend lists. We could do this via an offline job, but it will be better if we do this right away, because it is likely that the user will start looking at the new friend’s profile as soon as they add them. So it’s better to do this synchronously.
View your own Photos : This is again simple with our database model. We simply return Post Ids to the browser, and the browser can individually query each Post for the image and other data. We can also implement some sort of pagination here so that the browser can request, say, 100 Ids at a time instead of being flooded with potentially thousands of Post Ids. To do this, our REST API request can have a field to request a certain range of Post Ids. For e.g, 1-100, 101-200, etc.
PERFORMANCE IMPROVEMENTS
Geolocation : In most System Design interviews, you should bring up geo-location as a performance improvement technique. We can place servers in different locations around the world, and even in different parts of the country. When we add photos, we can use CDN to serve static content like images and videos. This reduces latency for users near those locations.
Caching : You can cache a lot of things in our social network. We can cache each active user’s profile page, their feeds, and even their latest photos as they are more likely to be accessed. In addition, you can cache popular posts and celebrity profiles in order to serve them quicker to a larger audience.
Offline Tasks to Job Queue : You want to perform the minimum required steps while processing the REST API request. Rest of the steps can be done offline. For example, when processing a Like on a post, you can queue a job and immediately return true from the app server. The job can be offloaded to a task queue for processing. Of course, we need to ensure that the task queue itself is efficient, so we want to monitor things like average time to completion. We can add more machines if needed.
Step 5: DETAILED DESIGN according to what the interviewer wants to discuss.
You can use the acronym FUSHED to remember this sequence. Its Pushed with an F.
Once you have a high-level diagram of your system, you have given the interviewer a menu of systems to pick from. Typically, this can go in 3 directions:
- DEEPER into a Subsystem: The interviewer wants to dig deeper into a specific component. For example, the interviewer wants to know how you would design and scale the database. Or how the load balancer works. You can utilize our sections for each of those components.
Interviewer: Cool, can you tell me more about the database. What kind of database will you use?
Or
Interviewer: Let’s talk about the file storage system here. How would you scale a large file storage system that might have millions of files?
- DEEPER into a Feature: The interviewer wants you to talk more about each interaction and how it will be processed in your high-level system. They might even ask you to add a new feature and modify your design to update it.
Interviewer: Great, can you tell me more about the home feed. How would you improve your feed’s selection of photos?
Interviewer: Let’s talk about caching. What will you use your cache for?
- BROADER into more Features:
Interviewer: Let’s say we wanted to add a way for users to share their location. How would you add that in your system?
During your prep, practice going into all of these directions.
Design a URL Shortening Service like TinyURL
Note: We are assuming that this is a general System Design Interview, which mostly involves backend design. If you are interviewing for a frontend-specific role, you will focus more on the UI.
Important: This section assumes you have gone through the following sections, which describe our approach and assumptions. If you don’t go through these, you might misunderstand our template.
- Section: Anatomy of a Scalable Web Application
- Approach for System Design Interviews + Uber/Lyft Design
- The iCamp Template for System Design Interviews
Overview
This problem comes down to implementing a distributed key-value store, where we can use the concepts we’ve already learned, such as Sharding and Distributed Databases.
However, there’s one twist - How do you generate the actual TinyURL? This will likely be a major part of the interview. We will cover that in a bit.
Why is it a distributed key-value store?
We need to generate a Key, which will also be our shortened URL, and map it to the actual URL.
Let’s say that we have a function makeTinyURL() that takes in a URL and returns a short unique string to use as the TinyURL. For example,
makeTinyURL( “http://www.yahoo.com?search=what+is+hello+world”) = ksfskfh
makeTinyURL( “http://www.google.com/mail?id=dsbsj234-3rfwd-3e3r…”) = djhdhsf
Now, we will store the following in our Distributed Key-Value Store (which is also our distributed database):
Key -> Value
ksfskfh -> “http://www.yahoo.com?search=what+is+hello+world”
djhdhsf -> “http://www.google.com/mail?id=dsbsj234-3rfwd-3e3r…”
The user can now share tinyurl.com/ ksfskfh. Whenever someone visits that URL, our system will look up the Distributed Database and redirect them to the actual URL.
How will we design our System?
Much of the system, except for the makeTinyURL() function, is a repetition of the systems we have seen already.
We will have App Servers that generate the TinyURL and store it in our Distributed Database. We will utilize our distributed cache to store popular URLs. We will use Sharding to distribute our database. Please look at the Sharding section for more details. The system will look as follows:
How to generate a TinyURL?
This is the unique feature in this system. When you think of shortening a URL, you should consider the following questions:
-
What method do we use to generate the shortened URL?
-
How long should the shortened URL be?
-
What happens if the same URL is shortened twice? Do we re-use the old TinyURL or create a new one?
Let’s look at the first question, which will lead us to the other questions:
What method do we use to generate the shortened URL?
There are 3 broad ways that are commonly brought up: Hashing the URL, Using a Random String, and using an Incremental Counter. Each has its own pros and cons. In an interview, we recommend knowing the pros and cons of each approach. The method we prefer for interviews is generating random strings .
Method 1: USING A HASH FUNCTION : We can use a common hash function such as MD5 or SHA1. We hash the entire URL to come up with a string: For e.g,
MD5(“https://parade.com/689217/km…”) -> 2D9399993E3D6F54AFB13F8B114D674D
Now, the above MD5 string is in hexadecimal (base 16). Our TinyURL needs to be alphanumeric, i.e, [a-z][0-9] (if you want it to be case-sensitive, you can add [A-Z]). That makes it base (26+10) = base 36. So our TinyURL will be:
hexToBase36(2D9399993E3D6F54AFB13F8B114D674D) = dnr65nzh0sh6cwjuovi2zc7
So let’s say we just use this. What does that mean for our system?
-
We will have to deal with collisions: Another URL can lead to the same hash. We will check for that and if we find a collision, we will need to find another way to generate a different hash.
-
The same URL added by different users will return the same TinyURL: There are both pros and cons to this. The advantage is that it will use less storage. The disadvantage is that it might lead to hotspots in our database because common URLs might see a lot of traffic.
For common URLs, we might need to address that by replicating or caching them in many places for load balancing. Another disadvantage is that you will not be able to report link stats for each user’s TinyURLs. This is a common feature in most of these services. Most shorteners do not use this approach. They create new TinyURLs instead of reusing the same. You can discuss these points with the interviewer.
-
You might get into Hashing discussions with the interviewer: In many cases, the interviewer might want to get deeper into how you would avoid collisions and get into details of hash functions. It is better to avoid those topics and let the interviewer focus more on the distributed system. Discussions around scaling systems are the core topics in system design interviews and have the most impact.
-
Hash Table is overkill for our use case: Hashing is useful when you need to look up a key that is in the form of a string or a number, such as a name. We then convert that name into its hash code and look up that code in the database. In our case, we are sharing the Hash Code (as the tinyURL), so we don’t need to use the hash function again. So really, using the hash function is as useful as generating a random string and using that.
For the reasons above, we recommend not selecting Hashing in your final design. You can mention it though and have a discussion of pros and cons with the interviewer.
Method 2: GENERATE RANDOM STRING : Instead of generating strings using a hash function, we can generate unique random strings and use them. Chances of collisions are small, and if we do see a collision, we can simply generate a new string. Additionally, we will create a new TinyURL every time, which will use more space but solves the problems mentioned above in the Hashing method.
There are several methods to do this. You can generate a random number and turn it into base 36. You can also use common UUID generators. We will need to ensure a certain maximum length of the TinyURL, which we will discuss later.
Method 3: USING A COUNTER : You can use an incremental counter to generate ids. The benefit of this approach is that you won’t have to deal with collisions. However, if our system is going to be distributed, you will need to deploy techniques used by distributed counters. Unless you are familiar with these topics, we recommend avoiding this approach in your final design because it distracts the interviewer from core scaling questions.
This functionality is also provided out-of-the-box with many databases, in which case you don’t have to worry about it in practice. But since this is a system design interview, we don’t want to let a black box handle a core functionality of our system.
An easier way to use counters is by using the current timestamp as the key. If there is a collision, simply try again with a new timestamp.
So, we recommend using Random Strings in your final system. It fits our needs perfectly and also simplifies our design. If you want, you can use the timestamp approach mentioned above as well if you prefer that.
How long should our TinyURL be?
The TinyURL needs to be short enough that it is easy to use, and long enough that is doesn’t result in many collisions. We also need enough length to cover a lot of potential URLs, although we can always increase the size later if we need to.
Let’s say our URL will be of length 5 (by URL here, we really mean the shortened key, not the entire URL). We can store 36^5 = ~60 million URLs.
With 6 : 36^6 = ~2 Billion URLs
With 7 : 36^7 = ~78 Billion URLs
With 8 : 36^8 = ~2.8 Trillion URLs
Note: This is hard to calculate in an interview, so you can estimate it. For example, let's take an easier number - 30. If a length works for 30, it will work for 36.

30^2:  *900*

30^3: 900 * 30 =  *27,000*

30^4: 27000 * 30 =  *810,000*

Now, we can express 810,000 as 0.8 million and continue.

30^5: 0.8 * 30 =  *24 million*

30^6: 24 * 30 =  *720 million ~ 0.7 billion*

30^7: 0.7 * 30 =  *21 billion*

30^8: 21*30 =  *630 billion*

We can stop here and assume that 8 is good enough because 36^8 will be a lot larger. You should clarify to the interviewer that you are just using 30 as a rough estimate and would perform the actual calculation if you had a calculator.
We will likely not need more than that, so let’s stick with 8. We can add more if we need to.
Keep in mind that a large space is good because we don’t want collisions. The larger the possible space of URLs, the lesser the likelihood of collisions.
Keep in Mind: If we want our TinyURL smaller, we can also make our URL case-sensitive, which will add 26 more characters (A-Z). In that case, our URL space becomes 62^7 = ~3.5 Trillion URLs with just 7 characters.
How to generate the Random String of size 8?
There are several ways to do this, here are a couple of good ones:
- Use Random Number Generators : You can use existing Universally Unique ID generators, which give us 128-bit numbers. This is pretty large, so we can just use the first N bits. While the first N bits will not be Universally Unique, they will be random enough for our purposes.
How to find N? We look at how many bits are needed in 8 characters of base 36. This is hard to calculate in an interview so you can give an interviewer a rough idea of how to do: it will be (log base 2 of 36) * 8 = 48 bits.
- Toss a (36-sided) coin 8 times: For each character in our TinyURL, find a random number between 1-36 and turn that to a character. Do this 8 times and concatenate them. Because our URL space is large, this should give you a good random string.
How to handle collisions?
After we generate a TinyURL, we need to make sure it is not already used, leading to a collision. So we query the database for the TinyURL and see if it exists. If it doesn’t exist, we add a new entry:
dhd7h0h -> “https://stackoverflow.com/questions/156…”
If it exists, we generate a new random String and try with that until we find an unused String. Given we picked a large URL space, this should be pretty rare. If this becomes frequent at some point, then we will need to resize our space and increase our length to 9.
Corner Cases : Several App Servers are writing to the distributed database. What happens if we checked that our TinyURL doesn’t exist and are about to write it, but some other server writes to that row in the meantime? Both servers will think they are successful, but the server that writes first will be overwritten.
We need to make sure that the distributed database is atomic and consistent, and also able to lock a row.
Why atomic? Because we want the entry to be success or failure, with no partial completions.
Why consistent? Because we don’t want a different copy of the row to reflect a different value, which will enable another server to write to that copy.
Why lock a row? Because we need to perform two steps - checking if a key exists and then adding it. If we don’t lock the row key after verifying it doesn’t exist, then someone could come in and write it in the middle.
Often, a “checkAndPut(key)” functionality is provided by the database, where the database handles the locking internally.
Which Database to Use?
A NoSQL database that provides consistency, atomicity and row locking is a good choice. HBase is a good example of such a database. Others, like Cassandra, are not good choices without explicitly telling them to prioritize consistency. Since there are no updates after we write an entry, there will be no lack of availability that is usually encountered in replicating an update to multiple copies.
Of course, you can also use a Relational Database such as MySQL, but then you will have to deploy scaling techniques like Sharding, which is easier with NoSQL.
PRE-GENERATING TinyURLs
In our Random String approach, the TinyURL does not depend on the actual URL. So, we could compute a bunch of TinyURLs offline and use them. We can have a service that generates TinyUrls and checks if they are already used in the DB. After checking, it can add that URL to a pile. It can then periodically divide up the pile and send one to each app server. The app server can simply read the URLs from that local file. In addition to speed (we are generating and checking URLs offline), this approach has an added benefit - since each app server gets its own unique TinyURLs, there won’t be any contentions.
RELIABILITY
We want our service to be reliable. We will utilize replication in our database system and copy the data in several geographic locations. This will also improve speed by taking advantage of locality. We will also use a distributed cache for popular URLs, which further increases speed.
REDIRECT
On the web browser, URL shorteners utilize a special kind of response code - the 302 - Temporary Redirect . With redirects like 302, the short URL is not added to the browser’s history. This would not happen if, for example, we returned an HTML page with a redirect tag.
302 serves as a direct URL replacement. So our TinyURL server sends the 302 response with the actual URL and the browser redirects to that URL. There is another related response code - the 301 -Permanent Redirect . This code acts the same way, except because the redirect is permanent, the browser ignores the TinyURL in subsequent requests and directly goes to the actual URL. This is good because it is not hitting our servers again, reducing the load. However, if you want to track the number of hits to your TinyURL, which most services do, 302 is the way to go.
Feature Walkthrough
-
Adding a URL - The load balancer sends the request to an app server. The app server reads a new pre-generated TinyURL from a local file (which is buffered in the RAM for quick access). It sends a write request to the distributed database. When the database returns, it sends back a success response with the new TinyURL.
-
Reading a URL - When a user tries to access the TinyURL, the app server tries to read it from cache first. If not available, it reads it from the database and returns a 302 response with the actual URL.
-
Removing a URL - We don’t really need this functionality in our system. But if the user wants the functionality, it would be a simple matter of deleting the entry from the database and cache.
Design a Messaging Service like WhatsApp
Note: We are assuming that this is a general System Design Interview, which mostly involves backend design. If you are interviewing for a frontend-specific role, you will focus more on the UI.
Important: This section assumes you have gone through the following sections, which describe our approach and assumptions. If you don’t go through these, you might misunderstand our template.
- Section: Anatomy of a Scalable Web Application
- Approach for System Design Interviews + Uber/Lyft Design
- The iCamp Template for System Design Interviews
Keep in mind : Before each step, you should tell your interviewer what you are doing. Sometimes, they might want something else.
Step 1: Define your FEATURES (2-3 Core features)
In our simple messaging app, we can have the following features:
-
Send and receive text messages between two devices
-
One-on-one conversations with different users
-
User can see the time of each message
There are a couple of restrictions we want to call out in our simple system:
-
Messages are one-on-one only, i.e, no group messages
-
Our server will not store the messages after they’re delivered
-
Our messages will be text-only
We can add saving messages later, but initially, it will simplify our design and help us focus on the core parts of the system. Of course, we will have simple User profiles (username/password), which are pretty easy to add on.
Step 2: Narrow down USE CASES
Here are the use cases for our app:
-
Send a message to a person
-
If you receive a message and you are online, immediately deliver it.
-
If you receive a message and you are offline, wait till you come online.
-
Get a notification and receive a message
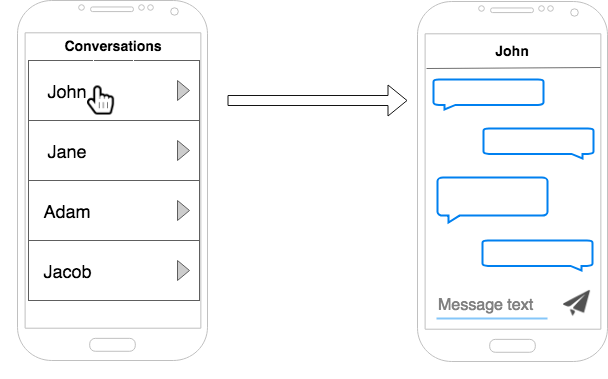
You can draw simple screenshots to illustrate the functionality to the interviewer. This helps communicate the narrow list of features. Keep the drawings simple as you want to spend as little time as possible on these initial steps.
Step 2.5: Clarify that you are designing with scale in mind and any other assumptions.
Note : Sometimes, the interviewer will want you to start with one machine and scale from there. For that case, please refer to the Anatomy of a Scalable Web Application section, where we walk through scaling a system from one machine to multiple machines.
Step 3: What to STORE
The mobile device will have its own storage for conversations and messages. As such, our backend only needs to store unread messages that haven’t been pulled by the device yet.
With each message, we need to attach a timestamp as well as a sender Id so that the device can tell which conversation it belongs to. The message is text-only.
Message Properties:
-
message text
-
timestamp
-
sender’s Id
We only need to store one table in our current design:
User
-
id
-
username
-
password
-
list<unread_messages>
Step 4 : HIGH-LEVEL DESIGN
Note: The high-level design of this system is more complicated than other web backends, so it’s ok if it takes longer.
Before we start designing our system, we should clarify how the messages will be delivered, because that will also determine some parts of our design, like how a message is passed on in our servers.
How to deliver a message?
Broadly, there are two ways your device can be notified of new messages: Push and Pull.
PULL
Regular Polling: This is a less sophisticated way to “send” notifications. The device can periodically ask the server if there are any new messages. Say every 2 minutes, the device sends a REST API request to check if there are new messages, and the server responds with yes or no. Downsides of this approach are obvious: you will have up to 2 minutes delay in getting your message. Also, you are constantly pinging the server 24/7, so you will need a lot of server capacity to handle millions of users.
Long Polling: A better way to do this is by long polling. It is just a variation of regular polling where the server holds on to the request until there is a message available. If there is a new message, the server immediately sends back the request. If there is no message, the server waits until the connection limit. After that, the device can send a new request.
The upside with long polling is that you get the notification immediately. The downside here is that the Server needs to keep many connections alive at the same time.
PUSH
Here is a good exercise to think about: If the device can contact the server and make requests, why can’t the server do the same?
To send requests to a device, the device will need to act like a web server. It will need to be discoverable to the world and filter out bad actors. It will also need a fairly static IP address. In reality, devices move around with different connections and firewalls, not to mention there are tremendous security risks in opening up each device to the public. This is very hard to do at scale. Instead, we use the client-server model, where each connection is initiated by the device.
Once the client initiates the connection though, it can be kept alive and there can be bi-directional communication. That is the basis for pushing data to devices.
WebSockets: These are a good choice. WebSockets give you a single bi-directional connection over TCP. Once the connection is established, the client and server can freely exchange information.
Push Notifications - Another good choice for mobile devices, although usually slower than WebSockets. Apple and Google provide push notification services with their OS.
Apple has the Apple Push Notification Service (APNS) for its devices, while Google has Google Cloud Messaging (GCM) for all Android devices. Your app will collect the device’s OS type and device ID and send it to your backend. The backend can then call these services using the device ID and send notifications as it wishes.
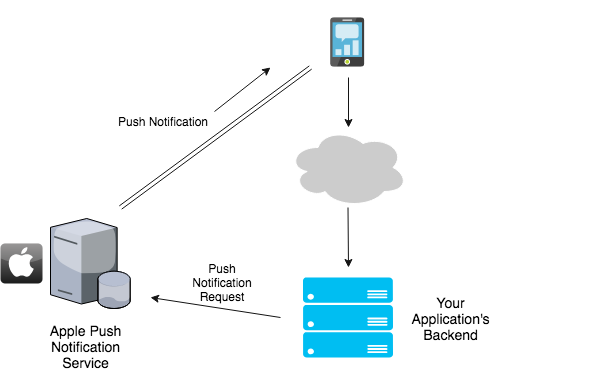
Whenever there is a new message, the backend will send a request to APNS or GCM to deliver the notification. APNS and GCM both maintain a persistent connection with each device, so they can handle the push part of it. One issue here is that the amount of data you can send with a notification is limited (2KB for APNS). So usually, the device will send a request to the server for new messages as soon as it gets the notification. This causes the slower performance compared to WebSockets. Like any discussion, you can discuss these tradeoffs with the interviewer. This approach lets you utilize a traditional REST API because all messages are delivered via client requests.
There are other push technologies as well, such as HTTP Live Streaming and WebRTC, but they are not useful for the messaging app use case.
You should discuss these options with the interviewer along with the pros and cons of each. The final choice will not affect our backend design much, because they are just different means of delivering the same information.
What about XMPP?
A common concern while preparing is - what about XMPP? XMPP is the most common protocol used for messaging communications. XMPP is a protocol (like HTTP) that defines how two servers communicate. It does not define what channel the communication happens over. Kind of like how HTTP is a protocol that communicates over TCP/IP, but if you really wanted, you could use HTTP methods (GET, POST, etc.) over UDP instead of TCP/IP.
So you can use XMPP over WebSockets, Long Polling or any push-based technology. For system design interviews, however, you need not use XMPP because you don’t want to get into a knowledge-based discussion. You can mention it if you want, and then just use JSON to fetch and send messages.
Let’s first take the Push Notifications approach. Our system will call APNS or GCM. In this approach, we don’t handle push communication, and the mobile device will make requests to fetch the latest messages. We have to process a request like we normally do in REST API backends.
The architecture will be as follows:
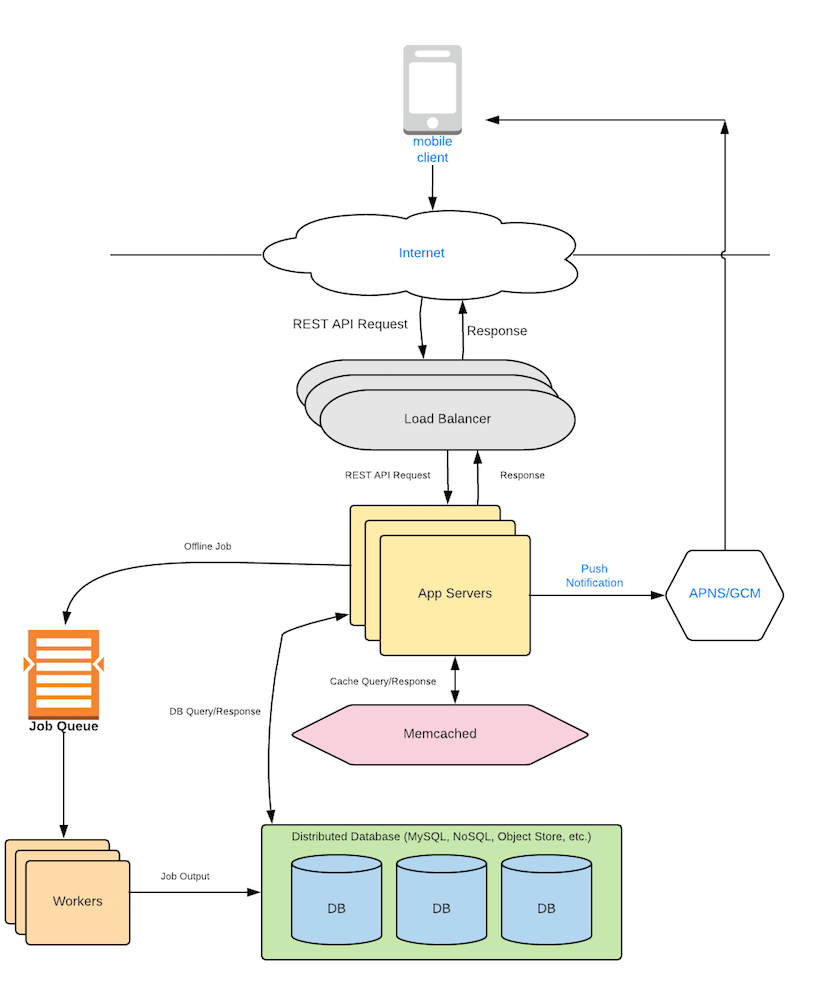
This is just our standard Anatomy of Web Backend Diagram, albeit without the CDN or Data Processing, because we don’t need them in our design right now.
Our App Servers will be stateless, so they will not store anything (Please review the Load Balancer section for more info on stateless servers). They will receive a message and store it in two places - a distributed In-Memory Cache and a NoSQL Database. They will then send a request to GCM or APNS (depending on the receiver’s mobile device) to send a notification to the receiver. When the receiver gets the notification, it will request our App Servers for the unread messages. The App Servers will read the cache, where lookups are quick and the message will likely be found. In rare cases, if it is not found in the cache, it can be retrieved from the persistent NoSQL database (more about this scenario below).
Keep in mind that there can be other architectures too. You can discuss with the interviewer to come up with the one you like. For example, instead of using a NoSQL database, you can use an In-Memory Database along with the In-Memory Cache, which persists the messages to disk. While they don’t provide the same horizontal scalability as NoSQL DBs, they might be good enough for our use case. This will prevent writing to 2 places, as we are doing right now. We are sticking to NoSQL databases for now, because later on, it makes it easy to store other things that need scale. For example, when we store the entire conversation on the server (instead of just unread messages), it will be easier to scale with a NoSQL DB rather than an In-Memory DB.
Database Model
- NoSQL Database : We can use a Wide-Column NoSQL store to store our data. If you are not comfortable with the Wide-Column Store data model, feel free to use a Distributed NoSQL Key-Value Store instead (like DynamoDB). Wide-Column Stores are essentially Key-Value Stores as well, just with a different data model. Please go over the Wide-Column Store section for more details on this.
Here is what the schema will look like:
User
-
id
-
username
-
password
-
device_OS
-
device_token
-
list<unread_messages>
The device_OS is used to identify which service to use to send the notification (Apple APNS or Google’s GCM). The device_token is used by APNS/GCM identify the device. It is provided by the OS.
- Distributed Cache : In our Distributed Cache, we will store the list of unread messages for each user. This way, the receiver can quickly get them.
UnreadMessages
-
user_id
-
list<unread_messages>
Note: This is the same list stored in the User table in our NoSQL DB. After the message has been read, our system will delete both these lists. In a future addition where we want to save the messages in our Database, we will delete only the cached copy.
Why are we storing the list in 2 places instead of just the cache? Most caches are of limited capacity because RAM is more expensive than disk. If the message has been in the cache for a long time, we will remove it from the cache to accommodate more recent messages. So our cache behaves like a First-In-First-Out (FIFO) queue. If the receiver finally asks for the message, it can still be retrieved from the NoSQL DB.
Feature Walkthrough
Sending a Message : We will have a request handler to send a message. It will have the following prototype:
sendMessage(string message_text, int sender_id, int reciever_id)
The device will send a message and user Id’s to our backend. The App server handling the request will generate a timestamp (more below on timestamps). The message will have the following properties:
<message_text, sender_id, timestamp>
The App Server will add the message to 2 places
-
The Distributed Cache - in User reciever_id’s list of unread messages.
-
The NoSQL Store - Again, in User reciever_id’s list of unread messages.
It will then send a request to APNS/GCM (depending on the User’s device_OS ) to send a notification to the device. It can configure the specific notification message to say something like “John has sent you a new message” .
At this point, the task of sending the message has been done. We have placed the message in the receiver’s “inbox”, and also notified them.
Receiving a Message :
When the receiver’s device gets the notification, it wakes up the messaging app. The app makes a request to the server to give it unread messages. This request just contain’s the receiver’s user id.
getUnreadMessages(int reciever_id)
The App Server handling the requests queries the cache for the reciever_id . If the cache has an entry, it has found the unread messages and it returns them to the device. In the rare case where there is no entry in the cache, it also checks the NoSQL Store’s User table to see if there are unread messages there. If it finds it there, it will return it, otherwise, it will return nothing.
After returning the unread messages, the App Server also needs to delete them from the backend because they are not needed anymore. So it kicks off an asynchronous job to do that. The job will delete those messages from the cache and the NoSQL store. If during this time, there is another message request, it is ok if the same unread messages are returned to the device again. The mobile device will do deduping on its side. The deduping can be done based on the message_text and timestamp.
Note on Timestamps: The messages’ timestamp should be generated on the server. If we generate it on the user’s device, it can lead to several issues. For example, the device might have the clock set incorrectly. In general, this approach is open to abuse. Most apps don’t count the message as “sent” until it has been successfully delivered to the server.
Now, let’s say we are using WebSockets and pushing the message via an established persistent connection. How will our design change?
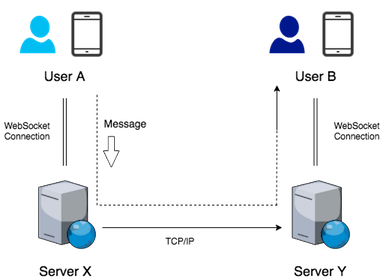
With WebSockets, we need to keep a persistent connection from a server to the device. Let’s say user A and user B are communicating. Let’s say server X has a connection to user A and server Y has a connection to user B:
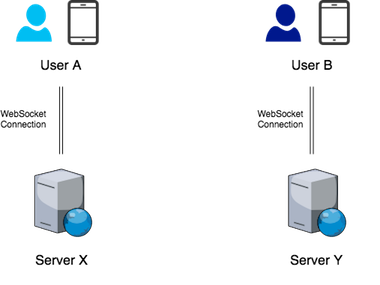
In this case, when A sends a message, server X will have to transfer the message to server Y, which will send it to user B’s device. Of course, it will be much better if X and Y were the same server so that no transfer needs to take place.
Before we look at the design, we need to consider when the WebSocket connection with start and end for each device.
-
One way to do this is to keep a WebSocket connection alive 24/7 for each device. But this seems wasteful - many devices are not online at any given time.
-
Another way is to set up the WebSocket connection as soon as the messaging app becomes active, i.e, the user opens the app.
With both 1 and 2, we have one connection per user. A server is assigned to the user and if the user talks to a user on another server, the message is transferred to that server.
The key thing to notice here is that the rest of the system will still work the same way as with push notifications. We still need to write the messages to our cache and NoSQL store, because a user might not be online and will need to pull the messages later. Also, with approach 2, we will need to rely on push notifications to initiate the conversation while the connection is not set up.
Our system will now look as follows:
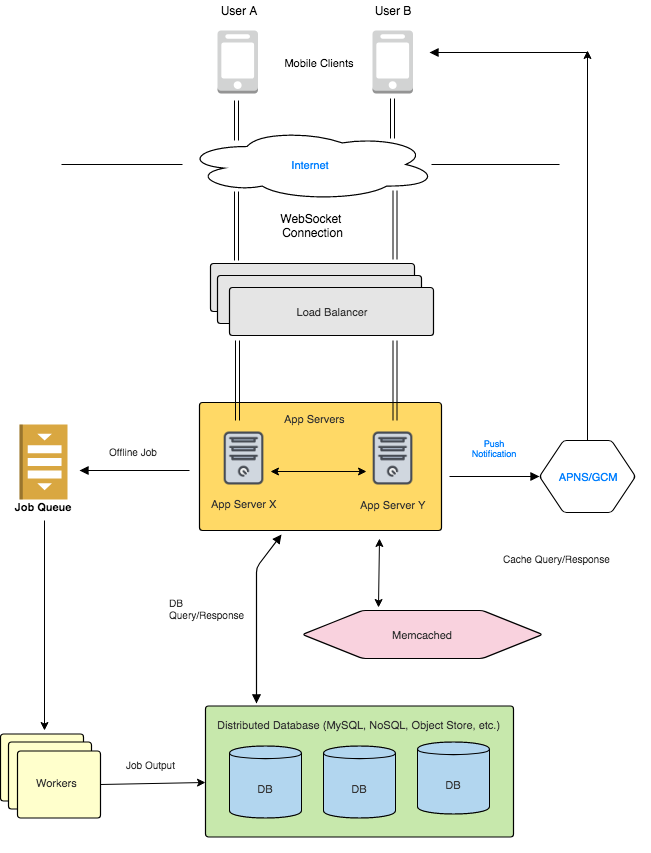
One thing to note here is that we will need a way to tells us which server holds the connection for a particular user . We will need to employ similar strategies as used in the Sharding section. We can either have a Locator Service (refer to Dynamic Sharding section) that keeps a table, or we could use a hash function with modulo operator (Static Sharding section). We could also use Consistent Hashing by using the userId as the hash key.
So we will shard users and divide them among our App Servers (also known here as Chat Servers). Once a server X looks up that server Y holds the connection for the user, it can cache the value locally and send any future messages without looking up that info again.
Keep in mind that in this approach, each user will always connect to the same machine (because of sharding rules), so even if the user disconnects while you are sending them messages, the receiving server can simply drop the messages. They can always be retrieved from the cache or persistent store later when the user comes online.
Which server will send Push Notifications?
We need to send push notifications in Approach #2 (establishing connection only when a user is active). If the user is offline, our system needs to send a push notification saying “You have a new message” . This should be done by the receiving server because it knows if the user is online or not. If the user is offline, which means there is no WebSocket connection, send a Push Notification via APNS/GCM. The receiving user can get the messages when he/she comes online and establishes a connection. Of course, at this point, the Chat Server will read the unread messages from either the cache or the NoSQL storage.
Will servers send entire messages to each other?
When server X is in charge of sending a message to server Y, it can either send the entire message, or it could just send a ping with the receiving User’s ID, essentially saying “hey, User B has a new message”. Server Y can then query the cache/NoSQL store to get the message. Both these approaches seem fine, but make sure you know the pros and cons of both.
Sending entire messages will consume a lot more overall bandwidth in the Chat Server cluster. However, it is likely to be quicker during live chats and will require less coordination with the cache. The ping approach will be lighter on the network but might increase latency during live chats because it includes additional calls and coordination with the cache.
Why don’t we make sure that both users are connected to the same server?
You might be thinking of another approach - if two people are chatting, why don’t we just make both users connect to the same server and avoid the transfer between servers. That is a good idea, but the design gets complicated with this approach. For example, what happens if a user is concurrently chatting with 2 or more users. Or when do we let the user connect and disconnect? That becomes a more complex implementation because all of a sudden connections to each device can happen on different servers. Additionally, if later on the interviewer asks you to implement group chat, this becomes harder to design.
This approach is very good for cases where only one connection is needed at a time, for e.g, while playing a multiplayer game. You can wait for a new connection to a new player or group of players and assign the entire game one server.
So you can get into this approach if you really want to, but we prefer to avoid it for interviews.
Feature Walkthrough
Establishing a connection : When the user opens the app, it will automatically establish a connection with a chat server. It will send a request to connect, and the load balancer will figure out which server to connect to based on our sharding logic. When the user leaves the app, the connection will be terminated.
Sending a Message : Now that the connection is established, the user can start sending messages. Like before, the call will have the following prototype:
sendMessage(string message_text, int sender_id, int reciever_id)
The device will send a message and the chat server. The chat server will generate a timestamp. The message will have the following properties now:
<message_text, sender_id, timestamp>
The App Server needs to send the message to 3 places:
-
The Chat Server where the User reciever_id is connected (if connected)
-
The Distributed Cache - in User reciever_id’s list of unread messages.
-
The NoSQL Store - Again, in User reciever_id’s list of unread messages.
Since online or active users will get messages through the Chat Server or Cache, we can kick off an offline job to write to the NoSQL store. This will make live chats much faster, as now we only need to write to the cache before sending the message to the receiving Chat Server. Alternatively, we could also send the message first and then write to the cache.
Here, a delay in writing to the NoSQL store is acceptable because the users who will retrieve the message from there are the ones who will not be online soon (if they were online or soon to be online, they would have retrieved it from the chat server or cache).
At this point, the task of sending the message has been done. We have placed the message in the receiver’s “inbox”, and it’s the receiving chat server’s job to notify them.
Receiving a Message:
When the receiving chat server gets the message (which contains the text, receiver id, and timestamp), it checks if the receiver has a live connection, and if so, sends the message immediately.
If there is no live connection, that means the receiver is not active right now. So the chat server sends a request to the device’s push notification system - APNS or GCM depending on the receiver’s device OS (it can get the details from either the database, or we can pass it along with the message). The notification system sends a push to the phone, and the user can open the application and reconnect when they choose to. When the user reconnects, the chat server looks into the cache to push any unread messages. After that, the persistent connection is running so the user can live chat as usual.
How to handle Chat Server failures?
We handle Chat Server Failures similar to how we handle Database Shard Failures. If we are using a Master-Worker model where there is a master locator service, the master will send heartbeats to each chat server. On seeing that a server is dead, it will delegate its chunk of users to one or more machines. Similarly, if we are using consistent hashing, which is masterless, each server can keep track of the next 2 or 3 servers in the ring and if any of them fail, take over their share of connections. If all this sounds unfamiliar, please refer to the Sharding section.
Step 5: DETAILED DESIGN according to what the interviewer wants to discuss.
You can use the acronym FUSHED to remember this sequence. Its Pushed with an F.
Important: The first 4 Steps should only take around 5-10 minutes. You want to spend a majority of the interview discussing Detailed Design. The first 4 Steps set you up for Step #5.
However, for this question, it’s ok if the High-Level Design takes longer because it is more complicated than simple web backends.
Once you have a high-level diagram of your system, you have given the interviewer a menu of systems to pick from. Typically, this can go in 3 directions:
- DEEPER into a Subsystem: The interviewer wants to dig deeper into a specific component. For example, the interviewer wants to know how you would design and scale the database. Or how the load balancer works. You can utilize our sections for each of those components.
Interviewer: Cool, can you tell me more about the cache. How will it be used here and how will you scale it?
Or
Interviewer: Let’s talk about the chat servers here. How would you scale a large number of chat servers that might need to connect to millions of users. (Hint: look at sharding discussion above)
- DEEPER into a Feature: The interviewer wants you to talk more about each interaction and how it will be processed in your high-level system. They might even ask you to add a new feature and modify your design to update it.
Interviewer: Great, can you tell me more about receiving the message. How would you handle different cases such as if the user is offline or doesn’t check his/her messages for a while?
Interviewer: Let’s talk about caching. What will you use your cache for?
- BROADER into more Features:
Interviewer: Let’s say we wanted to save all the messages in the database. How would you add that to your system?
During your prep, practice going into all of these directions.
Day Before Interview Guide
So you have an onsite scheduled. You are wondering what you should review a day or two before the interview.
Ideally, you should take a day off before an important interview. However, that may not always be possible. So in the two days before the interview, I recommend going through the sections listed below.
The day or two before the interview, I recommend you spend at least 6 hours going over these sections. Split it up by doing 3 hours each day.
*For each section below, unless we specify a problem, practice the solutions in the videos (not the homework). If you have practiced before, you won’t need to go over the videos.
How to go about this list
There are ~50 sections in this shortlist. I recommend doing it in two passes. In the first pass, review each section at a high level. Go over the solutions without watching the videos (unless specified).
After the First Pass, identify the sections which you are not comfortable implementing in an interview situation.
In the Second Pass, practice those on Paper. Practice each algorithm twice. That should be good enough to place them in your mind’s cache.
For me, I identified 12 sections which I wanted to put into my brain’s cache. I then practiced them twice on paper.
*For each section below, unless a problem is mentioned, practice the solutions in the videos (not the homework). If you have practiced before, you won’t need to go over the videos.
Total: 45 Sections
Week 1
Arrays I
Dutch National Flag Problem
Subarray Sum - Problem 3 (Given an array of ints, find Subarray that sums to 0)
Binary Search
Implementation
Binary Search with Duplicates
Search for Closest - Record and Move On
Recursion and Backtracking
Auxillary Buffers
- Given an array, print all Combinations (and Permutations) of length X
- Phone Number Mnemonics Problem
- Coin Change Problem
Backtracking Problems
- Maze with 4 Directional Movement (with memoization)
- Sudoku Solver
Sorting Algorithms
Intro - Go through Video and Key Concepts
Merge Sort - just review the algorithm, no need to implement
Quick Sort - just review the algorithm, no need to implement
Week 2
Linked List
Append Function
Linked Hash Table
Stack
Stack as Restriction - Q. Implement Queue using 2 Stacks
Stack with Max
Expression Evaluation
Queue
Intro - Q. Implement Queue using Array
Sliding Windows - Q. Sliding Windows with Time
Queue with Max
Dynamic Programming
Approaching DP Problems
- Longest Increasing Subsequence
- Coin Change - Print Count
Arrays II
Max Diff - with one trade
Add/Multiply without Operators
Week 3
Hash Table
Implementation - Key Points and Concepts
Hash Functions
String Search
Graphs I
BFS Algorithm
DFS Algorithm
Topological Sort
Line Sweep
Intro
Heap - Ok to Skip
Selection Algorithm
Intro, Implementation
Trie
Trie - Implementation
Majority Search - Ok to Skip
Week 4
Bit Manipulation
Flip Bits
Get & Set Bits
Swap Bits
Least Significant Bit (LSB)
Graphs II (The following are just modifications of BFS and DFS)
Detecting Cycles
Bipartite Graphs
Connected Components
Binary Tree
Intro, Traversing - Q. Print out Inorder Traversal Iteratively
Top to Bottom - Q. Find the height of Binary Tree
Bottom to Top - Q. Is Balanced - Find if the Binary Tree is balanced.
Binary Search Tree
Intro, Implementation
BST - Successor
BST - LCA
This list might seem large, but if you have practiced before, you will find it much quicker to go through each section. And of course, it will get easier after the first couple of interviews.
Amazon Leadership Principles
If you’re interviewing for Amazon, try to tailor your behavioral interview answers to these.
(Original: https://www.amazon.jobs/en/principles)
Customer Obsession
Leaders start with the customer and work backwards. They work vigorously to earn and keep customer trust. Although leaders pay attention to competitors, they obsess over customers.
Ownership
Leaders are owners. They think long term and don’t sacrifice long-term value for short-term results. They act on behalf of the entire company, beyond just their own team. They never say “that’s not my job."
Invent and Simplify
Leaders expect and require innovation and invention from their teams and always find ways to simplify. They are externally aware, look for new ideas from everywhere, and are not limited by “not invented here." As we do new things, we accept that we may be misunderstood for long periods of time.
Are Right, A Lot
Leaders are right a lot. They have strong judgment and good instincts. They seek diverse perspectives and work to disconfirm their beliefs.
Learn and Be Curious
Leaders are never done learning and always seek to improve themselves. They are curious about new possibilities and act to explore them.
Hire and Develop the Best
Leaders raise the performance bar with every hire and promotion. They recognize exceptional talent, and willingly move them throughout the organization. Leaders develop leaders and take seriously their role in coaching others. We work on behalf of our people to invent mechanisms for development like Career Choice.
Insist on the Highest Standards
Leaders have relentlessly high standards — many people may think these standards are unreasonably high. Leaders are continually raising the bar and drive their teams to deliver high quality products, services, and processes. Leaders ensure that defects do not get sent down the line and that problems are fixed so they stay fixed.
Think Big
Thinking small is a self-fulfilling prophecy. Leaders create and communicate a bold direction that inspires results. They think differently and look around corners for ways to serve customers.
Bias for Action
Speed matters in business. Many decisions and actions are reversible and do not need extensive study. We value calculated risk taking.
Frugality
Accomplish more with less. Constraints breed resourcefulness, self-sufficiency, and invention. There are no extra points for growing headcount, budget size, or fixed expense.
Earn Trust
Leaders listen attentively, speak candidly, and treat others respectfully. They are vocally self-critical, even when doing so is awkward or embarrassing. Leaders do not believe their or their team’s body odor smells of perfume. They benchmark themselves and their teams against the best.
Dive Deep
Leaders operate at all levels, stay connected to the details, audit frequently, and are skeptical when metrics and anecdote differ. No task is beneath them.
Have Backbone; Disagree and Commit
Leaders are obligated to respectfully challenge decisions when they disagree, even when doing so is uncomfortable or exhausting. Leaders have conviction and are tenacious. They do not compromise for the sake of social cohesion. Once a decision is determined, they commit wholly.
Deliver Results
Leaders focus on the key inputs for their business and deliver them with the right quality and in a timely fashion. Despite setbacks, they rise to the occasion and never settle.