Migrations
Exercises
Objective
Oops—we forgot a few fields when we created the movies database table! In addition to the existing fields, a movie could also use a textual description and the date it was released. So we need to modify the database, and that means it’s time for a new migration!
Migrations are used not only to create database tables, but also to incrementally modify them. Indeed, almost any modification you can make to a database using an admin tool or the database’s native language can be done through a migration. The benefit of using a migration is you end up with a more repeatable (and automated) way for everyone on the project to keep their database in step with the code. And since migrations make it easy to add or change database columns later, we can quickly adapt to new requirements. You’ll end up creating many migrations while developing a full-featured Rails app, so it’s good to get more practice with them.
Here’s what we need to do:
- Generate a new migration file that adds two fields to the movies database table
- Update the existing movies in the database to have values for the new fields
- Change the movie listing page to display the new movie fields
Notice that adding fields to the database has a small ripple effect. This is fairly typical, and it gives us an opportunity to learn how to realign things. It will also help reinforce a few things we learned in previous exercises.
Here are the changes we’ll make (in red):
So let’s jump right into it…
1. Add New Database Fields
First, we need to add the following columns and types to the movies database:
| name | type |
|---|---|
| description | text |
| released_on | date |
Note that we’re using a date type for the released_on field rather than datetime as we did for events. It makes more sense that a movie is released on a date and an event starts at a date and time.
To add those columns to the database, we’ll need a new migration file. Now, when we generated the Movie model we also got a migration file for creating the movies database table. This time we’d like to only generate a new migration file. Not surprisingly, this is so common that Rails has a migration generator .
- Start by printing the usage information for the migration generator:
rails generate migration
At the top you’ll see that the generator takes the migration name followed by a list of fields and types (and an optional index) separated by colons:
rails generate migration NAME [field[:type][:index] field[:type][:index]] [options]
- Note that each field/type pair is specified using the format field:type without any spaces before or after the colon. If a type isn’t specified, then the default type is string.
- Armed with this helpful information, now use the generator to generate a migration named AddFieldsToMovies with the two fields and types listed above.
Answer:
rails g migration AddFieldsToMovies description:text released_on:date
Running that command should generate a YYYYMMDDHHMMSS_add_fields_to_movies.rb file in the db/migrate directory. We now have our second migration file!
3. Open the generated migration file and you should see the following:
class AddFieldsToMovies < ActiveRecord::Migration[6.0]
  def change
    add_column :movies, :description, :text
    add_column :movies, :released_on, :date
  end
end
This time instead of using create_table the change method is using the add_column method to add both columns to the movies table. The add_column method takes three parameters: the name of the table, the name of the column, and the column type.
How did the generator know that we wanted columns added to that specific table? That’s another naming convention. If you name your migration using the format AddXXXToYYY, Rails assumes you want to add columns with the listed field names and types to the specified table (YYY). Pretty smart!
It’s worth pointing out that you could have generated the migration like this:
rails g migration add_fields_to_movies
In this case, because the field names and types weren’t listed, you would end up with an empty change method, like so:
class AddFieldsToMovies < ActiveRecord::Migration[6.0]
  def change
  end
end
You’d then need to put the add_column lines in the change method.So, if you follow the naming conventions, Rails is able to generate the complete migration for you. In cases where the naming convention doesn’t make sense, you’ll just need to edit the change method yourself.
4. Now that you have a new migration file, check the migration status by running:
rails db:migrate:status
This time you should see two migrations:
database: db/development.sqlite3

 Status   Migration ID    Migration Name
--------------------------------------------------
   up     20190502122806  Create movies
  down    20190506213706  Add fields to movies
The second (new) migration has a “down” status because we haven’t yet run it. Rails knows about the migration because it’s in the db/migrate directory.
5. Go ahead and run the migration.
[Asnwer]
rails db:migrate
You should get the following output:
==  AddFieldsToMovies: migrating ==============================================
-- add_column(:movies, :released_on, :date)
   -> 0.0006s
-- add_column(:movies, :description, :text)
   -> 0.0003s
==  AddFieldsToMovies: migrated (0.0010s) =====================================
Great—the migration successfully added both columns! It’s important to note that only the second migration was run. The first migration wasn’t re-run. Remember, when you run the db:migrate task, Rails looks at all the migration files in the db/migrate directory and only runs the migrations that haven’t already been run. In other words, it only runs the migrations that have a status of “down”.
6. Finally, re-check the migration status.
[Answer]
rails db:migrate:status
You should see both migrations marked as “up”:
database: db/development.sqlite3

 Status   Migration ID    Migration Name
--------------------------------------------------
   up     20190502122806  Create movies
   up     20190506213706  Add fields to movies
So now we’ve run two migrations. The first migration created the movies table and the second migration added new columns to that table.
2. Update the Movies
Next we need to update the movies in our database so that they have values for the new fields that we just added. To do that, we’ll need to read each movie into the console and assign values to the new description and released_on attributes. And you already know how to do that!
- Over in your console session, make sure to load the latest version of your application code by using the reload! command:
>> reload!
=> true
- Then find the “Iron Man” movie and assign it to a movie variable.
>> movie = Movie.find_by(title: "Iron Man")
You should get the following output:
=> #<Movie id: 1, title: "Iron Man", rating: "PG-13", total_gross: 0.585366247e9, created_at: "2019-05-02 12:46:57", updated_at: "2019-05-02 12:54:35", released_on: nil, description: nil>
Notice that the movie now has description and released_on attributes matching the new columns we added to the movies database table. We didn’t have to change the Movie model. When the Movie class was declared in the console, ActiveRecord queried the movies table schema and automatically defined attributes for each column.
3. You probably noticed that the movie’s description and released_on attributes have nil values, but go ahead and print them out just for practice.
Answer:
>> movie.description
=> nil
>> movie.released_on
=> nil
- Now assign values to the description and released_on attributes, and save the movie. For the date, you can assign a string with the format “YYYY-MM-DD” and it will get converted to a date.
>> movie.description = "Tony Stark builds an armored suit to fight the throes of evil"
>> movie.released_on = "2008-05-02"
>> movie.save
- Next, follow suit by updating the “Superman” movie.
Answer:
>> movie = Movie.find_by(title: "Superman")
>> movie.description = "Clark Kent grows up to be the greatest super-hero"
>> movie.released_on = "1978-12-15"
>> movie.save
- Finally, update the “Spider-Man” movie. This time, update the attributes and save the movie in one fell swoop.
Answer:
>> movie = Movie.find_by(title: "Spider-Man")
>> movie.update(description: "Peter Parker gets bitten by a genetically modified spider", released_on: "2002-05-03")
And with that, our database is all set!
3. Update the Movie Listing
The last step is to update the movie listing page so that it displays the new movie fields. You already know how to do this, too!
- Refresh the index page and it should come as no surprise that the movies don’t appear to have a description or release date.
- Fix that by updating the index.html.erb template. Just to keep things simple for now, put each new field in a paragraph tag.
Answer:
<p>
  <%= movie.description %>
</p>
<p>
  <%= movie.released_on %>
</p>
That completes this feature! We added missing columns to the database and now those changes are being reflected on the movie listing page. It’s interesting to note that we didn’t need to change the index action in the MoviesController. And that’s exactly as it should be!
Remember, the controller is just a middleman between the model and the view. It doesn’t concern itself with the details of the model or how the data is displayed in the view. So in this case, because we didn’t have to change the controller, we’re confident that we have the MVC responsibilities properly divided.
Solution
The full solution for this exercise is in the migrations directory of the code bundle.
Bonus Round
Convention Check
Rails is full of conventions that make apps easier to build, test, change, and ultimately, pass on to the next developer to test, change, and maintain. To practice using the Rails conventions you’ve learned so far, suppose you wanted your Rails app to be a listing of books for sale.
- By convention, the book listing route would map a _______ request for the URL ________ .
- [ANSWER]
The book listing route would map a GET request for the URL /books .
- The name of the controller would be _____________ and the name of the action would be ________.
[ANSWER]
The controller would be BooksController and the action would be index .
- If we don’t explicitly tell the index action the name of the view template to render, what will Rails do by convention?
[ANSWER]
Because the name of the action is index, Rails will assume it should look for a view template with a similar name: index.html.erb. Because the name of the controller is BooksController, Rails will look for the view template in the app/views/books directory.
- The model would be named _____________.
[ANSWER]
The name of the model would be Book (singular).
- The corresponding database table would be named _____________.
[ANSWER]
The database table would be named books . It is plural because it contains many records (or rows), each representing one book.
- If the model was named Person, the database table would be named _________.
[ANSWER]
The database table would be people . Yup, Rails is smart enough to figure that out!
- After a migration has been run (or applied), its status changes from _______ to _____.
[ANSWER]
Its status changes from down to up .
Wrap Up
Any time you have to make a change to the database, think “new migration.” Missing a column? Time for a new migration. Need to delete a column? That’s another migration. Want to rename a table or column? Yup, migrations can do that, too. In fact, we’ll talk even more about migrations a little later in this course.
Indeed, creating new migration files is really common. A typical Rails app will end up with tens, if not hundreds, of migration files where each migration represents an incremental database change. On team projects, all those migration files get checked in to a version control system as part of the Rails project. Then, whenever someone on the project checks out a version of the application, they can get their database schema in sync with the code simply by running rails db:migrate. That’s the beauty of migrations. You end up with an automated, repeatable way to make modifications to the database.
OK, so now that we’re showing more information on the movie listing page, it looks like we could use a bit of formatting. We’ll tackle that using view helpers in the next section.
Dive Deeper
We’ll write a couple more migrations a bit later in the course so you see them used in different situations. To learn more about migrations, refer to the Rails Guides: Migrations.
View Helpers
Exercises
Objective
Next we want to format how some of the movie information is displayed on the movie listing page:
- The movie description should be truncated to 40 characters.
- When the total gross of a movie is less than $225M, it should show the word “Flop!” in place of the total gross amount.
- The movie release date should be presented in a friendly format.
These formatting requirements are all presentation (view-level) concerns, so all of our work will be done in the view layer, with one exception we’ll discuss when we get there.
Now, there’s a slippery slope when beginning to format view content. It’s tempting to start sprinkling little bits of Ruby logic amongst the HTML tags in view templates. It’s just so darn easy to do! The problem is that it gets messy really quickly, and once you start down that slope the mess tends to spread (the copy/paste way) to other templates. Before long the templates are a rat’s nest and common logic is duplicated across multiple templates. Trust us, we’ve been there and it’s not a pretty place.
To avoid those problems, we’ll use view helpers . A view helper is simply a Ruby method that a view calls when it needs help generating output. The helper typically runs view-related logic and, depending on the result, returns the appropriate text that then gets rendered into HTML.
1. Use a Built-In View Helper
Rails is chock full of built-in helpers for things that are common across all web apps: formatting numbers, manipulating text, generating hyperlinks and form elements, and so on. So we might as well start by using what we get for free…
Use a built-in helper method to shorten the movie description to 40 characters. As a bonus, make sure the shortened description breaks on a space rather than chopping off a word.
[ANSWER]
<%= truncate(movie.description, length: 40, separator: ' ') %>
Make sure to refresh and check your work before moving on!
2. Write a Custom View Helper
Next, when the total gross of a movie is less than $225M, we’ll declare it a flop. Flop movies in our application don’t even deserve to have their total gross displayed. Instead, we want to display the word “Flop!”.
Rails doesn’t have a helper method that handles flop movies—it’s not that smart. But this can’t be difficult. All we need is a Ruby conditional that generates different text depending on the value of the total_gross attribute. And where should we put that snippet of view-related logic? In a custom view helper, of course.
- To get your bearings, remember that we’re already using the built-in number_to_currency helper to format the total gross as currency. Find this line in your index.html.erb template:
<%= number_to_currency(movie.total_gross, precision: 0) %>
That’ll work, but only in the case where the movie isn’t a flop.
2. Let’s start with some wishful thinking, working from the outside in. Suppose we want our custom view helper to be called total_gross and take a movie object as its parameter. Go ahead and replace the number_to_currency line with the following:
<%= total_gross(movie) %>
There, that neatly encapsulates what we want.
3. Refresh the index page and you should get the following error:
undefined method `total_gross' for #<#<Class:0x007fd0e3a3ece0>:0x007fd0e3b12ae0>
No surprise. We haven’t defined the total_gross method yet.
4. So where exactly should we define the total_gross helper? Unfortunately, the error doesn’t give us a clue, but the fact that our project has an app/helpers directory is conspicuous. And when we generated the MoviesController, Rails took the liberty of creating a file named movies_helper.rb. Open that file and you’ll see that it contains an empty Ruby module:
module MoviesHelper
end
Ruby modules have a number of uses, but in this case you can think of the module as a bucket of methods. Any helper methods defined in this module will be accessible by any view. The module basically serves as an organizational aid. And it’s a good idea to group related helpers into separate modules. As our total_gross helper is related to displaying movies, this module seems like a reasonable home.
5. Let’s take another incremental step toward our goal just to get things working. Start by implementing the total_gross method so that it simply returns the result of calling the built-in number_to_currency method (yup, helpers can call other helpers).
[ANSWER]
module MoviesHelper def total_gross(movie) number_to_currency(movie.total_gross, precision: 0) end end
- Refresh the movie listing page and the error should go away. Each movie’s total gross should be displayed as currency, just as it was before. That’s because we don’t have any movies that are flops. But now we know that our custom helper method is being called without errors.
- Jump into a console and either change one of the movies so that it has a total gross less than $225M, or create a new flop movie.
[ANSWER]
>> movie = Movie.new
>> movie.title = "Fantastic Four"
>> movie.rating = "PG-13"
>> movie.total_gross = 168_257_860
>> movie.description = "Four young outsiders teleport to an alternate and dangerous universe"
>> movie.released_on = "2015-08-07"
>> movie.save
Then refresh the movie listing and you should see the flop movie’s total gross. Oh, the shame. We just can’t allow that!
8. Next, change the total_gross helper to use a conditional. If the total_gross is less than $225M, return the string " Flop! ". Otherwise return the total gross amount formatted as currency.
[ANSWER]
module MoviesHelper
  def total_gross(movie)
    if movie.total_gross < 225_000_000
      "Flop!"
    else
      number_to_currency(movie.total_gross, precision: 0)
    end
  end
end
- Refresh and this time the flop movie should stick out like a sore thumb. And to think, $225M used to go a long way, even in Hollywood.
- Before you think about crossing this task off the to-do list, here comes the part that a lot of developers unfortunately skip. In the helper, we added this innocent little comparison expression:
movie.total_gross < 225_000_000
That single expression is the definition of what it means for a movie to be a flop in our application. That’s not really a view-level concern, is it? You can imagine other areas of our app wanting to know if a movie is a flop or not. And, if you really stretch your imagination, you can envision a time when some business person decides to change that definition to be less than $300M, for example. So this is actually business logic , and we need to encapsulate it in one definitive place in our app: the Movie model.
Define an instance method in the Movie class called flop?. (By convention, Ruby methods that end in a question mark (?) return true or false.) Implement the flop? method so that it returns true if the movie’s total gross is blank or less than $225M. Otherwise the method should return false.
[ANSWER]
class Movie < ApplicationRecord
  def flop?
    total_gross.blank? || total_gross < 225_000_000
  end
end
Then change the total_gross helper to call the flop? method to make the decision about whether the movie is a flop or not.
module MoviesHelper
  def total_gross(movie)
    if movie.flop?
      "Flop!"
    else
      number_to_currency(movie.total_gross, precision: 0)
    end
  end
end
Refresh the movie listing to make sure everything still works as you’d expect.
11. So we shuffled code around a little, pushing logic that was in the helper back to the model. Was it worth it? Absolutely! One of the benefits of creating the flop? method in the Movie model is you can now call that method from anywhere in your app, or even from the console. Suppose, for example, you wanted to know whether “Iron Man” was a flop. How would you do that in the console?
>> reload!

>> movie = Movie.find_by(title: "Iron Man")
>> movie.flop?
- Having your business logic totally decoupled from the web like this is not only really handy, it’s also one of the secrets of building flexible applications.
That’s all there is to writing custom view helpers!
3. Format the Release Date
Finally, as a nice touch we’d like to change the format of the movie’s release date. Instead of showing the year, month, and day (“2008-05-02” for example) we just want to show the year the movie was released (“2008”). And for practice, we want to encapsulate that formatting in a reusable view helper method.
- Write a custom view helper method named year_of that takes a movie object as its parameter and returns the year the movie was released. In the video we didn’t show the strftime directive for formatting the year, but you can probably guess it.
[ANSWER]
module MoviesHelper
  def year_of(movie)
    movie.released_on.strftime("%Y")
  end
end
- Then use that helper method in the index.html.erb template to display the year the movie was released.
<%= year_of(movie) %>
- Once you have that working, you might be delighted to learn that Rails adds a year method to all Date objects. And the released_on attribute is a Date object, so you can ask for the year. Give it a try!
module MoviesHelper
  def year_of(movie)
    movie.released_on.year
  end
end
And that completes all our formatting tasks!
Solution
The full solution for this exercise is in the helpers directory of the code bundle.
Bonus Round
Trying Helpers in the Console
It’s often handy to experiment with view helpers in a Rails console session. To do that, you need to use the special helper object. For example, here’s how to try the number_to_currency view helper from inside a Rails console session:
>> helper.number_to_currency(1234567890.50)
=> "$1,234,567,890.50"
Notice you call the helper method on the helper object, which you don’t need to do when calling a helper method inside of a view template.
And of course in the console you have access to your models, so you could find a movie and format its total gross as currency, like so:
>> movie = Movie.find_by(title: "Iron Man")
>> helper.number_to_currency(movie.total_gross, precision: 0)
=> "$585,366,247"
Another useful helper method is documentation for the pluralize. You can copy the examples straight from the documentation and try them out in the console:
>> helper.pluralize(1, 'person')
=> "1 person"

>> helper.pluralize(2, 'person')
=> "2 people"
Then once you have the hang of how a helper works, you can confidently use it in a view template. Just remember that you don’t use the helper object when inside of a view template. The helper object only exists in the console.
Wrap Up
If you take away one lesson from this exercise, let it be this: Strive to always keep your view templates as clean and concise as possible. The Ruby code should be kept to a minimum, basically just ERb tags for outputting values and iterating through collections. If it’s more complicated than that, it’s time to either use a built-in view helper or write a custom helper. Later on we’ll talk about how to decompose view into partials, which is another design technique for eliminating duplication and generally keeping views maintainable over time.
But first, speaking of maintainable views, in the next section we’ll learn how to use layouts to give the app a consistent look and feel.
Dive Deeper
Before writing your own custom helper, it’s wise to spend a few minutes getting familiar with what Rails gives you for free. Check out the helper methods in these modules:
The point isn’t to challenge yourself to use every single one of these in an app. Rather, it’s just good to know what’s available should you need it.
You can also search for a helper method in the Rails API documentation.
Layouts
Exercises
Objective
Every good web app has some sort of consistent layout across all the pages: a header at the top, a footer at the bottom, and perhaps even a sidebar next to the main content. What’s considered fashionable in terms of shapes, sizes, colors, and other design choices tends to change (usually about the time you launch your app). But when it comes to the layout of your app, consistency never goes out of style.
And to keep things consistent, we need to be able to put all the common layout elements in one definitive place. In Rails, that’s called the layout file. A layout file is just a regular ERb view template that “wraps” the other view templates in the application. In other words, the layout generates HTML for the header, footer, and sidebar that surrounds the HTML generated by an action’s view template. That way, we end up with a complete HTML document to send back to the browser. By having the layout in a single file, we can easily change the layout of our app.
We’ve gotten this far using the default HTML layout that was generated by Rails. That helped us get an app up and running quickly. Now it’s time to start customizing the layout to better suit our app.
This turns out to be a fairly easy exercise. So let’s jump right into it!
1. Review the Default Layout
Let’s start by reviewing what we get for free…
- Open the default layout file in app/views/layouts/application.html.erb and you should see the following:
<!DOCTYPE html>
<html>
  <head>
    <title>Flix</title>
    <%= csrf_meta_tags %>
    <%= csp_meta_tag %>

    <%= stylesheet_link_tag 'application', media: 'all', 'data-turbolinks-track': 'reload' %>
    <%= javascript_pack_tag 'application', 'data-turbolinks-track': 'reload' %>
  </head>

  <body>
    <%= yield %>
  </body>
</html>
Notice that the layout file is a mix of HTML and ERb tags, just like a regular view template.
2. To see what it generates, browse to any page in the app and view the generated source. What you’ll see is the HTML that was generated by a particular view template, index for example, is surrounded by the HTML generated by the layout template. Let’s unpack how that happens.Back in the layout file, at the top you’ll find a few built-in helpers that we haven’t seen before:
- stylesheet_link_tag generates the following link tags for the app’s stylesheets, which we’ll explore in the next section:
<link rel="stylesheet" media="all" href="/assets/movies.self-e3b0c44298fc1c149afbf4c8996fb92427ae41e4649b934ca495991b7852b855.css?body=1" data-turbolinks-track="reload" />
<link rel="stylesheet" media="all" href="/assets/application.self-f0d704deea029cf000697e2c0181ec173a1b474645466ed843eb5ee7bb215794.css?body=1" data-turbolinks-track="reload" />
- javascript_pack_tag generates the following script tag for the JavaScript file used by the app (beyond the scope of this course):
<script src="/packs/js/application-4e793d3ebc7e69100513.js" data-turbolinks-track="reload"></script>
- csrf_meta_tags generates meta tags for a token that’s used internally by Rails to add hidden security fields to forms (don’t worry about it):
<meta name="csrf-param" content="authenticity_token" />
<meta name="csrf-token" content="1jqaq6EPjEq6/e/nkhoL3czTGNIiYmOmIQq32yLl8GUqjp2X3GDkLkDhgyKmqVD7HDzzcEyG53HYLfbPQknJkA==" />
- csp_meta_tag generates meta tag for a per-session nonce value for allowing inline tags (don’t worry about it either).
So far, so good. That’s all fairly straight-forward.
Next comes the most non-intuitive part of the layout, which is also the most important part:
<%= yield %>
The yield returns the output (HTML) that an action generates. That output is then substituted right into the layout file because the <%= %> ERb tag was used. For example, if you visit the index page, the yield line in the layout file is replaced by the HTML that the index.html.erb template generates:
<ul>
  <li>
    <strong>Iron Man</strong> (PG-13): $585,366,247
    ...
  </li>
  ...
</ul>
So whichever page you visit, the main content changes but the surrounding layout remains consistent. That’s the essence of a layout file!
3. Just as a quick test, go ahead and change the contents of the title tag to a custom name for your app. Then refresh and you should see the new page title appear at the top of your browser window for every page in the app.
[ANSWER]
<title>Super-Heroic Flix</title>
2. Add a Header and Footer
Now let’s start customizing. To keep the marketing folks happy, each page needs some marquee header text at the top. And to keep the legal folks happy (a tall order), each page needs a footer at the bottom with a copyright.
- Inside the body tag, start by adding a header element above the main content. Inside the header, display the name of the app in an h1 tag.
[ANSWER]
<header>
  <h1>Flix</h1>
</header>
- Next, put the yield line in a div with the class of content, like so:
<div class="content">
  <%= yield %>
</div>
- Finally, add a footer element below the main content and inside the footer display a copyright notice and a link back to your company. Want to keep your copyright year up to date? No problem! Just use Time.now.year to display the current year.
<footer>
<p>
Copyright © 2005-<%= Time.now.year %>
<%= link_to 'The Pragmatic Studio','https://pragmaticstudio.com' %>
</p>
</footer>
Here’s the final, full layout file:
<!DOCTYPE html>
<html>
<head>
<title>Super-Heroic Flix</title>
...
</head>
<body>
<header>
<h1>Flix</h1>
</header>
<div class="content">
<%= yield %>
</div>
<footer>
<p>
Copyright © <%= Time.now.year %>
<%= link_to 'The Pragmatic Studio','https://pragmaticstudio.com' %>
</p>
</footer>
</body>
</html>
- Then browse to http://localhost:3000/movies and you should see the header text at the top, the result of calling the index action in the middle, and the footer text at the bottom.
And now you have a consistent layout that will get applied to every page of the application! This will become really convenient as we add more pages in upcoming exercises.
Solution
The full solution for this exercise is in the layouts directory of the code bundle.
Wrap Up
And that’s all there really is to layouts! They’re just regular ERb templates that “wrap” the other view templates so your application is displayed in a consistent layout.
Structuring the app around a basic layout is a good start. But once you’ve been introduced to the layout file, you start thinking about colors, sizes, fonts, and so on. Yup, this is the point where application development crosses over into web design . That’s a huge topic that’s beyond the scope of this course, but in the next section we’ll have a quick look at styling the app with CSS and images.
Dive Deeper
The application.html.erb layout file is the application-wide layout. By default, it’s applied to every action in the application. But Rails offers lots of options for rendering a custom layout file depending on the controller, action, or even arbitrary application logic. To learn more about custom layouts, refer to 2.2.13 Finding Layouts in the Rails Guide: Layouts and Rendering.
Stylesheet and Image Assets
Exercises
Objective
Since this isn’t a course about web design, we prepared a CSS stylesheet, images, and sample movie data for you. It’s always more enjoyable to work on an application that has some style, images, and realistic data. And this gives us an opportunity to learn the basics of how Rails handles assets such as stylesheets and images.
In this exercise we’ll copy in the prepared asset files and explore how they’re handled. In the end you’ll know where to put web design assets in a Rails app, whether you get those assets from a web designer or you apply your own web design skills!
1. Install the Bootstrap Gem
Our design uses the popular Bootstrap framework as the foundation and then adds a some custom CSS on top of that. The bootstrap gem makes it easy to use Bootstrap in Rails, so our first step is to add that gem as a dependency of the flix app.
- First, stop your currently-running flix app by typing CTRL-C in the console window where it’s running.
- Then add the following line to the
Gemfilein the flix directory:
gem 'bootstrap', '~> 4.3.1'
Remember, all Rails apps have a Gemfile that lists all the gems necessary to run the app. It generally doesn’t matter where you add gems in the file, though we tend to put them after the primary gems that are listed by default.
3. Now go back to the console window. You should still be in the flix directory. Install the gem by typing
bundle install
- You should see output indicating that the bootstrap gem was installed, as well as other gems it depends on.
2. Copy Prepared Files
The next step is to copy the prepared files into the appropriate directories of the flix app. Feel free to do this however is most comfortable to you on your operating system:
- First, locate the course code bundle. Inside that bundle you should see a directory named prepared-files at the top level. And inside that directory you’ll find a directory named flix.
- Copy all the image files contained in the prepared-files/flix/images directory into your flix/app/assets/images directory.
- Then copy the prepared-files/flix/custom.scss file into your flix/app/assets/stylesheets directory.
- Finally, copy the prepared-files/flix/seeds.rb file into your flix/db directory, overwriting the existing seeds.rb file. Take a peek at this file and you’ll see that it uses Movie.create! to create a more comprehensive set of movies with more realistic data.
3. Run the Styled App with Seed Data
With the prepared files copied, let’s take the app for a spin:
- First, the development database currently has some movies we created from the Rails console in previous exercises. We’ve included those same movies in the seeds.rb file, as well as some newer movies. So we want to clear out the database and populate it with the data in the seeds.rb file. To do that, use the following command:
rails db:reset
That handy command drops and re-creates the development database, applies all the migrations, and runs the db/seeds.rb file which creates example movies in the database.
2. Then go ahead and fire up the server:
rails s
- Now if you browse to http://localhost:3000/movies the page should have a blue header and a black footer. You’ll also see more example movies in the main content of the page.
4. Update the Index Template and Layout File
The header and footer are now styled, but the movie listing isn’t yet taking advantage of the CSS styles we copied into the app. We’d also like to display the application’s logo image in the header.
- First, to apply the styles to the movie listing, paste the following into your app/views/movies/index.html.erb file, replacing what’s already in that file:
<% @movies.each do |movie| %>
  <section class="movie">
    <div class="summary">
      <h2>
        <%= movie.title %>
      </h2>
      <h3>
        <%= total_gross(movie) %>
      </h3>
      <p>
        <%= truncate(movie.description, length: 150, separator: ' ') %>
      </p>
    </div>
  </section>
<% end %>
Don’t worry: All we’ve done is rearranged things slightly to use different HTML tags with class names that trigger the corresponding CSS rules in our custom.scss stylesheet. We also decided not to display the movie ratings and the year the movie was released on this page, but those attributes will make a comeback when we add the movie detail page in the next section.
2. Then display the application’s logo image in the header.
[ANSWER]
<header>
  <%= image_tag("logo") %>
</header>
- Now if you refresh the http://localhost:3000/movies page you should see the logo in the upper-left corner and the listed movies should be styled with a border separating each movie. Voila!
How Stylesheets Are Processed
Just to recap how stylesheets get picked up by Rails, open the application.html.erb layout file and narrow in on this line:
<%= stylesheet_link_tag 'application', media: 'all', 'data-turbolinks-track': 'reload' %>
The stylesheet_link_tag helper generates a link tag for the specified stylesheet file. The .css extension is automatically appended. So, in this case, our layout file references a stylesheet named application.css.
Where does that stylesheet file live? Well, whenever you reference an asset — be it a stylesheet, image, or JavaScript file — Rails actually searches for it in the following three directories:
- app/assets contains assets that are specific to this application
- lib/assets contains assets for custom libraries that you write and share across your Rails apps
- vendor/assets contains third-party assets that are used by this application such as an open-source lightbox or calendaring library
Since application.css is a stylesheet that’s specific to this app (hence the name), it lives in the app/assets/stylesheets directory.
Open the application.css file and you should see one big CSS comment that looks something like this (don’t worry about the ordering of the lines):
/*
 * This is a manifest file...
 *
 *= require_tree .
 *= require_self
 */
If you’ve ever laid eyes on a CSS file, you’ll quickly notice that this doesn’t look like your run-of-the-mill stylesheet. It’s actually a valid CSS file, but all the lines are in CSS comments. Embedded in those comments are special directives that start with an equal sign (=). Rails uses these directives to figure out which stylesheet files should be automatically included when the application.css file is requested.
The default application.css has two directives, which is all you really need:
*= require_tree .
The require_tree directive includes all files in the specified directory and any subdirectories. Using a dot (.) as the directory name means the “current directory”, so all CSS files in the app/assets/stylesheets directory (and any subdirectories) will be included.
*= require_self
The require_self directive simply includes the contents of the current file (application.css). So if we had any CSS below the comments, it would get included.
So the application.css file is really just a manifest : a list of other files to include in the final application.css file. So you can drop stylesheet files in the app/assets/stylesheets directory and the require_tree directive will make sure they’re included. The benefit of this approach is that we can organize styles into different stylesheets, in much the same way we strive to organize our source code into separate files.
It’s worth noting that Rails supports Sass out-of-the-box and it’s the default pre-processor for files with the .scss extenion. So our custom.scss file will get automatically pre-processed by Sass to generate valid CSS. But you can always use straight CSS if you prefer.
Solution
The full solution for this exercise is in the assets directory of the code bundle.
Bonus Round
If you have some favorite movies that aren’t in the movie listing, feel free to add them to the db/seeds.rb file. Then to reseed the data, run
rails db:reset
Wrap Up
It’s fun playing around with colors, fonts, rounded corners, drop-shadows, and all the other stuff that makes your app light up in the browser. And Rails makes it really easy to get started and keep things organized. So if you have web design chops, by all means go for it!
On the other hand, if web design isn’t exactly your strong suit, then here’s our recommendation: when it comes to building your own Rails app, now’s the time to get a web designer. Web design is a skill, and like any skill it can take years to master. It’s a rare programmer who has invested the time to learn both disciplines well. With what you’ve just learned about assets, you can meet a designer in the middle. And together you can create an app that works and looks great!
Anyway, at this point the movie listing page is looking pretty good. But given that we’ve truncated the movie description and removed a couple movie attributes from this page, we need another page that shows a movie’s full details. And wouldn’t you know it, that’s our task for the next section.
But first, it’s break time! Stand up. Stretch. Refresh yourself. Then enjoy a little movie-related humor with Men in Black 3 Bloopers or Avengers Gag Reel.
Routes: Show Page
Exercises
Objective
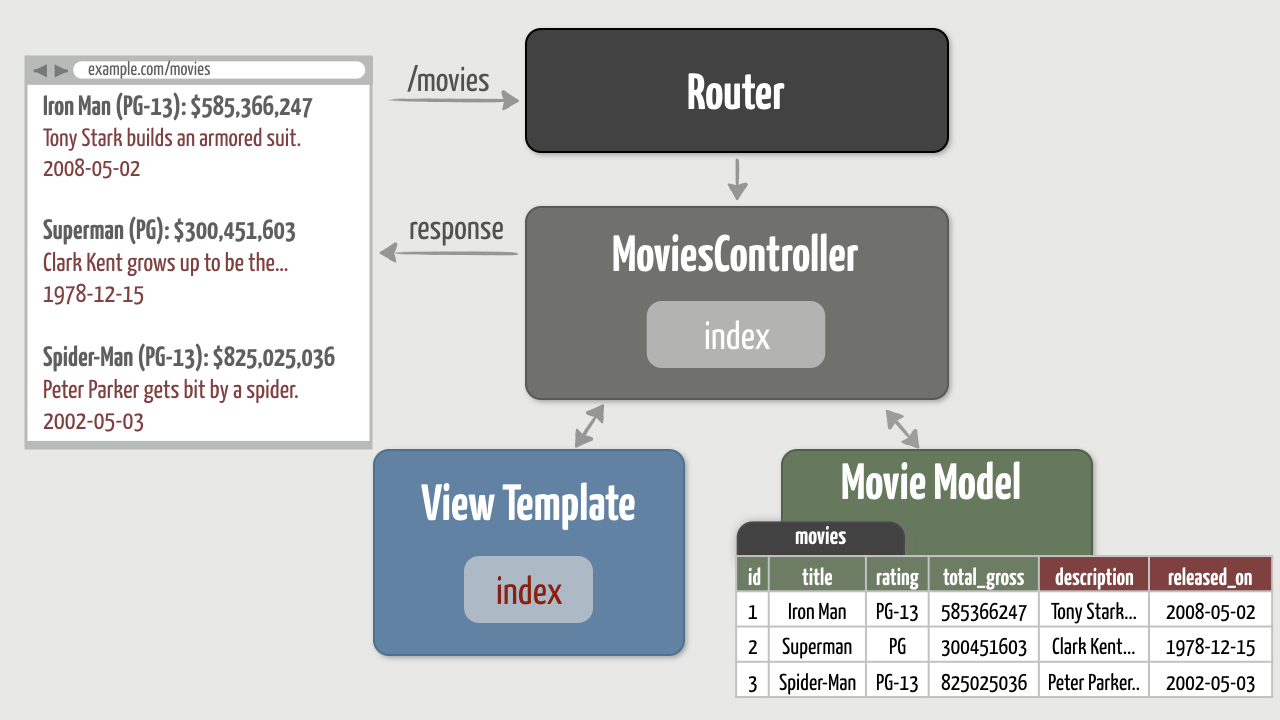
As our app now stands, we have one page that lists all of the movies in the database. When we visit /movies, the index action runs and fetches all the movies from the database. Then it renders the index.html.erb template which generates an HTML list of movies and sends it back to the browser. That makes for a nice summary page.
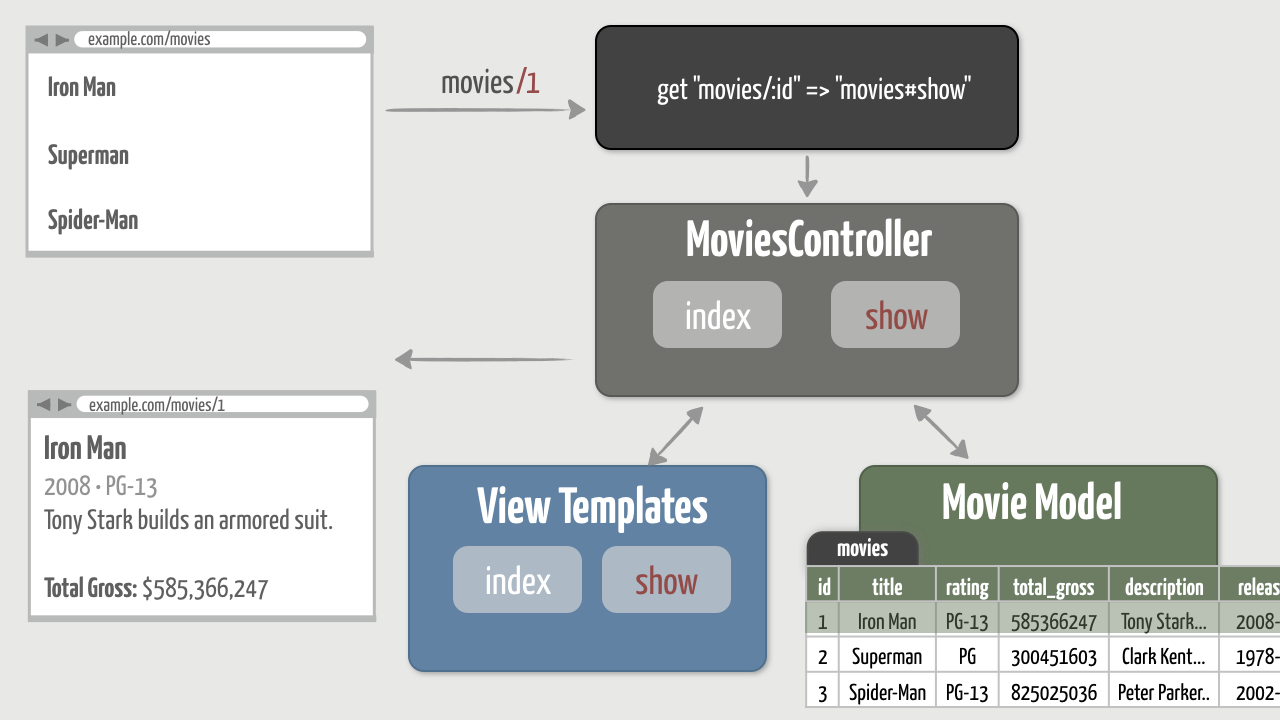
In this exercise we’ll create the second page of our app. When we visit /movies/1, for example, we want to see the details for that particular movie. By convention, Rails calls this the “show” page. To make that work, we need to do three things:
- Add a generic route to handle requests for /movies/1, /movies/2, /movies/3, and so on.
- Define a show action in the MoviesController that finds the movie with the id specified in the URL.
- Create a show.html.erb template that generates HTML to display the movie’s details.
If you’re new to working with MVC, keeping everything in your head can be tricky. So, here’s a visual of our objective:
1. Show One Movie
Again, we’ll work through this from the outside in, using the error messages to light our path forward.
- Start by browsing to http://localhost:3000/movies/1 and you should get the following error:
Routing Error

No route matches [GET] "/movies/1"
- Remember how to resolve this error? Add a route to the config/routes.rb file that maps GET requests for movies/1 to the show action of the movies controller. Don’t worry about supporting other movie ids for now. We’ll follow the literal error and work our way back to a more generic solution once we have the basic flow down.
[ANSWER]
Rails.application.routes.draw
  get "movies"   => "movies#index"
  get "movies/1" => "movies#show"
end
- Refresh your browser (you’re still accessing http://localhost:3000/movies/1) and this time you should get a different error message:
Unknown action

The action 'show' could not be found for MoviesController
- That’s your cue—and you know exactly what to do next! Define the show action such that it finds the movie in the database that has a primary key (id) of 1 and assigns it to an instance variable named @movie.
[ANSWER]
def show
  @movie = Movie.find(1)
end
- Refresh your browser again and—you probably anticipated it— we’re missing something:
No template for interactive request

MoviesController#show is missing a template...
Remember, unless we tell it otherwise, after running an action Rails will always try to find a view template using a naming convention. In this case, the name of the action is show, and it’s in the MoviesController class, so Rails tries to render the app/views/movies/show.html.erb view template file.
6. Create a file named show.html.erb in the app/views/movies directory. Inside that file, start by simply displaying the movie’s title to get confidence that the correct movie is being fetched from the database.
[ANSWER]
<h1><%= @movie.title %></h1>
Refresh and you should see the movie title! That tells us we have the model, view, and controller happily connected.
7. Now update the show.html.erb template to display all the movie’s information. Keep it simple by putting each attribute in a paragraph tag. In terms of helper methods, we don’t want to truncate the movie description on this page. However, on this page we do want to display the movie rating and year it was released. (Remember, we removed those movie attributes from the movie listing page.) Since we went to the trouble of creating the total_gross and year_of view helpers in a previous exercise, we might as well call those helpers here.
8. Once you get a basic show page working, go ahead and copy in the version in the answer. It uses HTML elements and class names that trigger the styles in our custom.scss stylesheet.
[ANSWER]
<section class="movie-details">
<div class="details">
<h1><%= @movie.title %></h1>
<h2>
<%= year_of(@movie) %> • <%= @movie.rating %>
</h2>
<p>
<%= @movie.description %>
</p>
<table>
<tr>
<th>Total Gross:</th>
<td><%= total_gross(@movie) %></td>
</tr>
</table>
</div>
</section>
That’s a great start!
2. Show Any Movie
Now that we have the MVC flow working, let’s make this more generic.
- Browse to http://localhost:3000/movies/2 and you should get the following error:
Routing Error

No route matches [GET] "/movies/2"
- We knew that would happen because we only added a route for movies/1, and that route doesn’t match this request. At this point we could add another route to handle movies/2, but clearly we need to make this more dynamic. The route needs to support a variable number of movie ids.
Update the route to match requests for showing any movie.
Rails.application.routes.draw
  get "movies"     => "movies#index"
  get "movies/:id" => "movies#show"
end
- Now you should be able to browse to any of these URLs without getting any errors:
- There’s just one problem: All of those pages show the details for the first movie! Fix that by updating the show action to use the number at the end of the URL to find the movie in the database.
[ANSWER[
def show
  @movie = Movie.find(params[:id])
end
- Now try visiting all three URLs above and you should see the matching movie’s details.
Great—now we have our “show” page implemented!
Solution
The full solution for this exercise is in the show-page directory of the code bundle.
Wrap Up
This exercise was a good opportunity to take a round trip back through the entire MVC cycle. Now we have two different paths through our application: /movies shows all the movies and /movies/:id shows the details of any single movie. You probably noticed that adding the second path involved the same high-level steps as the first:
- add a route
- define an action
- create a template
You’ll end up following those same three steps over and over again as you develop Rails apps. It’s the recipe for accepting requests and generating responses. The details vary depending on how you want the request to be handled, and we’ll see more examples of that in future exercises, but you can flesh out a basic flow simply by following the errors as we’ve done here.
Hey, now that we have two pages, it sure would be nice if we could easily navigate between them! Typing these URLs in the browser’s address bar is getting kinda tedious. So in the next section we’ll generate hyperlinks so we can easily navigate between pages.