Routes: Linking Pages
Exercises
Objective
The last exercise was a bit of a cliffhanger. We ended up with two different pages, but no way to easily navigate between them. That’s not very web-worthy. In this exercise we’ll add links so we can navigate between those pages. You know, like the World Wide Web was designed to work!
1. Link to Index Page
First, we want an “All Movies” link in the header that takes us back to the index page where all the movies are listed.
To do that, we could just hard-wire a link to /movies, like so:
<a href="/movies">All Movies</a>
That would work, but it makes our application really brittle because we would have link information in two places. First, we have the information in our routes file where we’ve told it how to handle /movies. And secondly, we’re explicitly typing out the URL here, and assuming there’s a matching route. So, if we decide later to change the URL, we’ll need to make changes in two places. And that’s always a bad sign.
So instead of hard-wiring the URL, we’ll ask the router to generate the URL for us. That way the link will always have a matching route that points back into our application. Better yet, if we want to change what the URL looks like down the road, we can do that in one place: the routes file.
- Start by navigating to http://localhost:3000/rails/info/routes to see all the routes we’ve defined so far.You should see a list of routes represented in a table, something like this (we’ll ignore the other default routes):
Helper        HTTP Verb        Path               Controller#Action
movies_path     GET        /movies(.:format)      movies#index
                GET        /movies/:id(.:format)  movies#show
What we have here is a handy inventory of the requests that the router recognizes and the matching controller/action pair to handle the request. It’s the same thing we have in the config/routes.rb file, but it’s easier to see here what’s actually going on.
The first row is the route that we want to be matched when we click the “All Movies” link, so let’s take a closer look at it:
movies_path GET /movies(.:format) movies#index
-
- The first column contains the name of the route helper method used to generate a URL that’s matched (recognized) by this route. Notice the method name includes the plural form movies because this route deals with multiple movies.
- The second column is the HTTP verb , which is a GET in this case. This is the most common HTTP verb because you typically “get” web pages, but we’ll see other verbs a bit later.
- The third column is the path . You can think of it as a pattern that’s used to match against the requested URL. Here, the pattern is a literal /movies, followed by an optional format in parentheses. (Don’t worry about the format.)
- The last column is the controller/action pair that will handle the route. We often say that the request is “mapped” to the controller/action pair.So this route will match a GET request for the URL http://localhost:3000/movies. Remember, the http://localhost:3000 part of the URL identifies the web server and it then forwards the /movies part on to the router. The request then gets dispatched to the index action of the MoviesController.
- So, how can this help us? Well, in addition to being able to map requests based on defined routes, the router can also generate URLs that match these routes. And to generate a URL, we simply call the appropriate route helper method. For example, to generate a link to the movie listing page, Rails gives us two possible methods to choose from:
| helper method | generates |
|---|---|
| movies_path | /movies |
| movies_url | http://www.example.com/movies |
Notice that the _path method generates the path part of the URL and the _url method generates the full URL. In practice you want to use the _path variant in view templates and the _url variant in controllers as redirects (which we’ll learn about later) require fully-formed URLs to be technically valid.
3. So now we know how to generate the URL that leads back to the movie listing page. The next step is to actually generate a hyperlink. And Rails has a helper method for doing that, too. The link_to helper is a method that takes two parameters:
- The first parameter is the text to link , such “All Movies”.
- The second parameter is the destination URL (or path) , such as the URL path returned from the movies_path method.So with that in mind, we’re ready to add an “All Movies” link in the header. To take advantage of styling, in the app/views/layouts/application.html.erb layout file change the header to include a nav and an empty list of links, like so:
<header>
  <nav>
    <%= image_tag("logo") %>
    <ul>
      <li>
        # link goes here
      </li>
    </ul>
  </nav>
</header>
Then generate an “All Movies” link that points back to the index page.
[ANSWER]
<%= link_to("All Movies", movies_path) %>
- Then refresh the show page and you should see the link. View the page source and you should see that the link points to the same URL we avoided hard-wiring.
<a href="/movies">All Movies</a>
- Finally, enjoy the thrill of clicking that link! It’s ok if you act totally surprised when you see the movie listing.
2. Link Index Page to Show Page
Next, let’s reciprocate that link love. We want each movie title on the index page to be a link to the movie’s show page. This is very similar to what we just did, but there’s a slight twist…
- Check out the list of defined routes again:
Helper        HTTP Verb        Path               Controller#Action
movies_path     GET        /movies(.:format)      movies#index
                GET        /movies/:id(.:format)  movies#show
- This time we want to generate a URL that gets routed to the show action, so the second row will be the matching route. But which route helper method should we call to generate the URL? Well, there is no helper in the leftmost column of the route we’re interested in. So to get a helper method we need to give the route a name.
- In the config/routes.rb file, give the route for showing a movie the name movie using the as: option. By convention, the name of the route that maps to the show action should be singular because we’re dealing with one thing.
[ANSWER]
get "movies/:id" => "movies#show", as: "movie"
- Then refresh http://localhost:3000/rails/info/routes and in the leftmost column you should now have helpers for both routes:
Helper        HTTP Verb        Path               Controller#Action
movies_path     GET        /movies(.:format)      movies#index
movie_path      GET        /movies/:id(.:format)  movies#show
The second route now has a helper named movie_path. Be mindful here of the subtle difference between the two helpers in the leftmost column: one includes the plural form movies and the other includes the singular form movie. It’s really easy to get these confused! Just remember that the plural-form helper is used when dealing with multiple movies and the singular-form helper is used when dealing with one specific movie.
4. Now we’re ready to actually generate the links to the show page! Keep a couple things in mind:
- The first parameter to link_to will be the movie’s title.
- The second parameter will be the result of calling the movie_path helper method. Remember, because the route for that helper has an :id placeholder, you must pass the movie’s id as a parameter so that the :id placeholder will get assigned. As a shortcut, if you instead pass the movie object the router will assume that it should use the object’s id attribute to fill in the :id placeholder.OK, go ahead and update the index template so that the movie title is a link to the movie’s show page.
<%= link_to(movie.title, movie_path(movie)) %>
- Then refresh the index page and you should see links for each movie title. View the page source and notice that each link points to a distinct movie, like so:
<a href="/movies/1">Avengers: Endgame</a>
<a href="/movies/2">Captain Marvel</a>
<a href="/movies/3">Black Panther</a>
- As a small reward for getting that working, here’s another shortcut. When generating links to an object’s show page, you can pass that object as the second parameter to link_to, like this:
<%= link_to movie.title, movie %>
- In this particular case, you don’t have to call the route helper method. Given the movie object, the link_to method assumes that it should call the movie_path method for you. It’s a small bit of syntactic sugar that makes the code more compact and readable.
- Finally, have you experienced the thrill of clicking any of those links yet? By all means, click away! And be sure to check that all your links work before moving on.
3. Add a Root Route
Now that you’re feeling like a routing and linking pro, let’s fix something that’s been annoying us from the get-go.
If you navigate to http://localhost:3000, you’ll see the default Rails welcome page. It would be a lot more useful if browsing to that URL always showed our movie listing, instead of the default welcome page. To do that, we can define something called a root route .
- First, in the config/routes.rb file, add a root route that maps to the index action of the MoviesController.
root "movies#index"
- Now browse to http://localhost:3000 and you should see the movie listing. Hurray!
- Next, we might as well change the logo image in the header to link to http://localhost:3000. Do we have a route helper method available to generate that URL? Let’s look at the defined routes:
Helper        HTTP Verb        Path               Controller#Action
root_path       GET        /                      movies#index
movies_path     GET        /movies(.:format)      movies#index
movie_path      GET        /movies/:id(.:format)  movies#show
What’s the name of the helper method that generates the URL? Using that helper, change the logo image in the header to point back to the root URL.
<%= link_to image_tag("logo"), root_path %>
Solution
The full solution for this exercise is in the link-pages directory of the code bundle.
Bonus Round
Displaying Routes
You can also print out a list of all the defined routes by going to a command prompt and typing:
rails routes
You should see a list like this (we’ll ignore the other default routes):
Prefix   Verb   URI Pattern             Controller#Action
movies   GET    /movies(.:format)       movies#index
movie    GET    /movies/:id(.:format)   movies#show
The output is slightly different than listing the routes by navigating to http://localhost:3000/rails/info/routes. Instead of the leftmost column containing the name of a helper method, it just shows a prefix. For example, the route in the first row has the prefix movies. The trick to deciphering this is knowing that the name of the helper method is derived from the prefix of the route. In this case the route prefix is movies, and therefore the helper methods are named movies_path and movies_url.
Trying Route Helpers in the Console
You can experiment with route helper methods in a Rails console session using the special app object. For example, here’s how to try the movies_path route helper from inside a Rails console session:
>> app.movies_path
=> "/movies"
Notice it generates the path part of the URL.
To generate the full URL, you need to use the movies_url helper, like so:
>> app.movies_url
=> "http://www.example.com/movies"
To generate the path to a specific event, you use the movie_path helper and either pass it a movie’s id or (as a shortcut) just the movie:
>> movie = Movie.find(1)

>> app.movie_path(movie.id)
=> "/movies/1"

>> app.movie_path(movie)
=> "/movies/1"
And to generate a link to the “root” page, you use the root_path helper:
>> app.root_path
=> "/"
Pop Quiz
Sharpen your pencil, it’s time for a pop quiz! Let’s say that you are building a Rails app with books for sale, and that your routes so far look like this:
books_path  GET /books(.:format)      books#index
            GET /books/:id(.:format)  books#show
- What URL will calling the books_path method generate?
[ANSWER]
The _path route method generates a relative path, in this case /books
- What URL will calling the books_url method generate?
[ANSWER]
The _url route method generates the full URL, in this case http://www.example.com/books
- The link_to helper method takes 2 parameters:
the name of the __________________, and the ______________________.
[ANSWER]
The link_to helper method takes 2 parameters: the **text to link (such as "All Books")** , and the **destination URL (or path)** .
- How would you link the words “See All Books” to the index page of the books app?
[ANSWER]
<%= link_to("See All Books", books_path) %>

or

<%= link_to "See All Books", books_path %>
- By convention, the name of the index route is books. What would you name the route for showing a particular book?
[ANSWER]
The name of the route would be book because, by convention, the name of the route that maps to the show action should be singular since we're dealing with one thing.
- How would you link a book’s title to the book’s show page? There are 2 possible answers.
[ANSWER]
<%= link_to(book.title, book_path(book)) %>

or

<%= link_to(book.title, book) %>

You don't have to call the route helper method. Given the book object, the link_to method assumes that it should call the _path method for you. But remember, this shortcut only works for generating links to an object's show page.
- How would you add a root route that maps http://localhost:3000 to the index page?
[ANSWER]
root "books#index"
- Lastly, with our root route in place, how would you change the “See All Books” link on the show page to now point to the root URL.
[ANSWER]
<%= link_to("See All Books", root_path) %>
Nicely done! Routes can be a little tricky to wrap your head around, so have patience with yourself as you work with them. In time, they’ll become as familiar as the route to your favorite coffee shop. (We never promised our jokes would be funny.)
Wrap Up
The router is a super powerful part of Rails. It also tends to be one of the most challenging, particularly because there are so many conventions at work behind the scenes. When you’re in doubt, the best thing to do is follow the routes. Look at the defined routes to see what’s going on, identify the name of the route you’re interested in, and then play with the route helper methods in the console until you’re confident. Oh, you think that’s what we tell all the beginners? Actually, no. That’s exactly how we debug routing problems!
Now that we have a full MVC stack with multiple pages linked together, in the next section we’ll start adding pages with web forms. You know, so we can edit and create movies from the comfort of our browser!
Forms: Editing Records Part 1
Exercises
Objective
At this point we have some fundamental features under our belt and our movies app is shaping up nicely. The movies are neatly tucked away in a database and we can list and show them in the browser. That’s a good start!
Now, what if we want to change a movie’s details? The only way to do that currently is to fire up a console session and programmatically change movie attributes. But this is supposed to be a web app ! So the next step is to create a web interface for editing (changing) movie details. We’ll tackle this in two parts, similar to the way we did it in the video.
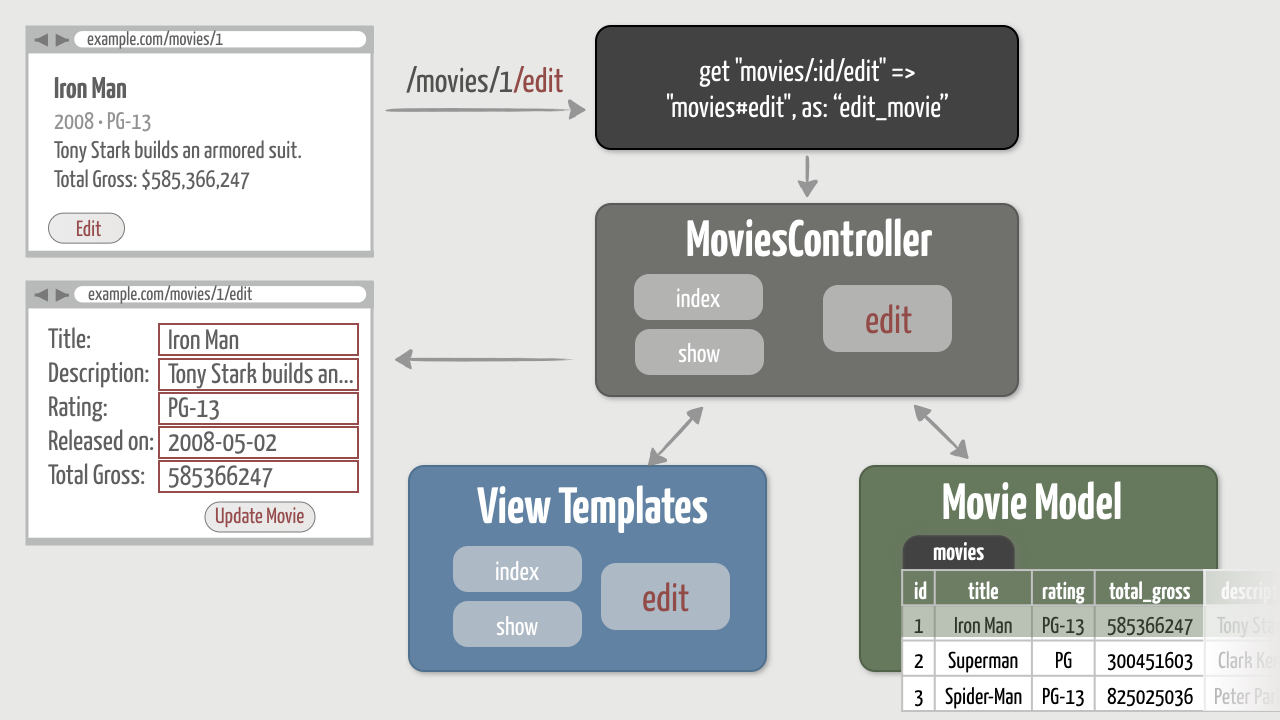
First we need to display a web form so a user can edit a movie’s details. Doing that involves the following high-level tasks:
- Add a route to handle requests for /movies/1/edit, for example.
- Generate an “Edit” link on the show page.
- Define an edit action in the MoviesController that finds the movie we want to update and displays an HTML form.
- Create an edit.html.erb view template that generates the HTML form pre-populated with the movie’s details.
Visually, here’s what we want to do:
Then, in the second part, we’ll need to define an update action in the MoviesController that saves movie changes to the database when the form is submitted.
We have our work cut out for us, so let’s get started!
1. Add an Edit Route and Link
Let’s start with the URL we want and work our way from the outside-in. By convention in Rails, the URL for editing a movie would be http://localhost:3000/movies/1/edit, for example. To make it easy to navigate there, we’ll generate an “Edit” link on the show page.
- As a jumping-off point, browse to http://localhost:3000/movies/1/edit and you should get the following error:
Routing Error

No route matches [GET] "/movies/1/edit"
-
Fix it by adding a route that sends requests for movies/1/edit, for example, to the edit action of the MoviesController. Make the route flexible enough to recognize any arbitrary movie id (not just 1). We’ll need to be able to generate an “Edit” link, so go ahead and name the route edit_movie.
- [ANSWER]
get "movies/:id/edit" => "movies#edit", as: "edit_movie"
- Now list the defined routes and you should have the following four routes, with the new route listed last:
Helper         HTTP Verb        Path                  Controller#Action
root_path         GET        /
movies_path       GET        /movies(.:format)           movies#index
movie_path        GET        /movies/:id(.:format)       movies#show
edit_movie_path   GET        /movies/:id/edit(.:format)  movies#edit
- Great! Now use the route helper method to generate an “Edit” link at the bottom of the show template. Once you get the link working, go ahead and copy in the version in the answer that uses HTML elements and class names that trigger the styles in our custom.scss stylesheet.
[ANSWER]
<section class="admin"> <%= link_to "Edit", edit_movie_path(@movie), class: "button" %> </section>
- Finally, hop back into your browser, navigate to a movie’s show page, and click the newly-generated “Edit” link. You should get the following error:
Unknown action

The action 'edit' could not be found for MoviesController
Clearly we need to implement the edit action next. Before moving to the next step, think about how you’ll do it! It’s good to start internalizing the high-level steps before jumping right to the code.
2. Create the Edit Action and Form
Did you figure it out? The edit action needs to do two things. First, similar to the show action, the edit action needs to use the ID embedded in the URL to find the appropriate movie in the database. Then the action needs to render a form and populate the form fields with the respective movie’s attributes.
- First up, define an edit action in the MoviesController that finds the requested movie and assigns it to an instance variable named @movie.
def edit
  @movie = Movie.find(params[:id])
end
- Refresh the page (you’re still accessing http://localhost:3000/movies/1/edit) and you should totally expect this error:
No template for interactive request

MoviesController#edit is missing a template...
- Following the error, create a file named edit.html.erb in the
app/views/moviesdirectory. Inside that file, start by simply displaying the movie’s title as a quick sanity check that the correct movie is being fetched from the database.
[ANSWER]
<h1>Editing <%= @movie.title %></h1>
Refresh and you should see the movie title. So far, so good!
4. Now that we have a movie object in the template, let’s start incrementally working on the form. First, update the edit.html.erb template to generate a form using the form_with helper method. For now, just add a label and a text field for the movie’s title attribute.
- [ANSWER]
<%= form_with(model: @movie, local: true) do |f| %> <%= f.label :title %> <%= f.text_field :title %> <% end %>
Refresh and you should see a label and a text field populated with the the movie’s title.
5. Then incrementally add form elements so you can edit a movie’s description, rating, released on date, and total gross. You’ll need to generate the appropriate HTML form element depending on the type of attribute:
- description (a text attribute) goes in a text area with 7 rows, for example
- rating (a string attribute) goes in a text field
- released_on (a date attribute) goes in a date select with the HTML option class set to “date”.
- total_gross (a decimal attribute) goes in a number field
As you work through these you might find it helpful to use the documentation at http://api.rubyonrails.org/. For example, search for “text_field” and “date_select” to find the corresponding form helpers.
[ANSWER]
<%= form_with(model: @movie, local: true) do |f| %>

  <%= f.label :title %>
  <%= f.text_field :title %>

  <%= f.label :description %>
  <%= f.text_area :description, rows: 7 %>

  <%= f.label :rating %>
  <%= f.text_field :rating %>

  <%= f.label :released_on %>
  <%= f.date_select :released_on, {}, {class: "date"} %>

  <%= f.label :total_gross %>
  <%= f.number_field :total_gross %>
<% end %>
- When you’re done, refresh the form and all the fields should contain the values for the attributes in the @movie object. In other words, the values in the form should reflect the movie details that are in the database.
- Finally, add a submit button at the bottom of the form:
[ANSWER[
<%= form_with(model: @movie, local: true) do |f| %>
  <%= f.label :title %>
  <%= f.text_field :title %>

  <%= f.label :description %>
  <%= f.text_area :description, rows: 7 %>

  <%= f.label :rating %>
  <%= f.text_field :rating %>

  <%= f.label :released_on %>
  <%= f.date_select :released_on, {}, {class: "date"} %>

  <%= f.label :total_gross %>
  <%= f.number_field :total_gross %>

  <%= f.submit %>
<% end %>
Refresh and you should see an “Update Movie” button. Wait a minute! How did Rails know that the submit button should say “Update Movie”? It figured that out because the @movie object you passed to form_with is an existing record in the database, so you must be trying to update it. Pretty clever, eh?
8. Bonus: As an alternative to using the date_select form helper, you can instead use the date_field helper. This helper creates an input of type “date”, which in the Chrome browser will show a little triangle next to the input box. Click the triangle, and a calendar pops up so you can easily pick a date! Note that not all browsers support the HTML 5 “date” type.
<%= f.date_field :released_on %>
It’s tempting to want to submit the form, but that’s the challenge of the next exercise. So if you’re seeing a form populated with a movie’s data, then you’re good to go for this exercise!
Solution
The full solution for this exercise is in the forms-edit-1 directory of the code bundle.
Wrap Up
Excellent! Now we’re showing a form for changing a movie’s details. Next we need to handle what happens when a user submit the form…
Forms: Editing Records Part 2
Exercises
Objective
Remember, the way forms work is a two-part story. The first part is all about displaying the form. The second part is about what happens when you enter information in the form and submit it. The form data needs to get sent back into the app so it can be saved in the database. To handle that, our app needs another route and a corresponding action. By convention, that action is called update because we’re updating an existing record in the database. Once the movie has been updated, we’ll redirect the browser to the movie’s show page.
If you like diagrams (can you tell we do?), here’s our goal:
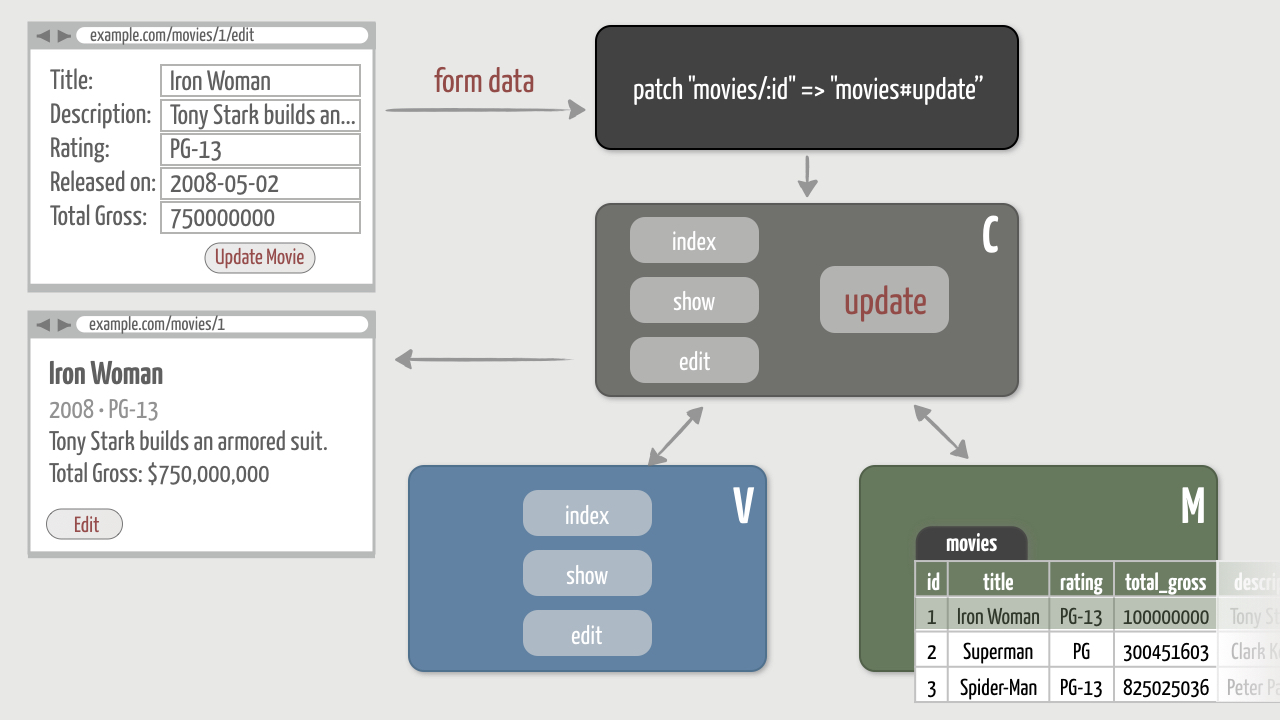
Let’s jump right into it!
1. Add a Route
Let’s try submitting the edit form and see where it leads us…
- Submit the form by clicking the “Update Movie” button and you should see the following error:
Routing Error

No route matches [PATCH] "/movies/1"
Well, the error looks familiar, but there’s something new this time. Notice that this is a PATCH request rather than a GET request as we’ve been seeing up to this point. In HTTP, GET requests are used to read things from the server. PATCH requests, by comparison, are used to update (write) things in the server. And Rails knows that we’re trying to update something.
2. The error clearly indicates that submitting the form will send the form data in a PATCH request to /movies/1. Let’s recheck which routes we already have:
Helper         HTTP Verb        Path                  Controller#Action
root_path         GET        /
movies_path       GET        /movies(.:format)           movies#index
movie_path        GET        /movies/:id(.:format)       movies#show
edit_movie_path   GET        /movies/:id/edit(.:format)  movies#edit
We have a route that recognizes /movies/1, but it expects the HTTP verb to be GET, not PATCH. It’s important to remember that the router matches requests based on the unique combination of both the HTTP verb and the URL. The same URL can do something different based on the HTTP verb. That being the case, we’re missing a route.
3. Add a route that sends PATCH requests for movies/1, for example, to the update action of the MoviesController. Don’t worry about giving the route a name because we don’t need to generate a link for it. (The form_with helper will handle that for us.)
patch "movies/:id" => "movies#update"
Listing the defined routes should then give you five total routes (we’ll ignore the other default routes):
Helper         HTTP Verb        Path                  Controller#Action
root_path         GET        /
movies_path       GET        /movies(.:format)           movies#index
movie_path        GET        /movies/:id(.:format)       movies#show
edit_movie_path   GET        /movies/:id/edit(.:format)  movies#edit
                  PATCH      /movies/:id(.:format)       movies#update
- Next, back over in your the browser, click the “Update Movie” button again to submit the form and you should see an old friend:
Unknown action

The action 'update' could not be found for MoviesController
2. Implement the Update Action
Taking that subtle hint, we need to define the update action in the MoviesController. The update action needs to pick up the submitted form data from the request in order to actually update the movie in the database.
- Just to see the form data that’s being submitted, define the update action and try this fail trick we used in the video:
def update
  fail
end
The fail method in Ruby intentionally raises an exception. It’s often used as a poor (lazy) person’s debugger. When fail is called in Rails app, execution is halted, Rails intercepts the exception, and spills its guts on an error page in the browser. In addition to all the request parameters, the error page also displays any submitted form data.
2. Now submit the form with data again and you’ll get an error (or a debugging page, depending on how you look at it). Check out the stuff under the “Request” heading and you should see something like this:
{"_method"=>"patch",
 "authenticity_token"=>"Zd7oa0CPg1P1/ObENZb22VjQHrbJS1loXrxp42lSNdw=",
 "movie"=>
   {"title"=>"Iron Man",
    "description"=>"When wealthy industrialist Tony Stark...",
    "rating"=>"PG-13",
    "released_on(1i)"=>"2008",
    "released_on(2i)"=>"5",
    "released_on(3i)"=>"2",
    "total_gross"=>"585366247.0"},
 "commit"=>"Update Movie",
 "id"=>"1"}
What we’re seeing here is a representation of a Ruby hash: a set of keys and values. The highlighted lines are what we’re most interested in. Notice that the hash includes an id key whose value is the id of the movie we want to update. The hash also includes a movie key. Here’s where things get interesting. The value of the movie key is actually another (nested) hash. And that hash contains the form data: the movie attribute keys and values we want to change. In other words, the form data is scoped to movie in the request parameters hash. So in the request parameters hash we have all the information we need to actually update the movie in the database!
Now, how exactly do we get access to this information in our update action? When Rails receives a request—be it a GET, PATCH, or whatever—it automatically packages the request parameters in a hash called params that’s accessible in an action.
Inside the update action, to get the movie id we use:
params[:id]
That returns 1 in this case. Note that in the original hash the key is the string “id”, but since we’re using the params hash we can use the symbol :id. The params hash lets us look up values using either string or symbol keys, but it’s more idiomatic to use symbols.
In the same way, to get the names and values of the movie attributes submitted from the form, we use:
params[:movie]
That returns a hash of movie attribute keys and values:
{
  "title"=>"Iron Man",
  "description"=>"When wealthy industrialist Tony Stark...",
  "rating"=>"PG-13",
  "released_on(1i)"=>"2008",
  "released_on(2i)"=>"5",
  "released_on(3i)"=>"2",
  "total_gross"=>"585366247.0"
}
Handy, dandy!
3. Now that you know how to pull out the form data from the request parameters, remove the fail line from the update action and instead do two things. First, find the movie being updated and assign it to an instance variable called @movie. Then use the submitted form data to update the movie’s attributes and save it to the database.
- [ANSWER]
def update @movie = Movie.find(params[:id]) @movie.update(params[:movie]) end
- Now, back in your browser, use the form to edit some details about your first movie. For example, you may want to rename “Iron Man” to “Iron Woman” and set its total gross to $1B!
- Then submit the form again and this time you should get a different error:
ActiveModel::ForbiddenAttributesError
Forbidden! What happened was we took all the movie attributes in the form data and tried to assign them in bulk (using update) to the movie being updated. Rails grabs us by the collar and says: “You sure about that? Do you really want to trust parameters from the big, bad Internet?” It’s actually quite trivial for a malicious user (a hacker) to fake form data and end up changing movie attributes that we don’t want them to change.
To prevent that from happening, Rails requires us to explicitly list the attributes that can be mass assigned from form data. We do that by calling the permit method and passing in the list of attributes that are allowed to be mass-assigned from form data, like so:
params[:movie].permit(:title, :description, :rating, :released_on, :total_gross)
That line of code returns a new hash that includes only the permitted attributes. It also marks the hash as being “permitted” which tells Rails that we’ve taken the necessary security precautions. In other words, we now have a white list of trusted attributes that can safely be sent through the update method.
Alternatively, if we want to lock this down a little tighter, we can call the require method on the params hash and pass it the parameter key we expect, like so:
params.require(:movie).permit(:title, :description, :rating, :released_on, :total_gross)
The require method returns the same hash as we get by accessing params[:movie], but require will raise an exception if the given key (:movie in this case) isn’t found in the params object. So using require is preferred because it gives us one more added check on the form data.
Finally, if you want all of a movie’s attributes to be updatable without listing them out, you can call permit! like so
params.require(:movie).permit!
While convenient, using permit! is risky because all the attributes will always be updatable from form data. Instead, it’s better to explicitly list the attributes that can be updated from a form.
6. In your update action, use the line of code above and assign the result to a variable called movie_params, for example. Then pass that variable as a parameter to the update method.
[ANSWER]
def update
  @movie = Movie.find(params[:id])

  movie_params =
    params.require(:movie).
      permit(:title, :description, :rating, :released_on, :total_gross)

  @movie.update(movie_params)
end
- Then submit the form with data again and Rails shouldn’t hassle you about the perils of form data on the big, bad web. However, this time the button should become disabled and it will appear as if nothing happened. But something did indeed happen!
If you have a look in the Terminal or command prompt window where the Rails server is running, you should see something like the following:
Started PATCH "/movies/1" for ::1 at 2019-05-28 13:42:05 -0600
Processing by MoviesController#update as HTML
Parameters: {...}
Movie Load (0.1ms)  SELECT "movies".* FROM "movies" WHERE "movies"."id" = ? LIMIT ?  [["id", 1], ["LIMIT", 1]]
(0.1ms)  begin transaction
Movie Update (0.3ms)  UPDATE "movies" SET "title" = ?, "total_gross" = ? WHERE "movies"."id" = ?  [["title", "Iron Woman"], ["total_gross", 1000000000.0], ["id", 1]]
(0.5ms)  commit transaction
No template found for MoviesController#update, rendering head :no_content
That output tells you exactly what happened, right down to the SQL UPDATE statement that was used to update the event in the database. (You’ll only see the update if you actually change movie attributes in the form.)
Great! This means the update action successfully update the movie details in the database based on the form data. After doing that, however, Rails went looking for a matching update view template, which we don’t have.
We’ll need to figure out what to show in response to the movie being updated, but let’s ignore that error for a minute. First let’s verify that the movie was indeed updated in the database. Hop into a console session, find the movie you updated, and then check that each attribute has the value you set in the form.
[ANSWER]
>> movie = Movie.find(1) >> movie.title => "Iron Woman" >> movie.total_gross.to_s => "1000000000.0"
- A billion dollars?! Now that’s a hit superhero movie!
3. Redirect to the Show Page
OK, so what should we do after the movie has been successfully updated? Well, it stands to reason that the user would want to see the updated movie’s details. And lo and behold, we already have a show action that does that. So let’s just redirect the browser back to that URL. That will force the browser to send a new request into our app. The new request will be a GET for /movies/1, for example.
In the update action, after the movie has been updated, redirect to the movie’s show page.
- [ANSWER]
def update @movie = Movie.find(params[:id]) movie_params = params.require(:movie). permit(:title, :description, :rating, :released_on, :total_gross) @movie.update(movie_params) redirect_to @movie end
Then submit the form one last time! This time the movie should get updated in the database and you should get redirected to the show page where those changes are reflected.
And with that, our two-part, edit-update story comes to an end. Nicely done!
Solution
The full solution for this exercise is in the forms-edit-2 directory of the code bundle.
Bonus Round
Where Did PATCH Come From?
Folks often ask how Rails knows to use the PATCH verb when updating data. The answer lies in the HTML that was generated by the form_with helper. View the page source of the form and hone in on this part of the HTML form:
<form action="/movies/1" method="post">
  <input name="_method" type="hidden" value="patch" />
  ...
</form>
The relevant parts here are the action and the method. The action says that submitting this form will send the data to /movies/1. But remember that the router recognizes requests based on both a URL pattern to match and an HTTP verb. So the method attribute in the form specifies the HTTP verb to use. By default, forms are submitted with the POST HTTP verb as indicated by the value of the method attribute here.
Ah, but the plot thickens: By convention in Rails, POST requests are used to create things. But in this case, Rails knows that we’re trying to update a movie, not create a movie. And by convention in Rails, PATCH requests are used to update things. So Rails effectively overrides the HTTP verb by adding a hidden field named _method with a value of patch. (It has to fake it with a hidden field because web browsers can’t natively send PATCH requests.)
Anyway, that’s where the PATCH comes from. Do you need to understand all that before moving on? Nope, not at all. Sometimes it’s just comforting to know what’s going on behind the curtain.
What Does a Redirect Do?
It’s important to understand that when we submit a form, our application actually ends up handling two requests: a PATCH request and a GET request. Let’s take a minute to follow those requests in the server log when you submit the form.
The first request you see is the PATCH that’s handled by the update action:
Started PATCH "/movies/1" for ::1 at 2019-05-28 13:51:46 -0600
Processing by MoviesController#update as HTML
Parameters: {...}
Movie Load (0.1ms)  SELECT "movies".* FROM "movies" WHERE "movies"."id" = ? LIMIT ?  [["id", 1], ["LIMIT", 1]]
(0.0ms)  begin transaction
Movie Update (0.3ms)  UPDATE "movies" SET "title" = ?, "updated_at" = ? WHERE "movies"."id" = ?  [["title", "Iron Man"], ["updated_at", "2019-05-28 19:51:46.740529"], ["id", 1]]
(0.7ms)  commit transaction
Redirected to http://localhost:3000/movies/1
Completed 302 Found in 6ms (ActiveRecord: 1.1ms | Allocations: 3734)
Check out what happens at the end of the request, on the second to the last line. It tells the browser to redirect to http://localhost:3000/movies/1. It does that by sending the browser a URL and an HTTP redirect status code (302) as seen on the last line. It’s like telling the browser: “Nothing to see here, move along. Go this way instead.”
So the browser issues a brand new GET request for the updated movie, and we see the second request come into our app:
Started GET "/movies/1" for ::1 at 2019-05-28 13:51:46 -0600
Processing by MoviesController#show as HTML
Parameters: {"id"=>"1"}
Movie Load (0.1ms)  SELECT "movies".* FROM "movies" WHERE "movies"."id" = ? LIMIT ?  [["id", 7], ["LIMIT", 1]]
Rendering movies/show.html.erb within layouts/application
Rendered movies/show.html.erb within layouts/application (Duration: 0.3ms | Allocations: 201)
Completed 200 OK in 24ms (Views: 22.6ms | ActiveRecord: 0.1ms | Allocations: 15221)
The result of that request is to render the show view template. After doing that, the app sends the generated HTML back to the browser with a 200 HTTP status code which indicates the request was successful.
By following the PATCH-Redirect-GET pattern, we prevent duplicate form submissions, and thereby create a more intuitive interface for our users.
Spend some time watching the server log, and all mysteries will be revealed!
Wrap Up
Congratulations! This was a big step that put together a whole bunch of concepts we learned earlier, and a few new ones. So make sure to reward yourself with a well-deserved break and a tasty snack!
Here’s the thing about forms in Rails: They’re actually quite elegant once you get comfortable with the conventions. The conventions really do save you time once you grok what’s going on, but initially they can feel overwhelming. It’s best to start with a simple form and use the errors (and server log) to trace through what’s happening at each step. By about your second or third form, everything will click. It just takes some practice to get the hang of it. And that’s what this exercise was all about: practice!
Speaking of practicing with forms, in the next section we’ll bring all this together again so we can create new movies in the web interface. That’ll give us a good opportunity to cement what we’ve learned about forms and their conventions.
Dive Deeper
For more options on permitting mass-assigned parameters, check out strong parameters.
Forms: Creating Records
Exercises
Objective
At this point we can edit movies in the web interface, but we have no way to create new movies outside of the console. That hardly makes for a useful web app, so let’s fix that!
It turns out there’s a lot of symmetry between editing movies and creating movies, so we’ll follow similar steps:
- Add a route to handle requests for /movies/new to show a form.
- Generate an “Add New Movie” link on the index page.
- Define a new action in the MoviesController that renders a form template.
- Create a new.html.erb template that generates an HTML form with blank fields
- Define a create action in the MoviesController that inserts the movie into the database when the form is submitted
Visually, here’s what we want to do first:
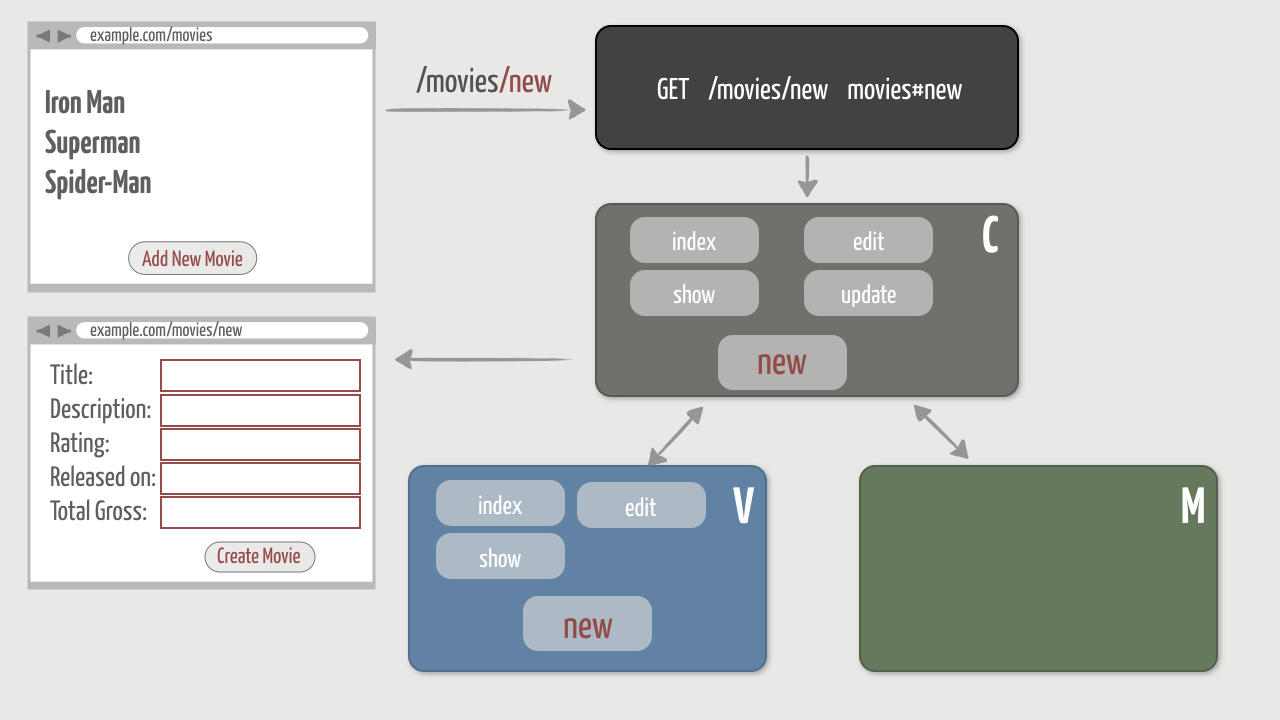
The good news is there’s honestly not much new to learn. We already have a form, and we’ve learned how to process form data in an action. So we’ll pick up the pace a bit…
1. Add a Route and Link
As usual, let’s start at a high level with the URL. By convention in Rails, the URL for creating a new movie would be http://localhost:3000/movies/new. And that request would get sent to a new action because we want to show the form for creating a new movie. We’ll put an “Add New Movie” link on the index page to make it easy to get to the form.
- Browse to http://localhost:3000/movies/new and you’ll get this brand spanking new error :
ActiveRecord::RecordNotFound in MoviesController#show

Couldn't find Movie with 'id'=new
Whoa! That’s not what we expected. The router recognizes the request and sends it to the show action. What’s up with that?
2. In these cases, your go-to debugging tool is http://localhost:3000/rails/info/routes. It never lies. You’ll see that we currently have these five routes defined:
Helper         HTTP Verb        Path                  Controller#Action
root_path         GET        /
movies_path       GET        /movies(.:format)           movies#index
movie_path        GET        /movies/:id(.:format)       movies#show
edit_movie_path   GET        /movies/:id/edit(.:format)  movies#edit
                  PATCH      /movies/:id(.:format)       movies#update
According to those routes, a GET request for movies/new would map to the show action in the MoviesController. Why? Well, it thinks the word “new” should be used to fill in the :id placeholder.
3. So our first step would be to define a new route that matches the literal movies/new and sends it to the new action. Because routes are evaluated top to bottom for a match, we’d need to put the movies/new route before the movies/:id route, like so:
Rails.application.routes.draw
  root   "movies#index"
  get   "movies"     => "movies#index"
  get   "movies/new" => "movies#new"
  get   "movies/:id" => "movies#show", as: "movie"
  get   "movies/:id/edit" => "movies#edit", as: "edit_movie"
  patch "movies/:id" => "movies#update"
end
But defining these routes one-by-one is getting kinda tedious. Rails to the rescue! It’s common to want routes for all these scenarios, plus a few more, on other entities in your application. Rails calls these entities resources . And to eliminate some of the grunt work, Rails has a handy convention for defining all the routes a resource might need in one fell swoop.
4. Open the config/routes.rb file and replace all the routes we defined previously (except the root route ) with the highlighted line below:
Rails.application.routes.draw
  root "movies#index"
  resources :movies
end
- Then reload http://localhost:3000/rails/info/routes to see what that does for us. You should see nine total routes: the five routes we had before plus four new routes highlighted below:
Helper         HTTP Verb        Path                  Controller#Action
root_path         GET        /
movies_path       GET        /movies(.:format)           movies#index
                  POST      /movies(.:format)         movies#create
new_movie_path  GET        /movies/new(.:format)    movies#new
edit_movie_path   GET        /movies/:id/edit(.:format)  movies#edit
movie_path        GET        /movies/:id(.:format)       movies#show
                  PUT       /movies/:id(.:format)     movies#update
                  PATCH      /movies/:id(.:format)       movies#update
                  DELETE    /movies/:id(.:format)     movies#destroy
Magic? No, the resources :movies line simply used the built-in Rails conventions to dynamically define all those routes. And because we used the Rails conventions when defining the routes manually, we end up with the same routes plus a couple extras. Even the route names are the same as the names we picked. And that means our application should work exactly as it did before! It’s almost like we planned it that way…So we don’t need to define any new routes after all. Notice that routes for GET requests to /movies/new and POST requests to /movies are already defined. And that’s exactly what the doctor ordered for this task!
6. Given those routes, use a route helper method to generate an “Add New Movie” link at the bottom of the index page. Once you get the link working, go ahead and copy in the version in the answer that uses HTML elements and class names that trigger the styles in our custom.scss stylesheet.
*[ANSWER]
<section class="admin"> <%= link_to "Add New Movie", new_movie_path, class: "button" %> </section>
- Back in your browser, navigate to the movie listing page and click the newly-generated “Add New Movie” link. You should get the following error:
Unknown action

The action 'new' could not be found for MoviesController
- Now we’re off to the races. Think you know the steps to get us to the finish line? Give it some thought before moving on to the implementation in the next step.
2. Create the New Action and Form
The new action needs to render a form so we can enter a new movie’s information. This is similar to the edit action, but in this case we don’t have an existing movie in the database. So the new action needs to instantiate a new Movie object in memory, so that the form can “bind” to that object.
- Define a new action in the MoviesController that instantiates a new (empty) movie object and assigns it to an instance variable named @movie.
*[ANSWER]
def new @movie = Movie.new end
- Refresh the page (you’re still accessing http://localhost:3000/movies/new) and by now you should be so comfortable with this error that resolving it is as easy as falling off a log:
No template for interactive request

MoviesController#new is missing a template...
- Create a file named new.html.erb in the app/views/movies directory. Inside that file, just add enough to get some text on the page:
<h1>Create a New Movie</h1>
Refresh as a blazing-fast smoke test.
- Finally, we need to generate a form in the new.html.erb template that uses the @movie object. It turns out that form would be exactly the same as the form we already have in the edit.html.erb template. So for now, copy the form that’s in edit.html.erb and paste it into the new.html.erb template. (Don’t worry: we’ll remove this duplication later.)
*[ANSWER]
<%= form_with(model: @movie, local: true) do |f| %>
  <%= f.label :title %>
  <%= f.text_field :title %>

  <%= f.label :description %>
  <%= f.text_area :description, rows: 7 %>

  <%= f.label :rating %>
  <%= f.text_field :rating %>

  <%= f.label :released_on %>
  <%= f.date_select :released_on, {}, {class: "date"} %>

  <%= f.label :total_gross %>
  <%= f.number_field :total_gross %>

  <%= f.submit %>
<% end %>
- When you’re done, refresh the page and the form should be displayed with all the fields blank. That seems reasonable given that all the attributes in the @movie object are nil. It’s a new object! (Remember, we called Movie.new in the new action.)Did you notice that the submit button says “Create Movie”? The form_with helper knows that the @movie object doesn’t yet exist in the database, so you must be trying to create it.
Excellent! We’ve put up a form for creating new movies. Now on to handling what happens when you submit the form…
3. Implement the Create Action
Our next task is to arrange things in our app so that it creates the movie in the database when the form is submitted. Here’s what we need to do, visually:
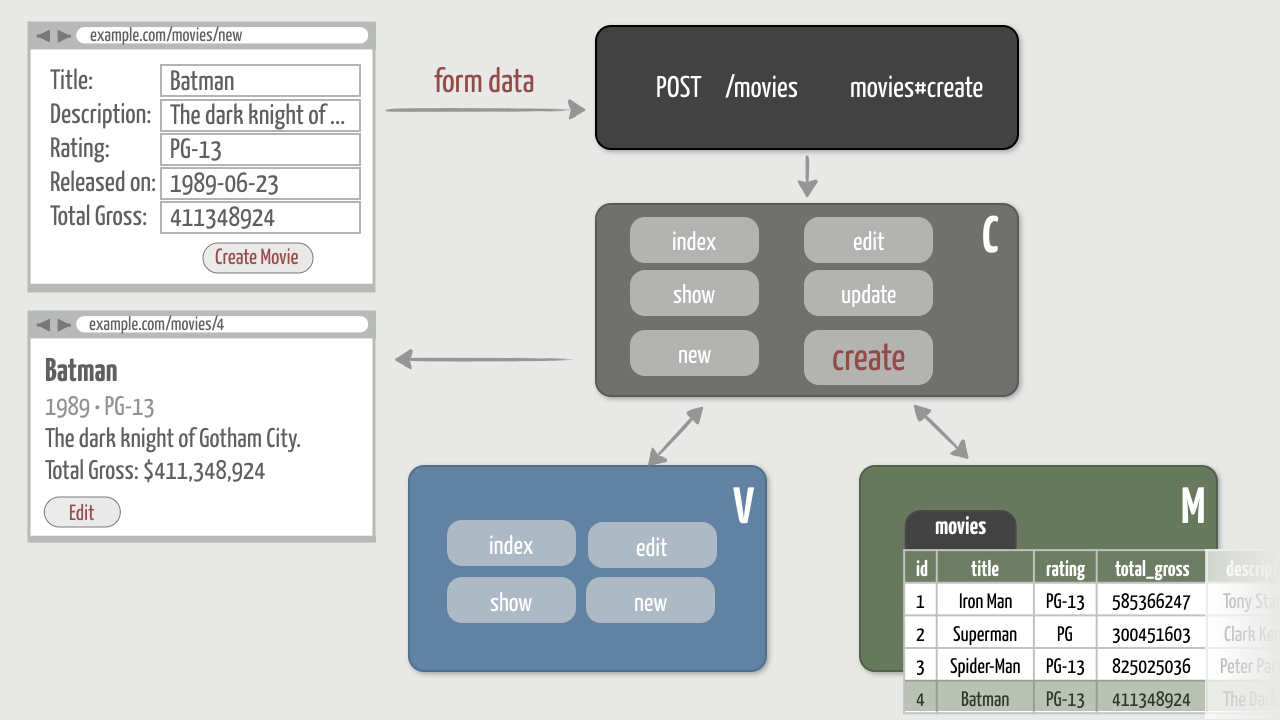
We’re feeling pretty cavalier, so let’s just see what happens when we submit the form…
- Enter a movie title and submit the form by clicking the “Create Movie” button and you should see the following error:
Unknown action

The action 'create' could not be found for MoviesController
- Implement the create action in the MoviesController. To do that, you’ll need to do three things. Remember the steps?
- Initialize a new Movie object using the submitted form data and assign it to a @movie instance variable
- Save the movie to the database
- Redirect to the movie’s show page
*[ANSWER]
def create
  @movie = Movie.new(params[:movie])
  @movie.save
  redirect_to @movie
end
- Now enter a movie title and submit the form again. KABOOM!
ActiveModel::ForbiddenAttributesError
Oh hello, our nemesis. Again, we’re trying to mass assign attributes using form data and Rails steps in to prevent potentially bad things from happening. Just like with the update action, you’ll need create a hash of permitted attributes and pass that hash as a parameter to the new method. (Feel free to copy the permit line from the update action for now. )
*[ANSWER]
def create movie_params = params.require(:movie). permit(:title, :description, :rating, :released_on, :total_gross) @movie = Movie.new(movie_params) @movie.save redirect_to @movie end
- Finally, fill out the form for a new movie, preferably one that involves superheroes saving the world from villains. Submit it, and this time the movie should get inserted in the database and you should get redirected to the show page where the new movie is displayed.
BOOM! Now we can edit and create movies in the web interface!
4. Refactor
Whoa—hold up there a minute, pardner! We’re not quite ready to declare victory. Have a look in your update and create actions and you’ll see a wee bit of duplication:
movie_params =
  params.require(:movie).
    permit(:title, :description, :rating, :released_on, :total_gross)
This sort of unnecessary duplication is what makes apps hard to change. Suppose, for example, that down the road we decide to add new movie attributes and allow them to be mass assigned. We’d have to remember to change the app in two places: in the update action and the create action.
Instead, we’d like to be able to reuse the same list of permitted attributes between those actions. To do that, we’ll create a method that returns the permitted attribute list, then call that method from both the update and create actions. By encapsulating the permit list inside of a method, we can add (or remove) permitted attributes later simply by changing that single method.
- Inside of the MoviesController class, define a private method called movie_params that returns a list of permitted parameters. (The name of the method is arbitrary.) Private methods can’t be called from outside of the class, which means private actions aren’t treated as web-accessible actions.
- [ANSWER]
class MoviesController < ApplicationController # existing public methods (actions) private def movie_params params.require(:movie). permit(:title, :description, :rating, :released_on, :total_gross) end end
- Then change the update and create actions to call your new movie_params method to get the permitted parameters, rather than explicitly creating a movie_params variable that points to a parameter list.
*[ANSWER]
def update @movie = Movie.find(params[:id]) @movie.update(movie_params) redirect_to @movie end def create @movie = Movie.new(movie_params) @movie.save redirect_to @movie end
- Finally, as a quick test, edit or create a movie. Since we’ve only refactored code, and not changed any functionality, everything should still work.
Solution
The full solution for this exercise is in the forms-create directory of the code bundle.
Bonus Round
Where Did POST Come From?
When we submitted the form, the form data was sent to the create action. But how did Rails know to do that? Simply put, because that’s what the routes dictate.
View the page source of the form and focus in on this part of the HTML form:
<form action="/movies" method="post">
  ...
</form>
The action says that submitting this form will send the data to /movies. The method says that the HTTP verb will be a POST. Rails doesn’t override this with a hidden field. So submitting the form will send the form data in a POST request to /movies.
What do the defined routes have to say about that?
Helper         HTTP Verb        Path                  Controller#Action
root_path         GET        /
movies_path       GET        /movies(.:format)           movies#index
                  POST       /movies(.:format)           movies#create
new_movie_path    GET        /movies/new(.:format)       movies#new
edit_movie_path   GET        /movies/:id/edit(.:format)  movies#edit
movie_path        GET        /movies/:id(.:format)       movies#show
                  PUT        /movies/:id(.:format)       movies#update
                  PATCH      /movies/:id(.:format)       movies#update
                  DELETE     /movies/:id(.:format)       movies#destroy
Notice there’s a route for the verb GET and the URL /movies and a route for the verb POST and the URL /movies (highlighted). Given the unique combination of HTTP verb and URL, according to the routes POST requests for /movies are handled by the create action in the controller. It’s that simple!
Wrap Up
Now that you’re getting good with forms and their conventions, it’s time for some celebration! Do your victory dance, give a couple fist pumps, or (if those options just seem too crazy) check your Twitter or Slack stream. Between editing movies and creating movies, you’ve learned a ton!
Up to this point we’ve implemented all the routes except delete, which we’ll get to shortly. In the next section, we’ll use partials to remove the duplication we created when we copy/pasted the HTML form code between the edit and new pages.
Partials
Exercises
Objective
Crafting good Rails apps isn’t just about implementing features that do what they should do. Good Rails apps also have clean, well-organized code under the hood. Indeed, what you see on the inside is as important as what you see on the outside. And that’s because an online web app is never really done. It’s inevitable that you’ll need to add new features, be it tomorrow or six months down the road. And when that time comes, you want your app to be in a position where you can make the changes as quickly and efficiently as possible.
So let’s take stock of where we left off in the last exercise. We can now edit and create movies. We even removed a bit of duplication in the update and create actions so that the controller code is easier to change later. But what about the edit and new forms themselves? We took a deliberate shortcut when we blatantly copied the form in the edit.html.erb template and pasted it into the new.html.erb template. We did that to quickly get up and running and learn how forms work. But duplicated code anywhere in an application, even in a view template, is a liability. If we need to change the form to accommodate a future feature, we’ll need to make the change in two places. And that’s both prone to error (we’ll likely forget to make the change in both places) and also double the work.
So before we strike a big red line through these features and move on, let’s take a minute to clean up the duplication in the forms. We’ll also restructure our layout file so it’s better organized.
1. Remove Duplication Using a Partial
As it stands, the edit.html.erb and new.html.erb templates both have the exact same form code. We want the form code in one place, so we’ll put the form in a common partial file . Think of a partial as a reusable view “chunk” (yes, that’s the technical term) that you can render from other views. Once we have the form in a partial, we’ll render it from the edit.html.erb and new.html.erb templates. It’s two forms for the price of one!
- Start by creating a file named _form.html.erb (partial files always start with an underscore) in the app/views/movies directory.
- Then go into the edit.html.erb template and cut all the code from form_with to end and paste it into the _form.html.erb file.
[ANSWER]
<%= form_with(model: @movie, local: true) do |f| %>
  <%= f.label :title %>
  <%= f.text_field :title %>

  <%= f.label :description %>
  <%= f.text_area :description, rows: 7 %>

  <%= f.label :rating %>
  <%= f.text_field :rating %>

  <%= f.label :released_on %>
  <%= f.date_select :released_on, {}, {class: "date"} %>

  <%= f.label :total_gross %>
  <%= f.number_field :total_gross %>

  <%= f.submit %>
<% end %>
- Then, back in the edit.html.erb template, render the _form partial.
- [ANSWER]
<h1>Editing Movie: <%= @movie.title %></h1> <%= render "form" %>
- Now browse to http://localhost:3000/movies/1/edit and you shouldn’t see any evidence that we shuffled code around. The form should appear exactly as it did before. One template down, one to go!
- Next, go into the new.html.erb template and replace the inline form code with the result of rendering our fancy new form partial.
[ANSWER]
<h1>Create a New Movie</h1>

<%= render "form" %>
- As a sanity check, browse to http://localhost:3000/movies/new and again the form should appear exactly as before.
It’s like we were never here…
2. Use a Local Variable
Currently the _form partial depends on an @movie instance variable. This certainly works, but it means the partial is tightly coupled to the controller actions that render it, which in this case is the new and edit actions.
Rather than using instance variables in partials, it’s considered a best practice to instead explicitly pass the partial the data it needs using local variables. That way the partial isn’t dependent on something outside of its scope, it just relies on local variables that were passed to it. And that makes the partial easier to reuse and maintain over time.
So let’s rearrange things slightly so the _form partial uses a local variable named movie.
- First, in the _form.html.erb partial, change the form_with to use a local movie variable rather than a @movie instance variable.
[ANSWER]
<%= form_with(model: movie, local: true) do |f| %> # existing fields <% end %>
- Then in the new.html.erb template where the form partial is rendered, pass it a local variable named movie that has the value of the @movie instance variable.
[ANSWER]
<h1>Create a New Movie</h1> <%= render "form", movie: @movie %>
- And do the same in the edit.html.erb template where it renders the form partial.
[ANSWER]
<h1>Editing <%= @movie.title %></h1> <%= render "form", movie: @movie %>
It might help to think of partials as being like simple functions. Functions get passed arguments, and those arguments are scoped to the function as local variables. In general, functions should avoid relying on global variables that are outside the scope of a function. In the same way, partials should be passed local variables that are then scoped to the partial rather than relying on instance variables that are outside a partial’s scope.
3. Accommodate New Features
Here comes the big payoff! Suppose some bright spark decides that all the movie forms should auto-focus the title field. And while we’re at it, the description field should have 10 rows instead of 7 rows. The person requesting these features would like an estimate of how long all this will take on his desk by tomorrow morning, preferably hand-signed. What he doesn’t know is that we’re way ahead of the game now.
- Change the shared _form.html.erb partial to autofocus the title field.
[ANSWER]
<%= form_with(model: movie, local: true) do |f| %>
  <%= f.label :title %>
  <%= f.text_field :title, autofocus: true %>

  <%= f.label :description %>
  <%= f.text_area :description, rows: 10 %>

  <%= f.label :rating %>
  <%= f.text_field :rating %>

  <%= f.label :released_on %>
  <%= f.date_select :released_on, {}, {class: "date"} %>

  <%= f.label :total_gross %>
  <%= f.number_field :total_gross %>

  <%= f.submit %>
<% end %>
- Browse to http://localhost:3000/movies/1/edit and http://localhost:3000/movies/new and the title field should automatically have focus and the description field should have 10 rows.
- Finally, send the person who requested these changes a one-word email: “Done!”
4. Extract Header and Footer Into Partials
We’ve seen that partials offer an easy way to remove view-level duplication. You can also use partials to decompose a view template into small chunks for better readability and maintenance.
For example, the header and footer sections of a layout can become fairly substantial as an application grows. And as things start to accumulate, the layout file can morph into an unrecognizable jumble of HTML and ERb tags. To help keep that under control, it’s generally a good practice to extract sections of views (including layouts) that logically go together into partials.
So let’s do ourselves a favor now by decomposing the layout file into separate header and footer partials. When we’re done, you won’t see any visible changes on the site. But you’ll feel better knowing the internal design is cleaner and easier to maintain.
- Create a file named _header.html.erb in the app/views/layouts directory. Copy the header section from the application.html.erb layout file and paste it into the new _header.html.erb partial.
[ANSWER]
<header>
  <nav>
    <%= link_to image_tag("logo"), root_path %>
    <ul>
      <li>
        <%= link_to "All Movies", movies_path %>
      </li>
    </ul>
  </nav>
</header>
- Then, back in the layout file, replace the header section with a call to render the layouts/header partial.
- [ANSWER]
<%= render "layouts/header" %>
- Getting the hang of this? How about trying the footer on your own.
- [ANSWER]
# in _footer.html.erb <footer> <p> Copyright © 2005-<%= Time.now.year %> <%= link_to 'The Pragmatic Studio','https://pragmaticstudio.com' %> </p> </footer> # in application.html.erb <%= render "layouts/footer" %>
Finally, check your work by refreshing the browser. The app should look exactly as it did before, but now we’ve organized things better into partials. If you run into trouble, double check that your layout file matches up with the version shown in the answer.
[ANSWER]
<%= render "layouts/header" %> <div class="content"> <%= yield %> </div> <%= render "layouts/footer" %>
Solution
The full solution for this exercise is in the partials directory of the code bundle.
Wrap Up
That’s really all there is to partials. Most often you’ll use them to remove duplication in views so you can make changes in one place. And in the same way you’d break a big Ruby method into smaller methods for better readability, you can use partials to break big view templates into smaller (reusable) view chunks.
A bit later we’ll see more examples of where partials come in handy. But first, in the next section we’ll implement the last remaining route: deleting a movie.
Dive Deeper
To learn more about partials, refer to the Rails Guides: Using Partials.
Destroying Records
Exercises
Objective
Our web interface is coming together nicely. We can create, read, and update movies in the browser. So what’s left? Well, there’s currently no way to delete a movie via the web. To do that, we need to:
- Generate a “Delete” link on the show page
- Define a destroy action in the MoviesController that deletes the movie from the database
Visually, here’s what we want to do:

Notice that we don’t need to add a new route to handle deleting movies. The resource routing conventions we used in a previous exercise already have that route set up for us. So given everything we’ve learned so far, this task is well within your reach…
1. Add a Delete Link
We’ll start by generating a “Delete” link on the show page. To do that, we’ll enlist the help of a route helper method.
- Start by reviewing all the routes we have so far:
Helper         HTTP Verb        Path                  Controller#Action
root_path         GET        /
movies_path       GET        /movies(.:format)           movies#index
                  POST       /movies(.:format)           movies#create
new_movie_path    GET        /movies/new(.:format)       movies#new
edit_movie_path   GET        /movies/:id/edit(.:format)  movies#edit
movie_path        GET        /movies/:id(.:format)       movies#show
                  PUT        /movies/:id(.:format)       movies#update
                  PATCH      /movies/:id(.:format)       movies#update
                  DELETE     /movies/:id(.:format)       movies#destroy
Whew! This is ending up as a checklist of to-do items, and we’re almost done. The only route we haven’t implemented is on the last line. According to that route, a DELETE request for /movies/:id maps to the destroy action in the MoviesController. (Yeah, it’s confusing that the action isn’t called delete, but what can we say.)So, what’s the name of the route helper method that generates link matching that route? Well, there’s no helper in the leftmost column, but if you look up that column you’ll run into the helper movie_path. Unless otherwise specified, route names get inherited from one row to the next. So the name of the route helper method to delete a movie is movie_path.
2. At the bottom of the show page, generate the “Delete” link using the helper method.
- [ANSWER]
<section class="admin"> <%= link_to 'Edit', edit_movie_path(@movie), class: 'button' %> <%= link_to "Delete", movie_path(@movie), class: 'button' %> </section>
- Now go ahead and refresh the show page and click the “Delete” link. You should end up right back on the show page. But it should have tried to run a not-yet-defined destroy action and failed, right? Hmm… something’s not quite right.
This is one of those times when the easiest way to diagnose what’s going on is to watch the log file. Open the console window where your app is running, hit Return a few times to create a bunch of white space in the scrolling log, and then in the browser click the “Delete” link again. In the log file you should see an incoming request that looks like this:
Started GET "/movies/1" for ::1 at 2019-06-03 16:04:32 -0600
Processing by MoviesController#show as HTML
The URL /movies/1 looks right, but notice that the HTTP verb is GET. And according to the routes, a GET request for /movies/:id maps to the show action. So the router is doing exactly what we told it to do! The problem is the link we generated isn’t triggering the delete route.
4. Returning your attention to the defined routes, notice that the show and destroy routes share a lot in common:
movie_path   GET      /movies/:id(.:format)    movies#show
             DELETE   /movies/:id(.:format)    movies#destroy
Interestingly, both of these routes recognize the same requested URL: /movies/:id. As well, they both have the same route helper method: movie_path. The only difference between these two routes is the HTTP verb (in the second column from the left). To show a movie we need to send a GET request and to delete a movie we need to send a DELETE request.
5. So how exactly do we send a DELETE request? Unfortunately, browsers can’t send DELETE requests natively, so Rails fakes them using some JavaScript.Change the “Delete” link to trigger the delete route by setting the method option to :delete, like so:
<section class="admin">
  <%= link_to 'Edit', edit_movie_path(@movie), class: 'button' %>
  <%= link_to 'Delete', movie_path(@movie), class: 'button',
                         method: :delete, data: { confirm: 'Are you sure?' } %>
</section>
Now we’re calling link_to with an optional third parameter that’s a hash of options. The method option is used to override the HTTP method. We’ve also used the confirm option to pop up a JavaScript confirmation dialog when the link is clicked. That way movies don’t accidentally get deleted.
6. To see what that generated, refresh the page and view the source. Search for the “Delete” link and you should see this little nugget:
<a class="button" data-confirm="Are you sure?" rel="nofollow" data-method="delete" href="/movies/14">Delete</a>
Notice how the link_to options got turned into data- attributes and values. For example, the data-method attribute has a value of delete. That tells Rails that this link should send a DELETE request rather than a GET request.
7. Finally, click the “Delete” link again and this time a confirmation dialog should pop up. Click “OK” and you should see the following error:
Unknown action

The action 'destroy' could not be found for MoviesController
- Perfect! Now we know we have the “Delete” link properly configured to trigger the delete route.
2. Implement the Destroy Action
It’s all downhill from here…
- Implement the destroy action in the MoviesController. Once the movie has been destroyed, redirect to the movie listing page.
- [ANSWER]
def destroy @movie = Movie.find(params[:id]) @movie.destroy redirect_to movies_url end
Strictly speaking, you don’t need to assign the movie to an instance variable since the destroy action never shows the movie. It just redirects. That being the case, you could assign the movie to a local variable. But for consistency, we tend to use an instance variable.
2. Then go back to the browser and click the “Delete” link again. This time you should end up back on the movie listing page and the movie you deleted shouldn’t be displayed in the listing.
3. Just to see what happened behind the scenes, check the log file (you may need to scroll back a bit). You should see that indeed clicking the link sent a DELETE request and the movie was deleted from the database:
Started DELETE "/movies/14" for ::1 at 2019-06-03 16:12:51 -0600
Processing by MoviesController#destroy as HTML
  Parameters: {"authenticity_token"=>"Zd7oa0CPg1P1/ObENZb22VjQHrbJS1loXrxp42lSNdw=", "id"=>"14"}
Movie Load (0.1ms)  SELECT "movies".* FROM "movies" WHERE "movies"."id" = ? LIMIT ?  [["id", 14], ["LIMIT", 1]]
   (0.0ms)  begin transaction
Movie Destroy (0.3ms)  DELETE FROM "movies" WHERE "movies"."id" = ?  [["id", 14]   (1.1ms)  commit transaction
Redirected to http://localhost:3000/movies
Completed 302 Found in 5ms (ActiveRecord: 1.6ms | Allocations: 2871)
(The HTTP verb is DELETE and the SQL statement uses DELETE, but the conventional Rails action is called destroy. Go figure.)
4. Finally, use your fancy new web interface to re-create the movie you just deleted! 
Solution
The full solution for this exercise is in the destroy directory of the code bundle.
Bonus Round
Book App
Suppose you had a Book resource and you wanted to create a web interface for creating, reading, updating, and deleting (CRUD) books. To do that, you’d tell the Rails router to generate all the routes using:
resources :books
Given the routing conventions, can you fill in the table below?
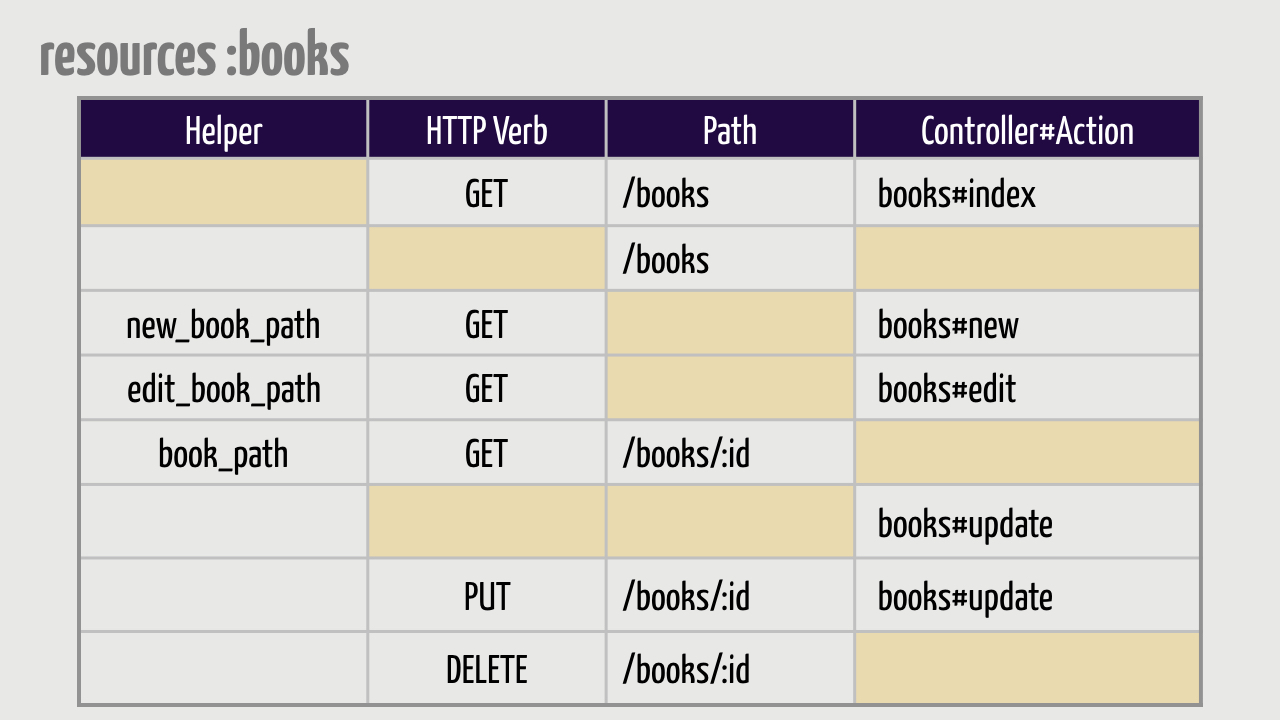
*[ANSWER]
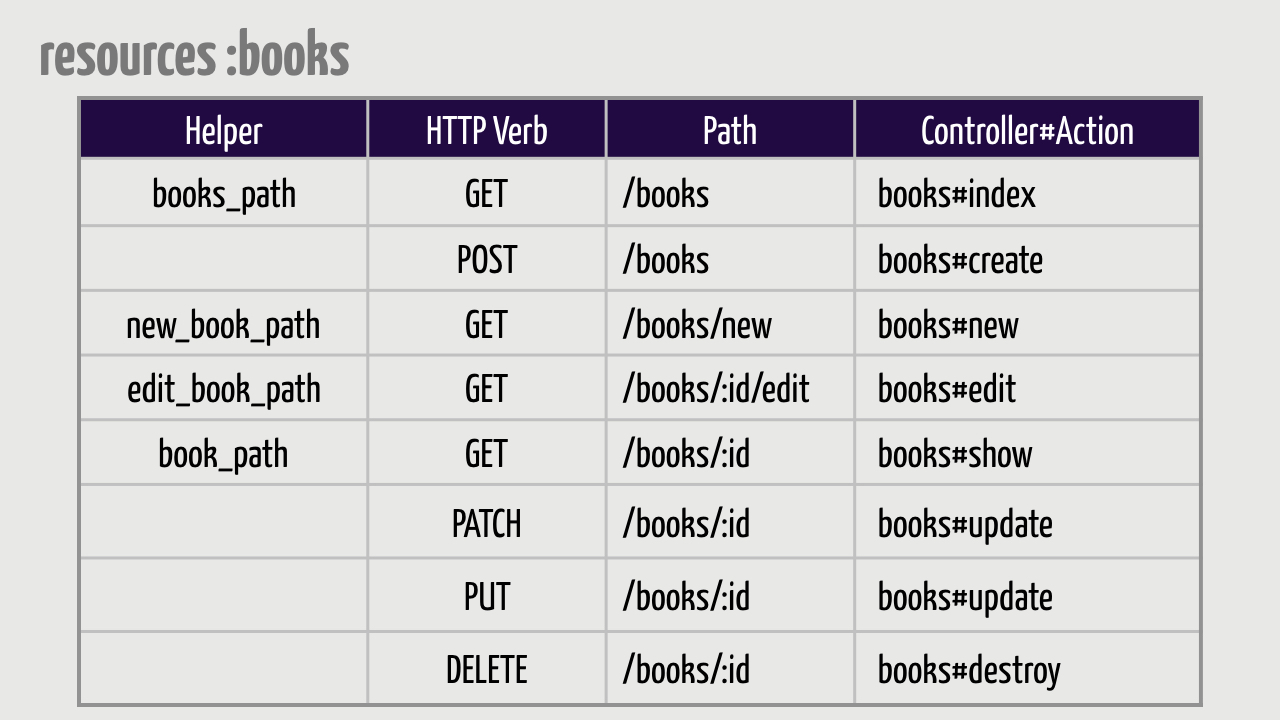
Wrap Up
Congratulations, you’ve now successfully implemented all these routes!
root_path         GET        /
movies_path       GET        /movies(.:format)           movies#index
                  POST       /movies(.:format)           movies#create
new_movie_path    GET        /movies/new(.:format)       movies#new
edit_movie_path   GET        /movies/:id/edit(.:format)  movies#edit
movie_path        GET        /movies/:id(.:format)       movies#show
                  PUT        /movies/:id(.:format)       movies#update
                  PATCH      /movies/:id(.:format)       movies#update
                  DELETE     /movies/:id(.:format)       movies#destroy
Here’s the really cool part: All resources follow these same routes and conventions. So once you understand how these eight routes work, you’re golden. In your own app, tell the Rails router to generate all the routes for you and then you’re ready to step through implementing each route, exactly as we did for movies.
When you boil it down, the only thing that changes is the names of things. That’s the power of conventions. And through these conventions, Rails does a lot to help us quickly stand up CRUD-based applications. That gives you more time to focus on the stuff that makes your application unique: the business logic.
And in the next section we’ll start adding some of that to our app…