One-to-Many: belongs_to
Exercises
Objective
The movie-related features of the app are in really good shape! Now it’s time to shift our focus to a new set of features. Most respectable movie apps allow users to write reviews for movies. Think of it as your chance to give your honest opinion about the movies in your app!
Let’s think about the relationship between movies and reviews. Any particular movie is watched by many people, so it makes sense that a movie could potentially have many reviews. Exactly how many reviews will be written for a given movie? We can’t predict the number. This ambiguity presents a bit of a challenge when it comes to storing reviews in the database. Clearly we can’t just add a new review_comment column to the movies table because then a movie could only have one review. Instead, to accommodate many reviews per movie, we’ll need to put the reviews in a new reviews table. Then we’ll need to somehow connect each review in the reviews table to a particular movie in the movies table.
Visually, here’s what that will look like in the database:
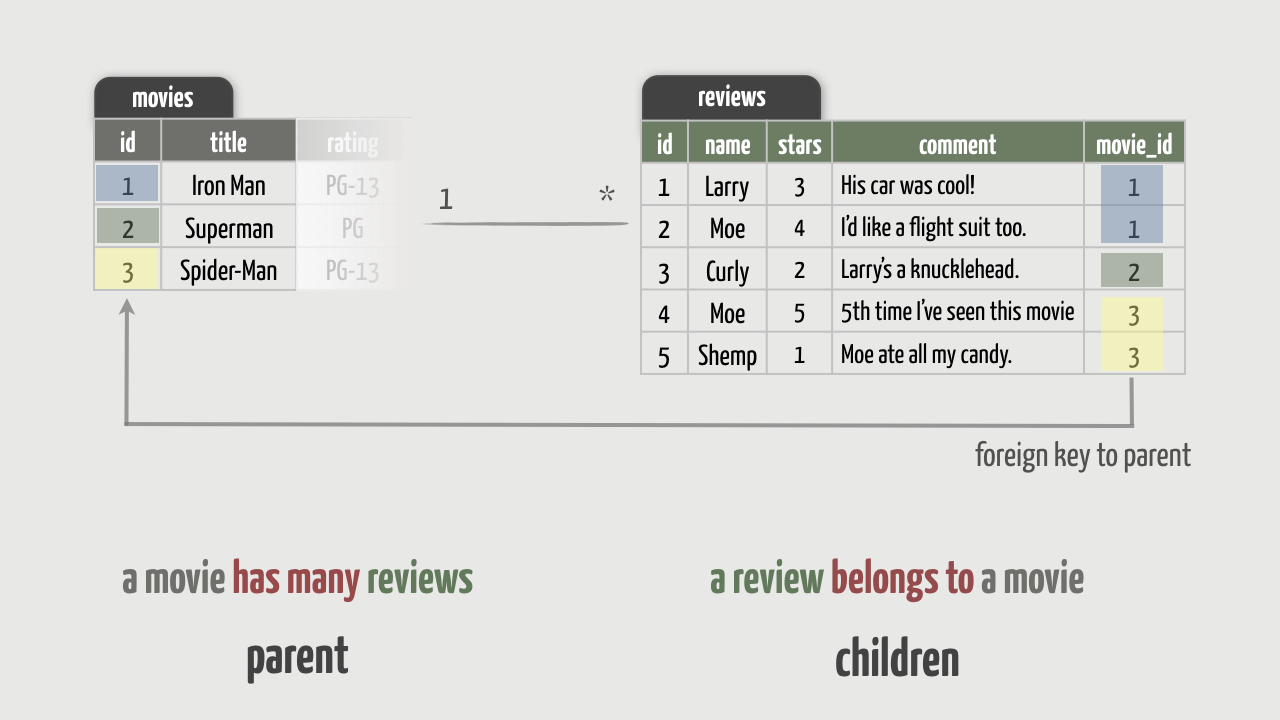
In database terms, this is called a one-to-many relationship. A movie potentially has many reviews. On the flip side, a review belongs to a single movie. To join the two tables together, each row of the reviews table holds a reference to a movie in the movies table. This reference is held in the movie_id column. The number in that column is the numeric id that corresponds to the associated row in the movies table. In database terms, the movie_id column is called a foreign key .
One-to-many relationships between application data are so common that Rails makes it easy to work with them at the model layer. It does this by relying on a simple set of database conventions:
- The object on the “many” (child) end of the relationship needs a foreign key that points to the object on the “one” (parent) end of the relationship.
- The name of the foreign key needs to be the name of the “one” (parent) object, followed by _id (e.g. movie_id).
Following those conventions in the database, Rails can glean a lot about the linkage between the tables. But it needs a little help from us. We need to tell Rails what kind of relationship we want between the models. In our case, a review belongs to one movie and a movie has many reviews. Rails refers to these model relationships as associations .
So to start creating the one-to-many association between movies and reviews,we’ll need to do two things:
- Create a new reviews database table and a corresponding Review model
- Declare that a Review belongs to a Movie.
Of course, we’ll ultimately need the reverse association (a movie has many reviews) and a web interface for writing reviews. But let’s not get ahead of ourselves!
1. Create the Review Resource
First we need to create a new reviews database table with the following fields and types:
| name | type |
|---|---|
| name | string |
| stars | integer |
| comment | text |
| movie_id | integer |
We’ll also need a corresponding Review model to access that table. We learned earlier how to generate a model and migration in one fell swoop using the model generator. We could do that again here, but let’s take it a step further. Thinking ahead, we’ll also need a ReviewsController to handle creating reviews. And later on we’ll also need some basic routes for interacting with reviews via the web.
Taken together, Rails calls all of this stuff a resource . Creating new resources is so common that Rails provides a handy resource generator .
- The resource generator takes the same options as the model generator: the model name followed by a list of fields and types separated by colons. So start by generating a resource named review (singular) with the fields and types listed above, like so:
rails g resource review name:string stars:integer comment:text movie:references
This is a long command that’s easy to goof up, so here’s a tip: If you end up running a generator with a misspelled field name or any other error, you can delete all the generated files by running rails destroy and give it the exact same options you used when running the generator. For example, to delete all the files we just generated, run:
rails destroy resource review name:string stars:integer comment:text movie:references
- We’ll look at everything that got generated in due time. For now, open the generated migration file and you should see the following:
class CreateReviews < ActiveRecord::Migration[6.0]
  def change
    create_table :reviews do |t|
      t.string :name
      t.integer :stars
      t.text :comment
      t.references :movie, null: false, foreign_key: true

      t.timestamps
    end
  end
end
That’s pretty much what we expected. The only surprise is this line:
t.references :movie, null: false, foreign_key: true
That’s simply a shortcut that ends up adding a column named movie_id. It’s equivalent to doing this in the migration:
t.integer :movie_id
Using references just makes it a bit more readable. Notice that the generator also tacks on the null: false option which effectively adds a validation that requires a review to have a non-null movie_id before the review can be saved to the database.
It also tacks on the foreign_key: true option to add a foreign key constraint to guarantee referential integrity. In general, a foreign key constraint prevents invalid values from being inserted into the foreign key column. In this instance, the value of the movie_id column has to be a primary key contained in the movies database table.
3. Now go ahead and run the migration to create the reviews table.
[ANSWER]
rails db:migrate
- Finally, hop into a console session and instantiate a new
Reviewobject:
>> r = Review.new
You should get the following output:
=> #<Review id: nil, name: nil, stars: nil, comment: nil, movie_id: nil, created_at: nil, updated_at: nil>
- That tells us the Review model is connected to the reviews database table. Notice that the Review model has attributes for every column in the reviews table, including the movie_id column which will contain foreign keys pointing to movies.
Great! Now our database schema follows the conventions.
2. Declare the belong_to Association
Applying the migration created the reviews database table with the movie_id foreign key column. So far, so good. But remember, the Review model needs to declare that it belongs to a Movie.
Open the generated app/models/review.rb file and you’ll see that it already has that belongs_to association declared:
class Review < ApplicationRecord
  belongs_to :movie
end
Cool—nothing for us to do here! Rails knew to add this declaration for us because we used movie:references when generating the review resource.
Notice that the belongs_to declaration references the singular form of the parent (movie). This declaration tells Rails that the movie_id database column holds a reference to a Movie object. Rails also dynamically defines methods for reading and writing a review’s related movie.
3. Use the belongs_to Association
Now let’s see how the belongs_to association works by using it in the console.
- First, instantiate a new Review object in memory by calling the new method on the Review class. Assign it to a review variable. Go ahead and set the name of the reviewer, the number of stars, and a brief comment. Assign it to a review variable.
[ANSWER]
>> review = Review.new(name: "Larry", stars: 5, comment: "Awesome!")
- Now print out the value of the review’s movie_id attribute.
[ANSWER]
>> review.movie_id
The foreign key should be nil because the review isn’t yet associated with a movie.
3. OK, so find an existing Movie that you want this review to be associated with. Assign that movie to a movie variable.
[ANSWER]
>> movie = Movie.find_by(title: "Captain Marvel")
- Now associate the review with the movie by assigning the movie object to the review’s movie attribute.
[ANSWER]
>> review.movie = movie
- To verify that the association has been made, first print the value of the review’s movie_id attribute again.
[ANSWER]
>> review.movie_id
This time you should get the primary key of the movie object. The movie_id foreign key was automatically set when the movie was assigned to the review.
Then access the review’s movie attribute.
[ANSWER]
>> review.movie
You should get back the Movie object (the parent) that’s associated with the Review object (the child). Behind the scenes, unless the movie has already been loaded from the database, Rails ran a database query to select the movie in the movies table that has an id matching the movie_id value for this particular review.
6. We haven’t yet saved the review in the database, so go ahead and do that next.
>> review.save
- Next, initialize a second review for the same movie in one fell swoop by calling new with a hash of review attributes, including the movie.
[ANSWER]
>> review = Review.new(name: "Daisy", stars: 4, comment: "Great!", movie: movie)
- Then print the value of the new review’s movie_id attribute.
[ANSWER]
>> review.movie_id
You should get the primary key of the movie object you assigned to the movie attribute. In other words, the movie_id foreign key was automatically set to point to that movie object. Convenient!
9. Remember, since we initialized the review using new, it won’t be saved to the database until you call save.
[ANSWER]
>> review.save
Great—now we know the belongs_to association is working as expected!
Wrap Up
That takes care of one side of the one-to-many association: a review belongs to a movie. In the next section we’ll tackle the other side: a movie has many reviews.
One-to-Many: has_many
Exercises
Objective
The one-to-many association currently can only be traversed in one direction. We can ask a review for its associated movie, but we can’t ask a movie for all of its reviews. Bi-directional associations aren’t required; you only need to define associations in the direction you intend to use them. However, in our case, given a Movie object we want to be able to get all of its associated reviews and also create reviews using a movie as the parent object.
To finish creating the one-to-many association between movies and reviews, we need to declare that a Movie has many Reviews. We’ll also add reasonable validations in the Review model.
1. Declare the has_many Association
If you look in the Movie model you’ll discover that it doesn’t have a reciprocal association to its reviews. The generator added the belongs_to association to the Review model, but the generator didn’t add an association to the Movie model. That’s because the generator doesn’t know what kind of association we want on that side of the relationship. So we have to explicitly declare the specific association we want in the Movie model. In particular, a movie has many reviews.
To make that so, update the Movie model (the parent) to have a has_many association with reviews (the plural form of the child).
[ANSWER]
class Movie < ApplicationRecord
  has_many :reviews

  # existing code
end
This declaration tells Rails to expect a movie_id foreign key column in the table wrapped by the Review model, which by convention will be the reviews table. Rails also dynamically defines methods for accessing a movie’s related reviews.
And with that one-liner, we now have a bi-directional association between a movie and its reviews!
2. Use the has_many Association
Let’s give this association a whirl in the console…
- First, make sure to load the latest version of your code by using reload!:
>> reload!
- Then find the movie you added reviews for in the previous exercise.
[ANSWER]
>> movie = Movie.find_by(title: "Captain Marvel")
- OK, now ask the movie for its reviews!
[ANSWER]
>> movie.reviews
You should see the database being queried and get back an array that contains the reviews for that movie. Behind the scenes, Rails ran a database query to select all the reviews in the reviews table that have a movie_id value matching the id for this particular movie.
- Next, create another review for the movie. This time use the parent movie object to create the review. Using the parent object to create child objects is preferred because the child will automatically be associated with the parent.
[ANSWER]
>> review = movie.reviews.new(name: "Moe", stars: 3, comment: "Spilled my popcorn!")
- Then print the value of the new review’s movie_id attribute.
[ANSWER]
>> review.movie_id
You should get the primary key of the movie object you used as the parent object. In other words, because we initialized the review using the reviews association of the movie object, the movie_id foreign key was automatically set to point to the movie object. Think of it this way: each child is created with a built-in reference back to their parent!
- Remember, since we initialized the review using new, it won’t be saved to the database until you call save.
[ANSWER]
>> review.save
- Now the movie should have three reviews. Use the movie object to query the database for its reviews and get the number of reviews.
[ANSWER]
>> movie.reviews >> movie.reviews.size
Nicely done!
3. Cascade Deletes
By default, when you delete the parent of a one-to-many relationship, the child rows of that parent remain in the database. That means if we delete a movie then its reviews will be orphaned. (Poor little reviews!) They’ll no longer be associated with a movie. And that leads to data integrity issues because a review only has meaning when it’s associated with a movie.
So we need to arrange things so that when we delete a movie (the parent), its reviews (the children) are automatically deleted as well. However, we don’t want the reverse to happen. Deleting a review should not delete the movie because the movie still has meaning on its own. Plus, the movie likely has other reviews associated with it.
- Change the has_many side of the association to destroy all reviews when a movie is destroyed.
[ANSWER]
class Movie < ApplicationRecord
  has_many :reviews, dependent: :destroy

  # existing code
end
- To see this in action, jump into a new console session or call reload! in your existing session. Then find a movie that has reviews and destroy it.
[ANSWER]
>> reload!

>> movie = Movie.find_by(title: "Captain Marvel")

>> movie.destroy
You should see one DELETE FROM “reviews” line printed for each associated review that was deleted. That tells you the cascading delete is working!
3. Finally, to resurrect that movie, you can copy its attributes from the db/seeds.rb file and pass those attributes to Movie.create! in the console as we did in the video. Then if you want some extra practice, recreate the reviews that were associated with that movie.
As a bonus, you may actually want to add a couple reviews to the bottom of your db/seeds.rb file so you can easily recreate them later, too. Try it on your own first since it’s good practice associating the reviews with a movie, then click the answer if you need examples.
[ANSWER]
movie = Movie.find_by(title: "Captain Marvel")

movie.reviews.create!(name: "Larry", stars: 5, comment: "Awesome!")
movie.reviews.create!(name: "Daisy", stars: 4, comment: "Great!")
movie.reviews.create!(name: "Moe", stars: 3, comment: "Spilled my popcorn!")
Then you can run rails db:reset. You’ll recall that this recreates the database from scratch and populates it by running the db/seeds.rb file.
4. Declare Review Validations
Remember when we said that you’ll need to think about validations every time you change the database or add new models? Well, here’s a perfect scenario to put that into practice. Similar to the way we declared validations in the Movie model, we also need some reasonable validations in our new Review model. Here’s the set of requirements:
- A value for the name field must be present.
[ANSWER]
validates :name, presence: true
- The comment field must have a minimum of 4 characters.
[ANSWER]
validates :comment, length: { minimum: 4 }
- Lastly, the stars field should have a value between 1 and 5. Similar to how we used a RATINGS constant for the movie rating validation, use a STARS constant for review star validation. Override the default error message for this validation with the custom message “must be between 1 and 5”.
[ANSWER]
STARS = [1, 2, 3, 4, 5]

validates :stars, inclusion: {
  in: STARS,
  message: "must be between 1 and 5"
}
- Now that you have validations declared in the Review model, use what you learned earlier about validations to check the validations in the console. For example, instantiate a new Review object without any attributes and check that it’s invalid and has the appropriate error messages. Then put the review into a valid state, with an associated movie, and save it to the database.
>> movie = Movie.find_by(title: "Captain Marvel")

>> review = movie.reviews.new

>> review.save
=> false

>> review.errors.full_messages
=> ["Name can't be blank", "Comment is too short (minimum is 4 characters)", "Stars must be between 1 and 5"]


>> review.name = "Lucy"
>> review.stars = 4
>> review.comment = "Fierce and funny!"

>> review.save
=> true
Solution
The full solution for this exercise is in the one-to-many-has-many directory of the code bundle.
Wrap Up
One of the most powerful features of Active Record is the ability to form associations between different models. In the case of our Movie model, each movie potentially has many reviews. Initially, you’d probably assume that linking the two models would involve complicated database gymnastics. But by following Rails conventions, you now know that it’s actually quite easy to do with a couple lines of Ruby code. Based on the type of association, Rails then dynamically generates methods to navigate and manage the associations. And that takes a lot of tedious grunt work off our hands!
Now that we have the associations working in the models, in the next section we’ll create a page that lists all the reviews we have so far for each movie.
One-to-Many: Nested Resources
Exercises
Objective
We’re off to a good start! We have a one-to-many association between the Movie and Review models, and that relationship is reflected in the database structure. In fact, in previous exercises we used the console to create a few reviews in the database. We’ll get to how to write reviews in the browser in the next section. But first, since we already have a few reviews in the database, let’s go ahead and add a page that lists all the reviews for a movie. Inquiring minds want to know: What are people saying about “Captain Marvel”?
To answer that question, we need to:
- Nest the review resource inside of a movie resource so that the router recognizes requests for /movies/2/reviews, for example.
- Define an index action in the ReviewsController that fetches all the reviews for the movie specified in the URL.
- Create a corresponding index.html.erb template that generates an HTML list of the movie’s reviews.
- Generate a “Reviews” link on the movie show page so it’s easy to navigate to the list of reviews for any movie.
Visually, here’s what we want to do:

The steps we’ll take to list reviews are similiar to the steps we took earlier to list movies. However, there are two important differences.
First, we’re now dealing with review resources rather than movies. So where do we put the code to list reviews? The index action in our MoviesController is already responsible for listing movies. We don’t want to conflate things by also making it responsible for listing reviews. By convention, each controller should only concern itself with a single resource. When our application grows to include an additional resource such as reviews, it’s time to introduce a new controller. So we’ll put the code to list reviews in the index action of the ReviewsController.
The second difference is in how we interact with reviews. Any time we list reviews it will always be in the context of a movie. In other words, we only want to see the reviews for a specific movie. There’s no situation in which a user wants to see a list of all the reviews in the database outside the context of a movie. So the URL for listing reviews needs to specify the associated movie. To impose that hierarchy in the URL, we’ll use nested resources . By nesting the reviews resource inside of the movies resource, every review-related URL will require a movie ID. For example, accessing the URL /movies/2/reviews should list the reviews that belong to the movie with an ID of 2. So in effect we’re mirroring the one-to-many association between a movie and its reviews in the URL.
Enough with the theory—let’s jump right into it!
1. Nest the Review Resource
As is customary by now, let’s start with the URL we want for listing reviews and work our way through the errors…
- Suppose we want to see all the reviews for “Captain Marvel” which has an ID of 2. Browse to http://localhost:3000/movies/2/reviews and you should get the following error:
Routing Error

No route matches [GET] "/movies/2/reviews"
No surprise there.
2. Crack open the config/routes.rb file and you’ll notice that the resource generator we ran in the previous exercise added this line:
resources :reviews
That’s a polite gesture, but it assumes that reviews are a top-level resource. Instead, we want to mirror the parent-child relationship in the routes by nesting reviews inside of movies.To do that, on the movies resource create a block with do and end and move the reviews resource inside of the block, like so:
resources :movies do
  resources :reviews
end
With this minor change, the reviews resource will now always be nested within movies resources in the URLs.
3. To see how the nesting changes the routes and URLs, reload http://localhost:3000/rails/info/routes. You should see the following eight new routes for reviews (we’ve left out the existing routes for movies):
Helper                 HTTP Verb        Path                                     Controller#Action
movie_reviews_path        GET       /movies/:movie_id/reviews(.:format)            reviews#index
                          POST      /movies/:movie_id/reviews(.:format)            reviews#create
new_movie_review_path     GET       /movies/:movie_id/reviews/new(.:format)        reviews#new
edit_movie_review_path    GET       /movies/:movie_id/reviews/:id/edit(.:format)   reviews#edit
movie_review_path         GET       /movies/:movie_id/reviews/:id(.:format)        reviews#show
                          PATCH     /movies/:movie_id/reviews/:id(.:format)        reviews#update
                          PUT       /movies/:movie_id/reviews/:id(.:format)        reviews#update
                          DELETE    /movies/:movie_id/reviews/:id(.:format)        reviews#destroy
We saw similar routes for accessing movies, but these nested routes have two crucial differences.First notice that every path to the ReviewsController requires a movie_id parameter in the URL for the route to match! In other words, all the routes for accessing reviews are nested under a specific movie. The :movie_id parameter gets automatically filled in with the movie ID that’s embedded in the URL. When accessing a specific review, such as deleting a review, the route also requires an id in the URL which identifies the ID of the review to delete. Second, notice that with nested routes the names of the route helper methods include the singular name of the parent, movie in this case. For example, the route helper to generate a URL to list the reviews for a movie is movie_reviews_path. This will come in handy a bit later.So how do you remember the names of the parameters and helpers? You don’t. Or at least it takes a while to internalize these conventions. In the meantime, just look at the routes! (Yup, even the pros do this.)
- Back in your browser, refresh the page (you’re still accessing http://localhost:3000/movies/2/reviews). This time the router should recognize the URL, and you should get the following all-too-familiar error:
Unknown action

The action 'index' could not be found for ReviewsController
- Perfect. According to the routes, the request should indeed go to the index action of the ReviewsController. We already have the controller, but we don’t have the action. Remember that the resource generator we used in the previous exercise went ahead and created an empty ReviewsController class for us. That’s a subtle way of Rails saying that each resource should have its own controller.

That error prompts us to take the next step. Think about how you might implement the index action before moving on.
2. Create the Index Action and Template
Got a plan in mind? Here’s a nudge in the right direction. First, because the index action always runs in the context of a nested route, the action needs to find the movie that has the ID supplied in the URL. Then the action needs to fetch all the reviews that belong to that movie. Finally, the action needs to render a template that lists that movie’s reviews.
- First up, define an index action in the ReviewsController. Begin the action by finding the movie and assigning it to a @movie variable. Then use that variable to fetch all of the movie’s reviews into an array and assign it to a @reviews variable.
[ANSWER]
def index
  @movie = Movie.find(params[:movie_id])
  @reviews = @movie.reviews
end
- Refresh the page (you’re still accessing http://localhost:3000/movies/2/reviews) and you should have anticipated getting this error:
No template for interactive request

ReviewsController#index is missing a template...
Hello, old friend! Notice this time it’s looking for the template in the app/views/reviews directory because we ran the index action in the ReviewsController. The convention is that a controller’s templates live in a subdirectory of app/views that matches the controller name.
- Following the error, create a file named index.html.erb in the
app/views/reviewsdirectory.In the index.html.erb template, for now just use the @movie variable to generate header text such as “Reviews for Iron Man”. If you want to get fancy, link the movie’s title back to the movie detail page.
[ANSWER]
<h1>Reviews for <%= link_to @movie.title, @movie %></h1>
- Refresh the page as a quick smoke test. You know it’s good to go if the header text reflects the movie specified in the URL. That tells us the index action is picking up the correct movie. We often take these incremental steps just as a confidence boost. (It makes problem-solving a lot easier, too.)
- Carry on by listing all the reviews in the @reviews variable. For each review, display the following attributes:
- number of stars (pluralized, please!)
- reviewer name
- commentStart with a simple list and don’t worrying about styling. Just get a quick win. Here’s the output you’re aiming for, assuming three reviews:
5 stars by Larry: Awesome!
4 stars by Daisy: Great!
3 stars by Moe: Spilled my popcorn!
[ANSWER]
<ul>
  <% @reviews.each do |review| %>
    <li>
      <%= pluralize(review.stars, 'star') %> by <%= review.name %>:
      <%= review.comment %>
    </li>
  <% end %>
</ul>
- Refresh the page and you should see a list of all the reviews for “Captain Marvel”, for example. If you don’t see any reviews, drop back into the console and make sure reviews exist for the movie.
- Now for a quick finishing move. Look at the examples of the built-in time_ago_in_words helper. Then use that helper to display how long ago the review was created, such as “about 5 minutes ago”.
[ANSWER]
<%= time_ago_in_words(review.created_at) %> ago
- Finally, to style up the listing a bit, click the answer for a version that takes advantage of our CSS rules. Note that for this to work, the
- tag needs to have the CSS class set to reviews.
[ANSWER]
<ul class="reviews">
  <% @reviews.each do |review| %>
    <li>
      <%= pluralize(review.stars, 'star') %>
      <p>
        <%= review.name %>
        <span class="date">
          <%= time_ago_in_words(review.created_at) %> ago
        </span>
      </p>
      <p>
        <%= review.comment %>
      </p>
    </li>
  <% end %>
</ul>
WooHoo! Now you can see the reviews for any movie!
3. Generate a “Reviews” Link
Finally, to make it easy to navigate to a movie’s list of reviews, we’ll generate a “Reviews” link on the movie show page.
Before looking at the steps below, can you guess which route helper method we’ll use to generate that link? We almost gave it away earlier. Noodle on it for a minute and give it a try yourself. Then follow the steps below if you need some help.
- First, identify the route helper method that generates a link that goes to the index action of the ReviewsController. The easiest way to find the helper method is by looking at http://localhost:3000/rails/info/routes.
[ANSWER]
movie_reviews_path
- Now use that route helper method to generate a “Reviews” link on the movie show template. Put the link under the existing h2, in a div with a class of reviews. Remember, since the route has one placeholder (:movie_id), the route helper method needs to get passed a movie id.
[ANSWER]
<h1><%= @movie.title %></h1>
<h2>
<%= year_of(@movie) %> • <%= @movie.rating %>
</h2>
<div class="reviews">
<%= link_to "Reviews", movie_reviews_path(@movie) %>
</div>
<p>
<%= @movie.description %>
</p>
<table>
...
</table>
</div>
- Then, back in your browser, navigate to a movie show page and you should see a tempting “Reviews” link. Go ahead and click it to view all the movie’s reviews!If you get an error, read it through carefully. It’s likely that double-checking the name of the route helper method will lead you to the solution.
- As a well-deserved bonus, change the “Reviews” link to include the number of reviews. For example, if the movie has 3 reviews, then generate the link “3 Reviews” (properly pluralized, of course).
[ANSWER]
<%= link_to pluralize(@movie.reviews.size, "review"),
            movie_reviews_path(@movie) %>
High fives all around!
Bonus Round
Want to display a review’s star rating as a series of partially filled in stars like you see on popular movie sites? We’ve got you covered!
- First we need a way to convert a review’s number of stars to a percentage. That sounds like something the Review model should be responsible for calculating. So define the following stars_as_percent instance method in the Review model:
class Review < ApplicationRecord
  # existing code

  def stars_as_percent
    (stars / 5.0) * 100.0
  end
end
Nothing tricky here. Just some basic math. Remember that the Review model has a stars attribute, so this method simply converts the value of that attribute to a percentage.
- Then we need a way to render a series of partially filled in stars based on the percentage returned by the stars_as_percent method. To do that, in the app/views/shared directory create a partial file named _stars.html.erb and paste in the following:
<div class="star-rating">
  <div class="back-stars">
    <span>★</span>
    <span>★</span>
    <span>★</span>
    <span>★</span>
    <span>★</span>
    <div class="front-stars" style="width: <%= percent %>%">
      <span>★</span>
      <span>★</span>
      <span>★</span>
      <span>★</span>
      <span>★</span>
    </div>
  </div>
</div>
Don’t worry about the details here. Basically, it uses some CSS to fill in the stars by setting the width to a certain percent, which is provided in the aptly-named percent variable.
- Now to make it work! Currently in the app/views/reviews/index.html.erb file, we’re rendering the number of stars for each review. Change that file to instead render the shared/stars partial, making sure to assign the required percent variable to the result of calling the stars_as_percent method for each review.
[ANSWER]
<ul class="reviews">
  <% @reviews.each do |review| %>
    <li>
      <%= render "shared/stars", percent: review.stars_as_percent %>
      <p>
        <%= review.name %>
        <span class="date">
          <%= time_ago_in_words(review.created_at) %> ago
        </span>
      </p>
      <p>
        <%= review.comment %>
      </p>
    </li>
  <% end %>
</ul>
Cool— partially filled in stars!
Wrap Up
It usually takes a few iterations of working with nested resources before you’re comfortable with them. If you find yourself getting confused, step back and look at your routes. They tell you what the URLs looks like, where they go, what parameters will be filled in for you, and the names of the route helper methods. Seriously, we look at our routes all the time to stay on track!
In the next section, we’ll get more practice with nested routes by creating a web interface for writing reviews. But first, all this talk about nesting has us thinking it might be time to fly the roost, take a walk, and get some sun on our faces. So feel free to get up and stretch your wings. You’ve earned it!
One-to-Many: Forms
Exercises
Objective
Now that we’ve gotten our feet wet with nested resources, we’re ready to wade in a bit deeper. After all, any online movie app worth its salted popcorn would let users write reviews in the browser! To do that we’ll need to implement a few more of the nested review routes.
Here’s the high-level flow we’re aiming for:
- A user goes to a movie detail page and clicks a “Write Review” link.
- That takes them to a new page with a form where they enter their review and submit it.
- If the review is valid, the user ends up on the page that shows the movie’s reviews with a cheery “Thanks for your review!” flash message. Otherwise, if the review is invalid, the user ends up seeing the review form with error messages prompting them to try again.
Sound familiar? It should because we did something very similiar to allow users to create movies. Creating reviews follows the same flow. In this situation, however, we need to make sure that reviews are always created in the context of a movie. For example, accessing the URL /movies/2/reviews/new should show a form for writing a review for the movie with an ID of 2. And when the form is submitted, the review should get associated with that movie in the database. So both the new and create actions need to know which movie is being reviewed.
Here’s the good news: Because we already configured nested review routes in the previous exercise, every path to the ReviewsController already requires a movie ID in the URL. That ID is automatically captured in the :movie_id parameter. And that means we can rely on the :movie_id parameter being filled in whenever any action in the ReviewsController runs.
Again, there’s a lot of commonality between creating reviews and creating movies, so we’ll follow similar steps:
- Generate a “Write Review” link on the movie show page so it’s easy to get to the review form for any movie.
- Define a new action in the ReviewsController that finds the movie being reviewed and uses it to instantiate a new Review object to bind to the form.
- Create a corresponding new.html.erb template that generates an HTML form with fields for the review.
- Define a create action in the ReviewsController that uses the form data to create a new review in the database and associates it with the respective movie.
Visually, here’s what we want to do:
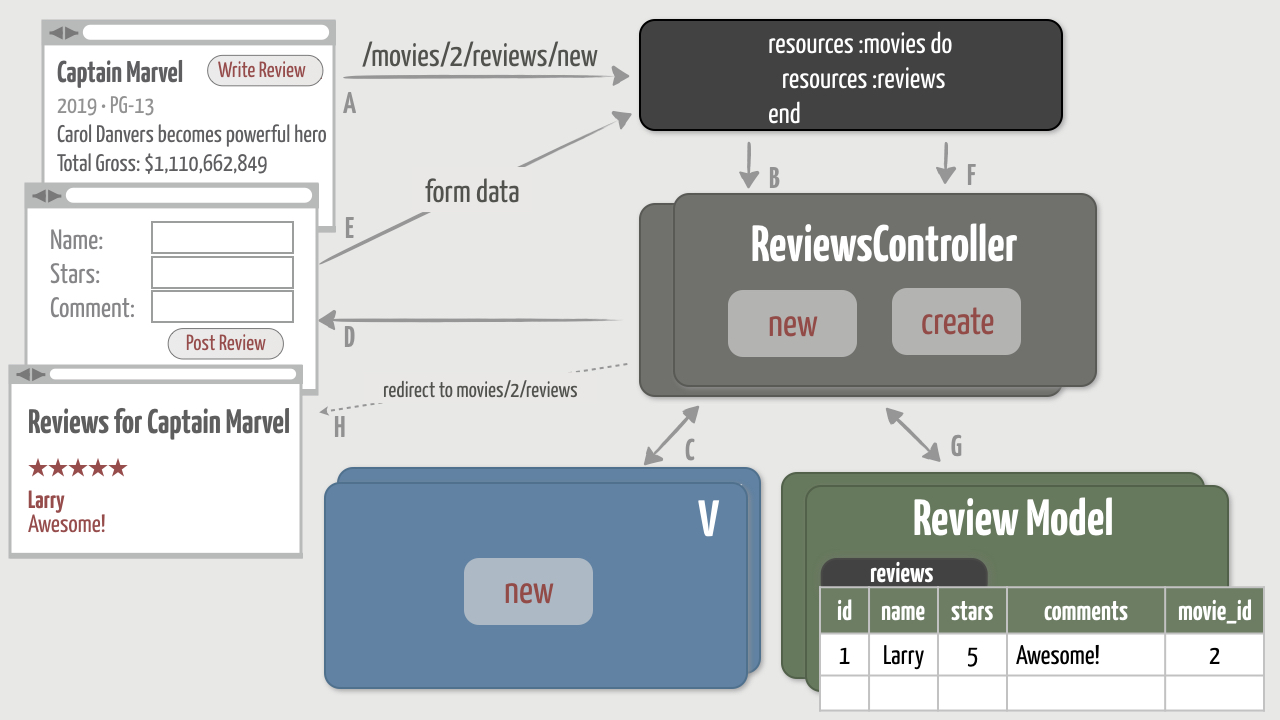
Nested resources are fairly common in Rails apps, so this will give us a good opportunity to get more practice implementing them. It’s also a good “put it all together” exercise that draws from many of the techniques we’ve already learned. As such, this exercise is fairly involved. If you get stuck along the way and need to backtrack (or rewatch the video), don’t beat yourself up. This is completely normal. It may take you a time or two through the material before nested resources really sink in. Be kind to yourself—you’re learning!
1. Generate a “Write Review” Link
Reviews are the bread and butter of any online movie review app, so we need a “Write Review” link on the movie show page. Let’s start there. And perhaps give it a try on your own first before following the steps below.
- Can you guess which route helper method we’ll use to generate the “Write Review” link? Here’s a hint: clicking that link should run the new action in the ReviewsController. If your first intuition was to look at the declared routes, pat yourself on the back!
[ANSWER]
new_movie_review_path
- Now use that route helper method to generate a “Write Review” link on the movie show page. To take advantage of some pre-defined styles, put it under the existing table tag and set the CSS class to review.
[ANSWER]
<div class="details">
<h1><%= @movie.title %></h1>
<h2>
<%= year_of(@movie) %> • <%= @movie.rating %>
</h2>
<div class="reviews">
<%= link_to pluralize(@movie.reviews.size, "review"),
movie_reviews_path(@movie) %>
</div>
<p>
<%= @movie.description %>
</p>
<table>
...
</table>
<%= link_to "Write Review", new_movie_review_path(@movie),
class: "review" %>
</div>
- Then, back in your browser, navigate to a movie show page and you should see the freshly-minted “Write Review” link styled as a button. If you get an error, double-check the name of the route helper method.
- Finally, go ahead and click “Write Review”. You should get an obvious error:
Unknown action

The action 'new' could not be found for ReviewsController
Think about how you might implement the new action before moving on…
2. Create the New Action and Template
Think you know what comes next? The new action needs to display a review form, of course. (It’s not quite as fun as throwing rotten tomatoes, but it’ll have to do!) And you already know how to write a new action to display a form.
But with nested resources, there’s a slight twist to the plot. The form needs to be generated in such a way that submitting it sends the data to the create action. And according to the nested routes, the way to get there is to send a POST request to /movies/2/reviews, for example. In order to create that URL, the form needs a Movie object so that it can fill in the :movie_id parameter in the URL. The form also needs a Review object in order to display the form with the review’s fields.
So, unlike the form for creating a movie, the review form needs two objects. Which means the new action needs to set two instance variables. First, the new action needs to find the movie specified in the /movies/2/reviews/new URL, for example. Then the action needs to instantiate a Review object. Finally, the action needs to render a template that generates the review form.
- Keying off the last error, define a new action in the ReviewsController. Begin the action by finding the movie and assigning it to a @movie variable. Then use that variable to instantiate a new Review object as a child of the movie and assign it to a @review variable.
[ANSWER]
def new
  @movie = Movie.find(params[:movie_id])
  @review = @movie.reviews.new
end
- Refresh the page (you’re still accessing http://localhost:3000/movies/2/reviews/new) and you should totally expect this error:
No template for interactive request

ReviewsController#new is missing a template...
- Following the error, create a file named new.html.erb in the
app/views/reviewsdirectory.
In the new.html.erb template, for now just use the @movie variable to generate header text such as “New Review for Iron Man”. Again, if you want to get sporty, link the movie’s title back to the movie detail page.
[ANSWER]
<h1>New Review for <%= link_to @movie.title, @movie %></h1>
Refresh the page as a quick smoke test. You know everything’s wired up correctly if the header text reflects the movie specified in the URL.
- Carry on by generating a basic form. To keep the form simple for now, just generate a text_field for the reviewer’s name attribute and a “Post Review” submit button. Generating a nested resource form is similar to the other forms we’ve generated, with one exception: the form_with method needs to be passed both the @movie and the @review as an array.
[ANSWER]
<%= form_with(model: [@movie, @review], local: true) do |f| %>
  <%= f.label :name %>
  <%= f.text_field :name, autofocus: true %>

  <%= f.submit "Post Review" %>
<% end %>
- Refresh and you should see an empty text field for the reviewer’s name and a “Post Review” button. That’s worth another victory dance! If instead you see an error, take a deep breath and calmly read it (out loud). Have both instance variables been assigned? Did you double-check the form_with syntax? Is it time for a mental (snack) break?
- At this point it’s worth viewing the page source and narrowing in on this part of the HTML form:
<form action="/movies/2/reviews" method="post">
The action attribute says that submitting this form will send the data to /movies/2/reviews. The method attribute says that the HTTP verb will be a POST. And according to our routes, that verb-URL combination matches the route that goes to the create action. So we’re golden!
- Now that the form is being displayed, finish it off by incrementally adding the following form elements:
- a drop-down to select the number of stars (using Review::STARS)
- a text area to enter the review comment (placeholder text would be helpful)
Need a little help with the syntax and/or styling? There’s absolutely no shame in cheating by looking at the app/views/movies/_form.html.erb partial for pointers. Give it an honest try on your own first before looking at the answer.
[ANSWER]
<%= form_with(model: [@movie, @review], local: true) do |f| %>
  <%= f.label :name %>
  <%= f.text_field :name, autofocus: true %>

  <%= f.label :stars %>
  <%= f.select :stars, Review::STARS, prompt: "Pick one" %>

  <%= f.label :comment %>
  <%= f.text_area :comment, placeholder: "What did you think?" %>

  <%= f.submit "Post Review" %>
<% end %>
Nicely done! We’ve displayed a form for writing movie reviews. Next we’ll turn our attention to what happens when an intrepid user posts a review…
3. Implement the Create Action
We’re on a roll, so let’s just see what happens when we submit the form…
- Click the “Post Review” button and you should see the following run-of-the-mill error:
Unknown action

The action 'create' could not be found for ReviewsController
Remember how to implement a create action? As a refresher, go ahead and look back at the create action in the MoviesController. The create action for reviews needs to handle the form data in similar fashion to the create action for movies. Both actions need to instantiate a new model object with the form’s contents and save the object to the database if it’s valid. But again, there’s a twist when it comes to reviews. A review must be created so that it’s associated with the movie being reviewed.
- To implement the create action in the ReviewsController, you’ll need to do three things. It actually doesn’t require much code, and all the code should be familiar since we’ve already used it in different scenarios:
- Before you can create a new review, you need to find the movie being reviewed (the form posts it in the :movie_id parameter). Assign that movie to a @movie variable.
- Then initialize a new Review object with the contents of the form and (here comes the important part!) remember to use the reviews.new method to associate it with the movie. Assign the new review to a @review variable.Don’t forget that you’ll need to pass reviews.new a list of attributes that are permitted to be mass-assigned from form data. For a refresher on how to do that, cheat by looking at the MoviesController.
- If saving the review is successful, redirect to the page that shows the movie’s reviews with a cheery flash notice such as “Thanks for your review!” Otherwise, if the review is invalid, redisplay the new form populated with any valid review data.
[ANSWER]
def create
  @movie = Movie.find(params[:movie_id])
  @review = @movie.reviews.new(review_params)

  if @review.save
    redirect_to movie_reviews_path(@movie),
                  notice: "Thanks for your review!"
  else
    render :new
  end
end

private

def review_params
  params.require(:review).permit(:name, :comment, :stars)
end
- Back in your browser, give it a whirl by creating a new (valid) review for a movie. You should end up getting redirected to the listing of reviews for that movie, with a flash message thanking you for the review. And you should see the review you just posted!
If for some reason it doesn’t work as you expect, check the log in the command prompt window where your app is running. Make sure the parameters are being passed as you’d expect when the form is posted.
Fantastic! Now we have a web interface for creating reviews and associating them with their respective movie.
4. Display Validation Errors
Whoopsie! We followed the happy path, but forgot about the unhappy path.
- Create an invalid review by entering a name, but leave the rest of the form blank. Submit it, and you should see the form redisplayed. The valid name you entered should be populated in the name field. The other required fields should be suspiciously highlighted, but the validation error messages aren’t being displayed at the top of the form.
- As you’ll recall, we already have a partial that displays validation errors. It’s in the app/views/shared/_errors.html.erb file.Hey, we can just use that partial to display review errors!
- To do that, change the new.html.erb template in the app/views/reviews directory to render the _errors partial at the top of the form. Since the _errors partial assumes that a local variable named object references an ActiveRecord model object, you’ll need assign @review to that variable when rendering the partial.
[ANSWER]
<%= form_with(model: [@movie, @review], local: true) do |f| %>
  <%= render "shared/errors", object: @review %>
   . . .
<% end %>
- Now try creating an invalid review and you should see helpful error messages at the top of the form.
And that takes care of the unhappy path.
5. Refactor
We’re almost done! But before we cross this feature off the to-do list, let’s take a moment to clean up some code duplication. Look back in your ReviewsController. See any duplicated code? Since a review only makes sense in the context of an movie, the first thing every action does is look up the movie using identical code:
@movie = Movie.find(params[:movie_id])
It’s easy to imagine if we add new actions we’ll end up duplicating this line of code more times. So let’s clean up the code duplication before it becomes more of a problem.
- Start by writing a private method named set_movie that retrieves the movie and sets the @movie instance variable.
[ANSWER]
def set_movie
  @movie = Movie.find(params[:movie_id])
end
Note that methods that are public (the default access control) are callable as actions. Our set_movie method is only going to be called within the controller, so it’s good form to make the method private. That way it can’t be called as an action.
- We always want to run the set_movie method before running any action’s code. To do that, use before_action to make sure the method is called before any action’s code is executed.
class ReviewsController < ApplicationController
  before_action :set_movie

  # existing code
- Then remove the duplicated line of code from each action.
- Check your handiwork in the browser and everything should flow just as before. But don’t you feel better knowing your code is nice and tidy?
Using a before_action is an idiomatic way to remove duplication in a controller, but you can also use before_action to share common functionality across controllers. For example, if you had a before_action in the ApplicationController class it would get applied to every action in your application. Alternatively, you could define a common method in the ApplicationController and then selectively apply it to specific controllers by adding the before_action line to each participating controller. Finally, you can use the :only and :except options to apply the before_action to specific actions within a controller.
Bonus Round
What, that wasn’t enough for ya? OK, eager beaver. Here are a few ideas for additional features you might want to try if you’re up for a challenge. You do not need to finish these before moving on to the next exercise. Consider them self-study extra credit!
- The review form is currently using a drop-down to select the number of stars to award a movie. Given that there are only five options and we don’t anticipate adding more, radio buttons are probably more user friendly. Change the review form to use radio buttons for selecting the stars.
<%= f.label :stars %>
<% Review::STARS.each do |star| %>
  <span class="star">
    <%= f.radio_button :stars, star %>
    <%= label_tag star %>
  </span>
<% end %>
- Suppose you wanted a user to be able to write a review directly on a movie’s show page. Try putting the review form at the bottom of that page. You’ll need to make sure the show action initializes a review object for the form to use. It might also be a good idea to make a form partial so you can use it on the movie’s show page and the review’s new page.
- Add functionality to delete reviews. It ends up being very similiar to the flow for deleting movies, but you’ll need to use a nested route helper method to generate the “Delete” link. Then in the destroy action, you’ll need to use the reviews association to find the existing review that’s associated with the movie specified in the URL.
- To take things up a notch, add functionality to edit existing reviews. Again, it’s similar to editing movies, but involves using the nested routes. To avoid duplication, use a form partial to reuse the existing form for creating reviews.
Wrap Up
Way to hang in there! We accomplished a lot over the last couple exercises. Even though the concept of one movie having many reviews isn’t necessarily complicated, there can be quite a bit of mental overhead involved when it comes to actually implementing this association in the user interface. You always have to keep not one, but two objects in your head as you work through each component of the MVC triad.
In the next section, we’re going to have some fun with the review data we now have nestled in our database.
One-to-Many: Logic
Exercises
Objective
Now that we have a web interface for writing movie reviews, let’s have a little fun with the data we’re collecting. For example, movie buffs would like to see the average number of stars for each movie. It turns out that Active Record makes it easy to run these sorts of calculations without having to write a bunch of complicated SQL. So let’s get right to it!
1. Calculate a Movie’s Average Stars
The inefficient way to calculate the average number of stars for a movie would be to use the movie.reviews association to load the array of reviews, loop through each review accumulating star values, then calculate the average at the end. If the data set is small enough, loading all the reviews isn’t a big deal.
But it’s more efficient to use native in-database calculation functions. That way we’re not loading a bunch of reviews into memory and then throwing them away. Each database supports calculations slightly differently, but Active Record hides all those details behind a friendly set of calculation methods.
So, before launching straight into the task at hand, let’s spend a few seconds in the console just getting the hang of the built-in average calculation method.
- To calculate the average value of a given model attribute, you use the average method. For example, here’s how to calculate the average number of stars for all the reviews in the database:
>> Review.average(:stars)
The result is a BigDecimal, so to print it in a friendly format in the console you’ll need to use to_s:
>> Review.average(:stars).to_s
Notice that the generated SQL statement uses SQLite’s AVG function to perform the entire calculation in one database query. Pretty cool!
- Ok, so we called the average method on the Review class. And that ran the average calculation on all the rows in the reviews database table. That’s interesting, but it’s not really what we want. We want to calculate the average number of stars for reviews written for a particular movie.How do we do that? Well, here’s something really cool: we can also call the average method on an association . In particular, we can call the average method on the reviews association of a specific movie.For example, here’s how to calculate the average number of stars for “Captain Marvel”:
>> movie = Movie.find_by(title: "Captain Marvel")

>> movie.reviews.average(:stars).to_s
Notice that the SQL statement is now querying the rows in the reviews database table, and in particular only those rows that belong to the movie “Captain Marvel”. And again, it’s just one database query!
Nifty! Now let’s apply what we learned back in the app…
2. Display a Movie’s Average Stars
Returning to our original task, we want to display the average number of review stars for each movie. We know how to run the calculation, but it’s always important to think about where the code will live. Calculations of this kind are a type of business logic. As such, they belong in the model. We’ll start by encapsulating the calculation in an average_stars method of the Movie model, then work our way back out to the web interface.
- In the Movie class, define an instance method named average_stars. Implement the method so that it calculates and returns the average number of stars for the movie. There’s a corner case to be aware of. If the movie doesn’t have any reviews then the calculation will return nil. In that case, return a value of 0.0 as the average.
[ANSWER]
class Movie < ApplicationRecord
  # existing code

  def average_stars
    reviews.average(:stars) || 0.0
  end
end
- Next we want to display the average number of stars on a movie’s show page. That’s easy enough, but there’s a catch: if the movie doesn’t have any reviews then the average_stars method will return 0.0. In that case, rather than just displaying a zero value we instead want to display “No reviews”.
Hmm… so to do that we’ll need some conditional view logic. And that always belongs in a view helper. Let’s start from the outside-in and assume we have a average_stars helper that takes a movie object and applies the conditional logic. Even though we don’t have that helper method yet, go ahead and update the movie show template with the following:
<div class="reviews">
  <%= average_stars(@movie) %>
  <%= link_to pluralize(@movie.reviews.size, "review"),
                movie_reviews_path(@movie) %>
</div>
- Now implement that view helper method. If the given movie has an average stars value of zero, the helper should return the string “No reviews” (in bold). Otherwise, return the average number of stars as the string “2 stars”, for example.
[ANSWER]
def average_stars(movie)
  if movie.average_stars.zero?
    content_tag(:strong, "No reviews")
  else
    pluralize(movie.average_stars, "star")
  end
end
- Here’s another finishing move: Since the movie.average_stars method returns a BigDecimal, you can end up with fairly precise numbers such as 3.333333333333333. That’s great for science, but overkill for movie review averages. To convert it into something more manageable such as 3.3, use the built-in number_with_precision helper to format the result with a precision of 1.
[ANSWER]
def average_stars(movie)
  if movie.average_stars.zero?
    content_tag(:strong, "No reviews")
  else
    pluralize(number_with_precision(movie.average_stars, precision: 1) , "star")
  end
end
- Finally, back in your browser, go to a movie show page and you should see the average number of stars!
- Since you now have a helper that makes it easy to display a movie’s average stars, feel free to update the movie index page as well if you fancy seeing averages in the movie listing. To pick up some CSS styling, put the call to the average_stars helper in a span with a class of stars. This will display the average stars to the right of the movie title.
[ANSWER]
<div class="summary">
  <h2>
    <%= link_to movie.title, movie_path(movie) %>
  </h2>
  <h3>
    <%= total_gross(movie) %>
  </h3>
  <span class="stars">
    <%= average_stars(movie) %>
  </span>
  <p>
    <%= truncate(movie.description, length: 150, separator: ' ') %>
  </p>
</div>
Nicely done—5 stars!
Bonus Round
Asterisk Stars
Change the average_stars helper method to display the average number of stars as a number of asterisks (*). For example, if the average rating is 4, show four asterisks.
[ANSWER]
def average_stars(movie)
  if movie.average_stars.zero?
    content_tag(:strong, "No reviews")
  else
    "*" * movie.average_stars.round
  end
end
★ Stars
If you completed a previous bonus exercise where you displayed a review’s star rating (1 - 5) as a series of partially filled in stars, then it makes sense to also display a movie’s average stars the same way!
- First you need a way to convert a movie’s average number of stars to a percentage. That responsibility clearly falls to the Movie model, and it already has an average_stars method.So start in the Movie model by defining an average_stars_as_percent instance method that defers to the existing average_stars method to calculate the average stars and returns the average stars as a percentage.
[ANSWER]
class Movie < ApplicationRecord
  # existing code

  def average_stars_as_percent
    (self.average_stars / 5.0) * 100
  end
end
- Then on the movie index page, change the line that calls the average_stars helper method to instead render the existing shared/stars partial, making sure to assign the required percent variable to the result of calling the movie.average_stars_as_percent.
[ANSWER]
<span class="stars">
  <%= render "shared/stars", percent: movie.average_stars_as_percent %>
</span>
- In the same way, on the movie show page, change the line that calls the average_stars helper method to instead render the same shared/stars partial and assign the percent.
[ANSWER]
<div class="reviews">
  <%= render "shared/stars", percent: @movie.average_stars_as_percent %>
  <%= link_to pluralize(@movie.reviews.size, "review"),
              movie_reviews_path(@movie) %>
</div>
- If you want, you can now remove the average_stars helper method defined in the MoviesHelper module since that method is no longer being used.
Now both the movie listing page and the movie detail page should show a series of partially-filled in stars reflecting the average reviews!
More Calculation Methods
In addition to average, the calculation API includes other handy calculation methods. Look through the possibilities, and then give the following scenarios a try in the console:
- Start by calculating the minimum total gross value of all the movies in the database.
>> Movie.minimum(:total_gross).to_s
- Now calculate the maximum total gross value of all the movies.
[ANSWER]
>> Movie.maximum(:total_gross).to_s
- What if you wanted to calculate the minimum (or maximum) total gross of only the movies that have a PG-13 rating? It turns out you can chain together calls such as where and minimum, for example. Give it a try before looking at the answer.
[ANSWER]
>> Movie.where(rating: "PG-13").minimum(:total_gross).to_s
- The accountants think it would be interesting to tally up the total gross values for all the movies in our database. Use a calculation to do that.
[ANSWER]
>> Movie.sum(:total_gross).to_s
- The statisticians think it’s more interesting to calculate the average total gross of all our movies. Show 'em how it’s done.
[ANSWER]
>> Movie.average(:total_gross).to_s
- The marketing gurus think it would be interesting to tally up the total number of review stars earned by a movie. We have no idea what they’ll do with this data, but the future of movie advertising may be at your fingertips!
[ANSWER]
>> movie = Movie.find_by(title: "Captain Marvel") >> movie.reviews.sum(:stars)
- Now calculate the maximum number of stars in a review for the same movie.
[ANSWER]
>> movie.reviews.maximum(:stars)
Calculations are fun stuff, even if you aren’t an accountant, statistician, or marketing guru!
Cult Movies
We all know of a movie that didn’t necessarily gross a ton at the box office, but the few people who did watch the movie really loved it! We call those movies cult classics . And to a specific group of fans they are blockbusters.
Change the definition of the flop? method so that cult classics aren’t included. For example, if a movie has more than 50 reviews and the average review is 4 stars or better, then the movie shouldn’t be a flop regardless of the total gross.
Here’s a hint: Because the logic for determining whether a movie is a flop is tucked inside the Movie model, you can make this change in one place. When you can do that, you know you’re on the right design path!
Wrap Up
Once you start creating model associations, looking at the data, and talking with users, you’ll likely come up with all sorts of interesting business logic. The secret is to always try to push as much business logic as you can back into the model. That makes it easier to use the logic in different parts of your application.
Also, although it may be tempting to perform calculations in Ruby, you’ll get better performance if you instead use Active Record’s calculation methods.