Current User
Exercises
Objective
So you’ve signed in, but how do you really know you’re still signed in when you browse from page to page? There’s currently no reassuring feedback indicating that the app knows who you are.
So let’s fix that. If a user is signed in, we’ll display their name in the header of every page with a link to their profile page. We’ll also remove those “Sign Up” and “Sign In” links, since they’re kinda meaningless if you’re already signed in.
1. Display the Current User
First we want to show the user’s name in the header, so let’s start simple and build up from there…
- To set the stage, begin by signing in so you have a user id in the session. You’ll end up on their profile page. Then go to the application home page, for example, and you’ll notice there’s absolutely no indication that you’re signed in.
- Get some practice reading session data by simply showing the currently signed-in user’s id in the header (app/views/layouts/_header.html.erb).
[ANSWER]
<ul class="right">
  <li>
    <%= session[:user_id] %>
  </li>
  <li>
    <%= link_to "Sign In", signin_path, class: "button" %>
  </li>
  <li>
    <%= link_to "Sign Up", signup_path, class: "button" %>
  </li>
</ul>
- Now reload and you should see the user’s id displayed at the top of every page.
- But of course we really want to display the user’s name rather than their id. For now, go ahead and add the code to do that directly inside the view template.
[ANSWER]
<ul class="right">
  <li>
    <%= User.find(session[:user_id]).name %>
  </li>
  <li>
    <%= link_to "Sign In", signin_path, class: "button" %>
  </li>
  <li>
    <%= link_to "Sign Up", signup_path, class: "button" %>
  </li>
</ul>
- Finally, reload again and you should now see the user’s name displayed at the top of every page.
2. Write a Custom View Helper
It’s working, but we’re never satisfied with that. To get it to work we put query code in a view template, and that’s always a red flag. Looking forward, other parts of our app will also need to be able to get the currently signed in user. And as we learned earlier in the course, a great way to reuse bits of view logic is to write custom view helpers. In this case, we want to define a helper named current_user that returns the currently signed-in user.
- Start by replacing the offending line in the header with what we really want it to look like—using a yet-to-be-defined current_user helper:
<ul class="right">
  <li>
    <%= current_user.name %>
  </li>
  <li>
    <%= link_to "Sign In", signin_path, class: "button" %>
  </li>
  <li>
    <%= link_to "Sign Up", signup_path, class: "button" %>
  </li>
</ul>
There, that’s more expressive and neatly encapsulates the query.
- Next, define that helper method. As it’s an application-wide helper, and not specific to any one controller, this helper belongs in the
ApplicationHelpermodule found in theapp/helpers/application_helper.rbfile.
[ANSWER]
module ApplicationHelper
  def current_user
    User.find(session[:user_id]) if session[:user_id]
  end
end
- Refresh any page and you should still see the user’s name. But now your code is better organized, and that makes you feel better, too.
- Having a helper method that returns the current user makes it easy to link the user’s name to their profile page. So go ahead and do that!
[ANSWER]
<ul class="right">
  <li>
    <%= link_to current_user.name, current_user %>
  </li>
  <li>
    <%= link_to "Sign In", signin_path, class: "button" %>
  </li>
  <li>
    <%= link_to "Sign Up", signup_path, class: "button" %>
  </li>
</ul>
- Now on every page you should be able to click the signed-in user’s name to go directly to their profile page.
3. Toggle the Header
Hey, what about those “Sign In” and “Sign Up” links? If a user is already signed in, it doesn’t make any sense to show those in the header.
Arrange things so that the header changes based on the sign-in status. When a user is signed in, they should only see their name in the header. When a user is not signed in, they should see the “Sign In” and “Sign Out” links in the header.
[ANSWER]
<ul class="right">
  <% if current_user %>
    <li>
      <%= link_to current_user.name, current_user %>
    </li>
  <% else %>
    <li>
      <%= link_to "Sign In", signin_path, class: "button" %>
    </li>
    <li>
      <%= link_to "Sign Up", signup_path, class: "button" %>
    </li>
  <% end %>
</ul>
Before moving on, check that the header changes as you’d expect based on whether a user is signed in or signed out. We don’t yet have a way to sign out a user (that’s coming up next!), so for now you’ll need to restart your browser which expires the session cookie.
4. Automatically Sign In After Sign Up
As things stand, when the user signs up for a new account they aren’t automatically signed in. They end up on their profile page, but their name doesn’t show up in the header. Instead, they have to sign in using the same information they just used to sign up and that’s pretty annoying!
Fix that by automatically signing in the user when they create an account.
[ANSWER]
def create
  @user = User.new(user_params)
  if @user.save
    session[:user_id] = @user.id
    redirect_to @user, notice: "Thanks for signing up!"
  else
    render :new
  end
end
Since you already have the header changing based on the sign-in status, when you create a new user you should immediately get feedback that they’re signed in!
5. Performance Tip
When you think you’ve finished a feature, it’s always a good idea see what’s going on in the log file when that feature is exercised. In particular, it’s wise to keep a check on the number of database queries required to show any particular page.
So let’s see what’s happening in query land for this feature…
- Make sure you’re signed in, and then go the application home page (or anywhere except the user profile page).
- Then scroll back in the log file to the part where the
GETrequest was issued for that page. As part of fulfilling that request, you should notice three SQL queries for the same user record:
User Load (0.1ms)  SELECT "users".* FROM "users" WHERE "users"."id" = ? LIMIT ?  [["id", 1], ["LIMIT", 1]]
CACHE User Load (0.0ms)  SELECT "users".* FROM "users" WHERE "users"."id" = ? LIMIT ?  [["id", 1], ["LIMIT", 1]]
CACHE User Load (0.1ms)  SELECT "users".* FROM "users" WHERE "users"."id" = ? LIMIT ?  [["id", 1], ["LIMIT", 1]]
Now, Rails is pretty good about caching query results in the same request. In this case, since these three queries fetch the same user record, Rails caches the result of the first SQL query. That cached result is then returned for the second and third queries. Thus, those two queries are marked as CACHE .
So it’s no big deal since the result is cached, but we can avoid those second two queries entirely.
- If you look back in the header (app/views/layouts/_header.html.erb), you’ll notice that we’re currently calling our
current_usermethod three times:
<% if current_user %>
  <%= link_to current_user.name, current_user %>
And we know that current_user performs a find query:
def current_user
  User.find(session[:user_id]) if session[:user_id]
end
So that’s why we see three queries in the log file!
- We can optimize the current_user method by storing the result of calling User.find in an instance variable, and only running the query again if that instance variable doesn’t already have a value. To do that, change the
current_usermethod to set a@current_userinstance variable using the ||= operator, like so:
def current_user
  @current_user ||= User.find(session[:user_id]) if session[:user_id]
end
This is a Ruby idiom that you’ll often see used in Rails applications. Here’s what happens in this case: The first time the current_user method is called, the @current_user instance variable doesn’t have a value. So the code on the right-hand side of the ||= operator (the User.find query) gets run and the result is assigned to the @current_user instance variable. Then the method implicitly returns the value of that instance variable. So far, so good.
Here’s where things get interesting: If the current_user method is called again during the same request , then it doesn’t bother running the query on the right-hand side of ||= because @current_user already has a value. Instead, it simply returns that value without running the database query.
It’s important to note that you must assign the result of calling User.find to an instance variable, not a local variable. A local variable (a variable without the @ symbol) would go out of scope when the current_user method returned, which would mean the query result wouldn’t be stored for use the next time current_user was called.
You’ll often hear this idiom referred to as memoization . It’s a fancy word for a simple concept. The upshot is that User.find will only be called once per request, the first time the current_user method is called.
- To observe its effect, reload the page and check out the log file again:
User Load (0.1ms) SELECT "users".* FROM "users" WHERE "users"."id" = ? LIMIT ? [["id", 1], ["LIMIT", 1]]
Now you should see one query rather than three! All the CACHE lines are gone since the current_user method now only calls the User.find query once per request.
Bonus Round
Show an “Account Settings” Link
When a user is signed-in, it might be convenient to also put an “Account Settings” link in the header next to the user’s name. That way the user can jump directly to the form for editing their account information. And it’s really easy to do now that you have a current_user method!
[ANSWER]
<ul class="right">
  <% if current_user %>
    <li>
      <%= link_to current_user.name, current_user %>
    </li>
    <li>
      <%= link_to "Account Settings", edit_user_path(current_user) %>
    </li>
  <% else %>
    <li>
      <%= link_to "Sign In", signin_path, class: "button" %>
    </li>
    <li>
      <%= link_to "Sign Up", signup_path, class: "button" %>
    </li>
  <% end %>
</ul>
Wrap Up
Way to hang in there! Looking back, you learned a lot about sessions in the last three modules.
Sessions are used to uniquely track signed-in users across multiple requests:
- When a user successfully signs in, their unique user id (the primary key in the users database table) is stored in a hash called session.
- The session hash with the user’s id is shuttled back and forth between the app and the browser in a cookie.
- The user’s id is removed from the session when they sign out (details coming up in the next section).
Session data is stored in a cookie. As such, this means:
- We don’t look up session data in a database table.
- We don’t need a Session model.
- We use a singular resource route (resource :session).
- We access the contents of the cookie by reading values from the session hash.
It’s the presence of the user id (or lack thereof) in the session hash that allows us to:
- Determine if a user is signed in.
- Look up the user in the database.
- Display that user’s name in the header.
- Show “Sign In” and “Sign Up” links as appropriate.
The SessionsController has three actions:
- The new action renders a sign-in form.
- The create action stores an authenticated user’s unique id in the session hash.
- The destroy action removes the user’s id from the session.
So next time you visit your favorite site and enter your information in their sign-in form, you’ll better appreciate the complexity that’s going on behind the scenes!
Up next, we’ll address what happens when you sign out, which is quick and easy as compared to signing in.
Sign Out
Exercises
Objective
Last, but by no means least, we need a way for signed-in users to sign out! To do that, we need to:
- Generate a “Sign Out” link in the header
- Implement the
destroyaction in theSessionsControllerso that it removes the user’s id from the session
Notice that we don’t need to add a new route because remember we already have the singular resource routes. So this turns out to be a short exercise!
1. Generate a “Sign Out” Link
First, let’s put a familiar “Sign Out” link in the header…
- We’ll need to use a route helper method to generate that link, so you may want to start by reviewing the defined session routes and identifying the correct route helper method.
- Using that route helper method, generate a “Sign Out” link next to the signed-in user’s name in the header. The link should only show up if a user is currently signed in.
[ANSWER]
<% if current_user %>
  <li>
    <%= link_to current_user.name, current_user %>
  </li>
  <li>
    <%= link_to "Sign Out", session_path, method: :delete,
                            class: "button" %>
  </li>
<% else %>
  ...
<% end %>
- Over in your browser, make sure you’re signed in and then reload any page. You should see a “Sign Out” link at the top of every page.
2. Implement the Destroy Action
To sign out the user, all we have to do is remove their user id from the session…
- Implement the
destroyaction in theSessionsController. Once the user is signed out, redirect to the application home page with a flash message that confirms the user is no longer signed in.
[ANSWER]
def destroy
  session[:user_id] = nil
  redirect_to movies_url, notice: "You're now signed out!"
end
- Then go back to the browser and click the “Sign Out” link again. You should end up on the movies page with the header status changed to indicate that you’re no longer signed in. That’s a nice reward for all the groundwork we did in previous exercises!
3. Sign Out When Destroying Accounts
Before we declare victory and move on, we have a small bit of house-keeping. If a signed-in user deletes their account, things go haywire because the session still has that user’s id. To avoid this messy situation, when a user deletes their account we need to automatically sign them out. That way an invalid user id isn’t left hanging around in the session to wreak havoc.
- To demonstrate the problem in the browser, first sign in. Then click the “Delete Account” link on the user’s profile page. You should get the following error as a parting gift:
ActiveRecord::RecordNotFound in UsersController#index

Couldn't find User with id=7
It’ll point to this line in your current_user view helper method as the source of the problem:
@current_user ||= User.find(session[:user_id]) if session[:user_id]
Remember, find method raises an RecordNotFound exception when it can’t find a record matching the given primary key. And in this case, session[:user_id] returns the primary key for the user you just deleted. Whoops!
- To avoid this situation, update the
destroyaction in theUsersControllerto sign out the user after destroying it.
[ANSWER]
def destroy
  @user = User.find(params[:id])
  @user.destroy
  session[:user_id] = nil
  redirect_to movies_url, alert: "Account successfully deleted!"
end
- You’ll then need to restart your browser to clear out the offending session cookie.
- Finally, make sure deleting a user account doesn’t raise an exception!
Wrap Up
A hearty round of applause is in order, we’d say! You now have an effective authentication solution in place that you built step-by-step from scratch by putting all the following components together:
- Creating a user resource complete with a
usersdatabase table, aUsermodel with validations, and aUsersController. - Defining actions (and creating respective views) to support the conventional resource routes for interacting with users via the web:
index,show,new,create,edit,update, anddestroy. - Validating that a user has a confirmed password and storing it securely using Rails conventions: a
password_digestcolumn to theusersdatabase table,has_secure_passwordin theUsermodel, and installing thebcryptgem. - Adding routes for a singular
sessionresource, creating aSessionsControllerto manage the session resource, and ultimately using the session to uniquely track signed-in users. - Generating a sign-in form using the
form_withhelper and the url option, since the session resource doesn’t map to a model object. - Authenticating a user with the super-easy, super-powerful
authenticatemethod. - Displaying the user’s name (and appropriate “Sign In”, “Sign Up”, or “Sign Out” links) in the header, courtesy of a
current_usermethod. - Implementing a
destroyaction in theSessionsControllerthat removes the user’s id from the session to effectively complete the authentication process.
Whew, that is a lot of progress! If you haven’t already, now’s a great time to take a break, stretch your legs, and let all this new knowledge settle in your brain.
In the next module, we’ll build on this foundation by restricting access to certain areas of the app. For starters, only Daisy should be able to edit her account information. Not Lucy, Larry, or any other user. We’ll fix that after the break!
Dive Deeper
- To learn more about sessions, refer to 5 Session in the Action Controller Overview and 2 Sessions in the Rails Guides: Ruby On Rails Security Guide.
- If you need an authentication system with a lot more bells and whistles, you might consider using Devise. It supports a number of advanced features out of the box, and hides all the nitty-gritty details from you. Unfortunately, that means Devise feels very magical if you don’t have a solid understanding of the basics of authentication. That’s why the creators of Devise recommend that you not use Devise if you’re building your first Rails app. Instead, they advise you start by creating a simple authentication system from scratch. And now you’ve done exactly that!
Authorization: Part 1
Exercises
Objective
Let’s face it, our app is a bit too trusting. As it stands, anybody —whether they’re signed in or not!—can do some serious damage: delete movies, change information in user accounts, and even permanently delete all the user accounts! But that’s all about to change…
First we need to make sure that a user is signed in before allowing them to list users or view a user’s profile page. In fact, with the exception of the new and create actions in the UsersController , all user-level actions should be restricted to signed-in users.
This process is commonly referred to as authorization . Now, authorization rules tend to vary widely depending on the nature of the application. The good news is once you understand the basic technique, you can apply it as you see fit. Enforcing authorization rules turns out to be fairly straightforward thanks to the before_action method in Rails. By defining a before_action we can intercept calls to any controller action and automatically run code to determine, given the circumstances, whether the action can indeed be called.
For the purposes of this exercise, we’ll define a require_signin method that runs before restricted user-level actions to check whether a user is signed in. If a user isn’t currently signed in, we’ll redirect to the sign-in form and the original action won’t run. Otherwise, if the user is signed in, we’ll go ahead and let the original action run.
Here’s a high-level visual of our goal:

It’s like putting a big, bad security guard at the door of every restricted action. He either nods and lets you in, or he furrows his brow and points you to the security desk to collect your badge.
Restrict Access to Users
Anyone should be able to create an account using the new and create actions in the UsersController . However, only signed-in users should be allowed to run the other actions in that controller. To enforce that, we’ll start by setting up a gatekeeper…
- In the
UsersController, use abefore_actionto call a method namedrequire_signin(which we’ll implement next) before running any action exceptneworcreate.
[ANSWER]
class UsersController < ApplicationController
  before_action :require_signin, except: [:new, :create]

  # existing actions
end
- Next, define the
require_signinmethod so that it redirects to the sign-in form if a user isn’t currently signed in.
Where should the require_signin method be defined? Well, the immediate need is to be able to call that method from the UsersController . But later on we’ll need to restrict access to actions in other controllers as well. So to make the require_signin method accessible to all controllers, you’ll need to define it in ApplicationController (in app/controllers/application_controller.rb ).
All Rails controllers inherit from ApplicationController which means any methods you define there are automatically accessible in all the other controllers. And since the require_signin method is only going to be called by before_action within a controller, it’s a good practice to make it a private method so it’s not exposed as a controller action.
For now, assume you can call the existing current_user method to determine if a user is signed in.
[ANSWER]
class ApplicationController < ActionController::Base

private

  def require_signin
    unless current_user
      redirect_to new_session_url, alert: "Please sign in first!"
    end
  end

end
- There’s one small problem: The
require_signinmethod calls thecurrent_usermethod which is currently a view helper method defined in theApplicationHelper. And that won’t work because helper methods can’t be called from inside controllers!
To fix that, move the current_user method from the ApplicationHelper module to the ApplicationController class as another private method. That makes the method available to controllers, but it can no longer be called as a helper method in views. So you’ll also need to declare current_user as a helper method so that it’s available in all views.
[ANSWER]
class ApplicationController < ActionController::Base

private

  def require_signin
    unless current_user
      redirect_to new_session_url, alert: "Please sign in first!"
    end
  end

  def current_user
    @current_user ||= User.find(session[:user_id]) if session[:user_id]
  end

  helper_method :current_user
end
- Finally, to check your work, sign out and then try to list the users and view a particular user’s profile page. Regardless of what you do, the
before_actionshould intercept your request and redirect you to the sign-in form. Because thebefore_actioncaused a redirect, the original action (indexorshowin this case) never got run. And that’s exactly as it should be!
Wrap Up
That’s a great start! Now that you have some basic authorization working, we’ll take thing up a notch in the next exercise by further restricting access based on who is signed in.
Authorization: Part 2
Exercises
Objective
Requiring users to be signed in puts us on the right path, but it’s not enough. We still have a gaping security hole: any signed-in user can edit or delete any other user’s account! Obviously, users should only be allowed to edit or delete their own account.
To enforce that, we’ll define a require_correct_user method to check whether the signed-in user is the same as the user being edited or deleted. And we’ll declare a second before_action to run the require_correct_user method before the edit , update , and destroy actions. We’ll also hide the “Edit Account” and “Delete Account” links if you’re not authorized to perform those actions.
Here’s a high-level visual of our goal, adding a second level of authorization:
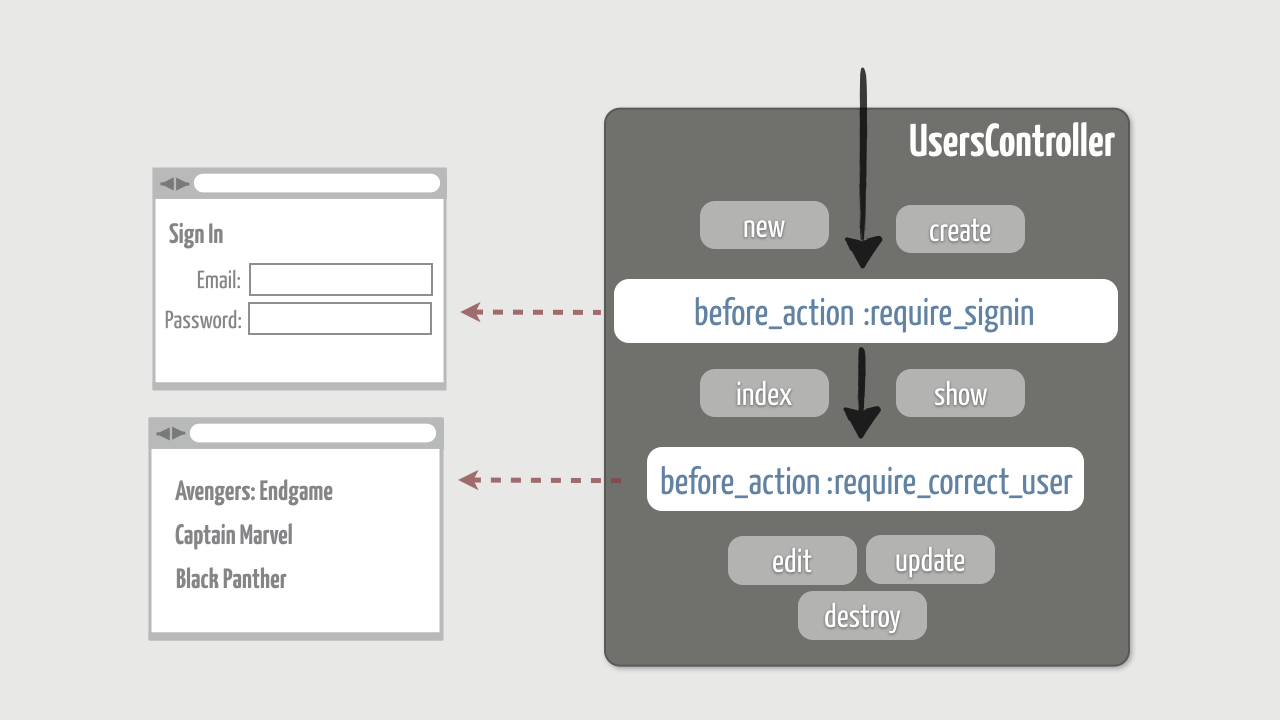
1. Ensure the Correct User Is Signed In
First up, a signed-in user should only be allowed to edit or delete their own account.
- In the
UsersControllerbeneath the existingbefore_action, add anotherbefore_actionthat calls a method namedrequire_correct_userbefore running theedit,update, ordestroyactions.
[ANSWER]
class UsersController < ApplicationController
  before_action :require_signin, except: [:new, :create]
  before_action :require_correct_user, only: [:edit, :update, :destroy]

  # existing actions
end
The order in which you declare before_action methods is crucial. Before an action is run, the before_action methods are executed in turn starting at the top and working down. If at any point along the way one of the before_action methods causes a redirect (or returns false ), then execution terminates. So by putting the require_correct_user check after the require_signin check, we’re assured that the user is signed in before checking that they’re the correct user.
- Then define the
require_correct_usermethod. It will only be called by theUsersController, so define the method in theprivatesection of that class. Therequire_correct_usermethod needs to find the user being accessed and compare it to the currently signed-in user (the result of calling thecurrent_usermethod). If the user being accessed is not the signed-in user, then deny access by redirecting to the application home page.
[ANSWER]
class UsersController < ApplicationController
  before_action :require_signin, except: [:new, :create]
  before_action :require_correct_user, only: [:edit, :update, :destroy]

  # existing actions

  private

  def require_correct_user
    @user = User.find(params[:id])
    unless current_user == @user
      redirect_to root_url
    end
  end
end
- Now you’re in a position to remove a small bit of duplication. Remember that
require_correct_userwill be called before theedit,update, anddestroyactions. And if you peek at those actions, you’ll notice that the first thing they do is find the user being accessed and assign it to an@userinstance variable. You can safely remove those lines since therequire_correct_usermethod has already set up an@userinstance variable. - Check your work by signing in, listing the users, and showing the profile page for a user you aren’t signed in as. Then try clicking the “Edit Account” link. Since it’s not your account, you should get redirected to the home page.What about deleting someone else’s account? You should get turned away just the same.
- Finally, make sure you can in fact edit your own account!
2. Hide Unauthorized Links
We’ve successfully restricted access to the edit and destroy actions, but the “Edit Account” and “Delete Account” links are still being displayed on every user’s profile page. Let’s tidy that up. We only want to display those links if you’re viewing your own profile page. In other words, you need to be the correct user to even see those links!
- Start by wrapping the “Edit Account” and “Delete Account” links on the profile page with a simple conditional. Notice that the
show.html.erbtemplate already has an@userinstance variable referencing the user being shown. So you only want to generate the links if that user is the same as the currently signed-in user (the result of calling thecurrent_usermethod).
[ANSWER]
<% if current_user == @user %>
  <div class="actions">
    <%= link_to "Edit Account", ... %>
    <%= link_to "Delete Account", ... %>
  </div>
<% end %>
- As a quick sanity check, go to a profile page for a user you aren’t signed in as. You shouldn’t see the “Edit Account” and “Delete Account” links. However, the links should still be displayed on your own profile page.
- OK, that works, but it presents an opportunity to refactor. You now have the following comparison happening in both the
showtemplate and therequire_correct_usermethod:
current_user == @user
What we’re essentially trying to do here is determine whether the @user is the currently signed-in user. We can make that more expressive, and eliminate possible duplication by encapsulating that comparison in a method called current_user? . Here’s an example of how we want to call that method:
current_user?(@user)
Remember, methods in Ruby that end with a question mark (?) generally return a boolean result. Calling them is like asking a yes or no question. In this case, we’re asking the current_user? method whether the given @user is the current user. And we can use the result to make a decision in a conditional expression. It’s a trivial one-line method, but it expresses our intent better.
- With that in mind, go ahead and define the
current_user?method. You want to be able to call it from any controller and also as a helper method from any view. So it needs to be defined in theApplicationController.
[ANSWER]
private
  # existing methods

  def current_user?(user)
    current_user == user
  end

  helper_method :current_user?
end
- Then change the user
showtemplate to call your newcurrent_user?method.
[ANSWER]
<% if current_user?(@user) %>
  <div class="actions">
    <%= link_to "Edit Account", ... %>
    <%= link_to "Delete Account", ... %>
  </div>
<% end %>
- As well, you can now use the
current_user?method over in therequire_correct_usermethod of theUsersController. For style points, put the redirection and conditional all on one line.
[ANSWER]
def require_correct_user
  @user = User.find(params[:id])
  redirect_to root_url unless current_user?(@user)
end
- Finally, make sure everything still works!
3. Go Back To The Intended URL
Ready for a finishing move? Here’s a fun one that gives you more practice with the session…
You probably noticed that if you’re not signed in and try to access a restricted page, after signing in you don’t end up on the intended page. Instead, after successfully signing in, you always get redirected to your profile page. It’s as if the application forgot where you intended to go in the first place. A smarter application would remember your intended destination and then immediately redirect you back to that URL after you’ve signed in.
And now that we understand sessions, we can do that…
- To demonstrate the problem, first sign out and then try to visit the user listing page. We’ve set it up to only be viewable by signed-in users, so you’ll get redirected to the sign-in form. Go ahead and take the bait by signing in. You should then get redirected to your profile page. But wait, the whole point of signing in was to see that user listing page!
- First, you need to store the URL of the requested page in the session before redirecting to the sign-in form. Remember, that redirection happens in the
require_signinmethod of the ApplicationController. You can get the URL of the requested page usingrequest.url. Simply assign it to the:intended_urlsession key (the name of the key is arbitrary).
[ANSWER]
def require_signin
  unless current_user
    session[:intended_url] = request.url
    redirect_to new_session_url, alert: "Please sign in first!"
  end
end
- Then, when a user has successfully signed in, redirect them back to the URL stored in the session if one exists. If there isn’t a URL to return to, default to redirecting to the user’s profile page as before. Remember that after redirecting you’ll need to remove the URL from the session so it’s not stuck in there.
[ANSWER]
class SessionsController < ApplicationController
  def create
    user = User.find_by(email: params[:email])
    if user && user.authenticate(params[:password])
      session[:user_id] = user.id
      redirect_to (session[:intended_url] || user),
                   notice: "Welcome back, #{user.name}!"
      session[:intended_url] = nil
    else
      flash.now[:alert] = "Invalid email/password combination!"
      render :new
    end
  end
end
- Finally, give it a whirl by signing out and going to a page that requires sign in. After signing in, you should end up on the page you were aiming for.
It’s just a little icing on the cake that makes life easier for our users!
Wrap Up
You now have “gatekeepers” in place for all the restricted user actions. This means your app is more secure when it comes to only allowing certain users to do certain things.
Can you guess where else we could use a gatekeeper in the app? Hint: What might a malicious user do if he doesn’t like a particular movie?
Admin Users
Exercises
Objective
In the previous exercise we focused on authorization to restrict access to the actions in the UsersController . Using the same technique, we can layer in authorization in other areas of our app. In this exercise we’ll apply what we learned toward restricting access to another resource. And this time we’ll throw in a twist…
Way, way back in the course we designed the interface for creating, editing, and even destroying movies. At the time we weren’t concerned with who could perform those actions. So as it stands, that interface is wide open to anyone who happens to stumble into our app. Obviously that’s just asking for trouble. We at least need to restrict that part of the interface to signed-in users only. And we already know how to do that.
But what type of user is allowed to create, edit, and destroy movies? To make things interesting, let’s say that only special “admin” users are allowed to perform those actions. Think of admins as the folks with the insider Hollywood connections. They’re our trusted authority when it comes to movie information.
So here’s what we need to do:
- Generate a new migration file that adds an
adminboolean field to theusersdatabase table - Turn an existing user into an admin user (with that special Hollywood glow!)
- Use a
before_actionto ensure only admin users can create, edit, and destroy movies - Hide all the links to admin functions unless an admin user is signed in
Here’s a quick visual of our goal:

Most of this is just a slight variation of what we’ve already done, so let’s break a leg…
1. Add an Admin Column to Users
Granting special access to admin users hinges on the ability to identify admin users apart from regular users. To do that, we’ll add a boolean admin attribute to the User model. Then we’ll flag a user as being an admin by setting their admin attribute to true .
- Use the migration generator to generate a migration named
AddAdminToUsersthat adds anadmincolumn of typebooleanto theuserstable.
[ANSWER]
rails g migration AddAdminToUsers admin:boolean
- Next we need to make sure that new users will not be flagged as admins by default. To enforce that, update the
changemethod in the generated migration file so that theadmincolumn defaults to a value offalse.
[ANSWER]
add_column :users, :admin, :boolean, default: false
Technically this isn’t necessary because boolean columns automatically default to nil which is considered false in Ruby. However, setting the default to false is more explicit and clear.
- Finally, apply the new migration.
[ANSWER]
rails db:migrate
2. Turn a Regular User Into an Admin User
Now we’re ready to transform a regular user into an all-powerful admin user. We’ll do that in the console…
- First, find an existing user you want to endow with admin privileges.
[ANSWER]
>> user = User.find_by(name: "Daisy")
- Then turn that user into an admin user.
[ANSWER]
>> user.admin = true
- Now check that the user is indeed an admin user.
[ANSWER]
>> user.admin?
=> true
- Finally, don’t forget to save the admin user before moving on!
[ANSWER]
>> user.save
3. Only Allow Admins to Create, Edit, and Delete Movies
Next up, we need to ensure that only signed-in admin users can create, edit, and delete movies. Thankfully, we already have some experience restricting access to controller actions.
- Starting in the
MoviesController, first use abefore_actionto require a signed-in user before running any action exceptindexorshow.
[ANSWER]
class MoviesController < ApplicationController
  before_action :require_signin, except: [:index, :show]
end
- Then add a second
before_actionthat calls a yet-to-be-definedrequire_adminmethod before running any action exceptindexorshow.
[ANSWER]
class MoviesController < ApplicationController
  before_action :require_signin, except: [:index, :show]
  before_action :require_admin, except: [:index, :show]
end
- Now define the
require_adminmethod. It needs to check that user is currently signed in and has admin status. If that’s not the case, deny access by redirecting to the application home page with a flash alert message.
To neatly encapsulate the code that checks whether the current user is an admin, go ahead and define another method named current_user_admin? . It should return true if there’s a current user and that user is an admin. Then call the current_user_admin? method from the require_admin method.
Both of these methods should be accessible to all controllers, so put them in the ApplicationController .
[ANSWER]
def require_admin
  unless current_user_admin?
    redirect_to root_url, alert: "Unauthorized access!"
  end
end

def current_user_admin?
  current_user && current_user.admin?
end
- Check your work by signing in as a non-admin user and clicking the “Add New Movie” link in the sidebar. Since you’re not an administrator, you should get bounced over to the home page. The same should hold true if you try to edit or delete a movie.
- Then sign out and sign in as a bonafide admin user. Now you should be able to create a new movie, as well as edit and delete an existing movie. How’s that for rolling out the red carpet?
4. Hide Unauthorized Links
Finally, only admin users should see the “Edit” and “Delete” links on the movie show page and the “Add New Movie” link on the movie index page. No sense tempting everyone else.
- We’ll obviously need to wrap the links in a conditional. The conditional needs to check whether the current user is also an admin user. And lo and behold, we’ve already encapsulated that logic in the
current_user_admin?method. But to call it from a view, you’ll first need to declare the method as a helper. Remember how to do that?
[ANSWER]
helper_method :current_user_admin?
- Then over on the movie show page, use that helper method to only generate the “Edit” and “Delete” links if the current user is an admin.
[ANSWER]
<% if current_user_admin? %>
  <section class="admin">
    <%= link_to "Edit", ... %>
    <%= link_to "Delete", ... %>
  </section>
<% end %>
- In the same way, hide the “Add New Movie” link on the movie index page unless the current user is an admin.
[ANSWER]
<% if current_user_admin? %>
  <section class="admin">
    <%= link_to "Add New Movie", new_movie_path, class: "button" %>
  </section>
<% end %>
- To visually check your work, first make sure you’re not signed in as an admin. Then go to a movie show page and you shouldn’t see the “Edit” and “Delete” links. You also shouldn’t see the “Add New Movie” link at the bottom of the movie index page.
Bonus Round
Only Allow Admins to Delete Accounts
We now have three before_action methods that give us fairly fine-grained control when it comes to authorization: require_signin , require_correct_user , require_admin . Depending on the situation, you can mix and match these methods (or define new ones) to dial in the proper amount of control.
As an example, suppose that you only wanted to allow admins to delete user accounts. That is, a user isn’t allowed to delete his or her own account. How might you re-arrange the code to support that?
- Restrict access with
before_actionmethods.
[ANSWER]
class UsersController < ApplicationController
  before_action :require_signin, except: [:new, :create]
  before_action :require_correct_user, only: [:edit, :update]
  before_action :require_admin, only: [:destroy]

  ...
end
- You’ll also need to change the
destroyaction to find the user to destroy since therequire_correct_userfilter is no longer being run for this action. Also, after destroying the user you don’t want to automatically sign out the current user. Otherwise, the admin user will get signed out when they delete someone’s account!
[ANSWER]
def destroy
  @user = User.find(params[:id])
  @user.destroy
  redirect_to root_url, alert: "Account successfully deleted!"
end
- On the user profile page, only show the “Delete Account” link if the current user is an admin.
[ANSWER]
<div class="actions">
  <% if current_user?(@user) %>
    <%= link_to "Edit Account", ... %>
  <% end %>
  <% if current_user_admin? %>
    <%= link_to "Delete Account", ... %>
  <% end %>
</div>
Wrap Up
You now have a built-from-scratch authorization and authentication system in place that:
- Uses
before_actionmethods to intercept calls to controller actions and determine if, based on that particular user, an action can indeed be called. - Defines commonly-used code in the
ApplicationControllerto avoid duplication. - Adds the user’s intended destination to the session and redirects the user back to that URL after she has signed in.
- Distinguishes admin users from regular users by way of a boolean
adminattribute in theUsermodel, and grants admin users special access. - Displays only certain links (such as “Edit Account” and “Edit Movie”) to authorized users.
Nicely done! Now might be the perfect time to enjoy a well-deserved break. 


Coming up next, since we have users and basic authorization in place, we’ll use it to streamline the movie review process. If you’re already signed in, there’s no need to ask for your name when you write a review. Furthermore, in the database we’ll associate your user account with the reviews you’ve written!
Many-to-Many Associations: Part 1
Exercises
Objective
So let’s take stock of where our app stands. We added support for user accounts and we have an effective authentication solution allowing users to sign up, sign in, and sign out. We also put in place a simple authorization system that only allows certain users to do certain things.
Building off that, we now want to arrange things so that only signed-in users can write a movie review. Given that restriction, we’ll always know who’s writing the review, so we can remove the name field from the review form. Then when a review is created, we’ll associate it with the user who reviewed the movie.
To do that, we’ll first need to create a one-to-many association between users and reviews. The Review model will become a join model that connects movies and users (reviewers). Visually, here’s what the relationships will look like in the database:
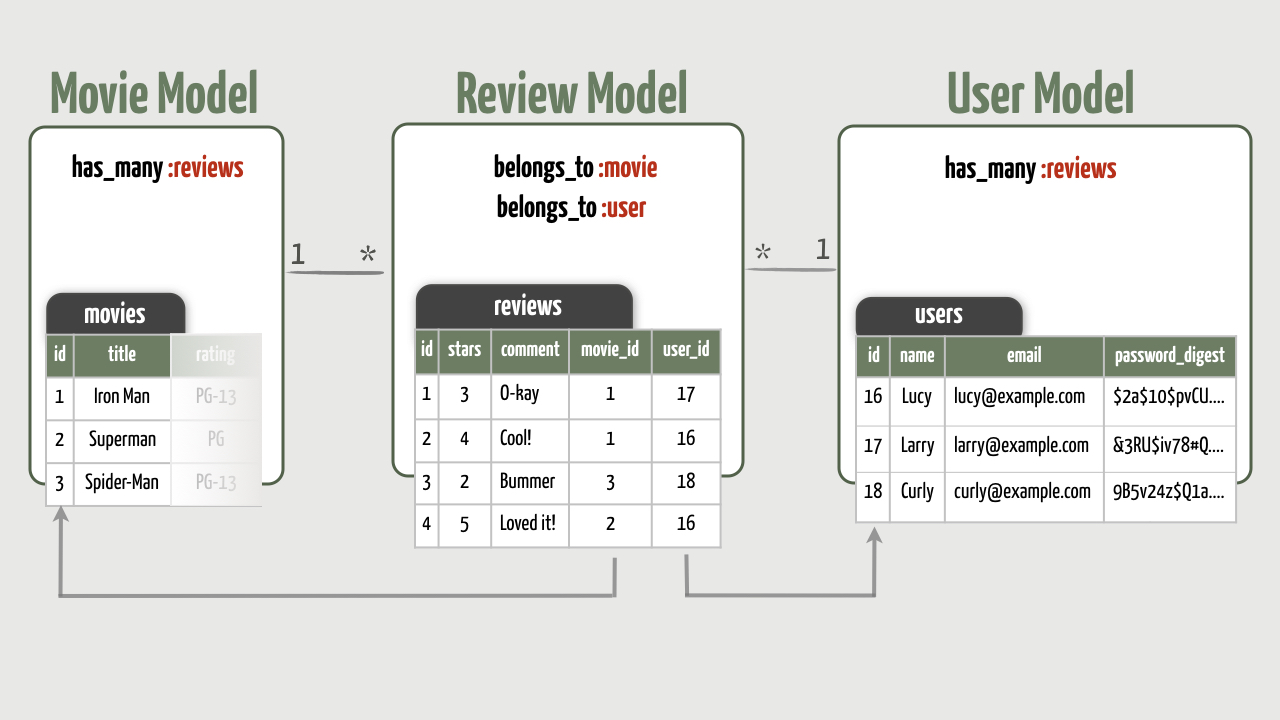
Per Rails conventions, a join model has two foreign keys. In our reviews table, the movie_id key references a row in the movies table and the user_id key references a row in the users table.
To create this one-to-many association between users and reviews, we’ll need to do the following:
- Change the
reviewsdatabase table to have auser_idforeign key, and remove thenamecolumn. - Remove the name validation from the
Reviewmodel. - Declare a one-to-many association between the
UserandReviewmodels.
Of course, we’ll also need to change the rest of the app to accommodate this new model association. But let’s not get ahead of ourselves. Rather than tackling all this at once, we’ll break it down into manageable tasks. We’ll start at the model layer in this exercise, and then build upon it in the next exercise.
1. Change the Reviews Table
First we need to change the reviews table so that it joins a movie and a user. To do that, we just need to remove the name column and add a user_id foreign key column. (The reviews table doesn’t have an email column like the registrations table did in the video.)
- Start by generating a new (empty) migration file named
MakeReviewsAJoinTable.
[ANSWER]
rails g migration MakeReviewsAJoinTable
- Then inside the migration file you’ll find an empty
changemethod. In thechangemethod, first remove thenamecolumn from thereviewstable using the handyremove_columnmethod.
Then add a user_id column of type integer to the reviews table using the add_column method.
And since this schema change will cause all the existing reviews to be invalid, go ahead and delete all the existing reviews.
[ANSWER]
class MakeReviewsAJoinTable < ActiveRecord::Migration[6.0]
  def change
    remove_column :reviews, :name, :string
    add_column :reviews, :user_id, :integer
    Review.delete_all
  end
end
- Finally, apply the migration.
[ANSWER]
rails db:migrate
It’s worth pointing out that applying this migration causes us to potentially lose some data. By removing the name column, any names that were in that column are now gone forever. On top of that, we deleted all the reviews anyway since they aren’t attached to users (their user_id column would have been nil ). As we’re in development mode and using example data, losing this data isn’t a big deal.
However, running this migration file on the production database could be disastrous if it contained legitimate reviews you wanted to preserve. In that case, you might consider a fancier solution whereby you try to find the user with the given name and then programmatically (using Ruby code) set the user_id for existing reviews.
2. Declare the Model Relationships
Applying the migration gave us a user_id foreign key column in the reviews table, but we still need to tell Rails what kind of relationship we want between the Review and User models. In particular, a user has many reviews and a review belongs to a user.
- Let’s start with the
Reviewmodel. It has an existingbelongs_toassociation with theMoviemodel. Update theReviewmodel to also have abelongs_toassociation with theUsermodel.
[ANSWER]
class Review < ApplicationRecord
  belongs_to :movie
  belongs_to :user

  ...
end
- While you’re in that model, remove the validation for the name since it’s no longer a review attribute. Leave the validations for
commentandstarsattributes intact, however.
[ANSWER]
class Review < ApplicationRecord
  belongs_to :movie
  belongs_to :user

  validates :comment, length: { minimum: 4 }

  STARS = [1, 2, 3, 4, 5]

  validates :stars, inclusion: {
    in: STARS,
    message: "must be between 1 and 5"
  }

  # existing code
end
- Next, look in the
Usermodel and you’ll notice that it doesn’t have a reciprocal association to its reviews. Bi-directional relationship aren’t required; you only need to define relationships in the direction you intend to use them. In our case, we certainly want to be able to find all of the associated reviews given aUserobject.
To do that, update the User model to declare a has_many association with reviews (the plural form). Make sure that the association automatically destroys all of a user’s reviews when the user itself is destroyed.
[ANSWER]
class User < ApplicationRecord
  has_many :reviews, dependent: :destroy

  # existing code
end
- Remember, this declaration tells Rails to expect a
user_idforeign key column in the table wrapped by theReviewmodel, which by convention will be thereviewstable. As we’ll see, Rails also dynamically defines methods for accessing a user’s reviews.
And with those two declarations, we now have a bi-directional association between a user and their reviews!
3. Experiment with the Association
Before we attempt to change the web interface, let’s spend a minute in the console just making sure we can create a proper review that’s attached to both a movie and a user.
- First, initialize a new
Reviewobject in memory and go ahead and set the number of stars and a brief comment. (Don’t worry about the movie or user just yet.) Assign the resulting review to areviewvariable.
[ANSWER]
>> review = Review.new(stars: 5, comment: "Two thumbs up!")
- Then ask the review for its associated movie.
>> review.movie
You should get nil because a movie hasn’t yet been attached to the review.
- So attach a movie to the review by first finding a
Movieobject and then assigning it to the review’smovieattribute.
[ANSWER]
>> movie = Movie.find_by(title: "Captain Marvel")

>> review.movie = movie
- To verify that the movie and review are now linked together, ask the review for its associated movie.
[ANSWER]
>> review.movie
You should get back the Movie object you assigned to the review. That works because the movie_id foreign key was automatically set by virtue of using the movie object to initialize the review . So now when we read the review’s movie attribute, it fetches the movie that has an id matching the movie_id value for this particular review.
The review is now attached to the movie. So far, so good.
- Now let’s turn our attention to the one-to-many association between
ReviewandUserthat we declared earlier in this exercise.
Start by asking the review for its associated user.
[ANSWER]
>> review.user
You should get nil because a user hasn’t yet been attached to the review.
- So find and attach a user to the review.
[ANSWER]
>> user = User.find_by(name: "Daisy")

>> review.user = user
- To verify that the review and user are now linked together, ask the review for its associated user again.
[ANSWER]
>> review.user
This time you should get back the User object you assigned to the review. When we assigned a User object to the user attribute, the user’s primary key ( id ) was automatically assigned to the review’s user_id foreign key. Now when we read the review’s user attribute, it queries the database for the user that has an id matching the user_id value for this particular review.
Excellent—now a review has everything it needs: a movie, a user, some stars, and a comment!
- We haven’t yet saved the review in the database, so go ahead and do that next.
[ANSWER]
>> review.save
- Now imagine you want to get all the reviews for this user. How would you do that?
[ANSWER]
>> user.reviews
You should see the database being queried and get back an array that contains the one Review object that’s associated with the user.
- Just for practice, count the number of reviews for this user.
[ANSWER]
>> user.reviews.size
Cool! Now we have two one-to-many associations. A movie has many reviews and a user has many reviews. And sitting in the middle, a review belongs to one movie and one user. That effectively means we have a many-to-many relationship!
Wrap Up
So now we have the associations working in the models. In the next section we’ll look at what else we need to change in our app so that only signed in users can write a review and we no longer need to ask for the user’s name on the review form.
This will actually be familiar territory. Before watching the next video, take a couple minutes to think through the MVC flow for reviews. Can you pinpoint some of the areas we’ll need to change? As you become a more practiced Rails developer it will become increasingly important for you to be able to identify how changes in one part of your app warrant changes in other parts of your app.
Many-to-Many Associations: Part 2
Exercises
Objective
Now that we have the new review-user association wired up, we’re ready for the next steps toward our overall objective:
- Only allow signed-in users to write a review
- Remove the name field from the review form since it’s no longer required
- When a review is created, associate it with the signed-in user
- List a user’s reviews on their profile page
To pull this off, we’ll make changes across the familiar MVC triad:
- Use a
before_actionto require a user to sign in before writing a movie review. - Change the review form to remove the unnecessary
namefield. - Update the
createaction so that it associates the signed-in user with the review before it’s saved. - Fix the review index page so it no longer expects a review to have a
nameattribute. - Spruce up the user profile page to list the reviews the user has written.
Visually, here’s what we’re looking for:
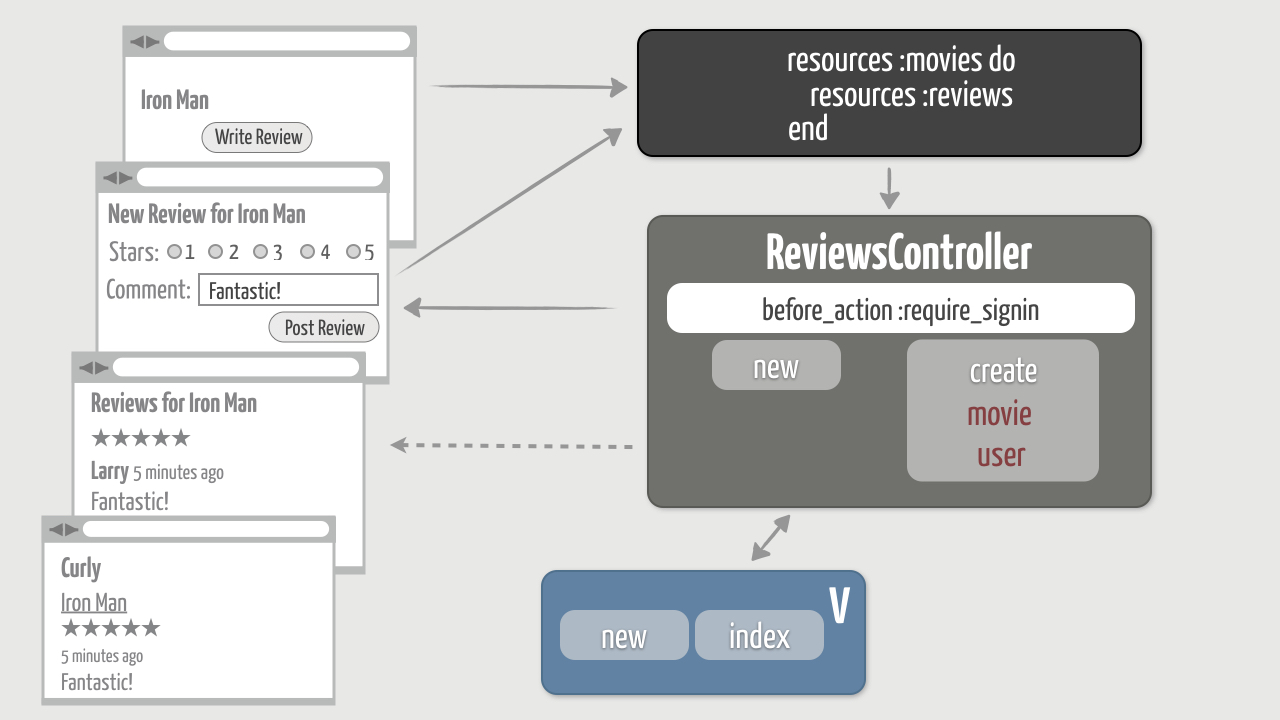
1. Require Signin to Write a Review
Currently, when someone writes a review using our web interface, the review is created but it’s not associated with any particular user. In other words, we end up with a row in the reviews table with the user_id foreign key set to nil .
We need to arrange things so that every review gets tied to a particular user. And to do that, we need to require that a user is signed in before allowing them to write a review. Here’s another opportunity to use that require_signin method we wrote earlier…
- At the top of the
ReviewsControllerclass definition, use abefore_actionto run therequire_signinmethod before every action.
[ANSWER]
class ReviewsController < ApplicationController
  before_action :require_signin
  before_action :set_movie

  # existing code
end
- Then sign out and try to review a movie. It should kick you back to the sign-in form. Sign in and you should end up back on the review form.
2. Update the Review Form
Since a user must now be signed in to write a review, we don’t need to ask for their name on the review form. In fact, if you view the form now you’ll get an error because the Review object no longer has a name attribute.
So go ahead and remove the name field from the form ( app/views/reviews/new.html.erb ), leaving the fields for the stars and comment.
[ANSWER]
<%= form_with(model: [@movie, @review], local: true) do |f| %>
  <%= render "shared/errors", object: @review %>

  <%= f.label :stars %>
  <% Review::STARS.each do |star| %>
    <span class="star">
      <%= f.radio_button :stars, star %>
      <%= label_tag star %>
    </span>
  <% end %>

  <%= f.label :comment %>
  <%= f.text_area :comment, placeholder: "What did you think?" %>

  <%= f.submit "Post Review" %>
<% end %>
3. Change the Create Action
We know the review form will post to the create action in the ReviewsController . Currently that action creates a review that’s attached to a movie, but the review isn’t attached to a user yet. We need to fix that…
- Change the
createaction in theReviewsControllerso that it associates the signed-in user with the review before it’s saved.
[ANSWER]
def create
  @review = @movie.reviews.new(review_params)
  @review.user = current_user
  if @review.save
    redirect_to movie_reviews_path(@movie), notice: "Thanks for your review!"
  else
    render :new
  end
end
- You’ll also want to update the
review_paramsmethod so that it no longer permits thenameparameter, just thecommentandstarsparameters. Technically this isn’t necessary since reviews no longer have anameattribute, but it’s always good to remove unnecessary code.
[ANSWER]
def review_params
  params.require(:review).permit(:comment, :stars)
end
- As a quick sanity check, reload the review form to make sure it no longer prompts for the name. But don’t try to submit it just yet…
4. Change the Reviews Index Page
When a movie review is successfully created, the create action redirects to the page that lists all the reviews for that particular movie. It turns out that removing the name attribute from Review also affects this page. We need to make one small tweak to get it back in step with the code…
- Start by looking in
app/views/reviews/index.html.erband you’ll notice that it’s displaying the reviewer’s name like so:
<%= review.name %>
That will no longer work because we removed the name attribute from the Review model.
- Change that line to instead display the name of the user who created the review.
[ANSWER]
<%= review.user.name %>
- For style points, instead of just displaying the reviewer’s name, link their name to their user profile page.
[ANSWER]
<%= link_to review.user.name, review.user %>
5. Write a Review Already!
Finally, with all these changes in place, it’s time to give it a whirl…
- First, make sure you’re signed out.
- Then go to a movie page.
- Click “Write Review” and you should get redirected to the sign-in form.
- Sign in and you should get redirected to the new review form. Perfect!
- Write a review that reflects your true opinion of the movie and submit it.
- You should end up seeing your review (with your linked name) in the list of reviews!
6. List Reviews on the User Profile Page
That leaves us with one final task…
Click on a reviewer’s name to go to that user’s profile page, and you’ll notice that the profile page is still fairly sparse. The lights are on, but nobody appears to be home. To liven things up a bit, let’s show all the reviews this user has written.
- First you need to access all of the user’s reviews. Remember that it’s a good practice to have a controller action set up the data for its view. So first identify the action that renders the profile page and then in that action define an
@reviewsinstance variable that references the user’s reviews.
[ANSWER]
def show
  @user = User.find(params[:id])
  @reviews = @user.reviews
end
- Now that you have the review data, update the
showview template to display the user’s reviews if any are present. For each review, display the following:
- title of the reviewed movie, linked back to the movie page
- number of stars (use the shared/stars partial)
- how long ago the review was created
- the review comment
Don’t worry about the HTML structure and styling. Once you get all the data displayed you can peek at the answer to structure and style the reviews according to our CSS rules (which is always totally optional).
[ANSWER]
<section class="user">
  # existing code

  <% if @reviews.present? %>
    <h3>Reviews</h3>
    <% @reviews.each do |review| %>
      <div class="review">
        <div class="details">
          <span class="title">
            <%= link_to review.movie.title, review.movie %>
          </span>
          <%= render "shared/stars", percent: review.stars_as_percent %>
          <span class="date">
            <%= time_ago_in_words(review.created_at) %> ago
          </span>
          <p>
            <%= review.comment %>
          </p>
        </div>
      </div>
    <% end %>
  <% end %>
</section>
- Finally, reload the user’s profile page and you should see some recent activity!
Bonus Round
Show Each Reviewer’s Profile Image
Want to give the list of reviewers a bit more personality? Consider displaying a small version of each reviewer’s profile image next to their name in the list. And if you added a username to each user in a previous bonus exercise, consider showing that as well.
To do that, you’ll need to modify the profile_image helper you created in a previous bonus exercise to allow for a size to be specified. Here’s one way to do that with size parameter that defaults to a size of 80:
def profile_image(user, size=80)
  url = "https://secure.gravatar.com/avatar/#{user.gravatar_id}?s=#{size}"
  image_tag(url, alt: user.name)
end
Then you can call that helper to display a small version of each review’s profile image, say 35 pixels.
[ANSWER]
<%= profile_image(review.user, 35) %>
Wrap Up
Way to hang in there! We accomplished a lot over the last couple exercises. Even though the concept of one movie having many reviews isn’t necessarily complicated, there can be quite a bit of mental overhead involved when it comes to actually implementing this association in the user interface. You have to keep not one, but two objects in your head as you think through the parts of MVC that are affected.
In the next section, we’ll use another join model to create yet another many-to-many association. This go-around we’ll allow users to “fave” movies, which will give us practice creating a many-to-many association from scratch…