Another Many-to-Many Association
Exercises
Objective
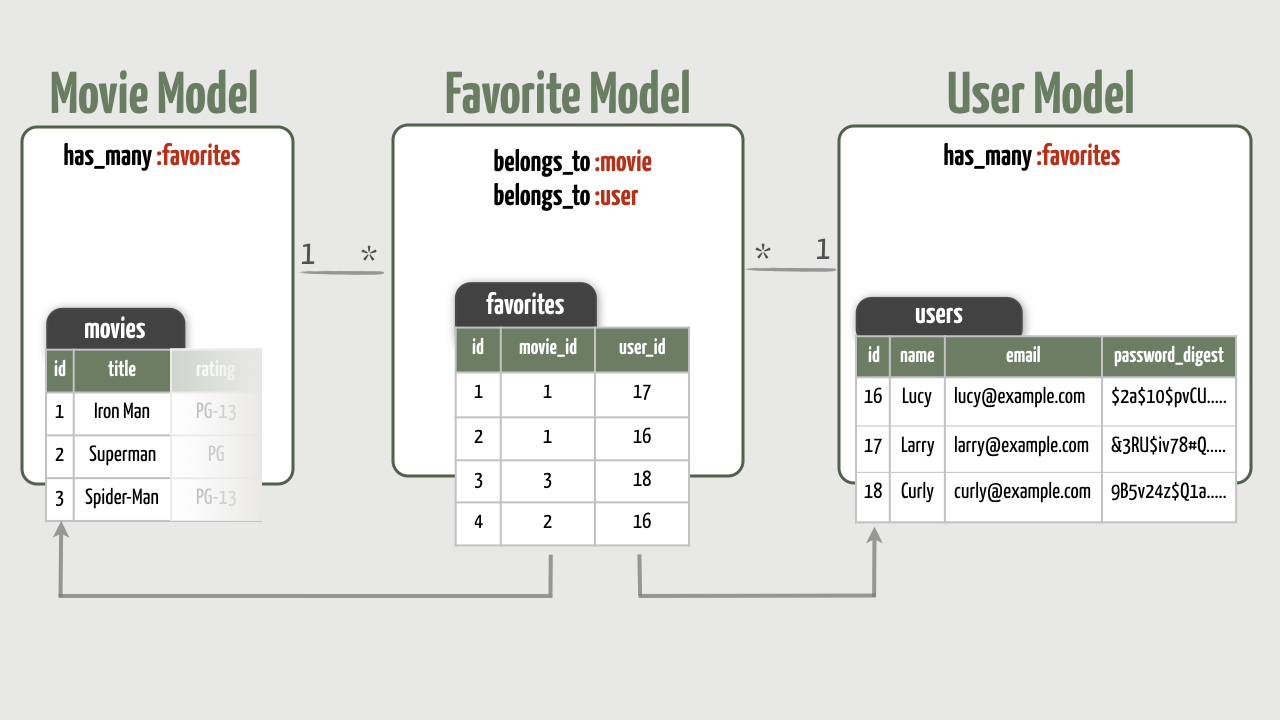
Got any favorite movies? We want to let signed-in users “fave” their favorite movies. A user can have many favorite movies. And a movie could be a favorite of many users.
To do this, we’ll need a many-to-many association between movies and users. Since many-to-many associations can’t be modeled with just two database tables, we’ll create a brand new join table named favorites between them. Then we’ll declare a many-to-many association between the Movie and User models that’s joined through the Favorite model. This will give us practice creating a many-to-many association from scratch.
Here’s a snapshot of the models and tables we want:
1. Generate the Favorites Resource
First we need a new resource to represent a favorite, which simply joins a movie and a user. We’ll need a favorites database table, a Favorite model, a FavoritesController , and the conventional resource routes. To make quick work of this, we’ll use the resource generator to churn out all the files we need.
- Start by generating a resource named
favoritethat references both amovieand auser.
[ANSWER]
rails g resource favorite movie:references user:references
- Crack open the generated migration file and you should see the following:
class CreateFavorites < ActiveRecord::Migration[6.0]
  def change
    create_table :favorites do |t|
      t.references :movie, null: false, foreign_key: true
      t.references :user, null: false, foreign_key: true

      t.timestamps
    end
  end
end
Remember that whenever you see references in a migration file, it’s simply a shortcut for adding a foreign key column. For example, the line t.references :movie adds a column called movie_id and t.references :user adds a column called user_id . The generator also tacks on the null: false and foreign_key: true options to both columns so null values aren’t allowed and appropriate foreign key constraints are added.
So this migration will end up creating a join table with two foreign keys, which is exactly what we want.
- Finish up as always by applying the migration, which in this case creates the
favoritesdatabase table.
[ANSWER]
rails db:migrate
2. Declare the Model Associations
Applying the migration created the favorites database table with movie_id and user_id foreign key columns. So far, so good. The next step is to declare the specific associations we want in the models. Coming back to our objective, we want a many-to-many association with the following direct model associations:
- A favorite belongs to both a movie and a user
- A movie has many favorites
- A user also has many favorites
Let’s start with the Favorite model…
- Open the generated
favorite.rbfile and you should see that it’s ready to go:
class Favorite < ApplicationRecord
  belongs_to :movie
  belongs_to :user
end
Fresh from the generator, a Favorite already belongs_to both a movie and a user. Those two declarations were generated because we used movie:references and user:references when generating the favorite resource. One model down, two to go.
- Next, look in the
Moviemodel and you’ll discover that it doesn’t yet have an association with its favorites. So update theMoviemodel to declare ahas_manyassociation withfavorites. If a movie is destroyed, make sure all of its favorites are also automatically destroyed.
[ANSWER]
class Movie < ApplicationRecord
  has_many :reviews, dependent: :destroy
  has_many :favorites, dependent: :destroy

  # existing code
end
Remember, this declaration tells Rails to expect a movie_id foreign key column in the table wrapped by the Favorite model (the favorites table).
Two models down, one to go.
- Now, over in the
Usermodel, we want to declare the reciprocal association. Declare ahas_manyassociation withfavorites. If a user is destroyed, all of its favorites should also be destroyed.
[ANSWER]
class User < ApplicationRecord
  has_many :reviews, dependent: :destroy
  has_many :favorites, dependent: :destroy

  # existing code
end
- This declaration tells Rails to expect a
user_idforeign key column in thefavoritestable.
We now have a bi-directional, many-to-many association between a movie and the users who fave it.
3. Experiment with the Associations
Now let’s jump into a console session and create some favorites, just to get a feel for how these associations work…
- First, find an existing
Movieand assign it to amovievariable.
[ANSWER]
>> movie = Movie.find_by(title: "Black Panther")
- Then find an existing
Userand assign it to auservariable.
[ANSWER]
>> user = User.find_by(name: "Daisy")
- Then initialize a new Favorite object and associate it with the movie and user.
[ANSWER]
>> favorite = Favorite.new
>> favorite.movie = movie
>> favorite.user = user
Then if you print the Favorite object, the movie_id and user_id foreign keys should be set to reference the respective movie and user objects.
- To verify that the movie and favorite are now linked together, ask the favorite for its associated movie.
[ANSWER]
>> favorite.movie
You should get back the Movie object you assigned to the favorite.
- Also verify that the favorite and user are linked together by asking the favorite for its associated user.
[ANSWER]
>> favorite.user
You should get back the User object you assigned to the favorite.
- We haven’t yet saved the favorite in the database, so go ahead and do that next.
[ANSWER]
>> favorite.save
You should see a SQL INSERT statement get executed to create a new row in the favorites database table. Notice that the movie_id and user_id foreign keys are set to reference the respective rows in the movies and users tables. So any particular row in the favorites table effectively joins a movie and a user.
7. Now, just for practice, make this same movie a favorite of another user. But instead of initializing a new favorite by calling Favorite.new , this time use the movie.favorites association to initialize the new favorite so that it’s automatically associated with the same movie object. Then associate the resulting Favorite object with another user.
[ANSWER]
>> favorite = movie.favorites.new
>> user = User.find_by(name: "Larry")
>> favorite.user = user
- Then verify that the favorite belongs to both the movie and the user.
[ANSWER]
>> favorite.movie
>> favorite.user
- Don’t forget to save it in the database.
[ANSWER]
>> favorite.save
- At this point, the movie should have two favorites. How would you verify that?
[ANSWER]
>> movie.favorites
>> movie.favorites.size
- Finally, create one more favorite for a different movie and the same user, this time associating the movie and user and saving the favorite in one step.
[ANSWER]
>> movie = Movie.find_by(title: "Avengers: Endgame")
>> movie.favorites.create!(user: user)
You should see a SQL INSERT statement get immediately executed to create a new favorites row in the database with the movie_id and user_id foreign keys automatically set to reference the respective movie and user objects.
- At this point, the user should have two favorites for different movies. How would you verify that?
[ANSWER]
>> user.favorites
>> user.favorites.size
Excellent! That gives us confidence that our models are in good shape.
Wrap Up
So this gave us more practice with many-to-many associations. But often when you have these types of associations, the join model gets in the way. For example, we can ask a user for her favorites, but what if we want to get the actual movies that she considers her favorites? Likewise, what if we want to get all the users who have favorited a particular movie? Well, as things stand right now, to do that we’d have to write custom code that traverses across three models: Movie, Favorite, and User. And doing that is both tedious and inefficient.
Thankfully, Rails offers another type of association—the through association—that offers a convenient and efficient way to traverse across the models. We’ll explore through associations in the next section…
Through Associations: Part 1
Exercises
Objective
Now we want to take the many-to-many association a step further by creating a through association so we can navigate directly from a user to her favorite movies, and vice versa. Like many things in Rails, these associations can feel magical at first. So give yourself permission to take your time through this exercise so you can fully appreciate and understand what’s going on.
Here are our objectives:
- Declare through associations between movies and users (which we’ll call “fans”)
- Display a movie’s fans on the movie’s show page
- Display a user’s favorite movies on the user’s profile page
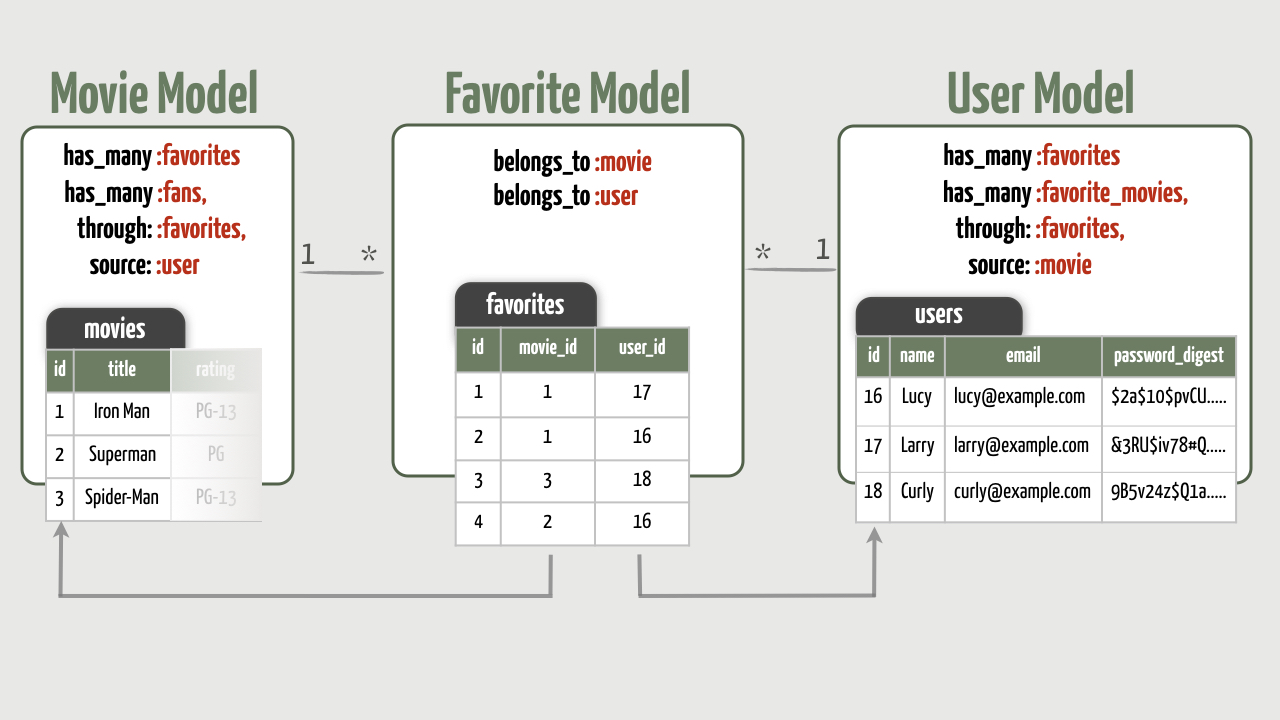
Here’s an updated snapshot of the associations we want:
1. Declare the Through Associations
We currently have the following direct associations between the Favorite, Movie, and User models:
- A favorite belongs to both a movie and a user
- A movie has many favorites
- A user also has many favorites
We also want the following indirect associations going through favorites:
- A movie has many fans (users)
- A user has many favorite movies
- Start by looking at the
Moviefile and you’ll see it currently has many favorites:
class Movie < ApplicationRecord
  has_many :reviews, dependent: :destroy
  has_many :favorites, dependent: :destroy

  # existing code
end
Given this has_many declaration, we can ask a movie for its favorites using movie.favorites . That returns an array of Favorite objects. Then if we wanted to get the users who favorited the movie, we’d need to iterate through each of the Favorite objects and fetch the associated user. But that’s the long way around the barn (it takes 1+n database queries). Instead of hopping from a movie to its favorites and then to the associated users, we want to go directly from a movie to its users, which we’ll call “fans”.
To do that, in the Movie model create another has_many association named fans that goes through the existing favorites association.
[ANSWER]
class Movie < ApplicationRecord
  has_many :reviews, dependent: :destroy
  has_many :favorites, dependent: :destroy
  has_many :fans, through: :favorites, source: :user

  # existing code
end
- Now, look in the User model and you’ll recall that it currently also has many favorites:
class User < ApplicationRecord
  has_many :reviews, dependent: :destroy
  has_many :favorites, dependent: :destroy

  # existing code
end
Given a user, we can ask for its favorites by calling user.favorites . But we’d also like to be able to ask for the user’s favorite movies, and fetch them from the database in one query.
To support that, in the User model create another has_many association named favorite_movies that goes through the existing favorites association.
[ANSWER]
class User < ApplicationRecord
  has_many :reviews, dependent: :destroy
  has_many :favorites, dependent: :destroy
  has_many :favorite_movies, through: :favorites, source: :movie

  # existing code
end
And that’s all there is to it! We can now efficiently traverse from one side of the relationship to the other. Not too shabby for 2 lines of code!
2. Experiment with the Associations
Let’s jump into a console session and see what these 2 lines of code let us do…
- First, find a
Moviethat you created favorites for in the previous exercise, assign it to amovievariable.
[ANSWER]
>> movie = Movie.find_by(title: "Black Panther")
- To check that the through association works, ask the movie for its fans.
[ANSWER]
>> movie.fans
You should get back an array that contains the users who fave’d that movie.Make sure to appreciate the SQL statement that was generated to query the database. It used an INNER JOIN to select all the users in the users table that have an id matching the user_id in the favorites table, but only for those rows in favorites where the movie_id also matches the id of the movie object. In short, the query joins together the movie and the users who favorited that movie by going through the favorites table. And it does all this in just one query ! Pretty cool.
- Then find a
Userthat you created favorites for in the previous exercise, and assign it to auservariable.
[ANSWER]
>> user = User.find_by(name: "Daisy")
- Ask the user for her favorite movies, as a quick check of the through association traversing from the user side of things.
[ANSWER]
>> user.favorite_movies
- You should get back an array that contains the movies that the user fave’d. Again, it joins together the user and their favorite movies in just one query!
3. List a Movie’s Fans
Now that we have some example fans in the database and we can access them using the through association, let’s display the fans on the movie show page.
- To set up the new data for the movie’s show page, fetch the fans for the movie and assign the result to a
@fansinstance variable.
[ANSWER]
def show
  @movie = Movie.find(params[:id])
  @fans = @movie.fans
end
- Then update the movie show template to generate a list of the movie’s fans with each fan’s name linking to their profile page, if any fans are present. To pull in some styling, list the fans in an aside tag directly under the div with a class of details.
[ANSWER]
<aside>
<% if @fans.present? %>
    <h4>Fans</h4>
    <ul>
      <% @fans.each do |user| %>
        <li>
          <%= link_to user.name, user %>
        </li>
      <% end %>
    </ul>
  <% end %>
</aside>
- Over in your browser, go to the show page for a movie that already has fans and you should see links for the users who are fans of the movie. Fan-tastic!
If you then click on a fan (you’ll need to be signed in), you’ll notice that their profile page doesn’t list their favorite movies. So let’s fix that next…
4. List a User’s Favorite Movies
Clearly a user’s profile page should list that user’s favorite movies. Sound easy enough? There’s nothing new here, so you should totally be able to do this with one hand tied behind your back.
- Set up the new data for the user’s profile page.
[ANSWER]
def show
  @user = User.find(params[:id])
  @reviews = @user.reviews
  @favorite_movies = @user.favorite_movies
end
- Then in the user show template generate a list of all the favorite movies underneath the list of reviews. Link each favorite movie image back to the movie page.
[ANSWER]
<% if @favorite_movies.present? %>
  <h3>Favorite Movies</h3>
  <div class="favorite-movies">
    <% @favorite_movies.each do |movie| %>
      <%= link_to image_tag(movie.image_file_name), movie %>
    <% end %>
  </div>
<% end %>
- Check your handiwork in the browser!
Bonus Round
Alternate Way to Create Fans
In the previous exercise you created a favorite by calling the create! method on the movie.favorites association, like so:
>> movie.favorites.create!(user: user)
You might be interested to learn that another way to do this is by adding User objects to the fans association using the << operator. For example, suppose you had three User objects referenced by the variables sally, jose, and susan respectively. You could make them fans of a movie like so:
>> movie.fans << sally
>> movie.fans << jose
>> movie.fans << susan
You can also call the include? method on the fans association to check whether a particular user is already a fan:
>> movie.fans.include?(sally)
=> true
Mix these together, and you get a one-liner for adding a fan if they aren’t already a fan:
>> movie.fans << sally unless movie.fans.include?(sally)
Show Each Fan’s Profile Image
The list of fans on the movie show page could also use a bit more personality! Consider displaying a small version of each fan’s profile image next to their name in the list. And if you added a username to each user in a previous bonus exercise, consider showing that as well.
[ANSWER]
<li>
  <%= profile_image(user, size: 35) %>
  ...
</li>
Query for Movie Critics
Suppose you wanted to be able to ask a movie for all of the users who have reviewed it (call them “critics”) using just one query. For example, calling movie.critics should return all the users that wrote a review for that movie. How would you do that?
[ANSWER]
class Movie < ApplicationRecord
  has_many :reviews, dependent: :destroy
  has_many :critics, through: :reviews, source: :user

  has_many :favorites, dependent: :destroy
  has_many :fans, through: :favorites, source: :user

  # existing code
end
Wrap Up
As we’ve seen, one of the most powerful features of Active Record is the ability to declare a variety of associations between different models: one-to-many, many-to-many, and through associations, for example. Traditionally, you’d be saddled with writing custom SQL queries to link everything together in the database and create corresponding Ruby objects. But by following Rails conventions, a few lines of declarative Ruby code takes care of all that for you. A through association is a perfect example of the true power of Active Record. And once you start using them, you’ll begin to see common usage patterns. In fact, we’ll use another through association a bit later.
In the meantime, our app is crying out for a “Fave” button so users can quickly and easily show some love for their top picks!
Through Associations: Part 2
Exercises
Objective
It’s pretty obvious that our app needs a “Fave” button! And if fan changes their mind, we need an “Unfave” button, too. We’re in a good position to make this work since our models, tables, and associations are already set up. So in this exercise, we’ll focus on the UI side for creating (and deleting) a favorite.
To do that, we need to:
- Nest the
favoritesresource inside of themoviesresource so that requests to theFavoritesControlleralways include a movie ID in the URL. - Generate a “Fave” button on the movie
showpage that runs thecreateaction in theFavoritesController. - Define a
createaction in theFavoritesControllerthat creates a new favorite in the database which is associated to both the movie specified in the URL and the signed-in user. - If the signed-in user has already fave’d the movie, generate an “Unfave” button on the movie
showpage that runs thedestroyaction in theFavoritesController. - Define a
destroyaction in theFavoritesControllerthat deletes the appropriate favorite from the database. - Write a custom view helper method that determines whether to display the “Fave” or “Unfave” button.
Here’s a snapshot of our objective for creating a favorite with a button:

1. Nest the Favorite Resource
Before we get too far along, we know that we always want to create favorites for a specific movie. So the URL for creating a favorite will always need to specify the movie that’s being favorited. As we learned earlier in the course, we can require all favorite-related URLs to include a movie ID by nesting the favorites resource inside of the movies resource.
So let’s go ahead and do that first…
- Pop open the
config/routes.rbfile and you’ll notice that the resource generator for favorites added this line:
resources :favorites
Move that line so that favorites are a nested resource inside of the movies resource. And since we only need routes for the create and destroy actions, use the only option to only generate routes for those actions. (In the video we generated all the like-related routes, but sometimes it’s nice to only generate what’s needed.)
[ANSWER]
resources :movies do
  resources :reviews
  resources :favorites, only: [:create, :destroy]
end
- As a refresher of what that gives you in terms of routes, check out the defined routes. You should see the following two favorite-related routes (we’ve left out the other routes):
Helper                   HTTP Verb              Path                               Controller#Action
movie_favorites_path       POST       /movies/:movie_id/favorites(.:format)         favorites#create
movie_favorite_path        DELETE     /movies/:movie_id/favorites/:id(.:format)     favorites#destroy
- Notice that every path to the
FavoritesControllernow requires amovie_idparameter in the URL, which is exactly what we need. Also notice that with nested routes the names of the route helper methods include the singular name of the parent,moviein this case. - We’re going to need to generate a “Fave” button that creates a new favorite. Can you guess which route helper method we’ll use to generate the URL that the button will POST to? What about the “Unfave” button?
2. Generate a “Fave” Button
Next we need to generate a “Fave” button on the movie show page. Why a button rather than a link? Well, we expect clicking a link to simply take us to a new page and not actually change anything. Pressing a button, on the other hand, comes with the expectation that something changes. In our case, hitting the “Fave” button should immediately create a new favorite in the database. So a button is the way to go here.
- First, did you identify the name of the route helper method that generates a URL to create a new favorite? In this case, we want the “Fave” button to run the
createaction of theFavoritesControllerso here’s the route:
movie_favorites_path POST /movies/:movie_id/favorites(.:format) favorites#create
- On the movie show page, inside the div with a class of image directly after the img tag, generate a “Fave” button using the route helper method. Make sure it’s only displayed if a user is currently signed-in. Put it inside a div with a class of faves to pull in our CSS styles.
[ANSWER]
<% if current_user %>
  <div class="faves">
    <%= button_to "♥️ Fave", movie_favorites_path(@movie) %>
  </div>
<% end %>
- While you’re here, display the total number of faves directly under the button. Put the count inside a div with a class of count to take advantage of our CSS styles.
[ANSWER]
<% if current_user %>
  <div class="faves">
    <%= button_to "♥️ Fave", movie_favorites_path(@movie) %>
    <div class="count">
      <%= @fans.size %>
    </div>
  </div>
<% end %>
- Then, back in your browser, navigate to a movie show page. If you’re signed in you should see an enticing “Fave” button and the number of faves for that movie.
- View the source of the generated page, and you’ll discover that
button_togenerated a tidy form that POSTs to/movies/1/favorites, for example. Unlike links which issue aGETrequest, a button generated withbutton_towill issue aPOSTrequest by default. And that’s exactly the HTTP verb required for our route to match! - It’s hard to resist hitting that button, so go ahead and do that to prompt our next step…
3. Implement the Create Action
In the create action of the FavoritesController we need to create a new favorite in the database, making sure it’s associated to a movie and a user. Doing this should feel familiar as you’ve already created a favorite in the console. The only difference here is the favorite needs to be associated with the movie specified in the URL and the signed-in user.
- Implement the
createaction so that it creates an appropriate favorite and redirects to the movieshowpage.
[ANSWER]
def create
  @movie = Movie.find(params[:movie_id])
  @movie.favorites.create!(user: current_user)

  # or append to the through association
  # @movie.fans << current_user

  redirect_to @movie
end
- For this to work, you need to require that a user is always signed in before running the
createaction, or any other action in theFavoritesControllerfor that matter. Remember how to do that?
[ANSWER]
class FavoritesController < ApplicationController
  before_action :require_signin

  # existing code
end
- Back in your browser, give it a whirl by hitting the “Fave” button a few times. Each time, you should see the favorite count increment and the signed-in user’s name added to the list of fans. Also, if you navigate over to a fan’s profile page, the movie title should be added to their list of favorite movies.
High-fives all around!
4. Only Allow One Fave Per User
That works good… perhaps a little too good. Overzealous users can fave a movie multiple times, unfairly driving up the fave count. If the user has already fave’d the movie, we should remove the “Fave” button and instead show an “Unfave” button.
- To do that, you first need a way to check whether the current user has already faved the movie. The
consoleis a great place to figure out queries like this, so hop intoconsolesession and we’ll work through a solution.Start by finding the user you’re currently signed-in as and the movie you just faved while you were in the browser:
>> user = User.find_by(name: "Lucy")

>> movie = Movie.find_by(title: "Captain Marvel")
Now, you need to run a query that checks if the favorites database table already has a row that joins that particular movie and user. To do that, you could try to find a favorite that has the matching user and movie IDs, like so:
>> favorite = Favorite.find_by(user_id: user.id, movie_id: movie.id)
That certainly works, but here’s the preferred way to do the same thing:
>> favorite = user.favorites.find_by(movie_id: movie.id)
The difference is we’re using the user.favorites association in this case. The beauty of using the association is that it automatically scopes the query to only those favorites with a user_id foreign key matching the ID of the user object. We then tack on a find_by which further scopes the query to only those favorites with a movie_id foreign key matching the ID of the movie object. In this way, the query is automatically scoped to a specific user.
And when you execute that line you’ll see that it performs just one database query, which looks something like this:
SELECT "favorites".* FROM "favorites" WHERE "favorites"."user_id" = ? AND "favorites"."movie_id" = 3 LIMIT 1 [["user_id", 1]]
So even though it would appear that the tacked-on find_by would generate a second query, Rails is smart enough to combine it all into one query.
- Now that you’ve isolated the code to run the query, it’s time to use it in the app. Over in the
showaction of theMoviesController, use that same query to check if the signed-in user has already faved the movie being shown. Assign the resulting favorite to a@favoriteinstance variable. We’ll use the existence of@favoriteas a flag to indicate that the user has already faved the movie.
[ANSWER]
def show
  @movie = Movie.find(params[:id])
  @fans = @movie.fans
  if current_user
    @favorite = current_user.favorites.find_by(movie_id: @movie.id)
  end
end
- Then change the
showtemplate to hide the “Fave” button if the movie has already been faved. To do that, you’ll need a conditional that checks if@favoritehas a value. In other words, you only want to show the “Fave” button if there is no current favorite. Go ahead and show a placeholder “Unfave” button (use'#'as the URL for now) if a current favorite already exists.
[ANSWER]
<% if current_user %>
  <div class="faves">
    <% if @favorite %>
      <%= button_to "♡ Unfave", "#" %>
    <% else %>
      <%= button_to "♥️ Fave", movie_favorites_path(@movie) %>
    <% end %>
    <div class="count">
      <%= @fans.size %>
    </div>
  </div>
<% end %>
- Finally, visit a show page for a movie you already faved (your browser is probably already on that page). The “Fave” button should be replaced by an “Unfave” button. Great - that means a user can only fave a movie once!
But of course the “Unfave” button doesn’t do anything, yet…
5. Make the “Unfave” Button Work
If a user hits that sad “Unfave” button, we need to delete the favorite that joins the signed-in user with the movie being shown. By convention, that should happen in the destroy action of the FavoritesController . So we need to configure the “Unfave” button to run the destroy action. To do that, we’ll use a different route helper method.
- Start by reviewing all the favorite-related routes. Here’s the route to the
destroyaction we’re aiming for:
movie_favorite_path DELETE /movies/:movie_id/favorites/:id(.:format) favorites#destroy
Because a favorite is nested under a specific movie, when accessing a favorite such as to delete a favorite, the route requires two parameters in the URL: :movie_id and :id . The :movie_id parameter identifies the ID of the parent movie and the :id identifies the ID of the favorite to delete. Notice also that this route will only be triggered by a DELETE request.
- Now use that route helper method to generate the URL for the “Unfave” button. This is where that
@favoritevariable comes in handy, because the URL needs to include the id of the favorite you intend to delete. And lo and behold, the favorite you want to delete is represented by the@favoritevariable.
[ANSWER]
<%= button_to "♡ Unfave", movie_favorite_path(@movie, @favorite), method: :delete %>
- As a quick sanity check that the button is wired up correctly, hit the “Unfave” button and it should try (unsuccessfully) to run the
destroyaction of theFavoritesController. - Following that cue, implement the
destroyaction. It needs to destroy the favorite that has the id embedded in the URL. Once the favorite has been destroyed, redirect to the show page for the movie that’s also identified in the URL.
Here’s the catch : It’s very important that you only destroy the favorite if it was created by the signed-in user. Otherwise it’s possible for a malicious signed-in user to generate URLs that end up deleting favorites created by other users.
[ANSWER]
def destroy
  favorite = current_user.favorites.find(params[:id])
  favorite.destroy

  movie = Movie.find(params[:movie_id])
  redirect_to movie
end
- Finally, go back to the browser and hit the “Unfave” button. The fave count should decrement by one.
- If at any point you want to delete all the favorites to get a clean slate, just jump into a console session and use:
>> Favorite.delete_all
Now you should only be able to fave a movie once! Change your mind? No problem. Just unfave it!
6. Write a Custom View Helper
Conditional statements in view templates are often difficult to read at a glance. You can easily tidy these up by writing a well-named view helper method. Let’s get some more practice doing that…
- In the FavoritesHelper, define a fave_or_unfave_button method that encapsulates the conditional statement for determining which button to display.
[ANSWER]
module FavoritesHelper
  def fave_or_unfave_button(movie, favorite)
    if favorite
      button_to "♡ Unfave", movie_favorite_path(movie, favorite), method: :delete
    else
      button_to "♥️ Fave", movie_favorites_path(movie)
    end
  end
end
- Then call that helper from the movie show template in place of the original conditional statement.
[ANSWER]
<div class="faves">
  <%= fave_or_unfave_button(@movie, @favorite) %>
  <div class="count">
    <%= @fans.size %>
  </div>
</div>
Bonus Round
Remove Duplication
You may have noticed a wee bit of duplication in the create and destroy actions of the FavoritesController . Both actions look up the movie using identical code. Remember how to clean up that sort of duplication?
- Write a
privatemethod namedset_moviethat fetches the movie and sets the@movieinstance variable.
[ANSWER]
private

  def set_movie
    @movie = Movie.find(params[:movie_id])
  end
- Then make sure to run the
set_moviemethod before running any action’s code.
[ANSWER]
before_action :set_movie
- Finally, as your reward, remove the duplicated line of code from each action.
Wrap Up
If your brain happens to feel a bit sore after the last few sections that’s because it’s swollen with a good deal of new info! You’ve learned a lot about many-to-many relationships:
- Strictly speaking, there is no such thing as a many-to-many relationship. Instead, this type of relationship is achieved with two one-to-many relationships with a join model in between.
- At a minimum, a join table has two foreign keys : one key referencing each of the entities being joined. That’s the case with our
favoritesjoin table. A join table can also have other columns, for example “stars” and “comments” as is the case with ourreviewsjoin table. - Through associations are a powerful yet simple way to jump between records that are related to each other, but stand two tables apart. They are also more efficient than hopping table to table. And you can give them descriptive names that better reflect your domain, such as fans!
- You can traverse across many-to-many relationships in multiple ways according to what pieces of data you want. For example, you can call
movie.fanswhen you want to traverse through thefavoritesrelationship, andmovie.favoritesif you want to work just with the join table. Similarly, you calluser.favorite_moviesoruser.favoritesdepending on your requirements. - When you don’t need a form to create a many-to-many relationship (because you already know the two pieces of information required), you can use a button that sends a POST request to the
createaction. Doing so will immediately create a new association in the join table. You can also configure a button to send a DELETE request to delete an existing association from the join table. - It’s always a good idea to make sure your associations are working correctly in the console first before making the trickle-down changes to the other parts of your app.
Coming up next, we’ll look at another way to design a many-to-many relationship. In the case of movies having fans, we designed favorites as its own resource. Next we want a movie to be able to have many genres, such as romance and comedy, or fantasy and comedy. How would we design that type of relationship? And how could we let admins assign multiple genres to a movie when its created or updated? That’s up next…
Many-to-Many with Checkboxes: Part 1
Exercises
Objective
An online movie review app wouldn’t be worth its weight in ticket stubs if it didn’t list genres for its movies. So we’ll need yet another many-to-many relationship. This time the relationship will be between movies and genres such that a movie can have multiple genres and a genre can be assigned to multiple movies.
We’ll start by setting up the database tables and models in this exercise, and then tackle the UI in the next exercise. For now, we’ll need to:
- Generate a
genreresource - Generate a
Characterizationjoin model. (Naming is hard! Even though it’s not necessarily fun to type out that name, it does fit the domain fairly well. If you come up with a better name, by all means go for it!) - Declare the model associations, including
throughassociations
If you like diagrams (can you tell we do?), here’s our goal:

Given everything you’ve learned about many-to-many relationships, this exercise is well within your reach…
1. Generate the Genre Resource
First we need to create a new resource to represent a genre, which simply has a name such as “Action” or “Drama”. We’ll use the resource generator to get a model and migration. In the event you decide to create a web interface for managing genres (as a bonus), you’ll also have a controller and resource routes.
- Start by generating a resource named
genrewith anamestring field.
[ANSWER]
rails g resource genre name:string
- Then apply the generated migration to create the genres database table.
[ANSWER]
rails db:migrate
- Next, add validations to the generated Genre model to ensure that a genre always has a non-blank and unique name.
[ANSWER]
class Genre < ApplicationRecord
  validates :name, presence: true, uniqueness: true
end
- Then hop into a console session and create a handful of example movie genres.
[ANSWER]
Genre.create(name: "Action")
Genre.create(name: "Comedy")
Genre.create(name: "Drama")
Genre.create(name: "Romance")
Genre.create(name: "Thriller")
Genre.create(name: "Fantasy")
Genre.create(name: "Documentary")
Genre.create(name: "Adventure")
Genre.create(name: "Animation")
Genre.create(name: "Sci-Fi")
- You might also consider creating example genres in your
db/seeds.rbfile so that a stock set of genres can easily be recreated.
2. Generate the Characterization Join Model
Next, we need a Characterization join model that will connect movies to genres. That is, any particular row in the characterizations table will effectively join a row in the movies table and a row in the genres table. In this case we don’t need a controller, so we’ll use the model generator to generate a join model and migration file.
- Generate a model named
Characterizationthat references both amovieand agenre.
[ANSWER]
rails g model characterization movie:references genre:references
- Can you guess what the generated migration file looks like?
[ANSWER]
class CreateCharacterizations < ActiveRecord::Migration[6.0]
  def change
    create_table :characterizations do |t|
      t.references :movie, null: false, foreign_key: true
      t.references :genre, null: false, foreign_key: true

      t.timestamps
    end
  end
end
- Then create the characterizations database table and you’re done with this step!
[ANSWER]
rails db:migrate
3. Declare the Model Associations
The next step is to declare associations in the models so that a movie can exist in many genres and a genre can contain many movies. We want our queries to be efficient, so we’ll also declare through associations that let us navigate directly from a movie to its genres, and vice versa.
- First, the
Characterizationmodel needs tobelong_toboth a movie and a genre. That’s already taken care of since you wisely usedmovie:referencesandgenre:referenceswhen generating the model.
[ANSWER]
class Characterization < ApplicationRecord
  belongs_to :movie
  belongs_to :genre
end
- Next up, in the
Moviemodel declare ahas_manyassociation withcharacterizationsand also ahas_manyassociation withgenresthat goes through thecharacterizationsassociation.
[ANSWER]
has_many :characterizations, dependent: :destroy
has_many :genres, through: :characterizations
Then, over in the Genre model, set up a reciprocal association. Declare a has_many association with characterizations and also a has_many association with movies that goes through the characterizations association.
[ANSWER]
has_many :characterizations, dependent: :destroy
has_many :movies, through: :characterizations
4. Experiment with the Associations
Now that we have a many-to-many association between movies and genres, and we have example movies and genres in the database, let’s see how we’d assign genres to movies in the console…
- First, find the “Black Panther” movie and ask for its associated genres.
[ANSWER]
>> movie = Movie.find_by(title: "Black Panther")
>> movie.genres
We haven’t assigned any genres to the movie yet, so you should get back an empty array. But at least you know that the through association is set up correctly. Hey, check out that single INNER JOIN query!
- Then find the “Action” genre and ask for its associated movies.
[ANSWER]
>> genre = Genre.find_by(name: "Action")
>> genre.movies
The genre doesn’t yet contain any movies, so you should get another empty array. But again, the query tells us that the through association is doing its job.
- The movie “Black Panther” is certainly an action flick, so now you need to assign that genre to the movie.
Thethroughassociation gives you a couple different ways to do that. The simplest way is to add the genre object to the array of genres that are associated with the movie. You can get that array by callingmovie.genres.
[ANSWER]
>> movie.genres << genre
You should see a SQL INSERT statement executed immediately that creates a new characterizations row in the database. Notice that the movie_id and genre_id foreign keys are automatically set to reference the respective movie and genre objects.
- Now ask the movie for its genres again.
[ANSWER]
>> movie.genres
This time you should get back an array that contains the one genre you added to the array.
Just for practice, go ahead and ask the genre for its associated movies.
[ANSWER]
>> genre.movies
You should get back an array that contains the one movie characterized as being in that genre.
- The
throughassociation also lets us access the ids of the genres that are associated with the movie. To get the array of genre ids, read thegenre_idsattribute of themovieobject.
[ANSWER]
>> movie.genre_ids
You should get back an array that contains a single genre id, 1 for example.
- You can also assign an array of genre ids to the
genre_idsattribute. Use that technique to assign the “Action”, “Adventure”, and “Sci-Fi” genres to the movie.
[ANSWER]
>> movie.genre_ids = [1, 8, 10]
This automatically creates two new rows in the characterizations table! The “Action” genre was already associated with the movie, so a new row wasn’t created for it. However, new rows were created to join the movie with the “Adventure” and “Sci-Fi” genres.
- Now suppose you only wanted to associate the “Action” and “Sci-Fi” genres with the movie, and disassociate the “Adventure” genre. To do that, assign an array of two genre ids.
[ANSWER]
>> movie.genre_ids = [1, 10]
This automatically deletes one row in the characterizations table! Notice that a SQL DELETE statement was executed to delete the row that joined the movie with the “Adventure” genre. Also, because “Action” and “Sci-Fi” were already associated with the movie, no new rows were created.
- Any guesses as to how you’d disassociate all the genres from the movie?
[ANSWER]
>> movie.genre_ids = []
- Now, to give us something to work with going forward, assign the “Action”, “Adventure”, and “Sci-Fi” genres back to the movie.
[ANSWER]
>> movie.genre_ids = [1, 8, 10]
- Finally, ask the movie for its genres one more time.
[ANSWER]
>> movie.genres
- You should get back an array that contains three genres. Notice that even though we assigned genre ids, the association knows to fetch the appropriate genres matching those ids.
Hey, that’s a handy way to assign multiple genres!
Wrap Up
Now that we have some genres in the database and a movie with multiple genres assigned, in the next exercise we’ll use the through association to list a movie’s genres. We’ll also design a UI that uses checkboxes to let admin users assign multiple genres to a movie.
Many-to-Many with Checkboxes: Part 2
Exercises
Objective
Since we assigned genres using the console in the previous exercise, we’ll start by listing a movie’s genres on the movie show page.
Then we need to change the movie form to include a set of checkboxes that can be checked or unchecked to assign specific genres when a movie is either created or updated.
1. List a Movie’s Genres
You should be able to knock this out on your own!
- In the
showaction of theMoviesController, fetch the movie’s associated genres and assign them to an instance variable.
[ANSWER]
def show
  @movie = Movie.find(params[:id])
  @fans = @movie.fans
  @genres = @movie.genres
  if current_user
    @favorite = current_user.favorites.find_by(movie_id: @movie.id)
  end
end
- Then list out the genres on the movie show page, inside the aside tag after the list of movie fans.
[ANSWER]
<% if @genres.present? %>
  <h4>Genres</h4>
  <ul>
    <% @genres.each do |g| %>
      <li><%= g.name %></li>
    <% end %>
  </ul>
<% end %>
- Back in your browser, the “Black Panther” movie should now be characterized as being in the genres you assigned in the console in the previous exercise.
2. Add Checkboxes to the Movie Form
So while we can assign genres in the console, our admins will most certainly want to assign genres in the web interface when they create or edit movies. To support that, we’ll put checkboxes on the movie form. Then admins can check or uncheck specific genres that best characterize the movie.
Keep in mind that when an admin user clicks “Create New Movie” or “Update Movie”, they are routed to the Movies Controller and the movie form is displayed in the browser. It’s in this movie form that we want to add the genre checkboxes. When the form is then submitted, it POSTs to the create action in the MoviesController . So, to assign genres to movies (create a row in the characterizations table), we don’t need a Characterizations Controller. Instead, the assignment happens in the MoviesController .
- Start by signing in as an admin and then editing the “Black Panther” movie. You won’t see any checkboxes yet, but this sets you up for a big reveal later.
- Then change the movie form (it’s a partial) to generate a checkbox for each possible genre.
[ANSWER]
<div class="checkboxes">
  <%= f.collection_check_boxes(:genre_ids, Genre.all, :id, :name) %>
</div>
- Now for the first part of that big reveal, reload the form. You should see a list of genre names with a checkbox to the left of each one. Whichever genres you assigned in the console should already be checked!
- To see what’s going on behind the scenes, view the page source and you should see a pair of
inputandlabelelements for each genre, like so:
 <input type="checkbox" value="1" checked="checked" name="movie[genre_ids][]" id="movie_genre_ids_1" />
 <label for="movie_genre_ids_1">Action</label>

 <input type="checkbox" value="2" name="movie[genre_ids][]" id="movie_genre_ids_2" />
 <label for="movie_genre_ids_2">Comedy</label>

 ...
Here’s what happened: The collection_check_boxes helper generated one input and label pair for each object in the collection returned by Genre.all. It called each genre object’s id attribute to populate the value attribute of the input element. It called each genre object’s name attribute to generate the text in the label element. And it called the movie’s genre_ids attribute to determine which genres should be “checked” by default.
Pretty slick!
3. Handle the Form Data
- Just to see the form data that’s being submitted, add fail as the first line in the update action of the MoviesController.
def update
   fail
   ...
 end
- Then submit the form and on the error page check out the parameters under the “Request” heading. You should see something like this:
{"_method"=>"patch",
 "authenticity_token"=>"0D5APaPViZh2cKc8...",
 "movie"=>
  {"title"=>"Black Panther",
   "description"=>"T'Challa, heir to the hidden but advanced kingdom of Wakanda, must step forward to lead his people into a new future and must confront a challenger from his country's past.",
   "rating"=>"PG-13",
   "released_on(1i)"=>"2018",
   "released_on(2i)"=>"2",
   "released_on(3i)"=>"16",
   "total_gross"=>"1346913161.0",
   "director"=>"Ryan Coogler",
   "duration"=>"134 min",
   "image_file_name"=>"black-panther.png",
   "genre_ids"=>["", "1", "8", "10"]},
 "commit"=>"Update Movie",
 "id"=>"3"}
In addition to all the expected keys and values, notice that the parameters hash includes a genre_ids key whose value is an array. And that array contains the ids of the genres that were checked in the form. (Remember, the ids are in the value attributes of the checkbox input elements.)
Hey, this is really convenient! Earlier in the console, we saw how we could add/remove genres based on an array of genre ids. And when we submit the form, it gives us an array of genre ids representing the “checked” genres. Perfect!
- Back in the
updateaction, remove thefailline. Now, you might think we need to do something special inupdateto handle the genre ids. But this existing line takes care of all that:
@movie.update(movie_params)
In the same way, we don’t need to update the create action because it already initializes a movie using the submitted form data, like so:
@movie = Movie.new(movie_params)
In both cases, the array of genre ids in the request parameters will get assigned to the genre_ids attribute, just like any other piece of form data. And we know that assigning to that attribute automatically creates or deletes rows in the characterizations table. So you don’t have to do anything special here. (Don’t you love it when a plan comes together?!)
- However, you do need to update the
movie_paramsmethod to allow genre ids to be mass-assigned. Because we’re dealing with an array, we have to set thegenre_idskey to an empty array. Here’s how to do that:
def movie_params
  params.require(:movie).permit(..., genre_ids: [])
end
- Now for the final big reveal! Hop back into your browser and check (or uncheck) specific genres. When you submit the form, you should end up on the movie
showpage and the list of genres should reflect your changes. And of course if you go back to the form, the associated genres should already be checked.
And with that, your admin users can easily assign multiple genres to a movie when it’s created or updated. Nicely done!
Bonus Round
Make a CRUD Interface for Genres
As our app stands, the list of genres can only be changed in the console. Although the set of familiar genres is fairly static and unlikely to change frequently, you still might consider standing up a web interface for managing genres. Bear in mind, only admin users should be able to create, update, and destroy genres.
You might also want a UI for listing out all the “comedy” movies or “action” movies. For example, on the genre show page, you could list the movies that are in that particular genre. And then on the movie show page, you could link each genre name so a user can see other movies in the same genre.
There’s nothing new here to learn, but it’s great practice if you want to layer in this functionality.
Wrap Up
In this section we put together a whole bunch of many-to-many concepts for a super-duper practice exercise. And we learned a little something new along the way: checkboxes! Hopefully at this point you’re feeling more comfortable designing a variety of model associations.
Now, wouldn’t it be nice to include links for showing hit or flop movies? That way you’d know which movies to watch (or skip) this weekend. We’ll do that next using a new concept called scopes .
Custom Scopes and Routes: Part 1
Exercises
Objective
Currently our movie listing page shows only the released movies. That’s a good start, but movie-savvy folks might also like to see the movies that haven’t yet been released—the upcoming movies. Or perhaps the most recent movies.
To list movies that match different criteria, we’ll first need to define custom queries that fetch a subset of movies from the database depending on the criteria. Earlier in the course we learned how to define custom queries by writing class-level methods in our models. For example, we’re currently listing the released movies by calling the Movie.released method. And we could certainly continue writing class-level methods for our new queries.
But a more idiomatic, concise way to write custom queries in Rails is using the declarative style offered by the scope method. You can think of using scope as “syntactic sugar” for defining an class-level query method. Rails programmers always enjoy a good bit of syntactic sugar, and as such you’ll see scopes used prevalently across Rails apps. So it’s worth understanding how to use them properly.
In this exercise we’ll focus on defining all the custom queries we need as scopes. As such, we’ll need to:
- Convert the existing released class-level query method to a scope
- Declare an
upcomingscope that returns all the movies that have not yet been released, ordered with the soonest movie first - Declare a parameterized
recentscope that returns an arbitrary number of released movies, for example the last 5 movies
Then in the next exercise we’ll update the index action in the MoviesController to run the appropriate query depending on the URL.
So let’s get rolling…
1. Convert ‘Released’ to a Scope
We’ll start by converting the existing released class-level query method to a scope …
- As a refresher, check out the
indexaction in theMoviesControllerand you should see the following:
def index
  @movies = Movie.released
end
So when you visit http://localhost:3000/movies, the index action calls the released custom query method we wrote earlier in the course. Therefore, you see a list of only the movies that have been released.
- Drill down into the
releasedclass-level method in the Movie model and you’ll see the query:
def self.released
  where("released_on < ?", Time.now).order("released_on desc")
end
It fetches all the movies that have a released on date in the past, ordered with the most-recently released movie first.
That class-level method works fine and dandy, but all it’s really doing is defining a named query. The name of the query is the name of the method ( released ) and the query itself is the body of the method. A more concise way to define a named query is by using a scope , so let’s do that…
- Convert the
releasedclass-level method to a scope namedreleased.
[ANSWER]
scope :released, -> { where("released_on < ?", Time.now).order("released_on desc") }
Don’t forget to remove your released class-level method when you’re done. The scope declaration will dynamically define the equivalent released class-level method for you.
- Now hop over into a console session and call the
releasedmethod that thescopedefined.
[ANSWER]
>> reload!

>> Movie.released
- It should run the same query you had before, returning all the released movies. The point is, you can call scopes as if they were class-level methods.
So from outside of the Movie model, nothing has changed. The index action in the MoviesController continues to call Movie.released without caring how the query is defined. And that’s a great example of why you always want to encapsulate your queries in the model!
2. Declare a New ‘Upcoming’ Scope
Now we’re ready to declare a new upcoming scope…
- Declare a new scope named
upcomingthat queries for all the movies that have not yet been released, ordered with the soonest movie first.
[ANSWER]
scope :upcoming, -> { where("released_on > ?", Time.now).order("released_on asc") }

# or

scope :upcoming, lambda { where("released_on > ?", Time.now).order("released_on asc") }
- Then check your work by running the query in the console.
[ANSWER]
>> reload!

>> Movie.upcoming
3. Declare a Parameterized ‘Recent’ Scope
We also need a recent scope that returns an arbitrary number of released movies. How many movies? You guessed it, that’s a number parameter! And rather than duplicating the query code to fetch the released movies, we can instead reuse the released scope.
- Declare a scope named
recentthat reuses the existingreleasedscope and accepts the maximum number of movies as a parameter, with a default value of 5.
[ANSWER]
scope :recent, ->(max=5) { released.limit(max) }

# or

scope :recent, lambda { |max=5| released.limit(max) }
- Over in a console, call the recent method with no parameters.
[ANSWER]
>> reload!

>> Movie.recent
It should return a maximum of 5 movies, the default. Check out the generated SQL and notice it includes an AND clause that fetches all the movies that are both released and recent in one database query. This is incredibly powerful! It means we can chain multiple scopes together to compose one complex query out of several small queries.
3. Now query for the 1, 5, and 10 most-recent movies.
[ANSWER]
>> reload!

>> Movie.recent(1)
>> Movie.recent(5)
>> Movie.recent(10)
Bonus Round
Convert ‘Hits’ and ‘Flops’ to Scopes
If you completed a previous bonus exercise where you declared hits and flops class-level query methods, then they are good candidates for scopes.
But let’s suppose we want to further scope (constrain) the hits and flops queries to only include released movies. Movies don’t become hits until they’re released anyway. And movies that haven’t been released will be flops by definition. So we only want released movies that are also hits or flops. Rather than duplicating the query code, you can instead chain the released scope together with the hits and flops scopes.
- Convert the hits class-level method to a scope with the same name, and combine it with the existing
releasedscope.
[ANSWER]
scope :hits, -> { released.where("total_gross >= 300000000").order(total_gross: :desc) }
Don’t forget to remove the class-level method when you’re done.
- In the same way, convert the
flopsclass-level method to a scope and reuse the existingreleasedscope.
[ANSWER]
scope :flops, -> { released.where("total_gross < 22500000").order(total_gross: :asc) }
Again, don’t forget to remove the class-level methods when you’re done.
- As a quick sanity check of your work, run each query in the console.
[ANSWER[
>> reload!

>> Movie.hits
>> Movie.flops
- It’s worth noting that you can continue to chain other familiar query methods onto a scope. For example, suppose the bean counters come to you and want to know which hit movies exceeded $400 million in total gross. The standard
hitsquery queries for $300 million and above, but you can add awhereclause to the chain like so:
>> Movie.hits.where("total_gross > 400000000")
This is a neat example of how scopes are lazily evaluated. When you call the hits scope, it doesn’t immediately query the database. Instead, it builds a query object (an ActiveRecord::Relation object). When you then call where it modifies that query object to include the where conditions. Finally, when you hit Return in the console, it generates a single SQL query statement and performs the query. Inside of a Rails app, it’s clever enough to only run the query when you begin to iterate through the results.
How would you then count the number of hits over $400 million?
[ANSWER]
>> Movie.hits.where("total_gross > 400000000").count
- Finally, you might be surprised to know that scopes can also be called on a
throughassociation. For example, suppose you wanted to get all the hits and flops that a particular user favorited. Recall that a user already has athroughassociation calledfavorite_movies. So to further scope the favorites to the hits and flops, you could do this:
>> user = User.find_by(name: "Daisy")

>> user.favorite_movies.hits

>> user.favorite_movies.flops
Declare User-Level Scopes
Currently, the user listing page shows all users. Suppose you didn’t want to list admin users, only non-admin users. Suppose you also wanted to list the users ordered by their name. How might you do that using small scopes chained together?
- First, declare a
by_namescope in theUsermodel that returns all the users ordered by their name in alphabetical order.
[ANSWER]
scope :by_name, -> { order(:name) }
- Then declare a second scope in the
Usermodel that builds off the first scope but returns only those users who are not admins, ordered by their name.
[ANSWER]
scope :not_admins, -> { by_name.where(admin: false) }
- Finally, change the
indexaction of theUsersControllerso that only non-admin users are listed.
[ANSWER]
def index
  @users = User.not_admins
end
More Scope Ideas
Want to continue building your scoping muscles? Good for you! Here are some more ideas:
- Suppose you wanted an easy way to fetch all the reviews that have been written in the past
ndays. For example, you might use this query to find all the reviews written in the past week (7 days) like so:
Review.past_n_days(7)
Or in the last month (30 days) like so:
Review.past_n_days(30)
Declare a past_n_days scope that takes the number of days as a parameter and returns the reviews written during that period. As a hint, remember in Rails you can use 3.days.ago to get the date as of 3 days ago.
[ANSWER]
scope :past_n_days, ->(days) { where("created_at >= ?" , days.days.ago) }

# or

scope :past_n_days, lambda { |days| where("created_at >= ?" , days.days.ago) }
Keep the Hollywood bookkeepers happy by declaring scopes that return released movies that grossed less than or greater than a specified amount. In the console, they want to be able to run the queries like so:
Movie.grossed_less_than(25000000)
Movie.grossed_greater_than(500000000)
Declare the scopes to make that possible.
[ANSWER]
scope :grossed_less_than, ->(amount) { released.where("total_gross < ?", amount) }
scope :grossed_greater_than, ->(amount) { released.where("total_gross > ?", amount) }
Another Use for Lambdas
Now that you have a handle on Ruby lambdas, you might be interested to learn that you can pass a Ruby lambda as the second parameter to the has_many method to customize the query.
For example, suppose you wanted to change the ordering of movie reviews so that the most-recent review appeared first in the listing on http://localhost:3000/movies/1/reviews. To do that, change the has_many :reviews declaration in the Movie model like so:
has_many :reviews, -> { order(created_at: :desc) }, dependent: :destroy
You can use any of the usual query methods inside of -> { } to customize the query.
Wrap Up
Using scopes is a great way to define custom queries in the declarative style you’ve come to expect in Rails. When you begin to build your own app, take the time to declare concise, expressive queries as scopes that you can then use to compose more complex queries by chaining them together. In addition to making your application code easier to read, using scopes leads to more reusable, flexible, and efficient queries.
As we’ve seen, declaring a scope is simply a shortcut to defining the equivalent class method. Indeed, you can do anything in a class method that you can do in a scope. So you might be wondering why you’d ever use a class method instead of a scope.
Personally, we tend to use scopes when the query logic is fairly concise and uses simple where , order , and limit clauses, for example. When the query logic gets more complex, requires some computation or logic, or requires a large number of parameters, we’ll use a class method instead.
In the next exercise we’ll put our new scopes to work in the index action of the MoviesController so we can list movies in a variety of ways.
Custom Scopes and Routes: Part 2
Exercises
Objective
Now that we’ve declared scopes for querying movies with specific criteria, it’s time to put the scopes to work. Our objective is to be able to list upcoming and recent movies by putting links in the header that correspond to the following URLs:
So which action should handle those URLs? Well, the action needs to run the scope query and display the resulting movies in a formatted list. That’s pretty close to what the existing index action of the MoviesController does. It queries for released movies and renders the index.html.erb view template which formats the movies listing quite nicely. And as a well-designed view template, it’s not concerned with how those movies were fetched or even where they originated. It just expects a collection of movies to exist in an @movies instance variable.
Rather than defining a new action, we’ll instead piggyback on the existing index action and its view template. In that action we’ll determine which scope to call based on the last part of the URL. Then we’ll assign the resulting movies to the @movies instance variable for the view template to list out.
1. List Upcoming and Recent Movies
- Try browsing to http://localhost:3000/movies/filter/upcoming and and you’ll get this expected error:
Routing Error

No route matches [GET] "/movies/filter/upcoming"
To support this URL, we’ll need a new route. And we want that route to also support browsing to http://localhost:3000/movies/filter/recent.
- To do that, define a new route that uses a :filter parameter to match the URL path movies/filter followed by any scope name. For example, a request for movies/filter/upcoming should fill in the :filter parameter with the value “upcoming”. And a request for movies/filter/recent should fill in the :filter parameter with the value “recent”. When that route matches, it should send the request to the
indexaction of the MoviesController
[ANSWER]
get "movies/filter/:filter" => "movies#index"
- Now reload http://localhost:3000/movies/filter/upcoming and you should see the movie listing, which means that the
indexaction was run as intended. However, it’s still listing all the released movies rather than the upcoming movies. When this route is matched, you need to tell theindexaction to only list upcoming movies. - To see that the
:filterparameter flows through to the action, addfailas the first line in theindexaction of theMoviesControllerlike so:
def index
  fail
  @movies = Movie.released
end
- Then reload and on the resulting error page check out the parameters under the “Request” heading. You should see this:
{"filter"=>"upcoming"}
Perfect. So when the movies/filter/upcoming route invokes the index action, the params hash includes a filter key whose value is upcoming . In other words, the router simply passes the parameter name and value through to the index action. This comes in really handy! You can use the value of the :filter parameter as a flag to determine which query to run.
- Back in the
indexaction, remove thefailline. Instead, use acasestatement to run the appropriate query depending on the value of the:filterparameter. If the value isupcoming, list the upcoming movies. If the value isrecent, list the recent movies. You can use the default number (5) or explicitly set a number. Otherwise, if the:filterparameter has any other value, list the released movies.
[ANSWER]
def index
  case params[:filter]
  when "upcoming"
    @movies = Movie.upcoming
  when "recent"
    @movies = Movie.recent
  else
    @movies = Movie.released
  end
end
- It’s important to note that the value of the route parameter need not be the same as the name of the scope. For example, you could arrange things so that if the value of :filter was upcoming-movies (the URL path would be movies/filter/upcoming-movies) then the Movie.upcoming query would be run. We decided to make the value of the route parameter the same as the name of the scope, just to keep things simple and direct.
- Finally, make sure you have at least one upcoming movie in your database and then verify that http://localhost:3000/movies/filter/upcoming lists only the upcoming movies.Also verify that http://localhost:3000/movies/filter/recent list the recent movies.And verify that http://localhost:3000/movies lists all the released movies, same as before.
2. Add Links In The Header
To make it easy to see the upcoming and recent movies, let’s add links to the header…
- We’ll need a route helper method to generate the links, but currently our route doesn’t have an associated helper. So to get a helper method, give the route the name
filtered_movies.
[ANSWER]
get "movies/filter/:filter" => "movies#index", as: :filtered_movies
- Then in the app/views/layouts/_header.html.erb partial, first change the “All Movies” link to “Released” just to be more consistent with the other links. Then use the route helper method to add “Upcoming” and “Recent” links.
<li>
  <%= link_to "Released", movies_path %>
</li>
<li>
  <%= link_to 'Upcoming', filtered_movies_path(:upcoming) %>
</li>
<li>
  <%= link_to 'Recent', filtered_movies_path(:recent) %>
</li>
- Finally, verify the links works as you’d expect.
Solution
The full solution for this exercise is in the scopes-2 directory of the code bundle.
Bonus Round
List Hits and Flops
If you declared hits and flops scopes in the previous bonus exercise, then in the header add links that correspond to the following URLs:
- First, in the index action add case clauses to handle the case when the :filter parameter is either hits or flops.
[ANSWER]
def index
  case params[:filter]
  when "upcoming"
    @movies = Movie.upcoming
  when "recent"
    @movies = Movie.recent
  when "hits"
    @movies = Movie.hits
  when "flops"
    @movies = Movie.flops
  else
    @movies = Movie.released
  end
end
- Then add “Hits” and “Flops” links in the header.
[ANSWER]
<li>
  <%= link_to "Hits", filtered_movies_path(:hits) %>
</li>
<li>
  <%= link_to "Flops", filtered_movies_path(:flops) %>
</li>
- Finally, verify the links work as you’d expect!.
Highlight the Active Link
From the user’s perspective, it’s currently not clear which scope is being used to list the movies. As a finishing touch, when the user clicks a link in the header it would be useful to highlight that link as being the “active” link. That way the user knows they’re currently viewing the upcoming movies, for example.
To help get you started, we already have an active CSS class that underlines the active link. To see what it looks like, add the active class to the “Upcoming” link, like so:
<%= link_to "Upcoming", filtered_movies_path(:upcoming), class: "active" %>
Then reload, and the “Upcoming” link should be underlined.
Now for the challenge: You only want to highlight the “Upcoming” link if the user is currently on the page with the URL movies/filter/upcoming . More generally, you want to highlight whichever link matches the current URL. To determine if the URL generated by a link is the same as the URL of the current page, you can use the built-in current_page? method. If you pass it the URL of a link and true is returned, then it’s the “active” page. In that case, you need to add the active class to the link.
Encapsulate that view-level logic in a helper called nav_link_to (put it in movies_helper.rb ) and change all the navigation links in the header (the _header.html.erb partial) to use that helper, like so:
<%= nav_link_to "Released", movies_path %>
<%= nav_link_to "Upcoming", filtered_movies_path(:upcoming) %>
<%= nav_link_to "Recent", filtered_movies_path(:recent) %>
<%= nav_link_to "Hits", filtered_movies_path(:hits) %>
<%= nav_link_to "Flops", filtered_movies_path(:flops) %>
[ANSWER]
def nav_link_to(text, url)
  if current_page?(url)
    link_to(text, url, class: "active")
  else
    link_to(text, url)
  end
end
Make It More Dynamic, Carefully!
Using a case statement to decide which scope to run is a perfectly valid solution. Sure, you have to add a clause every time you come up with a new scope, but in reality defining new scopes will be fairly infrequent. So maintaining the case statement isn’t a big deal, and it has the benefit of being straightforward and explicit.
But suppose you wanted a more dynamic solution that could handle new scopes without any changes to the index action. How might you do that? One solution that often comes to mind, usually after a web search, is to use the Ruby send method. The send method lets you invoke a method dynamically, by its name. For example, try this in a console session:
>> Movie.send("upcoming")

>> Movie.send("recent")
Pretty cool! Calling send("upcoming") on the Movie class is the same as calling Movie.upcoming . Using send is simply a more dynamic way to call the method. So what you can do with that kind of power?
Assuming that the name of the scope used in the URL is the same as the scope method in the Movie class, you might be tempted to do something like this in your index action:
def index
  if params[:filter]
    @movies = Movie.send(params[:scope])
  else
    @movies = Movie.released
  end
end
DO NOT DO THIS! This code is a major security vulnerability! It allows anyone on the big, bad Internet to run any method of your Movie class. For example, suppose you had a scope named secret that was only intended to be used internally. Surprise! Anyone can now run that scope using the URL http://localhost:3000/movies/filter/secret. Or worse yet, how about that delete_all method that’s defined on all models? With a wee bit of guesswork, a malicious user could delete all the movies in your database!
As they say, with great power comes great responsibility. The responsible way to do this is to only invoke the send method for a white-listed set of scope names. Similar to how you define a private method to only allow specific parameters to be mass-assigned from forms, you need to define a private method that only allows specific scope names, like so:
def movies_filter
  if params[:filter].in? %w(upcoming recent hits flops)
    params[:filter]
  else
    :released
  end
end
Think of this method as vetting the :filter parameter. If the value of params[:filter] is in the array of acceptable scope names, then that value is returned. Otherwise, if any other name is included in the URL, the default released scope name is returned instead. (Yup, you’ll have to update this list if you want to expose new scopes.)
Then in your index action, you need to make sure to call movies_filter and only send its result to send , like so:
def index
  @movies = Movie.send(movies_filter)
end
The lesson here is to be very, very careful with any sort of dynamic programming (meta-programming) that involves user-supplied data. And don’t trust any code you find on the Internet. 
Wrap Up
In the last two sections we focused on scopes and routes and you now know quite a bit about them:
- Scopes dynamically define class-level methods.
- Scopes take two parameters: the first parameter is the name of the scope (a symbol) and the second parameter is the custom query code.
- The query code in a scope declaration must be wrapped with a lamdba (
-> { }) to make it a callable Ruby object (aProcobject) so that the query code gets evaluated every time the scope is invoked. - To pass arguments to a scope, specify the arguments as parameters to the lambda, for example
->(max). Just as a method parameter can have a default value, a lambda parameter can also have a default value, for example->(max=3). - Scopes can be chained together to make a single complex query out of several small queries.
- Scopes are lazily evaluated, meaning they don’t immediately query the database. A good example of this is the use of
whereto modify the query object. - Scopes can be called on
throughassociations. - Declare one route that handles multiple filters (scopes) by using a route parameter, such as
:filter, to match the name of the filter in the URL.
It’s important to point out that not all scopes need to be directly accessible from the web. Most Rails apps have scopes (custom queries) that are only used internally in service of some higher-level business logic.
Speaking of scopes, now might be a good time to scope out a snack in preparation for the next section on cheerful, affectionate, friendly URLs.