Friendly URLs and Callbacks
Exercises
Objective
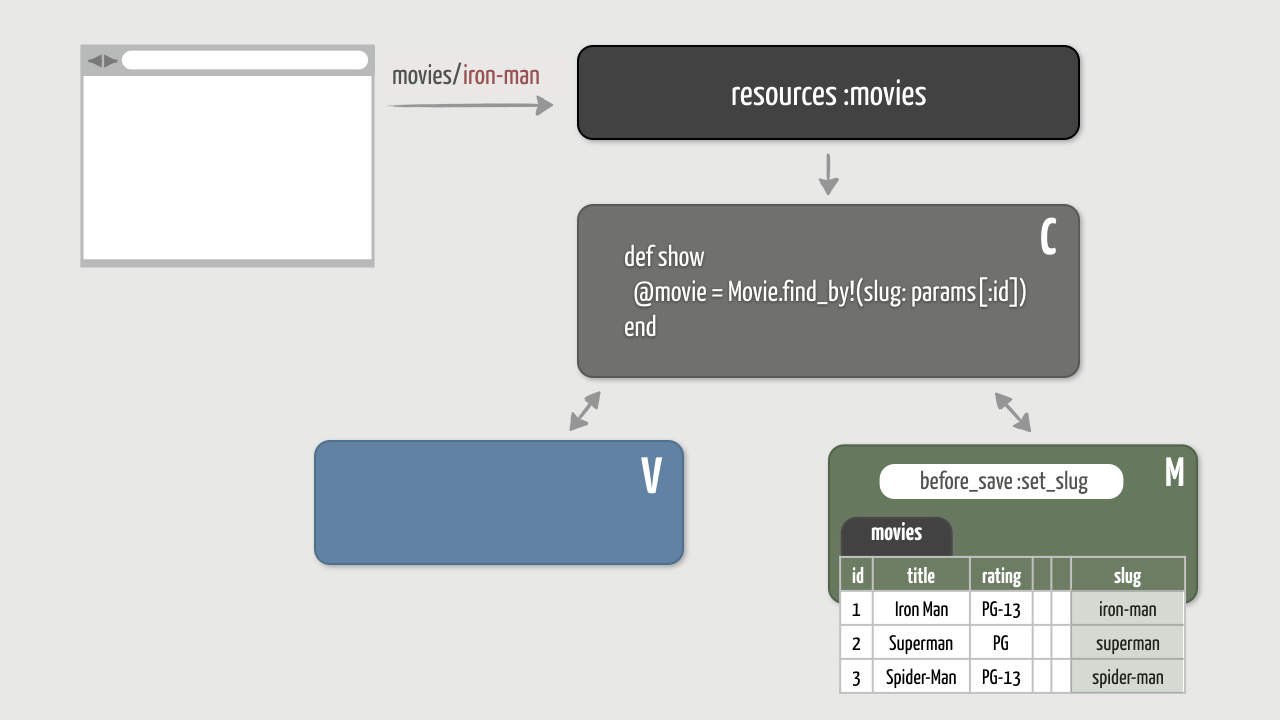
The folks in Hollywood decided to go all vain on us. It turns out those movies/1 , movies/2 , and movies/3 URLs aren’t good enough for them. Instead, they’d prefer vanity URLs such as movies/iron-man , movies/avengers-endgame , and movies/x-men-the-last-stand . So we’ll roll out the red carpet for them.
Kidding aside, how your URLs look is actually worth serious consideration. After all, URLs are the user interface of the web. We browse to them, read them, bookmark them, post them to Twitter, email them to friends, and share them in other ways. An expressive URL can also help with search engine optimization (SEO).
To change the URLs to be a bit more Hollywood-friendly, we’ll need to:
- Add a
slugcolumn to themoviesdatabase table - Define a model callback to automatically generate and assign a slug to the slug attribute of the Movie model
- Define a to_param method in the Movie model to return the value of the slug attribute.
- Modify existing controller actions to find movies using the
slugattribute
Here’s what we want to do visually:
Let’s get right to it!
1. Add a Slug Column
To support the URL movies/iron-man , for example, we’ll need to be able to find a movie by its slug. That means we need to store each movie’s slug in the database.
- Start by generating a new migration that adds a
slugcolumn of typestringto themoviestable.
[ANSWER]
rails g migration AddSlugToMovies slug
- Don’t forget to apply the migration.
[ANSWER]
rails db:migrate
- The slug for each movie must be unique, and since it will be derived from the title of the movie, the title must be unique. Add validations to the Movie model to ensure the title is unique.
[ANSWER]
validates :title, presence: true, uniqueness: true
At this point the movies database table has a slug column, but none of the current movies have a slug. And if a new movie is created, it won’t have a slug. This gives us a great opportunity to learn about model callbacks .
2. Define a Model Callback
Since the slug will be derived from the movie’s title, there’s no need to bother our admins with entering a slug on the movie form. Instead, we want to automatically generate and assign a slug when a movie is saved. To do that, we’ll register a model callback .
- Start by defining a private method named
set_slugin theMoviemodel that assigns the parameterized version of thetitleto theslugattribute.
[ANSWER]
def set_slug
  self.slug = title.parameterize
end
- The
set_slugmethod needs to be run before the movie is saved. To do that, add abefore_savecallback that calls theset_slugmethod.
[ANSWER]
class Movie < ApplicationRecord
  before_save :set_slug

  ...

private

  def set_slug
    self.slug = title.parameterize
  end
end
- To see the callback in action, hop into a console session and find any movie. Initially it won’t have a slug:
>> reload!

>> movie = Movie.find_by(title: "Avengers: Endgame")

>> movie.slug
=> nil
Then save the movie and verify that a slug was automatically assigned:
>> movie.save

>> movie.slug
=> "avengers-endgame"
Auto-magic… with no actual magic!
- What about all the other existing movies? They don’t have slugs either. That’s easy enough to fix in the
console. Just load each movie and re-save it.
[ANSWER]
>> Movie.all.each { |m| m.save }
Here’s a neat trick to verify that appropriate slugs were assigned to each movie. The pluck method queries for the specified attribute(s) without having to load up all the records:
>> Movie.pluck(:slug)
=> ["avengers-endgame", "captain-marvel", "black-panther", "avengers-infinity-war", "green-lantern", "fantastic-four", "iron-man", "superman", "spider-man", "batman", "catwoman", "wonder-woman"]
3. Define a to_param Method
With each movie now having a slug, we want movie-related URLs to include the slug rather than the id.
Anytime a model object needs to be converted into a URL parameter, the to_param method is called on the model object. All models that subclass ApplicationRecord inherit a default to_param method that simply returns the id of the record as a string. If your model doesn’t explicitly define a to_param method, then the default implementation is used. But you can override the to_param method in any model to return a custom string that represents the URL parameter for that model. So all we need to do is return the movie’s slug.
- In the
Moviemodel, define ato_parammethod that returns the value of theslugattribute.
[ANSWER]
def to_param
  slug
end
- Then jump back into the
consoleand call theto_paramon a movie object:
>> reload!

>> movie = Movie.find_by(title: "Avengers: Endgame")

>> movie.to_param
=> "avengers-endgame"
You should get a string formatted like avengers-endgame which is sometimes called a slug.
- Now use the
movie_pathroute helper method to generate the URL path for the movie, like so:
>> app.movie_path(movie)
=> "/movies/avengers-endgame"
Behind the scenes, the route helper method automatically called the to_param on the movie object to convert it to a slug. Then it used the result to generate the final URL path.
For this to work, it’s important that we pass the full movie object to the movie_path method. Check out what happens if instead we pass the id:
>> app.movie_path(movie.id)
=> "/movies/1"
This time it doesn’t call to_param because we explicitly passed the value of the id attribute.
This is why it’s important to always pass the model object to route helper methods and let the to_param method decide how to represent that object as a URL parameter.
- To bring that full circle, look in the
app/views/movies/index.html.erbview template and recall that we’re currently generating movie links like so:
<%= link_to movie.title, movie %>
Remember, that’s just a shortcut for using the movie_path route helper like so:
<%= link_to movie.title, movie_path(movie) %>
- Just as we did in the console, the
movie_pathroute helper method is being called and passed amovieobject, not just the movie’s id. So the generated links include the movie’s slug.
4. Fix the Controller Actions
Now that we have slugs and movie URLs are generated with those slugs, we next need to modify the affected controller actions to find movies using the provided slug rather than the id.
- Reload the movie listing page and and if you hover over a movie link it should now have a proper slug. Great! Now click the “Avengers: Endgame” link, for example, and you should end up at http://localhost:3000/movies/avengers-endgame. The URL is correct, but you’ll get this error:
ActiveRecord::RecordNotFound in MoviesController#show

Couldn't find Movie with 'id'=avengers-endgame
And the following line of the show action is highlighted:
@movie = Movie.find(params[:id])
What happened was the slug "avengers-endgame" was stored in params[:id] . Then the show action called find which always queries the id field. And of course there is no movie that has an id of "avengers-endgame" .
- To fix that, modify the
showaction to find a movie by its slug rather than its id.
[ANSWER]
def show
  @movie = Movie.find_by!(slug: params[:id])

  ...
end
- Now if you reload the page (you’ll still on http://localhost:3000/movies/avengers-endgame) it should show the movie!
- But if you try editing the movie (you need to be signed in as an admin), then you’ll bump into a similar error. The
editaction also needs to be modified to query theslugfield. As does theupdateaction. And you guessed it, thedestroyaction, too! You could certainly change each of these actions, but you should take this as an opportunity to clean up the duplication.
Define a private method named set_movie that finds a movie by its slug and assigns the movie to an @movie instance variable.
[ANSWER]
private

def set_movie
  @movie = Movie.find_by!(slug: params[:id])
end
Then use a before_action to call that method before the show , edit , update , and destroy actions.
[ANSWER]
class MoviesController < ApplicationController
  before_action :require_signin, except: [:index, :show]
  before_action :require_admin, except: [:index, :show]
  before_action :set_movie, only: [:show, :edit, :update, :destroy]

  # existing code
end
Finally, remove the line of code in those actions that finds the movie.
- At this point, you should be able run any of the actions in the
MoviesController. However, theReviewsControllerand theFavoritesControlleralso need to be modified to find their parent movie by the slug rather than the id. Thankfully, those controllers already use a tidyset_moviemethod so you just need to change one line of code in each controller.
[ANSWER]
# in reviews_controller.rb

def set_movie
  @movie = Movie.find_by!(slug: params[:movie_id])
end

# in favorites_controller.rb

def set_movie
  @movie = Movie.find_by!(slug: params[:movie_id])
end
And there you go! All the movie links across the entire app now use the movie slug. Roll the credits…
Bonus Round
Practice With More Callbacks
To get more practice with model callbacks, you might consider using callback to format user-entered data before it’s saved to the database. For example, if you added a username field to the User model in a previous bonus exercise, use a callback to convert it to a lowercase form.
[ANSWER]
before_save :format_username

def format_username
  self.username = username.downcase
end
E-mail addresses should generally be lower-cased as well, so use another callback to convert them as well.
Once you learn about callbacks, it’s tempting to go overboard with them. Callbacks are a good choice when they’re focused on manipulating and keeping the model data consistent. Callbacks are the wrong choice when they’re used to trigger behavior that may have unintended side effects or out-of-band processes, such as sending emails.
Friendly User URLs
Users are typically fairly friendly, so why not give them a friendly URL? If you did a previous bonus exercise, then you already have a username field that’s both unique and URL-safe. Return it from the to_param method to generate URLs such as:
- http://localhost:3000/users/daisy
- http://localhost:3000/users/larry
- http://localhost:3000/users/lucy
Friendly Genre URLs
While you’re on a roll, here’s another friendly suggestion. If you did the previous bonus where you listed genres, then the next step would be to support URLs such as:
- http://localhost:3000/genres/action
- http://localhost:3000/genres/comedy
- http://localhost:3000/genres/drama
- http://localhost:3000/genres/romance
- http://localhost:3000/genres/sci-fi
As with movies, in the case of genres you can’t just use the name field because it’s not URL-safe. For example, you might have genres such as “Film Noir”, “Variety Show”, or “Children’s Series”. So you’ll need to add a new field to support URL-friendly slugs.
Wrap Up
We used friendly URLs as an opportunity to demystify how URLs are generated and learn about model callbacks. So you now have a recipe for supporting friendly URLs and, more important, you have a general technique for running custom code at certain points in a model’s lifecycle.
Next up we’ll deploy this app! So dig out your favorite party hat and queue up some lively tunes because it will soon be time to celebrate your first launch!
Deployment
Exercises
Objective
It’s time to deploy your app to a production server so you can share it with others!
Now, you may think you’re off the hook because your company has an entire ops team dedicated to deploying apps to their servers. If that’s the case, you probably owe them a round of coffee and donuts. But if you’re like the rest of us, you’ll be doing it all yourself. Either way, we think being able to deploy a Rails app is a fundamental skill for every Rails developer. And there’s nothing quite as satisfying as seeing your app running on the 'net!
Deploying Rails apps has gotten easier over the years thanks in large part to cloud services such as Heroku. We love Heroku because it’s fast, easy, and free. And that means we can focus our time and attention on delivering new application features and let Heroku worry about all the system-level details.
It’s time to make this app real, so let’s get right to it!
1. Prepare the App
Add the PostgreSQL Gem
When we run our application in the development environment (the default), the app talks to a local SQLite database. In production, however, Heroku will arrange things so that our app is connected to a PostgreSQL database. The PostgreSQL database is already provisioned on the Heroku servers, but we need to add the PostgreSQL adapter gem in order for our app to talk to the PostgreSQL database.
- First, in the Gemfile find the line for the sqlite3 gem. We only want that gem to be required when running in the development or test environments. To do that, put the sqlite3 line inside of a group block, like so:
group :development, :test do
  gem 'sqlite3', '~> 1.4'
end
Heroku will automatically ignore any gem dependencies that are in the development or test environments, so the sqlite3 gem won’t get installed or loaded when we deploy the app to Heroku’s servers.
- Then add the PostgreSQL gem (pg) in the production group like this:
group :production do
  gem 'pg'
end
- Save the Gemfile and then run
bundle install --without production
- The --without production flag ignores any gem dependencies that are in the production environment. In this case, it skips installing the pg gem on your development machine. Otherwise, you’d need to install PostgreSQL locally since the pg gem won’t install if PostgreSQL isn’t also installed.All your gem dependencies should already be installed, so running that command shouldn’t install any new gems. So why run the command at all? Because running it updates the Gemfile.lock file. And this is the file Heroku will use to determine which gems to install. The upshot is when the application runs in the production environment on Heroku’s servers, the pg gem will get installed and loaded by default.
- At this point, you might guess that the next step would be to update the database.yml file with PostgreSQL connection settings in the production environment. Actually, Heroku takes care of that for us. When our app is deployed, Heroku auto-generates a database.yml with connection settings for Heroku’s PostgreSQL database service. We don’t have to mess around with the PostgreSQL database at all. It just works!
Fix the Logo Image
It’s often the case that putting your app in production reveals problems you didn’t see coming when you were working in the default development environment. And indeed the first time we tried to deploy the events app we got an error saying the logo image couldn’t be found. Your movies app has the same problem (because you followed our instructions!), so let’s go ahead and fix that…
In the app/views/layouts/_header.html.erb file, change the line that generates the logo image to include the .png extension like so:
<%= link_to image_tag("logo.png"), movies_path %>
It turns out you don’t need to include the extension when running the app in the development environment, but the production environment requires all images to include an extension.
Sorry for leading you astray!
2. Create a Local Git Repository
Next we need a way to deploy (transfer) our application code to Heroku’s servers which live in the cloud. And we do that using the Git distributed version control system.
One of the benefits of Git is that it’s designed for distributed development. This makes it easy to share code and collaborate with other developers, but it also makes it easy to share code with a production server such as Heroku. In fact, Heroku requires that our application code be version controlled with Git. Here’s how it works:
- We create a local Git repository and add all the application code to it.
- We also create a remote Git repository on the Heroku server.
- Then, when we want to deploy the application to Heroku, we push the code from our local repository to the remote repository.
If you’re worried about this turning into an exercise in system administration, fear not! With Git and the tools provided by Heroku, we’ll have everything deployed in just a few simple commands.
Let’s start by adding all the application code to a local Git repository…
- First you’ll need to install Git for your operating system if you don’t already have a version installed. You can check by typing
git --version
- Then, if you haven’t already set your user name and e-mail address, it’s a good idea to do that now so Git knows your identity.
To see if your user name and e-mail are already configured, run these two commands:
git config user.name
git config user.email
If they don’t return anything, set your user name and e-mail address like so:
git config --global user.name "Your Name"
git config --global user.email you@example.com
Since this affects the global configuration, you only have to do it once. Now whenever you do anything with Git it will remember that you were in the driver’s seat. If you need to change your identity later, just run the commands again.
- Next, make sure you’re in the
flixproject directory, or change directory into it.
Mac OS X or Linux
cd ~/rails-studio/flix
Windows :
cd \rails-studio\flix
- Then create a new local Git repository by typing:
git init
You should get output like the following which confirms that the local repository was created in the .git subdirectory:
Initialized empty Git repository in /Users/mike/rails-studio/flix/.git/
- The repository is empty, so the next step is to add all the files (and subdirectories) in the flix directory to the repository. To do that, type:
git add .
You won’t see any output. Notice that because we used a dot (.), which represents the current working directory (flix), Git recursively adds all the files and subdirectories in one fell swoop. (Files that match the patterns in the .gitignore file won’t be automatically added, however.)
- It turns out that the add command doesn’t really add the files to the repository. It actually adds them to a staging area . The staging area becomes important in more advanced scenarios, but don’t worry about it for our purposes. So to really, truly add the files to the repository, the last step is to use the commit command:
git commit -m "Ready to deploy v1.0"
You’ll see a long list of files that were committed. Whenever you commit a change, it’s polite to include a short commit message. To add a message, we’ve used the -m flag followed by the message in double quotes. If you leave off the -m, Git will attempt to open a text editor where you can enter the commit message.
Now we have a local Git repository and our application code has been committed to that repository. But we haven’t yet sent the code to the Heroku server. That’s the next step…
3. Create a Remote Git Repository on Heroku
Next we need to create a remote Git repository on the Heroku server.
- First, sign up for a Heroku account. You’ll immediately receive a confirmation email with instructions for activating your new account. Basic usage of Heroku is free, which is sufficient for our needs in this course. However, Heroku also has paid features that are crucial for mission-critical apps.
- After completing the creation of your account, download and install the Heroku Command Line Interface (CLI) for your operating system.
- Next, open a new command prompt just to make sure your environment includes the newly-installed Heroku CLI. Then change back into the
flixproject directory.
Mac OS X or Linux :
cd ~/rails-studio/flix
Windows :
cd \rails-studio\flix
- The Heroku CLI includes the heroku command-line tool for creating and managing Heroku apps. Start by logging in:
heroku login
You’ll be prompted to enter any key to open your web browser where you can login and the CLI will then log you in automatically.
Or you can stay in the CLI to enter your credentials by using the -i option, like so:
heroku login -i
You’ll be prompted for your credentials:
heroku: Enter your login credentials
Email:
Password:
Use the email address and password you used when creating your Heroku account.
Either way, you should end up seeing a reassuring message such as
Logged in as daisy@example.com
- Next, to create the app on Heroku, make sure you’re still in your flix project directory and type:
heroku create
This command creates a new application on Heroku with a placeholder name, and also sets up the remote Git repository. Here’s an example of what you should see:
Creating app... done, ⬢ mighty-thicket-8732
https://mighty-thicket-8732.herokuapp.com/ | https://git.heroku.com/mighty-thicket-8732.git
We didn’t specify the name of the application when using the create command, so Heroku automatically assigned a unique application name (mighty-thicket-8732). (We’ll see how to rename the app a bit later.) A remote repo was also created and added as a remote endpoint of your local repo.
- Finally, open the app either by browsing to the printed URL or by typing
heroku open
- That command automatically pops open your default browser and points it to the right web address.You should see a welcome message!
Cool—now we have a web address to share with our friends. But creating the app on Heroku doesn’t automatically send our application code. That’s the next step…
4. Deploy the App!
Now that we have both a local and remote Git repo, deploying our application code is trivial. All we need to do is push the code in our local repo up to the remote repo.
- To deploy the application code to Heroku, type:
git push heroku master
This command pushes all the code committed in the local repo to the remote repo named heroku. We’ve specified that we want to push the code that’s in the master branch. All Git repos start out with a master branch from which you can create other branches, but don’t worry about branching right now.
You’ll see a bunch of output as Heroku chugs through the deployment process, and at the end you should get something like this:
https://mighty-thicket-8732.herokuapp.com deployed to Heroku
- We’re almost there, but the production application is missing something crucial: the database tables! To create those tables, you need to apply the migrations to the PostgreSQL database that’s running on the Heroku server. To do that, run:
heroku run rails db:migrate
Note that this is the same task we’ve been using to apply migrations locally (rails db:migrate), but prefixing any task with heroku run causes the task to run on the Heroku server.
- Then to populate those tables with the example movies (and other seed data) contained in your db/seeds.rb file, run:
heroku run rails db:seed
-
- Now for the moment of truth! Reload the app in your browser using the production URL, and you should see the Flix app!

- Now for the moment of truth! Reload the app in your browser using the production URL, and you should see the Flix app!
OK, now what? Well, since we know that apps are constantly undergoing change, let’s see how we’d deploy the next iteration of the app…
5. Deploy a New Version
Suppose you share your freshly-deployed app with a few friends and one of them suggests a change. It’s inevitable. As soon as you release an app, invariably a keen-eyed user will notice something that needs to be changed. Your first reaction might be a deep sigh, a palm to the forehead, or a big smile knowing that you’ve just enlisted your first human tester!
Either way, now that we have everything set up, it’s super easy to release changes.
- Just to keep it simple, suppose you need to add a link for contacting support. It might be an e-mail address, a Twitter link, or (if you’re really daring) your personal phone number. Choose one and add it to the footer, for example.
- Next, add and commit the changes to your local Git repo:
git add .
git commit -m "Add a support link"
- Then deploy the changes by pushing the code to Heroku just like before:
git push heroku master
- There is no step 5!
And that’s all there is to it! You can now deploy new versions of your app whenever you want with a couple commands. Some people call that being agile . We call it working smarter.
6. Create Your Admin User Account
At this point you may want to create an account for yourself. That’s easy enough to do in the browser, but if you want to be an admin then you’ll need to use a Rails console to set the admin flag on your account. And that console session needs to be connected to your production database. You’ve probably already guessed how to do that…
To start a Rails console session that’s attached to the Heroku server, type
heroku run rails console
It’s just like being in a local Rails console session, but just remember that any changes you make in this remote console session will affect your production database!
Troubleshooting
Hopefully it’s smooth sailing from here, but if trouble strikes you may need to see what’s going on behind the scenes of the Heroku servers. Here are a couple troubleshooting commands worth keeping in your back pocket:
- To list your apps, use
heroku apps
To check the status of your processes on Heroku, use
heroku ps
To look at the remote logs, use
heroku logs
Or you can stream the remote logs by using the --tail option, like so
heroku logs --tail
Renaming or Removing the App
At some point, you might want to rename your app (to change the subdomain URL) or remove the app entirely. Here’s how to do that:
- Heroku automatically generated a unique, obscure subdomain name for your app. To list your apps, type:
heroku apps
You should see something like this, but your application name will most certainly be different:
mighty-thicket-8732
If you wanted share this app with your closest friends, you’d send them the link https://mighty-thicket-8732.herokuapp.com/.
Honestly, unless you have good reason to do otherwise, it’s probably best to stick with it. Only people you share this link with will be able to find the app, and it’s unlikely that a malicious person would go looking for an app called mighty-thicket-8732. It’s kinda like finding a needle in a thicket, and a mighty one at that.
However, if you do want to change the app name, use the rename command like so:
$ heroku rename flix
You’ll see output confirming that the app was renamed and the subdomain was updated:
Renaming mighty-thicket-8732 to flix... done
http://flix.herokuapp.com/ | https://git.heroku.com/flix.git
Git remote heroku updated
Remember though that Heroku application names must be unique, so it’s possible that flix is already taken! It’s also a lot easier to guess, so beware.
- Alternatively, if you ever want to delete the app, simply use the destroy command and specify the name of the app to destroy, like so
heroku destroy mighty-thicket-8732
This is a destructive, permanent action, so you’ll be prompted to re-enter the application name as confirmation that you really (really!) want to delete it.
- Heroku also provides a convenient dashboard for administering and configuring your application.
Bonus Round
Share Code on GitHub
If you want to share your application code and collaborate with other developers, you might consider also pushing your code up to GitHub. It’s a popular social site for hosting and sharing Git repositories.
- Sign up for a GitHub account if you don’t have one already. The free account allows you to host open-source code.
- After signing up, click on the link to create a repository. For the repository name, use “flix” and leave the “Initialize this repository with a README” option unchecked since your app already has that file.
- Then use these commands to add GitHub as a remote repository and push your code up to your new GitHub repo:
git remote add origin https://github.com/<username>/flix.git
git push -u origin master
Of course you’ll need to replace with your GitHub user name.
-
Refresh the GitHub repository page and you should see a list of your application files, a history of all the commits you’ve made, and a bunch of other options.
-
After making a change to the application, make sure to check your code into your local Git repo:
git commit -am "Some useful message about the change"
The -am flag adds all the changes to the repo and adds the commit message in one fell swoop.
- Then push your changes to the GitHub remote repository:
git push origin master
- Finally, deploy the revised application code to Heroku:
git push heroku master
Wrap Up
Congratulations on releasing your Rails app!
That’s a huge accomplishment and you should totally give a couple fist pumps and sound off with a hearty W00T! And if it isn’t too much to ask, e-mail us. We’d love to be one of the first people to visit your new Rails app!
Using Git
In this section, we looked at Git primarily in the context of sharing code with a production server, in this case Heroku. But this barely scratches the surface of Git. More than just for deployment, Git is a very powerful version control system used by both solo developers and development teams throughout the entire lifecycle of app development. To learn more about Git, we recommend the online Git Immersion tutorial. For a more comprehensive look at Git (as well as a more searchable reference), check out the free online book Pro Git.
Active Storage File Uploads: Part 1
Exercises
Objective
As the application stands, when you create a new movie you have to use an existing image file that’s in the app/assets/images directory. It’s not a huge deal when you’re developing the app. You can just drop a new image into that directory. But it’s totally unfeasible when the app is running on a production server. To create a new movie you would need to add a new image to your local Git repo and then re-deploy the app to the server. Anyone volunteering to do that every time an admin user wants to create a movie?
Instead, when admin users create (or edit) a movie we’d like them to be able to select a movie image file on their local computer and upload it to the server. Uploading files in this way turns out to be fairly easy to do using Active Storage.
We’ll start by using Active Storage to upload and store images on our local machine during development.
1. Remove the image_file_name Attribute
First up, since we’re no longer going to tie movies to images in the app/assets/images directory, we’ll remove the image_file_name column from the movies database table and also remove existing validations for that attribute.
- Generate a migration file that removes the image_file_name column from the movies database table.
[ANSWER]
rails g migration RemoveImageFileNameFromMovies image_file_name:string
- Run that migration.
[ANSWER]
rails db:migrate
- Then remove the existing format validation for the image_file_name attribute in the Movie model.
That causes some unavoidable breakage. A few view templates still reference the defunct image_file_name attribute, so you’ll see errors if you navigate around the app. We could temporarily fix those by, for example, always displaying a placeholder image as we did in the video. But we know where we’re headed so instead of patching things up, let’s just leave the templates as they are for now.
2. Install Active Storage
With that out of the way, we’re ready to start using Active Storage to tie movies to uploaded images. Naturally the first step is to install Active Storage.
- Run the Active Storage installer:
rails active_storage:install
This simply copies a migration file into our db/migrate directory.
- Then run that migration:
rails db:migrate
You’ll see it creates two database tables: active_storage_blobs and active_storage_attachments.
- Although you won’t use these new tables directly, it’s always empowering to have a cursory understanding of what goes on behind the scenes. So crack open the generated migration file and have a peek.
The active_storage_blobs table is fairly straightforward. It stores all the details of uploaded files including their filename, content_type, metadata, and other such information. And the key is an encoded value that points to the file in the Active Storage service.
The active_storage_attachments table is much more interesting. Focus in on the following two lines:
t.references :record, null: false, polymorphic: true, index: false
t.references :blob,   null: false
Each row of this table references a blob (a row in the active_storage_blobs table) and also references a record. In other words, each row of the active_storage_attachments table joins a blob and record.
Now, from previous exercises we already know how join tables work. But what’s different about this join table is it’s a special type of join table: a polymorphic join table. You can tell because the first line uses the polymorphic: true option:
t.references :record, null: false, polymorphic: true, index: false
- This means that the record it’s referencing can be any ActiveRecord model. In our case it’s going to be a Movie record. But it just as well could be a User record if we were to allow users to upload their avatar, for example.How does it know what kind of record it’s referencing? To answer that, remember what happens when you use t.references :record without the polymorphic: true option. The migration would create a column named record_id that’s a foreign key pointing to a record. But it wouldn’t know what kind of record it’s pointing to. So when you add the polymorphic: true option, the migration also creates a column named record_type which contains the name of an ActiveRecord model class, for example Movie. And with these two pieces of information—a foreign key and a class name—the row knows exactly which record it’s referencing.Pretty clever, huh?
3. Declare Attachment Associations
The database is ready to join any ActiveRecord model to a blob (an uploaded image), but we still need to declare any respective associations in our models. In particular, we want a movie to have one attachment image named main_image.
Add such a declaration to the Movie model.
[ANSWER]
has_one_attached :main_image
4. Update the Movie Form
The Movie model can now accept a file attachment. Next we need to change the form so users can actually upload an image file when creating or editing a movie.
- In the app/views/movies/_form.html.erb partial, find the label and text_field that currently reference the old image_file_name attribute. Change them to reference the new main_image attribute and swap out the text_field for a file_field which generates an input for selecting a file to upload.
[ANSWER]
<%= f.label :main_image %>
<%= f.file_field :main_image %>
- For this to work, you need to add the main_image attribute to the list of permitted parameters which are defined in the MoviesController. While you’re at it, remove image_file_name from the list.
[ANSWER]
def movie_params
  params.require(:movie).
    permit(... :main_image ...)
end
5. Use a Helper to Display Attached Images
Before uploading an image, let’s first fix those broken view templates that are still trying to display an image using the old image_file_name attribute. If a movie has an attached main image, we want to display it. But if it doesn’t have an image attached, we want to display the placeholder image. We’re going to need to perform this same check in several templates, so we’re wise to encapsulate it in a custom view helper.
- In the MoviesHelper module, define a helper method named main_image that takes an Movie object and returns an image_tag either for the placeholder image or the main image if one is attached to the movie.
[ANSWER]
def main_image(movie)
  if movie.main_image.attached?
    image_tag movie.main_image
  else
    image_tag "placeholder.png"
  end
end
- Then in the app/views/movies/index.html.erb template, find the line that references the old image_file_name attribute and change it to use the main_image helper method.
[ANSWER]
<%= main_image(movie) %>
- Similarly, change the app/views/movies/show.html.erb template to also use that helper method.
[ANSWER]
<%= main_image(@movie) %>
- Finally, use the helper in the app/views/users/show.html.erb template to display the main image for the user’s favorite movies.
[ANSWER]
<%= link_to main_image(movie), movie %>
- Now if you navigate around the app, the placeholder should be displayed everywhere since we haven’t yet uploaded a movie image.
6. Upload a Movie Image File
Time for the moment of truth!
Go to the form for editing a movie and you should see a “Choose File” button near the bottom of the form. Click it and select an image file you want to attach to the movie. For example, you might want to find a different poster image for “Captain Marvel”, download it to your desktop, and select it. Or you can select an image that’s already in the app/assets/images directory.
Then click “Update Movie” and you should get redirected back to the movie’s show page and see the uploaded image displayed!
7. Find the Stored File
By default in the development environment, Active Storage stores all uploaded images on your local disk in the storage directory.
If you now drill down into that directory, buried under a few subdirectories you’ll find a file whose name is the same as the blob key. It’ll be something obscure like hizv9iu78dmll6rzal6kcfak02gf. That’s the file you just uploaded!
Wrap Up
We’re now using Active Storage to store all uploaded movie images in the storage directory. With the basics in place, next up we’ll add validations, resize the images, and upload images for all the remaining movies in a more developer-friendly way.
Active Storage File Uploads: Part 2
Exercises
Objective
Now that we’ve converted over to using Active Storage for uploading movie images, we’re in a position to make the process more robust and flexible.
We want to do three things:
- Add reasonable validations to restrict what can be uploaded
- Resize uploaded images by creating variants
- Attach images using code instead of using the form
1. Add Validations
We trust that admin users aren’t malicious, and yet we’d be foolhardy if we didn’t add validations to set limitations on the size and content type of uploaded files. What’s acceptable? That’s up to you. Just to put a reasonable stake in the ground, suppose we won’t accept images over 1 MB and they must be either JPEG or PNG images.
You might think Active Storage would include built-in validations for this kind of thing. Unfortunately that’s not the case. But not to worry: it’s surprisingly easy to write custom validations.
Start by adding this to your Movie model:
validate :acceptable_image
This says “Hey, call the acceptable_image method when you’re trying to validate a movie!”
Then down in the private section, define that method:
def acceptable_image
end
That empty method obviously won’t do anything, but what if you changed it like so?
def acceptable_image
  errors.add(:main_image, "is too big")
end
Now when the movie is validated, a validation error will always be added to the main_image attribute with the blunt message “is too big”.
So that’s how you add validation errors when writing custom validations in this way.
But how do you know if the main image is too big? Well, you can read the value of the main_image attribute, which has an asssociated blob, which in turn has a byte_size attribute:
main_image.blob.byte_size
Likewise, you can read the content_type attribute of the blob:
main_image.blob.content_type
Armed with that knowledge, you’re off to the races!
In the acceptable_image method, validate that the main image isn’t over 1 MB and is either a JPEG or PNG image. A main image need not be attached, in which case you don’t want to validate it. (Feel free to set your own reasonable limitations on the main image.)
[ANSWER]
def acceptable_image
  return unless main_image.attached?

  unless main_image.blob.byte_size <= 1.megabyte
    errors.add(:main_image, "is too big")
  end

  acceptable_types = ["image/jpeg", "image/png"]
  unless acceptable_types.include?(main_image.content_type)
    errors.add(:main_image, "must be a JPEG or PNG")
  end
end
Don’t forget to put the validations to the test by trying to upload a big PDF or animated GIF, for example.
2. Create Image Variants
Active Storage will always store unaltered copies of uploaded files. But sometimes you need to transform those images in some way. A typical scenario is when you need a smaller thumbnail image.
Active Storage has an answer for that, too: it can create something it calls a variant . It’s a variation of the original uploaded image. For example, the original image might be 100x100 pixels and it has a variant that’s only 50x50 pixels.
- To generate variants for images, we first need to uncomment the following line in the Gemfile:
gem 'image_processing', '~> 1.2'
Then install the gem:
bundle install
- Now, the image_processing gem relies on ImageMagick to do the actual image transformation. ImageMagick isn’t a Ruby gem; it’s distributed as a binary that’s specific to your operating system. You’ll need to install it separately for your operating system:
- Windows using the Windows binary release
- Mac using Homebrew:
brew install imagemagick
Linux using apt-get:
sudo apt-get install imagemagick
-
Then once you have ImageMagick installed, you’ll need to restart your Rails app.
-
With those things in place, we’re ready to create image variants! Suppose, for example, we want to resize the main image to 150 pixels on the long side.
The image tag for the main image is being generated by the main_image view helper in the MoviesHelper module. In that helper, use the variant method with the resize_to_limit option to create a variant of the main image.
[ANSWER]
def main_image(movie)
  if movie.main_image.attached?
    image_tag movie.main_image.variant(resize_to_limit: [150, nil])
  else
    image_tag "placeholder.png"
  end
end
- Now if you browse to a page that displays a movie image, the new variant will be generated and stored if the requested variant doesn’t already exist in storage.
You can have as many image variants as you like, and they’re automatically created and stored when requested. If you drill down into the storage directory you’ll find all the variants down under the va/ri/variants directory. Each images variants are stored in a separate subdirectory whose name is the same as the image blob key such as hizv9iu78dmll6rzal6kcfak02gf.
Pretty cool!
- Attach Images Using Code
Now that we have validations and variants, we’re in good shape to upload images for all the movies. Unless you’ve already done that using the form, you’ll still see the default placeholder image for all the movies that don’t have an image attached.
Using the form works and you could certainly take that route to upload images for the remaining movies. But sometimes it’s convenient to be able to upload files programmatically using code.
There’s no better place to try that out than in a Rails console session…
- Start by finding a movie:
>> movie = Movie.find_by(title: "Avengers: Endgame")
- Then let’s suppose we want to upload the avengers-end-game.png image file that’s currently in the app/assets/images directory. First you need to open that file like so:
>> file = File.open(Rails.root.join("app/assets/images/avengers-end-game.png"))
We’re using this image because it’s readily available, but you could just as well use an image on your Desktop. Just make sure to pass an absolute filename to the File.open method.
- Then to upload that file and attach it to the movie, you call the attach method on the main_image attribute, like so:
>> movie.main_image.attach(io: file, filename: "avengers-end-game.png")
You must specify both an I/O object, in this case a file, and a filename.
When this code is executed, a copy of the app/assets/images/avengers-end-game.png file is uploaded into the storage directory.
And if you browse to the movie listing page or the show page for that movie, you should see the uploaded file. No form required!
- That’s handy! Where else might you want to upload images this way? Well, your db/seeds.rb file currently creates movies to “seed” the database so the application starts out with a collection of example movies. It would be convenient to also upload images for all those movies as part of the seeding process. And since you already know how to attach an image to a single movie using code, it’s straightforward from there to attach images to all the movies created by the seeds.rb file.
Give it a go on your own, then check the answer to see how we did it.
[ANSWER]
[
  ["Avengers: Endgame", "avengers-end-game.png"],
  ["Captain Marvel", "captain-marvel.png"],
  ["Black Panther", "black-panther.png"],
  ["Avengers: Infinity War", "avengers-infinity-war.png"],
  ["Green Lantern", "green-lantern.png"],
  ["Fantastic Four", "fantastic-four.png"],
  ["Iron Man", "ironman.png"],
  ["Superman", "superman.png"],
  ["Spider-Man", "spiderman.png"],
  ["Batman", "batman.png"],
  ["Catwoman", "catwoman.png"],
  ["Wonder Woman", "wonder-woman.png"]
].each do |movie_title, file_name|
  movie = Movie.find_by!(title: movie_title)
  file = File.open(Rails.root.join("app/assets/images/#{file_name}"))
  movie.main_image.attach(io: file, filename: file_name)
end
In that file, you’ll also need to remove all references to the image_file_name attribute. Then if you were to run the seeds file, all the seeded movies would have images.
Wrap Up
In the last two sections we learned a lot about Active Storage:
- It’s built right into Rails and installing it is a snap.
- You use has_one_attached :main_image in an ActiveRecord model to declare its association to an attached image named main_image, for example.
- To attach an image, you either use a form with a file_field bound to the main_image attribute or you call the attach method on the main_image attribute.
- All uploaded images are stored in the storage directory by default when the app is running in the development environment. Behind the scenes, Active Storages uses two database tables—active_storage_attachments and active_storage_blobs—to store file information and join models to their attachments.
- Uploaded images can be resized and transformed in other ways by creating what Active Storage calls a variant . Variants are generated on demand and also stored in the storage directory.
Next we turn our attention to using Active Storage in the production environment where we want all uploaded files to be stored on Amazon S3. Before we can do that, first we need to encrypt our super-secret Amazon credentials. That’s up next…
Encrypted Credentials
Exercises
Objective
To communicate with external APIs or services that require authentication, an application generally needs to use access keys, tokens, or passwords. Indeed, all of the cloud-based storage services supported by Active Storage require some set of credentials. So to use Amazon S3 in production to store uploaded files, we need to hand over our credentials.
Here’s the rub: those credentials are super-secret! If they were revealed, someone could hijack our account and run up our storage bill. So how do we safely give a Rails application our super-secret credentials so it can use them to access our Amazon S3 account?
This is such a common need that Rails has a built-in, and secure, solution.
We’ll let Rails encrypt our Amazon S3 credentials in a special file that gets deployed with the application. And when the application runs, it will decrypt that encrypted file and use our credentials to communicate with Amazon S3.
1. Create an AWS Account and an S3 Bucket
First you’ll need to create and activate an Amazon Web Services account if you don’t already have one. The free tier offers sufficient storage space for our educational purposes.
Access to S3 is governed by a set of credentials: an access key id and a secret access key. The access key identifies your S3 account and the secret access key should be treated like a password. Your S3 credentials can be found on the Your Security Credentials section of the AWS console. For now just make sure you have these keys handy.
All files in S3 are stored in buckets which act basically like directories. Create an S3 bucket where your uploaded images will be stored. You can name the bucket anything you want, but the name must be unique across the entire Amazon S3 system. To avoid naming conflicts, you might want to use the name of the app that Heroku generated as the bucket name. For example, if your app is named still-thunder then you might name your bucket still-thunder-images.
2. Encrypt Your Access Keys
Now we’re ready to encrypt our secret access keys in a file that the Rails app can decrypt when its running.
- To do that, first run
rails credentials:edit
This will open a temporary file in your default editor. It uses the value of the EDITOR environment variable to determine your default editor. If nothing happens, you can set the EDITOR variable when running the command. For example, if VS Code is your preferred editor, then run
EDITOR="code --wait" rails credentials:edit
The --wait option prevents the command from exiting immediately. It waits until you’re done editing the credentials and you’ve closed the file.
- Once the temporary file opens you’ll see all the credentials in plaintext. Uncomment the following section, and replace the values of both keys with your AWS access keys:
aws:
  access_key_id: 123
  secret_access_key: 345
- Here comes the semi-magical part: Save the temporary file and close it in your editor. Doing that causes the contents of the temporary file to be encrypted and written to the config/credentials.yml.enc file. If you open up that file, it’s total gibberish. That’s the result of good encryption.
So config/credentials.yml.enc is obviously an important file. But on its own, this file is useless. To unlock the secrets held within that file, you need a master key.
Where’s the master key? You guessed it: in the aptly-named config/master.key file. This file was generated when you initially generated the Rails app. And if you look inside, you’ll see that it also generated a master key that unlocks the secrets of your app!
It’s worth repeating that under no circumstances should you store the config/master.key file in your Git repo . Otherwise anybody with access to that repo could unlock your secret credentials. Rails helps prevent that by generating a .gitignore file that ignores the config/master.key file.
You will, however, need to share the master key with your development team. Just be careful how you share it! Your best bet is to put it in a password manager such as 1Password that your team can access.
3. Accessing Credentials
How then does our Rails app access those credentials when it’s running?
To answer that, hop back into a Rails console session and give this a whirl:
>> Rails.application.credentials.dig(:aws, :access_key_id)
The result should be the value of the access_key_id you typed into the temporary file.
To retrieve that credential, first the master key was used to unlock the secrets in the encrypted credentials file. Then we used the dig method to dig down into the credentials and extract the value that’s nested under the given sequence of keys.
Using the same approach you can get your secret access key:
>> Rails.application.credentials.dig(:aws, :secret_access_key)
And if you look in the config/storage.yml file, that’s exactly how the credentials are accessed to configure the Amazon S3 storage service:
amazon:
  service: S3
  access_key_id: <%= Rails.application.credentials.dig(:aws, :access_key_id) %>
  secret_access_key: <%= Rails.application.credentials.dig(:aws, :secret_access_key) %>
Bonus Round
Print All Credentials
If you just want to print all the credentials, you can run
rails credentials:show
Generate a New Master Key
If for some reason you need to generate a new master key, run
rails secret
Get Help
To learn more about credentials, run
rails credentials:help
Wrap Up
The takeaway is there is one and only one way to add or edit credentials needed by an application, and that’s by running
rails credentials:edit
In this way, all secret credentials for an application are stored in an encrypted format in the config/credentials.yml.enc file using the master key contained in the config/master.key file.
With our super-secret credentials safely tucked away in an encrypted file, we’re ready to take the application into production.
Uploading Files to Amazon S3
Exercises
Objective
Now we’re ready to put all this into production!
Here’s what we need to do:
- change the storage service to Amazon S3
- set the master key on Heroku
- install the AWS gem
- deploy!
Let’s make it happen…
1. Change the Production Storage Service
In the production environment we need to use the storage service named amazon.
- Start by uncommenting that service in the config/storage.yml file and setting your region and the name of the bucket where you want uploaded images to be stored:
amazon:
  service: S3
  access_key_id: <%= Rails.application.credentials.dig(:aws, :access_key_id) %>
  secret_access_key: <%= Rails.application.credentials.dig(:aws, :secret_access_key) %>
  region: us-east-1
  bucket: your_own_bucket
- Then we need to configure Active Storage to use the amazon storage service when the application is running in the production environment. To do that, in config/environments/production.rb switch the ActiveStorage service from local to amazon:
config.active_storage.service = :amazon
2. Set the Master Key on Heroku
When the application runs in production on a Heroku server, the app needs to read your Amazon S3 credentials which are encrypted in the config/credentials.yml.enc file. And to decrypt that file, the app needs your master key.
But remember, the master.key file won’t be in your local Git repo. So when you push changes from your local Git repo to the remote Git repo on Heroku, the master.key file won’t go along for the ride. Instead, you have to set the master key in a Heroku application-level configuration variable named RAILS_MASTER_KEY.
To do that, use the heroku command like so:
heroku config:set RAILS_MASTER_KEY=12345678
(Yup, you need to replace 12345678 with your application’s master key.)
When the app is deployed, Rails will first look for the master key in a config/master.key file. And when it doesn’t find that file, Rails then looks for the master key in the RAILS_MASTER_KEY variable.
Forgot whether you set the key or not? No problem. You can review all the Heroku config variables you’ve set using
heroku config
3. Install the AWS Gem
Since we’ll be storing movie images in an Amazon S3 bucket, we need to install the AWS gem. Drop this into your Gemfile:
gem "aws-sdk-s3", require: false
And install it:
bundle install
4. Commit Changes and Deploy!
Now all you need to do is commit the changes to your local Git repo and push them to the remote Git repo on Heroku, which re-deploys the app.
- Start by adding and committing the changes to your local Git repo:
git add .
git commit -m "Use Active Storage"
- Then deploy the changes by pushing the code to Heroku:
git push heroku master
You might want to grab a beverage as Heroku churns through the deployment process. When you get back, you’ll be refreshed and the app should have re-deployed.
- Next you need to create the Active Storage database tables in the PostgreSQL database that’s running on the Heroku server. The deployed code already has a migration file that creates those tables, so it’s just a matter of applying that migration to the production database:
heroku run rails db:migrate
- Now if you reload the app in your browser using the production URL, you shouldn’t see any errors… but all the movies will be using the placeholder image. No surprise.
You should now be able to upload movie images to your production app and the image files will be automatically stored in S3!
You might want to upload all the images in one fell swoop. To do that, first fire up a console session that’s attached to the Heroku server:
heroku run rails console
- Then paste in the image-upload code that you previously added to your seeds.rb file. You’ll see the images get pushed up into the cloud and when you reload all the movies will have respectable images!
Bonus Round
Providing the Master Key to Other Servers
When you set a Heroku config variable, behind the scenes an environment variable is set. So if you’re running on a non-Heroku server that you have privileged access to, then you can simply set the RAILS_MASTER_KEY environment variable.
Another way to provide the master key to a server is to ssh the master.key file to a privileged directory on the server (for example a shared directory), and then create a symbolic link to the master.key file when the app is deployed.
Mirrors
It’s worth pointing out that in addition to the standard cloud-based services, the storage.yml also includes a commented service named mirror. This lets you specify a primary service (for example amazon) and also a collection of mirror services which will store backup copies of uploaded files. The mirror services are automatically kept in sync with the primary service. This is especially handy if you’re migrating from one service to the other in production.
Just remember that to use the mirror service in production you need to change config/environments/production.rb file to use the mirror service.
Wrap Up
Now your admin users can create and edit movies as fast as Hollywood produces them! And the best part is they don’t have to bother you to do it. 