Module 1: Getting Started
Assignment 1.1: Fix the bugs 
Requirements
- Fork this sandbox: https://codesandbox.io/s/assignment-11-starter-e5mu1
- Fix the errors in the code
- Calculate the result of the formula in the code. You are not allowed to do it in your head!
- Add some other stuff. Whatever you like!
- Remember to press CMD-S to save your file
Hints
- What are the requirements for tags in JSX?
- Quotes must always appear in pairs
- If you still see red squiggly lines after fixing the img tag, hover your mouse on it and try to fix the issue.
Submit your solution! 
Solution (Promise me: don’t peek until you’ve tried your best!  )
)
Module 2: Toggle
Assignment 2.1: Style the toggle
Requirements
- Fork this sandbox: https://codesandbox.io/s/25-functions-screencast-5dz1e
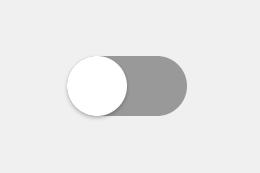
- Move the toggle to the center of the screen
- Style the toggle and the background however you like, e.g. :
Hints
- Use center attribute of Frame to center it in its parent div
- Use background and shadow attributes and/or many others
Bonus questions
- Try using the style attribute instead of background and shadow
- Try using Flexbox to center the toggle instead of the center attribute
Solution (Promise me: don’t peek until you’ve tried your best!  )
)
Assignment 2.2: Checkbox
Requirements
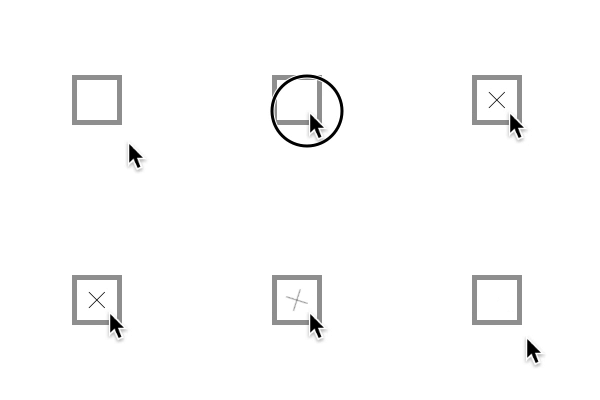
Make a checkbox that works like this:

Hints
- Use this character inside the box: ╳
- Use the border attribute of Frame , the value is consistent with CSS border rule, e.g. “4px solid #999”
- How do you animate the opacity of a frame? Check out this page: https://www.framer.com/api/frame/#visual
Solution (Promise me: don’t peek until you’ve tried your best!  )
)
Assignment 2.3: Fancier checkbox
Hints
- useCycle can be used multiple times
- Feel free to style the checkbox however you want!
Solution
Assignment 3.1 Help Mr. Skinny Pose
Requirements
- Fork this sandbox: https://codesandbox.io/s/module-3-assignment-help-skinny-pose-starter-clqjb
- Add another slider that adjusts the rotation angle of Skinny’s wing
Hints
- How do you animate the rotation of a frame? Check out this page: https://www.framer.com/api/frame/#visual
- Use this to customize the rotation center style={{ transformOrigin: “bottom right” }}
- Also try it without transformOrigin
- You could also use originX={1} and originY={1}.
- This assignment also gives you exercise on reading other people’s code, understand it and make changes. Believe it or not, this is actually more important than writing completely new code.
- If the movement of the cheek and wings feels laggy to you, try different transition configurations: https://www.framer.com/api/animation/#spring
Solution (Promise me: don’t peek until you’ve tried your best!  )
)
Assignment 3.2. iOS Task Switcher
Requirements
- Fork this sandbox: https://codesandbox.io/s/module-3-assignment-ios-task-switcher-starter-ynx25
- Build the task switcher interaction using
dragattributes anduseAnimation
https://www.dropbox.com/s/69q5wl9gi1oltgx/slider-as-2-ios-switch-task.mp4?dl=0
Hints
-
What could the
info.point.yvalue be when the screen is dragged up? Useconsole.logto find out. -
How to define
dragConstraintswhen the drag direction is vertical? -
Use both
onDragandonDragEnd -
How would you start different animations according to the value of
info.point.y? -
useAnimationcan be used multiple times. -
Use both
left/topandxto put the Google map screen into the correct place and animate it -
transitioncan be used inanimationControls.start(). E.g.:animationControls.start({
x: 100,
transition: { duration: 0.1 }
})Use this to give the animations some final touch.
Solution
Assignment 3.3 More drag and drop!
Want more challenges? Kudos!
What else could you build with the drag attributes and useAnimation?

Module 4: Mouse Parallax
Starter Sandbox
Assignment 4.1: 3D card
Fork this sandbox: https://codesandbox.io/s/module-4-assignment-3d-card-starter-0yjbb
Requirements
- When not on hover, display the card normally.
- When on hover, make the card slightly bigger and update its box shadow as if the card moves closer to the viewer.
- When the mouse is on different parts of the card, create an effect as if the card is pressed down at where the mouse is.
- For simplicity, only create two kinds of box shadows (one on hover, another when not hovered). You don’t need to adjust the box shadow according to the mouse position. But of course, feel free to try to make the shadows more realistic. The solution includes this improvement.
Hints
- Use onMouseMove
- Which event should you use to determine when the mouse is no longer on the card? Search the React doc to find out.
- The interaction is very similar to the mouse parallax example. Use the same offsetX and offsetY values as the starting point. Can you tell why they are similar?
- Use perspective attribute on a Frame to enable the 3D effect. Note the perspective attribute only affects the current element’s children. See here for more details.
- The 3D effect is created by rotating the card around X and Y axes. The angles to be rotated depend on offsetX and offsetY. It’s tricky to figure out what values to use, but the solution uses this rotateX: -offsetY/20, rotateY: offsetX/20. Experiment with different values to see what kind of effect you’ll get.
- It’d be easier to understand if you only turn on rotation for one axis, e.g. if you just write rotateX: -offsetY/10 and test it, you’ll see how it rotates in relation to the mouse position.
Solution
Assignment 4.2 Convert JSX to JS
Requirements
- Fork your sandbox from the last assignment or this one: https://codesandbox.io/s/module-4-assignment-42-jsx-to-js-starter-z3511
- Convert the JSX code inside into JavaScript function calls, such as React.createElement(Frame)
Hints
- What’s the JS equivalent of ?
- What’s the JS equivalent of ?
- The code will look a bit nicer if you move the function declarations out of onMouseMove and onMouseLeave attributes.
Solution
Assignment 5.1: Revisit Slider
Fork this sandbox: https://codesandbox.io/s/assignment-51-revisit-slider-starter-kobev
Requirements
- Use
useMotionValueinstead ofuseAnimationto build the slider - What if you use
useSpringinstead? How is the result different?
Hints - What props would you need for the
SkinnyandSlidercomponents? - How would you track the
xoffset of the slider when the knob is dragged? Remember how we did it in the card swipe example? - Do you still need
onDrag?
Solution
Assignment 5.2: Bottom Sheet
Fork this sandbox: https://codesandbox.io/s/assignment-52-gmap-bottom-sheet-starter-ezx2r
Requirements
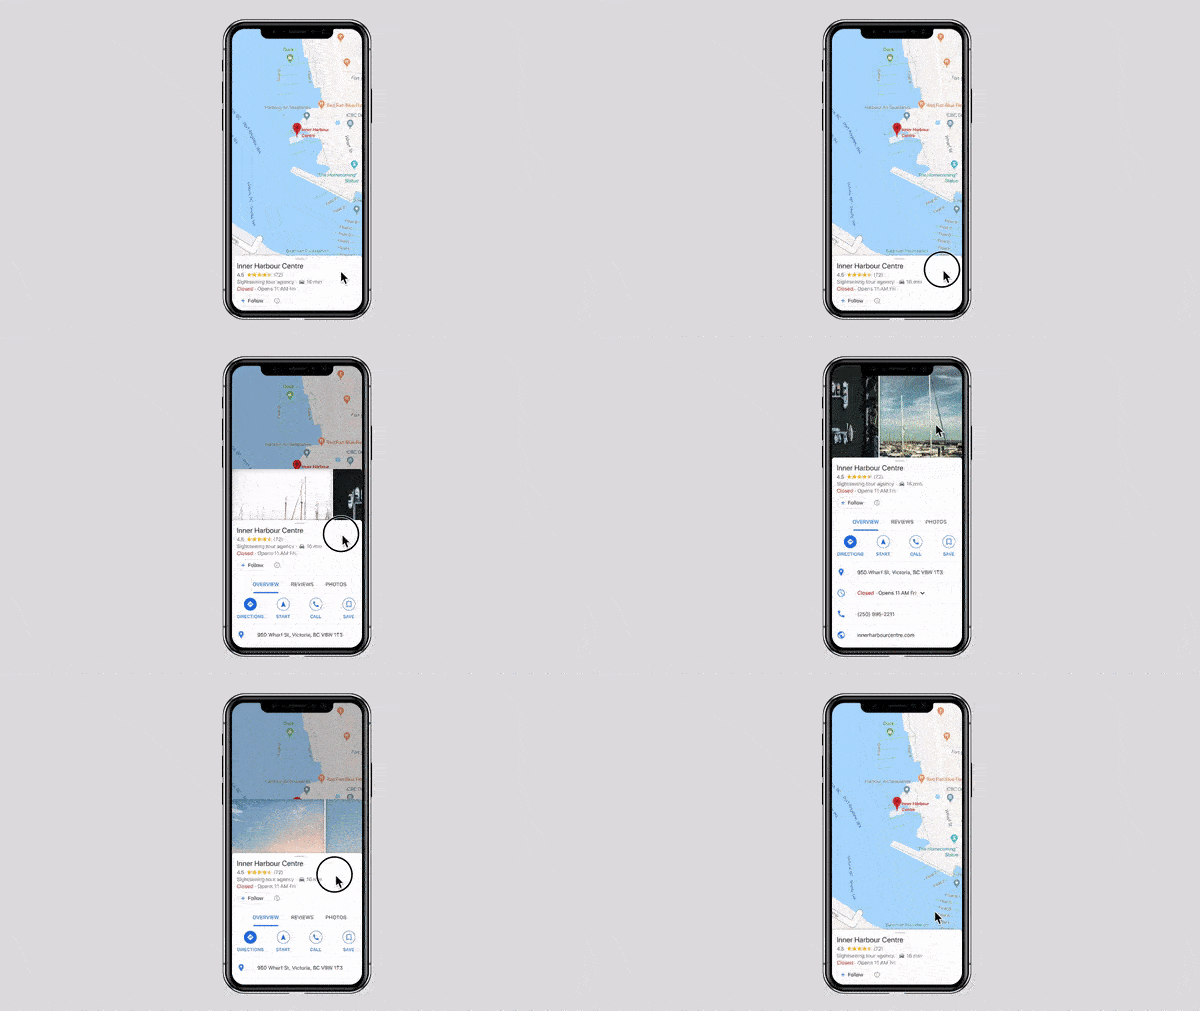
- Build a bottom sheet as shown in the video below
- Populate the image gallery with the
photosarray - If the user releases the mouse when the bottom sheet is dragged up more than halfway, animate the bottom sheet and the image gallery to full screen
- Otherwise, move the bottom sheet and the image gallery back to their original positions
- There should be a backdrop darkening the map while dragging
- Fix any warnings in the console
Hints
- Use a combination of
useMotionValue,useTransformanduseAnimation - Use
onDragEnd - Use a
Framewith black background and opacity to create the backdrop overlay
Solution
Assignment 6.1 Counter
Requirements
Make a simple counter like this

Solution
Assignment 6.2 Card Deck Continued
Requirements
- Fork this sandbox: https://codesandbox.io/s/assignment-62-card-deck-continued-starter-d9qsm
- When a card is swiped to the right, add the name of the card to the board on the right
- When a card is swiped left, do nothing.
Hints
- Use the onThumbUp prop of Card
- State doesn’t have to be numbers. It can be other things, for example, an array!
- How to add things into an array? Use this syntax:
const array1 = [3, 2, 1]
const array2 = [...array1, 4]
// The resulting array2 will be [3, 2, 1, 4]
Did you recognize the three dots? Yup, “spread operator” can be used with arrays too!
Solution
Assignment 6.3. Bonus
Think for a minute. What have you learned so far?
- A few different ways to create animations:
-
animateprop andonTap -
dragprops,onDraganduseAnimation -
useMotionValue,useSpringanduseTransform
-
- React states
-
useState: how to request our component “printer” to print a new page? -
useCycleis actuallyuseStatein disguise.
-
Can you use a combination of the above to build something cool?
Here’s my attempt, a replica of the Messages app on iOS. It only prints out outgoing messages, but you get the idea.
If you need an iPhone X frame, fork this sandbox.
Assignment 7.1 Flashcard Transition
Requirements
- Fork this sandbox: https://codesandbox.io/s/assignment-71-flash-card-useanimation-starter-1o6gh
- Build the transition with useAnimation , async/await and the delay option in transition.
Hints
- Download the result mp4 file. Play it in slow motion or frame by frame to observe the details.
- Remember? You can use transition to customize the animation:
anim.start({ scale: 1, transition: { duration: 0.3 }})
Solution
Assignment 7.2 Complete Flashcard Transition
Requirements
- Fork this sandbox: https://codesandbox.io/s/assignment-71-flash-card-useanimation-starter-1o6gh
- Make a complete transition effect for the flashcard, i.e. when the button on the top left corner is clicked, cycle through two screen states
- Use useCycle, variants, staggerChildren
- Use keyframes and times to precisely control the animations.
- Compare the code with the last assignment. Which one do you prefer?
Hints
- Download the result mp4 file. Play it in slow motion or frame by frame to observe the details
Solution
Module 8: Scroll Effects
Video Starter Code
8.1
Assignment 8.1: Image Background Parallax
Requirements
- Fork this sandbox: https://codesandbox.io/s/81-scroll-parallax-image-bg-starter-59y7s
- Make scroll parallax effects, as if there’s a sliding window that reveals a portion of the static image behind.
- Add some customizations to this page. Make it look great!

Hints
- Use either useSticky or useTransform to make the background image sticky
- How would you make that sliding window? It’d be a normal Frame with overflow=“hidden”.
Solution
Assignment 8.2: iPhone XR Marketing Page
Requirements
- Fork this sandbox: https://codesandbox.io/s/assignment-82-iphonexr-site-starter-6r4ts
- Make a prototype that has scroll parallax effect, using one or more of useTransform, useSticky, useSpeed and useTrigger.
Hints
- Follow along with the course videos to understand how to use the input/output ranges of useTransform to make different effects
- Start with a very simple project first to test out useSticky, useSpeed and useTrigger, such as this sandbox. Make sure to understand the parameters of each function.
Solution
Module 9: Framer X
Video Starter Code
9.4
Assignment 9.1: Animate Status Bar
Requirements
- Use this starter file: https://www.dropbox.com/s/x83dwb55zfldjwr/assignment9.1-card-expand-starter.framerx?dl=0
- Use override to animate the status bar as below, i.e. push it away when the card is expanded, and move it back otherwise.
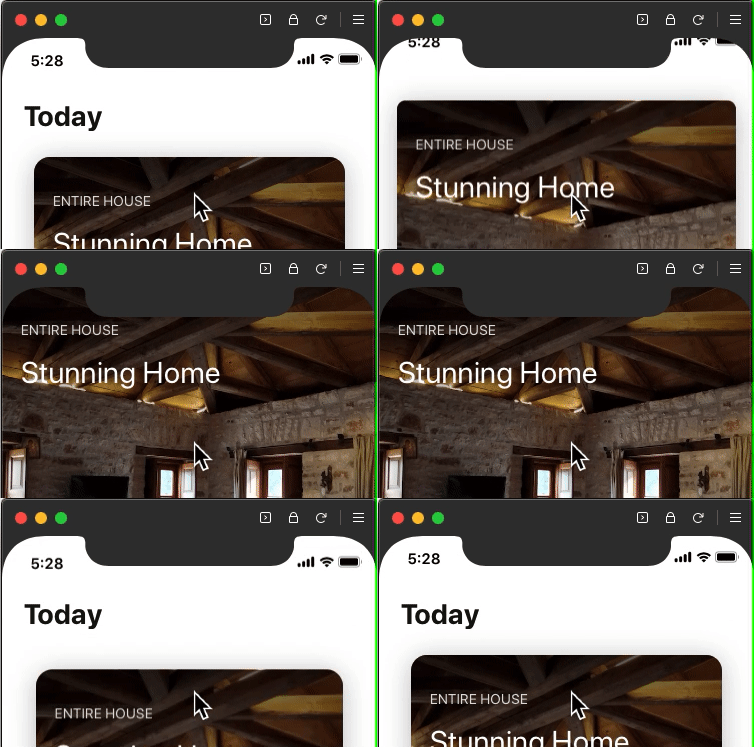
Hints
- You could directly add overrides to the status bar, but it won’t work.
- You’ll need to add a Frame as the parent of the status bar, and add overrides to the Frame.
- Do you know why only the second solution works?
Solution
Assignment 9.2: Flashcard Transition
Requirements
- Remember the Flashcard transition you worked on in an earlier module? Build it in Framer X this time.
- Use this starter file: https://www.dropbox.com/s/7v9d6xbmkssp0rp/assignment-9.2-Flashcard-micro-interaction-starter.framerx?dl=0
Hints
- The value of a
variantcan be an array, which defines the keyframes of the animation:
export function SomeOverride(): Override {
return {
variants: { on: { opacity: [0, 0.25, 1] }}
}
} - You can control the timing of each keyframe with
timesintransitionprop:
export function SomeOverride(): Override {
return {
variants: { on: { opacity: [0, 0.25, 1] }},
transition: { times: [0, 0.4, 1] }
}
}
Here, the numbers in times are between 0 and 1. The size of the times array needs to be the same as arrays in variants
Solution
Module 10: Stock Chart
Video Starter Code / Links
10.2
- tsla.json file
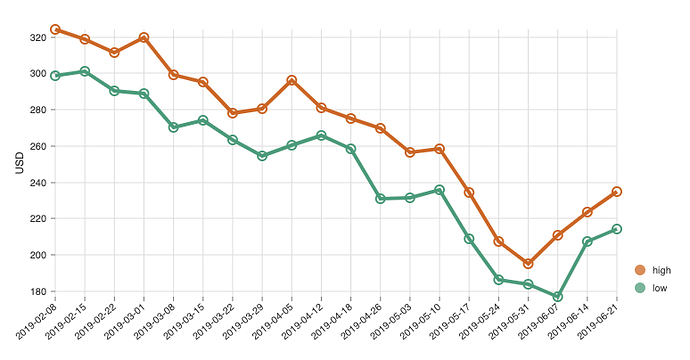
Assignment 10.1: High & Low Prices
Requirements
- Fork this sandbox: https://codesandbox.io/s/assignment-101-highlow-prices-starter-g3ywb
- Follow the instructions in the videos to create a chart, style it however you like.
- Populate the chart with the data in the tsla.json file:
- Get the most recent 20 time series
- Use the high and low prices
- Style the chart however you want!
Hints
- How to create two lines in the chart? Insert two object with different id.
[
{ id: "high", data: [...] },
{ id: "low", data: [...] }
]
- If the chart looks different than the above, try a different value of stacked in yScale.
Solution
Assignment 10.2 Currency Exchange Rate Chart
Requirements
- Build an interactive bar chart that allows the user to select from and to currencies
- Get the exchange rates for the past 12 months
- Use Nivo or ReCharts or any other chart library (the solution uses ReCharts)
- Don’t forget to add a progress indicator and error handling.
Hints
- Documentation for the data API: https://www.alphavantage.co/documentation/
- Remember to get a free API key for the web service
- How many times do you need to use useState in the App component?
- Can you extract the select into a separate component to make the code better?
Solution
Module 11: Framer Motion
Assignment 11.1: Build swiping card with Motion
Requirements
- Fork this sandbox: https://codesandbox.io/s/assignment-111-build-swiping-card-with-motion-starter-lvhvr
- Remove framer from the list of dependencies
- Convert the app to use motion.div instead of Frame
Hints
- Use flexbox to center the card.
Solution
Assignment 11.2: Count down animation
Requirements
- Fork this sandbox: https://codesandbox.io/s/assignment-112-countdown-flip-starter-0h6nx
- Add transition animation to the
Digitcomponent
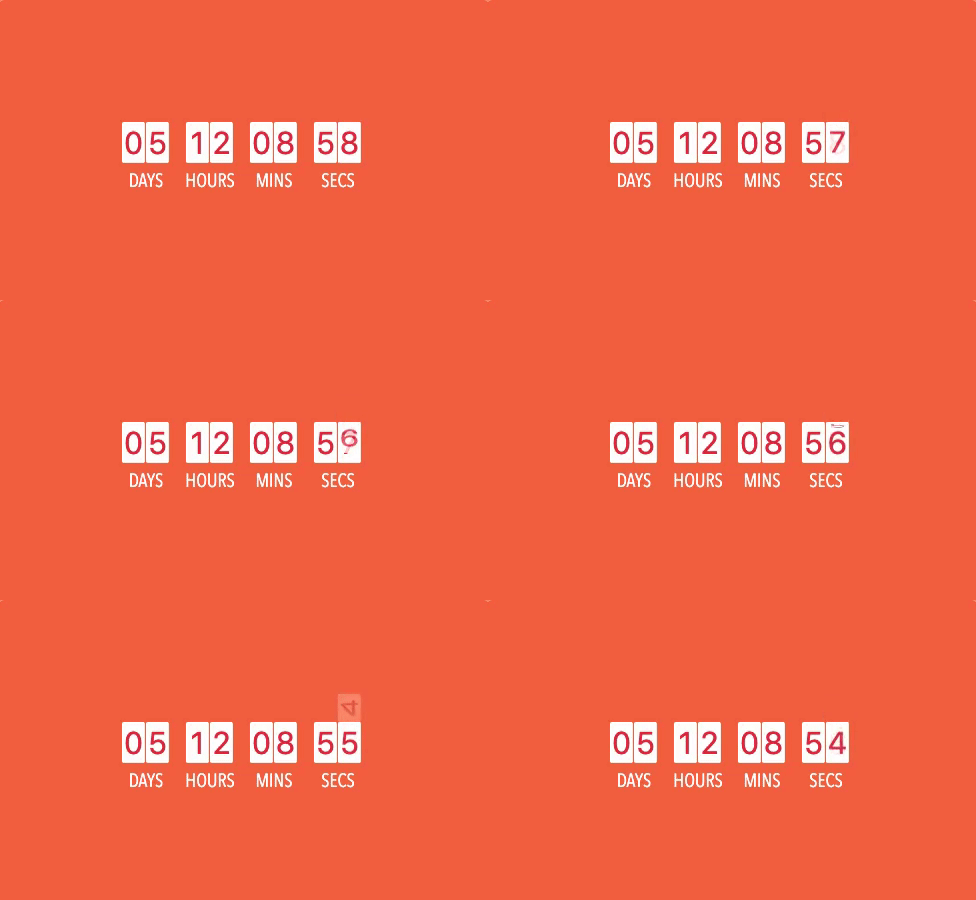
Hints
- You only need to update the
Digitcomponent. - Animate
rotateXto achieve the card flipping effect - Use
transformOrigin: "top" - Use
position: "absolute"if the animation doesn’t behave as expected - For better result, wrap your
motion.divwith adivthat has a fixed width and height. Why? This is due toposition: "absolute". - Read the rest of the code to learn how the timer is setup, how the
CountDowncomponent is broken down intoDigitsandDigit, etc. - You can use this component in your app if you want!
Solution
Module 12: SVG animations
Assignment 12.1 Animate the check mark
Requirements
- Fork this sandbox: https://codesandbox.io/s/assignment-121-animate-checkmark-starter-p6t1j
- Change the animation of the check mark to be this:
Hints
- If you set the pathLength of the check mark svg, you’ll see that it’s not working. Why? Add stroke and strokeWidth props to find out!
- Instead of what’s in the d prop of that tag, you probably want to use this one: d=“M3 50L45 92L134 3”
Solution
Assignment 12.2 Two-knob dial
Requirements
- Fork this sandbox: https://codesandbox.io/s/assignment-122-two-knob-dial-starter-jqm8i
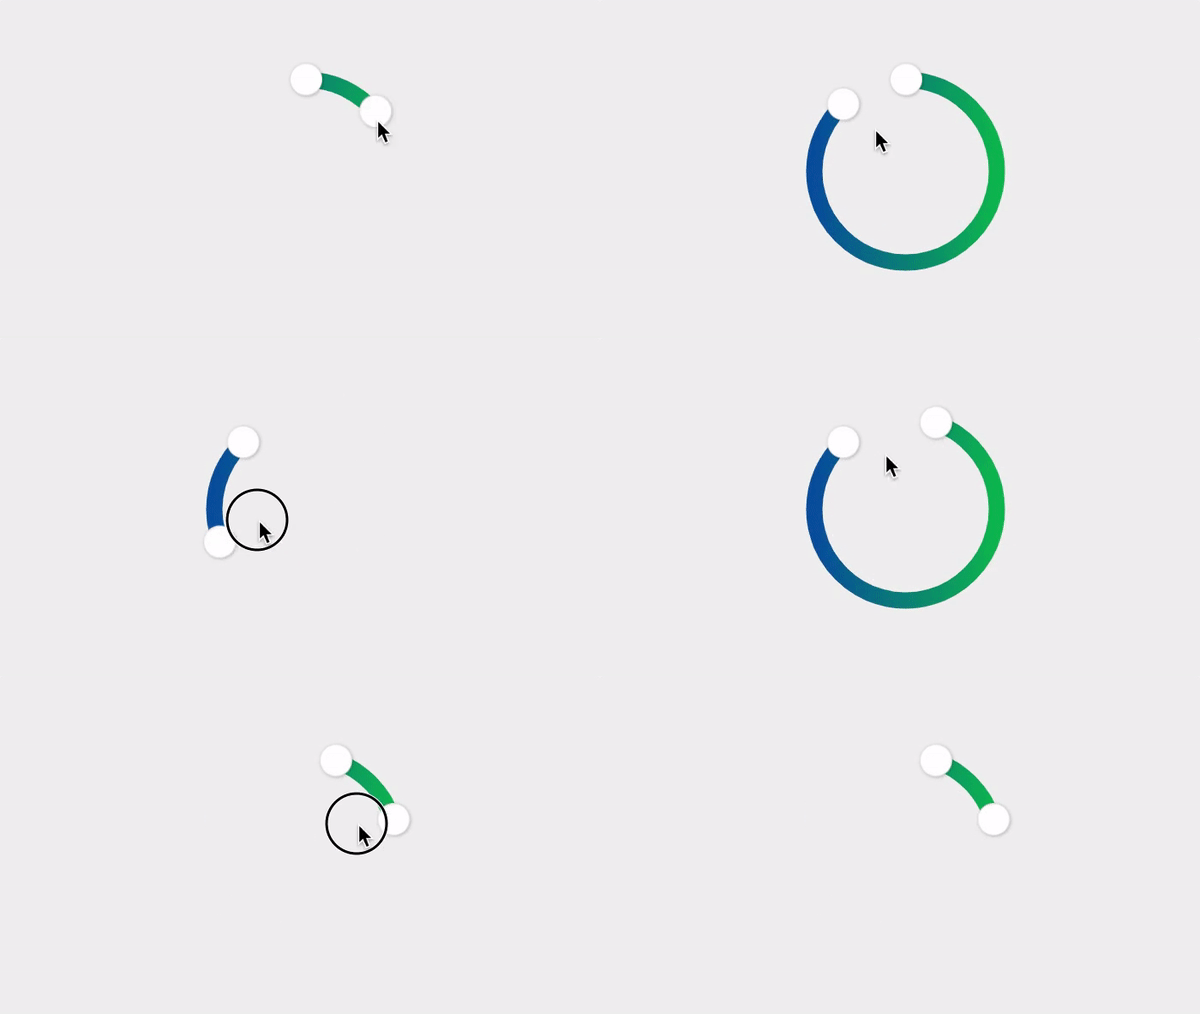
- Add another knob to control the other end of the circle, like this:
Hints
- Use the new knob to control the
pathOffsetof the SVG circle - Create two
MotionValues,startAngleandendAngle - Use
onMouseDownto determine which knob is being pressed -
pathLengthno longer only depends on one angle. It depends on bothstartAngleandendAngle. - After you finish, if you move the start knob to the left of the top point, the circle will be invisible, do you know why?


