s16e78 - Intro
Animation
Welcome to the animation section. This is where the real fun begins. Demos that look cool, impress your friends, and sound good at the dinner table.
At my dinner table at least …

You already know how React and D3 work together, so these examples are going to go faster. You know that we’re using React for rendering SVG and D3 for calculating props. You know how to make your dataviz interactive and how to handle oodles of data.
Now you’re going to learn how to make it dance. Smooth transitions between states, complex animations, interacting with users in real-time. 60 frames per second, baby!
Animation looks like this in a nutshell:
- render something
- change it 60 times per second
When that happens humans perceive smooth motion. You can go as low as 24 frames per second, like old TVs used to, but that often looks jaggeddy on modern monitors.
You’re about to learn two different approaches to building these animations. Using game loops and using transitions.
- Game loops give you more control
- Transitions are easier to implement
We’re starting with an example or two in CodeSandbox, then building some bigger stuff. No more big huge projects like the tech salary visualization, though. Takes too long to set up and doesn’t focus on animation.
s16e79 - Using a game loop for rich animation
Using a game loop for rich animation
Game loops are fun! They’re my favorite. They even sound fun: “game loop”. Doesn’t it sound fun to go build a game loop? Maybe it’s because I’ve always used game loops when building something fun to play with.
At its core, a game loop is an infinite loop where each iteration renders the next frame of your animation.
The concept comes from the video game industry. At some point they realized that building game engines is much easier when you think about each frame as its own static representation of your game state.
You take every object in the game and render it. Then you throw it all away, make small adjustments, and render again.
This turns out to be both faster to run and easier to implement than diffing scenes and figuring out what moves and what doesn’t. Of course as you get more objects on the screen it becomes silly to re-render the immovable background every time.
But you don’t have to worry about that. That’s React’s job.
React can figure out a diff between hierarchical representations of your scene and re-render the appropriate objects.
That’s a hard engineering problem, but you can think of it this way:
- Render a DOM from state
- Change some values in state
- Trigger a re-render
Make those state changes fast enough and you get 60 frames per second. The hard part then becomes thinking about your movement as snapshots in time.
When something speeds up, what does that mean for changes in its position?
s17e80 - Begin bouncy ball
A bouncing ball game loop example
Let’s get our feet wet with my favorite childhood example: a bouncing ball.
I must have built dozens of them back in my Turbo Pascal days using BGI. Endless afternoons playing with different parameters in my bouncy ball examples.
Yes, those Turbo Pascal and BGI are from the 80’s. No, I’m not that old. I started young and with old equipment. Coding for DOS is easier when you’re a kid than coding for Windows 95.
Here is a screenshot of our bouncing ball:
s17e81 - Step 1: stub out App and Ball
Step 1: stub out App and Ball
We start with a skeleton: An App component rendering a BouncingBall component inside an SVG, and a Ball component.
// index.js
import React from "react";
import { render } from "react-dom";

import BouncingBall from "./BouncingBall";

const App = () => (
  <div>
    <svg width="800" height="600">
      <BouncingBall max_h={600} />
    </svg>
  </div>
);

render(<App />, document.getElementById("root"));
App imports dependencies, imports BouncingBall , renders it all into a root DOM node. CodeSandbox gives us most of this code by default.
// Ball.js
import React from "react";

const Ball = ({ x, y }) => <circle cx={x} cy={y} r="5" />;

export default Ball;
We’re calling it a ball, but eh it’s a just a circle. You can make this more fun if you want. Right now it’s a black SVG circle that renders at a specified x, y coordinate with a radius of 5 pixels.
It’s these coordinates that we’re going to play with to make the ball drop and bounce. Each time, React is going to re-render and move our ball to its new coordinates. Because we change them so quickly, it looks like the ball is animated. You’ll see.
Those are the boring components. The animation game loop fun happens in BouncingBall .
s17e82 - Stub out BouncingBall
Step 2: Stub out BouncingBall
We encapsulate everything in this component so that App doesn’t have to know about the details of our animation. App declaratively renders a bouncing ball and that’s it.
import React, { Component } from "react";
import * as d3 from "d3";

class BouncingBall extends Component {
  constructor() {
    super();

    this.state = {
      y: 5,
      vy: 0
    };
  }

  componentDidMount() {
    // start game loop
    this.timer = d3.timer(this.gameLoop);
  }

  componentWillUnmount() {
    // stop loop
    this.timer.stop();
  }

  gameLoop = () => {
    // move ball by vy
    // increase vy to accelerate
  }

  render() {
    // render Ball at position y
    return <g />;
  }
}

export default BouncingBall;
Nothing renders yet and we’re set up to get started.
We start with default state: vertical position y=5 , vertical speed vy😮 .
componentDidMount fires off a d3 timer and componentWillUnmount stops it so we don’t have unwanted code running in the background. The timer calls this.gameLoop every 16 milliseconds, which translates to about 60 frames per second.
D3 timers work like JavaScript’s own setInterval , but their implementation is more robust. They use requestAnimationFrame to save computer resources when possible, and default to setInterval otherwise.
Unlike setInterval timers are also synced so their frames match up, can be restarted, stopped, etc. You should default to favoring d3.timer over setInterval or hacking your own requestAnimationFrame implementation.
s17e83 - Step 3: Rendering
Step 3: Rendering
To render our Ball we have to tweak BouncingBall’s render method. A small change. Try it yourself first.
// BouncingBall.js
import Ball from "./Ball"

class App extends Component {
  // ...
  render() {
    // render Ball at position y
    return <g><Ball x={10} y={this.state.y} /></g>
  }
}
Import our Ball component, render it at x=10 and use this.state.y for the vertical coordinate.
A black ball shows up on your screen. Like this:

Black ball
s17e84 - Step 4: The Game Loop
Step 4: The Game Loop
Our game loop is already running. It’s that d3.timer we started on component mount.
What do you think we should do every time gameLoop is called?
Move the ball. Accelerate. Bounce it back. 
The physics is tricky to think about. Few students at my workshops figure this one out and that’s the point: Game loop gives you control. All the control.
// BouncingBall.js
  componentDidMount() {
      // start game loop
      this.timer = d3.timer(this.gameLoop);
  }

  componentWillUnmount() {
      this.timer.stop();
  }

  gameLoop = () => {
    let { y, vy } = this.state;

    if (y > this.props.max_h) {
      vy = -vy * .87;
    }

    this.setState({
      y: y + vy,
      vy: vy + 0.3
    })
  }
Our gameLoop method is called every 16 milliseconds give or take. Sometimes more, if the computer is busy, low on batter, or the tab is left inactive for too long
Bounce physics go like this:
- add vertical speed,
vy, to position,y - increased
vyby amount of acceleration - if position is more than max, bounce
- bounce means invert speed
- bounce means energy loss, reduce speed by 13%
High school physics my friend. You might not remember.
Speed tells you how much an object moves per unit of time. Our speed starts at 5 pixels per frame.
Acceleration tells you how much speed increases per unit of time. Gravity makes you fall 10 meters per second faster every second. Our gravity looks best at 0.3 pixels per frame.
Bounce is what really breaks people’s brains.
I think it’s one of Newton’s laws? Or a derivation from there. Bouncing means balls maintain the same speed, but change direction. Our wall is perpendicular to the path of travel, so the speed inverts.
We add some energy loss to make the bounce more realistic.
Gravity acceleration points the same downwards direction as always. Except now it’s slowing down the ball instead of speeding it up.
Eventually speed reaches zero and the ball starts falling again.

Magic
Here’s a CodeSandbox with the final bouncy ball code.
Experiment with multiple balls. Start them at different heights. Play with different factors in those equations. It’s fun if you’re a nerd like me.
s17e85 - Step 5: Correcting for time and frame drops
Step 5: Correcting for time and frame drops
If you run the CodeSandbox a few times, you’ll notice two bugs.
- Sometimes our ball gets trapped at the bottom of the bounce. We won’t fix this one; it’s tricky.
- When you slow down your computer, the ball lags. That’s not how things behave in real life.
We’re dealing with dropped frames.
Modern browsers slow down JavaScript in tabs that aren’t focused, on computers running off batteries, when batteries get low… many different reasons. To make our animation silky smooth, we have to take this into account.
That involves calculating how many frames we dropped and adjusting our physics.
// BouncingBall.js
  gameLoop = () => {
    let { y, vy, lastFrame } = this.state;

    let frames = 1;

    if (lastFrame) {
      frames = (d3.now() - lastFrame) / (1000 / 60);
    }

    for (let i = 0; i < frames; i++) {
      if (y > this.props.max_h) {
        vy = -vy * 0.87;
      }

      y = y + vy;
      vy = vy + 0.3;
    }

    this.setState({
      y,
      vy,
      lastFrame: d3.now()
    });
  };
We add lastFrame to game state and set it with d3.now() . This gives us a high resolution timestamp that’s pegged to requestAnimationFrame . D3 guarantees that every d3.now() called within the same frame gets the same timestamp.
(d3.now()-lastFrame)/16 tells us how many frames were meant to have happened since last iteration. Most of the time, this value will be 1 .
We use frames to simulate as many frames as we need in a quick loop. Run the same calculations with the same height checks. This simulates the missing frames and makes our animation look smooth.
Try it out on CodeSandbox: click me for time-fixed bouncy ball
s17e86 - Game loop recap
Game loop recap
You now know how to build a game loop and use it to run custom animations. 
- render from state
- change state 60 times per second
- reason about movement in snapshots
- deal with dropped frames
- complete control
Complete control is nice, but the mental acrobatics are not. Getting game loops just right is hard.
And that’s why I recommend transitions in most cases. Transitions can handle all of that for you out of the box.
s18e87 - Transition basics
Using transitions for simple animation
Game loops are great for fine-grained control. And when all you need is a little flourish on user action, that’s where transitions shine.
No details, just keyframes.
Transitions let you animate SVG elements by saying “I want this property to change to this new value and take this long to do so” .
Start-end keyframes are the simplest. You define the starting position. Start a transition. Define the end position. D3 figures out the rest. Everything from calculating the perfect rate of change to match your start and end values and your duration, to what to change and handling dropped frames.
Quite magical.
You can also sequence transitions to create complex keyframe-based animation. Each new transition definition is like a new keyframe. D3 figures out the rest.
Better yet, you can use easing functions to make your animation look more natural. Make rate of change follow a mathematical curve to create smooth natural movement.
You can read more about the why of easing functions in Disney’s 12 Basic Principles of Animation. Bottom line is that it makes your animation feel natural.
How they work is hard to explain. You can grok part of it in my Custom transition tweens article.
But don’t worry about it. All you have to know is that many easing functions exist. easings.net lists the common ones. D3 implements everything on that list.
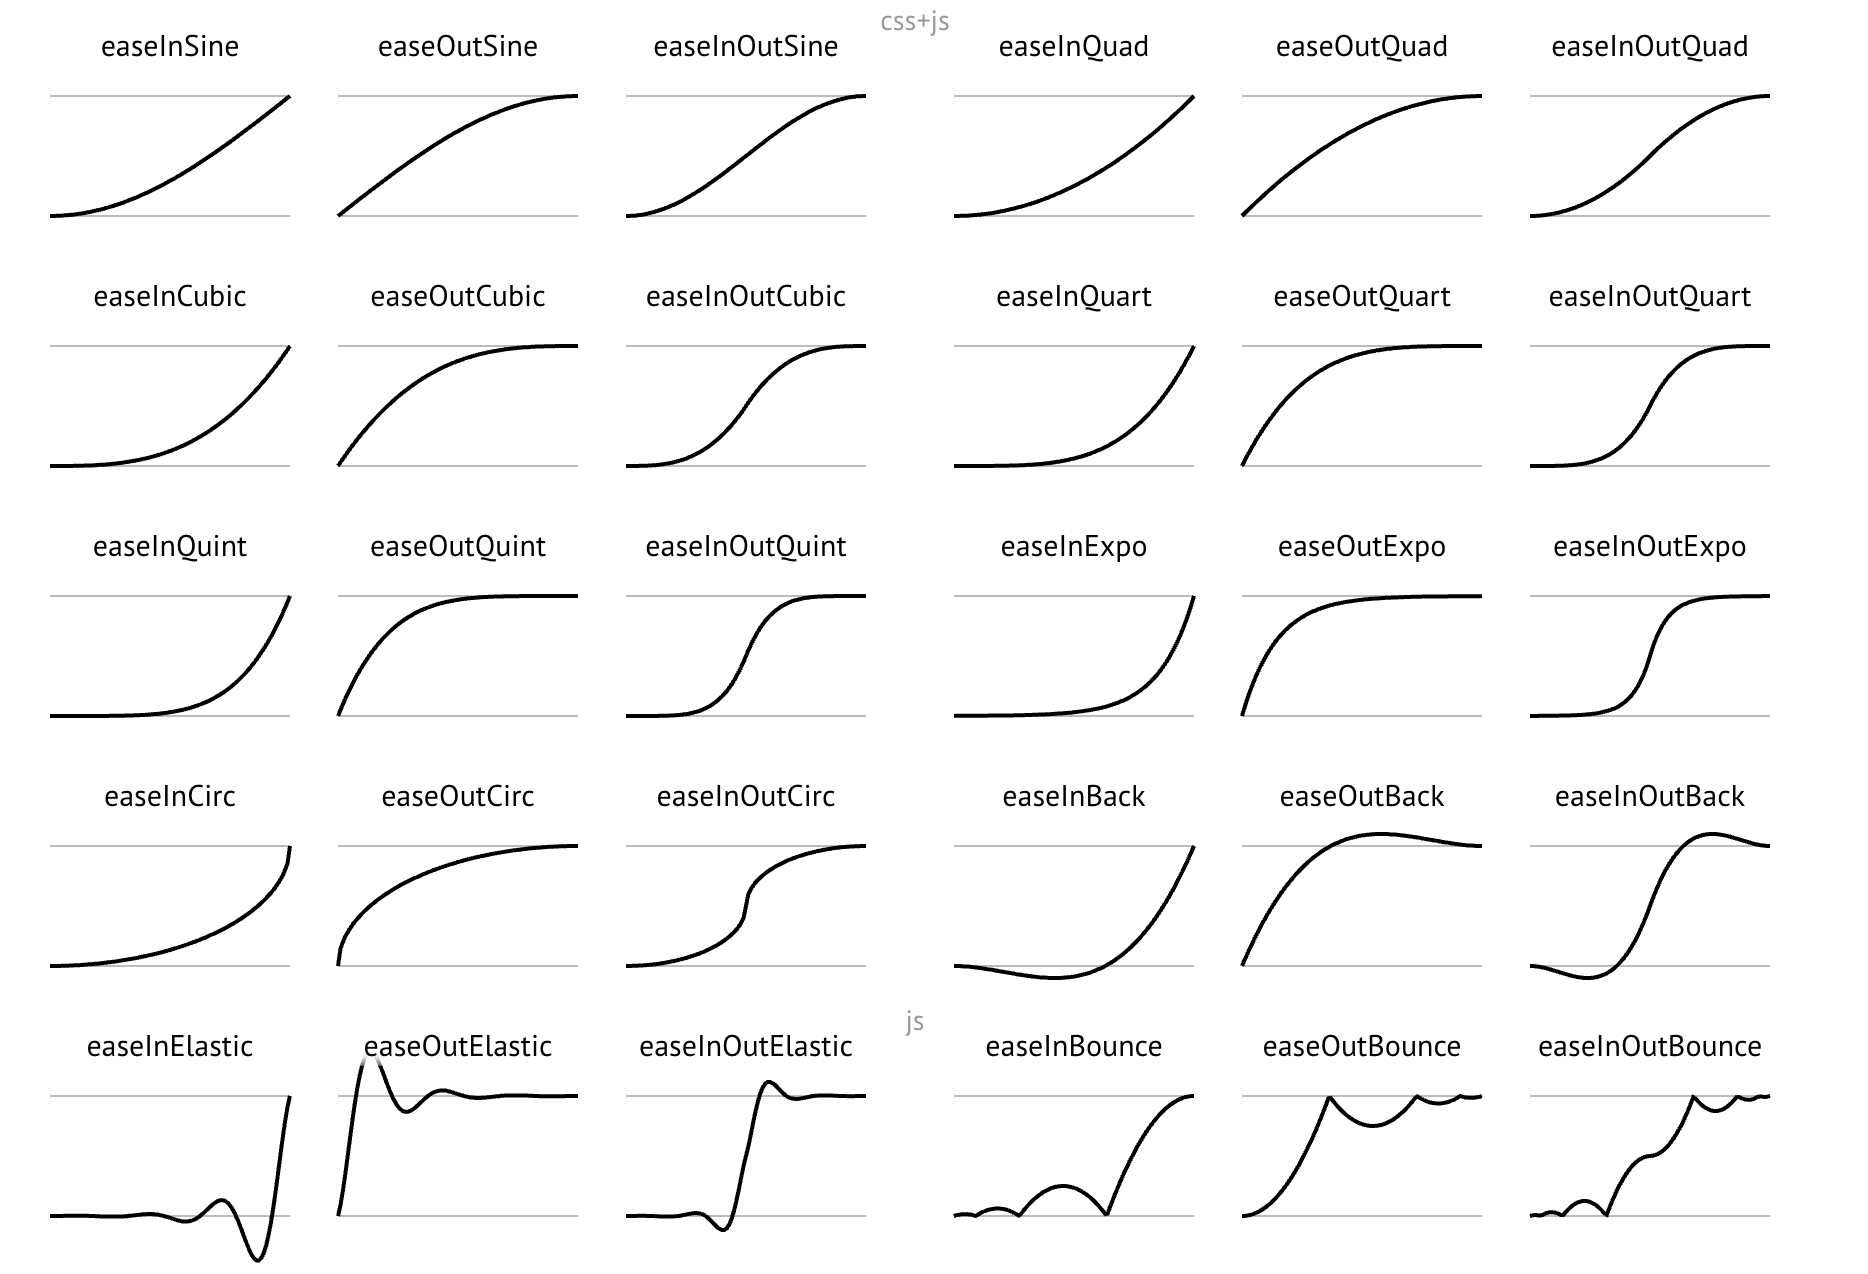
Common easing functions
Let’s try an example: A swipe transition.
s19e88 - A swipe transition component
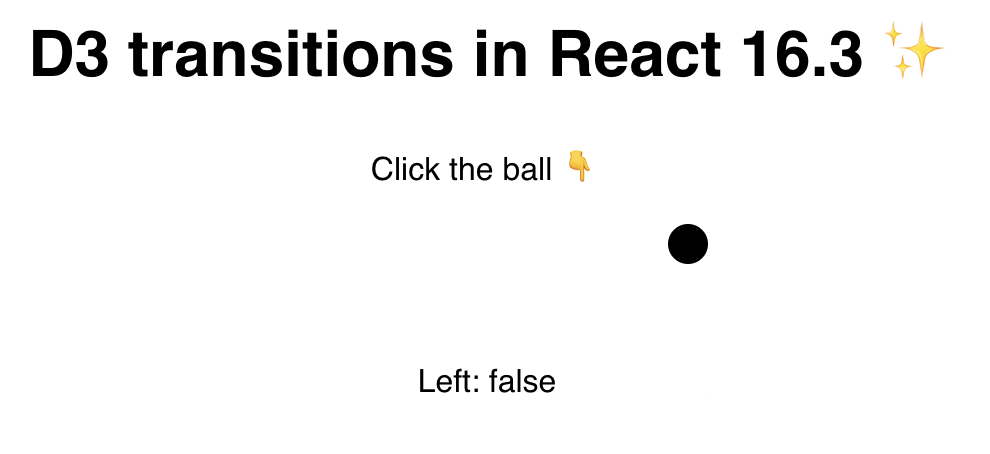
Swipe transition
Our goal is to build a declarative component fully controlled by props. We pass in the x coordinate and the coordinate figures out the rest.
We shouldn’t care about the transition or how long it takes. That’s up to the component. We just change x .
You can see it in action on CodeSandbox, here. Tweak params, see what happens. Follow along as I explain how it works.

s19e89 - App.js
App.js
Like we said: the hard stuff happens inside our Ball component. That means App has render our Ball and implement a mechanism to toggle the x coordinate between two states: Left and right.
class App extends React.Component {
  state = {
    ballLeft: true
  };
  ballJump = () =>
    this.setState({
      ballLeft: !this.state.ballLeft
    });

  render() {
    const { ballLeft } = this.state;
    return (
      <div style={styles}>
        <h1>D3 transitions in React 16.3 {"\u2728"}</h1>
        <p>Click the ball :point_down:</p>
        <svg style={{ width: "300", height: "300px" }} onClick={this.ballJump}>
          <Ball x={ballLeft ? 15 : 250} />
        </svg>
      </div>
    );
  }
}
Typical class based component:
- State holding a
ballLeftboolean - A method to toggle said boolean
- A render method that renders an SVG with an
onClickevent
When state.ballLeft is true, ball renders on the left. When it’s false, on the right. Left and right are hardcoded x coordinates.
Ball component handles the rest.
s19e90 - Ball.js
Ball.js
You’ve rendered a ball before: It’s an SVG circle. You can make it fancier, but that’s not the point. The point are transitions.
The way D3 transitions work with React feels like combining the blackbox and full integration approaches. Full integration for rendering, switch to blackbox for the transition, release control back to React. 
class Ball extends React.PureComponent {
  constructor(props) {
    super();
    this.state = {
      x: props.x
    };
  }

  circleRef = React.createRef();


  render() {
    const { x, y } = this.state;

    return <circle r="10" cx={x} cy={10} ref={this.circleRef} />;
  }
}
We render a circle at x coordinate and a random y and give it a React ref. We’ll use this ref to give control of the DOM node to D3. Just like blackbox components.
The interesting part is that we use a constructor to copy our x prop into state. That’s because we’re going to use props as a sort of staging area for what we want x to be, not what it currently is.
Props change, state stays the same. React doesn’t move our ball.
s19e91 - Ball.js state transition
Ball.js state transition
What does move our ball, is our transition. We do that in componentDidUpdate .
  componentDidUpdate() {
    let el = d3.select(this.circleRef.current);

    el.transition()
      .duration(800)
      .ease(d3.easeBounceOut)
      .attr("cx", this.props.:satisfied:
      .on("end", () =>
        this.setState({
          x: this.props.x
        })
      );
  }
React calls componentDidUpdate when props or state change. We use this as an opportunity to run a D3 transition on our DOM node.
Here’s what happens:
- Take the node with
d3.select - Start a transition with
.transition - Specify 800ms duration with
.duration - Add an easing function for that beautiful bounce effect with
.ease - Define which attributes are changing with
.attr - Use
.on("end"😉to sync React worldview with reality after transition ends
What’s great about D3 transitions is that D3 figures everything for you. You can throw as many attributes at a transition as you want. The attributes can be as complex as you can imagine.
D3’s interpolation methods will figure it out for you. Numbers, strings, colors, it all works great.
After a transition is done, I like to sync React’s worldview with what the transition changed. It’s not strictly required but it can sometimes lead to React freaking out that you moved an element.
Play around. Try adding some more transitions. Make the ball move diagonally. Make it go right then down. It’s fun. 
s20e92 - Enter-update-exit animation intro
Enter/update/exit animation
Now that you know how to use transitions, it’s time to take it up a notch. Enter/exit animations.
Enter/exit animations are the most common use of transitions. They’re what happens when a new element enters or exits the picture. For example: in visualizations like this famous Nuclear Detonation Timeline by Isao Hashimoto. Each new Boom! flashes to look like an explosion.
I don’t know how Hashimoto did it, but with React & D3, you’d do it with enter/exit transitions.
Another favorite of mine is this animated alphabet example by Mike Bostock, the creator of D3, that showcases enter/update/exit transitions.
That’s what we’re going to build: An animated alphabet. New letters fall down and are green, updated letters move right or left, deleted letters are red and fall down.
You can play with a more advanced version here. Same principle as the alphabet, but it animates what you type.
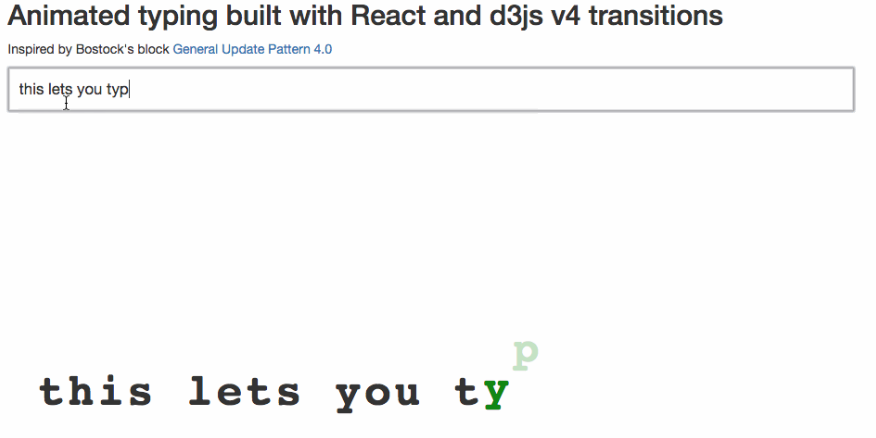
Typing animation screenshot
We’re building the alphabet version because the string diffing algorithm is a pain to explain. I learned that the hard way when giving workshops on React and D3…
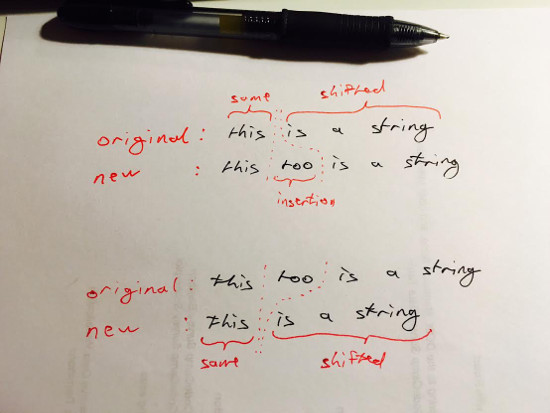
String diffing algorithm sketch
See?
Easy on paper, but the code is long and weird. That, or I’m bad at implementing it. Either way, it’s too tangential to explain here. You can read the article about it.
s20e93 - Build a declarative animated alphabet
Animated alphabet
Our goal is to render a random subset of the alphabet. Every time the set updates, old letters transition out, new letters transition in, and updated letters transition into a new position.
We need two components:
-
Alphabet, which creates random lists of letters every 1.5 seconds, then maps through them to renderLettercomponents -
Letter, which renders an SVG text element and takes care of its own enter/update/exit transitions
You can see the full code on GitHub here.
s20e94 - Project setup
Project setup
To get started you’ll need a project. Either start one with create-react-app or in CodeSandbox. Either will work.
You’ll need a base App component that renders an SVG with an <Alphabet> child. Our component is self-contained so that’s all you need.
Something like this 
import Alphabet from './components/Alphabet`;

const App = () => (
  <svg width="100%" height="600">
    <Alphabet x={32} y={300} />
  </svg>
)
I follow the convention of putting components in a src/components directory. You don’t have to.
Remember to install dependencies: d3 and react-transition-group
s20e95 - The Alphabet component
The Alphabet component
The Alphabet component holds a list of letters in component state and renders a collection of Letter components in a loop.
We start with a skeleton like this:
// src/components/Alphabet.js
import React from "react";
import * as d3 from "d3";
import { TransitionGroup } from "react-transition-group";

import Letter from "./Letter";

class Alphabet extends React.Component {
    static letters = "abcdefghijklmnopqrstuvwxyz".split("");
    state = { alphabet: [] };

    componentDidMount() {
        // start interval
    }

    shuffleAlphabet = () => {
       // generate new alphabet
    };

    render() {
        let transform = `translate(${this.props.x}, ${this.props.y})`;

        return (
            // spit out letters
        );
    }
}

export default Alphabet;
We import dependencies and define the Alphabet component. It keeps a list of available letters in a static letters property and an empty alphabet in component state.
We’ll start a d3.interval on componentDidMount and use shuffleAlphabet to generate alphabet subsets.
To showcase enter-update-exit transitions, we create a new alphabet every second and a half. Using d3.interval lets us do that in a browser friendly way.
// src/components/Alphabet/index.js
    componentDidMount() {
        d3.interval(this.shuffleAlphabet, 1500);
    }

    shuffleAlphabet = () => {
        const alphabet = d3
            .shuffle(Alphabet.letters)
            .slice(0, Math.floor(Math.random() * Alphabet.letters.length))
            .sort();

        this.setState({
            alphabet
        });
    };
Think of this as our game loop: Change alphabet state in consistent time intervals.
We use d3.interval( //.., 1500) to call shuffleAlphabet every 1.5 seconds. Same as setInterval , but friendlier to batteries and CPUs because it pegs to requestAnimationFrame . On each period, we use shuffleAlphabet to shuffle available letters, slice out a random amount, sort them, and update component state with setState .
This process ensures our alphabet is both random and in alphabetical order.
Starting the interval in componentDidMount ensures it only runs when our Alphabet is on the page. In real life you should stop it on componentWillUnmount . Since this is a tiny experiment and we know <Alphabet> never unmounts without a page refresh, it’s okay to skip that step.
s20e96 - Declarative render for enter-exit transitions
Declarative render for enter/exit transitions
Our declarative enter/exit transitions start in the render method.
// src/components/Alphabet/index.js
    render() {
        let transform = `translate(${this.props.x}, ${this.props.y})`;

        return (
            <g transform={transform}>
                <TransitionGroup enter={true} exit={true} component="g">
                    {this.state.alphabet.map((d, i) => (
                        <Letter letter={d} index={i} key={d} />
                    ))}
                </TransitionGroup>
            </g>
        );
    }
An SVG transformation moves our alphabet into the specified (x, y) position. We map through this.state.alphabet inside a <TransitionGroup> component and render a <Letter> component for every letter. Each Letter gets a letter prop for the text, an index prop to know where it stands, and a key so React can tell them apart.
The key property
The key property is how React identifies components. Pick wrong, and you’re gonna have a bad time. I spent many hours debugging and writing workarounds before I realized that basing my key on the index was a Bad Move™. Obviously , you want the letter to stay constant in each component and the index to change.
That’s how x-axis transitions work.
You move the letter into a specific place in the alphabet. You’ll see what I mean when we look at the Letter component.
s20e97 - TransitionGroup
TransitionGroup
React TransitionGroup gives us coordinated control over a set of transitionable components. Each Letter is going to be a <Transition> , you’ll see.
We need TransitionGroup to gain declarative control over the enter/exit cycle. Transition components can handle transitions themselves, but they need an in prop to say whether they’re in or out of the visualization.
Flip from false to true , run an enter transition.
true to false , run an exit transition.
We can make this change from within our component, of course. When responding to user events for example. In our case we need that control to come from outside based on which letters exist in the alphabet array.
TransitionGroup handles that for us. It automatically passes the correct in prop to its children based on who is and isn’t being rendered.
As an added bonus, we can use TransitionGroup to set a bunch of default parameters for child Transitions. Whether to use enter animations, exit animations, stuff like that. You can read a full list in the docs.
s20e98 - The Letter component
The Letter component
We’re ready for the component that can transition itself into and out of a visualization. Without consumers having to worry about what’s going on behind the scenes 
The skeleton for our Letter component looks like this:
// src/components/Letter.js

import React from "react";
import * as d3 from "d3";
import Transition from "react-transition-group/Transition";

const ExitColor = "brown",
    UpdateColor = "#333",
    EnterColor = "green";

class Letter extends React.Component {
    defaultState = {
        y: -60,
        x: this.props.index * 32,
        color: EnterColor,
        fillOpacity: 1e-6
    };
    state = this.defaultState;
    letterRef = React.createRef();

    onEnter = () => {
        // Letter enters the visualization
    };

    onExit = () => {
        // Letter drops out transition
    };

    componentDidUpdate(prevProps, prevState) {
        // update transition
    }

    render() {
        const { x, y, fillOpacity, color } = this.state,
            { letter } = this.props;

        return (
            // render Transition with text
        );
    }
}

export default Letter;
We start with some imports and define a Letter component with a default state. We keep defaultState in a separate value because we’re going to manually reset state in some cases.
A letterRef helps us hand over control to D3 during transitions, the onEnter callback handles enter transitions, onExit exit transitions, and componentDidUpdate update transitions. Render is where it call comes together.
Each of these transition methods is going to follow the same approach you learned about in the swipe transition example. Render from state, transition with D3, update state to match.
You can make this component more flexible by moving the various magic numbers we use into props. Default y offset, transition duration, colors, stuff like that. The world is your oyster my friend.
s20e99 - onEnter
onEnter
We start with the enter transition in the onEnter callback.
// src/components/Letter.js
    onEnter = () => {
        // Letter is entering the visualization
        let node = d3.select(this.letterRef.current);

        node.transition()
            .duration(750)
            .ease(d3.easeCubicInOut)
            .attr("y", 0)
            .style("fill-opacity", 1)
            .on("end", () => {
                this.setState({
                    y: 0,
                    fillOpacity: 1,
                    color: UpdateColor
                });
            });
    };
We use d3.select to grab our DOM node and take control with D3. Start a new transition with .transition() , specify a duration, an easing function, and specify the changes. Vertical position moves to 0 , opacity changes to 1 .
This creates a drop-in fade-in effect.
When our transition ends, we update state with the new y coordinate, fillOpacity , and color .
The result is an invisible letter that starts at -60px and moves into 0px and full visibility over 750 milliseconds.
s20e100 - onExit
onExit
Our exit transition goes in the onExit callback.
// src/components/Alphabet/
    onExit = () => {
        // Letter is dropping out
        let node = d3.select(this.letterRef.current);

        node.style("fill", ExitColor)
            .transition(this.transition)
            .attr("y", 60)
            .style("fill-opacity", 1e-6)
            .on("end", () => this.setState(this.defaultState));
    };
Same as before, we take control of the DOM, run a transition, and update state when we’re done. We start with forcing our letter into a new color, then move it 60px down, transition to invisible, and reset state.
But why are we resetting state instead of updating to current reality?
Our components never unmount.
We avoid unmounts to keep transitions smoother. Instead of unmounting, we have to reset state back to its default values.
That moves the letter back into its enter state and ensures even re-used letters drop down from the top. Took me a while to tinker that one out.
s20e101 - componentDidUpdate
componentDidUpdate
componentDidUpdate is our trickiest transition yet. It has two jobs:
- jump existing components to correct horizontal position when a new
entertransition begins - transition components into new horizontal positions based on changing indexes
It goes like this
// src/components/Alphabet/Letter.js
    componentDidUpdate(prevProps, prevState) {
        if (prevProps.in !== this.props.in && this.props.in) {
            // A new enter transition has begun
            this.setState({
                x: this.props.index * 32
            });
        } else if (prevProps.index !== this.props.index) {
            // Letter is moving to a new location
            let node = d3.select(this.letterRef.current),
                targetX = this.props.index * 32;

            node.style("fill", UpdateColor)
                .transition()
                .duration(750)
                .ease(d3.easeCubicInOut)
                .attr("x", targetX)
                .on("end", () =>
                    this.setState({
                        x: targetX,
                        color: UpdateColor
                    })
                );
        }
    }
When the in prop changes to true , we’re starting a new enter transition on an existing component. We already moved it to the top of the visualization after exiting, but we couldn’t have known its future index.
A quick setState makes sure our letter is in the right place and onEnter takes care of the rest.
Otherwise we check if index changed and if it has, we run a transition in much the same way as we have so far:
- calculate new
targetX - update letter color
- start a transition with the usual parameters
- update
xcoordinate - update state when transition ends
You now have a component that knows how to run its own enter/update/exit transitions. Time to wire it all up in the render method.
s20e102 - render
render
Hard work is done. Here’s how you render:
// src/components/Alphabet/Letter.js
    render() {
        const { x, y, fillOpacity, color } = this.state,
            { letter } = this.props;

        return (
            <Transition
                in={this.props.in}
                unmountOnExit={false}
                timeout={750}
                onEnter={this.onEnter}
                onExit={this.onExit}
            >
                <text
                    dy=".35em"
                    x={x}
                    y={y}
                    style={{
                        fillOpacity: fillOpacity,
                        fill: color,
                        font: "bold 48px monospace"
                    }}
                    ref={this.letterRef}
                >
                    {letter}
                </text>
            </Transition>
        );
    }
We render a Transition element, which gives us the transition super powers we need to run enter/exit transitions. Update transitions work on all React components.
The outside TransitionGroup gives us the correct in prop value, we just have to pass it into Transition . We disable unmountOnExit to make transitions smoother, define a timeout which has to match what we’re using in our transitions, and define onEnter and onExit callbacks.
There’s a lot more to the API that we can use and you should check that out in the docs. Docs don’t go into detail on everything, but if you experiment I’m sure you’ll figure it out.
Inside the transition we render an SVG <text> element rendered at an (x, y) position with a color and fillOpacity style. It shows a single letter taken from the letter prop.
s20e103 - That’s it 
That’s it 
Boom. We’re done.
Alphabet transitions are hard to screenshot
You can play with a more complex version of this example here: https://swizec.github.io/react-d3-enter-exit-transitions/. Try typing different strings and see how the visualization reacts.
The typing example uses the same Letter components to declaratively render its string, but it drives the input through your typing instead of an automatic shuffler.
s20e104 - Key transition takeaways
Key takeaways for transitions are:
- use d3 for transitions
- use React to manage SVG elements
- use TransitionGroup and Transition for the enter/update/exit pattern