There are two projects you’ll be refactoring to use Hooks during this course. You’ll get more information when the time comes.
Why React Hooks?
The first thing you should do whenever you’re about to learn something new is ask yourself two questions -
- Why does this thing exist?
- What problems does this thing solve?
If you never develop a convincing answer for both of those questions, you won’t have a solid enough foundation to build upon when you dive into the specifics. These questions are specifically interesting in regards to React Hooks. React was the most popular and most loved front-end framework in the JavaScript ecosystem when Hooks were released. Despite the existing praise, the React team still saw it necessary to build and release Hooks. Lost in the various Medium posts and blog think pieces on Hooks are the reasons (1) why and for what (2) benefit , despite high praise and popularity, the React team decided to spend valuable resources building and releasing Hooks. To better understand the answers to both of these questions, we first need to take a deeper look into how we’ve historically written React apps.
createClass
If you’ve been around the React game long enough, you’ll remember the React.createClass API. It was the original way in which we’d create React components. All of the information you’d use to describe the component would be passed as an object to createClass .
const ReposGrid = React.createClass({
  getInitialState () {
    return {
      repos: [],
      loading: true
    }
  },
  componentDidMount () {
    this.updateRepos(this.props.id)
  },
  componentDidUpdate (prevProps) {
    if (prevProps.id !== this.props.id) {
      this.updateRepos(this.props.id)
    }
  },
  updateRepos (id) {
    this.setState({ loading: true })

    fetchRepos(id)
      .then((repos) => this.setState({
        repos,
        loading: false
      }))
  },
  render() {
    const { loading, repos } = this.state

    if (loading === true) {
      return <Loading />
    }

    return (
      <ul>
        {repos.map(({ name, handle, stars, url }) => (
          <li key={name}>
            <ul>
              <li><a href={url}>{name}</a></li>
              <li>@{handle}</li>
              <li>{stars} stars</li>
            </ul>
          </li>
        ))}
      </ul>
    )
  }
})
 Play with the code.
createClass was a simple and effective way to create React components. The reason React initially used the createClass API was because, at the time, JavaScript didn’t have a built-in class system. Of course, this eventually changed. With ES6, JavaScript introduced the class keyword and with it a native way to create classes in JavaScript. This put React in a tough position. Either continue using createClass and fight against the progression of JavaScript or submit to the will of the EcmaScript standard and embrace classes. As history has shown, they chose the later.
React.Component
We figured that we’re not in the business of designing a class system. We just want to use whatever is the idiomatic JavaScript way of creating classes. - React v0.13.0 Release
React v0.13.0 introduced the React.Component API which allowed you to create React components from (now) native JavaScript classes. This was a big win as it better aligned React with the EcmaScript standard.
class ReposGrid extends React.Component {
  constructor (props) {
    super(props)

    this.state = {
      repos: [],
      loading: true
    }

    this.updateRepos = this.updateRepos.bind(this)
  }
  componentDidMount () {
    this.updateRepos(this.props.id)
  }
  componentDidUpdate (prevProps) {
    if (prevProps.id !== this.props.id) {
      this.updateRepos(this.props.id)
    }
  }
  updateRepos (id) {
    this.setState({ loading: true })

    fetchRepos(id)
      .then((repos) => this.setState({
        repos,
        loading: false
      }))
  }
  render() {
    if (this.state.loading === true) {
      return <Loading />
    }

    return (
      <ul>
        {this.state.repos.map(({ name, handle, stars, url }) => (
          <li key={name}>
            <ul>
              <li><a href={url}>{name}</a></li>
              <li>@{handle}</li>
              <li>{stars} stars</li>
            </ul>
          </li>
        ))}
      </ul>
    )
  }
}
Though a clear step in the right direction, React.Component wasn’t without its trade-offs.
constructor
With Class components, you initialize the state of the component inside of the constructor method as a state property on the instance ( this ). However, according to the ECMAScript spec, if you’re extending a subclass (in this case, React.Component ), you must first invoke super before you can use this . Specifically, when using React, you also have to remember to pass props to super .
  constructor (props) {
    super(props) // 🤮

    ...
  }
Autobinding
When using createClass , React would auto-magically bind all the methods to the component’s instance, this . With React.Component , that wasn’t the case. Very quickly, React developers everywhere realized they didn’t know how the this keyword worked. Instead of having method invocations that “just worked”, you had to remember to .bind methods in the class’s constructor . If you didn’t, you’d get the popular “Cannot read property setState of undefined” error.
  constructor (props) {
    ...

    this.updateRepos = this.updateRepos.bind(this) // 😭
  }
Now I know what you might be thinking. First, these issues are pretty superficial. Sure calling super(props) and remembering to bind your methods is annoying, but there’s nothing fundamentally wrong here. Second, these aren’t necessarily even issues with React as much as they are with the way JavaScript classes were designed. Both points are valid. However, we’re developers. Even the most superficial issues become a nuisance when you’re dealing with them 20+ times a day. Luckily for us, shortly after the switch from createClass to React.Component , the Class Fields proposal was created.
Class Fields
Class fields allow you to add instance properties directly as a property on a class without having to use constructor . What that means for us is that with Class Fields, both of our “superficial” issues we previously talked about would be solved. We no longer need to use constructor to set the initial state of the component and we no longer need to .bind in the constructor since we could use arrow functions for our methods.
class ReposGrid extends React.Component {
  state = {    repos: [],    loading: true  }  componentDidMount () {
    this.updateRepos(this.props.id)
  }
  componentDidUpdate (prevProps) {
    if (prevProps.id !== this.props.id) {
      this.updateRepos(this.props.id)
    }
  }
  updateRepos = (id) => {    this.setState({ loading: true })

    fetchRepos(id)
      .then((repos) => this.setState({
        repos,
        loading: false
      }))
  }
  render() {
    const { loading, repos } = this.state

    if (loading === true) {
      return <Loading />
    }

    return (
      <ul>
        {repos.map(({ name, handle, stars, url }) => (
          <li key={name}>
            <ul>
              <li><a href={url}>{name}</a></li>
              <li>@{handle}</li>
              <li>{stars} stars</li>
            </ul>
          </li>
        ))}
      </ul>
    )
  }
}
So now we’re good, right? Unfortunately, no. The move from createClass to React.Component came with some tradeoffs, but as we saw, Class Fields took care of those. Unfortunately, there are still some more profound (but less talked about) issues that exist with all the previous versions we’ve seen.
The whole idea of React is that you’re better able to manage the complexity of your application by breaking it down into separate components that you then can compose together. This component model is what makes React so elegant. It’s what makes React, React. The problem, however, doesn’t lie in the component model, but in how the component model is implemented.
Duplicate Logic
Historically, how we’ve structured our React components has been coupled to the component’s lifecycle. This divide naturally forces us to sprinkle related logic throughout the component. We can clearly see this in the ReposGrid example we’ve been using. We need three separate methods ( componentDidMount , componentDidUpdate , and updateRepos ) to accomplish the same thing - keep repos in sync with whatever props.id is.
  componentDidMount () {
    this.updateRepos(this.props.id)
  }
  componentDidUpdate (prevProps) {
    if (prevProps.id !== this.props.id) {
      this.updateRepos(this.props.id)
    }
  }
  updateRepos = (id) => {
    this.setState({ loading: true })

    fetchRepos(id)
      .then((repos) => this.setState({
        repos,
        loading: false
      }))
  }
To fix this, we’d need a whole new paradigm for the way in which we’d handle side effects in React components.
Sharing Non-visual Logic
When you think about composition in React, odds are you think in terms of UI composition. This is natural since it’s what React is so good at.
view = fn(state)
Realistically, there’s more to building an app than just the UI layer. It’s not uncommon to need to compose and reuse non-visual logic. However, because React couples UI to a component, this can be difficult. Historically, React hasn’t had a great answer for this.
Sticking with our example, say we needed to create another component that also needed the repos state. Right now, that state and the logic for handling it lives inside of the ReposGrid component. How would we approach this? Well, the simplest approach would be to copy all of the logic for fetching and handling our repos and paste it into the new component. Tempting, but nah. A smarter approach would be to create a Higher-Order Component that encapsulated all of the shared logic and passed loading and repos as props to whatever component needed it.
function withRepos (Component) {
  return class WithRepos extends React.Component {
    state = {
      repos: [],
      loading: true
    }
    componentDidMount () {
      this.updateRepos(this.props.id)
    }
    componentDidUpdate (prevProps) {
      if (prevProps.id !== this.props.id) {
        this.updateRepos(this.props.id)
      }
    }
    updateRepos = (id) => {
      this.setState({ loading: true })

      fetchRepos(id)
        .then((repos) => this.setState({
          repos,
          loading: false
        }))
    }
    render () {
      return (
        <Component
          {...this.props}
          {...this.state}
        />
      )
    }
  }
}
Now whenever any component in our app needed repos (or loading ), we could wrap it in our withRepos HOC.
// ReposGrid.js
function ReposGrid ({ loading, repos }) {
  ...
}

export default withRepos(ReposGrid)
// Profile.js
function Profile ({ loading, repos }) {
  ...
}

export default withRepos(Profile)
This works and historically (along with Render Props) has been the recommended solution for sharing non-visual logic. However, both these patterns have some downsides.
First, if you’re not familiar with them (and even when you are), your brain can get a little wonky following the logic. With our withRepos HOC, we have a function that takes the eventually rendered component as the first argument but returns a new class component which is where our logic lives. What a convoluted process.
Next, what if we had more than one HOC we were consuming. As you can imagine, it gets out of hand pretty quickly.
export default withHover(
  withTheme(
    withAuth(
      withRepos(Profile)
    )
  )
)
Worse than ^ is what eventually gets rendered. HOCs (and similar patterns) force you to restructure and wrap your components. This can eventually lead to “wrapper hell” which again, makes it harder to follow.
<WithHover>
  <WithTheme hovering={false}>
    <WithAuth hovering={false} theme='dark'>
      <WithRepos hovering={false} theme='dark' authed={true}>
        <Profile
          id='JavaScript'
          loading{true}
          repos={[]}
          authed={true}
          theme='dark'
          hovering={false}
        />
      </WithRepos>
    </WithAuth>
  <WithTheme>
</WithHover>
Current State
So here’s where we’re at.
- React is hella popular.
- We use Classes for React components cause that’s what made the most sense at the time.
- Calling super(props) is annoying.
- No one knows how “this” works.
- OK, calm down. I know YOU know how “this” works, but it’s an unnecessary hurdle for some.
- Organizing our components by lifecycle methods forces us to sprinkle related logic throughout our components.
- React has no good primitive for sharing non-visual logic.
Now we need a new component API that solves all of those problems while remaining simple , composable , flexible , and extendable . Quite the task, but somehow the React team pulled it off.
React Hooks
Since React v0.14.0, we’ve had two ways to create components - classes or functions. The difference was that if our component had state or needed to utilize a lifecycle method, we had to use a class. Otherwise, if it just accepted props and rendered some UI, we could use a function.
Now, what if this wasn’t the case. What if instead of ever having to use a class, we could just always use a function.
Sometimes, the elegant implementation is just a function. Not a method. Not a class. Not a framework. Just a function.
- John Carmack. Oculus VR CTO.
Sure we’d need to figure out a way to add the ability for functional components to have state and lifecycle methods, but assuming we did that, what benefits would we see?
Well, we would no longer have to call super(props) , we’d no longer need to worry about bind ing our methods or the this keyword, and we’d no longer have a use for Class Fields. Essentially, all of the “superficial” issues we talked about earlier would go away.
(ノಥ,_」ಥ)ノ彡 React.Component 🗑

function ヾ(Ő‿Ő✿)
Now, the harder issues.
- State
- Lifecycle methods
- Sharing non-visual logic
State
Since we’re no longer using classes or this , we need a new way to add and manage state inside of our components. As of React v16.8.0, React gives us this new way via the useState method.
useStateis the first of many “Hooks” you’ll be seeing in this course. Let the rest of this post serve as a soft introduction. We’ll be diving much deeper intouseStateas well as other Hooks in future sections.
useState takes in a single argument, the initial value for the state. What it returns is an array with the first item being the piece of state and the second item being a function to update that state.
const loadingTuple = React.useState(true)
const loading = loadingTuple[0]
const setLoading = loadingTuple[1]

...

loading // true
setLoading(false)
loading // false
As you can see, grabbing each item in the array individually isn’t the best developer experience. This is just to demonstrate how useState returns an array. Typically, you’d use Array Destructuring to grab the values in one line.
// const loadingTuple = React.useState(true)
// const loading = loadingTuple[0]
// const setLoading = loadingTuple[1]

const [ loading, setLoading ] = React.useState(true) // 👌
Now let’s update our ReposGrid component with our new found knowledge of the useState Hook.
function ReposGrid ({ id }) {
  const [ repos, setRepos ] = React.useState([])  const [ loading, setLoading ] = React.useState(true)
  if (loading === true) {
    return <Loading />
  }

  return (
    <ul>
      {repos.map(({ name, handle, stars, url }) => (
        <li key={name}>
          <ul>
            <li><a href={url}>{name}</a></li>
            <li>@{handle}</li>
            <li>{stars} stars</li>
          </ul>
        </li>
      ))}
    </ul>
  )
}
- State

- Lifecycle methods
- Sharing non-visual logic
Lifecycle methods
Here’s something that may make you sad (or happy?). When using React Hooks, I want you to take everything you know about the traditional React lifecycle methods as well as that way of thinking, and forget it. We’ve already seen the problem of thinking in terms of the lifecycle of a component - “This [lifecycle] divide naturally forces us to sprinkle related logic throughout the component.” Instead, think in terms of synchronization .
Think of any time you’ve ever used a lifecycle event. Whether it was to set the initial state of the component, fetch data, update the DOM, anything - the end goal was always synchronization. Typically, synchronizing something outside of React land (an API request, the DOM, etc.) with something inside of React land (component state) or vice versa.
When we think in terms of synchronization instead of lifecycle events, it allows us to group together related pieces of logic. To do this, React gives us another Hook called useEffect .
Defined, useEffect lets you perform side effects in function components. It takes two arguments, a function, and an optional array. The function defines which side effects to run and the (optional) array defines when to “re-sync” (or re-run) the effect.
React.useEffect(() => {
  document.title = `Hello, ${username}`
}, [username])
In the code above, the function passed to useEffect will run whenever username changes. Therefore, syncing the document’s title with whatever Hello, ${username} resolves to.
Now, how can we use the useEffect Hook inside of our code to sync repos with our fetchRepos API request?
function ReposGrid ({ id }) {
  const [ repos, setRepos ] = React.useState([])
  const [ loading, setLoading ] = React.useState(true)

  React.useEffect(() => {
    setLoading(true)

    fetchRepos(id)
      .then((repos) => {
        setRepos(repos)
        setLoading(false)
      })
  }, [id])

  if (loading === true) {
    return <Loading />
  }

  return (
    <ul>
      {repos.map(({ name, handle, stars, url }) => (
        <li key={name}>
          <ul>
            <li><a href={url}>{name}</a></li>
            <li>@{handle}</li>
            <li>{stars} stars</li>
          </ul>
        </li>
      ))}
    </ul>
  )
}
Pretty slick, right? We’ve successfully gotten rid of React.Component , constructor , super , this and more importantly, we no longer have our effect logic sprinkled (and duplicated) throughout the component.
- State
- Lifecycle methods
- Sharing non-visual logic
Sharing non-visual logic
Earlier we mentioned that the reason React didn’t have a great answer to sharing non-visual logic was because “React couples UI to a component”. This lead to overcomplicated patterns like Higher-order components or Render props. As you can probably guess by now, Hooks have an answer for this too. However, it’s probably not what you think. There’s no built-in Hook for sharing non-visual logic, instead, you can create your own custom Hooks that are decoupled from any UI.
We can see this in action by creating our own custom useRepos Hook. This Hook will take in an id of the Repos we want to fetch and (to stick to a similar API) will return an array with the first item being the loading state and the second item being the repos state.
function useRepos (id) {
  const [ repos, setRepos ] = React.useState([])
  const [ loading, setLoading ] = React.useState(true)

  React.useEffect(() => {
    setLoading(true)

    fetchRepos(id)
      .then((repos) => {
        setRepos(repos)
        setLoading(false)
      })
  }, [id])

  return [ loading, repos ]
}
What’s nice is any logic that’s related to fetching our repos can be abstracted inside of this custom Hook. Now, regardless of which component we’re in and even though it’s non-visual logic, whenever we need data regarding repos , we can consume our useRepos custom Hook.
function ReposGrid ({ id }) {
  const [ loading, repos ] = useRepos(id)

  ...
}
function Profile ({ user }) {
  const [ loading, repos ] = useRepos(user.id)

  ...
}
- State
- Lifecycle methods
- Sharing non-visual logic
The marketing pitch for Hooks is that you’re able to use state inside function components. In reality, Hooks are much more than that. They’re about improved code reuse, composition, and better defaults. There’s a lot more to Hooks we still need to cover, but now that you know WHY they exist, we have a solid foundation to build on.
The useState Hook
Perhaps the most critical part of React is the ability for individual components to own and manage their own state. Historically (with Class components), the way we’ve accomplished this is by adding a state property on the component’s instance ( this ) and updating that state with the setState method.
class Theme extends React.Component {
  state = {
    theme: "light"
  }
  toDark = () => this.setState({ theme: "dark" })
  toLight = () => this.setState({ theme: "light" })
  render() {
    const { theme } = this.state

    return (
      <div className={theme}>
        {theme === "light"
          ? <button onClick={this.toDark}>🔦</button>
          : <button onClick={this.toLight}>💡</button>}
      </div>
    )
  }
}
This worked fine, but with the advent of React Hooks, we no longer need to use Classes for our stateful components. Instead, we can use function components and make them stateful with the useState Hook.
useState
useState comes built-in with React and can be accessed via React.useState . It takes in a single argument, the initial value for that piece of state, and returns an array with the first item being the state value and the second item being a way to update that state.
const themeArray = React.useState('light')
const theme = themeArray[0]
const setTheme = themeArray[1]

...

theme // 'light'
setTheme('dark')
theme // 'dark'
The canonical and more precise way to write the code above is to use Array destructuring and put it all on one line. You can see that in the full example here.
function Theme () {
  const [theme, setTheme] = React.useState('light')

  const toDark = () => setTheme('dark')
  const toLight = () => setTheme('light')

  return (
    <div className={theme}>
      {theme === "light"
        ? <button onClick={toDark}>🔦</button>
        : <button onClick={toLight}>💡</button>}
    </div>
  )
}
The Mental Model
Now that we’ve seen a simple example for how the useState API works, before we get into more advanced use cases, it’s important to have a solid mental model for the actual functionality that it provides. Namely, useState allows you to trigger a component re-render, and it can preserve values between renders.
Trigger Re-renders
The concept here is the same as before when we’d invoke setState . Whenever you invoke the updater function that useState gives you, assuming the argument you pass in is different from the current state value, React will cause a re-render to the component, updating the UI.
Preserve Values
Typically when you invoke a function in JavaScript, unless you’re utilizing closures, you expect any values defined in that function to get garbage collected once the function is finished executing and you expect each subsequent call to that function to produce its own unique values.
function foo () {
  const name = 'Tyler'
  const surname = 'McGinnis'
}

foo()
// name and surname are garbage collected
foo()
// name and surname are garbage collected
Because React Components are now just functions, naturally you may want to apply the same intuition to them. However, if that were the case, React wouldn’t work. The whole point of React is that components are able to describe their UI based on their current state, View = fn(state) . This implies that React, under the hood, has some way to preserve values between function calls to prevent them from being garbage collected once the function has finished executing. The public API for this, as you’ve seen, is useState .
The way I like to think about useState is it’s the tool to preserve values between function calls/renders and to trigger a re-render of the component.
In a future lesson, you’ll learn of another Hook (useRef) that, like useState, allows you to preserve values between renders but, unlike useState, won’t trigger a re-render to the component.
setState vs useState
Right away you’ll notice a few differences between the useState Hook and the traditional way we’ve managed state in Class components. First, there’s no more instance wide API for updating all of the state of the component as there was with setState . Instead, each piece of state comes with its own updater function. Second, and this is related to the first point, there’s no instance wide API for setting the initial values of all of the state properties on the component as there was with state = {} . Instead, each unique piece of state should have its own useState invocation (and therefore its own value and updater function).
Class
state = {
  loading: true,
  authed: false,
  repos: []
}
useState
const [ loading, setLoading ] = React.useState(true)
const [ authed, setAuthed ] = React.useState(false)
const [ repos, setRepos ] = React.useState([])
State Objects
Perhaps the most important distinction between setState and useState is how they handle objects. Historically, all of the state for our component would live on an object, this.state . Whenever we wanted to update that state, we’d call setState passing it an object representing the state changes we wanted to make. Any properties that existed on our state previously, that weren’t included in the object passed to setState , would stay the same since React would merge the two objects to form the new state.
state = {
  loading: true,
  authed: false,
  repos: []
}
setLoading = (loading) => {
  this.setState({
    loading
  }) // wouldn't modify "authed" or "repos".
}
With useState , that’s not the case. Unlike setState , useState won’t merge the new object with the previous state. Instead, it’ll replace it completely.
const [ state, setState ] = React.useState({
  loading: true,
  authed: false,
  repos: []
})

const setLoading = (loading) => {
  setState({
    loading
  }) // state.authed and state.repos are now gone.
}
This design decision makes sense in the context of what we mentioned earlier, that “each unique piece of state should have its own useState invocation (and therefore its own value and updater function).”
Of course, you can get around this by manually merging the previous state with the new state if you want, but that’ll come with a performance hit.
const setLoading = (loading) => {
  setState({
    ...state,
    loading
  })
}
If the most logical data type for your piece of state is an object, it’s best to use the useReducer Hook which we’ll see in an upcoming lesson.
Functional Updates
With setState , whenever you set the current state based on the previous state, it’s recommended to pass a function as an argument to setState instead of an object. The reason for this is state updates may be asynchronous. There’s a lot of work happening under the hood when you call setState , so for React to guarantee that the state value is up to date, they have you pass them a function that receives state rather than relying on referencing state from the component instance.
class Counter extends React.Component {
  state = { count: 0 }
  increment = () => this.setState(({ count }) => ({ count: count + 1}))
  decrement = () => this.setState(({ count }) => ({ count: count - 1}))
  render () {
    return (
      <React.Fragment>
        <button onClick={this.decrement}>-</button>
        <h1>{this.state.count}</h1>
        <button onClick={this.increment}>+</button>
      </React.Fragment>
    )
  }
}
Here, we’re incrementing or decrementing count based on its previous value, so we use the function form of setState .
With useState , the same logic applies. Whenever you’re setting the current state based on the previous state, you’ll want to pass a function to your updater function so you get the correct, most up to date value.
function Counter () {
  const [ count, setCount ] = React.useState(0)

  const increment = () => setCount((count) => count + 1)
  const decrement = () => setCount((count) => count - 1)

  return (
    <React.Fragment>
      <button onClick={decrement}>-</button>
      <h1>{count}</h1>
      <button onClick={increment}>+</button>
    </React.Fragment>
  );
}
Lazy State Initialization
Here’s a scenario. What if the initial value for a piece of state was the result of an expensive calculation? Something like this.
function getExpensiveCount () {
  console.log('Calculating initial count')
  return 999
}

function Counter() {
  const [count, setCount] = React.useState(getExpensiveCount())

  const increment = () => setCount((count) => count + 1)
  const decrement = () => setCount((count) => count - 1)

  return (
    <React.Fragment>
      <button onClick={decrement}>-</button>
      <h1>{count}</h1>
      <button onClick={increment}>+</button>
    </React.Fragment>
  );
}
If you play around with that code, you’ll notice that, even though React only uses the value calculated from getExpensiveCount on the initial render, anytime the component re-renders, the “expensive” getExpensiveCount is being invoked. That’s not ideal at all. We only want to calculate the initial state once, not on every render. Luckily for us, React gives us an escape hatch for this scenario.
If the initial value for a piece of state is the result of an expensive calculation, you can pass useState a function that when invoked, will resolve to the initial state. When useState sees that it received a function as its initial state argument, it’ll only invoke it once on the initial render.
function getExpensiveCount () {
  console.log('Calculating initial count')
  return 999
}

function Counter() {
  const [count, setCount] = React.useState(() => getExpensiveCount())
  const increment = () => setCount((count) => count + 1)
  const decrement = () => setCount((count) => count - 1)

  return (
    <React.Fragment>
      <button onClick={decrement}>-</button>
      <h1>{count}</h1>
      <button onClick={increment}>+</button>
    </React.Fragment>
  );
}
If you’re confused by the difference between the last two examples, note that the key lies in what we pass to
useState. In the first example, we passuseStatea function invocation . In the second, we pass it a function definition . What that means is that, fromuseState's perspective, in the first example, it receives 999 since that’s whatgetExpensiveCountreturns. In the second, it receives a function that it needs to invoke to get the initial value.
Now that you know the API and mental model behind the useState Hook, the next Hook we’re going to dive into is useEffect which will allow us to replace our lifecycle methods.
(Practice) Theme
Refer to the instructions in the code.
(Solution) Theme
(Practice) Todos
Refer to the instructions in the code.
(Solution) Todos
(Practice) Show/Hide
Refer to the instructions in the app.
(Solution) Show/Hide
(Bonus) Execution Contexts, Scopes, and Closures
It may seem surprising, but in my opinion, the most important and fundamental concept to understanding the JavaScript language is understanding Execution Context. By properly learning it, you’ll be positioned nicely to learn more advanced topics like hoisting, scope chains, and closures. With that in mind, what exactly is an “Execution Context”? To better understand it, let’s first take a look at how we write software.
One strategy for writing software is to break our code up into separate pieces. Though these “pieces” have many different names (functions, modules, packages, etc), they all exist for a single purpose - to break apart and manage the complexity in our applications. Now instead of thinking like someone authoring code, think in terms of the JavaScript engine whose job is to interpret code. Can we use that same strategy, separating code into pieces, to manage the complexity of interpreting code just like we did in order to write it? Turns out we can and these “pieces” are called Execution Contexts. Just like functions/modules/packages allow you to manage the complexity of writing code, Execution Contexts allow the JavaScript engine to manage the complexity of interpreting and running your code. So now that we know the purpose of Execution Contexts, the next questions we need to answer are how do they get created and what do they consist of?
The first Execution Context that gets created when the JavaScript engine runs your code is called the “Global Execution Context”. Initially, this Execution Context will consist of two things - a global object and a variable called this . this will reference the global object which will be window if you’re running JavaScript in the browser or global if you’re running it in a Node environment.
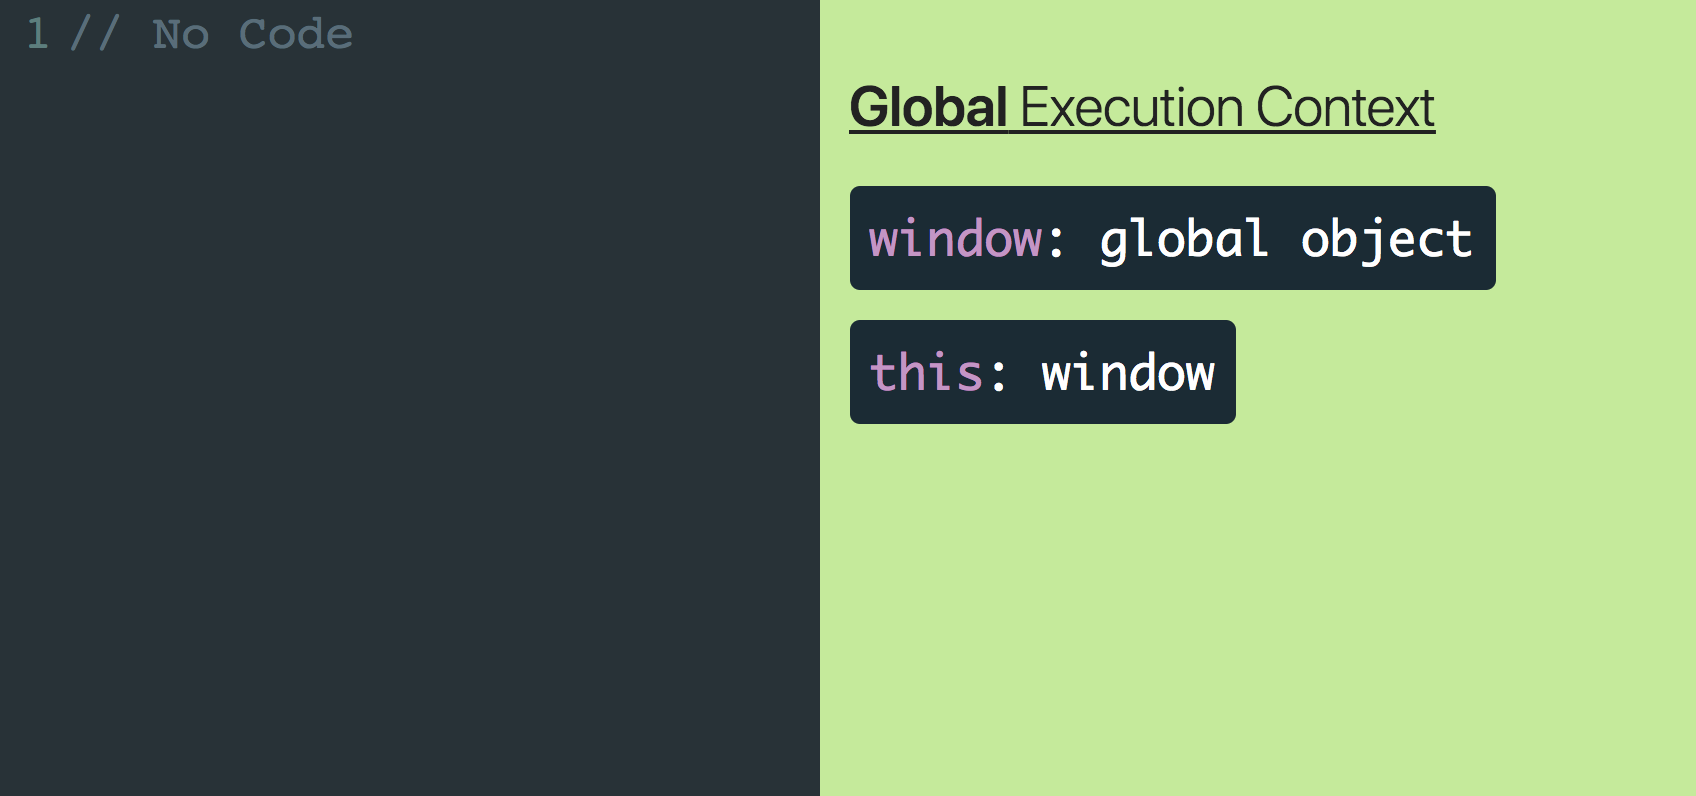
Above we can see that even without any code, the Global Execution Context will still consist of two things - window and this . This is the Global Execution Context in its most basic form.
Let’s step things up and see what happens when we start adding code to our program. Let’s start with adding a few variables.

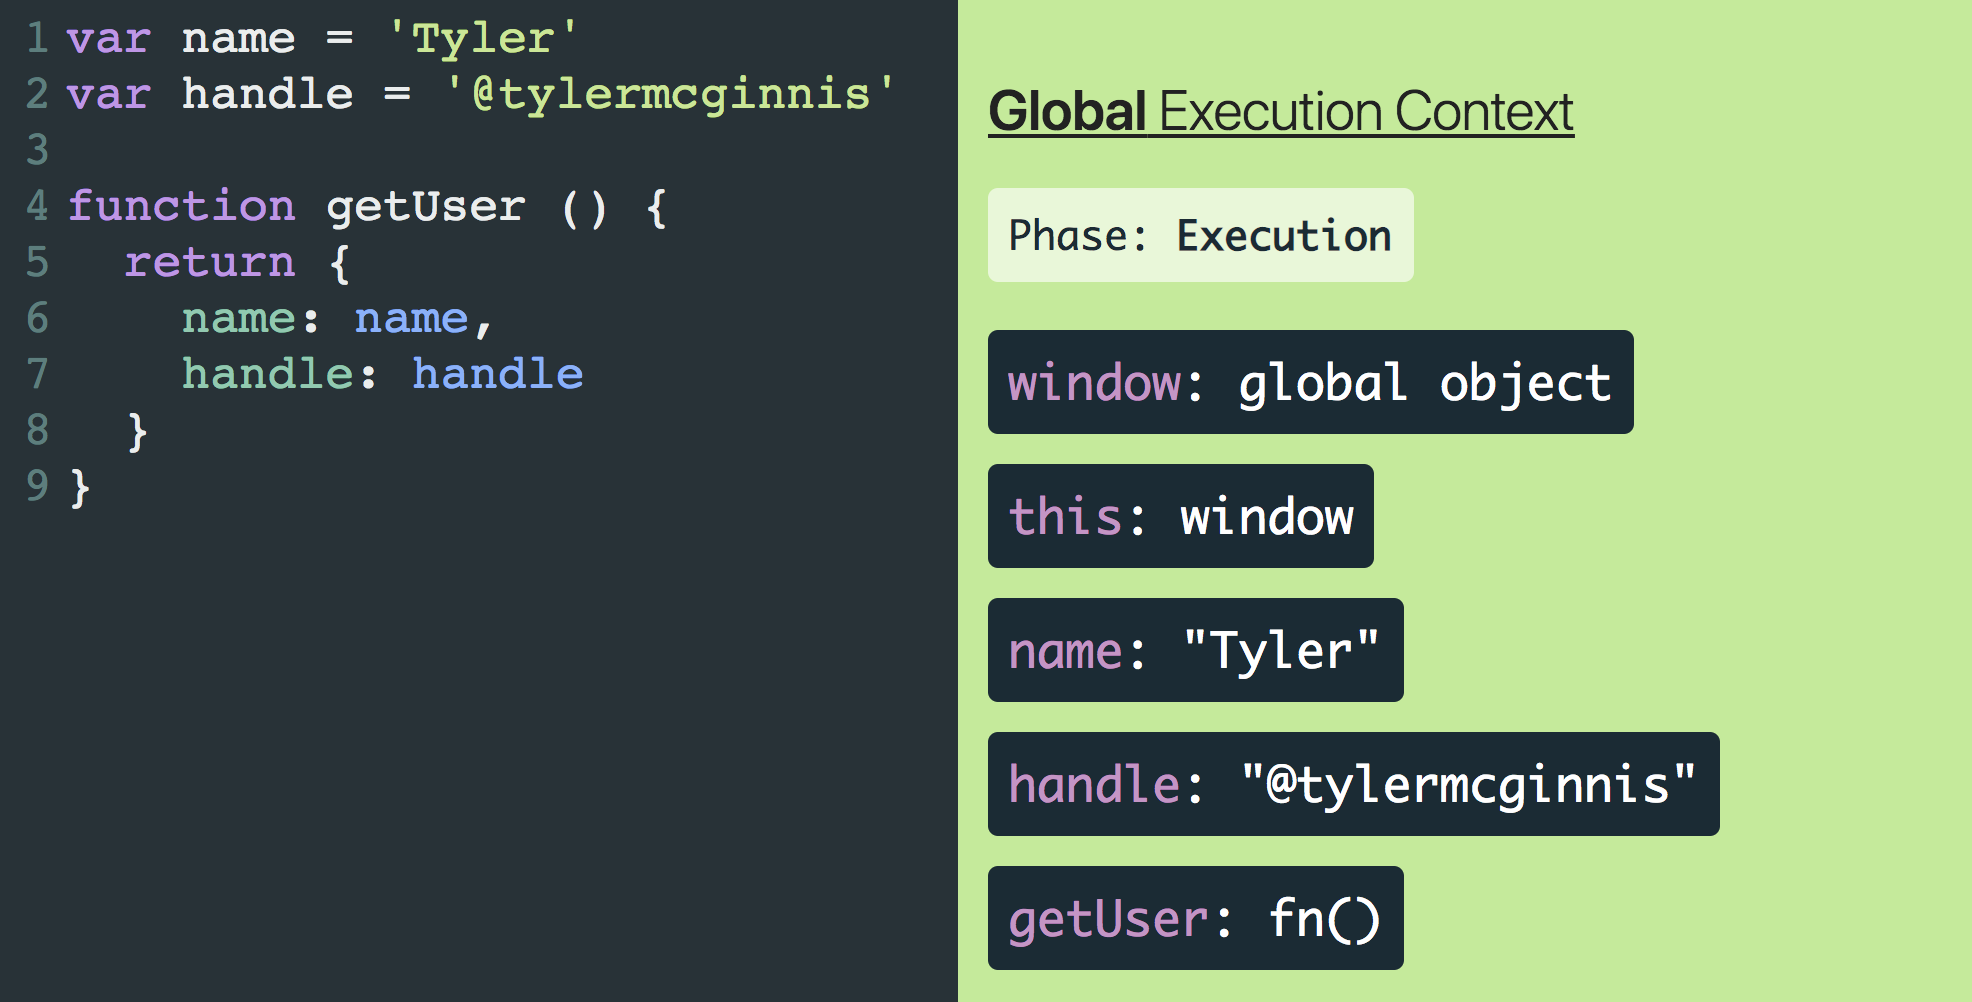
Can you spot the differences between those two images above? The key take away is that each Execution Context has two separate phases, a Creation phase, and an Execution phase and each phase has its own unique responsibilities.
In the Global Creation phase, the JavaScript engine will
- Create a global object.
- Create an object called “this”.
- Set up memory space for variables and functions.
- Assign variable declarations a default value of “undefined” while placing any function declarations in memory.
It’s not until the Execution phase where the JavaScript engine starts running your code line by line and executing it.
We can see this flow from Creation phase to Execution phase in the GIF below.
During the Creation phase window and this are created, variable declarations ( name and handle ) are assigned a default value of undefined , and any function declarations ( getUser ) are placed entirely into memory. Then once we enter the Execution phase, the JavaScript engine starts executing the code line by line and assigns the real values to the variables already living in memory.
GIFs are cool but not as cool as stepping through the code and seeing the process for yourself. Because you deserve it, I created JavaScript Visualizer just for you. If you want to walk through the exact code above, use THIS LINK.
To really cement this idea of Creation phase vs Execution phase, let’s log some values after the Creation phase and before the Execution phase.
console.log('name: ', name)
console.log('handle: ', handle)
console.log('getUser :', getUser)

var name = 'Tyler'
var handle = '@tylermcginnis'

function getUser () {
  return {
    name: name,
    handle: handle
  }
}
In the code above, what do you expect to be logged to the console? By the time the JavaScript engine starts executing our code line by line and invoking our console.logs, the Creation phase has already happened. What that means is that, as we saw earlier, the variable declarations should have been assigned a value of undefined while the function declaration should be fully in memory already. So just as we should expect, name and handle are undefined and getUser is a reference to the function in memory.
console.log('name: ', name) // name: undefined
console.log('handle: ', handle) // handle: undefined
console.log('getUser :', getUser) // getUser: ƒ getUser () {}

var name = 'Tyler'
var handle = '@tylermcginnis'

function getUser () {
  return {
    name: name,
    handle: handle
  }
}
This process of assigning variable declarations a default value of
undefinedduring the creation phase is called Hoisting .
Hopefully, you just had an 'Aha!" moment. You may have had “hoisting” explained to you previously without much success. The thing that’s confusing about “hoisting” is that nothing is actually “hoisted” or moved around. Now that you understand Execution Contexts and that variable declarations are assigned a default value of undefined during the Creation phase, you understanding “hoisting” because that’s literally all it is.
At this point, you should be fairly comfortable with the Global Execution Context and its two phases, Creation and Execution . The good news is there’s only one other Execution Context you need to learn and its almost exactly identical to the Global Execution Context. It’s called the Function Execution Context and it’s created whenever a function is invoked .
This is key. The only time an Execution Context is created is when the JavaScript engine first starts interpreting your code (Global Execution Context) and whenever a function is invoked.
Now the main question we need to answer is what’s the difference between the Global Execution Context and a Function Execution Context. If you remember from earlier, we said that in the Global Creation phase, the JavaScript engine will
- Create a global object.
- Create an object called “this”.
- Set up memory space for variables and functions.
- Assign variable declarations a default value of “undefined” while placing any function declarations in memory.
Which of those steps doesn’t make sense when we’re talking about a Function Execution Context? It’s step #1. We should only ever have one global object that’s created during the Creation phase of the Global Execution Context, not every time a function is invoked and the JavaScript engine creates a Function Execution Context. Instead of creating a global object, one thing a Function Execution Context needs to worry about that the Global Execution Context doesn’t are arguments. With that in mind, we can adapt our list from earlier. Whenever a Function Execution Context is created, the JavaScript engine will
1. ~~Create a global object.~~

1. Create an arguments object.

2. Create an object called this.

3. Set up memory space for variables and functions.

4. Assign variable declarations a default value of “undefined” while placing any function declarations in memory.
To see this in action, let’s go back to the code we had earlier, but this time instead of just defining getUser , let’s see what happens when we invoke it.
Just as we talked about, when we invoke getUser a new Execution Context is created. During the Creation phase of getUsers Execution Context, the JavaScript engine creates a this object as well as an arguments object. Because getUser doesn’t have any variables, the JavaScript engine doesn’t need to set up any memory space or “hoist” any variable declarations.
You may have also noticed that when the getUser function is finished executing, it’s removed from the visualization. In reality, the JavaScript engine creates what’s called an “Execution Stack” (also known as the “Call Stack”). Anytime a function is invoked, a new Execution Context is created and added to the Execution Stack. Whenever a function is finished running through both the Creation and Execution phase, it gets popped off the Execution Stack. Because JavaScript is single threaded (meaning only one task can be executed at a time), this is easy to visualize. With “JavaScript Visualizer” the Execution Stack is shown in a nested fashion with each nested item being a new Execution Context on the Execution Stack.
At this point, we’ve seen how function invocations create their own Execution Context which get placed on the Execution Stack. What we haven’t seen yet is how local variables play into that. Let’s change up our code so our functions have local variables.
There are few important details to notice here. First is that any argument you pass in will be added as a local variable in that function’s Execution Context. In the example handle exists both as a variable in the Global Execution Context (since that’s where it was defined) as well as the getURL Execution Context because we passed it in as an argument. Next is that variables declared inside of a function live inside that function’s Execution Context. So when we created twitterURL , it lived inside of the getURL Execution Context since that’s where it was defined, not the Global Execution Context. That may seem obvious, but it’s fundamental to our next topic, Scopes.
In the past, you probably heard a definition of “Scope” along the lines of “where variables are accessible”. Regardless of whether or not that made sense at the time, with your newfound knowledge of Execution Contexts and the JavaScript Visualizer tool, Scopes will be more clear than they’ve ever been. In fact, MDN defines “Scope” as “The current context of execution.” Sound familiar? We can think of “Scope” or “where variables are accessible” in a very similar way to how we’ve been thinking about execution contexts.
Here’s a test for you. What will bar be when it’s logged in the code below?
function foo () {
  var bar = 'Declared in foo'
}

foo()

console.log(bar)
Let’s check it out in JavaScript Visualizer.
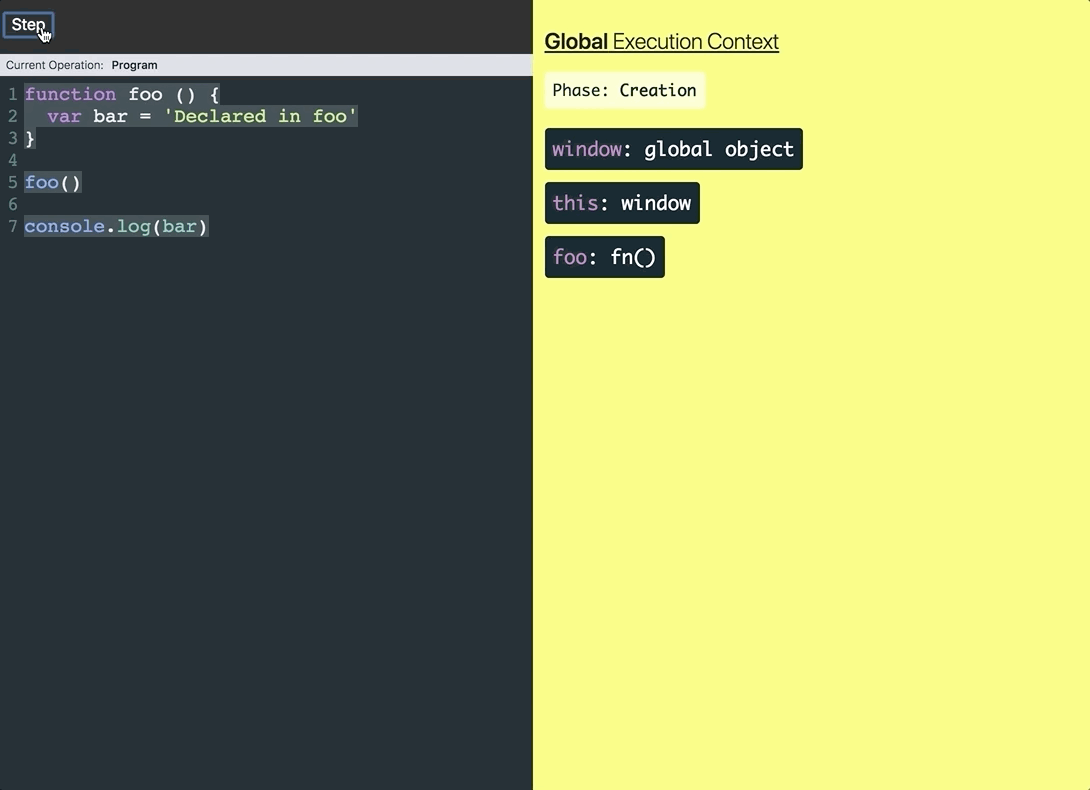
When foo is invoked we create a new Execution Context on the Execution Stack. The Creation phase creates this , arguments , and sets bar to undefined . Then the Execution phase happens and assigns the string Declared in foo to bar . After that the Execution phase ends and the foo Execution Context is popped off the stack. Once foo is removed from the Execution Stack, we try to log bar to the console. At that moment, according to JavaScript Visualizer, it’s as if bar never even existed so we get undefined . What this shows us is that variables created inside of a function are locally scoped. That means (for the most part, we’ll see an exception later) they can’t be accessed once the function’s Execution Context has been popped off the Execution Stack.
Here’s another. What will be logged to the console after the code is finished executing?
function first () {
  var name = 'Jordyn'

  console.log(name)
}

function second () {
  var name = 'Jake'

  console.log(name)
}

console.log(name)
var name = 'Tyler'
first()
second()
console.log(name)
Again, let’s take a look at JavaScript Visualizer.
We get undefined , Jordyn , Jake , then Tyler . What this shows us is that you can think of each new Execution Context as having its own unique variable environment. Even though there are other Execution Contexts that contain the variable name , the JavaScript engine will first look to the current Execution Context for that variable.
This brings up the question, what if the variable doesn’t exist in the current Execution Context? Will the JavaScript engine just stop trying to look for that variable? Let’s see an example that will answer this question. In the code below, what’s going to be logged?
var name = 'Tyler'

function logName () {
  console.log(name)
}

logName()
Your intuition might be that it’s going to log undefined since the logName Execution Context doesn’t have a name variable in its scope. That’s fair, but it’s wrong. What happens is if the JavaScript engine can’t find a variable local to the function’s Execution Context, it’ll look to nearest parent Execution Context for that variable. This lookup chain will continue all the way until the engine reaches the Global Execution Context. In that case, if the Global Execution Context doesn’t have the variable, it’ll throw a Reference Error.
This process of the JavaScript engine going one by one and checking each individual parent Execution Context if a variable doesn’t exist in the local Execution Context is called the
Scope Chain. JavaScript Visualizer shows the Scope Chain by having each new Execution Context indented and with a unique colored background. Visually you can see that any child Execution Context can reference any variables located in any of its parent Execution Contexts, but not vice versa.
Earlier we learned that variables created inside of a function are locally scoped and they can’t be ( for the most part ) accessed once the function’s Execution Context has been popped off the Execution Stack. It’s time to dive into that “ for the most part ”. The one scenario where this isn’t true is if you have a function nested inside of another function. In this case, the child function will still have access to the outer function’s scope, even after the parent function’s Execution Context has been removed from the Execution Stack. That was a lot of words. As always, JavaScript Visualizer can help us out here.
Notice that after the makeAdder Execution Context has been popped off the Execution Stack, JavaScript Visualizer creates what’s called a Closure Scope . Inside of that Closure Scope is the same variable environment that existed in the makeAdder Execution Context. The reason this happened is because we have a function nested inside of another function. In our example, the inner function is nested inside of the makeAdder function, so inner creates a Closure over the makeAdder variable environment. Even after the makeAdder Execution Environment has been popped off the Execution Stack, because that Closure Scope was created, inner has access to the x variable (via the Scope Chain).
As you probably guessed, this concept of a child function “closing” over the variable environment of its parent function is called Closures .
Bonus Section
Here are a few more related topics that I know if I don’t mention someone will call me out on it  .
.
Global Variables
In the browser, anytime you create a variable in the Global Execution Context (outside of any function), that variable will be added as a property on the window object.
In both the browser and in Node, if you create a variable without a declaration (ie without var , let , or const ), that variable will also be added as a property on the global object.
// In the browser
var name = 'Tyler'

function foo () {
  bar = 'Created in foo without declaration'
}

foo()

console.log(window.name) // Tyler
console.log(window.bar) // Created in foo without declaration
The useEffect Hook
The key to writing bug-free software is to maximize the predictability of your program. One strategy to do that is to minimize and encapsulate the side effects in your program. In English, a side effect is defined as “a secondary, typically undesirable effect.” Related, in programming, a side effect is a state change that can be observed outside of its local environment. Said differently, a side effect is anything that interacts with the outside world (in our case, “outside” meaning outside of the local function that’s being executed). Mutating non-local variables, making network requests, and updating the DOM are all examples of common side effects.
function addTodo (todo) {
  todos.push(todo)
}
function getGithubProfile (username) {
  return fetch(`https://api.github.com/users/${username}`)
    .then((res) => res.json())
}
function updateDocumentTitle (title) {
  document.title = title
}
Side Effects in React
Because the encapsulation of side effects is so crucial, React comes with a built-in Hook to do just that called useEffect . As the name suggests, useEffect allows you to perform side effects in function components. Per our definition earlier, whenever you want to interact with the world outside of React (whether that’s to make a network request, manually update the DOM, etc.), you’d reach for useEffect .
There are three aspects to the useEffect API that are important to understand - how to add an effect, how to skip re-invoking the effect, and how to (optionally) clean up that effect.
Add an effect
To add a side effect to your React component, you invoke useEffect passing it a function which defines your side effect.
React.useEffect(() => {
  document.title = 'The new title.'
})
By default, React will re-invoke the effect after every render . We can see this by looking at a simple “Counter” example. Here we’re using useEffect to synchronize the document’s title with our local count state.
function Counter () {
  const [count, setCount] = React.useState(0)

  React.useEffect(() => {
    console.count('In useEffect, after render')
    document.title = `Count: ${count}`
  })

  console.count('Rendering')

  return (
    <React.Fragment>
      <button onClick={() => setCount((c) => c - 1)}>-</button>
      <h1>Count: {count}</h1>
      <button onClick={() => setCount((c) => c + 1)}>+</button>
    </React.Fragment>
  )
}
If you were to play around with the code above, you’d notice that Rendering always gets logged before In useEffect, after render . Again, by default, on every render (including the initial render), the effect won’t run until after React has updated the DOM and the browser has painted those updates to the view. The reason for this timing is so the side effect doesn’t block updates to the UI.
If we were to step through this sequence of state changes and re-renders in our Counter app, it would look like this.
Initial Render
  count: 0
  Effect (run after render):
    () => document.title = `Count: 0`
  Description of UI: ➖ 0 ➕

  React: Updates the DOM
  Browser: Re-paints with DOM updates
  React invokes Effect:
    () => document.title = `Count: 0`


User clicks ➕ Button
  React increments "count" by 1, causing a re-render


Next Render
  count: 1
  Effect (run after render):
    () => document.title = `Count: 1`
  Description of UI: ➖ 1 ➕

  React: Updates the DOM
  Browser: Re-paints with DOM updates
  React invokes Effect:
    () => document.title = `Count: 1`


User clicks ➖ Button
  React decrements "count" by 1, causing a re-render


Next Render
  count: 0
  Effect (run after render):
    () => document.title = `Count: 0`
  Description of UI: ➖ 0 ➕

  React: Updates the DOM
  Browser: Re-paints with DOM updates
  React invokes Effect:
    () => document.title = `Count: 0`
At this point, we’ve learned both how to add side effects to our React components and when they run, after every render. Knowing what you know now, how would you approach making an API request in your function component? For example, say you were given this getGithubProfile function which fetched profile data from the Github API.
function getGithubProfile (username) {
  return fetch(`https://api.github.com/users/${username}`)
    .then((res) => res.json())
}
How would you implement a Profile component which was responsible for displaying information about a Github user’s profile information?
Here’s a codesandbox where you can attempt it for yourself. Don’t just scroll down and go to the solution! Get your hands dirty.
.
.
.
.
.
.
Here’s the approach you probably took. First, since the whole purpose of our component is to display profile information about a user, we’ll want to have a piece of state that represents that user’s profile. We can use the useState Hook for that.
function Profile () {
  const [profile, setProfile] = React.useState(null)
}
Next, we know that making a network request is a side effect. To manage our side effect, we’ll put it inside of React’s useEffect Hook. To keep things simple for now, we’ll hardcode tylermcginnis as our Github username. While we’re here, we’ll also give our component some (basic) UI.
function Profile () {
  const [profile, setProfile] = React.useState(null)

  React.useEffect(() => {    getGithubProfile('tylermcginnis')      .then(setProfile)  })
  if (profile === null) {
    return <p>Loading...</p>
  }

  return (
    <React.Fragment>
      <h1>@{profile.login}</h1>
      <img
        src={profile.avatar_url}
        alt={`Avatar for ${profile.login}`}
      />
      <p>{profile.bio}</p>
    </React.Fragment>
  );
}
Looks pretty good, right? Unfortunately, no. Can you think of what’s wrong with the code above? Like we did earlier, let’s walk through the sequence of state changes and re-renders in our Profile component to figure out where we went wrong.
Initial Render
  profile: null
  Effect (run after render):
    () => getGithubProfile('tylermcginnis').then(setProfile)
  Description of UI: Loading...

  React: Updates the DOM
  Browser: Re-paints with DOM updates
  React invokes Effect:
    () => getGithubProfile('tylermcginnis').then(setProfile)


setProfile was invoked
  React updates "profile", causing a re-render


Next Render
  profile: {login: 'tylermcginnis', name: 'Tyler McGinnis'}...
  Effect (run after render):
    () => getGithubProfile('tylermcginnis').then(setProfile)
  Description of UI: <h1>@tylermcginnis</h1>...

  React: Updates the DOM
  Browser: Re-paints with DOM updates
  React invokes Effect:
    () => getGithubProfile('tylermcginnis').then(setProfile)


setProfile was invoked
  React updates "profile", causing a re-render


Repeat previous render


setProfile was invoked
  React updates "profile", causing a re-render


Repeat previous render


setProfile was invoked
  React updates "profile", causing a re-render


♾🧨♾💥♾🧨♾💥♾🧨♾💥♾🧨♾💥♾
Did you spot the issue? We quickly get caught in an infinite loop (and just as quickly, get rate limited by the Github API). Our component gets rendered then invokes our effect, which updates our state, which triggers a re-render, which then invokes our effect, which updates our state, which triggers a re-render, and on and on.
What we need is a way to opt out of useEffect 's default functionality of being re-invoked on every re-render. In our example, since we hardcoded the username to be tylermcginnis , we only want to invoke the effect once on the initial render, not on every subsequent re-render. Luckily for us, useEffect exposes a way to customize this via its second argument.
Skipping side effects
If you pass a second argument to useEffect , you need to pass to it an array of all of the outside values your effect depends on. A byproduct of that is, given an array of values, React can infer when to re-invoke the effect based on if any of those values change between renders. This typically leads us to one of three scenarios - no second argument, an array of all outside values the effect depends on, or an empty array (assuming your effect doesn’t depend on any values).
React.useEffect(() => {
  // Will be invoked on the initial render
  // and all subsequent re-renders.
})
React.useEffect(() => {
  // Will be invoked on the initial render
  // and when "id" or "authed" changes.
}, [id, authed])
React.useEffect(() => {
  // Will only be invoked on the initial render
}, [])
We’ll dive deeper into effectively managing useEffect 's second array argument later in this course.
Now, knowing what we know about skipping effects, how can we update our Profile component from earlier so we don’t get trapped in an infinite loop?
Previously, we mentioned that “we only want to invoke the effect once on the initial render, not on every subsequent re-render.” Along with that, since we hardcoded the username to be tylermcginnis , our effect isn’t dependant on any outside values. This means we can safely pass an empty array as the second argument so our effect will only be invoked on the initial render.
function Profile () {
  const [profile, setProfile] = React.useState(null)

  React.useEffect(() => {
    getGithubProfile('tylermcginnis')
      .then(setProfile)
  }, [])
  if (profile === null) {
    return <p>Loading...</p>
  }

  return (
    <React.Fragment>
      <h1>@{profile.login}</h1>
      <img
        src={profile.avatar_url}
        alt={`Avatar for ${profile.login}`}
      />
      <p>{profile.bio}</p>
    </React.Fragment>
  );
}
Now our code is perfect, assuming we only ever want to fetch the tylermcginnis profile. Sadly, that’s now how writing real software works.
Instead of always fetching the profile for tylermcginnis , we probably want our Profile component to take in a dynamic username prop. That way, we let the consumer of our Profile component decide which profile to show.
function Profile({ username }) {

}
Now the only other changes we need to make are related to our useEffect Hook. As a reminder, here’s what we currently have.
React.useEffect(() => {
  getGithubProfile('tylermcginnis')
    .then(setProfile)
}, [])
First, we want to swap out our hardcoded tylermcginnis string with our dynamic username prop.
  React.useEffect(() => {
    getGithubProfile(username)      .then(setProfile)
  }, [])
By adding username inside of our effect, we’ve introduced an outside value that it depends on. This means we can no longer use an empty array as our second argument. Our options are either get rid of the array (which will bring back our infinite loop problem) or update the dependency array with what the effect depends on, username . Naturally, we’ll do the later. That brings the final code for our Profile component to this.
function Profile({ username }) {  const [profile, setProfile] = React.useState(null)

  React.useEffect(() => {
    getGithubProfile(username)      .then(setProfile)
  }, [username])
  if (profile === null) {
    return <p>Loading...</p>
  }

  return (
    <React.Fragment>
      <h1>@{profile.login}</h1>
      <img
        src={profile.avatar_url}
        alt={`Avatar for ${profile.login}`}
      />
      <p>{profile.bio}</p>
    </React.Fragment>
  );
}
Now, anytime username changes (and only when username changes), once the component re-renders and the browser re-paints the view, our effect will be invoked and the profile state will be synchronized with the result of our API request.
At this point, we’ve learned how, using the useEffect Hook, we can add side effects to our React components. We’ve also learned how, using the second argument to useEffect , we can skip re-invoking an effect if none of the values it depends on changes. The last scenario we need to cover is a side effect that requires a clean-up phase, like a subscription-based API or a timer.
Cleaning up side effects
Let’s imagine we’re dealing with the same Github API as we saw earlier, but this time it’s WebSocket based. Instead of making a single network request to get our data, we set up a listener to be notified whenever the data changes. In this scenario, we can’t just set it and forget it. We need to make sure that we clean up our subscription whenever the component is removed from the DOM or when we no longer want to receive updates from the API. If not, we’ll have a memory leak.
This brings us to the last part of the useEffect API we haven’t explored yet, the cleanup function. If you return a function from useEffect , React will make sure that function is invoked right before the component is removed from the DOM. Additionally, if your component is re-rendered, the cleanup function for the previous render’s effect will be invoked before re-invoking the new effect.
React.useEffect(() => {

  return () => {
    // invoked right before invoking
    // the new effect on a re-render AND
    // right before removing the component
    // from the DOM
  }
})
Here’s an example of what this might look like if we had an API that exposed two methods, subscribe and unsubscribe .
import { subscribe, unsubscribe } from './api'

function Profile ({ username }) {
  const [profile, setProfile] = React.useState(null)

  React.useEffect(() => {
    subscribe(username, setProfile)

    return () => {      unsubscribe(username)      setProfile(null)    }  }, [username])

  if (profile === null) {
    return <p>Loading...</p>
  }

  return (
    <React.Fragment>
      <h1>@{profile.login}</h1>
      <img
        src={profile.avatar_url}
        alt={`Avatar for ${profile.login}`}
      />
      <p>{profile.bio}</p>
    </React.Fragment>
  );
}
In this example, there are two scenarios where the cleanup function would be invoked. First, whenever username changes, before the new effect is invoked with the new username . And second, right before Profile is removed from the DOM. In both scenarios, we want to unsubscribe from our API as well as reset profile to null so we get the Loading... UI.
As we’ve done a few times now, it’s helpful to walk through the process of state changes and re-renders. This time especially so we can see exactly when the cleanup function will be invoked compared to our effect and re-renders.
So we can better see this process, let’s assume our Profile component is rendered initially with the username tylermcginnis , then a user event triggers a re-render with the username sdras .
Initial Render
  username prop: 'tylermcginnis'
  profile: null
  Effect:
    () => subscribe('tylermcginnis', setProfile)
  Cleanup:
    () => unsubscribe('tylermcginnis')
  Description of UI: Loading...

  React: Updates the DOM
  Browser: Re-paints with DOM updates
  React invokes Effect:
    () => subscribe('tylermcginnis', setProfile)


setProfile was invoked
  React updates 'profile', causing a re-render


Next Render
  username prop: 'tylermcginnis'
  profile: {login: 'tylermcginnis', name: 'Tyler McGinnis'}...
  Effect:
    () => subscribe('tylermcginnis', setProfile)
  Cleanup:
    () => unsubscribe('tylermcginnis')
  Description of UI: <h1>@tylermcginnis</h1>...

  React: Updates the DOM
  Browser: Re-paints with DOM updates
  Effect: Skipped since 'username' didn't change.


User event changes 'username' to 'sdras'


Next Render
  username prop: 'sdras'
  profile: {login: 'tylermcginnis', name: 'Tyler McGinnis'}...
  Effect:
    () => subscribe('sdras', setProfile)
  Cleanup:
    () => unsubscribe('sdras')
  Description of UI: <h1>@tylermcginnis</h1>...

  React: Updates the DOM  Browser: Re-paints with DOM updates  React invokes previous render's cleanup:    () => unsubscribe('tylermcginnis')  React invokes Effect:     () => subscribe('sdras', setProfile)

setProfile was invoked
  React updates "profile", causing a re-render


Next Render
  username prop: 'sdrsa'
  profile: {login: 'sdrsa', name: 'Sarah Drasner'}...
  Effect:
    () => subscribe('sdrsa', setProfile)
  Cleanup:
    () => unsubscribe('sdras')
  Description of UI: <h1>@sdrsa</h1>...

  React: Updates the DOM
  Browser: Re-paints with DOM updates
  Effect: Skipped since 'username' didn't change.
To me, the most interesting part of that flow is how React prioritizes UI updates before worrying about any of the effects. When username changes to sdras , React has to invoke the old cleanup for tylermcginnis , then invoke the new effect for sdras . However, before it does any of that, React updates the DOM and the browser repaints with the new UI.
If you haven’t already, I highly recommend playing around with the code from this example and trying to guess what order the
console.logs will be executed.
useEffect vs Lifecycle Events
You may have noticed that up until this point, I’ve been deliberate about not making comparisons between useEffect and the traditional component lifecycle methods ( componentDidMount , componentDidUpdate , componentWillUnmount ). There are a few reasons for that. First, it creates an unnecessary pre-requisite for someone new to React. As we’ve seen, you don’t need to know anything about the traditional lifecycle methods to understand useEffect . Second, they’re two fundamentally different mental models. By comparing them upfront you send a signal, often unintentionally, that useEffect is just a new way of adding lifecycle events to our function components. As you’ve seen by now, this couldn’t be further from the truth.
(Practice) Character Limit
Refer to the instructions in the code.
(Solution) Character Limit
(Practice) Wait Delay
Refer to the instructions in the code.
(Solution) Wait Delay
(Practice) API Requests
Refer to the instructions in the code.
(Solution) API Requests
Rules of Hooks
At this point, we’ve seen how Hooks allow us to add state and side effects to our function components. However, there is one rule you have to follow when using Hooks and it has to do with where Hooks can be called.
Only call Hooks from the top-level of a function component or a custom Hook.
You can’t call them anywhere else. That means you can’t call them from a normal function, you can’t call them from a class component, and you can’t call them anywhere that’s not on the top level like inside of a loop, if statement, or event handler.
function Counter () {
  // 👍 from the top level function component
  const [count, setCount] = React.useState(0)

  if (count % 2 === 0) {
    // 👎 not from the top level
    React.useEffect(() => {})
  }

  const handleIncrement = () => {
    setCount((c) => c + 1)

    // 👎 not from the top level
    React.useEffect(() => {})
  }

  ...
}
function useAuthed () {
  // 👍 from the top level of a custom Hook
  const [authed, setAuthed] = React.useState(false)
}
class Counter extends React.Component {
  render () {
    // 👎 from inside a Class component
    const [count, setCount] = React.useState(0)
  }
}
function getUser () {
  // 👎 from inside a normal function
  const [user, setUser] = React.useState(null)
}
The reason for this rule is because React relies on the call order of Hooks to keep track of internal state and references. If your Hooks aren’t called consistently in the same order across renders, React can’t do that.
(Bonus) Higher-order Components
There are two important things to note before we get started. First, what we’re going to talk about is just a pattern. It’s not even a React thing as much as it is a component architecture thing. Second, this isn’t required knowledge to build a React app. You could skip this post, never learn what we’re about to talk about, and still build fine React applications. However, just like building anything, the more tools you have available, the better the outcome will be. If you write React apps, you’d be doing yourself a disservice by not having this in your “toolbox”.
You can’t get very far into studying software development before you hear the (almost cultish) mantra of Don't Repeat Yourself or D.R.Y . Sometimes it can be taken a bit too far, but for the most part, it’s a worthwhile goal. In this post, we’re going to look at the most popular pattern for accomplishing DRY in a React codebase, Higher-Order Components. However before we can explore the solution, we must first fully understand the problem.
Let’s say we were in charge of recreating a dashboard similar to Stripe’s. As most projects go, everything goes great until the very end. Just when you think you’re about to be done, you notice that the dashboard has a bunch of different tooltips that need to appear when certain elements are hovered over.
There are a few ways to approach this. The one you decide to go with is to detect the hover state of the individual components and from that state, show or not show the tooltip. There are three components you need to add this hover detection functionality to - Info , TrendChart and DailyChart .
Let’s start with Info . Right now it’s just a simple SVG icon.
class Info extends React.Component {
  render() {
    return (
      <svg
        className="Icon-svg Icon--hoverable-svg"
        height={this.props.height}
        viewBox="0 0 16 16" width="16">
          <path d="M9 8a1 1 0 0 0-1-1H5.5a1 1 0 1 0 0 2H7v4a1 1 0 0 0 2 0zM4 0h8a4 4 0 0 1 4 4v8a4 4 0 0 1-4 4H4a4 4 0 0 1-4-4V4a4 4 0 0 1 4-4zm4 5.5a1.5 1.5 0 1 0 0-3 1.5 1.5 0 0 0 0 3z" />
      </svg>
    )
  }
}
Now we need to add functionality to it so it can detect whether it’s being hovered over or not. We can use the onMouseOver and onMouseOut mouse events that come with React. The function we pass to onMouseOver will be invoked when the component is hovered over and the function we pass to onMouseOut will be invoked when the component is no longer being hovered over. To do this the React way, we’ll add a hovering state property to our component so that we can cause a re-render when the hovering state changes, showing or hiding our tooltip.
class Info extends React.Component {
  constructor(super) {
    super(props)

    this.state = {
      hovering: false
    }

    this.mouseOver = this.mouseOver.bind(this)
    this.mouseOut = this.mouseOut.bind(this)
  }
  mouseOver() {
    this.setState({hovering: true})
  }
  mouseOut() {
    this.setState({hovering: false})
  }
  render() {
    return (
      <>
        {this.state.hovering === true
          ? <Tooltip id={this.props.id} />
          : null}
        <svg
          onMouseOver={this.mouseOver}
          onMouseOut={this.mouseOut}
          className="Icon-svg Icon--hoverable-svg"
          height={this.props.height}
          viewBox="0 0 16 16" width="16">
            <path d="M9 8a1 1 0 0 0-1-1H5.5a1 1 0 1 0 0 2H7v4a1 1 0 0 0 2 0zM4 0h8a4 4 0 0 1 4 4v8a4 4 0 0 1-4 4H4a4 4 0 0 1-4-4V4a4 4 0 0 1 4-4zm4 5.5a1.5 1.5 0 1 0 0-3 1.5 1.5 0 0 0 0 3z" />
        </svg>
      </>
    )
  }
}
Now we need to add the same functionality to our other two components, TrendChart and DailyChart . If it’s not broke, don’t fix it. Our hover logic for Info worked great so let’s use that same code again.
class TrendChart extends React.Component {
  constructor(super) {
    super(props)

    this.state = {
      hovering: false
    }

    this.mouseOver = this.mouseOver.bind(this)
    this.mouseOut = this.mouseOut.bind(this)
  }
  mouseOver() {
    this.setState({hovering: true})
  }
  mouseOut() {
    this.setState({hovering: false})
  }
  render() {
    return (
      <>
        {this.state.hovering === true
          ? <Tooltip id={this.props.id}/>
          : null}
        <Chart
          type='trend'
          onMouseOver={this.mouseOver}
          onMouseOut={this.mouseOut}
        />
      </>
    )
  }
}
You probably know the next step. We can do the same thing for our final DailyChart component.
class DailyChart extends React.Component {
  constructor(super) {
    super(props)

    this.state = {
      hovering: false
    }

    this.mouseOver = this.mouseOver.bind(this)
    this.mouseOut = this.mouseOut.bind(this)
  }
  mouseOver() {
    this.setState({hovering: true})
  }
  mouseOut() {
    this.setState({hovering: false})
  }
  render() {
    return (
      <>
        {this.state.hovering === true
          ? <Tooltip id={this.props.id}/>
          : null}
        <Chart
          type='daily'
          onMouseOver={this.mouseOver}
          onMouseOut={this.mouseOut}
        />
      </>
    )
  }
}
And with that, we’re all finished. You may have written React like this before. It’s not the end of the world (#shipit), but it’s not very “DRY”. As you saw, we’re repeating the exact same hover logic in every one of our components.
At this point, the problem should be pretty clear, we want to avoid duplicating our hover logic anytime a new component needs it . So what’s the solution ? Well before we get to that, let’s talk about a few programming concepts that’ll make the step to understanding the solution much easier, callbacks and higher-order functions .
In JavaScript, functions are “first-class objects”. What that means is that just like objects/arrays/strings can be assigned to a variable, passed as an argument to a function, or returned from a function, so too can other functions.
function add (x, y) {
  return x + y
}

function addFive (x, addReference) {
  return addReference(x, 5)
}

addFive(10, add) // 15
Your brain might have got a little weird on this one if you’re not used to it. We pass the add function as an argument to the addFive function, rename it addReference , and then we invoke it.
When you do this, the function you’re passing as an argument is called a callback function and the function you’re passing the callback function to is called a higher-order function .
Because vocabulary is important, here’s the same code with the variables re-named to match the concepts they’re demonstrating.
function add (x,y) {
  return x + y
}

function higherOrderFunction (x, callback) {
  return callback(x, 5)
}

higherOrderFunction(10, add)
This pattern should look familiar; it’s everywhere. If you’ve ever used any of the JavaScript Array methods, jQuery, or a library like lodash, you’ve used both higher-order functions and callbacks.
[1,2,3].map((i) => i + 5)

_.filter([1,2,3,4], (n) => n % 2 === 0 );

$('#btn').on('click', () =>
  console.log('Callbacks are everywhere')
)
Let’s go back to our example. What if instead of just creating an addFive function, we also wanted an addTen function, addTwenty function, etc. With our current implementation, we’d have to duplicate a lot of our logic whenever we needed a new function.
function add (x, y) {
  return x + y
}

function addFive (x, addReference) {  return addReference(x, 5)}
function addTen (x, addReference) {  return addReference(x, 10)}
function addTwenty (x, addReference) {  return addReference(x, 20)}
addFive(10, add) // 15
addTen(10, add) // 20
addTwenty(10, add) // 30
Again, this isn’t terrible, but we’re repeating a lot of the same logic. The goal here is to be able to create as many “adder” functions ( addFive , addTen , addTwenty , etc) as we need while minimizing code duplication. To accomplish this, what if we create a makeAdder function? This function can take in a number and a reference to the original add function. Because the goal of this function is to make a new adder function, we can have it return a brand new function that accepts the number to add. That was a lot of words. Let’s see some code.
function add (x, y) {
  return x + y
}

function makeAdder (x, addReference) {
  return function (y) {
    return addReference(x, y)
  }
}

const addFive = makeAdder(5, add)
const addTen = makeAdder(10, add)
const addTwenty = makeAdder(20, add)

addFive(10) // 15
addTen(10) // 20
addTwenty(10) // 30
Cool. Now we can make as many “adder” functions as we need while minimizing the duplicate code we have to write.
If you care, this concept of having a function with multiple parameters return a new function with fewer parameters is called “Partial Application” and it’s a functional programming technique. JavaScript’s “.bind” method is a common example of this.
Alright, but what does this have to do with React and the problem we saw earlier of duplicating our hover logic anytime a new component needs it? Well just as creating our makeAdder higher-order function allowed us to minimize code duplication, so too can making a similar “higher-order component” help us in the same way. However, instead of the higher-order function returning a new function that invokes the callback, the higher-order component can return a new component that renders the “callback” component  . That was a lot. Let’s break it down.
(Our) Higher-Order Function
- Is a function
- Takes in a callback function as an argument
- Returns a new function
- The function it returns can invoke the original callback function that was passed in
function higherOrderFunction (callback) {
  return function () {
    return callback()
  }
}
(Our) Higher-Order Component
- Is a component
- Takes in a component as an argument
- Returns a new component
- The component it returns can render the original component that was passed in
function higherOrderComponent (Component) {
  return class extends React.Component {
    render() {
      return <Component />
    }
  }
}
So now that we have the basic idea of what a higher-order component does, let’s start building ours out. If you’ll remember, the problem earlier was that we were duplicating all of our hover logic amongst all of the component that needed that functionality.
constructor(super) {
  super(props)

  this.state = {
    hovering: false
  }

  this.mouseOver = this.mouseOver.bind(this)
  this.mouseOut = this.mouseOut.bind(this)
}
mouseOver() {
  this.setState({hovering: true})
}
mouseOut() {
  this.setState({hovering: false})
}
With that in mind, we want our higher-order component (which we’ll call withHover ) to be able to encapsulate that hover logic in itself and then pass the hovering state to the component that it renders. That will allow us to prevent duplicating all the hover logic and instead, put it into a single location ( withHover ).
Ultimately, here’s the end goal. Whenever we want a component that is aware of it’s hovering state, we can pass the original component to our withHover higher-order component.
const InfoWithHover = withHover(Info)
const TrendChartWithHover = withHover(TrendChart)
const DailyChartWithHover = withHover(DailyChart)
Then, whenever any of the components that withHover returns are rendered, they’ll render the original component, passing it a hovering prop.
function Info ({ hovering, height }) {
  return (
    <>
      {hovering === true
        ? <Tooltip id={this.props.id} />
        : null}
      <svg
        className="Icon-svg Icon--hoverable-svg"
        height={height}
        viewBox="0 0 16 16" width="16">
          <path d="M9 8a1 1 0 0 0-1-1H5.5a1 1 0 1 0 0 2H7v4a1 1 0 0 0 2 0zM4 0h8a4 4 0 0 1 4 4v8a4 4 0 0 1-4 4H4a4 4 0 0 1-4-4V4a4 4 0 0 1 4-4zm4 5.5a1.5 1.5 0 1 0 0-3 1.5 1.5 0 0 0 0 3z" />
      </svg>
    </>
  )
}
Now the last thing we need to do is actually implement withHover . As we saw above, it needs to do three things.
- Take in a “Component” argument.
- Return a new component
- Render the “Component” argument passing it a “hovering” prop.
Take in a “Component” argument.
function withHover (Component) {

}
Return a new component
function withHover (Component) {
  return class WithHover extends React.Component {

  }
}
Render the “Component” argument passing it a “hovering” prop.
Now the question becomes, how do we get the hovering state? Well, we already have the code for that that we build earlier. We just need to add it to the new component and then pass the hovering state as a prop when we render the argument Component .
function withHover(Component) {
  return class WithHover extends React.Component {
    constructor(super) {
      super(props)

      this.state = {
        hovering: false
      }

      this.mouseOver = this.mouseOver.bind(this)
      this.mouseOut = this.mouseOut.bind(this)
    }
    mouseOver() {
      this.setState({hovering: true})
    }
    mouseOut() {
      this.setState({hovering: false})
    }
    render() {
      return (
        <div onMouseOver={this.mouseOver} onMouseOut={this.mouseOut}>
          <Component hovering={this.state.hovering} />
        </div>
      );
    }
  }
}
The way I like to think about it (and how it’s mentioned in the React docs) is a component transforms props into UI, a higher-order component transforms a component into another component. In our case, we’re transforming our Info , TrendChart , and DailyChart components into new components which are aware of their hover state via a hovering prop.
At this point, we’ve covered all of the fundamentals of Higher-Order Components. There are still a few more important items to discuss though.
If you look back at our withHover HOC, one weakness it has is it assumes that the consumer of it is fine with receiving a prop named hovering . For the most part this is probably fine but there are certain use cases where it wouldn’t be. For example, what if the component already had a prop named hovering ? We’d have a naming collision. One change we can make is to allow the consumer of our withHover HOC to specify what they want the name of the hovering state to be when it’s passed to their component as a prop. Because withHover is just a function, let’s change it up to accept a second argument which specifies the name of the prop that we’ll pass to the component.
function withHover(Component, propName = 'hovering') {  return class WithHover extends React.Component {
    constructor(super) {
      super(props)

      this.state = {
        hovering: false      }      this.mouseOver = this.mouseOver.bind(this)
      this.mouseOut = this.mouseOut.bind(this)
    }
    mouseOver() {      this.setState({hovering: true})
    }
    mouseOut() {
      this.setState({hovering: false})
    }
    render() {
      const props = {
        [propName]: this.state.hovering
      }

      return (
        <div onMouseOver={this.mouseOver} onMouseOut={this.mouseOut}>
          <Component {...props} />
        </div>
      );
    }
  }
}
Now we’ve set the default prop name to hovering (via ES6’s default parameters), but if the consumer of withHover wants to change that, they can by passing in the new prop name as the second argument.
function withHover(Component, propName = 'hovering') {
  return class WithHover extends React.Component {
    constructor(super) {
      super(props)

      this.state = {
        hovering: false
      }

      this.mouseOver = this.mouseOver.bind(this)
      this.mouseOut = this.mouseOut.bind(this)
    }
    mouseOver() {
      this.setState({hovering: true})
    }
    mouseOut() {
      this.setState({hovering: false})
    }
    render() {
      const props = {        [propName]: this.state.hovering
      }
      return (
        <div onMouseOver={this.mouseOver} onMouseOut={this.mouseOut}>
          <Component {...props} />
        </div>
      );
    }
  }
}

function Info ({ showTooltip, height }) {
  return (
    <>
      {showTooltip === true        ? <Tooltip id={this.props.id} />
        : null}
      <svg
        className="Icon-svg Icon--hoverable-svg"
        height={height}
        viewBox="0 0 16 16" width="16">
          <path d="M9 8a1 1 0 0 0-1-1H5.5a1 1 0 1 0 0 2H7v4a1 1 0 0 0 2 0zM4 0h8a4 4 0 0 1 4 4v8a4 4 0 0 1-4 4H4a4 4 0 0 1-4-4V4a4 4 0 0 1 4-4zm4 5.5a1.5 1.5 0 1 0 0-3 1.5 1.5 0 0 0 0 3z" />
      </svg>
    </>
  )
}

const InfoWithHover = withHover(Info, 'showTooltip')
You may have noticed another problem with our withHover implementation as well. Looking at our Info component, you’ll notice that it should also take in a height property. With the current way we’ve set it up, height is going to be undefined. The reason for that is because our withHover component is the one rendering the Component . Currently, how we’ve set it up, we’re not passing any props to <Component /> besides the hovering prop that we created.
const InfoWithHover = withHover(Info)

...

return <InfoWithHover height="16px" />
The height prop gets passed to the InfoWithHover component. But what exactly is that component? It’s the component that we’re returning from withHover .
function withHover(Component, propName = 'hovering') {
  return class WithHover extends React.Component {    constructor(super) {      super(props)      this.state = {        hovering: false      }      this.mouseOver = this.mouseOver.bind(this)      this.mouseOut = this.mouseOut.bind(this)    }    mouseOver() {      this.setState({hovering: true})    }    mouseOut() {      this.setState({hovering: false})    }    render() {      console.log(this.props) // { height: "16px" }

      const props = {
        [propName]: this.state.hovering
      }

      return (
        <div onMouseOver={this.mouseOver} onMouseOut={this.mouseOut}>
          <Component {...props} />
        </div>
      );
    }
  }
}
Inside of the WithHover component this.props.height is 16px but from there we don’t do anything with it. We need to make sure that we pass that through to the Component argument that we’re rendering.
    render() {
      const props = {
        [propName]: this.state.hovering,
        ...this.props,      }

      return (
        <div onMouseOver={this.mouseOver} onMouseOut={this.mouseOut}>
          <Component {...props} />
        </div>
      );
    }
At this point, we’ve seen the benefits of using Higher-Order Components to reuse component logic amongst various components without duplicating code. But, does it have any pitfalls? It does, and we’ve already seen it.
When using a HOC, there’s an inversion of control happening. Imagine we were using a third part HOC like React Router’s withRouter HOC. According to their docs, " withRouter will pass match , location , and history props to the wrapped component whenever it renders."
class Game extends React.Component {
  render() {
    const { match, location, history } = this.props // From React Router

    ...
  }
}

export default withRouter(Game)
Notice we’re not the ones creating the Game element (i.e. <Game /> ). We’re handing over our component entirely to React Router and we’re trusting them to not only render it but also pass it the correct props. We saw this problem earlier when we talked about naming collisions with hovering . To fix that we decided to let the consumer of our withHover HOC pass in a second argument to configure what the prop name was going to be. With the 3rd party withRouter HOC, we don’t have that option. If our Game component is already using match , location , or history , we’re out of luck. We’d either have to modify those names in our component or we’d have to stop using the withRouter HOC.