(Bonus) React Render Props
There are two important things to note before we get started. First, what we’re going to talk about is just a pattern. It’s not even a React thing as much as it is a component architecture thing. Second, this isn’t required knowledge to build a React app. You could skip this post, never learn what we’re about to talk about, and still build fine React applications. However, just like building anything, the more tools you have available the better the outcome will be. If you write React apps, you’d be doing yourself a disservice by not having this in your “toolbox”.
You can’t get very far into studying software development before you hear the (almost cultish) mantra of Don't Repeat Yourself or D.R.Y . Sometimes it can be taken a bit too far, but for the most part, it’s a worthwhile goal. In this post, we’re going to look at the most popular pattern for accomplishing DRY in a React codebase, Higher-Order Components. However before we can explore the solution, we must first fully understand the problem.
Let’s say we were in charge of recreating a dashboard similar to Stripe’s. As most projects go, everything goes great until the very end. Just when you think you’re about to be done, you notice that the dashboard has a bunch of different tooltips that need to appear when certain elements are hovered over.
There are a few ways to approach this. The one you decide to go with is to detect the hover state of the individual components and from that state, show or not show the tooltip. There are three components you need to add this hover detection functionality to - Info , TrendChart and DailyChart .
Let’s start with Info . Right now it’s just a simple SVG icon.
class Info extends React.Component {
  render() {
    return (
      <svg
        className="Icon-svg Icon--hoverable-svg"
        height={this.props.height}
        viewBox="0 0 16 16" width="16">
          <path d="M9 8a1 1 0 0 0-1-1H5.5a1 1 0 1 0 0 2H7v4a1 1 0 0 0 2 0zM4 0h8a4 4 0 0 1 4 4v8a4 4 0 0 1-4 4H4a4 4 0 0 1-4-4V4a4 4 0 0 1 4-4zm4 5.5a1.5 1.5 0 1 0 0-3 1.5 1.5 0 0 0 0 3z" />
      </svg>
    )
  }
}
Now we need to add functionality to it so it can detect whether it’s being hovered over or not. We can use the onMouseOver and onMouseOut mouse events that come with React. The function we pass to onMouseOver will be invoked when the component is hovered over and the function we pass to onMouseOut will be invoked when the component is no longer being hovered over. To do this the React way, we’ll add a hovering state property to our component so that we can cause a re-render when the hovering state changes, showing or hiding our tooltip.
class Info extends React.Component {
  constructor(super) {
    super(props)

    this.state = {
      hovering: false
    }

    this.mouseOver = this.mouseOver.bind(this)
    this.mouseOut = this.mouseOut.bind(this)
  }
  mouseOver() {
    this.setState({hovering: true})
  }
  mouseOut() {
    this.setState({hovering: false})
  }
  render() {
    return (
      <>
        {this.state.hovering === true
          ? <Tooltip id={this.props.id} />
          : null}
        <svg
          onMouseOver={this.mouseOver}
          onMouseOut={this.mouseOut}
          className="Icon-svg Icon--hoverable-svg"
          height={this.props.height}
          viewBox="0 0 16 16" width="16">
            <path d="M9 8a1 1 0 0 0-1-1H5.5a1 1 0 1 0 0 2H7v4a1 1 0 0 0 2 0zM4 0h8a4 4 0 0 1 4 4v8a4 4 0 0 1-4 4H4a4 4 0 0 1-4-4V4a4 4 0 0 1 4-4zm4 5.5a1.5 1.5 0 1 0 0-3 1.5 1.5 0 0 0 0 3z" />
        </svg>
      </>
    )
  }
}
Now we need to add the same functionality to our other two components, TrendChart and DailyChart . If it’s not broke, don’t fix it. Our hover logic for Info worked great so let’s use that same code again.
class TrendChart extends React.Component {
  constructor(super) {
    super(props)

    this.state = {
      hovering: false
    }

    this.mouseOver = this.mouseOver.bind(this)
    this.mouseOut = this.mouseOut.bind(this)
  }
  mouseOver() {
    this.setState({hovering: true})
  }
  mouseOut() {
    this.setState({hovering: false})
  }
  render() {
    return (
      <>
        {this.state.hovering === true
          ? <Tooltip id={this.props.id}/>
          : null}
        <Chart
          type='trend'
          onMouseOver={this.mouseOver}
          onMouseOut={this.mouseOut}
        />
      </>
    )
  }
}
You probably know the next step. We can do the same thing for our final DailyChart component.
class DailyChart extends React.Component {
  constructor(super) {
    super(props)

    this.state = {
      hovering: false
    }

    this.mouseOver = this.mouseOver.bind(this)
    this.mouseOut = this.mouseOut.bind(this)
  }
  mouseOver() {
    this.setState({hovering: true})
  }
  mouseOut() {
    this.setState({hovering: false})
  }
  render() {
    return (
      <>
        {this.state.hovering === true
          ? <Tooltip id={this.props.id}/>
          : null}
        <Chart
          type='daily'
          onMouseOver={this.mouseOver}
          onMouseOut={this.mouseOut}
        />
      </>
    )
  }
}
And with that, we’re all finished. You may have written React like this before. It’s not the end of the world (#shipit), but it’s not very “DRY”. As you saw, we’re repeating the exact same hover logic in every one of our components.
At this point, the problem should be pretty clear, we want to avoid duplicating our hover logic anytime a new component needs it . So what’s the solution ? Well before we get to that, we need to get a refresh on two fundamental aspects of React. They are components which don’t render UI and passing functions as props.
No UI Components
In most cases whenever you build a React component, the end goal it to show some UI to the screen.
View = fn(state)
However, that doesn’t always need to be the case. It’s entirely reasonable to have components which act as “Wrapper” components. They’re responsible for handling some logic, but instead of rendering their own UI, they just render another component passing it data.
class Users extends React.Component {
  constructor(props) {
    super(props)

    this.state = {
      users: null
    }
  }
  componentDidMount() {
    getUsers()
      .then((users) => {
        this.setState({ users })
      })
  }
  render() {
    <Grid data={this.state.users} />
  }
}
In the example above, Users is responsible for getting the users, then passing them to the Grid component. It doesn’t have its own UI, instead, it uses the UI from the Grid component.
Passing functions as props
As you know, props are part of React’s component API that allow you to pass data into a component.
<User id='tylermcginnis' />
Then inside of the User component, the props object would have an id property referencing the string tylermcginnis .
function User (props) {
  const id = props.id // tylermcginnis
}
Now, what if instead of passing a string as a prop, we passed a function?
<User id={() => 'tylermcginnis'} />
Now the props object still has an id property, only now instead of being a string, it references a function. So in order to get the id, we need to invoke the function.
function User (props) {
  const id = props.id() // tylermcginnis
}
Now, what if we wanted to pass the function prop some data? Well, it’s just a function so we could do it just like we normally would by passing it an argument.
function User (props) {
  const id = props.id(true) // tylermcginnis
}

<User id={(isAuthed) => isAuthed === true ? 'tylermcginnis' : null} />
OK… but what do both of these have to do with the problem we saw earlier of duplicating our hover logic anytime a new component needs it? Well, we can combine both of these simple concepts in order to solve our problem.
First, we want to create a “Wrapper” component which is responsible for managing the hover state. We’ll call it, naturally, Hover and it’ll contain all the hover logic that we had to duplicate from earlier.
class Hover extends React.Component {
  constructor(super) {
    super(props)

    this.state = {
      hovering: false
    }

    this.mouseOver = this.mouseOver.bind(this)
    this.mouseOut = this.mouseOut.bind(this)
  }
  mouseOver() {
    this.setState({hovering: true})
  }
  mouseOut() {
    this.setState({hovering: false})
  }
  render() {
    return (
      <div onMouseOver={this.mouseOver} onMouseOut={this.mouseOut}>

      </div>
    )
  }
}
The next question becomes, what should Hover render? This is where are function prop knowledge comes into play. Let’s have Hover receive a prop called render . This render prop is going to be a function that we can pass the hovering state to and it will return some UI.
<Hover render={(hovering) =>
  <div>
    Is hovering? {hovering === true ? 'Yes' : 'No'}
  <div>
} />
Now the last change we need to make is in our Hover component. All we need to do is invoke this.props.render passing it this.state.hover .
class Hover extends React.Component {
  constructor(super) {
    super(props)

    this.state = {
      hovering: false
    }

    this.mouseOver = this.mouseOver.bind(this)
    this.mouseOut = this.mouseOut.bind(this)
  }
  mouseOver() {
    this.setState({hovering: true})
  }
  mouseOut() {
    this.setState({hovering: false})
  }
  render() {
    return (
      <div onMouseOver={this.mouseOver} onMouseOut={this.mouseOut}>
        {this.props.render(this.state.hovering)}
      </div>
    )
  }
}
Well, would you look at that? Now that we have our Hover component, any time we need a component to be aware of its hover state, we just wrap it inside of a Hover s render prop.
Finally, let’s head back to the original code we had and see how we no longer have to duplicate all the hover logic since we have our Hover component.
This is what we had before.
class Info extends React.Component {
  constructor(super) {
    super(props)

    this.state = {
      hovering: false
    }

    this.mouseOver = this.mouseOver.bind(this)
    this.mouseOut = this.mouseOut.bind(this)
  }
  mouseOver() {
    this.setState({hovering: true})
  }
  mouseOut() {
    this.setState({hovering: false})
  }
  render() {
    return (
      <>
        {this.state.hovering === true
          ? <Tooltip id={this.props.id} />
          : null}
        <svg
          onMouseOver={this.mouseOver}
          onMouseOut={this.mouseOut}
          className="Icon-svg Icon--hoverable-svg"
          height={this.props.height}
          viewBox="0 0 16 16" width="16">
            <path d="M9 8a1 1 0 0 0-1-1H5.5a1 1 0 1 0 0 2H7v4a1 1 0 0 0 2 0zM4 0h8a4 4 0 0 1 4 4v8a4 4 0 0 1-4 4H4a4 4 0 0 1-4-4V4a4 4 0 0 1 4-4zm4 5.5a1.5 1.5 0 1 0 0-3 1.5 1.5 0 0 0 0 3z" />
        </svg>
      </>
    )
  }
}

class TrendChart extends React.Component {
  constructor(super) {
    super(props)

    this.state = {
      hovering: false
    }

    this.mouseOver = this.mouseOver.bind(this)
    this.mouseOut = this.mouseOut.bind(this)
  }
  mouseOver() {
    this.setState({hovering: true})
  }
  mouseOut() {
    this.setState({hovering: false})
  }
  render() {
    return (
      <>
        {this.state.hovering === true
          ? <Tooltip id={this.props.id}/>
          : null}
        <Chart
          type='trend'
          onMouseOver={this.mouseOver}
          onMouseOut={this.mouseOut}
        />
      </>
    )
  }
}

class DailyChart extends React.Component {
  constructor(super) {
    super(props)

    this.state = {
      hovering: false
    }

    this.mouseOver = this.mouseOver.bind(this)
    this.mouseOut = this.mouseOut.bind(this)
  }
  mouseOver() {
    this.setState({hovering: true})
  }
  mouseOut() {
    this.setState({hovering: false})
  }
  render() {
    return (
      <>
        {this.state.hovering === true
          ? <Tooltip id={this.props.id}/>
          : null}
        <Chart
          type='daily'
          onMouseOver={this.mouseOver}
          onMouseOut={this.mouseOut}
        />
      </>
    )
  }
}

function App () {
  return (
    <>
      <Info />
      <TrendChart />
      <DailyChart />
    </>
  )
}
And now with our Hover component, instead of each component having to duplicate the hover logic, we can wrap each one inside of the render prop we pass to Hover and then pass down the hovering argument as a prop.
function Info (props) {
  return (
    <>
      {props.hovering === true
        ? <Tooltip id={this.props.id} />
        : null}
      <svg
        onMouseOver={this.mouseOver}
        onMouseOut={this.mouseOut}
        className="Icon-svg Icon--hoverable-svg"
        height={this.props.height}
        viewBox="0 0 16 16" width="16">
          <path d="M9 8a1 1 0 0 0-1-1H5.5a1 1 0 1 0 0 2H7v4a1 1 0 0 0 2 0zM4 0h8a4 4 0 0 1 4 4v8a4 4 0 0 1-4 4H4a4 4 0 0 1-4-4V4a4 4 0 0 1 4-4zm4 5.5a1.5 1.5 0 1 0 0-3 1.5 1.5 0 0 0 0 3z" />
      </svg>
    </>
  )
}

function TrendChart (props) {
  return (
    <>
      {props.hovering === true
        ? <Tooltip id={this.props.id}/>
        : null}
      <Chart
        type='trend'
        onMouseOver={this.mouseOver}
        onMouseOut={this.mouseOut}
      />
    </>
  )
}


function DailyChart (props) {
  return (
    <>
      {props.hovering === true
        ? <Tooltip id={this.props.id}/>
        : null}
      <Chart
        type='daily'
        onMouseOver={this.mouseOver}
        onMouseOut={this.mouseOut}
      />
    </>
  )
}

function App () {
  return (
    <>
      <Hover render={(hovering) =>
        <Info hovering={hovering}>
      } />

      <Hover render={(hovering) =>
        <TrendChart hovering={hovering}>
      } />

      <Hover render={(hovering) =>
        <DailyChart hovering={hovering}>
      } />
    </>
  )
}
This pattern, as you probably guessed by now, is called Render Props . Summarized in the React docs, “the term render prop refers to a technique for sharing code between React components using a prop whose value is a function”.
Another way to utilize the render props pattern is with React’s children prop. If you’ve never used props.children before, it’s just like any other prop. However, instead of you passing it explicitly to the component, React automatically does it for you and it references whatever between the opening and closing tags of the component.
function User (props) {
  return (
    <div>
      {props.children}
    </div>
  )
}

<User>
  This is props.children
</User>
In the example above, what’s going to get rendered to the UI is a div with the words This is props.children inside of it.
Now what if instead of having props.children be a string, it was a function? Just as we saw earlier, we’d need to invoke it to get the value.
function User (props) {
  return (
    <div>
      {props.children()}    </div>
  )
}

<User>
  {() => This is props.children}</User>
With our newly formed knowledge of props.children , let’s update our examples from earlier. Now instead of Hover having a render prop, let’s get rid of that all together and use props.children instead.
function App () {
  return (
    <>
      <Hover>
        {(hovering) => <Info hovering={hovering}>}
      </Hover>

      <Hover>
        {(hovering) => <TrendChart hovering={hovering}>}
      </Hover>

      <Hover>
        {(hovering) => <DailyChart hovering={hovering}>}
      </Hover>
    </>
  )
}
Now we need to update Hover so instead of invoking this.props.render , it invokes this.props.children .
class Hover extends React.Component {
  constructor(super) {
    super(props)

    this.state = {
      hovering: false
    }
    this.mouseOver = this.mouseOver.bind(this)
    this.mouseOut = this.mouseOut.bind(this)
  }
  mouseOver() {
    this.setState({hovering: true})
  }
  mouseOut() {
    this.setState({hovering: false})
  }
  render() {
    return (
      <div onMouseOver={this.mouseOver} onMouseOut={this.mouseOut}>
        {this.props.children(this.state.hovering)}
      </div>
    )
  }
}
Nice. Is this better? Not really, it’s just different. I prefer it, but there’s nothing objectively better about it.
If you read our post about Higher Order Components, you’ll be familiar with how HOCs have some pitfalls. The biggest one was with inversion of control and naming collisions. Because you have to pass your component over to the Higher-Order component, you have no control over how it’s rendered. We looked at an example with React Router’s withRouter HOC. withRouter will pass match , location , and history props to the wrapped component whenever it renders.
class Game extends React.Component {
  render() {
    const { match, location, history } = this.props // From React Router

    ...
  }
}

export default withRouter(Game)
If our Game component is already receiving match , location , or history as a prop, we’re going to have a naming collision and it’s going to be a hard bug to track down.
Does this same pitfall occur with Render Props? Nope. Instead of handing over the component, we hand over a function. Then, when that function is invoked, it’ll be passed the data we need — no inversion of control and no naming collisions since we can decide how the component is rendered.
<Hover>
  {(hovering) => {
    // We can do whatever we want here.
    // We decide how and when to render the component
    return <Info anyNameWeWant={hovering} />
  }}
</Hover>
Now the big question is, should you use Render Props or Higher Order Components? Well, that’s up to you. You now know how to use them both which means you have enough information to make an informed decision for yourself.
Creating Custom Hooks
When you think about composition in React, odds are you think in terms of UI composition. This is natural since it’s what React is so good at.
view = fn(state)
Realistically, there’s more to building an app than just the UI layer. It’s not uncommon to need to compose and reuse non-visual logic. However, historically because React couples UI to a component, it’s never had a great answer for this.
To demonstrate this, let’s say we were in charge of recreating a dashboard similar to Stripe’s. As most projects go, everything goes great until the very end. Just when you think you’re about to be done, you notice that the dashboard has a bunch of different tooltips that need to appear when certain elements are hovered over.
There are a few ways to approach this. The one you decide to go with is to detect the hover state of the individual components and from that state, show or not show the tooltip. There are three components you need to add this hover detection functionality to - Info , TrendChart and DailyChart .
Let’s start with Info . Right now it’s just a simple SVG icon.
function Info ({ size }) {
  return (
    <svg viewBox="0 0 16 16" width={size}>
      <path d="M9 8a1 1 0 0 0-1-1H5.5a1 1 0 1 0 0 2H7v4a1 1 0 0 0 2 0zM4 0h8a4 4 0 0 1 4 4v8a4 4 0 0 1-4 4H4a4 4 0 0 1-4-4V4a4 4 0 0 1 4-4zm4 5.5a1.5 1.5 0 1 0 0-3 1.5 1.5 0 0 0 0 3z" />
    </svg>
  )
}
Now we need to add functionality to it so it can detect whether it’s being hovered over or not. We can use the onMouseOver and onMouseOut mouse events that come with React. The function we pass to onMouseOver will be invoked when the component is hovered over and the function we pass to onMouseOut will be invoked when the component is no longer being hovered over. To do this the React way, we’ll add a hovering state value to our component using the useState Hook. This will trigger a re-render whenever hovering changes, showing or hiding our tooltip.
function Info ({ id, size }) {
  const [hovering, setHovering] = React.useState(false)

  const mouseOver = () => setHovering(true)
  const mouseOut = () => setHovering(false)

  return (
    <div className='container'>
      {hovering === true
        ? <Tooltip id={id} />
        : null}
      <svg
        onMouseOver={mouseOver}
        onMouseOut={mouseOut}
        width={size}
        viewBox="0 0 16 16">
        <path d="M9 8a1 1 0 0 0-1-1H5.5a1 1 0 1 0 0 2H7v4a1 1 0 0 0 2 0zM4 0h8a4 4 0 0 1 4 4v8a4 4 0 0 1-4 4H4a4 4 0 0 1-4-4V4a4 4 0 0 1 4-4zm4 5.5a1.5 1.5 0 1 0 0-3 1.5 1.5 0 0 0 0 3z" />
      </svg>
    </div>
  )
}
Now we need to add the same functionality to our other two components, TrendChart and DailyChart . If it’s not broke, don’t fix it. Our hover logic for Info worked great so let’s use that same code again.
function TrendChart ({ id }) {
  const [hovering, setHovering] = React.useState(false)

  const mouseOver = () => setHovering(true)
  const mouseOut = () => setHovering(false)

  return (
      <React.Fragment>
        {hovering === true
          ? <Tooltip id={id}/>
          : null}
        <Chart
          type='trend'
          onMouseOver={mouseOver}
          onMouseOut={mouseOut}
        />
      </React.Fragment>
  )
}
You can probably guess the next step. We can do the same thing for our final DailyChart component.
function DailyChart ({ id }) {
  const [hovering, setHovering] = React.useState(false)

  const mouseOver = () => setHovering(true)
  const mouseOut = () => setHovering(false)

  return (
      <React.Fragment>
        {hovering === true
          ? <Tooltip id={props.id}/>
          : null}
        <Chart
          type='daily'
          onMouseOver={mouseOver}
          onMouseOut={mouseOut}
        />
      </React.Fragment>
  )
}
And with that, we’re all finished. The easiest way to reuse stateful logic in React is by copy/pasting  .
.
You may have written React like this before. It’s not the end of the world (#shipit), but it’s not very “DRY”. As was obvious, we’re repeating the exact same hover logic in every one of our components.
At this point, the problem should be pretty clear, we want to avoid duplicating our hover logic anytime a new component needs it. So what’s the solution? Historically, we’ve had two (subpar) options, Higher-order components or Render Props.
Higher-order Components
With Higher-order components, you create a function that takes in a component as its argument. From that function, you return a new component that encapsulates all of the shared logic and renders the component that was passed in. From there, you can pass any data to the rendered component via props.
function withHover (Component) {
  return function (props) {
    const [hovering, setHovering] = React.useState(false)

    const mouseOver = () => setHovering(true)
    const mouseOut = () => setHovering(false)

    return (
      <div onMouseOver={mouseOver} onMouseOut={mouseOut}>
        <Component {...props} hovering={hovering} />
      </div>
    )
  }
}
Now, whenever we need a component to have data about its hovering state, we can pass that component as an argument to withHover . What we’ll get back is a new component that will be passed its hovering state as a prop called hovering .
const InfoWithHover = withHover(Info)
const TrendChartWithHover = withHover(TrendChart)
const DailyChartWithHover = withHover(DailyChart)
For a much deeper dive into Higher-order components, check out React Higher-Order Components
It’s not the prettiest solution, but it works. If sharing non-visual logic via Higher-Order components isn’t your cup of tea, we also have some Render Props.
Render Props
With Render Props, you take advantage of the fact that you can pass functions as props to React components. This means you can encapsulate shared logic in a component as you normally would. Then, to get the data out of that component, you pass it as an argument to the render prop.
function Hover ({ render }) {
  const [hovering, setHovering] = React.useState(false)

  const mouseOver = () => setHovering(true)
  const mouseOut = () => setHovering(false)

  return (
    <div onMouseOver={mouseOver} onMouseOut={mouseOut}>
      {render(hovering)}
    </div>
  )
}
Now with our Hover component, instead of each component having to duplicate the hovering logic, we can wrap each one inside of the render prop we pass to Hover and then pass down the hovering argument as a prop.
<Hover render={(hovering) => <Info hovering={hovering} />} />
<Hover render={(hovering) => <TrendChart hovering={hovering} />} />
<Hover render={(hovering) => <DailyChart hovering={hovering} />} />
For a much deeper dive into Render Props, check out React Render Props
Tradeoffs
Though they work, these patterns aren’t without their tradeoffs. First, if you’re not familiar with them (and even when you are), your brain can get a little wonky following the logic. Though necessary, it feels like the wrong abstraction. On top of that, both patterns force you to adjust your tree structure for the sake of reusability. At scale, this eventually leads to code that looks like this.
export default withHover(
  withTheme(
    withAuth(
      withRepos(Profile)
    )
  )
)
export default <Hover render={(hovering) => (
  <Theme render={(theme) => (
    <Auth render={(authed) => (
      <Repos render={(repos) => (
        <Profile
          hovering={hovering}
          theme={theme}
          authed={authed}
          repos={repos}
        />
      )} />
    )} />
  )} />
)} />
The problem with both Higher-order components and Render Props is they’re a band-aid over a bigger problem - React couples UI to the component and has lacked a good primitive for sharing non-visual logic. As you can probably guess by now, Hooks have an answer for this. There’s no built-in Hook for sharing non-visual logic, instead, you can create your own custom Hooks that are decoupled from any UI.
Custom Hooks
To create a custom Hook, you simply create a function whose name starts with use . Like any other Hook, your custom Hook needs to follow the rules for Hooks. From there, because it’s just a function (and not a component), it’s not coupled to any UI and can return whatever it wants.
Now the question you’ve been waiting this whole post to answer, how would a custom Hook for sharing our hovering logic look compared to our Higher-Order Component and Render Prop solutions?
First, we create a function that starts with use .
function useHover () {}
Then we add the logic we want to share to it.
function useHover () {
  const [hovering, setHovering] = React.useState(false)

  const mouseOver = () => setHovering(true)  const mouseOut = () => setHovering(false)}
Then we decide what to return. In this case, we want the consumer of useHover to have two pieces of data, the hovering state and the attributes to add to the DOM node whose hovering state they want to track.
function useHover () {
  const [hovering, setHovering] = React.useState(false)

  const mouseOver = () => setHovering(true)
  const mouseOut = () => setHovering(false)

  const attrs = {    onMouseOver: mouseOver,    onMouseOut: mouseOut  }  return [hovering, attrs]}
Now we can invoke useHover directly inside of any component which renders a DOM node whose hovering state we want to track.
function Info ({ id, size }) {
  const [hovering, attrs] = useHover()
  return (
      <React.Fragment>
        {hovering === true
          ? <Tooltip id={id} />
          : null}
        <svg
          {...attrs}          width={size}
          viewBox="0 0 16 16" >
            <path d="M9 8a1 1 0 0 0-1-1H5.5a1 1 0 1 0 0 2H7v4a1 1 0 0 0 2 0zM4 0h8a4 4 0 0 1 4 4v8a4 4 0 0 1-4 4H4a4 4 0 0 1-4-4V4a4 4 0 0 1 4-4zm4 5.5a1.5 1.5 0 1 0 0-3 1.5 1.5 0 0 0 0 3z" />
        </svg>
      </React.Fragment>
  )
}
There’s no convoluted logic flow you have to follow, you don’t have to create unnecessary wrapper components that modify your tree structure, and they compose with your app rather than against it.
To prove this even more, let’s look at how our code scales when we have to utilize multiple custom Hooks. As a reminder, I’ll also include the Higher-Order Component and Render Props solutions.
Higher-Order Component
export default withHover(
  withTheme(
    withAuth(
      withRepos(Profile)
    )
  )
)
Render Props
export default <Hover render={(hovering) => (
  <Theme render={(theme) => (
    <Auth render={(authed) => (
      <Repos render={(repos) => (
        <Profile
          hovering={hovering}
          theme={theme}
          authed={authed}
          repos={repos}
        />
      )} />
    )} />
  )} />
)} />
Custom Hooks
function Profile () {
  const [hovering, attrs] = useHover()
  const theme = useTheme()
  const [authed, toLogin] = useAuth()
  const repos = useRepos()

  ...
}
Adding state and side effects to your function components is nice, but sharing non-visual logic via a custom Hook is THE thing that makes Hooks so special.
(Practice) useWait
Refer to the instructions in the code.
(Solution) useWait
(Practice) useWindowDimensions
Refer to the instructions in the code.
(Solution) useWindowDimensions
(Practice) useFetch
Refer to the instructions in the code.
(Solution) useFetch
The useReducer Hook
We’re going to start this post off exactly how you’d expect, by talking about JavaScript’s forEach method. forEach lives on Array.prototype and every instance of Array has access to it. It allows you to invoke a provided function once for each element in an array.
const friends = ['Jake', 'Mikenzi', 'Jacob']

friends.forEach((friend) => addToDOM(friend))
Now, say you had an array of numbers, [2,4,6] . Using forEach to iterate through each number, how would you add all of the numbers together to get a single value, 12 ? One approach might look like this.
const nums = [2,4,6]
let state = 0

function sum (value) {
  state += value
}

nums.forEach(sum)
 Play with the code.
With forEach , to add up all of the values, we need to create and manage an intermediate value ( state ) and modify it on each invocation. As this demonstrates, not only is forEach dependent on the state of our application, but it’s also modifying state outside of its own scope - this makes it an impure function. While not always bad, it’s best to avoid impure functions when you can. To accomplish the same functionality with a pure function, we can use JavaScript’s reduce method.
Reduce
Reduce (also referred to as fold , accumulate , or compress ) is a functional programming pattern that takes a collection (an array or object) as input and returns a single value as output. In JavaScript, the most common use of reduce is the reduce method all Arrays have access to. Applying reduce to our example above, our input would be nums and our output would be the summation of every value in nums .
The key difference between reduce and forEach is that reduce is able to keep track of the accumulated state internally without relying upon or modifying state outside of its own scope - that’s what makes it a pure function. The way it does this is, for each element in the collection, it invokes a reducer function passing it two arguments, the accumulated state and the current element in the collection. What the reducer function returns will be passed as the first argument to the next invocation of the reducer and will eventually result in the final value.
const nums = [2,4,6]
const initialState = 0

function reducer (state, value) {
  return state + value
}

const total = nums.reduce(reducer, initialState)
The very first time the reducer function is invoked, state will be 0 and value will be 2 . Then on the next invocation, state will be whatever the previous invocation returned, which was 0 + 2 and value will be the 2nd element in the array, 4 . Then on the next invocation, state will be 6 ( 2 + 4 ) and value will be 6 . Finally, since are no more elements in the collection to iterate over, the returned value will be 6 + 6 or 12 . We can see this in the diagram below.
Initial Value: 0

First invocation:
  state: 0
  value: 2

Second invocation:
  state: 2
  value: 4

Third invocation:
  state: 6
  value: 6

No more elements in the collection, return 6 + 6 which is 12.
Here’s what we know so far - reduce is a functional programming pattern that takes a collection as input and returns a single value as output. The way you get to that single value is by invoking a reducer function for every element in the collection.
Now, instead of using this pattern to transform arrays, how can we apply it to creating better UI? What if instead of our input collection being an array, it was a collection of user actions that happened over time? Then, whenever a new user action occurred, we could invoke the reducer function which would get us the new state.
Assuming we had a simple UI that was a button and a counter that incremented every time the button was clicked, here’s what the flow might look like using the same reducer logic.
UI: 0 ➕

User clicks ➕, reducer is invoked:
  state: 0
  value: 1

UI: 1 ➕

User clicks ➕, reducer is invoked:
  state: 1
  value: 1

UI: 2 ➕

User clicks ➕, reducer is invoked:
  state: 2
  value: 1

UI: 3 ➕
It might seem strange, but if you think about reduce in the context of being a functional programming pattern, it makes sense that we can utilize it to create more predictable UIs. Now the question is, how?
useReducer
React comes with a built-in Hook called useReducer that allows you to add state to a function component but manage that state using the reducer pattern.
The API for useReducer is similar to what we saw earlier with reduce ; however, there’s one big difference. Instead of just returning the state, as we mentioned earlier, we need a way for user actions to invoke our reducer function. Because of this, useReducer returns an array with the first element being the state and the second element being a dispatch function which when called, will invoke the reducer .
const [state, dispatch] = React.useReducer(
  reducer,
  initialState
)
When invoked, whatever you pass to dispatch will be passed as the second argument to the reducer (which we’ve been calling value ). The first argument (which we’ve been calling state ) will be passed implicitly by React and will be whatever the previous state value was. Putting it all together, here’s our code.
function reducer (state, value) {
  return state + value
}

function Counter () {
  const [count, dispatch] = React.useReducer(
    reducer,
    0
  )

  return (
    <React.Fragment>
      <h1>{count}</h1>
      <button onClick={() => dispatch(1)}>
        +
      </button>
    </React.Fragment>
  );
}
The flow is the exact same as our diagram above. Whenever the + button is clicked, dispatch will be invoked. That will call reducer passing it two arguments, state , which will come implicitly from React, and value , which will be whatever was passed to dispatch . What we return from reducer will become our new count . Finally, because count changed, React will re-render the component, updating the UI.
At this point, you’ve seen how useReducer works in its most basic form. What you haven’t seen yet is an example of useReducer that resembles anything close to what you’d see in the real-world. To get closer to that, let’s add a little bit of functionality to our app. Instead of just incrementing count by 1, let’s add two more buttons - one to decrement count and one to reset it to 0 .
For decrementing, all we need to do is pass -1 to dispatch, because math.
function reducer (state, value) {
  return state + value
}

function Counter() {
  const [count, dispatch] = React.useReducer(
    reducer,
    0
  )

  return (
    <React.Fragment>
      <h1>{count}</h1>
      <button onClick={() => dispatch(1)}>
        +
      </button>
      <button onClick={() => dispatch(-1)}>        -      </button>    </React.Fragment>
  );
}
For resetting the count to 0 , it gets a little trickier.
Right now with how we’ve set up our reducer function, there’s no way to specify different types of actions that can occur to update our state. We only accept a value (which we get from whatever was passed to dispatch ) and add that to state .
function reducer (state, value) {
  return state + value
}
What if instead of dispatch ing the value directly, we dispatch the type of action that occurred? That way, based on the type of action, our reducer can decide how to update the state.
With the current functionality of our app, we’ll have three different action types, increment , decrement , and reset .
return (
  <React.Fragment>
    <h1>{count}</h1>
    <button onClick={() => dispatch('increment')}>      +    </button>    <button onClick={() => dispatch('decrement')}>      -    </button>    <button onClick={() => dispatch('reset')}>      Reset    </button>  </React.Fragment>
);
Now, inside of our reducer , we can change how we update the state based on those action types. Instead of naming our second parameter value , we’ll change it to action to better represent what it is.
function reducer (state, action) {  if (action === 'increment') {    return state + 1  } else if (action === 'decrement') {    return state - 1  } else if (action === 'reset') {    return 0  } else {    throw new Error(`This action type isn't supported.`)  }}
function Counter() {
  const [count, dispatch] = React.useReducer(
    reducer,
    0
  )

  return (
    <React.Fragment>
      <h1>{count}</h1>
      <button onClick={() => dispatch('increment')}>
        +
      </button>
      <button onClick={() => dispatch('decrement')}>
        -
      </button>
      <button onClick={() => dispatch('reset')}>
        Reset
      </button>
    </React.Fragment>
  );
}
This is where we start to see useReducer shine. You may not have noticed it, but we’ve completely decoupled the update logic of our count state from our component. We’re now mapping actions to state transitions. We’re able to separate how the state updates from the action that occurred. We’ll dive into the practical benefits of this later on in this post.
Let’s add another feature to our app. Instead of incrementing and decrementing count by 1 , let’s let the user decide via a slider. Imagine we had a Slider component that took in 3 props, min , max , and onChange .
<Slider
  min={1}
  max={10}
  onChange={(value) => }
/>
The way we get the value of the slider is via the Slider 's onChange prop. Knowing this, and knowing that its the value of the slider that will decide by how much we increment and decrement count , what changes do we need to make to our reducer ?
Right now the state for our reducer is an integer which represents the count . This worked previously, but now that we need our reducer to manage another piece of state for our slider value, we’ll need to modify it. Instead of being an integer, let’s make it an object. This way, any new pieces of state that our reducer needs to manage can go as a property on the object.
0 -> { count: 0, step: 1 }
Now we need to actually update our code. The first change we need to make is for the initial state of our reducer . Instead of 0 (representing count ), it’ll be our state object.
const [state, dispatch] = React.useReducer(
  reducer,
  { count: 0, step: 1 }
)
Now, since state is no longer an integer, we’ll need to update the reducer to account for that.
function reducer (state, action) {
  if (action === 'increment') {
    return {
      count: state.count + 1,
      step: state.step,
    }
  } else if (action === 'decrement') {
    return {
      count: state.count - 1,
      step: state.step,
    }
  } else if (action === 'reset') {
    return {
      count: 0,
      step: state.step,
    }
  } else {
    throw new Error(`This action type isn't supported.`)
  }
}
Now that our reducer is updated with our new state object, the next thing we need to do is update step whenever the user moves the slider. If you’ll remember, we get access to that slider value by passing an onChange function to Slider .
<Slider
  min={1}
  max={10}
  onChange={(value) => } />
Now the question becomes, what do we want to dispatch ? Up until this point, we’ve been able to dispatch the type of action that occurred ( increment , decrement , and reset ). This worked fine but we’re now running into its limitations. Along with the action type , we also need to include some more data. In our case, we want to pass along the value of the slider so we can update our step state. To do this, instead of having our action we dispatch be a string, let’s change it to be an object with a type property. Now, we can still dispatch based on the type of action that occurred, but we can also pass along any other data as properties on the action object. We can see this perfectly with what we dispatch from our Slider .
<Slider onChange={(value) => dispatch({
  type: 'updateStep',
  step: value
})} />
While we’re here, we also need to update all our other dispatch es to pass an object with a type property instead of a string.
return (
  <React.Fragment>
    <Slider onChange={(value) => dispatch({
      type: 'updateStep',
      step: value
    })} />
    <hr />
    <h1>{state.count}</h1>
    <button onClick={() => dispatch({
      type: 'increment',
    })}>
      +
    </button>
    <button onClick={() => dispatch({
      type: 'decrement'
    })}>
      -
    </button>
    <button onClick={() => dispatch({
      type: 'reset'
    })}>
      Reset
    </button>
  </React.Fragment>
)
Finally, there are three changes we need to make to our reducer . First, we need to account for our new action type, updateStep . Next, we need to account for changing action to be an object instead of a string. Finally, we need to update increment and decrement to adjust the count based on the step property and not just 1 .
function reducer (state, action) {
  if (action.type === 'increment') {    return {
      count: state.count + state.step,      step: state.step,
    }
  } else if (action.type === 'decrement') {    return {
      count: state.count - state.step,      step: state.step,
    }
  } else if (action.type === 'reset') {    return {
      count: 0,
      step: state.step,
    }
  } else if (action.type === 'updateStep') {    return {      count: state.count,      step: action.step,    }  } else {    throw new Error(`This action type isn't supported.`)
  }
}
With that, we see another subtle but powerful benefit of useReducer you might have missed. Because the reducer function is passed the current state as the first argument, it’s simple to update one piece of state based on another piece of state. In fact, I’d go as far as to say whenever updating one piece of state depends on the value of another piece of state, reach for useReducer . In our example, we can see this in how we’re updating count based on the value of step .
At this point, we’ve seen both how useReducer works and some of the advantages it gives us. Now, let’s dive a little deeper into those advantages and answer the question you’ve most likely been asking.
useState vs useReducer
Fundamentally, useState and useReducer accomplish the same thing - they both allow us to add state to function components. Now the question becomes, when should you use one over the other?
Declarative state updates
Imagine we were creating a component that was responsible for handling the registration flow for our app. In this app, we need to collect three pieces of information from the user - their username , email , and password . For UX purposes, we’ll also need a few other pieces of state, loading , error , and registered . Using useState , here’s one approach for how we’d accomplish this.
function Register() {
  const [username, setUsername] = React.useState('')
  const [email, setEmail] = React.useState('')
  const [password, setPassword] = React.useState('')
  const [loading, setLoading] = React.useState(false)
  const [error, setError] = React.useState('')
  const [registered, setRegistered] = React.useState(false)

  const handleSubmit = (e) => {
    e.preventDefault()

    setLoading(true)
    setError('')

    newUser({username, email, password})
      .then(() => {
        setLoading(false)
        setError('')
        setRegistered(true)
      }).catch((error) => {
        setLoading(false)
        setError(error)
      })
  }

  if (registered === true) {
    return <Redirect to='/dashboard' />
  }

  if (loading === true) {
    return <Loading />
  }

  return (
    <React.Fragment>
      {error && <p>{error}</p>}
      <form onSubmit={handleSubmit}>
        <input
          type='text'
          placeholder='email'
          onChange={(e) => setEmail(e.target.value)}
          value={email}
        />
        <input
          type='text'
          placeholder='username'
          onChange={(e) => setUsername(e.target.value)}
          value={username}
        />
        <input
          placeholder='password'
          onChange={(e) => setPassword(e.target.value)}
          value={password}
          type='password'
        />
        <button type='submit'>Submit</button>
      </form>
    </React.Fragment>
  )
}
First, there’s nothing wrong with this code. It works just fine. However, it’s a pretty imperative approach to solving the problem. We’re conforming to the operational model of the machine by describing how we want to accomplish the task. Instead, what if we took a more declarative approach? Instead of describing how we want to accomplish the task, let’s describe what we’re trying to accomplish. This declarative approach will allow us to conform closer to the mental model of the developer. To accomplish this, we can leverage useReducer .
The reason useReducer can be more declarative is because it allows us to map actions to state transitions. This means, instead of having a collection of setX invocations, we can simply dispatch the action type that occurred. Then our reducer can encapsulate the imperative, instructional code.
To see what this looks like, let’s assume we’ve already set up our registerReducer and we’re updating our handleSubmit function we saw above.
const handleSubmit = (e) => {
  e.preventDefault()

  dispatch({ type: 'login' })

  newUser({username, email, password})
    .then(() => dispatch({ type: 'success' }))
    .catch((error) => dispatch({
      type: 'error',
      error
    }))
}
Notice that we’re describing what we want to do - login . Then, based on that result, success or error .
Here’s what all of the code now looks like, including our new registerReducer .
function registerReducer(state, action) {
  if (action.type === 'login') {
    return {
      ...state,
      loading: true,
      error: ''
    }
  } else if (action.type === 'success') {
    return {
      ...state,
      loading: false,
      error: '',
      registered: true
    }
  } else if (action.type === 'error') {
    return {
      ...state,
      loading: false,
      error: action.error,
    }
  } else if (action.type === 'input') {
    return {
      ...state,
      [action.name]: action.value
    }
  } else {
    throw new Error(`This action type isn't supported.`)
  }
}

const initialState = {
  username: '',
  email: '',
  password: '',
  loading: false,
  error: '',
  registered: false
}

function Register() {
  const [state, dispatch] = React.useReducer(
    registerReducer,
    initialState
  )

  const handleSubmit = (e) => {
    e.preventDefault()

    dispatch({ type: 'login' })

    newUser({
      username: state.username,
      email: state.email,
      password: state.password
    })
    .then(() => dispatch({ type: 'success' }))
    .catch((error) => dispatch({
      type: 'error',
      error
    }))
  }

  if (state.registered === true) {
    return <Redirect to='/dashboard' />
  }

  if (state.loading === true) {
    return <Loading />
  }

  return (
    <React.Fragment>
      {state.error && <p>{state.error}</p>}
      <form onSubmit={handleSubmit}>
        <input
          type='text'
          placeholder='email'
          onChange={(e) => dispatch({
            type: 'input',
            name: 'email',
            value: e.target.value,
          })}
          value={state.email}
        />
        <input
          type='text'
          placeholder='username'
          onChange={(e) => dispatch({
            type: 'input',
            name: 'username',
            value: e.target.value,
          })}
          value={state.username}
        />
        <input
          placeholder='password'
          onChange={(e) => dispatch({
            type: 'input',
            name: 'password',
            value: e.target.value,
          })}
          value={state.password}
          type='password'
        />
        <button type='submit'>Submit</button>
      </form>
    </React.Fragment>
  )
}
Update state based on another piece of state
We’ve already seen this one in action. From earlier, “because the reducer function is passed the current state as the first argument, it’s simple to update one piece of state based on another piece of state. In fact, I’d go as far as to say whenever updating one piece of state depends on the value of another piece of state, reach for useReducer .”
We’ll see another example of why this holds true in the next section.
Minimize Dependency Array
Part of mastering the useEffect Hook is learning how to properly manage its second argument, the dependency array.
React.useEffect(() => {
  // side effect
}, [/* dependency array */])
Leave it off and you could run into an infinite loop scenario. Forget to add values your effect depends on and you’ll have stale data. Add too many values and your effect won’t be re-invoked when it needs to be.
It may come as a surprise, but useReducer is one strategy for improving the management of the dependency array. The reason for this goes back to what we’ve mentioned a few times now, useReducer allows you to decouple how the state is updated from the action that triggered the update. In practical terms, because of this decoupling, you can exclude values from the dependency array since the effect only dispatch es the type of action that occurred and doesn’t rely on any of the state values (which are encapsulated inside of the reducer ). That was a lot of words, here’s some code.
React.useEffect(() => {
  setCount(count + 1)
}, [count])
React.useEffect(() => {
  dispatch({
    type: 'increment'
  })
}, [])
In the second code block, we can remove count from the dependency array since we’re not using it inside of the effect. When is this useful? Take a look at this code. Notice anything wrong?
React.useEffect(() => {
  const id = window.setInterval(() => {
    setCount(count + 1)
  }, 1000)

  return () => window.clearInterval(id)
}, [count])
Every time count changes (which is every second) our old interval is going to be cleared and a new interval is going to be set up. That’s not ideal.
Instead, we want the interval to be set up one time and left alone until the component is removed from the DOM. To do this, we have to pass an empty array as the second argument to useEffect . Again, useReducer to the rescue.
React.useEffect(() => {
  const id = window.setInterval(() => {
    dispatch({ type: 'increment' })
  }, 1000)

  return () => window.clearInterval(id)
}, [])
We no longer need to access count inside of our effect since it’s encapsulated in the reducer . This allows us to remove it from the dependency array.
Now for the record, there is one way to fix the code above without useReducer . You may remember that you can pass a function to the updater function useState gives you. When you do this, that function will be passed the current state value. We can utilize this to clear out our dependency array without having to use useReducer .
React.useEffect(() => {
  const id = window.setInterval(() => {
    setCount((count) => count + 1)  }, 1000)

  return () => window.clearInterval(id)
}, [])
This works fine, but there is one use case where it starts to fall apart. If you’ll remember back to our Counter component earlier, the final piece of functionality we added was the ability for the user to control the step via a Slider component. Here’s the workable code as a refresher. Once we added step , count was then updated based on that step state. This is the use case where our code above starts to fall apart. By updating count based on step , we’ve introduced a new value into our effect which we have to add to our dependency array.
React.useEffect(() => {
  const id = window.setInterval(() => {
    setCount((count) => count + step)  }, 1000)

  return () => window.clearInterval(id)
}, [step])
Now we’re right back to where we started. Anytime step changes, our old interval is going to be cleared and a new interval is going to be set up. Again, not ideal. Luckily for us, the solution is the same, useReducer .
React.useEffect(() => {
  const id = window.setInterval(() => {
    dispatch({ type: 'increment' })
  }, 1000)

  return () => window.clearInterval(id)
}, [])
Notice the code is still the exact same as we saw earlier. Encapsulated inside of the increment action is the logic for count + step . Again, since we don’t need any state values to describe what happened, we can clear everything from our dependency array.
Summary
useState and useReducer both allow you to add state to function components. useReducer offers a bit more flexibility since it allows you to decouple how the state is updated from the action that triggered the update - typically leading to more declarative state updates.
If different pieces of state update independently from one another ( hovering , selected , etc.), useState should work fine. If your state tends to be updated together or if updating one piece of state is based on another piece of state, go with useReducer .
(Practice) Refactor useFetch
Refer to the instructions in the code.
(Solution) Refactor useFetch
The useRef Hook
The marketing pitch for useState is that it allows you to add state to function components. This is true, but we can break it down even further. Fundamentally, the useState Hook gives you two things - a value that will persist across renders and an API to update that value and trigger a re-render.
const [value, setValueAndReRender] = React.useState(
  'initial value'
)
When building UI, both are necessary. Without the ability to persist the value across renders, you’d lose the ability to have dynamic data in your app. Without the ability to update the value and trigger a re-render, the UI would never update.
Now, what if you had a use case where you weren’t dealing with any UI, so you didn’t care about re-rendering, but you did need to persist a value across renders? In this scenario, it’s like you need the half of useState that lets you persist a value across renders but not the other half that triggers a re-render — Something like this.
function usePersistentValue (initialValue) {
  return React.useState({
    current: initialValue
  })[0]
}
Alright, stick with me here. Remember, useState returns an array with the first element being a value that will persist across renders and the second element being the updater function which will trigger a re-render. Since we only care about the first element, the value, we append [0] to the invocation. Now, whenever we invoke usePersistentValue , what we’ll get is an object with a current property that will persist across renders.
If it’s still fuzzy, looking at an actual example may help.
If you’re not familiar with the native browser APIs
setIntervalandclearInterval, you can read about them here before continuing on.
Let’s say we were tasked to build an app that had a counter that incremented by 1 every second and a button to stop the counter. How would you approach this? Here’s what one implementation might look like.
function Counter () {
  const [count, setCount] = React.useState(0)

  let id

  const clear = () => {
    window.clearInterval(id)
  }

  React.useEffect(() => {
    id = window.setInterval(() => {
      setCount(c => c + 1)
    }, 1000)

    return clear
  }, [])

  return (
    <div>
      <h1>{count}</h1>
      <button onClick={clear}>Stop</button>
    </div>
  )
}
id is created inside of useEffect but we need to access it inside of the clear event handler to stop the interval. To do that, we move the declaration of id up to the main scope and then initialize it with the id when the effect runs.
All good, right? Sadly, no. The reason for this is because id doesn’t persist across renders. As soon as our count state variable changes, React will re-render Counter , re-declaring id setting it back to undefined .
What we need is a way to persist the id across renders  . Luckily for us, we have our
 usePersistentValue Hook we created earlier. Let’s try it out.
function usePersistentValue(initialValue) {
  return React.useState({
    current: initialValue
  })[0]
}

function Counter() {
  const [count, setCount] = React.useState(0)
  const id = usePersistentValue(null)

  const clearInterval = () => {
    window.clearInterval(id.current)
  }

  React.useEffect(() => {
    id.current = window.setInterval(() => {
      setCount(c => c + 1)
    }, 1000)

    return clearInterval
  }, [])

  return (
    <div>
      <h1>{count}</h1>
      <button onClick={clearInterval}>Stop</button>
    </div>
  )
}
Admittedly, it’s a bit hacky but it gets the job done. Now instead of id being re-declared on every render, because it’s really a value coming from useState , React will persist it across renders.
As you probably guessed by now, the ability to persist a value across renders without causing a re-render is so fundamental that React comes with a built-in Hook for it called useRef . It is, quite literally, the same as our usePersistentValue Hook that we created. To prove this, here’s the exact same code as before except with useRef instead of usePersistentValue .
function Counter() {
  const [count, setCount] = React.useState(0)
  const id = React.useRef(null)
  const clearInterval = () => {
    window.clearInterval(id.current)
  }

  React.useEffect(() => {
    id.current = window.setInterval(() => {
      setCount(c => c + 1)
    }, 1000)

    return clearInterval
  }, [])

  return (
    <div>
      <h1>{count}</h1>
      <button onClick={clearInterval}>Stop</button>
    </div>
  )
}
useRef follows the same API we created earlier. It accepts an initial value as its first argument and it returns an object that has a current property (which will initially be set to whatever the initial value was). From there, anything you add to current will be persisted across renders.
The most popular use case for useRef is getting access to DOM nodes. If you pass the value you get from useRef as a ref prop on any React element, React will set the current property to the corresponding DOM. This allows you to do things like grab input values or set focus.
function Form () {
  const nameRef = React.useRef()
  const emailRef = React.useRef()
  const passwordRef = React.useRef()

  const handleSubmit = e => {
    e.preventDefault()

    const name = nameRef.current.value
    const email = emailRef.current.value
    const password = passwordRef.current.value

    console.log(name, email, password)
  }

  return (
    <React.Fragment>
      <label>
        Name:
        <input
          placeholder="name"
          type="text"
          ref={nameRef}
        />
      </label>
      <label>
        Email:
        <input
          placeholder="email"
          type="text"
          ref={emailRef}
        />
      </label>
      <label>
        Password:
        <input
          placeholder="password"
          type="text"
          ref={passwordRef}
        />
      </label>

      <hr />

      <button onClick={() => nameRef.current.focus()}>
        Focus Name Input
      </button>
      <button onClick={() => emailRef.current.focus()}>
        Focus Email Input
      </button>
      <button onClick={() => passwordRef.current.focus()}>
        Focus Password Input
      </button>

      <hr />

      <button onClick={handleSubmit}>Submit</button>
    </React.Fragment>
  )
}
If you want to add state to your component that persists across renders and can trigger a re-render when it’s updated, go with useState or useReducer . If you want to add state to your component that persists across renders but doesn’t trigger a re-render when it’s updated, go with useRef .
(Practice) Complex Form
Refer to the instructions in the code.
(Solution) Complex Form
(Practice) Click Game
Refer to the instructions in the code.
Final App
(Solution) Click Game
Guide to React Context
Whenever you’re utilizing a component architecture, as your application grows, the ability to share state amongst different components will inevitably become an issue.
Let’s pretend we had an app with the following architecture, each circle representing a different component.
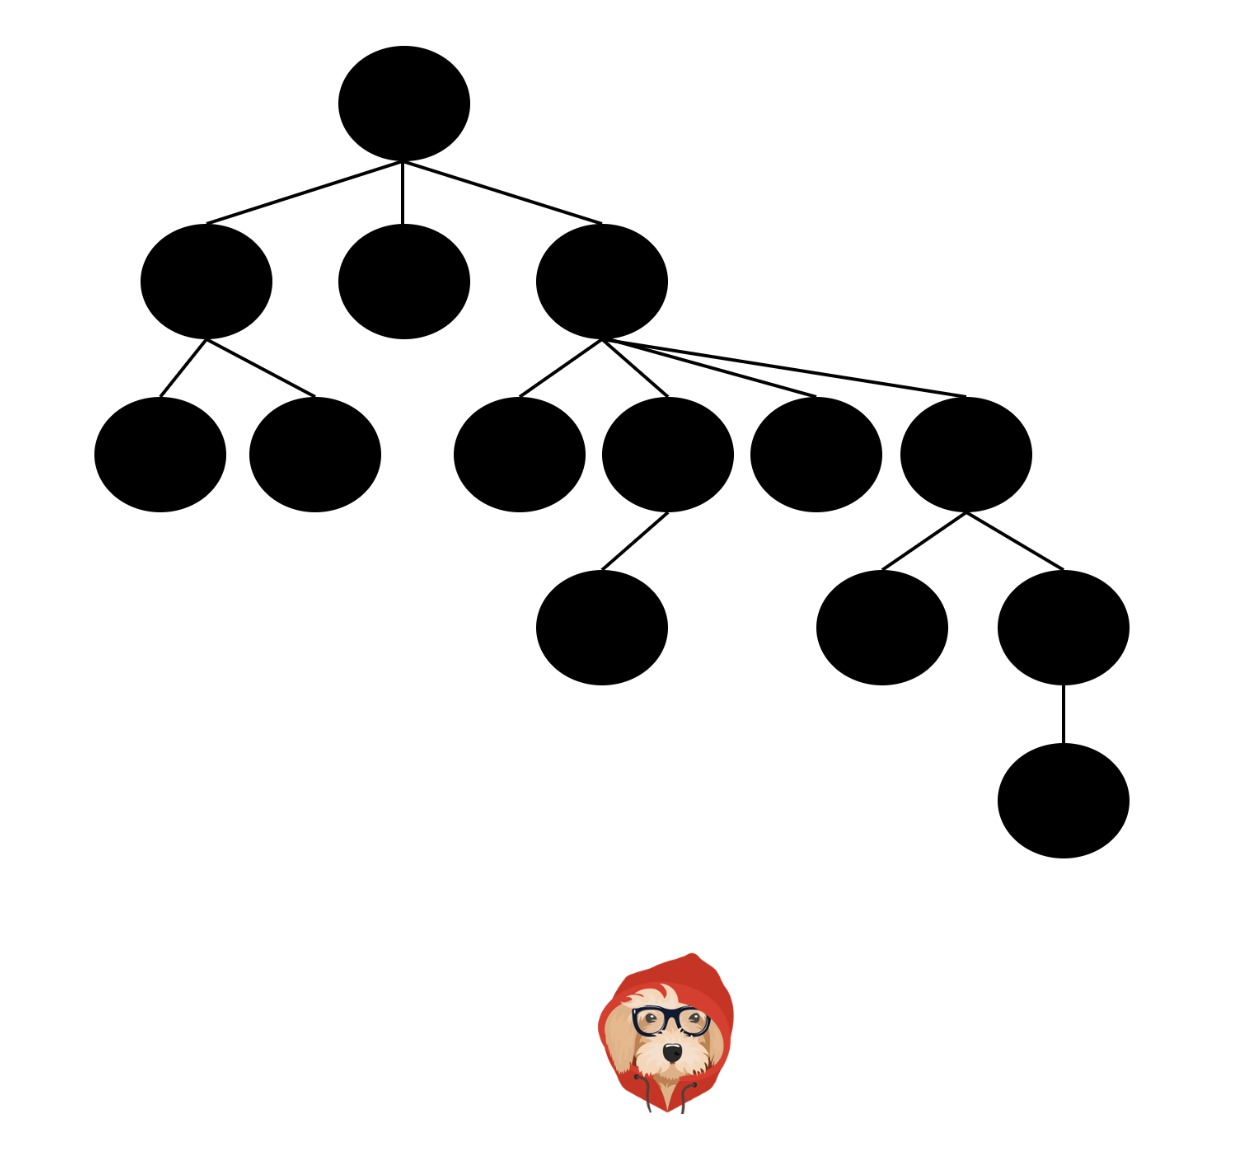
Now let’s pretend that we had a piece of state that was needed throughout various levels of our application, represented here as a diamond.

The recommended solution for this problem is to move that state up to the nearest parent component and then pass it down via props.

This works, and most of the time it’s the right solution. However, there are times when passing props through intermediate components can become overly redundant or downright unmanageable. Take a tool like React Router for example. React Router needs to have the ability to pass routing props to any component in the component tree, regardless of how deeply nested the components are. Because this is such a significant problem, React comes with a built-in API to solve it called Context.
Context provides a way to pass data through the component tree without having to pass props down manually at every level. - The React Docs
Now that we know the problem that Context solves, how do we use it?
The Context API
For our example, let’s say we’re building an app that is used by both English and Spanish speaking countries. We want to expose a button that when it’s clicked, can toggle the text of our entire application between English and Spanish.
From a high level, if you think about what’s needed to solve this problem, there are two aspects to it.
- We need a way to declare the data that we want available throughout our component tree. In our example, that data is a
localevalue that will be eitherenores. - We need a way for any component in the component tree that requires that data to be able to subscribe to it.
React gives us the ability to do both of those things whenever we create a new Context using the React.createContext method. Typically, you create a new Context for each unique piece of data that needs to be available throughout your component tree. Based on our example, we’ll create a LocaleContext .
const LocaleContext = React.createContext()
Now if we examine our LocaleContext , you’ll notice that it has two properties, both of which are React components, Provider , and Consumer .
Provider allows us to “declare the data that we want available throughout our component tree”.
Consumer allows “any component in the component tree that needs that data to be able to subscribe to it”.
Provider
You use Provider just like you would any other React component. It accepts a value prop which is the data that you want available to any of its children who need to consume it.
<MyContext.Provider value={data}>
  <App />
</MyContext.Provider>
In our example, we want locale to be available anywhere in the component tree. We also want to update the UI (re-render) whenever it changes, so we’ll stick it on our component’s state.
// LocaleContext.js
import React from "react"

const LocaleContext = React.createContext()

export default LocaleContext
import React from 'react'
import LocaleContext from './LocaleContext'

export default function App () {
  const [locale, setLocale] = React.useState('en')

  return (
    <LocaleContext.Provider value={locale}>
      <Home />
    </LocaleContext.Provider>
  )
}
Now, any component in our component tree that needs the value of locale will have the option to subscribe to it using LocaleContext.Consumer .
Consumer
Again, the whole point of the Consumer component is it allows you to get access to the data that was passed as a value prop to the Context’s Provider component. To do this, Consumer uses a render prop.
<MyContext.Consumer>
  {(data) => {
    return (
      <h1>
        The "value" prop passed to "Provider" was {data}
      </h1>
    )
  }}
</MyContext.Consumer>
Now in our example, because we passed locale as the value prop to LocaleContext.Provider , we can get access to it by passing LocaleContext.Consumer a render prop.
// Blog.js
import React from 'react'
import LocaleContext from './LocaleContext'

export default function Blog () {
  return (
    <LocaleContext.Consumer>
      {(locale) => <Posts locale={locale} />}
    </LocaleContext.Consumer>
  )
}
Updating Context State
At this point, we’ve seen that because we wrapped our whole app in <LocaleContext.Provider value={locale}> , any component in our application tree can get access to locale by using LocaleContext.Consumer . However, what if we also want to be able to toggle it ( en -> es ) from anywhere inside of our component tree?
Your first intuition might be to do something like this.
export default function App () {
  const [locale, setLocale] = React.useState('en')

  const toggleLocale = () => {
    setLocale((locale) => {
      return locale === 'en' ? 'es' : 'en'
    })
  }

  return (
    <LocaleContext.Provider value={{
      locale,
      toggleLocale
    }}>
      <Home />
    </LocaleContext.Provider>
  )
}
What we’ve done is added a new property to the object we pass to value . Now, anywhere in our component tree, using ThemeContext.Consumer , we can grab locale OR toggleLocale .
Sadly, the idea is right, but the execution is a little off. Can you think of any downsides to this approach? Hint, it has to do with performance.
Just like React re-renders with prop changes, whenever the data passed to value changes, React will re-render every component which used Consumer to subscribe to that data. The way in which React knows if the data changes is by using “reference identity” (which is kind of a fancy way of saving oldObject === newObject ).
Currently with how we have it set up ( value={{}} ), we’re passing a new object to value every time that App re-renders. What this means is that when React checks if the data passed to value has changed, it’ll always think it has since we’re always passing in a new object. As a result of that, every component which used Consumer to subscribe to that data will re-render as well, even if locale or toggleLocale didn’t change.
To fix this, instead of passing a new object to value every time, we want to give it a reference to an object it already knows about. To do this, we can use the useMemo Hook.
export default function App () {
  const [locale, setLocale] = React.useState('en')

  const toggleLocale = () => {
    setLocale((locale) => {
      return locale === 'en' ? 'es' : 'en'
    })
  }

  const value = React.useMemo(() => ({    locale,    toggleLocale  }), [locale])
  return (
    <LocaleContext.Provider value={value}>
      <Home />
    </LocaleContext.Provider>
  )
}
React will make sure the value that useMemo returns stays the same unless locale changes. This way, any component which used Consumer to subscribe to our locale context will only re-render if locale changes.
Now, anywhere inside of our component tree, we can get access to the locale value or the ability to change it via toggleLocale .
// Blog.js
import React from 'react'
import LocaleContext from './LocaleContext'

export default function Blog () {
  return (
    <LocaleContext.Consumer>
      {({ locale, toggleLocale }) => (
        <React.Fragment>
          <Nav toggleLocal={toggleLocale} />
          <Posts locale={locale} />
        </React.Fragment>
      )}
    </LocaleContext.Consumer>
  )
}
Here’s a link to the full locale app if you want to play around with it. Admittedly, it’s not the best use of Context as it’s a pretty shallow app, but it gives you the general idea how to use Context in an app with multiple routes/components.
defaultValue
Whenever you render a Consumer component, it gets its value from the value prop of the nearest Provider component of the same Context object. However, what if there isn’t a parent Provider of the same Context object? In that case, it’ll get its value from the first argument that was passed to createContext when the Context object was created.
const MyContext = React.creatContext('defaultValue')
And adapted to our example.
const LocaleContext = React.createContext('en')
Now, if we use <LocaleContext.Consumer> without previously rendering a <LocaleContext.Provider> , the value passed to Consumer will be en .
Here’s a very clever example my good friend chantastic came up with. I’ve modified it a bit, but the core idea is his.
import React from 'react'
import ReactDOM from 'react-dom'

const ExpletiveContext = React.createContext('shit')

function ContextualExclamation () {
  return (
    <ExpletiveContext.Consumer>
      {(word) => <span>Oh {word}!</span>}
    </ExpletiveContext.Consumer>
  )
}

function VisitGrandmasHouse () {
  return (
    <ExpletiveContext.Provider value='poop'>
      <h1>Grandma's House 🏡</h1>
      <ContextualExclamation />
    </ExpletiveContext.Provider>
  )
}

function VisitFriendsHouse () {
  return (
    <React.Fragment>
      <h1>Friend's House 🏚</h1>
      <ContextualExclamation />
    </React.Fragment>
  )
}

function App () {
  return (
    <React.Fragment>
      <VisitFriendsHouse />
      <VisitGrandmasHouse />
    </React.Fragment>
  )
}
Can you follow what’s going on? First, we create a new ExpletiveContext and set its default value to shit . Then we render two components, VisitFriendsHouse and VisitGrandmasHouse .
Because we’re allowed to swear at our friend’s house, VisitFriendsHouse renders ExpletiveContext.Consumer whose value will default to shit since there’s not an ExpletiveContext.Provider in the tree above it.
Unlike at our friends, with Grandma, we’re not allowed to swear. So instead of just rendering ExpletiveContext.Consumer , we wrap it in ExpletiveContext.Provider passing it a value of poop . This way when the Consumer looks for its nearest Provider , it’ll find it and get a value of poop rather than the default value of shit .
useContext
At this point, you’ve seen that in order to get access to the data that was passed as a value prop to the Context’s Provider component, you use Consumer as a render prop.
export default function Nav () {
  return (
    <LocaleContext.Consumer>
      {({ locale, toggleLocale }) => locale === "en"
        ? <EnglishNav toggleLocale={toggleLocale} />
        : <SpanishNav toggleLocale={toggleLocale} />}
    </LocaleContext.Consumer>
  );
}
This works, but as always the render-props syntax is a little funky. The problem gets worse if you have multiple context values you need to grab.
export default function Nav () {
  return (
    <AuthedContext.Consumer>
      {({ authed }) => authed === false
        ? <Redirect to='/login' />
        : <LocaleContext.Consumer>
            {({ locale, toggleLocale }) => locale === "en"
              ? <EnglishNav toggleLocale={toggleLocale} />
              : <SpanishNav toggleLocale={toggleLocale} />}
          </LocaleContext.Consumer>}
    </AuthedContext.Consumer>
  )
}
Oof. Luckily for us, there’s a Hook that solves this problem - useContext . useContext takes in a Context object as its first argument and returns whatever was passed to the value prop of the nearest Provider component. Said differently, it has the same use case as .Consumer but with a more composable API.
export default function Nav () {
  const { locale, toggleLocale } = React.useContext(
    LocaleContext
  )

  return locale === 'en'
    ? <EnglishNav toggleLocale={toggleLocale} />
    : <SpanishNav toggleLocale={toggleLocale} />
}
As always, this API really shines when you need to grab multiple values from different Contexts.
export default function Nav () {
  const { authed } = React.useContext(AuthedContext)

  if (authed === false) {
    return <Redirect to='/login' />
  }

  const { locale, toggleLocale } = React.useContext(
    LocaleContext
  )

  return locale === 'en'
    ? <EnglishNav toggleLocale={toggleLocale} />
    : <SpanishNav toggleLocale={toggleLocale} />
}
Warnings
Here’s the thing, when you’re a hammer, everything looks like a nail. Typically when you first learn about Context, it appears like it’s the solution to all your problems. Just remember, there’s nothing wrong with passing props down multiple levels, that’s literally how React was designed. I don’t have a universal rule for when you should and shouldn’t use Context, just be mindful that it’s common to overuse it.
(Practice) LocaleContext
Refer to the instructions in the code.