Welcome! (Don’t skip this)
Learning anything new is always a significant endeavor. I don’t take for granted that there’s an opportunity cost in taking this course. Trust that every aspect of this course, from the text and videos to the quizzes and practice problems have been meticulously thought over and debated. The end result is what we strongly believe is the most in-depth and effective way to learn React Router that exists.
Before we dive into the material, there are some important housekeeping items to mention first.
- Unlike our other courses, this course doesn’t follow a direct “linear” path. The reason for this is because most of the topics we’ll cover are independent from one another. What this means is that after the first few introductory lectures, feel free to skip around to the topics that interest you most.
- Throughout the course, you’ll see various types of content. Here’s a breakdown.
- The first introduction you’ll see to any new concept will be in a blog post/video format. This ensures you’re able to hyperfocus on the new concept without needing any external context. If you see a section without the () tags (listed below), it’s this format. You’re not expected to code along during these sections.
- (Project) - Throughout the course, we’ll build a project together. Above each (Project) video will be a link to its coinciding branch as well as the specific commit on Github. If you get stuck or your code isn’t working, check your code against the code in the commit. You are expected to code along with these sections.
- (Practice) - These are usually hosted on Code Sandbox and are designed to get you experience with a particular topic before you’re tasked with implementing it into the project. You might be tempted to skip these, don’t.
- (Solution) - These are the solution videos to the (Practice)s.
- (Quiz) - Your typical quiz. If you find yourself guessing on the quiz problems, redo the section. If the quizzes seem “easy”, that’s a good sign.
- (Bonus) - Bonus material that doesn’t fit into the flow of the normal course but is still important to know.
- If you skipped #2, go read it.
- Unlike our other courses, this course doesn’t have any curriculum. Instead, we place a higher priority on (Practice)s for this course since most of the topics are independent from one another.
- You can take this course regardless of if you’re on Mac, Linux, or Windows. If you’re wondering, I’m running Node v12.12.0 and NPM v6.11.3.
- If you haven’t already, request to join our official private Facebook Group for subscribers. It’s where other members of the team and I will be hanging out answering support questions. Again, if your code isn’t working after following a video, very carefully compare it to the specific commit for that video before asking a question in the facebook group.
- If you’re using React Router v5, I assume you’re also using React Hooks. If you aren’t familiar with Hooks, I recommend checking out our React Hooks course first.
- If you run into any errors/typos/etc. related to the course material, you can make a comment on this issue and I’ll get it fixed.
Good luck!
Introduction and Philosophy behind React Router v5
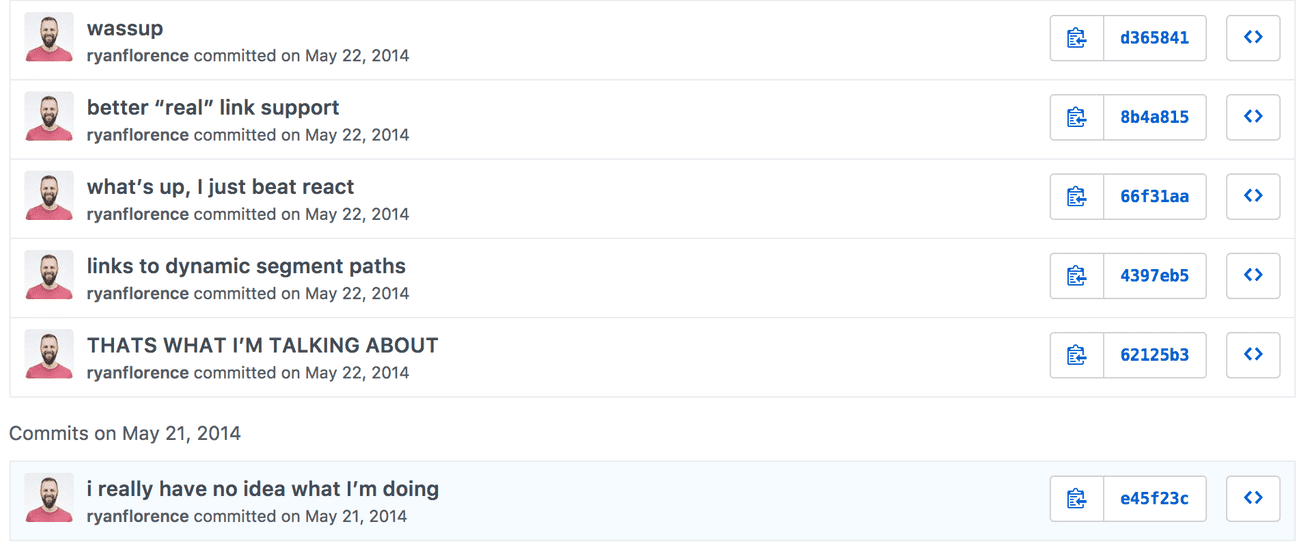
If you’ve been in React land for the last few years, you know that React Router has gone through a few different iterations. Say what you will, but it’s clear that the React Router we have today is a huge improvement on previous versions. The reason for these changes are pretty standard - the authors today are more experienced React developers than they were when React Router was first built. You see, back in 2014, everyone was new to React. React itself was still under a year old and no one really knew to what extent this whole component thing would play out. With that in mind, it’s natural that the first commits of React Router looked something like this.
At the time, the creators of React Router were coming from Ember backgrounds. So naturally, the first version of React Router was similar in nature to that of Ember’s router. That is, with both routers you’d establish your routes statically as part of the app’s initialization process. In fact, mostly all of the router’s you’re probably familiar with are used this way - Express, Angular, Ember, etc.
Here’s some code from an older version of React Router (v3). As you can see, you’d have a routes.js file where you’d establish your static routes.
// routes.js

const routes = (
  <Router>
    <Route path='/' component={Main}>
      <IndexRoute component={Home} />
      <Route path='playerOne' component={Prompt} />
      <Route path='playerTwo/:playerOne' component={Prompt} />
      <Route path='battle' component={ConfirmBattle} />
      <Route path='results' component={Results} />
      <Route onEnter={checkAuth} path='dashboard' component={Dashboard} />
    </Route>
  </Router>
)

export default routes
Then when you’d initialize your app, you’d pass your route to ReactDOM.render .
// index.js

import * as React from 'react'
import ReactDOM from 'react-dom'
import routes from './config/routes'

ReactDOM.render(routes, document.getElementById('app'))
This brings up the question, is static routing bad? The answer to that is obviously no. However, one could argue it’s not really the “React way” of doing things. Since its creation, as the creators of React Router gained more experience, what they found was the original API behind React Router didn’t align with the mental model of React. Not only that but in some places React Router even competed against React.
Looking back at the previous example, we pass an onEnter prop to the <Route> component.
<Route
  onEnter={checkAuth}
  path='dashboard'
  component={Dashboard}
/>
The idea here is that before the user sees the Dashboard component, the checkAuth function verifies the user is authenticated. Not bad, but React has built in ways for accomplishing this already with the useEffect Hook.
With the original versions of React Router, it was more of a router for React rather than a true React router.
React Router v4 (and now v5) were built to fix these inconsistencies and work with React, rather than against it. If you’re already familiar with the benefits of React and the benefits of component composition, newer versions of React Router are going to make you feel at home - you just need to forget everything you know about traditional static routers.
So what is it about newer versions of React Router that align so nicely with React when previous versions fought against it? The answer has to do with composition. By ditching static route configs (rrv4) and leveraging custom Hooks (rrv5), you can compose your routes together just like you would any other part of your React app.
Now that you’re familiar with the why of React Router, let’s look at some code.
BrowserRouter
There are certain circumstances where React Router will need to pass routing props to any component in your application. To accomplish this, React Router uses React Context under the hood of the BrowserRouter component. There’s not much to it, you just need to make sure that if you’re using React Router on the web, you wrap your app inside of a BrowserRouter component.
It’s convention to rename
BrowserRoutetoRouterwhen you import it. We’ll stick to that pattern in this course.
import ReactDOM from 'react'
import * as React from 'react'
import { BrowserRouter as Router } from 'react-router-dom'
import App from './App`

ReactDOM.render(
  <BrowserRouter>
    <App />
  </BrowserRouter>
, document.getElementById('app))
Route
Next is the workhorse of React Router, the Route component. Put simply, Route will render its children element if its path prop matches the app’s location. If not, it’ll render null .
<Route path='/feed'>
  <Home />
</Route>
<Route path='/messages'>
  <Messages >
</Route>
The only gotcha to the Route component is its exact prop. When true, a Route with an exact prop will only match (and therefor render its children element) if the path matches the app’s location exactly. Sounds straight forward but it gets a little weird since React Router v5 does partial matching.
<Route path='/users'>
  <Users />
</Route>
<Route path='/users/new'>
  <NewUser />
</Route>
In this example, if the user was at /users/new , what components would you expect to see? It may come as a surprise but you’d see both the NewUser component as well as the Users component.
The reason for this is because /users is a partial match of /users/new , so both Route s match.’
The most frequent use of the exact prop will be when you have an index route, / . Yes, the index route will partially match any other Route in your application.
<Route path='/'> {/* 🚨 Always matches */}
  <Home />
</Route>
<Route path='/messages'>
  <Messages >
</Route>
<Route exact path='/'>
  {/* Only matches when the user is at / */}
  <Home />
</Route>
<Route path='/messages'>
  <Messages >
</Route>
In their defense, they fix this weird behavior in React Router v6.
Link
Now that you know how to create Route s, the next step is being able to navigate between them. This is the purpose of the Link component.
To tell Link what path to take the user to when clicked, you pass it a to prop.
<nav>
  <Link to='/'>Home</Link>
  <Link to='/messages'>Messages</Link>
</nav>
If you need more control over Link , you can pass to as an object.
<nav>
  <Link to='/'>Home</Link>
  <Link to={{
    pathname: '/messages',
    search: '?sort=date',
    state: { fromHome: true },
    hash: '#does-anyone-use-hashes-anymore`
  }}>Messages</Link>
</nav>
At this point we’ve covered the absolute fundamentals of React Router v5 but one thing should be clear - by embracing composition, React Router is truly a router for React. I believe React will make you a better JavaScript developer and React Router will make you a better React developer.
URL Parameters with React Router v5
URL parameters are parameters whose values are set dynamically in a page’s URL. This allows a route to render the same component (UI) while passing that component the dynamic portion of the URL so it can change based off of it.
Take Twitter for example. Regardless of which profile you go to, Twitter is going to show you the same UI just with different data. They do this by utilizing URL Parameters. If rendered by React Router v5, the Route for the profile pages may look like this.
<Route path='/:handle'>
  <Profile />
</Route>
Notice that the path has a : in front of it. That’s because it’s dynamic. Instead of matching literally, it’s matching for a specific pattern. With this app, anytime someone visits a route that matches that pattern ( /tylermcginnis , /dan_abramov , /anything ), the Profile component is going to be rendered.
Now the question becomes, how do we access the dynamic portion of the URL (in this case, handle ) from the component that’s rendered? As of React Router v5.1, React Router ships with a custom Hook that does just this, useParams . useParams returns an object with a mapping between the URL Parameter and its value.
import * as React from 'react'
import { useParams } from 'react-router-dom'
function Profile () {
  const [user, setUser] = React.useState(null)
  const { handle } = useParams()
  React.useEffect(() => {
    fetch(`https://api.twitter.com/user/${handle}`)
      .then(setUser)
  }, handle)

  return (
    ...
  )
}
Now let’s look at the example from the React Router v5 docs. It’s a simple app that allows us to navigate between 4 different “accounts” - netflix , zillow-group , yahoo , and module-create . Each account will have its own page, similar to Twitter we saw earlier.
First, let’s import the components we’ll need and create our navbar for linking between the different accounts.
import * as React from 'react'
import {
  BrowserRouter as Router,
  Link
} from 'react-router-dom'

export default function App () {
  return (
    <Router>
      <React.Fragment>
        <h2>Accounts</h2>
        <ul>
          <li><Link to="/netflix">Netflix</Link></li>
          <li><Link to="/zillow-group">Zillow Group</Link></li>
          <li><Link to="/yahoo">Yahoo</Link></li>
          <li><Link to="/modus-create">Modus Create</Link></li>
        </ul>
      </React.Fragment>
    </Router>
  )
}
Now that we can navigate between our different accounts, we need to actually render some UI for each account page. To keep things simple, we’ll create a component that just renders the name of the account, i.e. the URL Parameter. Again, in order to get access to the URL Parameter with React Router v5, you use the useParams Hook.
function Account () {
  const { account } = useParams()

  return <h3>ID: {account}</h3>
}
Now that we have our links and the component to render, let’s create our Route with a URL Parameter. Like we saw earlier with Twitter, the pattern we want to use is /:account .
export default function App () {
  return (
    <Router>
      <React.Fragment>
        <h2>Accounts</h2>
        <ul>
          <li><Link to="/netflix">Netflix</Link></li>
          <li><Link to="/zillow-group">Zillow Group</Link></li>
          <li><Link to="/yahoo">Yahoo</Link></li>
          <li><Link to="/modus-create">Modus Create</Link></li>
        </ul>

        <Route path='/:account'>          <Account />        </Route>      </React.Fragment>
    </Router>
  )
}
 Play with the code.
And that’s it. Because we’re using a URL parameter, we can have four different paths render the same component and that component can get access to the dynamic URL Parameter via React Router v5’s useParams Hook.
(Practice) URL Parameters
Refer to the instructions in the code.
Final App Preview
Starter Code
(Solution) URL Parameters
Solution
Nested routes with React Router v5
To understand recursion, you first need to be familiar with functions, return values, and the call stack. Similar, to understand nested routes with React Router v5, you first need to be comfortable with React Router v5’s most fundamental component, Route .
Route allows you to map URL paths to different React components. For example, say we wanted to render the Dashboard component whenever a user navigates to the /home path. To do that, we’d render a Route that looks like this.
<Route path='/home'>
  <Dashboard />
</Route>
The mental model I use for Route is that it always has to render something – either its children element if the path matches or null if it doesn’t.
I realize we’re starting off slow here, but if you fully grasp that last sentence, the rest of this tutorial will be
.
With that out of the way, let’s take a look at the example we’ll be building to demonstrate nested routes. The idea is we have a list of topics, those topics have resources, and those resources have a URL.
Final App
Here’s the data structure we’ll be working with. Notice it maps pretty nicely to our final UI.
const topics = [
  {
    name: 'React Router',
    id: 'react-router',
    description: 'Declarative, component based routing for React',
    resources: [
      {
        name: 'URL Parameters',
        id: 'url-parameters',
        description: "URL parameters are parameters whose values are set dynamically in a page's URL. This allows a route to render the same component while passing that component the dynamic portion of the URL so it can change based off of it.",
        url: 'https://ui.dev/react-router-v5-url-parameters/'
      },
      {
        name: 'Programmatically navigate',
        id: 'programmatically-navigate',
        description: "When building an app with React Router, eventually you'll run into the question of navigating programmatically. The goal of this post is to break down the correct approaches to programmatically navigating with React Router.",
        url: 'https://ui.dev/react-router-v5-programmatically-navigate/'
      }
    ]
  },
  {
    name: 'React.js',
    id: 'reactjs',
    description: 'A JavaScript library for building user interfaces',
    resources: [
      {
        name: 'React Lifecycle Events',
        id: 'react-lifecycle',
        description: "React Lifecycle events allow you to tie into specific phases of a component's life cycle",
        url: 'https://ui.dev/an-introduction-to-life-cycle-events-in-react-js/'
      },
      {
        name: 'React AHA Moments',
        id: 'react-aha',
        description: "A collection of 'Aha' moments while learning React.",
        url: 'https://ui.dev/react-aha-moments/'
      }
    ]
  },
  {
    name: 'Functional Programming',
    id: 'functional-programming',
    description: 'In computer science, functional programming is a programming paradigm—a style of building the structure and elements of computer programs—that treats computation as the evaluation of mathematical functions and avoids changing-state and mutable data.',
    resources: [
      {
        name: 'Imperative vs Declarative programming',
        id: 'imperative-declarative',
        description: 'A guide to understanding the difference between Imperative and Declarative programming.',
        url: 'https://ui.dev/imperative-vs-declarative-programming/'
      },
      {
        name: 'Building User Interfaces with Pure Functions and Function Composition',
        id: 'fn-composition',
        description: 'A guide to building UI with pure functions and function composition in React',
        url: 'https://ui.dev/building-user-interfaces-with-pure-functions-and-function-composition-in-react-js/'
      }
    ]
  }
]
Before we start worrying about nested routes, let’s first create the skeleton of our app including the navbar which will allow us to navigate between Home ( / ) and Topics ( /topics ).
import * as React from 'react'
import {
  BrowserRouter as Router,
  Link,
  Route // for later
} from 'react-router-dom'

const topics = [
  // ...
]

export default function App () {
  return (
      <Router>
        <div style={{width: 1000, margin: '0 auto'}}>
          <ul>
            <li><Link to='/'>Home</Link></li>
            <li><Link to='/topics'>Topics</Link></li>
          </ul>
        </div>
      </Router>
  )
}
Now what we want to do is render a few Route s so that we can map different components to the user’s path. However, before we can do that, we need to actually build out those components. As you saw earlier in the final version of our app, the two top-level components we’ll need are Home and Topics . For now, we’ll throw some placeholder text in both of them.
function Home () {
  return <h1>HOME</h1>
}

function Topics () {
  return <h1>TOPICS</h1>
}
Now that we have our two top-level components, we need to create a Route for each of them. Home will be rendered when the user is at / and Topics will be rendered when the user is at /topics .
export default function App () {
  return (
    <Router>
      <div style={{width: 1000, margin: '0 auto'}}>
        <ul>
          <li><Link to='/'>Home</Link></li>
          <li><Link to='/topics'>Topics</Link></li>
        </ul>

        <hr />

        <Route exact path='/'>          <Home />        </Route>        <Route path='/topics'>          <Topics />        </Route>      </div>
    </Router>
  )
}
When we’re at / , we’ll see the navbar and the Home component. When we’re at /topics , we’ll see the navbar and the Topics component.
Finally, we have a nice foundation to start talking about how we go about dealing with nested routes with React Router v5. Thanks for your patience  .
.
If you look back to the final example, you’ll notice that when we go to /topics , the UI we get is another navbar which includes all of the topics. Let’s modify our Topics component to include this navbar. This time instead of hard-coding our Link s, we’ll need to use our topics array to create a Link for each high-level topic.
function Topics () {
  return (
    <div>
      <h1>Topics</h1>
      <ul>
        {topics.map(({ name, id }) => (
          <li key={id}>
            <Link to={`/topics/${id}`}>{name}</Link>
          </li>
        ))}
      </ul>
    </div>
  )
}
Now, when we go to /topics and the Topics component is rendered, we’ll get three Link s - each linking to a different high-level topic.
Notice where we’re linking to, /topics/${id} . If we’re going to link someone to /topics/${id} , that means we need to render a Route which is going to match at that path. This is the first big concept of nested routes with React Router v5 - it doesn’t matter if you render a Route in your main component or in a child component, if the path matches the app’s location, the children element will be rendered.
With that in mind, let’s create a Route to match the Link s we just created.
function Topic () {
  return <div>TOPIC</div>
}

function Topics () {
  return (
    <div>
      <h1>Topics</h1>
      <ul>
        {topics.map(({ name, id }) => (
          <li key={id}>
            <Link to={`/topics/${id}`}>{name}</Link>
          </li>
        ))}
      </ul>

      <hr />

      <Route path={`/topics/:topicId`}>        <Topic />
      </Route>
    </div>
  )
}
This is why understanding Route was so important. The mental model for Route is still the exact same, but for some reason your brain gets all worked up the first time you render a Route outside of the main App component.
Here’s a step by step step walk-through of what’s happening. When we go to /topics , the Topic component is rendered. Topics then renders a navbar and a new Route which will match for any of the Link s in the navbar we just rendered (since the Link s are linking to /topics/${id} and the Route is matching for /topics/:topicId ). This means that if we click on any of the Link s in the Topics component, the Topic component is going to be rendered.
It’s important to note that just because we matched another
Routecomponent, that doesn’t mean the previousRoutes that matched aren’t still rendered. This is what confuses a lot of people. Remember,Routewill always render something, either a component if thepathmatches ornull. The same way you think of nesting normal components in React can apply directly to nestingRoutes.
At this point, we’re progressing along nicely. What if, for some reason, another member of your team who wasn’t familiar with React Router decided to change /topics to /concepts ? They’d probably head over to the main App component and change the Route
// <Route path='/topics'><Topics /></Route>
<Route path='/concepts'><Topics /><Route/>
NBD, right? Well, now our routing is all broken. Inside of the Topics component, we’re assuming that the path begins with /topics but now it’s been changed to /concepts . Instead of hard coding the initial path, what we need is a way for the Topics component to get access to whatever the initial path is up to that point. That way, regardless of if someone changes the parent Route , it’ll always work.
Good news for us is React Router v5 comes with a custom Hook to give us access to this information called useRouteMatch . useRouteMatch returns an object which contains information about how the Route was matched. Specifically, it has two properties on it, path and url .
path - The path pattern used to match. Useful for building nested <Route>s
url - The matched portion of the URL. Useful for building nested <Link>s
The most important takeaway from those definitions is to use url for creating nested Route s and path for nested Link .
The best way to answer “why” is to look at an example.
If you’re not familiar with URL Parameters, head over to React Router: URL Parameters before continuing.
Assume we were using an app that had nested route’s and the current URL was /topics/react-router/url-parameters .
If we were to use useRouteMatch and log path and url in the most nested component, here’s what we would get.
const { path, url } = useRouteMatch()

console.log(path) // /topics/:topicId/:subId
console.log(url) // /topics/react-router/url-parameters

return (
  ...
)
Notice that path is including the URL parameters and url is just the full URL. This is why one is used for Link s and the other used for Route s.
When you’re creating a nested Link , you don’t want to include the URL parameters. You want the user to literally go to /topics/react-router/url-parameters . That’s why url is better for nested Link s. However, when you’re matching certain patterns with Route , you want to include the URL parameters - that’s why path is used for nested Route s.
Now let’s head back to our example. As of right now, we’re hard-coding /topics into our Route and Link s.
function Topics () {
  return (
    <div>
      <h1>Topics</h1>
      <ul>
        {topics.map(({ name, id }) => (
          <li key={id}>
            <Link to={`/topics/${id}`}>{name}</Link>
          </li>
        ))}
      </ul>

      <hr />

      <Route path={`/topics/:topicId`}>
        <Topic />
      </Route>
    </div>
  )
}
As we just learned, we want our nested Route 's path to be dynamic instead of hard coded. To do this, we can replace the /topics portion of our Link with url and the /topics portion of our Route with path - both coming from useRouteMatch .
function Topics () {
  const { url, path } = useRouteMatch()
  return (
    <div>
      <h1>Topics</h1>
      <ul>
        {topics.map(({ name, id }) => (
          <li key={id}>
            <Link to={`${url}/${id}`}>{name}</Link>          </li>
        ))}
      </ul>

      <hr />

      <Route path={`${path}/:topicId`}>        <Topic />
      </Route>
    </div>
  )
}
At this point, our app is about halfway done. We still need to add a few more layers of nesting. Here’s the good news - there’s nothing more you’re going to learn in this tutorial. We’ll continue to create new nested navbars, continue to render Route s and we’ll continue to use useRouteMatch . If you’re comfortable at this point, the rest is gravy.
Now just as we initially did with the Topics component, we want to make it so Topic (no s) will also render a nested navbar and a Route . The only difference is now we’re one level deeper so we’ll map over the topic 's resources for our Link s and our Route will match at /topics/:topicId/subId .
function Resource () {
  return <p>RESOURCE</p>
}

function Topic () {
  const { topicId } = useParams()
  const { url, path } = useRouteMatch()

  const topic = topics.find(({ id }) => id === topicId)

  return (
    <div>
      <h2>{topic.name}</h2>
      <p>{topic.description}</p>

      <ul>
        {topic.resources.map((sub) => (
          <li key={sub.id}>
            <Link to={`${url}/${sub.id}`}>{sub.name}</Link>
          </li>
        ))}
      </ul>

      <hr />

      <Route path={`${path}/:subId`}>
        <Resource />
      </Route>
    </div>
  )
}
Finally, the last thing we need to do it finish out our Resource component. Because this is the last child component, we’ll no longer be rendering any more Link s or Route s. Instead, we’ll just give it a basic UI including the name of the resource, the description, and a (normal) link.
function Resource () {
  const { topicId, subId } = useParams()

  const topic = topics.find(({ id }) => id === topicId)
    .resources.find(({ id }) => id === subId)

  return (
    <div>
      <h3>{topic.name}</h3>
      <p>{topic.description}</p>
      <a href={topic.url}>More info.</a>
    </div>
  )
}
Here’s the full code.
import * as React from 'react'
import {
  BrowserRouter as Router,
  Link,
  Route,
  useRouteMatch,
  useParams
} from 'react-router-dom'

const topics = [
  {
    name: 'React Router',
    id: 'react-router',
    description: 'Declarative, component based routing for React',
    resources: [
      {
        name: 'URL Parameters',
        id: 'url-parameters',
        description: "URL parameters are parameters whose values are set dynamically in a page's URL. This allows a route to render the same component while passing that component the dynamic portion of the URL so it can change based off of it.",
        url: 'https://ui.dev/react-router-v5-url-parameters/'
      },
      {
        name: 'Programmatically navigate',
        id: 'programmatically-navigate',
        description: "When building an app with React Router, eventually you'll run into the question of navigating programmatically. The goal of this post is to break down the correct approaches to programmatically navigating with React Router.",
        url: 'https://ui.dev/react-router-v5-programmatically-navigate/'
      }
    ]
  },
  {
    name: 'React.js',
    id: 'reactjs',
    description: 'A JavaScript library for building user interfaces',
    resources: [
      {
        name: 'React Lifecycle Events',
        id: 'react-lifecycle',
        description: "React Lifecycle events allow you to tie into specific phases of a component's life cycle",
        url: 'https://ui.dev/an-introduction-to-life-cycle-events-in-react-js/'
      },
      {
        name: 'React AHA Moments',
        id: 'react-aha',
        description: "A collection of 'Aha' moments while learning React.",
        url: 'https://ui.dev/react-aha-moments/'
      }
    ]
  },
  {
    name: 'Functional Programming',
    id: 'functional-programming',
    description: 'In computer science, functional programming is a programming paradigm—a style of building the structure and elements of computer programs—that treats computation as the evaluation of mathematical functions and avoids changing-state and mutable data.',
    resources: [
      {
        name: 'Imperative vs Declarative programming',
        id: 'imperative-declarative',
        description: 'A guide to understanding the difference between Imperative and Declarative programming.',
        url: 'https://ui.dev/imperative-vs-declarative-programming/'
      },
      {
        name: 'Building User Interfaces with Pure Functions and Function Composition',
        id: 'fn-composition',
        description: 'A guide to building UI with pure functions and function composition in React',
        url: 'https://ui.dev/building-user-interfaces-with-pure-functions-and-function-composition-in-react-js/'
      }
    ]
  }
]

function Home() {
  return <h1>HOME</h1>
}

function Resource() {
  const { topicId, subId } = useParams()

  const topic = topics.find(({ id }) => id === topicId)
    .resources.find(({ id }) => id === subId)

  return (
    <div>
      <h3>{topic.name}</h3>
      <p>{topic.description}</p>
      <a href={topic.url}>More info.</a>
    </div>
  )
}

function Topic() {
  const { topicId } = useParams()
  const { url, path } = useRouteMatch()

  const topic = topics.find(({ id }) => id === topicId)

  return (
    <div>
      <h2>{topic.name}</h2>
      <p>{topic.description}</p>

      <ul>
        {topic.resources.map((sub) => (
          <li key={sub.id}>
            <Link to={`${url}/${sub.id}`}>{sub.name}</Link>
          </li>
        ))}
      </ul>

      <hr />

      <Route path={`${path}/:subId`}>
        <Resource />
      </Route>
    </div>
  )
}

function Topics() {
  const { url, path } = useRouteMatch()

  return (
    <div>
      <h1>Topics</h1>
      <ul>
        {topics.map(({ name, id }) => (
          <li key={id}>
            <Link to={`${url}/${id}`}>{name}</Link>
          </li>
        ))}
      </ul>

      <hr />

      <Route path={`${path}/:topicId`}>
        <Topic />
      </Route>
    </div>
  )
}

export default function App() {
  return (
    <Router>
      <div style={{ width: 1000, margin: '0 auto' }}>
        <ul>
          <li><Link to='/'>Home</Link></li>
          <li><Link to='/topics'>Topics</Link></li>
        </ul>

        <hr />

        <Route exact path='/'>
          <Home />
        </Route>
        <Route path='/topics'>
          <Topics />
        </Route>
      </div>
    </Router>
  )
}
Congrats! You now have the power to create nested routes with React Router v5. Tell your Mom, she’ll be proud  .
.
(Practice) Nested Routes
Refer to the instructions in the code.
Final App Preview
Starter Code
(Solution) Nested Routes
Solution
Pass props to a component rendered by React Router v5
React Router v5 uses a declarative, component-based approach to routing. What that means is when you want to create a new route, you render a Route component. Route allows you to map URL paths to different React components. For example, say we wanted to render the Dashboard component whenever a user navigates to the /dashboard path. To do that, we’d render a Route that looks like this.
<Route path='/dashboard'>
  <Dashboard />
</Route>
Now, what if we also wanted to pass the Dashboard component a prop? In previous versions of React Router (v4), this was non-trivial since React Router was in charge of creating the element. You’d have to use the Route s render prop. However, with React Router v5, since you’re in charge of creating the element, you’d pass a prop just like you normally would.
<Route path='/dashboard'>
  <Dashboard authed={true}/>
</Route>
(Practice) Passing Props
Refer to the instructions in the code.
Starter Code
(Solution) Passing Props
Solution
Programmatically navigate using React Router v5
What I love about React Router is its dedication to declarative, “React like” code. The whole goal of the redesign to React Router v3 to v4 was to align React Router’s vision with React’s. Fundamentally, what this means is that the same mental model that applies to React should also apply to React Router.
If you broke React down into three core principles, you’d get component composition, declarative UI, and state management - specifically, user event -> state change -> re-render . Because React Router’s vision is aligned with React’s, programmatically navigating with React Router should, by definition, align with those three core concepts. The reason I’m emphasizing this is because your initial reaction to what’s coming next will most likely be negative.
The primary way you programmatically navigate using React Router v5 is by using a <Redirect /> component.
Let’s look at an example then we’ll walk through more of why this isn’t as crazy as it may first appear.
The typical use case for routing programmatically is routing on some sort of user event that isn’t a Link click. So in our example, let’s navigate the user to /dashboard once they’ve registered for our app.
function Register () {
  const [toDashboard, setToDashboard] = React.useState(false)

  if (toDashboard === true) {
    return <Redirect to='/dashboard'/>
  }

  return (
      <div>
        <h1>Register</h1>
        <Form afterSubmit={() => toDashboard(true)} />
      </div>
  )
}
After reading that, there’s at least a small chance that you hate it. Instead of using an imperative API ( history.push ), we’re using a declarative Redirect component. Again, the reason for this is because it aligns exactly with the principles of React itself.
is
- Composable

- Declarative
- user event -> state change -> re-render
What are the downsides to this approach? The most often heard criticism is that you need to create a new property on the component’s state in order to know when to render the Redirect component. That’s valid, but again, that’s pretty much the whole point of React - state changes update the UI. “It’s more typing”, yes. Naturally, by explicitly defining and modifying your state, you have to type more. However, I’d argue that explicit state leading to a declarative API is better than implicit state handled by an imperative API.
Steps off high horse
Let’s take a look at the other approach now.
The real workhorse of React Router is the History library. Under the hood, it’s what’s keeping track of session history for React Router. As of React Router v5.1, you can get access to history via the useHistory custom Hook. This history object has a ton of fancy properties on it related to routing. In this case, the one we’re interested in is history.push . What it does is it pushes a new entry into the history stack - redirecting the user to another route.
Going back to our example from earlier, if we wanted to use the imperative history.push method, it would look like this.
import React from 'react'
import { useHistory } from 'react-router-dom
function Register () {
  const history = useHistory()
  return (
    <div>
      <h1>Register</h1>
      <Form afterSubmit={() => history.push('/dashboard')} />    </div>
  )
}
Easy peasy. Worse, IMO. But, easy peasy.
So there you have it. There are two ways to programmatically navigate with React Router v5 - <Redirect /> and history.push . You can get access to Redirect by importing it from the react-router-dom package and you can get access to history by using the custom useHistory Hook. Which you use is mostly up to you and your specific use case, though I try to favor Redirect as it’s more declarative.
(Practice) Programmatically Navigate (Declarative)
Refer to the instructions in the code.
Final App Preview
Starter Code
(Solution) Programmatically Navigate (Declarative)
Solution
(Practice) Programmatically Navigate (Imperative)
Refer to the instructions in the code.
Final App Preview
Starter Code
(Solution) Programmatically Navigate (Imperative)
Solution
Query Strings with React Router v5
When you’re building for the web, sometimes you need to pass information via the URL. To do this, you can use a query string.
You’ve probably seen them before IRL. Here’s an example from Twitter’s analytics page.
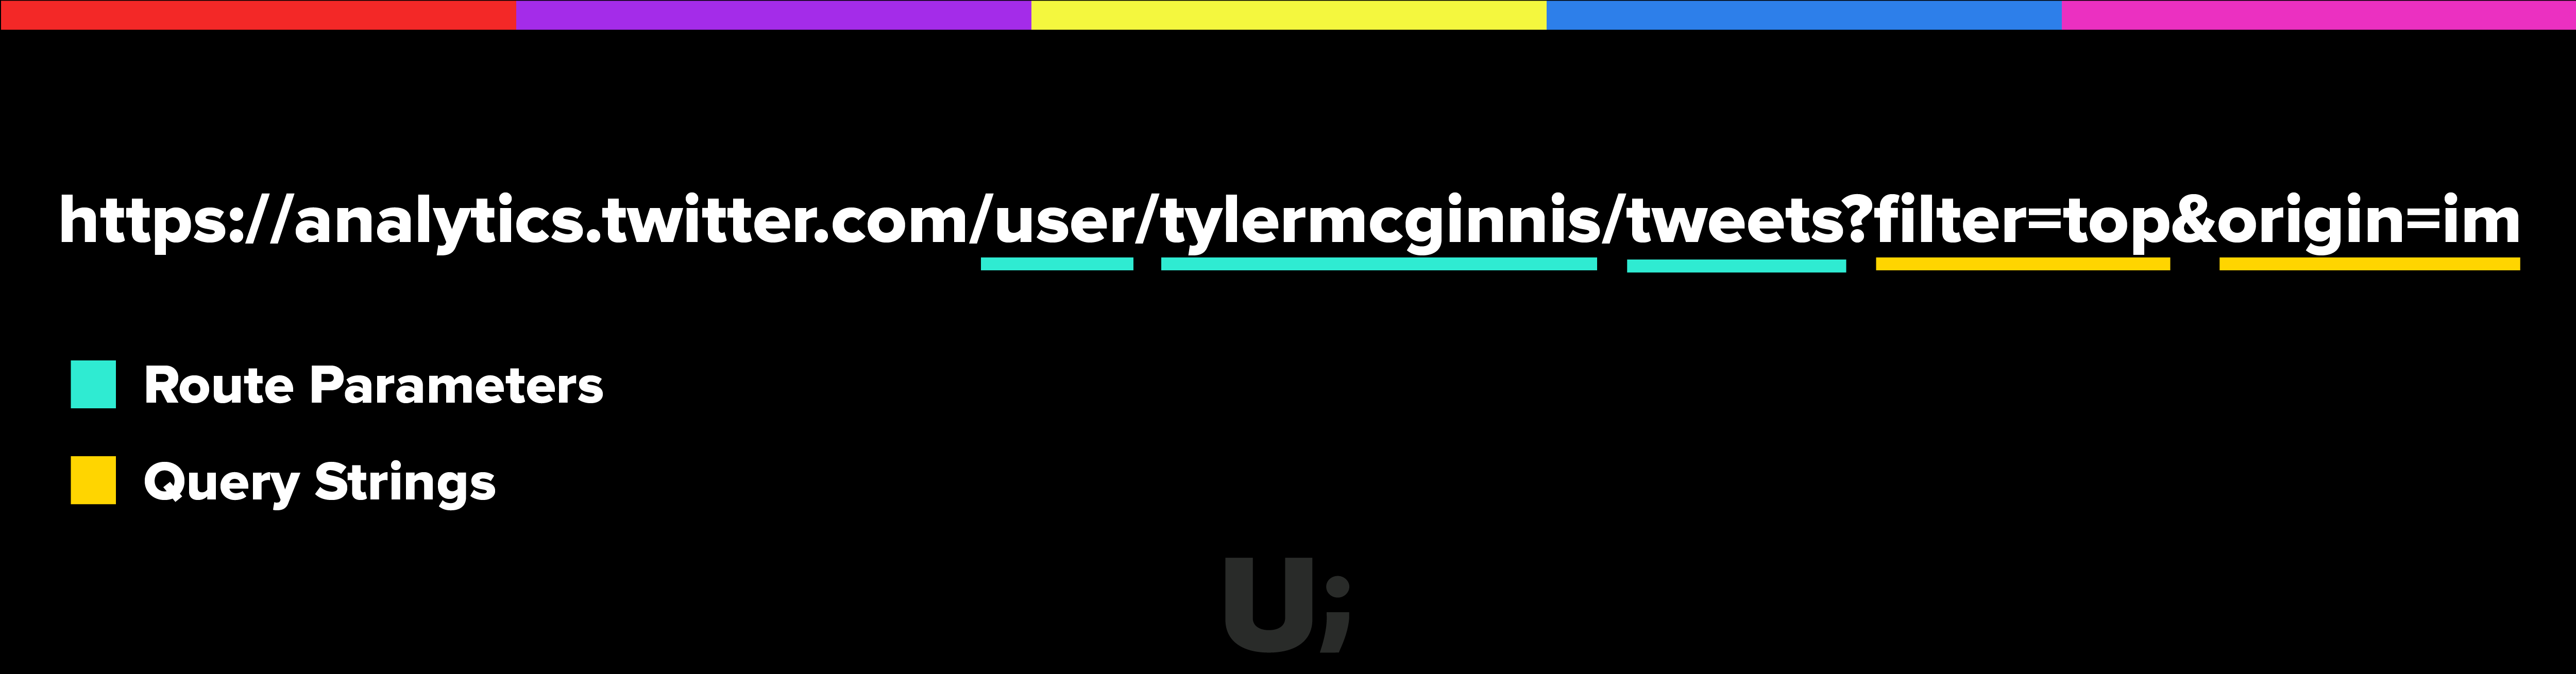
This URL has three route parameters and two query strings. Twitter is using query strings to tell its route to filter the Tweets by top (most popular) and that the origin was im (which I’m not sure what that means, TBH).
With that said, odds are you’re not here to learn what query strings are but instead how to use them with React Router v5. The good news is that if you’re already comfortable with React Router v5, there are just a few small details you need to know.
Let’s say we were Twitter and we were building the Route for the URL above. It would probably look something like this.
const { path } = useRouteMatch()

return (
  <Route path={`${path}/tweets`}>
    <Tweets />
  </Route>
)
Notice at this point there’s nothing new. We don’t account for the query string when we create the Route . Instead, we parse them inside the component that is being rendered when that path matches - in this case, Tweets .
Now the question becomes, how do we actually do this?
As of React Router v5.1, React Router comes with a custom useLocation Hook. useLocation returns a location object which has a search property whose value is the query string.
const { search } = useLocation()
console.log(search) // "?filter=top&origin=im"
Cool, but this is the literal query string . You’ll need to somehow parse it before you can get the actual values.
You may be surprised to hear that React Router v5 doesn’t come with built-in with support for parsing query strings. The reason for this is because, over the years, there have been many requests to support different implementations. With that, the team decided it would be best for users to decide what the implementation looks like rather than baking in a “one size fits all” solution. Regardless, what that means is that you’ll need to bring your own query-string parser.
There are two common solutions. Either use a browser API (that may not be supported by all the browsers you need) or use an external library for parsing the query string. The library I typically use is the query-string library on NPM.
With that library installed, all we need to do is call queryString.parse , passing it location.search . That will parse the query string into an object which we can then grab the values off of.
import queryString from 'query-string'
import { useLocation } from 'react-router-dom'

...

const { search } = useLocation()
const values = queryString.parse(search)
console.log(values.filter) // "top"
console.log(values.origin) // "im"
That’s it. Go parse those query strings.
(Practice) Query Strings
Refer to the instructions in the code.
Final App Preview
Starter Code
(Solution) Query Strings
Solution
Handling 404 pages (catch all routes) with React Router v5
A common use case for when you’re building a web app is to have a “catch all” route that will be rendered if none of your other routes match. A common example of this would be a 404 page.
To see how this works with React Router v5, let’s first render a navbar with the following paths - / , /will-match , /will-not-match , and /also/will/not/match .
import * as React from 'react'
import {
  BrowserRouter as Router,
  Route,
  Link
} from 'react-router-dom'

export default function App () {
  return (
    <Router>
      <div>
        <ul>
          <li><Link to="/">Home</Link></li>
          <li><Link to="/will-match">Will Match</Link></li>
          <li><Link to="/will-not-match">Will Not Match</Link></li>
          <li><Link to="/also/will/not/match">Also Will Not Match</Link></li>
        </ul>
      </div>
    </Router>
  )
}
Now that we have the navbar set up, let’s create three different components to render - Home , which will match on / , WillMatch which will match on /will-match , and NoMatch , which will be the catch-all component which will render only if none of the other Route 's match.
const Home = () => <h1>Home</h1>

const WillMatch = () => <h3>Matched!</h3>

const NoMatch = () => {
  const { pathname } = useLocation()

  <h3>No match for <code>{pathname}</code></h3>
}
Now that we have the components which are going to be rendered, we need to actually render some Route s. Home and WillMatch are straight forward, you just render them as you normally would.
export default function App() {
  return (
    <Router>
      <div>
        <ul>
          <li><Link to="/">Home</Link></li>
          <li><Link to="/will-match">Will Match</Link></li>
          <li><Link to="/will-not-match">Will Not Match</Link></li>
          <li><Link to="/also/will/not/match">Also Will Not Match</Link></li>
        </ul>

        <Route path="/" exact>          <Home />        </Route>        <Route path="/will-match">          <WillMatch />        </Route>      </div>
    </Router>
  )
}
Now the question becomes, how do we render NoMatch ? Remember, we only want to render NoMatch if both the / and /will-match Route s don’t match. There are two parts to accomplishing this - the first is to render a Route that will always match. We can do this by passing * to the Route s path prop.
<Route path="/" exact>
  <Home />
</Route>
<Route path="/will-match">
  <WillMatch />
</Route>
<Route path='*'>
  <NoMatch />
</Route>
That’s closer, but if you play around with the app, you know we’re not done yet. Now the app renders the Home and WillMatch components properly but it also always renders the NoMatch component no matter what path we’re on.
What we need is a way to tell React Router v5 that we only want to render the first Route that matches - even if there’s more than one match. By doing this, our NoMatch component will only get rendered if the two Route s above it, / and /will-match aren’t matched.
The good news is React Router v5 comes with a component that does exactly this and it’s called Switch . By wrapping your Route s inside of Switch , React Router v5 will only render the first Route that matches.
export default function App() {
  return (
    <Router>
      <div>
        <ul>
          <li><Link to="/">Home</Link></li>
          <li><Link to="/will-match">Will Match</Link></li>
          <li><Link to="/will-not-match">Will Not Match</Link></li>
          <li><Link to="/also/will/not/match">Also Will Not Match</Link></li>
        </ul>

        <Switch>          <Route path="/" exact>            <Home />          </Route>          <Route path="/will-match">            <WillMatch />          </Route>          <Route path='*'>            <NoMatch />          </Route>        </Switch>      </div>
    </Router>
  )
}
Now if the user isn’t at / or /will-match , the NoMatch component will be rendered.
You can utilize this same pattern to render a client-side 404 page if none of your other Route s match.
<Switch>
  <Route exact path="/"><Home /></Route>
  <Route path="/profile"><Profile /></Route>
  <Route path='*'><FourZeroFour /></Route>
</Switch>
(Practice) Catch All Routes
Refer to the instructions in the code.