Ambiguous Matches with React Router v5
tl;dr
Place your dynamic Route at the end of all of your Route s and place all of your Route s inside of a Switch component. That way, only the first Route that matches will be rendered.
Here’s the scenario. It’s April 2020. Covid-19 is nbd yet and there’s an excess of venture capital and you’ve managed to snag some by pitching your “Twitter for minimalists” app. You’re a long time contributor to Hacker News so you’re confident you can knock it out in a weekend.
The app is simple with only three routes - / , /notifications , and /:handle .
You’re a few hours in and you hit a snag. You run rm -rf node_modules && npm install , no luck. You check Twitter. You come back to your app. It’s still broken.
You take a look at your Routes.
<Route exact path='/'><Home /></Route>
<Route path='/notifications'><Notifications /></Route>
<Route path='/:handle'><Profile /></Route>
The issue you’re running into is that every time you navigate to /notifications , not only does the Notifications component render, but so does the Profile component since /:handle is also matching. What you need is a way to tell React Router to not match on /:handle if /notifications already matched. You decide to google “ambiguous matches” and you find this post, meta.
First, let’s create our navbar to navigate between our three routes. We’ll use /tylermcginnis and /dan-abramov to represent our dynamic user links.
import React from 'react'
import {
  BrowserRouter as Router,
  Link,
} from 'react-router-dom'

export default function App () {
  return (
    <Router>
      <div>
        <ul>
          <li><Link to="/">Home</Link></li>
          <li><Link to="/notifications">Notifications</Link></li>
          <li><Link to="/tylermcginnis">Tyler (dynamic)</Link></li>
          <li><Link to="/dan_abramov">Dan (dynamic)</Link></li>
        </ul>
      </div>
    </Router>
  )
}
 Play with the code.
Now that we have our navbar setup, let’s create our components that we’ll be rendering. We’ll have Home , Notifications , and Profile .
const Home = () => <h2>Home</h2>
const Notifications = () => <h2>Notifications</h2>

const Profile = () => {
  const { handle } = useParams()

  return (
    <div>
      <h2>Profile: {handle}</h2>
    </div>
  )
}
Now comes the point of this post. Earlier we mentioned that our Route s looked like this -
<Route exact path='/'><Home /></Route>
<Route path='/notifications'><Notifications /></Route>
<Route path='/:handle'><Profile /></Route>
The problem, as mentioned earlier, is every time you navigate to /notifications , not only does the Notifications component render, but so does the Profile component since /:handle is also matching. What we need is a way to tell React Router v5 to not match on /:handle if /notifications already matched. Another way to put that is we only want to render the first Route that matches, not every Route that matches which is the default behavior.
To do this, you can wrap your Route s inside of the Switch component that comes with React Router v5.
<Switch>
  <Route exact path='/' component={Home} />
  <Route path='/notifications' component={Notifications} />
  <Route path='/:handle' component={Profile} />
</Switch>
(Practice) Ambiguous Matches
Refer to the instructions in the code.
Final App Preview
Starter Code
(Solution) Ambiguous Matches
Solution
Pass props to React Router v5’s Link component
When building an app with React Router v5, sometimes you’ll need to pass props through the Link component to the new route. In this post, we’ll break down how that process works.
There are two different ways to pass data from the Link component through to the new route. The first is through URL Parameters and the second is through state .
First, let’s take a look at URL parameters. If you’ve read our URL Parameters post, you’ll be familiar with this example. Say we were in charge of building out the Route that renders Twitter’s profile page. If created with React Router v5, that Route would probably look something like this.
<Route path='/:handle'>
  <Profile />
</Route>
Notice that handle has a : in front of it, that’s because it’s going to be dynamic. It could be anything from tylermcginnis or dan_abramov to realDonaldTrump .
So in our app, we may have a Link component that looks like this.
<Link to='/tylermcginnis'>Tyler McGinnis</Link>
If clicked, the user would be taken to /tylermcginnis and the Profile component would be rendered. Profile would be able to access the dynamic URL parameter ( tylermcginnis ) by using the useParams custom Hook.
function Profile () {
  const { handle } = useParams()
  const [user, setUser] = React.useState(null)

  React.useEffect(() => {
    fetch(`https://api.twitter.com/user/${handle}`)      .then(setUser)
  }, [handle])

  return (
    ...
  )
}
URL parameters are great, but they’re not meant to serve as a way to get data from one route to another as they’re limited to just strings. What if instead of just a string, we wanted to pass along something a little more complex, like an object or an array? There would be no way to do that with URL parameters. This brings us to the second way to pass data from one route to another and that’s with state .
Going back to our Twitter example from earlier, what if we wanted to pass along if the user is coming from a certain route? For example, say we wanted to know if the user is coming from the /notifications route when they click on the Link . To do this, instead of passing to as a string to Link , we can pass it an object with a pathname and a state property.
<Link to={{
  pathname: '/tylermcginnis',
  state: {
    fromNotifications: true
  }
}}>Tyler McGinnis</Link>
Now the question becomes, how does the component that’s being rendered when the user goes to /tylermcginnis get access to the fromNotifications property? Anytime you pass data along via the state property, that data will be available on location.state which you can get access to by using the custom useLocation Hook that comes with React Router v5.
function Profile () {
  const { handle } = useParams()
  const location = useLocation()  const { fromNotifications } = location.state  const [user, setUser] = React.useState(null)

  React.useEffect(() => {
    fetch(`https://api.twitter.com/user/${handle}`)
      .then(setUser)
  }, [handle])

  return (
    ...
  )
}
To recap, there are two ways to pass data from a Link through to the new route: URL parameters and state . URL parameters work great for strings, but aren’t meant for any other data types. By making the Link s to prop an object, you can pass along any sort of data you need under the state property and that data can be accessed via location.state using the custom useLocation Hook.
(Practice) Passing Props to Link
Refer to the instructions in the code.
Final App Preview
Starter Code
(Solution) Passing Props to Link
Solution
Rendering a Sidebar or Breadcrumbs with React Router v5
A common UI pattern is to have a sidebar or breadcrumb navbar in your app. Because React Router v5 allows you to render and match more than one Route per page, implementing this pattern is pretty straight forward. The goal of this post is to show how you can, by rendering multiple Route s, render separate components at separate parts of your page (like a sidebar).
The first thing we’ll do, and really the secret implementing a sidebar or breadcrumbs, is to create a routes array. Each item in the array is going to contain all the information about the specific route, including which component should be rendered.
const routes = [
  {
    path: '/',
    exact: true,
    sidebar: () => <div>home!</div>,
    main: () => <h2>Home</h2>
  },
  {
    path: '/bubblegum',
    sidebar: () => <div>bubblegum!</div>,
    main: () => <h2>Bubblegum</h2>
  },
  {
    path: '/shoelaces',
    sidebar: () => <div>shoelaces!</div>,
    main: () => <h2>Shoelaces</h2>
  }
]
Now, because we’ve abstracted our routes to this array, whenever we want to render any Route s, we can map over it and specify which component should be rendered ( main or sidebar ).
To show how this is done, let’s first build out the basic skeleton for our app.
import * as React from 'react'
import {
  BrowserRouter as Router,
  Route,
  Link,
} from 'react-router-dom'

const routes = [
  {
    path: '/',
    exact: true,
    sidebar: () => <div>home!</div>,
    main: () => <h2>Home</h2>
  },
  {
    path: '/bubblegum',
    sidebar: () => <div>bubblegum!</div>,
    main: () => <h2>Bubblegum</h2>
  },
  {
    path: '/shoelaces',
    sidebar: () => <div>shoelaces!</div>,
    main: () => <h2>Shoelaces</h2>
  }
]

export default function App () {
  return (
    <Router>
      <div style={{ display: 'flex' }}>
        <div style={{
          padding: '10px',
          width: '40%',
        }}>
          <ul style={{ listStyleType: 'none', padding: 0 }}>
            <li><Link to="/">Home</Link></li>
            <li><Link to="/bubblegum">Bubblegum</Link></li>
            <li><Link to="/shoelaces">Shoelaces</Link></li>
          </ul>

        </div>
      </div>
    </Router>
  )
}
Remember, the goal here is to render multiple components in different places of the app, based on the app’s path. We already have our routes array, so wherever we want to render some Route s we can map over it. First, let’s add some Route s to the sidebar (inside of our nav).
export default function App () {
  return (
    <Router>
      <div style={{ display: 'flex' }}>
        <div style={{
          padding: '10px',
          width: '40%',
        }}>
          <ul style={{ listStyleType: 'none', padding: 0 }}>
            <li><Link to="/">Home</Link></li>
            <li><Link to="/bubblegum">Bubblegum</Link></li>
            <li><Link to="/shoelaces">Shoelaces</Link></li>
          </ul>
          {routes.map((route) => (            <Route              key={route.path}              path={route.path}              exact={route.exact}            >              <route.sidebar />            </Route>          ))}        </div>
      </div>
    </Router>
  )
}
The biggest thing to notice is that we’ve passed route.sidebar to Route s component prop. This is the crux of the example and shows the importance of the routes array we created earlier. Now whenever the app’s location matches the path , the sidebar component will be rendered. However, we don’t just want to stop there. We also want to render a component in the main body of our app as well. To do that, we’ll map over routes again but instead of component being route.sidebar , we’ll pass it route.main .
export default function App () {
  return (
    <Router>
      <div style={{ display: 'flex' }}>
        <div style={{
          padding: '10px',
          width: '40%',
        }}>
          <ul style={{ listStyleType: 'none', padding: 0 }}>
            <li><Link to="/">Home</Link></li>
            <li><Link to="/bubblegum">Bubblegum</Link></li>
            <li><Link to="/shoelaces">Shoelaces</Link></li>
          </ul>
          {routes.map((route) => (
            <Route
              key={route.path}
              path={route.path}
              exact={route.exact}
            >
              <route.sidebar />
            </Route>
          ))}
        </div>

        <div style={{ flex: 1, padding: '10px' }}>
          {routes.map((route) => (            <Route              key={route.path}              path={route.path}              exact={route.exact}            >              <route.main />            </Route>          ))}        </div>
      </div>
    </Router>
  )
}
Because React Router v5 allows us to render and match more than one Route on a page, and because we abstracted our routes to their own array, we can render different components at different sections of our page whenever the app’s location matches the Route s path .
(Practice) Sidebar
Refer to the instructions in the code.
Final App Preview
Starter Code
(Solution) Sidebar
Solution
Customizing your own Link component with React Router v5
The most important thing to understand about React Router v5 is how composable it is. React Router doesn’t give you a house - it gives you some nails, screws, plywood, and a hammer while trusting that you can do the rest. A more technical way to say that is React Router v4 gives you the routing primitives upon which you can build your app. This concept really shines in the example we’re going to build.
What we want to do is create our own “old school” navbar. Basically what that means is we’ll add a “>” to the front of whatever Link is active. If our two routes were / and /about , the two states of our navbar would look like this
> Home
About
Home
> About
First, the easy part. Let’s build the skeleton of the app by building out our Route s and the components we’ll be rendering, Home and About .
import * as React from 'react'
import {
  BrowserRouter as Router,
  Route,
  Link
} from 'react-router-dom'

const Home = () => <h2>Home</h2>
const About = () => <h2>About</h2>

export default function App () {
  return (
    <Router>
      <div>
        {/* Links */}

        <hr/>

        <Route exact path="/"><Home/></Route>
        <Route path="/about"><About/></Route>
      </div>
    </Router>
  )
}
Beautiful. Now we need to implement our custom Link component - we’ll call it OldSchoolMenuLink . The goal is to make the code below work properly. Notice it’s the OldSchoolMenuLink that will be in charge of adding and removing the > but its API is the same as Link .
export default function App() {
  return (
    <Router>
      <div>
        <OldSchoolMenuLink exact={true} to="/">          Home        </OldSchoolMenuLink>        <OldSchoolMenuLink to="/about">          About        </OldSchoolMenuLink>
        <hr />

        <Route exact path="/"><Home /></Route>
        <Route path="/about"><About /></Route>
      </div>
    </Router>
  )
}
First, let’s do the easy part. We know what props OldSchoolMenuLink is going to be taking in, so we can build out the skeleton of the component.
function OldSchoolMenuLink ({ children, to, exact }) {}
Now the main question is, what is it going to render? Remember, the whole point of this component is to make this navbar UI work (based on the active route)
> Home
About
Home
> About
With that said, we know we’re going to render a Link and if the app’s current location matches the Link s path, we’ll pre-pend it with a > .
Now the next question naturally becomes, how do we find out if the “app’s current location matches the Link 's path”? Here’s one approach. We know the Link s path because we’re passing it in as the to prop. We also know the app’s location because we can use window.location.pathname . With that said, we might implement OldSchoolMenuLink like this.
function OldSchoolMenuLink ({ children, to, exact }) {
  const match = window.location.pathname === to

  return (
    <div className={match ? 'active' : ''}>
      {match ? '> ' : ''}
      <Link to={to}>
        {children}
      </Link>
    </div>
  )
}
Well, this seems to work. The problem is it’s not really the React or React Router way of doing things. It also feels weird to reach out to the window object to get the app’s location. There’s a better way and it involves a tool that we already have at our disposal, React Router’s useRouteMatch custom Hook.
useRouteMatch gives you information on how (or if) the Route matched. Typically you invoke it with no arguments to get the app’s current path and url . In our case, instead of just getting the current path and url , we want to customize it to see if the app’s path matches OldSchoolMenuLink 's to prop. If it does we want to pre-pend > and if it doesn’t we won’t. To tell useRouteMatch what we want to match for, we can pass it an object with a path prop and an exact prop.
function OldSchoolMenuLink ({ children, to, exact }) {
  const match = useRouteMatch({
    exact,
    path: to,
  })

  return (
    <div className={match ? 'active' : ''}>
      {match ? '> ' : ''}
      <Link to={to}>
        {children}
      </Link>
    </div>
  )
}
Just like that, we’ve created our own Link component and used React Router’s useRouteMatch custom Hook to do some path checking for us.
(Practice) Customizing Link
Refer to the instructions in the code.
Final App Preview
Starter Code
(Solution) Customizing Link
Solution
(Project) Hash History Basketball League Introduction
You can play around with the final project here - basketball-v5.ui.dev
The repo for this project is located here
(Project) Starter Code
The full code for this video can be found here.
The single commit for this video can be found here.
(Project) Initial Routes
The full code for this video can be found here.
The single commit for this video can be found here.
(Project) Catch-all (404) route
The full code for this video can be found here.
The single commit for this video can be found here.
(Project) Home Route
The full code for this video can be found here.
The single commit for this video can be found here.
(Project) Sidebar Component
The full code for this video can be found here.
The single commit for this video can be found here.
(Project) Players Route
The full code for this video can be found here.
The single commit for this video can be found here.
(Project) Team’s Route
The full code for this video can be found here.
The single commit for this video can be found here.
(Project) Team Page
The full code for this video can be found here.
The single commit for this video can be found here.
(Project) Articles Route
The full code for this video can be found here.
The single commit for this video can be found here.
(Project) Loading Component
The full code for this video can be found here.
The single commit for this video can be found here.
Animated Transitions with React Router v5
If you’re reading this, you’ve probably discovered that React Router v5 doesn’t come with a built-in solution for animated transitions. That ties into React Router’s philosophy - it gives you routing primitives that you can build on and trusts you can figure out the rest. Because every app has different needs, this approach is typically the safest. The downside of this is that it’ll take some extra work to get the exact functionality you want. The tool we’ll be using alongside React Router in this post is “React Transition Group”. React Transition Group is an animation library that gives us a way to perform animations when a React component enters or leaves the DOM. Paired with React Router, it’s the perfect tool to animate route transitions.
First, let’s walk through the type of app we’re going to be building to demonstrate animated route transitions.
If you’re not familiar with URL Parameters, read URL Parameters with React Router v5 before continuing.
Animations aside, the goal is to make it so the user can navigate between URLs with the following patterns, /hsl/:h/:s/:l and /rgb/:r/:g/:b .
If you’re familiar with HSL and RGB codes, those should look familiar. When the user navigates to a path that matches /hsl/:h/:s/:l , the background will animate to an HSL color with the corresponding hue ( :h ), saturation ( :s ), and lightness ( :l ). Similar, when the user navigates a path that matches /rgb/:r/:g/:b , the background will animate to an RGB color with the corresponding red ( :r ), green ( :g ), and blue ( :b ) values.
Final App Preview
Because you’re here to learn about animated transitions with React Router v5 and not how to set up a basic React app, I’ll give you the starter code upfront. Don’t continue before you have a solid understanding of how it works. It’s the final app without the animated transitions.
For animating our transitions, the first thing we need to do is take a look into how React Transition Group works. Like React Router, it has a component-based API. The two components we’ll be using from it are TransitionGroup and CSSTransition .
First, let’s look at TransitionGroup . The way you use TransitionGroup is as a wrapper component.
<TransitionGroup>
  {/* stuff */}
</TransitionGroup>
Defined, it’s a “state machine for managing the mounting and unmounting of components over time”. In practice, the first thing it does is it keeps track of all of its children ( props.children ) inside of its local state. Then, whenever its props change and its getDerivedStateFromProps is called, it loops over the next children and figures out which are new (entering), which have been deleted (exiting), and which children have stayed the same. Once it figures that out, it clones and merges all of its children together passing to each item a few props which represent its status ( exiting , entering , etc.). At this point, it updates its local state with all of the merged children (which all individually know if they’re entering, exiting, or remaining the same). That causes a re-render and the new merged children is shown to the view.
Breathe
That was a lot of words to say that TransitionGroup renders all its new and old children after passing certain props to each based on if they’re new, old, or the same.
You may be wondering why it renders all the old children, new children, and children that didn’t change. The reason for that is for animation purposes. For example, an “old” ( exiting ) child might receive an animation that takes its opacity from 1 to 0. A new ( entering ) child might pull a Peter Thiel and receive an animation that takes its opacity from 0 to 1. Regardless, it’s important to understand that all the children are going to be shown for a specified time.
The last important item to mention about TransitionGroup is the way in which it keeps track of which children are which. If you’re familiar with React, you’re familiar with the idea of key props. When you’re mapping over an array to create a list UI, you need to give each item a unique key prop. This way, React can effectively manage that list. It’s the exact same thing with TransitionGroup 's children. Each child needs its own unique key prop so TransitionGroup can more effectively figure out which children have changed (entered or exited).
I realize we’re pretty deep in the weeds here. Stick with me, you’re doing great.
Next, we have the CSSTransition component. When you render a TransitionGroup , its direct children must either be a CSSTransition component or a Transition component (both come with the library).
What CSSTransition does is it takes the information it got from TransitionGroup , specifically if certain children are entering, leaving, or staying the same, and it applies a pair of class names to them during the ‘appear’, ‘enter’, and ‘exit’ stages of the transition based on their status. What this allows you to do is, based on those class names, have CSS in your app which will select the same class names that CSSTransition is applying and add some styles to those elements. For example, if we told CSSTransition to apply a fade class, our CSS might look like this.
.fade-enter {
  opacity: 0;
  z-index: 1;
}

.fade-enter.fade-enter-active {
  opacity: 1;
  transition: opacity 250ms ease-in;
}
That way we’ll adjust the opacity of an element anytime it has a class name of fade-enter (which CSSTransition will apply for us).
Alright now that we have our App set up and we understand a little bit more about React Transition Group, let’s join them.
First, we know that we have to wrap everything that’s going to be animating inside of TransitionGroup . Since we’ll be animating our Switch component, let’s wrap it in TransitionGroup .
...

import { TransitionGroup } from 'react-transition-group'
...

function Content () {
  return (
    <div className='fill content'>
      <TransitionGroup>        <Switch>          <Route exact path="/hsl/:h/:s/:l">            <HSL />          </Route>          <Route exact path="/rgb/:r/:g/:b">            <RGB />          </Route>          <Route path='*'>            <div>Not Found</div>          </Route>        </Switch>      </TransitionGroup>    </div>
  )
}
Now as we talked about earlier, TransitionGroup only gets us part of the way there; we also need to tie in CSSTransition Just like we did with TransitionGroup , let’s wrap our Switch inside of a CSSTransition component so we can specify some properties for how Switch will be animated.
We’ll pass it two props, timeout and classNames (notice it’s plural, with an s ). timeout specifies how long TransitionGroup will display all of its children before removing the old children (aka how long the animation will take place). classNames is the CSS class that is applied to the component as it enters or exits.
For example, if you provide a classNames of
fade, then the following classes will be added to the component during its animation lifecycle -fade-enter,fade-enter-active,fade-exit,fade-exit-active,fade-appear, andfade-appear-active.
...

import { TransitionGroup, CSSTransition } from 'react-transition-group'
...

function Content () {
  return (
    <div className='fill content'>
      <TransitionGroup>
        <CSSTransition          timeout={300}          classNames='fade'        >
          <Switch>
            <Route exact path="/hsl/:h/:s/:l">
              <HSL />
            </Route>
            <Route exact path="/rgb/:r/:g/:b">
              <RGB />
            </Route>
            <Route path='*'>
              <div>Not Found</div>
            </Route>
          </Switch>        </CSSTransition>
      </TransitionGroup>
    </div>
  )
}
Now, because we’ve given it a classNames prop of fade , we need to add some CSS that will do the animation for us.
.fade-enter {
  opacity: 0;
  z-index: 1;
}

.fade-enter.fade-enter-active {
  opacity: 1;
  transition: opacity 250ms ease-in;
}
And…! It doesn’t work. 
Remember earlier when we talked about how TransitionGroup keeps track of its children? Because we didn’t give CSSTransition a unique key, whenever we switch routes, TransitionGroup just assumes nothing happened since none of its children’s key s changed.
Now the question is, what should we use for a unique key? Well, what is the thing that is changing in the app? It’s the app’s location. So ideally, we would use that as the key since we know if the location changed, we’d want TransitionGroup to be aware of that and let CSSTransition know.
Now we have another problem  . How do we get the app’s location? We could reach out to
 window.location but that feels hacky and not very React like. Instead, we’ll use React Router v5’s useLocation custom Hook. That will return us a location object which has a key property we can use.
...

import { useLocation } from 'react-router-dom'
...

function Content () {
  const location = useLocation()
  return (
    <div className='fill content'>
      <TransitionGroup>
        <CSSTransition
          timeout={300}
          classNames='fade'
          key={location.key}        >
          ...
        </CSSTransition>
      </TransitionGroup>
    </div>
  )
}
 now we have access to a unique key value in
 location.key and we can pass that as a key prop to CSSTransition . And with that, we’re done!
Just kidding

You’re so close! Pinky promise.
If you run the app as it currently is, you’ll notice that everything seems to be working fine. When you navigate to a new path, for 300ms ( timeout ), both the new CSSTransition component and the old CSSTransition component are in the DOM. You can see this perfectly in the React Dev Tools screenshot below.
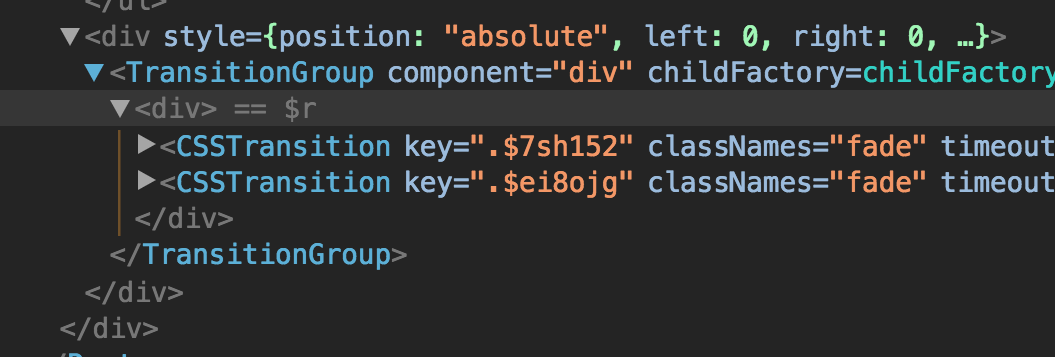
Here’s what’s happening. At that exact moment of the screenshot, if you look deeper into the CSSTransition components, the first one looks like this.

and the second looks like this

Notice that eventually CSSTransition is rendering our Switch component, which makes sense. You’ll also notice that the images are the exact same except for the key props. This isn’t’ good and it’s the reason why it’s not working.
Take a closer look at the Switch components in the images above. Notice that both of them have the exact same location prop. We don’t want that to happen. Remember the purpose of Switch is to render the component of the first Route that matches. If the location prop is the same on both Switch components, that means that the same Route is going to match in both Switch es, which means the same component is going to be rendered. This means that even if the animations are occurring, we’re not going to see them since both components being rendered are the same. What we need to do is figure out why the locations are the same and how to fix them. The goal here is to make it so when TransitionGroup renders its children, the old child has the previous location while the new child has the new location. Right now, they both just have the new location.
Whenever you render a Switch component, under the hood Switch is going to get its location from context.location . You can think of it as Router keeping track of the app’s current location and Switch always has access to it. This gives us a huge insight into the current issue we’re having. When both Switch es are rendered, they’re both grabbing the location from context. By the time they render, context.location has already been updated to the new location. This means that instead of getting one Switch with the old location and one with the new location, both have the new location since both got the location from context.location . Now, how do we fix this?
When you use Switch , it can take in an optional location prop. That prop allows you to tell Switch “Hey, use this location instead of the location from context”. Exactly what we need. Since we already have access to location from earlier when we used useLocation , all we have to do is pass it so Switch .
function Content () {
  const location = useLocation()

  return (
    <div className='fill content'>
      <TransitionGroup>
        <CSSTransition
          timeout={300}
          classNames='fade'
          key={location.key}
        >
          <Switch location={location}>            <Route exact path="/hsl/:h/:s/:l">
              <HSL />
            </Route>
            <Route exact path="/rgb/:r/:g/:b">
              <RGB />
            </Route>
            <Route path='*'>
              <div>Not Found</div>
            </Route>
          </Switch>
        </CSSTransition>
      </TransitionGroup>
    </div>
  )
}
And just like that, it works! (for real this time).
The goal of this post was to really dive into the why of animated transitions in React Router v5 and I think we’ve accomplished just that.
(Practice) Animated Transitions
Refer to the instructions in the code.
Final App Preview
Starter Code
(Solution) Animated Transitions
Solution
(Project) Animating Players
The full code for this video can be found here.
The single commit for this video can be found here.
Code Splitting with React.lazy and React Router v5
It’s 2020. Your users shouldn’t have to download your entire app when all they need is a piece of it. If a user is creating a new post, it doesn’t make sense to have them download all the code for the /registration route. If a user is registering, they don’t need the huge rich text editor your app needs on the /settings route. It’s wasteful and some would argue disrespectful to those users who don’t have the privilege of unlimited bandwidth. This idea has not only gained much more popularity in recent years, but it’s also become exponentially easier to pull off - it even has a fancy cool name - code splitting.
The idea is simple, don’t download code until the user needs it. Though in practice, it’s not that simple. The reason for this isn’t because code splitting itself is terribly difficult, but that there are various tools to do it and everyone has an opinion on which is the best. When you’re first starting out, it can be hard to parse what is what.
The two most common approaches are using Webpack and its bundle loader or the ECMAScript dynamic import() proposal which is currently in stage 4 of the ECMAScript process. Any chance I get to not use webpack I take, so we’ll be using dynamic
import()in this post.
If you’re familiar with ES modules, you know that they’re completely static. What that means is that you must specify what you’re importing and exporting at compile time, not run time. This also means that you can’t dynamically import a module based on some condition. import s need to be declared at the top of your file or they’ll throw an error.
if (!user) {
import * as api from './api' // 🙅♀️🚫. "import' and 'export' may only appear at the top level"
}
Now, what if import didn’t have to be static? Meaning what if the code above worked? What benefits would that give us? First, it would mean we could load certain modules on demand. That would be pretty powerful since it would enable us to get closer to the vision of only downloading code the user needs.
if (editPost === true) {
  import * as edit from './editpost'

  edit.showEditor()
}
Assuming editpost contained a pretty large rich text editor, we’d make sure we didn’t download it until the user was actually ready to use it.
Another cool use case of this would be for legacy support. You could hold off on downloading specific code until you were certain the user’s browser didn’t already have it natively.
Here’s the good news (that I kind of already alluded to earlier). This type of functionality does exist, it’s supported by default with Create React App, and it’s currently in Stage 4 of the ECMAScript process. The difference is that instead of using import as you typically would, you use it like a function that returns you a promise that resolves with the module once the module is completely loaded.
if (editPost === true) {
  import('./editpost')
    .then((module) => module.showEditor())
    .catch((e) => )
}
Pretty rad, right?
Now that we know how to import modules dynamically, the next step is figuring out how to use it with React and React Router v5.
The first (and probably biggest) question we need to ask ourselves when it comes to code splitting with React is where should we split at? Typically, there are two answers.
Split at the route level.
Split at the component level.


The more common approach is to split at the route level. You already split your app into different routes, so adding in code splitting on top of that feels pretty natural. How would this actually look?
Let’s start off with a basic React Router v5 example. We’ll have three routes, / , /topics , /settings .
import * as React from 'react'
import {
  BrowserRouter as Router,
  Route,
  Link,
} from 'react-router-dom'

import Home from './Home'
import Topics from './Topics'
import Settings from './Settings'

export default function App() {
  return (
    <Router>
      <div>
        <ul>
          <li><Link to='/'>Home</Link></li>
          <li><Link to='/topics'>Topics</Link></li>
          <li><Link to='/settings'>Settings</Link></li>
        </ul>

        <hr />

        <Route exact path='/'>
          <Home/>
        </Route>
        <Route path='/topics'>
          <Topics/>
        </Route>
        <Route path='/settings'>
          <Settings/>
        </Route>
      </div>
    </Router>
  )
}
Now, say our /settings route was super heavy. It contains a rich text editor, an original copy of Super Mario Brothers, and an HD image of Guy Fieri. We don’t want the user to have to download all of that when they’re not on the /settings route. We’ve already learned about Dynamic Imports but there’s still one piece of information we’re missing, React.lazy .
React.lazy takes in a single argument - a function that invokes a dynamic import . What it returns is a regular React Component
const LazyHomeComponent = React.lazy(() => import('./Home'))

...

<LazyHomeComponent />
Now the last question you may have centers around what to show to the UI as React is loading the module. Because Dynamic Imports are asynchronous, there’s an unspecified amount of time the user needs to wait before the component is loaded, rendered, and the UI is displayed. To solve this, you can use React’s Suspense component passing it a fallback element.
const Settings = React.lazy(() => import('./Settings'))

function App () {
  return (
    <div>
      <React.Suspense fallback={<Loading />}>
        <Settings />
      </React.Suspense>
    </div>
  )
}
What’s nice about React.Suspense is that Suspense can take in multiple, lazily loaded components while still only rendering one fallback element.
const AdDashboard = React.lazy(() => import('./AdDashboard'))
const Analytics = React.lazy(() => import('./Analytics'))
const Settings = React.lazy(() => import('./Settings'))

function App () {
  return (
    <div>
      <React.Suspense fallback={<Loading />}>
        <AdDashboard />
        <Analytics />
        <Settings />
      </React.Suspense>
    </div>
  )
}
Now let’s update our app from earlier to utilize our newly found knowledge of Dynamic Imports, React.lazy , and React.Suspense .
import * as React from 'react'
import {
  BrowserRouter as Router,
  Route,
  Link,
} from 'react-router-dom'
import Loading from './Loading'

const Home = React.lazy(() => import('./Home'))
const Topics = React.lazy(() => import('./Topics'))
const Settings = React.lazy(() => import('./Settings'))

export default function App () {
  return (
    <Router>
      <div>
        <ul>
          <li><Link to='/'>Home</Link></li>
          <li><Link to='/topics'>Topics</Link></li>
          <li><Link to='/settings'>Settings</Link></li>
        </ul>

        <hr />

        <React.Suspense fallback={<Loading />}>
          <Route exact path='/'>
            <Home />
          </Route>
          <Route path='/topics'>
            <Topics />
          </Route>
          <Route path='/settings'>
            <Settings />
          </Route>
        </React.Suspense>
      </div>
    </Router>
  )
}
How do we know this is actually working and code splitting our routes? If you were to run npm run build with an app created by Create React App, you’d see our app’s being split into 3 chunk s.

Each chunk is each dynamic import() in our app.
Remember earlier when we talked about how there were two main ways to go about code splitting your app? We had this handy little guide.
Split at the route level.
Split at the component level.
So far we’ve only covered splitting at the route level. This is where a lot of people stop. Code splitting at the route level only is like brushing your teeth but never flossing. Your teeth will be mostly clean, but you’ll still get cavities.
Instead of thinking about code splitting as splitting your app up by its routes, you should think of it as splitting your app up by its components ( <Route> s are just components, after all). If you have a rich text editor that lives in a modal, splitting by the route only will still load the editor even if the modal is never opened.
At this point, it’s more of a paradigm shift that needs to happen in your brain rather than any new knowledge. You already know how to dynamically import modules with import() , now you just need to figure out which components in your app you can hold off downloading until your user needs them.
(Practice) React.lazy
Refer to the instructions in the code.
Final App Preview
Starter Code
(Solution) React.lazy
Solution
(Project) Code split
The full code for this video can be found here.
The single commit for this video can be found here.
Protected routes and authentication with React Router v5
Often times when building a web app, you’ll need to protect certain routes in your application from users who don’t have the proper authentication. Though React Router doesn’t provide any functionality for this out of the box, because it was built with composability in mind, adding it is fairly straight forward.
Before we even go about creating our protected routes, we’ll need a way to figure out if the user is authenticated. Because this is a tutorial about React Router v5 protected routes and not about authentication, we’ll use a dummy object to mock our auth service.
const fakeAuth = {
  isAuthenticated: false,
  authenticate(cb) {
    this.isAuthenticated = true
    setTimeout(cb, 100) // fake async
  },
  signout(cb) {
    this.isAuthenticated = false
    setTimeout(cb, 100) // fake async
  }
}
Now that that’s out of the way, let’s build out the components that’ll be rendered by React Router v5 when certain paths match - Public , Protected and Login .
Public and Protected are simple. Login will be a little more complex so we’ll build out the skeleton for it now and finish the rest later.
const Public = () => <h3>Public</h3>
const Protected = () => <h3>Protected</h3>

function Login () {
  return (
    <div>
      Login
    </div>
  )
}
Now that we have some components, the next step is to start rendering some Route s.
Before we start worrying about creating any protected routes, let’s render the Route s for /public and /login and the Link s for /public and /protected .
export default function App () {
  return (
    <Router>
      <div>
        <ul>
          <li><Link to="/public">Public Page</Link></li>
          <li><Link to="/protected">Protected Page</Link></li>
        </ul>

        <Route path="/public" component={Public}/>
        <Route path="/login" component={Login}/>
      </div>
    </Router>
  )
}
Now the idea is that anyone will be able to access /public (and therefore see the Public component), but eventually, anyone who tries to access /protected who isn’t authenticated, will get redirected to /login .
So naturally, the next step is to render a Route with a path of /protected . The problem is that by rendering a normal Route , anyone will be able to access it, which obviously isn’t what we want.
It would be nice if, just like React Router v5 gives us a Route component, they also gave us a PrivateRoute component which would render the component only if the user was authenticated.
Something like this
<Route path="/public">
  <Public />
</Route>
<Route path="/login">
  <Login />
</Route>
<PrivateRoute path='/protected'>
  <Protected />
</PrivateRoute>
Unfortunately, they don’t. However, the good news is that Route is composable. That means wee can create our PrivateRoute implementation which handles our own specific use cases.
Here are the requirements for our PrivateRoute component.
- It has the same API as .
- It renders a and passes all the props through to it.
- It checks if the user is authenticated. If they are, it renders the “component” prop. If not, it redirects the user to /login.
With those requirements in mind, let’s build it out.
// Requirement 1.
// It has the same API as <Route />

function PrivateRoute ({ component: Component, ...rest }) {

}
// Requirement 2.
// It renders a <Route /> and passes all the props through to it.

function PrivateRoute ({ component: Component, ...rest }) {
  return (
    <Route {...rest}>

    </Route>
  )
}
// Requirement 3.
// It checks if the user is authenticated, if they are,
// it renders the "component" prop. If not, it redirects
// the user to /login.

function PrivateRoute ({ children, ...rest }) {
  return (
    <Route {...rest} render={() => {
      return fakeAuth.isAuthenticated === true
        ? children
        : <Redirect to='/login' />
    }} />
  )
}
Notice that we’re using React Router v5’s render prop instead of the children element as we usually do. The reason for this is because render allows us to re-check if the user is authenticated every time the Route matches. If instead we used the children element, React Router would only ever see the initial state of fakeAuth.isAuthenticated .
At this point, you can see the PrivateRoute component in action if you try to click on the Protected Page link. You should be redirected to /login instead of being taken to the /protected route.
Now what we need to do is finish filling out our Login component so that we can actually authenticate.
First, let’s add a login method which calls fakeAuth.authenticate .
function Login () {
  const login = () => fakeAuth.authenticate(() => {

  })

  return (
    <div>
      Login
    </div>
  )
}
Now what we want to do is when the user authenticates (through the login method), they should be redirected to the home ( / ) page. There are a few different approaches to redirecting with React Router v5. You can use the imperative history.push method or you can use the declarative <Redirect /> component. In this case, let’s go with <Redirect /> .
We’ll need to add a property to the component’s state that will clue us in to when we should render a <Redirect /> .
function Login () {
  const [
    redirectToReferrer,
    setRedirectToReferrer
  ] = React.useState(false)

  const login = () => fakeAuth.authenticate(() => {
    setRedirectToReferrer(true)
  })

 if (redirectToReferrer === true) {
   return <Redirect to='/' />
 }

 return (
   <div>
     Login
   </div>
 )
}
So now what we’re doing is when the user authenticates, we change redirectToReferrer to true which causes a re-render and then renders the <Redirect /> component taking the user to the / route.
Now all of this is worthless if the user has no way to login. Let’s add that now.
return (
  <div>
    <p>You must log in to view the page</p>
    <button onClick={login}>Log in</button>
  </div>
)
At this point, everything works great. When a user who isn’t authenticated tries to go to /protected , they’re redirected to /login . Then once they’re authenticated, they can access /protected .
There is one more addition we can make to make the UX a little better. You’ve probably experienced this very common UX fail before. You try to access a specific page, it redirects you to the login page, you authenticate, then, instead of taking you back to the initial page you were trying to access, it takes you to a completely unrelated page. Instead of being taken to an unrelated page, you should have been taken back to the initial page you were trying to access before you were redirected. At this point in our code, we’re also committing that UX fail. Let’s fix it.
First, inside of our PrivateRoute component, when we redirect the user for not being authenticated, we’ll need to pass along the current route they’re trying to visit so we can come back to it after they authenticate. We can do this by changing the Redirect 's to prop from a string to an object and pass along a state key whose value is the current location of the route the user is trying to access.
Because we used Route s render prop, we’re passed the location as a prop rather than using useLocation Hook.
function PrivateRoute({ children, ...rest }) {
  return (
    <Route {...rest} render={({ location }) => {      return fakeAuth.isAuthenticated === true
        ? children
        : <Redirect to={{            pathname: '/login',            state: { from: location }          }} />    }} />
  )
}
Now we need to modify our Login component so that if the user was redirected there from a previous route, once they authenticate, they’re taken back to that original route.
function Login() {
  const [
    redirectToReferrer,
    setRedirectToReferrer
  ] = React.useState(false)

  const { state } = useLocation()
  const login = () => fakeAuth.authenticate(() => {
    setRedirectToReferrer(true)
  })

  if (redirectToReferrer === true) {
    return <Redirect to={state?.from || '/'} />  }

  return (
    ...
  )
}
 . Now when the user authenticates, they’ll be taken back to the original route they were trying to access.
At this point we’re basically done. The only other feature we need to add the ability for users to log out. To do this, we’ll create an AuthButton component that if the user is logged in, will render a logout button and if they’re not logged in, will render text that says “You are not logged in”. The biggest gotcha of this component will be how we redirect once the user logs out.
With React Router v5 there are two ways to programmatically navigate. The first, and what you’ve seen in this post, is to render a Redirect component. The second, and what we’ll do in this component, is to use history.push . We can get access to history via React Router v5.1’s useHistory custom Hook.
function AuthButton () {
  const history = useHistory()

  return fakeAuth.isAuthenticated === true
    ? <p>
        Welcome! <button onClick={() => {
          fakeAuth.signout(() => history.push('/'))
        }}>Sign out</button>
      </p>
    : <p>You are not logged in.</p>
}
Now that we have our AuthButton component, all we have to do now is just render it.
export default function App() {
  return (
    <Router>
      <div>
        <AuthButton />
        <ul>
          <li><Link to="/public">Public Page</Link></li>
          <li><Link to="/protected">Protected Page</Link></li>
        </ul>

        <Route path="/public">
          <Public />
        </Route>
        <Route path="/login">
          <Login />
        </Route>
        <PrivateRoute path='/protected'>
          <Protected />
        </PrivateRoute>
      </div>
    </Router>
  )
}
And with that, we’re all finished.
Here’s the obligatory comment where I say “You shouldn’t solely rely on front end authentication to protect your routes”. It’s just for UX purposes.