Introduction, Philosophy, and Tips
Welcome! (Don’t skip this)
Learning anything new is always a significant endeavor. I don’t take for granted that there’s an opportunity cost in taking this course. Trust that every aspect of this course, from the text and videos to the quizzes and curriculum have been meticulously thought over and debated. The end result is what we strongly believe is the most in-depth and effective way to learn React that exists.
Before we dive into the material, there are some important housekeeping items to mention first.
- I believe very strongly in creating a linear approach to learning. You should feel as if you’re walking up a staircase, not rock climbing. Logistically what this means is that this course is very in-depth. At times you may be tempted to skip certain texts or videos, don’t. Because of this linear approach, each new section builds upon the previous sections. If you’re already familiar with a certain topic, skim it, don’t skip it.
- Throughout the course, you’ll see various types of content. Here’s a breakdown.
- The first introduction you’ll see to any new concept will be in a blog post/video format. This ensures you’re able to hyperfocus on the new concept without needing any external context. If you see a section without the () tags (listed below), it’s this format. You’re not expected to code along during these sections.
- (Project) - Throughout the course, we’ll build a project together. Above each (Project) video will be a link to its coinciding branch as well as the specific commit on Github. If you get stuck or your code isn’t working, check your code against the code in the commit. You are expected to code along with these sections.
- (Practice) - These are usually hosted on Code Sandbox and are designed to get you experience with a particular topic before you’re tasked with implementing it into the project. You might be tempted to skip these, don’t.
- (Solution) - These are the solution videos to the (Practice)s.
- (Quiz) - Your typical quiz. If you find yourself guessing on the quiz problems, redo the section. If the quizzes seem “easy”, that’s a good sign.
- (Bonus) - Bonus material that doesn’t fit into the flow of the normal course but is still important to know.
- If you skipped #2, go read it.
- Once the course is over, you’ll be given a link to the curriculum. This will be the hardest part of the course but also the most rewarding.
- You can take this course regardless of if you’re on Mac, Linux, or Windows. If you’re wondering, I’m running Node v11.10.0 and NPM v6.8.0.
Good luck!
There are two projects you’ll build during this course.
Why React?
I’ve been using and teaching React since 2014. Back then we all knew it was special, but I don’t think any of us could have predicted the growth and impact it would eventually have on the JavaScript ecosystem. In this post, I hope to break down why I personally love React as well as what I believe have been important factors to its success.
Composition
You’re probably familiar with the idea of taking individual functions and composing them together to get some value.
function getProfilePic (username) {
  return 'https://photo.fb.com/' + username
}

function getProfileLink (username) {
  return 'https://www.fb.com/' + username
}

function getAvatarInfo (username) {
  return {
    pic: getProfilePic(username),
    link: getProfileLink(username)
  }
}

getAvatarInfo('tylermcginnis')
Now, what if instead of composing functions together to get some value , we compose functions together to get some UI ? Sounds a little strange at first, but this idea is foundational to what makes React so powerful.
function ProfilePic (props) {
  return (
    <img src={'https://photo.fb.com/' + props.username'} />
  )
}

function ProfileLink (props) {
  return (
    <a href={'https://www.fb.com/' + props.username}>
      {props.username}
    </a>
  )
}

function Avatar (props) {
  return (
    <div>
      <ProfilePic username={props.username} />
      <ProfileLink username={props.username} />
    </div>
  )
}


<Avatar username="tylermcginnis" />
Because composition is a language-agnostic programming principle, regardless of what programming language you have experience with, the same intuition you have about building and composing functions together can be directly applied to building and composing React components together. On top of that, by bringing composition to the UI layer, the same benefits you typically see from composition will now directly apply to your UIs.
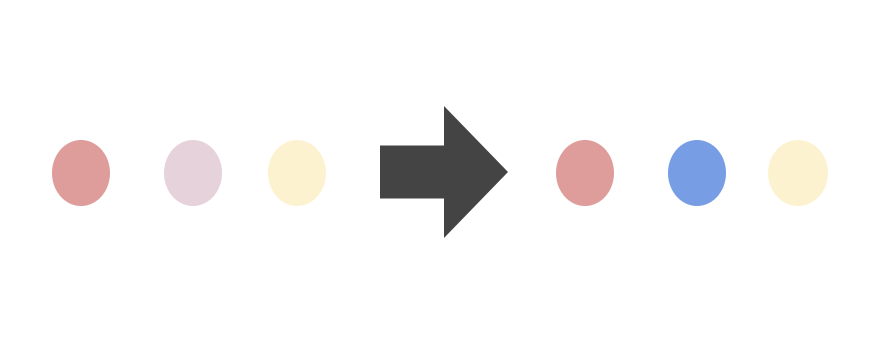
Another benefit of component composition is you naturally get a vibrant ecosystem of third-party components. At this point pretty much any type of React component that can be made as a third party component has been and is available on NPM.
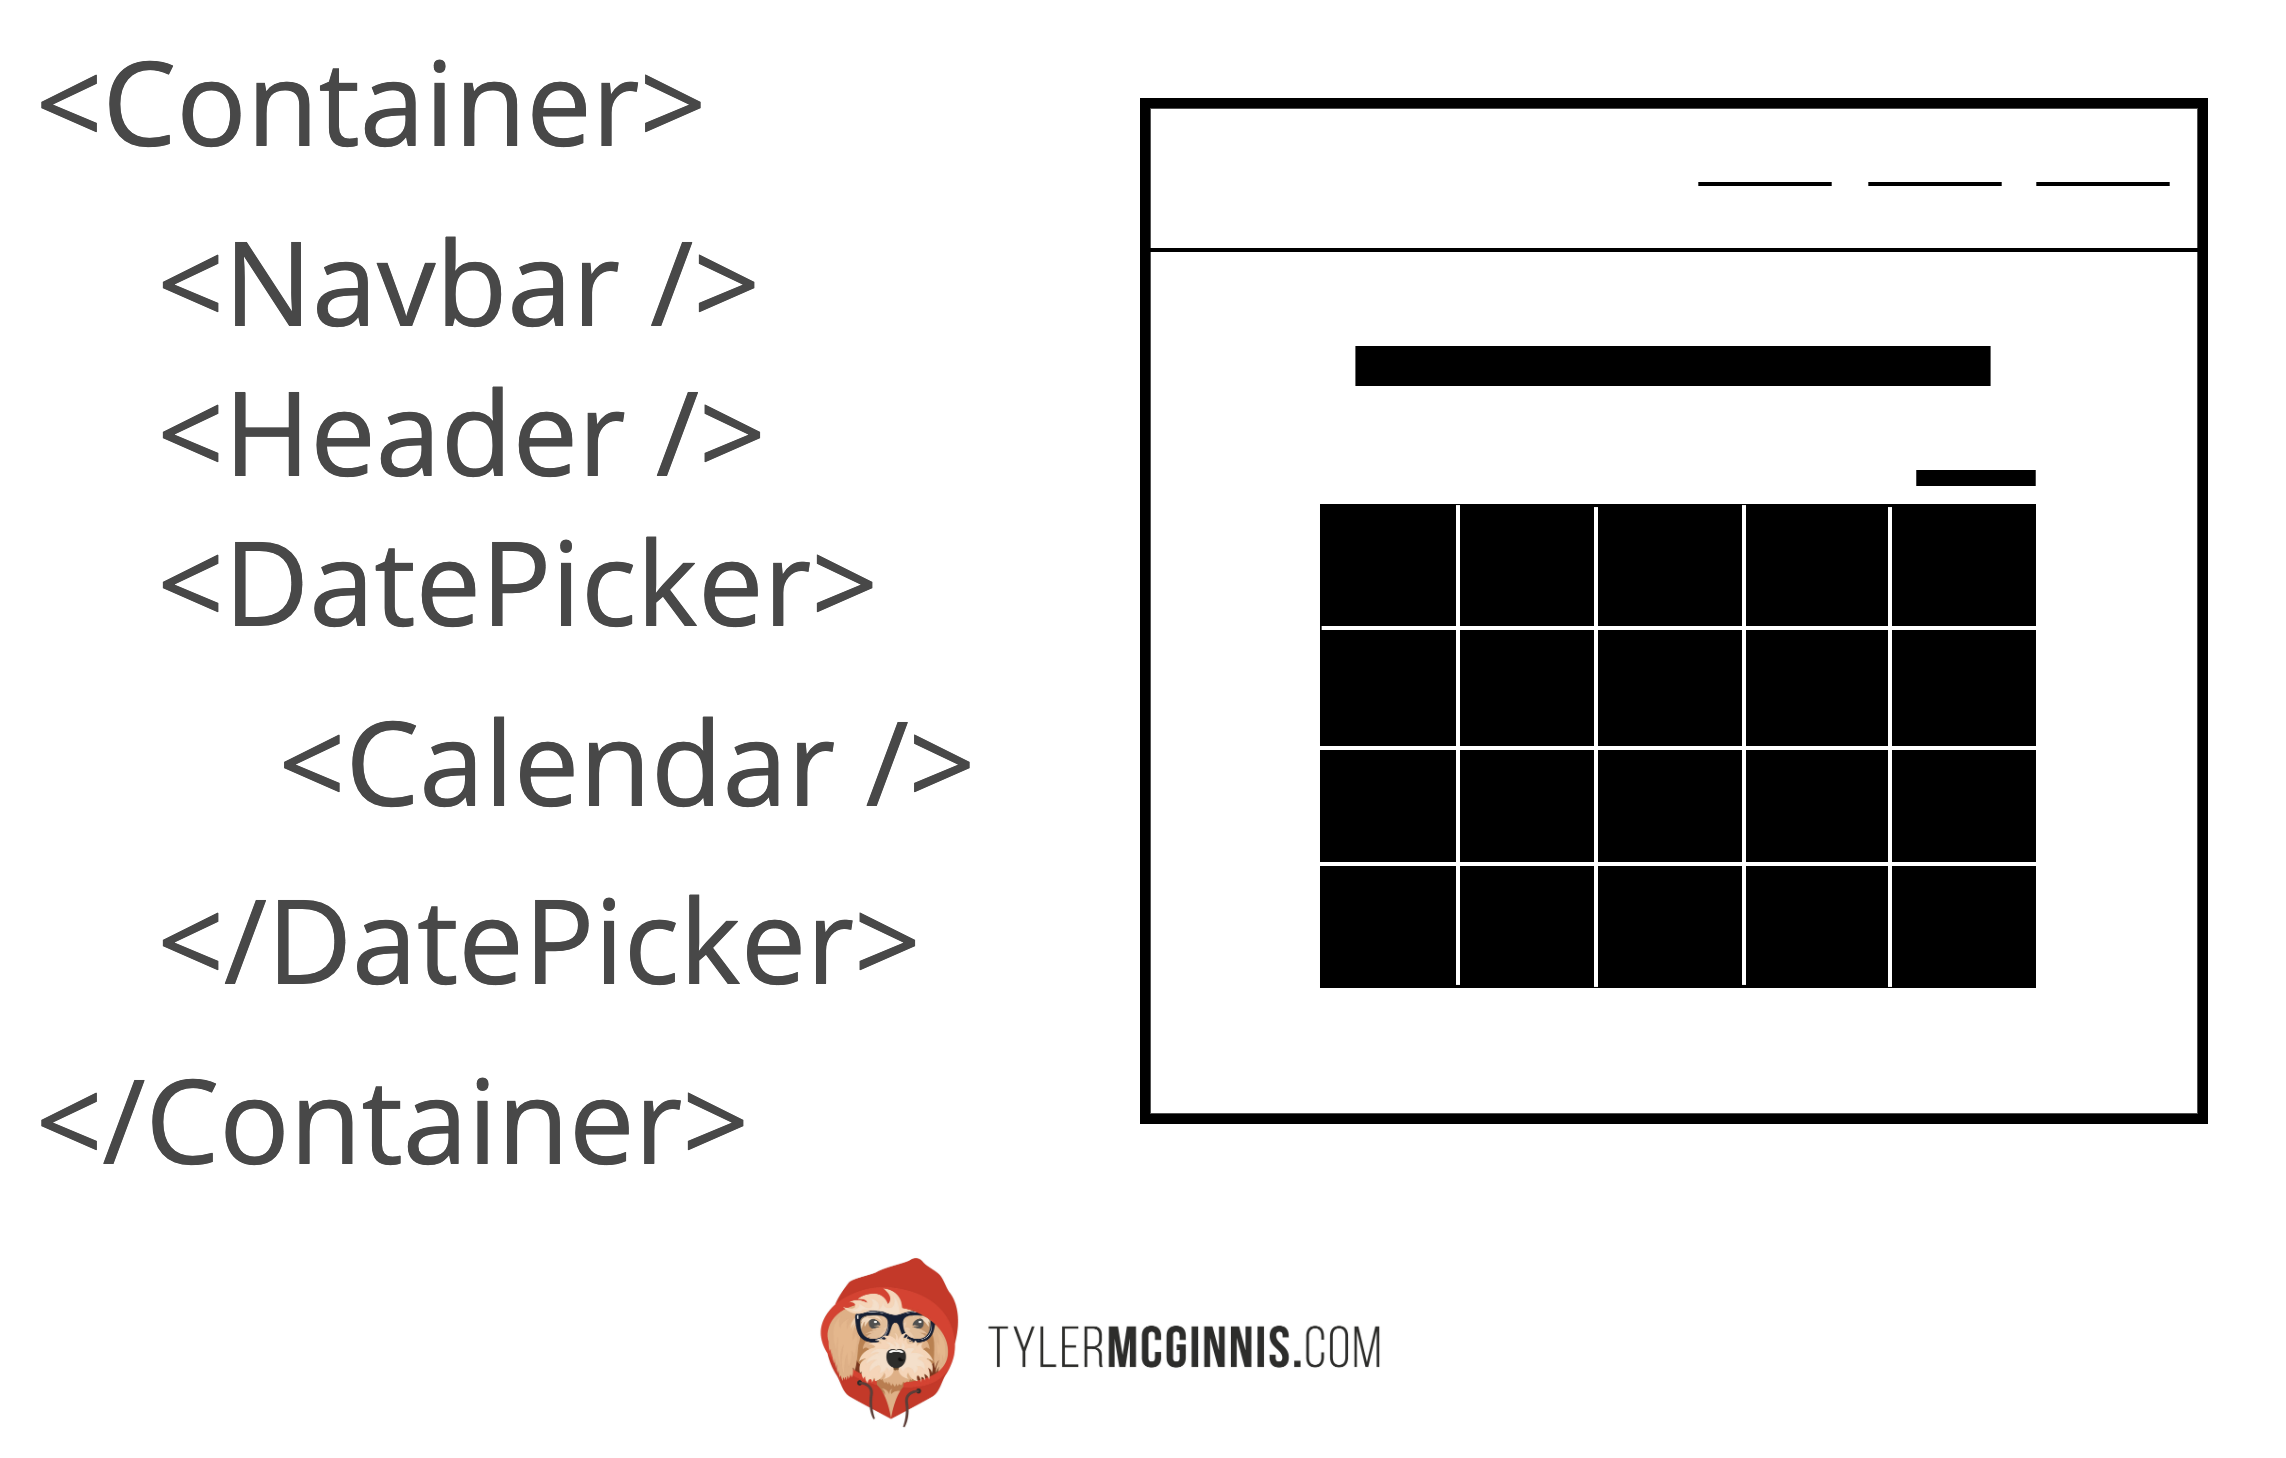
To get your brain thinking this way, here are some example components that you might build or download. React really is just Legos for developers.
<Calendar />

<Map />

<Chart />

<Datepicker />

<Slider />

<Navbar />

<Router />

<Header />

<Date />

<Avatar />

<Carousel />

<Icon />
Unidirectional Dataflow
A big part of building predictable and robust applications is knowing when and how state changes. If you’re coming from a jQuery background, you may be familiar with the following scenario. You start building your app, and everything is fine. You have event handlers which are responsible for updating the state of your application (which lives in the DOM, primarily).
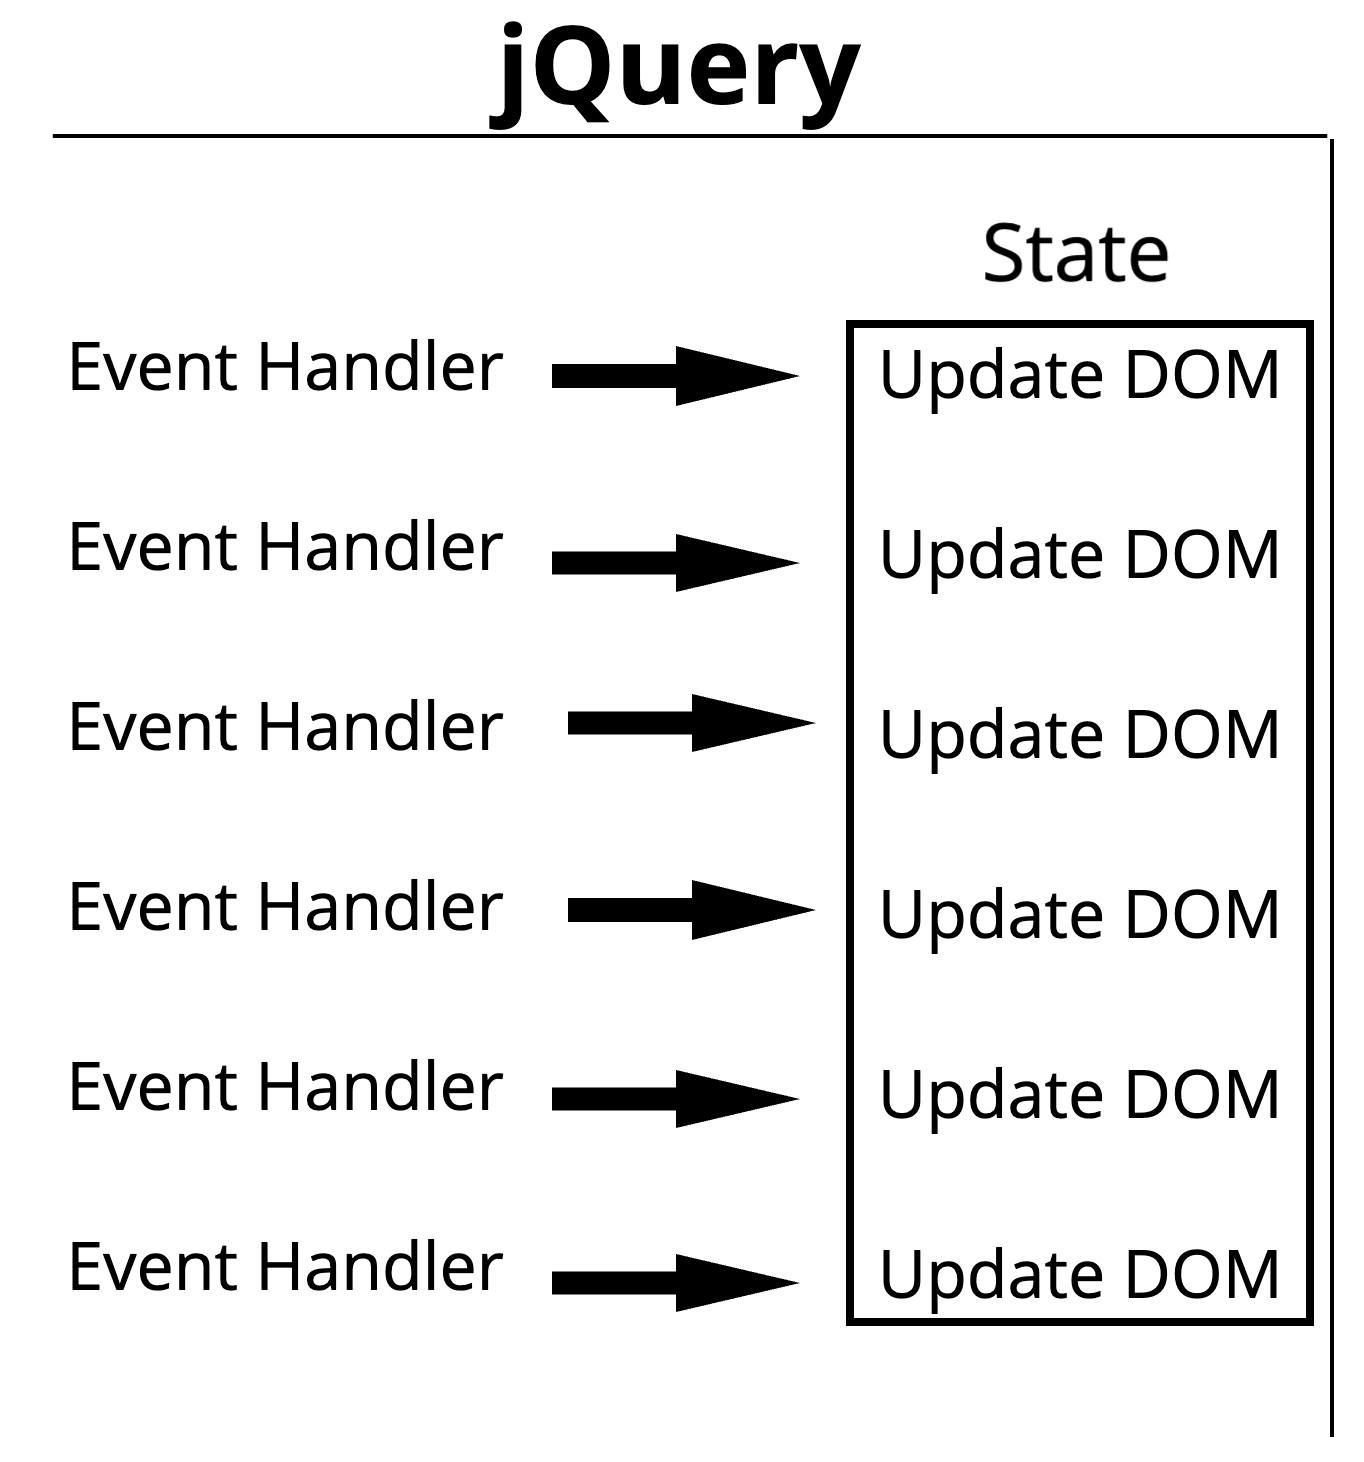
Then your application starts to grow. Slowly each event handler gets tasked with updating more and more pieces of state. What once was nice and predictable begins to look more like this.
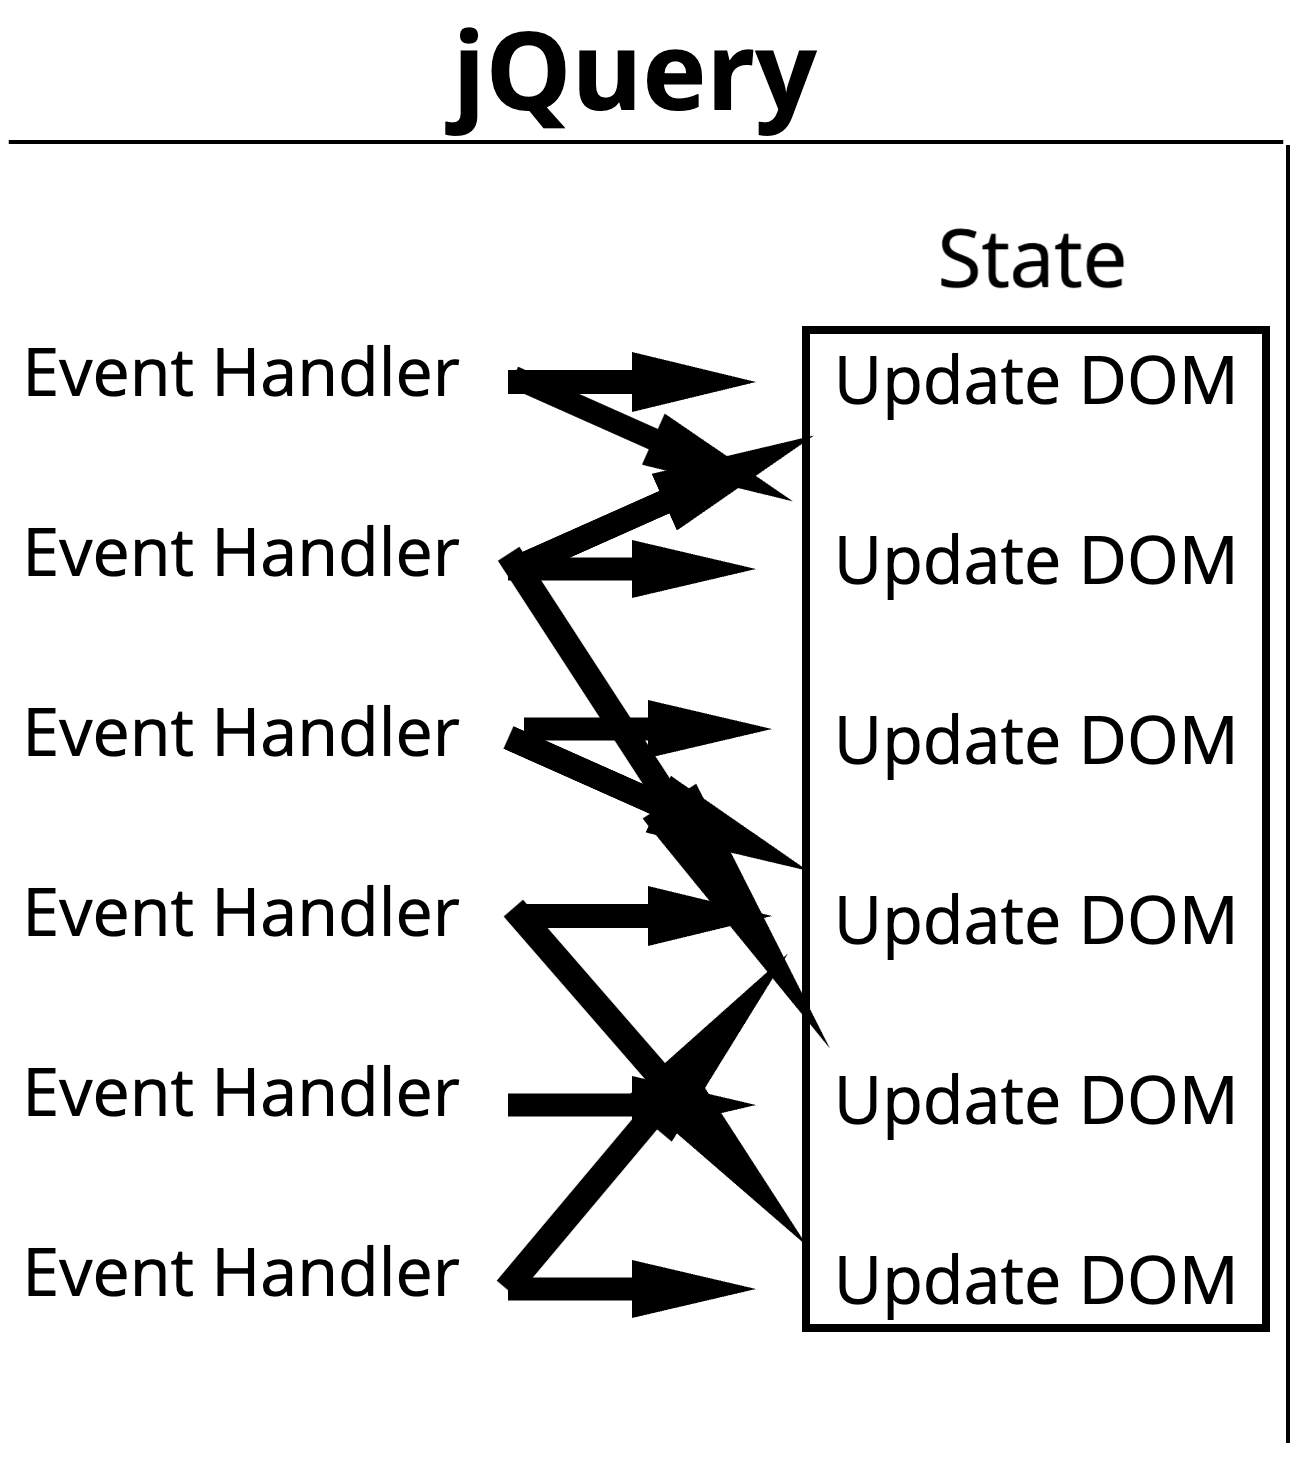
As you can imagine, relying on shared mutable state is typically a bad idea. React takes a different approach. Instead of the source of truth for the state of your application living in the DOM, it lives inside of your React components. From there, you can explicitly decide how and when the state should change as well as what the UI looks like based off of that state.

An interesting way to think about this is that your UI is just a function of your state, UI = fn(state) .
Declarative UI
One thing I glossed over with our jQuery and React examples above is exactly how the DOM gets updated. With jQuery, you’re responsible for writing the imperative code to update the DOM. That typically ends up looking something like this.
$('btn').click(() => {
  $(this).toggleClass('highlight')
  $(this).text() === 'Add Highlight'
    ? $(this).text('Remove Highlight')
    : $(this).text('Add Highlight')
})
With React, however, that responsibility is abstracted from you. Instead, React allows you to describe what the UI should look like, not how it gets updated. In other words, when a component’s state changes, React will do the hard work of actually updating the DOM. This process lowers the cognitive load of building your application since you only need to worry about 1. how the state in a component changes and 2. what the UI looks like based off that state.
<Btn
  highlight={this.state.highlight}
  onToggle={this.toggleBtn}
/>
For further reading, see Imperative vs. Declarative Programming
“Just JavaScript”
This one’s a bit controversial, but I still hold it to be true. Generally speaking, if you’re already comfortable with JavaScript, you’ll have an easier time picking up React. There are two reasons for that. First is that the surface level of the React API is pretty minimal. There’s not a whole lot of API that you need to remember. Second is that React tries to not re-create functionality that you can already do in JavaScript. For example, say you had an array of friends that you wanted to loop over and show to the UI. In some front-end frameworks, there would be a special API for this. For example, in Vue, you would use their v-for directive.
<ul id="friends">
  <li v-for="friend in friends">
    {{ friend }}
  </li>
</ul>
With React, you’d use JavaScript’s .map method.
<ul>
  {friends.map((name) => (
    <li>
      {name}
    </li>
  ))}
</ul>
Neither approach is “wrong” or “bad,” they simply prioritize different things.
The Right Abstraction
React is such a good idea that we will spend the rest of the decade continuing to explore its implications and applications. - Guillermo Rauch. CEO ZEIT.
Part of what makes creating abstractions difficult is, by their nature, they have to be opinionated. The right abstraction should empower the user without getting in their way. It should simplify how you think about a behavior. It needs to allow for an almost infinite amount of use cases all without leaking its implementation details. React does all of these things, gracefully.
The proof is really in the types of applications and even tools that have been built using or on top of React.
- Gatsby is a free and open source framework based on React that helps developers build blazing fast websites and apps.
- Styled Components are “Visual primitives for the component age”.
- Next.js is a JavaScript framework that lets you build server-side rendered, static web applications using React.
These are just a few examples, but there’s a reason entire industries are being built upon React.
Community
An underrated aspect of the React ecosystem is the welcoming community around it. From educators and OSS devs to newsletters and conferences, there’s never a short supply of helpful developers willing to lend a hand.
The Team
Last but not least, Facebook continues to invest heavily in React’s development and in my opinion, the current React team continues to innovate and prioritize the right problems.
The React Ecosystem
The path to learning about React is more complicated than it might first appear. What makes learning about React difficult isn’t React itself, as React is just a UI library. Instead, the confusion comes from trying to put all the pieces of the React ecosystem together for the first time.
To even get a normal React app up and running you need the right combination of NPM, Babel, and Webpack. What about routing? Well, React doesn’t come with a router so you’ll need to add one. Wait, what about styling? Also, where does Redux fit into all of it? In this post, we’ll answer all these questions, and you’ll get a high level overview of how the most popular pieces of the React ecosystem fit together.
There’s no better place to start a post about the React ecosystem than with React itself.
React
As I mentioned earlier, React itself is just a library for building user interfaces, nothing more. If that’s all it is, then why is the setup for building a React application so complicated? The reality is you can build React apps with just an index.html if you wanted.
<!DOCTYPE html>
<html>
<head>
  <title>React</title>
  <script crossorigin src="https://unpkg.com/react@16.7/umd/react.development.js"></script>
  <script crossorigin src="https://unpkg.com/react-dom@16.7/umd/react-dom.development.js"></script>
  <script src='https://unpkg.com/babel-standalone@6/babel.min.js'></script>
</head>
<body>
  <div id='app'></div>
  <script type='text/babel'>
    function Hello ({ name }) {
      return <h1>Hello, {name}</h1>
    }

    ReactDOM.render(
      <Hello name='Tyler' />,
      document.getElementById('app')
    )

  </script>
</body>
</html>
Is that the best idea long term? Probably not, but it’s important to know that it is entirely possible.
Now that that’s out of the way, eventually you’ll want a more “production ready” build setup, which leads us back to the same question, why is the setup for building a React application so complicated? There are a few different reasons for that and the best way to see why is with some code. Here’s a typical React file (don’t worry too much about the specifics, we’ll dive much deeper into it all of it later on).
import React from 'react'

export default function User ({ name, username }) {
  const avatarURL = `https://github.com/${username}.png?size=200`

  return (
    <div>
      <h1>{name}</h1>
      <img
        alt={`Avatar for ${username}`}
        src={avatarURL}
      />
    </div>
  )
}
If we were to give this file to a modern web browser as is, one of two things would happen, either the browser would throw an error because we have what appears to be HTML located inside of our JavaScript file, or it would throw an error due to our import/export syntax. Both are important for building a modern React application and both shed light on why the setup is so complicated.
First, let’s tackle the weird HTML in JavaScript syntax, this brings us to our first explanation of why the setup is so complicated, Babel.
Babel
Technically Babel is a JavaScript compiler. The way I like to think about it is Babel is a code transformer. You put your code into one end of the Babel machine, and out the other end comes new code after it’s been transformed to your liking. Remember that weird HTML syntax inside of our JavaScript that you saw earlier? It’s called JSX. It’s React’s way to allow you to describe UI inside of your components. Your gut reaction might be to hate it, that’s fine because by the end of this course you’ll love it. We’re going to learn about the why of JSX in a later section, but for now, know that browsers (obviously) don’t support JSX natively. Before we ever give our React code (with JSX) to a browser, we first need to transform it into regular old JavaScript that the browser can understand , this sounds like the perfect scenario for our Babel machine. We’ll put our React code with JSX in one end of the machine, and out the other, we’ll get browser compatible JavaScript.
What’s also cool about Babel is it’s not limited to just making JSX -> JS transformations. In fact, you can make any transformation. The most common use case is using it to convert ECMAScript 2015+ code into a backward compatible version of JavaScript that current and older browsers or environments can understand.
Now that we know that we can use Babel to solve our JSX issue, the next issue we still have to face is the import/export syntax. This is where Webpack comes into play.
If you’re not familiar with JavaScript modules, read From IIFEs to CommonJS to ES6 Modules before continuing.
Webpack
Webpack is a module bundler. What it does is it examines your codebase, looks at all the imports and exports, then intelligently bundles all of your modules together into a single file that the browser can understand. What that means is instead of including all the scripts in your index.html file as we did above, you include the single bundle.js file the bundler creates for you.
How can that help us in our scenario? At this point, it should be pretty obvious. The output that Webpack gives us won’t include any import/export statements. This way the browser won’t choke on it.
We’ll dive into the implementation details of both Babel and Webpack in a later section. For now, you should understand at a high level why they exist and how they benefit us.
Routing
It may be surprising, but React itself doesn’t come with a router. The reason for that, again, is React is just a UI library. The benefit of this is you’re able to pick which router works best for you. The most popular Router for React is React Router.
We’ll dive much deeper into React Router later on, but for now, know that React Router’s whole job is to render specific components based on the current URL path of the user.
<Router>
  <div>
    <ul>
      <li><Link to="/">Home</Link></li>
      <li><Link to="/about">About</Link></li>
      <li><Link to="/topics">Topics</Link></li>
    </ul>

    <Route exact path="/" component={Home}/>
    <Route path="/about" component={About}/>
    <Route path="/topics" component={Topics}/>
  </div>
</Router>
When a user navigates to the home page ( / ), React Router will render the Home component. When they navigate to /about , React Router will render About . Finally, as you can probably guess, when they navigate to /topics , React Router will render the Topics component.
What’s interesting about React Router is you’ll notice the entire API is just components, this aligns nicely with React itself.
Styling
Styling in React is, for some reason, the most controversial part of the React ecosystem. There are typically two schools of thought, let’s call them Traditional and Untraditional (for the sake of remaining free of bias, for now).
Traditional
Traditionally, you style your React applications just like you would any other application. You have an index.css file where all your styles go. You have classes and cascading. You could even use SASS or any other CSS pre-processor, but at the end of the day, there’s nothing inherently different about styling your React app than any other app you’ve built. All the benefits and downsides of standard CSS still apply.
Untraditional
In an untraditional way, you embrace React’s component model. If you’re already encapsulating the logic and UI in the component, why not include the styles as well? The term typically used is “CSS in JS.” With CSS in JS, you avoid all the typical properties of standard CSS. No more cascade, no more global namespace, instead, all of your styles for a component live in the component itself.
Revisiting our simple User component from earlier, CSS in JS may look like this.
const styles = {
  header: {
    fontWeight: 400,
    fontSize: 55,
    color: '#a41c1c'
  },
  avatar: {
    width: 50,
    height: 50,
    borderRadius: 25
  }
}

export default function User ({ name, username }) {
  const avatarURL = `https://github.com/${username}.png?size=200`

  return (
    <div>
      <h1 style={styles.header}>{name}</h1>
      <img
        style={styles.avatar}
        alt={`Avatar for ${username}`}
        src={avatarURL}
      />
    </div>
  )
}
The most popular CSS in JS library in the React ecosystem is Styled Components. They take it one step further and allow you to define components which specify styling.
import React from 'react'
import styled from 'styled-components'

const Header = styled.h1`
  font-weight: 400;
  font-size: 55;
  color: #a41c1c;
`

const Avatar = styled.img`
  width: 50px;
  height: 50px;
  border-radius: 25px;
`

export default function User ({ name, username }) {
  const avatarURL = `https://github.com/${username}.png?size=200`

  return (
    <div>
      <Header>{name}</Header>
      <Image
        alt={`Avatar for ${username}`}
        src={avatarURL}
      />
    </div>
  )
}
Redux
Redux markets itself as a “Predictable state container for JavaScript.” I like to think about it as an ecosystem for making state changes in your applications more predictable. Often Redux gets coupled with React, but that coupling is artificial. You can use Redux with any other view library, not just React.
Comparing the principles for how React manages state and how Redux manages state leads to some interesting insights about the two libraries. The whole philosophy of React is that you build individual components that can each manage their own state as well as describe their UI. You then compose those components together to get your app.
The philosophy of Redux is pretty different. Instead of having state spread out in different places, with Redux you stick all of your state in a single location called a Store. You then establish strict rules for how the state of your Store can change.
If Redux is the right tool for the job, it’s fantastic. If it’s the wrong tool for the job, it’s overkill. For some reason, over the last few years, the hype around Redux surmounted all rationality. With that hype came many misconceptions around the use of Redux and React together. Here’s my attempt to clear up those misconceptions before you get any further into the course. First, if you’re new to React, ignore Redux entirely until you feel comfortable with React. If you start mixing the two, you’ll get confused as to what’s React and what’s Redux. If someone says otherwise, they’re wrong. Second, there’s a good chance that you may never need Redux. There was a time before Redux existed where we all built complex React applications, and we were just fine. Third, no new features of React are making Redux obsolete. Again, I think of Redux as more of an ecosystem than anything else. New features to React can replace parts of that ecosystem, but I don’t believe it’ll ever replace the whole thing.
(Bonus) Imperative vs Declarative Programming
At this point, you’ve undoubtedly heard about imperative programming vs. declarative programming. You might have even searched for what those terms actually mean. Sadly, you probably encountered a definition similar to this
“You know, imperative programming is like how you do something, and declarative programming is more like what you do, or something.”
That definition makes perfect sense once you actually know the difference between imperative and declarative — but you don’t, which is why you asked the question in the first place. It’s like trying to answer “What came first, the chicken or the egg?” except everyone seems to think the chicken did, but you don’t even like eggs, and you’re confused. Combine this frustration with the bastardization of the actual word “declarative” to basically just mean “good” and all of a sudden your imposter syndrome is tap dancing on your confidence, and you realize you don’t even like programming that much. Don’t worry though, friend. I don’t know what a monad is, so hopefully this post will help you realize that declarative is more than just being “easy to reason about” and “good.”
The hard part about this topic is, as Merrick has observed, “It’s one of those things you have an intuition about but can’t seem to explain.” I’ve talked with many developers and what seems to help most is a combination of metaphors with actual code examples. So buckle up cause I’m about to #preach.
Let’s go back to the initial definition I made fun of
“Imperative programming is like how you do something, and declarative programming is more like what you do.”
There’s actually SOME good information hidden in here. Let’s first see the merit in this definition by taking it out of the context of programming and look at a “real life” example.
You decide that you’ve been spending too much time arguing about “JavaScript Fatigue”™ and your husband deserves a nice date. You choose to go to Red Lobster since you’ve been listening to a lot of Beyonce lately (
 ). You arrive at Red Lobster, approach the front desk and say…
An imperative approach (HOW) : “I see that table located under the Gone Fishin’ sign is empty. My husband and I are going to walk over there and sit down.”
A declarative approach (WHAT) : “Table for two, please.”
The imperative approach is concerned with HOW you’re actually going to get a seat. You need to list out the steps to be able to show HOW you’re going to get a table. The declarative approach is more concerned with WHAT you want, a table for two.
“Ok.” — your brain
More metaphors!
I’m going to ask you a question. I want you to think of both an imperative response and a declarative response.
“I’m right next to Wal-Mart. How do I get to your house from here?”
Imperative response : Go out of the north exit of the parking lot and take a left. Get on I-15 North until you get to the 12th street exit. Take a right off the exit like you’re going to Ikea. Go straight and take a right at the first light. Continue through the next light then take your next left. My house is #298.
A declarative response : My address is 298 West Immutable Alley, Eden, Utah 84310
Regardless of how I get to your house, what really matters is the car I drive. Am I going to drive an imperative stick shift car or a declarative automatic car? Enough metaphors?
Before we dive into the code, it’s important to realize that many declarative approaches have some sort of imperative abstraction layer. Look at all of our examples:
- The declarative response to the Red Lobster employee (“table for two, please”) is assuming that the Red Lobster employee knows all of the imperative steps to get us to the table.
- Knowing the address assumes you have some sort of GPS that knows the imperative steps of how to get to your house.
- An automatic car has some sort of abstraction layer over shifting gears.
That was the realization that really made it click for me, so I’ll repeat it:
Many (if not all) declarative approaches have some sort of underlying imperative abstraction.
If that sentence makes sense, you’re doing great!
Now, we’re going to attempt to take the leap from metaphorical happy land to real-world code land. To make the jump more graceful, let’s look at some programming “languages” that are inherently declarative versus those which are more imperative by nature.
Imperative : C, C++, Java
Declarative : SQL, HTML
(Can Be) Mix : JavaScript, C#, Python
Think about your typical SQL or HTML example,
SELECT * FROM Users WHERE Country=’Mexico’;
<article>
  <header>
    <h1>Declarative Programming</h1>
    <p>Sprinkle Declarative in your verbiage to sound smart</p>
  </header>
</article>
By glancing at both examples, you have a clear understanding of what is going on. They’re both declarative. They’re concerned with WHAT you want to be done, rather than HOW you want it done.
You’re describing what you’re trying to achieve, without instructing how to do it. The implementation of selecting all of the users who live in Mexico has been abstracted from you. You’re not concerned with how the web browser is parsing your article and displaying it to the screen. Your WHAT is Mexican users or a new header and paragraph on your website.
So far so good. Let’s dive into more practical JavaScript examples.
I want you to pretend you’re now in a technical interview and I’m the interviewer. Open up your console and answer the following questions.
- Write a function called
doublewhich takes in an array of numbers and returns a new array after doubling every item in that array.double([1,2,3]) // [2,4,6] - Write a function called
addwhich takes in an array and returns the result of adding up every item in the array.add([1,2,3]) // 6 - Using jQuery (or vanilla JavaScript), add a
clickevent handler to the element which has anidofbtn. When clicked, toggle (add or remove) thehighlightclass as well as change the text toAdd HighlightorRemove Highlightdepending on the current state of the element.
Let’s look at the most common approaches to these problems, which all happen to also be imperative approaches.
function double (arr) {
  let results = []
  for (let i = 0; i < arr.length; i++){
    results.push(arr[i] * 2)
  }
  return results
}
function add (arr) {
  let result = 0
  for (let i = 0; i < arr.length; i++){
    result += arr[i]
  }
  return result
}
$("#btn").click(function() {
  $(this).toggleClass("highlight")
  $(this).text() === 'Add Highlight'
    ? $(this).text('Remove Highlight')
    : $(this).text('Add Highlight')
})
By examining what all three of these imperative examples have in common, we’ll be able to better identify what actually makes them imperative.
- The most obvious commonality is that they’re describing HOW to do something. In each example, we’re either explicitly iterating over an array or explicitly laying out steps for how to implement the functionality we want.
- This one might not be as obvious if you’re not used to thinking in the declarative or even more specifically functional way. In each example, we’re mutating some piece of state (If you’re unfamiliar with the term state, it’s basically information about something held in memory — which should sound a lot like variables). In the first two examples we create a variable called results, and then we continually modify it. In the third example, we don’t have any variables, but we still have state living in the DOM itself — we then modify that state in the DOM.
- This one is a bit subjective, but to me, the code above isn’t very readable. I can’t just glance at the code and understand what’s going on. My brain needs to step through the code just as an interpreter would while also taking into account the context in which the code lives(another negativity of mutable data).
All right, enough  ing on the code. Let’s now take a look at some declarative examples. The goal is to fix all the problems from above. So each example needs to describe WHAT is happening, can’t mutate state, and should be readable at a glance.
function double (arr) {
  return arr.map((item) => item * 2)
}
function add (arr) {
  return arr.reduce((prev, current) => prev + current, 0)
}
<Btn
  onToggleHighlight={this.handleToggleHighlight}
  highlight={this.state.highlight}>
    {this.state.buttonText}
</Btn>
Much better 
Notice that in the first two examples we’re leveraging JavaScript’s built-in map and reduce methods. This goes back to what we’ve been talking about over and over in this article, the most declarative solutions are an abstraction over some imperative implementation.
In every example we’re describing WHAT we want to happen rather than HOW (we don’t know HOW map and reduce are implemented, we also probably don’t care). We’re not mutating any state. All of the mutations are abstracted inside of map and reduce . It’s also more readable (once you get used to map and reduce , of course).
Now, what about the last example? Well, I cheated a little bit and am using React — but note that all three imperative mistakes are still fixed. The real beauty of React is that you can create these declarative user interfaces. By looking at our Btn component, I’m able to quickly understand what the UI is going to look like. Another benefit is instead of state living in the DOM, it lives in the React component itself.
Another less-spoken-of benefit to declarative code is that your program can be context-independent. This means that because your code is concerned with what the ultimate goal is— rather than the steps it takes to accomplish that goal — the same code can be used in different programs, and work just fine.
Look at all three of our examples above. We can consume both functions and component in any program we want. They’re program agnostic. This is hard to do with imperative code because often times, by definition, imperative code relies on the context of the current state.
One thing that I didn’t go too far into is how functional programming is a subset of declarative programming. If you haven’t already, I highly recommend getting more familiar with functional programming techniques in JavaScript. Start with .map , .reduce , .filter and work your way up from there. Odds are there isn’t a lower hanging fruit to improve your codebase than making it more functional.
Here are some other definitions that I’ve found from around the web that may or may not be helpful.
Declarative programming is “the act of programming in languages that conform to the mental model of the developer rather than the operational model of the machine.”
Declarative Programming is programming with declarations, i.e., declarative sentences.
The declarative property is where there can exist only one possible set of statements that can express each specific modular semantic. The imperative property is the dual, where semantics are inconsistent under composition and/or can be expressed with variations of sets of statements.
Declarative languages contrast with imperative languages which specify explicit manipulation of the computer’s internal state ; or procedural languages which specify an explicit sequence of steps to follow.
In computer science, declarative programming is a programming paradigm that expresses the logic of a computation without describing its control flow.
I draw the line between declarative and non-declarative at whether you can trace the code as it runs. Regex is 100% declarative, as it’s untraceable while the pattern is being executed.
(Bonus) Composition vs Inheritance
This post is designed to be read after you read JavaScript Inheritance and the Prototype Chain . It’s not required, but if the code below doesn’t make sense to you, check it out.
Previously we looked at how to accomplish inheritance in JavaScript using both ES5 and ES6. In our example, we abstracted the common features amongst every animal (name, energy, eat, sleep, and play) to an Animal base class. Then, whenever we wanted to create an individual type of animal (Dog, Cat, etc.), we created a subclass for that type.
class Animal {
  constructor(name, energy) {
    this.name = name
    this.energy = energy
  }
  eat(amount) {
    console.log(`${this.name} is eating.`)
    this.energy += amount
  }
  sleep() {
    console.log(`${this.name} is sleeping.`)
    this.energy += length
  }
  play() {
    console.log(`${this.name} is playing.`)
    this.energy -= length
  }
}

class Dog extends Animal {
  constructor(name, energy, breed) {
    super(name, energy)

    this.breed = breed
  }
  bark() {
    console.log('Woof Woof!')
    this.energy -= .1
  }
}

class Cat extends Animal {
  constructor(name, energy, declawed) {
    super(name, energy)

    this.declawed = declawed
  }
  meow() {
    console.log('Meow!')
    this.energy -= .1
  }
}
And without the code, we can visualize our class structure like this.
Animal
  name
  energy
  eat()
  sleep()
  play()

  Dog
    breed
    bark()

  Cat
    declawed
    meow()
This worked well as it allowed us to minimize code duplication and maximize code reuse.
Let’s take this a step further and pretend we’re building software for “Farm Fantasy” - a massively multiplayer online (MMO) role-playing game where you do the same thing a farmer does, except, you know, online and you pay to do it.
Now that we’re creating an MMO, we’re going to need to have users. We can update our class structure now to look like this.
User  email  username  pets  friends  adopt()  befriend()

Animal
  name
  energy
  eat()
  sleep()
  play()

  Dog
    breed
    bark()

  Cat
    declawed
    meow()
The examples above are textbook examples of classes and inheritance. Sadly, unlike in the classroom, real-world software development isn’t always so predictable.
Let’s say six months after building out our initial class structure, our project manager decides we need to change some things. Users love the app and the ability to pay to be a pretend farmer, but they want a more real-life experience. Right now, only instances of Animal have the ability to eat , sleep , and play . The users are demanding that they also have those same features.
Alright, no issue. We just need to adjust our class structure around a little bit.
... 🤔
I guess we could abstract the common properties to another parent class and have one more step of inheritance.
FarmFantasy
  name
  play()
  sleep()
  eat()

  User
    email
    username
    pets
    friends
    adopt()
    befriend()

  Animal
    energy

    Dog
      breed
      bark()

    Cat
      declawed
      meow()
That works, but it’s incredibly fragile. There’s even a name for this anti-pattern - God object.
And just like that, we see the most significant weakness with inheritance. With inheritance, you structure your classes around what they are , a User , an Animal , a Dog , a Cat - all of those words encapsulate a meaning centered around what those things are . The problem with that is a User today will probably be different than a User in 6 months. Inheritance makes us turn a blind eye to the inevitable fact that our class structure will most likely change in the future, and when it does, our tightly coupled inheritance structure is going to crumble.
The problem with object-oriented languages is they’ve got all this implicit environment that they carry around with them. You wanted a banana but what you got was a gorilla holding the banana and the entire jungle. - Joe Armstrong. Creator of Erlang.
So if inheritance is such a problem, how do we get the same functionality while minimizing some of the downsides? Rather than thinking in terms of what things are , what if we think in terms of what things do ? Let’s take a Dog, for example. A Dog is a sleeper, eater, player, and barker. A Cat is a sleeper, eater, player, and meower. A User is a sleeper, eater, player, adopter, and friender. Now let’s transform all of these verbs into functions.
const eater = () => ({})
const sleeper = () => ({})
const player = () => ({})
const barker = () => ({})
const meower = () => ({})
const adopter = () => ({})
const friender = () => ({})
Do you see where we’re going with this? Instead of having these methods defined (and coupled) to a particular class, if we abstract them into their own functions, we can now compose them together with any type that needs them.
Let’s take a closer look at one of our methods again, eat .
eat(amount) {
  console.log(`${this.name} is eating.`)
  this.energy += amount
}
Notice that eat logs to the console then increases the energy property on the instance by the amount argument. Now the question we need to answer is how we can operate on a specific instance from a one-off function? Well, what if we just pass it in when we invoke the function? Seems simple enough.
const eater = (state) => ({
  eat(amount) {
    console.log(`${state.name} is eating.`)
    state.energy += amount
  }
})
Now we can follow this same pattern for each one of our functions.
...

const sleeper = (state) => ({
  sleep(length) {
    console.log(`${state.name} is sleeping.`)
    state.energy += length
  }
})

const player = (state) => ({
  play() {
    console.log(`${state.name} is playing.`)
    state.energy -= length
  }
})

const barker = (state) => ({
  bark() {
    console.log('Woof Woof!')
    state.energy -= .1
  }
})

const meower = (state) => ({
  meow() {
    console.log('Meow!')
    state.energy -= .1
  }
})

const adopter = (state) => ({
  adopt(pet) {
    state.pets.push(pet)
  }
})

const friender = (state) => ({
  befriend(friend) {
    state.friends.push(friend)
  }
})
Now whenever a Dog, Cat, or User needs to add the ability to do any of the functions above, they merge the object they get from one of the functions onto their own object.
Let’s see what that looks like. We’ll start with a Dog. Earlier we defined a Dog by what it does, a Dog is a sleeper , eater , player , and barker .
function Dog (name, energy, breed) {
  let dog = {
    name,
    energy,
    breed,
  }

  return Object.assign(
    dog,
    eater(dog),    sleeper(dog),    player(dog),    barker(dog),  )
}

const leo = Dog('Leo', 10, 'Goldendoodle')
leo.eat(10) // Leo is eating
leo.bark() // Woof Woof!
Inside of Dog we create the “instance” using a plain old JavaScript object. Then we use Object.assign to merge the dog’s state with all of the methods a dog should have - each defined by what a dog does , not what it is .
Now how would we create a Cat class? Earlier we defined a Cat as a sleeper , eater , player , and meower .
function Cat (name, energy, declawed) {
  let cat = {
    name,
    energy,
    declawed,
  }

  return Object.assign(
    cat,
    eater(cat),
    sleeper(cat),
    player(cat),
    meower(cat),
  )
}
Now, what about a User ? Earlier we ran into issues when we needed to refactor our class structure so that users could also sleep , eat , and play . Now that we’ve decoupled our functions from the class hierarchy, this is trivial to do.
function User (email, username) {
  let user = {
    email,
    username,
    pets: [],
    friends: []
  }

  return Object.assign(
    user,
    eater(user),
    sleeper(user),
    player(user),
    adopter(user),
    friender(user),
  )
}
To really test our theory, what if we wanted to give all dogs the ability to add friends as well. This wasn’t in our initial requirement but with composition, it’s pretty straight forward.
function Dog (name, energy, breed) {
  let dog = {
    name,
    energy,
    breed,
    friends: []  }

  return Object.assign(
    dog,
    eater(dog),
    sleeper(dog),
    player(dog),
    barker(dog),
    friender(dog),  )
}
By favoring composition over inheritance and thinking in terms of what things do rather than what things are , you free yourself of fragile and tightly coupled inheritance structures.
You may have noticed I’m using what we previously referred to as the “Functional Instantiation” pattern. This is mostly for preference since we’re not involving the prototype at all. If for some reason you really liked the this and new keyword, you could use the following pattern.
function Cat (name, energy, declawed) {
  this.name = name
  this.energy = energy
  this.declawed = declawed

  return Object.assign(
    this,
    eater(this),
    sleeper(this),
    player(this),
    meower(this),
  )
}

const charles = new Cat('Charles', 10, false)
Everything you should know about NPM
If you think about the underlying architecture of writing software, the program is usually comprised of a collection of modules (a module being some code that is grouped together, usually by file). If you have one or more modules that are program agnostic, meaning they can be reused in other programs, you’d create a “package”.
Program
  App.js        <- Module
  Dashboard.js  <- Module
  About.js      <- Module
  Math       <- Package
    add.js      <- Module
    subtract.js <- Module
    multiply.js <- Module
    divide.js   <- Module
This package architecture is what makes the JavaScript ecosystem so powerful. If there’s a package you need, odds are it’s already been created and is available to download for free. Want to use Lodash? You’d download the lodash package. Want to use MomentJS to better manage timestamps in your app? Download the moment package. What about React? Yup, there’s a react package. Now the question becomes, how and from where do we download these packages?
CDNs and script tags
The traditional way is to create a <script> tag that links to a CDN where the package is hosted or if you download it locally, the path to that file.
<body>

  ...

  <script src="http://cdnjs.cloudflare.com/ajax/libs/jquery/2.1.4/jquery.min.js"></script>
  <script src="libs/react.min.js"></script>
</body>
This approach works, but it doesn’t scale very well. First, if the CDN servers crash, your app crashes with it. Second, the order of the <script> tags matters. If library B is dependant on Library A, but the <script> tag to load library B comes before the <script> to load library A, things will break. Finally, you have a versioning problem. If jQuery releases a new version, you either need to manually swap out the CDN (assuming there’s an updated one), or you’ll need to re-download the new version to have it locally. Now for just one package this probably isn’t a big deal, but as your application grows and you start having to manually manage 20+ packages, it’s going to be a pain.
So let’s try to conjure up a solution; here’s a list of what we need.
- Make it easier to download packages
- Make it easier to upload packages for others to consume
- Make it easier to switch versions of our packages
- Do it all for free
Luckily for us, there’s a company which solved all of our problems.
npm, Inc.
npm, Inc. is a for-profit, venture-backed company founded in 2014. They host and maintain “npm” (short for Node.js package manager). npm consists of two parts: a registry (for hosting the packages) and a CLI (for accessing and uploading packages). At the time of this writing, the npm registry has over 800,000 packages being installed over 2 billion times a day by over 11 million JavaScript developers,  .
.
Installing npm
In order to use the npm CLI, you’ll need to install it. However, if you already have Node installed, you should already have npm as it comes with Node. If you don’t have Node installed, you can download it from here or use a tool like Homebrew.
If Node and npm are installed correctly, you should be able to run the following commands in your terminal to check which versions you have installed.
node -v # My installed version: v11.10.0
npm -v # My installed version: 6.9.0
npm init
Now that you have Node and npm installed, the next step is to actually download a package. Before you do that, though, you’ll want to initialize your new project with npm. You can do that by running npm init inside of your project’s directory. This will walk you through some steps for initializing your project. Once finished, you’ll notice you have a brand new package.json file and an empty node_modules directory.
node_modules
Whenever you install a package, the source code for that package will be put inside of the node_modules directory. Then, whenever you import a module into your project that isn’t a file path, i.e. import React from 'react' , your app will look to node_modules for the source.
package.json
You can think of your package.json file as containing all of the meta information for your project. It contains information like the project’s name, author, description, and most important, the list of packages (as well as what versions) that your project depends on as well as how to run your project - here’s an example.
{
  "name": "github-battle",
  "version": "1.0.0",
  "description": "Compare two Github user's profile.",
  "author": "Tyler McGinnis",
  "license": "ISC",
  "homepage": "https://github.com/tylermcginnis/react-course#readme",
  "keywords": [
    "react",
    "react-router",
    "babel",
    "webpack"
  ],
  "repository": {
    "type": "git",
    "url": "git+https://github.com/tylermcginnis/react-course.git"
  },
  "main": "index.js",
  "dependencies": {
    "prop-types": "^15.7.2",
    "query-string": "^6.2.0",
    "react": "^16.8.3",
    "react-dom": "^16.8.3",
    "react-icons": "^3.4.0",
    "react-router-dom": "^4.3.1"
  },
  "devDependencies": {
    "@babel/core": "^7.3.4",
    "@babel/plugin-proposal-class-properties": "^7.3.4",
    "@babel/preset-env": "^7.3.4",
    "@babel/preset-react": "^7.0.0",
    "babel-loader": "^8.0.5",
    "babel-plugin-syntax-dynamic-import": "^6.18.0",
    "copy-webpack-plugin": "^5.0.0",
    "css-loader": "^2.1.0",
    "html-webpack-plugin": "^3.2.0",
    "style-loader": "^0.23.1",
    "webpack": "^4.29.5",
    "webpack-cli": "^3.2.3",
    "webpack-dev-server": "^3.2.1"
  },
  "scripts": {
    "start": "webpack-dev-server --open",
    "build": "NODE_ENV='production' webpack",
  }
}
A few properties to point out.
dependencies
These are the packages your application needs to run. Whenever you install a new package, the source for that package will be placed into the node_modules directory and the name and version of that package will be added to the dependencies property in your package.json file.
devDependencies
If dependencies are the packages your application needs to run, devDependencies are the packages your application needs during development.
npm install
The reason it’s so important to keep track of your dependencies and ``devDependencies is if someone downloads your project and runs npm install , npm will download all of the packages inside both dependencies and devDependencies and place them into the node_modules directory. This makes it so when you push your code to Github, instead of having to push up your entire node_modules directory, you can instead keep track of your dependencies and install them when needed using npm install`.
The reason dependencies are separate from devDependencies is so you can build your app for production. In production, you don’t care about the packages needed to develop your app; you only care about the packages needed to run your app.
scripts
You can use the scripts property to automate tasks. In the example above, we have two, start and build .
In order to run your script, cd into the same directory as the package.json file and from the command line run, npm run [NAME OF SCRIPT] . In our example, we have our start script running webpack-dev-server --open . In order to execute that script, from the command line we’d run npm run start .
Installing Packages
Now that we know all about initializing our project with npm init , node_modules , and the package.json file, the next step is to learn how to actually install a package from the npm registry. To do this, from the command line, run npm install package-name .
npm install react
That command will do a few things. It’ll put the react package inside of our node_modules directory as well as add react as a property on our dependencies object inside our package.json file.
To tell npm you’re installing a developer dependency (and it should be put it in devDependencies instead of dependencies ), you’ll append the --save-dev flag.
npm install webpack --save-dev
Publishing Packages
There wouldn’t be over 800,000 packages on the npm registry if it wasn’t easy to publish one. All you need to publish a package is an account on npm, a package.json file with name , version , and main (which points to the entry point of your package) properties.
Once you have those things, in your command line run npm login to login then npm publish to publish your package.
There are more advanced features about publishing that we won’t go into in this post, but if you’re curious, you can check out their official guide.
Versioning
Earlier one of our needs was the ability to more efficiently manage the different versions of the packages we were using. The npm CLI helps us out here as well.
Typically each package on the npm registry follows semantic versioning. There are three parts to semantic versioning, major versions, minor versions, and patch versions.
v1.2.3
In the version above, the major version is 1 , the minor version is 2 , and the patch version is 3 .
The idea is if you’re a library author and you had a breaking change, you’d increment the major version. If you had a new, non-breaking feature, you’d increment the minor version. For everything else, you’d increment the patch version.
So why is this important? We want to avoid having our app break because we installed the wrong version of a package. npm gives us some tools to prevent this.
^
If you look at the dependencies inside of our package.json file again, you’ll notice that before each version number, there’s a little ^ .
  "dependencies": {
    "prop-types": "^15.7.2",
    "query-string": "^6.2.0",
    "react": "^16.8.3",
    "react-dom": "^16.8.3",
    "react-icons": "^3.4.0",
    "react-router-dom": "^4.3.1"
  }
What the ^ does is it instructs npm to install the newest version of the package with the same major version. So for example, if the prop-types package released v15.8.0, when we ran npm install on our project, we’d get that new version. However, if there was a breaking change and prop-types released v16.0.0, only the newest v15.X.X version would be installed and not the breaking v16.0.0 version.
~
If instead, you wanted to have both the major and minor version match, you’d use ~ .
"dependencies": {
  "prop-types": "~15.7.2"
}
Now, if v16.0.0 or v15.8.0 came out, neither would be installed. However, if v15.7.3 came out, it would be installed since its the newest version where both the major and minor versions match.
Exact version
Finally, if you wanted to only download the exact version of what’s listed in your package.json file, you’d list only the version number.
"dependencies": {
  "prop-types": "15.7.2"
}
Now, only v15.7.2 will ever be installed.
If you want to see a few less common options for specifying acceptable ranges, you can check out the Semver Calculator
Webpack: A Gentle Introduction
Whenever you’re learning a new tool, you should first ask yourself two questions.
- Why does this tool exist?
- What problems does this tool solve?
If you can’t answer both of those questions, you may not need the tool in the first place. Let’s take those questions and apply them to webpack.
Why does webpack Exist?
At its core, webpack is a module bundler. It examines all of the modules in your application, creates a dependency graph, then intelligently puts all of them together into one or more bundle(s) that your index.html file can reference.
App.js --->     |         |
Dashboard.js -> | Bundler | -> bundle.js
About.js --->   |         |
What problem is webpack solving?
Historically when building a JavaScript application, your JavaScript code would be separated by files (these files may or may not have been actual modules). Then in your index.html file, you’d have to include <script> tags to every JavaScript file you had.
<body>

  ...

  <script src="http://cdnjs.cloudflare.com/ajax/libs/jquery/2.1.4/jquery.min.js"></script>
  <script src="libs/react.min.js"></script>
  <script src='src/admin.js'></script>
  <script src='src/dashboard.js'></script>
  <script src='src/api.js'></script>
  <script src='src/auth.js'></script>
  <script src='src/rickastley.js'></script>
</body>
Not only was this tedious, but it was also error-prone. There were the obvious issues like typos or forgetting to include a file, but more than that, the order of the <script> tags mattered. If you loaded a script that depended on React before loading the React script, things would break. Because webpack (intelligently) creates a bundle for you, both of those problems go away. You don’t have to worry about forgetting a <script> and you don’t have to worry about the order.
<body>

  ...

  <script src='dist/bundle.js'></script>
</body>
As we’ll soon see, the “module bundling” aspect is just one part of webpack. If needed, you’re also able to tell webpack to make certain transformations on your modules before adding them to the bundle. Examples might include transforming SASS/LESS to regular CSS or “modern JavaScript” to ES5 that the browser can understand.
Installing webpack
Assuming you’ve initialized a new project with npm, there are two packages you need to install to use webpack, webpack and webpack-cli .
npm install webpack webpack-cli --save-dev
webpack.config.js
Once you’ve installed webpack and webpack-cli , it’s time to start configuring webpack. To do that, you’ll create a webpack.config.js file that exports an object. Naturally, this object is where all the configuration settings for webpack will go.
// webpack.config.js
module.exports = {}
Remember, the whole point of webpack is to “examine all of your modules, (optionally) transform them, then intelligently put all of them together into one or more bundle(s)” If you think about that process, in order to do that, webpack needs to know three things.
- The entry point of your application
- Which transformations, if any, to make on your code
- The location to put the newly formed bundle(s)
The entry point
Whenever your application is composed of modules, there’s always a single module that is the entry point of your application. It’s the module that kicks everything off. Typically, it’s an index.js file. Something like this.
index.js
  imports about.js
  imports dashboard.js
    imports graph.js
    imports auth.js
      imports api.js
If we give webpack the path to this entry file, it’ll use that to create the dependency graph of our application (much like we did above, except… better). To do that, you add an entry property to your webpack config which points to your entry file.
// webpack.config.js

module.exports = {
  entry: './app/index.js'
}
Transformations with Loaders
Now that webpack knows the entry file, the next thing we need to tell it is what transformations to run on our code. To do this, we’ll use what are called “loaders”.
Out of the box, when webpack is building its dependency graph by examining all of your import / require() statements, it’s only able to process JavaScript and JSON files.
import auth from './api/auth' // 👍
import config from './utils/config.json' // 👍
import './styles.css' // ⁉️
import logo from './assets/logo.svg' // ⁉️
There’s a very good chance that you’re going to want your dependency tree to be made up of more than just JS and JSON files - i.e., you’re going to want to be able to import .css files, .svg files, images, etc, as we’re doing above. This is where “loaders” can help us out. The primary purpose of a loader, as the name suggests, is to give webpack the ability to process more than just JavaScript and JSON files.
The first step to adding any loader is to download it. Because we want to add the ability to import .svg files in our app, we’ll download the svg-inline-loader from npm.
npm install svg-inline-loader --save-dev
Next, we need to add it to our webpack config. All of the information for your loaders will go into an array of objects under module.rules .
// webpack.config.js

module.exports = {
  entry: './app/index.js',
  module: {
    rules: []
  }
}
Now there are two pieces of information we need to give webpack about each loader. First, the type of file we want to run the loader on (in our case, all .svg files). Second, the loader to use on that file type (in our case, svg-inline-loader ).
To do this, we’ll have an object with two properties, test and use . test will be a regex to match the file path and use will be the name of the loader we want to use.
// webpack.config.js

module.exports = {
  entry: './app/index.js',
  module: {
    rules: [
      { test: /\.svg$/, use: 'svg-inline-loader' }
    ]
  }
}
Now anywhere in our app, we’ll be able to import .svg files. What about our .css files though? Let’s add a loader for that as well. We’ll use the css-loader .
npm install css-loader --save-dev
// webpack.config.js

module.exports = {
  entry: './app/index.js',
  module: {
    rules: [
      { test: /\.svg$/, use: 'svg-inline-loader' },
      { test: /\.css$/, use: 'css-loader' }
    ]
  }
}
Now anywhere in our app, we can import .svg and .css files. However, there’s still one more loader we need to add to get our styles to work properly. Right now, because of our css-loader , we’re able to import .css files. However, that doesn’t mean those styles are being injected into the DOM. What we really want to do is import a CSS file then have webpack put all of that CSS in a <style> tag in the DOM so they’re active on the page. To do that, we’ll use the style-loader .
npm install style-loader --save-dev
// webpack.config.js

module.exports = {
  entry: './app/index.js',
  module: {
    rules: [
      { test: /\.svg$/, use: 'svg-inline-loader' },
      { test: /\.css$/, use: [ 'style-loader', 'css-loader' ] }
    ]
  }
}
Notice, because we now have two loaders for our .css rule, we change use to be an array. Also, notice that we have style-loader before css-loader . This is important. Webpack will process those in reverse order. So css-loader will interpret the import './styles.css' line then style-loader will inject that CSS into the DOM.
As we just saw with style-loader , loaders can do more than just allow you to import certain file types. They’re also able to run transformations on files before they get added to the final output bundle. The most popular is transforming “next generation JavaScript” to the JavaScript of today that browsers can understand using Babel. To do this, you can use the babel-loader on every .js file.
npm install babel-loader --save-dev
// webpack.config.js

module.exports = {
  entry: './app/index.js',
  module: {
    rules: [
      { test: /\.svg$/, use: 'svg-inline-loader' },
      { test: /\.css$/, use: [ 'style-loader', 'css-loader' ] },
      { test: /\.(js)$/, use: 'babel-loader' }
    ]
  }
}
There are loaders for just about anything you’d need to do. You can check out the full list here.
The output
Now that webpack knows the entry file and what loaders to use, the next thing we need to tell it is where to put the bundle it creates. To do this, you add an output property to your webpack config.
// webpack.config.js

const path = require('path')

module.exports = {
  entry: './app/index.js',
  module: {
    rules: [
      { test: /\.svg$/, use: 'svg-inline-loader' },
      { test: /\.css$/, use: [ 'style-loader', 'css-loader' ] },
      { test: /\.(js)$/, use: 'babel-loader' }
    ]
  }
  output: {
    path: path.resolve(__dirname, 'dist'),
    filename: 'index_bundle.js'
  }
}
So the full process looks something like this.
- webpack grabs the entry point located at
./app/index.js. - It examines all of our
importandrequirestatements and creates a dependency graph. - webpack starts creating a bundle, whenever it comes across a path we have a loader for, it transforms the code according to that loader then adds it to the bundle.
- It takes the final bundle and outputs it at
dist/index_bundle.js.
Plugins
We’ve seen how you can use loaders to work on individual files before or while the bundle is being generated. Unlike loaders, plugins allow you to execute certain tasks after the bundle has been created. Because of this, these tasks can be on the bundle itself, or just to your codebase. You can think of plugins as a more powerful, less restrictive version of loaders.
Let’s take a look at a few examples.
HtmlWebpackPlugin
Earlier we saw that the main benefit of webpack was that it would generate a single bundle for us that we could then use to reference inside of our main index.html page.
What HtmlWebpackPlugin does is it will generate this index.html page for us, stick it inside of the same directory where our bundle is put, and automatically include a <script> tag which references the newly generated bundle.
So in our example, because we’ve told webpack to name the final bundle index_bundle.js and put it in a folder called dist , when HtmlWebpackPlugin runs, it’ll create a new index.html file, put it in dist , and include a script to reference the bundle, <script src='bundle_index.js'></script> . Pretty nice, right? Because this file is being generated for us by HtmlWebpackPlugin , even if we change the output path or file name of our bundle, HtmlWebpackPlugin will have that information and it’ll adapt accordingly.
Now, how we do adjust our webpack config in order to utilize HtmlWebpackPlugin ? As always, we first need to download it.
npm install html-webpack-plugin --save-dev
Next, we add a plugins property which is an array to our webpack config.
// webpack.config.js

const path = require('path')

module.exports = {
  entry: './app/index.js',
  module: {
    rules: [
      { test: /\.svg$/, use: 'svg-inline-loader' },
      { test: /\.css$/, use: [ 'style-loader', 'css-loader' ] },
      { test: /\.(js)$/, use: 'babel-loader' }
    ]
  }
  output: {
    path: path.resolve(__dirname, 'dist'),
    filename: 'index_bundle.js'
  },
  plugins: []
}
Then in order to use HtmlWebpackPlugin , we create a new instance of it inside of our plugins array.
// webpack.config.js

const path = require('path')
const HtmlWebpackPlugin = require('html-webpack-plugin')

module.exports = {
  entry: './app/index.js',
  module: {
    rules: [
      { test: /\.svg$/, use: 'svg-inline-loader' },
      { test: /\.css$/, use: [ 'style-loader', 'css-loader' ] },
      { test: /\.(js)$/, use: 'babel-loader' }
    ]
  }
  output: {
    path: path.resolve(__dirname, 'dist'),
    filename: 'index_bundle.js'
  },
  plugins: [
    new HtmlWebpackPlugin()
  ]
}
EnvironmentPlugin
If you’re using React, you’ll want to set process.env.NODE_ENV to production before you deploy your code. This tells React to build in production mode which will strip out any developer features like warnings. Webpack makes this simple by providing a plugin called EnvironmentPlugin . It comes as part of the webpack namespace so you don’t need to download it.
// webpack.config.js

const path = require('path')
const HtmlWebpackPlugin = require('html-webpack-plugin')
const webpack = require('webpack')

module.exports = {
  entry: './app/index.js',
  module: {
    rules: [
      { test: /\.svg$/, use: 'svg-inline-loader' },
      { test: /\.css$/, use: [ 'style-loader', 'css-loader' ] },
      { test: /\.(js)$/, use: 'babel-loader' }
    ]
  }
  output: {
    path: path.resolve(__dirname, 'dist'),
    filename: 'index_bundle.js'
  },
  plugins: [
    new HtmlWebpackPlugin(),
    new webpack.EnvironmentPlugin({
      'NODE_ENV': 'production'
    })
  ]
}
Now, anywhere in our application, we’ll be able to tell if we’re running in production mode by using process.env.NODE_ENV .
HtmlWebpackPlugin and EnvironmentPlugin are just a small taste of what you can do with webpack’s plugin system. Here’s a full list of officially supported plugins.
Mode
Whenever you build your app for production, there are a few steps you want to take. We just learned about one of them which was setting process.env.NODE_ENV to production . Another would be minifying your code and stripping out comments to reduce the bundle size.
Utilizing plugins for each one of these production tasks would work, but there’s a much easier way. In your webpack config, you can set the mode property to development or production depending on which environment you’re in.
// webpack.config.js

const path = require('path')
const HtmlWebpackPlugin = require('html-webpack-plugin')

module.exports = {
  entry: './app/index.js',
  module: {
    rules: [
      { test: /\.svg$/, use: 'svg-inline-loader' },
      { test: /\.css$/, use: [ 'style-loader', 'css-loader' ] },
      { test: /\.(js)$/, use: 'babel-loader' }
    ]
  }
  output: {
    path: path.resolve(__dirname, 'dist'),
    filename: 'index_bundle.js'
  },
  plugins: [
    new HtmlWebpackPlugin()
  ],
  mode: 'production'
}
Notice we were able to get rid of our EnvironmentPlugin . The reason for that is by setting mode to production , webpack will automatically set process.env.NODE_ENV to production . It will also minify our code and strip out warnings.
Running webpack
At this point, we have a pretty solid grasp on how webpack works and how to configure it, the only other thing we need to do now is actually run it.
Assuming you’re using npm and have a package.json file, you can create a script to execute webpack .
// package.json

"scripts": {
  "build": "webpack"
}
Now whenever you run npm run build from the command line, webpack will execute and create an optimized bundle named index_bundle.js and put it inside of the dist directory.
Production vs Development Modes
At this point, there’s nothing more about webpack itself that we’re going to cover. However, it is important that you understand how to easily switch between running in development mode and running in production mode.
As we talked about, when we’re building for production , we want everything to be as optimized as possible. When we’re building for development , the opposite is true.
To make it easy to switch between production and development builds, we’ll have two different commands we can run via our npm scripts .
npm run build will build our app for production.
npm run start will start a development server which will automatically regenerate our bundle whenever we make a change to our code.
If you’ll remember, we hardcoded mode to production inside of our webpack config. However, we only want to run in production mode when we run npm run build . If we run npm run start , we want mode set to development . To fix this, let’s adjust our scripts.build property in our package.json file to pass along an environment variable.
"scripts": {
  "build": "NODE_ENV='production' webpack",
}
If you’re on Windows, the command is a bit different:
"SET NODE_ENV='production' && webpack"
Now, inside of our webpack config, we can toggle mode based on process.env.NODE_ENV .
// webpack.config.js

...

  mode: process.env.NODE_ENV === 'production' ? 'production' : 'development'
}
Now whenever we want to build our app for production, we just run npm run build in our command line. That will generate an index.html file and an index_bundle.js file and put them in the dist directory.
webpack DevServer
Unlike building for production, when we’re developing, it’s all about speed. We don’t want to have to re-run webpack and wait for it to rebuild the dist directory every time we change our code. This is where the webpack-dev-server package can help us out.
As the name implies, webpack-dev-server is a development server for webpack. Instead of generating a dist directory, it’ll keep track of your files in memory and serve them via a local server. More than that, it supports live reloading. What that means is whenever you make a change in your code, webpack-dev-server will quickly recompile your code and reload the browser with those changes.
As always, to use it we first need to install it.
npm install webpack-dev-server --save-dev
Then all we need to do is update our start script to run webpack-dev-server .
"scripts": {
  "build": "NODE_ENV='production' webpack",
  "start": "webpack-dev-server"
}
Just like that, we have two commands, one for creating a development server and one for building our app for production.
(Project) First Component
The code for this video can be found here.
The commit for this video can be found here.
npm install --save-dev @babel/core @babel/preset-env @babel/preset-react webpack webpack-cli webpack-dev-server babel-loader css-loader style-loader html-webpack-plugin
A few months ago I had, what I thought, was a simple question that I posted to Twitter.
What surprised me wasn’t the joint confusion around this question, but instead was the number of inaccurate responses I received.
Instances / Instantiation
Rendering
Evaluation
Invocation
“Using it :)”
The primary reason for the confusion is that there’s an often un-talked about abstraction layer between JSX and what’s actually going on in React land. To answer this question, we need to take a deep dive into that abstraction.
Let’s start by looking at the absolute fundamentals of React. What is React? It’s a library for building user interfaces. No matter how complex React or the React ecosystem seem to be, this is React at its core — building UIs. With this in mind, we arrive at our first definition, an Element . Simply put, a React element describes what you want to see on the screen . Not so simply put, a React element is an object representation of a DOM node . Notice I used the word describe . It’s important to note that a React element isn’t actually the thing you’ll see on your screen. Instead, it’s just an object representation of it. There are a few reasons for this. The first is that JavaScript objects are lightweight — React can create and destroy these elements without too much overhead. The second reason is React can analyze the object, diff it with the previous object representation to see what changed. Then, React can update the actual DOM only where those changes occurred. This has some performance upsides to it.
In order to create our object representation of a DOM node (aka a React element), we can use React’s createElement method.
const element = React.createElement(
  'div',
  {id: 'login-btn'},
  'Login'
)
createElement takes in three arguments. The first is a tag name string ( div , span , etc), the second is any attributes you want the element to have, the third is the contents or the children of the element, in this case, the text “Login”. The createElement invocation above is going to return an object that looks like this.
{
  type: 'div',
  props: {
    children: 'Login',
    id: 'login-btn'
  }
}
When it’s rendered to the DOM (using ReactDOM.render ), we’ll have a new DOM node that looks like this,
<div id='login-btn'>Login</div>
What’s interesting about learning React is that typically the first thing you’re taught are components. “Components are the building blocks of React”. Notice, however, that we started this post with elements. The reason for this is because once you understand elements, understanding components is a smooth transition. A component is a function or a Class which optionally accepts input and returns a React element.
function Button ({ onLogin }) {
  return React.createElement(
    'div',
    {id: 'login-btn', onClick: onLogin},
    'Login'
  )
}
By definition, we have a Button component which accepts an onLogin input and returns a React element. One thing to note is that our Button component receives an onLogin method as its prop. To pass that along to our object representation of the DOM, we pass it along as the second argument to createElement , just as we did our id attribute.
Let’s go deeper.
Up until this point we’ve only covered creating React elements with the type property of native HTML elements ( span , div , etc), but you can also pass in other React components to the first argument of createElement .
const element = React.createElement(
  User,
  {name: 'Tyler McGinnis'},
  null
)
However, unlike with an HTML tag name, if React sees a class or a function as the first argument, it will then check to see what element it renders, given the corresponding props. React will continue to do this until there are no more createElement invocations which have a class or a function as their first argument. Let’s take a look at this in action.
function Button ({ addFriend }) {
  return React.createElement(
    "button",
    { onClick: addFriend },
    "Add Friend"
  )
}

function User({ name, addFriend }) {
  return React.createElement(
    "div",
    null,
    React.createElement(
      "p",
      null,
      name
    ),
    React.createElement(Button, { addFriend })
  )
}
Above we have two components. A Button and a User . User ’s object representation of the DOM will be a div with two children, a p which wraps the user’s name and a Button component. Now, let’s swap out the createElement invocations with what they return,
function Button ({ addFriend }) {
  return {
    type: 'button',
    props: {
      onClick: addFriend,
      children: 'Add Friend'
    }
  }
}

function User ({ name, addFriend }) {
  return {
    type: 'div',
    props: {
      children: [
        {
          type: 'p',
          props: {
            children: name
          }
        },
        {
          type: Button,
          props: {
            addFriend
          }
        }
      ]
    }
  }
}
You’ll notice in the above code we have four different type properties, button , div , p , and Button . When React sees an element with a function or class type (like our type: Button above), it will then consult with that component to know which element it returns, given the corresponding props. With that in mind, at the end of this process, React has a full object representation of the DOM tree. In our example, that will look like this,
{
  type: 'div',
  props: {
    children: [
      {
        type: 'p',
        props: {
          children: 'Tyler McGinnis'
        }
      },
      {
        type: 'button',
        props: {
          onClick: addFriend,
          children: 'Add Friend'
        }
      }
    ]
  }
}
This whole process is called reconciliation in React and it’s triggered every time setState or ReactDOM.render is called.
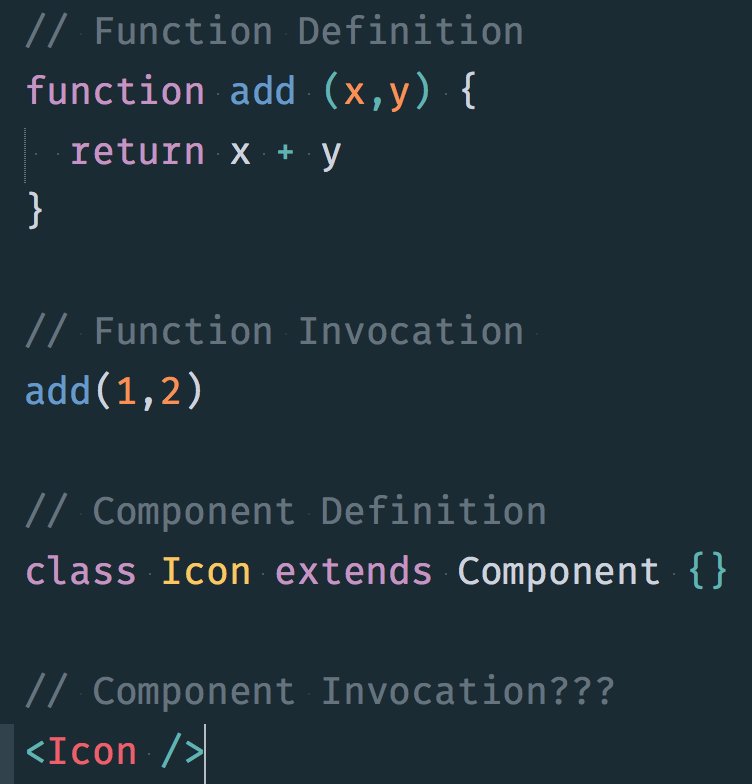
So now let’s again take a look at our initial question that sparked this blog post,
// Function Definition
function add (x, y) {
  return x + y
}

// Function Invocation
add(1,2)

// Component Definition
function Icon () {}

// Component Invocation???
<Icon />
At this point, we have all the knowledge we need to answer this question except for one crucial piece. Odds are, if you’ve been using React for any amount of time, you don’t use React.createElement to create your object representations of the DOM. Instead, you’re probably using JSX. Earlier I wrote, “The primary reason for the confusion is that there’s an often un-talked about abstraction layer between JSX and what’s actually going on in React land”. This abstraction layer is that JSX is always going to get compiled to React.createElement invocations (typically) via Babel.
Looking at our earlier example, this code
function Button ({ addFriend }) {
  return React.createElement(
    "button",
    { onClick: addFriend },
    "Add Friend"
  )
}

function User({ name, addFriend }) {
  return React.createElement(
    "div",
    null,
    React.createElement(
      "p",
      null,
      name
    ),
    React.createElement(Button, { addFriend })
  )
}
is the result of this JSX being compiled.
function Button ({ addFriend }) {
  return (
    <button onClick={addFriend}>Add Friend</button>
  )
}

function User ({ name, addFriend }) {
  return (
    <div>
      <p>{name}</p>
      <Button addFriend={addFriend}/>
    </div>
  )
}
So finally, what do we call it when we write out our component like this, <Icon/> ? We can call it “creating an element” because after the JSX is compiled, that’s exactly what’s happening.
React.createElement(Icon, null)
All of these examples are “creating a React element”.
React.createElement(
  'div',
  { className: 'container' },
  'Hello!'
)

<div className='container'>Hello!</div>

<Hello />
JSX Tips for Beginners
For the most part, JSX should feel pretty natural. There are a few things to be aware of though.
Variables in JSX
Whenever you want to use an expression (something that produces a value) in JSX, you need to wrap the expression in single curly braces, {} .
render() {
  const name = 'Tyler'

  return (
    <div>
      <h1>Hello, {name}</h1>
      <p>Today is {new Date().toLocaleDateString()}</p>
      <p>What is 2 + 2? {2 + 2}</p>
    </div>
  )
}
Rendering nothing
If you want React to render nothing, return null .
render() {
  if (isLoading() === true) {
    return null
  }

  return (
    ...
  )
}
Conditional Rendering
The ability to conditionally render UI based on a piece of state is pretty foundational to any front-end framework. Typically, this functionality is built natively into the framework.
// Angular
<h1 *ngIf="authed; else elseBlock">Welcome back!</h1>
<ng-template #elseBlock><h1>Login to see your dashboard</h1></ng-template>

// Vue
<h1 v-if="authed">Welcome back!</h1>
<h1 v-else>Login to see your dashboard</h1>
With React, it’s a bit different. Instead of increasing the API surface layer, because JSX is “Just JavaScript”, React can leverage native JavaScript features to accomplish the same task. There are pros and cons to this approach, but if you’re already familiar with conditional rendering in JavaScript, you’ll feel pretty comfortable.
If/else
The most basic example is just using a simple if/else statement.
render() {
  const authed = isAuthed()

  if (authed === true) {
    return <h1>Welcome back!</h1>
  } else {
    return <h1>Login to see your dashboard</h1>
  }
}
Again, because we’re just writing JavaScript, if we had another conditional, we’d just add an else if case.
render() {
  const authed = isAuthed()
  const firstLogin = isNew()

  if (firstLogin === true) {
    return <h1>👋 Welcome!</hi>
  } else if (authed === true) {
    return <h1>Welcome back!</h1>
  } else {
    return  <h1>Login to see your dashboard</h1>
  }
}
Ternary Operator
If you’re rendering different UI based on a single condition, typically you’d use JavaScript’s ternary operator.
render() {
  return isAuthed() === true
    ? <h1>Welcome back!</h1>
    : <h1>Login to see your dashboard</h1>
}
We learned earlier that any expression needs to be wrapped in {} . We can use that knowledge to render a ternary inside of JSX.
render() {
  return (
    <div>
      <Logo />
      {isAuthed() === true
        ? <h1>Welcome back!</h1>
        : <h1>Login to see your dashboard</h1>}
    </div>
  )
}
Earlier we also learned that we can render null if we want React to render nothing. This is a common pattern when using ternaries.
render() {
  return (
    <div>
      <Logo />
      {showWarning() === true
        ? <Warning />
        : null}
    </div>
  )
}
Logical && Operator
If you’re not already familiar with it, JavaScript has an && operator. Typically it’s used in conditionals as an “AND” statement.
if (user && authed) {}
In the example above, it’s important to note that authed won’t be checked if user isn’t truthy. Using that logic, we can use the && operator as a more concise ternary that renders null.
render() {
  return (
    <div>
      <Logo />
      {showWarning() === true && <Warning />}
    </div>
  )
}
React Fragments
Can you spot what’s wrong with the following JSX code?
render() {
  const name = 'Tyler'

  return (
    <h1>Hello, {name}</h1>
    <p>Today is {getDay()}</p>
    <p>What is 2 + 2? {2 + 2}</p>
  )
}
It looks fine, right? Unfortunately, it’ll throw an error.
Adjacent JSX elements must be wrapped in an enclosing tag.
That’s a fancy way to say that you can only ever return one top-level element from a component. In our example, we’re trying to return 3. We can fix this by wrapping everything in a div .
render() {
  const name = 'Tyler'

  return (
    <div>
      <h1>Hello, {name}</h1>
      <p>Today is {getDay()}</p>
      <p>What is 2 + 2? {2 + 2}</p>
    </div>
  )
}
That fixes the issue, but now we have a semantic problem. We’re unnecessarily creating an extra div . This is the exact use case that React.Fragment was created for. If you want to return adjacent elements but don’t want to change your markup, wrap them in <React.Fragment> .
render() {
  const name = 'Tyler'

  return (
    <React.Fragment>
      <h1>Hello, {name}</h1>
      <p>Today is {getDay()}</p>
      <p>What is 2 + 2? {2 + 2}</p>
    </React.Fragment>
  )
}
Much better.
There also exists a shorthand syntax for React Fragment, but I don’t use it.
render() {
  const name = 'Tyler'

  return (
    <>
      <h1>Hello, {name}</h1>
      <p>Today is {getDay()}</p>
      <p>What is 2 + 2? {2 + 2}</p>
    </>
  )
}
Capitalization
How does React know the difference between a custom React component like <User /> and a built-in HTML element like <span> ? The answer is probably simpler than you’d expect, it’s based on the capitalization. Whenever you create a React component, you need to capitalize it. Otherwise, React will think it’s a built-in HTML element.
Introduction to Props
Whenever you have a system that is reliant upon composition, it’s critical that each piece of that system has an interface for accepting data from outside of itself. You can see this clearly illustrated by looking at something you’re already familiar with, functions.
function getProfilePic (username) {
  return 'https://photo.fb.com/' + username
}

function getProfileLink (username) {
  return 'https://www.fb.com/' + username
}

function getAvatarInfo (username) {
  return {
    pic: getProfilePic(username),
    link: getProfileLink(username)
  }
}

getAvatarInfo('tylermcginnis')
We’ve seen this code before as our very soft introduction to function composition. Without the ability to pass data, in this case username , to each of our of functions, our composition would break down.
Similarly, because React relies heavily on composition, there needs to exist a way to pass data into components. This brings us to our next important React concept, props .
Props are to components what arguments are to functions.
Again, the same intuition you have about functions and passing arguments to functions can be directly applied to components and passing props to components.
There are two parts to understanding how props work. First is how to pass data into components, and second is accessing the data once it’s been passed in.
Passing data to a component
This one should feel natural because you’ve been doing something similar ever since you learned HTML. You pass data to a React component the same way you’d set an attribute on an HTML element.

<Hello name='Tyler' />
In the example above, we’re passing in a name prop to the Hello component.
Accessing props
Now the next question is, how do you access the props that are being passed to a component? In a class component, you can get access to props from the props key on the component’s instance ( this ).
class Hello extends React.Component {
  render() {
    return (
      <h1>Hello, {this.props.name}</h1>
    )
  }
}
Each prop that is passed to a component is added as a key on this.props . If no props are passed to a component, this.props will be an empty object.
class Hello extends React.Component {
  render() {
    return (
      <h1>Hello, {this.props.first} {this.props.last}</h1>
    )
  }
}

<Hello first='Tyler' last='McGinnis' />
It’s important to note that we’re not limited to what we can pass as props to components. Just like we can pass functions as arguments to other functions, we’re also able to pass components (or really anything we want) as props to other components.
<Profile
  username='tylermcginnis'
  authed={true}
  logout={() => handleLogout()}
  header={<h1>👋</h1>}
/>
If you pass a prop without a value, that value will be set to true . These are equivalent.
<Profile authed={true} />

<Profile authed />