(Project) Adding Routes
The code for this video can be found here.
The commit for this video can be found here.
(Project) Navbar
The code for this video can be found here.
The commit for this video can be found here.
React Router v4 Query Strings
This is originally part of our React Router v4 course. However, it’s applicable to us here as well.
When you’re building for the web, sometimes you need to pass information via the URL. To do this, you can use a query string.
You’ve probably seen them before IRL. Here’s an example from Twitter’s analytics page.
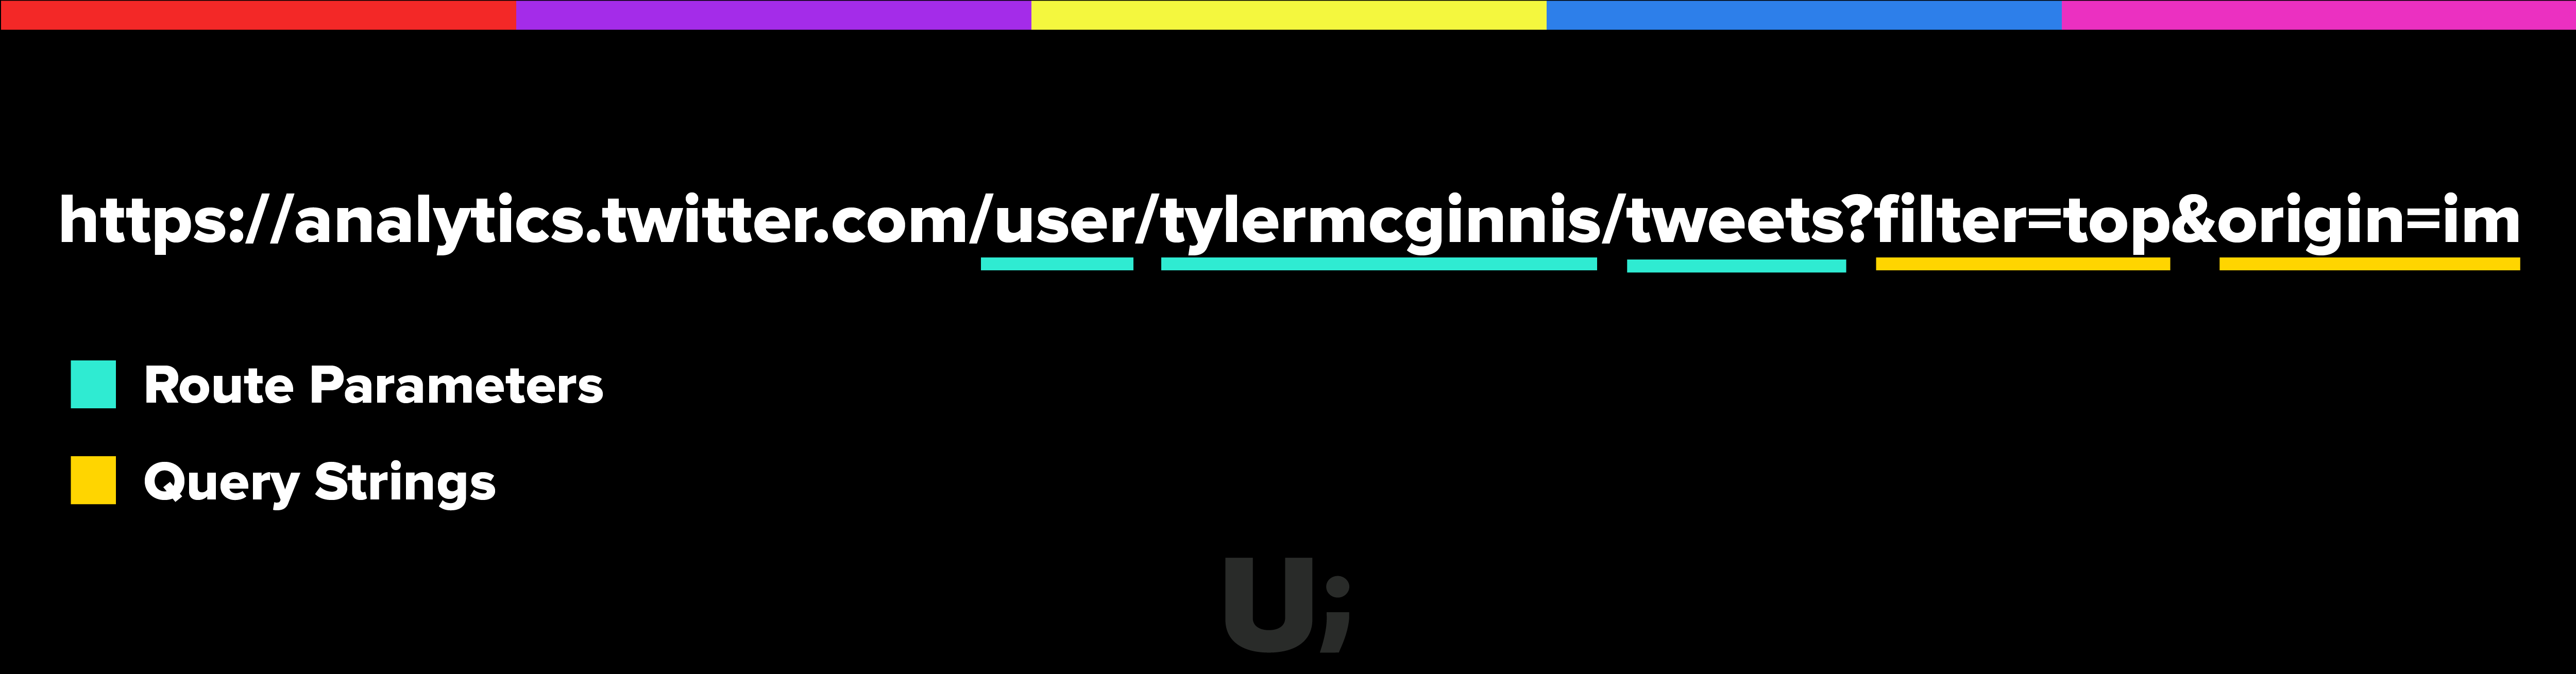
This URL has three route parameters and two query strings. Twitter is using query strings to tell its route to filter the Tweets by top (most popular) and that the origin was im (which I’m not sure what that means, TBH).
With that said, odds are you’re not here to learn what query strings are but instead how to use them with React Router v4. The good news is that if you’re already comfortable with React Router v4, there are just a few small details you need to know.
Let’s say we were Twitter and we were building the Route for the URL above. It would probably look something like this.
<Route
  path={`${match.path}/tweets`}
  component={Tweets}
/>
Notice at this point there’s nothing new. We don’t account for the query string when we create the Route . Instead, we parse them inside the component that is being rendered when that path matches - in this case, Tweets .
Now the question becomes, how do we actually do this?
If you poke around on the location object that is passed to all components rendered by React Router v4, you’ll notice that it has a search property on it.
componentDidMount() {
  console.log(this.props.location.search) // "?filter=top&origin=im"
}
Cool, but this is the literal query string . You’ll need to somehow parse it before you can get the actual values.
You may be surprised to hear that React Router v4 doesn’t come with built-in with support for parsing query strings. The reason for this is because, over the years, there have been many requests to support different implementations. With that, the team decided it would be best for users to decide what the implementation looks like rather than baking in a “one size fits all” solution. Regardless, what that means is that you’ll need to bring your own query-string parser.
There are two common solutions. Either use a browser API (that may not be supported by all the browsers you need) or use an external library for parsing the query string. The library I typically use is the query-string library on NPM.
With that library installed, all we need to do is call queryString.parse passing in our location.search . That will parse the query string into an object which we can then grab the values off of.
import queryString from 'query-string'

...

componentDidMount() {
  const values = queryString.parse(this.props.location.search)
  console.log(values.filter) // "top"
  console.log(values.origin) // "im"
}
That’s it. Go parse those query strings.
(Project) Query Strings
The code for this video can be found here.
The commit for this video can be found here.
404 with React Router v4
This is originally part of our React Router v4 course. However, it’s applicable to us here as well.
A common use case for when you’re building a web app is to have a “catch all” route that will be rendered if none of your other routes match. A common example of this would be a 404 page.
To see how this works with React Router v4, let’s first render a navbar with the following paths - / , /will-match , /will-not-match , and /also/will/not/match .
import React from 'react'
import {
  BrowserRouter as Router,
  Route,
  Link
} from 'react-router-dom'

class App extends React.Component {
  render() {
    return (
      <Router>
        <div>
          <ul>
            <li><Link to="/">Home</Link></li>
            <li><Link to="/will-match">Will Match</Link></li>
            <li><Link to="/will-not-match">Will Not Match</Link></li>
            <li><Link to="/also/will/not/match">Also Will Not Match</Link></li>
          </ul>
        </div>
      </Router>
    )
  }
}

export default App
 Play with the code.
Now that we have the navbar set up, let’s create three different components to render - Home , which will match on / , WillMatch which will match on /will-match , and NoMatch , which will be the catch-all component which will render only if none of the other Route 's match.
const Home = () => <h1>Home</h1>

const WillMatch = () => <h3>Matched!</h3>

const NoMatch = ({ location }) => (
  <h3>No match for <code>{location.pathname}</code></h3>
)
Now that we have the components which are going to be rendered, we need to actually render some Route s. Home and WillMatch are straight forward, you just render them as you normally would.
render() {
  return (
    <Router>
      <div>
        <ul>
          <li><Link to="/">Home</Link></li>
          <li><Link to="/will-match">Will Match</Link></li>
          <li><Link to="/will-not-match">Will Not Match</Link></li>
          <li><Link to="/also/will/not/match">Also Will Not Match</Link></li>
        </ul>

        <Route path="/" exact component={Home}/>        <Route path="/will-match" component={WillMatch}/>      </div>
    </Router>
  )
}
Now the question becomes, how do we render NoMatch ? Remember, we only want to render NoMatch if both the / and /will-match Route s don’t match. There are two parts to accomplishing this - the first is that if you render a Route but don’t specify a path prop, that route will always match and render the component . Let’s do that for our NoMatch component.
<Route path="/" exact component={Home}/>
<Route path="/will-match" component={WillMatch}/>
<Route component={NoMatch} />
That’s closer, but if you play around with the app, you know we’re not done yet. Now the app renders the Home and WillMatch components properly but it also always renders the NoMatch component no matter what path we’re on.
What we need is a way to tell React Router v4 that we only want to render the first Route that matches - even if there’s more than one match. By doing this, our NoMatch component will only get rendered if the two Route s above it, / and /will-match aren’t matched.
The good news is React Router v4 comes with a component that does exactly this and it’s called Switch . By wrapping your Route s inside of Switch , React Router will only render the first Route that matches.
render() {
  return (
    <Router>
      <div>
        <ul>
          <li><Link to="/">Home</Link></li>
          <li><Link to="/will-match">Will Match</Link></li>
          <li><Link to="/will-not-match">Will Not Match</Link></li>
          <li><Link to="/also/will/not/match">Also Will Not Match</Link></li>
        </ul>

        <Switch>          <Route path="/" exact component={Home}/>          <Route path="/will-match" component={WillMatch}/>          <Route component={NoMatch} />        </Switch>      </div>
    </Router>
  )
}
Now if the user isn’t at / or /will-match , the NoMatch component will be rendered.
You can utilize this same pattern to render a client-side 404 page if none of your other Route s match.
<Switch>
  <Route exact path="/" component={Home}/>
  <Route exact path="/profile" component={Profile}/>
  <Route component={FourZeroFour} />
</Switch>
(Project) 404
The code for this video can be found here.
The commit for this video can be found here.
Class Fields
This is originally part of our Advanced JavaScript course. However, it’s applicable to us here as well.
My favorite part of the JavaScript community is that everyone seems to always be asking “why?” . Why do we do things the way we do them? Generally, the answer to that question is full of reason and historical context. But sometimes, the answer tends to be more simple - “because that’s what we’ve always done.”
In the previous post we learned how to create JavaScript classes in both ES5 as well as ES6. We also discussed how to add state to the instances of those classes via the constructor as well as how to share methods across instances via the classes’ prototype. Here’s a simple Player class which encompasses everything we discussed in regards to ES6 classes.
class Player {
  constructor() {
    this.points = 0
    this.assists = 0
    this.rebounds = 0
    this.steals = 0
  }
  addPoints(amount) {
    this.points += amount
  }
  addAssist() {
    this.assists++
  }
  addRebound() {
    this.rebounds++
  }
  addSteal() {
    this.steals++
  }
}
Looking at that code, is there any way we can make it a little more intuitive? The methods are fine, those come pretty naturally. What about the constructor? What even is a constructor and why do we have to define instance values there? Now, there are answers to those questions but why can’t we just add state to our instances just like we did with the methods? Something like this
class Player {
  points = 0
  assists = 0
  rebounds = 0
  steals = 0
  addPoints(amount) {
    this.points += amount
  }
  addAssist() {
    this.assists++
  }
  addRebound() {
    this.rebounds++
  }
  addSteal() {
    this.steals++
  }
}
It turns out this is the foundation for the Class Fields Declaration proposal which is currently at Stage 3 in the TC-39 process. This proposal will allow you to add instance properties directly as a property on the class without having to use the constructor method. Pretty slick, but where this proposal really shines is if we look at some React code. Here’s a typical React component. It has local state, some methods, and a few static properties being added to the class.
class PlayerInput extends Component {
  constructor(props) {
    super(props)
    this.state = {
      username: ''
    }

    this.handleChange = this.handleChange.bind(this)
  }
  handleChange(event) {
    this.setState({
      username: event.target.value
    })
  }
  render() {
    ...
  }
}

PlayerInput.propTypes = {
  id: PropTypes.string.isRequired,
  label: PropTypes.string.isRequired,
  onSubmit: PropTypes.func.isRequired,
}

PlayerInput.defaultProps = {
  label: 'Username',
}
Let’s see how the new Class Fields proposal improves the code above First, we can take our state variable out of the constructor and define it directly as a property (or “field”) on the class.
class PlayerInput extends Component {
  state = {
    username: ''
  }
  constructor(props) {
    super(props)

    this.handleChange = this.handleChange.bind(this)
  }
  handleChange(event) {
    this.setState({
      username: event.target.value
    })
  }
  render() {
    ...
  }
}

PlayerInput.propTypes = {
  id: PropTypes.string.isRequired,
  label: PropTypes.string.isRequired,
  onSubmit: PropTypes.func.isRequired,
}

PlayerInput.defaultProps = {
  label: 'Username',
}
Cool, but nothing to get too excited over. Let’s keep going. In the previous post, we talked about how you can add static methods to the class itself by using the static keyword. However, according to the ES6 class specification, this only works with methods, not values. That’s why in the code above we have to add propTypes and defaultProps to PlayerInput after we define it and not in the class body. Again, why can’t those go directly on the class body just as a static method would? Well, the good news is this is encompassed in the Class Fields proposal as well. So now instead of just defining static methods in the class body, you can also define static values. What that means for our code is we can move propTypes and defaultProps up into the class definition.
class PlayerInput extends Component {
  static propTypes = {
    id: PropTypes.string.isRequired,
    label: PropTypes.string.isRequired,
    onSubmit: PropTypes.func.isRequired,
  }
  static defaultProps = {
    label: 'Username'
  }
  state = {
    username: ''
  }
  constructor(props) {
    super(props)

    this.handleChange = this.handleChange.bind(this)
  }
  handleChange(event) {
    this.setState({
      username: event.target.value
    })
  }
  render() {
    ...
  }
}
Much better, but we still have that ugly constructor method and super invocation. Again, the reason we need the constructor right now is in order to bind the handleChange method to the correct context. If we could figure out another way to make sure handleChange was always invoked in the correct context, we could get rid of the constructor altogether.
If you’ve used arrow functions before, you know that they don’t have their own this keyword. Instead, the this keyword is bound lexically . That’s a fancy way of saying when you use the this keyword inside of an arrow function, things behave how you’d expect them to. Taking that knowledge and combining it with the “Class Fields” proposal, what if we swapped out the handleChange method for an arrow function? Seems a little weird but by doing this we’d get rid of the .bind issue altogether since, again, arrow functions bind this lexically.
class PlayerInput extends Component {
  static propTypes = {
    id: PropTypes.string.isRequired,
    label: PropTypes.string.isRequired,
    onSubmit: PropTypes.func.isRequired,
  }
  static defaultProps = {
    label: 'Username'
  }
  state = {
    username: ''
  }
  handleChange = (event) => {
    this.setState({
      username: event.target.value
    })
  }
  render() {
    ...
  }
}
Well, would you look at that? That’s much better than the original class we started with and it’s all thanks to the Class Fields proposal which will be part of the official EcmaScript specification soon.
From a developer experience standpoint, Class Fields are a clear win. However, there are some downsides to them that are rarely talked about. In the last post, we talked about how ES6 classes are just sugar over what we called the “pseudo-classical” pattern. Meaning, when you add a method to a class, that’s really like adding a method to the function’s prototype.
class Animal {
  eat() {}
}

// Is equivalent to

function Animal () {}
Animal.prototype.eat = function () {}
This is performant because eat is defined once and shared across all instances of the class. What does this have to do with Class Fields? Well, as we saw above, Class Fields are added to the instance. This means that, when using Class Fields, for each instance we create we’ll be re-creating all of the methods in memory.
class Animal {
  eat() {}
  sleep = () => {}
}

// Is equivalent to

function Animal () {
  this.sleep = function () {}
}

Animal.prototype.eat = function () {}
Notice how sleep gets put on the instance and not on Animal.prototype . Is this a bad thing? Well, it can be. Making broad statements about performance without measuring is generally a bad idea. The question you need to answer in your application is if the developer experience you gain from Class Fields outweighs the potential performance hit.
If you want to use any of what we’ve talked about so far in your app, you’ll need to use the babel-plugin-transform-class-properties plugin.
Private Fields
Another aspect of the Class Fields proposal are “private fields”. Sometimes when you’re building a class, you want to have private values that aren’t exposed to the outside world. Historically in JavaScript, because we’ve lacked the ability to have truly private values, we’ve marked them with an underscore.
class Car {
  _milesDriven = 0
  drive(distance) {
    this._milesDriven += distance
  }
  getMilesDriven() {
    return this._milesDriven
  }
}
In the example above, we’re relying on the consumer of the Car class to get the car’s mileage by invoking the getMilesDriven method. However, because there’s really nothing making _milesDriven private, any instance can access it.
const tesla = new Car()
tesla.drive(10)
console.log(tesla._milesDriven)
There are fancy (hacky) ways around this problem using WeakMaps, but it would be nice if a simpler solution existed. Again, the Class Fields proposal is coming to our rescue. According to the proposal, you can create a private field using a # . Yes, you read that right, # . Let’s take a look at what that does to our code,
class Car {
  #milesDriven = 0
  drive(distance) {
    this.#milesDriven += distance
  }
  getMilesDriven() {
    return this.#milesDriven
  }
}
and we can go one step further with the shorthand syntax
class Car {
  #milesDriven = 0
  drive(distance) {
    #milesDriven += distance
  }
  getMilesDriven() {
    return #milesDriven
  }
}

const tesla = new Car()
tesla.drive(10)
tesla.getMilesDriven() // 10
tesla.#milesDriven // Invalid
If you’re interested in more of the details/decisions behind private fields, there’s a great write-up here.
There’s currently a PR to add private fields to Babel so you can use them in your apps.
(Project) Migrating to Class Fields
The code for this video can be found here.
The commit for this video can be found here.
Code Splitting with React Router v4
This is originally part of our React Router v4 course. However, it’s applicable to us here are well.
It’s 2020. Your users shouldn’t have to download your entire app when all they need is a piece of it. If a user is creating a new post, it doesn’t make sense to have them download all the code for the /registration route. If a user is registering, they don’t need the huge rich text editor your app needs on the /settings route. It’s wasteful and some would argue disrespectful to those users who don’t have the privilege of unlimited bandwidth. This idea has not only gained much more popularity in recent years, but it’s also become exponentially easier to pull off - it even has a fancy cool name - code splitting.
The idea is simple, don’t download code until the user needs it. Though in practice, it’s not that simple. The reason for this isn’t because code splitting itself is terribly difficult, but that there are various tools to do it and everyone has an opinion on which is the best. When you’re first starting out, it can be hard to parse what is what.
The two most common approaches are using Webpack and its bundle loader or the ECMAScript dynamic import() proposal which is currently in stage 4 of the ECMAScript process. Any chance I get to not use webpack I take, so we’ll be using dynamic
import()in this post.
If you’re familiar with ES modules, you know that they’re completely static. What that means is that you must specify what you’re importing and exporting at compile time, not run time. This also means that you can’t dynamically import a module based on some condition. import s need to be declared at the top of your file or they’ll throw an error.
if (!user) {
import * as api from './api' // 🙅♀️🚫. "import' and 'export' may only appear at the top level"
}
Now, what if import didn’t have to be static? Meaning what if the code above worked? What benefits would that give us? First, it would mean we could load certain modules on demand. That would be pretty powerful since it would enable us to get closer to the vision of only downloading code the user needs.
if (editPost === true) {
  import * as edit from './editpost'

  edit.showEditor()
}
Assuming editpost contained a pretty large rich text editor, we’d make sure we didn’t download it until the user was actually ready to use it.
Another cool use case of this would be for legacy support. You could hold off on downloading specific code until you were certain the user’s browser didn’t already have it natively.
Here’s the good news (that I kind of already alluded to earlier). This type of functionality does exist, it’s supported by Create React App, and it’s currently in Stage 4 of the ECMAScript process. The difference is that instead of using import as you typically would, you use it like a function that returns you a promise that resolves with the module once the module is completely loaded.
if (editPost === true) {
  import('./editpost')
    .then((module) => module.showEditor())
    .catch((e) => )
}
Pretty rad, right?
Now that we know how to import modules dynamically, the next step is figuring out how to use it with React and React Router v4.
The first (and probably biggest) question we need to ask ourselves when it comes to code splitting with React is where should we split at? Typically, there are two answers.
Split at the route level.
Split at the component level.


The more common approach is to split at the route level. You already split your app into different routes, so adding in code splitting on top of that feels pretty natural. How would this actually look?
Let’s start off with a basic React Router example. We’ll have three routes, / , /topics , /settings .
import React from 'react'
import {
  BrowserRouter as Router,
  Route,
  Link,
} from 'react-router-dom'

import Home from './Home'
import Topics from './Topics'
import Settings from './Settings'

class App extends React.Component {
  render() {
    return (
      <Router>
        <div>
          <ul>
            <li><Link to='/'>Home</Link></li>
            <li><Link to='/topics'>Topics</Link></li>
            <li><Link to='/settings'>Settings</Link></li>
          </ul>

          <hr />

          <Route exact path='/' component={Home} />
          <Route path='/topics' component={Topics} />
          <Route path='/settings' component={Settings} />
        </div>
      </Router>
    )
  }
}

export default App
Now, say our /settings route was super heavy. It contains a rich text editor, an original copy of Super Mario Brothers, and an HD image of Guy Fieri. We don’t want the user to have to download all of that when they’re not on the /settings route. Let’s use our knowledge of dynamic imports and React to code split the /settings route.
Just like we solve any problem with React, let’s make a component. We’ll call it DynamicImport . The goal of DynamicImport is to dynamically load a module, then, once it’s loaded, pass that module to its children .
Once implemented, it’ll look something like this.
const Settings = (props) => (
  <DynamicImport load={() => import('./Settings')}>
    {(Component) => Component === null
      ? <Loading />
      : <Component {...props} />}
  </DynamicImport>
)
The above code tells us two important details about DynamicImport . First, it will receive a load prop which when invoked, will dynamically import a module using the dynamic import syntax we covered earlier. Second, it will receive a function as its children which will need to be invoked with the imported module.
Before we dive into the implementation of DynamicImport , let’s think about how we might accomplish this. The first thing we need to do is to make sure we call props.load . That will return us a promise that when it resolves, should have the module. Then, once we have the module, we need a way to cause a re-render so we can invoke props.children passing it that module. How do you cause a re-render in React? By setting state. By adding the dynamically imported module to DynamicImport s local state, we follow the exact same process with React as we’re used to - fetch data -> set state -> re-render. Except this time instead of “fetch data”, we have “import module”.
First, let’s add some initial state to DynamicImport . component will eventually be the component that we’re dynamically importing.
class DynamicImport extends React.Component {
  state = {
    component: null
  }
}
Now, we need to call props.load . That will return us a promise that when it resolves, should have the module.
class DynamicImport extends React.Component {
  state = {
    component: null
  }
  componentDidMount () {
    this.props.load()
      .then((component) => {
        this.setState({ component })
      })
  }
}
There’s one small caveat here. If the module we’re dynamically importing is using ES modules (export default), it’ll have a .default property. If the module is using commonjs (module.exports), it won’t. Let’s change our code to adapt for that.
this.props.load()
  .then((component) => {
    this.setState({
      component: component.default
        ? component.default
        : component
    })
  })
Now that we’re dynamically importing the module and adding it to our state, the last thing we need to do it figure out what the render method looks like. If you remember, when the DynamicImport component is used, it’ll look like this.
const Settings = (props) => (
  <DynamicImport load={() => import('./Settings')}>
    {(Component) => Component === null
      ? <Loading />
      : <Component {...props} />}
  </DynamicImport>
)
Notice that we’re passing it a function as its “children” prop. That means we need to invoke children passing is the component state.
class DynamicImport extends React.Component {
  state = {
    component: null
  }
  componentDidMount() {
    this.props.load()
      .then((component) => {
        this.setState({
          component: component.default
            ? component.default
            : component
        })
      })
  }  render() {
    return this.props.children(this.state.component)
  }
}
Now anytime we want to import a module dynamically, we can wrap it in DynamicImport . If we were to do this to all our routes, our code would look like this.
import React from 'react'
import {
  BrowserRouter as Router,
  Route,
  Link,
} from 'react-router-dom'

class DynamicImport extends React.Component {
  state = {
    component: null
  }
  componentDidMount() {
    this.props.load()
      .then((component) => {
        this.setState({
          component: component.default
            ? component.default
            : component
        })
      })
  }
  render() {
    return this.props.children(this.state.component)
  }
}

const Home = (props) => (
  <DynamicImport load={() => import('./Home')}>
    {(Component) => Component === null
      ? <Loading />
      : <Component {...props} />}
  </DynamicImport>
)

const Topics = (props) => (
  <DynamicImport load={() => import('./Topics')}>
    {(Component) => Component === null
      ? <Loading />
      : <Component {...props} />}
  </DynamicImport>
)

const Settings = (props) => (
  <DynamicImport load={() => import('./Settings')}>
    {(Component) => Component === null
      ? <Loading />
      : <Component {...props} />}
  </DynamicImport>
)

class App extends React.Component {
  render() {
    return (
      <Router>
        <div>
          <ul>
            <li><Link to='/'>Home</Link></li>
            <li><Link to='/topics'>Topics</Link></li>
            <li><Link to='/settings'>Settings</Link></li>
          </ul>

          <hr />

          <Route exact path='/' component={Home} />
          <Route path='/topics' component={Topics} />
          <Route path='/settings' component={Settings} />
        </div>
      </Router>
    )
  }
}

export default App
How do we know this is actually working and code splitting our routes? If you run npm run build with an app created by Create React App, you’ll see our app’s been split.

Each chunk is each dynamic import() in our app.
At this point, you may be wondering why React doesn’t come with a built-in solution for code splitting similar to our DynamicImport component. I have good news, it does, but the implementation is a little different.
Wait, why did we spend all this time building
DynamicImportif React has a built-in solution that we can use? - YouCause you’re smarter now, and that’s all I care about - Me
With the DynamicImport component, we passed to it a load prop which was a function that when invoked, would resolve with the module.
const Settings = (props) => (
  <DynamicImport load={() => import('./Settings')}>
  </DynamicImport>
)
With React’s built-in solution, instead of passing the function which wraps a dynamic import as a prop to a component, you pass it as an argument to the React.lazy method.
const Settings = React.lazy(() => import('./Settings'))
The next difference is how we show the Loading component. With DynamicImport , we used null to check if the component was still loading. If it was, we rendered <Loading /> , if it wasn’t, we rendered the component.
const Settings = (props) => (
  <DynamicImport load={() => import('./Settings')}>
    {(Component) => Component === null
      ? <Loading />
      : <Component {...props} />}
  </DynamicImport>
)
With React.lazy , it’ll assume that the dynamic import will resolve to a module that exports a React component. What that means is that you don’t have to render the lazily loaded component yourself, instead, you render what React.lazy returns you and it’ll take care of rendering the actual component.
What you do have to worry about though is what you want to show when the module is still loading. To do this, you can use React’s Suspense component giving it a fallback prop which is a React element.
const Settings = React.lazy(() => import('./Settings'))

function App () {
  return (
    <div>
      <React.Suspense fallback={<Loading />}>
        <Settings />
      </React.Suspense>
    </div>
  )
}
What’s nice about React.Suspense that we weren’t able to do with our DynamicImport component is that Suspense can take in multiple, lazily loaded components while still only rendering one Loading element.
const AdDashboard = React.lazy(() => import('./AdDashboard'))
const Analytics = React.lazy(() => import('./Analytics'))
const Settings = React.lazy(() => import('./Settings'))

function App () {
  return (
    <div>
      <React.Suspense fallback={<Loading />}>
        <AdDashboard />
        <Analytics />
        <Settings />
      </React.Suspense>
    </div>
  )
}
Now let’s update our main app to use both our DynamicImport component as well as React.lazy to see the difference.
import React from 'react'
import Loading from './Loading'
import DynamicImport from './DynamicImport'
import {
  BrowserRouter as Router,
  Route,
  Link,
} from 'react-router-dom'

const Home = (props) => (
  <DynamicImport load={() => import('./Home')}>
    {(Component) => Component === null
      ? <Loading />
      : <Component {...props} />}
  </DynamicImport>
)

const Topics = (props) => (
  <DynamicImport load={() => import('./Topics')}>
    {(Component) => Component === null
      ? <Loading />
      : <Component {...props} />}
  </DynamicImport>
)

const Settings = (props) => (
  <DynamicImport load={() => import('./Settings')}>
    {(Component) => Component === null
      ? <Loading />
      : <Component {...props} />}
  </DynamicImport>
)

const LazyHome = React.lazy(() => import('./Home'))const LazyTopics = React.lazy(() => import('./Topics'))const LazySettings = React.lazy(() => import('./Settings'))
class App extends React.Component {
  render() {
    return (
      <Router>
        <div>
          <ul>
            <li><Link to='/'>Home</Link></li>
            <li><Link to='/topics'>Topics</Link></li>
            <li><Link to='/settings'>Settings</Link></li>
          </ul>

          <hr />

          <Route exact path='/' component={Home} />
          <Route path='/topics' component={Topics} />
          <Route path='/settings' component={Settings} />

          <React.Suspense fallback={<Loading />}>            <Route exact path='/' component={LazyHome} />            <Route path='/topics' component={LazyTopics} />            <Route path='/settings' component={LazySettings} />          </React.Suspense>        </div>
      </Router>
    )
  }
}

export default App
Remember earlier when we talked about how there were two main ways to go about code splitting your app? We had this handy little guide.
Split at the route level.
Split at the component level.
So far we’ve only covered splitting at the route level. This is where a lot of people stop. Code splitting at the route level only is like brushing your teeth but never flossing. Your teeth will be mostly clean, but you’ll still get cavities.
Instead of thinking about code splitting as splitting your app up by its routes, you should think of it as splitting your app up by its components ( <Route> s are just components, after all). If you have a rich text editor that lives in a modal, splitting by the route only will still load the editor even if the modal is never opened.
At this point, it’s more of a paradigm shift that needs to happen in your brain rather than any new knowledge. You already know how to dynamically import modules with import() , now you just need to figure out which components in your app you can hold off downloading until your user needs them.
(Project) Code Split
The code for this video can be found here.
The commit for this video can be found here.
Building React Apps for Production
If I had a dollar for every time I’ve seen someone post “slow” React benchmarks only to find later that React was running in development mode rather than in production, I’d have like, 6 dollars. Turns out, React in development mode is significantly larger and slower than React in production (because it includes a bunch of helpful things like warnings that you don’t need in production). Before you ever deploy your React app, it’s vital that you add a build step to build React in production. In this post, we’ll learn how to do that with Create React App as well as our own custom Webpack build.
Create React App
npm run build
That’s it  . That command will create you a
 build directory with a production build of your app. You can then take that build directory and deploy it to production.
Custom Webpack Build
There’s one critical step when creating a production build with React and Webpack. You need to tell Webpack to run in production mode. This will do a few things. First, it’ll let Webpack know that it should minify your code. Second, it’ll set process.env.NODE_ENV to production . This is React’s signal to only include what is absolutely necessary to run the app (removing things like warnings, PropTypes, etc.).
Now the question is, how do you do that? All you need to do is add a mode property to your Webpack config and set it to production .
mode: 'production'
And that’s it! Well, not quite. Now your app will always run in production mode, even when you’re developing. Ideally what we want to do is have different commands we can run based on the mode we want to run in. Something like this.
For development
npm run start
For Production Build
npm run build
To update our NPM scripts, we’ll need to update our package.json file.
"scripts": {
  "start": "webpack-dev-server",
  "build": "NODE_ENV='production' webpack",
},
Windows users, use this instead:
"SET NODE_ENV='production' && webpack"
Now, because we included NODE_ENV='production' when we run npm run build , inside of our Webpack config, process.env.NODE_ENV will be set to production. We can then use that to decide if Webpack should be in production or development mode.
// webpack.config.js

...

mode: process.env.NODE_ENV === 'production' ? 'production' : 'development',

...