The Era of Single-Page Applications#
Single-page applications (SPA) have quickly become a web standard. Almost every website is SPA these days. They give users a native-like app experience with smooth transitions, you don’t need to bother with preparing your application for different browsers (frameworks take care of that), and much more. However, they have at least one big pitfall: they are rendered in the browser rather than on the server. To understand the problem, consider the browser’s simplified workflow. The browser:
- Establishes a connection with the server (queries DNS, sets up an SSL connection, etc.) and requests data.
- Retrieves the data.
- Renders HTML.
- Applies CSS.
- Bootstraps JavaScript.
As you can see, the moment when your Angular application is bootstrapped is at the very end of the workflow. That’s why it takes so long to render the first contentful paint.
SPAs have one more pitfall. Because content is rendered in the browser, the index.html file shipped to the end user has no content. What if your end user is a web crawler?
Guide to Angular Universal#
In this course, you will learn how to address these pitfalls by bootstrapping your Angular application in Node.js and serving the end user’s browser with fully rendered HTML views. You will learn how to improve your overall application performance and boost its Google PageSpeed Insights score from 66 to 95 points!.
In the first course module you will build a regular Angular application served from the Heroku. Such application scores around 60-70 points in the PageSpeed Insights audit:
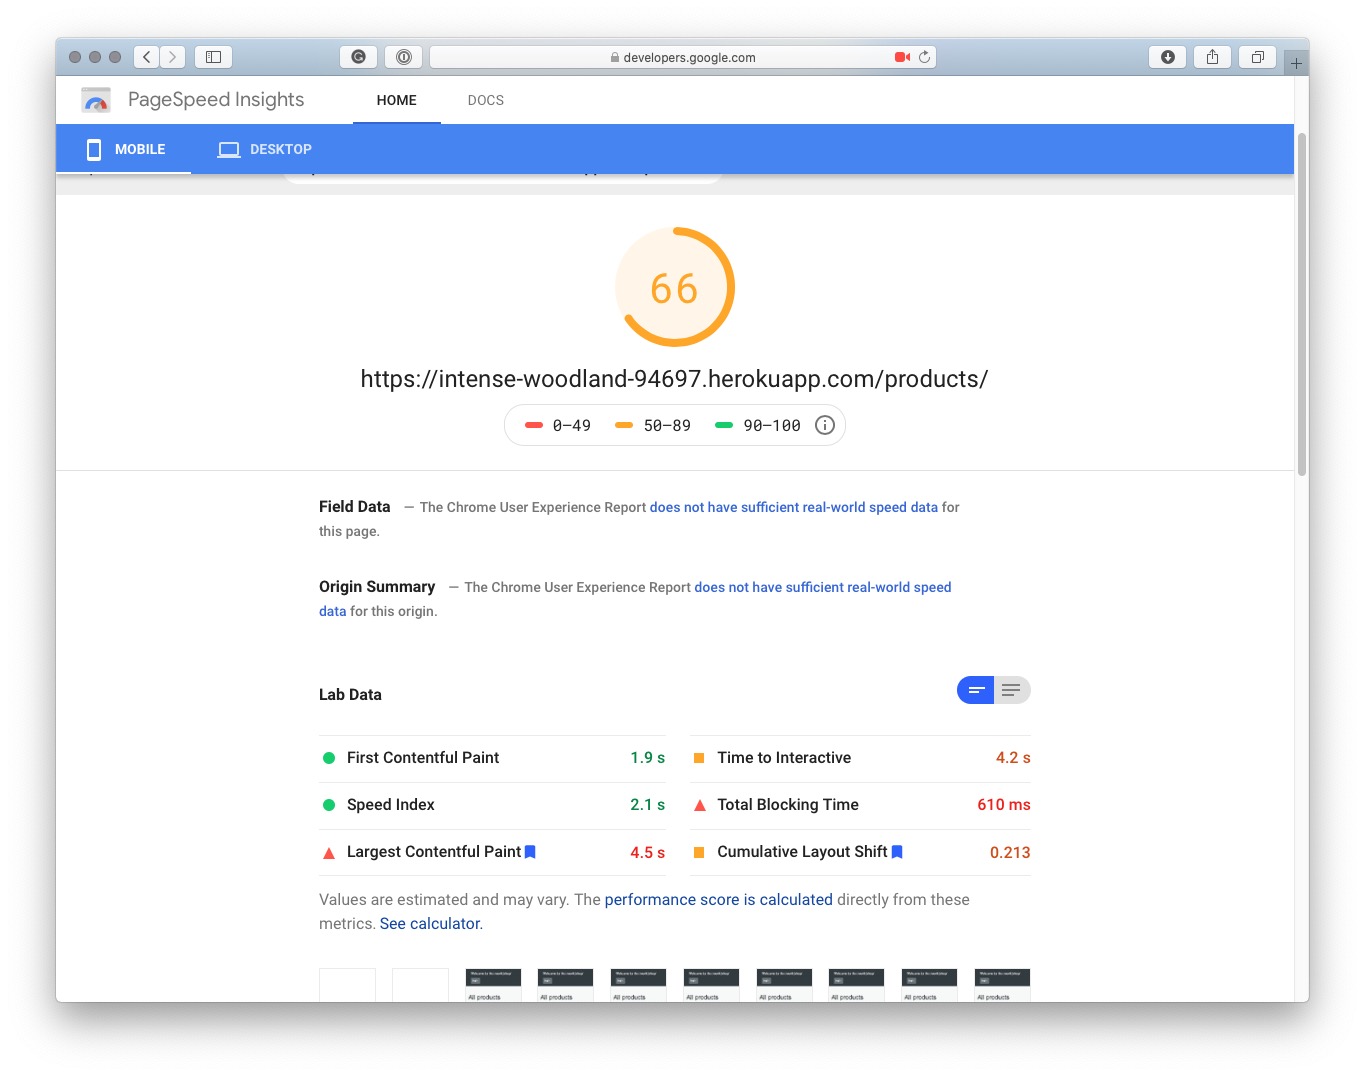
Moreover, it takes a little bit to ship the first byte (about 70ms):

At the very end of this course, your application will score over 90 points:
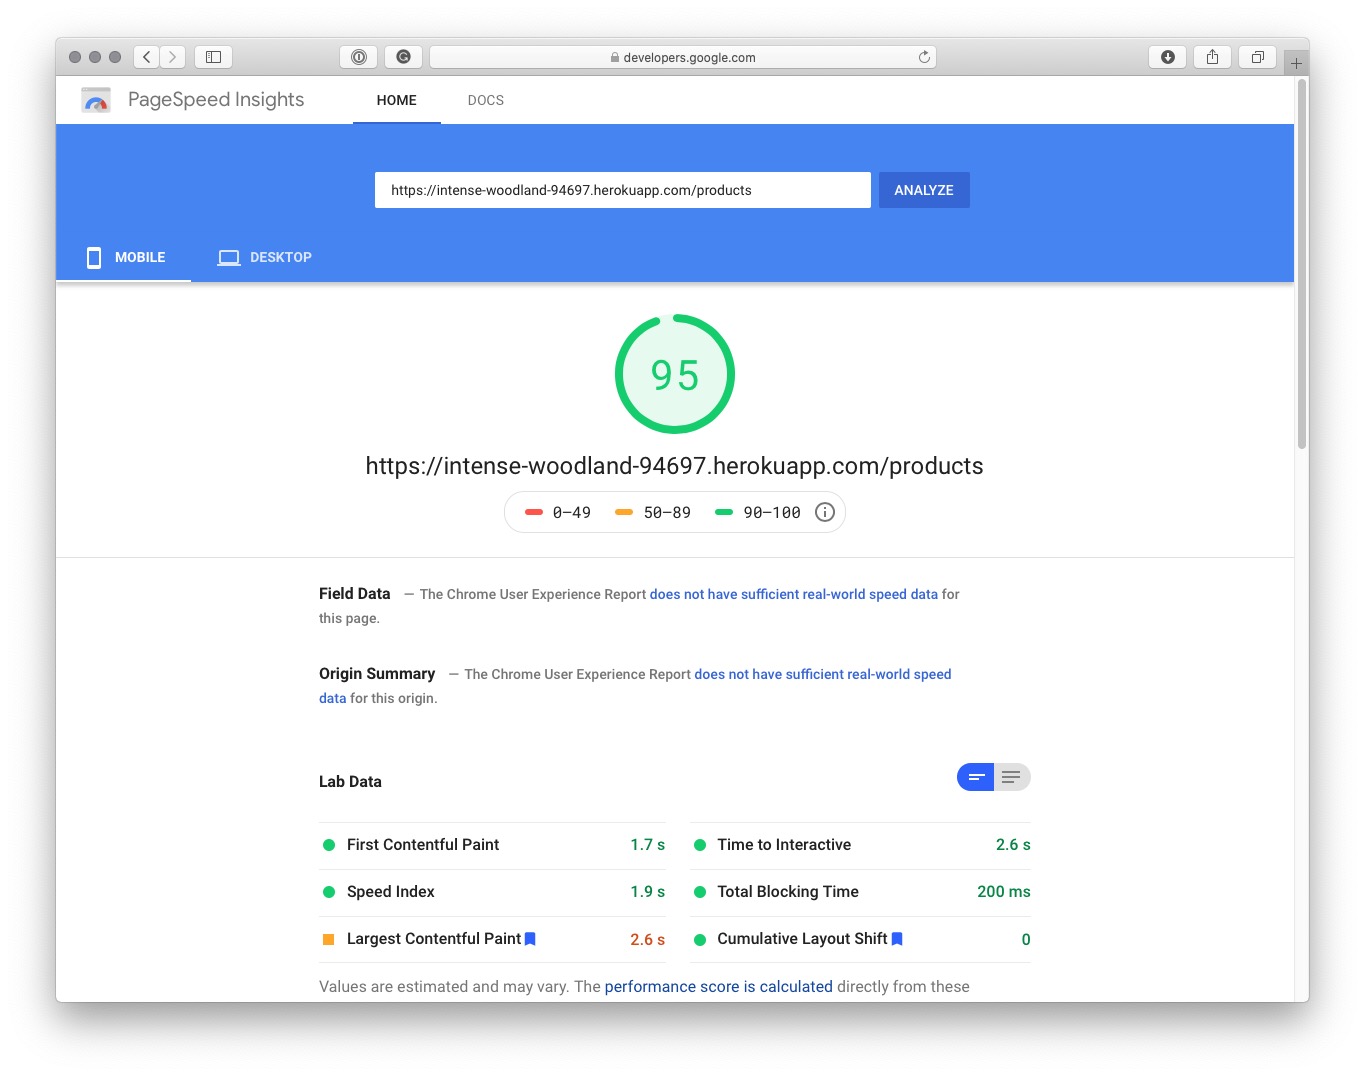
And TTFB will be decreased to 38ms:
In addition to learning to apply Angular Universal in existing applications, you will learn best practices and techniques such as:
- Preparing separate logic paths in your application for browser and server runtimes.
- Preparing server-specific Angular services.
- Working with HTTP requests in Angular.
- Transferring data between the server and the browser along with the application bundle.
- Abandoning long-running API calls that affect server-side rendering performance.
- Using Redis to cache rendered views on the server.
- Testing server-side code.
- Pre-rendering Angular applications to publish them using static hosting.
During this course you will build an Angular application that:
- Responds to each HTTP request with fully rendered HTML.
- Retrieves content from MongoDB.
- Uses the
TransferStateregistry to embed data retrieved during rendering into the application bundle and send it to the browser. - Contains routes that are only available to authenticated users.
- Is fully functional also for users with disabled JavaScript.
- Uses Redis to cache rendered views and ship them to the end user even faster.
You will learn how to:
Course prerequisites
This lesson answers the questions “What do I need to accomplish the course?” “What software is needed?” “What should I know about Angular and other technologies?” “What should I do to accomplish the course offline?”
Prerequisites#
You don’t need to be an Angular expert to take this course. However, it would be helpful if you have an understanding of the following concepts:
- Angular components
- Angular services and Dependency Injection
- Angular routing and route resolvers
- End-to-end testing and unit testing techniques for Angular applications
- JavaScript
- TypeScript
- Node.js
Although not essential, knowledge about the following concepts would help you understand some of the techniques applied in the course:
- Angular HTTP interceptors
- Redis
- NoSQL databases (MongoDB)
- RESTful HTTP APIs
You’ll need the following to complete tasks in this course (in parenthess you can find information about software version used during creation of this course):
- Node.js and npm (12.18.2 and 7.0.3)
- Angular CLI (10.2.0)
- Postman - you will use it to perform REST request, if you wish you can also use cURL instead
You can take this course both offline and online. However, I strongly recommend you to learn when connected to the Internet. This will enable you to publish your application and test it in the battlefield. To complete every task online, you will also need the following:
- A Heroku account
- A MongoDB Cloud account (or an account with any other publicly available MongoDB provider)
The following is not necessary, but nice to have:
- A Cloudflare account
- An account with a domain registrar with access to DNS records (you will need this to put your application on the Cloudflare CDN)
If you will run into troubles during the course, you can fallback to the downloadable projects that are provided at the beginning and end of each module. These projects contains all the code, that you should have at the given stage of the course.
Offline#
If you want to follow this course offline, make sure that you have installed the following software:
- MongoDB server
- Redis server
You also should setup your project and install necessary dependencies, before you will go offline:
ng new my-universal-app --style scss --routing true --skipTests
cd my-universal-app
ng add @nguniversal/express-engine
npm i express mongodb cors body-parser cookie-parser saslprep@1.0.0 redis compression
npm -D sinon concurrently mongo-unit
Apart of that, setup the side-project that will be used in this course:
cd ..
mkdir my-service
cd my-service
git init
npx gitignore node
npm init -y
npm install express body-parser cors
touch index.js
Moreover you should also download:
See you in the next module!
Application overview
In this course module, you will build a production-ready Angular application. It will consist of a list of products with pictures, descriptions, and prices. Each product will have a dedicated landing page. You will also develop the functionality of adding products to a list of favorites and displaying that list. You will build a back-end and API to feed your application with data. The data will be retrieved from MongoDB provisioned in your Heroku application.
What you will build#
In this course module, you will build a production-ready Angular application. It will consist of a list of products with pictures, descriptions, and prices. Each product will have a dedicated landing page. You will also develop the functionality of adding products to a list of favorites and displaying that list.
You will build a back-end and API to feed your application with data. The data will be retrieved from MongoDB provisioned in your Heroku application.

The application flow#
Services and components in your Angular application will need to be composed to communicate as shown in the diagram below (solid purple lines represents REST calls; dotted lines represents in-app navigation):
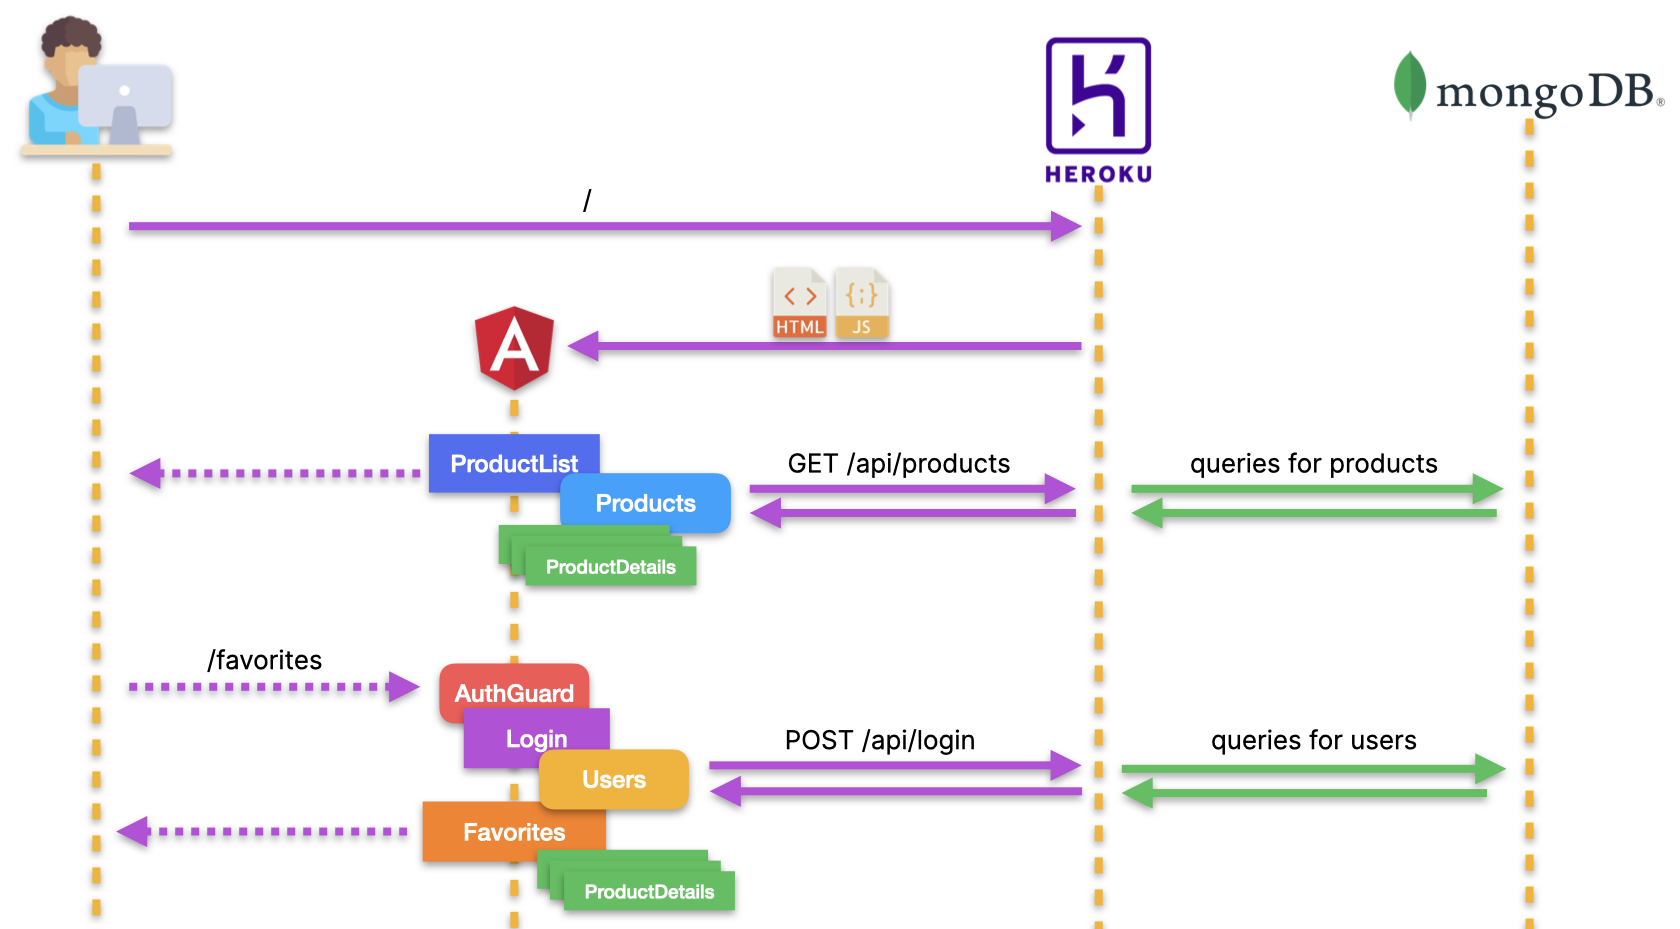
- When the user navigates to the application URL, their browser will be served by Heroku with HTML and JavaScript that make up the Angular application.
- From now on, communication will be performed via REST calls (purple arrows) - that’s how Angular is going to feed the application with the data retrieved from MongoDB.
- Inside the application, the user will able to navigate within the following routes:
-
/ and /products (shown in the diagram): the list of products displayed by
ProductsListComponent(blue rectangle) andProductDetailsComponent(green rectangle). -
/product/:id : product landing page containing a long description of the product - displayed by
ProductDetailsComponent(green rectangle). -
/favorites (shown in the diagram): the list of products that have been marked as favorite by the user, displayed with
FavoritesComponent(orange rectangle) andProductDetailsComponent(green rectangle).AuthGuard(red rounded rectangle) will protect this route from unauthorized access. - Components will utilize two services which will retrieve data via REST calls:
-
ProductsService(light-blue rounded rectangle) - responsible for getting data about all products, or about a specific product. -
UserService(yellow rounded rectangle) - responsible for user authentication, getting data about the user (i.e. the list of favorite products) and adding a given product to the favorites list.
What you will learn#
After finishing this module, you will know how to:
- Set up an Angular project
- Set up an ExpressJS back-end
- Retrieve data from MongoDB using NodeJS
- Set up and retrieve cookies
- Encrypt and decrypt cookies
Setting up the Project
Most projects start from scracth. This one is not an exception. In this lesson you will initialize the Angular application using CLI, include the Cascading StyleSheet, set up routing and basic components.
Generate the project and components#
First of all, you need to generate a new project and its components using the Angular CLI ( @angular/cli ). Type the following commands in your terminal:
ng new my-universal-app --style scss --routing true --skipTests
cd my-universal-app
ng g c header --skipTests --inlineStyle --inlineTemplate
ng g c products-list --skipTests  --inlineStyle --inlineTemplate
Build the application skeleton#
You’re going to use the Bootstrap CSS framework. This means you need to import the CSS available on Bootstrap CDN into your application.
In your src/index.html file, add a link element with a reference to the stylesheet hosted on the CDN:
<link rel="stylesheet"
href="https://stackpath.bootstrapcdn.com/bootstrap/4.5.0/css/bootstrap.min.css
" integrity="sha384-9aIt2nRpC12Uk9gS9baDl411NQApFmC26EwAOH8WgZl5MYYxFfc+NcPb1dKGj7Sk" crossorigin="anonymous">
And noscript section:
  <noscript>
    Unfortunately, your browser doesn't support JavaScript
    that is necessary to run this application.
  </noscript>
Set up basic CSS in the src/styles.scss file:
html {
    height: 100%;
    width: 100%;
}

body {
    height: 100%;
    width: 100%;
    margin: 0;
    font-family: -apple-system,BlinkMacSystemFont,
        "Segoe UI",Roboto,"Helvetica Neue",Arial,
        "Noto Sans",sans-serif;
    font-size: 1rem;
    font-weight: 400;
    line-height: 1.5;
    color: #212529;
    text-align: left;
    background-color: #fff;
}

noscript {
    display: flex;
    align-items: center;
    justify-content: center;
    height: 100%;
}
Routing#
Next, let’s declare application routing. Add the following routes to src/app/app-routing.module.ts
import { ProductsListComponent } from './products-list/products-list.component';

const routes: Routes = [
  { path: '', redirectTo: 'products', pathMatch: 'full' },
  { path: 'products', component: ProductsListComponent },
];
Header#
It’s time to build the application header. You don’t need any business logic there, so simply add the following HTML template to src/app/header/header.component.ts:
template: `
  <div class="navbar navbar-dark bg-dark shadow-sm">
    <div class="container d-flex justify-content-between">
      <a
        routerLink="/"
        class="navbar-brand d-flex align-items-center"
        ><strong>Welcome to the (work)shop!</strong></a
      >
    </div>
  </div>
`,
Application component#
Let’s prepare a template for AppComponent . That’s the place where you are going to have your <router-outlet> and website footer. Replace the code in src/app/app.component.html with the following:
<app-header></app-header>
<div class="content bg-light">
    <div class="album py-5 bg-light">
        <div class="container">
            <router-outlet></router-outlet>
        </div>
    </div>
</div>
<footer class="text-muted">
    <div class="container">
        <p><a
            href="https://www.newline.co/courses/newline-guide-to-angular-universal">
            The newline Guide to Angular Universal
        </a></p>
    </div>
</footer>
To make your footer sticky, add the following styles to src/app/app.component.scss :
:host {
    display: flex;
    min-height: 100vh;
    flex-direction: column;
}

.content {
    flex: 1;
}

footer {
    padding-top: 3rem;
    padding-bottom: 3rem;
}
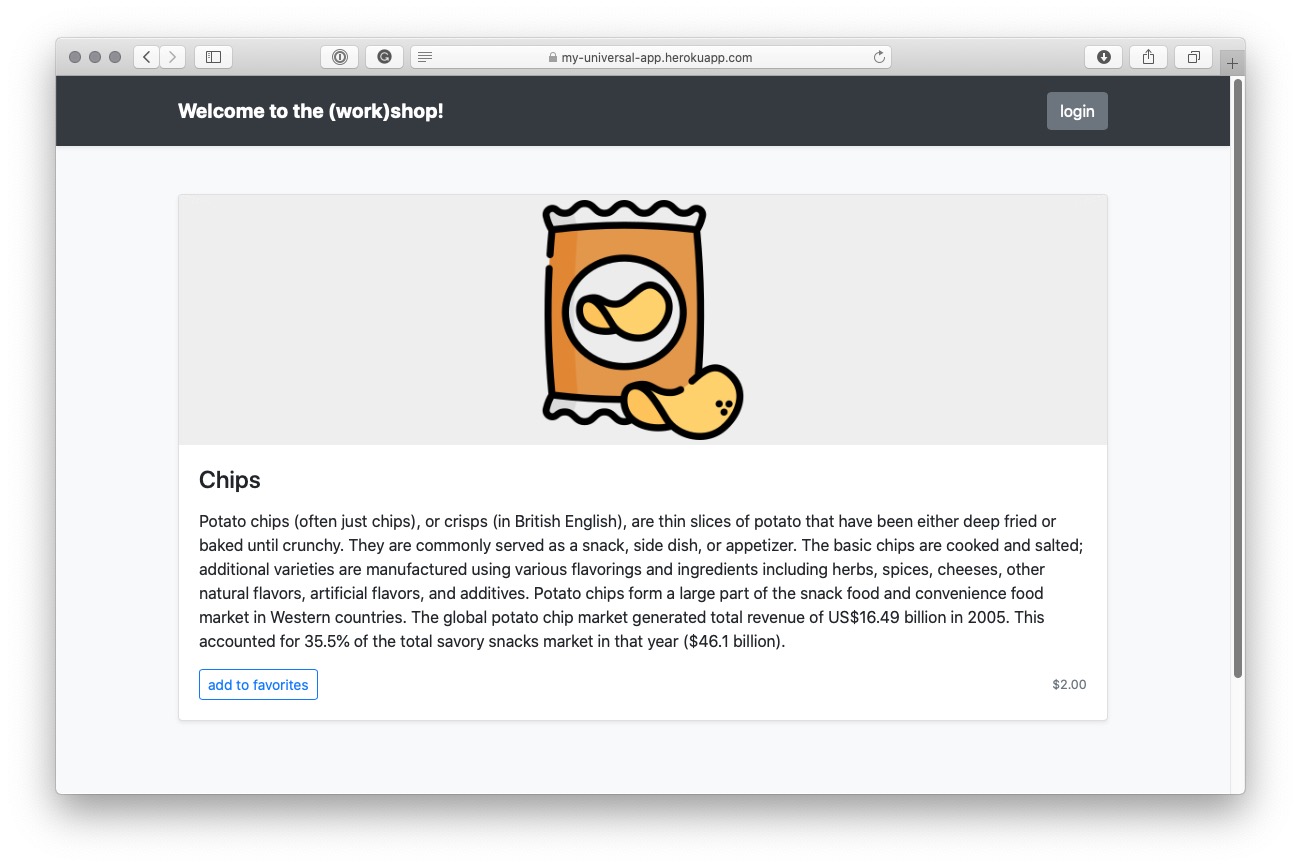
Test what you have built so far by running the Angular JIT compiler. Type the following command in your terminal:
ng serve
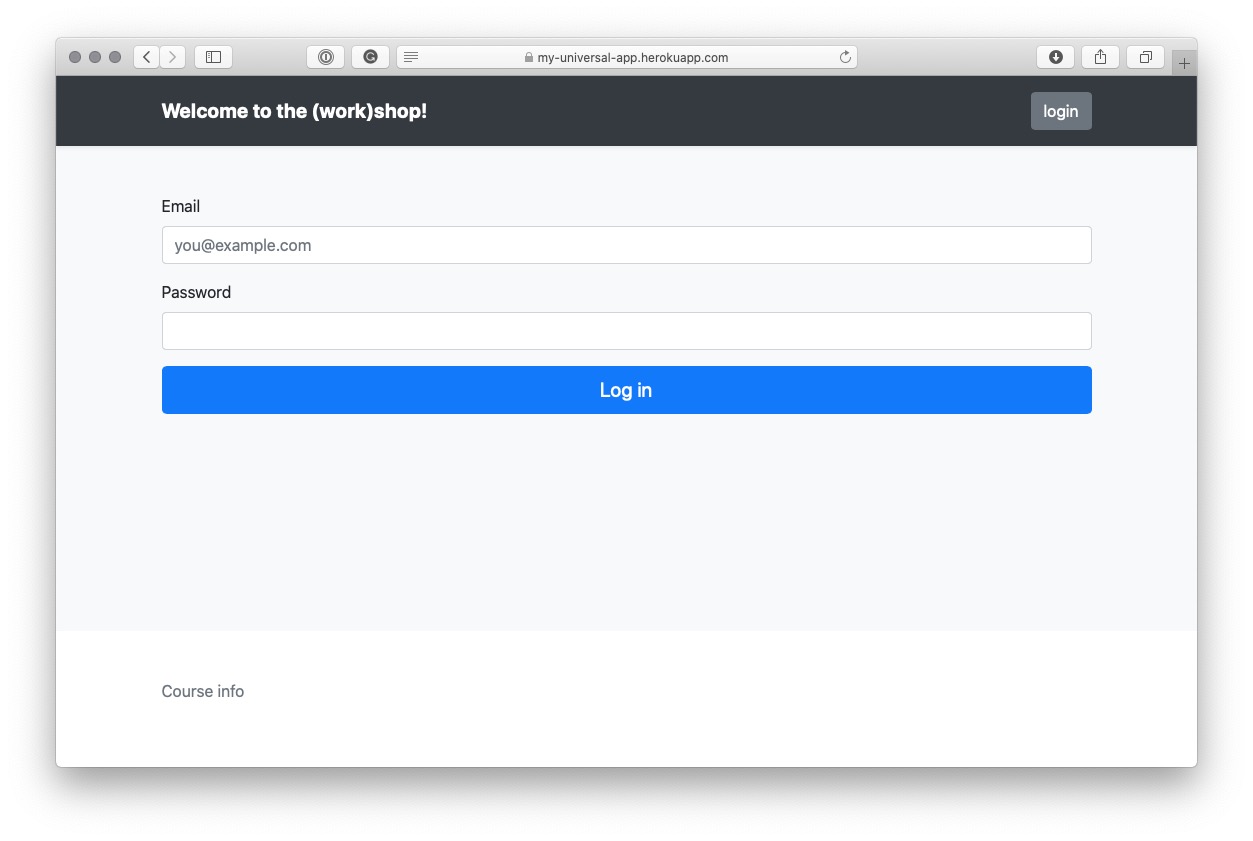
After navigating to http://localhost:4200, you should see the following:
Building the backend
In this lesson you will prepare the application backend an entry gate for communicating with persistance layer and hosting Angular application bundle.
Building the Backend#
Now implement the backend which will be used to host your Angular application on production. Add the necessary dependency to your Angular project:
npm i express
Create a new file called backend.ts in your project root directory (next to the package.json file) and add the following code to it:
import * as express from 'express';
import { join } from 'path';

export const app = express();

const distFolder = join(
  process.cwd(),
  'dist/my-universal-app'
);

app.get(
  '*.*',
  express.static(distFolder, {
    maxAge: '1y',
  })
);

app.use('/', express.static(distFolder));
app.use('/**', express.static(distFolder));

const port = process.env.PORT || 80;

app.listen(port, () => {
  console.log(
    `Backend is runing on: http://localhost:${port}`
  );
});
The code above serves the business logic from api.ts under the /api/* endpoints (you will add it soon).
The code above serves all traffic with static files available in the dist folder where your Angular application will reside.
Compiler and package.json scripts#
The final step is to set up compiler options for the backend. Create a new file called tsconfig.backend.json and add the following configuration to it:
{
    "extends": "./tsconfig.app.json",
    "compilerOptions": {
      "outDir": "./dist/backend",
      "module": "commonjs",
      "types": [
        "node"
      ]
    },
    "files": [
      "backend.ts"
    ]
}
Last but not least, adjust the scripts section in the package.json file by changing the start script and adding the build:backend script:
 "scripts": {
      "ng": "ng",
      "start": "node dist/backend/backend.js",
      "build": "ng build --prod && npm run build:backend",
      "test": "ng test",
      "lint": "ng lint",
      "e2e": "ng e2e",
      "build:backend": "tsc --project tsconfig.backend.json"
    },
Testing the backend#
Build and run the backend using the following commands:
npm run build
npm start
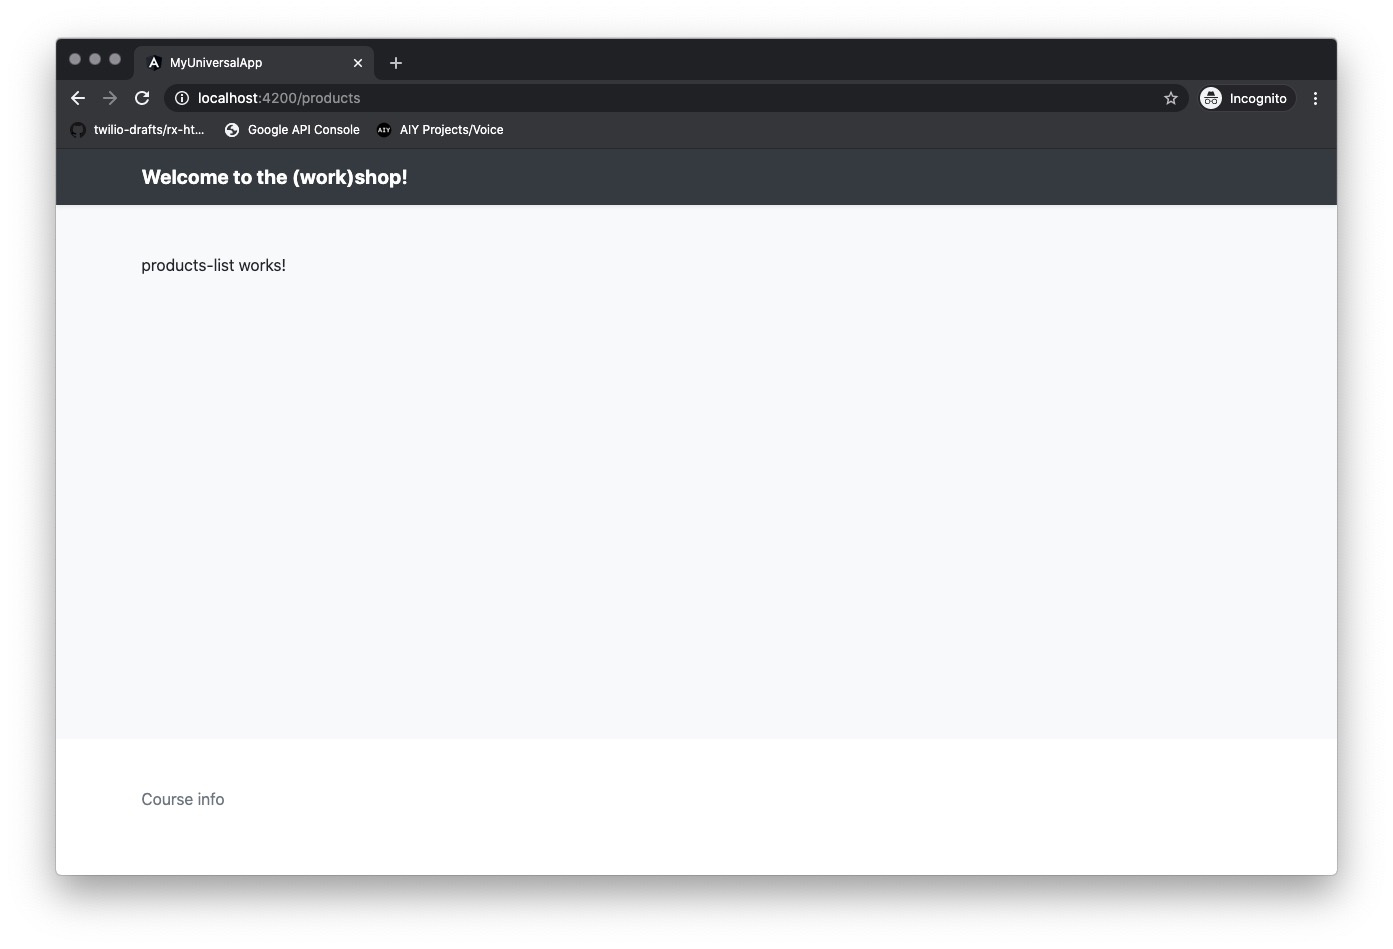
Navigate with your browser to http://localhost. You should see your Angular application skeleton:

Setting up MongoDB
Every application needs a persistence layer. This lesson will show you how to enroll for free Atlas cloud MongoDB instance. You will also feed your database with data.
Setting up MongoDB#
Before you start coding the backend, you need a MongoDB instance where you will keep your application data.
There are a few ways to do this. You can either 1. install MongoDB on your local machine and test it that way or 2. use a cloud MongoDB instance.
In both cases, you will also need to fed your database with data. If you wish, you can use the same objects as I used. To do that, download the db_dump - you will import it into your DB during this lesson.
Setting up MongoDB locally#
Below, we’re going to describe how to use a cloud MongoDB instance, but if you’d rather use a local installation, then the MongoDB docs are very good. For your convenience here are the relevant links, depending on your system:
- Install MongoDB Community Edition on macOS
- Install MongoDB Community Edition on Windows
- Install MongoDB Community Edition on Linux
Because local development environments vary so widely, we can’t describe each scenario in detail. But if you follow the above instructions and run into trouble, join our Discord server and someone can probably help you out.
Provisioning a MongoDB Atlas cloud instance#
This page is a preview of The newline Guide to Angular Universal
Building the API - querying products
Once the database is set up and ready, you need to establish a connection with it. That’s what you’re going to do in this part of the course. Apart of that you will create backend API to get list of products and their descriptions.
Building the API#
Once your MongoDB instance is set up and fed with data, it’s time to build an API that retrieves that data from the DB and serves it to the API consumer. Install the necessary dependencies:
npm i mongodb cors body-parser saslprep@1.0.0
Creating API - products endpoints#
Create a new file called api.ts (in the same directory as backend.ts ) and add the following code:
import * as express from 'express';
import * as cors from 'cors';
import * as bodyParser from 'body-parser';

export const api = express.Router();

api.use(
  cors({
    origin: true,
    credentials: true,
  })
);
api.use(bodyParser.json());
The code above introduces the express.Routing() object and sets up the middleware that you are going to use.
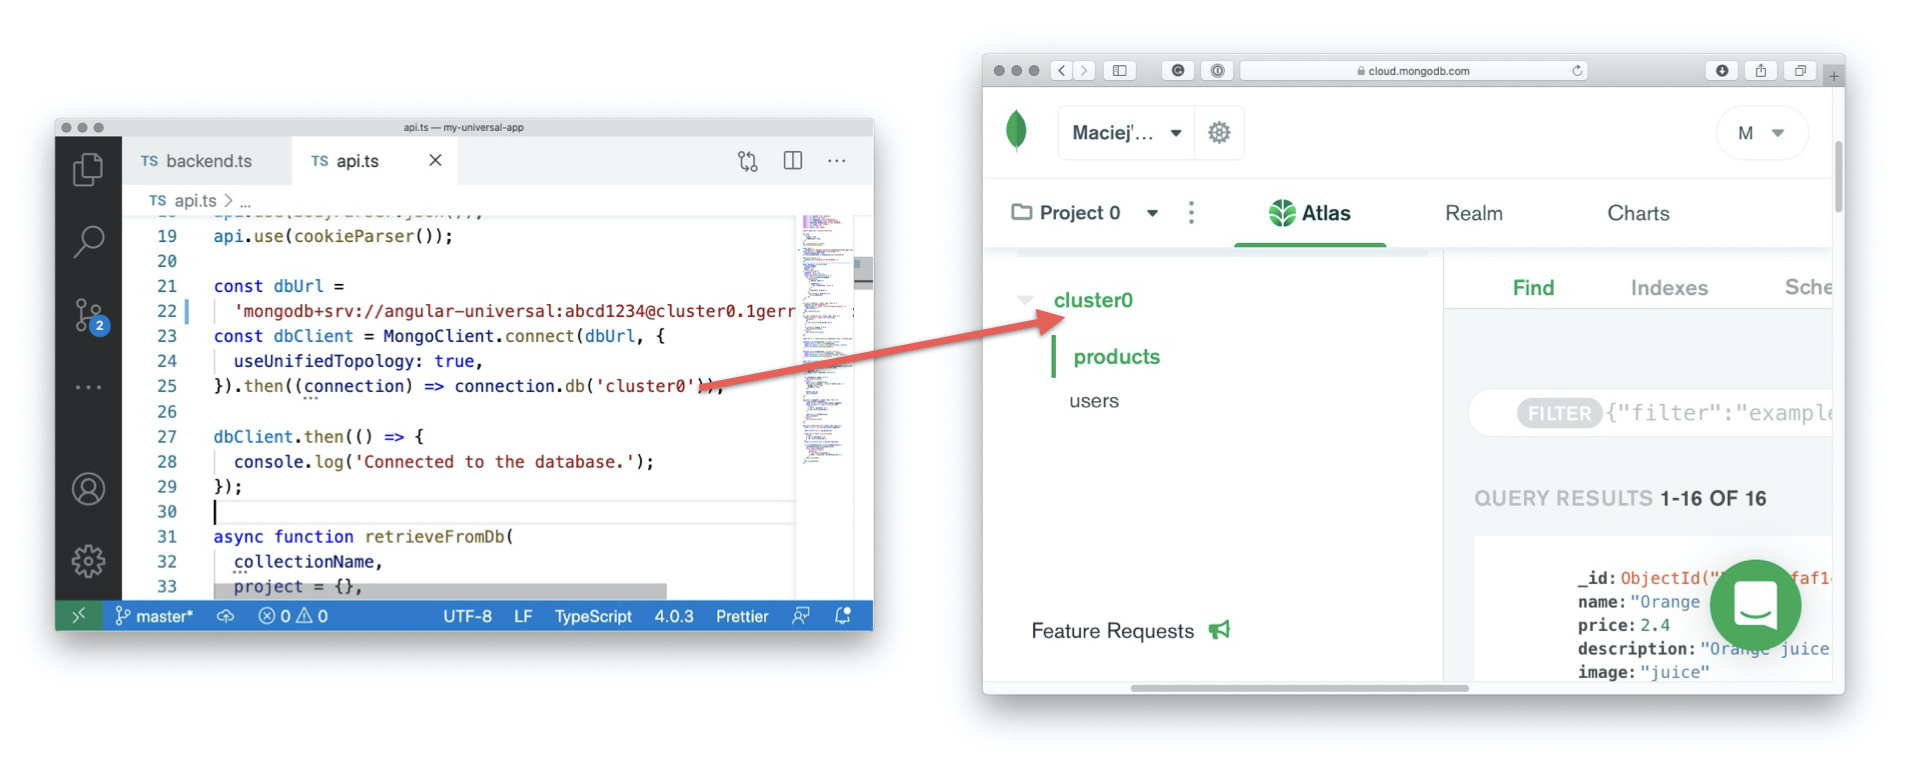
Connecting to the database#
To respond to an API client with a product list or user data, you first need to retrieve it from MongoDB. It’s time to instantiate a connection with your MongoDB instance.
Add the following import statements to api.ts :
import { ObjectId, MongoClient } from 'mongodb';
Set up a connection with the database:
const dbUrl =
  'mongodb+srv://angular-universal:abcd1234@cluster0.bcfzj.mongodb.net';
const dbClient = MongoClient.connect(dbUrl, {
  useUnifiedTopology: true,
}).then((connection) => connection.db('cluster0'));

dbClient.then(() => {
  console.log('Connected to the database.');
});
Remember to replace the connection string and database name with your database-specific data.
Beware that database name which you provide in the connection.db() method must match database name in your Atlasian account. Otherwise your program will fail silently - instead of returning data your API will respond with empty arrays and objects.
Building the API - user interaction
We’re building software for people, and we need to give them a way to communicate with it. This lesson will show you how to prepare an API for user interaction like loging in and adding products to list of favorites. Moreover you will be introduced to the security essentials like cookies encryption and password hashing.
Building the API - user interaction#
You are about to implement three more endpoints:
-
POST /login will accept body in the form of
{email: user_email, password: user_password}, look for a user in the database, and respond with one of the following:- Status code
200along with a cookie containinguserIDif the user is found. - Status code
401if the user is not found.
- Status code
-
GET /isLoggedIn will respond with one of the following:
- Status code
200if a cookie containinguserIDis present in the request, and the user with the givenuserIDexists in the database. - Status code
401if the cookie is not set or the user is not found.
- Status code
-
POST /favorites/:id will add a product to the list of a user’s favorites. The product will be defined by the
:idquery parameter, and the user will be retrieved byuserIDfrom the cookie. Action success will be confirmed by status code202. If the cookie is not present, this endpoint will respond with status code401.
You will keep userID in a cookie file, which could be easily compromised. An attacker could steal this data, use it to impersonate someone else, and act in the system as that person, which is as easy as changing the cookie file content. To protect your users against this kind of attacks, always encrypt cookies containing sensitive data.
Install dependencies necessary to accomplish this step:
npm i cookie-parser
Cookie encryption#
Generate a private key that you will use to encrypt and decrypt cookies:
openssl genrsa -out ./privkey.pem 2048
Add import statements that you’ll need for /user/* endpoints to api.ts :
import * as crypto from 'crypto';
import * as fs from 'fs';
import { join } from 'path';
Declare the encrypt() and decrypt() functions that will help protect data kept in cookies from manipulation:
const key = fs.readFileSync(
  join(process.cwd(), 'privkey.pem'),
  'utf8'
);

function encrypt(toEncrypt: string): string {
  const buffer = Buffer.from(toEncrypt);
  const encrypted = crypto.privateEncrypt(key, buffer);
  return encrypted.toString('base64');
}

function decrypt(toDecrypt: string): string {
  const buffer = Buffer.from(toDecrypt, 'base64');
  const decrypted = crypto.publicDecrypt(key, buffer);
  return decrypted.toString('utf8');
}
User authentication#
You can now introduce endpoints mentioned at the beginning of this section, and keep userID in the cookie file as it’s now protected from manipulation.
Start by importing the cookie-parser :
import * as cookieParser from 'cookie-parser';
Add it to your api sub-application:
api.use(cookieParser());
Then add the endpoints code:
const hash = crypto.createHash('sha512');
api.post('/login', async (req, res) => {
  const email = req.body.email;
  const password = hash
    .update(req.body.password)
    .digest('hex');
  const foundUsers = await retrieveFromDb(
    'users',
    { password: 0 },
    { email: email, password: password }
  );

  if (foundUsers.length == 0) {
    res.sendStatus(401);
  } else {
    const user = foundUsers[0];
    res.cookie('loggedIn', encrypt(`${user.id}`), {
      maxAge: 600 * 1000,
      httpOnly: true,
    });

    delete user.id;
    res.send(user);
  }
});
User Authentication
When the backend is ready, it’s time for frontend. In this lesson you will integrate user API with Angular. You will implement the user authentication flow.
User Authentication#
Once the application’s backend and the API are ready, it’s time to go forward and build the frontend Angular application.
To be able to retrieve data using the API, remember to keep your backend built and running:
npm start
You are now about to implement the user authentication flow:
- The
FavoritesComponentcomponent will display the user’s favorite products. - The
AuthGuardservice will protectFavoritesComponentfrom unauthorized access. - In case of unauthorized access, the user will be redirected to
LoginComponent.
To generate these components and services, type the following commands in a new terminal window:
ng g s user --skipTests
ng g s auth-guard --skipTests
ng g c login --skipTests --inlineStyle --inlineTemplate
ng g c favorites --skipTests --inlineStyle --inlineTemplate
Adjusting AppModule#
The code you are about to implement will depend on two modules that AppModule does not import by default: HttpClientModule and ReactiveFormsModule .
To fix this, add two import statements to src/app/app.module.ts :
import { HttpClientModule } from '@angular/common/http';
import { ReactiveFormsModule } from '@angular/forms';
Then update the imports table:
imports: [
  BrowserModule,
  AppRoutingModule,
  HttpClientModule,
  ReactiveFormsModule,
],
User service#
Before you start coding UserService , you need to implement the User model that it will be using.
Create a new folder, src/model/ . Inside this folder, add a new file, user.model.ts , with the following code:
export interface User {
  email: string;
  favorite: string[];
}
Now you can start implementing UserService . Start with declaring class fields, injecting services that you’ll need, and checking if the user is authenticated. Add the following code to src/app/user.service.ts :
import { Injectable } from '@angular/core';
import { HttpClient } from '@angular/common/http';
import {
  map,
  catchError,
  tap,
  distinctUntilChanged,
  mergeMap,
  filter,
  take,
} from 'rxjs/operators';
import {
  Observable,
  of,
  Subject,
  BehaviorSubject,
} from 'rxjs';
import { User } from '../model/user.model';
import { Router } from '@angular/router';

@Injectable({
  providedIn: 'root',
})
export class UserService {
  private API_URL = 'http://localhost/api';

  private currentUser$: Subject<User> = new BehaviorSubject(
    null
  );
  private redirectUrl: string = '/';
  private redirectParams: any = null;

  constructor(
    private http: HttpClient,
    private router: Router
  ) {
    this.currentUser$
      .pipe(
        distinctUntilChanged(),
        filter((user) => !user),
        mergeMap(() => this.checkCookie())
      )
      .subscribe();
  }

  private checkCookie(): Observable<void> {
    return this.http
      .get(`${this.API_URL}/isLoggedIn`, {
        withCredentials: true,
      })
      .pipe(
        catchError(() => of(null)),
        tap((user) => this.currentUser$.next(user))
      );
  }
The code above introduces four variables:
-
API_URLis the URL of the API that the service is going to communicate with. -
currentUser$is anObservablerepresenting the currently authenticated user, ornullif there is no authenticated user. -
redirectUrlis a placeholder thatAuthGuarduses to define where the user should be redirected after successful authentication. -
redirectParamsrepresents path params of the URL above.
The constructor injects two services:
-
HttpClientis used to perform HTTP calls to the API. -
Routeris used to redirect the user to the desired URL after successful authentication.
Within the constructor, you’ve piped the currentUser$ observable with a set of operators that includes a call to the checkCookie() function whenever the value of currentUser$ changes to null .
Notice that you’ve called the subscribe() method of the currentUser$ object. You should be aware of keeping opened subscriptions in your code, because doing this may lead to memory leaks.
Keeping a subscription open is only acceptable here because we’re dealing with a service. Thanks to the Dependency Injection mechanism, you are guaranteed that you will only have one instance of this class ( UserService ) in your application.
As to components, you should avoid opening subscriptions to them whenever you can. Components can be instantiated multiple times during your application lifecycle, which makes them difficult to manage. If you have an Observable in a component, it is much better to pass it to the template and let an async pipe handle subscribing to and unsubscribing from it.
The checkCookie() function calls the /api/isLoggedIn endpoint, which checks that the cookie exists and validates its content. Based on the API’s response, checkCookie() emits the logged-in user (or null ) using the currentUser$ observable.
Because you’ve set up your cookie as httpOnly , it isn’t reachable by JavaScript. Moreover, even if it were set as a regular cookie, its value is encrypted. Without a key, you’re unable to read its content.
Once you’re done with handling service instantiation, it’s time to implement the login functionality:
public isLoggedIn(): Observable<boolean> {
    return this.currentUser$.pipe(
      map((user) => user != null)
    );
  }

  public setRedirectUrl(url: string) {
    this.redirectUrl = url;
  }

  public login(email: string, password: string): void {
    this.http
      .post<User>(`${this.API_URL}/login`, {
        email: email,
        password: password,
      })
      .pipe(
        tap((user) => {
          this.currentUser$.next(user);
          if (this.redirectParams) {
            this.router.navigate([
              this.redirectUrl,
              this.redirectParams,
            ]);
          } else {
            this.router.navigate([this.redirectUrl]);
          }

          this.redirectParams = null;
          this.redirectUrl = '/';
        })
      )
      .subscribe();
  }
The code above introduces the following functions:
-
isLoggedIn()returns anObservableemitting a boolean value based on what is emitted bycurrentUser$. -
setRedirectUrl()is a setter for theredirectUrlfield. -
login()is responsible for user authentication usingemailandpasswordpassed as parameters. It’s emitting authenticated user data via thecurrentUser$observable, based on response from the api/login endpoint. When the user is authenticated, they are redirected to the URL specified in theredirectUrlvariable.
Building the Products Service
Our application would be nothing without the data. In this course part you will display products images, description and prices in your Angular application.
Building the Products Service#
It’s time to enable displaying products in your application. In this step, you are going to use product images that are available for download here. Place the images inside the src/assets/images folder in your project.
To generate the component and the service that you are going to implement, type the following commands in the terminal:
ng g s products --skipTests
ng g c product-details --skipTests
Products service#
Before digging into the service, let’s declare the Product interface that you will use across the application. Create a new file called product.model.ts in the src/model directory and copy the following code:
export interface Product {
  id: string;
  name: string;
  description: string;
  price: number;
  image: string;
}
To implement ProductsService , add the following code to src/products.service.ts :
import { Injectable } from '@angular/core';
import { HttpClient } from '@angular/common/http';
import { Product } from '../model/product.model';
import { Observable } from 'rxjs';

@Injectable({
  providedIn: 'root',
})
export class ProductsService {
  private API_URL = '/api';

  constructor(private httpClient: HttpClient) {}

  public getProducts(): Observable<Product[]> {
    return this.httpClient.get<Product[]>(
      `${this.API_URL}/products`
    );
  }

  public getProduct(
    productId: string
  ): Observable<Product> {
    return this.httpClient.get<Product>(
      `${this.API_URL}/products/${productId}`
    );
  }
}
ProductsService is consuming two API endpoints:
- GET /products that returns the list of all products (without product descriptions).
-
GET /products/:id that returns the full description of the product specified by the
:idquery parameter.
Notice that you’ve assigned the value /api to the API_URL constant. From now on, you are going to run your frontend together with the backend. You don’t need to specify the whole URL of the API anymore because it will be served from the same domain as the frontend. Apply the same modification in src/app/user.service.ts and change API_URL accordingly.
Product details component#
You now need to add ProductDetailsComponent to the application routing. Change routes in src/app-routing.module.ts to the following:
import { ProductDetailsComponent } from './product-details/product-details.component';

const routes: Routes = [
  { path: '', redirectTo: 'products', pathMatch: 'full' },
  { path: 'products', component: ProductsListComponent },
  {
    path: 'product/:id',
    component: ProductDetailsComponent,
  },
  { path: 'login', component: LoginComponent },
  {
    path: 'favorites',
    component: FavoritesComponent,
    canActivate: [AuthGuardService],
  },
];
To consume ProductsService in ProductDetailsComponent , replace the content of src/app/product-details/product-details.component.ts with the following TypeScript code:
import { Component, OnInit, Input } from '@angular/core';
import { Product } from 'src/model/product.model';
import { ActivatedRoute, ParamMap } from '@angular/router';
import { ProductsService } from '../products.service';
import {
  switchMap,
  tap,
  mergeMap
} from 'rxjs/operators';
import { Observable, of } from 'rxjs';
import { UserService } from '../user.service';

@Component({
  selector: 'app-product-details',
  templateUrl: './product-details.component.html',
  styleUrls: ['./product-details.component.scss'],
})
export class ProductDetailsComponent implements OnInit {
  @Input() product: Product;
  @Input() isFavorite: boolean;
Deploying and Measuring Performance
Every journey has some end. At the end of software development is production. It’s time to deploy your application to Heroku and test with multiple tools how it performs.
Deploying and Measuring Performance#
The code you’ve built thus far is available for download here. Once you download it, remember to install the project using the npm install command inside the project directory.
Your application is ready. You’ve built it using the ng build --prod command that minifies JavaScript, performs tree shaking and other kinds of magic to boost performance. Let’s test it in the battlefield. That’s the moment where you are going to use the Heroku account, so if you don’t have one sign up for it. You should also have Heroku CLI installed on your machine.
There are, of course, tons of great places you can host your Angular app. AWS has a dozens of ways you could deploy it, even more adding Google Cloud, Azure, Digital Ocean, etc.
To keep thing “simple” we’re going to focus on Heroku in this chapter, but know that the same principles apply to any deployment scenario where you can run the Node.js server.
Creating a Heroku application#
Use Heroku CLI to create a new project:
heroku create
After executing this command, Heroku CLI should set up a Git remote in your Angular project. Verify that by executing the following command:
git remote -v

Deploying to Heroku#
This task is straightforward - just push your changes to the Heroku Git:
git add .
git commit -am "make it better"
git push heroku master
Measuring performance#
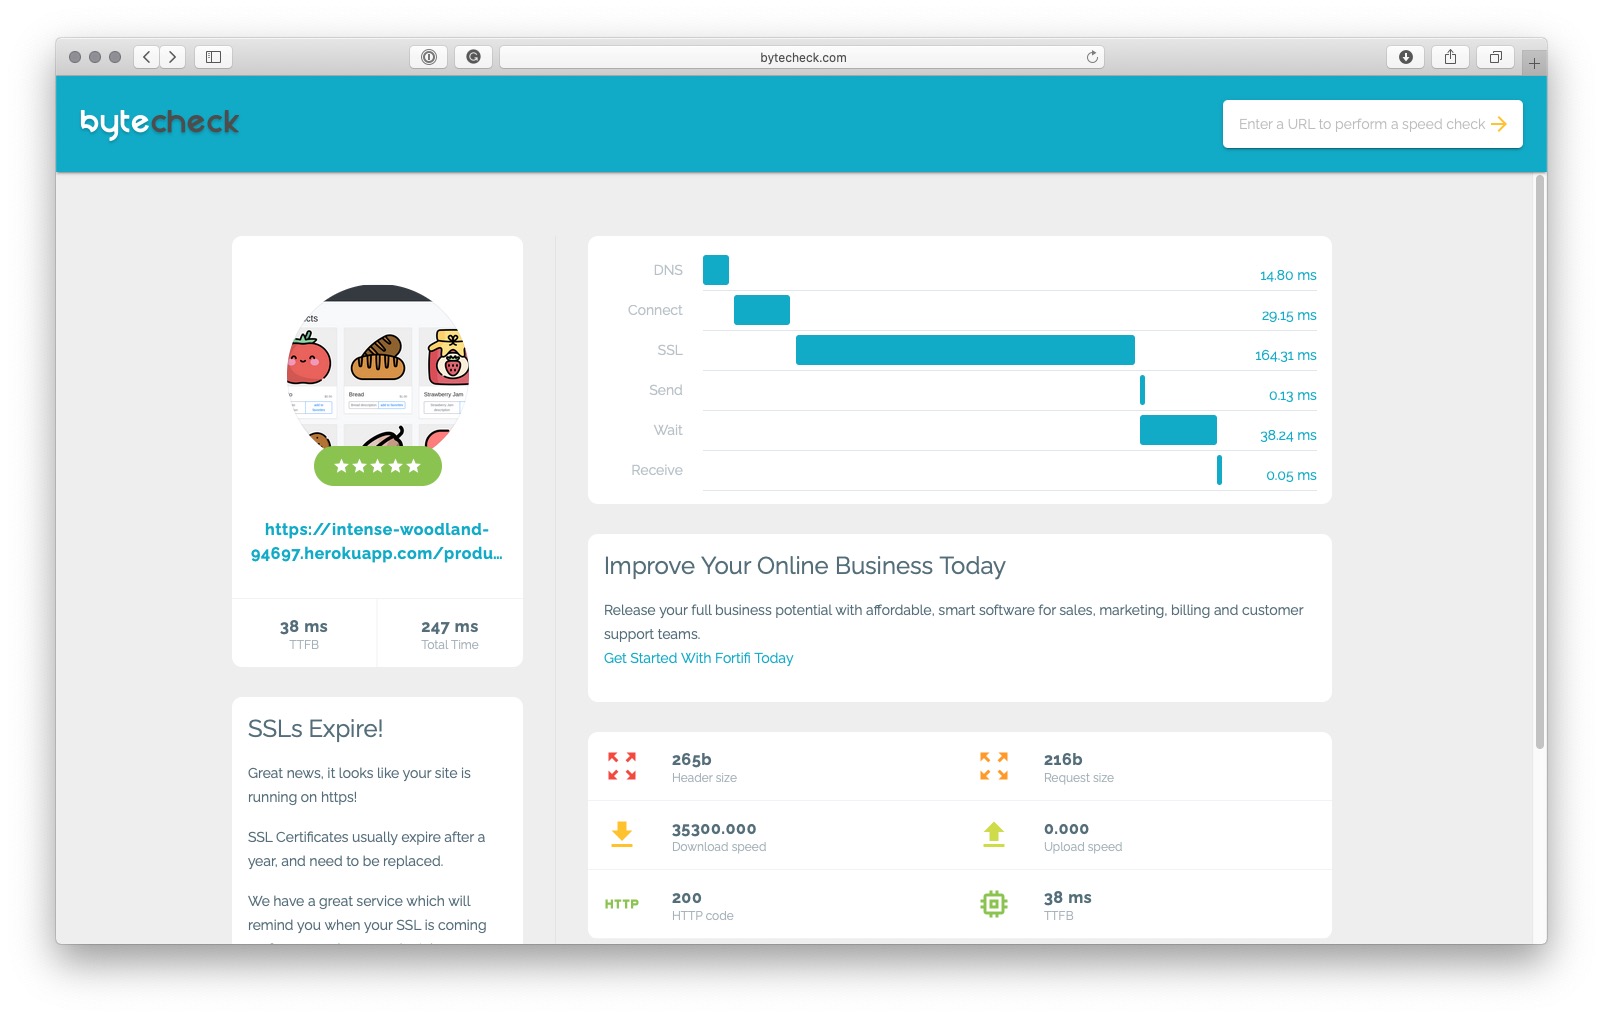
Let’s measure performance of the server’s response. You can use the Byte Check website to measure time to first byte (TTFB) for any website available on the Internet. It’s a really good practice to use systems like this instead of performing tests on your machine, as they don’t rely on your home network connection.
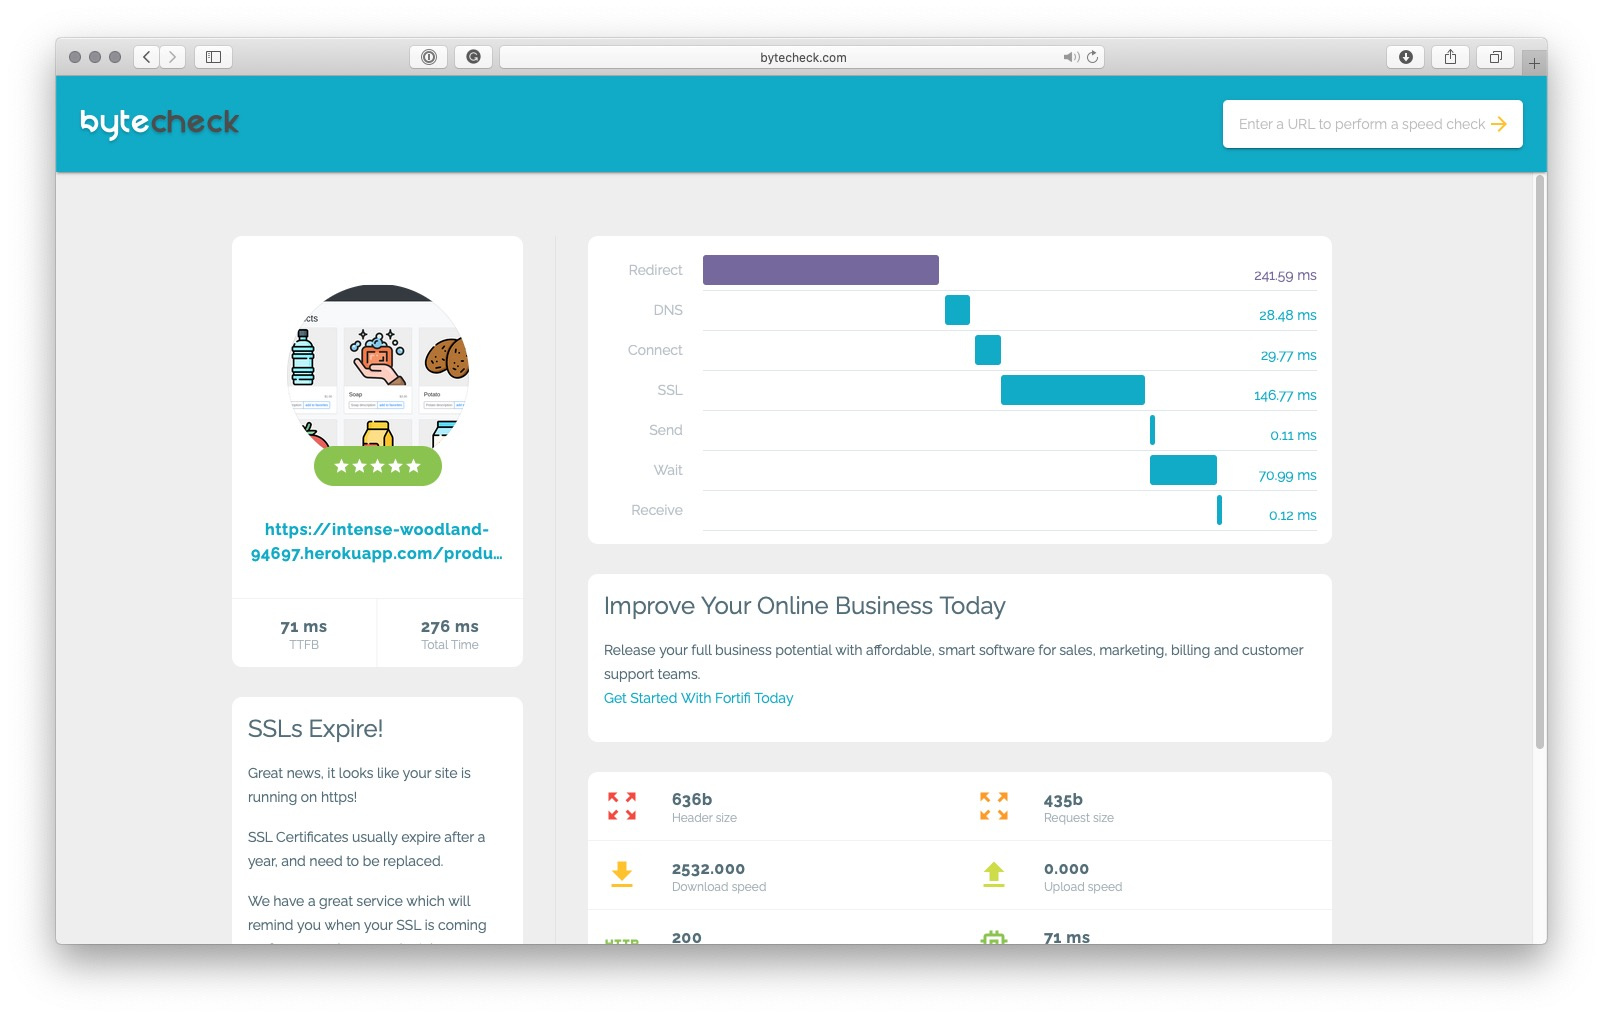
After performing a few tests, you can see that TTFB of your application is around 70 ms . Quite impressive. Of course, server response time is important, but it’s not a useful metric for Angular applications.
Angular Universal
In the previous module, you’ve built a fully functional production-ready application. Unfortunately, like other single-page applications, this application has its weaknesses. In this module, you will learn how to address one of them and render HTML content on the server.
Angular Universal#
The code of the application built in the previous module is available for download here. Once you download it, remember to install the project using the npm install command inside the project directory.
Where you are#
In the previous module, you’ve built a fully functional production-ready application. Unfortunately, like other single-page applications, this application has its weaknesses. In this module, you will learn how to address one of them and render HTML content on the server.
What you will build#
In this module, you will enhance your Angular application by adding Angular Universal. Thanks to server-side rendering, your application will be readable for search engine robots and other web crawlers. In addition, you will significantly improve the application’s boot performance, resulting in faster first meaningful paint.
What you will learn#
After finishing this module, you will know:
- How to add Angular Universal to an existing Angular application.
- What are the benefits of server-side rendering.
- How Angular Universal changes your application’s boot process.
- How to adjust your application to prevent breaking SSR (i.e., by using the window object).
- How to dynamically change
<title>and meta tags of your website.
Applying Universal Schematics
The easiest way to enhance your Angular project with new functionalities is to use Schematics - a set of instruction for CLI on how to change the project and install new dependencies. Let’s do that with Angular Universal and review what Schematics did for us.
Applying schematics#
Starting your adventure with Angular Universal is as simple as applying a single command using the Angular CLI. Navigate to your project root directory and type the following in the terminal:
ng add @nguniversal/express-engine
Angular CLI will install all the necessary dependencies for you and apply schematics (a set of instructions on how to adjust the project). After applying the schematics, you should see the summary output of what has been changed, added, or deleted in your project:
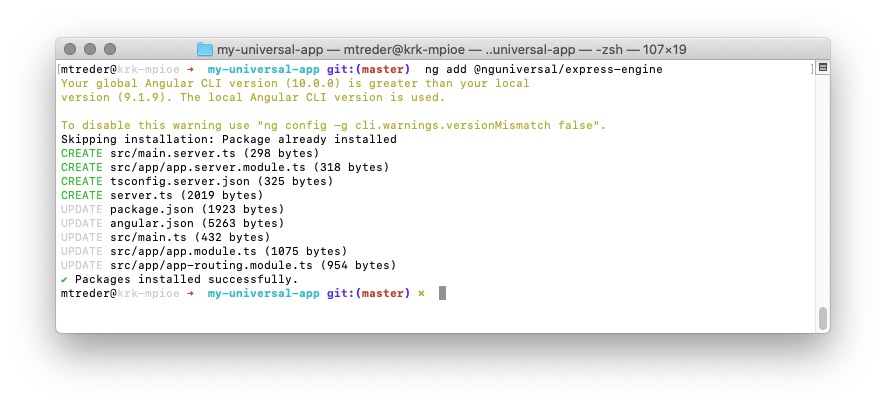
Let’s review these changes.
Dependencies and scripts#
The backbone of your project is the package.json file. Angular CLI has installed new dependencies there that are necessary to run Angular in the Node.js runtime environment:
@angular/platform-server
@nguniversal/express-engine
@nguniversal/builders
@types/express
Another change is in the scripts section:
  "scripts": {
    "ng": "ng",
    "start": "node dist/backend/backend.js",
    "build": "ng build --prod && npm run build:backend",
    "test": "ng test",
    "lint": "ng lint",
    "e2e": "ng e2e",
    "build:backend": "tsc --project tsconfig.backend.json",
    "dev:ssr": "ng run my-universal-app:serve-ssr",
    "serve:ssr": "node dist/my-universal-app/server/main.js",
    "build:ssr": "ng build --prod && ng run my-universal-app:server:production",
    "prerender": "ng run my-universal-app:prerender"
  },
Angular CLI has added the following new scripts:
-
dev:ssris an equivalent of theng servecommand. You should use it for development purposes. The difference betweennpm run dev:ssrandng serveis that the former will compile both server-side and browser-side code for you. This enables you to check how your application behaves in the server environment. Both solutions are watching your project for changes, so whenever you apply changes in code, they will automatically trigger the compilation process. -
build:ssris an equivalent ofng build --prod. This command should be used to compile the production-ready application. Once it is applied, you will see compilation output inside the dist//browser and dist//server folders in your project. -
serve:ssris used to serve the application in production mode. This script runs the compiled server source code, which resides in the dist//server folder. -
prerenderis a script that you can use to generate HTML and JavaScript for static hosting - we will cover this topic later in the course.
Builders#
Under the hood, the scripts described above use a set of builders added to your project. You can find them in the angular.json file:
"server": {
          "builder": "@angular-devkit/build-angular:server",
          "options": {
            "outputPath": "dist/my-universal-app/server",
            "main": "server.ts",
            "tsConfig": "tsconfig.server.json"
          },
          "configurations": {
            "production": {
              "outputHashing": "media",
              "fileReplacements": [
                {
                  "replace": "src/environments/environment.ts",
                  "with": "src/environments/environment.prod.ts"
                }
              ],
              "sourceMap": false,
              "optimization": true
            }
          }
        },
        "serve-ssr": {
          "builder": "@nguniversal/builders:ssr-dev-server",
          "options": {
            "browserTarget": "my-universal-app:build",
            "serverTarget": "my-universal-app:server"
          },
          "configurations": {
            "production": {
              "browserTarget": "my-universal-app:build:production",
              "serverTarget": "my-universal-app:server:production"
            }
          }
        },
        "prerender": {
          "builder": "@nguniversal/builders:prerender",
          "options": {
            "browserTarget": "my-universal-app:build:production",
            "serverTarget": "my-universal-app:server:production",
            "routes": [
              "/"
            ]
          },
          "configurations": {
            "production": {}
          }
        }
As you can see, the server-side rendering build will use a new entry point to your application, server.ts .
Node.js application#
The server.ts file is where the Node.js application resides.
import 'zone.js/dist/zone-node';

import { ngExpressEngine } from '@nguniversal/express-engine';
import * as express from 'express';
import { join } from 'path';

import { AppServerModule } from './src/main.server';
import { APP_BASE_HREF } from '@angular/common';
import { existsSync } from 'fs';

// The Express app is exported so that it can be used by serverless Functions.
export function app() {
  const server = express();
  const distFolder = join(process.cwd(), 'dist/my-universal-app/browser');
  const indexHtml = existsSync(join(distFolder, 'index.original.html')) ? 'index.original.html' : 'index';

  // Our Universal express-engine (found @ https://github.com/angular/universal/tree/master/modules/express-engine)
  server.engine('html', ngExpressEngine({
    bootstrap: AppServerModule,
  }));

  server.set('view engine', 'html');
  server.set('views', distFolder);
Measuring Performance
Once the application is said to be SEO friendly and performance optimized by schemtaics - let’s check that in battlefield. In this lesson you will deploy your project to Heroku and measure its performance.
Deploying to Heroku#
It’s the right moment to check how applying Angular Universal changes the application’s performance.
Change the start and build scripts in package.json :
"start": "npm run serve:ssr",
"build": "npm run build:ssr",
You may also remove the build:backend script as it is no longer needed.
Deploy the application by pushing changes to the Heroku repository:
git add .
git commit -m "applying ssr" .
git push heroku master
Performance#
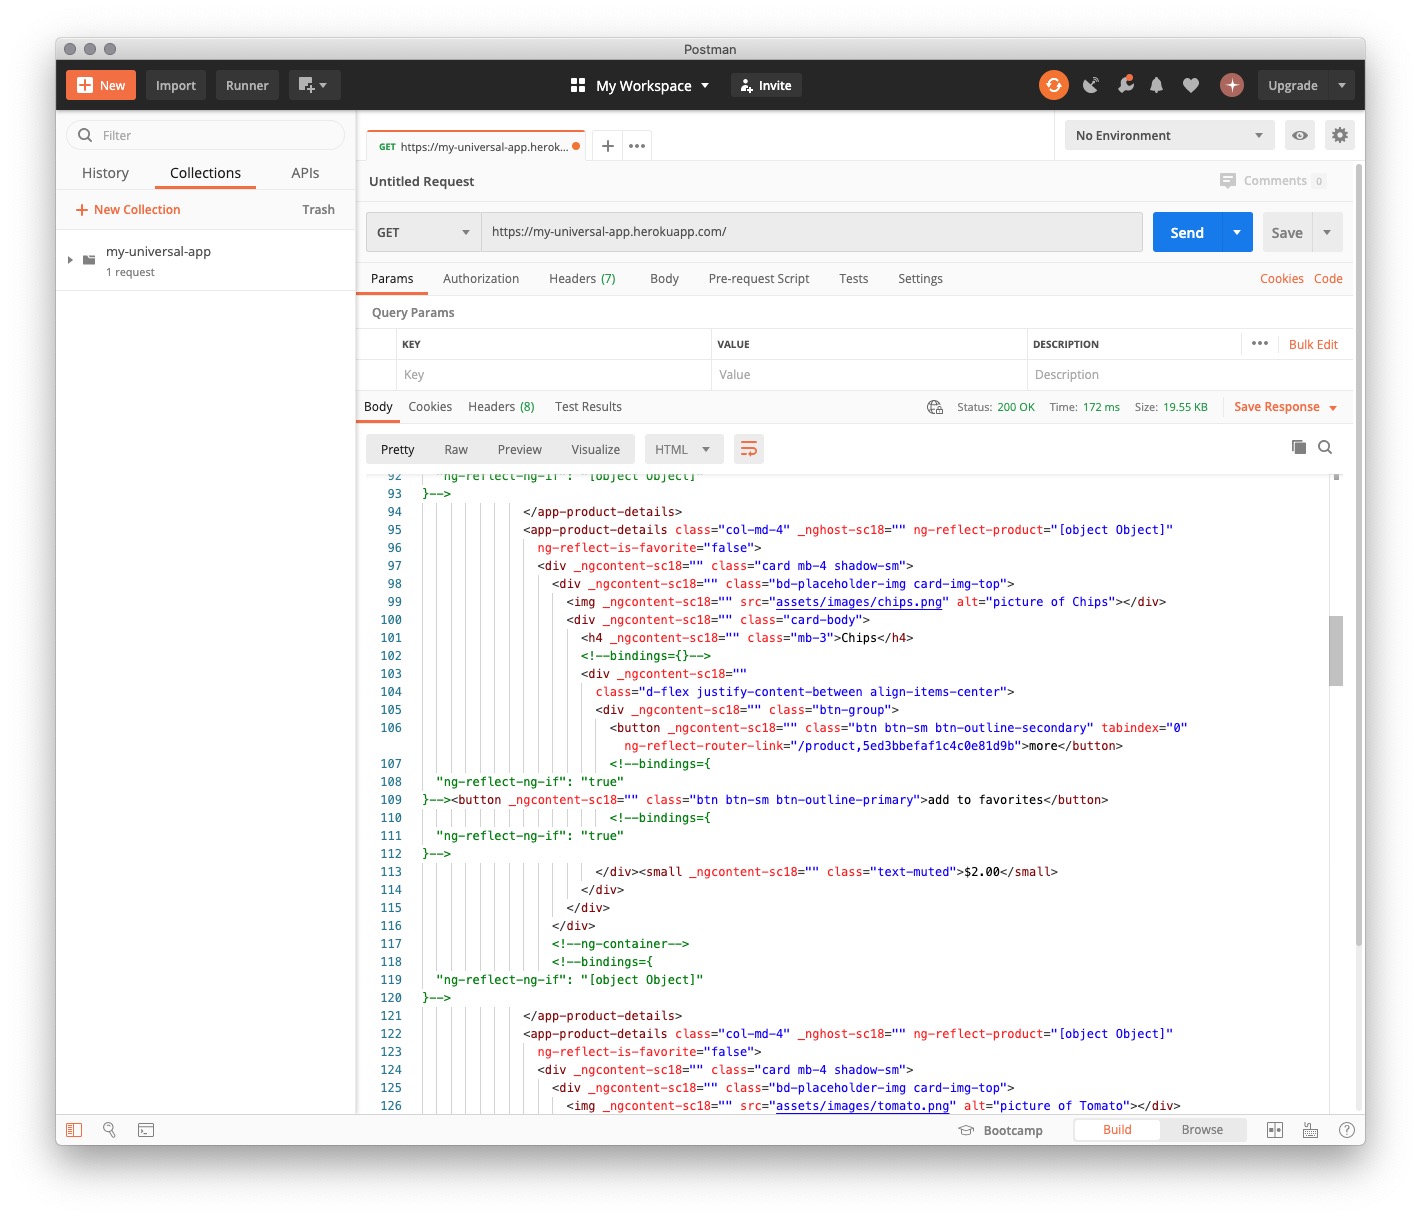
First things first, let’s check if the backend launches Angular and renders HTML. Use Postman to perform a GET request to your application’s home page:
Once you’ve ensured that the application works as expected, perform Time To First Byte (TTFB) tests using Byte Check:

It’s around 113 ms. Compared to the 70ms achieved without Universal, this doesn’t look optimistic.
However, as we agreed in the past, TTFB is not everything. What you should be more interested in is First Contentful Paint (FCP). Perform the test using Chrome Developer tools:

Now the results look drastically better, even though the total index is worse. FCP has been shipped in 2.1 seconds, while in the previous test without SSR it took 2.6 seconds.
Let’s also check how the application performs in a more restrictive PageSpeed Insights test:
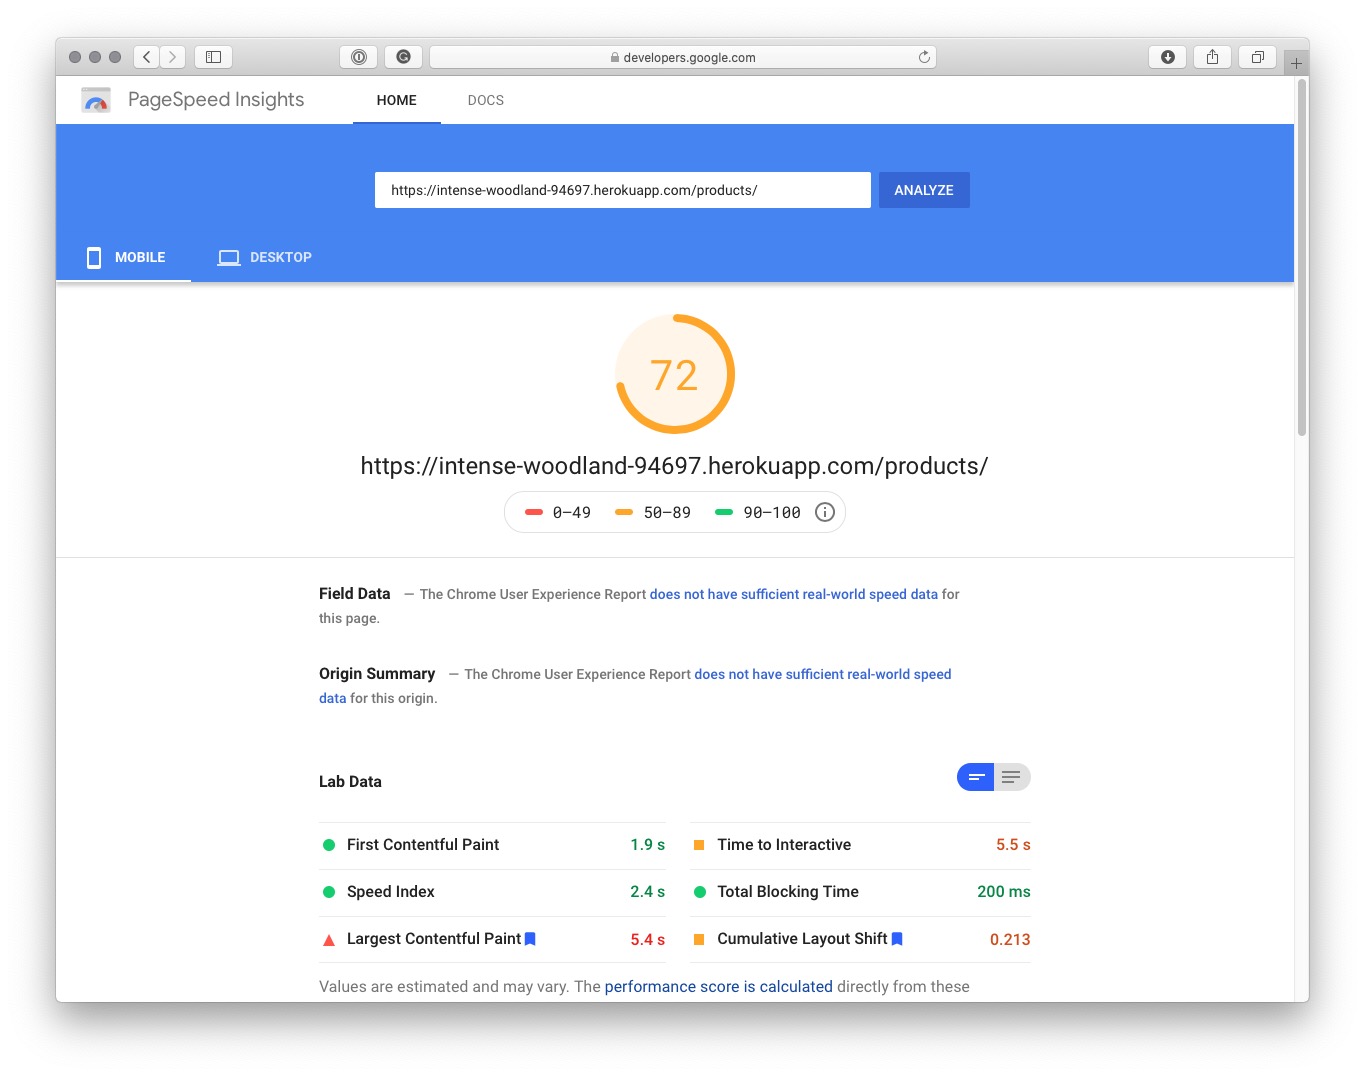
This tool reports a decrease in performance as well. No worries though: you will address this in future course modules.
Here is what the summary results look like:

The following diagram compares performance with and without SSR:
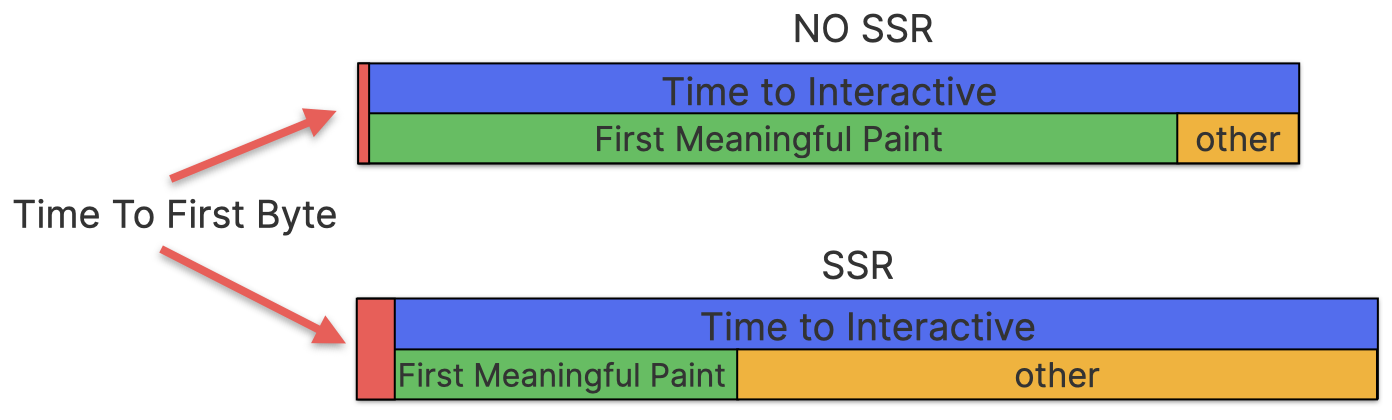
As you can see, the TTFB value doesn’t have a significant impact on the Time To Interactive value. So what does? What does the mysterious “other” label in the diagram stand for? Let’s recall the browser flow described in the previous module. Here is how your application is shipped to the end user without SSR:
- Establish a connection with the server and query for data.
- Retrieve the data ( Time to First Byte ).
- Render HTML and apply CSS.
- Bootstrap JavaScript and Angular, then render views in the browser ( First Contentful Print ).
- Bind functions to HTML elements, execute other scripts ( other ).
What does it look like when SSR is applied?
- Establish a connection with the server and query for data.
- Retrieve the data ( Time to First Byte ).
- Render HTML and apply CSS ( First Contentful Print ).
- Bootstrap JavaScript and Angular, then render views in the browser (again), then execute other scripts ( other ).
When you apply server-side rendering to your application, you bootstrap Angular twice: first on the server and then in the browser. That’s the reason why the other rectangle is so prominent with SSR.
In the following modules, you will learn techniques to significantly decrease that scripting time!
Adding Internationalization with SSR - The Browser Is Not The Server
Unfortunately, schematics are not a magic wand and they won’t solve all of your problems. Sometimes your project needs to be adjusted to do not break Server-Side Rendering process. Here’s what might go wrong, and how to address that.
The Browser Is Not The Server#
What can break SSR?#
In the beginning of this module, you’ve already had a chance to see that some actions can be performed in the browser but not on the server. One such action is performing a REST call using a relative URL. However, this is not the only action that might cause the SSR process to fail.
There are some global objects that are exclusive to the browser:
-
windowcan be used to display alerts to the user. -
documentbelongs to thewindownamespace and is used to manipulate DOM elements. -
navigatorbelongs to thewindownamespace and enables service workers that are used extensively with Progressive Web Applications.
There is also a set of objects that are exclusive to the server:
-
fsrepresents the file system and is used for CRUD operations. -
requestrepresents the HTTP request retrieved by the server.
Your Angular application has a shared code base for server and browser environments. That’s good because you don’t need to repeat yourself. However, if you want to use any of these objects, you need to execute a different logic path based on the current runtime: Node.js or the browser window. In this part, you will learn one of the techniques of doing that.
Adding internationalization#
Let’s add internationalization to your application. Don’t worry, I’m not going to ask you to translate every product description. For now, let’s display product prices in three currencies: US dollars, British pounds, and Polish zloty. The application should pick a currency based on browser settings, and if a given language is not supported, it should fall back to Polish zloty.
Let’s generate a new service:
ng g s i18n
Now let’s detect user language and implement the getCurrencyCode() method that returns one of the three available currency codes:
import { Injectable } from '@angular/core';

@Injectable({
  providedIn: 'root'
})
export class I18nService {

  private userLang;

  constructor() {
      this.userLang = window.navigator.language;
  }

  public getCurrencyCode(): string {
    switch(this.userLang) {
      default:
      case 'pl-PL': return 'PLN';
      case 'en-US': return 'USD';
      case 'en-EN': return 'GBP';
    }
  }
}
Import the service in src/app/product-details/product-details.component.ts :
import { I18nService } from '../i18n.service';
Set up a new public field userCurrency and inject the service in the constructor:
public userCurrency: string = this.i18n.getCurrencyCode();

constructor(
  private route: ActivatedRoute,
  private ps: ProductsService,
  private us: UserService,
  private i18n: I18nService
) { }
Modify the currency pipe in src/product-details/product-details.component.html :
<small class="text-muted">{{p.price | currency: userCurrency}}</small>
Robots and Sitemap
In this lesson, you will add even more for SEO. Your application deserves robots.txt and proper sitemap.
SEO#
To make your application more accessible for search engines you should provide them with the robots.txt and sitemap.xml files
Robots.txt#
Start by informing robots what they should and shouldn’t traverse on your website. This helps avoid unnecessary traffic from them. Create a new file, src/robots.txt , and feed it with data:
User-agent: *
Disallow: /favorites/
Disallow: /login/
Disallow: /assets/
Disallow: /api/

Sitemap: https://my-universal-app.herokuapp.com/sitemap.xml
This configuration will prevent search engine robots from visiting paths that they have no need to traverse:
- /favorites is only available to authenticated users.
- /login doesn’t contain any content that is critical from the SEO perspective.
- /assets is where static files reside (this doesn’t mean that Google won’t index images).
- /api is where the backend API resides.
The last line is to inform robots where they should look for the sitemap of your application.
SEO
Next step in SEO is to set up meta-tags. If you want to know how to do it in Angular, this lesson will help you to find the answer.
Manipulating title and meta tags#
Last but not least, you need to set up <title> and meta-tags of your sub-pages. Generate a service that will be used for this purpose:
ng g s seo --skipTests
Implement SeoService by adding the following code to src/seo.service.ts :
import { Injectable } from '@angular/core';
import { Title, Meta } from '@angular/platform-browser';

@Injectable({
  providedIn: 'root',
})
export class SeoService {
  private titleBase: string = `Angular Universal (work)shop - `;

  constructor(private title: Title, private meta: Meta) {}

  public setTitle(titlePart: string): void {
    this.title.setTitle(this.titleBase + titlePart);
  }

  public setDescription(description: string): void {
    this.meta.updateTag(
      { name: 'description', content: description },
      'name=description'
    );
  }

  public setKeywords(keywords: string[]): void {
    this.meta.updateTag(
      {
        name: 'keywords',
        content: keywords.reduce(
          (prev, curr) => (prev += `, ${curr}`)
        ),
      },
      'name=keywords'
    );
  }
}
SeoService injects the Title and Meta services available in @angular/platform-browser . These services are used in the methods that SeoService exports:
-
setTitle()adjusts the<title>entity for each sub-page. -
setDescription()is used to manipulate<meta name="description">. -
setKeywords()is used to manipulate<meta name="keywords">.
Now you need to import and use SeoService in several components.
import { SeoService } from '../seo.service';
ProductsListComponent :
  constructor(
    private ps: ProductsService,
    private us: UserService,
    private route: ActivatedRoute,
    private seo: SeoService
  ) {}
Noscript
In this lesson, you can see how Angular Universal helps when your user’s browser doesn’t support JavaScript
When the browser doesn’t support JavaScript#
Last (but not least) Single Page Application pitfall that we described is that it needs JavaScript to run. In case that your user has disabled JavaScript in his browser, regular SPA can display just a piece of information that asks him to turn it on. With Angular Universal, the thing is a little bit different.
With Angular Universal, you can ship the fully rendered view to your user even if he doesn’t have JS enabled. Adjust the src/styles.scss :
Summary
This lesson summarize what you’ve learned in this module; SEO & SSR
Summary#
The code you’ve built thus far is available for download here. Once you download it, remember to install the project using the npm install command inside the project directory.
In this module, you’ve learned how to make your Angular application perform better on initial load and ship the first meaningful paint twice as fast. That’s a crucial skill in the development of modern web applications: 47% of consumers expect a web page to load in 2 seconds or less, and 40% of people abandon a website that takes more than 3 seconds to load.