Using Secrets with Angular Universal
In this course module, you will learn how to pass objects and function references from Node.js to Angular Universal sandbox. You will build a service that will be used to connect with MongoDB and perform queries. You will also gain knowledge on how to prepare a server-equivalent of services used in browser-side Angular; and how to improve your application performance thanks to them. You will also make your application fully functional for users with disabled JavaScript.
Browser Versus Server#
The code of the application built in the previous module is available for download here. Once you download it, remember to install the project using the npm install command inside the project directory.
Where you are#
In the previous module, you’ve applied Angular Universal schematics to a production-ready application. You’ve also learned how to significantly improve Time To First Byte in production environment. Here’s how your application works right now:
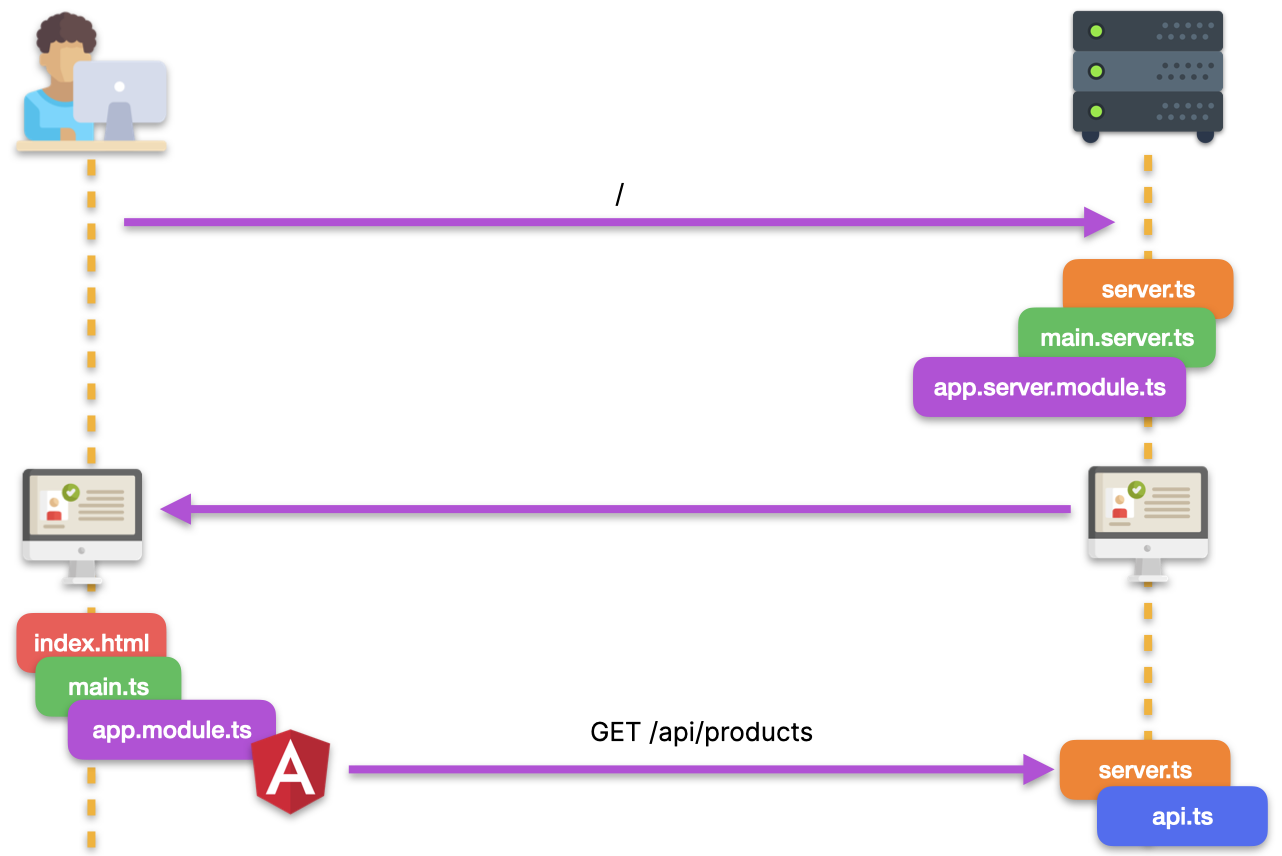
On the one hand, your solution is fully functional. Thanks to Angular Universal, you share the code base between your server-side and browser-side bundles. On the other hand, there is still plenty of room for improvement. Let’s take a look at the detailed server-side flow of the application (purple arrows shows HTTP communication; green arrows shows in-app communication):
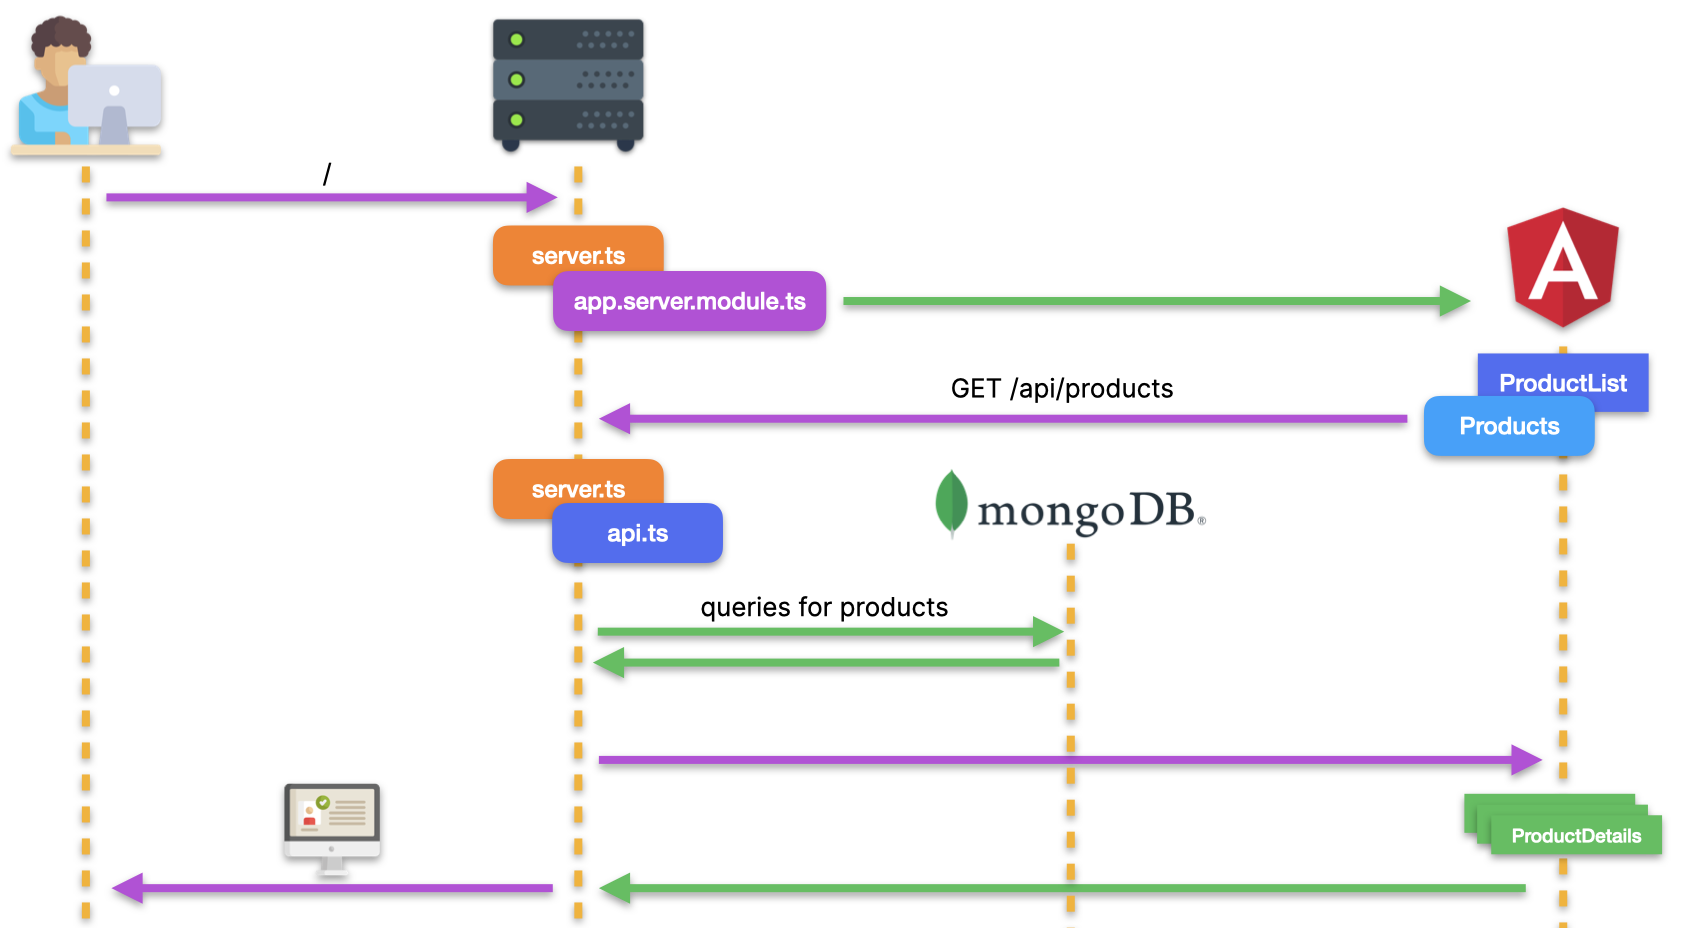
- The user navigates to the application’s root path ( / ).
- server.ts recognizes that an Angular route has been invoked, so it bootstraps the rendering process.
-
ProductListComponentretrieves a list of products usingProductsService. -
ProductsServicesends an HTTP request to retrieve the list of products from the /api/products endpoint. - server.ts recognizes the API request and passes it to api.ts .
- api.ts queries MongoDB to retrieve the requested data.
- The list of products is sent back to
ProductsServiceas an HTTP response. - The rendered HTML is sent back to the user.
Querying the Database from Angular
One of possible improvements is to perform queries against MongoDB directly from Angular Universal. In this lesson you will create a service which does this job.
MongoService#
Generating the service#
Start your work by generating a new service that will be used to connect to MongoDB:
ng g s mongo --skipTests
To apply the Don’t Repeat Yourself (DRY) principle, you will utilize this service in the api.ts file. In other words, you will move the database querying logic from api.ts to MongoService . A naive implementation could look like this:
import { Injectable } from '@angular/core';

@Injectable({
  providedIn: 'root',
})
export class MongoService {
  private dbUrl =
    'mongodb+srv://angular-universal:abcd1234@cluster0.bcfzj.mongodb.net';

  constructor() {
    //connect to database
  }

  public async retrieveFromDb(
    collectionName,
    project = {},
    query = {}
  ): Promise<any[]> {
    return [];
  }
}
The prepared class can now be imported into api.ts instead of the current MongoDB-related logic. Unfortunately, this is not trivial. Try to inject the prepared service anywhere in your application, such as ProductsService :
import { MongoService } from './mongo.service';

@Injectable({
  providedIn: 'root',
})
export class ProductsService {
  private API_URL = `${environment.apiBasePath}/api`;

  constructor(
    private httpClient: HttpClient,
    private mongoService: MongoService
  ) {}
Now run the Angular compiler:
npm run build:ssr
Take a look at the content of the dist/browser/main**.js* bundle that is sent to the end user’s browser:

That’s a severe security breach: you disclose your database connection string to every user of your application!
Angular Universal is an excellent solution as it enables sharing the code base between browser and server bundles. While it’s a great way to avoid duplicating business logic in your project, it might lead to serious security breaches and compromising sensitive data such as database connection strings!
Using the isPlatformBrowser() and isPlatformServer() methods doesn’t help here because the same code base is still used on both platforms. This is how the isPlatformXXX() method used in I18nService is translated to a JavaScript bundle:
this.userLang=function(e){
 return"browser"===e
 }
 (this.platformId)?window.navigator.language:(
 this.request.headers["accept-language"]||"").substring(0,5)}
As you can see, the server-specific code branch is still present in the browser bundle.
Moreover, the connection string may change in the future. Do you want to rebuild your application because a variable value has changed? You probably don’t.
Providing secrets to server-side Angular#
Fortunately, ngExpressEngine that we use to render Angular views can provide additional injection tokens to the Angular application. You could provide Angular with a connection string and use it to set up a database connection. However, that would lead you to another pitfall: a database connection would be set up every time a user accesses the application. Instead, it would be better to provide Angular with an already instantiated connection and inject it into MongoService using Dependency Injection.
First, let’s export the dbClient object from api.ts :
export const dbClient = MongoClient.connect(dbUrl, {
  useUnifiedTopology: true,
}).then((connection) => connection.db('cluster0'));```
Next, adjust the statement that imports from api.ts into server.ts :
import { api, dbClient } from './api';
Server-Specific Service
Once your MongoService is in place, you need to prepare a server-equivalent of ProductsService. This service will query MongoService for products list and descriptions and embed those in the HTML rendered by Angular Universal.
Providing Angular With Server-Specific Service Implementation#
It’s time to consume MongoService . You could do this using the isPlatformServer() and isPlatformBrowowser() methods that you already know. The problem with this solution is that server-specific code is included in the main bundle that is shipped to the browser. In other words, this solution increases the size of the application delivered to the end user.
Fortunately, another technique is available. You are going to make use of AppServerModule and provide the implementation of the ProductsService interface that is specific to the server runtime.
Implementing the server-specific service#
Generate a new service using the following command:
ng g s products-server --skipTests
Copy the following service logic to src/app/products-server.service.ts :
import { Injectable } from '@angular/core';
import { Observable } from 'rxjs';
import { Product } from 'src/model/product.model';
import { MongoService } from './mongo.service';
import { ObjectId } from 'mongodb';
import { from } from 'rxjs';
import { map } from 'rxjs/operators';

@Injectable({
  providedIn: 'root',
})
export class ProductsServerService {
  constructor(private ms: MongoService) {}

  public getProducts(): Observable<Product[]> {
    return from(
      this.ms.retrieveFromDb<Product>('products', {
        description: 0,
      })
    );
  }

  public getProduct(
    productId: string
  ): Observable<Product> {
    return from(
      this.ms.retrieveFromDb<Product>(
        'products',
        {},
        { _id: ObjectId(productId) }
      )
    ).pipe(map((products) => products[0]));
  }
}
Working With Cookies in Angular
Next step is to create a server-equivalent of service responsible for user interactions. This lesson will show you how to read HTTP requests in Angular, get cookies from it and decrypt them.
Working With Cookies in Angular#
Your application won’t be only visited by anonymous users. Some users could navigate directly to the /favorites path to see the list of their favorite products. In this case, even if the user is authenticated, server-side Angular won’t recognize them as such and redirect them to the login page. Moreover, the content of the / path depends on the favorites list of the authenticated user.
Navigate to the application in the browser, authenticate (login: name@email.com , password: abc123 ), and add a couple of products to the list of favorites.
Now click My Favorite Products and reload the page. Server-side Angular will render the login page although you clearly have the authentication cookie!
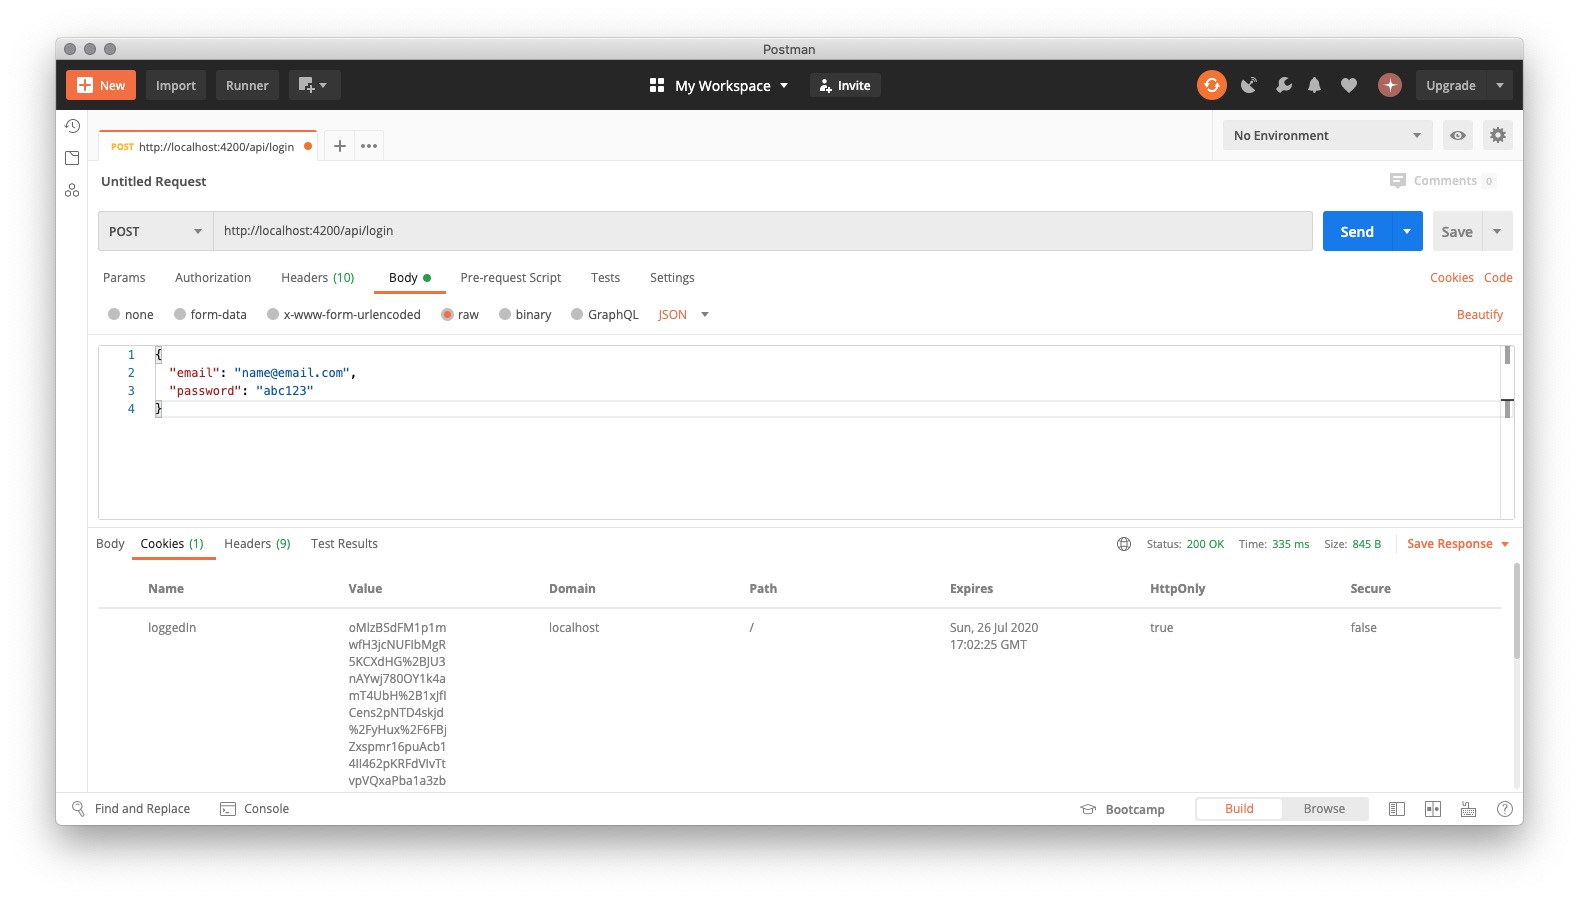
Now switch to Postman and obtain the authentication cookie by sending a POST request to /api/login with the following body:
{
 "email": "name@email.com",
 "password": "abc123"
}
Once you receive a response, Postman saves the cookie, and it’s used with further requests as long as its expires value is valid.
Perform a GET request to / . As you can see, all products can be added to favorites.
You can perform that test using cURL as well:
curl -i --header "Content-Type: application/json" \
--request POST \
--data '{"email": "name@email.com","password": "abc123"}' \
--cookie-jar cookie.txt \
http://localhost:4200/api/login

curl -i --cookie cookie.txt \
http://localhost:4200
To address the problem described above, you need to create UserServerService similar to the existing ProductsServerService .
Providing a function reference to Angular#
First things first, let’s generate a new service with the following CLI command:
ng g s user-server --skipTests
In this service, you’re going to read cookie content and retrieve user data from the database. The cookie is encrypted with a key stored on the server. It would be best if you had a function that decrypts the cookie to read its content. You will obtain it in the same way you obtained the dbConnection object - by injecting it from server.ts to Angular.
Export the decrypt() function from api.ts :
export function decrypt(toDecrypt: string): string {
  const buffer = Buffer.from(toDecrypt, 'base64');
  const decrypted = crypto.publicDecrypt(key, buffer);
  return decrypted.toString('utf8');
}
Import it into server.ts and provide to Angular in the ngExpressEngine() call:
import { api, dbClient, decrypt } from './api';

/*
 other code
*/

server.engine(
  'html',
  ngExpressEngine({
    bootstrap: AppServerModule,
    providers: [
      { provide: 'dbConnection', useValue: dbClient },
      { provide: 'decrypt', useValue: decrypt },
    ],
  })
);
You can now inject this function in the constructor of UserServerService along with other services:
import { Injectable, Inject } from '@angular/core';
import { MongoService } from './mongo.service';
import { REQUEST } from '@nguniversal/express-engine/tokens';
import { Request } from 'express';

@Injectable({
  providedIn: 'root',
})
export class UserServerService {
  constructor(
    @Inject('decrypt') private decrypt: any,
    private ms: MongoService,
    @Inject(REQUEST) private request: Request
  ) {}
Getting cookie content in Angular#
You now have the decrypt() method, MongoService , and the request object. Everything is ready to obtain a user ID from the request cookie and retrieve their data from the database. Start by adding the import statements that you are going to use in this part:
import { Observable, from, of } from 'rxjs';
import { User } from 'src/model/user.model';
import { map, mergeMap } from 'rxjs/operators';
import { ObjectId } from 'mongodb';
Unfortunately, the request object you have in Angular is not equivalent to what you have in Express.js ( server.ts ). There is no .cookies field to easily retrieve a cookie’s names and values. You have request headers though, so with a little bit of play, you can build up that object yourself.
Noscript
Once you know how to read cookies in the Angular Universal app, it’s time to learn how to set them up. In this lesson, you will make your application fully functional for users whose browser doesn’t support JavaScript at all.
Working With Cookies in Angular#
Armed with the knowledge about reading cookies and dealing with HTTP requests inside Angular Sandbox, you can enhance your application to provide the full functionality for users who have disabled JavaScript in their browsers.
User login#
Let’s start from adjusting the login page functionality. First step is to add action and method attributes to the <form> entity; next you should add name attribute to both form fields. Edit src/app/login/login.component.ts file:
template: `
    <form [formGroup]="loginForm" (ngSubmit)="logIn()" action="/login" method="post">
      <div class="mb-3">
        <label for="email">Email</label>
        <input
          name="email"
          type="email"
          class="form-control"
          id="email"
          placeholder="you@example.com"
          formControlName="email"
        />
      </div>
      <div class="mb-3">
        <label for="password">Password</label>
        <input
          name="password"
          type="password"
          class="form-control"
          id="password"
          formControlName="password"
        />
      </div>

      <button class="btn btn-primary btn-lg btn-block" type="submit">
        Log in
      </button>
    </form>
  `,
Now you need to handle form-data on the back-end side ( api.ts ). Replace the existing api.post('/login', () => {}) entry with the following code:
const hash = crypto.createHash('sha512');
export async function authenticate(email:string, password:string, res) {
  const foundUsers = await mongoService.retrieveFromDb<User>(
    'users',
    { password: 0 },
    { email: email, password: hash.update(password).digest('hex') }
  );

  if (foundUsers.length == 1) {
    const user = foundUsers[0];
    res.cookie('loggedIn', encrypt(`${user.id}`), {
      maxAge: 600 * 1000,
      httpOnly: true,
    });
    return user;
  }
  return null;
}

api.post('/login', async (req, res) => {
  const loggedUser = await authenticate(req.body.email, req.body.password, res);

  if (!loggedUser) {
    res.sendStatus(401);
  } else {
    delete loggedUser.id;
    res.send(loggedUser);
  }
});
Since now, verifying user credentials and setting up cookie actions are delegated to the authenticate function. Thanks to that, you can inject a reference to this function into the Angular Sandbox and reuse it there. Import authenticate function inside the server.ts file:
import { api, dbClient, decrypt, authenticate } from './api';
and register new route which handles submitted form and provides the authenticate method to the Angular sandbox:
server.post('/login', (req, res) => {
    res.render(indexHtml, {
      req,
      providers: [
        { provide: APP_BASE_HREF, useValue: req.baseUrl },
        { provide: 'authentication', useValue: authenticate}
      ],
    });
  })
You need also to enable Node.js application to parse form data, add the following ipmort in the server.ts :
import * as bodyParser from 'body-parser';
and apply it on the server object:
server.use(bodyParser.urlencoded({extended: true}));
Inject the authenticate method inside src/app/user-server.service.ts together with the RESPONSE token from the @nguniversal/express-engine/tokens :
import { Injectable, Inject, Optional } from '@angular/core';
import { REQUEST, RESPONSE } from '@nguniversal/express-engine/tokens';
import { Request, Response } from 'express';
constructor(
  @Inject('decrypt') private decrypt: any,
  private ms: MongoService,
  @Inject(REQUEST) private request: Request,
  @Inject(RESPONSE) private response: Response,
  @Optional() @Inject('authentication') private authServer: any
) {}
and implement the authentication logic:
  public login(): void {
    const email = this.request.body?.email;
    const password = this.request.body?.password;
    if (email && password) {
      this.authServer(email, password, this.response);
Summary
In this module, you’ve learned an advanced technique of preparing code that is specific to the server runtime. That’s a crucial skill when you are creating a search engine optimized Angular application. You can now avoid keeping all logic in one bundle and decrease the size of the browser bundle. Moreover you’ve made your application fully functional for users with disabled JavaScript.
Summary#
The code you’ve built thus far is available for download here. Once you download it, remember to install the project using the npm install command inside the project directory.
Module Overview
Does it make sense to request products list from the back-end when it’s already included in redered view? In this module, you will add a mechanism that embeds the data retrieved during rendering into the application bundle. As a result, the application initialized in the browser will use that data instead of querying the backend.
Transferring Data Between the Server and the Browser#
The code of the application built in the previous module is available for download here. Once you download it, remember to install the project using the npm install command inside the project directory.
Where you are#
In the previous module, you’ve improved the rendering process in your application by retrieving data directly from the database rather than with HTTP requests. You’ve learned how to pass function and variable references from Node.js into the Angular sandbox. You’ve also introduced MongoService , a placeholder for database logic shared between Angular and the API of your application.
Although your application doesn’t use HTTP to retrieve data during the rendering process, it still does that when it’s bootstrapped in the browser. To see that behavior, navigate to http://localhost:4200 in the browser with Developer Tools open. In the Network tab of Developer Tools, you will see that a request to the /products endpoint is performed, as well as a redundant request that checks if the user is authenticated:
Introducing TransferState
Say Hello to TransferState, a key-value registry that is passed along with the application bundle, from the server-side angular to the browser-side part of the application. In this lesson you will learn how frontend can get to know what backend has already do (ie retrieving data from DB); thanks to that you can avoid repeating those steps and offload your application backend.
Introducing TransferState#
First, you need to provide the modules that contain the TransferState service.
Update src/app/app.module.ts by adding BrowserTransferStateModule to the @angular/platform-browser import statement:
import {
  BrowserModule,
  BrowserTransferStateModule,
} from '@angular/platform-browser';
Add it to the imports array of AppModule :
imports: [
  BrowserModule.withServerTransition({
    appId: 'serverApp',
  }),
  AppRoutingModule,
  HttpClientModule,
  ReactiveFormsModule,
  BrowserTransferStateModule,
],
Update src/app/app.server.module.ts by adding ServerTransferStateModule to the @angular/platform-server import statement:
import {
  ServerModule,
  ServerTransferStateModule,
} from '@angular/platform-server';
Add it to the imports array of AppServerModule :
imports: [
  AppModule,
  ServerModule,
  ServerTransferStateModule,
],
Adjusting product services#
You need to prepare keys that you will use in services responsible for retrieving products. Create a new file, src/model/state-keys.ts , and add the following code:
import {
  makeStateKey,
  StateKey,
} from '@angular/platform-browser';
import { Product } from './product.model';

export class StateKeys {
  public static get PRODUCTS(): StateKey<Product[]> {
    return makeStateKey<Product[]>('products');
  }
  public static get PRODUCT(): StateKey<Product> {
    return makeStateKey<Product>('product');
  }
}
Import TransferState and StateKeys , and then add the tap operator to the rxjs import statement in src/app/products-server.service.ts :
import { map, tap } from 'rxjs/operators';
import { TransferState } from '@angular/platform-browser';
import { StateKeys } from 'src/model/state-keys';
Inject the TransferState service, then update the getProducts() and getProduct(productId) methods to set entries to the TransferState registry when data is returned from the database. You can do it by introducing the tap operator into the observables returned by those methods:
constructor(
    private ms: MongoService,
    private ts: TransferState
  ) {}

  public getProducts(): Observable<Product[]> {
    return from(
      this.ms.retrieveFromDb<Product>('products', {
        description: 0,
      })
    ).pipe(
      tap((products) =>
        this.ts.set(StateKeys.PRODUCTS, products)
      )
    );
  }

  public getProduct(
    productId: string
  ): Observable<Product> {
    return from(
      this.ms.retrieveFromDb<Product>('products', {}, {
        _id: ObjectId(productId),
      })
    ).pipe(
      map((products) => products[0]),
      tap((product) =>
        this.ts.set(StateKeys.PRODUCT, product)
      )
    );
  }
The browser side#
Now you need to retrieve data from the TransferState registry in the browser. Adjust import statements in src/app/products.service.ts by adding the following entries:
import { Observable, of } from 'rxjs';
import { TransferState } from '@angular/platform-browser';
import { StateKeys } from 'src/model/state-keys';
TransferHttpCacheModule
Next step is to get know a TransferHttpCacheModule, which provides the TransferState functionality “out of the box” for the HTTP calls.
TransferHttpCacheModule#
In the previous lesson, you’ve learned how to adjust services responsible for data retrieval to use the TransferState registry. What if the application doesn’t retrieve data from the database but performs an HTTP call instead? This may occur if your web application communicates with services that are not deployed on the same machine, such as in a microservice architecture.
Should you prepare a special server-side implementation of such a service? Fortunately, you don’t need to. Instead, you can use the TransferHttpCacheModule module that is shipped with the @nguniversal library. This module provides HTTP_INTERCEPTOR : a mechanism for altering HTTP calls and responses “on the fly”, which uses the TransferState registry under the hood. On the server, the interceptor feeds TransferState with data retrieved via HTTP requests. In the browser, it looks up for these entries in the registry and does not repeat HTTP calls.
Creating a microservice#
Create a new npm project outside of your Angular Universal application, and install dependencies that are necessary to publish a basic HTTP API:
cd ..
mkdir my-service
cd my-service
git init
npx gitignore node
npm init -y
npm install express body-parser cors
touch index.js
This service will broadcast information about promotions and opening hours of the terrain shop that stands behind your online grocery. Add the following code to index.js:
const express = require('express');
const cors = require('cors');
const app = express();

const port = process.env.PORT || 8080;

app.use(
  cors({
    origin: true,
    credentials: true,
  })
);

app.get('/opening', (req, res) => {
  console.log('GET opening');
  res.send({ open: '8 AM', close: '10 PM' });
});

app.get('/promotions', (req, res) => {
  console.log('GET promotions');
  res.send(['Buy four potatoes and pay for three!']);
});

app.listen(port, () => {
  console.log(
    `Backend is runing on: http://localhost:${port}`
  );
});
The code above introduces two API endpoints:
- GET /promotions
- GET /opening
Update package.json to be able to deploy this service to Heroku:
"scripts": {
    "start": "node index.js",
    "test": "echo \"Error: no test specified\" && exit 1"
  },
Deploying to Heroku#
Create and deploy a new Heroku application:
heroku create
git add .
git commit -am "make it better"
git push heroku master
Verify the deployment with Postman or cURL:
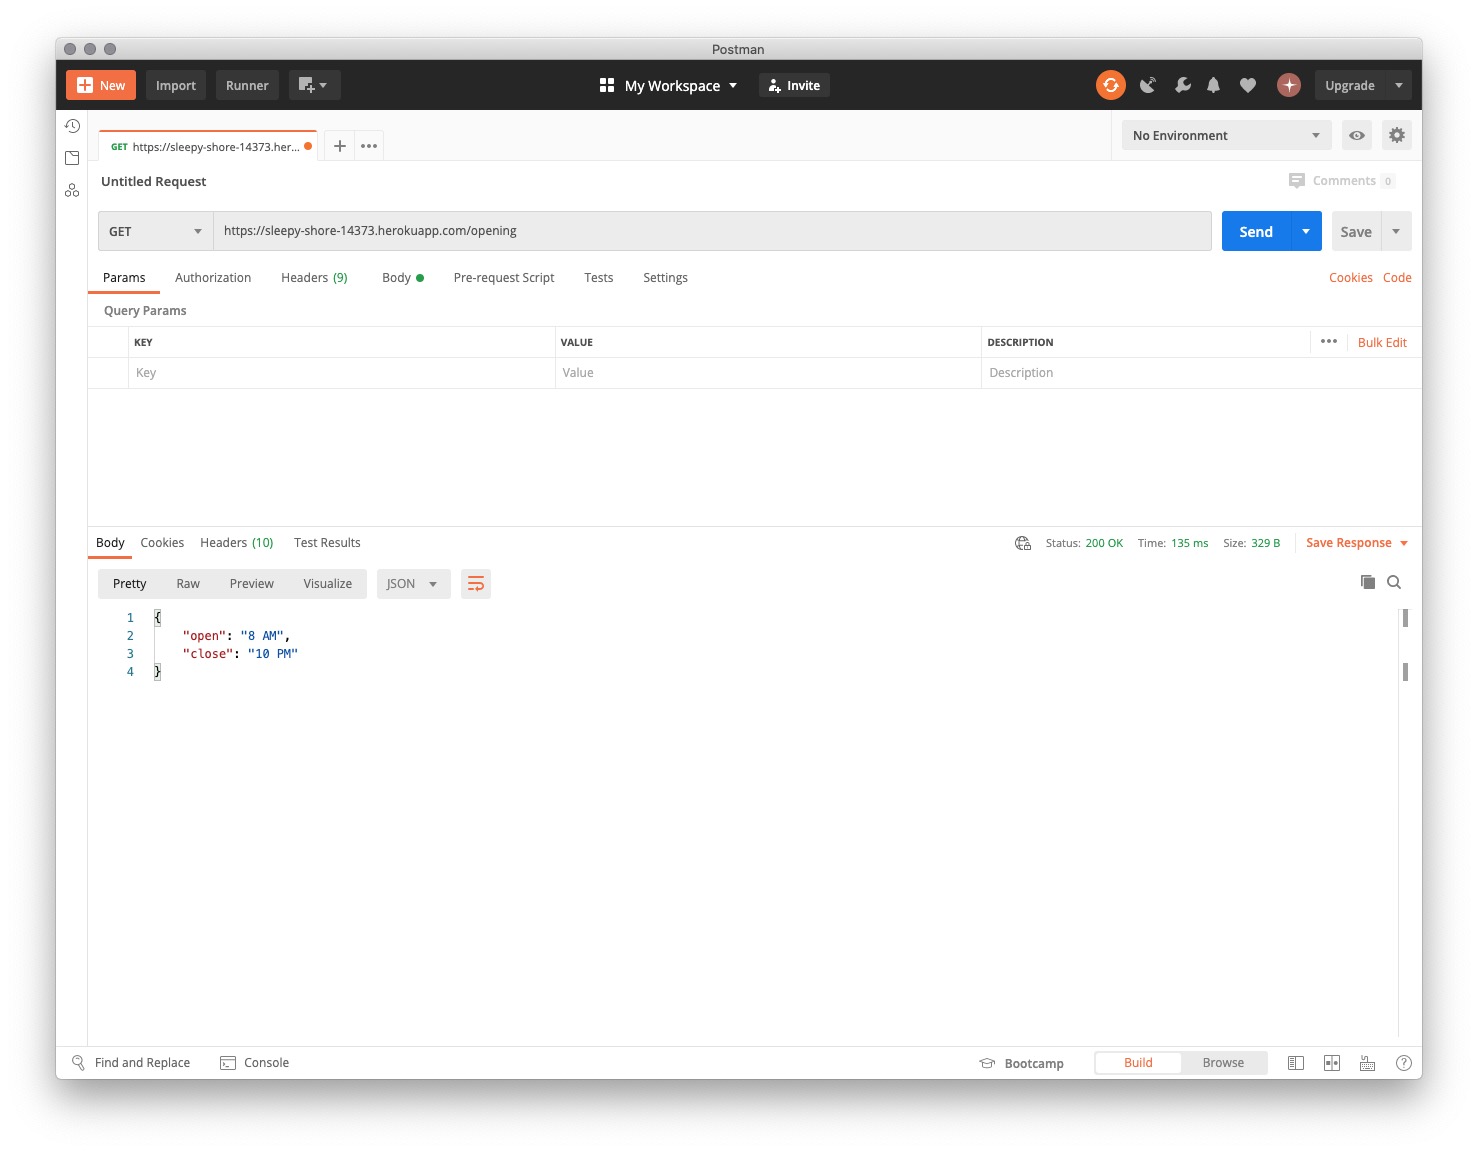
Consuming the microservice#
Add the terrainShopBasePath entry to src/environments/environment.ts :
export const environment = {
  production: false,
  apiBasePath: 'http://localhost:4200',
  terrainShopBasePath: 'http://localhost:8080',
};
Add the same entry to src/environments/environment.prod.ts:
export const environment = {
  production: true,
  apiBasePath:
    'https://intense-woodland-94697.herokuapp.com',
  terrainShopBasePath:
    'https://sleepy-shore-14373.herokuapp.com',
};
Create a new file, src/model/opening-hours.model.ts , and add a class that represents data returned by the /opening endpoint:
export interface OpeningHours {
  open: string;
  close: string;
}
Handling long-running API calls
Long running API calls can affect your application rendering time, that might lead to the SEO disaster. In this lesson you will learn how you can protect your application against such situation.
The Nightmare of Long-Running HTTP Calls#
Angular Universal gives your application the advantage of performing HTTP calls on the server. On the other hand, performing an HTTP call takes time. What if a call is long-running? You can simulate this behavior by slowing down one of the endpoints in terrain-shop-service . Introduce a setTimeout to the /promotions endpoint to delay the response:
const express = require('express');
const cors = require('cors');
const app = express();

const port = process.env.PORT || 8080;

app.use(
  cors({
    origin: true,
    credentials: true,
  })
);

app.get('/opening', (req, res) => {
  console.log('GET opening');
  res.send({ open: '8 AM', close: '10 PM' });
});

app.get('/promotions', (req, res) => {
  console.log('GET promotions');
  setTimeout(() => {
    res.send(['Buy four potatoes and pay for three!']);
  }, 4000);
});

app.listen(port, () => {
  console.log(
    `Backend is runing on: http://localhost:${port}`
  );
});
Use Postman to check how long it now takes to render the http://localhost:4200/terrain-shop landing page:
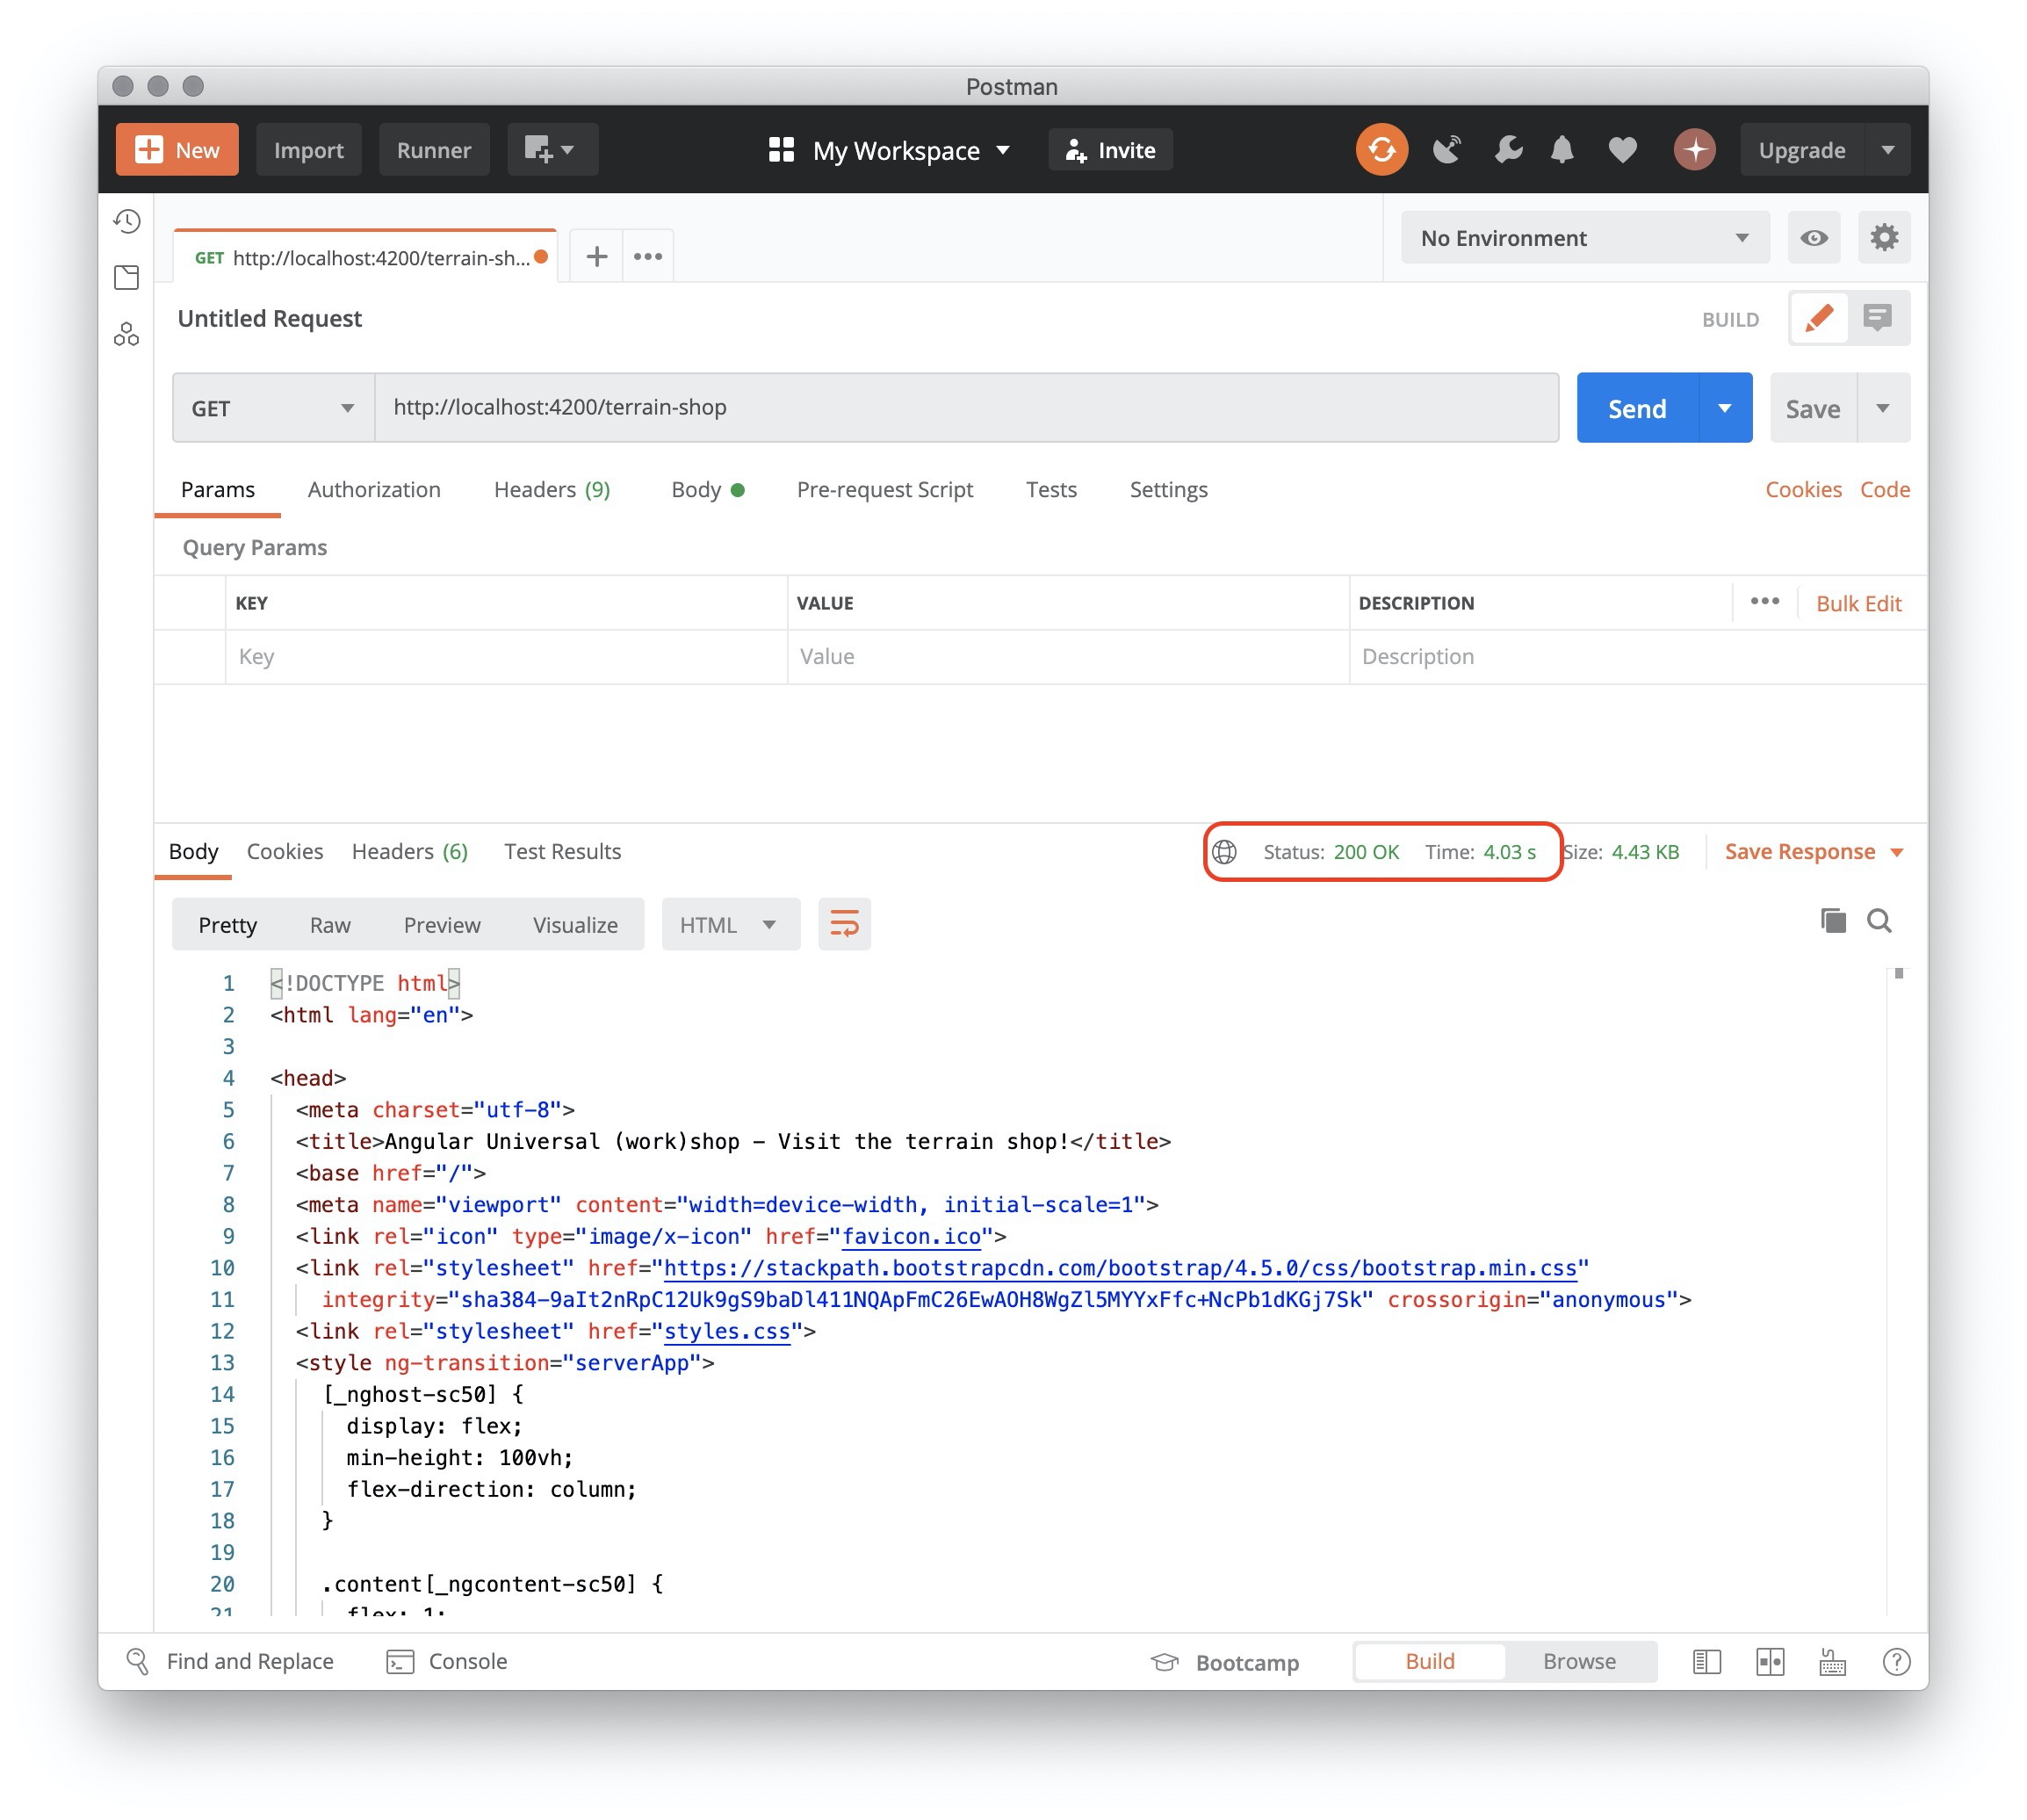
An equivalent test can be performed using cURL:
curl -o /dev/null -w %{time_total} http://localhost:4200/terrain-shop
Your application’s rendering process is as fast as the slowest API call !
Introducing API watchdog#
To protect yourself against such situations, you can set up a route resolver that allows you to get data before navigating to a new route.
Thanks to the isPlatformServer() and isPlatformBrowser() methods, you can determine the current runtime of the Angular application and modify the logic of the resolver accordingly.
Generate a new route resolver service:
ng g s terrain-shop-resolver --skipTests
Copy the following code to src/app/terrain-shop-resolver.service.ts :
import {
  Injectable,
  Inject,
  PLATFORM_ID,
} from '@angular/core';
import { Resolve } from '@angular/router';
import { TerrainShopService } from './terrain-shop.service';
import { Observable, timer, race } from 'rxjs';
import { isPlatformServer } from '@angular/common';
import { map } from 'rxjs/operators';

@Injectable({
  providedIn: 'root',
})
export class TerrainShopResolverService
  implements Resolve<string[]> {
  constructor(
    private ts: TerrainShopService,
    @Inject(PLATFORM_ID) private platformId: any
  ) {}

  public resolve(): Observable<string[]> {
    if (isPlatformServer(this.platformId)) {
      return race(
        this.ts.getPromotions(),
        timer(500).pipe(map(() => ['Loading data...']))
      );
    } else {
      return this.ts.getPromotions();
    }
  }
}
Summary
In this module, you’ve learned how to pass data between the server and the browser using the TransferState registry. You’ve also introduced TransferHttpCacheModule that passes data obtained via HTTP during server-side rendering to the browser. You’ve learned how to abandon long-running REST API calls that affect rendering performance.
Summary#
The code you’ve built thus far is available for download here. Once you download it, remember to install the project using the npm install command inside the project directory.
In this module, you’ve learned how to pass data between the server and the browser using the TransferState registry. You’ve fed the registry with data retrieved from the database during the server-side rendering process. Then you’ve passed that data to the browser along with the application bundle.
Module Overview
Wanna be a performance beast? It’s time to cache! In this module, you will use the Redis database to implement server-side caching and improve Time To First Byte. From now on, only selected requests will trigger the rendering process. The rendered output will be kept in Redis for a specified period of time. Subsequent requests will be served with data retrieved from Redis.
Caching With Redis and Fine-Tuning Your Application#
The code of the application built in the previous module is available for download here. Once you download it, remember to install the project using the npm install command inside the project directory.
Where you are#
In the previous module, you’ve learned how to use TransferState to pass data between the server and the browser. This enabled the browser-side part of your application to reuse the data retrieved on the server during rendering. You’ve learned how to use HttpCacheModule and TransferState with HTTP calls. As a result, your application avoids performing redundant HTTP calls once it’s initialized in the browser.
Installing Redis
First things first. Let’s install the Redis DB on your machine and provision it in the Heroku environment.
Installing Redis#
The first step is to set up a Redis instance. You can provision it in your Heroku account. If you are working with this course offline, you might want to install Redis on your machine.
Localhost#
If you’re using a Windows machine, use Windows Subsystem for Linux (WSL) and a package manager to install Redis:
sudo apt-get update
sudo apt-get upgrade
sudo apt-get install redis-server
redis-cli -v
On macOS, you can use the Homebrew package manager:
Redis middleware
In this lesson you will create a Node.JS middle-ware, that will be responsible for caching rendered views inside Redis database.
Implementing Redis Middleware#
It’s time to implement the server logic to handle requests from the end user and check for rendered output in Redis. If an entry doesn’t exist in the Redis database, then the rendering process is triggered, and the output is saved to the database.
Install redis as a dependency:
npm install redis
Start by initializing a Redis client. Copy the following code into server.ts :
import * as redis from './node_modules/redis';

let redisUrl;
if (process.env.NODE_ENV == 'development') {
  redisUrl = 'redis://localhost:6379';
} else {
  redisUrl =
    'redis://h:your-redis-url@ec2-54-86-250-147.compute-1.amazonaws.com:19079';
}

const redisClient = redis.createClient(redisUrl);
redisClient.on('error', (err) => {});
This code sets up the redisUrl variable that depends on the NODE_ENV environment variable. If the application runs in the development environment, redisUrl is set to localhost. Otherwise, it is set to the Heroku instance URL. Then redisClient is initialized, and all errors that might occur (such as if a Redis instance is not running) are handled.
Remember to replace the redisUrl value with your Redis URI, obtained in previous lesson.
You can now implement Redis middleware:
const redisMiddleware = (req, res, next) => {
  if (!redisClient.connected) {
    next();
    return;
  }

  let entryName = req.url + req.cookies?.loggedIn;
  redisClient.get(entryName, (err, result) => {
    if (result) {
      res.send(result);
    } else {
      let sendReference = res.send.bind(res);
      res.send = (body) => {
        redisClient.setex(entryName, 60 * 5, body);
        sendReference(body);
      };
      next();
    }
  });
};
Tuning the application
Faster! Faster! Faster! In this lesson you will enable gzip compression, defer the CSS, lazy-load images and more. All to make it faster!
Tuning the Application#
Your application is almost ready. Let’s add some final touches to tune it up.
Enabling gzip compression#
The first thing you can do to improve Time To First Byte is to enable gzip compression. As a result, you will decrease the size of files shipped to the browser.
Install the compression middleware:
npm i compression
Now enable compression in server.ts :
import * as compression from 'compression';

/**
 * other code
 */

export function app(): express.Express {
 const server = express();
 server.use(compression());
Deferring Bootstrap CSS#
Another possible improvement is to defer CSS downloaded from the Bootstrap CDN. Replace the current stylesheet link in src/index.html with the following code:
<link rel="preload"
  href="https://stackpath.bootstrapcdn.com/bootstrap/4.5.0/css/bootstrap.min.css"
  as="style" onload="this.onload=null;this.rel='stylesheet'">
<noscript>
  <link rel="stylesheet"
    href="https://stackpath.bootstrapcdn.com/bootstrap/4.5.0/css/bootstrap.min.css">
</noscript>
Instead of rel="stylesheet" , the file is initially loaded as rel="preload" . This enables the browser to download stylesheets asynchronously. Once the styles are downloaded, you change the rel attribute to stylesheet to apply the styles. To support browsers where JavaScript is disabled, there’s a <noscript> section that attaches styles in a regular way.
Loading images lazily#
In most web applications images are the largest files downloaded via HTTP. Most browsers support lazy-loading of images, which prevents them from blocking the final page render time. Using this functionality is as easy as adding loading="lazy" attribute to the <img> tag.
Summary
After fishing this module, your application will gain up to 95 points in the PageInsights speed audit. You’ve learned how to apply server-side caching to avoid redundant rendering and serve the client with content from the Redis database. You’ve also applied a few techniques to improve your application’s performance.
Summary#
The code you’ve built thus far is available for download here. Once you download it, remember to install the project using the npm install command inside the project directory.
In this module, you’ve learned how to apply server-side caching to avoid redundant rendering and serve the client with content from the Redis database.
You’ve also applied a few techniques to improve your application’s performance:
Module Overview
Testing an Angular Universal application can be tricky. In this module, you will learn how to create tests that are specific to Angular Universal applications.
Testing#
The code of the application built in the previous module is available for download here. Once you download it, remember to install the project using the npm install command inside the project directory.
Where you are#
After completing the previous module, you now have a finished Angular Universal application. You’ve used Redis to cache rendered views and deliver them to the end user. You’ve also applied gzip compression and other best practices to tune up the application.
Unit Tests - Stubbing PLATFORM_ID
How to verify your application behavior in different environments? In this lesson you will get to know how you can stub the PLATFORM_ID injection token and HTTP request, for tests purpose.
Stubbing PLATFORM_ID#
Let’s start by testing I18nService . As you may recall, this service determines the user’s language and prints currency in the corresponding format. It injects the PLATFORM_ID token from the @angular/core library. The token is used in the isPlatformBrowser() method, determining if the code executes on the server or in the browser.
Create a new file, src/app/i18n.service.spec.ts , then import TestBed and I18nService :
import { TestBed } from '@angular/core/testing';
import { I18nService } from './i18n.service';
import { PLATFORM_ID } from '@angular/core';
What is PLATFORM_ID?#
The value held by the variable identified with the PLATFORM_ID token is a string. That string has the value browser or server depending on where code executes. You can stub it as a variable reference. Add the following code to the test file:
let platformId = 'browser';
Stubbing the window object#
Set up the variables that you are going to use in test expectations:
let windowLanguage = 'en-EN';
let windowCurrency = 'GBP';
Next, set up the spec using Jasmine’s describe() and beforeEach() methods:
describe('I18nService', () => {
  let service: I18nService;

  beforeEach(() => {
    delete (window as any).navigator.language;
    Object.defineProperty(window.navigator, 'language', {
    configurable: true,
    enumerable: true,
    value: windowLanguage,
    writable: true,
    });
The code above introduces a mechanism that changes the value of window.navigator.language to the value of the windowLanguage variable before each test.
You can now provide the PLATFORM_ID token with the TestBed.configureTestingModule() method:
TestBed.configureTestingModule({
  providers: [
    { provide: PLATFORM_ID, useFactory: () => platformId },
  ],
});
The last step in beforeEach() is to inject the service that you are going to test:
  service = TestBed.inject(I18nService);
});
At this point, your code containing import statements and the beforeEach() method should look like the following:
import { TestBed } from '@angular/core/testing';
import { I18nService } from './i18n.service';
import { PLATFORM_ID } from '@angular/core';

let platformId = 'browser';

let windowLanguage = 'en-EN';
let windowCurrency = 'GBP';
Unit Tests - long-running API calls
Next step is to simulate a long-running API and verify how server-side Angular deals with it. This lesson will demonstrate you how to do that.
Testing Long-Running API Calls#
Let’s now test TerrainShopResolver . This resolver should abandon long-running API calls that may prevent a view from being rendered on the server.
TerrainShopResolver doesn’t perform HTTP calls; instead, it delegates them to TerrainShopService . This means you don’t need to stub the HttpClient service. You can just mock TerrainShopService and return the data from getPromotions() with a specified delay.
Create a new file, src/app/terrain-shop-resolver.service.spec.ts , and add the following import statements:
import { TestBed } from '@angular/core/testing';
import { TerrainShopResolverService } from './terrain-shop-resolver.service';
import { PLATFORM_ID } from '@angular/core';
import { TerrainShopService } from './terrain-shop.service';
import { Observable } from 'rxjs';
Similar to I18nServiceTests , you want to test service behavior both in the browser and on the server. To do this, you are going to provide a mocked PLATFORM_ID value. Declare a variable that will be used to stub PLATFORM_ID :
let platformId = 'server';
The next step is to prepare a mock of TerrainShopService :
let timeout = 1000;
let terrainServiceMock = {
  getPromotions() {
    return new Observable((observer) => {
      setTimeout(() => {
        observer.next(['testValue']);
        observer.complete();
      }, timeout);
    });
  },
};
The code above introduces the terrainServiceMock variable that holds an object containing the getPromotions() method. This method returns an observable that emits after a timeout defined by the timeout variable. You are going to modify this variable in tests.
When mocks are ready, it’s time to write the beforeEach() section, inject a service that you are going to test, and verify that it’s instantiated correctly:
describe('Terrain Shop Resolver', () => {
  let service: TerrainShopResolverService;
Unit Tests - server-specific services
Last but not least of your unit tests, should be to verify the server-specific services. In this lesson you will learn how to enforce Karma to run tests against code that includes server-specific objects and libraries.
Testing Server-Specific Classes#
You’re moving to a more sophisticated part of unit testing in your Angular Universal application. In this lesson, you will create more advanced stubs that you need to perform assertions.
Stubbing MongoDB and TransferState#
Start by installing Sinon.JS that you will use to create stubs:
npm i -D sinon
Create a new file, src/app/products-server.service.spec.ts , then add import statements and set up variables that will hold stubs:
import { TestBed } from '@angular/core/testing';
import { ProductsServerService } from './products-server.service';
import { TransferState } from '@angular/platform-browser';
import { ObjectId } from 'mongodb';
import * as sinon from 'sinon';

describe('Products Server Service', () => {
  let service: ProductsServerService;
  let transferStateStub;
  let dbClientStub;
  let products = [
    {
      _id: ObjectId('5ed3bbefaf1c4c0e81d9b400'),
      name: 'product1',
      price: 2.4,
      description: 'Lorem ipsum.',
      image: 'juice',
    },
    {
      _id: ObjectId('5ed3bbefaf1c4c0e81d9b401'),
      name: 'product2',
      price: 0.5,
      description: 'Lorem ipsum.',
      image: 'tomato',
    },
  ];
Initialize stubs in the beforeEach() method and provide them in configureTestingModule() :
beforeEach(() => {
    dbClientStub = {
      collection: sinon.stub().returns({
        aggregate: sinon.stub().returns({
          toArray: (callbackFn: Function) =>
            callbackFn(null, products),
        }),
      }),
    };

    transferStateStub = {
      set: sinon.stub(),
    };

    TestBed.configureTestingModule({
      providers: [
        {
          provide: 'dbConnection',
          useValue: Promise.resolve(dbClientStub),
        },
        {
          provide: TransferState,
          useValue: transferStateStub,
        },
      ],
    });
    service = TestBed.inject(ProductsServerService);
  });
Notice that dbClientStub and transferStateStub are both created using the sinon.stub() method. This lets you check inside tests if the service is calling MongoDB (rather than HTTP) to retrieve products. You will also check if it feeds up TransferState with retrieved products by calling its set() method.
Let’s write the tests:
it('should initialize service', () => {
    expect(service).toBeTruthy();
  });

  it('should query all products', async () => {
    await service.getProducts().toPromise();
    expect(
      dbClientStub.collection().aggregate.calledOnce
    ).toBeTrue();
    expect(
      dbClientStub.collection().aggregate.getCall(0)
        .args[0][0]
    ).toEqual({ $match: {} });

    expect(transferStateStub.set.calledOnce).toBeTrue();
    expect(transferStateStub.set.getCall(0).args).toEqual([
      'products',
      products,
    ]);
  });

  it('should query specific product', async () => {
    await service
      .getProduct('5ed3bbefaf1c4c0e81d9b400')
      .toPromise();
    expect(
      dbClientStub.collection().aggregate.calledOnce
    ).toBeTrue();
    expect(
      dbClientStub.collection().aggregate.getCall(0)
        .args[0][0]
    ).toEqual({
      $match: { _id: ObjectId('5ed3bbefaf1c4c0e81d9b400') },
    });
E2E - testing TransferState
In this lesson you will learn how you can verify the TransferState registry content in your E2E tests.
End-to-End Tests for Angular Universal Applications#
Let’s move on to end-to-end (E2E) testing. Unfortunately, Angular does not support Universal E2E tests out of the box. If you run the npm run e2e script right now, Angular will only build and test a production version of the browser application, ignoring the server-side part.
Running Protractor tests with your Universal application#
Before running Protractor tests against your Universal application, you need to build and start it up. Install an additional dependency:
npm i -D concurrently
Now, add a new script, serve:e2e , to package.json :
"serve:e2e":
"npm run build:ssr && concurrently \"PORT=4200 npm run serve:ssr\" \ npm
run e2e\"  --kill-others --success first"
Notice that you’ve set up the environment variable PORT to value 4200 . You need to do that, because by default production build of Angular Universal is running on port 4000 while your protractor tests are looking for the app on port 4200 .
Moreover, because you’re going to run the Angular Universal application instead of the browser-side build, adjust the angular.json file and remove the projects.my-universal-app.architect.e2e.options.devServerTarget entry:
"devServerTarget": "my-universal-app:serve"
Testing TransferState#
Open e2e/src/app.po.ts and replace its content with the following code:
import {
  browser,
  by,
  element,
  ElementArrayFinder,
} from 'protractor';

export class AppPage {
  async navigateTo(): Promise<void> {
    await browser.get(browser.baseUrl);
  }

  getProducts(): ElementArrayFinder {
    return element.all(
      by.css('app-products-list app-product-details')
    );
  }

  getTitleText(): Promise<string> {
    return element(
      by.css('app-header strong')
    ).getText() as Promise<string>;
  }
}
The code above introduces two getters:
-
getProducts()returns the list of products displayed on a page. -
getTitleText()returns the application title.
You’ve also modified the navigateTo() method to wait for the page to load synchronously.
Now you need to prepare code that will be responsible for retrieving objects from the TransferState registry. Create a new file, e2e/src/utils.ts , and add the following code to it:
import { by, element, ElementFinder } from 'protractor';

export class Utils {
  public static async getTransferStateStore() {
    const cacheScript: ElementFinder = await element(
      by.id('serverApp-state')
    );
    const rawValue: string = await cacheScript.getAttribute(
      'textContent'
    );
    return JSON.parse(this.unescapeHtml(rawValue));
  }
E2E - Mocking MongoDB
This lesson is going to show you how to mock your data-source - MongoDB - for the E2E tests purpose. Thanks to using mongo-unit you will be able to perform actions that changes data in your DB, during E2E testing.
Mocking MongoDB#
E2E tests that you have written so far have one serious issue. They use the production database instance. That’s a terrible design. Tests should never touch the production environment. Building the production version of the application for testing is good, but this application has a hardcoded database URL, which is bad. In this lesson, you will fix this issue. Apart from that, you will introduce a test that verifies if the user can add a product to the list of favorites.
Start by installing mongo-unit - a library that mocks MongoDB. Using a mock rather than a localhost MongoDB instance means you don’t need to bother about database state - it’s always the same. To install mongo-unit , type the following command in the terminal:
npm i -D mongo-unit
Now you need to prepare data that you want mongo-unit to return. Create a new file, e2e/testData.js , and add the following code:
const mongodb = require('mongodb');

module.exports = {
  products: [
    {
      _id: mongodb.ObjectId('5ed3bbefaf1c4c0e81d9b400'),
      name: 'product1',
      price: 2.4,
      description: 'Lorem ipsum.',
      image: 'juice',
    },
    {
      _id: mongodb.ObjectId('5ed3bbefaf1c4c0e81d9b401'),
      name: 'product2',
      price: 0.5,
      description: 'Lorem ipsum.',
      image: 'tomato',
    },
  ],
  users: [
    {
      _id: mongodb.ObjectId('5ed3bbefaf1c4c0e81d9b400'),
      email: 'name@email.com',
      password:
        'c70b5dd9ebfb6f51d09d4132b7170c9d20750a7852f00680f65658f0310e810056e6763c34c9a00b0e940076f54495c169fc2302cceb312039271c43469507dc',
      favorite: [],
    },
  ],
};
Configuring Protractor#
The next step is to modify the Protractor configuration that is defined in e2e/protractor.conf.js . First of all, you need to introduce mongo-unit , child_process , and path :
const mongoUnit = require("mongo-unit");
const childProcess = require("child_process");
const path = require("path");
You also need to set up a variable to hold a reference to the process that you are going to launch later:
let backEndProcess;
And function, that you will use to delay the promise resolve:
function delay(timeout) {
  return () => {
    new Promise((resolve) => {
      setTimeout(resolve, timeout * 1000);
    });
  };
}
Now modify the onPrepare() method to instantiate mongo-unit and launch a Node.js instance with the application that you’re going to test. Add the following return statement to it:
onPrepare() {
    require("ts-node").register({
      project: require("path").join(__dirname, "./tsconfig.json"),
    });
    jasmine.getEnv().addReporter(
      new SpecReporter({
        spec: {
          displayStacktrace: StacktraceOption.PRETTY,
        },
      })
    );

    return mongoUnit
      .start({ dbName: "cluster0" })
      .then((testMongoUrl) => {
        process.env.MONGO_URL = testMongoUrl;
      })
      .then(() => {
        const testData = require("./testData.js");
        mongoUnit.initDb(process.env.MONGO_URL, testData);
      })
      .then(() => {
        const distFolder = path.join(
          process.cwd(),
          "dist/my-universal-app/server"
        );
        backEndProcess = childProcess.fork(distFolder + "/main.js");
      })
      .then(delay(10));
  },
The last step is to introduce the onComplete() method to shut down the Node.js instance that you’ve launched in onPrepare() :
onComplete() {
  backEndProcess.kill("SIGHUP");
},
Your configuration file should now look like the following:
// @ts-check
// Protractor configuration file, see link for more information
// https://github.com/angular/protractor/blob/master/lib/config.ts
Summary
In this course module, you’ve learned how to test your Angular Universal application. You’ve written both unit tests and end-to-end tests.
Summary#
The code you’ve built thus far is available for download here. Once you download it, remember to install the project using the npm install command inside the project directory.
Module Overview
In this module, you’ll learn how to adjust the Angular application to be pre-renderable. Such prepared application can be deployed on static hosting like GitHub pages and still be SEO friendly! You will feed your application with data retrieved from MongoDB during the prerendering process.
Prerendering#
The code of the application built in the previous module is available for download here. Once you download it, remember to install the project using the npm install command inside the project directory.
Prerendering Angular application
What is prerendering and how Angular Universal supports it? This lesson will answer that questio and show you what steps you need to take, to make your application prerenderable.
Prerendering#
You’ve already added the script to run pre-rendering of your application by executing the ng add @nguniversal/express-engine schematics. The problem is that it’s not working with more sophisticated applications. Try to run it:
npm run prerender
As you can see, you’ve run into several issues. Some dependencies are missing in the Dependency Injection mechanism:
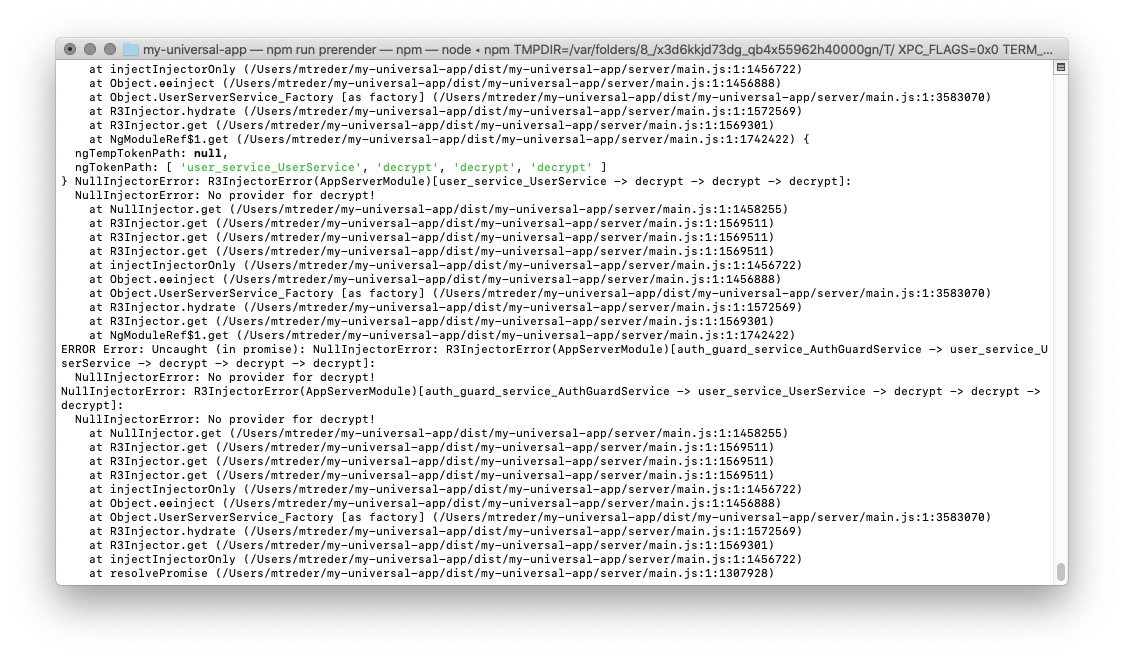
Terminate the rendering process.
The point is that the pre-rendering mechanism does not launch your application through the server.ts file; it does not even launch the server. Because of that, providers passed to the ngExpressEngine function are not applied. You need to provide them inside the src/app/app.server.module.ts file. Add the following imports statements at the top of this file:
import { REQUEST, RESPONSE } from '@nguniversal/express-engine/tokens';
import { dbClient } from '../../api';
And provide services and tokens that are missing:
providers: [
  {
    provide: ProductsService,
    useClass: ProductsServerService,
  },
  { provide: UserService, useClass: UserServerService },
  { provide: 'decrypt', useValue: (param) => 'noop' },
  { provide: 'addToFavorites', useValue: (param) => 'noop' },
  { provide: 'authentication', useValue: (param) => 'noop' },
  { provide: 'dbConnection', useValue: dbClient },
  {
    provide: REQUEST,
    useValue: {
      headers: {
        cookie: null,
      },
    },
  },
  {
    provide: RESPONSE,
    useValue: {
      append: (val1, val2) => {},
      status: (val1) => {}
    },
  },
],
Note that you’ve also provided the REQUEST token used by the I18nService . The pre-rendering mechanism does not act like a browser, and it doesn’t send HTTP requests to the server; because of that, no REQUEST object is provided automatically. You need to do it on your own.
There is one more issue that you’ve faced. The rendering process doesn’t terminate. It’s because of issue in the /node_modules/@nguniversal/builders/src/prerender/render.js file (in @nguniversal v. 10.1.0 ). The problem is that this script doesn’t provide an exit code to the Node.js process:
}))().then().catch();
That can be easily fixed by adding it:
}))().then(()=>process.exit(0)).catch(()=>process.exit(1));
Add the script in the package.json which will ensure that fix is applied. Adjust the prerender script so the check will be performed before any prerendering process:
"prerender:fix-exit":
"sed -i -e \"s/}))().then().catch();/}))().then(()=>process.exit(0)).catch(()=>process.exit(1));/g\" ./node_modules/@nguniversal/builders/src/prerender/render.js",
"prerender":
"npm run prerender:fix-exit && ng run my-universal-app:prerender",
Re-run prerendering:
npm run prerender

It works! But… Angular pre-rendered only part of the routes in the application. The reason is that out of the box Angular analyzes routes declared in your application routing. Notice that routes to specific product landing pages are dynamic (they are parameterized based on the content stored in the database). If you want to add such routes to the pre-rendering process, you need to adjust the angular.json configuration file, and list them in the routes array of the projects.my-universal-app.architect.prerender.options entry:
Summary
After finishing this module, you will know how prerendering works, how to prepare backend for prerendered Angular application and how to utilize MongoDB connection during prerendering process.
Summary#
The code you’ve built thus far is available for download here. Once you download it, remember to install the project using the npm install command inside the project directory.
Comparing --prod Universal & Prerender
That was a bumpy ride, but definetely worth it. In this lesson we will summarize what you’ve learned so far and how ng --prod differentiate from Universal and Prerendered application.
Summary#
That was a long journey, but worth it. At this moment, you know what the biggest Single Page Application pitfall is and how to address it in your Angular application. You’ve learned how to apply Angular Universal to already existing application and how to follow best practices of coding your application server-part, such as:
- Preparing separate logic paths in your application for browser and server runtimes.
- Preparing server-specific Angular services.
- Working with HTTP requests in Angular.
- Transferring data between the server and the browser, along with the application bundle.
- Abandoning long-running API calls that affect server-side rendering performance.
- Using Redis to cache rendered views on the server.
- Testing the server-side code.