SEO
To make your application more accessible for search engines you should provide them with the robots.txt and sitemap.xml files
Robots.txt
Start by informing robots what they should and shouldn’t traverse on your website. This helps avoid unnecessary traffic from them. Create a new file, src/robots.txt, and feed it with data:
User-agent: *
Disallow: /favorites/
Disallow: /login/
Disallow: /assets/
Disallow: /api/

Sitemap: https://my-universal-app.herokuapp.com/sitemap.xml
This configuration will prevent search engine robots from visiting paths that they have no need to traverse:
-
/favorites is only available to authenticated users.
-
/login doesn’t contain any content that is critical from the SEO perspective.
-
/assets is where static files reside (this doesn’t mean that Google won’t index images).
-
/api is where the backend API resides.
The last line is to inform robots where they should look for the sitemap of your application.
Sitemap.xml
A sitemap provides robots an easily accessible list of URLs that are available on your website. To create a sitemap, you can use one of many generators available online, CLI tools, or server-side scripts.
For example, you could use this sitemap-generator package on npm. That said, setting up how you generate your sitemap is beyond the scope of this course so, for now, let’s generate a sitemap using the XML-Sitemaps online generator.
Navigate to https://www.xml-sitemaps.com and place your website URL into the input field at the very top of the page:
Once the generation process is complete, download the sitemap.xml file and place it in your project next to robots.txt.
Adjusting the angular.json file
Add robots.txt and sitemap.xml to the assets section in the angular.json configuration file:
 "architect": {
    "build": {
        "builder": "@angular-devkit/build-angular:browser",
        "options": {
            "outputPath": "dist/my-universal-app/browser",
            "index": "src/index.html",
            "main": "src/main.ts",
            "polyfills": "src/polyfills.ts",
            "tsConfig": "tsconfig.app.json",
            "aot": true,
            "assets": [
                "src/favicon.ico",
                "src/assets",
                "src/robots.txt",
                "src/sitemap.xml"
            ],
The Angular compiler will now copy these two files to the dist/my-universal-app/browser directory, and they will become available under the server.get(".") path that serves static files.
Manipulating title and meta tags
Last but not least, you need to set up and meta-tags of your sub-pages. Generate a service that will be used for this purpose:
ng g s seo --skipTests
Implement SeoService by adding the following code to src/seo.service.ts:
import { Injectable } from '@angular/core';
import { Title, Meta } from '@angular/platform-browser';

@Injectable({
  providedIn: 'root',
})
export class SeoService {
  private titleBase: string = `Angular Universal (work)shop - `;

  constructor(private title: Title, private meta: Meta) {}

  public setTitle(titlePart: string): void {
    this.title.setTitle(this.titleBase + titlePart);
  }

  public setDescription(description: string): void {
    this.meta.updateTag(
      { name: 'description', content: description },
      'name=description'
    );
  }

  public setKeywords(keywords: string[]): void {
    this.meta.updateTag(
      {
        name: 'keywords',
        content: keywords.reduce(
          (prev, curr) => (prev += `, ${curr}`)
        ),
      },
      'name=keywords'
    );
  }
}
SeoService injects the Title and Meta services available in @angular/platform-browser. These services are used in the methods that SeoService exports:
-
setTitle() adjusts the entity for each sub-page.
-
setDescription() is used to manipulate .
-
setKeywords() is used to manipulate .
Now you need to import and use SeoService in several components.
import { SeoService } from '../seo.service';
ProductsListComponent:
  constructor(
    private ps: ProductsService,
    private us: UserService,
    private route: ActivatedRoute,
    private seo: SeoService
  ) {}

  ngOnInit(): void {
    this.route.paramMap
      .pipe(
        filter((params) => params.keys.length > 0),
        mergeMap((params) =>
          this.us.addToFavorites(params.get('pid'))
        )
      )
      .subscribe();
    this.products$ = this.ps.getProducts();
    this.userFavorites$ = this.us.getFavorites();

    this.seo.setTitle('Products list');
    this.seo.setDescription(
      'List of all products available in the shop'
    );
    this.seo.setKeywords(['food', 'drink', 'grocery']);
  }
ProductDetailsComponent:
  constructor(
    private route: ActivatedRoute,
    private ps: ProductsService,
    private us: UserService,
    private i18n: I18nService,
    private seo: SeoService
  ) {}

  ngOnInit(): void {
    if (this.product) {
      this.product$ = of(this.product);
    } else {
      this.product$ = this.us.getFavorites().pipe(
        mergeMap((favorites) => {
          return this.route.paramMap.pipe(
            switchMap((params: ParamMap) =>
              this.ps.getProduct(params.get('id'))
            ),
            tap((product) => {
              this.isFavorite = favorites.includes(
                product.id
              );
              this.seo.setTitle(product.name);
              this.seo.setDescription(product.description);
              this.seo.setKeywords([
                product.name,
                'food',
                'drink',
                'grocery',
              ]);
            })
          );
        })
      );
    }
  }
LoginComponent:
  constructor(
    private us: UserService,
    private seo: SeoService
  ) {}

  ngOnInit(): void {
    this.seo.setTitle('Login page');
  }
FavoritesComponent:
  constructor(
    private us: UserService,
    private ps: ProductsService,
    private seo: SeoService
  ) {}

  ngOnInit(): void {
    this.favorite$ = this.us.getFavorites().pipe(
      mergeMap((favoriteProducts) => {
        return this.ps
          .getProducts()
          .pipe(
            map((allProducts) =>
              allProducts.filter((product) =>
                favoriteProducts.includes(product.id)
              )
            )
          );
      })
    );
    this.seo.setTitle('Your favorite products');
  }
Notice that you didn’t call setDescription() and setKeywords() in LoginComponent and FavoritesComponent. The reason is simple: LoginPage has no meaningful content worth indexing, and the content of FavoritesComponent depends on who, if anyone, is authenticated. In both of these components, there is no generic data that would be of interest to search engine crawlers.
Deploying and measuring SEO
Now you are ready to redeploy your application on Heroku:
git add .
git commit . -m "SEO improvements"
git push heroku master
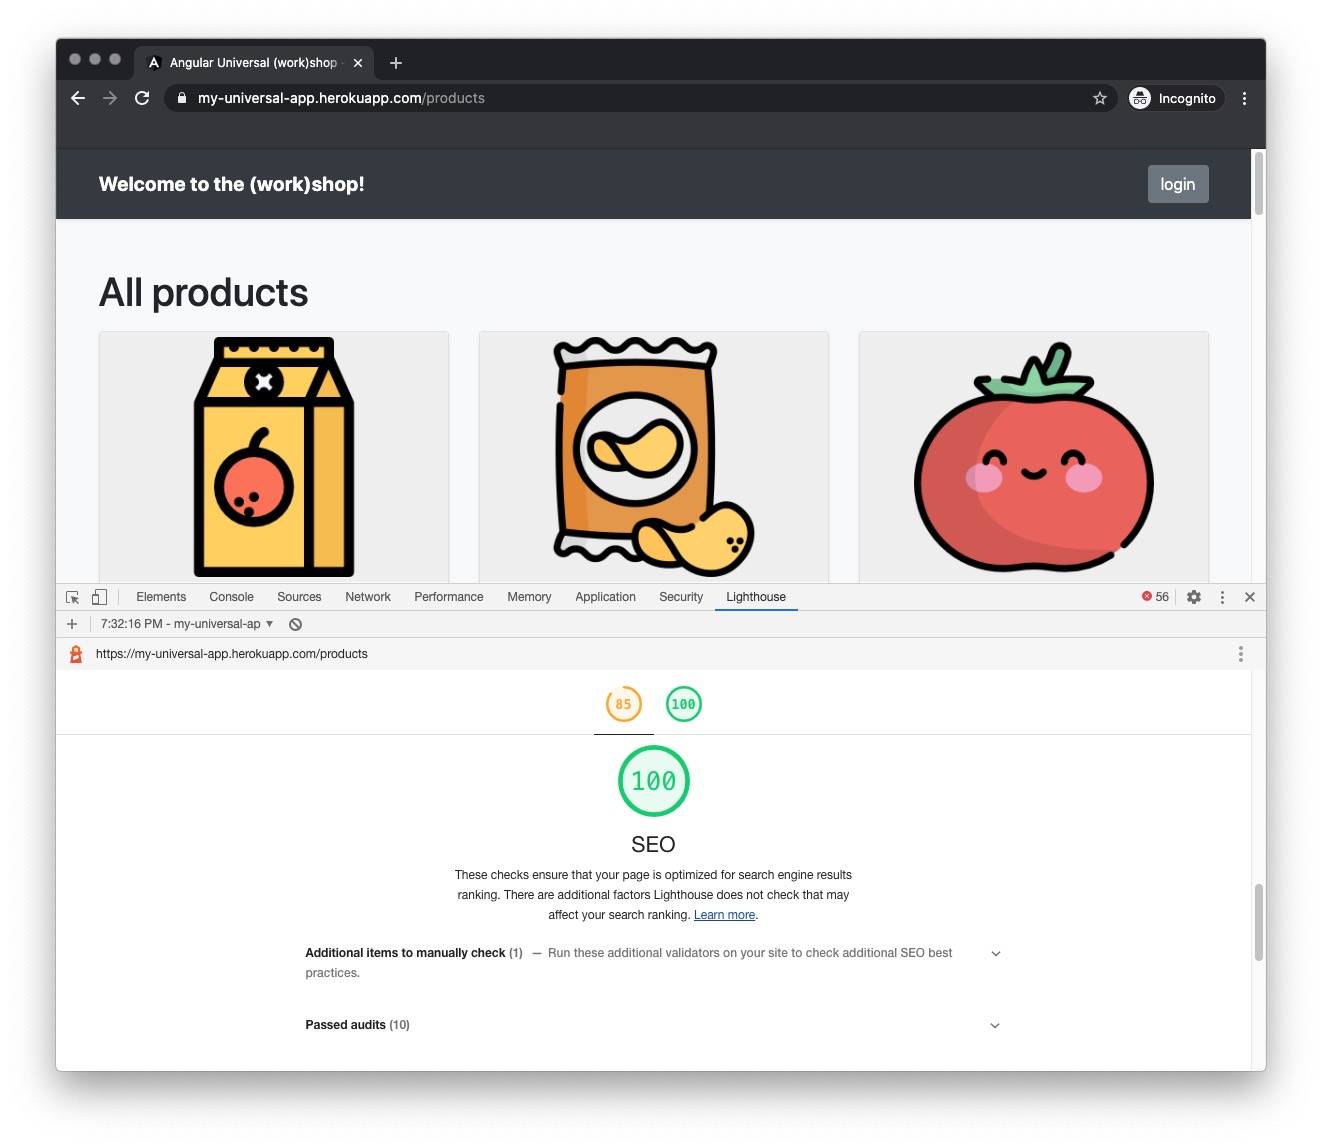
Once the application is built, run a Lighthouse audit against it and enjoy getting 100/100 SEO points! Yay!
Browser Versus Server#
The code of the application built in the previous module is available for download here. Once you download it, remember to install the project using the npm install command inside the project directory.
Where you are#
In the previous module, you’ve applied Angular Universal schematics to a production-ready application. You’ve also learned how to significantly improve Time To First Byte in production environment. Here’s how your application works right now:
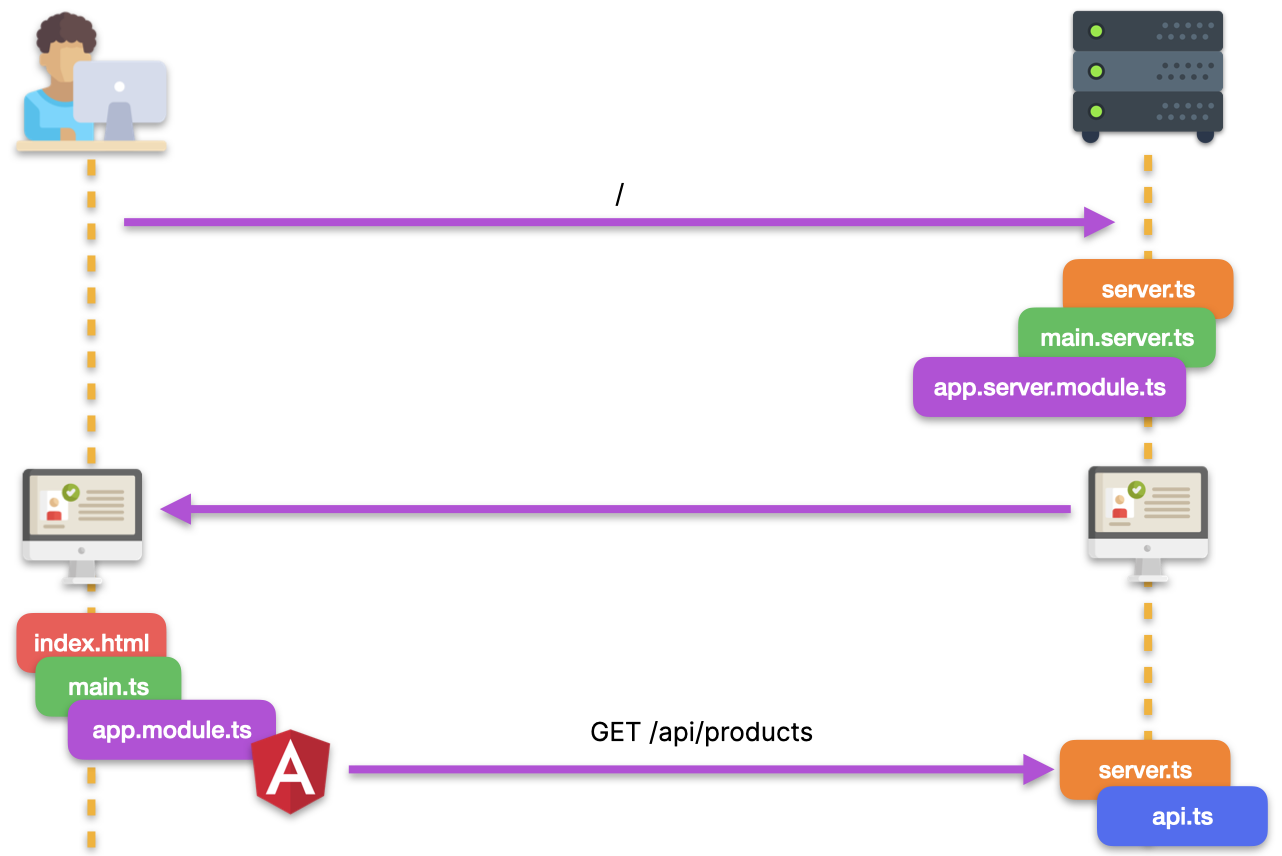
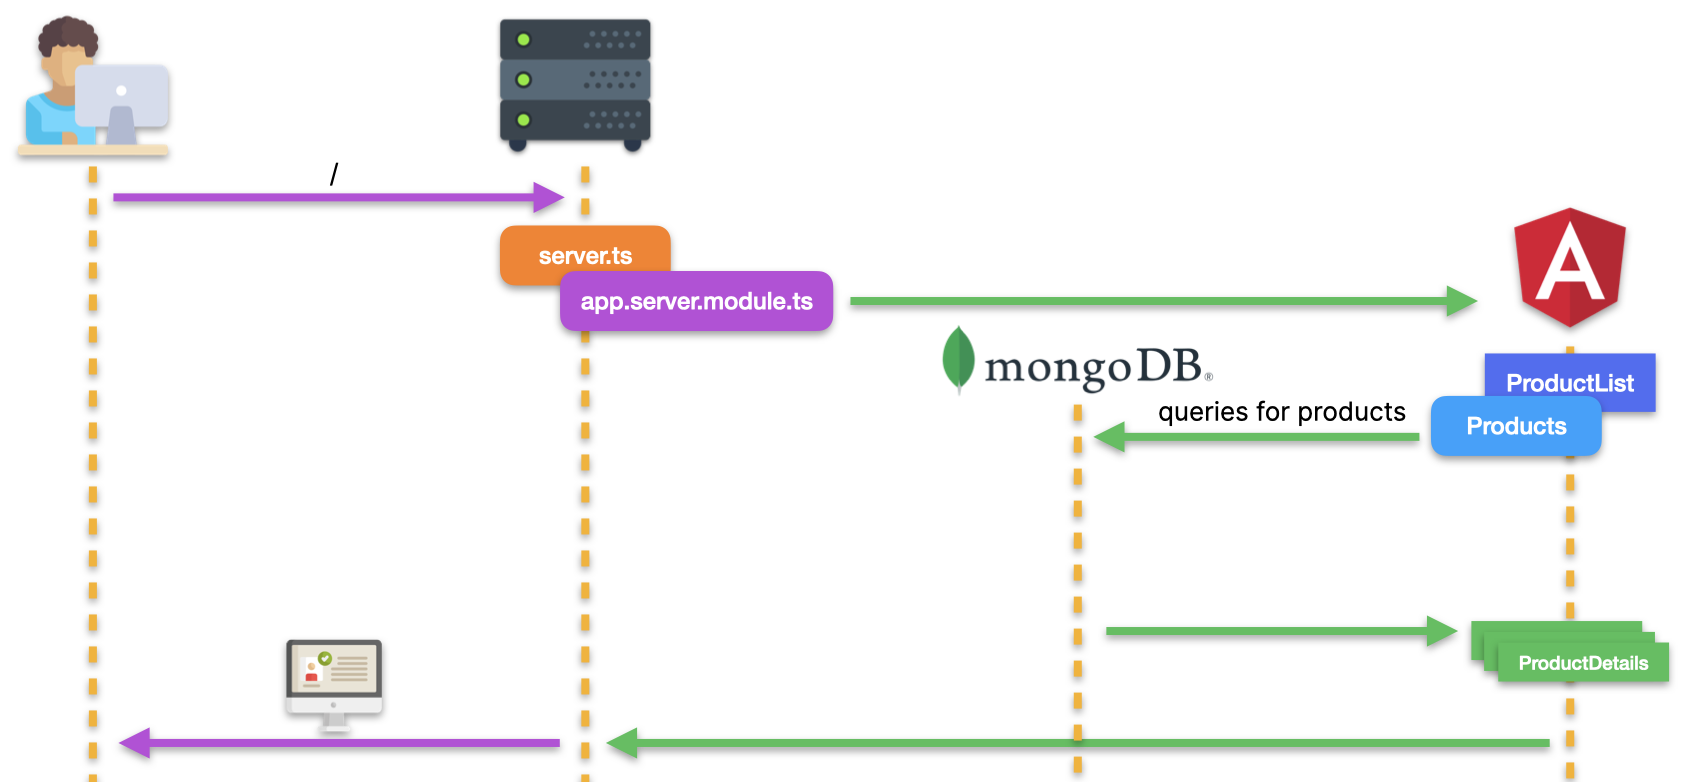
On the one hand, your solution is fully functional. Thanks to Angular Universal, you share the code base between your server-side and browser-side bundles. On the other hand, there is still plenty of room for improvement. Let’s take a look at the detailed server-side flow of the application (purple arrows shows HTTP communication; green arrows shows in-app communication):
- The user navigates to the application’s root path ( / ).
- server.ts recognizes that an Angular route has been invoked, so it bootstraps the rendering process.
-
ProductListComponentretrieves a list of products usingProductsService. -
ProductsServicesends an HTTP request to retrieve the list of products from the /api/products endpoint. - server.ts recognizes the API request and passes it to api.ts .
- api.ts queries MongoDB to retrieve the requested data.
- The list of products is sent back to
ProductsServiceas an HTTP response. - The rendered HTML is sent back to the user.
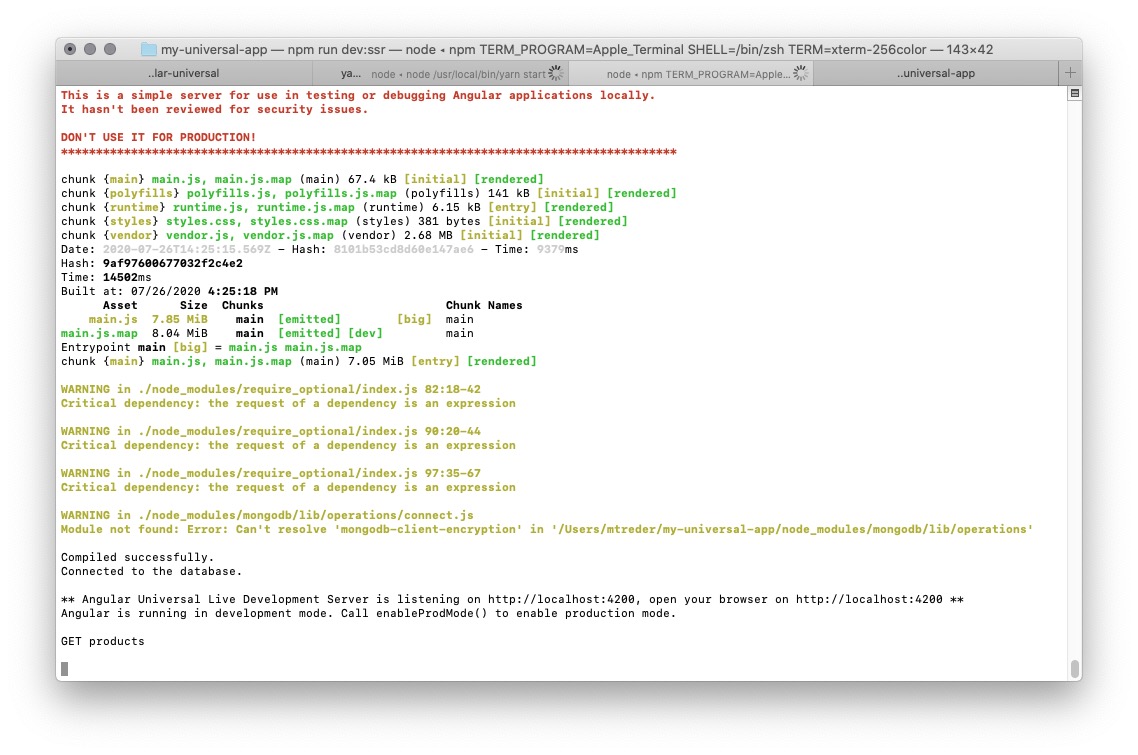
You can observe this behavior by running the application in development mode:
npm run dev:ssr
Then perform a request to http://localhost:4200 using Postman or cUrl:
curl http://localhost:4200
As you can see in the terminal where npm run dev:ssr is running, the application receives a GET request to the /api/products endpoint:
What you will build#
One possible improvement is to retrieve data from the database during the rendering process instead of the HTTP queries described in steps 4-7.
In this course module, you will build a new service called MongoService that will be used to connect with MongoDB and perform queries. In this service, you will utilize a database connection object initialized outside of the Angular sandbox - in the api.ts file. MongoService will be consumed by ProductsServerService and UserServerService , which will be server-side equivalents of ProductsService and UserService .
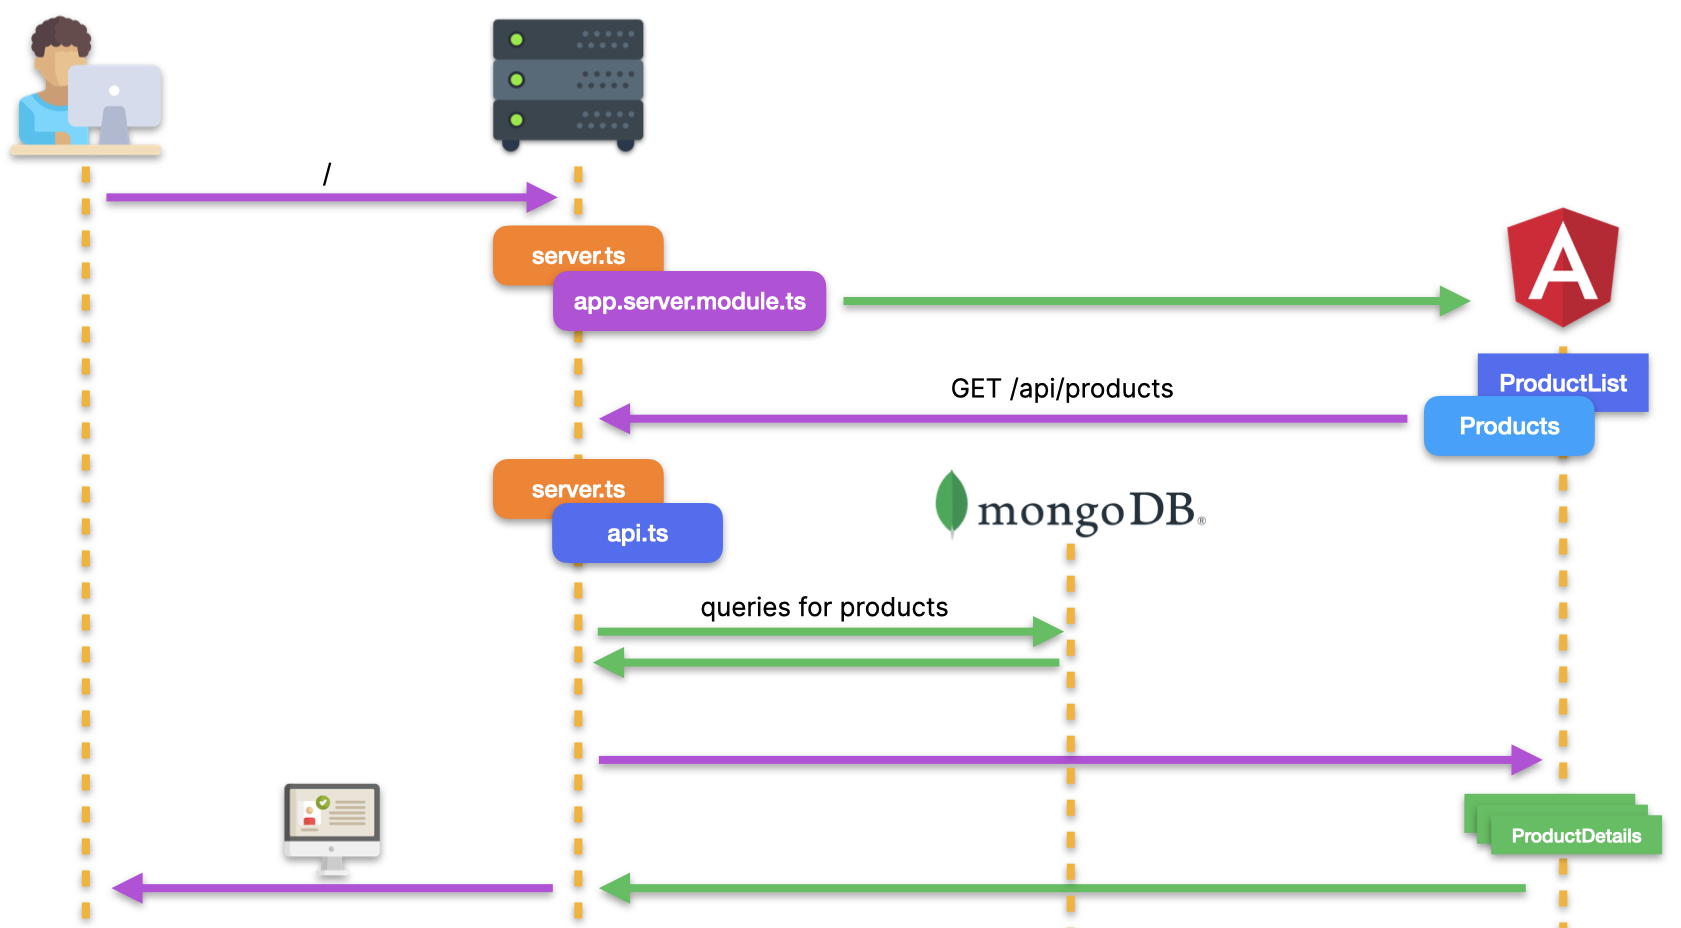
Here’s what the application flow is going to look like after these modifications:
- The user navigates to your application’s root path ( / ).
- server.ts recognizes that an Angular route has been invoked and bootstraps the rendering process.
-
ProductListComponentretrieves a list of products usingProductsServerService. -
ProductsServerServiceretrieves the data from MongoDB usingMongoService. - The rendered HTML is sent back to the user.
Apart from those improvements, you will also enhance your server-side Angular application to accept POST requests so it will became fully functional for users with disabeld JavaScript.
What you will learn#
After finishing this module, you will know:
- What are potential security breaches that you need to avoid when building Angular Universal applications.
- How to pass server secrets into your Angular application.
- How to pass function references to your Angular application.
- How to use Angular’s Dependency Injection mechanism to provide different service implementations for different Angular execution environments.
- How to make your Angular application fully funcional even for users with disabled Javascript
MongoService#
Generating the service#
Start your work by generating a new service that will be used to connect to MongoDB:
ng g s mongo --skipTests
To apply the Don’t Repeat Yourself (DRY) principle, you will utilize this service in the api.ts file. In other words, you will move the database querying logic from api.ts to MongoService . A naive implementation could look like this:
import { Injectable } from '@angular/core';

@Injectable({
  providedIn: 'root',
})
export class MongoService {
  private dbUrl =
    'mongodb+srv://angular-universal:abcd1234@cluster0.bcfzj.mongodb.net';

  constructor() {
    //connect to database
  }

  public async retrieveFromDb(
    collectionName,
    project = {},
    query = {}
  ): Promise<any[]> {
    return [];
  }
}
The prepared class can now be imported into api.ts instead of the current MongoDB-related logic. Unfortunately, this is not trivial. Try to inject the prepared service anywhere in your application, such as ProductsService :
import { MongoService } from './mongo.service';

@Injectable({
  providedIn: 'root',
})
export class ProductsService {
  private API_URL = `${environment.apiBasePath}/api`;

  constructor(
    private httpClient: HttpClient,
    private mongoService: MongoService
  ) {}
Now run the Angular compiler:
npm run build:ssr
Take a look at the content of the dist/browser/main**.js* bundle that is sent to the end user’s browser:

That’s a severe security breach: you disclose your database connection string to every user of your application!
Angular Universal is an excellent solution as it enables sharing the code base between browser and server bundles. While it’s a great way to avoid duplicating business logic in your project, it might lead to serious security breaches and compromising sensitive data such as database connection strings!
Using the isPlatformBrowser() and isPlatformServer() methods doesn’t help here because the same code base is still used on both platforms. This is how the isPlatformXXX() method used in I18nService is translated to a JavaScript bundle:
this.userLang=function(e){
 return"browser"===e
 }
 (this.platformId)?window.navigator.language:(
 this.request.headers["accept-language"]||"").substring(0,5)}
As you can see, the server-specific code branch is still present in the browser bundle.
Moreover, the connection string may change in the future. Do you want to rebuild your application because a variable value has changed? You probably don’t.
Providing secrets to server-side Angular#
Fortunately, ngExpressEngine that we use to render Angular views can provide additional injection tokens to the Angular application. You could provide Angular with a connection string and use it to set up a database connection. However, that would lead you to another pitfall: a database connection would be set up every time a user accesses the application. Instead, it would be better to provide Angular with an already instantiated connection and inject it into MongoService using Dependency Injection.
First, let’s export the dbClient object from api.ts :
export const dbClient = MongoClient.connect(dbUrl, {
  useUnifiedTopology: true,
}).then((connection) => connection.db('cluster0'));
Next, adjust the statement that imports from api.ts into server.ts :
import { api, dbClient } from './api';
Now you can provide the dbClient object to server-side Angular using Dependency Injection, similar to how you would do in a regular Angular module:
server.engine(
  'html',
  ngExpressEngine({
    bootstrap: AppServerModule,
    providers: [
      { provide: 'dbConnection', useValue: dbClient },
    ],
  })
);
Retrieving secrets in Angular#
Injecting the dbClient object into MongoService allows you to move the retrieveFromDB() method from api.ts to src/mongo.service.ts :
import { Injectable, Inject } from '@angular/core';

@Injectable({
  providedIn: 'root',
})
export class MongoService {
  constructor(
    @Inject('dbConnection') private dbConnection
  ) {}

  public async retrieveFromDb<T>(
    collectionName,
    project = {},
    query = {}
  ): Promise<T[]> {
    const intervalId = setInterval(() => {}, 1000); //https://github.com/angular/universal-starter/issues/181
    project['_id'] = 0;
    const db = await this.dbConnection;
    return new Promise((resolve) => {
      db.collection(collectionName)
        .aggregate([
          { $match: query },
          { $addFields: { id: { $toString: '$_id' } } },
          { $project: project },
        ])
        .toArray((err, objects) => {
          resolve(objects);
          clearInterval(intervalId);
        });
    });
  }
}
Notice that the code above slightly changes the implementation of retrieveFromDB() . From now on, you will need to provide the generic type of the expected output (i.e., User ).
There is one more change in this method’s implementation. Because of an issue in Angular Universal, you must introduce a setInterval to force Angular to wait for the async function to resolve.
Using an Angular service outside of Angular#
Since MongoService is a regular TypeScript class, its use is not limited to the Angular application.
Import and instantiate MongoService in api.ts :
import { MongoService } from './src/app/mongo.service';
/*
 establishing db connection
*/
const mongoService = new MongoService(dbClient);
Change all occurrences of await retrieveFromDb() to await mongoService.retrieveFromDb<Product>() or await mongoService.retrieveFromDb<User>() . After making these changes, your api.ts file should look like the following:
import * as express from 'express';
import * as cors from 'cors';
import * as bodyParser from 'body-parser';
import * as cookieParser from 'cookie-parser';
import { ObjectId, MongoClient } from 'mongodb';
import * as crypto from 'crypto';
import * as fs from 'fs';
import { join } from 'path';

import { MongoService } from './src/app/mongo.service';
import { Product } from 'src/model/product.model';
import { User } from 'src/model/user.model';

export const api = express.Router();

api.use(
  cors({
    origin: true,
    credentials: true,
  })
);
api.use(bodyParser.json());
api.use(cookieParser());

const dbUrl =
  'mongodb+srv://angular-universal:abcd1234@cluster0.bcfzj.mongodb.net';
export const dbClient = MongoClient.connect(dbUrl, {
  useUnifiedTopology: true,
}).then((connection) => connection.db('cluster0'));

dbClient.then(() => {
  console.log('Connected to the database.');
});

const mongoService = new MongoService(dbClient);

api.get('/products', async (req, res) => {
  console.log('GET products');
  const products = await mongoService.retrieveFromDb<
    Product
  >('products', { description: 0 });
  res.send(products);
});

api.get('/products/:id', async (req, res) => {
  const products = await mongoService.retrieveFromDb<
    Product
  >('products', {}, { _id: ObjectId(req.params.id) });

  if (products.length == 0) {
    res.sendStatus(404);
  } else {
    res.send(products[0]);
  }
});

const key = fs.readFileSync(
  join(process.cwd(), 'privkey.pem'),
  'utf8'
);

function encrypt(toEncrypt: string): string {
  const buffer = Buffer.from(toEncrypt);
  const encrypted = crypto.privateEncrypt(key, buffer);
  return encrypted.toString('base64');
}

function decrypt(toDecrypt: string): string {
  const buffer = Buffer.from(toDecrypt, 'base64');
  const decrypted = crypto.publicDecrypt(key, buffer);
  return decrypted.toString('utf8');
}

const hash = crypto.createHash('sha512');
api.post('/login', async (req, res) => {
  const email = req.body.email;
  const password = hash
    .update(req.body.password)
    .digest('hex');
  const foundUsers = await mongoService.retrieveFromDb<
    User
  >(
    'users',
    { password: 0 },
    { email: email, password: password }
  );

  if (foundUsers.length == 0) {
    res.sendStatus(401);
  } else {
    const user = foundUsers[0];
    res.cookie('loggedIn', encrypt(`${user.id}`), {
      maxAge: 600 * 1000,
      httpOnly: true,
    });

    delete user.id;
    res.send(user);
  }
});

api.get('/isLoggedIn', async (req, res) => {
  if (req.cookies.loggedIn) {
    const userId = decrypt(req.cookies.loggedIn);
    const foundUsers = await mongoService.retrieveFromDb<
      User
    >(
      'users',
      { _id: 0, password: 0 },
      { _id: ObjectId(userId) }
    );

    const user = foundUsers[0];
    res.send(user);
  } else {
    res.sendStatus(401);
  }
});

api.post('/favorites/:id', async (req, res) => {
  const userId = decrypt(req.cookies.loggedIn);

  const newFavorite = req.params.id;

  const user = await mongoService.retrieveFromDb<User>(
    'users',
    { _id: 0, password: 0 },
    { _id: ObjectId(userId) }
  );
  const currentFavorites = user[0].favorite;

  if (!currentFavorites.includes(newFavorite)) {
    currentFavorites.push(newFavorite);
    await (await dbClient)
      .collection('users')
      .updateOne(
        { _id: ObjectId(userId) },
        { $set: { favorite: currentFavorites } }
      );
    res.status(202);
  }
  res.send(user[0]);
});
Because the backend uses userId inside the POST /login method, you also need to adjust the user model in src/user.model.ts :
export interface User {
  id?: number;
  email: string;
  favorite: string[];
}
Providing Angular With Server-Specific Service Implementation#
It’s time to consume MongoService . You could do this using the isPlatformServer() and isPlatformBrowowser() methods that you already know. The problem with this solution is that server-specific code is included in the main bundle that is shipped to the browser. In other words, this solution increases the size of the application delivered to the end user.
Fortunately, another technique is available. You are going to make use of AppServerModule and provide the implementation of the ProductsService interface that is specific to the server runtime.
Implementing the server-specific service#
Generate a new service using the following command:
ng g s products-server --skipTests
Copy the following service logic to src/app/products-server.service.ts :
import { Injectable } from '@angular/core';
import { Observable } from 'rxjs';
import { Product } from 'src/model/product.model';
import { MongoService } from './mongo.service';
import { ObjectId } from 'mongodb';
import { from } from 'rxjs';
import { map } from 'rxjs/operators';

@Injectable({
  providedIn: 'root',
})
export class ProductsServerService {
  constructor(private ms: MongoService) {}

  public getProducts(): Observable<Product[]> {
    return from(
      this.ms.retrieveFromDb<Product>('products', {
        description: 0,
      })
    );
  }

  public getProduct(
    productId: string
  ): Observable<Product> {
    return from(
      this.ms.retrieveFromDb<Product>(
        'products',
        {},
        { _id: ObjectId(productId) }
      )
    ).pipe(map((products) => products[0]));
  }
}
The code above introduces ProductsServerService that injects MongoService . This service is used in two methods of the class: getProducts() and getProduct(productId: string) . These two methods have their equivalents in ProductsService , but the implementation differs: while ProductsService retrieves data via HTTP calls, ProductsServerService does it by querying the database.
Providing the service#
ProductsServerService is ready to use. You don’t want to inject it in components or other services (like you are doing with ProductsService ). Instead, you want components and services to use the ProductsServerService implementation of ProductsService whenever the application executes on the server to render HTML. To do this, you need to provide that implementation in AppServerModule (which runs instead of AppModule when Angular is executed in Node.js) and specify that you want to use it whenever ProductsService is requested.
Go to AppServerModule inside src/app/app.server.module.ts , import the services and provide them using the {provide: useClass:} technique:
import { NgModule } from '@angular/core';
import { ServerModule } from '@angular/platform-server';

import { AppModule } from './app.module';
import { AppComponent } from './app.component';
import { ProductsService } from './products.service';
import { ProductsServerService } from './products-server.service';

@NgModule({
  imports: [
    AppModule,
    ServerModule,
  ],
  bootstrap: [AppComponent],
  providers: [
    {provide: ProductsService, useClass: ProductsServerService}
  ]
})
export class AppServerModule {}
Testing the service#
It’s time to verify that Angular injects a proper implementation of the service depending on the environment. Perform a request to http://localhost:4200 using Postman or ( curl http://localhost:4200 ), and verify that nothing appears in the terminal window where your application is running - in other words, make sure that this method from api.ts has not been executed:
api.get('/products', async (req, res) => {
  console.log('GET products');
  const products = await mongoService.retrieveFromDb<
    Product
  >('products', { description: 0 });
  res.send(products);
});
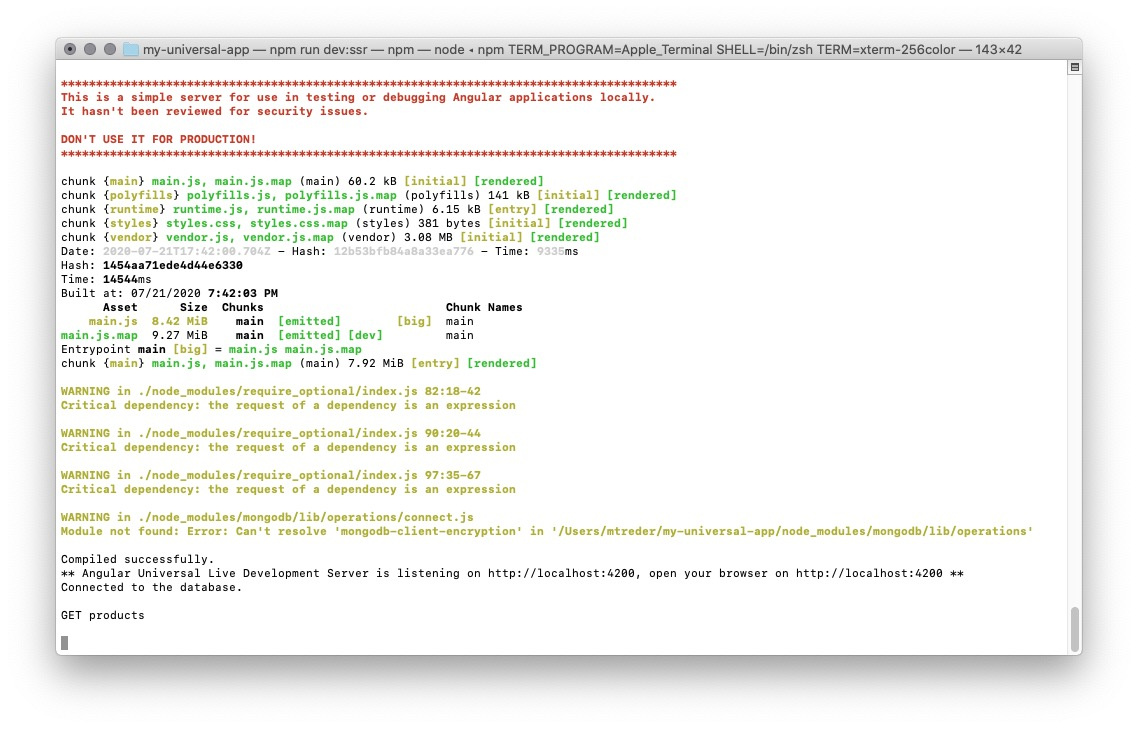
Navigate to your application using the browser, and ensure that the browser-side implementation is injected properly and works as expected. After that you should see the GET products entry in the terminal where your application is running:
Working With Cookies in Angular#
Your application won’t be only visited by anonymous users. Some users could navigate directly to the /favorites path to see the list of their favorite products. In this case, even if the user is authenticated, server-side Angular won’t recognize them as such and redirect them to the login page. Moreover, the content of the / path depends on the favorites list of the authenticated user.
Navigate to the application in the browser, authenticate (login: name@email.com , password: abc123 ), and add a couple of products to the list of favorites.
Now click My Favorite Products and reload the page. Server-side Angular will render the login page although you clearly have the authentication cookie!
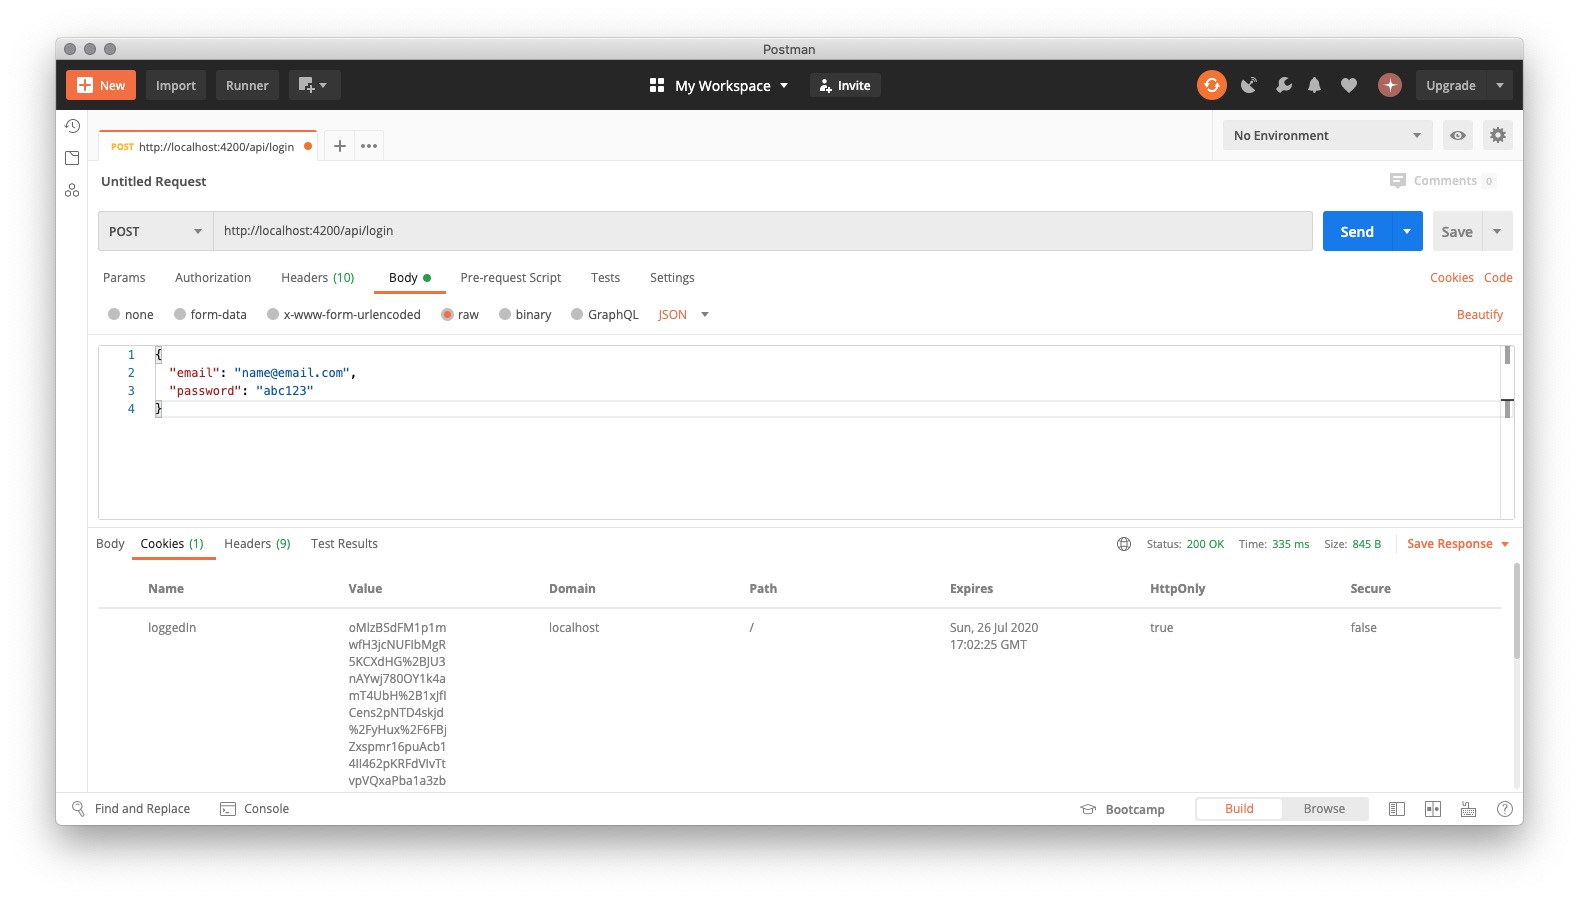
Now switch to Postman and obtain the authentication cookie by sending a POST request to /api/login with the following body:
{
 "email": "name@email.com",
 "password": "abc123"
}
Once you receive a response, Postman saves the cookie, and it’s used with further requests as long as its expires value is valid.
Perform a GET request to / . As you can see, all products can be added to favorites.
You can perform that test using cURL as well:
curl -i --header "Content-Type: application/json" \
--request POST \
--data '{"email": "name@email.com","password": "abc123"}' \
--cookie-jar cookie.txt \
http://localhost:4200/api/login

curl -i --cookie cookie.txt \
http://localhost:4200
To address the problem described above, you need to create UserServerService similar to the existing ProductsServerService .
Providing a function reference to Angular#
First things first, let’s generate a new service with the following CLI command:
ng g s user-server --skipTests
In this service, you’re going to read cookie content and retrieve user data from the database. The cookie is encrypted with a key stored on the server. It would be best if you had a function that decrypts the cookie to read its content. You will obtain it in the same way you obtained the dbConnection object - by injecting it from server.ts to Angular.
Export the decrypt() function from api.ts :
export function decrypt(toDecrypt: string): string {
  const buffer = Buffer.from(toDecrypt, 'base64');
  const decrypted = crypto.publicDecrypt(key, buffer);
  return decrypted.toString('utf8');
}
Import it into server.ts and provide to Angular in the ngExpressEngine() call:
import { api, dbClient, decrypt } from './api';

/*
 other code
*/

server.engine(
  'html',
  ngExpressEngine({
    bootstrap: AppServerModule,
    providers: [
      { provide: 'dbConnection', useValue: dbClient },
      { provide: 'decrypt', useValue: decrypt },
    ],
  })
);
You can now inject this function in the constructor of UserServerService along with other services:
import { Injectable, Inject } from '@angular/core';
import { MongoService } from './mongo.service';
import { REQUEST } from '@nguniversal/express-engine/tokens';
import { Request } from 'express';

@Injectable({
  providedIn: 'root',
})
export class UserServerService {
  constructor(
    @Inject('decrypt') private decrypt: any,
    private ms: MongoService,
    @Inject(REQUEST) private request: Request
  ) {}
Getting cookie content in Angular#
You now have the decrypt() method, MongoService , and the request object. Everything is ready to obtain a user ID from the request cookie and retrieve their data from the database. Start by adding the import statements that you are going to use in this part:
import { Observable, from, of } from 'rxjs';
import { User } from 'src/model/user.model';
import { map, mergeMap } from 'rxjs/operators';
import { ObjectId } from 'mongodb';
Unfortunately, the request object you have in Angular is not equivalent to what you have in Express.js ( server.ts ). There is no .cookies field to easily retrieve a cookie’s names and values. You have request headers though, so with a little bit of play, you can build up that object yourself.
Cookies are sent by the browser as an HTTP header called cookie . This header contains cookie names and values delimited by the ; character: cookieName=value;cookie2=value2;andSoON=andSoOn .
Let’s implement the getCookie(name) method that retrieves the value of that header, splits it by the ; delimiter, and returns the value of a particular cookie specified by the function’s parameter:
private getCookie(name: string): string {
  const cookies = {};
  if (this.request.headers.cookie) {
    const decoded = decodeURIComponent(
      this.request.headers.cookie
    );
    decoded.split(';').forEach((cookie) => {
      const parts = cookie.split('=');
      cookies[parts[0].trim()] = (parts[1] || '').trim();
    });
  }
  return cookies[name];
}
Use that function to set up the loggedInCookie object field:
private loggedInCookie = this.getCookie('loggedIn');
Now, to create an observable representing the logged-in user’s ID, you can either decrypt the ID value if it’s present or return null :
private userId = of(
  this.loggedInCookie
    ? this.decrypt(this.loggedInCookie)
    : null
);
Once you have userId , you can use it to build an observable representing the currently logged-in user:
private currentUser$: Observable<User> = this.userId.pipe(
  mergeMap((userId) => {
    if (userId == null) {
      return of(null);
    } else {
      return from(
        this.ms.retrieveFromDb<User>(
          'users',
          { _id: 0 },
          { _id: new ObjectId(userId) }
        )
      ).pipe(map((users) => users[0]));
    }
  })
);
The code above creates the currentUser$ observable by piping userId$ to the mergeMap() operator. Within mergeMap() , you retrieve the given user’s data from MongoDB or return null if userId is not present (which means the user is not authenticated).
Now you’re ready to implement other methods in this service, which should be similar to their counterparts in UserService :
  public isLoggedIn(): Observable<boolean> {
    return this.currentUser$.pipe(map((user) => !!user));
  }

  public getFavorites(): Observable<string[]> {
    return this.currentUser$.pipe(
      map((user) => {
        if (user) {
          return user.favorite;
        } else {
          return [];
        }
      })
    );
  }

  public setRedirectUrl(url: string) {
    // TO BE IMPLEMENTED
  }
The finished UserServerService implementation should look like the following:
import { Injectable, Inject } from '@angular/core';
import { MongoService } from './mongo.service';
import { REQUEST } from '@nguniversal/express-engine/tokens';
import { Request } from 'express';
import { Observable, from, of } from 'rxjs';
import { User } from 'src/model/user.model';
import { map, mergeMap } from 'rxjs/operators';
import { ObjectId } from 'mongodb';

@Injectable({
  providedIn: 'root',
})
export class UserServerService {
  private loggedInCookie = this.getCookie('loggedIn');

  private userId = of(
    this.loggedInCookie
      ? this.decrypt(this.loggedInCookie)
      : null
  );

  private currentUser$: Observable<User> = this.userId.pipe(
    mergeMap((userId) => {
      if (userId == null) {
        return of(null);
      } else {
        return from(
          this.ms.retrieveFromDb<User>(
            'users',
            { _id: 0 },
            { _id: new ObjectId(userId) }
          )
        ).pipe(map((users) => users[0]));
      }
    })
  );

  constructor(
    @Inject('decrypt') private decrypt: any,
    private ms: MongoService,
    @Inject(REQUEST) private request: Request
  ) {}

  private getCookie(name: string): string {
    const cookies = {};
    if (this.request.headers.cookie) {
      const decoded = decodeURIComponent(
        this.request.headers.cookie
      );
      decoded.split(';').forEach((cookie) => {
        const parts = cookie.split('=');
        cookies[parts[0].trim()] = (parts[1] || '').trim();
      });
    }
    return cookies[name];
  }

  public isLoggedIn(): Observable<boolean> {
    return this.currentUser$.pipe(map((user) => !!user));
  }

  public getFavorites(): Observable<string[]> {
    return this.currentUser$.pipe(
      map((user) => {
        if (user) {
          return user.favorite;
        } else {
          return [];
        }
      })
    );
  }

  public setRedirectUrl(url: string) {
    // TO BE IMPLEMENTED
  }
}
Testing the service#
Provide this service in AppServerModule :
import { NgModule } from '@angular/core';
import { ServerModule } from '@angular/platform-server';

import { AppModule } from './app.module';
import { AppComponent } from './app.component';
import { ProductsService } from './products.service';
import { ProductsServerService } from './products-server.service';
import { UserService } from './user.service';
import { UserServerService } from './user-server.service';

@NgModule({
  imports: [AppModule, ServerModule],
  bootstrap: [AppComponent],
  providers: [
    {
      provide: ProductsService,
      useClass: ProductsServerService,
    },
    { provide: UserService, useClass: UserServerService },
  ],
})
export class AppServerModule {}
Perform a POST request to /login using Postman once more, and then verify that the service works correctly by performing a GET request to /favorites . Now you should see the list of products that the currently logged-in user has marked as favorite:

Working With Cookies in Angular#
Armed with the knowledge about reading cookies and dealing with HTTP requests inside Angular Sandbox, you can enhance your application to provide the full functionality for users who have disabled JavaScript in their browsers.
User login#
Let’s start from adjusting the login page functionality. First step is to add action and method attributes to the <form> entity; next you should add name attribute to both form fields. Edit src/app/login/login.component.ts file:
  template: `
    <form [formGroup]="loginForm" (ngSubmit)="logIn()" action="/login" method="post">
      <div class="mb-3">
        <label for="email">Email</label>
        <input
          name="email"
          type="email"
          class="form-control"
          id="email"
          placeholder="you@example.com"
          formControlName="email"
        />
      </div>
      <div class="mb-3">
        <label for="password">Password</label>
        <input
          name="password"
          type="password"
          class="form-control"
          id="password"
          formControlName="password"
        />
      </div>

      <button class="btn btn-primary btn-lg btn-block" type="submit">
        Log in
      </button>
    </form>
  `,
Now you need to handle form-data on the back-end side ( api.ts ). Replace the existing api.post('/login', () => {}) entry with the following code:
const hash = crypto.createHash('sha512');
export async function authenticate(email:string, password:string, res) {
  const foundUsers = await mongoService.retrieveFromDb<User>(
    'users',
    { password: 0 },
    { email: email, password: hash.update(password).digest('hex') }
  );

  if (foundUsers.length == 1) {
    const user = foundUsers[0];
    res.cookie('loggedIn', encrypt(`${user.id}`), {
      maxAge: 600 * 1000,
      httpOnly: true,
    });
    return user;
  }
  return null;
}

api.post('/login', async (req, res) => {
  const loggedUser = await authenticate(req.body.email, req.body.password, res);

  if (!loggedUser) {
    res.sendStatus(401);
  } else {
    delete loggedUser.id;
    res.send(loggedUser);
  }
});
Since now, verifying user credentials and setting up cookie actions are delegated to the authenticate function. Thanks to that, you can inject a reference to this function into the Angular Sandbox and reuse it there. Import authenticate function inside the server.ts file:
import { api, dbClient, decrypt, authenticate } from './api';
and register new route which handles submitted form and provides the authenticate method to the Angular sandbox:
  server.post('/login', (req, res) => {
    res.render(indexHtml, {
      req,
      providers: [
        { provide: APP_BASE_HREF, useValue: req.baseUrl },
        { provide: 'authentication', useValue: authenticate}
      ],
    });
  })
You need also to enable Node.js application to parse form data, add the following ipmort in the server.ts :
import * as bodyParser from 'body-parser';
and apply it on the server object:
server.use(bodyParser.urlencoded({extended: true}));
Inject the authenticate method inside src/app/user-server.service.ts together with the RESPONSE token from the @nguniversal/express-engine/tokens :
import { Injectable, Inject, Optional } from '@angular/core';
import { REQUEST, RESPONSE } from '@nguniversal/express-engine/tokens';
import { Request, Response } from 'express';
constructor(
  @Inject('decrypt') private decrypt: any,
  private ms: MongoService,
  @Inject(REQUEST) private request: Request,
  @Inject(RESPONSE) private response: Response,
  @Optional() @Inject('authentication') private authServer: any
) {}
and implement the authentication logic:
  public login(): void {
    const email = this.request.body?.email;
    const password = this.request.body?.password;
    if (email && password) {
      this.authServer(email, password, this.response);

      this.response.append('Location', '/favorites');
      this.response.status(302);
    }
  }
You need to adjust the src/app/user.service.ts so the UserServerSerice still conforms the interface. Simply mark the email and password parameters of the login() method as optional:
  public login(email?: string, password?: string): void {
    this.http
      .post<User>(`${this.API_URL}/login`, {
        email: email,
        password: password,
      })
      .pipe(
        tap((user) => {
          this.currentUser$.next(user);
          if (this.redirectParams) {
            this.router.navigate([this.redirectUrl, this.redirectParams]);
          } else {
            this.router.navigate([this.redirectUrl]);
          }

          this.redirectParams = null;
          this.redirectUrl = '/';
        })
      )
      .subscribe();
  }
Last step is to call login() method inside src/app/login/login.component.ts . Start by importing Inject decorator, PLATFORM_ID injection token from the @angular/core ; and isPlatformServer from @angular/common :
import { Component, Inject, OnInit, PLATFORM_ID } from '@angular/core';
import { isPlatformServer } from '@angular/common';
Now inject the token in the constructor:
constructor(
  private us: UserService,
  private seo: SeoService,
  @Inject(PLATFORM_ID) private platformId: any
) {}
and call login() method from the UserServerService when component is rendered on the server-side:
ngOnInit(): void {
  if (isPlatformServer(this.platformId)) {
    this.us.login();
  }
  this.seo.setTitle('Login page');
}
Adding product to favorites#
Once user is able to login, he would probably want to add some products to the list of his favorite ones. This adjustment will be much easier. Start by creating function which will handle process of manipulating data on the server-side. Inside api.ts replace the api.post('favorites/:id', async (req, res) => {}) entry with the following code:
export async function addToFavorites(productId, encryptedUserId) {
  const userId = decrypt(encryptedUserId);

  const user = await mongoService.retrieveFromDb<User>(
    'users',
    { _id: 0, password: 0 },
    { _id: ObjectId(userId) }
  );
  const currentFavorites = user[0].favorite;

  if (!currentFavorites.includes(productId)) {
    currentFavorites.push(productId);
    await (await dbClient)
      .collection('users')
      .updateOne(
        { _id: ObjectId(userId) },
        { $set: { favorite: currentFavorites } }
      );
  }
  return user[0];
}

api.post('/favorites/:id', async (req, res) => {
  const user = await addToFavorites(req.params.id, req.cookies.loggedIn);
  res.status(202)
  res.send(user)
});
Now import addToFavorites function in the server.ts file:
import { api, dbClient, decrypt, authenticate, addToFavorites } from './api';
and provide it to the Angular Sandbox:
  server.engine(
    'html',
    ngExpressEngine({
      bootstrap: AppServerModule,
      providers: [
        { provide: 'dbConnection', useValue: dbClient },
        { provide: 'decrypt', useValue: decrypt },
        { provide: 'addToFavorites', useValue: addToFavorites }
      ],
    })
  );

  server.set('view engine', 'html');
  server.set('views', distFolder);
Once you’re done with that, you can inject this method reference in the UserServerService located in the src/app/user-server.service.ts :
constructor(
  @Inject('decrypt') private decrypt: any,
  private ms: MongoService,
  @Inject(REQUEST) private request: Request,
  @Inject(RESPONSE) private response: Response,
  @Optional() @Inject('authentication') private authServer: any,
  @Inject('addToFavorites') private addToFavoritesServer: any
) {}
and implement the server version of the addToFavorites() method:
public addToFavorites(id: string): Observable<boolean> {
  if (!this.loggedInCookie) {
    this.response.append('Location', '/login');
    this.response.status(302);
    return of(false);
  } else {
    return from(this.addToFavoritesServer(id, this.loggedInCookie)).pipe(
      map(user => !!user)
    )
  }
}
Now you need to edit the src/app/product-details/product-details.component.html and replace the <button> entity responsible for adding product to favorites, with the <a> entity:
<a href="/products;pid={{p.id}}" *ngIf="!isFavorite" (click)="addToFavorites(p.id)"
 class="btn btn-sm btn-outline-primary">add to
 favorites</a>
Since now, when JavaScript is disabled, this button will navigate to the /products;pid=<product_id> URL. Notice the pid=<product_id> section - this is how Angular factually passes query parameters; and that’s what we’ve already got implemented in previous modules. Last change is to simply add return false statement to the addToFavorites() function in the src/app/product-details/product-details.component.ts :
public addToFavorites(id: string) {
  this.us.addToFavorites(id).subscribe();
  return false;
}
Thanks to that, you will prevent Angular from navigating to that URL when JavaScript is enabled.
Testing the noscript version of the application#
Run the application using the following command:
npm run dev:ssr
Using Chrome Developer Tools disable JavaScript in your browser (cmd+shift+p or ctrl+shift+p):
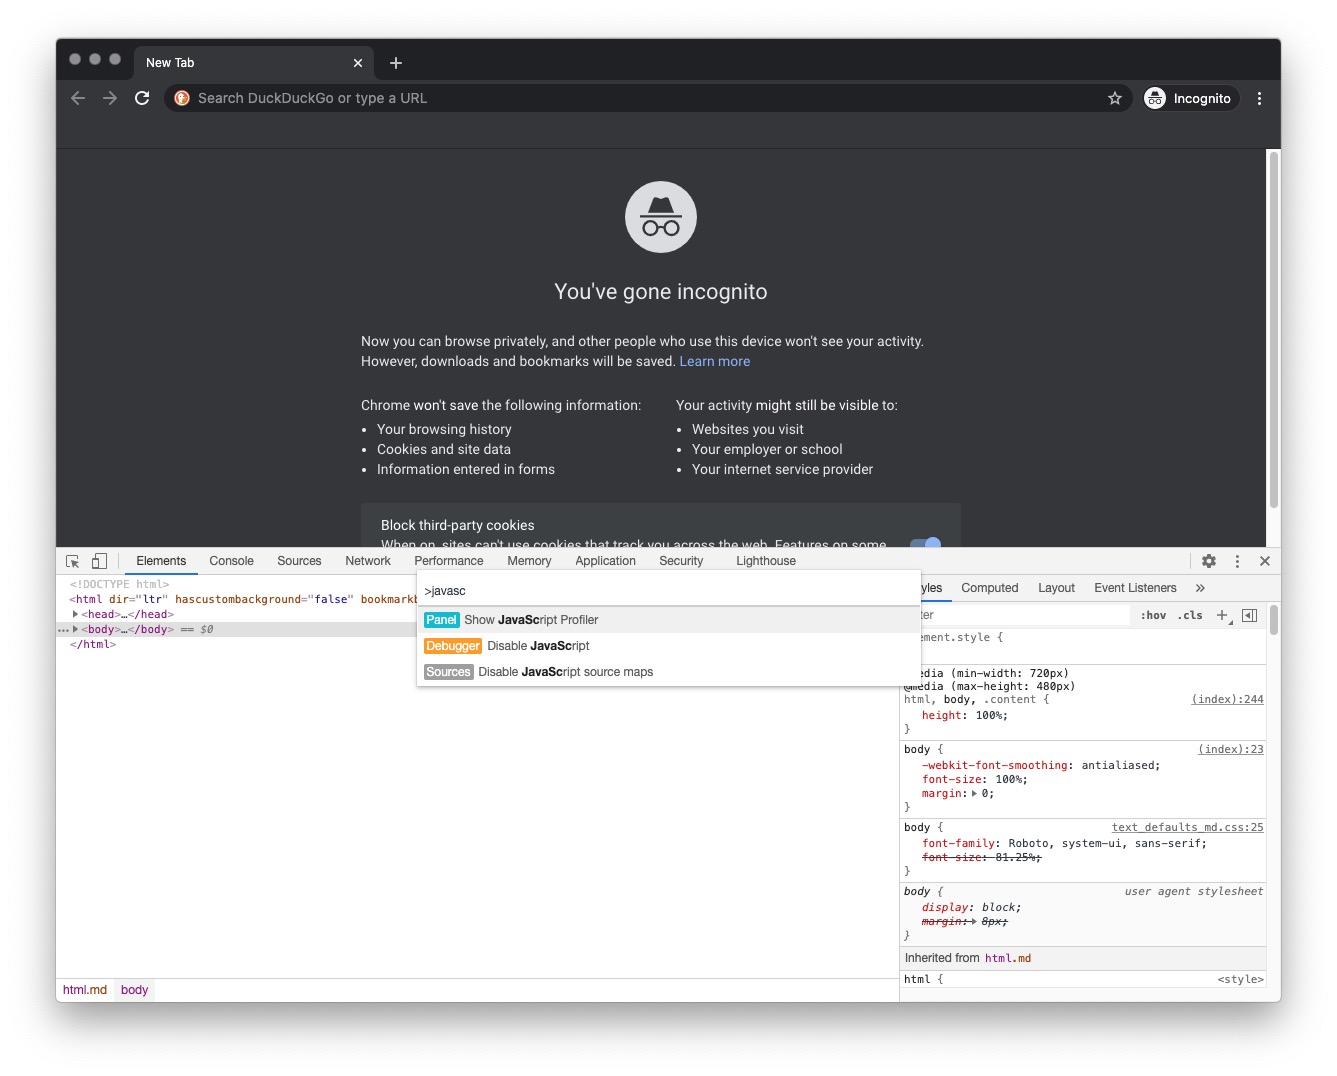
Navigate to the application and verify if authentication and adding product to favorites functionalities works as expected.
It’s time to replace the old <noscript> section in the src/index.html with new one:
<noscript>
  Unfortunately, your browser doesn't support JavaScript
  that is necessary to provide the best user experience.
</noscript>
Introducing TransferState#
First, you need to provide the modules that contain the TransferState service.
Update src/app/app.module.ts by adding BrowserTransferStateModule to the @angular/platform-browser import statement:
import {
  BrowserModule,
  BrowserTransferStateModule,
} from '@angular/platform-browser';
Add it to the imports array of AppModule :
imports: [
  BrowserModule.withServerTransition({
    appId: 'serverApp',
  }),
  AppRoutingModule,
  HttpClientModule,
  ReactiveFormsModule,
  BrowserTransferStateModule,
],
Update src/app/app.server.module.ts by adding ServerTransferStateModule to the @angular/platform-server import statement:
import {
  ServerModule,
  ServerTransferStateModule,
} from '@angular/platform-server';
Add it to the imports array of AppServerModule :
imports: [
  AppModule,
  ServerModule,
  ServerTransferStateModule,
],
Adjusting product services#
You need to prepare keys that you will use in services responsible for retrieving products. Create a new file, src/model/state-keys.ts , and add the following code:
import {
  makeStateKey,
  StateKey,
} from '@angular/platform-browser';
import { Product } from './product.model';

export class StateKeys {
  public static get PRODUCTS(): StateKey<Product[]> {
    return makeStateKey<Product[]>('products');
  }
  public static get PRODUCT(): StateKey<Product> {
    return makeStateKey<Product>('product');
  }
}
Import TransferState and StateKeys , and then add the tap operator to the rxjs import statement in src/app/products-server.service.ts :
import { map, tap } from 'rxjs/operators';
import { TransferState } from '@angular/platform-browser';
import { StateKeys } from 'src/model/state-keys';
Inject the TransferState service, then update the getProducts() and getProduct(productId) methods to set entries to the TransferState registry when data is returned from the database. You can do it by introducing the tap operator into the observables returned by those methods:
  constructor(
    private ms: MongoService,
    private ts: TransferState
  ) {}

  public getProducts(): Observable<Product[]> {
    return from(
      this.ms.retrieveFromDb<Product>('products', {
        description: 0,
      })
    ).pipe(
      tap((products) =>
        this.ts.set(StateKeys.PRODUCTS, products)
      )
    );
  }

  public getProduct(
    productId: string
  ): Observable<Product> {
    return from(
      this.ms.retrieveFromDb<Product>('products', {}, {
        _id: ObjectId(productId),
      })
    ).pipe(
      map((products) => products[0]),
      tap((product) =>
        this.ts.set(StateKeys.PRODUCT, product)
      )
    );
  }
The browser side#
Now you need to retrieve data from the TransferState registry in the browser. Adjust import statements in src/app/products.service.ts by adding the following entries:
import { Observable, of } from 'rxjs';
import { TransferState } from '@angular/platform-browser';
import { StateKeys } from 'src/model/state-keys';
Inject the TransferState service, and then update getProducts() and getProduct(productId) to retrieve data from the TransferState registry or fall back to an HTTP request when the registry is empty:
  constructor(
    private httpClient: HttpClient,
    private ts: TransferState
  ) {}

  public getProducts(): Observable<Product[]> {
    if (this.ts.hasKey(StateKeys.PRODUCTS)) {
      const products = this.ts.get<Product[]>(
        StateKeys.PRODUCTS,
        null
      );
      this.ts.remove(StateKeys.PRODUCTS);
      return of(products);
    } else {
      return this.httpClient.get<Product[]>(
        `${this.API_URL}/products`
      );
    }
  }

  public getProduct(
    productId: string
  ): Observable<Product> {
    const product = this.ts.get<Product>(
      StateKeys.PRODUCT,
      null
    );
    if (!!product) {
      this.ts.remove(StateKeys.PRODUCT);
      return of(product);
    } else {
      return this.httpClient.get<Product>(
        `${this.API_URL}/products/${productId}`
      );
    }
  }
Notice that once this.ts.get() retrieves data, the entry is cleared using this.ts.remove() . This is very important to do: otherwise, the service would always return data from the TransferState registry rather than querying the HTTP API. Consider the following scenario:
- The user requests the Orange Juice landing page at /product/abcd1234 .
- Angular queries for the Orange Juice description during rendering and puts it into the
TransferStateregistry. - HTML along with the JavaScript bundle containing the
TransferStaterepository is sent to the browser. - Angular is bootstrapped in the browser.
ProductsServicefires up to retrieve the description of Orange Juice. Because it’s inTransferState, no HTTP call is performed, and the component is fed with data from the registry. - The user navigates to the home page and checks the description of another product, let’s say Tomato.
- The component queries
ProductsServicefor the description of Tomato. BecauseTranferStatestill contains thePRODUCTentry, it is returned by the service. - The user sees the description of Orange Juice instead of Tomato. :::
User service#
Now, apply the same changes to the UserService and UserServerService classes.
Update StateKeys in src/model/state-keys.ts by adding the USER and REDIRECT placeholders:
import {
  makeStateKey,
  StateKey,
} from '@angular/platform-browser';
import { Product } from './product.model';
import { User } from './user.model';

export class StateKeys {
  public static get PRODUCTS(): StateKey<Product[]> {
    return makeStateKey<Product[]>('products');
  }
  public static get PRODUCT(): StateKey<Product> {
    return makeStateKey<Product>('product');
  }
  public static get USER(): StateKey<User> {
    return makeStateKey<User>('user');
  }
  public static get REDIRECT(): StateKey<string> {
    return makeStateKey<string>('redirect');
  }
}
Import TransferState and StateKeys , and then add the tap operator to the rxjs import statement in src/app/user-server.service.ts :
import { mergeMap, map, tap } from 'rxjs/operators';
import { TransferState } from '@angular/platform-browser';
import { StateKeys } from 'src/model/state-keys';
Inject the TransferState service into the constructor:
constructor(
  @Inject('decrypt') private decrypt: any,
  private ms: MongoService,
  @Inject(REQUEST) private request: Request,
  @Inject(RESPONSE) private response: Response,
  @Optional() @Inject('authentication') private authServer: any,
  @Inject('addToFavorites') private addToFavoritesServer: any,
  private ts: TransferState
) {}
Adjust the initialization of the currentUser$ observable by adding the tap operator. Inside, set the TransferState entry for the USER key:
private currentUser$: Observable<User> = this.userId.pipe(
  mergeMap((userId) => {
    if (userId == null) {
      return of(null);
    } else {
      return from(
        this.ms.retrieveFromDb<User>(
          'users',
          { _id: 0, password: 0 },
          { _id: new ObjectId(userId) }
        )
      ).pipe(map((users) => users[0]));
    }
  }),
  tap((user) => this.ts.set(StateKeys.USER, user))
);
Change the implementation of the setRedirectUrl(url) method:
public setRedirectUrl(url: string) {
  this.ts.set(StateKeys.REDIRECT, url);
}
The browser side#
You now need to make UserService in the browser consume the data supplied by TransferState .
Import TransferState and StateKeys :
import { TransferState } from '@angular/platform-browser';
import { StateKeys } from 'src/model/state-keys';
Change the implementation of the currentUser$ and redirectUrl variables. Then adjust the constructor by injecting TransferState and removing the body:
  private currentUser$: Subject<User> = new BehaviorSubject(
    this.ts.get(StateKeys.USER, null)
  );
  private redirectUrl: string = this.ts.get(
    StateKeys.REDIRECT,
    '/'
  );

  constructor(
    private http: HttpClient,
    private router: Router,
    private ts: TransferState
  ) {}
You can also remove the checkCookie() function as it is no longer used.
You don’t clear the TransferState registry in UserService as you do in ProductsService . Why? Notice that TransferState is only used to set up the initial values for variables rather than to return a value from the method. The value of redirectUrl can be overwritten later as the application runs. currentUser$ is a different story: this observable is initialized using the BehaviorSubject implementation. You set the initial value of the observable using the value retrieved from TransferState (or null if the registry is empty). :::
Testing the services#
Verify that data is transferred between the server and the browser as expected:
- Run the application on your computer and perform a request to http://localhost:4200 . You should no longer see redundant HTTP requests in the Network tab of Developer Tools.
- Navigate to a description of any product in the application. Verify that an HTTP call retrieving the product’s description is performed.
- Navigate back to the home page and verify that the list of products is retrieved via an HTTP call rather than from the
TransferStateregistry.
TransferHttpCacheModule#
In the previous lesson, you’ve learned how to adjust services responsible for data retrieval to use the TransferState registry. What if the application doesn’t retrieve data from the database but performs an HTTP call instead? This may occur if your web application communicates with services that are not deployed on the same machine, such as in a microservice architecture.
Should you prepare a special server-side implementation of such a service? Fortunately, you don’t need to. Instead, you can use the TransferHttpCacheModule module that is shipped with the @nguniversal library. This module provides HTTP_INTERCEPTOR : a mechanism for altering HTTP calls and responses “on the fly”, which uses the TransferState registry under the hood. On the server, the interceptor feeds TransferState with data retrieved via HTTP requests. In the browser, it looks up for these entries in the registry and does not repeat HTTP calls.
Creating a microservice#
Create a new npm project outside of your Angular Universal application, and install dependencies that are necessary to publish a basic HTTP API:
cd ..
mkdir my-service
cd my-service
git init
npx gitignore node
npm init -y
npm install express body-parser cors
touch index.js
This service will broadcast information about promotions and opening hours of the terrain shop that stands behind your online grocery. Add the following code to index.js :
const express = require('express');
const cors = require('cors');
const app = express();
const port = process.env.PORT || 8080;
app.use(
cors({
origin: true,
credentials: true,
})
);
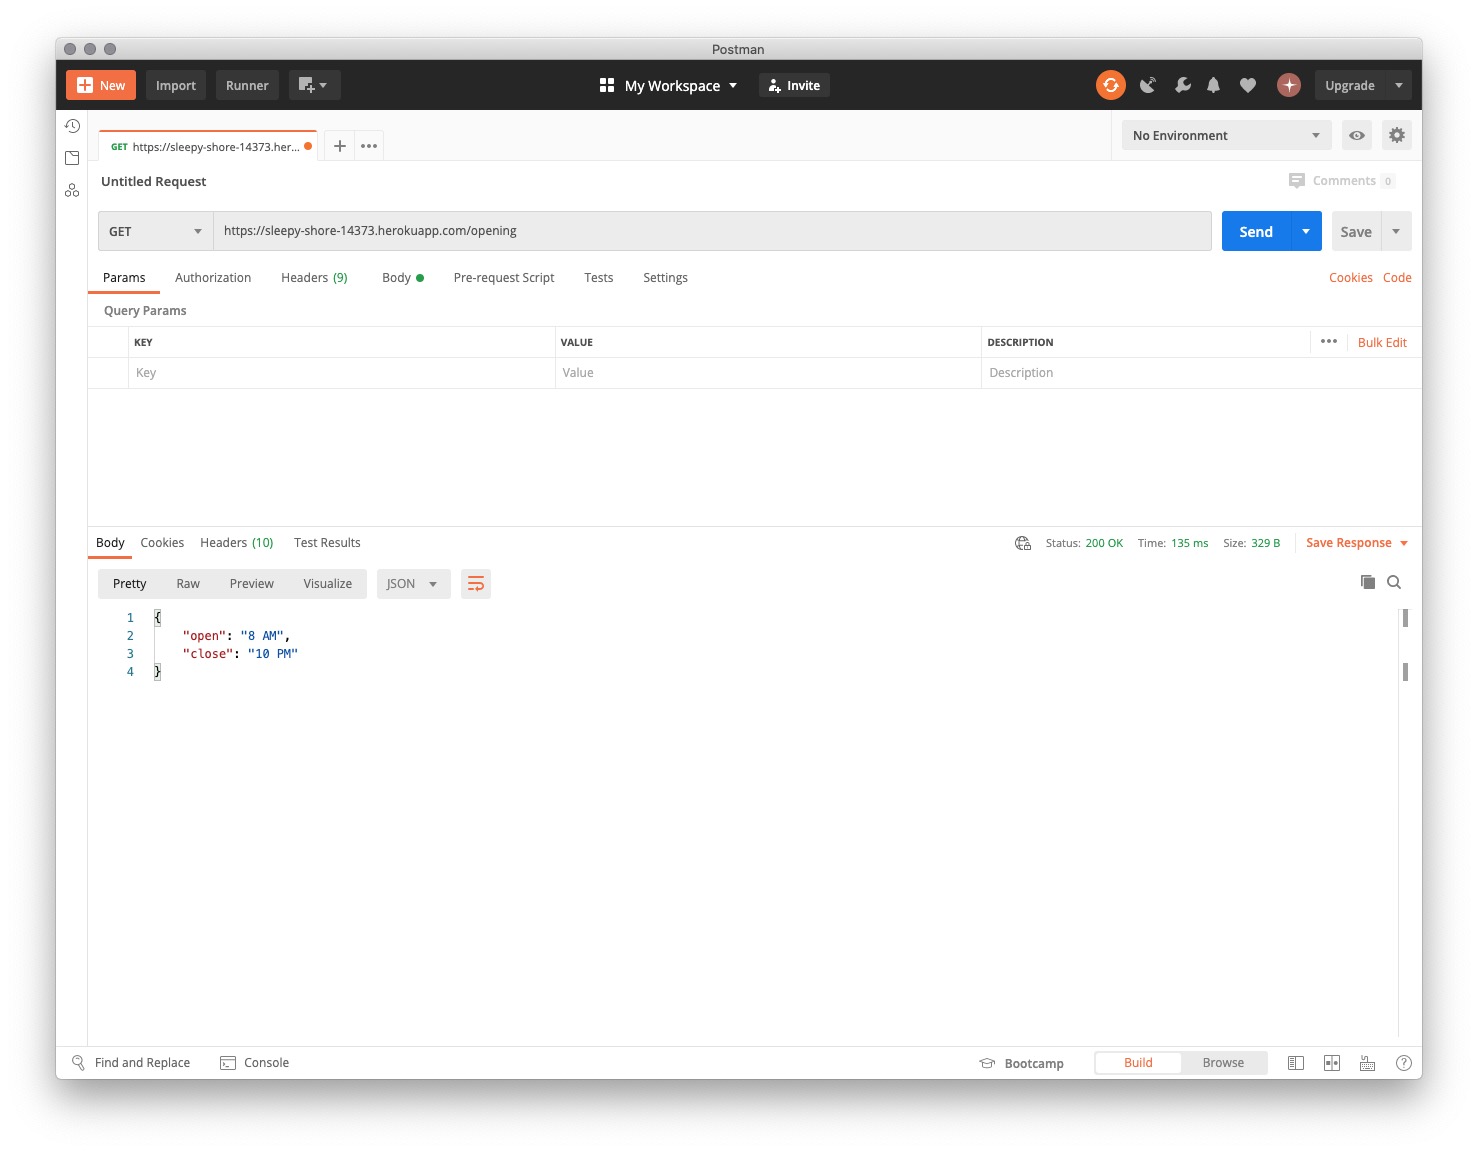
app.get('/opening', (req, res) => {
console.log('GET opening');
res.send({ open: '8 AM', close: '10 PM' });
});
app.get('/promotions', (req, res) => {
console.log('GET promotions');
res.send(['Buy four potatoes and pay for three!']);
});
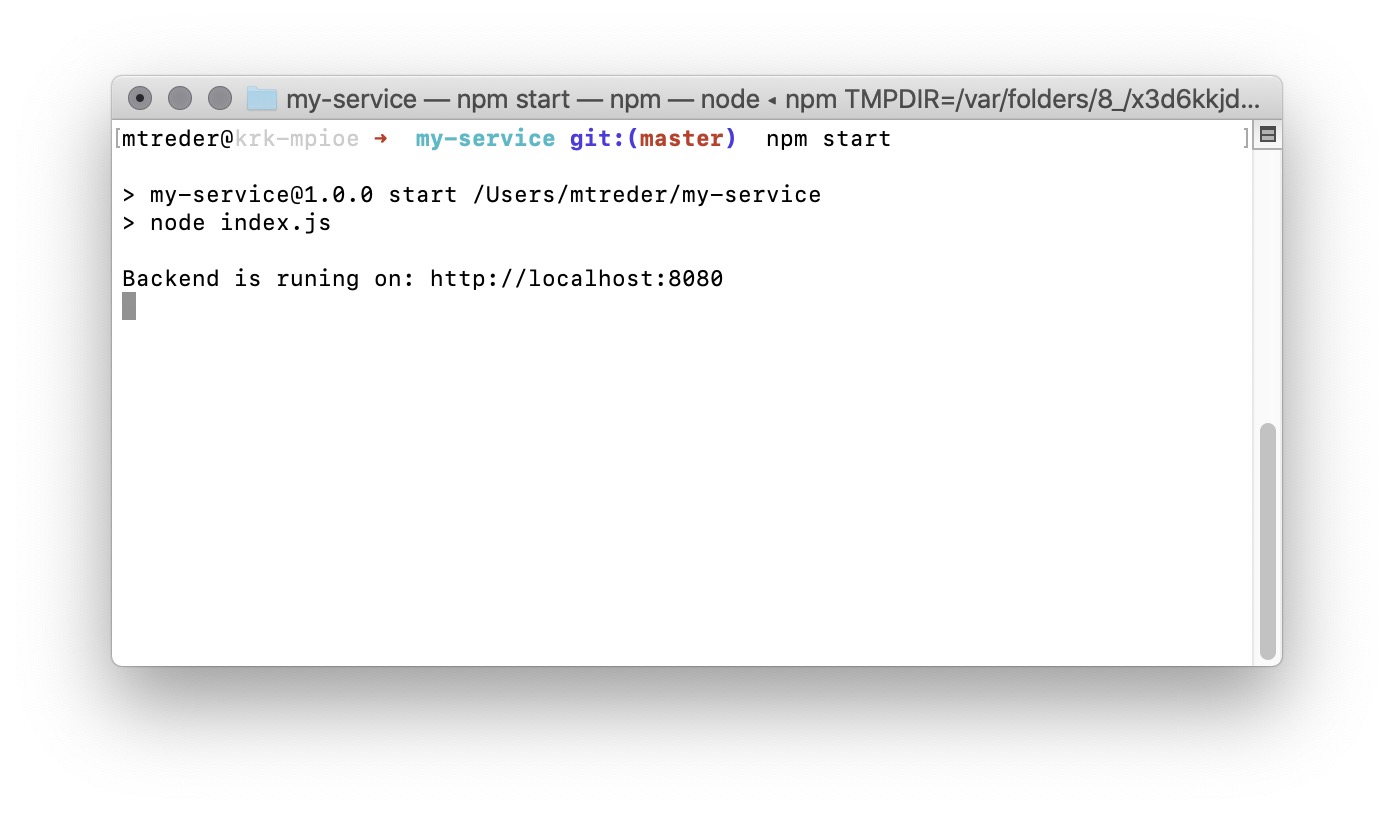
app.listen(port, () => {
console.log(
`Backend is runing on: http://localhost:${port}`
);
});
The code above introduces two API endpoints:
- GET /promotions
- GET /opening
Update package.json to be able to deploy this service to Heroku:
  "scripts": {
    "start": "node index.js",
    "test": "echo \"Error: no test specified\" && exit 1"
  },
Deploying to Heroku#
Create and deploy a new Heroku application:
heroku create
git add .
git commit -am "make it better"
git push heroku master
Verify the deployment with Postman or cURL:
Consuming the microservice#
Add the terrainShopBasePath entry to src/environments/environment.ts :
export const environment = {
  production: false,
  apiBasePath: 'http://localhost:4200',
  terrainShopBasePath: 'http://localhost:8080',
};
Add the same entry to src/environments/environment.prod.ts :
export const environment = {
  production: true,
  apiBasePath:
    'https://intense-woodland-94697.herokuapp.com',
  terrainShopBasePath:
    'https://sleepy-shore-14373.herokuapp.com',
};
Create a new file, src/model/opening-hours.model.ts , and add a class that represents data returned by the /opening endpoint:
export interface OpeningHours {
  open: string;
  close: string;
}
Generate a new service that will be used to query the microservice for opening hours and current promotions:
ng g s terrain-shop --skipTests
Implement the TerrainShopService service by adding the following code into src/app/terrain-shop.service.ts :
import { Injectable } from '@angular/core';
import { HttpClient } from '@angular/common/http';
import { Observable } from 'rxjs';
import { OpeningHours } from 'src/model/opening-hours.model';
import { environment } from '../environments/environment';

@Injectable({
  providedIn: 'root',
})
export class TerrainShopService {
  private API_URL = environment.terrainShopBasePath;

  constructor(private http: HttpClient) {}

  public getPromotions(): Observable<string[]> {
    return this.http.get<string[]>(
      `${this.API_URL}/promotions`
    );
  }

  public getOpeningHours(): Observable<OpeningHours> {
    return this.http.get<OpeningHours>(
      `${this.API_URL}/opening`
    );
  }
}
The code above introduces the TerrainShopService class that injects the HttpClient service and has two publicly available methods:
-
getPromotions()is responsible for performing GET requests to the /promotions endpoint. -
getOpeningHours()is responsible for performing GET requests to the /opening endpoint.
Both requests are performed to the service available at the URL specified in environment files.
It’s time to display the retrieved data to the user. To avoid increasing the size of the main bundle, generate your component in a lazy-loaded module:
ng generate module terrain-shop --route terrain-shop --module app.module
Add the following code to src/app/terrain-shop/terrain-shop.component.ts :
import { Component, OnInit } from '@angular/core';
import { TerrainShopService } from '../terrain-shop.service';
import { OpeningHours } from 'src/model/opening-hours.model';
import { Observable } from 'rxjs';
import { SeoService } from '../seo.service';

@Component({
  selector: 'app-terrain-shop',
  template: `
    <div class="card mb-4 shadow-sm">
      <div class="card-body">
        <h2 class="mb-3">Visit our terrain shop!</h2>
        <ng-container *ngIf="openingHours$ | async as time">
          <p>Opens at: {{ time.open }}</p>
          <p>Closes at: {{ time.close }}</p>
        </ng-container>
        <h4 class="mb-3">Current promotions!</h4>
        <p *ngFor="let promotion of promotions$ | async">
          {{ promotion }}
        </p>
      </div>
    </div>
  `,
})
export class TerrainShopComponent implements OnInit {
  public openingHours$: Observable<
    OpeningHours
  > = this.ts.getOpeningHours();
  public promotions$: Observable<
    string[]
  > = this.ts.getPromotions();

  constructor(
    private ts: TerrainShopService,
    private seo: SeoService
  ) {}

  ngOnInit(): void {
    this.seo.setTitle('Visit the terrain shop!');
  }
}
Update the AppComponent template in src/app/app.component.html by adding a link to the terrain-shop route:
<footer class="text-muted">
    <div class="container">
        <p class="float-right">
            <a routerLink="terrain-shop">Check out the terrain shop!</a>
        </p>
        <p><a
            href="https://www.newline.co/courses/newline-guide-to-angular-universal">
            The newline Guide to Angular Universal
        </a></p>
    </div>
</footer>
Testing the component and the microservice#
Run your Angular application on localhost. In a separate terminal window, launch your service using npm start :
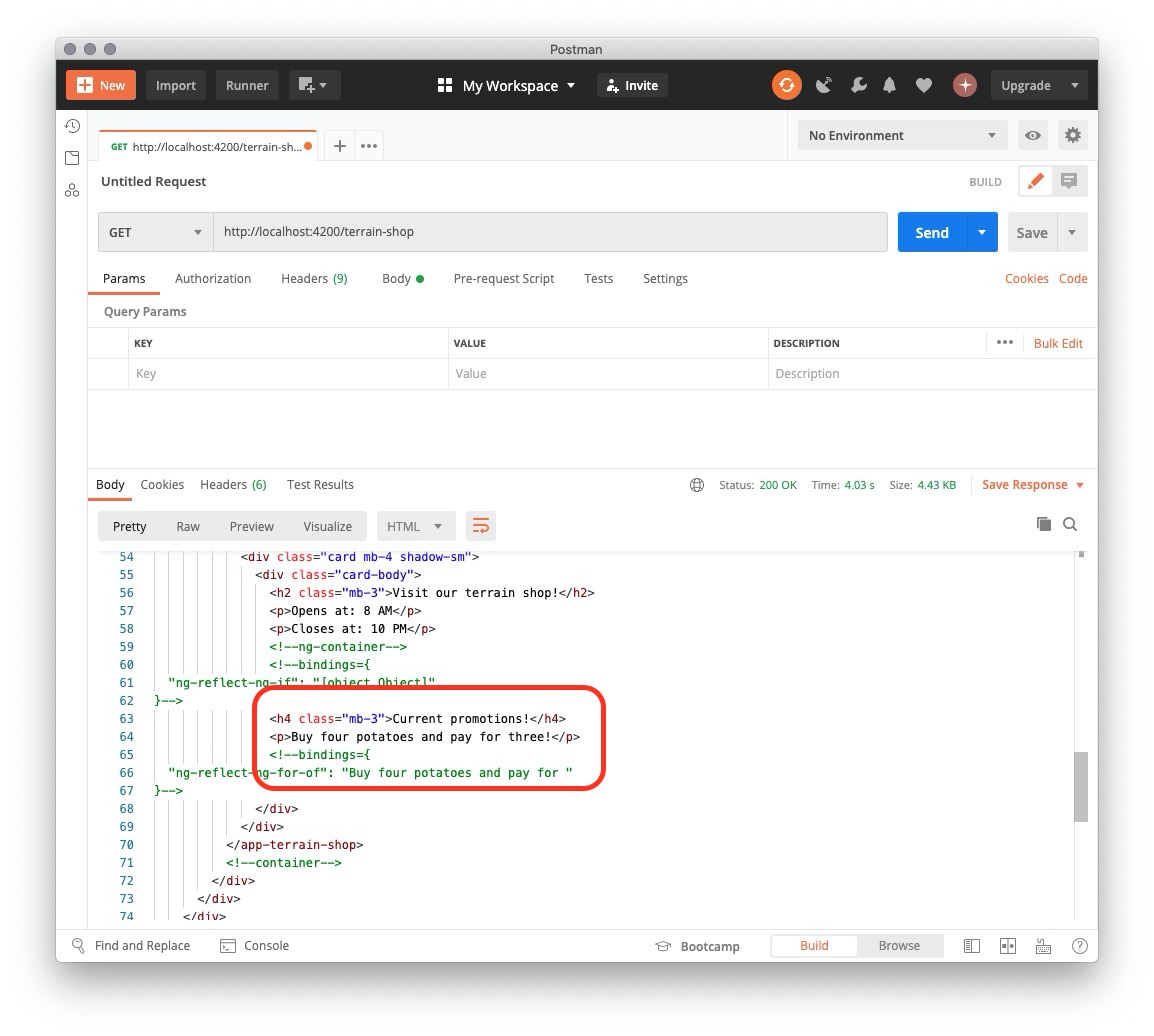
Navigate to http://localhost:4200/terrain-shop and check the console output of the terrain-shop microservice:
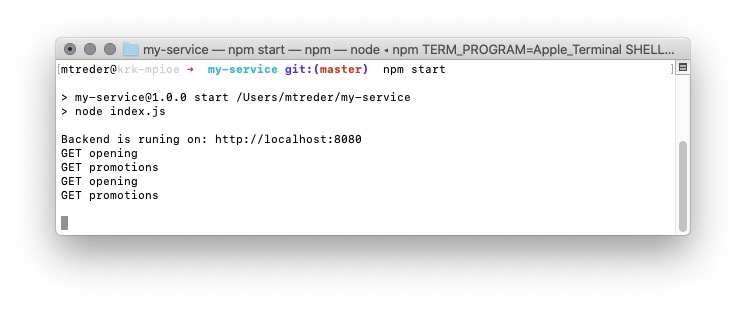
As you can see, HTTP requests are performed twice. The Node.js application performs one hit during the HTML rendering process. The second request is performed by the browser when Angular is bootstrapped in it.
Adding TransferState to HTTP calls#
Update src/app/app.module.ts by importing TransferHttpCacheModule from @nguniversal :
import { TransferHttpCacheModule } from '@nguniversal/common';
Add TransferHttpCacheModule to the imports array of AppModule :
imports: [
  BrowserModule.withServerTransition({
    appId: 'serverApp',
  }),
  AppRoutingModule,
  HttpClientModule,
  ReactiveFormsModule,
  BrowserTransferStateModule,
  TransferHttpCacheModule,
],
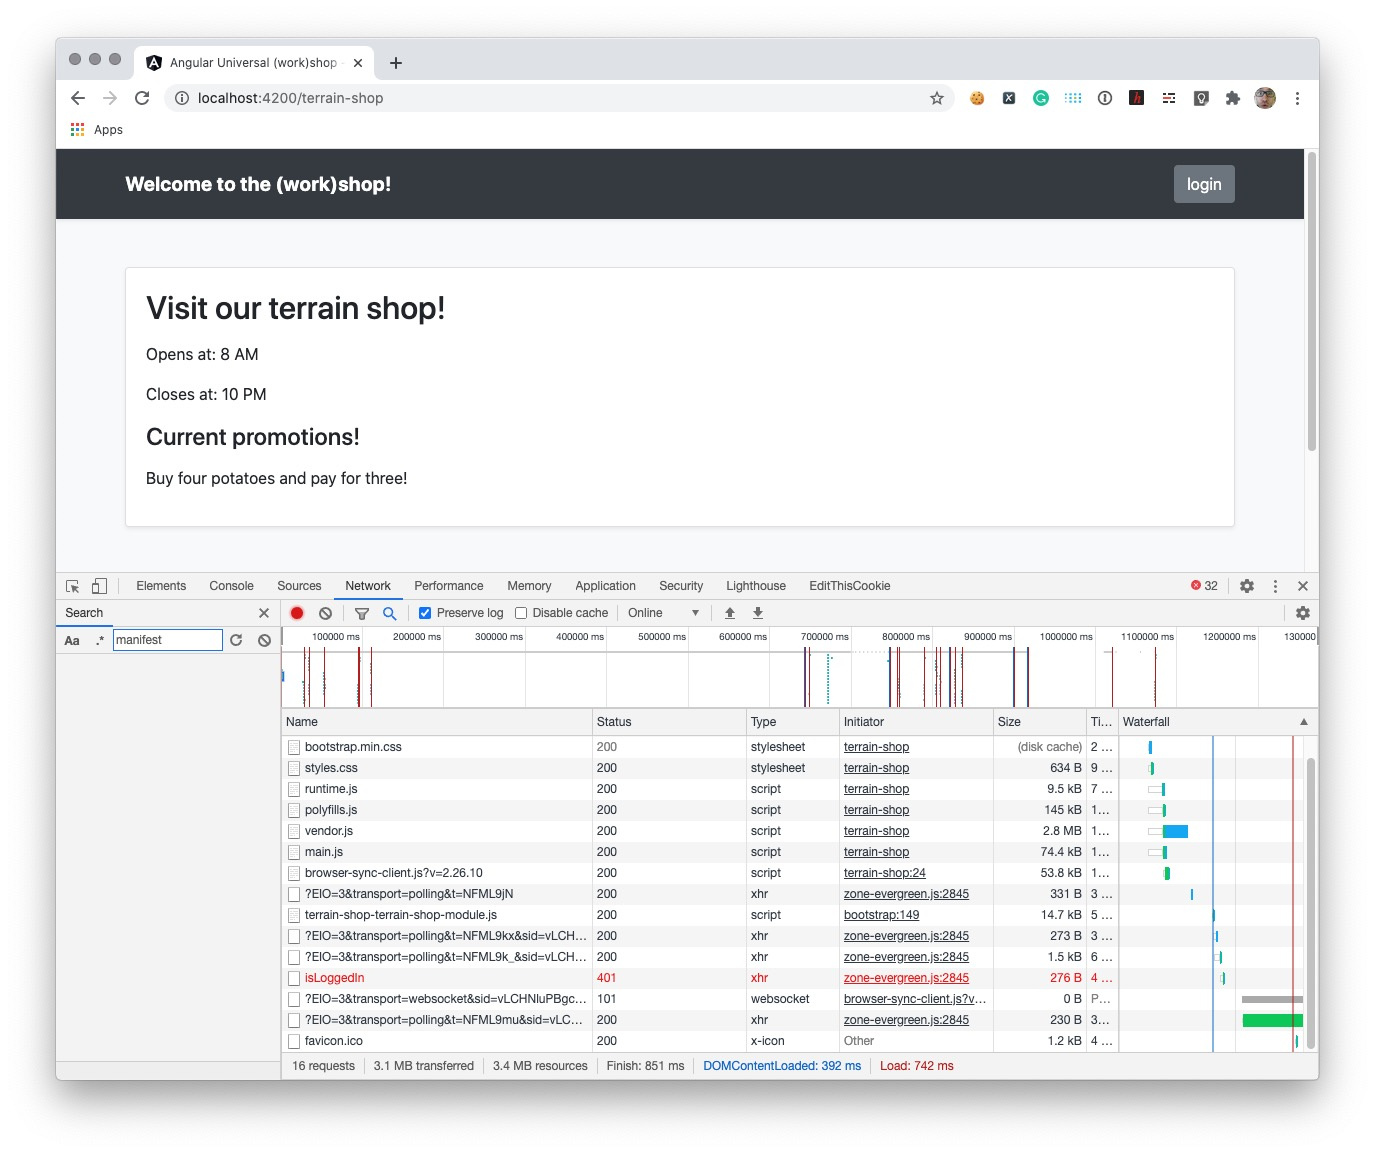
Navigate to http://localhost:4200/terrain-shop and check the console output of the terrain-shop microservice:

You can verify that the browser doesn’t perform a call by checking the Network tab in the Developer Tools:
The Nightmare of Long-Running HTTP Calls#
Angular Universal gives your application the advantage of performing HTTP calls on the server. On the other hand, performing an HTTP call takes time. What if a call is long-running? You can simulate this behavior by slowing down one of the endpoints in terrain-shop-service . Introduce a setTimeout to the /promotions endpoint to delay the response:
const express = require('express');
const cors = require('cors');
const app = express();

const port = process.env.PORT || 8080;

app.use(
  cors({
    origin: true,
    credentials: true,
  })
);

app.get('/opening', (req, res) => {
  console.log('GET opening');
  res.send({ open: '8 AM', close: '10 PM' });
});

app.get('/promotions', (req, res) => {
  console.log('GET promotions');
  setTimeout(() => {
    res.send(['Buy four potatoes and pay for three!']);
  }, 4000);
});

app.listen(port, () => {
  console.log(
    `Backend is runing on: http://localhost:${port}`
  );
});
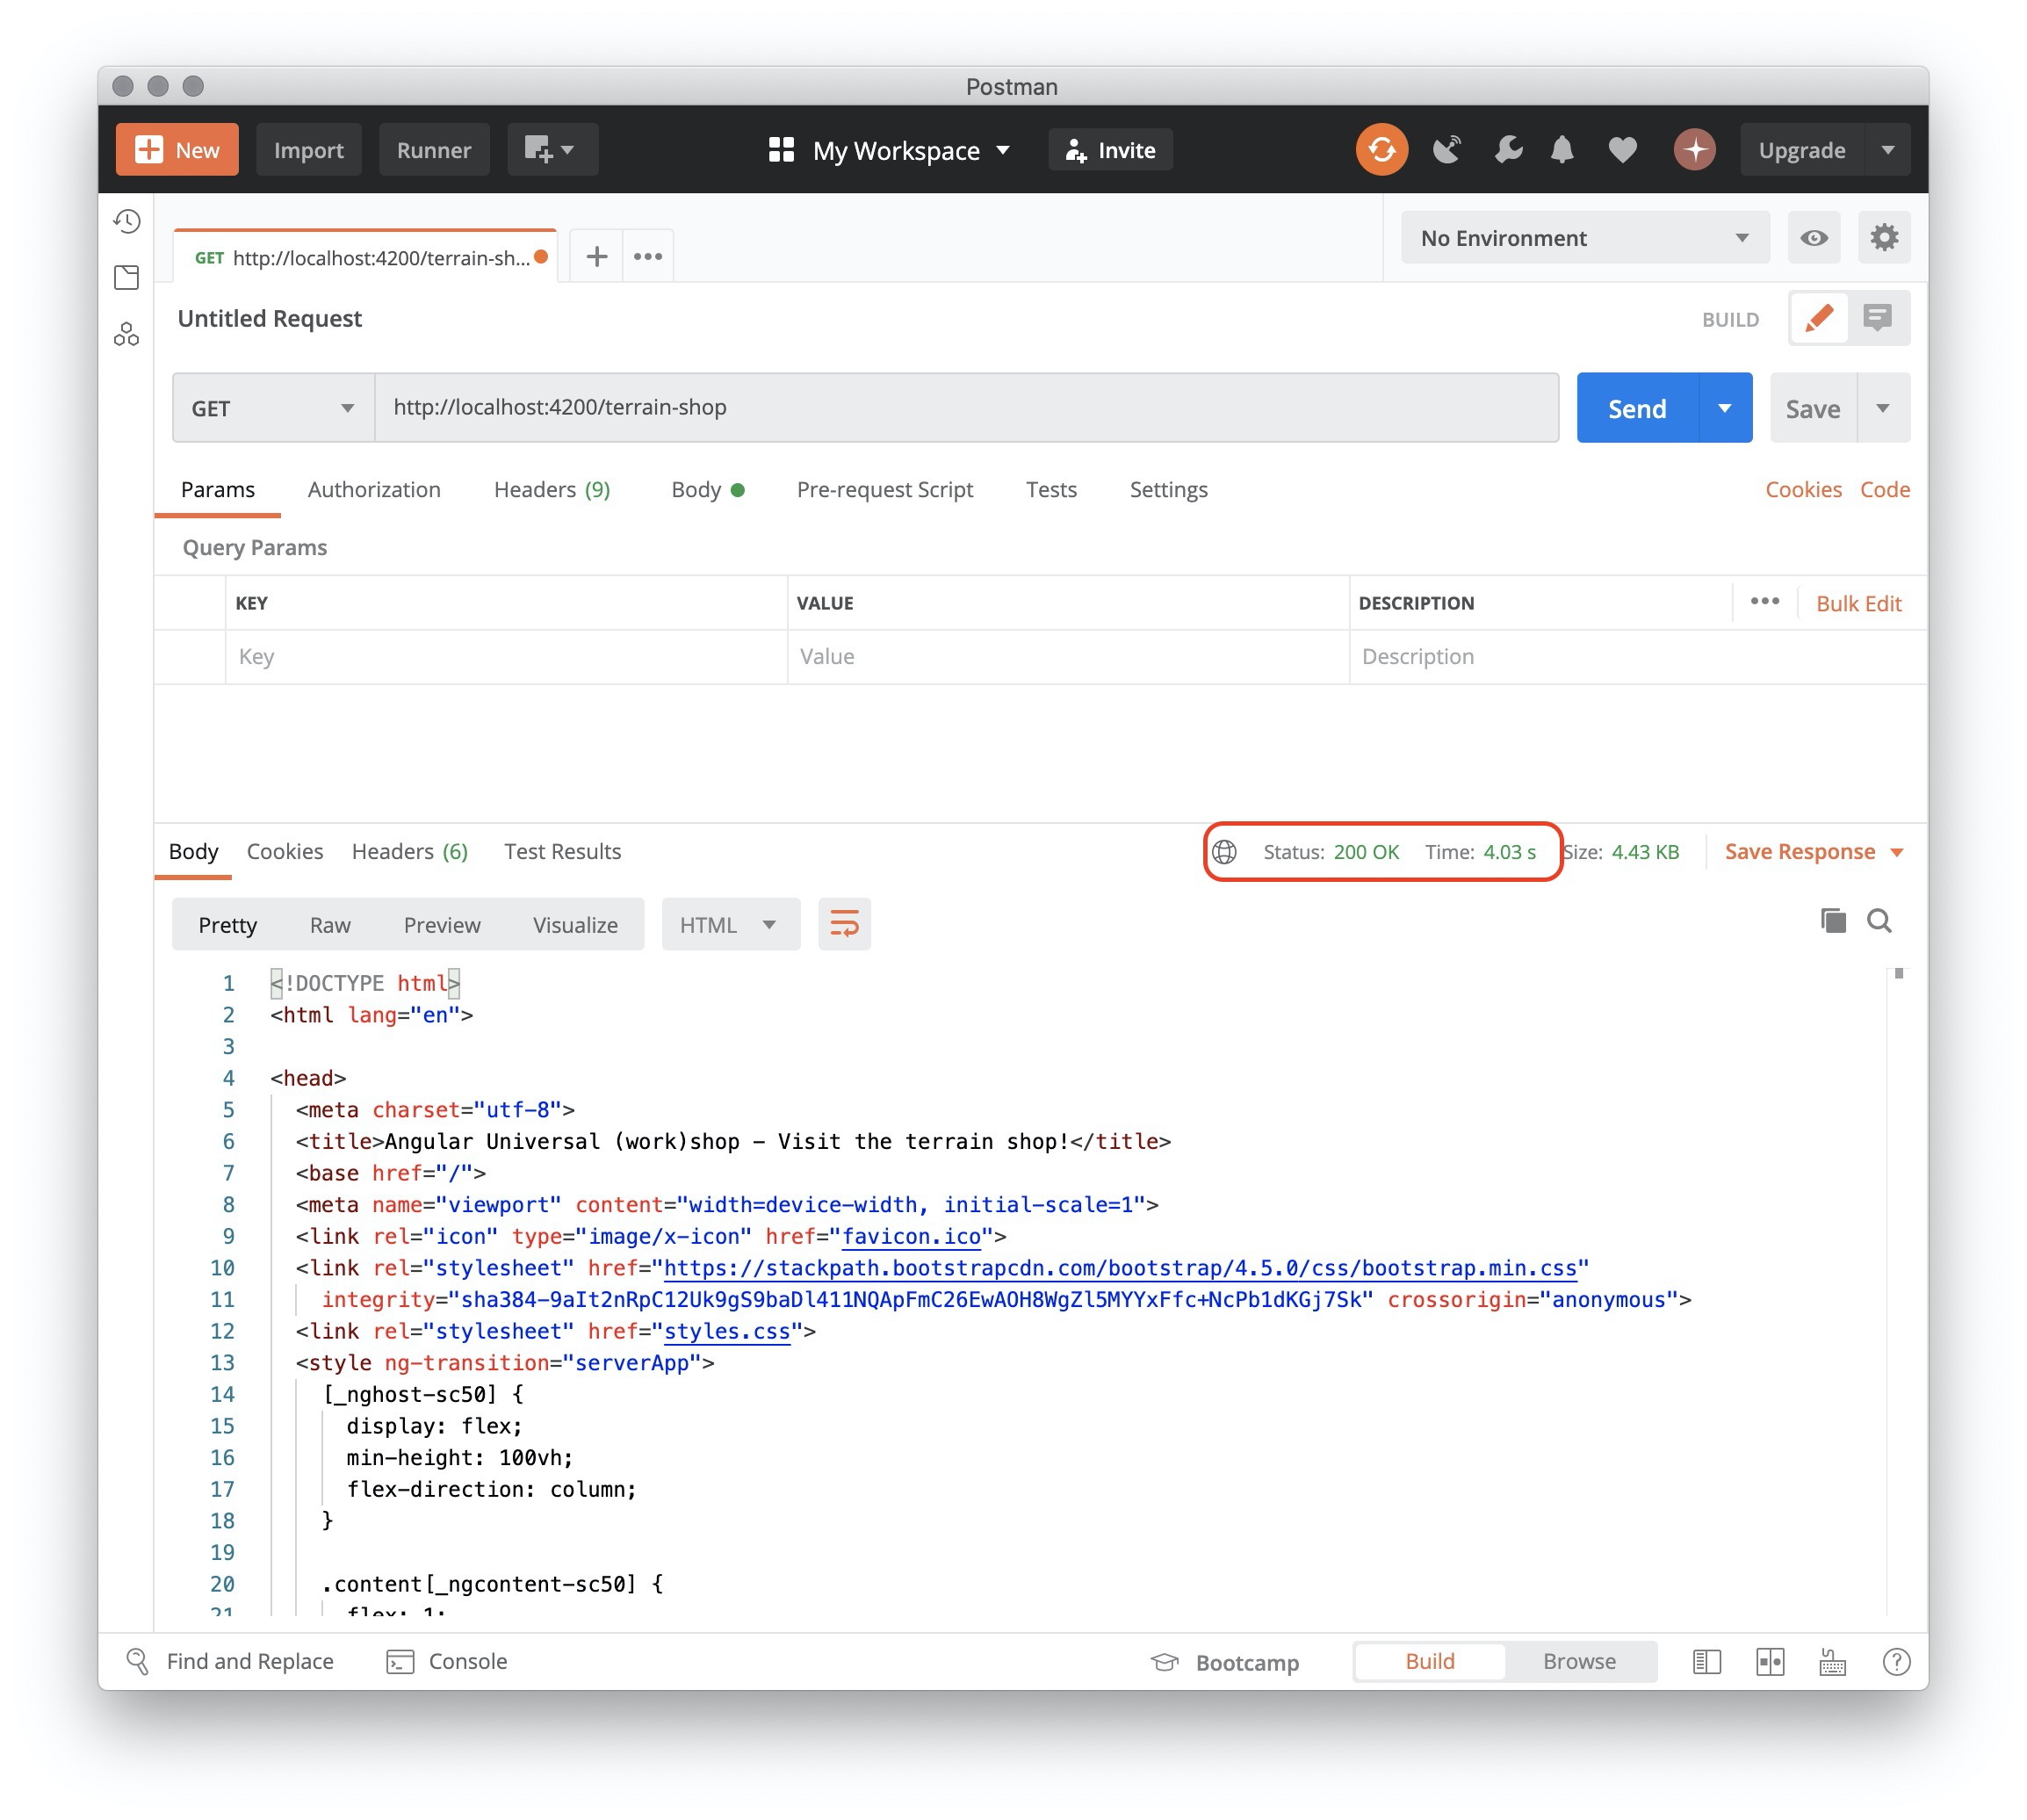
Use Postman to check how long it now takes to render the http://localhost:4200/terrain-shop landing page:
An equivalent test can be performed using cURL:
curl -o /dev/null -w %{time_total} http://localhost:4200/terrain-shop
Your application’s rendering process is as fast as the slowest API call !
Introducing API watchdog#
To protect yourself against such situations, you can set up a route resolver that allows you to get data before navigating to a new route.
Thanks to the isPlatformServer() and isPlatformBrowser() methods, you can determine the current runtime of the Angular application and modify the logic of the resolver accordingly.
Generate a new route resolver service:
ng g s terrain-shop-resolver --skipTests
Copy the following code to src/app/terrain-shop-resolver.service.ts :
import {
  Injectable,
  Inject,
  PLATFORM_ID,
} from '@angular/core';
import { Resolve } from '@angular/router';
import { TerrainShopService } from './terrain-shop.service';
import { Observable, timer, race } from 'rxjs';
import { isPlatformServer } from '@angular/common';
import { map } from 'rxjs/operators';

@Injectable({
  providedIn: 'root',
})
export class TerrainShopResolverService
  implements Resolve<string[]> {
  constructor(
    private ts: TerrainShopService,
    @Inject(PLATFORM_ID) private platformId: any
  ) {}

  public resolve(): Observable<string[]> {
    if (isPlatformServer(this.platformId)) {
      return race(
        this.ts.getPromotions(),
        timer(500).pipe(map(() => ['Loading data...']))
      );
    } else {
      return this.ts.getPromotions();
    }
  }
}
The code above introduces the TerrainShopResolverService class that implements the Resolve interface. To fulfill its interface contract, TerrainShopResolverService implements the resolve() method. Inside this method, you check the current runtime of the application.
If the application is running on the server, you introduce the race() method available in the rxjs library. The race() method accepts a set of observables as a parameter. It determines which observable emits first, and the fastest observable is passed along while emissions from all other observables are ignored. The mechanism that you’ve introduced abandons an HTTP call if it takes more than 0.5 sec and emits the default value Loading data... .
If the application runs in the browser, you perform a regular HTTP call (in regard to TransferHttpCacheModule ).
To consume the resolver service in application routing, add it to src/app/app-routing.module.ts :
import { TerrainShopResolverService } from './terrain-shop-resolver.service';

const routes: Routes = [
  { path: '', redirectTo: 'products', pathMatch: 'full' },
  { path: 'products', component: ProductsListComponent },
  {
    path: 'product/:id',
    component: ProductDetailsComponent,
  },
  { path: 'login', component: LoginComponent },
  {
    path: 'favorites',
    component: FavoritesComponent,
    canActivate: [AuthGuardService],
  },
  {
    path: 'terrain-shop',
    loadChildren: () =>
      import('./terrain-shop/terrain-shop.module').then(
        (m) => m.TerrainShopModule
      ),
    resolve: { promotions: TerrainShopResolverService },
  },
];
Import TerrainShopResolverService , ActivatedRoute , and the map operator into src/app/terrain-shop/terrain-shop.component.ts :
import { ActivatedRoute } from '@angular/router';
import { map } from 'rxjs/operators';
Inject ActivatedRoute in the TerrainShopComponent constructor:
constructor(
  private ts: TerrainShopService,
  private seo: SeoService,
  private router: ActivatedRoute
) {}
Update the initialization of the promotions$ field:
public promotions$: Observable<
  string[]
> = this.router.data.pipe(
  map((data) => data['promotions'])
);
The current application behavior is depicted in the diagram below:
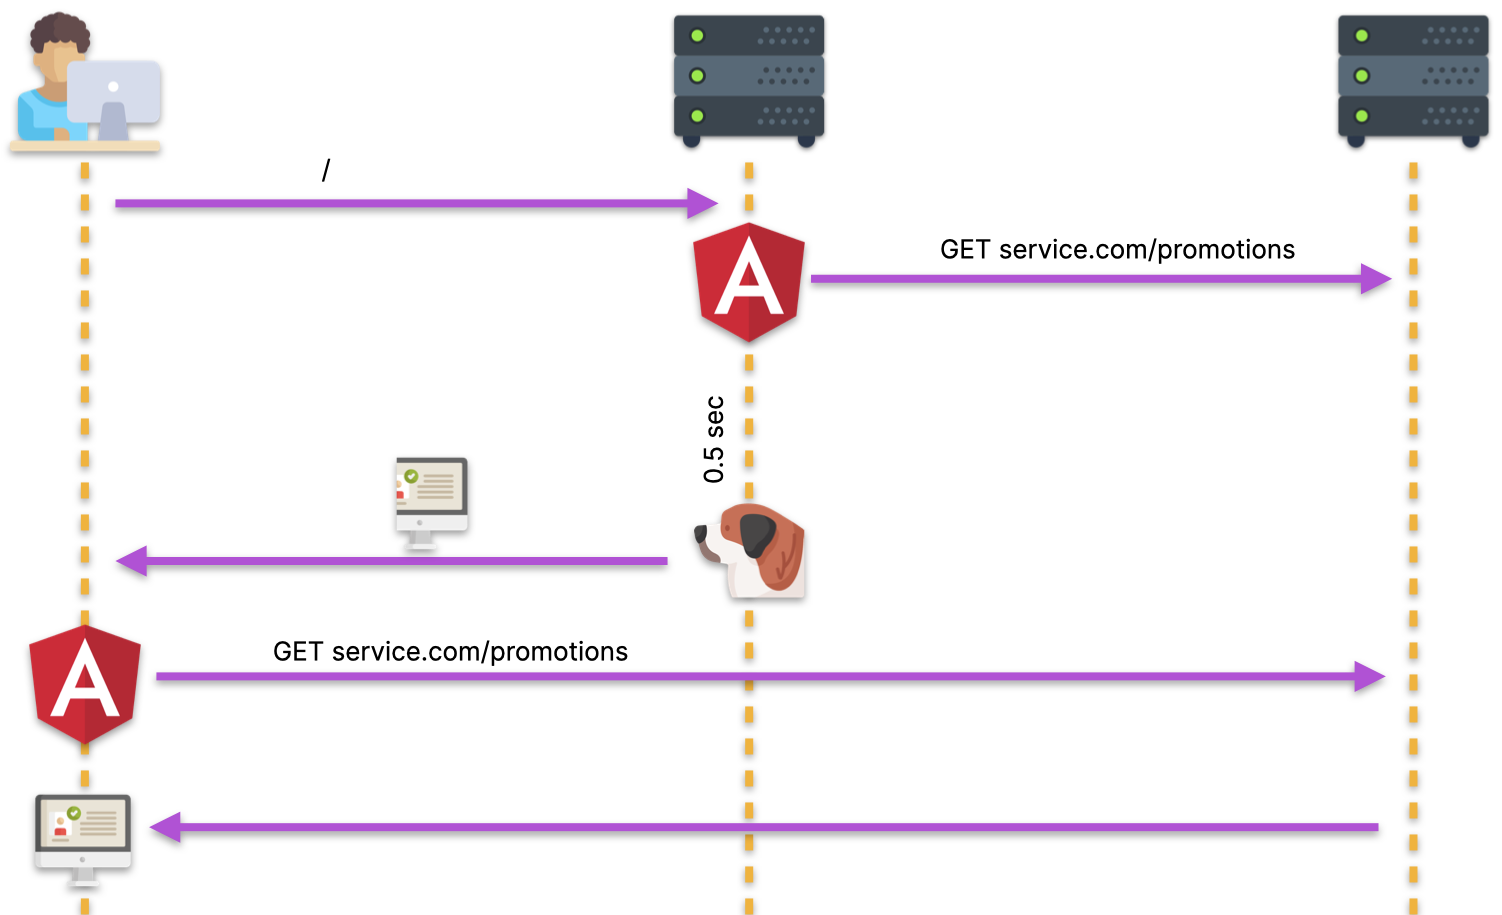
If server-side rendering hits the watchdog while waiting for an HTTP response, it will not include that response in the rendered output and ship the “partially” rendered HTML.
Testing the resolver#
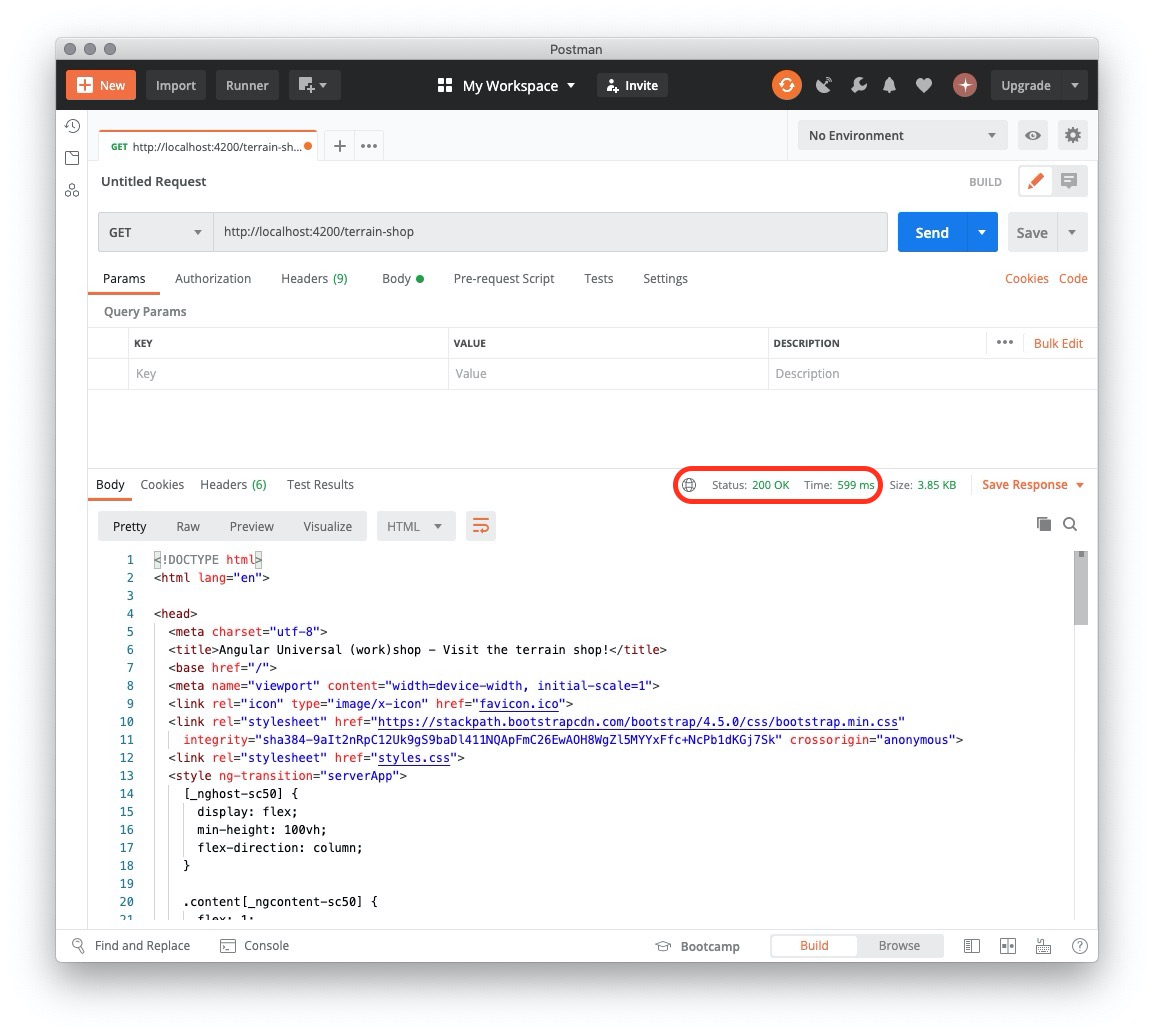
Use Postman to check how long it now takes to render the http://localhost:4200/terrain-shop landing page:
Or cURL:
curl -o /dev/null -w %{time_total} http://localhost:4200/terrain-shop
Much better!
Increase the timeout set in TerrainShopResolverService to 5000 and see what happens when the API responds within that time:
As you can see, the call output is rendered in the view, and TransferHttpCacheModule makes sure that the call is not performed again in the browser.
Instead of creating a route resolver for each component that retrieves data via HTTP calls, you can introduce HTTP_INTERCEPTOR and abandon long-running calls across the entire application.
Installing Redis#
The first step is to set up a Redis instance. You can provision it in your Heroku account. If you are working with this course offline, you might want to install Redis on your machine.
Localhost#
If you’re using a Windows machine, use Windows Subsystem for Linux (WSL) and a package manager to install Redis:
sudo apt-get update
sudo apt-get upgrade
sudo apt-get install redis-server
redis-cli -v
On macOS, you can use the Homebrew package manager:
brew install redis
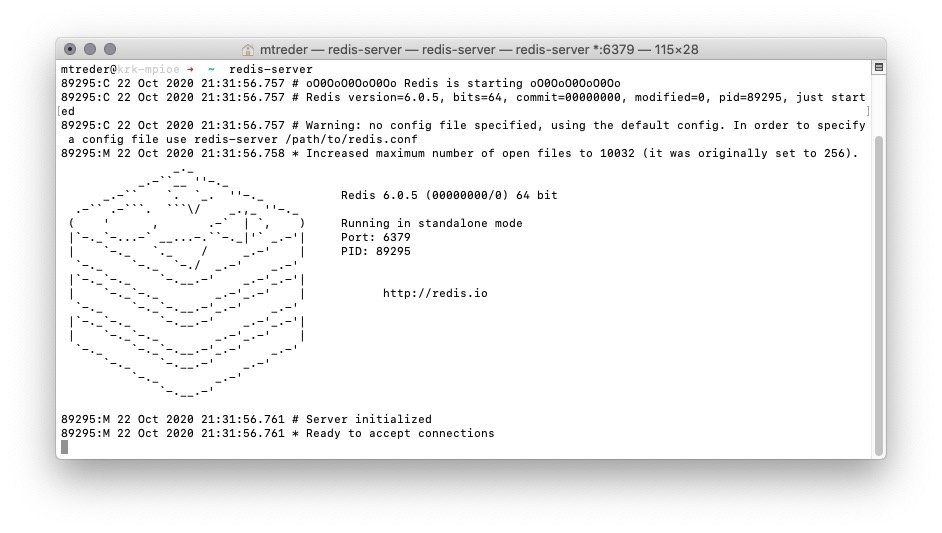
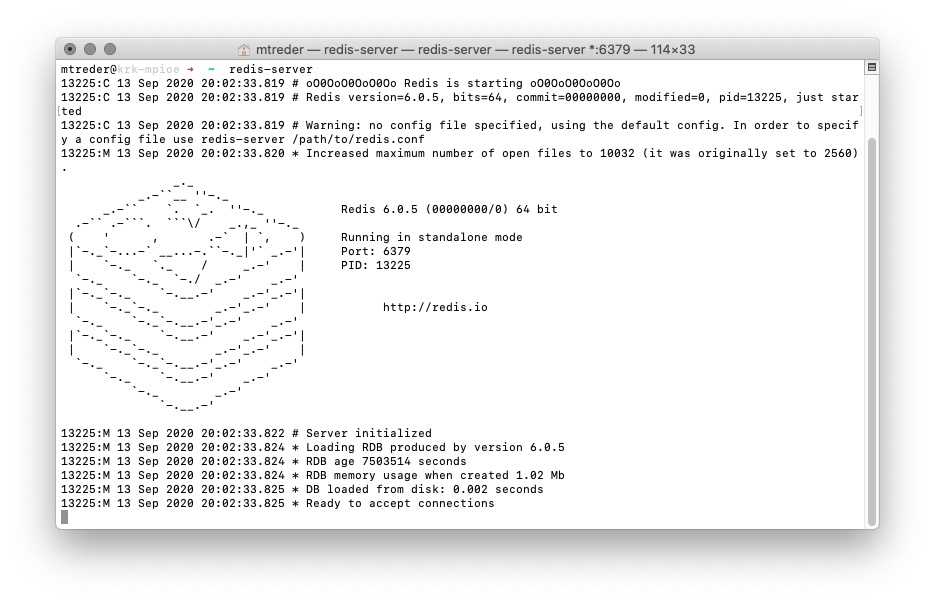
Verify your installation by running the database server:
redis-server
Heroku#
Navigate to the Heroku Dashboard and choose your application from the list.
Navigate to the Resources tab and search for the Heroku Redis add-on:
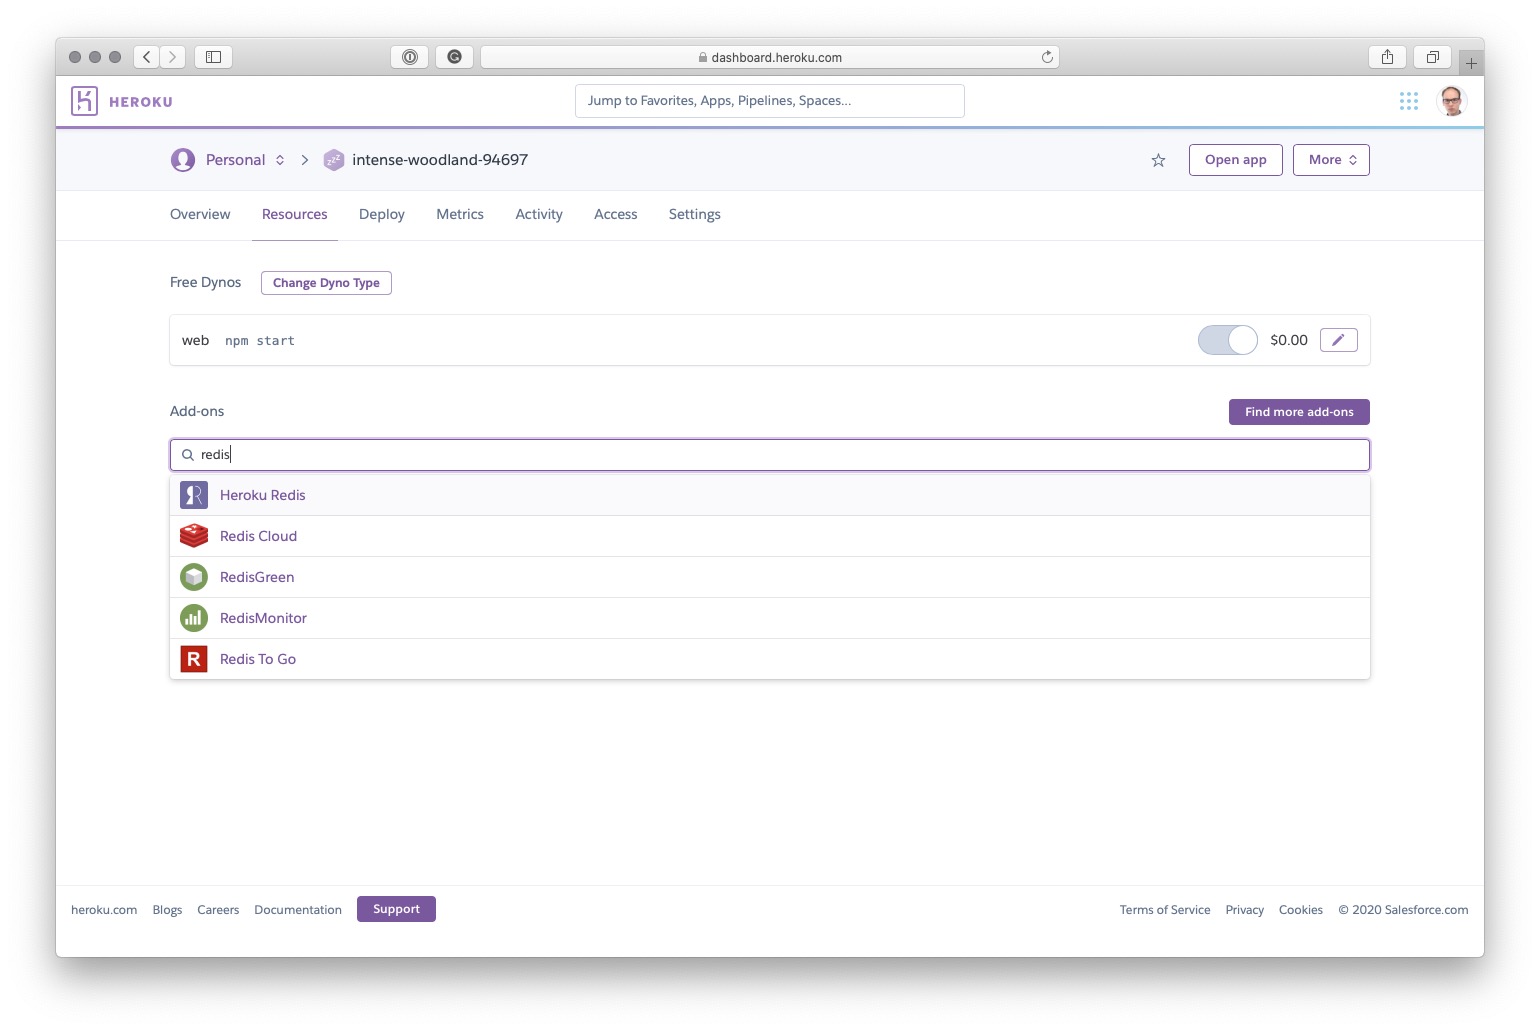
Confirm the provisioning by clicking the Provision button.
Once the Redis instance is provisioned, navigate into it and go to the Settings section. Click on the View Credentials… button to obtain your Redis URI. Note it down for further use

Implementing Redis Middleware#
It’s time to implement the server logic to handle requests from the end user and check for rendered output in Redis. If an entry doesn’t exist in the Redis database, then the rendering process is triggered, and the output is saved to the database.
Install redis as a dependency:
npm install redis
Start by initializing a Redis client. Copy the following code into server.ts :
import * as redis from './node_modules/redis';

let redisUrl;
if (process.env.NODE_ENV == 'development') {
  redisUrl = 'redis://localhost:6379';
} else {
  redisUrl =
    'redis://h:your-redis-url@ec2-54-86-250-147.compute-1.amazonaws.com:19079';
}

const redisClient = redis.createClient(redisUrl);
redisClient.on('error', (err) => {});
This code sets up the redisUrl variable that depends on the NODE_ENV environment variable. If the application runs in the development environment, redisUrl is set to localhost. Otherwise, it is set to the Heroku instance URL. Then redisClient is initialized, and all errors that might occur (such as if a Redis instance is not running) are handled.
Remember to replace the redisUrl value with your Redis URI, obtained in previous lesson.
You can now implement Redis middleware:
const redisMiddleware = (req, res, next) => {
  if (!redisClient.connected) {
    next();
    return;
  }

  let entryName = req.url + req.cookies?.loggedIn;
  redisClient.get(entryName, (err, result) => {
    if (result) {
      res.send(result);
    } else {
      let sendReference = res.send.bind(res);
      res.send = (body) => {
        redisClient.setex(entryName, 60 * 5, body);
        sendReference(body);
      };
      next();
    }
  });
};
This is a regular Node.js middleware function that accepts three parameters:
-
reqrepresents an HTTP request sent to the server. -
resrepresents the response that will be sent by the server. -
nextis a reference to the next request handler.
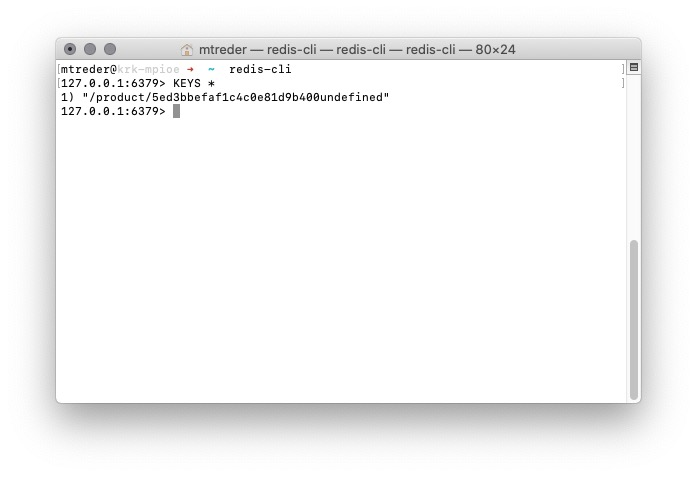
At the very beginning, the function initializes the entryName variable. The entry name is the request URL concatenated with the value retrieved from the loggedIn cookie (or undefined if the cookie is missing). You need to check the cookie value because the rendered output looks different for logged-in users (i.e., some products may be marked as favorites).
In the next line, the function tries to get a value for the specified entryName : redisClient.get(entryName, (err, result) => {}) . If such entry exists, it’s returned to the end user as an HTTP response.
If the entry is not found, you trigger ngExpressEngine and feed the database with rendered output. To do that, you need to extend the res.send() function to create a new entry in Redis when the output is rendered:
- The variable
sendReferencekeeps a reference to theres.send()function. Usingbind()makes sure that the function has itsthiskeyword set to the provided value. - The
res.send()function is extended by introducing theredisClient.setex(entryName, 60*5, body)entry that feeds the Redis database with the rendered body and instructs Redis to keep this entry for 300 seconds (5 minutes). - You invoke
sendReference(body)that holds a reference to the oldres.send(). - Finally, the request is passed to the next handler using the
next()function.
You can now use the middleware with requests that are routed to ngExpressEngine . Update the server.get('*') method:
  server.get('*', redisMiddleware, (req, res) => {
    res.render(indexHtml, {
      req,
      providers: [
        { provide: APP_BASE_HREF, useValue: req.baseUrl },
      ],
    });
  });
Make sure that your Redis instance is up and running:
Launch the application in a separate terminal window:
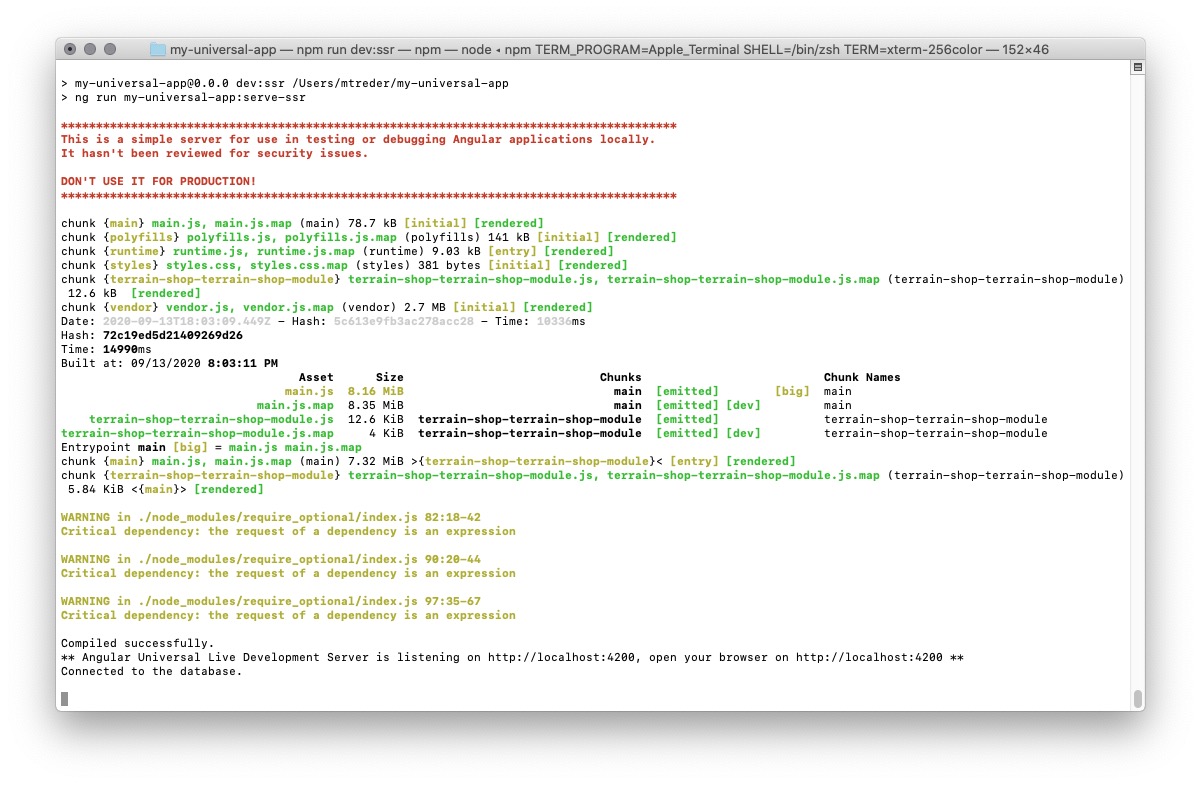
Navigate to the application, then see what’s inside the Redis database:
redis-cli
KEYS *
The current application flow
Now, whenever a user navigates to the application, the first thing it does is check for rendered content in Redis. If the given URL’s rendered output exists in the database, the user is served with the cached output. This flow is depicted in the diagram below:
The user sends an HTTP request to the application.
If server.ts doesn’t find anything in the Redis DB, it triggers Angular.
The rendered output is saved in Redis.
The rendered output is sent back to the user.
Another user sends a request to the application.
server.ts looks for rendered output in Redis.
The rendered output is retrieved from Redis.
The user is served with the content retrieved from Redis.
Tuning the Application
Your application is almost ready. Let’s add some final touches to tune it up.
Enabling gzip compression
The first thing you can do to improve Time To First Byte is to enable gzip compression. As a result, you will decrease the size of files shipped to the browser.
Install the compression middleware:
npm i compression
Now enable compression in server.ts:
import * as compression from 'compression';

/**
 * other code
 */

export function app(): express.Express {
 const server = express();
 server.use(compression());
Deferring Bootstrap CSS
Another possible improvement is to defer CSS downloaded from the Bootstrap CDN. Replace the current stylesheet link in src/index.html with the following code:
<link rel="preload"
  href="https://stackpath.bootstrapcdn.com/bootstrap/4.5.0/css/bootstrap.min.css"
  as="style" onload="this.onload=null;this.rel='stylesheet'">
<noscript>
  <link rel="stylesheet"
    href="https://stackpath.bootstrapcdn.com/bootstrap/4.5.0/css/bootstrap.min.css">
</noscript>
Instead of rel=“stylesheet”, the file is initially loaded as rel=“preload”. This enables the browser to download stylesheets asynchronously. Once the styles are downloaded, you change the rel attribute to stylesheet to apply the styles. To support browsers where JavaScript is disabled, there’s a section that attaches styles in a regular way.
Loading images lazily
In most web applications images are the largest files downloaded via HTTP. Most browsers support lazy-loading of images, which prevents them from blocking the final page render time. Using this functionality is as easy as adding loading=“lazy” attribute to the tag.
Navigate to src/app/product-details/product-details.component.html and adjust ProductDetailsComponent by adding the loading attribute to the tag:
<img data-src="assets/images/{{p.image}}.png"
  alt="pictogram of {{p.name}}" loading="lazy">
WebP & AVIF
Another improvement that you can apply to images is to serve them in formats that use smaller file sizes. The web development community has recently got excited by the AVIF file format. Unfortunately, Chrome is the only browser in the market that currently supports it.
As an alternative to AVIF, you can use the WebP format that also helps keep file size low. It’s supported by most browsers (Safari currently supports it in a Technical Preview release).
It may look like PNG is still the best format to use for graphics on the web. Not really: thanks to the
Update the src/app/product-details/product-details.component.html template to make use of the
<picture>
    <source srcset="assets/images/{{p.image}}.avif" type="image/avif">
    <source srcset="assets/images/{{p.image}}.webp" type="image/webp">
    <source srcset="assets/images/{{p.image}}.png" type="image/png">
    <img src="assets/images/{{p.image}}.png"
      alt="pictogram of {{p.name}}" loading="lazy">
  </picture>
Doing so is totally worth it. While WebP seems to cut down on size by a few percent compared to PNG, AVIF can be several times smaller:
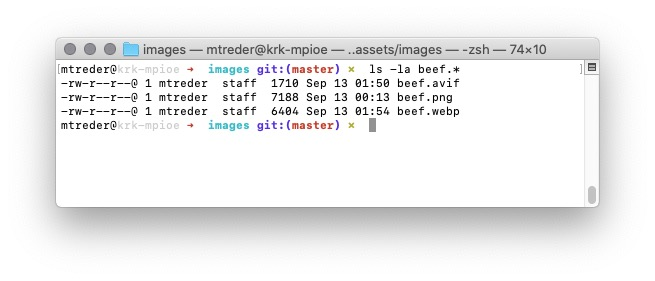
Pictures of goods available in our online grocery, in avif and webp formats are available for download here
CDN & HTTP2
Heroku doesn’t support HTTP2 out of the box. Fortunately, you can easily enable HTTP2 connections for your web application using one of the content delivery networks (CDN) available for free in basic plans. For example, configuring Cloudflare is as easy as setting up DNS. Since you’ve enabled server-side rendering, a CDN can cache way more content from your origin than usual.
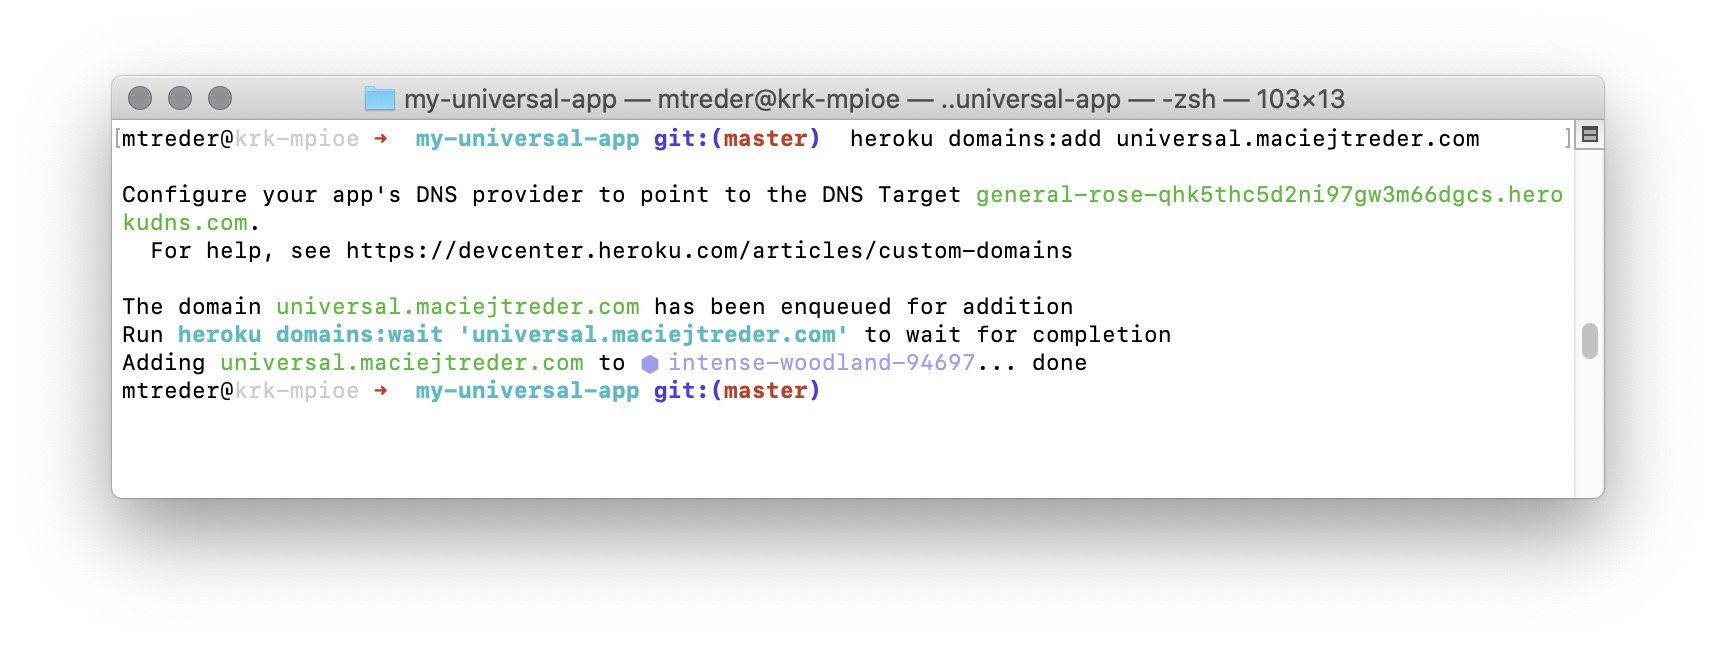
To enable a custom domain in your Heroku application, run the following CLI command:
heroku domains:add universal.maciejtreder.com