Stubbing PLATFORM_ID#
Let’s start by testing I18nService . As you may recall, this service determines the user’s language and prints currency in the corresponding format. It injects the PLATFORM_ID token from the @angular/core library. The token is used in the isPlatformBrowser() method, determining if the code executes on the server or in the browser.
Create a new file, src/app/i18n.service.spec.ts , then import TestBed and I18nService :
import { TestBed } from '@angular/core/testing';
import { I18nService } from './i18n.service';
import { PLATFORM_ID } from '@angular/core';
What is PLATFORM_ID?#
The value held by the variable identified with the PLATFORM_ID token is a string. That string has the value browser or server depending on where code executes. You can stub it as a variable reference. Add the following code to the test file:
let platformId = 'browser';
Stubbing the window object#
Set up the variables that you are going to use in test expectations:
let windowLanguage = 'en-EN';
let windowCurrency = 'GBP';
Next, set up the spec using Jasmine’s describe() and beforeEach() methods:
describe('I18nService', () => {
  let service: I18nService;

  beforeEach(() => {
    delete (window as any).navigator.language;
    Object.defineProperty(window.navigator, 'language', {
    configurable: true,
    enumerable: true,
    value: windowLanguage,
    writable: true,
    });
The code above introduces a mechanism that changes the value of window.navigator.language to the value of the windowLanguage variable before each test.
You can now provide the PLATFORM_ID token with the TestBed.configureTestingModule() method:
TestBed.configureTestingModule({
  providers: [
    { provide: PLATFORM_ID, useFactory: () => platformId },
  ],
});
The last step in beforeEach() is to inject the service that you are going to test:
  service = TestBed.inject(I18nService);
});
At this point, your code containing import statements and the beforeEach() method should look like the following:
import { TestBed } from '@angular/core/testing';
import { I18nService } from './i18n.service';
import { PLATFORM_ID } from '@angular/core';

let platformId = 'browser';

let windowLanguage = 'en-EN';
let windowCurrency = 'GBP';

describe('I18nService', () => {
  let service: I18nService;

  beforeEach(() => {
    delete (window as any).navigator.language;
    Object.defineProperty(window.navigator, "language", {
      configurable: true,
      enumerable: true,
      value: windowLanguage,
      writable: true
    });

    TestBed.configureTestingModule({
      providers: [
        {provide: PLATFORM_ID, useFactory: () => platformId},
      ]
    });
    service = TestBed.inject(I18nService);
  });
Notice that PLATFORM_ID is provided using the useFactory() method rather than useValue() . The reason is that you are going to change this value between tests. If you used useValue() , the configureTestingModule() method would use a value of the platformId variable at the moment of defining this method. In contrast, the useFactory() method makes sure that whenever PLATFORM_ID is requested in the test, an anonymous function call returns the current platformId value.
Testing the service in the browser environment#
Add the following tests to your test file:
it('should initialize service', () => {
  expect(service).toBeTruthy();
});

describe('browser tests', () => {
  beforeAll(() => {
    platformId = 'browser';
  });

  it('should retrieve language from window object', () => {
    expect(service.getCurrencyCode()).toEqual(
      windowCurrency
    );
  });
});
The code above introduces a basic test that checks if the service has been initialized. It also adds a test verifying that the currency code returned by the service is equal to the value held by the windowCurrency variable.
Notice that the latter test is wrapped with yet another describe() method and preceded by a beforeAll() call. The beforeAll() method only executes before tests nested into this particular describe() code block. It’s crucial to ensure that platformId is set to browser before you verify anything that is coming from the window object.
Testing the service in the server environment#
You now know that mocking the server environment is as easy as changing the platformId variable. Before you do this, you need to provide TestingModule with another injection token: REQUEST . Update your imports to add the following statement:
import { REQUEST } from '@nguniversal/express-engine/tokens';
Now prepare variables that will hold the language info and expected currency code for the server environment:
let serverLanguage = 'en-US';
let serverCurrency = 'USD';
Provide the service in configureTestingModule() :
TestBed.configureTestingModule({
  providers: [
    {
      provide: PLATFORM_ID,
      useFactory: () => platformId,
    },
    {
      provide: REQUEST,
      useValue: {
        headers: { 'accept-language': serverLanguage },
      },
    },
  ],
});
Add a test that verifies service behavior in the server runtime environment:
  describe('server tests', () => {
    beforeAll(() => {
      platformId = 'server';
    });

    it('should retrieve language from header', () => {
      expect(service.getCurrencyCode()).toEqual(
        serverCurrency
      );
    });
  });
});
Here, you’re again using beforeAll() specific to the test nested under describe() to make sure that platformId is set to server .
Your spec file should now look like the following:
import { TestBed } from '@angular/core/testing';
import { I18nService } from './i18n.service';
import { PLATFORM_ID } from '@angular/core';
import { REQUEST } from '@nguniversal/express-engine/tokens';

let platformId = 'browser';

let windowLanguage = 'en-EN';
let windowCurrency = 'GBP';
let serverLanguage = 'en-US';
let serverCurrency = 'USD';

describe('I18nService', () => {
  let service: I18nService;

  beforeEach(() => {
    delete (window as any).navigator.language;
    Object.defineProperty(window.navigator, 'language', {
      configurable: true,
      enumerable: true,
      value: windowLanguage,
      writable: true,
    });

    TestBed.configureTestingModule({
      providers: [
        {
          provide: PLATFORM_ID,
          useFactory: () => platformId,
        },
        {
          provide: REQUEST,
          useValue: {
            headers: { 'accept-language': serverLanguage },
          },
        },
      ],
    });
    service = TestBed.inject(I18nService);
  });

  it('should initialize service', () => {
    expect(service).toBeTruthy();
  });

  describe('browser tests', () => {
    beforeAll(() => {
      platformId = 'browser';
    });

    it('should retrieve language from window object', () => {
      expect(service.getCurrencyCode()).toEqual(
        windowCurrency
      );
    });
  });

  describe('server tests', () => {
    beforeAll(() => {
      platformId = 'server';
    });

    it('should retrieve language from header', () => {
      expect(service.getCurrencyCode()).toEqual(
        serverCurrency
      );
    });
  });
});
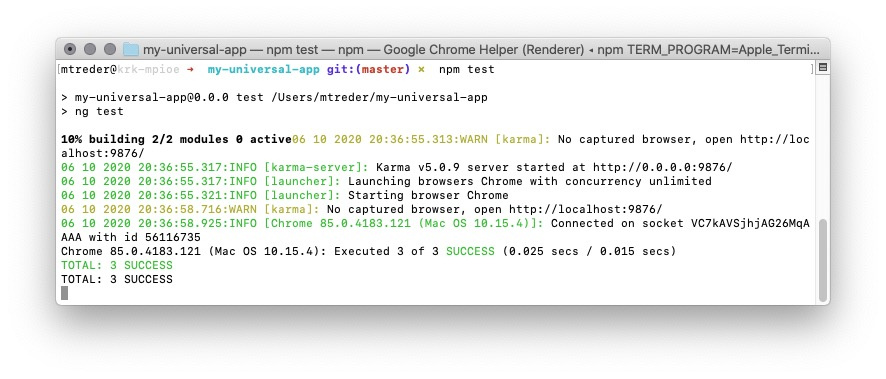
Run your tests with the npm test command and verify that they pass as expected:
Testing Long-Running API Calls#
Let’s now test TerrainShopResolver . This resolver should abandon long-running API calls that may prevent a view from being rendered on the server.
TerrainShopResolver doesn’t perform HTTP calls; instead, it delegates them to TerrainShopService . This means you don’t need to stub the HttpClient service. You can just mock TerrainShopService and return the data from getPromotions() with a specified delay.
Create a new file, src/app/terrain-shop-resolver.service.spec.ts , and add the following import statements:
import { TestBed } from '@angular/core/testing';
import { TerrainShopResolverService } from './terrain-shop-resolver.service';
import { PLATFORM_ID } from '@angular/core';
import { TerrainShopService } from './terrain-shop.service';
import { Observable } from 'rxjs';
Similar to I18nServiceTests , you want to test service behavior both in the browser and on the server. To do this, you are going to provide a mocked PLATFORM_ID value. Declare a variable that will be used to stub PLATFORM_ID :
let platformId = 'server';
The next step is to prepare a mock of TerrainShopService :
let timeout = 1000;
let terrainServiceMock = {
  getPromotions() {
    return new Observable((observer) => {
      setTimeout(() => {
        observer.next(['testValue']);
        observer.complete();
      }, timeout);
    });
  },
};
The code above introduces the terrainServiceMock variable that holds an object containing the getPromotions() method. This method returns an observable that emits after a timeout defined by the timeout variable. You are going to modify this variable in tests.
When mocks are ready, it’s time to write the beforeEach() section, inject a service that you are going to test, and verify that it’s instantiated correctly:
describe('Terrain Shop Resolver', () => {
  let service: TerrainShopResolverService;

  beforeEach(() => {
    delete (window as any).navigator.language;

    TestBed.configureTestingModule({
      providers: [
        {
          provide: PLATFORM_ID,
          useFactory: () => platformId,
        },
        {
          provide: TerrainShopService,
          useValue: terrainServiceMock,
        },
      ],
    });
    service = TestBed.inject(TerrainShopResolverService);
  });

  it('should initialize service', () => {
    expect(service).toBeTruthy();
  });
Now let’s move on to the server part:
  describe('server', () => {
    beforeAll(() => (platformId = 'server'));

    it('should abandon long running call', async () => {
      timeout = 1000;
      let value = await service.resolve().toPromise();
      expect(value).toEqual(['Loading data...']);
    });

    it('should not abandon quick call', async () => {
      timeout = 100;
      let value = await service.resolve().toPromise();
      expect(value).toEqual(['testValue']);
    });
  });
Here’s what’s going on in this part of code:
- Before all tests that check server-side behavior of the service, you make sure that the value of the mocked
PLATFORM_IDis set toserver. - The first test checks how the service behaves when resolving a value from
TerrainShopServicetakes 1 second (which we treat as a long-running call). In this case, you expect the resolver to stop waiting and return the"Loading data..."string. - The next test verifies the behavior of short-running calls (0.1 seconds). In this case, you expect the resolver to return a value from the service.
Finally, add a test to verify that the resolver waits as long as necessary when running in the browser environment:
  describe('browser', () => {
    beforeAll(() => (platformId = 'browser'));

    it('should NOT abandon long running call', async () => {
      timeout = 1000;
      let value = await service.resolve().toPromise();
      expect(value).toEqual(['testValue']);
    });
  });
});
Your spec file should now look like the following:
import { TestBed } from '@angular/core/testing';
import { TerrainShopResolverService } from './terrain-shop-resolver.service';
import { PLATFORM_ID } from '@angular/core';
import { TerrainShopService } from './terrain-shop.service';
import { Observable } from 'rxjs';

let platformId = 'server';

let timeout = 1000;
let terrainServiceMock = {
  getPromotions() {
    return new Observable((observer) => {
      setTimeout(() => {
        observer.next(['testValue']);
        observer.complete();
      }, timeout);
    });
  },
};

describe('Terrain Shop Resolver', () => {
  let service: TerrainShopResolverService;

  beforeEach(() => {
    delete (window as any).navigator.language;

    TestBed.configureTestingModule({
      providers: [
        {
          provide: PLATFORM_ID,
          useFactory: () => platformId,
        },
        {
          provide: TerrainShopService,
          useValue: terrainServiceMock,
        },
      ],
    });
    service = TestBed.inject(TerrainShopResolverService);
  });

  it('should initialize service', () => {
    expect(service).toBeTruthy();
  });

  describe('server', () => {
    beforeAll(() => (platformId = 'server'));

    it('should abandon long running call', async () => {
      timeout = 1000;
      let value = await service.resolve().toPromise();
      expect(value).toEqual(['Loading data...']);
    });

    it('should not abandon quick call', async () => {
      timeout = 100;
      let value = await service.resolve().toPromise();
      expect(value).toEqual(['testValue']);
    });
  });

  describe('browser', () => {
    beforeAll(() => (platformId = 'browser'));

    it('should NOT abandon long running call', async () => {
      timeout = 1000;
      let value = await service.resolve().toPromise();
      expect(value).toEqual(['testValue']);
    });
  });
});
Run your tests with the npm test command and verify that they all pass as expected:

Testing Server-Specific Classes#
You’re moving to a more sophisticated part of unit testing in your Angular Universal application. In this lesson, you will create more advanced stubs that you need to perform assertions.
Stubbing MongoDB and TransferState#
Start by installing Sinon.JS that you will use to create stubs:
npm i -D sinon
Create a new file, src/app/products-server.service.spec.ts , then add import statements and set up variables that will hold stubs:
import { TestBed } from '@angular/core/testing';
import { ProductsServerService } from './products-server.service';
import { TransferState } from '@angular/platform-browser';
import { ObjectId } from 'mongodb';
import * as sinon from 'sinon';

describe('Products Server Service', () => {
  let service: ProductsServerService;
  let transferStateStub;
  let dbClientStub;
  let products = [
    {
      _id: ObjectId('5ed3bbefaf1c4c0e81d9b400'),
      name: 'product1',
      price: 2.4,
      description: 'Lorem ipsum.',
      image: 'juice',
    },
    {
      _id: ObjectId('5ed3bbefaf1c4c0e81d9b401'),
      name: 'product2',
      price: 0.5,
      description: 'Lorem ipsum.',
      image: 'tomato',
    },
  ];
Initialize stubs in the beforeEach() method and provide them in configureTestingModule() :
Notice that dbClientStub and transferStateStub are both created using the sinon.stub() method. This lets you check inside tests if the service is calling MongoDB (rather than HTTP) to retrieve products. You will also check if it feeds up TransferState with retrieved products by calling its set() method.

Let's write the tests:
it(‘should initialize service’, () => {
expect(service).toBeTruthy();
});
it(‘should query all products’, async () => {
await service.getProducts().toPromise();
expect(
dbClientStub.collection().aggregate.calledOnce
).toBeTrue();
expect(
dbClientStub.collection().aggregate.getCall(0)
.args[0][0]
).toEqual({ $match: {} });
expect(transferStateStub.set.calledOnce).toBeTrue();
expect(transferStateStub.set.getCall(0).args).toEqual([
  'products',
  products,
]);
});
it(‘should query specific product’, async () => {
await service
.getProduct(‘5ed3bbefaf1c4c0e81d9b400’)
.toPromise();
expect(
dbClientStub.collection().aggregate.calledOnce
).toBeTrue();
expect(
dbClientStub.collection().aggregate.getCall(0)
.args[0][0]
).toEqual({
$match: { _id: ObjectId(‘5ed3bbefaf1c4c0e81d9b400’) },
});
expect(transferStateStub.set.calledOnce).toBeTrue();
expect(transferStateStub.set.getCall(0).args).toEqual([
  'product',
  products[0],
]);
});
});
Similar to previous specs, the first test verifies that the service has been instantiated correctly. Next, you are testing the getProducts() method of ProductsServerService. Inside the test you verify that MongoDB has been called with a proper query:
expect(
dbClientStub.collection().aggregate.calledOnce
).toBeTrue();
expect(
dbClientStub.collection().aggregate.getCall(0)
.args[0][0]
).toEqual({ $match: {} });
The following expectations check if TransferState has been called, and if the value stored in TransferState is equal to the list set up in the products variable:
expect(transferStateStub.set.calledOnce).toBeTrue();
expect(transferStateStub.set.getCall(0).args).toEqual([
‘products’,
products,
]);
The last step applies the same approach to testing the getProduct() method.

Your file src/app/products-server.service.spec.ts should now contain the following code:
import { TestBed } from ‘@angular/core/testing’;
import { ProductsServerService } from ‘./products-server.service’;
import { TransferState } from ‘@angular/platform-browser’;
import { ObjectId } from ‘mongodb’;
import * as sinon from ‘sinon’;
describe(‘Products Server Service’, () => {
let service: ProductsServerService;
let transferStateStub;
let dbClientStub;
let products = [
{
_id: ObjectId(‘5ed3bbefaf1c4c0e81d9b400’),
name: ‘product1’,
price: 2.4,
description: ‘Lorem ipsum.’,
image: ‘juice’,
},
{
_id: ObjectId(‘5ed3bbefaf1c4c0e81d9b401’),
name: ‘product2’,
price: 0.5,
description: ‘Lorem ipsum.’,
image: ‘tomato’,
},
];
beforeEach(() => {
dbClientStub = {
collection: sinon.stub().returns({
aggregate: sinon.stub().returns({
toArray: (callbackFn: Function) =>
callbackFn(null, products),
}),
}),
};
transferStateStub = {
  set: sinon.stub(),
};

TestBed.configureTestingModule({
  providers: [
    {
      provide: 'dbConnection',
      useValue: Promise.resolve(dbClientStub),
    },
    {
      provide: TransferState,
      useValue: transferStateStub,
    },
  ],
});
service = TestBed.inject(ProductsServerService);
});
it(‘should initialize service’, () => {
expect(service).toBeTruthy();
});
it(‘should query all products’, async () => {
await service.getProducts().toPromise();
expect(
dbClientStub.collection().aggregate.calledOnce
).toBeTrue();
expect(
dbClientStub.collection().aggregate.getCall(0)
.args[0][0]
).toEqual({ $match: {} });
expect(transferStateStub.set.calledOnce).toBeTrue();
expect(transferStateStub.set.getCall(0).args).toEqual([
  'products',
  products,
]);
});
it(‘should query specific product’, async () => {
await service
.getProduct(‘5ed3bbefaf1c4c0e81d9b400’)
.toPromise();
expect(
dbClientStub.collection().aggregate.calledOnce
).toBeTrue();
expect(
dbClientStub.collection().aggregate.getCall(0)
.args[0][0]
).toEqual({
$match: { _id: ObjectId(‘5ed3bbefaf1c4c0e81d9b400’) },
});
expect(transferStateStub.set.calledOnce).toBeTrue();
expect(transferStateStub.set.getCall(0).args).toEqual([
  'product',
  products[0],
]);
});
});
Try to run tests to verify that everything works as expected:
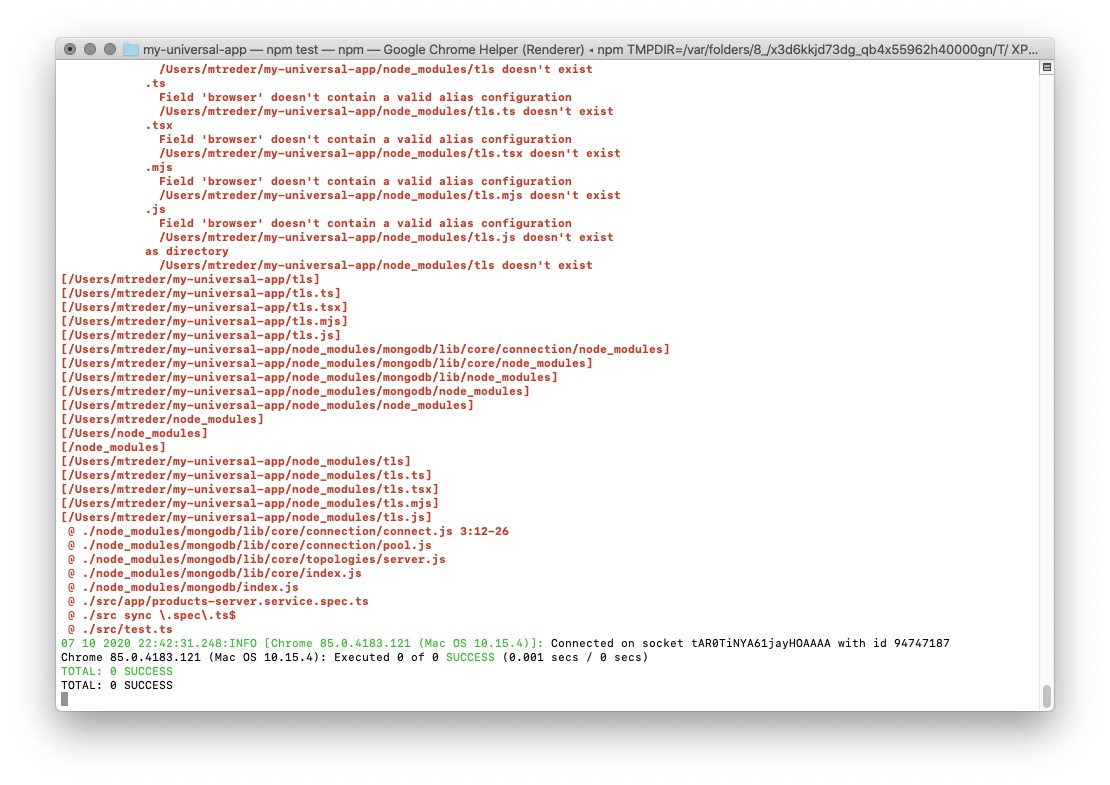
Unfortunately it doesn’t… You’ve got multiple compilation issues. The compiler is complaining that the following modules are missing:
tlsnetmodulefsdnschild_process
Why?
The Karma problem#
Angular uses Karma to run unit tests. Karma is designed to test browser-side code, but ProductsServerService is designed to run in the Node.js environment. The problematic code is at the very beginning of ProductsServerService . It’s this line:
import { ObjectId } from 'mongodb';
mongodb is a module designed for Node.js, and it looks for modules that Karma is missing in the browser.
Fortunately, the workaround for this issue is very simple. Just add the browser field to package.json and list modules that cause compilation errors:
"browser": {
    "tls": false,
    "net": false,
    "module": false,
    "fs": false,
    "dns": false,
    "child_process": false
},
This entry informs the compiler that it doesn’t need the specified dependencies for the browser build.
Run your tests one more time. From now, everything should be green:

End-to-End Tests for Angular Universal Applications
Let’s move on to end-to-end (E2E) testing. Unfortunately, Angular does not support Universal E2E tests out of the box. If you run the npm run e2e script right now, Angular will only build and test a production version of the browser application, ignoring the server-side part.
Running Protractor tests with your Universal application
Before running Protractor tests against your Universal application, you need to build and start it up. Install an additional dependency:
npm i -D concurrently
Now, add a new script, serve:e2e, to package.json:
"serve:e2e":
"npm run build:ssr && concurrently \"PORT=4200 npm run serve:ssr\" \"npm run e2e\" --kill-others --success first"
Notice that you’ve set up the environment variable PORT to value 4200. You need to do that, because by default production build of Angular Universal is running on port 4000 while your protractor tests are looking for the app on port 4200.
Moreover, because you’re going to run the Angular Universal application instead of the browser-side build, adjust the angular.json file and remove the projects.my-universal-app.architect.e2e.options.devServerTarget entry:
"devServerTarget": "my-universal-app:serve"
Testing TransferState
Open e2e/src/app.po.ts and replace its content with the following code:
import {
  browser,
  by,
  element,
  ElementArrayFinder,
} from 'protractor';

export class AppPage {
  async navigateTo(): Promise<void> {
    await browser.get(browser.baseUrl);
  }

  getProducts(): ElementArrayFinder {
    return element.all(
      by.css('app-products-list app-product-details')
    );
  }

  getTitleText(): Promise<string> {
    return element(
      by.css('app-header strong')
    ).getText() as Promise<string>;
  }
}
The code above introduces two getters:
-
getProducts() returns the list of products displayed on a page.
-
getTitleText() returns the application title.
You’ve also modified the navigateTo() method to wait for the page to load synchronously.
Now you need to prepare code that will be responsible for retrieving objects from the TransferState registry. Create a new file, e2e/src/utils.ts, and add the following code to it:
import { by, element, ElementFinder } from 'protractor';

export class Utils {
  public static async getTransferStateStore() {
    const cacheScript: ElementFinder = await element(
      by.id('serverApp-state')
    );
    const rawValue: string = await cacheScript.getAttribute(
      'textContent'
    );
    return JSON.parse(this.unescapeHtml(rawValue));
  }

  private static unescapeHtml(text: string): string {
    const unescapedText: { [k: string]: string } = {
      '&a;': '&',
      '&q;': '"',
      '&s;': "'",
      '&l;': '<',
      '&g;': '>',
    };
    return text.replace(
      /&[^;]+;/g,
      (s) => unescapedText[s]
    );
  }
}
This helper class has a method called getTransferStateStore(). Here’s what it does whenever invoked:
-
It parses HTML and looks for the element with ID #serverApp-state where Angular embeds TransferState.
-
It obtains rawValue by reading the content of that HTML element.
-
It calls the unenscapeHtml() method that converts an escaped string into the original string, and parses that value into a JSON object that is returned from the function.
It’s time to write some tests. Open e2e/src/app.e2e-spec.ts and import the Utils class:
import { Utils } from './utils';
Replace beforeEach() with the following beforeAll() method:
beforeAll(() => {
  page = new AppPage();
  page.navigateTo();
});
Now, add tests that will verify the content of the application’s home page:
  it('should display welcome message', () => {
    expect(page.getTitleText()).toEqual(
      'Welcome to the (work)shop!'
    );
  });

  it('transfer state should contain products', async () => {
    let transferState = await Utils.getTransferStateStore();
    expect(transferState.products).toBeDefined();
  });

  it('should display all products from TransferState', async () => {
    let transferState = await Utils.getTransferStateStore();
    expect(transferState.products.length).toEqual(
      page.getProducts().count()
    );
  });
The first test is self-explanatory: it verifies that the page has loaded correctly and has the expected title. The second test retrieves data from TransferState and verifies that it contains the list of products. The last test verifies that all products from TransferState are displayed on the page.
At the very end, change the afterEach() invocation to afterAll(): it makes no sense to verify console output after each test when the page is only loaded once.
Your e2e/src/app.e2e-spec.ts file should now look like the following:
import { AppPage } from './app.po';
import { browser, logging } from 'protractor';
import { Utils } from './utils';

describe('workspace-project App', () => {
  let page: AppPage;

  beforeAll(() => {
    page = new AppPage();
    page.navigateTo();
  });

  it('should display welcome message', () => {
    expect(page.getTitleText()).toEqual(
      'Welcome to the (work)shop!'
    );
  });

  it('transfer state should contain products', async () => {
    let transferState = await Utils.getTransferStateStore();
    expect(transferState.products).toBeDefined();
  });

  it('should display all products from TransferState', async () => {
    let transferState = await Utils.getTransferStateStore();
    expect(transferState.products.length).toEqual(
      page.getProducts().count()
    );
  });

  afterAll(async () => {
    // Assert that there are no errors emitted from the browser
    const logs = await browser
      .manage()
      .logs()
      .get(logging.Type.BROWSER);
    expect(logs).not.toContain(
      jasmine.objectContaining({
        level: logging.Level.SEVERE,
      } as logging.Entry)
    );
  });
});
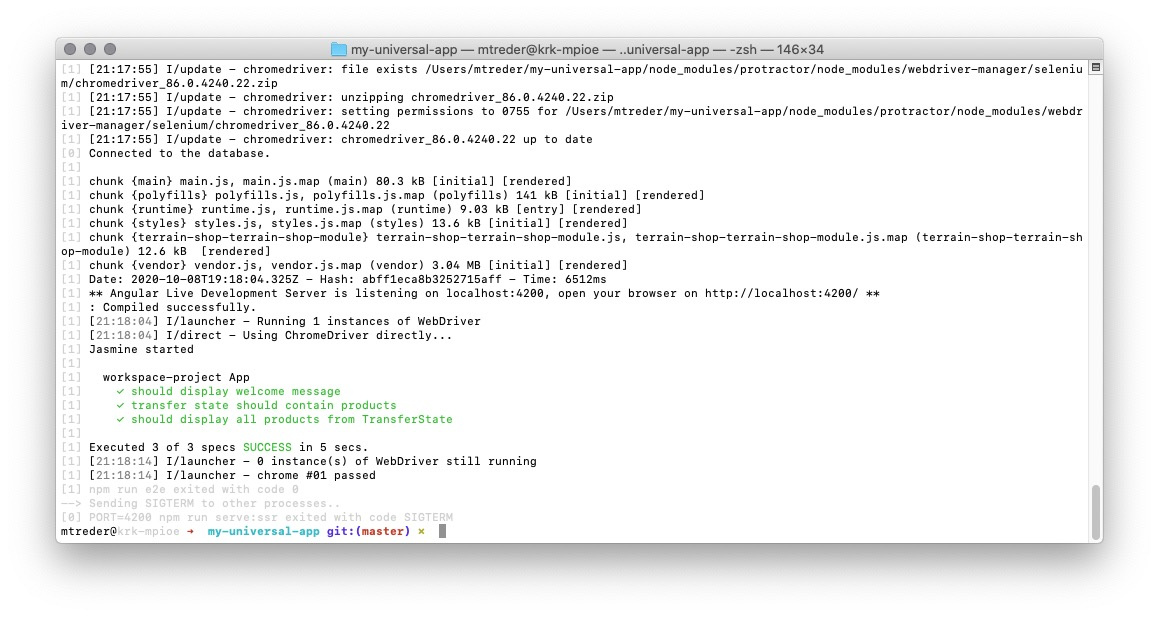
That’s it! Run your tests and verify that they work as you expect:
npm run serve:e2e
Mocking MongoDB
E2E tests that you have written so far have one serious issue. They use the production database instance. That’s a terrible design. Tests should never touch the production environment. Building the production version of the application for testing is good, but this application has a hardcoded database URL, which is bad. In this lesson, you will fix this issue. Apart from that, you will introduce a test that verifies if the user can add a product to the list of favorites.
Start by installing mongo-unit - a library that mocks MongoDB. Using a mock rather than a localhost MongoDB instance means you don’t need to bother about database state - it’s always the same. To install mongo-unit, type the following command in the terminal:
npm i -D mongo-unit
Now you need to prepare data that you want mongo-unit to return. Create a new file, e2e/testData.js, and add the following code:
const mongodb = require('mongodb');

module.exports = {
  products: [
    {
      _id: mongodb.ObjectId('5ed3bbefaf1c4c0e81d9b400'),
      name: 'product1',
      price: 2.4,
      description: 'Lorem ipsum.',
      image: 'juice',
    },
    {
      _id: mongodb.ObjectId('5ed3bbefaf1c4c0e81d9b401'),
      name: 'product2',
      price: 0.5,
      description: 'Lorem ipsum.',
      image: 'tomato',
    },
  ],
  users: [
    {
      _id: mongodb.ObjectId('5ed3bbefaf1c4c0e81d9b400'),
      email: 'name@email.com',
      password:
        'c70b5dd9ebfb6f51d09d4132b7170c9d20750a7852f00680f65658f0310e810056e6763c34c9a00b0e940076f54495c169fc2302cceb312039271c43469507dc',
      favorite: [],
    },
  ],
};
Configuring Protractor
The next step is to modify the Protractor configuration that is defined in e2e/protractor.conf.js. First of all, you need to introduce mongo-unit, child_process, and path:
const mongoUnit = require("mongo-unit");
const childProcess = require("child_process");
const path = require("path");
You also need to set up a variable to hold a reference to the process that you are going to launch later:
let backEndProcess;
And function, that you will use to delay the promise resolve:
function delay(timeout) {
  return () => {
    new Promise((resolve) => {
      setTimeout(resolve, timeout * 1000);
    });
  };
}
Now modify the onPrepare() method to instantiate mongo-unit and launch a Node.js instance with the application that you’re going to test. Add the following return statement to it:
  onPrepare() {
    require("ts-node").register({
      project: require("path").join(__dirname, "./tsconfig.json"),
    });
    jasmine.getEnv().addReporter(
      new SpecReporter({
        spec: {
          displayStacktrace: StacktraceOption.PRETTY,
        },
      })
    );

    return mongoUnit
      .start({ dbName: "cluster0" })
      .then((testMongoUrl) => {
        process.env.MONGO_URL = testMongoUrl;
      })
      .then(() => {
        const testData = require("./testData.js");
        mongoUnit.initDb(process.env.MONGO_URL, testData);
      })
      .then(() => {
        const distFolder = path.join(
          process.cwd(),
          "dist/my-universal-app/server"
        );
        backEndProcess = childProcess.fork(distFolder + "/main.js");
      })
      .then(delay(10));
  },
The last step is to introduce the onComplete() method to shut down the Node.js instance that you’ve launched in onPrepare():
onComplete() {
  backEndProcess.kill("SIGHUP");
},
Your configuration file should now look like the following:
// @ts-check
// Protractor configuration file, see link for more information
// https://github.com/angular/protractor/blob/master/lib/config.ts

const mongoUnit = require("mongo-unit");
const childProcess = require("child_process");
const path = require("path");

const { SpecReporter, StacktraceOption } = require("jasmine-spec-reporter");

function delay(timeout) {
  return () => {
    new Promise((resolve) => {
      setTimeout(resolve, timeout * 1000);
    });
  };
}

let backEndProcess;
/**
 * @type { import("protractor").Config }
 */
exports.config = {
  allScriptsTimeout: 11000,
  specs: ["./src/**/*.e2e-spec.ts"],
  capabilities: {
    browserName: "chrome",
  },
  directConnect: true,
  baseUrl: "http://localhost:4200/",
  framework: "jasmine",
  jasmineNodeOpts: {
    showColors: true,
    defaultTimeoutInterval: 30000,
    print: function () {},
  },
  onPrepare() {
    require("ts-node").register({
      project: require("path").join(__dirname, "./tsconfig.json"),
    });
    jasmine.getEnv().addReporter(
      new SpecReporter({
        spec: {
          displayStacktrace: StacktraceOption.PRETTY,
        },
      })
    );

    return mongoUnit
      .start({ dbName: "cluster0" })
      .then((testMongoUrl) => {
        process.env.MONGO_URL = testMongoUrl;
      })
      .then(() => {
        const testData = require("./testData.js");
        mongoUnit.initDb(process.env.MONGO_URL, testData);
      })
      .then(() => {
        const distFolder = path.join(
          process.cwd(),
          "dist/my-universal-app/server"
        );
        backEndProcess = childProcess.fork(distFolder + "/main.js");
      })
      .then(delay(10));
  },
  onComplete() {
    backEndProcess.kill("SIGHUP");
  },
};
From now on, you will launch your Universal application inside the onPrepare() method rather than from package.json. The reason is that you need to have more control over the order of setting up prerequisites for your tests. You want to launch mongo-unit before launching Universal. Apart of that you’ve delayed the Promise resolve by 1 second, to give your application time, to connect to the mocked MongoDB instane.
An alternative would be to introduce yet another Node.js application responsible for starting mongo-unit and running it with the script in package.json.
The last preparation step is to modify the serve:e2e script in package.json:
"serve:e2e":
"ng build && ng run my-universal-app:server:production && PORT=4200 npm run e2e"
Writing tests
Now you can dig into testing. Start by adding page objects representing the login and favorites buttons. Add the ExpectedConditions import statement to e2e/src/app.po.ts:
import {
  browser,
  by,
  element,
  ElementArrayFinder,
  ExpectedConditions,
} from 'protractor';
Add the following methods:
  async addToFavorites(productId: number) {
    const button = this.getProducts()
      .get(productId)
      .element(by.css('button'));
    await button.click();

    browser.wait(
      ExpectedConditions.invisibilityOf(button),
      5000
    );
  }

  getFavoritesButton() {
    return element(by.css('a[href="/favorites"]'));
  }
Now you need to wrap the Login page into a PageObject. Create a new file, e2e/src/login.po.ts, and add the following code:
import {
  browser,
  by,
  element,
  ExpectedConditions,
} from 'protractor';

export class LoginPage {
  private url: string = `${browser.baseUrl}/login`;

  async navigateTo(): Promise<void> {
    await browser.get(this.url);
  }

  public async login(user: string, password: string) {
    element(by.css('input#email')).sendKeys(user);
    element(by.css('input#password')).sendKeys(password);
    element(by.css('button')).click();

    browser.wait(
      ExpectedConditions.urlContains('/products'),
      5000
    );
  }
}
The last PageObject to create is a wrapper for the Favorites page. Create a new file, e2e/src/favorites.po.ts, and add the following code:
import {
  browser,
  by,
  element,
  ElementArrayFinder,
} from 'protractor';

export class FavoritesPage {
  private url: string = `${browser.baseUrl}/favorites`;

  async navigateTo(): Promise<void> {
    await browser.get(this.url);
    await browser.waitForAngular();
  }

  getProducts(): ElementArrayFinder {
    return element.all(
      by.css('app-favorites app-product-details')
    );
  }
}
Now you’re ready to write tests! Create yet another file, e2e/src/user.e2e-spec.ts, then import PageObjects and Utils:
import { LoginPage } from './login.po';
import { AppPage } from './app.po';
import { FavoritesPage } from './favorites.po';
import { Utils } from './utils';
Next, set up PageObject variables and instantiate them inside beforeAll(), along with adding a product to the list of favorites:
describe('workspace-project App', () => {
  let loginPage: LoginPage;
  let mainPage: AppPage;
  let favoritesPage: FavoritesPage;

  beforeAll(() => {
    loginPage = new LoginPage();
    loginPage.navigateTo();
    loginPage.login('name@email.com', 'abc123');

    mainPage = new AppPage();
    mainPage.navigateTo();
    mainPage.addToFavorites(1);

    favoritesPage = new FavoritesPage();
    favoritesPage.navigateTo();
  });
Finally, add tests that verify that Favorites page content and TransferState are as expected:
  it('product should be displayed in favorites list', async () => {
    expect((await favoritesPage.getProducts()).length).toBe(
      1
    );
  });

  it('product should be present in transfer state', async () => {
    let transferState = await Utils.getTransferStateStore();
    expect(transferState.user.favorite.length).toBe(1);
  });
});
Last but not least, update the api.ts file so the dbUrl is retrieved from an environment variable and falls back to a hardcoded value.
Replace the following line:
const dbUrl =
  'mongodb+srv://angular-universal:abcd1234@cluster0.bcfzj.mongodb.net';
with:
const dbUrl =
  process.env.MONGO_URL ||
  'mongodb+srv://angular-universal:abcd1234@cluster0.bcfzj.mongodb.net';
Remember to customize the connection string to match your database instance.
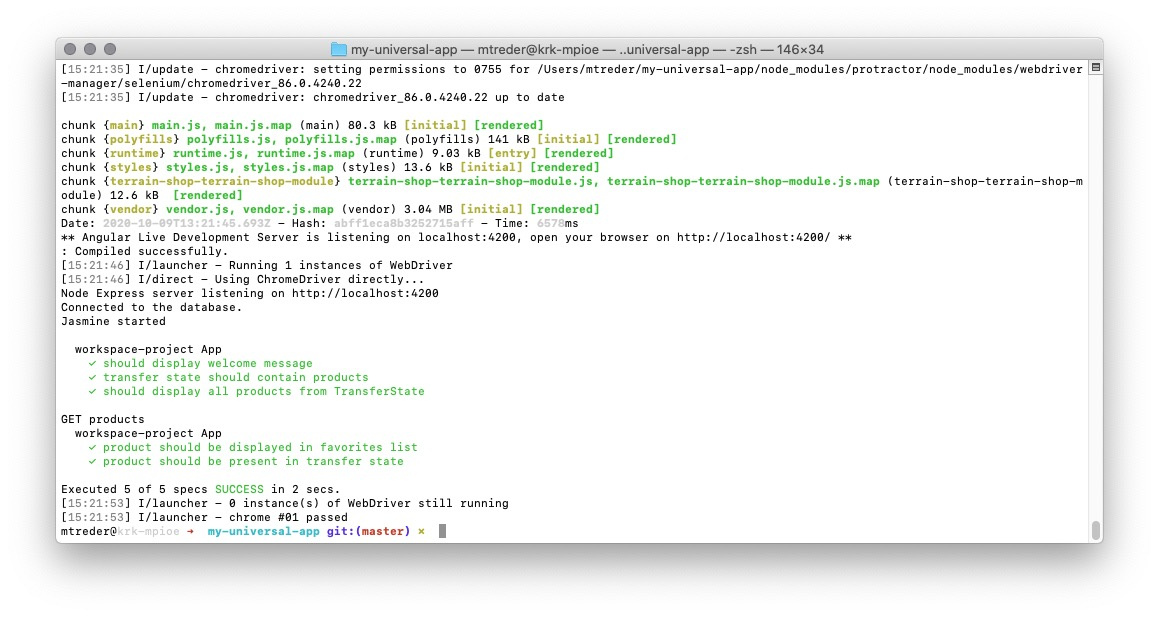
Run your tests and verify that they work as expected:
npm run serve:e2e
Prerendering
The code of the application built in the previous module is available for download here. Once you download it, remember to install the project using the npm install command inside the project directory.
Where you are
In the previous module, you’ve learned how to test your Angular Universal application. You’re at the very end of mastering server-side rendering Angular. So far, you’ve built an SEO friendly application that handles client HTTP requests on the server and renders the HTML output based on it. Sometimes running server instances like Heroku or Amazon EC2 might be too expensive for a particular use case. Moreover, the content of your application might not change often (or not change at all). In such a case, you don’t need to render the view on each request. For this scenario, the Angular team prepared the prerendering mechanism.
What you will build
In this module, you’ll learn how to adjust the Angular application to be pre-renderable. Such prepared application can be deployed on static hosting like GitHub pages and still be SEO friendly!
What you will learn
-
After finishing this module, you will know:
-
How prerendering works
-
How to utilize data from MongoDB during the rendering process
-
How to prepare back-end for prerendered Angular application
Prerendering
You’ve already added the script to run pre-rendering of your application by executing the ng add @nguniversal/express-engine schematics. The problem is that it’s not working with more sophisticated applications. Try to run it:
npm run prerender
As you can see, you’ve run into several issues. Some dependencies are missing in the Dependency Injection mechanism:
Terminate the rendering process.
The point is that the pre-rendering mechanism does not launch your application through the server.ts file; it does not even launch the server. Because of that, providers passed to the ngExpressEngine function are not applied. You need to provide them inside the src/app/app.server.module.ts file. Add the following imports statements at the top of this file:
import { REQUEST, RESPONSE } from '@nguniversal/express-engine/tokens';
import { dbClient } from '../../api';
And provide services and tokens that are missing:
providers: [
  {
    provide: ProductsService,
    useClass: ProductsServerService,
  },
  { provide: UserService, useClass: UserServerService },
  { provide: 'decrypt', useValue: (param) => 'noop' },
  { provide: 'addToFavorites', useValue: (param) => 'noop' },
  { provide: 'authentication', useValue: (param) => 'noop' },
  { provide: 'dbConnection', useValue: dbClient },
  {
    provide: REQUEST,
    useValue: {
      headers: {
        cookie: null,
      },
    },
  },
  {
    provide: RESPONSE,
    useValue: {
      append: (val1, val2) => {},
      status: (val1) => {}
    },
  },
],
Note that you’ve also provided the REQUEST token used by the I18nService. The pre-rendering mechanism does not act like a browser, and it doesn’t send HTTP requests to the server; because of that, no REQUEST object is provided automatically. You need to do it on your own.
There is one more issue that you’ve faced. The rendering process doesn’t terminate. It’s because of issue in the /node_modules/@nguniversal/builders/src/prerender/render.js file (in @nguniversal v. 10.1.0). The problem is that this script doesn’t provide an exit code to the Node.js process:
}))().then().catch();
That can be easily fixed by adding it:
}))().then(()=>process.exit(0)).catch(()=>process.exit(1));
Add the script in the package.json which will ensure that fix is applied. Adjust the prerender script so the check will be performed before any prerendering process:
"prerender:fix-exit":
"sed -i -e \"s/}))().then().catch();/}))().then(()=>process.exit(0)).catch(()=>process.exit(1));/g\" ./node_modules/@nguniversal/builders/src/prerender/render.js",
"prerender":
"npm run prerender:fix-exit && ng run my-universal-app:prerender",
Re-run prerendering:
npm run prerender

It works! But… Angular pre-rendered only part of the routes in the application. The reason is that out of the box Angular analyzes routes declared in your application routing. Notice that routes to specific product landing pages are dynamic (they are parameterized based on the content stored in the database). If you want to add such routes to the pre-rendering process, you need to adjust the angular.json configuration file, and list them in the routes array of the projects.my-universal-app.architect.prerender.options entry:
"prerender": {
          "builder": "@nguniversal/builders:prerender",
          "options": {
            "browserTarget": "my-universal-app:build:production",
            "serverTarget": "my-universal-app:server:production",
            "routes": [
              "/",
              "/product/5ed3bbefaf1c4c0e81d9b400",
              "/product/5ed3bbefaf1c4c0e81d9b401",
              "/product/5ed3bbefaf1c4c0e81d9b402",
              "/product/5ed3bbefaf1c4c0e81d9b403",
              "/product/5ed3bbefaf1c4c0e81d9b404",
              "/product/5ed3bbefaf1c4c0e81d9b405",
              "/product/5ed3bbefaf1c4c0e81d9b406",
              "/product/5ed3bbefaf1c4c0e81d9b407",
              "/product/5ed3bbefaf1c4c0e81d9b408",
              "/product/5ed3bbefaf1c4c0e81d9b409",
              "/product/5ed3bbefaf1c4c0e81d9b40a",
              "/product/5ed3bbefaf1c4c0e81d9b40b",
              "/product/5ed3bbefaf1c4c0e81d9b40c",
              "/product/5ed3bbefaf1c4c0e81d9b40d",
              "/product/5ed3bbefaf1c4c0e81d9b40e",
              "/product/5ed3bbefaf1c4c0e81d9b40f"
            ]
          },
          "configurations": {
            "production": {}
          }
        }
Once you’re done with that, run the pre-rendering process yet another time.
npm run prerender
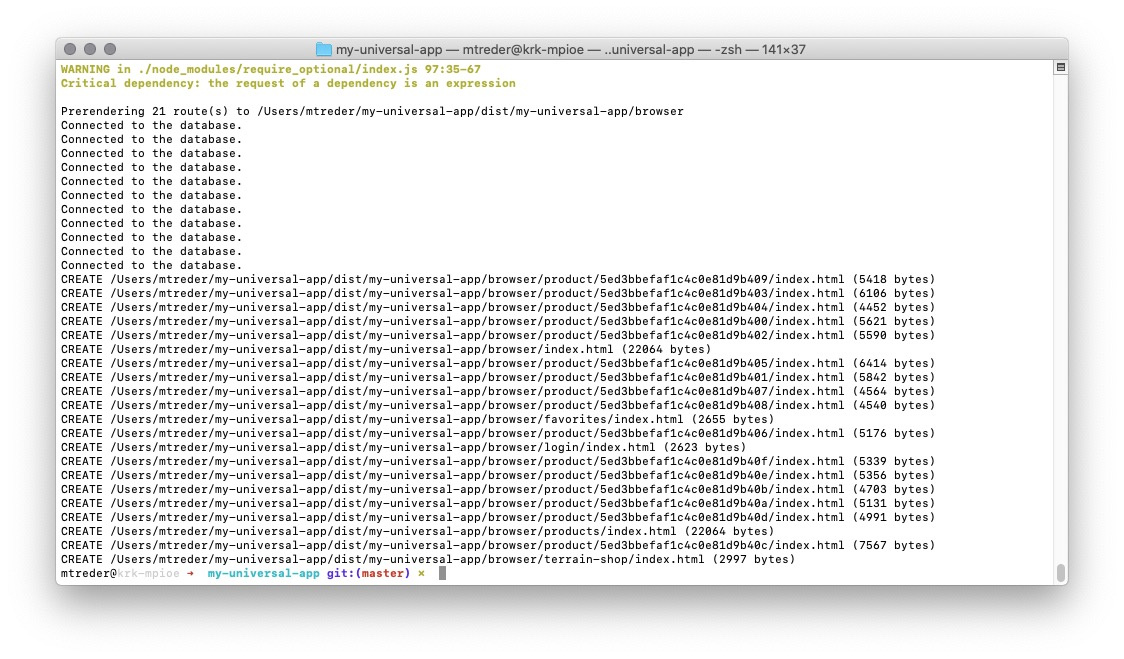
As you can see, now all of the routes within the application are pre-rendered and can be served statically. You can examine rendered files inside the dist/my-universal-app/browser catalog.
Hosting static application
There is no rocket science in this area. To host your pre-rendered application, adjust the backend.ts file (that you’ve introduced at the very beginning of the course). Find the following line:
const distFolder = join(process.cwd(), 'dist/my-universal-app');
and replace it with:
const distFolder = join(process.cwd(), 'dist/my-universal-app/browser');
Verify if your application works by compiling and running the backend.
npm run build:backend
node dist/backend/backend.js
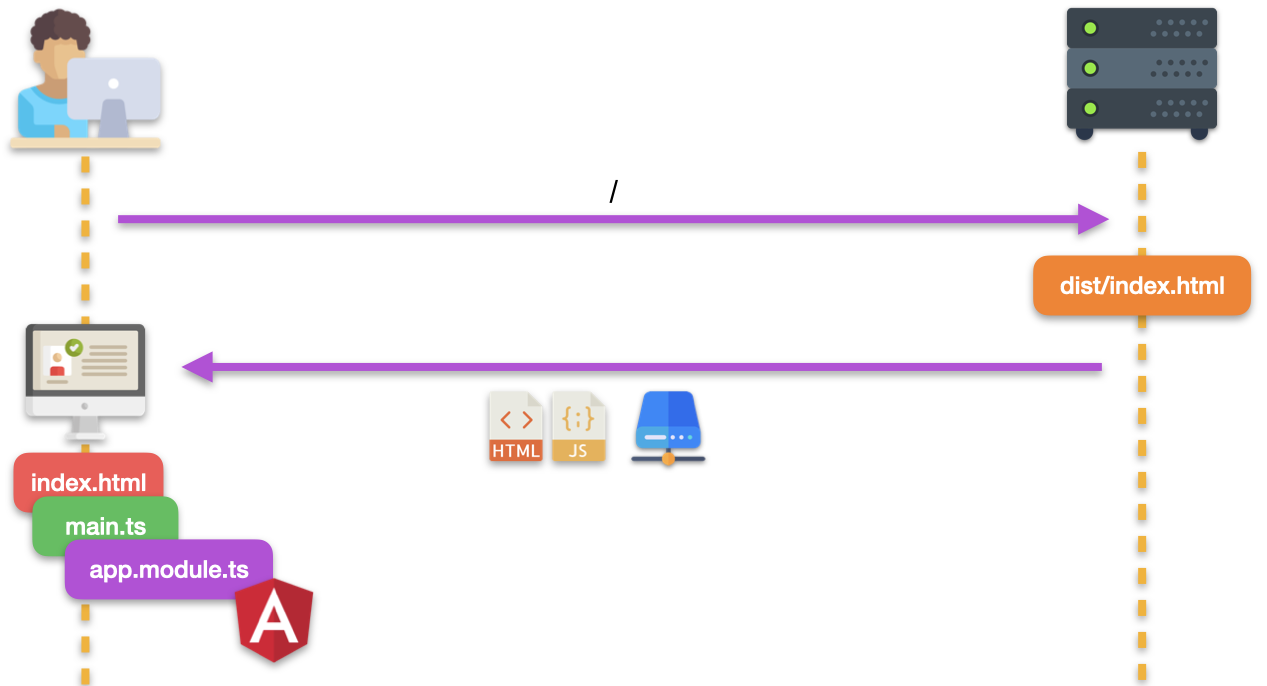
Since now, on each request server will reply with the ready HTML file that contains JavaScript file with your Angular application. The application will be bootstrapped once it reaches user browser:
Deploy and measure performance#
To deploy your application on Heroku, adjust the package.json start and build scripts:
"start": "node dist/backend/backend.js",
    "build": "npm run build:backend && npm run prerender",
and push your changes to the git repository:
git commit -m "pre-rendered" .
git push heroku master
Check how application performes, using the bytecheck tool:
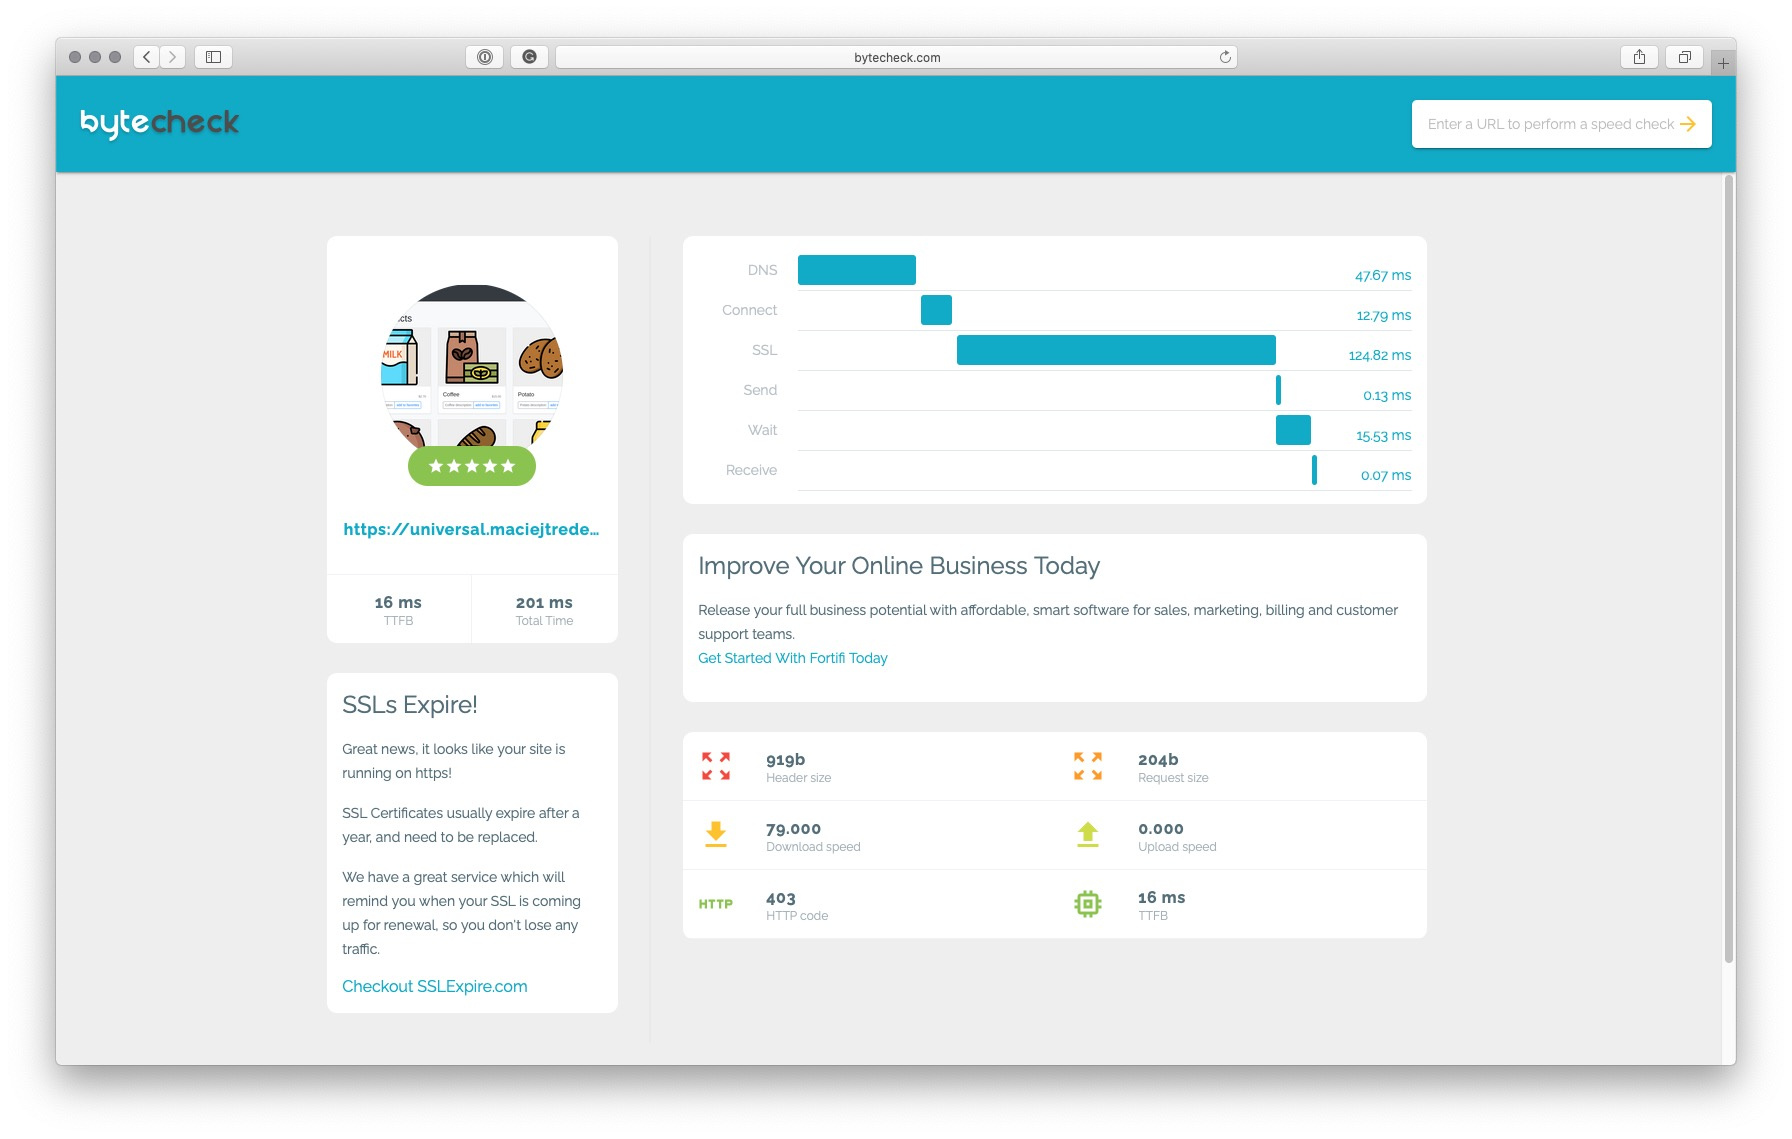
Down to 16 ms of TTFB (Time To First Byte). Your application performs even better than the code served from Redis!
Let’s check the PageSpeed Insights:
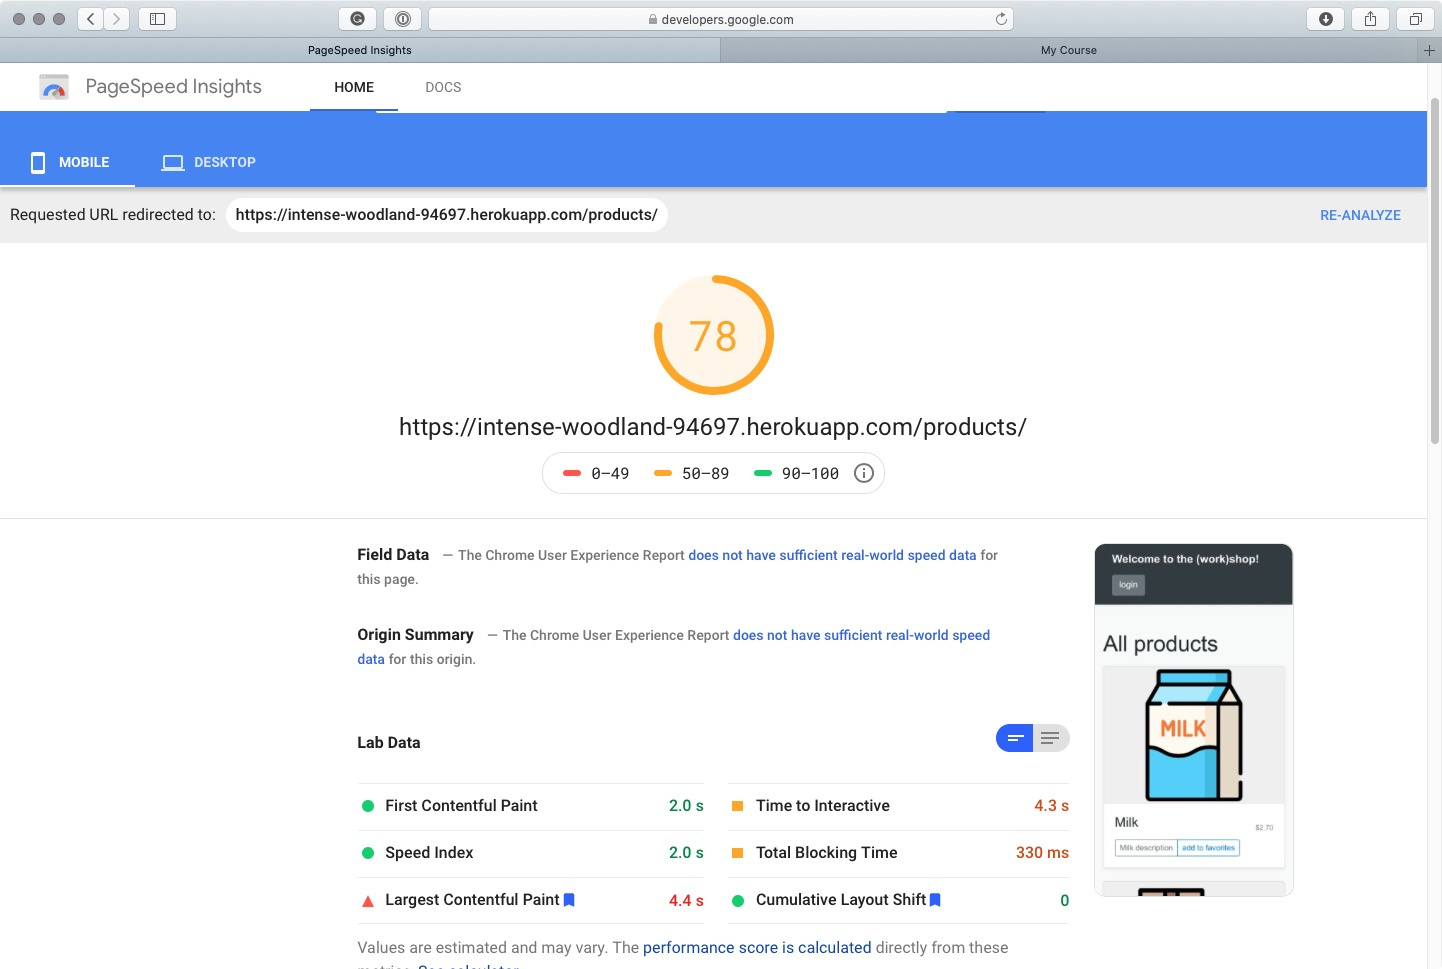
78 points and FCM within 2 seconds. The result is worse than Server-Side Rendered application (95 points); but better than regular application built with ng build --prod (66 points).
As you can see, reading file from the disk, by Node.JS application, takes a little bit longer than reading entry from Redis database.
NOTE#
The prerendered view, also benefit from the TransferState. You’re embedding data in the registry during the rendering process; so there is no additional HTTP calls performed on the application startup, like in “standard” solution (using ng build --prod). Be aware that this may lead to displaying outdated data on the first load in some cases.
Another approach to making application pre-renderable#
You’ve prepared your application to be pre-renderable by providing server-side tokens (from server.ts) to the AppServerModule. That’s an entirely valid approach, but another one might be better in some cases.
Instead of providing server specific tokens in the AppServerModule, you might get rid of the server-specific services in it. To do that remove the following lines from the src/app.server.module.ts:
providers: [
    {
      provide: ProductsService,
      useClass: ProductsServerService,
    },
    { provide: UserService, useClass: UserServerService },
    { provide: 'decrypt', useValue: (param) => 'noop' },
While rendering your application, you will use services that utilize HTTP rather than connecting directly to MongoDB. Beware, that pre-rendering script doesn’t launch the server, so you need to do that manually.
Summary
The code you’ve built thus far is available for download here. Once you download it, remember to install the project using the npm install command inside the project directory.
That was straightforward. Once your application is prepared for Angular Universal, it’s 95% prepared for prerendering, so adjusting it for prerendering isn’t challenging.
After finishing this module, you will know:
-
How prerendering works
-
How to utilize data from MongoDB during the rendering process
-
How to prepare back-end for prerendered Angular application
Summary
That was a long journey, but worth it. At this moment, you know what the biggest Single Page Application pitfall is and how to address it in your Angular application. You’ve learned how to apply Angular Universal to already existing application and how to follow best practices of coding your application server-part, such as:
-
Preparing separate logic paths in your application for browser and server runtimes.
-
Preparing server-specific Angular services.
-
Working with HTTP requests in Angular.
-
Transferring data between the server and the browser, along with the application bundle.
-
Abandoning long-running API calls that affect server-side rendering performance.
-
Using Redis to cache rendered views on the server.
-
Testing the server-side code.
In the previous module, you’ve also learned what you can do if your application does not need back-end computation or limited resources, and you still want to make your Angular application SEO friendly: prerendering with Angular Universal.
Angular Universal and Prerendering comparison
Let’s compare all three techniques with which you may prepare your Angular application for the production:
As you can see, the rendering view on the server-side is the fastest solution (thanks to using Redis). Unfortunately, it requires you to have a back-end instance like an EC2 container, dedicated server, virtual private server, or another solution that allows back-end computations. Fortunately, if you don’t want or need to run a back-end machine, you can still go for the Prerender technique and even get much better results than while using raw ng build --prod.