Text#
The most useful abstraction ever devised for computers is arguably human–readable text. At the lowest level, computers manipulate electrons. Above that level are bits, then numbers, and then text. This chapter will look at how text is structured and some useful details around the mapping from numbers to text.
Newlines#
In one of the great tragedies of computing history, the three main operating system classes chose three different ways to indicate the separation between one line of text and the next one. Two of these are still with us:
- Linux uses a line feed, Unicode code point U+000A, as the line terminator, meaning that each line including the last one in a file has a trailing line feed character.
- Windows uses a carriage return, Unicode code point U+000D followed by a line feed as a two–character line separator, meaning that the last line in a file by convention does not have a trailing carriage return + line feed. This means that a Windows file which ends in a carriage return and line feed has an empty last line.
- The third style, a carriage return terminator, was used by older Apple operating systems .
Synonyms for “line feed” include:
- The abbreviation LF
- The symbol for line feed
- “Newline”, abbreviated as NL
- The symbol for newline
- ASCII/UTF–8 hexadecimal byte value 0A
- “End of line”, abbreviated as EOL
Carriage return is a valid character within a Bash script, but maybe not in the way you might think. Try creating a simple script like this, containing Windows newlines:
$ printf '%s\r\n' '#!/usr/bin/env bash' '(( "$?" == 0 ))' > test.bash
$ chmod u+x test.bash
$ ./test.bash
/usr/bin/env: ‘bash\r’: No such file or directory
That carriage return character is now part of the shebang line! In general Bash will treat carriage return like any other character in your script, so this can wreak various kinds of havoc depending on how the script is run and whether every line has a Windows newline. Say for example you bypass the shebang line:
$ bash test.bash
test.bash: line 2: syntax error in conditional expression
'est.bash: line 2: syntax error near `))
'est.bash: line 2: `(( "$?" == 0 ))
By now you might be thinking “‘est.bash? What happened to the file name?” In the previous error message the carriage return was printed as \r , a character which returns the carriage (the position where the next character will be printed at) to the origin, the left margin. Unfortunately Bash does not escape the code in this error message, so it actually prints “test.bash: line 2: syntax error near `]]”, then returns the carriage to the left margin, and then prints the “’” character which is part of the error message, overwriting the initial “t” character in the terminal output.
A similar warning goes for processing files originating on a Windows system, where the results might still contain carriage returns. If the input has been shuffled in any way, such as reorganizing CSV columns, you might find that the carriage return isn’t even at the end of the line.
All this is to say that Windows newlines in Bash scripts can cause inscrutable errors . Fortunately there is a tool which solves most such issues. To convert from Windows to Unix newlines use dos2unix FILE… . Conversely, unix2dos FILE… converts from Unix to Windows newlines, adding the .
Remember how Linux has line terminators and Windows has line separators? This means a “normal” file on Linux should have a trailing newline and on Windows it should not have a trailing newline. But
unix2dosanddos2unixdo not add and remove the newline at the end of the file. This can cause problems with certain tools, most notablyread. After runningdos2unixyou can check the end of a file by converting the last character of the file to a human readable representation. Let’s try with a simple comma–separated value file:
$ printf '%s,%s\r\n%s,%s' 'Key' 'Value' 'pi' '3.14' > example.csv
$ dos2unix example.csv
dos2unix: converting file example.csv to Unix format...
$ tail --bytes=1 example.csv | od --address-radix=n --format=c --width=1
   4
In the last line,
tail --bytes=1prints just the last (“tail end”) byte ofexample.csvbefore passing it tood, which we’ve encountered before.
The last character in the file is “4”, not “\n”, as we would expect for processing with Linux tools. To fix this simply add a single newline to the end of the file using `echo >> FILE:
$ echo >> example.csv
$ tail --bytes=1 example.csv | od --address-radix=n --format=c --width=1
  \n
If instead you want to unconditionally make sure a file ends with a line feed, just run sed --in-place '$a\' FILE… .
The
sedscript$a\can be read as “on the last line ($) append (a\) nothing (the empty string aftera\).sedimplicitly adds a newline to every line it processes, so this ends up adding a newline. It can basically be considered as a no–op which happens to have a useful side effect.
Encoding#
One of the first data types you learn to work with as a programmer is strings. But this seemingly simple data type has very complex depths, so complex that it’s still changing, and various programming languages still handle strings in very different ways. In Bash, the contents of a string variable is “simply” stored as a sequence of bytes (values 0 through 255) with a NUL byte at the end. For scripting purposes the NUL byte is not part of the variable value, and this terminator means that if you try to store arbitrary binary data in a variable the value will be cut off at the first occurrence of a NUL byte:
$ value=$'foo\0bar'
$ echo "$value"
foo
$ echo "${#value}"
3
As you can see, the NUL byte at the end is not considered part of the string.
That takes care of Bash variables: series of bytes with no special meaning, internally terminated by a NUL byte. To get to what humans would consider a string you have to add an encoding: a mapping from byte values to code units, and in the case of multi–byte encodings another mapping from code units to code points (often called “characters” although this is a heavily overloaded word). Let’s first check which encoding the current shell is using:
$ locale
LANG=C.UTF-8
LANGUAGE=
LC_CTYPE="C.UTF-8"
LC_NUMERIC="C.UTF-8"
LC_TIME="C.UTF-8"
LC_COLLATE="C.UTF-8"
LC_MONETARY="C.UTF-8"
LC_MESSAGES="C.UTF-8"
LC_PAPER="C.UTF-8"
LC_NAME="C.UTF-8"
LC_ADDRESS="C.UTF-8"
LC_TELEPHONE="C.UTF-8"
LC_MEASUREMENT="C.UTF-8"
LC_IDENTIFICATION="C.UTF-8"
LC_ALL=
localeprints the settings rather than the variable assignments. So if you want to get the current collation setting in a script you should inspect the output oflocalerather than the value of$LC_COLLATE(“collate” is synonymous with “sort” and “order”). Even if$LC_COLLATEis set it may be overridden by$LANGor$LC_ALL.
The values except for LANGUAGE are formatted as language[_territory][.codeset][@modifier] (documented in man 3 setlocale ). We’re only interested in the LC_CTYPE (locale character type) “codeset” part, “UTF-8”, which tells the shell how to interpret byte sequences as code points. Let’s see what it does:
$ currency='€'
$ echo "${#currency}"
1
$ printf '%s' "$currency" | wc --bytes
3
$ printf '%s' "$currency" | xxd -groupsize 1
00000000: e2 82 ac
So in Unicode “€” is one code point (the Bash variable length in the first command), and when encoded as UTF–8 it takes up three bytes whose hexadecimal representation is 0xe282ac. And, crucially, those bytes need to be treated as UTF–8 to get back the original code point!
You can also enter Unicode code points by their hexadecimal representations. For example, the Euro sign “€” is U+20AC. This can be represented in Bash as either a literal string
€or as(lowercase “u” can be used for code points up to FFFF), meaning that `[[ '€' == ` . Uppercase “U” works with the entire Unicode range, so U+1F600, the grinning face emoji, is.
Handling strings#
So how do you actually deal with strings (including text files, CSV, HTML, database records, etc.) in shell scripts?
First, you need to know which encoding applies to each string. If you don’t know, the file utility can make an educated guess based on the first mebibyte:\u20ac’(lowercase “u” can be used for code points up to FFFF), meaning thatDISCOURSE_PLACEHOLDER_3. Uppercase “U” works with the entire Unicode range, so U+1F600, the grinning face emoji, isDISCOURSE_PLACEHOLDER_4` .
Handling strings#
So how do you actually deal with strings (including text files, CSV, HTML, database records, etc.) in shell scripts?
First, you need to know which encoding applies to each string. If you don’t know, the DISCOURSE_PLACEHOLDER_5 utility can make an educated guess based on the first mebibyte:\u20AC’ ]]. Uppercase “U” works with the entire Unicode range, so U+1F600, the grinning face emoji, isDISCOURSE_PLACEHOLDER_4` .
Handling strings#
So how do you actually deal with strings (including text files, CSV, HTML, database records, etc.) in shell scripts?
First, you need to know which encoding applies to each string. If you don’t know, the DISCOURSE_PLACEHOLDER_5 utility can make an educated guess based on the first mebibyte:\u20ac’(lowercase “u” can be used for code points up to FFFF), meaning thatDISCOURSE_PLACEHOLDER_3. Uppercase “U” works with the entire Unicode range, so U+1F600, the grinning face emoji, isDISCOURSE_PLACEHOLDER_4` .
Handling strings#
So how do you actually deal with strings (including text files, CSV, HTML, database records, etc.) in shell scripts?
First, you need to know which encoding applies to each string. If you don’t know, the DISCOURSE_PLACEHOLDER_5 utility can make an educated guess based on the first mebibyte:\U0001f600’` .
Handling strings#
So how do you actually deal with strings (including text files, CSV, HTML, database records, etc.) in shell scripts?
First, you need to know which encoding applies to each string. If you don’t know, the DISCOURSE_PLACEHOLDER_5 utility can make an educated guess based on the first mebibyte:\u20ac’(lowercase “u” can be used for code points up to FFFF), meaning thatDISCOURSE_PLACEHOLDER_3. Uppercase “U” works with the entire Unicode range, so U+1F600, the grinning face emoji, isDISCOURSE_PLACEHOLDER_4` .
Handling strings#
So how do you actually deal with strings (including text files, CSV, HTML, database records, etc.) in shell scripts?
First, you need to know which encoding applies to each string. If you don’t know, the DISCOURSE_PLACEHOLDER_5 utility can make an educated guess based on the first mebibyte:\u20AC’ ]]. Uppercase “U” works with the entire Unicode range, so U+1F600, the grinning face emoji, isDISCOURSE_PLACEHOLDER_4` .
Handling strings#
So how do you actually deal with strings (including text files, CSV, HTML, database records, etc.) in shell scripts?
First, you need to know which encoding applies to each string. If you don’t know, the DISCOURSE_PLACEHOLDER_5 utility can make an educated guess based on the first mebibyte:\u20ac’(lowercase “u” can be used for code points up to FFFF), meaning thatDISCOURSE_PLACEHOLDER_3. Uppercase “U” works with the entire Unicode range, so U+1F600, the grinning face emoji, isDISCOURSE_PLACEHOLDER_4` .
Handling strings#
So how do you actually deal with strings (including text files, CSV, HTML, database records, etc.) in shell scripts?
First, you need to know which encoding applies to each string. If you don’t know, the DISCOURSE_PLACEHOLDER_5 utility can make an educated guess based on the first mebibyte:
$ printf '%s\n' 'abc' | file -
/dev/stdin: ASCII text
$ printf '%s\n' 'abc' '€' | file -
/dev/stdin: UTF-8 Unicode text
The result of using the wrong encoding to decode some text is usually a lot of Unicode replacement characters (“�”, but looks different in each font) or Mojibake, text intermingled with garbled symbols. For example, if we try to treat an UTF–8 string as ISO 8859–1 and convert it back to UTF–8:
$ echo '€1.50' | iconv --from-code=iso-8859-1 --to-code=utf-8
â¬1.50
Second, convert everything to the same encoding before processing. Doing this means you won’t have to worry about silly things like sorting the same code point in different ways. UTF-8 is very handy here, because Unicode contains every character used in every standardized encoding, so any string in any encoding can be converted to a Unicode encoding without losing code points. If you can, standardize on UTF–8 across your entire system and convert everything to that. Then you won’t have to worry about these conversions again. iconv can do this conversion:
$ printf '%s\n' $'\xDF\xE0\xD8\xD2\xD5\xE2' > input.txt
$ cat input.txt
������
$ iconv --from-code=iso-8859-5 --to-code=utf-8 --output=result.txt input.txt
$ cat result.txt
привет
Third , if you need to keep some strings in other encodings, make sure to convert everything back to the original encoding before saving. Saving a UTF–8 string into a Windows–1251 encoded database column is going to ruin someone’s day.
To get to what you see on screen, the machine also has to translate:
- code points to graphemes or extended grapheme clusters (abstract graphical units)
- graphemes to glyphs, which are defined by fonts. But these are rarely relevant for shell scripting.
Math#
Bash on its own only supports integer numbers, and often in surprising ways. That said, we can get a lot of mileage out of integers. We won’t look at every one of the 30+ arithmetic operators available in Bash — they are documented in the “Arithmetic Evaluation” section of man bash — but we are going to look at how operators are used in practice. For tasks involving complex math, Bash is often the wrong language, but we’ll look briefly at an example at the end of the chapter.
Arithmetic expansion#
If you want to perform a calculation and use the resulting base 10 string for something the syntax is $((EXPRESSION)) . This is called arithmetic expansion because Bash expands (replaces) the arithmetic expression with a string when running the command, and the inside of the parentheses is called a numeric context because the expression is treated as arithmetic rather than a string. An example, printing the result of x² – y², should make this clearer:
$ x='5'
$ y='3'
$ echo "$(( ("$x" ** 2) - ("$y" ** 2) ))"
16
Strictly speaking, the inner parentheses are not needed, because exponentiation has higher precedence than subtraction, but it often pays to be explicit. Also, whitespace is ignored but helpful.
Arithmetic evaluation#
Sometimes we care about the exit code or side–effect of the expression but not the string value of it. We can evaluate (that is, calculate) an expression without printing anything using the syntax ((EXPRESSION)) . One common use case is incrementing a counter:
$ count=‘0’ $ ((++count)) $ echo “$count” 1
Notice how the variable in the arithmetic expression is not preceded by a dollar sign. This is intentional: to increment a variable we need the expression to refer to the name of the variable, not its value.
((++count))is called pre–increment: the variable is incremented and the new value is the value of the expression. There is also post–increment,((count++)), where the original value before incrementing is the value of the expression. In other words, givencount=0, the value of((++count))is 1 and the value of((count++))is 0. This relates to an important quirk: arithmetic evaluations return 1 (indicating failure) if the value of the calculation is zero. This is why I used pre–increment above: post–incrementing a variable with a value of 0 results in 0, which in turn results in an exit code of 1:{lang=“console”}
W> $ count=0 $ ((count++)) $ echo "$?" 1For this reason it is important to consider whether any arithmetic evaluation could result in a value of zero, and to handle or avoid this situation to avoid terminating the program early. For a uniformly increasing counter starting at 0 this leads to an obvious pattern: always pre–increment.
To be clear, the value of
$countis incremented even though the exit code is 1. It’s just not very helpful if the program exits because some arbitrary calculation yielded 0.When doing anything more complex it might be worth allowing exit code 1 specifically. For example, when doing arithmetic on user input basically any operation can result in zero. When such an operation fails we can check whether the exit code was 1. This results in a command where exit code 0 or 1 are treated as success, and any other exit code is treated as a failure, as in lines 13 and 15 below:
{lang=bash}<<math/count.bash
Another common use case is comparison. The exit code of a comparison will be 0 if true and 1 if false:
$ x='5'
$ y='7'
$ if (("$x" > "$y"))
> then
>     echo "x is bigger"
> else
>     echo "y is bigger"
> fi
y is bigger
Best practice#
You might have seen bareword variables like x in Bash arithmetic, but the use of "$x" above is deliberate. First, "$x" is consistent with how variables are used in general, and using different syntax in arithmetic contexts is just a needless complexity. Second, a subtle difference is that if $x is not set x will be coerced to zero while "$x" results in a syntax error. Debugging a rogue zero is going to be much more difficult than a syntax error, so we should always quote within arithmetic contexts. Example:
$ x=‘5’ $ echo “$(( (x ** 2) - (y ** 2) ))” # Don’t do this! 25 $ echo “$(( (”$x" ** 2) - ("$y" ** 2) ))" bash: (5 ** 2) - ( ** 2) : syntax error: operand expected (error token is "** 2) ")
$(expr EXPRESSION) is similar to $((EXPRESSION)) , but not recommended. expr requires you to put in quotes any part of the expression which has special meaning, like * , and it will be slower because it runs a new process for each expression, unlike $((EXPRESSION)) which is calculated by the current shell process.
let EXPRESSION is similar to ((EXPRESSION)) , but also not recommended because (like expr ) it requires you to quote any parts of the expression which have special meaning.
The result of the expansion is a string representing a base 10 number. It is possible to set an integer attribute on a variable by using
declare -i VARIABLEin order to treat any subsequent assignment to it as an arithmetic expansion, but the value will still be stored in memory as a string. This also makes the code more confusing, because you need to know about the state of a variable to know which value it will take. For these reasonsdeclare -iis not recommended.
$ count='2 * 2'
$ echo "$count"
2 * 2
$ declare -i count
$ echo "$count"
2 * 2
$ count='2 * 2'
$ echo "$count"
4
Arithmetic operators#
Another common numeric context is conditionals with arithmetic operators, documented in the “Conditional Expressions” part of man bash . The arithmetic operators are -eq (equal), -ne (not equal), -lt (less than), -le (less than or equal), -gt (greater than), and -ge (greater than or equal). [[ "$count" -le '3' ]] is equivalent to (( "$count" <= '3' )) : both sides are coerced to numbers and compared as such. The latter form should be more familiar from other languages, but there is another reason for avoiding numeric comparisons in [[ : confusing numbers with strings. For example, the numeric operators coerce each argument to a number before comparing them:
$ month=‘07’ $ [[ “$month” -eq 7 ]] $ echo “$?” 0 $ [[ “$month” == 7 ]] $ echo “$?” 1
You will sometimes see
=used instead of==in[[comparisons, and both are valid. Some prefer=because it’s defined in POSIX, but since most languages use=only for assignments and==only for comparisons, following the convention by using==in Bash is more universally readable.
In the first example “07” is treated as the number 7, which is equal to the second number 7. In the second example “07” is treated as a string, and is therefore not equal to the second string “7”. “07” is numerically equal to “7”, but not string equal.
Using a numeric operator for strings has a different problem — to coerce a string to a number, any non–number characters are removed. If there are no characters left, the value is coerced to zero. So two strings with no numbers in them are both numerically equal to zero:
$ month='August'
$ [[ "$month" -eq 'June' ]]
$ echo "$?"
0
$ [[ "$month" == 'June' ]]
$ echo "$?"
1
(( "$month" == 'June' ))has the same problem of not reporting invalid numbers.
The following example is much closer to what other languages do — the comparison is in brackets similar to languages like Java, and the numeric comparison operator is == :
$ (( “$month” == 7 )) $ echo “$?” 0
In short, I would recommend using [[ when dealing with strings and (( when dealing with numbers.
The range of Bash integers is 2^64^. Over– and underflow are silent, so if you want to deal with numbers outside that range you should probably be using a different language.
Bases#
The result of any Bash arithmetic is a string representing a base 10 integer, but the inputs to an arithmetic expression can be in any of several different formats. Base 10 is the most obvious, consisting of only numbers zero through nine.
Octal numbers (base 8) start with a zero followed by numbers zero through seven. For example, 035 means “three eights plus five,” which in decimal is 29. Or as a Bash expression, (( 035 == 29 )) . This is convenient in a few areas to express a collection of three bits (eight unique values) per character, such as file permissions.
Hexadecimal numbers (base 16) start with 0x followed by any one of zero through nine or the first six letters of the alphabet to represent ten through fifteen. One common number you might see is 0xff , which represents the maximum value of a single byte, 255 or 2^8^ – 1. So a single letter in hexadecimal represents half a byte, also known as a “nibble.” Who said programmers don’t know how to have fun?
Finally, BASE#NUMBER supports bases 2 through 64 (including the ones above).
-
BASEis a decimal number andNUMBERis the string representing a number in that base. -
NUMBERcharacters include:- 0–9
- “a” – “z” (10 through 35 in base 10),
- “A” through “Z” (36 through 61)
- “@” (62)
- “_” (63)
So (( 64#_@Zz9 == 1073469641 )) , or (63 × 64^4^) + (62 × 64^3^) + (61 × 64^2^) + (35 × 64) + 9.
Bases other than 8, 10 and 16 are rare in practice. Base 64 could theoretically be used to store big numbers in few bytes, but there are much better ways to compress such data, including custom binary protocols.
Numeric base 64 should not be confused with Base64 or the related command
base64, a way to encode binary data in 64 ASCII characters (not the same as above).
A confusing technicality: when using bases between 11 and 36 you can fit the numbers above 9 into a single alphabet, so you’re allowed to mix upper and lower case. Which means that
(( 36#A == 10 ))but(( 37#A == 36 )). For consistency I recommend using lowercase in bases less than 37.
Negative numbers need to have the hyphen before the base, as in
-64#_.
Floating-point and advanced math#
As mentioned, Bash only supports integer math. Trying to use non–integer numbers results in an error message like this:
$ echo "$((2 * 1.1))"
bash: 2 * 1.1: syntax error: invalid arithmetic operator (error token is ".1")
bc is commonly used for math involving large or decimal numbers. It can be run in an interactive shell by running it with no parameters and without standard input. In the shell you can type expressions to get answers:
$ bc --quiet
2 ^ 100
1267650600228229401496703205376
quit
--quietavoids printing a few lines of extra information when starting the shell.
The first and last lines after the command are input, and the second is the output. As we can see there are two differences from Bash arithmetic: The power operator is ^ rather than ** and the values do not wrap at 2^63^ – 1. In fact, bc can handle both huge and tiny numbers. The operators and limits are documented in info bc .
Floating-point numbers are fixed–precision. That is, each floating-point number uses a specific number of bits to store a value, which means it has practical limits to both size and precision. As far as I can tell
bcdoes not support IEEE 754 floating-point math, but most popular programming languages do.
You can also run bc non–interactively by passing expressions on standard input. This is the default way:
$ bc <<< '4 * 3'
12
By default bc does not print decimal digits, and rounds toward 0:
$ bc <<< '5 / 3'
1
$ bc <<< '-5 / 3'
-1
We can also control both the input and output bases with the ibase and obase variables, respectively. For example, we can convert hexadecimal 0xff to binary:
$ bc <<< 'ibase = 16; obase = 2; FF'
11111111
The hexadecimal characters must be uppercase, otherwise the input is coerced to zero.
Another important feature of bc is the square root function, sqrt :
$ bc <<< 'scale = 2; sqrt(2)'
1.41
Anything much more advanced than this should probably be implemented in another language.
Time#
We’ll be looking at three different ways of dealing with time:
- Printing and modifying datetimes
- Checking how much time a command takes
- Limiting how much time a command takes
Datetime processing#
Anyone who has worked for a while with computers will tell you that dealing with time is hard. A gigantic amount of effort has gone into trying to map the human understanding of time, combining a messy universe with thousands of years of human culture and innovation, to something computers can actually deal with.
We’ll look at how to deal with some common and fairly simple cases using the date command. date by default prints a human–readable datetime with second resolution and the current time zone:
$ date
Thu Dec 31 23:59:59 NZDT 2020
$ date
Thu Dec 31 23:59:59 NZDT 2020
Input formatting#
We can also give date a specific input datetime with --date=DATETIME . It has complex rules for parsing all manner of human–readable input, but the safest is to specify a machine–readable RFC 3339 string:
$ date --date='2000-11-30 22:58:58+00:00'
Fri Dec  1 11:58:58 NZDT 2000
Output formatting#
For RFC 3339 output use --rfc-3339=PRECISION :
$ date --rfc-3339=date
2020-12-31
$ date --rfc-3339=seconds
2020-12-31 23:59:59+13:00
$ date --rfc-3339=ns
2020-12-31 23:59:59.123456789+13:00
You may have heard of ISO 8601 as the machine–readable datetime format, but RFC 3339 has some advantages: it allows a space separator between the date and time for readability, and it only allows a full stop between the integer and fractional seconds.
date --iso-8601=nson the other hand uses a comma separator, which is not appropriate in an English–speaking locale.
In addition to making the datetime easy to parse, RFC 3339 datetimes (in the same time zone) can be trivially sorted. So if you ever want to parse your datetimes or sort your lines simply use RFC 3339.
Time zones#
You can use the TZ variable to specify the output time zone:
$ TZ='UTC' date
Sun May 24 22:29:51 UTC 2020
$ TZ='Pacific/Auckland' date
Mon May 25 10:29:51 NZST 2020
I would recommend using UTC everywhere you can. Time zones are a cultural construct which frequently change – there were a full 90 new releases of the time zone database in the 2010s. Some time zones also have daylight saving time or other discontinuities. Better to use UTC and avoid any conversions or ambiguity.
To use UTC for the duration of a shell and its sub–shells simply
export TZ='UTC'rather than specifying it for eachdatecommand:
$ export TZ='UTC'
$ date
Sun May 24 22:29:51 UTC 2020
Specifying the input time zone is also possible:
$ TZ='UTC' date --date='TZ="Pacific/Auckland" 2020-12-31 23:59:59' --rfc-3339=seconds
2020-12-31 10:59:59+00:00
Now we can apply human–readable offsets:
$ TZ='UTC' date --date='2000-01-01 08:00:00 + 5 days 3 seconds' --rfc-3339=seconds
2000-01-06 08:00:03+00:00
You can specify a custom output format. Because of the availability of shorthands like --rfc-3339=seconds , the only other format we’re likely to encounter is the Unix timestamp, the number of seconds since 1970–01–01 00:00:00 UTC minus leap seconds:
$ date --date='2020-12-31 23:59:59+13:00' +%s
1609412399
The + character at the start of the word indicates that this parameter is a format string. %s is the format specifier “seconds since 1970-01-01 00:00:00 UTC.” The full set of specifiers is documented in info date .
Because of the leap second handling we can’t treat UTC and Unix timestamps as interchangeable. As with time zones, I would advise to simply convert everything to UTC and go from there. Timestamp arithmetic may be tempting, but it leads to real bugs which are hard to reproduce and fix. Relevant to this is the classic Falsehoods programmers believe about time.
Use @NUMBER to specify a Unix timestamp as input:
$ TZ='UTC' date --date='@1000000000' --rfc-3339=seconds
2001-09-09 01:46:40+00:00
Timing a command#
time COMMAND will tell you how long a command took to run:
$ time sleep 3

real	0m3.011s
user	0m0.003s
sys	0m0.005s
The “user” and “system” times show how much CPU time was spent in user space and kernel space, respectively. In our case they are much smaller than the real time, because the
sleepcommand uses barely any CPU, but they are counted per CPU, so they can actually exceed the elapsed time for a busy, multi–threaded program.
timeprints the timing information even when interrupted.
For most regular programmers only the first line is interesting. It shows the actual amount of elapsed time, or “wall–clock” time.
It may be surprising that on a machine capable of processing billions of instructions per second the timing was off by a full 11 milliseconds. This is because sleep does not give any hard guarantees about how long it runs. It will try to run for approximately the given time, but we should never rely on it as an accurate time–keeper.
This can be devastating in programs which assume that, on average, the Nth run of something will be N times M seconds after the first run. A typical example would be two programs which are meant to run in lockstep: the first one produces a new file every minute, the second one starts 30 seconds later and runs every minute, processing the file for the previous minute. Such timing is guaranteed to drift, and the second process will sometimes process the same file twice and sometimes skip a file. A common “fix” is to run the second command at a shorter interval, but that assumes that each program will have a very regular run time and that the file is only available if the first program has finished writing to it, neither of which are usually true. A reliable solution will either send a signal from the first to the second program when a new file is ready for processing or will use other signaling like inode notifications as a proxy.
Timeouts#
timeout DURATION COMMAND kills the command and returns a non–zero exit code if it is still running after the duration has elapsed. While this command looks helpful, it would be a code smell in a production pipeline. Long–running processes are common, and not necessarily a sign of a problem. Using a flat timeout for the running time of a whole command is usually too simple an approach to be useful. And finally, a lot of programs which deal with requests which may time out, such as ping or curl , have their own timeout mechanisms which are probably more useful because they will be able to do their own reporting of the failure.
Output#
Sometimes pipelines are not enough, and we just want to emit a simple string. Let’s look at a few ways to output text.
echo#
You might have heard of echo as the command to “print lines.” Technically it emits each of the arguments in turn, separated by a space character, and prints a single newline at the end. Let’s explore this with some examples.
$ echo "It’s pitch black. You’re likely to be eaten by a grue."
It’s pitch black. You’re likely to be eaten by a grue.
$ █
As you can see the cursor appears on a new line below the output. Since the prompt does not contain a newline, that newline must be part of the output of echo . We can confirm this by printing the output character representations:
$ echo 'A' | od --address-radix=n --format=c --width=1
   A
  \n
odis a tool for converting arbitrary data between different formats. In this case we’re telling it to:
- not display address offsets periodically (
--address-radix=n)- format the input as printable ASCII character equivalents (
--format=c)- print one byte representation per line (
--width=1)
hexdumpandxxdhave similar features, but they have different ways of expressing the same conversions.
This shows us that the echo command emitted a byte corresponding to the ASCII character “A” plus a byte corresponding to a newline. This is a very common requirement when dealing with human–readable output, but most of the time it’s best to follow the Unix philosophy and think of the output of your program as the input to another program. For that, there’s printf .
printf#
printf takes a format specifier as the first argument, and substitutes the following arguments in the format repeatedly, giving us complete control of the output. We’ll look into the two main placeholders used in the format specifier, %s and %q . See man 1 printf for more details.
%s - String#
$ names=(‘Ada Lovelace’ ‘Alan Turing’) $ printf ‘Name: %s\n’ “${names[@]}” Name: Ada Lovelace Name: Alan Turing
Let’s deconstruct that format specifier:
-
%sformats an argument as a string. This is the part of the format string which is replaced by subsequent arguments (from the$namesarray variable in the above code). - The rest of the string (the prefix “Name: ” and the escaped newline “\n”) is printed as–is every time the format is repeated.
To reproduce this with echo we would have to loop over the entries in the array manually. Analogous to HTML and CSS in web development, printf cleanly separates the content (the $names array) from the formatting (the “Name: ” prefix, string substitution and newline suffix).
%q #
We can also put several % format specifiers within a format string to consume more than one entry at a time. One handy use case for this is if we have an array with pairs of keys and values, and want to create a Bash configuration file with key=value assignments to source later. Let’s try it using the %s format specifier:
$ assignments=(‘developer’ ‘Ada Lovelace’ ‘license’ ‘GPLv3+’) $ printf ‘%s=%s\n’ “${assignments[@]}” > settings.bash # Don’t do this! $ cat settings.bash developer=Ada Lovelace license=GPLv3+ $ . settings.bash Lovelace: command not found
What happened here? The main problem is that developer=Ada Lovelace is two words as far as Bash is concerned, because the space character is neither quoted nor escaped. So the meaning of this line is that Bash tries to run the Lovelace command with developer=Ada as part of its context. Fortunately it’s easy to avoid this by using the %q format specification, which automatically quotes or escapes the output so that it’s reusable in Bash:
$ printf '%q=%q\n' "${assignments[@]}" > settings.bash
$ cat settings.bash
developer=Ada\ Lovelace
license=GPLv3+
$ . settings.bash
$ echo "$developer"
Ada Lovelace
Unfortunately, trying to share setting files like this one between languages is generally a Bad Idea™. Variable assignment rules are completely different in different languages, and reimplementing one language’s parsing rules in another language is going to be time consuming and brittle. In such situations I recommend using a well–supported language like JSON to store assignments. At least then the only thing we should have to worry about is the value encoding.
logger#
When starting out with a script it may be appropriate to simply redirect printf output to a file, but to scale we can use logger :
- Parallel processes can’t write safely to the same file, because file writes are buffered. The buffer size varies, but on my system a simple character repetition ended up producing interleaved sequences of 4096 As and Bs:
$ printf 'A%.0s' {1..10000} >> log &
 $ printf 'B%.0s' {1..10000} >> log &
 $ wait
 $ cat log
 [As and Bs, interleaved]
-
loggerwill interact with the configured system log directly, which hopefully is set up to handle this gracefully. In systemd, for example, each log message is associated with the PID of theloggercommand, and two concurrentloggermessages can be easily distinguished. - Once we end up with many scripts it becomes arduous to keep all the log formats in sync to enable easy debugging.
loggerpasses the message with metadata to the logging system, so there is no need to propagate the log format in each script. -
loggersupports The Syslog Protocol, so interacting with compliant servers for centralized logging is available out of the box.
logger MESSAGE logs the given message to the currently active log mechanism, which may be anything at all. Many systems used to be configured by default to log to the file /var/log/syslog. Nowadays it’s more common to log to a journal on desktop systems and to a log aggregation service on servers. If you are on a system with systemd, for example, you can run journalctl --follow to show log entries as they show up in the systemd journal. Open another terminal and see what shows up in the journal window when experimenting with various commands and options. For example, to send a user–level warning to the journal and also to standard error:
$ logger --priority=user.warning --stderr "It's a trap!"
<12>Feb 23 20:14:41 jdoe: It's a trap!
The standard error line starts with a numeric representation of the priority between angle brackets, followed by the datetime the message was recorded, the username, and the message itself. Within the journal this shows up as “Feb 23 20:28:00 box jdoe: It’s a trap!”: the datetime, hostname, username, process ID in brackets, and the message.
The priority number is calculated as the facility number times eight plus the level. By convention, the
userfacility is number 1 andwarningis number 4. 1 * 8 + 4 = 12, as shown above.
The journal output might look superficially similar to a normal log file, but it is much more flexible. The pieces of information shown above and many more are stored in a structured database, so we can retrieve exactly the information we require in any of several formats. For example, we can easily get JSON objects with all the fields of all the user warnings since we started logging:
$ journalctl --facility=user --priority=warning --output=json-pretty
{
        "__REALTIME_TIMESTAMP" : "1614064481380349",
        "_BOOT_ID" : "5bfd1a8ffbb34361a134f1df6110e1fa",
        "_MACHINE_ID" : "37c339f51ea74ab5be6e9f1d0ec63b86",
        "SYSLOG_TIMESTAMP" : "Feb 23 20:14:41 ",
        "MESSAGE" : "It's a trap!",
        "SYSLOG_FACILITY" : "1",
        "_UID" : "1000",
        "__MONOTONIC_TIMESTAMP" : "855112431841",
        "_GID" : "1000",
        "SYSLOG_IDENTIFIER" : "victor",
        "PRIORITY" : "4",
        "_TRANSPORT" : "syslog",
        "_PID" : "553862",
        "_HOSTNAME" : "big",
        "__CURSOR" : "s=bde7e70adbe5411280494c7d43e32068;i=31e3b9;b=5bfd1a[…]",
        "_SOURCE_REALTIME_TIMESTAMP" : "1614064481380109"
}
Other useful options:
-
--bootto show messages since last boot (equivalent to--boot=0),--boot=-1to show the logs from the previous boot if saved to disk, etc -
--lines=Nto show the last N entries -
--reverseto show entries in reverse chronological order -
--output-fields=FIELD[,FIELD…]to limit the fields -
--utcto show UTC timestamps rather than local ones -
--catalogto augment some log messages with explanations -
--unit=UNITto show the log of a specific unit (such asjournalctl --unit=sshd.servicefor the SSH daemon) -
--since=DATETIMEto show messages after some datetime -
--until=DATETIMEto show messages before some datetime
See man journalctl for more.
JSON#
JSON is an incredibly useful data structure that we encounter all the time in web-based applications. Here we’ll look at a few tools that make working with JSON easier.
Filtering#
jq is the program to manipulate JSON in Bash. The most common use is to pull some information out of JSON files. It uses a filter language to manipulate the input. The simplest filter is the identity, . (a single full stop). This is similar to mathematical identity: the input becomes the output. Let’s create a file containing some non–trivial JSON and apply the identity filter to it:
$ cat > ./credentials.json << 'EOF'
> {"username":"jdoe","password":"sec\\ret$"}
> EOF
$ jq . ./credentials.json
{
  "username": "jdoe",
  "password": "sec\\ret$"
}
The first command uses a quoted here document to save a string with special characters without having to escape them.
Since this is an interactive session jq pretty–prints and syntax–highlights, which is a good way to get familiar with new JSON structures. As we can see, the semantics of the output is exactly the same as the original file.
The pretty–printing is a useful reminder that JSON is a more flexible format than CSV. A JSON file can have whitespace anywhere between tokens, it can be arbitrarily nested, and it has its own rules for escaping which are subtly different from Bash. All this means that reliably manipulating JSON with line–based tools like
grep,sedorawkis basically impossible.
In a shell script you may want to pull out a property of credentials.json into a variable. To do this, simply use the --raw-output flag to avoid any kind of formatting of the output and use an “object identifier–index” filter, .IDENTIFIER 
$ password="$(jq --raw-output .password credentials.json)"
$ printf '%s\n' "$password"
sec\ret$
If the identifier contains any special characters you need to double–quote it, at which point single–quoting the whole pattern avoids having to escape characters:
$ jq '."$ amount"' <<< '{"$ amount": "5"}' "5"
XML#
XML (and HTML)
Pulling out a value
Probably the most common use case for transforming XML in Bash is pulling out a simple value such as a configuration item. When doing so you need to be careful that any XML escaping is undone – you’ll want any &NAME; characters replaced by their literals in your script. xml_grep is one tool which can do this:
$ cat > ./test.xml << 'EOF'
> <configuration>
> <password>foo & bar</password>
> </configuration>
> EOF
$ password="$(xml_grep --text_only '/configuration/password' ./test.xml)"
$ printf '%s\n' "$password"
foo & bar
This method also handles character data sections:
$ cat > ./test.xml << 'EOF'
> <configuration>
>   <password><![CDATA[<&;>\'✓]]></password>
> </configuration>
> EOF
$ password="$(xml_grep --text_only '/configuration/password' ./test.xml)"
$ printf '%s\n' "$password"
<&;>\'✓
XML does not permit NUL characters, so any XML content is representable in a Bash variable.
Transforming
Because of the complexity of XML, transforming from one document structure to another can be arbitrarily complex. XSLT is the main language for declaring such transformations, and xsltproc can apply such transformations to XML documents. Let’s look at a simple use case, starting with an attribute–based configuration file v1.xml:
We’d like to keep the indentation but put each of the configuration values into a separate element for easier parsing. To do that we
-
specify strip-space and output elements to control the indentation
-
match “/”, the root of the document
-
match the “db” and “host” child elements, transforming each of them separately
The result is v1-to-v2.xslt:
The xmlns (“XML namespace”) declaration at the start says that any element starting with xsl: belongs to the XSLT namespace, as defined by the URL. This makes it easy to mix namespaces: anything starting with xsl: is an XSLT directive, and anything else is part of the “default” (unnamed) namespace, which we generally use for the output elements.
Now we can run xsltproc --output ./v2.xml ./v1-to-v2.xslt ./v1.xml to transform the original configuration into v2.xml:
<?xml version="1.0"?>
<configuration>
<db>
<name>app</name>
<host>example.org</host>
<user>jdoe</user>
<password>foo & bar"</password>
</db>
<host>
<name>0.0.0.0</name>
<port>443</port>
</host>
</configuration>
This has taken care of one of the subtleties of XML escaping: double quotes of course need to be escaped within an attribute value delimited by double quotes, but within element text it does not need to be escaped. So in the interest of readability xsltproc avoids unnecessary escaping.
Creating
xsltproc can also help with creating XML files from scratch, and take care of escaping and formatting easily. To do this we start with a parametric XSLT file:
We then use --stringparam NAME VALUE to specify the values of the parameters:
$ xsltproc --output ./authentication.xml \
> --stringparam username jdoe --stringparam password 'foo > bar' \
> ./authentication.xslt - <<< '<x/>'
xsltproc does not have an option analogous to jq’s --null-input, so we have to pass a dummy XML document.
This results in a properly formatted authentication.xml:
<?xml version="1.0"?>
<authentication>
<username>jdoe</username>
<password>foo > bar</password>
</authentication>
Auto-Formatting
All the XML and XSLT files above have been formatted using xmllint --format. There are many other XML formatters, for example tidy, xml_pp and xmlstarlet. If you track your XML files in version control I would recommend using a formatter you’re comfortable with to give yourself an advantage when comparing revisions. Some formatters like xmllint can validate the input against a schema definition. If you’re dealing with XML which is consumed and/or produced by different systems I would recommend creating and enforcing a schema at each system to ensure interoperability.
Images
Software developers often have to deal with collections of images, creating or manipulating them in bulk. We’ll look at some common tasks and how to achieve them easily in Bash.
Taking screenshots
Keyboard shortcuts
Most desktop environments come with a built–in screenshot facility. Try pressing the Print Screen button (often labeled with an abbreviation like “PrtScn”), and you might see the screen blink, hear a camera shutter sound, or get some other indication that a screenshot file is available. If this works other variants might be available:
-
Alt–Print Screen to capture only the currently–focused application
-
Shift–Print Screen to capture a custom rectangle of the screen
Ubuntu saves screenshots in the ~/Pictures directory.
gnome-screenshot
This and many other tools offer convenient features beyond keyboard shortcuts:
-
gnome-screenshot --interactive opens a window to set up a screenshot.
-
gnome-screenshot --include-pointer includes the mouse pointer in the image.
-
gnome-screenshot --delay=5 waits for five seconds before taking the screenshot. This allows you to capture any process which would be broken by pressing a key, or to easily capture screenshots at an interval.
-
–file=FILE allows you to set a custom filename, which you could, for example, use in a loop to create sequential image files:
index=0
while true
do
    gnome-screenshot --delay=1 --file="./$((++index)).png"
done
Currently it is not easy to disable the screen flash and shutter sound of gnome-screenshot (bug report). If you want to avoid these right now you might want to look into another tool such as scrot or shutter, or search your package manager for something like “screenshot”.
Cropping, resizing and converting
Let’s say you have a bunch of screenshots like this one:

You want to get rid of everything except the text area in the middle. By selecting that region in GIMP you’ve established that it’s 729 pixels wide by 434 pixels tall and starts 0 pixels from the left side and 54 pixels below the top. You then want to resize it to 50% in both the X and Y directions to make it a quarter–size image. ImageMagick’s mogrify can do both changes in a single command:
mogrify -crop '729x434+0+54' -resize '50%' ./*.png
The result:

You can stack as many operations as you want between the input and the output filenames. As you can see from the above they are applied left to right.
If you want to keep the original files you can use the convert command, which supports the same operations as mogrify but only operates on one file at a time. Its synopsis is convert [INPUT_OPTION…] INPUT_FILE [OUTPUT_OPTION…] OUTPUT_FILE.
Creating videos
Creating a video from a set of images is simple with ffmpeg:
ffmpeg -i '%d.png' time-lapse.webm
This assumes that the files are called 1.png, 2.png, etc, like the ones created by the screenshot loop above. Because %d in the pattern specifically means an integer without leading zeros FFmpeg inserts the images into the video in numeric order, which is typically what you want. You can also use -pattern_type glob -i ‘./*.png’ to match a glob. This is useful for alphabetically ordered files (for example, screenshots with RFC 3339 datetimes like “2101-12-31 23:59:59.png”). Just be aware that alphabetic ordering is not the same as numeric ordering:
$ cd "$(mktemp --directory)"
$ touch ./{1..10}.png
$ echo ./*
./10.png ./1.png ./2.png ./3.png ./4.png ./5.png ./6.png ./7.png ./8.png ./9.png
Another common option is -framerate VALUE, which must be put before -i. -framerate 60 creates a 60 FPS video. This option also supports fractions such as -framerate 1/5 and abbreviations such as -framerate ntsc.
Creating graphs
DOT is a text format for representing abstract graphs, for example architecture.gv below:
“DOT” is not an abbreviation, just an all–caps name.
Replace graph with digraph and – with -> to create a directed graph.
The last few lines of the DOT file were used to create an image suitable for inclusion in this book, and are completely optional. bgcolor = transparent; sets the background to be transparent rather than a fixed color. dpi = 300; sets the dots per inch to use to calculate the resulting image resolution. size = “8.5,11!”; creates an image scaled up to where either the width is 8.5", the height is 11", or both, at the given DPI.
The Graphviz package contains the dot tool which converts DOT files (usually with a .gv extension) to images:
-Tpng specifies the output format as Portable Network Graphics, a popular bitmap image format. Other output formats are documented in man dot. -Tsvg for Scalable Vector Graphics output is probably the most popular vector image format.
The resulting image:

As you can see, architecture.gv contains absolutely no directives about how the graph should be presented, only the nodes and their connections. The layout is created by dot, which tries to position the nodes in a sensible way automatically so that there is minimal or no overlap in nodes or connections. Which in turn means you can create simple (and even not so simple) graphs really quickly and even programmatically. A common use case is generating diagrams such as package dependencies as part of a CI/CD pipeline to include in documentation and as a developer aid.
Graphviz also comes with neato, which takes the same command line options as dot but uses a different layout algorithm. If you’re generating complex graphs I would recommend comparing the outputs of both to see which one works best. If neither of them creates usable graphs you can still salvage the situation by splitting the graph, creating subgraphs, or tweaking the graph properties.
Even though the settings allow it, I would not recommend manually positioning the nodes. At that point most of the usefulness of the layout tools is gone, and you might as well use a manual graphing tool.
The Wikipedia article does a good job of going through the basics of the DOT language, and the online documentation is a good technical reference.
A heavily interconnected graph can become unreadable very quickly, at maybe 10 nodes or so. Lightly connected nodes such as a typical package dependency graph can easily go into hundreds of nodes before it’s unreadable, since most of the time we’re only interested in part of the graph rather than the overall structure. Judicious use of grouping, different formats for different types of items, and other advanced settings and techniques can make an otherwise impenetrable graph much more useful.
Metadata
It is common for digital cameras to embed metadata such as date, time, location and camera model in the files they create in the form of an Exif header. This information can be useful for editing tools and web sites, but sometimes you might want to inspect or even change it locally.
By default the exif tool simply prints all the Exif “tags” (key/value pairs) it finds in the file, if any:
$ exif ./image.jpg
EXIF tags in './image.jpg' ('Intel' byte order):
--------------------+----------------------------------------------------------
Tag                 |Value
--------------------+----------------------------------------------------------
Manufacturer        |Canon
Model               |Canon EOS 500D
[…]
Focal Plane Resoluti|Inch
GPS Tag Version     |2.2.0.0
--------------------+----------------------------------------------------------
EXIF data contains a thumbnail (10716 bytes).
A common use case is adding or replacing copyright information in an image. Let’s say we’re starting with a default copyright value:
$ exif --tag=Copyright --machine-readable ./image.jpg
[None] (Photographer) - [None] (Editor)
We can set this to a more useful value and verify the result:
$ full_name="$(getent passwd "$USER" | cut --delimiter=: --fields=5)"
$ exif --ifd=0 --output=./new.jpg --set-value="Copyright ${full_name}" \
> --tag=Copyright ./image.jpg
Wrote file './new.jpg'.
$ exif --tag=Copyright --machine-readable ./new.jpg
Copyright Victor Engmark (Photographer) - [None] (Editor)
I believe the mandatory --ifd=0 parameter denotes a part of the Exif header, but I don’t know the details.
The “Editor” part of the “Copyright” tag is a bit of a mystery. It doesn’t show up in exif --list-tags ./image.jpg | grep Editor.
Archiving and Compression
Storage has never been cheaper, but modern systems often use so much of it that the costs can still be a significant part of maintenance and use. So to make the most of the space we have and to save money it’s useful to know our way around the standard tools. There are heaps of tools and formats available, and we’ll look at the most common ones.
tar
This is by far the most used compression tool on Linux, and is famously difficult to use:
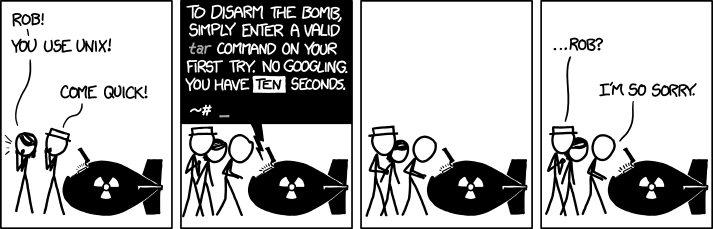
This may have something to do with the huge range of options available and the fact that some tar implementations only support short options like -t which lis_t_s (!) files within a tarball, resulting in obtuse shorthands like tar -zxvf. Fortunately the long option names are obvious, so you’ll be disarming nukes in no time.
To create a tarball: tar --create --file=./backup.tar.gz --gzip ./project
–create is the flag to create a new archive.
–file=FILE is the key/value option to set the archive file we’re working with. .tar.gz is the conventional extension, since the resulting file is a tarball contained within a gzip archive.
–gzip specifies that the file is to be compressed — this is not the default!
To add other files and directories to the tarball, simply enter them after ./project.
After running, ./backup.tar.gz will contain the project directory and all the files in it, recursively.
As you can see, tar doesn’t have bareword subcommands like Git’s commit or pull — subcommands are just another set of flags. The main purpose of tar isn’t actually compression, but rather creating tarballs, an evocative name for a collection of files placed back–to–back within another file.
The other things you may want to do with archives is to list files and extract:
To list the files in a tarball: tar --list --file=./backup.tar.gz --gzip
And to extract a tarball: tar --extract --file=./backup.tar.gz --gzip
The --gzip flag in the listing and extraction commands is not strictly speaking necessary: in a test run, tar --extract --file=./backup.tar.gz did the same thing as the command above. It even worked after renaming the file to backup.tar, so tar must be looking at what are literally called magic patterns within the file to determine what type it is. Such shortcuts can save you seconds when writing the command — at the expense of risking minutes or hours of debugging.
The only other flag you are likely to use often is --verbose, which prints the paths as they are added to or extracted from the tarball.
Streaming files to another machine
tar --create . | ssh example.org tar --directory=/tmp --extract will recursively copy the current directory into the /tmp directory on example.org. This pattern is useful in lots of situations:
-
the transfer needs to be automated
-
physical access to the source or target machine is restricted, for example on a third–party cloud
-
an archive of the data and the decompressed files are too big to fit on the filesystem at the same time
-
you can’t or don’t want to install extra tools or services on either machine, especially in case of a one–time transfer
-
speed is of the essence (for example, the target machine could start processing files immediately rather than having to wait for the user to mount some external storage device, copy the files across, unmount, go to the other machine, mount the device and start copying)
Sometimes sneakernet is appropriate, but networks today have so much bandwidth that the above could be the fastest and easiest solution. If you’re moving around lots of data it’s probably worth comparing them. If the data is highly compressible it might also be faster to add -C to the ssh command to enable gzip compression.
Plain gzip
One .gz file corresponds to one decompressed file. This is why files are often tarballed first – it’s just easier to deal with a single file than several, especially if you want to retain the directory structure. Raw gzip comes up rarely, but when it does the relevant tools are gzip to compress and gunzip to decompress. If you’re dealing with a stream of compressed data you’ll want to use the --stdout flag with both commands to send the streams to standard output rather than creating intermediate files.
Zip
This compressed format has been supported by the built–in file manager in Windows for decades, so it is still commonly found on that platform.
To create a zip file: zip --recurse-paths backup.zip ./project
To list the files in a zip file: unzip -l backup.zip
And to extract a zip file: unzip backup.zip
Other formats
There are heaps of other formats as well, but most of them use a similar command structure to tar and gzip. Tools for 7z, bzip, rar, xz and more compressed file formats should all be available in your package manager. Memory use, processing time, compression ratios and features very by several orders of magnitude depending on which format, tool and options you use. If you have particular needs I would recommend researching the available tools to get the best for the job at hand.