INTRODUCTION TO THE PROJECT
In this project we’re going to create a cool chat application.
We’ll not build a browser interface this time. Instead, we’ll build a command line application. Why? Because it’s best to use a frontend framework like React to build the frontend in the browser, and it would be too much “full stack” rather than a project focused on Node.js.
This will showcase many things you can do with Node.js:
- how to create an executable Node.js app
- how to accept CLI arguments
- how to ask for input from the command line
- how to communicate using Axios to a 3rd party API
We’re going to use Chatkit, a very nice tool provided by Pusher that will let us abstract all the nitty gritty details of implementing a chat, like notifications, read confirmations and so on.
They have a free plan, which will be more than enough for our simple demo.
Let’s start!
START BY SETTING UP CHATKIT
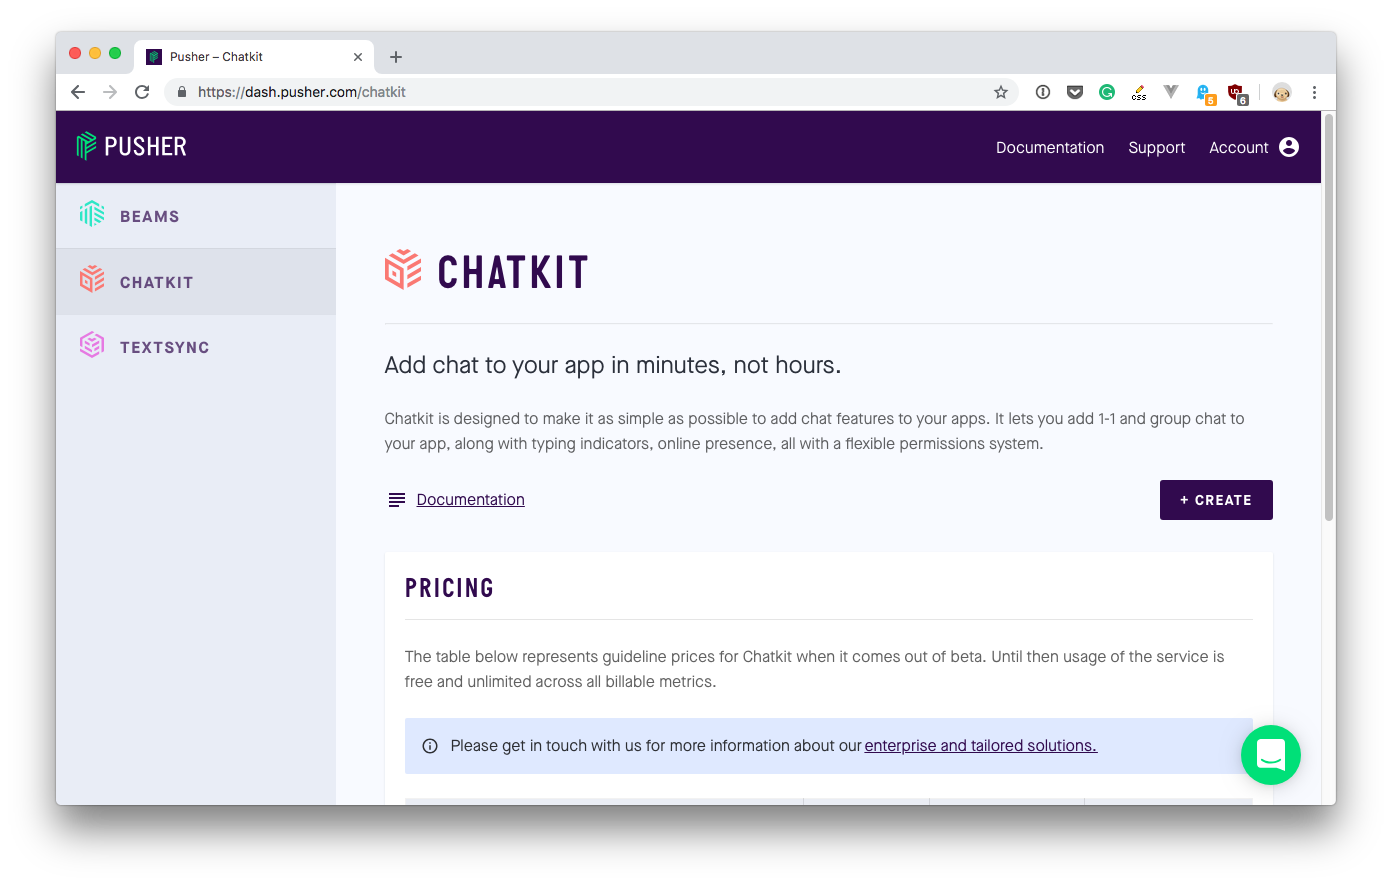
As mentioned in the first lesson, we’ll be using ChatKit by Pusher.
Go to https://pusher.com/chatkit and register for a free account.
Once you are logged in, you’ll see a similar screen:
click the “CREATE” button and add a name to your chat. I’ll call mine “dogs” since I like talking about dogs.
Once you are done, the interface will show you
- the Instance Locator , a string that identifies your chat
- the Secret Key
we’ll need them soon.
LET’S START
We said this is a terminal-based application. To do this, we’ll use a library that allows us to easily manage the command line input and output. There are a lot of nice libraries in the Node.js world that let us create command line interfaces.
One of them is Inquirer.js (https://github.com/SBoudrias/Inquirer.js/).
Install it in a brand new Glitch application by adding them to the package.json file, or using npm locally:
npm init
npm install inquirer
Let’s start by asking the user name when the chat program is launched.
We initialize it:
const inquirer = require('inquirer')
and we pass a question, asking the user for the nickname:
const { nickname } = await inquirer.prompt([
  {
    type: 'input',
    name: 'nickname',
    message: 'Choose a nickname'
  }
])
We’re just using the inquirer APIs here, nothing special.
The nickname variable now contains the value entered by the user.
const { nickname } = ... is a syntax that lets us extract the nickname variable from the object returned by inquirer.prompt() .
The code is available at https://glitch.com/edit/#!/node-course-project-chat-a?path=server.js
AUTHENTICATION
After the user enters the nickname we’re ready for the authentication phase.
If the nickname provided does not exist yet in our chat, we’ll allow the user to enter (Chatkit will tell us this information)
Otherwise we’ll tell that the nickname already exists, so we cannot allow 2 people with the same name - another one needs to be entered.
We add Chatkit by installing and then requiring @pusher/chatkit-server :
const Chatkit = require('@pusher/chatkit-server')
and we create a new instance by using the new Chatkit.default() method:
const chatkit = new Chatkit.default({
  instanceLocator: process.env.INSTANCE_LOCATOR,
  key: process.env.SECRET_KEY
})
All of this is coming from the Chatkit docs.
INSTANCE_LOCATOR and SECRET_KEY are the 2 values provided on the Chatkit dashboard. I added them as environment variables.
To fill them, in Glitch you can add them to the .env file. To do so locally as well, you can install the dotenv package:
npm install dotenv
and then calling
require('dotenv').config()
in your main JavaScript file.
While you are here, also add a INSTANCE_ID environment variable, which is like INSTANCE_LOCATOR , but without the first 7 characters (in my case, v1:us1: . Just remove those and let the other part of the string in.
Next, we call chatkit.createUser() , passing our nickname as parameter. Chatkit allows to have an id (nickname) and a full name as well. We’re not going to do this now, but you can add it later as part of a final project challenge.
chatkit.createUser({ id: nickname, name: nickname })
This returns a promise, so we can use await to wait for the execution of it before our program workflow can continue. We also use a try/catch block to listen for possible errors:
  try {
    await chatkit.createUser({ id: nickname, name: nickname })
    console.log('User created')
  } catch (err) {
    if (err.error === 'services/chatkit/user_already_exists') {
      console.error(`Nickname already exists: ${nickname}`)
    } else {
      console.log(err.error)
    }
    return
  }
Note that when you create a user, you cannot create it again, because a user is unique and persistent. We’ll solve this later. For now, just enter a different nickname every time you run the application.
You can see all users you registered to the chat from the Chatkit dashboard (and remove them):

Once this is done, we can create a new ChatManager object , which will enable us to connect to the chat.
Before doing so, there is a little quirk we must do: the ChatManager object expects to run inside the browser, and will try to access the document and window objects, which are not available in the Node environment.
To fix this, we must do a little trick: install JSDOM and @pusher/chatkit
npm install jsdom @pusher/chatkit
Require them:
const { ChatManager, TokenProvider } = require('@pusher/chatkit')
const { JSDOM } = require('jsdom')
and add those 3 lines at the beginning of the Node.js file:
const { window } = new JSDOM()
global.window = window
global.navigator = {}
Now you can instantiate ChatManager:
const chatManager = new ChatManager({
  instanceLocator: process.env.INSTANCE_LOCATOR,
  userId: nickname,
  tokenProvider: new TokenProvider({
    url: 'https://us1.pusherplatform.io/services/chatkit_token_provider/v1/' + process.env.INSTANCE_ID + '/token'
  })
})
In the Chatkit dashboard, make sure the “Test token provider” option is enabled.
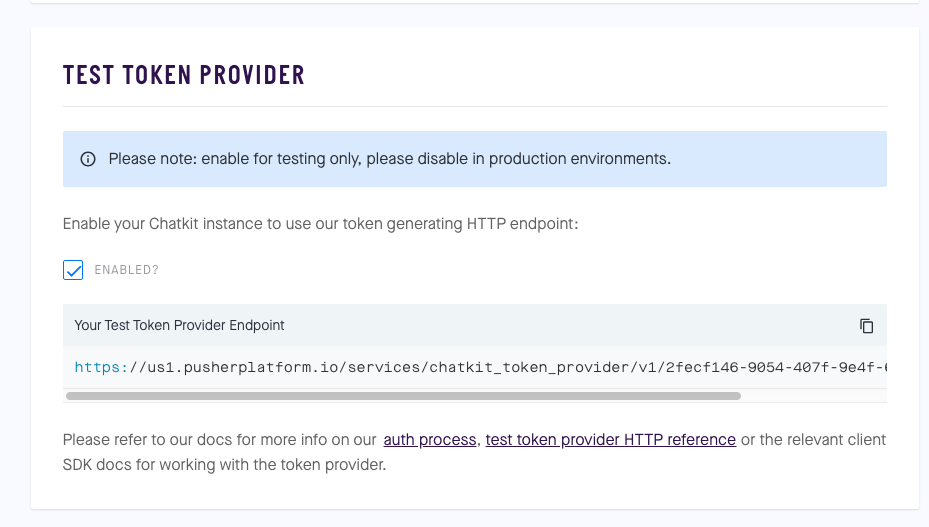
Now the current user object can be get using:
const currentUser = await chatManager.connect();
We are connected and ready to move on!
The app source code is available at https://glitch.com/edit/#!/node-course-project-chat-b?path=server.js
FIX USERS PROBLEM
As noted before, every time you run the app you need to create a new username.
Let’s fix this, because it’s annoying!
We could use a username and password combination, but to simplify the matter now, we’re just going to trust the user that they have the right to use the username
We can add a prompt using inquirer in the try/catch surrounding chatkit.createUser() :
try {
  await chatkit.createUser({ id: nickname, name: nickname })
} catch (err) {
  if (err.error === 'services/chatkit/user_already_exists') {
    const { useExisting } = await inquirer.prompt([
      {
        type: 'confirm',
        name: 'useExisting',
        message: 'The nickname exists. Do you want to use it?',
        default: true
      }
    ])

    if (!useExisting) {
      return
    }
  } else {
    console.log(err.error)
    return
  }
}
Now if that call fails because the user already exists (we check the error message), we ask the user if they really want to use that username, which already exists:

This is an approach viable now while we test, but of course another strategy needs to be in place if you want to avoid user impersonation when going “live”. More on this in the project challenges later on.
The app source code is available at https://glitch.com/edit/#!/node-course-project-chat-c?path=server.js
CREATE A ROOM AND JOIN IT, OR CHOOSE ONE
Now that we are connected, we need to go into a room before we can talk to anyone.
We don’t have any rooms at first! So let’s create one. If no room exists, we’ll call the first room “general”.
The user object has a rooms property which lists the room the user has already joined. Plus, we call its getJoinableRooms() method to see the other rooms we can join.
Let’s first check if there is at least a room. We join the two arrays by using the spread operator (…):
let joinableRooms
let currentRoom

try {
  joinableRooms = await currentUser.getJoinableRooms()
} catch (err) {
  console.error(err)
  return
}

const rooms = [...currentUser.rooms, ...joinableRooms]
Then if no room exists, we create the general room:
if (!rooms.length) {
  try {
    const room = await currentUser.createRoom({
      name: 'general'
    })
  } catch (err) {
    console.error(err)
	  return
  }
}
The last thing we need to do is to join it!
await currentUser.joinRoom({ roomId: room.id })
currentRoom = room.id
If there is already a room we join it and set it as current:
if (rooms.length === 1) {
  try {
    await currentUser.joinRoom({ roomId: rooms[0].id })
  } catch (err) {
    console.error(err)
    return
  }
  currentRoom = rooms[0].id
}
If there 2 or more, then we let the person choose which one to join first:
if (rooms.length === 1) {
  //...
} else {
  const { roomNameToJoin } = await inquirer.prompt([
    {
      type: 'list',
      name: 'roomNameToJoin',
      message: 'Select a room to join',
      choices: rooms.map(room => room.name)
    }
  ])

  const roomToJoin = rooms.filter(room => room.name === roomNameToJoin)[0]

  try {
    await currentUser.joinRoom({ roomId: roomToJoin.id })
  } catch (err) {
    console.error(err)
    return
  }

  currentRoom = roomToJoin.id
}
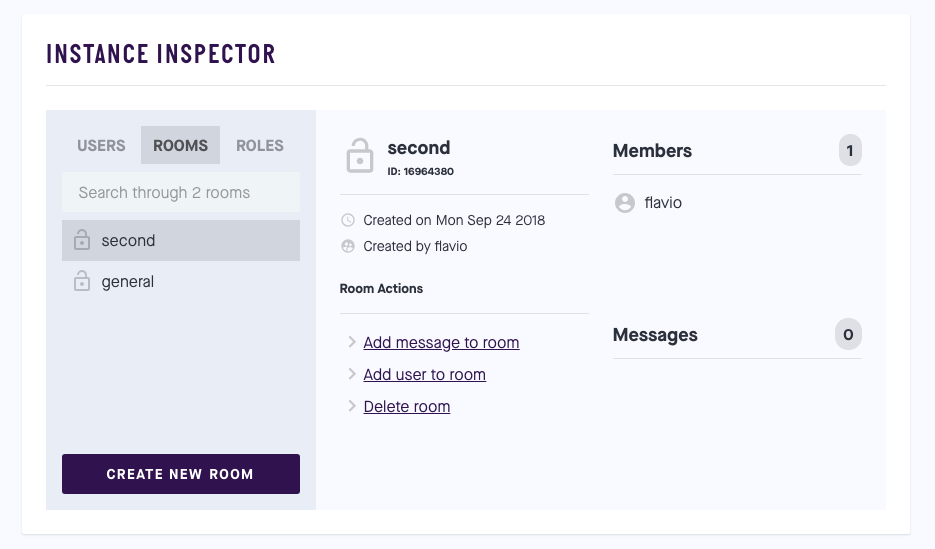
As with the users, we can inspect the rooms in the Chatkit dashboard, and also create a new room, or delete rooms (useful to test this code):
The app source code is available at https://glitch.com/edit/#!/node-course-project-chat-d?path=server.js
SEND AND RECEIVE MESSAGES
After we join a room, any time the user presses the enter key, thus adds a new line, we will send a message to the chat.
We use the readline built-in Node module: https://nodejs.org/api/readline.html
const readline = require('readline')
Using readline we can listen when the user presses enter and when this happens, we get passed the message object.
We pass that object to currentUser.sendMessage() to send a message to the room with the corresponding roomId parameter:
const input = readline.createInterface({ input: process.stdin })
input.on('line', async message => {
  try {
    await currentUser.sendMessage({ roomId: currentRoom.id, text: message })
  } catch (err) {
    console.error(err)
    return
  }
})
After this we also subscribe to the current room by using currentUser.subscribeToRoom() , passing the room id.
You can add various hooks , events that are triggered by Chatkit. In this case we use onNewMessage to display the message in the console.
If we are the sender, we add ‘me:‘, otherwise the sender name:
currentUser.subscribeToRoom({
  roomId: currentRoom.id,
  hooks: {
    onNewMessage: message => {
      console.log(
        `${nickname === message.sender.name ? 'me' : message.sender.name}: ${
          message.text
        }`
      )
    }
  },
  messageLimit: 0
})
messageLimit indicated that when we subscribe we don’t get any older messages, we just want to get new ones (like IRC works, unlike how other modern chat works - you’ll get to improve this in the challenges).
The app source code is available at https://glitch.com/edit/#!/node-course-project-chat-e?path=server.js
SHOW THE PEOPLE IN THE ROOM
We can send and receive messages now, but who are we talking to?
We can get a list of the people that are in the room, and we can create a simple command: /people .
When we intercept this line, we know it’s not a message, but a specific command. To do this we add an if/else statement inside the input.on() callback. If we recognize a command we execute it, otherwise we send the message text.
input.on('line', async message => {
    if (message === '/people') {
      //...
    } else {
      try {
        await currentUser.sendMessage({ roomId: currentRoom.id, text: message })
      } catch (err) {
        console.error(err)
        return
      }
    }
})
The users are available by calling currentRoom.users . This provides us an array and we can use map() to iterate and log the user name to the console:
input.on('line', async message => {
    if (message === '/people') {
      console.log('People in the room:')
      currentRoom.users.map(user => {
        console.log(user.name)
      })
    } else {
      try {
        await currentUser.sendMessage({ roomId: currentRoom.id, text: message })
      } catch (err) {
        console.error(err)
        return
      }
    }
})
The app source code is available at https://glitch.com/edit/#!/node-course-project-chat-f?path=server.js
BROADCAST A MESSAGE WHEN ONE PERSON JOINS THE ROOM
When a person joins the room, you want other people to know it. At least this is what every chat app does. We want to show a little funny message when someone enters (like Discord does).
We’ll create an array of welcome messages, and use that array to randomly print one of the options:
const choices = [
    `Hey ${currentUser.name}, we hope you brought pizza!`,
    `Welcome to the party, ${currentUser.name}!`,
    `Big ${currentUser.name} showed up!`,
    `Swooooosh! ${currentUser.name} just landed`,
    `${currentUser.name} joined our party`
  ]

try {
  await currentUser.sendMessage({ roomId: room.id, text: choices[Math.floor(Math.random() * choices.length)] })
} catch (err) {
  console.error(err)
  return
}
we used Math.floor(Math.random() * choices.length) to generate a random number between 0 and the array length, to get a random welcome message.
We have 3 places where join a room (depending if no rooms are there, if 1 is there, if they are more than 1).
So let’s create a joinRoom() function and instead of calling currentUser.joinRoom() 3 times like we do now, plus the welcome message code, we’ll just call joinRoom() and do all the logic in there:
const joinRoom = async room => {
  const choices = [
    `Hey ${currentUser.name}, we hope you brought pizza!`,
    `Welcome to the party, ${currentUser.name}!`,
    `Big ${currentUser.name} showed up!`,
    `Swooooosh! ${currentUser.name} just landed`,
    `${currentUser.name} joined our party`
  ]

  try {
    await currentUser.joinRoom({ roomId: room.id })
    await currentUser.sendMessage({
      roomId: room.id,
      text: choices[Math.floor(Math.random() * choices.length)]
    })
  } catch (err) {
    console.error(err)
    return
  }
}
The app source code is available at https://glitch.com/edit/#!/node-course-project-chat-g?path=server.js
SEE OTHER ROOMS AND CHANGE ROOM
Let’s now add two more commands:
-
/roomsto list the rooms (like we did for people in a room) -
/join <room>to join another room (and set that as the active room instead of the current one)
To do both, we step into the input.on() callback and intercept the message, like we do for /people :
  input.on('line', async message => {
    if (message === '/people') {
      //...
    } else {
      //...
    }
For /rooms we want to list all the rooms available, except the one we’re into right now.
We have all the rooms in the rooms variable. We’ll just filter out the current one:
const availableRooms = rooms.filter(
  room => room.name !== currentRoom.name
)
and we’ll show a message depending on the number of available rooms:
if (availableRooms.length === 0) {
  console.log('This is the only room available')
} else {
  console.log('Rooms available:')
  availableRooms.map(room => {
    console.log(room.name)
  })
}
Next up is /join <room> ! We need to check if the message starts with /join :
//...
else if (message.startsWith('/join')) {
  //...
}
Let’s do it. First we get the room name from the string, by removing the first 6 characters (“/join “). Then we get from the rooms array the room with that name. If it exists, we pass it to joinRoom() and update the currentRoom object:
//...
} else if (message.startsWith('/join')) {
  const roomName = message.substring(6)

  const room = rooms.filter(room => room.name === roomName)

  if (room.length) {
    joinRoom(room[0])
    currentRoom = room[0]

    console.log(`Switched to the ${roomName} room! 😀`)
  } else {
    console.log('Room not found 😟')
  }
}
The app source code is available at https://glitch.com/edit/#!/node-course-project-chat-h?path=server.js
CHALLENGES
If you got the mentoring package, you can clone the project at https://github.com/flaviocopes/node-course-project-chat and implement the following coding challenges. Once you are done, email me and I will review your work (if you got the mentoring package!)
- Add a command to create new room
- Implement a /quit command to disconnect and close the Node.js app (bonus: show a “quit” message to other people in the room)
- Now if you add a room on the Chatkit dashboard, you won’t see it until you re-run the Node app again in /rooms. Make it “real-time”.
- Add full name: remember when we authenticated the user? In addition to asking for a nickname, also ask for the full name.
- Provide nicer error when no nickname is entered
- Ask users for a username and password, centralized in a database (Airtable?) to avoid user impersonation and people logging in twice with the same nickname
- Right now we don’t show old messages. Implement history (see https://docs.pusher.com/chatkit/reference/javascript#subscriptions)
You can do those challenges later after you completed the other projects in the course, as it might take more time than you can currently dedicate (and some might also be too advanced right now)