20 Physics
Difficulty Very hard
Introduction
Physics can be one of the coolest features you can add to a WebGL experience. People enjoy playing with objects, see them collide, collapse, fall and bounce like in my portfolio: https://bruno-simon.com/
There are many ways of adding physics to your project, and it depends on what you want to achieve. You can create your own physics with some mathematics and solutions like Raycaster, but if you wish to get realistic physics with tension, friction, bouncing, constraints, pivots, etc. and all that in 3D space, you better use a library.
Theory
The idea is simple. We are going to create a physics world. This physics world is purely theoretical, and we cannot see it. But in this world, things fall, collide, rub, slide, etc.
When we create a Three.js mesh, we will also create a version of that mesh inside the physics world. If we make a Box in Three.js, we also create a box in the physics world.
Then, on each frame, before rendering anything, we tell the physics world to update itself; we take the coordinates (position and rotation) of the physics objects and apply them to the corresponding Three.js mesh.
And that’s all. What is most difficult is to organize our code in a decent structure. That is a part where paths separate. Each developer will have its habits, and it also depends on what you want to do and how complex the physics can become.
To begin with, we will simply create spheres and boxes.
Libraries
There are multiple available libraries. First, you must decide if you need a 3D library or a 2D library. While you might think it has to be a 3D library because Three.js is all about 3D, you might be wrong. 2D libraries are usually much more performant, and if you can sum up your experience physics up to 2D collisions, you better use a 2D library.
One example is if you want to create a pool game. The balls can collide and bounce on the walls, but you can project everything on a 2D plane. You can design balls as circles in the physics world, and the walls are simple rectangles. Indeed, you won’t be able to do tricks hitting the bottom of the ball so that it can jump over the other balls.
An excellent example of a project done like this is Ouigo Let’s play by Merci Michel. They used a 2D physics library because every collision and animation can be represented in a 2D space.
For 3D physics, there are three main libraries:
- Ammo.js
- Website: http://schteppe.github.io/ammo.js-demos/
- Git repository: https://github.com/kripken/ammo.js/
- Documentation: No documentation
- Direct JavaScript port of Bullet (a physics engine written in C++)
- A little heavy
- Still updated by a community
- Cannon.js
- Website: https://schteppe.github.io/cannon.js/
- Git repository: https://github.com/schteppe/cannon.js
- Documentation: http://schteppe.github.io/cannon.js/docs/
- Lighter than Ammo.js
- More comfortable to implement than Ammo.js
- Mostly maintained by one developer
- Hasn’t been updated for many years
- There is a maintained fork
- Oimo.js
- Website: https://lo-th.github.io/Oimo.js/
- Git repository: https://github.com/lo-th/Oimo.js
- Documentation: http://lo-th.github.io/Oimo.js/docs.html
- Lighter than Ammo.js
- Easier to implement than Ammo.js
- Mostly maintained by one developer
- Hasn’t been updated for 2 years
For 2D physics, there are many libraries, but here’s the most popular:
- Matter.js
- Website: https://brm.io/matter-js/
- Git repository: https://github.com/liabru/matter-js
- Documentation: https://brm.io/matter-js/docs/
- Mostly maintained by one developer
- Still kind of updated
- P2.js
- Website: https://schteppe.github.io/p2.js/
- Git repository: https://github.com/schteppe/p2.js
- Documentation: http://schteppe.github.io/p2.js/docs/
- Mostly maintained by one developer (Same as Cannon.js)
- Hasn’t been update for 2 years
- Planck.js
- Website: https://piqnt.com/planck.js/
- Git repository: https://github.com/shakiba/planck.js
- Documentation: https://github.com/shakiba/planck.js/tree/master/docs
- Mostly maintained by one developer
- Still updated nowadays
- Box2D.js
- Website: http://kripken.github.io/box2d.js/demo/webgl/box2d.html
- Git repository: https://github.com/kripken/box2d.js/
- Documentation: No documentation
- Mostly maintained by one developer (same as Ammo.js)
- Still updated nowadays
We won’t use a 2D library in this lesson, but the 2D library code would be very similar to a 3D library code. The main difference is the axes you have to update.
There are already solutions that try to combine Three.js with libraries like Physijs. Still, we won’t use any of those solutions to get a better learning experience and better understand what’s going on.
While Ammo.js is the most used library and particularly with Three.js, as you can see in the examples, we will go for Cannon.js. The library is more comfortable to implement in our project and easier to use.
Import Cannon.js
To add Cannon.js to our project, we first need to add the dependency.
In your terminal, on the project folder, run this command npm install --save cannon .
We can now import Cannon.js in our JavaScript with a classic import :
import CANNON from 'cannon'
JavaScript
Copy
Everything we need is available in the CANNON variable.
Setup
Our starter is composed of one sphere on a plane, and shadows are already enabled for aesthetic reasons.

Base
World
First, we need to create a Cannon.js World:
/**
 * Physics
 */
const world = new CANNON.World()
JavaScript
Copy
We could make a WebGL experience in space where there is no gravity, but let’s keep our feet on Earth and add gravity. You can change this value with the gravity property, which is a Cannon.js Vec3.
Cannon.js Vec3 is just like Three.js Vector3. It has x , y , and z properties, but also a set(...) method:
world.gravity.set(0, - 9.82, 0)
JavaScript
Copy
We used - 9.82 as the value because it’s the gravity constant on earth, but you can use any other value if you want things to fall slower or if your scene happens on Mars.
Object
Because we already have a sphere in our scene, let’s create a sphere inside our Cannon.js World.
To do that, we must create a Body. Bodies are simply objects that will fall and collide with other bodies.
Before we can create a Body, we must decide on a shape. There are many available primitive shapes like Box, Cylinder, Plane, etc. We will go for a Sphere with the same radius as our Three.js sphere:
const sphereShape = new CANNON.Sphere(0.5)
JavaScript
Copy
Then we can create our Body and specify a mass and a position:
const sphereBody = new CANNON.Body({
    mass: 1,
    position: new CANNON.Vec3(0, 3, 0),
    shape: sphereShape
})
JavaScript
Copy
Finally, we can add the Body to the world with addBody(...) :
world.addBody(sphereBody)
JavaScript
Copy
Nothing is happening because we still need to update our Cannon.js world and update our Three.js sphere accordingly.
Update the Cannon.js world and the Three.js scene
To update our World, we must use the step(...) . The code behind this method is hard to understand, and we won’t explain it in this lesson, but you can find more about it in this article.
For it to work, you must provide a fixed time step, how much time passed since the last step, and how much iterations the world can apply to catch up with a potential delay.
We won’t explain what is a time step, but because we want our experience to run at 60fps, we are going to use 1 / 60 . Don’t worry, the experience will work at the same speed on devices with higher and lower frame rates.
It’s up to you for the number of iterations, but it’s not that important if the experience is running smoothly. Let’s use 3 .
For the delta time, it’s a little harder. We need to calculate how much time has passed since the last frame. Do not use the getDelta() method from the Clock class. You won’t get the intended result, and you’ll mess up with the class’s internal logic.
To get the right delta time, we need to subtract the elapsedTime from the previous frame to the current elapsedTime :
const clock = new THREE.Clock()
let oldElapsedTime = 0

const tick = () =>
{
    const elapsedTime = clock.getElapsedTime()
    const deltaTime = elapsedTime - oldElapsedTime
    oldElapsedTime = elapsedTime

    // ...
}
JavaScript
Copy
We can finally update our world:
const tick = () =>
{
    // ...

    // Update physics
    world.step(1 / 60, deltaTime, 3)
}
JavaScript
Copy
Still, nothing seems to be moving. But our sphereBody is falling, and you can see that by logging its position after updating the world:
    world.step(1 / 60, deltaTime, 3)
    console.log(sphereBody.position.y)
JavaScript
Copy
What we need to do now is update our Three.js sphere by using the sphereBody coordinates. There are two ways of doing it. You can either update each position property separately:
    sphere.position.x = sphereBody.position.x
    sphere.position.y = sphereBody.position.y
    sphere.position.z = sphereBody.position.z
JavaScript
Copy
Or you can copy all the properties as one with the copy(...) method:
sphere.position.copy(sphereBody.position)
JavaScript
Copy
copy(...) is available in many classes such as Vector2, Vector3, Euler, Quaternion, and even classes like Material, Object3D, Geometry, etc.
You should eventually see your sphere falling. The problem is that our sphere seems to fall through the floor. It’s because that floor exists in the Three.js scene but not in the Cannon.js world.
We can simply add a new Body using a Plane shape, but we don’t want our floor to be affected by gravity and fall. In other words, we want our floor to be static. To make a Body static, set its mass to 0 :
const floorShape = new CANNON.Plane()
const floorBody = new CANNON.Body()
floorBody.mass = 0
floorBody.addShape(floorShape)
world.addBody(floorBody)
JavaScript
Copy
As you can see, we did things quite differently this time. We created a Body with no parameter, and we set those parameters after. The result is the same, and the only reason we did this is for the lesson’s sake. One interesting thing is that you can create a Body composed of multiple Shapes. It can be useful for complex but solid objects.
You should see the sphere jumping in a direction (probably toward the camera). Not the intended result. The reason is that our plane is facing the camera by default. We need to rotate it just like we rotated the floor in Three.js.
Rotation with Cannon.js is a little harder than with Three.js because you have to use Quaternion. There are multiple ways of rotating the Body, but it has to be with its quaternion property. We are going to use the setFromAxisAngle(...) .
The first parameter is an axis. You can imagine it like a spike going through the Body. The second parameter is the angle. It’s how much you are rotating the Body around that spike.
floorBody.quaternion.setFromAxisAngle(new CANNON.Vec3(- 1, 0, 0), Math.PI * 0.5)
JavaScript
Copy
We set the axis like if it was a spike going through the Body on the negative x axis (to the left relatively to the camera) and we set the Angle to Math.PI * 0.5 (a quarter of a circle).
You should now see the sphere falling and then stopping on the floor.
We don’t need to update the Three.js floor with the Cannon.js floor because this object is not moving.
Contact material
As you can see, the ball doesn’t bounce much. That is the default behavior, and we can change that with Material (Not the Material from Three.js) and ContactMaterial.
A Material is just a reference. You can give it a name and associate it with a Body. The idea is to create a Material for each type of material you have in your scene.
Suppose everything in your world is made out of plastic. In that case, you only have to create one material and name it 'default' or 'plastic' . If you have multiple types of materials in your scene, let’s say one material for the floor and one for the ball. Then, you should create various Material and give them names like 'concrete' and 'plastic' .
You could have called them 'ground' and 'ball' . Still, if you want to use the same materials for walls and other objects like cubes, it could be inconvenient to use a material named 'ground' .
Before you create the sphere and the floor, create these two Material:
const concreteMaterial = new CANNON.Material('concrete')
const plasticMaterial = new CANNON.Material('plastic')
JavaScript
Copy
Now that we have our Material, we must create a ContactMaterial. It is the combination of the two Materials and contains properties for when objects collide.
The first two parameters are the Materials. The third parameter is an object {} that contains two important properties: the friction coefficient (how much does it rub) and the restitution coefficient (how much does it bounce)—both have default values of 0.3 .
Once created, add the ContactMaterial to the world with the addContactMaterial(...) method:
const concretePlasticContactMaterial = new CANNON.ContactMaterial(
    concreteMaterial,
    plasticMaterial,
    {
        friction: 0.1,
        restitution: 0.7
    }
)
world.addContactMaterial(concretePlasticContactMaterial)
JavaScript
Copy
There isn’t much friction between concrete and plastic, but if you let a plastic ball fall on a concrete floor, you’ll see it bounce quite a lot.
We can now use our Material on the Body. You can pass the Material directly when instancing the Body or after with the material property. Let’s do both for the sake of learning:
const sphereBody = new CANNON.Body({
    // ...
    material: plasticMaterial
})

// ...

const floorBody = new CANNON.Body()
floorBody.material = concreteMaterial
JavaScript
Copy
You should see the ball bounce many times before stopping. We cannot see the friction in action because our ball falls perfectly straight on our floor and spend most of its time in the air.
Having different Materials and creating a ContactMaterial for each combination can prove to be puzzling. To simplify everything, let’s replace our two Materials by a default one and use it on every Bodies:
const defaultMaterial = new CANNON.Material('default')
const defaultContactMaterial = new CANNON.ContactMaterial(
    defaultMaterial,
    defaultMaterial,
    {
        friction: 0.1,
        restitution: 0.7
    }
)
world.addContactMaterial(defaultContactMaterial)

// ...

const sphereBody = new CANNON.Body({
    // ...
    material: defaultMaterial
})

// ...

floorBody.material = defaultMaterial
JavaScript
Copy
We get the same result.
We can go even further by setting our material as the default one of our World. To do that, simply assign the defaultContactMaterial to the world 's defaultContactMaterial property:
world.defaultContactMaterial = defaultContactMaterial
JavaScript
Copy
We can now remove or comment the material assignation of the sphereBody and floorBody .
Apply forces
There are many ways to apply forces to a Body:
- applyForce to apply a force to the Body from a specified point in space (not necessarily on the Body’s surface) like the wind that pushes everything a little all the time, a small but sudden push on a domino or a greater sudden force to make an angry bird jump toward the enemy castle.
- applyImpulse is like applyForce but instead of adding to the force that will result in velocity changes, it applies directly to the velocity.
-
applyLocalForce is the same as applyForce but the coordinates are local to the Body (meaning that
0, 0, 0would be the center of the Body). - applyLocalImpulse is the same as applyImpulse but the coordinates are local to the Body.
Because using “force” methods will result in velocity changes, let’s not use “impulse” methods
Let’s use applyLocalForce(...) to apply a small impulse on our sphereBody at the start:
sphereBody.applyLocalForce(new CANNON.Vec3(150, 0, 0), new CANNON.Vec3(0, 0, 0))
JavaScript
Copy
You can see the ball bounce to the right and roll.
Now let’s use the applyForce(...) to apply some wind. Because the wind is permanent, we should apply this force to each frame before updating the World. To correctly apply this force, the point should be the sphereBody.position :
const tick = () =>
{
    // ...

    // Update physics
    sphereBody.applyForce(new CANNON.Vec3(- 0.5, 0, 0), sphereBody.position)

    world.step(1 / 60, deltaTime, 3)

    // ...
}
JavaScript
Copy
Handle multiple objects
Handling one or two objects is easy, but managing dozens of objects can be a mess. We need to automate things a little.
First, remove or comment the sphere , the sphereShape and the sphereBody .
Automate with functions
To start with, let’s improve how we create spheres with a function that will add both the Three.js and the Cannon.js versions.
As parameters of this function, we will only pass the radius and the position , but feel free to add other parameters such as mass , material , subdivisions , etc.
/**
 * Utils
 */
const createSphere = (radius, position) =>
{
}
JavaScript
Copy
Now we can create the Three.js Mesh:
const createSphere = (radius, position) =>
{
    // Three.js mesh
    const mesh = new THREE.Mesh(
        new THREE.SphereBufferGeometry(radius, 20, 20),
        new THREE.MeshStandardMaterial({
            metalness: 0.3,
            roughness: 0.4,
            envMap: environmentMapTexture
        })
    )
    mesh.castShadow = true
    mesh.position.copy(position)
    scene.add(mesh)
}
JavaScript
Copy
And the Cannon.js Body:
const createSphere = (radius, position) =>
{
    // ...

    // Cannon.js body
    const shape = new CANNON.Sphere(radius)

    const body = new CANNON.Body({
        mass: 1,
        position: new CANNON.Vec3(0, 3, 0),
        shape: shape,
        material: defaultMaterial
    })
    body.position.copy(position)
    world.addBody(body)
}
JavaScript
Copy
We can remove the previously created sphere and call the createSphere(...) (after creating the Cannon.js world and the Three.js scene). Don’t forget to remove the sphere update in the tick() function:
createSphere(0.5, { x: 0, y: 3, z: 0 })
JavaScript
Copy
As you can see, the position doesn’t have to be a Three.js Vector3 or a Cannon.js Vec3 and we can simply use an object with x , y and z properties (luckily for us).
You should see the sphere floating above the floor, but unfortunately, it’s not moving anymore. And this is perfectly normal because we removed the code that was taking the Cannon.js Body position to apply it to the Three.js Mesh position .
Use an array of objects
To handle this part, we will create an array of all objects that need to be updated. Then we’ll add the newly created Mesh and Body inside an object to that array:
const objectsToUpdate = []

const createSphere = (radius, position) =>
{
    // ...

    // Save in objects to update
    objectsToUpdate.push({
        mesh: mesh,
        body: body
    })
}
JavaScript
Copy
You can write this last part like this (no need to specify the property when the variable name is the same in JavaScript):
objectsToUpdate.push({ mesh, body })
JavaScript
Copy
We can now loop on that array inside the tick() function (right after updating the world) and copy each body.position to the mesh.position :
const tick = () =>
{
    // ...

    world.step(1 / 60, deltaTime, 3)

    for(const object of objectsToUpdate)
    {
        object.mesh.position.copy(object.body.position)
    }
}
JavaScript
Copy
The sphere should start falling again.
Add to Dat.GUI
Let’s have fun and add a createSphere button to our Dat.GUI. The problem is that the first parameter when using the gui.add(...) method, should be an object, and the second parameter should be a property name. Unfortunately, our createSphere method is not in an object, and also need to passe parameters to it. This kind of situation can happen regularly. A not so bad solution would be to create an object which only purpose would be to have those lost functions as properties:
const gui = new dat.GUI()
const debugObject = {}
JavaScript
Copy
And then add functions to it when needed (after creating the createSphere function):
debugObject.createSphere = () =>
{
    createSphere(0.5, { x: 0, y: 3, z: 0 })
}
JavaScript
Copy
Finally, we can add this new createSphere property to Dat.GUI:
gui.add(debugObject, 'createSphere')
JavaScript
Copy
If you click on the newly created createSphere button, you should see spheres staking one on each other. That is due to the sphere popping on the exact same position. Let’s add some randomness:
debugObject.createSphere = () =>
{
    createSphere(
        Math.random() * 0.5,
        {
            x: (Math.random() - 0.5) * 3,
            y: 3,
            z: (Math.random() - 0.5) * 3
        }
    )
}
JavaScript
Copy
It’s raining spheres!
Try not to burn your computer; this code needs optimization.
Optimize
Because the geometry and the material of the Three.js Mesh are the same, we should get them out of the createSphere function. The problem is that we are using the radius to create our geometry. An easy solution would be to fix the radius of the SphereBufferGeometry to 1 and then scale the Mesh:
const sphereGeometry = new THREE.SphereBufferGeometry(1, 20, 20)
const sphereMaterial = new THREE.MeshStandardMaterial({
    metalness: 0.3,
    roughness: 0.4,
    envMap: environmentMapTexture
})
const createSphere = (radius, position) =>
{
    // Three.js mesh
    const mesh = new THREE.Mesh(sphereGeometry, sphereMaterial)
    mesh.castShadow = true
    mesh.scale.set(radius, radius, radius)
    mesh.position.copy(position)
    scene.add(mesh)

    // ...
}
JavaScript
Copy
You should get the same result.
Add boxes
Now that our spheres are working well, let’s do the same process but for the boxes.
To create a box, we must use a BoxBufferGeometry and a Box shape. Be careful; the parameters aren’t the same. A BoxBufferGeometry needs a width , a height , and a depth . In the meantime, a Box shape needs a halfExtents . It is represented by a Vec3 corresponding to a segment that starts at the center of the box and joining one of that box corners:
// Create box
const boxGeometry = new THREE.BoxBufferGeometry(1, 1, 1)
const boxMaterial = new THREE.MeshStandardMaterial({
    metalness: 0.3,
    roughness: 0.4,
    envMap: environmentMapTexture
})
const createBox = (width, height, depth, position) =>
{
    // Three.js mesh
    const mesh = new THREE.Mesh(boxGeometry, boxMaterial)
    mesh.scale.set(width, height, depth)
    mesh.castShadow = true
    mesh.position.copy(position)
    scene.add(mesh)

    // Cannon.js body
    const shape = new CANNON.Box(new CANNON.Vec3(width * 0.5, height * 0.5, depth * 0.5))

    const body = new CANNON.Body({
        mass: 1,
        position: new CANNON.Vec3(0, 3, 0),
        shape: shape,
        material: defaultMaterial
    })
    body.position.copy(position)
    world.addBody(body)

    // Save in objects
    objectsToUpdate.push({ mesh, body })
}

createBox(1, 1.5, 2, { x: 0, y: 3, z: 0 })

debugObject.createBox = () =>
{
    createBox(
        Math.random(),
        Math.random(),
        Math.random(),
        {
            x: (Math.random() - 0.5) * 3,
            y: 3,
            z: (Math.random() - 0.5) * 3
        }
    )
}
gui.add(debugObject, 'createBox')
JavaScript
Copy
Don’t forget to remove the first createSphere(...) call, or you’ll have both the sphere and the box created in the same position simultaneously, which might get messy.
You should see a box falling and suddenly going through the floor. If you click on the createBox button of Dat.GUI, it should get even more acute.
We forgot one significant thing: our meshes are not rotating. What’s happening here is that the box bounce on the floor and fall on its side. But all we can see is the box standing straight and going through the floor because the Three.js Mesh isn’t rotating like the Cannon.js Body is.
We didn’t see the problem before because we were using spheres and they looked the same wether we rotate them or not.
We can fix this by copying the Body quaternion to the Mesh quaternion just like we did with the position :
const tick = () =>
{
    // ...

    for(const object of objectsToUpdate)
    {
        object.mesh.position.copy(object.body.position)
        object.mesh.quaternion.copy(object.body.quaternion)
    }

    // ...
}
JavaScript
Copy
The boxes should fall adequately now. You can create spheres and boxes as you want. As always, try not to burn your computer.
Performance
Broadphase
When testing the collisions between objects, a naive approach is testing every Body against every other Body. While this is easy to do, it’s costly in terms of performance.
That is where broadphase comes up. The broadphase is doing a rough sorting of the Bodies before testing them. Imagine having two piles of boxes far from each other. Why would you test the boxes from one pile against the boxes in the other pile? They are too far to be colliding.
There are 3 broadphase algorithms available in Cannon.js:
- NaiveBroadphase: Tests every Bodies against every other Bodies
- GridBroadphase: Quadrilles the world and only tests Bodies against other Bodies in the same grid box or the neighbors’ grid boxes.
- SAPBroadphase (Sweep and prune broadphase): Tests Bodies on arbitrary axes during multiples steps.
The default broadphase is NaiveBroadphase, and I recommend you to switch to SAPBroadphase. Using this broadphase can eventually generate bugs where a collision doesn’t occur, but it’s rare, and it involves doing things like moving Bodies very fast.
To switch to SAPBroadphase, simply instantiate it in the world.broadphase property and also use this same world as parameter:
world.broadphase = new CANNON.SAPBroadphase(world)
JavaScript
Copy
Sleep
Even if we use an improved broadphase algorithm, all the Body are tested, even those not moving anymore. We can use a feature called sleep.
When the Body speed gets incredibly slow (at a point where you can’t see it moving), the Body can fall asleep and won’t be tested unless a sufficient force is applied to it by code or if another Body hits it.
To activate this feature, simply set the allowSleep property to true on the World:
world.allowSleep = true
JavaScript
Copy
You can also control how likely it is for the Body to fall asleep with the sleepSpeedLimit and sleepTimeLimit properties but we won’t change those.
Events
You can listen to events on the Body. That can be useful if you want to do things like play a sound when objects collide or if you want to know if a projectile has touched an enemy.
You can listen to events on Body such as 'colide' , 'sleep' or 'wakeup' .
Let’s play a hit sound when our spheres and boxes collide with anything. First, create that sound in native JavaScript and create a function that should play the sound.
Some browsers like Chrome prevent sounds from playing unless the user has interacted with the page like clicking anywhere, so don’t worry if you don’t hear the first sounds.
/**
 * Sounds
 */
const hitSound = new Audio('/sounds/hit.mp3')

const playHitSound = () =>
{
    hitSound.play()
}
JavaScript
Copy
A little far-fetched to just play a sound, but we will add more to that function later.
Now, let’s listen to the 'collide' event on our Bodies. We will only focus on the createBox function and add it to the createSphere function once we are done.
Now, listen to the collide event and use the playHitSound function as the callback:
const createBox = (width, height, depth, position) =>
{
    // ...

    body.addEventListener('collide', playHitSound)

    // ...
}
JavaScript
Copy
You should hear the hit sound when the cube touches the ground or when cubes collide. Don’t forget to click on the page before the box hits the floor if you are using Chrome because Chrome refuse to play sounds if no user interaction occurred yet.
The sound seems pretty good. Unluckily, things get truly odd when we add multiples boxes.
The first problem is that when we call hitSound.play() while the sound is playing, nothing happens because it is already playing. We can fix that by resetting the sound to 0 with the currentTime property:
const playHitSound = () =>
{
    hitSound.currentTime = 0
    hitSound.play()
}
JavaScript
Copy
While this is better at the start, we hear too many hit sounds even when a cube slightly touches another. We need to know how strong the impact was and not play anything if it wasn’t strong enough.
To get the impact strength, we first need to get information about the collision. We can do that by adding a parameter to the 'collide' callback (which is our playHitSound function):
const playHitSound = (collision) =>
{
    console.log(collision)

    // ...
}
JavaScript
Copy
The collision variable now contains a lot of information. The impact strength can be found by calling the getImpactVelocityAlongNormal() method on the contact property:
const playHitSound = (collision) =>
{
    console.log(collision.contact.getImpactVelocityAlongNormal())

    // ...
}
JavaScript
Copy
If you look at the logs, you should see a number. The stronger the impact, the higher the number.
We test that value and only play the sound if the impactStrength is strong enough:
const playHitSound = (collision) =>
{
    const impactStrength = collision.contact.getImpactVelocityAlongNormal()

    if(impactStrength > 1.5)
    {
        hitSound.currentTime = 0
        hitSound.play()
    }
}
JavaScript
Copy
For even more realism, we can add some randomness to the sound volume:
const playHitSound = (collision) =>
{
    const impactStrength = collision.contact.getImpactVelocityAlongNormal()

    if(impactStrength > 1.5)
    {
        hitSound.volume = Math.random()
        hitSound.currentTime = 0
        hitSound.play()
    }
}
JavaScript
Copy
If we wanted to go even further, we could have multiple slightly different hit sounds. And to prevent having too many sounds playing simultaneously, we could add a very short delay where the sound cannot play again after being played once.
We won’t do those in this lesson, but feel free to try stuff.
Let’s copy the code we used in the createBox function to the createSphere function:
const createSphere = (radius, position) =>
{
    // ...

    body.addEventListener('collide', playHitSound)

    // ...
}
JavaScript
Copy
The sounds should be working for the spheres too.
Remove things
Let’s add a reset button.
Create a reset function and add it to your Dat.GUI as we did for createBox and createSphere :
// Reset
debugObject.reset = () =>
{
    console.log('reset')
}
gui.add(debugObject, 'reset')
JavaScript
Copy
Now, let’s loop on every object inside our objectsToUpdate array. Then remove both the object.body from the world and the object.mesh from the scene . Also, don’t forget to remove the eventListener like you would have done in native JavaScript:
debugObject.reset = () =>
{
    for(const object of objectsToUpdate)
    {
        // Remove body
        object.body.removeEventListener('collide', playHitSound)
        world.removeBody(object.body)

        // Remove mesh
        scene.remove(object.mesh)
    }
}
JavaScript
Copy
And that’s it. You can click on the reset button to remove everything.
Go further with Cannon.js
While we covered the basics and you can already do a lot of things, here are some areas of improvement.
Constraints
Constraints, as the name suggests, enable constraints between two bodies. We won’t cover those in this lesson, but here’s the list of constraints:
- HingeConstraint: acts like a door hinge.
- DistanceConstraint: forces the bodies to keep a distance between each other.
- LockConstraint: merges the bodies like if they were one piece.
- PointToPointConstraint: glues the bodies to a specific point.
Classes, methods, properties and events
There are many classes, and each one with different methods, properties, and events. Try to browse through all of them at least once just to know that they exist. It might save you some time in your future projects.
Examples
The documentation isn’t perfect. It would help if you spent some time in the demos and research to find out how to do things. Many people probably had the issues you might encounter. Don’t hesitate to rely on the community.
Workers
Running the physics simulation takes time. The component of your computer doing the work is the CPU. When you run Three.js, Cannon.js, your code logic, etc. everything is done by the same thread in your CPU. That thread can quickly overload if there is too much to do (like too many objects in the physics simulation), resulting in a frame rate drop.
The right solution is to use workers. Workers let you put a part of your code in a different thread to spread the load. You can then send and receive data from that code. It can result in a considerable performance improvement.
The problem is that the code has to be distinctly separated. You can find a good and simple example here in the page source code.
Cannon-es
As we said earlier, Cannon.js hasn’t been updated for years. Fortunately, some guys forked the repository and started working on updates. Thanks to them, we have access to a better and maintained version of Cannon.js:
- Git repository: https://github.com/pmndrs/cannon-es
- NPM page: https://www.npmjs.com/package/cannon-es
To use this version instead of the original, open the terminal in the project folder (or shut down the server), remove the previous cannon.js dependency with npm uninstall --save cannon , install the new version with npm install --save cannon-es@0.15.1 , and change the way you import Cannon.js in the code:
import * as CANNON from 'cannon-es'
JavaScript
Copy
Everything should be working just like before. You can check out the changes on the Git repository page.
Ammo.js
We used Cannon.js because the library is easy to implement and understand. One of its biggest competitors is Ammo.js. While it’s harder to use and to implement in your project, here are some features that might be of interest to you:
- It’s a portage of Bullet, a well known and well-oiled physics engine written in C++.
- It has WebAssembly (wasm) support. WebAssembly is a low-level language supported by most recent browsers. Because it’s a low level, it has better performance.
- It’s more popular, and you can find more examples of Three.js.
- It supports more features.
If you need the best performance or have particular features in your project, you probably should go for Ammo.js instead of Cannon.js.
Physijs
Physijs ease the implementation of physics in a Three.js project. It uses Ammo.js and supports workers natively.
- Website: https://chandlerprall.github.io/Physijs/
- Git repository: https://github.com/chandlerprall/Physijs
- Documentation: https://github.com/chandlerprall/Physijs/wiki
Instead of creating the Three.js object and the physics object, you create both simultaneously:
box = new Physijs.BoxMesh(
    new THREE.CubeGeometry(5, 5, 5),
    new THREE.MeshBasicMaterial({ color: 0x888888 })
)
scene.add(box)
JavaScript
Copy
Physijs will take care of the rest.
While it’s fascinating, especially for beginners, things get complicated when you try to do something not supported by the library. Finding where a bug comes from can also be a hassle.
Like for Ammo.js, take your time and think about what is the best solution for your project.
21 Imported models
Difficulty Hard
Introduction
Three.js lets you create many primitive geometries, but when it comes to more complex shapes, we better use a dedicated 3D software.
In this lesson, we will use already made models, but we will learn how to create a model entirely within a 3D software in a future lesson.
Formats
Through times, many 3D model formats have been used. Each one responded to a problem, such as what data is embedded in the model, the weight, its compression, compatibility, copyrights, etc.
That is why, today, we have access to hundreds of model formats: https://en.wikipedia.org/wiki/List_of_file_formats#3D_graphics.
Some formats are dedicated to one software. Some are known to be very light but sometimes lack specific data. Some are known to have almost all data you could need in them but are heavy. Some formats are open source, some formats are not, some are binary, some are ASCII, and it goes on and on.
If you need precise data and can’t find the adequate format supported by your software, you can even create your own quite easily.
Here’s a list of popular formats you might come across:
- OBJ
- FBX
- STL
- PLY
- COLLADA
- 3DS
- GLTF
We won’t cover all of these formats. It would be boring, and we don’t need to because one format is becoming a standard and should cover most of your needs.
GLTF
GLTF stands for GL Transmission Format. It’s made by the Khronos Group (the guys behind OpenGL, WebGL, Vulkan, Collada and with many members like AMD / ATI, Nvidia, Apple, id Software, Google, Nintendo, etc.)
GLTF has become very popular these past few years.
It supports very different sets of data. You can obviously have data like the geometries and the materials but you can also have data like cameras, lights, scene graph, animations, skeletons, morphing and even multiple scene.
It also supports various file formats like json, binary, embed textures.
GLTF has become the standard when it comes to real-time. And because it’s becoming a standard, most 3D softwares, game engines, and libraries support it. That means that you can easily have a similar result in different environments.
That doesn’t mean that you have to use GLTF in all cases. If you merely need a geometry, you better use another format like OBJ, FBX, STL, or PLY. You should test different formats on every project to see if you have all the data you need, if the file isn’t too heavy, how long it takes to uncompress the information if it’s compressed, etc.
Find a model
First, we need a model. As we said earlier, we will learn how to create our own model in a 3D software later, but for now, let’s use a pre-made one.
The GLTF team also provides various models from a simple triangle to realistic models and things like animations, morphings, clearcoat materials, etc.
You can find them in this repository: https://github.com/KhronosGroup/glTF-Sample-Models
If you want to test those models, you’ll have to download or clone the whole repository and take the files you need. But we will start with a simple duck that you can already find in the /static/models/ folder in the starter.
GLTF formats
While GLTF is a format itself, it can have different file formats too. It’s a little complex but for good reasons.
If you open the /static/models/Duck/ folder, you’ll see 4 different folders. Each one contains the duck but in different GLTF formats:
- glTF
- glTF-Binary
- glTF-Draco
- glTF-Embedded
You can even find other formats, but those 4 are the most important and cover what we need to learn.
Be careful; your OS might hide the extension of some of these files. Refer to the file names from your code editor that should show the extension.
glTF
This format is kind of the default format. The Duck.gltf file is a JSON that you can open in your editor. It contains various information like cameras, lights, scenes, materials, objects transformations, but neither the geometries nor the textures. The Duck0.bin file is a binary that you can’t read like this. It usually contains data like the geometries and all information associated with the vertices like UV coordinates, normals, vertex colors, etc. The DuckCM.png is simply the texture of the duck.
When we load this format, we only load the Duck.gltf that contains references to the other files that will then be loaded automatically.
glTF-Binary
This format is composed of only one file. It contains all the data we talked about in the glTF default format. That is a binary file, and you can’t just open it in your code editor to see what’s inside.
This format can be a little lighter and more comfortable to load because there is only one file, but you won’t be able to easily alter its data. For example, if you want to resize or compress the textures, you just can’t because it’s inside that binary file, merge with the rest.
glTF-Draco
This format is like the glTF default format, but the buffer data (typically the geometry) is compressed using the Draco algorithm. If you compare the .bin file size, you’ll see that it’s much lighter.
While there is a separate folder for this format, you can apply the Draco compression to the other formats.
Let’s put this one on the side, and we will talk more about it later.
glTF-Embedded
This format is like the glTF-Binary format because it’s only one file, but this file is actually a JSON that you can open in your editor.
The only benefit of this format is to have only one easily editable file.
Choosing
Choosing the right format is a matter of how you want to handle the assets.
If you want to be able to alter the textures or the coordinates of the lights after exporting, you better go for the glTF-default . It also presents the advantage of loading the different files separately, resulting in a load speed improvement.
If you want only one file per model and don’t care about modifying the assets, you better go for glTF-Binary .
In both cases, you must decide if you want to use the Draco compression or not, but we will cover this part later.
Setup
The starter is composed of one empty plane.
Because GLTF is a standard, it clearly supports lights. Usually, when you import a GLTF into your Three.js project, you’ll end up with Meshes that have MeshStandardMaterial and, as you probably remember, if you don’t have lights in your scene, you won’t see much of those materials.
There is already an AmbientLight and a DirectionalLight in the starter.
Load the model in Three.js
To load GLTF files in Three.js, we must use the GLTFLoader. This class isn’t available by default in the THREE variable. We need to import it from the examples/ folder located in the three dependency:
import { GLTFLoader } from 'three/examples/jsm/loaders/GLTFLoader.js'
JavaScript
Copy
then we can instantiate it like we did for the TextureLoader:
/**
 * Models
 */
const gltfLoader = new GLTFLoader()
JavaScript
Copy
And if we need it, we can also use a LoadingManager as we did in the Textures lesson.
To load models, great news, it’s almost as easy as loading a texture. We call the load(...) method and use the right parameters:
- The path to the file
- The success callback function
- The progress callback function
- The error callback function
gltfLoader.load(
    '/models/Duck/glTF/Duck.gltf',
    (gltf) =>
    {
        console.log('success')
        console.log(gltf)
    },
    (progress) =>
    {
        console.log('progress')
        console.log(progress)
    },
    (error) =>
    {
        console.log('error')
        console.log(error)
    }
)
JavaScript
Copy
You should see the progress and the success function being called. If the file couldn’t be loaded, the error functions might be called. Check the path, and don’t forget that we must not add the /static part.
Let’s pretend we know what we are doing and remove the progress and error callback:
gltfLoader.load(
    '/models/Duck/glTF/Duck.gltf',
    (gltf) =>
    {
        console.log(gltf)
    }
)
JavaScript
Copy
Add the loaded model to our scene
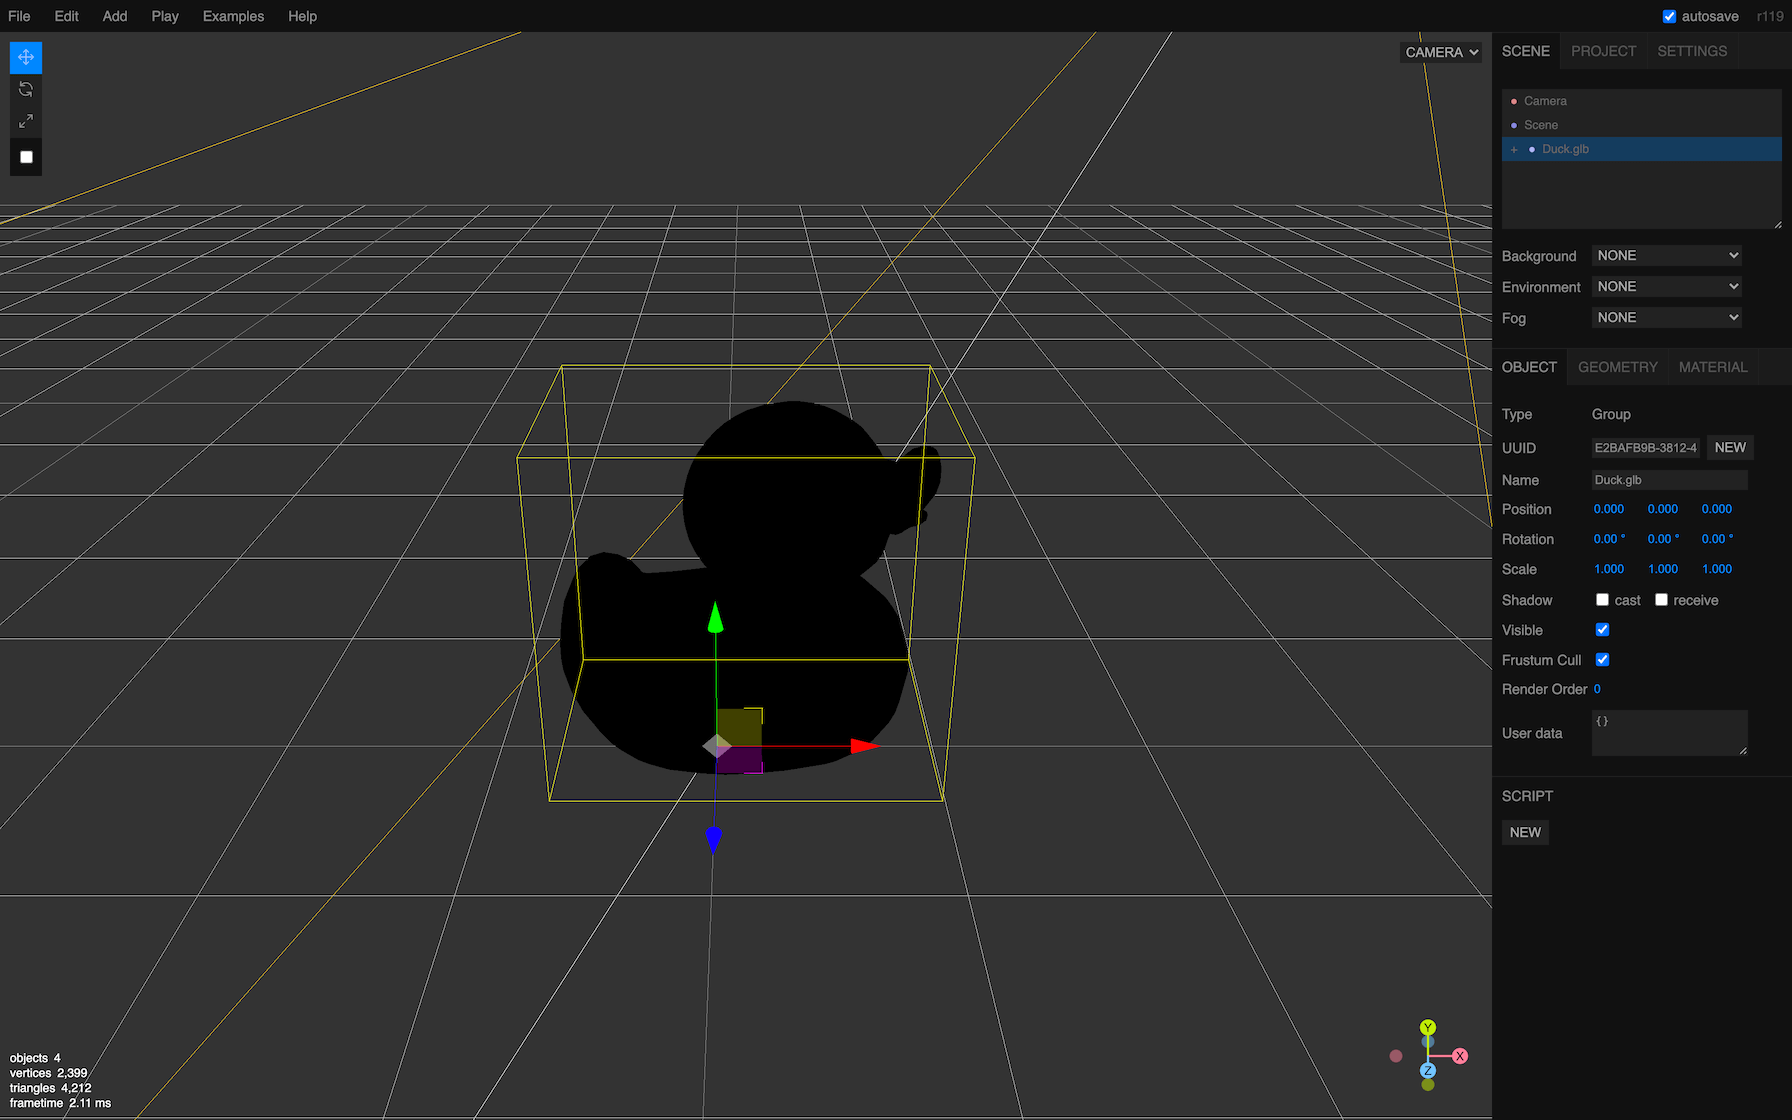
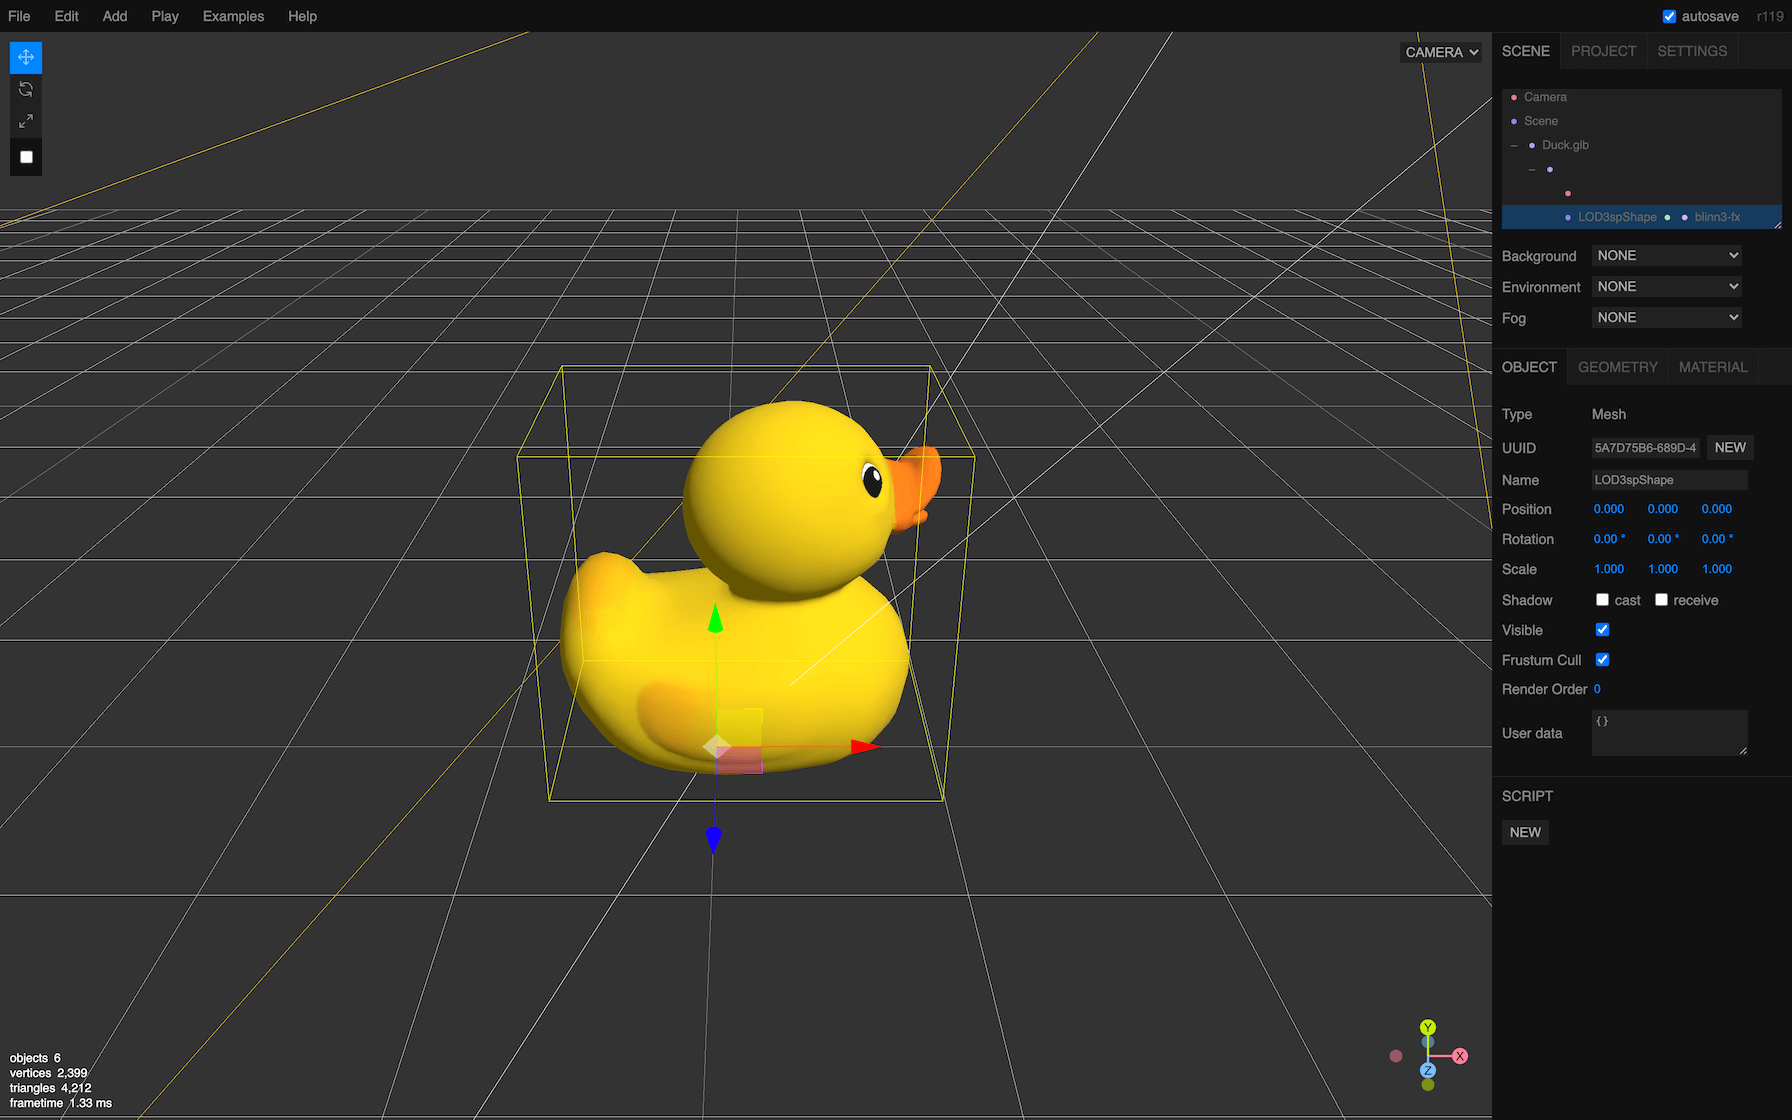
If you look at the object logged in the console, you’ll find a lot of elements. The most important part is the scene property because we have only one scene in the exported model.
This scene contains everything we need. But it also includes more. Always start by studying what is available in it and watch the scale property of the different Groups, Object3D, and Mesh.
We get something like this:
THREE.Group: scene
└───Array: children
    └───THREE.Object3D
        └───Array: children
            ├───THREE.PerspectiveCamera
            └───THREE.Mesh
JavaScript
Copy
The Mesh should be our duck. We don’t really care about the PerspectiveCamera. Both the camera and the duck seem to be in the first and only Object3D in the scene’s children array. Even worst, that Object3D has a scale set to a minimal value.
As you can see, it’s a little complex even to get our duck, and it’s where most beginners get lost.
All we want is to get our duck in the scene. We have multiples ways of doing it:
- Add the whole
scenein our scene. We can do that because even if its name isscene, it’s in fact a Group. - Add the children of the
sceneto our scene and ignore the unused PerspectiveCamera. - Filter the children before adding to the scene to remove the unwanted objects like the PerspectiveCamera.
- Add only the Mesh but end up with a duck that could be wrongly scaled, positioned or rotated.
- Open the file in a 3D software and remove the PerspectiveCamera then export it again.
Because our model structure is simple, we will add the Object3D to our scene, and ignore the unused PerspectiveCamera inside. In future lessons, we will add the whole scene as one object:
gltfLoader.load(
    '/models/Duck/glTF/Duck.gltf',
    (gltf) =>
    {
        scene.add(gltf.scene.children[0])
    }
)
JavaScript
Copy
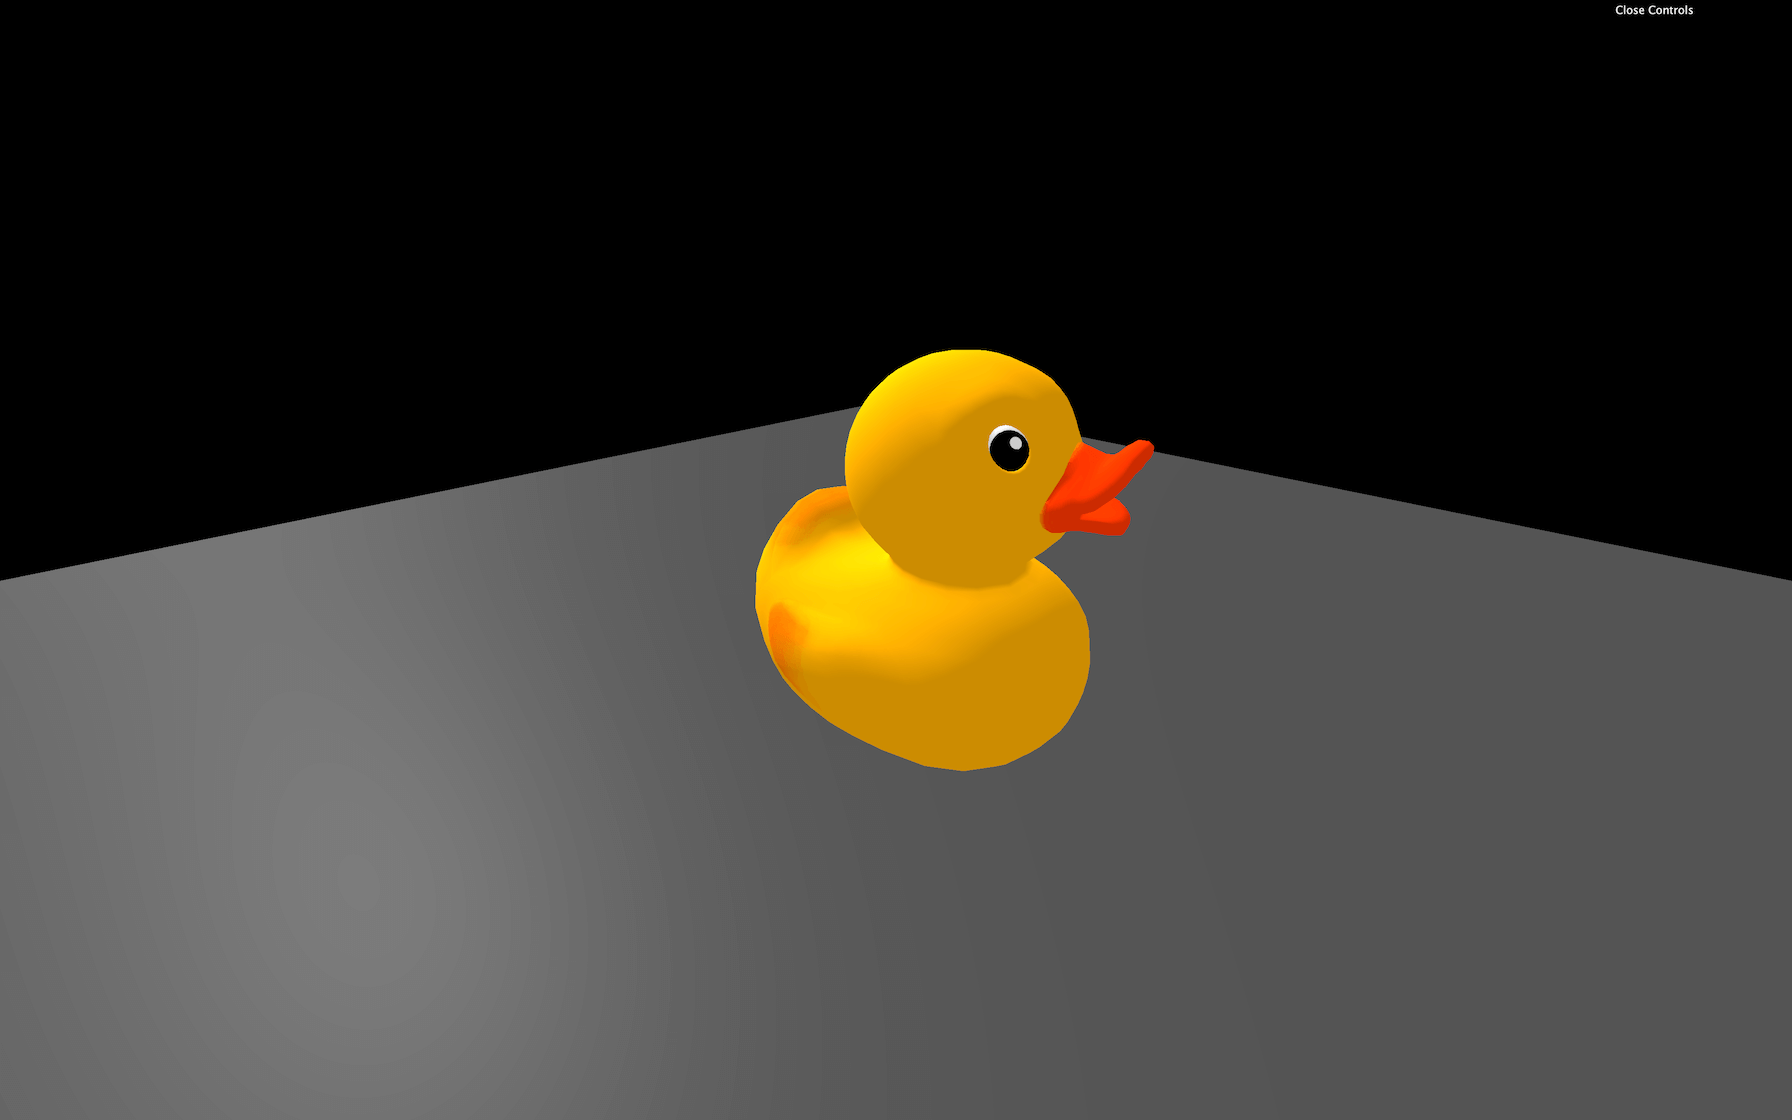
You should see the duck.
You can try with other formats, but not the Draco that won’t work yet:
gltfLoader.load(
    '/models/Duck/glTF/Duck.gltf', // Default glTF

// Or
gltfLoader.load(
    '/models/Duck/glTF-Binary/Duck.glb', // glTF-Binary

// Or
gltfLoader.load(
    '/models/Duck/glTF-Embedded/Duck.gltf', // glTF-Embedded
JavaScript
Copy
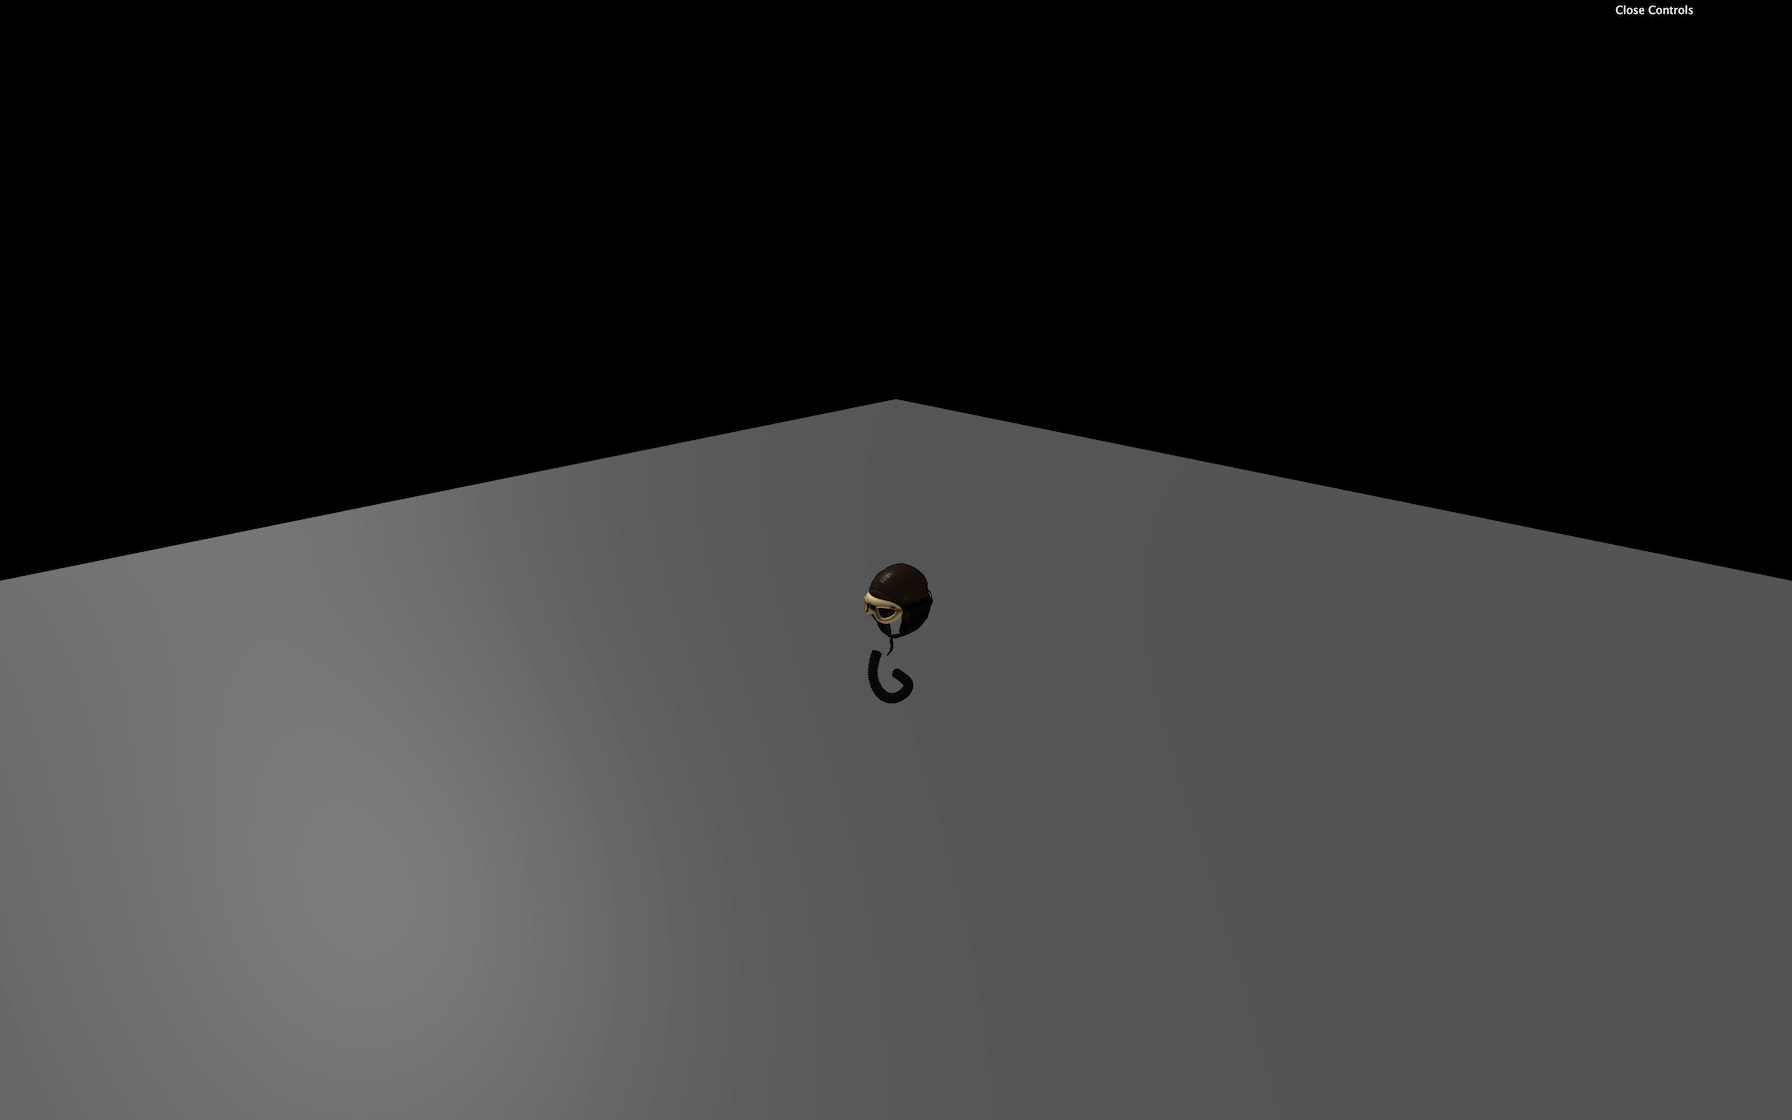
Another model named FlightHelmet (also taken from the glTF model samples) is available in the /static/models/ folder. This model comes in only one format, which is the default glTF.
Try to load this model:
gltfLoader.load(
    '/models/FlightHelmet/glTF/FlightHelmet.gltf',
    (gltf) =>
    {
        scene.add(gltf.scene.children[0])
    }
)
JavaScript
Copy
Instead of a beautiful helmet, we only get a few parts.
The problem is that we added only the first child of the loaded scene to our scene.
What we can try is to loop on the children and add them to the scene:
        for(const child of gltf.scene.children)
        {
            scene.add(child)
        }
JavaScript
Copy
That will result in more elements, but not all of them. Even worst, when refreshing, you may get different parts.
The problem is that when we add a child from one scene to the other, it gets automatically removed from the first scene. That means that the first scene now has fewer children in it.
When we add the first object, it gets removed from the first scene, and the second element just moved to the first place. But your loop now takes the second element of the array. You’ll always have elements left in the children array.
There are multiple solutions to this problem. The first solution is to take the first children of the loaded scene and add it to our scene until there is none left:
        while(gltf.scene.children.length)
        {
            scene.add(gltf.scene.children[0])
        }
JavaScript
Copy
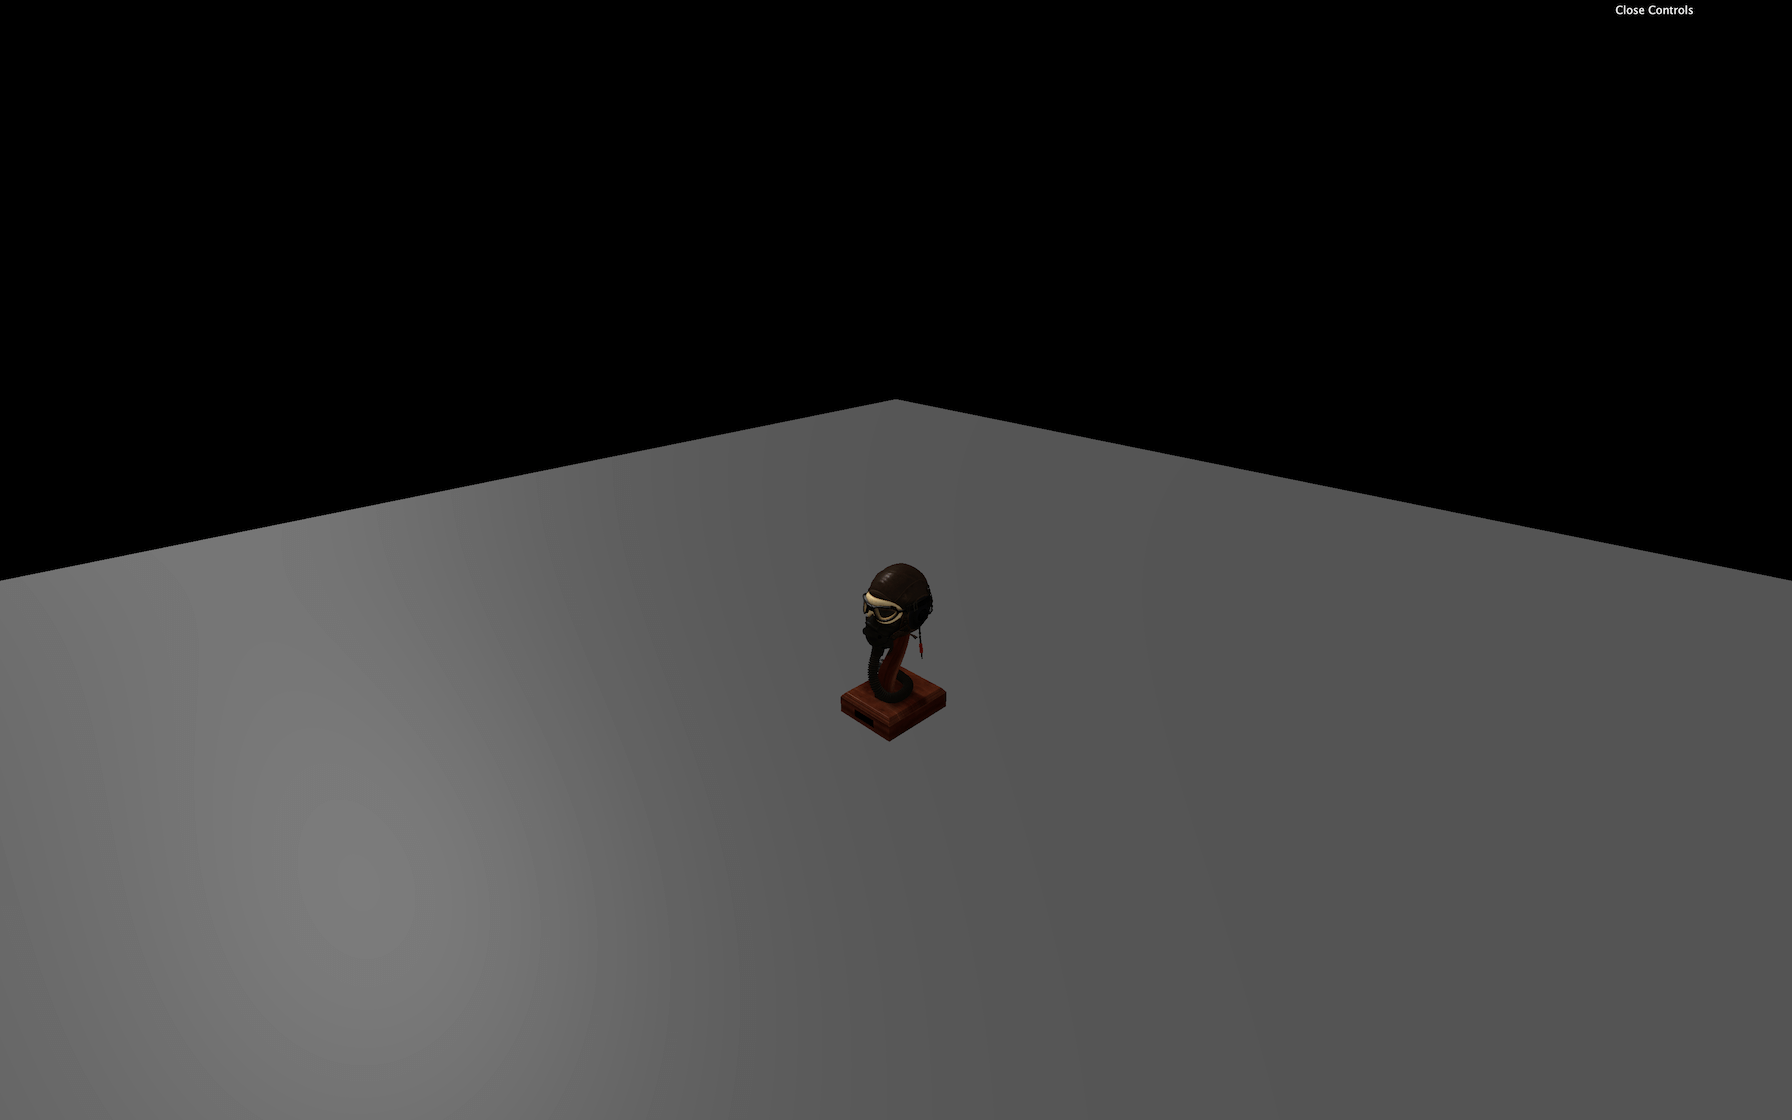
We now get the whole helmet.
Another solution would be to duplicate the children array in order to have an unaltered independent array. To do that, we can use the spread operator ... and put the result in a brand new array [] :
        const children = [...gltf.scene.children]
        for(const child of children)
        {
            scene.add(child)
        }
JavaScript
Copy
This is a native JavaScript technique to duplicate an array without touching the original one.
Finally, one good and simple solution we mentioned earlier is to add the scene property:
scene.add(gltf.scene)
JavaScript
Copy
Our helmet is too small, and we could just increase the scale, but instead, we’ll get back to our Duck and try the Draco compressed version.
Draco compression
Let’s get back to our duck but this time, we are going to use the Draco version:
gltfLoader.load(
    '/models/Duck/glTF-Draco/Duck.gltf',
JavaScript
Copy
Sadly, we don’t get any duck. If you look at the logs, you should see a warning looking like this No DRACOLoader instance provided . We need to provide a DRACOLoader instance to our GLTFLoader so it can load compressed files.
As we saw when browsing the files, the Draco version can be much lighter than the default version. Compression is applied to the buffer data (typically the geometry). It doesn’t matter if you are using the default glTF , the binary glTF or the embedded glTF .
It’s not even exclusive to glTF, and you can use it with other formats. But both glTF and Draco got popular simultaneously, so the implementation went faster with glTF exporters.
Google develops the algorithm under the open-source Apache License:
- Website: https://google.github.io/draco/
- Git repository: https://github.com/google/draco
Add the DRACOLoader
Three.js already supports Draco. We must start by importing the DRACOLoader:
import { DRACOLoader } from 'three/examples/jsm/loaders/DRACOLoader.js'
JavaScript
Copy
Then we can instantiate the loader (before the gltfLoader ):
const dracoLoader = new DRACOLoader()
JavaScript
Copy
The decoder is available in native JavaScript but also Web Assembly (wasm), and it can run in a worker (another thread as we saw at the end of the Physics lesson). Those two features significantly improve performances, but they imply having a wholly separated code.
Three.js already provided this seperated code. To find it, we must browse into the Three.js dependency and copy the Draco decoder folder into our /static/ folder.
This Draco folder is located in /node_modules/three/examples/js/libs/ . Take the whole /draco/ folder and copy it into your /static/ folder. We can now provide the path to this folder to our dracoLoader :
dracoLoader.setDecoderPath('/draco/')
JavaScript
Copy
Finally, we can provide the DRACOLoader instance to the GLTFLoader instance with the setDRACOLoader(...) method:
gltfLoader.setDRACOLoader(dracoLoader)
JavaScript
Copy
Your duck should be back but this time it’s a Draco compressed version.
You can still load not compressed glTF file with the GLTFLoader and the Draco decoder is only loaded when needed.
When to use the Draco compression
While you might think that the Draco compression is a win-win situation, it is not. Yes, the geometries are lighter, but first, you have to load the DRACOLoader class and the decoder. Secondly, it takes time and resources for your computer to decode a compressed file that can result in a short freeze at the start of the experience, even if we are using a worker and Web Assembly code.
You’ll have to adapt and decide what the best solution is. If you only have one model with a 100kB geometry, you probably don’t need Draco. But if you have many MB of models to load and don’t care about some freezes at the start of the experience, you might need the Draco compression.
Animations
As we said earlier, glTF also supports animations. And Three.js can handle those animations.
Load an animated model
First, we need an animated model. We can use the fox located in /static/models/Fox/ folder (also taken from the glTF model samples).
Change the path to load that fox:
gltfLoader.load(
    '/models/Fox/glTF/Fox.gltf',
JavaScript
Copy
We have a problem; the fox is way too big. If you can’t see it, look above or zoom out.
Before handling the animation, let’s fix the scale. If you look at the composition of the imported scene, the fox is composed of one Object3D, itself made of a Bone and a SkinnedMesh. We won’t explain what those are, but the idea is that we shouldn’t simply scale the Object3D. Even if it would work in this case, it would probably not work with more complex models.
What we can do here, is scale the loaded scene and add it directly to our scene:
gltfLoader.load(
    '/models/Fox/glTF/Fox.gltf',
    (gltf) =>
    {
        gltf.scene.scale.set(0.025, 0.025, 0.025)
        scene.add(gltf.scene)
    }
)
JavaScript
Copy
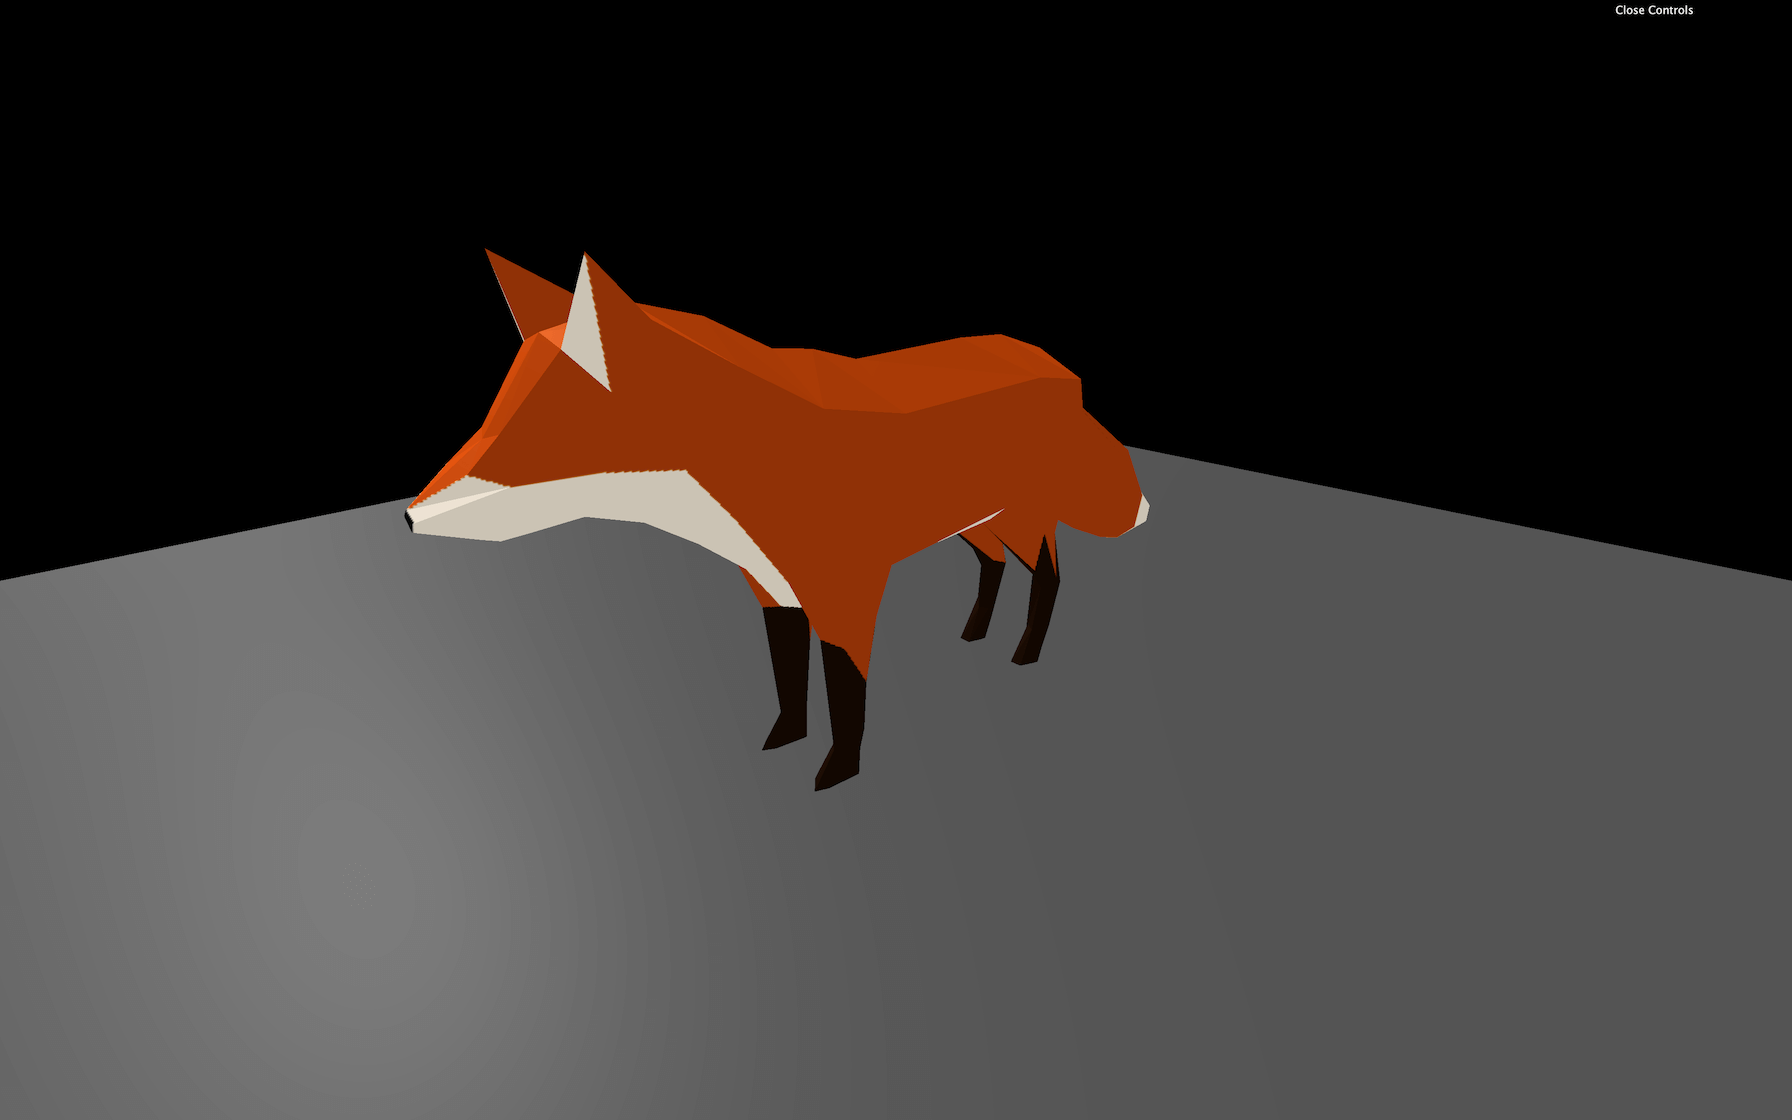
Handle the animation
If you look at the loaded gltf object, you can see a property named animations containing multiple AnimationClip.
These AnimationClip cannot be used easily. We first need to create an AnimationMixer. An AnimationMixer is like a player associated with an object that can contain one or many AnimationClips. The idea is to create one for each object that needs to be animated.
Inside the success function, create a mixer and send the gltf.scene as parameter:
const mixer = new THREE.AnimationMixer(gltf.scene)
JavaScript
Copy
We can now add the AnimationClips to the mixer with the clipAction(...) method. Let’s start with the first animation:
const action = mixer.clipAction(gltf.animations[0])
JavaScript
Copy
This method returns a AnimationAction, and we can finally call the play() method on it:
action.play()
JavaScript
Copy
Regrettably, still no animation.
To play the animation, we must tell the mixer to update itself at each frame. The problem is that our mixer variable has been declared in the load callback function, and we don’t have access to it in the tick function. To fix that, we can declare the mixer variable with a null value outside of the load callback function and update it when the model is loaded:
let mixer = null

gltfLoader.load(
    '/models/Fox/glTF/Fox.gltf',
    (gltf) =>
    {
        gltf.scene.scale.set(0.03, 0.03, 0.03)
        scene.add(gltf.scene)

        mixer = new THREE.AnimationMixer(gltf.scene)
        const action = mixer.clipAction(gltf.animations[0])
        action.play()
    }
)
JavaScript
Copy
And finally, we can update the mixer in the tick function with the already calculated deltaTime .
But before updating it, we must test if the mixer variable is different from null . This way, we update the mixer if the model is loaded, meaning that the animation is not ready:
const tick = () =>
{
    // ...

    if(mixer)
    {
        mixer.update(deltaTime)
    }

    // ...
}
JavaScript
Copy
The animation should be running. You can test the other animations by changing the value in the clipAction(...) method.
const action = mixer.clipAction(gltf.animations[2])
JavaScript
Copy
Three.js editor
Three.js posses its own online editor. You can find it here: https://threejs.org/editor/
It’s like a 3D software but online and with fewer features. You can create primitives, lights, materials, etc.
And because you can import models, it’s a good way to test if your model is working fine. Though be careful; you can only test models composed of one file. You can try with the glTF-Binary or the glTF-Embedded duck.
Drag and drop the model into the editor.
You should see a black duck because there is no light. Add an AmbientLight and a DirectionalLight from the Add menu to see it more clearly.
Finally, you can export your scene in various formats that you can re-use in your code but we are getting out of the scope.
That’s it for the moment but we’re going to use loaded models multiple time in the following lessons.